

Page 1
3D Printers User Guide
M Series
Page 2
2
Table of Contents
Introduction 3
Intended Use of Zortrax Printers 3
General Safety Information 4
Warning and Safety Labels on Zortrax Devices 6
Learn More About Zortrax M Series 8
How does the Zortrax 3D Printer Work? 8
What’s in the Box 9
Main Components 11
Zortrax 3D Printing Technology Glossary 15
First Use Preparations 19
Z-Firmware Installation 27
Navigating through the Zortrax Printer Menu 28
Material Loading 30
Platform Calibration 31
Z-SUITE Installation 33
Starting and Removing a Print 34
Available Materials 39
Basic Maintenance and Service Work 39
Support and Troubleshooting 45
Specifications 49
Recycling 50
©2017, Zortrax S.A. All rights reserved. All trade names, logos and trademarks mentioned in the following document are registered
trademarks of Zortrax and are subject to legal protection.
Page 3

3
Introduction
Read this User Guide carefully and thoroughly before operating Zortrax products for the first time. The
User Guide includes basic information about the 3D printer, safety and protection guidelines as well
as advice on preparing the machine for the first printing and basic maintenance work. Ignorance and
non-compliance with these instructions may result in property damage, injuries, device failures or lower
quality of 3D prints. It is also necessary to ensure that every 3D printer user knows, fully understands and
follows the instructions provided in this User Guide.
The Manufacturer makes every effort to ensure that Zortrax products are safe in transportation, installation, usage, storage and disposal.
However, due to the lack of direct and ad hoc control as well as other conditions influencing the device
and those that are beyond the Manufacturer’s knowledge, the Manufacturer is not responsible for damages, injuries, failures and costs resulting from improper transportation, installation, usage, storage and
disposal.
Furthermore, the users should take into consideration the risk of possible faults of the device resulting
from material and production defects.
Intended Use of Zortrax Printers
Zortrax devices 3D print in Layer Plastic Deposition (LPD) technology which allows to apply previously
melted material one layer after another on a given surface in order to form a predesigned shape. The
extruder is equipped with three heating points which makes it possible for the liquid material to flow
through the nozzle onto the heated platform without causing blockages in it. Zortrax 3D printers together with Z-SUITE and dedicated materials guarantee achieving high quality prints. However, the users are
responsible for qualifying and determining the intended use of the 3D printed models. The Manufacturer takes no responsibility for any use of the printed objects, especially, when these objects constitute
a part of safety equipment or strictly regulated medical, military or space science equipment.
Due to the size and specificity, Zortrax devices are not intended for use by children under the age of 14
and by people with reduced manual, motor and psychomotor skills. The Manufacturer recommends providing assistance and guidance to people with disabilities and older adults who wish to operate Zortrax
printers.
©2017, Zortrax S.A. All rights reserved. All trade names, logos and trademarks mentioned in the following document are registered
trademarks of Zortrax and are subject to legal protection.
Page 4

4
General Safety Information
This User Guide contains important safety directions that should be followed during installation and operation of Zortrax 3D printers. It also mentions situations which require special attention and includes
warnings against negligence and misuse that could cause damages or injuries.
Always read safety data sheets available at: https://zortrax.com/materials/zortrax-m-series/. They are
a source of basic information and safety procedures for the equipment you bought. It is essential to up-
date the firmware so as to avoid any kind of failures. Visit our website: https://zortrax.com/ regularly to
see the latest news and updates.
Zortrax 3D printers operate at high temperatures and have easily accessible movable components,
therefore, you must be particularly careful when handling or operating the devices. While operating
the printer, it is extremely important to avoid situations that may lead to burns or interference in proper
functioning.
Do not leave the machine unattended during the print job - check it periodically for proper functioning in
order to avoid potential accidents or breakdowns. Turn off the printer once the print job is finished.
Monitor your device for wear and tear regularly. Contact our Support Center at: http://support.zortrax.
com/ for assistance while replacing worn or broken parts.
Keep the printer away from heat sources, fire, flammable materials, humidity as well as water and other
liquids. Place the machine away from any equipment emitting radiation. To prevent any inadvertent use,
keep the device out of reach of children and animals. It is forbidden to shake or drop the printer as it may
cause breakdowns. The equipment is not intended for use in a potentially explosive environment.
Health and Safety at Work
All service and maintenance activities as well as device operation require wearing safety gloves included
in the Starter Kit. Wearing safety gloves is also advised while removing the finished print from the platform.
The vapors released during the printing process are not hazardous, however, it is important to ensure
proper ventilation in the print room.
Food and beverages should be kept away from both the 3D printers and 3D printed objects.
While operating Zortrax devices, all measures regarding health and safety provided in this User Guide as
well as in separate regulations should be taken into account.
©2017, Zortrax S.A. All rights reserved. All trade names, logos and trademarks mentioned in the following document are registered
trademarks of Zortrax and are subject to legal protection.
Page 5

5
Electrical Safety
Zortrax M Series 3D printers have been tested for compliance with Low Voltage Directive. In order to ensure the highest safety standards, including protection against short circuit, overload, overvoltage and
printer overheating, do not attempt to modify the printer and do not use electronic replacement parts
other than those recommended by the Manufacturer.
Replace electronic units according to the instructions and be particularly careful while using the tools
supplied with the printer.
Before plugging the power cable into the outlet, make sure that the power supply voltage in the outlet
matches the required value provided on the nameplate at the back of the printer. Avoid overloading the
outlet with too many devices.
The printer must be well-grounded. Always make sure that the ground complies with local and national
regulations.
Use only the original power cable supplied with the printer. Do not damage, cut or repair the cable.
A damaged cable should be immediately replaced with a new one.
All maintenance and repair work should be carried out while the device is off and unplugged. Do not
expose the device to moisture and liquids. Modifications such as soldering of electronic subunits are
forbidden.
Mechanical Safety
Zortrax 3D printers have movable components, such as the drive belts, Z-axis screw, extruder or platform. Therefore, it is forbidden to reach into the printer or put anything inside the printer when it is running, about to start running or at rest. This may lead to serious injuries or damages.
Tools and accessories from the Starter Kit box should be used with special care for intended purposes
only. Improper use may cause serious injuries.
While following post-processing procedures, wear safety gloves and glasses in order to avoid injuries
that may be caused by sharp edges and fragile elements.
Removing the prints from the platform should be dealt with very carefully so as to avoid injuries. Moreover, special care should be taken so as not to damage the small connector placed at the edge of the
platform with the blade of the spatula.
©2017, Zortrax S.A. All rights reserved. All trade names, logos and trademarks mentioned in the following document are registered
trademarks of Zortrax and are subject to legal protection.
Page 6
6
Risk of Burns
There is a high risk of burns while operating Zortrax printers as the extruder’s temperature may reach
up to 380⁰C [716⁰F]. Do not touch the extruder with bare hands. Be extremely careful during maintenance and repair work of heated units. If it is necessary to touch a heated component, use the pliers
which are specially adapted for this purpose. Cooling of components should not take less than 30 minutes.
The platform’s temperature can reach up to 110⁰C [230⁰C], therefore, special care should be taken
while operating the printer or while removing the finished print.
Do not ignore the warning labels placed on the devices.
Moreover, constructional modifications of the printer’s operating temperature are not permitted as it
may cause serious injuries or bring damage to the device.
Warning and Safety Labels on Zortrax Devices
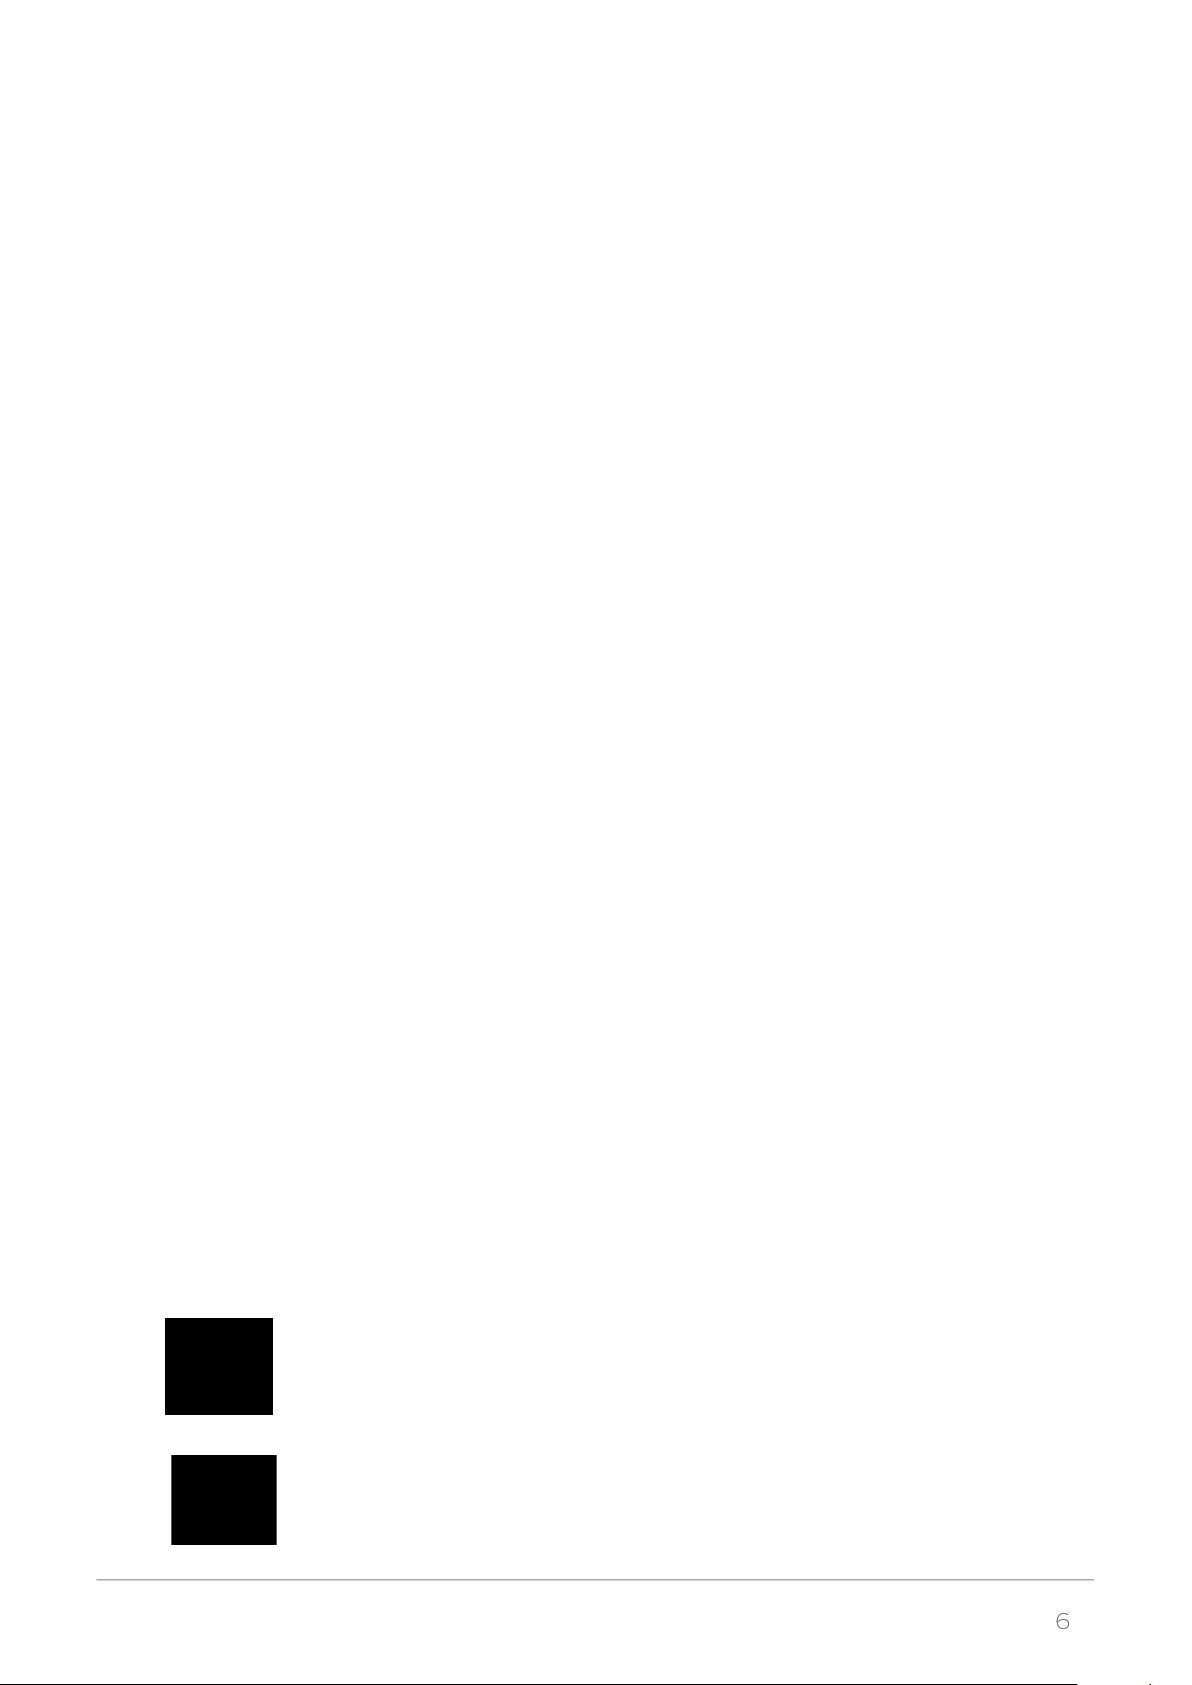
Hot surface. Allow to cool before touching
Due to design characteristics, the screws securing the Z-axis screw nut cannot be fully tightened
Do not attempt to modify or remanufacture the product
Removing the print from the platform should be handled with extreme care
Wear safety gloves
This warning symbol indicates that special care should be taken when repairing the device. Also, it points out an important step to carry out.
©2017, Zortrax S.A. All rights reserved. All trade names, logos and trademarks mentioned in the following document are registered
trademarks of Zortrax and are subject to legal protection.
Page 7
7
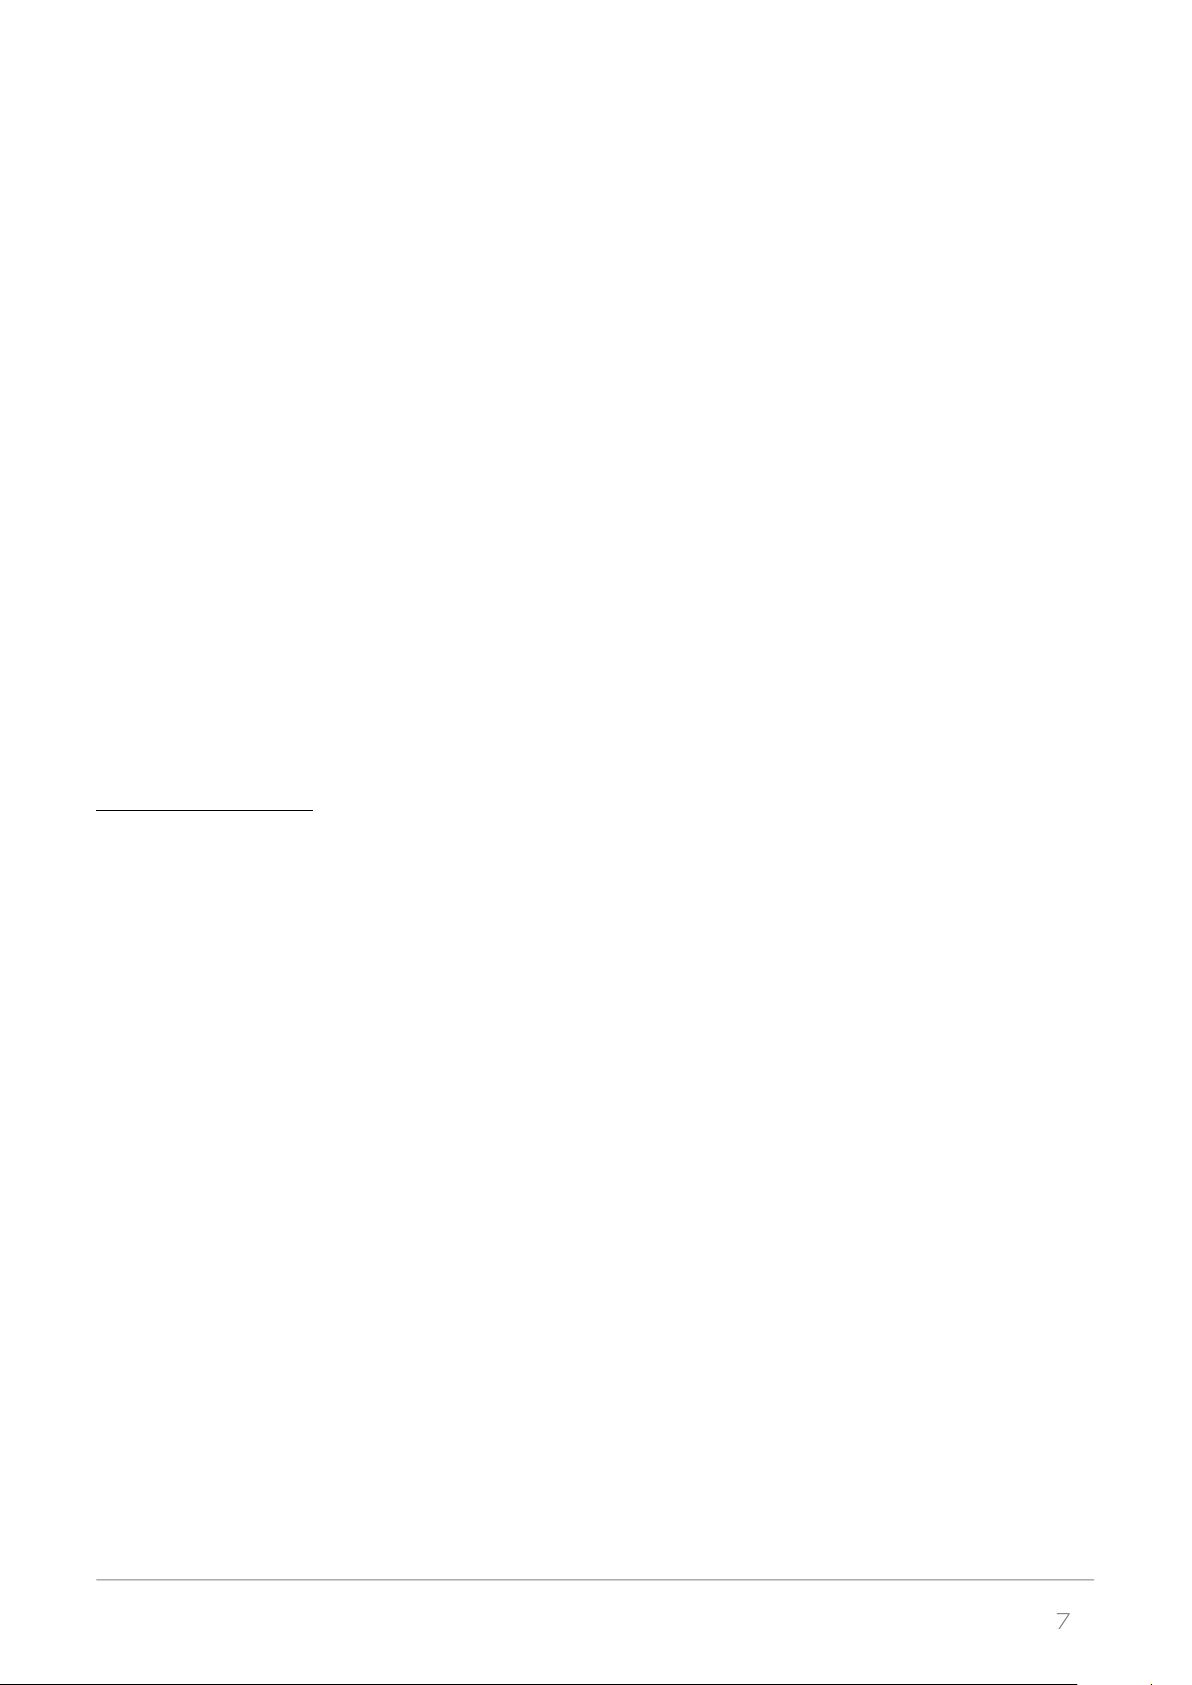
The printer needs to be placed on a flat and stable surface to ensure proper
quality of the prints.
Hot surface. Do not touch.
Never reach into moving elements.
Safe Storage and Transport Guidance
Zortrax devices must be stored between 0 and 35 ⁰C. The storage space should be free of moisture and
other extreme conditions.
Transport Instructions
When stacking several devices on a pallet, follow the instructions provided on the packaging. One device
may weigh more than 20kg [44lbs]. It is therefore advisable to provide safe pallet storage but not higher
than 1,7m [5’7”]. It should be noted that the packages must not project beyond the outline of the pallet.
Packages stacked on the pallet should be then bound together and wrapped in foil. The pallet prepared
as above can be then forwarded to the shipping company.
Pallet stacking and destacking should be carried out by two people. The package with the device should
be lifted or moved using special handles. In case of M300, the device should not be carried by one person as it may cause injury or other damage to health.
Electromagnetic Compatibility (EMC)
Each Zortrax printer complies with Part 15 of the FCC rules. Operation is subject to the following two conditions: (1) this device may not cause harmful interference, and (2) this device must accept any interference
received, including interference that may cause undesired operation.
This equipment generates, uses, and can radiate radio frequency energy and, if not installed and used
in accordance with this instruction manual, may cause harmful interference to radio communications.
Operation of this equipment in a residential area is likely to cause harmful interference, in which case the
user will be required to correct the interference at his own expense.
©2017, Zortrax S.A. All rights reserved. All trade names, logos and trademarks mentioned in the following document are registered
trademarks of Zortrax and are subject to legal protection.
Page 8

8
Learn More About Zortrax M Series
Zortrax M Series includes two 3D printer models – M200 and M300, which together with Z-SUITE and
dedicated materials constitute the whole 3D printing ecosystem. Thanks to these devices, it is possible
to turn digital projects into three-dimensional objects. Zortrax 3D printers can be used in many industries
while designing and prototyping for instance automotive parts, mechanical elements, everyday objects
or decorative elements.
How does the Zortrax 3D Printer Work?
Everything begins with preparing a model. The work on the model can be started in any program which
creates 3D models and generates .stl, .obj, .3mf or .dxf files. These are the standard file formats supported
by most 3D modeling software – the model is saved as a set of three-dimensional triangles (triangle mesh).
The next step is to open the .stl file (or other) in Z-SUITE – the application created specifically for Zortrax
devices. Z-SUITE prepares the model by slicing it into individual layers and saving it as a .zcode. Each layer
represents the extruder’s motion (vertical and horizontal) while building the whole object. Z-SUITE also allows to change and adjust the necessary print settings, such as the size of the model, layer thickness, a type
of infill or what the support structures will look like. The file is then ready to be printed.
Once your model is prepared, save the .zcode onto the hard drive and then onto an SD card. In order to
transfer the model, insert the SD card into the card reader in the printer.
Next, prepare the material which you are going to use to print your model. The full material offer is available
at: https://zortrax.com/materials/zortrax-m-series/.
To start the print, turn on the printer and place the spool with the material on the spool holder at the back
of the printer and load the material into the extruder. Turn the knob to select the model to be printed, push
it to begin the printing process.
©2017, Zortrax S.A. All rights reserved. All trade names, logos and trademarks mentioned in the following document are registered
trademarks of Zortrax and are subject to legal protection.
Page 9
9
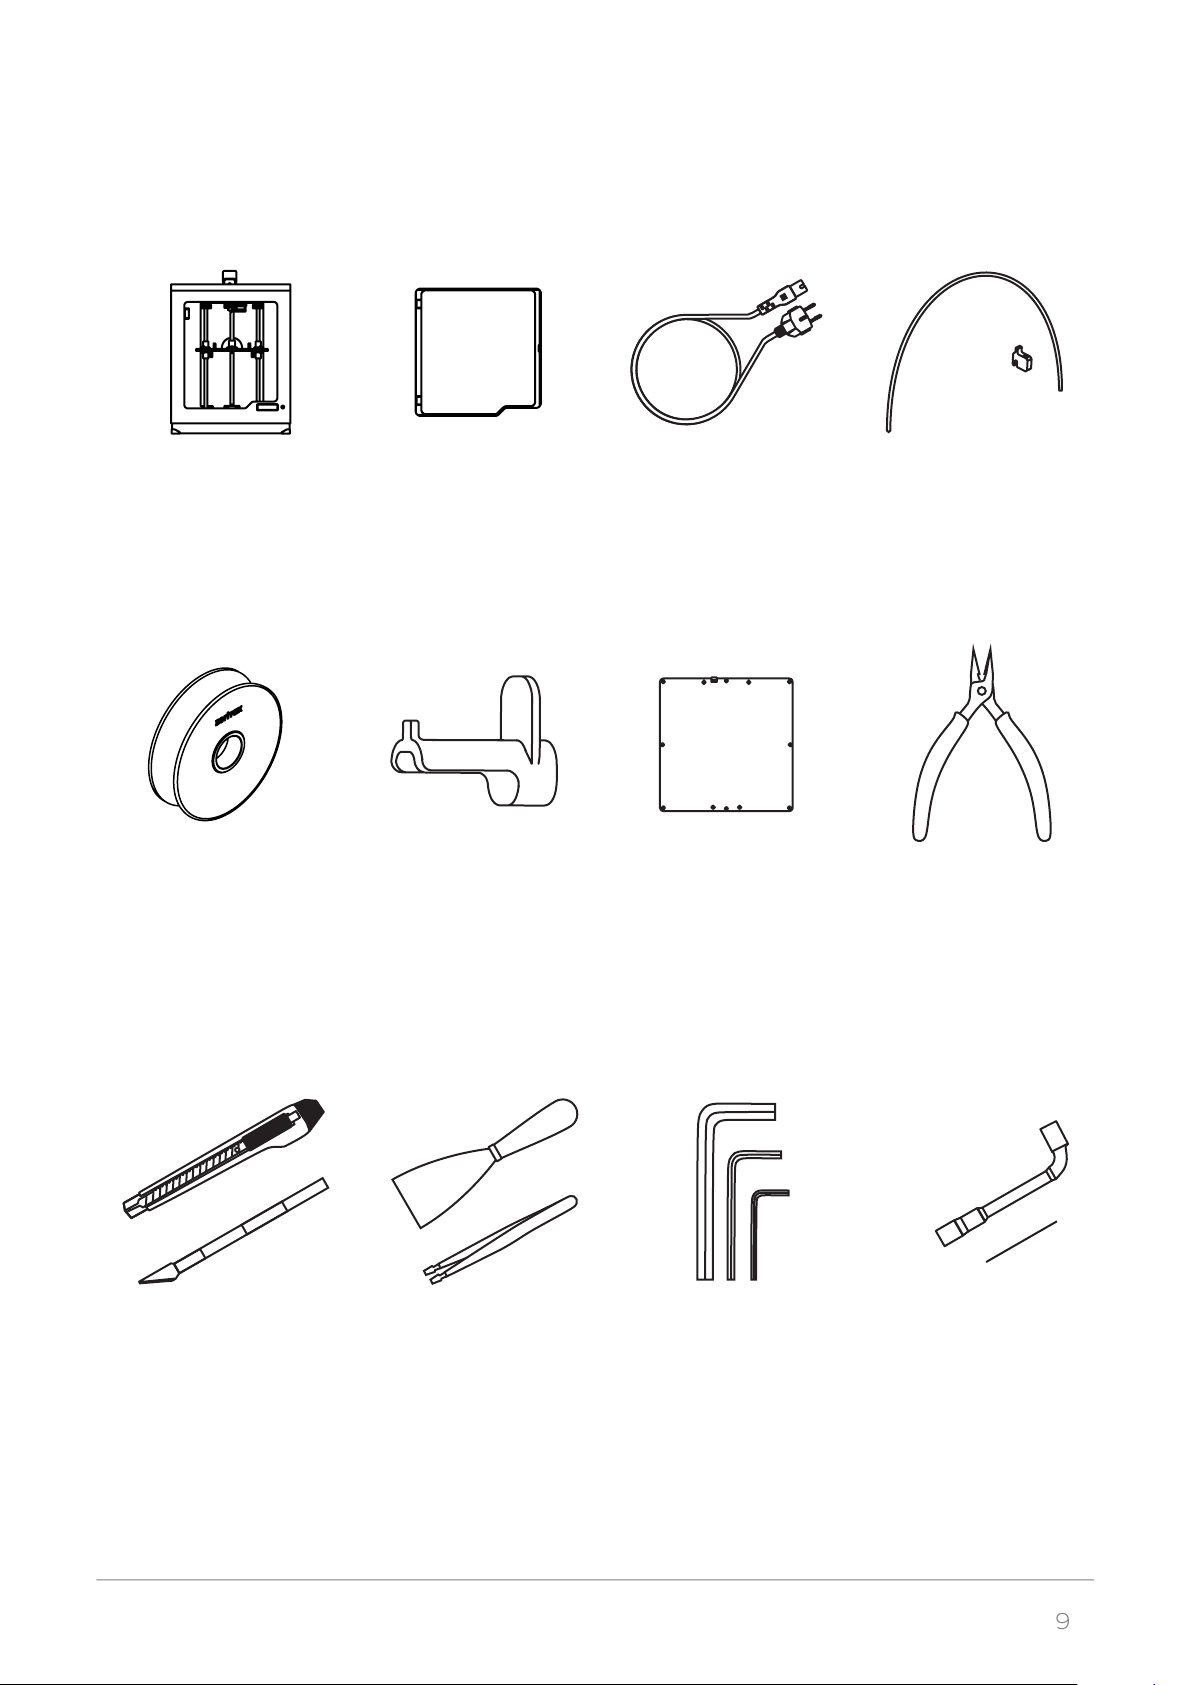
What’s in the box
3D Printer
Zortrax M Series
Material
Spool
Side
Covers*
Spool
Holder
Power
Cable
Perforated
Plate
Material
Guide
Pliers
Cutting Knife
& Scalpel
Spatula
& Tweezers
Allen
Keys
Nozzle Key
&
Nozzle Needle
©2017, Zortrax S.A. All rights reserved. All trade names, logos and trademarks mentioned in the following document are registered
trademarks of Zortrax and are subject to legal protection.
Page 10
10
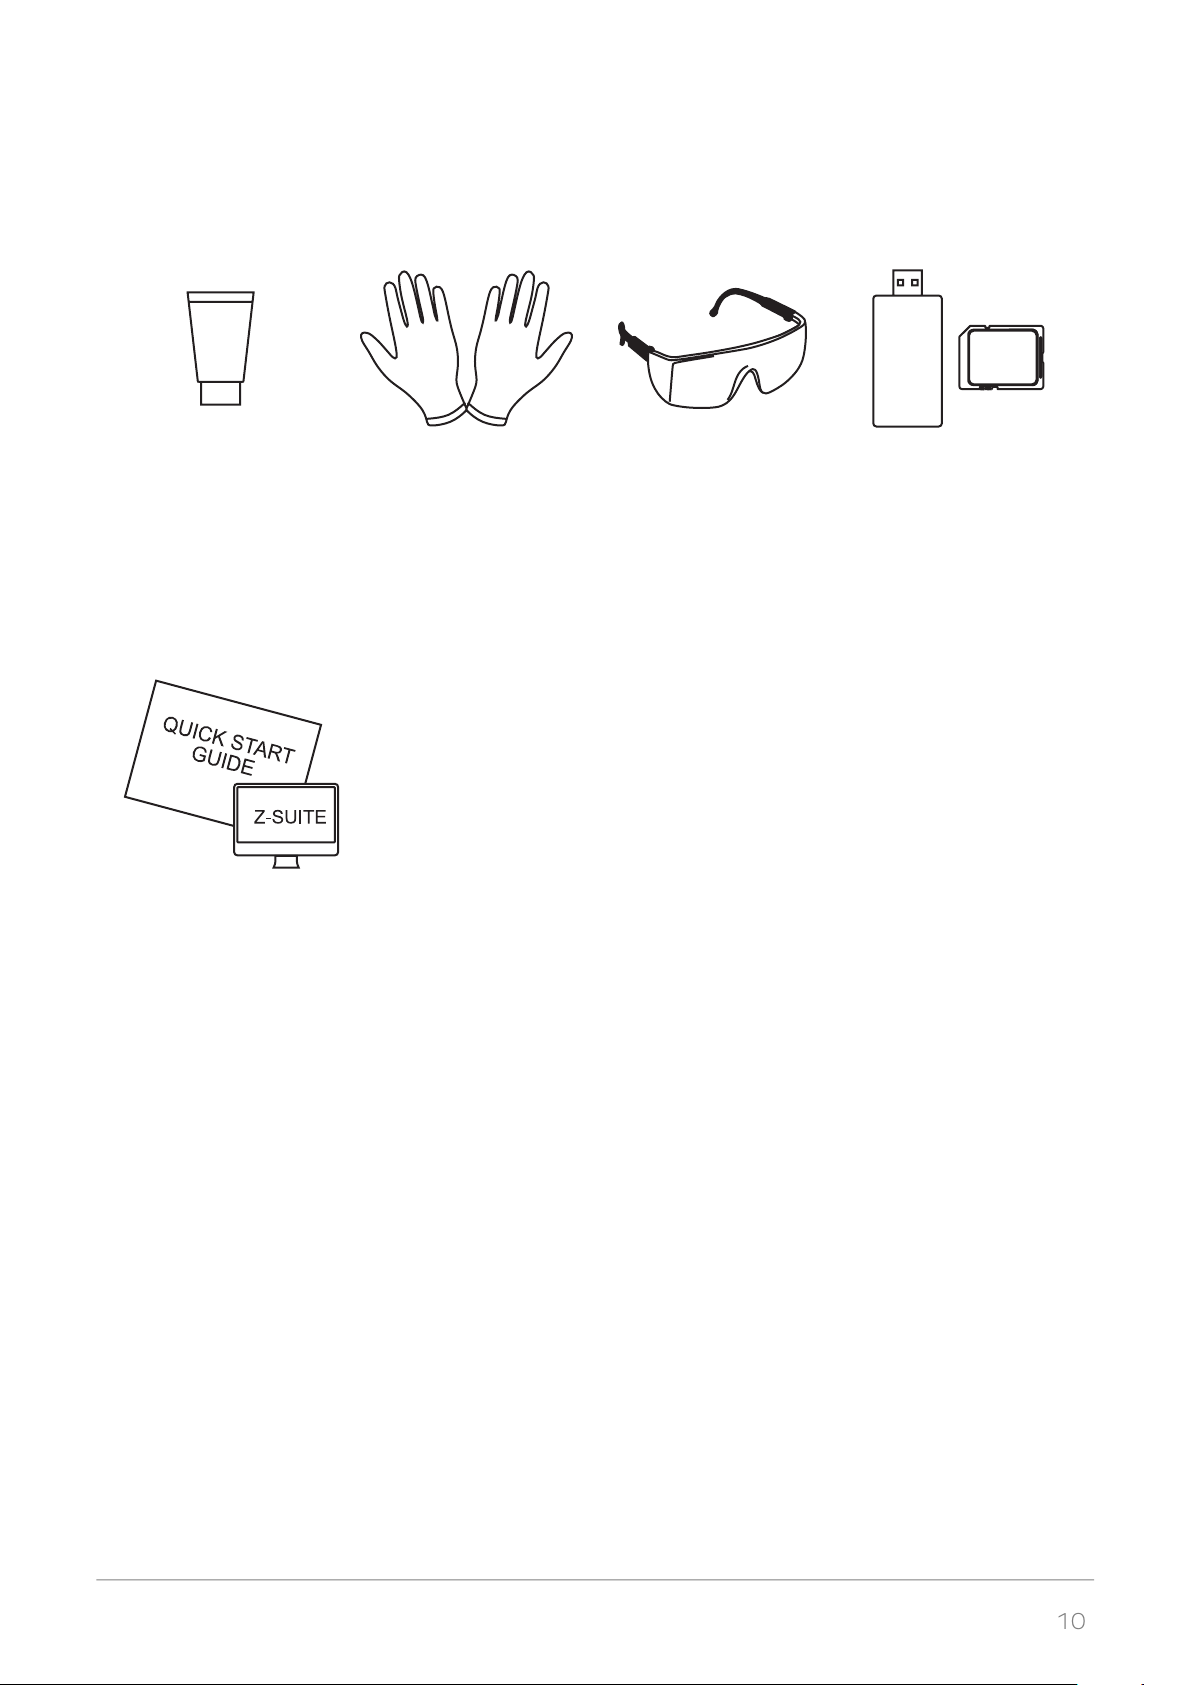
Service
Grease
Z-SUITE &
Quick Start Guide
* delivered only with Zortrax M300
Safety
Gloves
Safety
Glasses
SD Card &
SD Card Reader
©2017, Zortrax S.A. All rights reserved. All trade names, logos and trademarks mentioned in the following document are registered
trademarks of Zortrax and are subject to legal protection.
Page 11
11
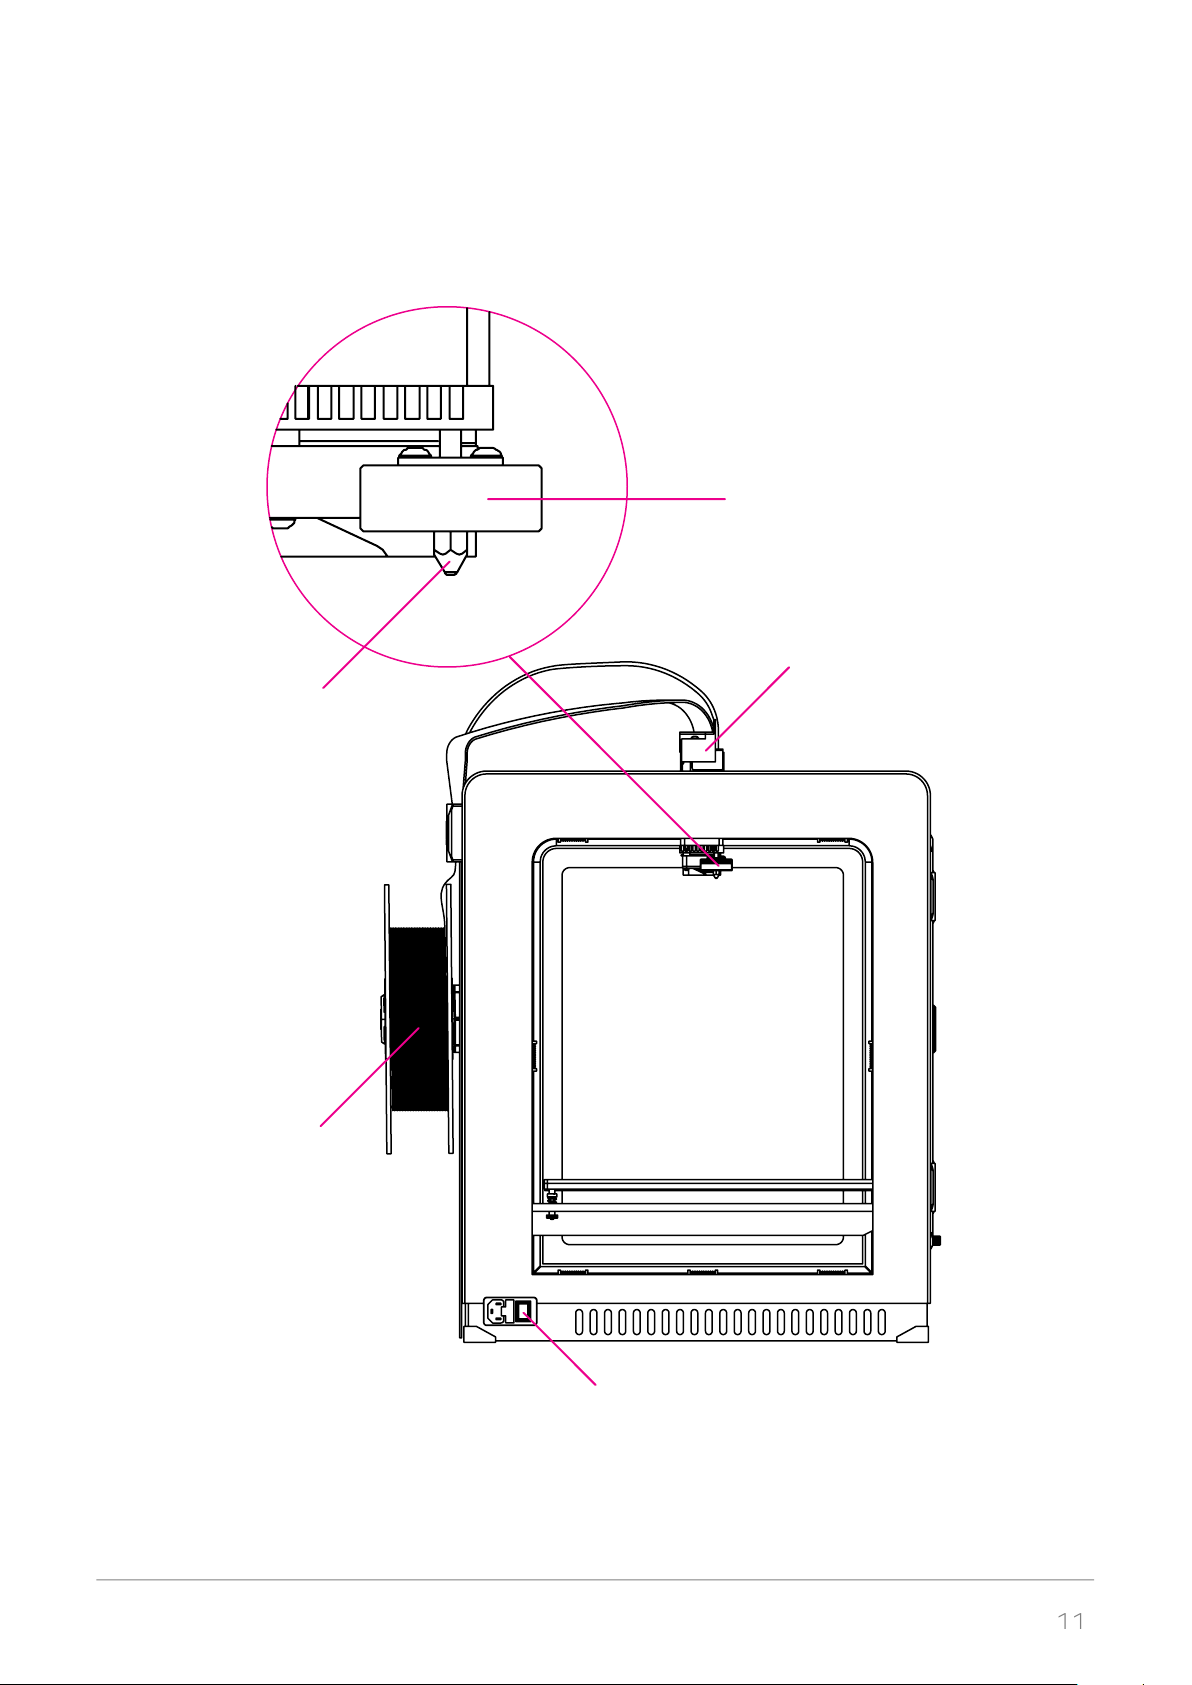
Main Components
Nozzle
Hotend
Extruder
Material
spool
Power Switch
©2017, Zortrax S.A. All rights reserved. All trade names, logos and trademarks mentioned in the following document are registered
trademarks of Zortrax and are subject to legal protection.
Page 12

12
Side Covers
Extruder Cable
Material Guide
Spool Holder
Motherboard Power Supply Unit
©2017, Zortrax S.A. All rights reserved. All trade names, logos and trademarks mentioned in the following document are registered
trademarks of Zortrax and are subject to legal protection.
Page 13
13
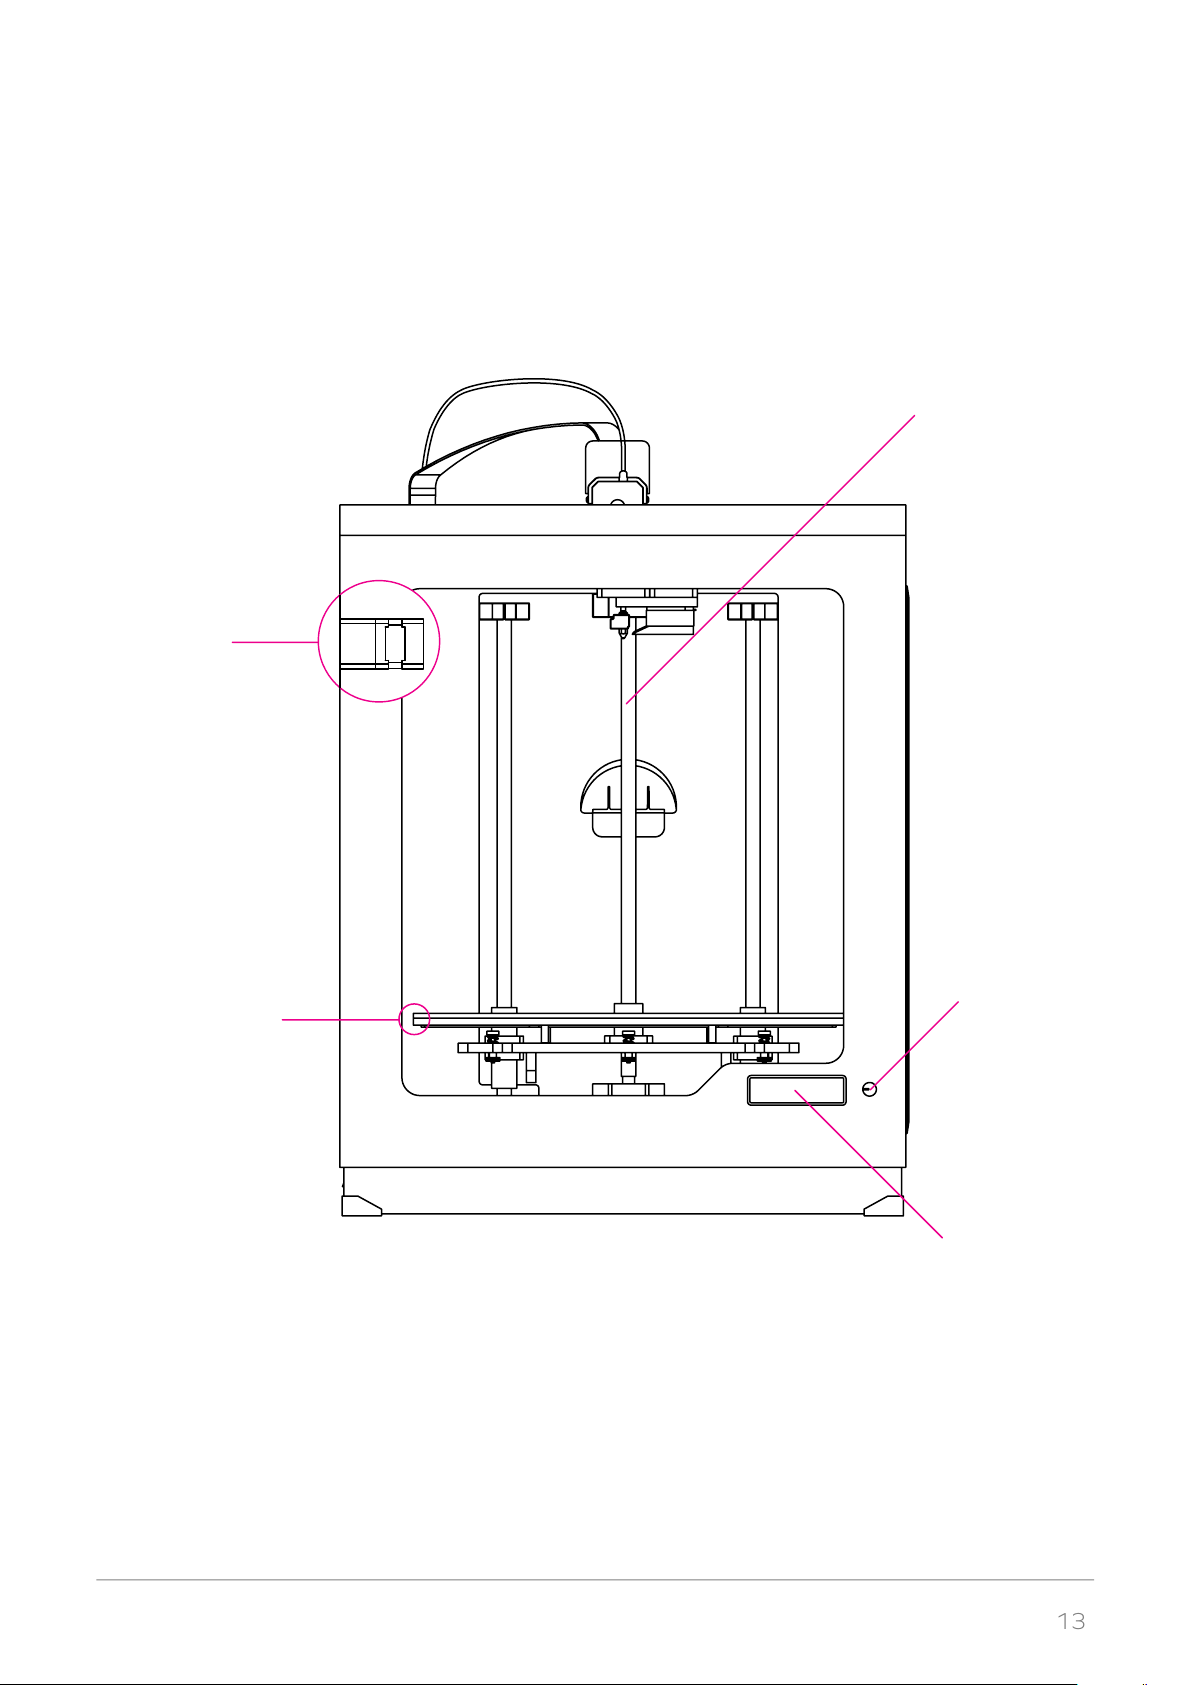
Stepper Motor
Z Axis Screw
Build Platform
Dial
Display
©2017, Zortrax S.A. All rights reserved. All trade names, logos and trademarks mentioned in the following document are registered
trademarks of Zortrax and are subject to legal protection.
Page 14
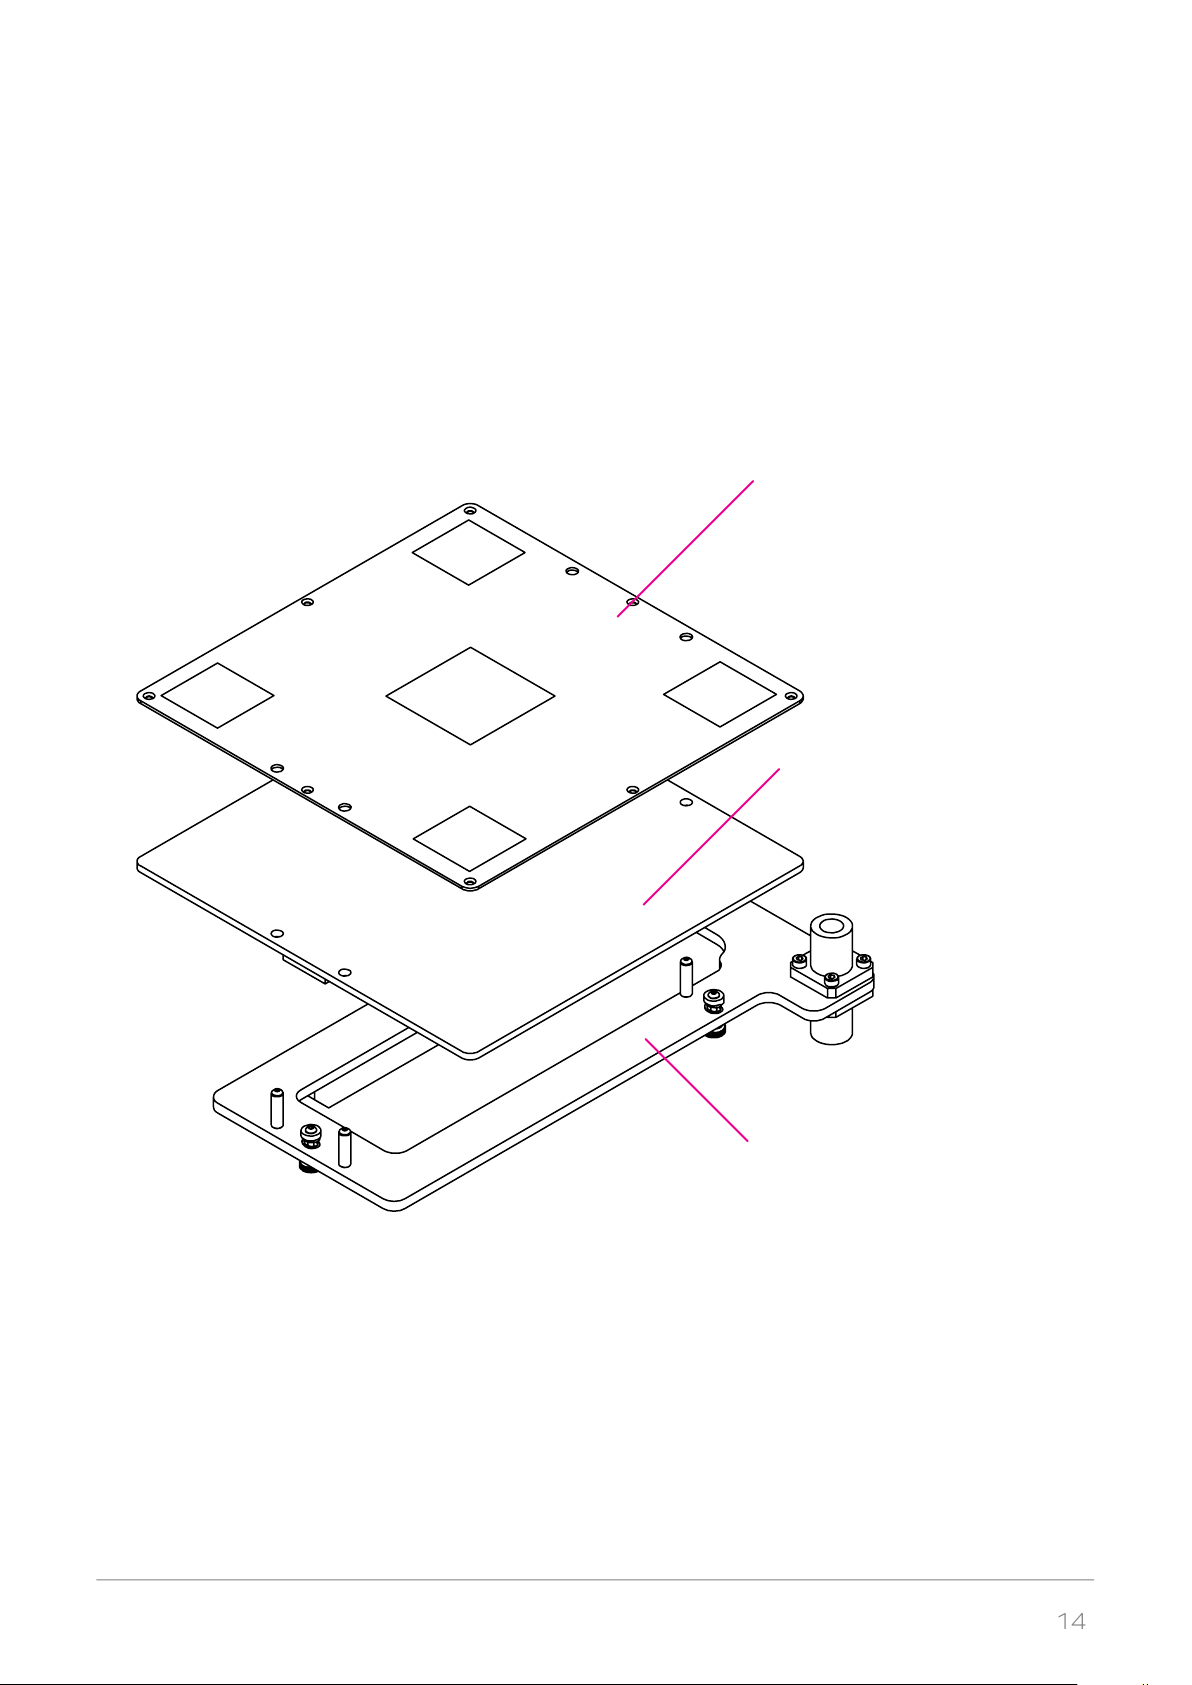
14
Perforated Plate
Heatbed
Heatbed Mount
©2017, Zortrax S.A. All rights reserved. All trade names, logos and trademarks mentioned in the following document are registered
trademarks of Zortrax and are subject to legal protection.
Page 15

15
Zortrax 3D Printing Technology Glossary
DISPLAY PANEL
a high contrast screen displaying information about the current printing process, the printer’s menu and
other information concerning the printer.
EXTRUDER
the mechanism which ensures material feeding, heating and extruding as well as cooling of the print.
Its main components include the hotend and the nozzle. The material is melted in the hotend and then
pushed through to the nozzle. The melted thermoplastic is deposited layer by layer to form a previously
designed shape. Additionally, there are two fans on the extruder which cool the whole mechanism and
the print.
EXTRUDER CABLE
a ribbon cable which connects the extruder with the motherboard. It supplies the extruder with electricity and allows to regulate the printing process.
HOTEND
a basic heating system which consists of the aluminium block and the heater & thermocouple. The hotend is responsible for heating and melting the material as well as for providing the proper temperature
of the material during the whole printing process.
KNOB
a round, rotating button used to navigate through the printer’s menu and control its basic settings.
LAYER PLASTIC DEPOSITION (LPD)
the technology in which a melted material is deposited on a given surface. This technique involves applying one layer of material after another in order to form a predesigned shape – an accurate representation of a virtual design. This technology is applied by Zortrax devices – the printer starts to print from the
bottom and builds the object until it is fully formed. The model and the support structures are created
using the same material.
MATERIAL GUIDE
a tube which feeds the material from the spool to the extruder at the proper angle. The material guide in
Zortrax printers has to be attached to the extruder cable and the back of the printer with special buckles.
MATERIALS
specially dedicated Zortrax printing materials which maximize the benefits of 3D printing. These thermoplastic materials are in the filament form wound on a spool. There is a wide choice of materials in the
Zortrax product offer which is available at: https://zortrax.com/materials/zortrax-m-series/. Each mate-
©2017, Zortrax S.A. All rights reserved. All trade names, logos and trademarks mentioned in the following document are registered
trademarks of Zortrax and are subject to legal protection.
Page 16

16
rial has different properties, therefore a given material can be easily adopted to a wide range of needs
and applications. Moreover, most materials are suitable for mechanical and chemical post-processing.
MODEL LIBRARY
the collection of ready-made models available within Z-SUITE. All models are divided into categories, for
instance art. & design, education or robotics. You can find many useful and attractive models there that
were uploaded by the Zortrax printers’ users. Moreover, there is also one category called Zortrax Parts
where you can find models of parts useful while printing with Zortrax printers, for example the spool holder or the extruder top cover.
MOTHERBOARD
the main part of every Zortrax printer to which all the necessary components are connected. It is the
main printed circuit board that makes it possible for other parts of a printer to communicate with each
other. The motherboard is placed under the bottom plate along with the cooling fan and the power supply unit.
NOZZLE
the final element of the extruder. It is used to direct the material throughout the entire printing process.
PLATFORM
an integral part of the 3D printer on which the model is created. It consists of two parts: the heatbed
and the perforated plate. The heatbed provides proper platform heating, whereas the perforated plate
guarantees full adhesion to its surface. The platform can be easily removed from the printer as well as
installed back in its place.
PLATFORM CALIBRATION
the procedure which ensures a problem-free printing process. Platform calibration basically involves the
procedure of checking the distance between the nozzle and five points on the platform and tightening/
loosening the calibration screws.
POST-PROCESSING
all procedures of mechanical and chemical treatment that improve the final look of the model. Postprocessing techniques include: polishing, sanding, smoothing, painting or gluing two or more parts together.
POWER OUTLET AND MAIN SWITCH
the switch enables turning the printer off and on. Next to the switch, there is a power outlet where you
plug the power cable in.
RAFT
first few layers of material which begin the whole printing process. This element is always printed before
©2017, Zortrax S.A. All rights reserved. All trade names, logos and trademarks mentioned in the following document are registered
trademarks of Zortrax and are subject to legal protection.
Page 17

17
the main object and has a larger area than the target model. Once the printing is done, both need to be
removed together from the platform. The RAFT enhances adhesion of the whole print and reduces the
risk of warping.
SIDE COVERS
plastic panels that can be easily attached to the casing of the printer. They’ve been designed so as to
provide protection from drafts and temperature differences that can take place in the printing room.
Constant temperature inside the printing chamber is very important to avoid cracks on the model and
the problem of warping. Therefore, thanks to the use of side covers, the model is being protected during
the printing process and at the same time it adheres to the platform more tightly. The set consists of side
covers, 1 front cover, magnets and hinges. The front panel is fixed to the casing with two hinges and
closed by hidden magnets, whereas the side panels are snap-on. We recommend using the side covers
especially for large-sized prints and prints made of materials with high or medium shrinkage level like
Z-ABS.
SPOOL HOLDER
an element used to secure the spool of material at the back of the printer.
STARTER KIT
several pieces of equipment that are put together in one set. Apart from the perforated plate, the set
contains tools and protective elements. The Starter Kit is what you need to perform your maintenance
and repair work of Zortrax printers easier and more efficient. Each printer is delivered with equipment
including, for example, a set of nozzle keys or a pair of safety gloves.
STEPPER MOTOR
a type of electric motor in which the power supply does not cause full rotation of the motor shaft, but
instead, a series of steps. There are four stepper motors in each Zortrax printer: two that are responsible
for the extruder’s motion, one which allows the platform’s vertical motion and one which enables material loading.
SUPPORT STRUCTURES
if your model has any overhanging or protruding parts, they have to be supported with special structures
so that they don’t fall down. Without these structures, the model may lose its predesigned shape. The
support is printed with the same material as the model. Once the printing is done, it is necessary to carefully remove the support by hand or using pliers.
Z-AXIS SCREW
the screw which is responsible for platform’s vertical motion. It is driven by a stepper motor placed under
the bottom plate. The Z-axis screw constitutes an integral part of the platform moving system.
ZCODE
the type of file which contains a model prepared for 3D printing with previously selected print settings
©2017, Zortrax S.A. All rights reserved. All trade names, logos and trademarks mentioned in the following document are registered
trademarks of Zortrax and are subject to legal protection.
Page 18

18
(such as layer thickness, infill type, etc.). All print settings can be managed in Z-SUITE before generating
the .zcode. The .zcode format can only be created by saving an .stl / .dxf / .obj / .3mf file in Z-SUITE.
Z-FIRMWARE
the software programmed into the Zortrax printers which controls and monitors all the data in the device. It also gives the possibility to enable/disable the printer’s options. Whenever there is a technical
issue, the firmware immediately informs you about it by displaying an error message on the screen. The
whole list of firmware error messages along with the possible causes and solutions is available in this user
guide.
We systematically update our firmware. The latest update is available in the Downloads section at:
http://support.zortrax.com/downloads/. Simply download the file, upload it on the SD card, insert the
card into the slot in the printer and turn on the printer. The firmware will be automatically installed.
Z-SUITE
the application created specifically for Zortrax devices. Z-SUITE prepares a model for 3D printing by
generating a project and saving it in the .zcode format. Z-SUITE allows changing and adjusting the print
settings, such as the size of the model, layer thickness, a type of infill or how many support structures will
be generated. Once the .zcode file is generated, the print settings cannot be changed. The last step is to
save the .zcode onto an SD card and then the model is ready to be printed.
©2017, Zortrax S.A. All rights reserved. All trade names, logos and trademarks mentioned in the following document are registered
trademarks of Zortrax and are subject to legal protection.
Page 19
19
First Use Preparations
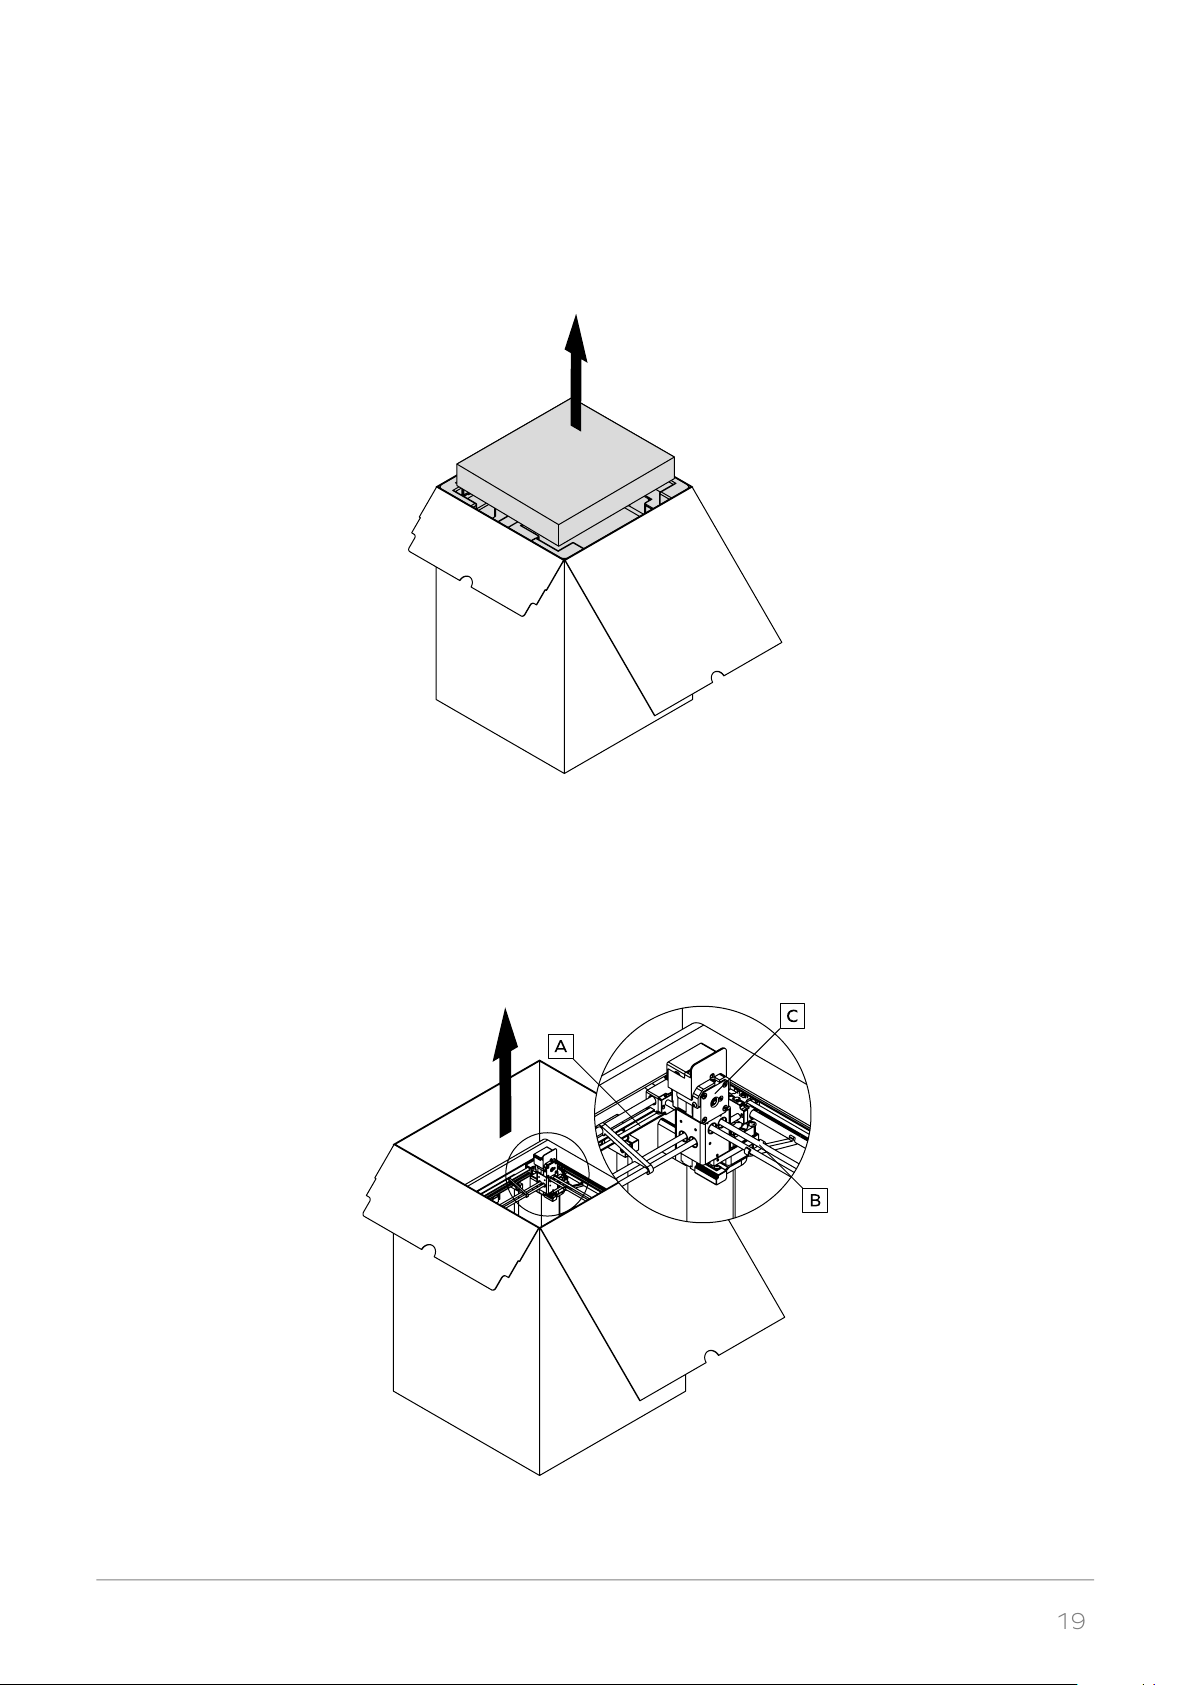
1. Open the box and remove the cushioning material.
2. Take the 3D printer out of the box*.
When lifting or moving the printer, do not grab:
a. the belts,
b. the shipping clips,
c. the extruder.
* Bearing in mind the printer’s weight (30kg/66lbs), Zortrax M300 should be taken out of the box or moved by two people.
©2017, Zortrax S.A. All rights reserved. All trade names, logos and trademarks mentioned in the following document are registered
trademarks of Zortrax and are subject to legal protection.
Page 20
20
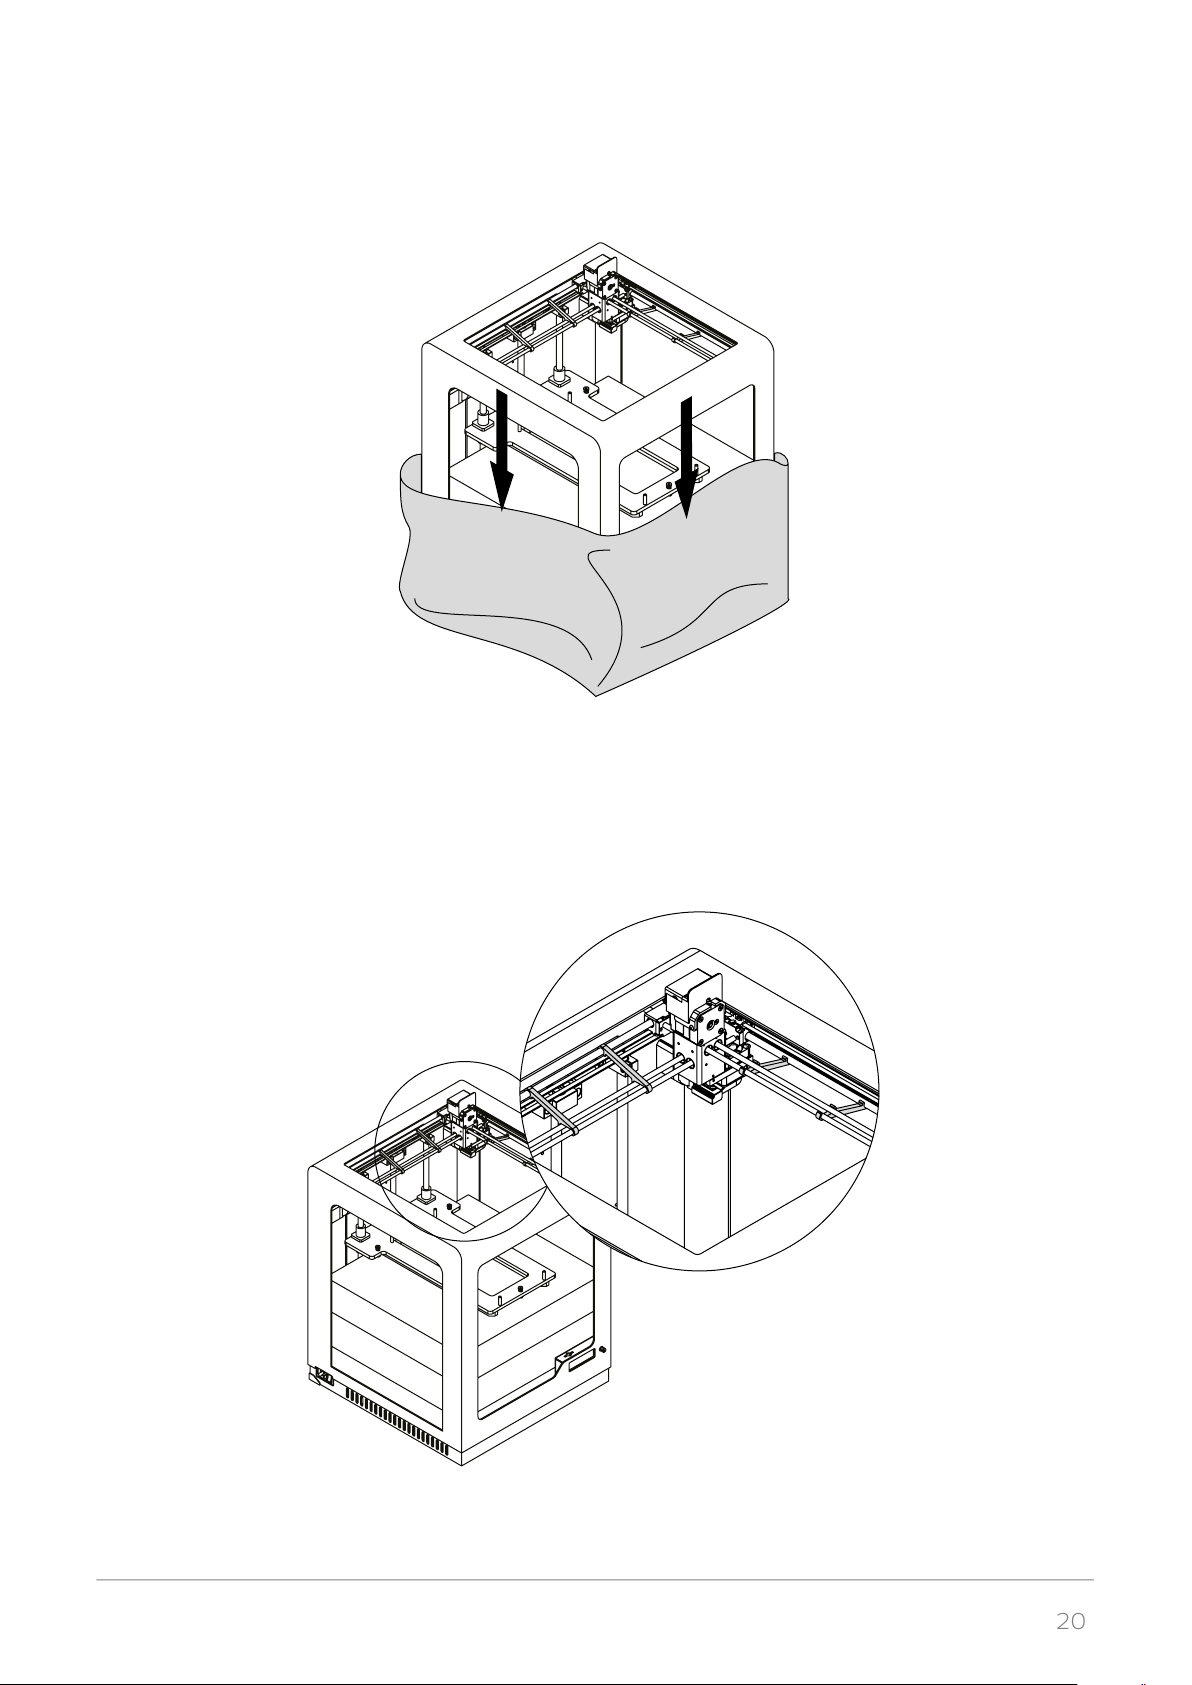
3. Remove the foil and fillers.
4. Remove the shipping clips.
©2017, Zortrax S.A. All rights reserved. All trade names, logos and trademarks mentioned in the following document are registered
trademarks of Zortrax and are subject to legal protection.
Page 21
21
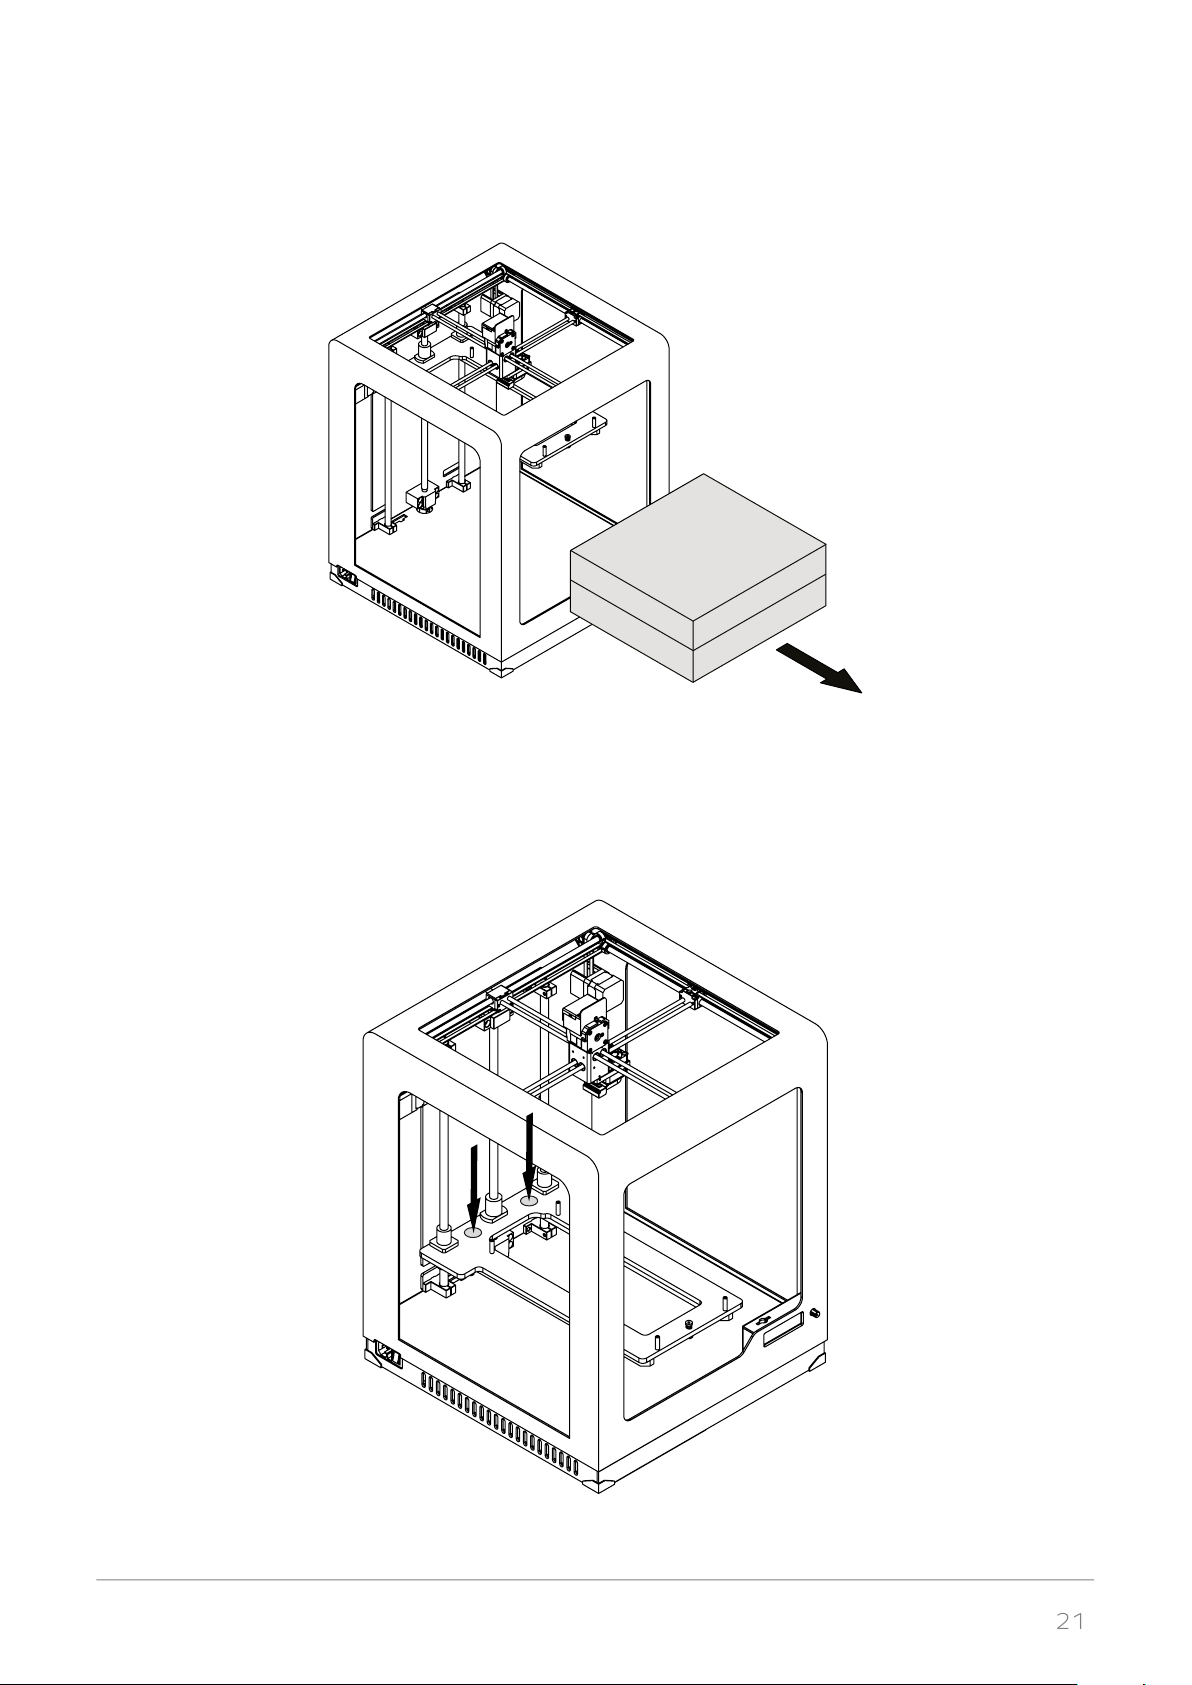
5. Remove the foams/boxes with accessories.
6. Lower the heatbed mount by pressing the places marked in the picture.
©2017, Zortrax S.A. All rights reserved. All trade names, logos and trademarks mentioned in the following document are registered
trademarks of Zortrax and are subject to legal protection.
Page 22
22
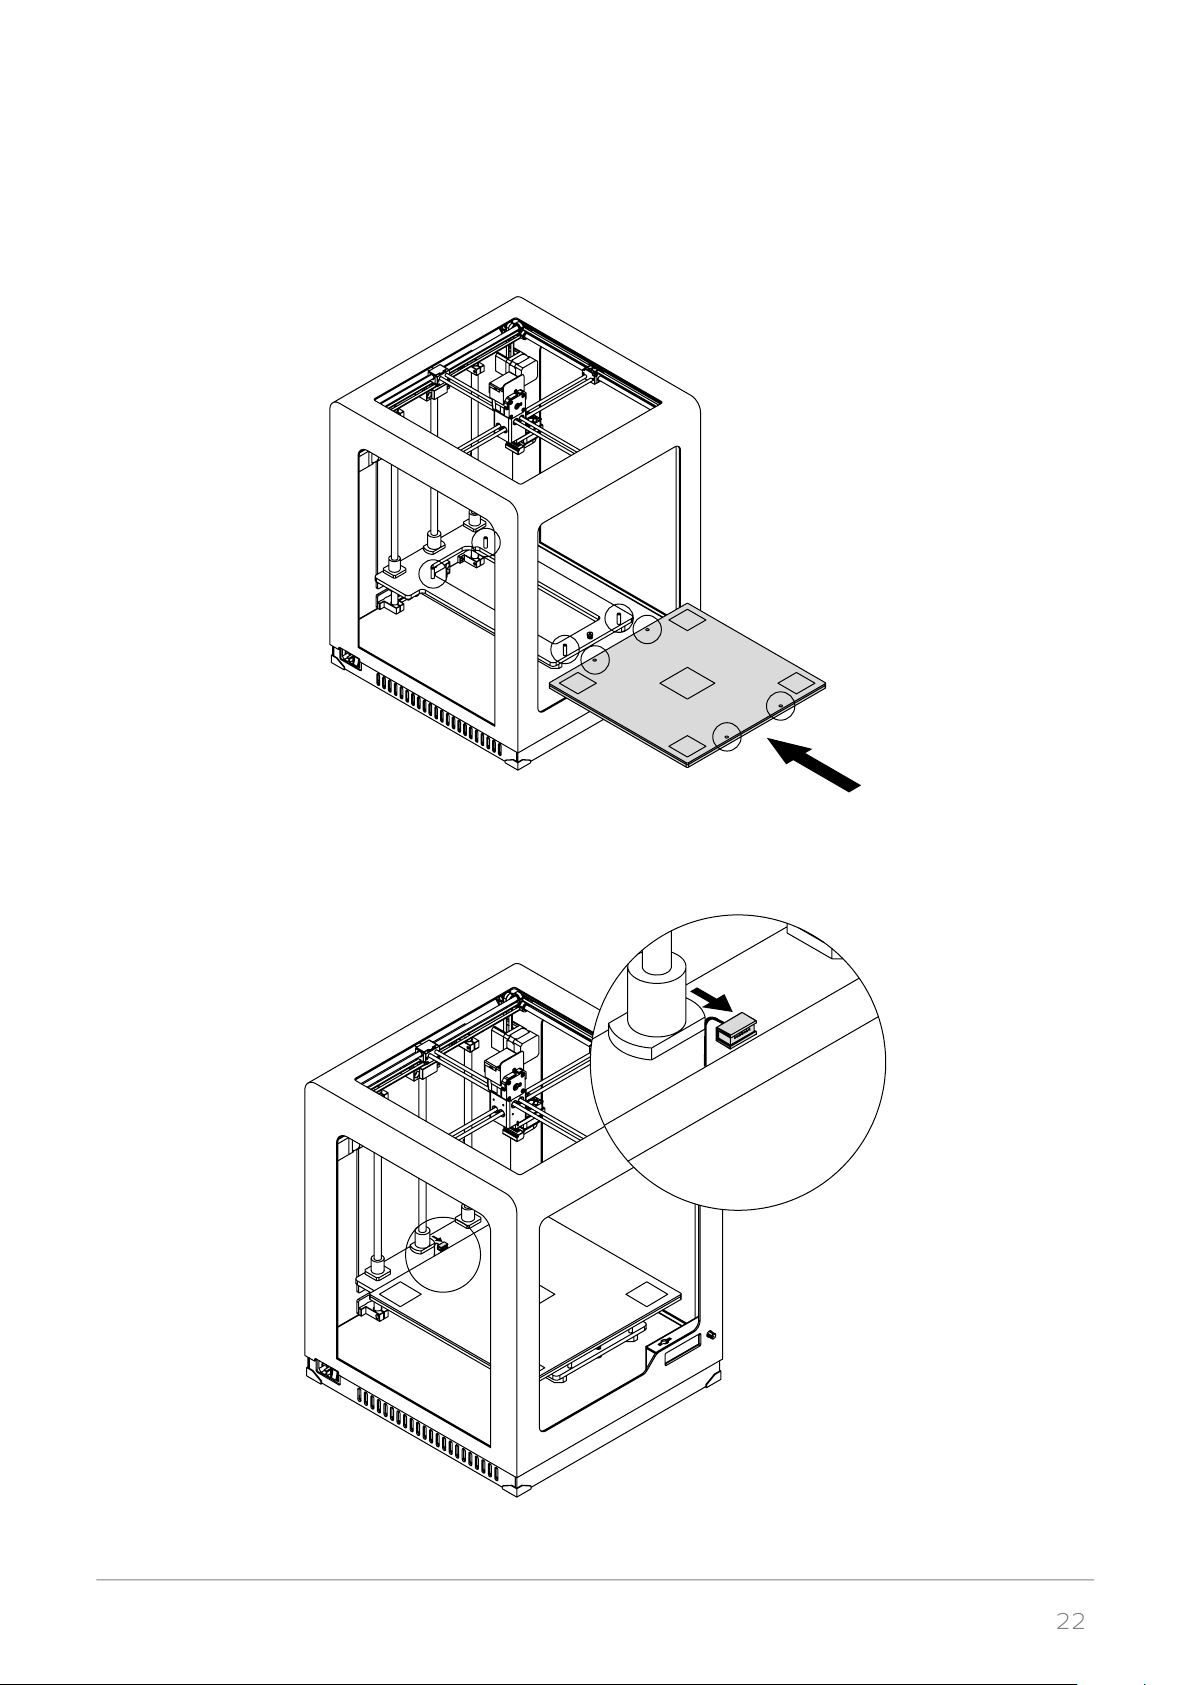
7. Install the platform onto the bolts marked in the picture.
NOTE! REMEMBER THAT THE PLATFORM SHOULD BE INSTALLED IN YOUR DEVICE WITH THE
PERFORATED PLATE AND ITS FIVE SILVER CALIBRATION SQUARES DIRECTED UP.
8. Plug the heatbed cable in.
©2017, Zortrax S.A. All rights reserved. All trade names, logos and trademarks mentioned in the following document are registered
trademarks of Zortrax and are subject to legal protection.
Page 23
23
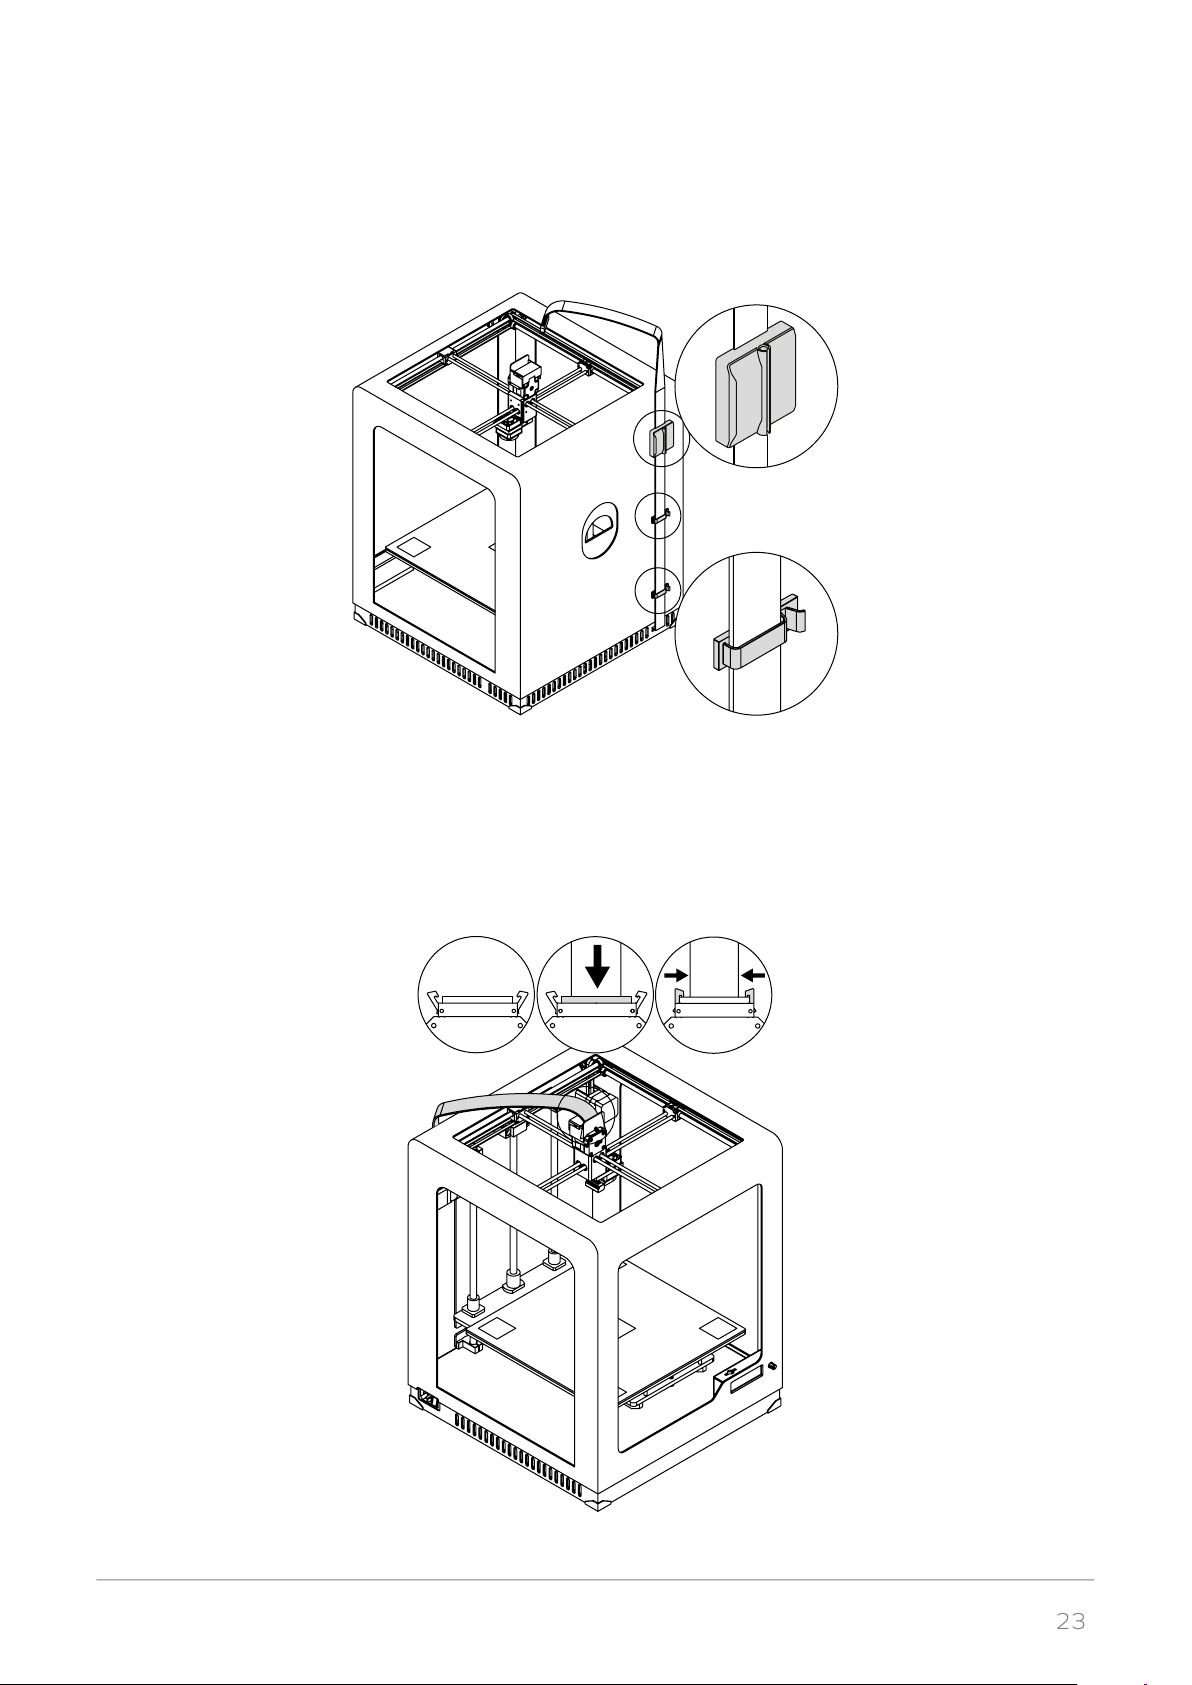
9. Attach the extruder cable clamps at the back of the printer and place the cable in them.
10. Plug the extruder cable in.
©2017, Zortrax S.A. All rights reserved. All trade names, logos and trademarks mentioned in the following document are registered
trademarks of Zortrax and are subject to legal protection.
Page 24
24
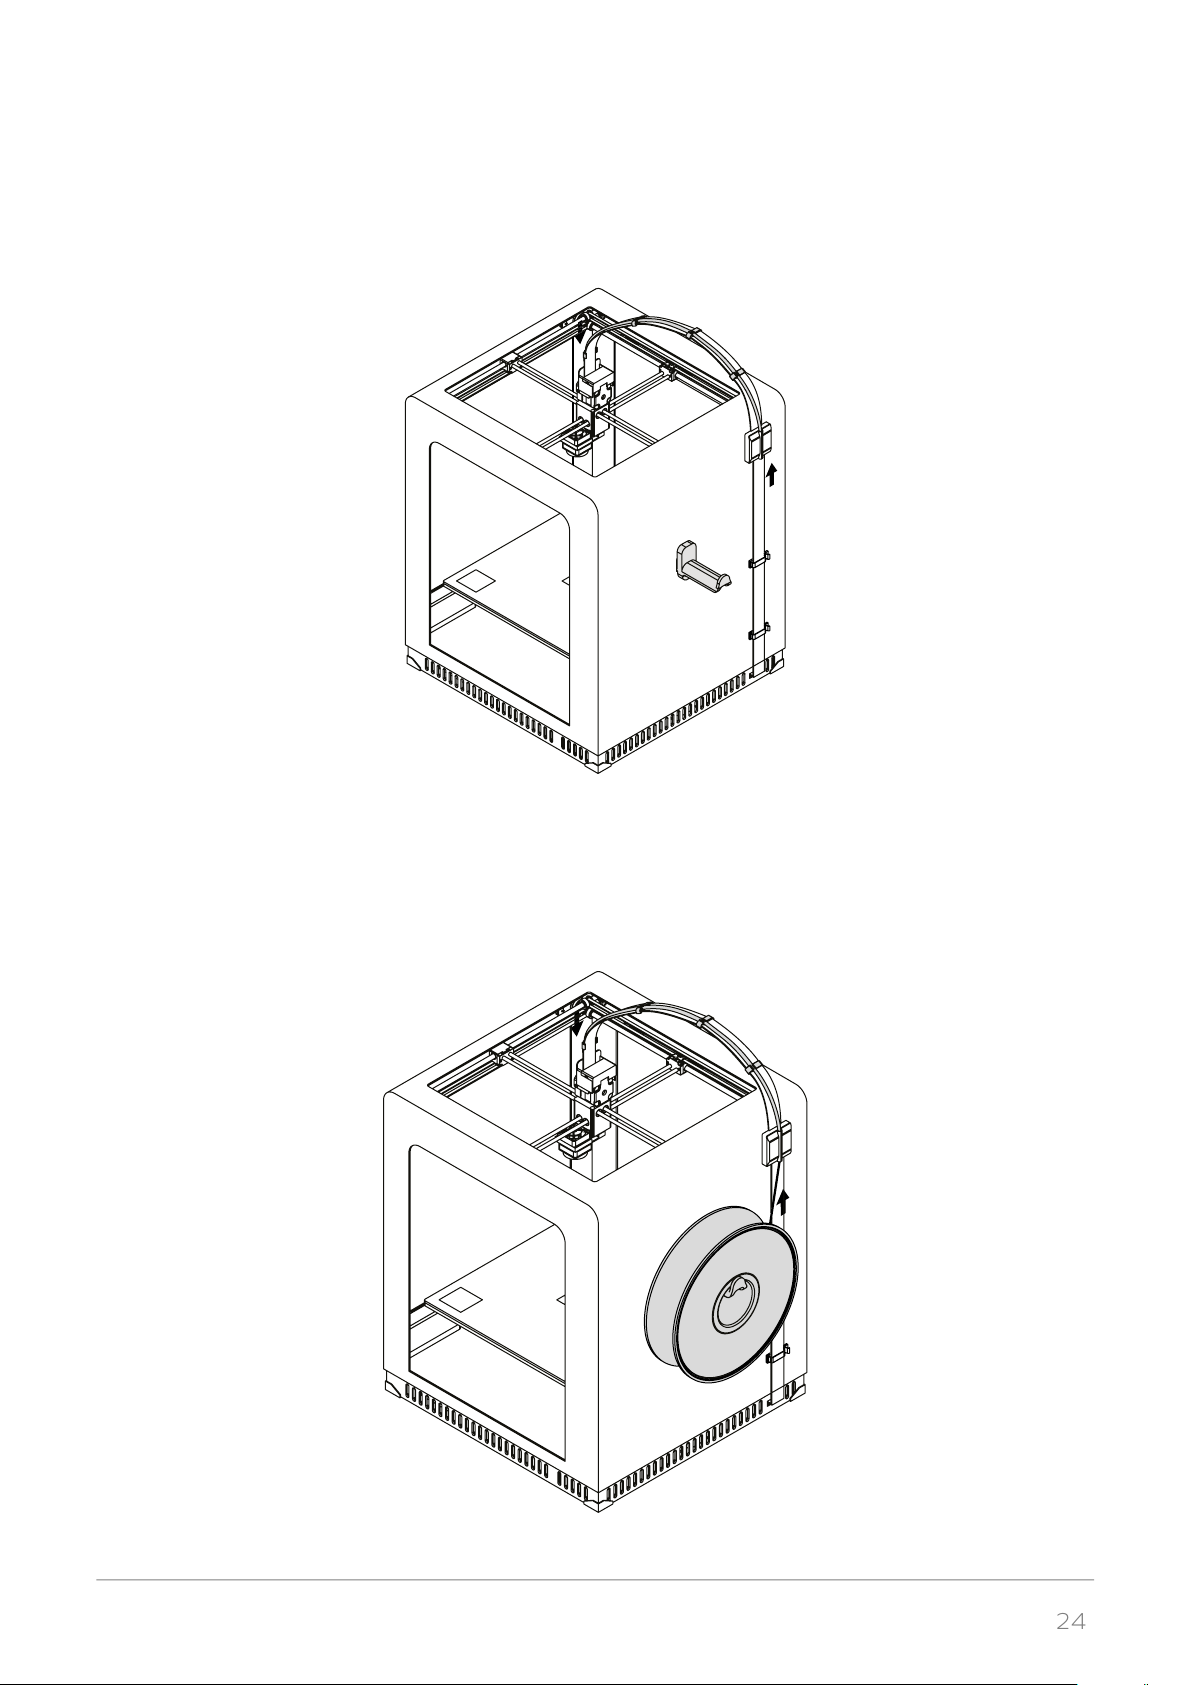
11. Attach the spool holder at the back of the printer. Using the buckles, attach the material guide to
the extruder cable.
12. Place the material spool onto the holder so that the marking on the spool is visible. The spool
should rotate anti-clockwise. Next, feed the material into the extruder through the material guide.
©2017, Zortrax S.A. All rights reserved. All trade names, logos and trademarks mentioned in the following document are registered
trademarks of Zortrax and are subject to legal protection.
Page 25
25
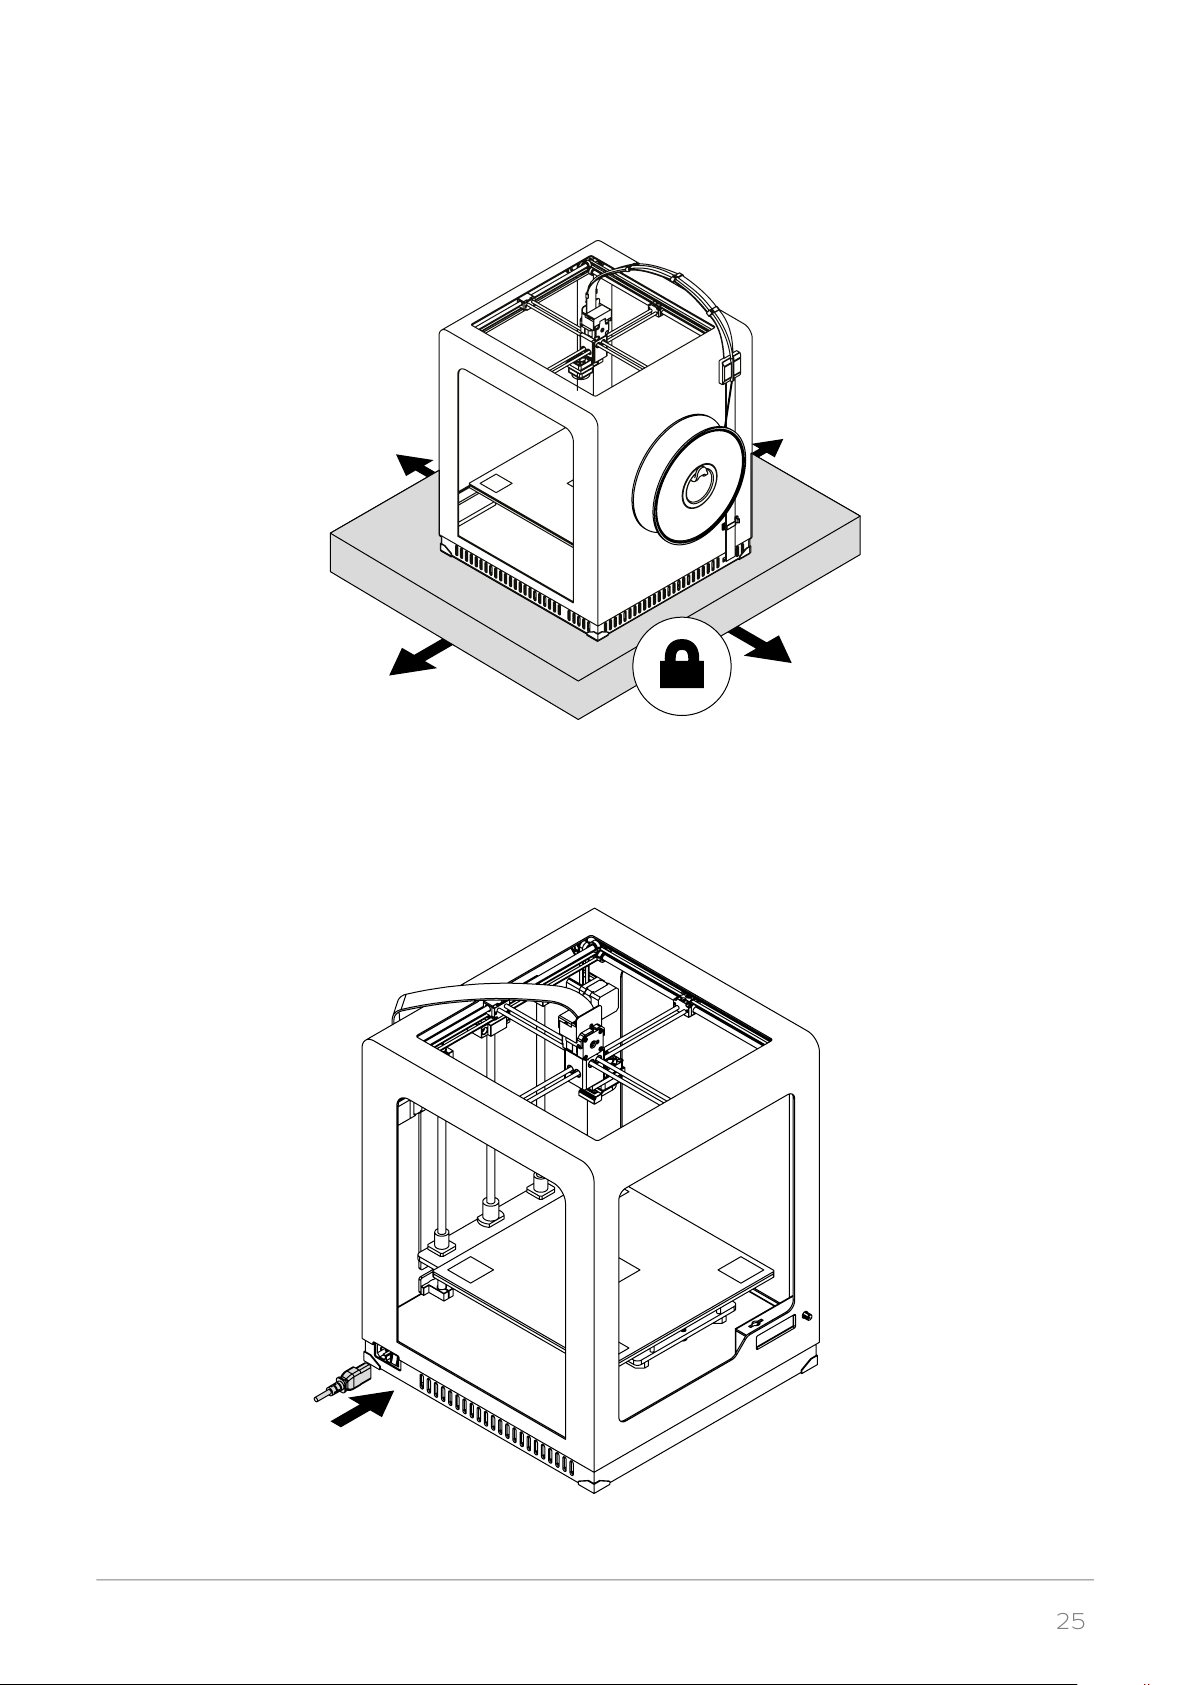
13. Place the printer on a flat and stable surface.
14. Plug the power cable in.
©2017, Zortrax S.A. All rights reserved. All trade names, logos and trademarks mentioned in the following document are registered
trademarks of Zortrax and are subject to legal protection.
Page 26
26
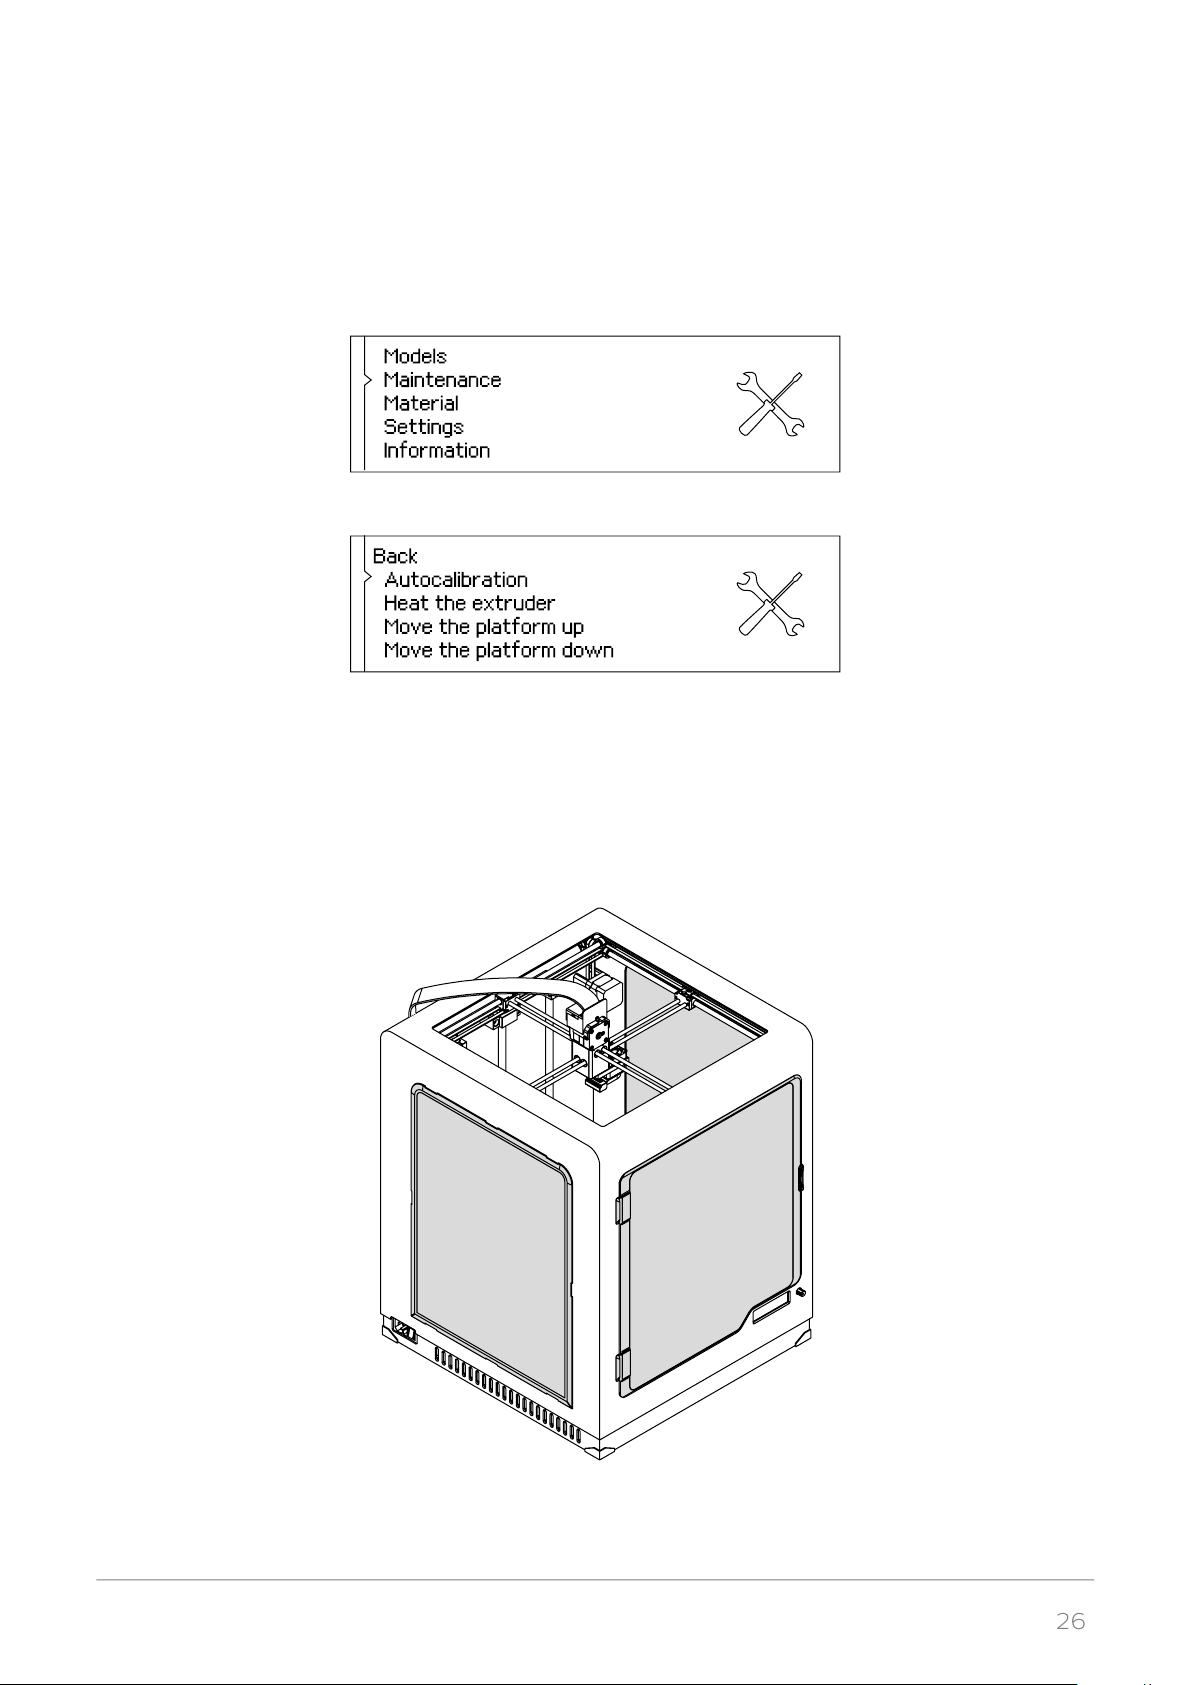
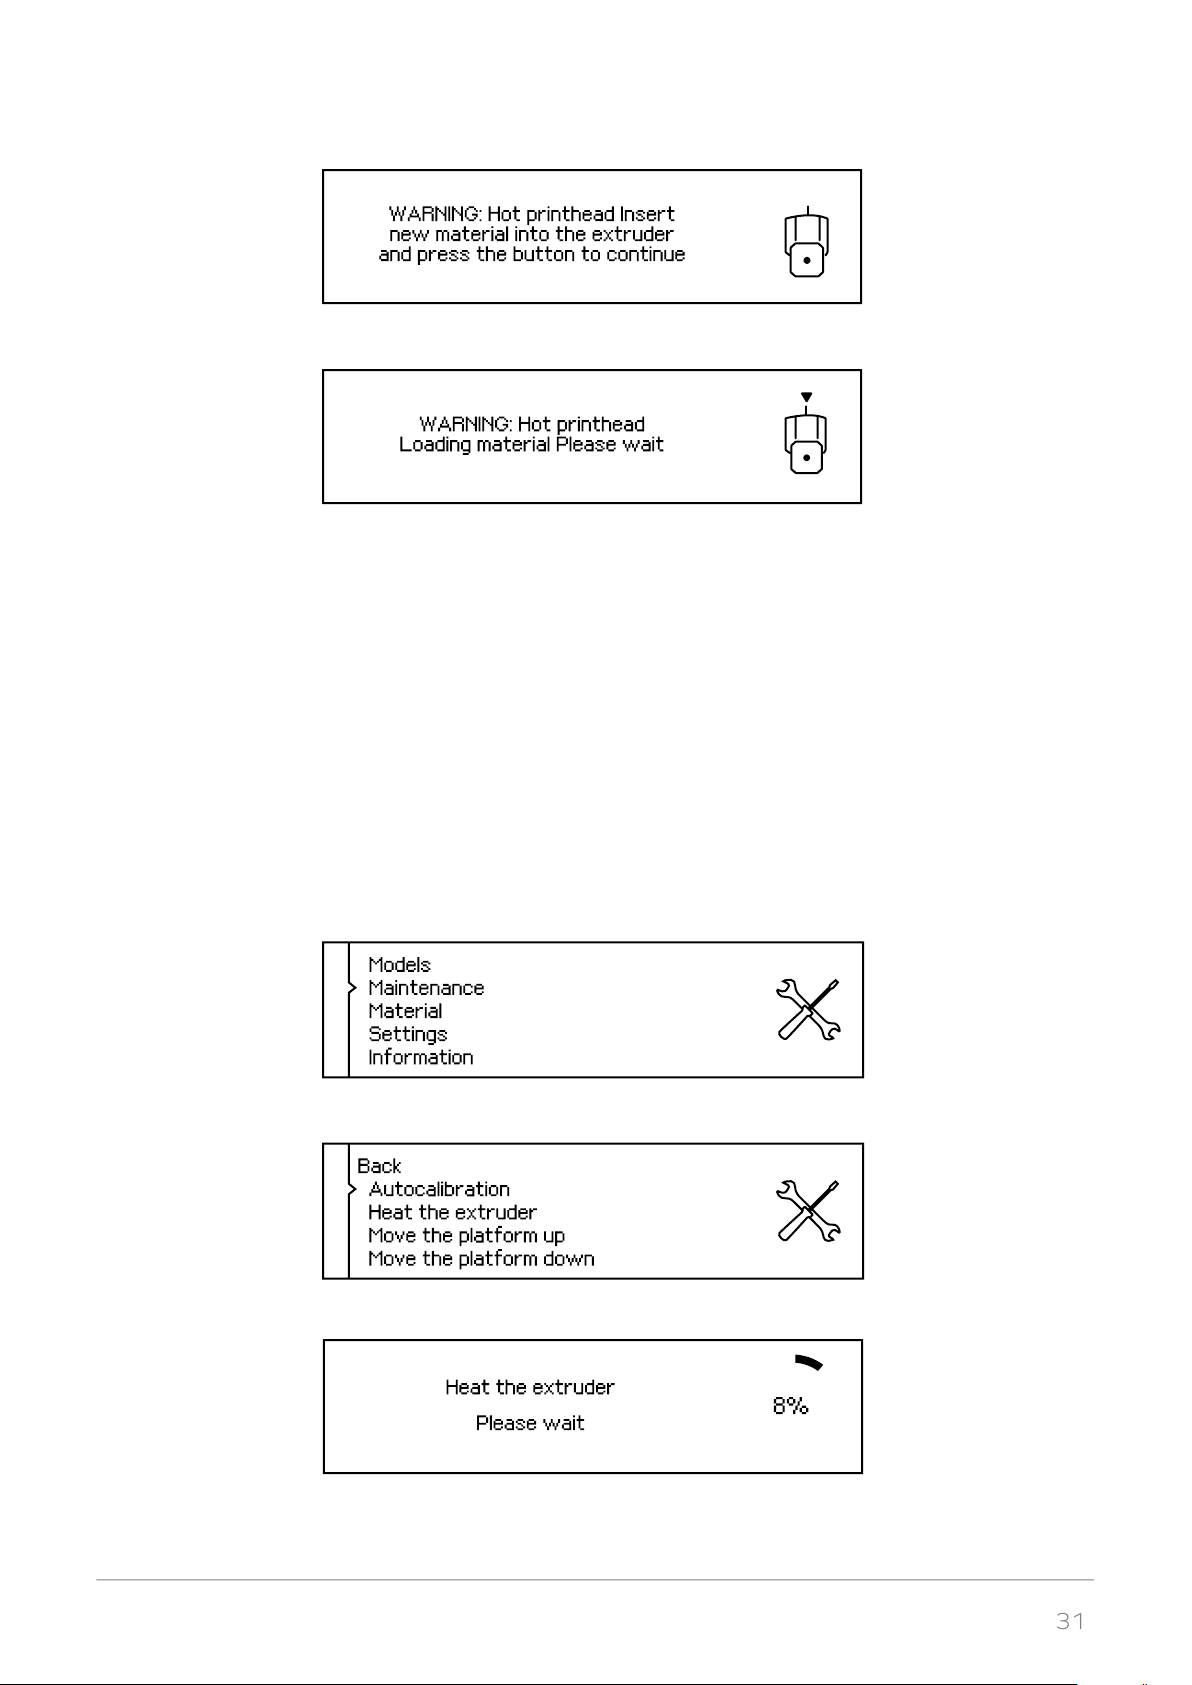
15. To calibrate the platform, from the menu select “Maintenance” and then “Autocalibration.”
Follow the instructions displayed on the screen.
16. Install the side covers*.
*Delivered only with Zortrax M300
©2017, Zortrax S.A. All rights reserved. All trade names, logos and trademarks mentioned in the following document are registered
trademarks of Zortrax and are subject to legal protection.
Page 27
27
Z-Firmware Installation
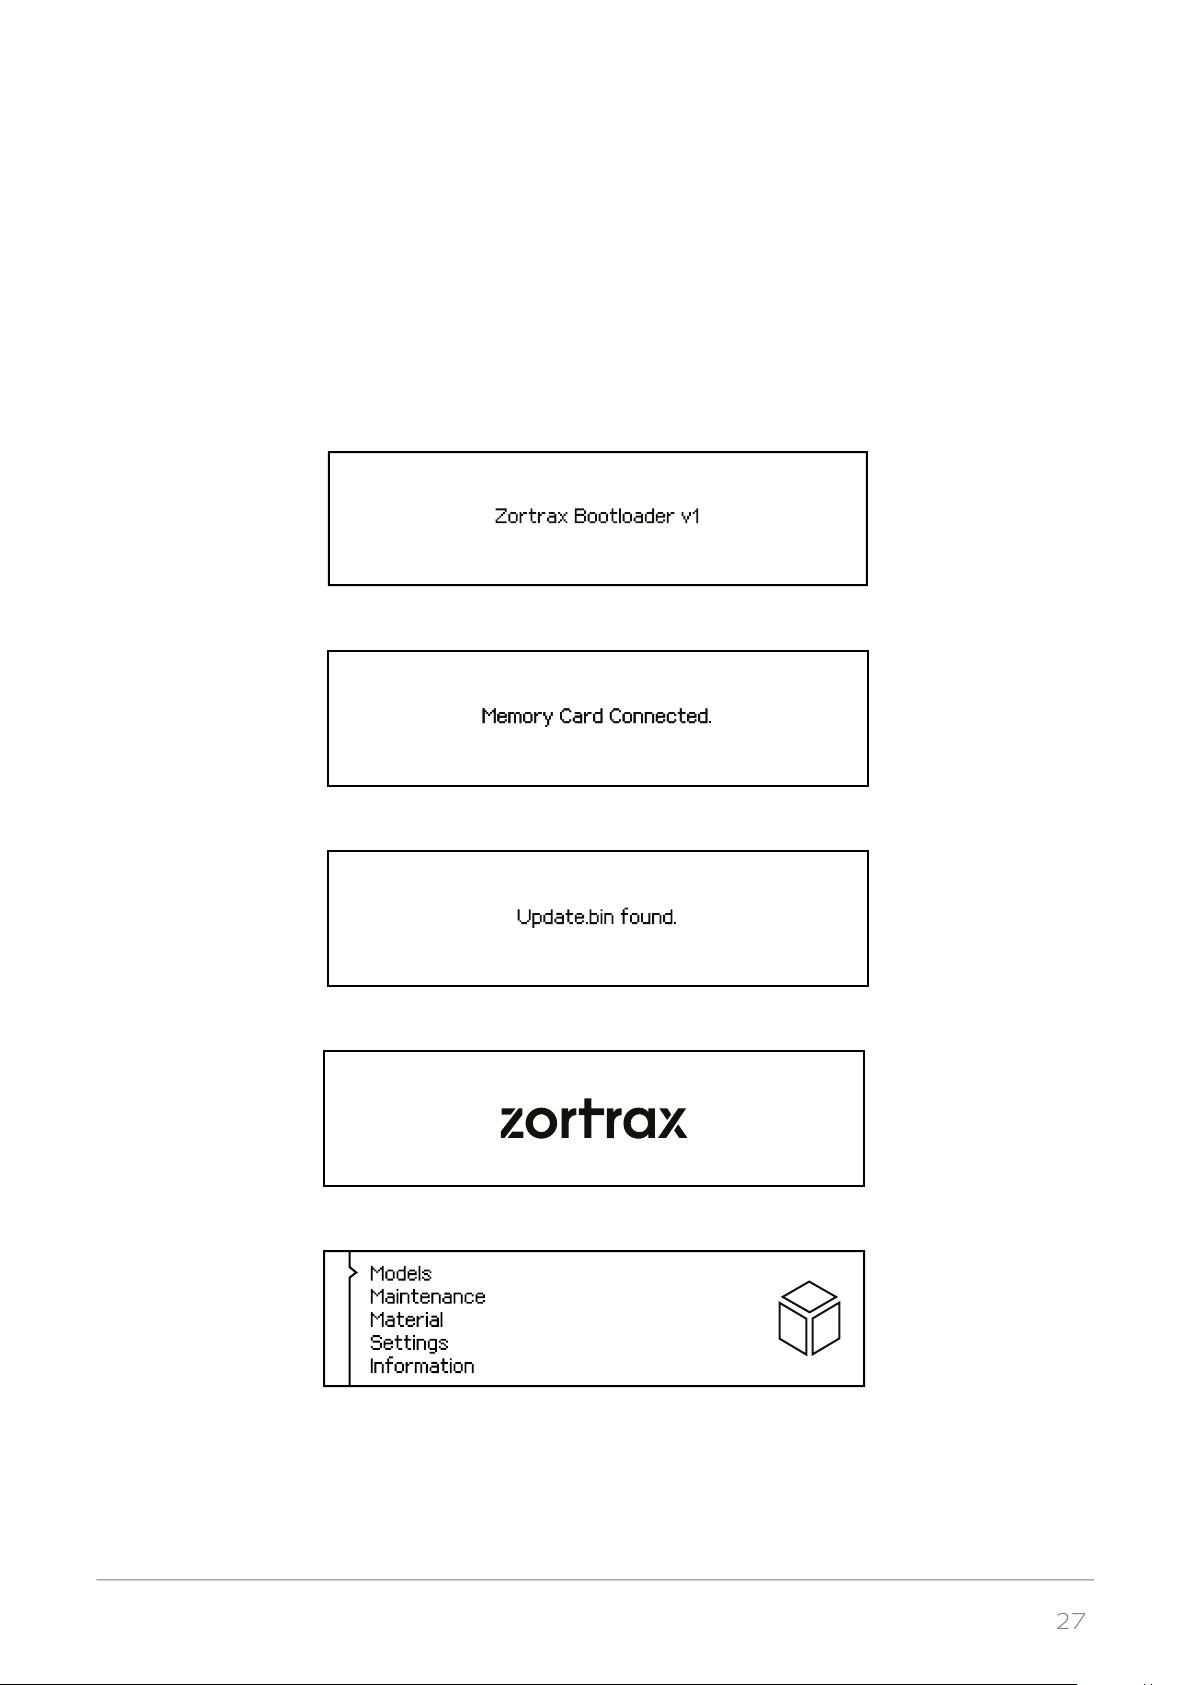
17. Download the latest Z-Firmware update from: http://support.zortrax.com/downloads/. To
install the firmware in your printer, upload the Update.bin on an SD card. Next, insert the card
into the slot in the printer and turn it on. The program will be installed automatically.
©2017, Zortrax S.A. All rights reserved. All trade names, logos and trademarks mentioned in the following document are registered
trademarks of Zortrax and are subject to legal protection.
Page 28
28
Navigating through the Zortrax Printer Menu
The printer’s functions can be activated or deactivated through the main menu.
The menu, current processes and all relevant information are shown on the display panel situated in the
bottom right corner of the printer. Navigating through the menu and adjusting the basic settings is possible with the use of a knob. To select a given function, turn the knob, to confirm, press it.
Main menu is divided into 5 main submenus: models, maintenance, material, settings, information. Each
category is discussed in detail below.
Models: This menu includes all models saved on the SD card. You can store all of your files in one or several folders.
Maintenance: this menu lists all functions useful when taking actions connected with keeping the printer
in good condition.
Autocalibration - the function which activates the procedure of autocalibration.
Heat the extruder – the function which heats up the extruder to operating temperatures. It is very useful
while replacing the nozzle and performing other extruder maintenance activities.
Move the platform up/down – this function allows to change the position of the platform. Move up the
platform if you want to access the bottom plate in order to clean it.
Material: this menu contains two options that are particularly helpful during the printing process.
Unload the material – choose this option to change the material for a different color or type.
Load the material – choose this option before starting the print or after changing the material.
Settings: this menu allows to adapt the printer’s operation to individual requirements.
Light – the function which enables switching on the dynamic light – a different color of light for a different
mode (heating mode, sleep mode, stand-by mode), the white light for all modes or disabling the light at
all.
Buzzer – the function which enables/disables the sounds in the device.
Sleep mode – the function activating the sleep mode which reduces power consumption and noises. It
also turns off the heating, motors and fans.
©2017, Zortrax S.A. All rights reserved. All trade names, logos and trademarks mentioned in the following document are registered
trademarks of Zortrax and are subject to legal protection.
Page 29
29
Language – this option can be used to change the language of the menu and printer messages.
Models sorting – the function which allows to organize models saved in folders by the date and time of
saving or the file size.
Information: this tab provides all information about the device and its current state.
Firmware version – the tab which displays currently installed Z-firmware version.
Printer information – the tab containing information which identifies the printer model, its hardware version, serial number and total printing time.
Help - the section providing Customer Support contact details.
The menu in Zortrax devices allows to activate the pause option during the printing process. In order to
pause the printing, press the knob for 10 seconds. The display will show the options related to the pause
mode: Resume the print (the function which continues the printing process), Change the material (the
function which allows to unload the material and load a different one) or Stop the print (the function
which finishes the printing process).
Modes and Signal Tones of Zortrax Devices
Zortrax printer indicates its current mode by the LED lights as well as informative and alert sounds. When
the printer enters a given mode, the color of LED lights changes into a different one. Also, while changing
to some modes, the device may emit a sound. Therefore, working with Zortrax devices becomes easier
and more convenient because there is no need to read the printer’s present mode from the display.
Heating Mode
When the light turns red, it is a sign that the platform or the extruder is heating up.
Sleep Mode
Purple light indicates the sleep mode.
This mode turns off the heating, motors and fans every time the printer is not used for 15 minutes. The
sleep mode has been introduced so as to save power consumption and reduce noises.
Other Modes
White light signifies other modes: printing mode, autocalibration mode and stand-by mode.
While working with Zortrax printer, you can hear two types of sounds: long and short ones.
©2017, Zortrax S.A. All rights reserved. All trade names, logos and trademarks mentioned in the following document are registered
trademarks of Zortrax and are subject to legal protection.
Page 30
30
All activities that involve preparing the device for printing, such as heating the extruder or loading and
unloading the material, begin with a short sound. The printing process is initiated with a short sound and
it ends with a double short sound.
A long sound indicates malfunctions, failures or the user’s negligence. Also, the long sound points out the
need to update the firmware.
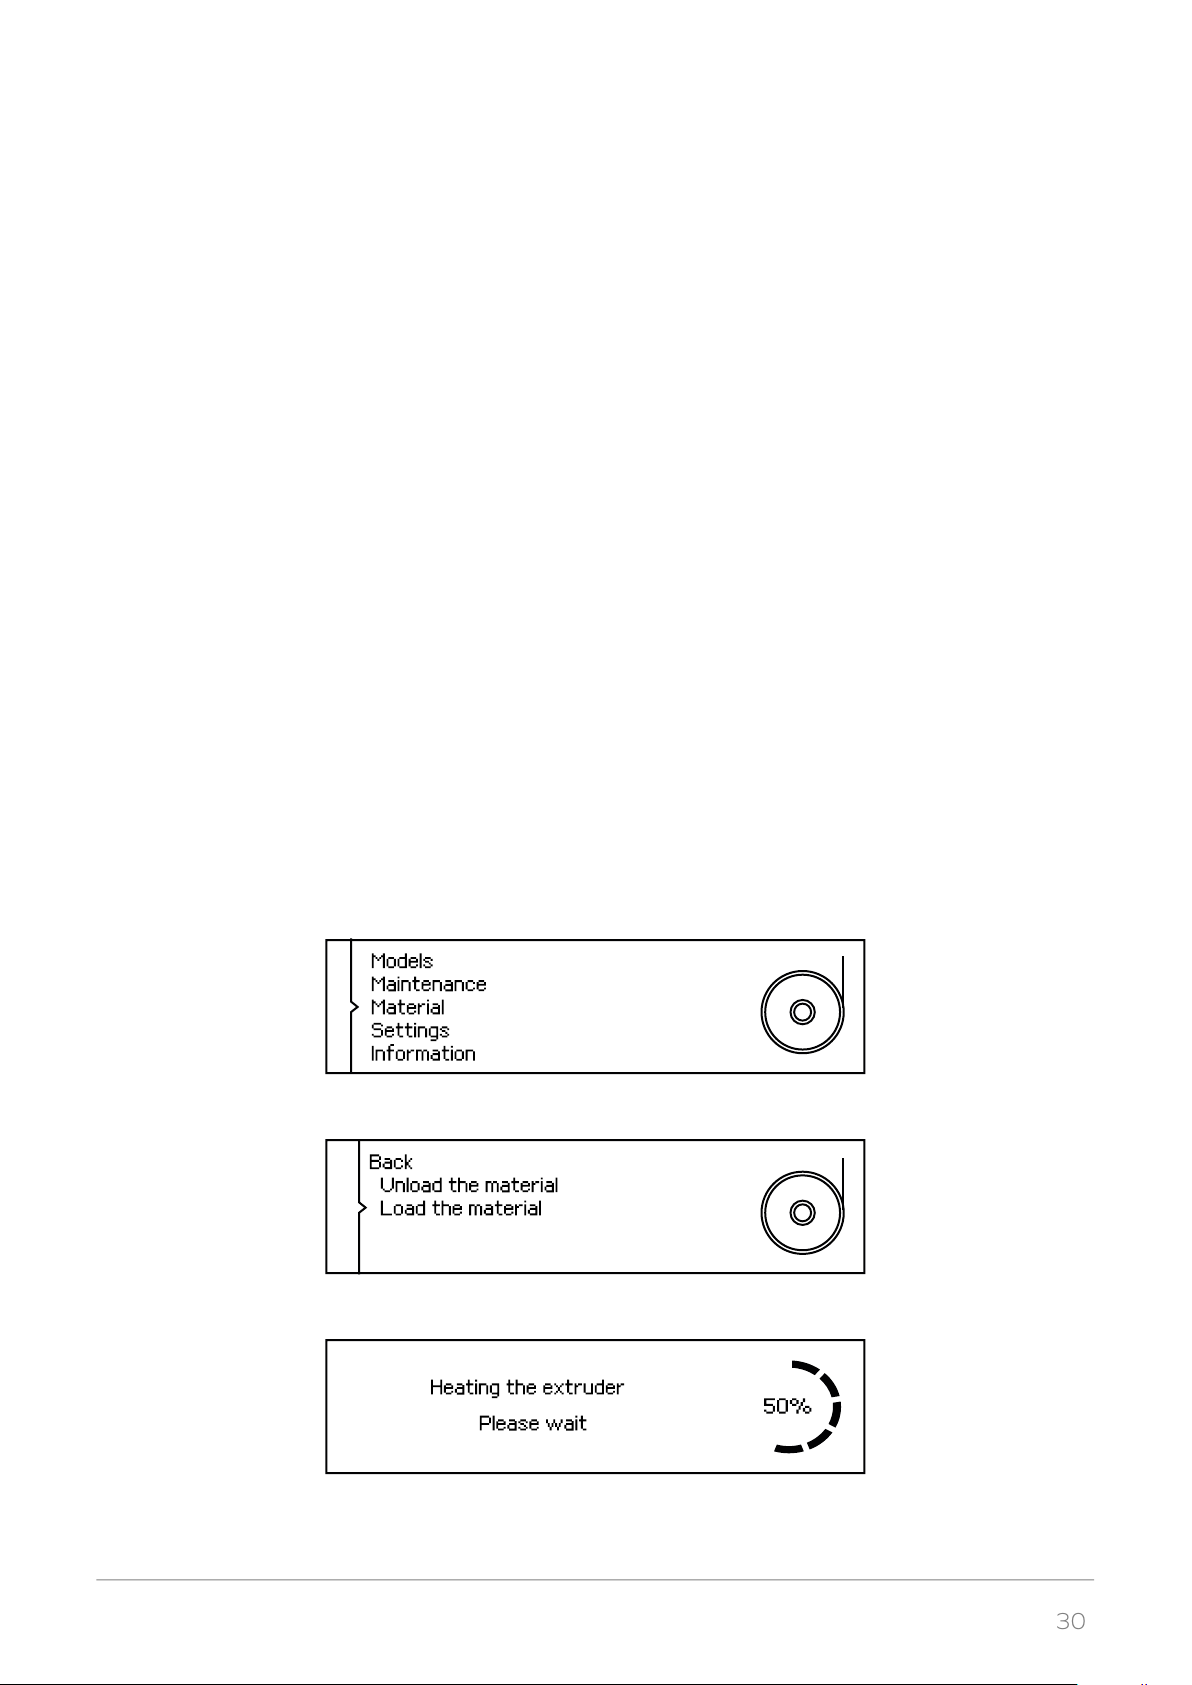
Material Loading
18. From the main menu select “Material” and then “Load the material.” At this point the printer will
begin to heat up the extruder.
WARNING! The extruder will be hot. Don’t touch it. Wear safety gloves.
Once the extruder heating is done, insert the material into the extruder and push the knob to continue.
When the material is loaded, the device is ready to begin the printing process. Remove the excess material using the tweezers.
©2017, Zortrax S.A. All rights reserved. All trade names, logos and trademarks mentioned in the following document are registered
trademarks of Zortrax and are subject to legal protection.
Page 31
31
Platform Calibration
19. Platform calibration involves the procedure of checking the distance between the nozzle and five
silver points on the platform and tightening/loosening the calibration screws.
From the main menu select “Maintenance” and then “Autocalibration.” At this point the printer will begin
to heat up the extruder.
WARNING! The extruder will be hot during the autocalibration. Don’t touch it. Wear safety gloves.
©2017, Zortrax S.A. All rights reserved. All trade names, logos and trademarks mentioned in the following document are registered
trademarks of Zortrax and are subject to legal protection.
Page 32
32
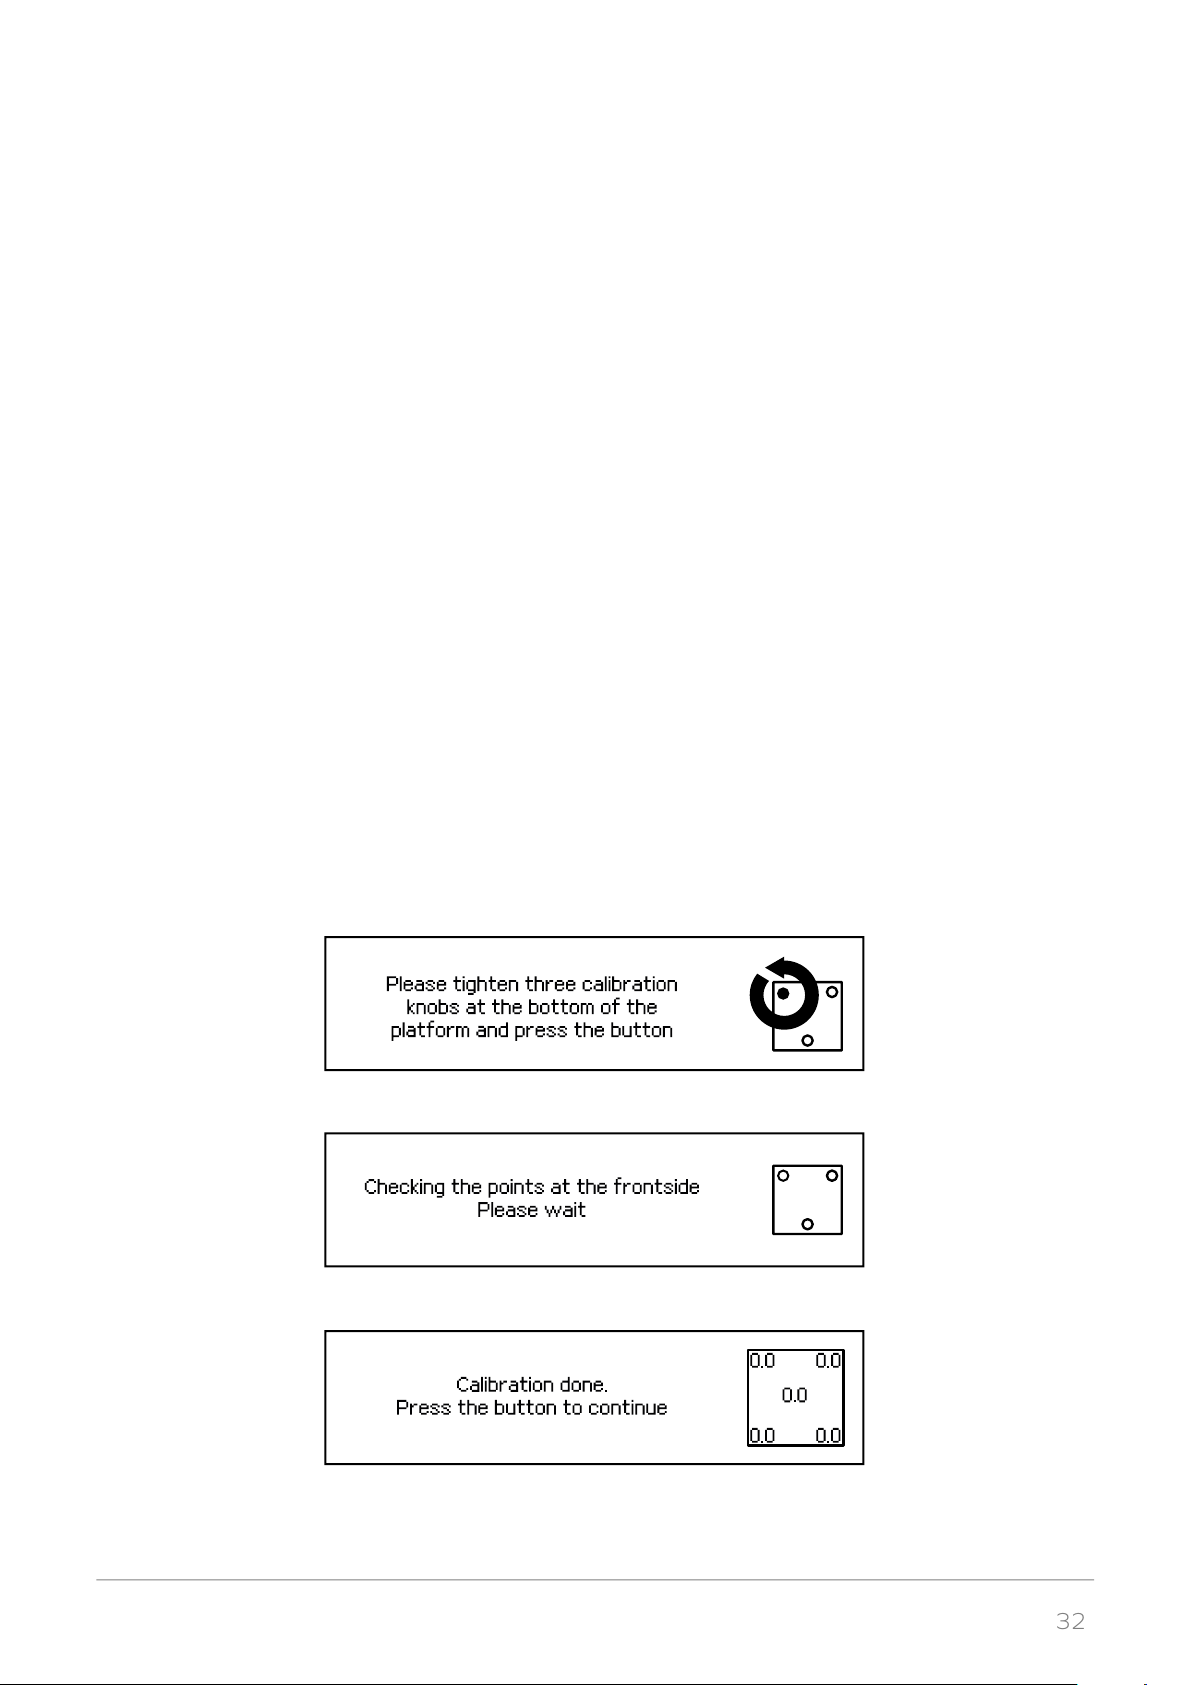
20. Once the extruder heating is done, push the knob to continue.
Follow the instructions displayed on the screen.
At this moment the printer will lift up the platform and check the distance between the nozzle and the
center point of the platform. Next, the display will show a message indicating that the three calibration
screws placed under the platform need to be tightened. Once you’ve tightened the screws, push the
knob to continue.
The printer will begin to check the distance between the nozzle and five silver points on the platform: two
points at the front of the platform, two points at the back and the center point.
If the printer detects an incorrect distance in any of these points, the display will show instructions on
what adjustments should be made. Follow the instructions and tighten or loosen the screw indicated in
the message. Turn the screw slightly, only by a few degrees. Once you finish, push the knob and the printer will recheck a given point on the platform.
If the distance between the nozzle and five points is set within the acceptable limits, the printer will finish
the calibration procedure. Additionally, the display will show the calibration results.
©2017, Zortrax S.A. All rights reserved. All trade names, logos and trademarks mentioned in the following document are registered
trademarks of Zortrax and are subject to legal protection.
Page 33
33
Z-SUITE Installation
21. Download the latest Z-SUITE update from: http://support.zortrax.com/downloads/. In order to
download and install Z-SUITE on your computer, you need to enter the serial number of your device. The
serial number can be found in the printer’s menu in “Information” section and on the nameplate on the
back of the printer.
Z-SUITE is a program created specifically for Zortrax devices. Thanks to this application it is possible to
prepare a 3D model for printing by generating a project and saving it in a .zcode format. The program
allows changing and adjusting the print settings, such as the size of the model, the layer thickness, a type
of infill or how much support structure should be generated.
Remember to update Z-SUITE regularly. All updates are available at: http://support.zortrax.com/down-
loads/.
©2017, Zortrax S.A. All rights reserved. All trade names, logos and trademarks mentioned in the following document are registered
trademarks of Zortrax and are subject to legal protection.
Page 34
34
Starting and Removing a Print
Once your model has been prepared for 3D printing in Z-SUITE, you need to save it on your hard drive
and then on an SD card. Next, insert the card into the card reader in the printer.
Use the “Models” option from the main menu to choose the model you want to print.
From all the models saved on the SD card select the one to be printed by turning the knob and press it.
At this point the printer begins to heat up the extruder.
WARNING! The extruder will be hot. Don’t touch it. Wear safety gloves.
The printing process will start automatically.
Removing the print needs to be dealt with very carefully because there are some elements of the printer
that can get damaged in the process. The following instructions show the correct procedure of removing
the print from the platform.
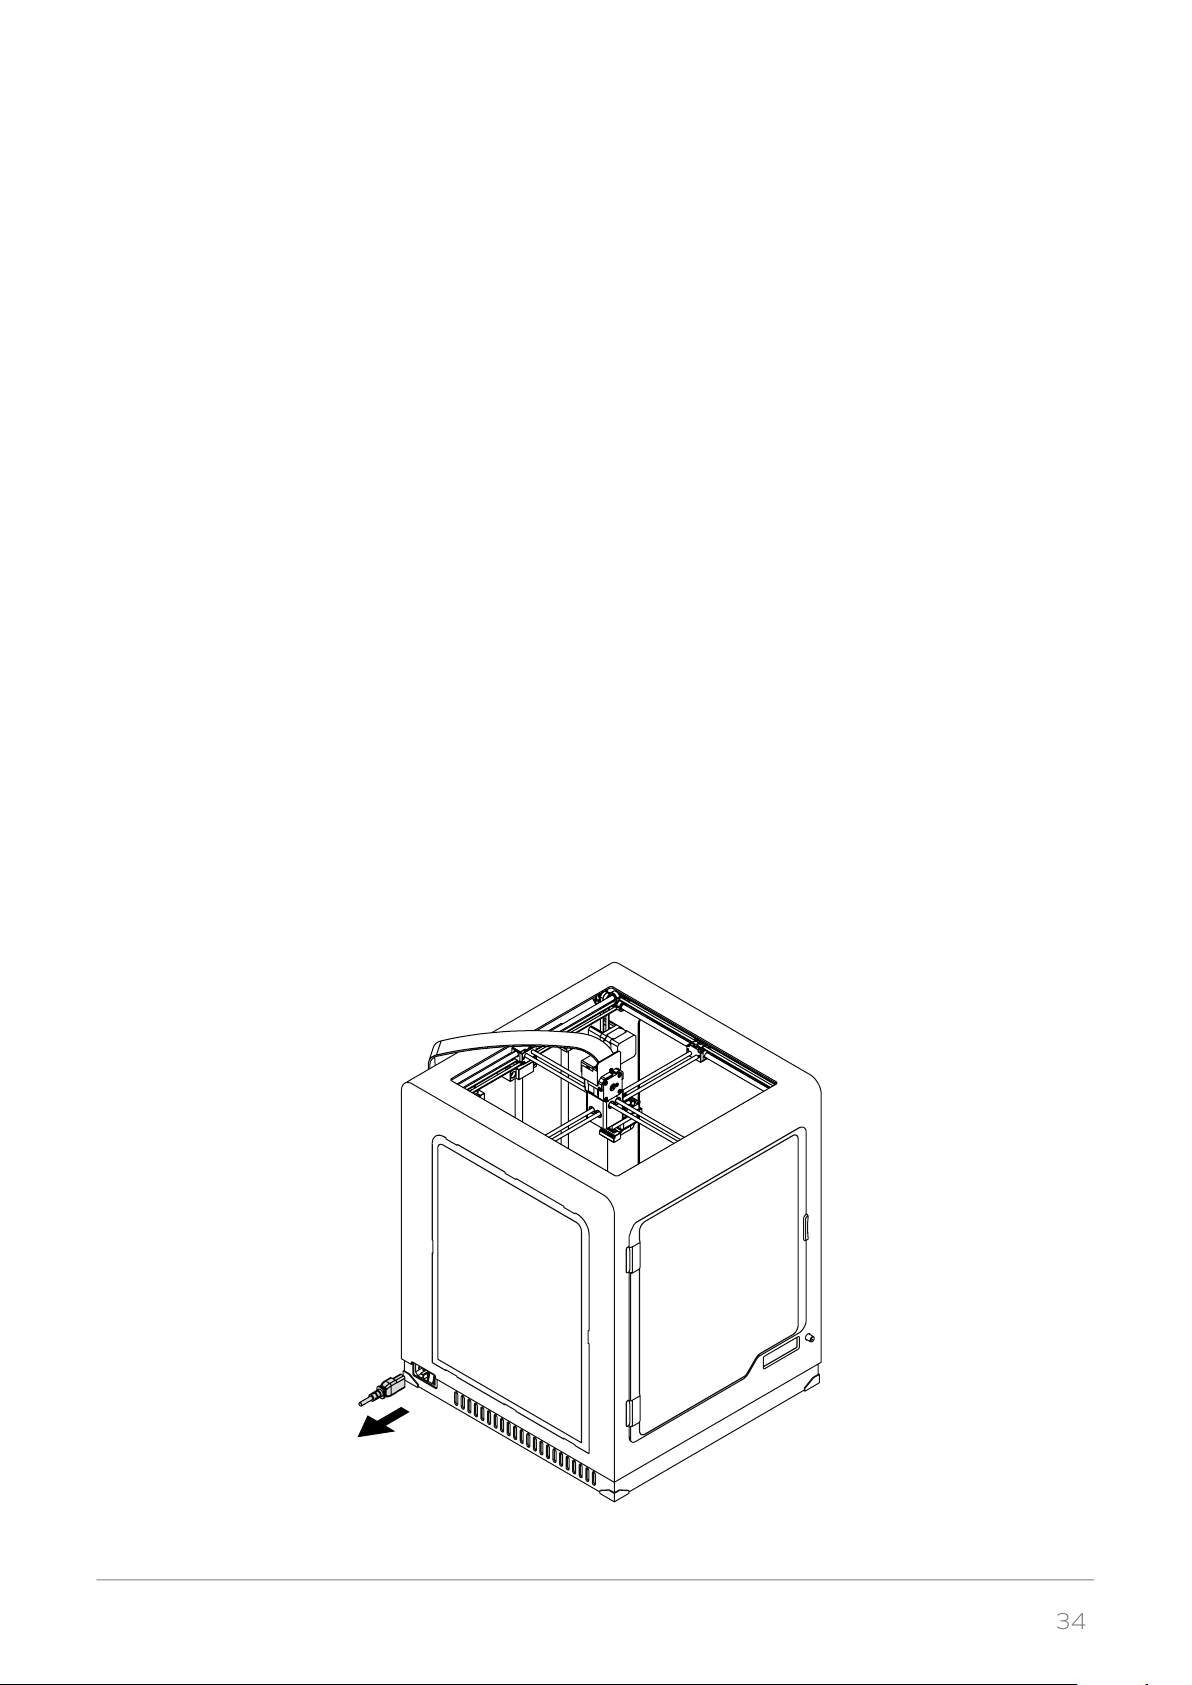
1. Turn off the platform and unplug the power cable.
WARNING! WAIT 30 MINUTES UNTIL THE PLATFORM AND THE PRINT COOL DOWN.
©2017, Zortrax S.A. All rights reserved. All trade names, logos and trademarks mentioned in the following document are registered
trademarks of Zortrax and are subject to legal protection.
Page 35
35
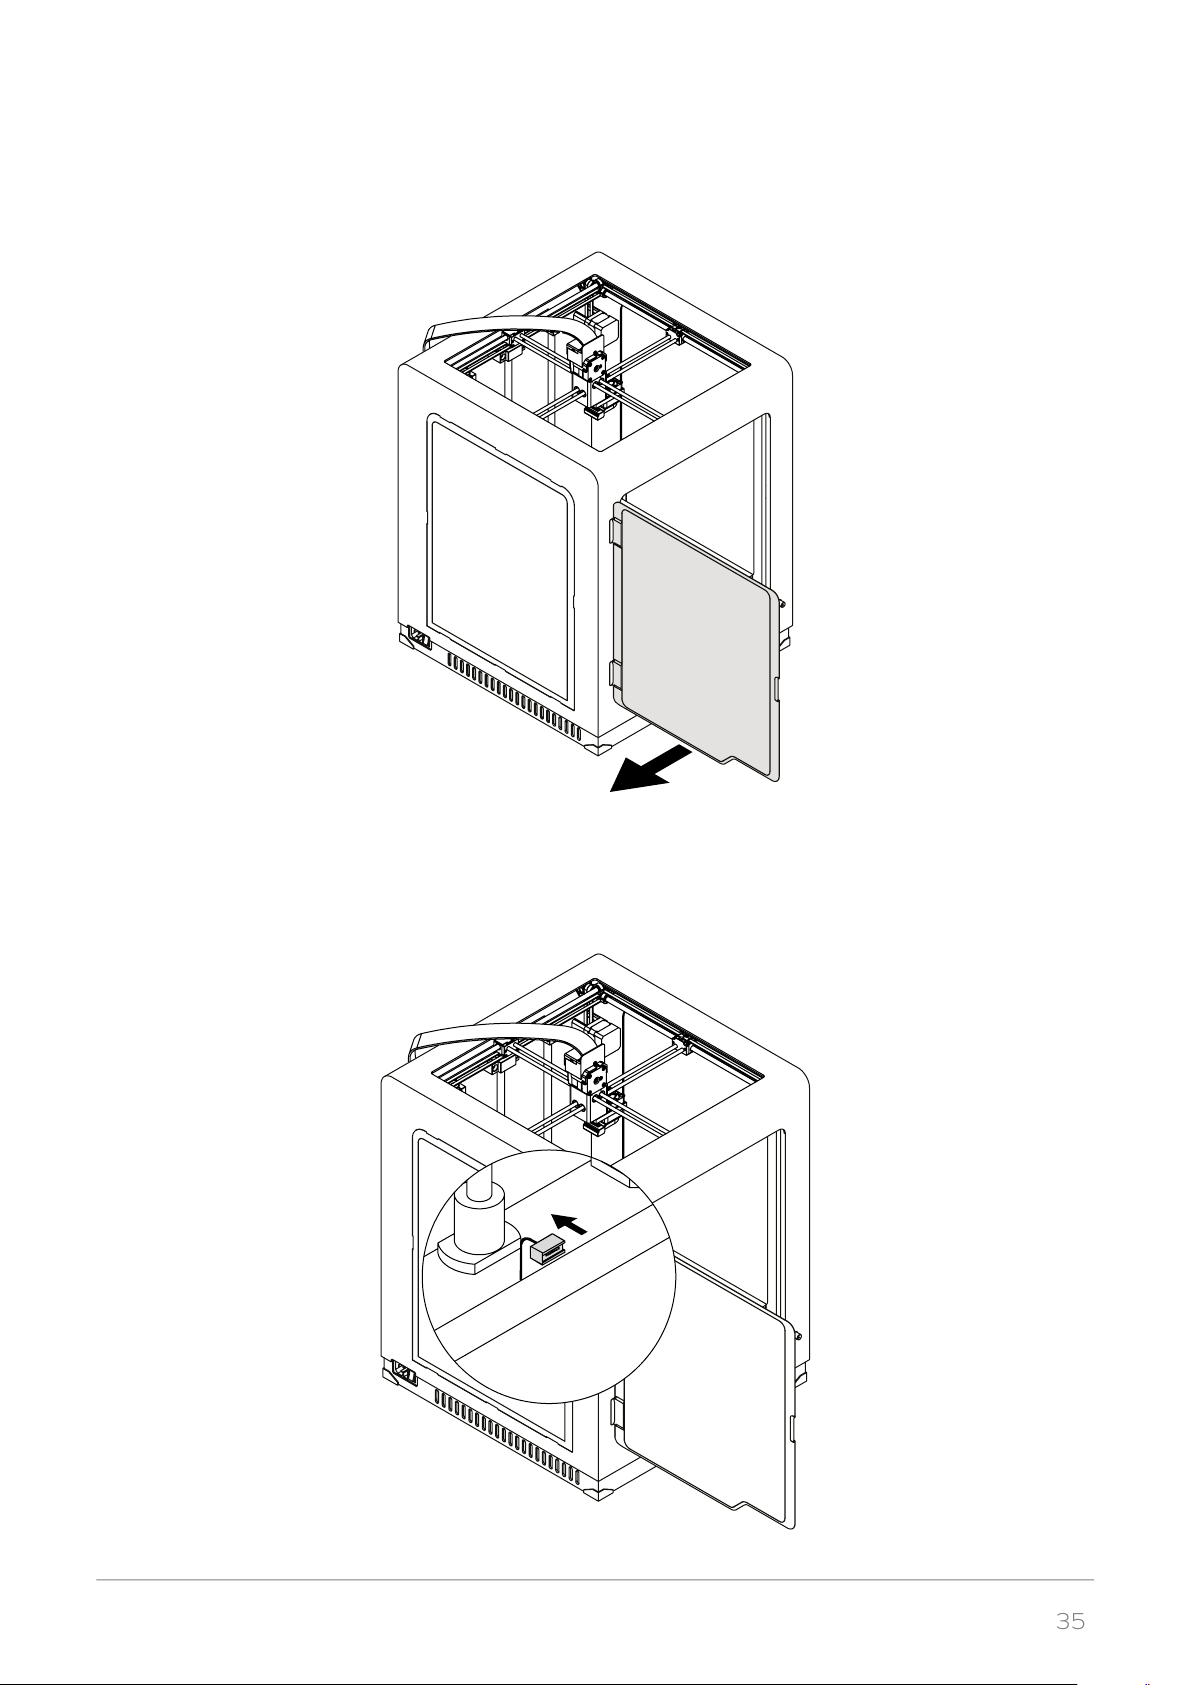
2. Open the front cover.
3. Unplug the heatbed cable from the platform. Both the big and small connector need to be unplug-
ged.
©2017, Zortrax S.A. All rights reserved. All trade names, logos and trademarks mentioned in the following document are registered
trademarks of Zortrax and are subject to legal protection.
Page 36
36
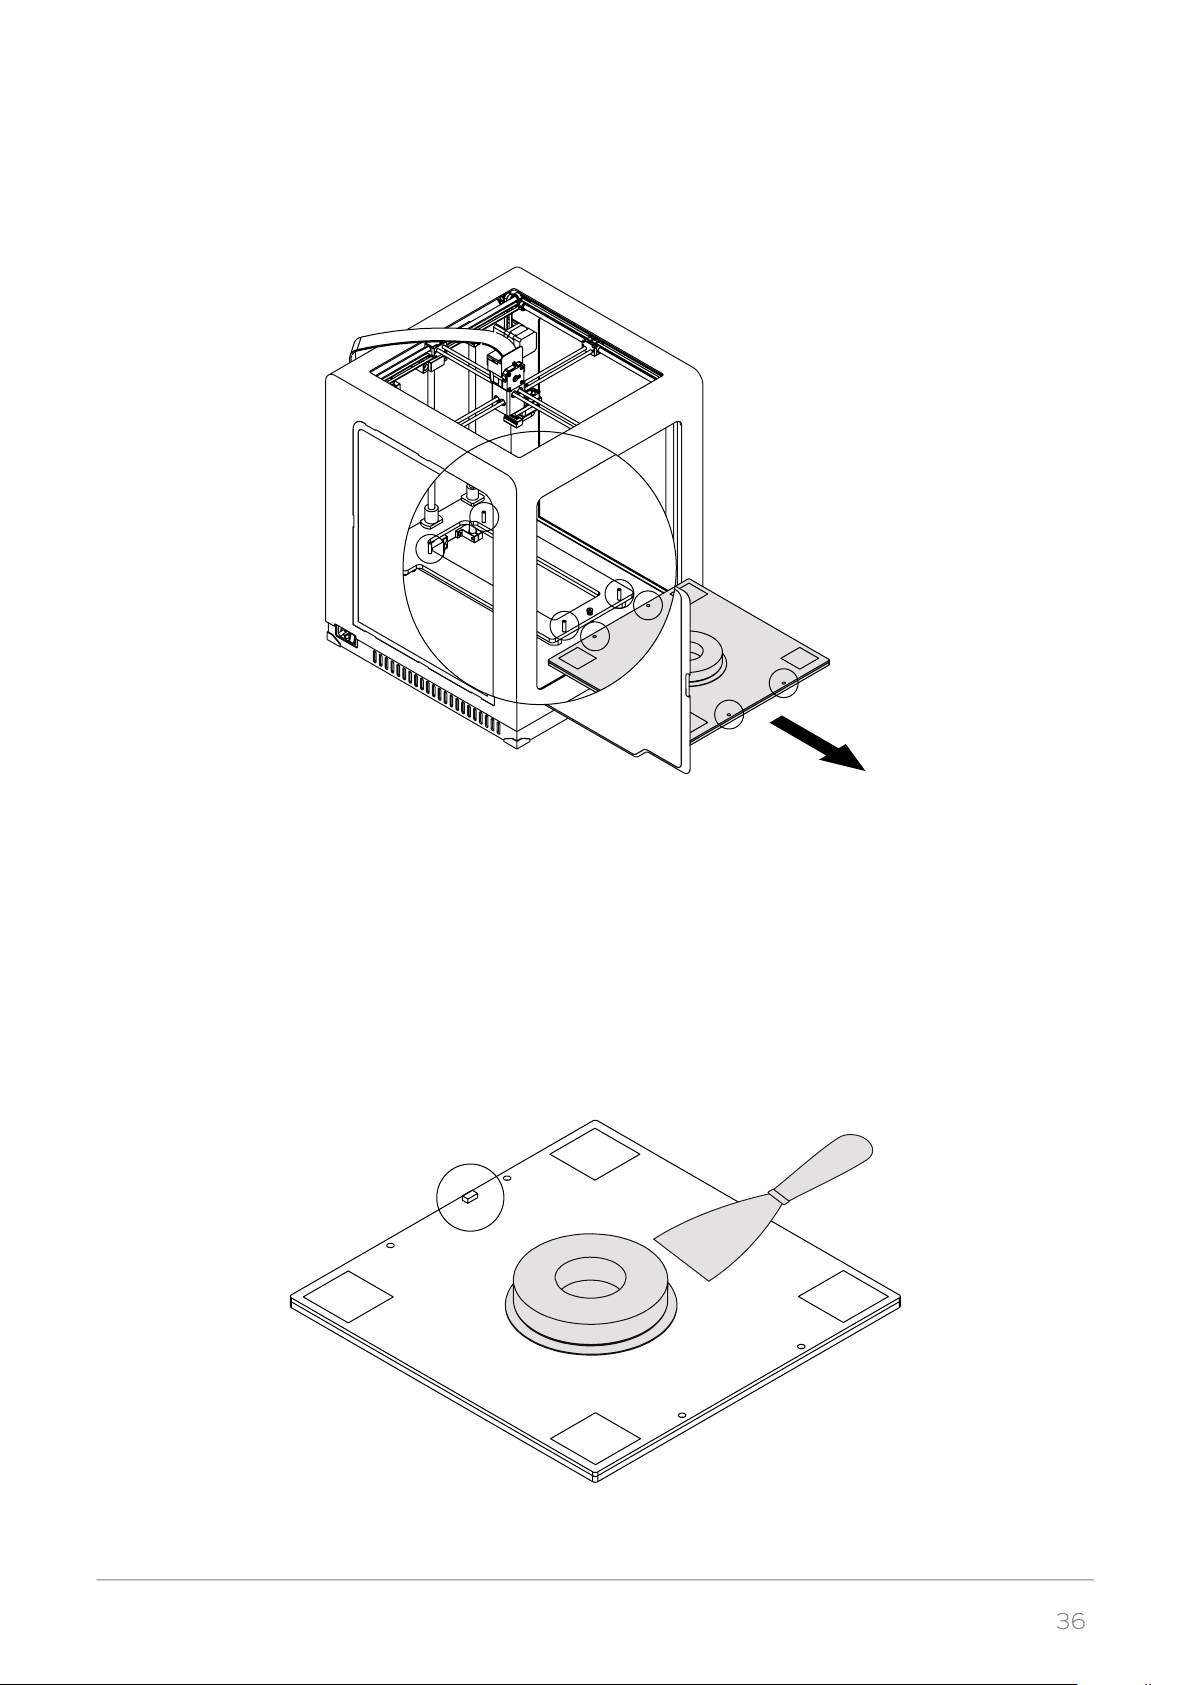
4. Remove the platform from the printer.
5. Use the spatula to remove the print.
WARNING! REMOVE THE PRINT VERY CAREFULLY. WEAR SAFETY GLOVES. DO NOT POINT THE
BLADE OF THE SPATULA TOWARDS THE PLATFORM CONNECTORS.
!
©2017, Zortrax S.A. All rights reserved. All trade names, logos and trademarks mentioned in the following document are registered
trademarks of Zortrax and are subject to legal protection.
Page 37
37
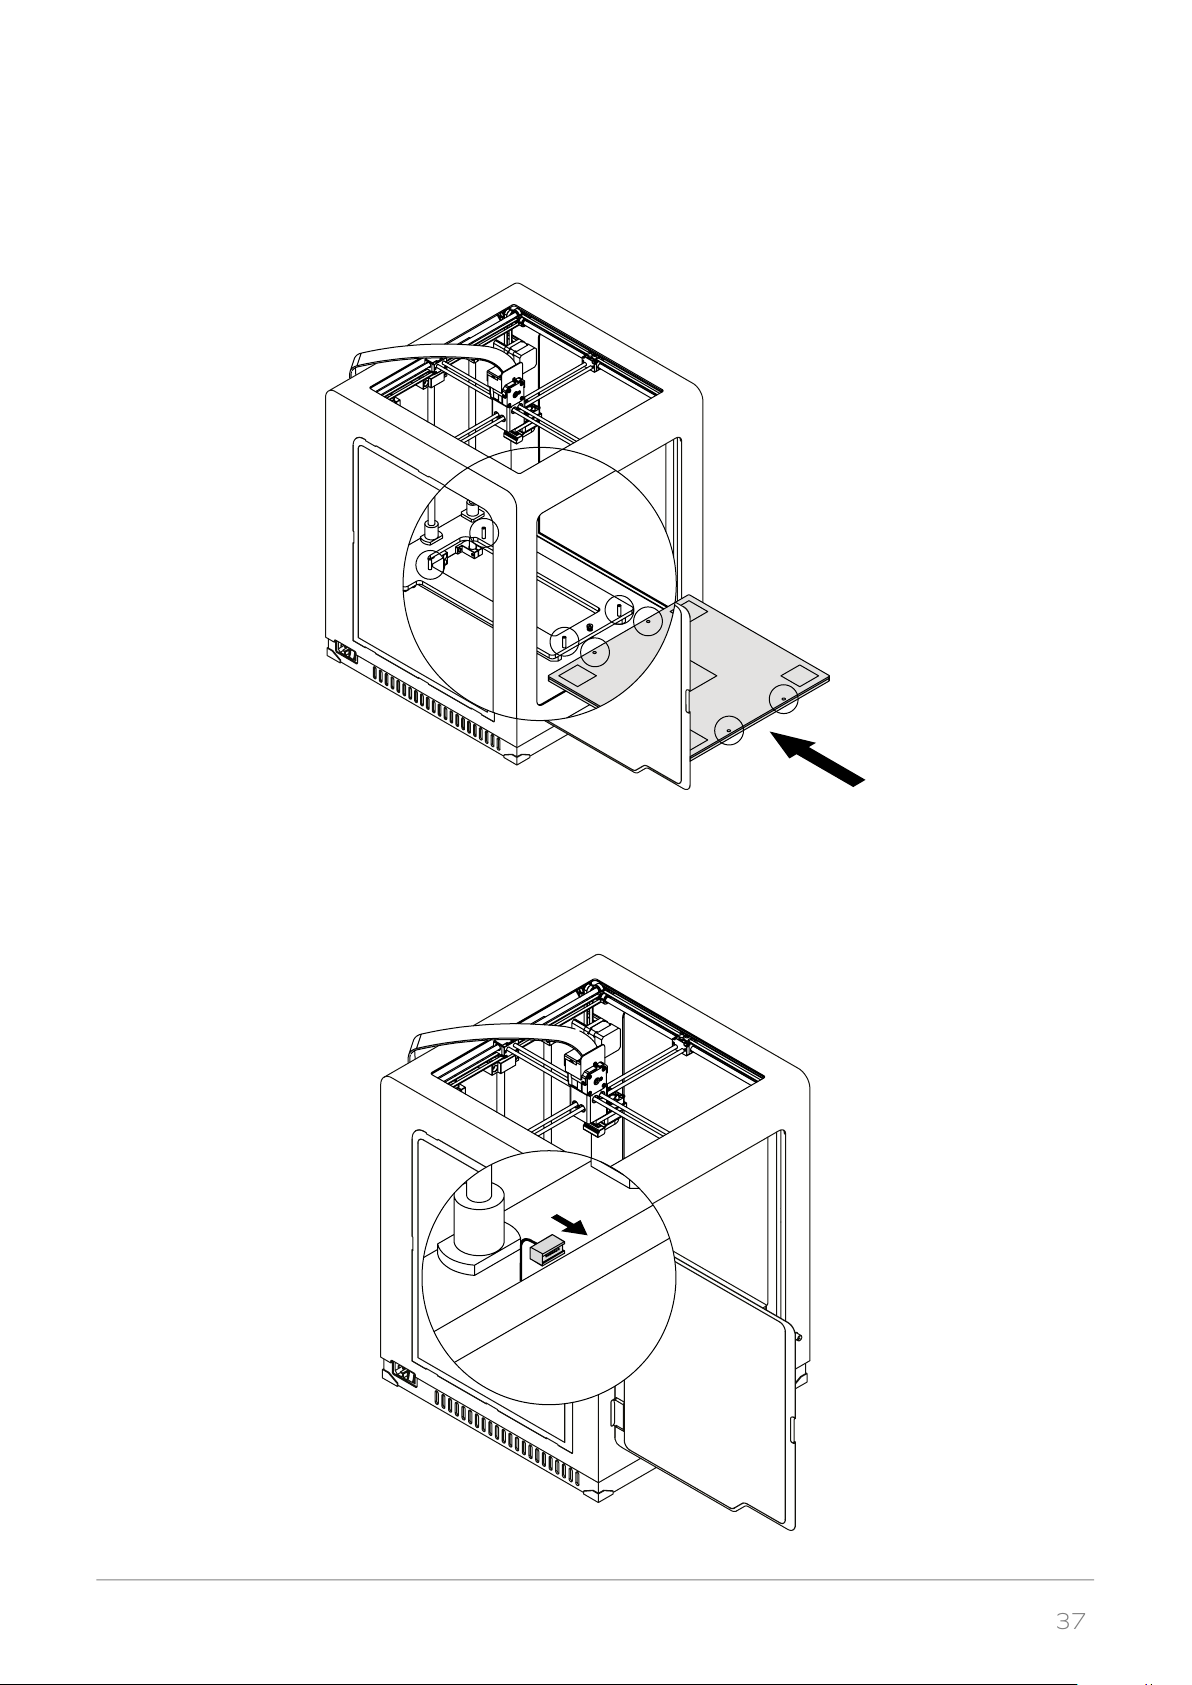
6. Put the platform back in the printer.
7. Plug the heatbed cable in. Both the big and small connectors need to be plugged in.
©2017, Zortrax S.A. All rights reserved. All trade names, logos and trademarks mentioned in the following document are registered
trademarks of Zortrax and are subject to legal protection.
Page 38
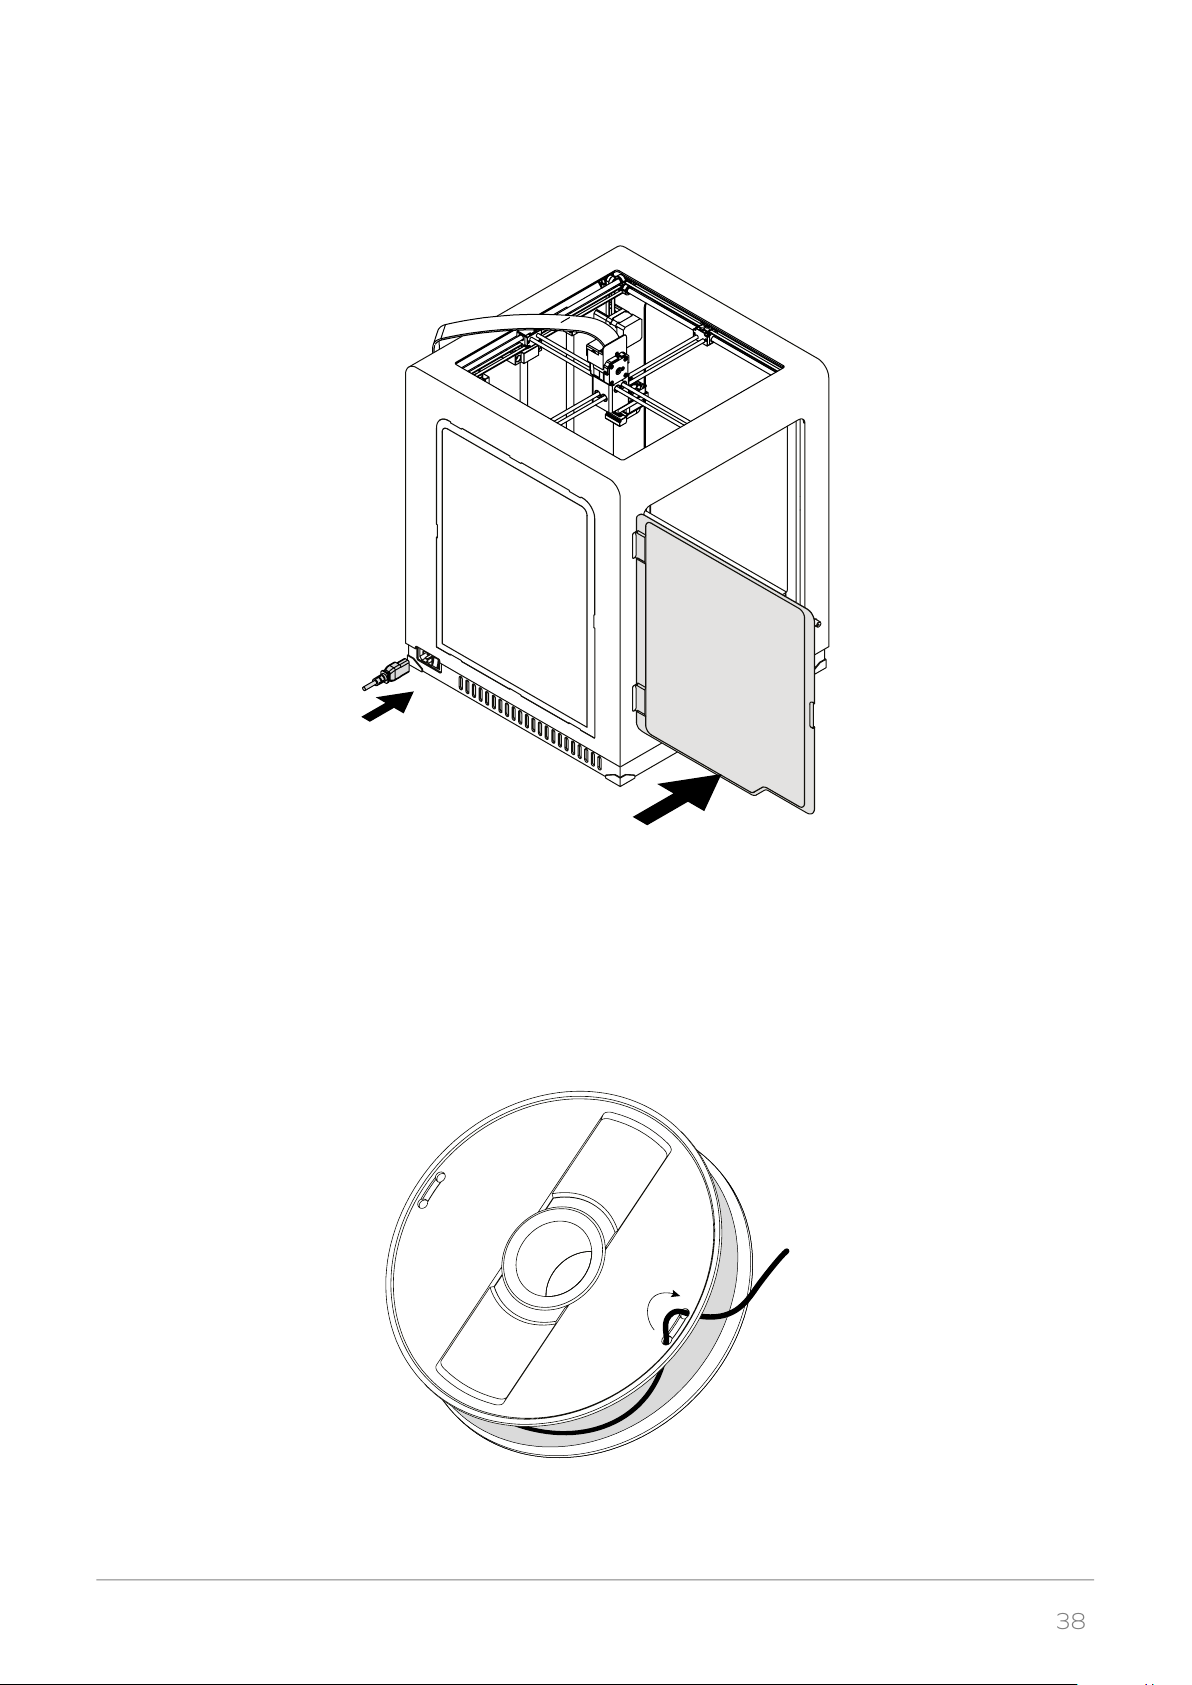
38
8. Close the front cover and plug the power cable in.
NOTE! ONCE THE PRINTING PROCESS IS FINISHED, UNLOAD THE MATERIAL AND TAKE THE SPO-
OL OFF OF THE SPOOL HOLDER, SECURE THE END OF THE MATERIAL AS IT IS SHOWN IN THE
PICTURE TO AVOID HAVING TANGLED THREADS OF MATERIAL ON THE SPOOL.
©2017, Zortrax S.A. All rights reserved. All trade names, logos and trademarks mentioned in the following document are registered
trademarks of Zortrax and are subject to legal protection.
Page 39
39
Available Materials
Zortrax certified materials increase the benefits of 3D printing with Zortrax devices. The complete offer
of different materials is available at: https://zortrax.com/materials/zortrax-m-series/. There is a wide
choice of colors to choose from. Technical and safety data sheets are available on the same website.
When 3D printing with Zortrax devices, it is recommended to use Zortrax certified materials so as to
acquire the best possible quality of the prints.
Basic Maintenance and Service Work
Maintenance work should be regular in order to keep the printer in good condition and achieve high
quality prints every time. Some parts require maintenance before each print and some every few hundred working hours. All maintenance activities do not take much time and they are not complicated.
Before commencing any repair it is extremely important to turn off the printer and let it cool down. Remember to always wear safety gloves and glasses.
The printer is delivered with a full set of tools needed to carry out maintenance and service work.
The following tables present maintenance and repair guidelines connected with each section of Zortrax
3D printer, together with specific check points, necessary activities and their frequency.
©2017, Zortrax S.A. All rights reserved. All trade names, logos and trademarks mentioned in the following document are registered
trademarks of Zortrax and are subject to legal protection.
Page 40
40
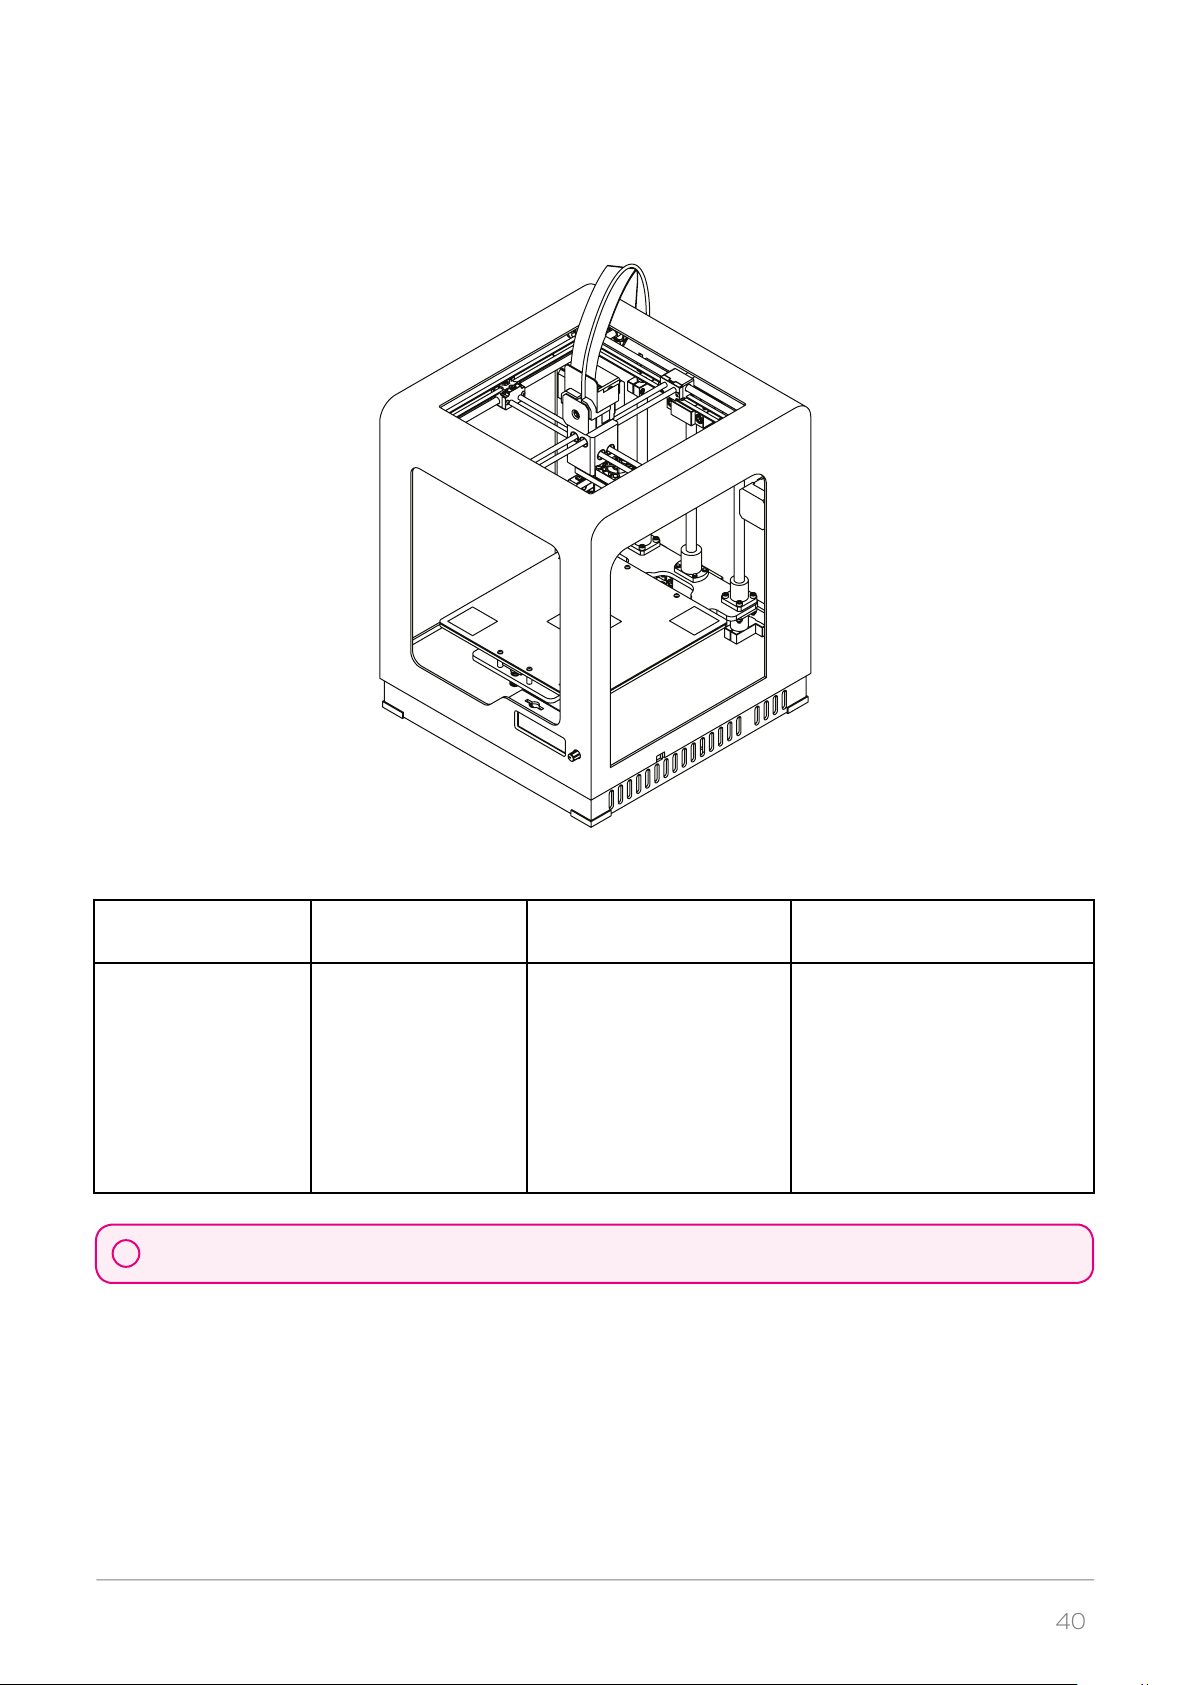
1. Main
Activity Frequency Solution to problems Necessary accessories
Cleaning the machine,
its interior and surroundings, especially the
bottom plate under
the platform
Lack of proper care of the machine can cause inevident damage or improper operation of the drive units.
!
Before each printing The user is responsible for
keeping the machine clean.
To remove material remains
from the interior of the device, use a vacuum cleaner or
compressed air
Vacuum cleaner, cleaning products with a high evaporation
rate
©2017, Zortrax S.A. All rights reserved. All trade names, logos and trademarks mentioned in the following document are registered
trademarks of Zortrax and are subject to legal protection.
Page 41
41
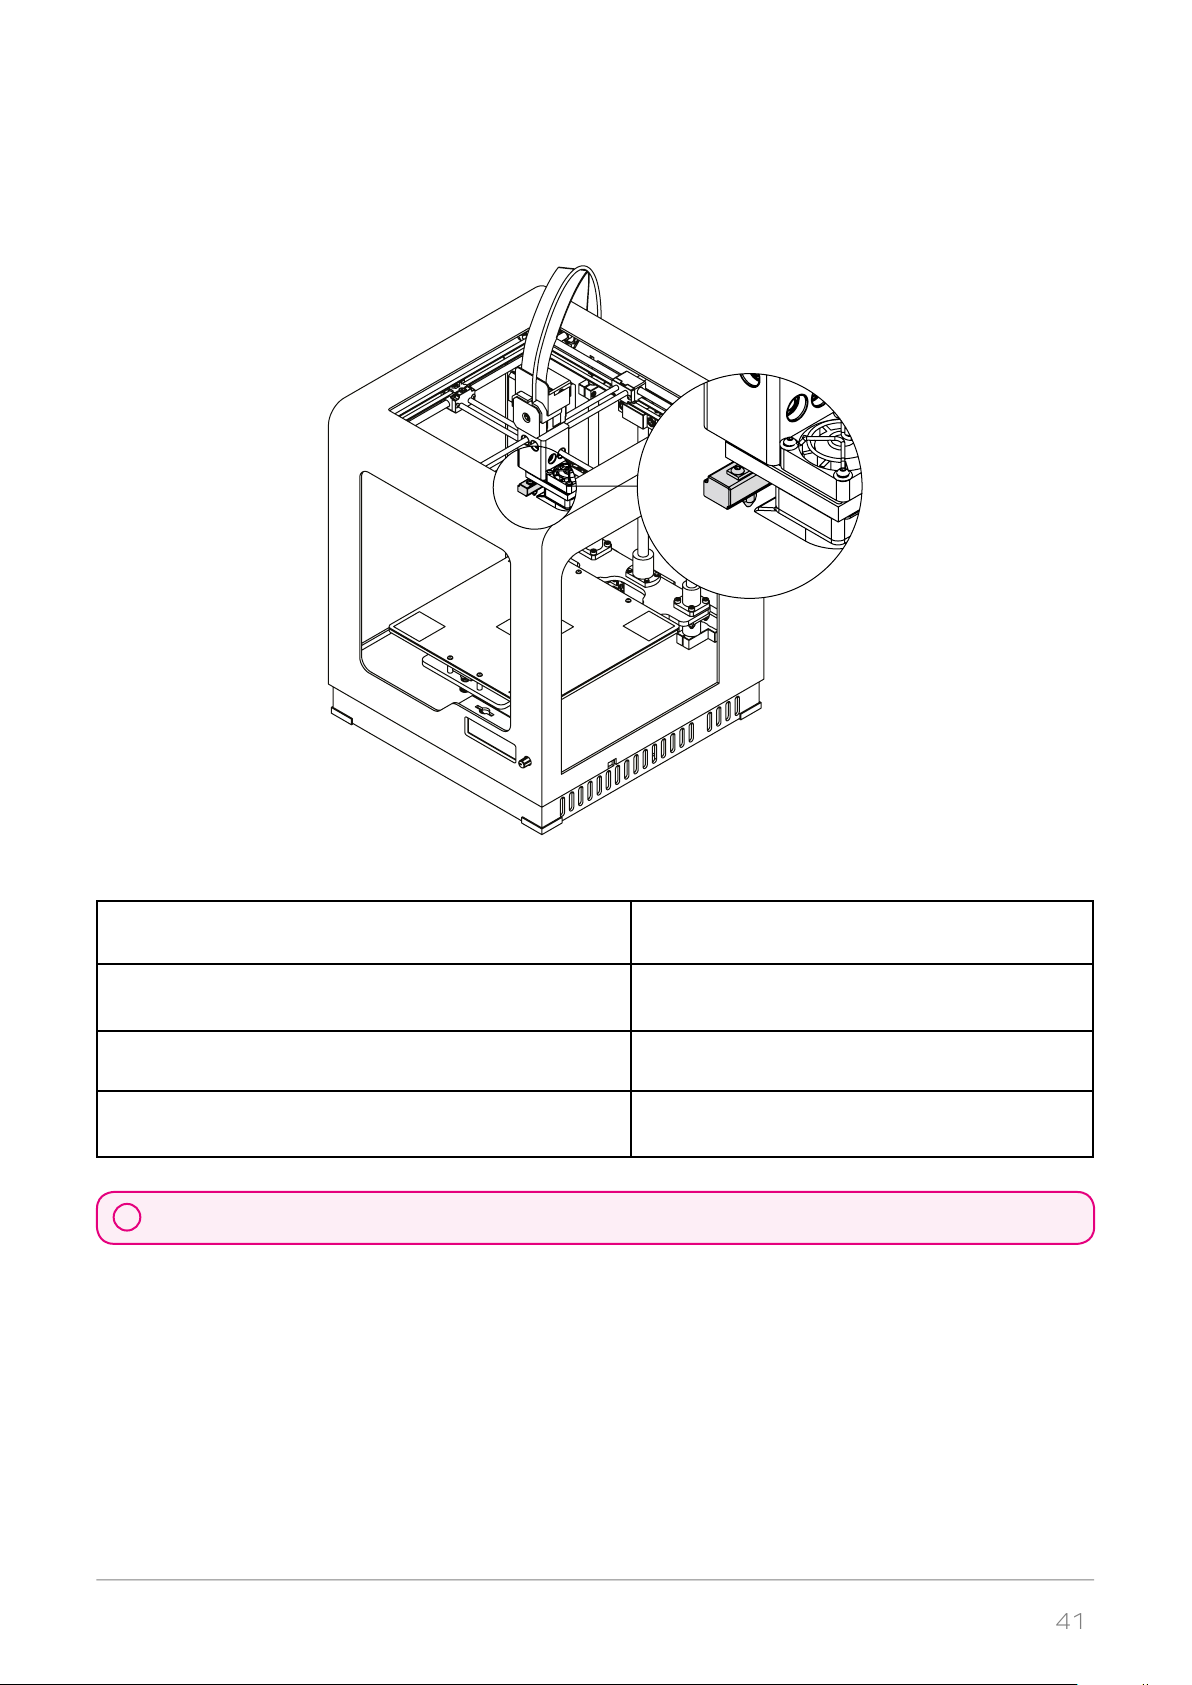
2. Hotend
Activity Frequency
Checking if the hotend and the nozzle are not clogged
and if they are clean from material residues
Cleaning the nozzle After finishing one spool of material
Checking if the screws securing the heater and
thermocouple are tightened
!
Lack of proper care of the machine can cause inevident damage or improper operation of the drive units.
Before each printing
Every 300 working hours
©2017, Zortrax S.A. All rights reserved. All trade names, logos and trademarks mentioned in the following document are registered
trademarks of Zortrax and are subject to legal protection.
Page 42
42
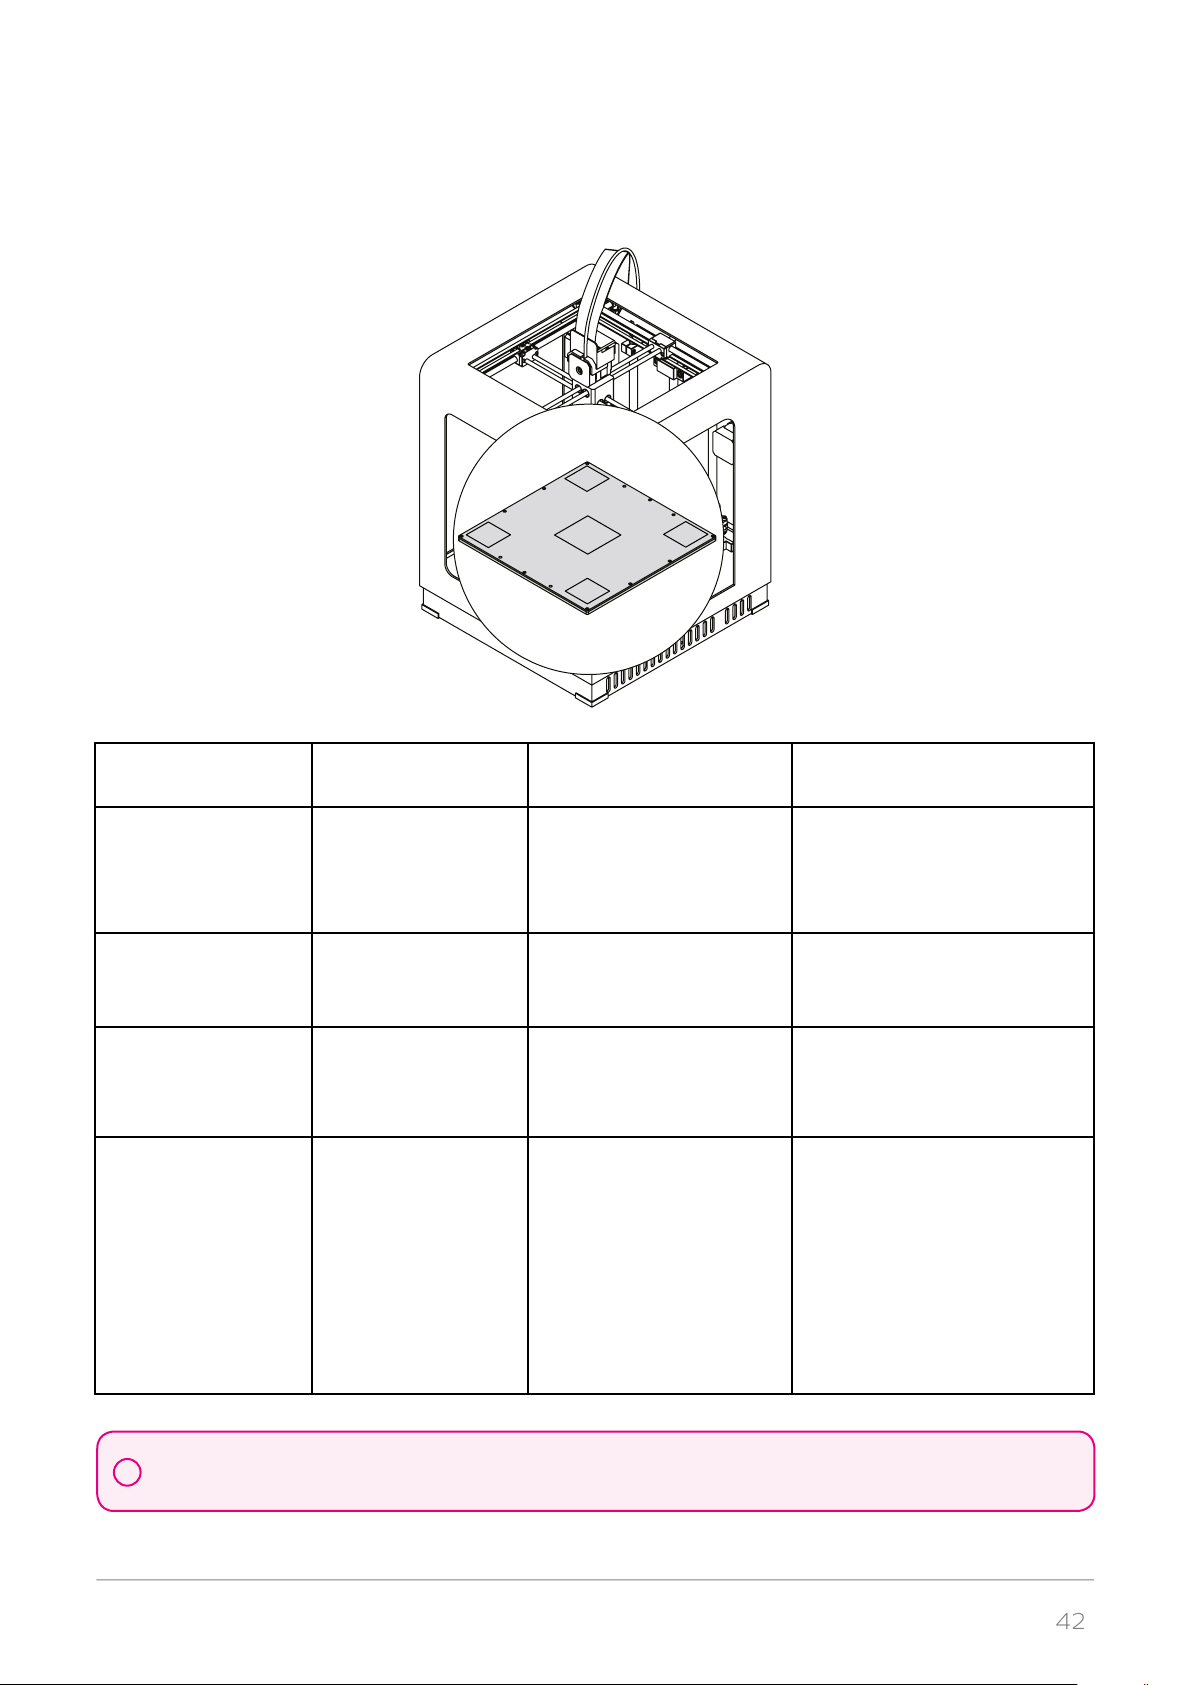
3. Platform
Activity Frequency Solution to problems Necessary accessories
Cleaning the perforated plate
Checking the perforated plate for deformation
Autocalibration Every 200 working
Cleaning the heatbed
and the underside of
the perforated plate
Before each printing To remove material remains
Before each printing - -
hours
Every 300 working
hours
from the surface of the perforated plate, use a spatula
If the platform
autocalibration fails,
move on to the next step
Unscrew the screws securing the perforated plate
and remove the residues
from the underside of
the plate using a spatula.
The heatbed needs to be
cleaned with a piece of
cloth damped in acetone
Spatula
-
Spatula, piece of cloth, acetone
While cleaning the perforated plate, be careful not to damage the small connector placed at the edge of
!
the platform.
©2017, Zortrax S.A. All rights reserved. All trade names, logos and trademarks mentioned in the following document are registered
trademarks of Zortrax and are subject to legal protection.
Page 43
43
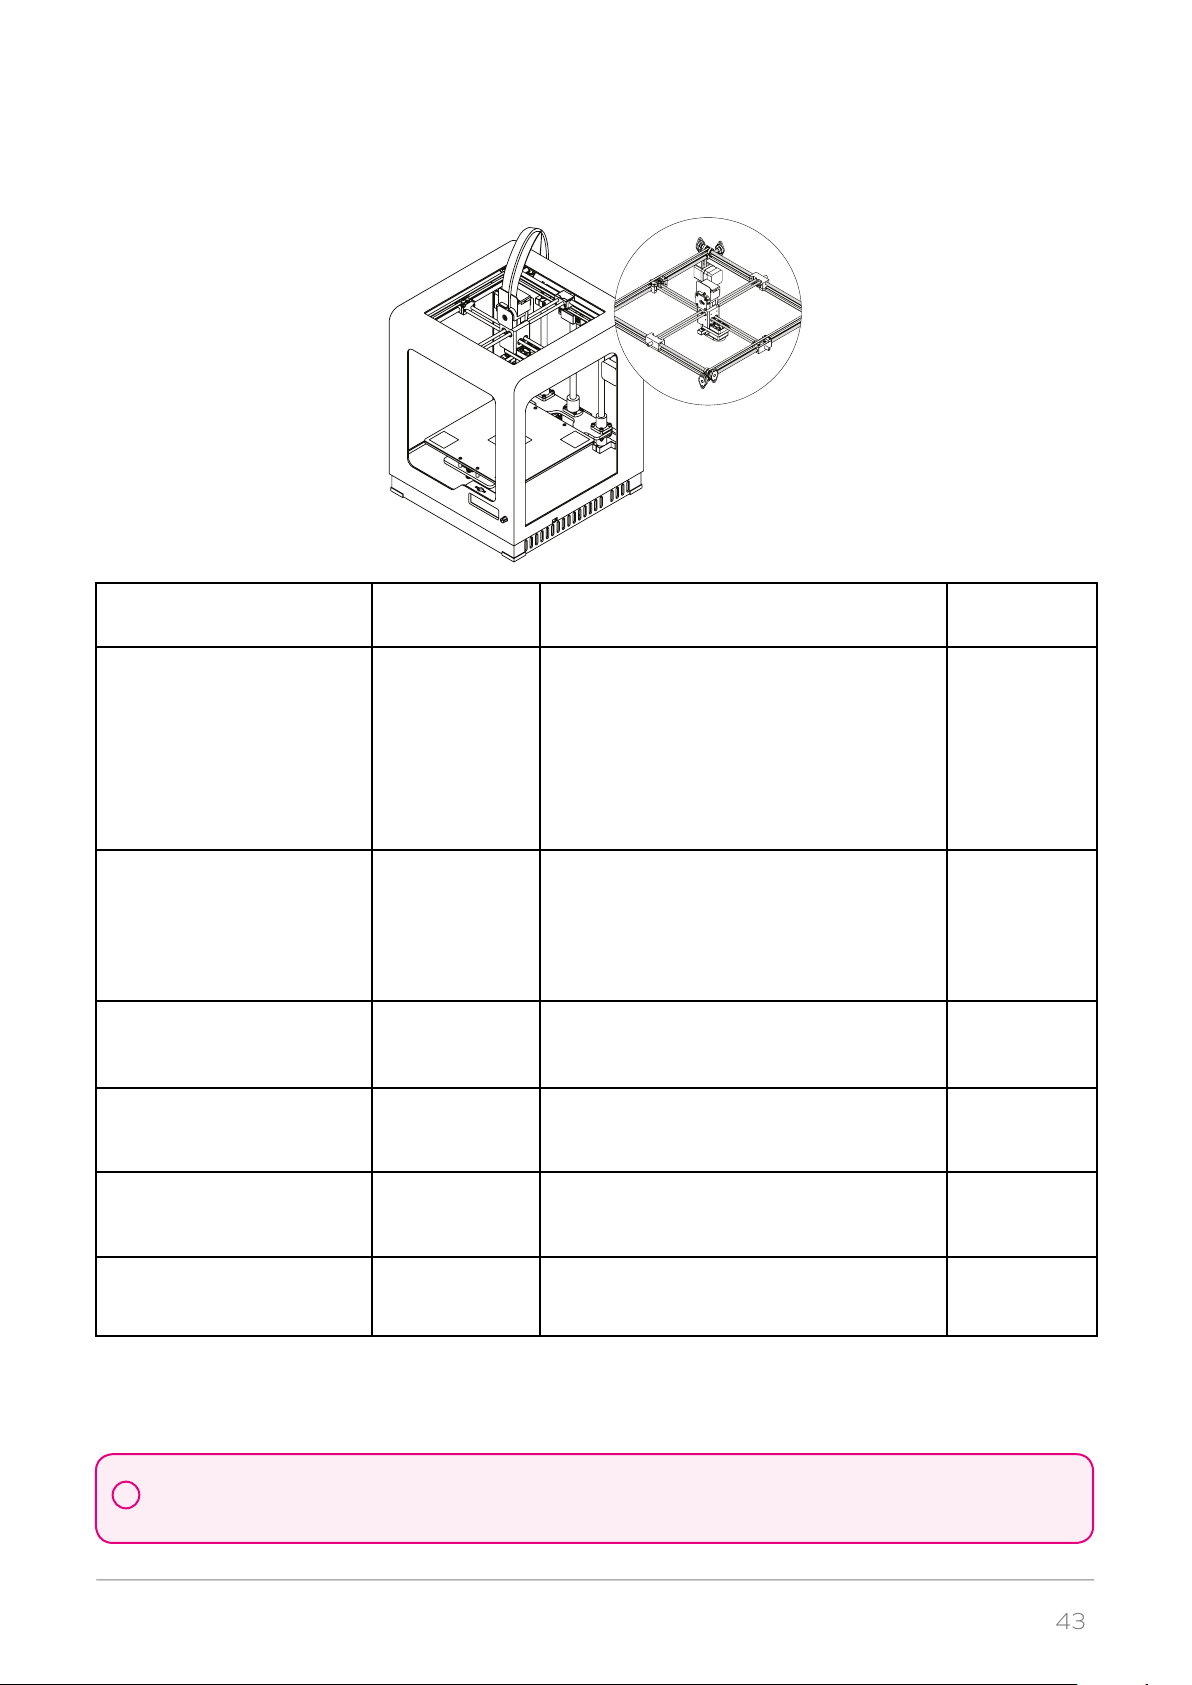
4. X/Y axes; extruder guide rails
Activity Frequency Solution to problems
Checking if the axes and the
extruder guide rails are clean
from material remains and
dust
Checking the tension of the
drive belts on the X/Y axes
Checking the tension of the
drive belts between the
motors and the X/Y axes
Checking if the screws on the
X/Y axes and the motors
pulleys are tightened
Before each
printing
Every 300
working hours
Every 300
working hours
Every 300
working hours
It is possible to feel slight resistance while
checking if the extruder moves freely on the
guide rails. In such case you should check if
the X/Y axes and the extruder guide rails
are covered with black grime. The axes and
guide rails should be cleaned with a cloth
damped in acetone and then lubricated
with grease supplied in the Starter Kit
In order to check the tension of the drive
belts on the X/Y axes, move the extruder to
the central point and gently tug the belts. If
the belts are loosened, tighten the screws
placed on the top part of the X/Y axes
blocks
- -
- -
Necessary
accessories
-
-
Checking if the extruder
moves freely when the
printer is off
Lubricating the X/Y axes
and the extruder guide rails
Lack of proper maintenance of the X/Y axes can influence the final look of the print and cause the effect of shifted
layers. Cleaning and lubricating the axes can help you save the material used for 3D printing as well as the time for
!
preparing the device for printing.
©2017, Zortrax S.A. All rights reserved. All trade names, logos and trademarks mentioned in the following document are registered
trademarks of Zortrax and are subject to legal protection.
Every 300
working hours
Every 200
working hours
-
- Teflon or
graphite
grease
Page 44
44
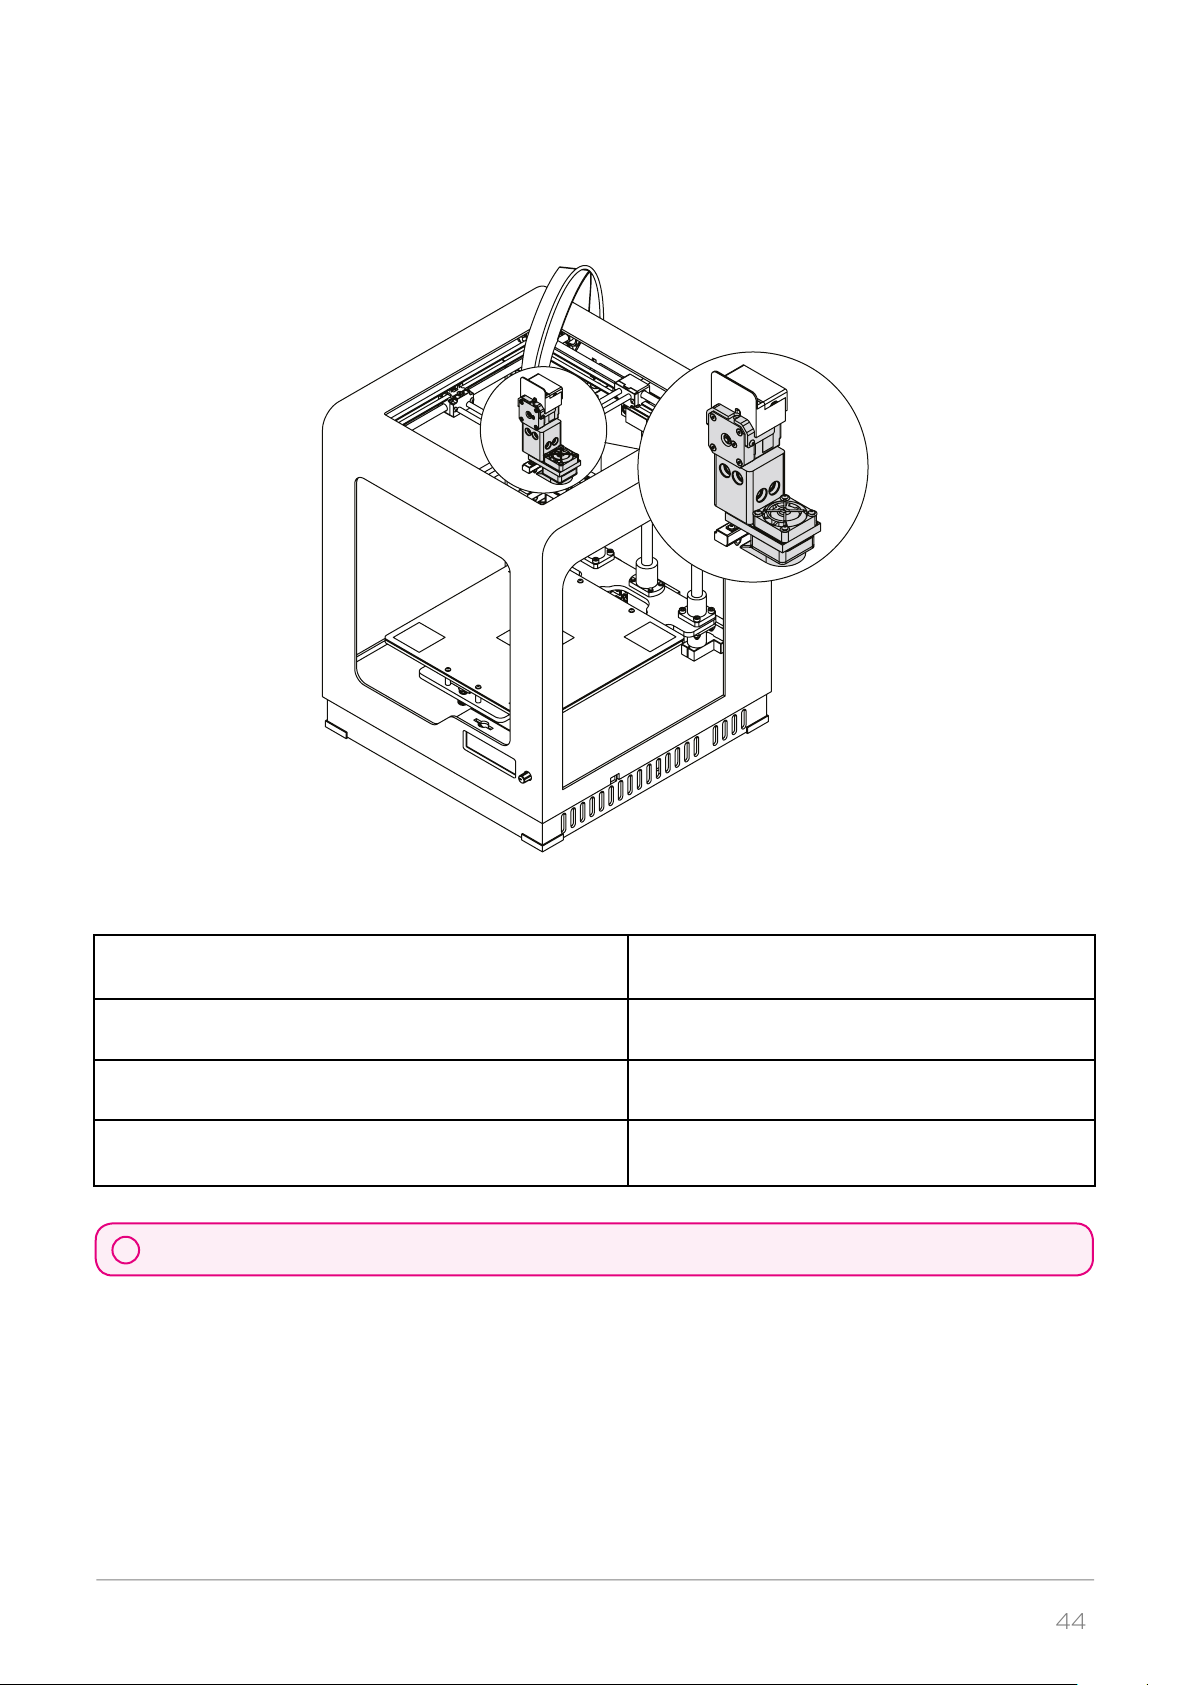
5. Extruder
Activity Frequency
Checking if the screws securing the hotend are not loose
and, if necessary, tightening them
Removing the material remains and lumps from
the extruder
Checking if the fans are working Every 300 working hours
Lack of proper care of the machine can cause inevident damage or improper operation of the drive units.
!
Every 300 working hours
Every 300 working hours
©2017, Zortrax S.A. All rights reserved. All trade names, logos and trademarks mentioned in the following document are registered
trademarks of Zortrax and are subject to legal protection.
Page 45
45
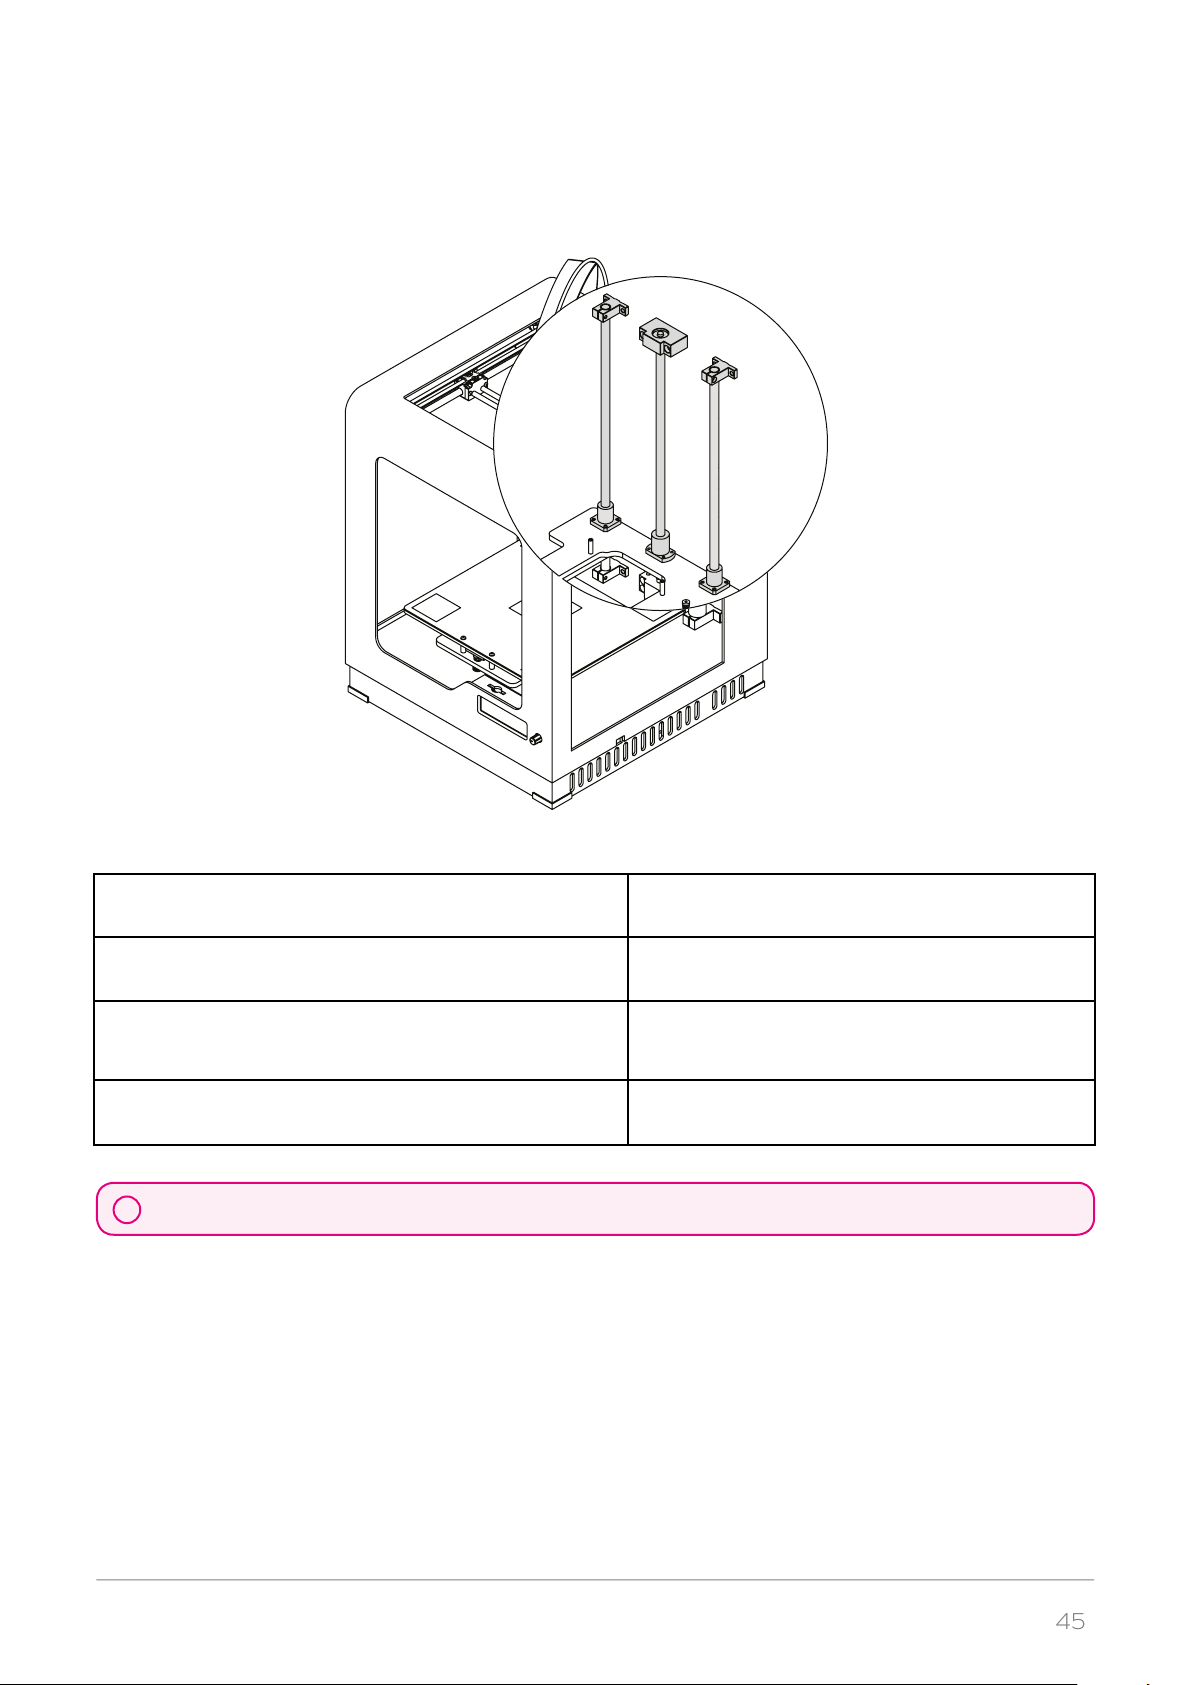
6. Z axis
Activity Frequency
Checking if the Z-axis screw and rails are clean from
material remains
Checking if the screws and nuts are properly secured
NOTE: Due to design characteristics, the screws
securing the Z-axis screw nut cannot be fully tightened
Lubricating the Z axis and rails Every 200 working hours
Lack of proper care of the machine can cause inevident damage or improper operation of the drive units.
!
Before each printing
Every 300 working hours
Support and Troubleshooting
In order to ensure safety of every 3D printer’s user, the Manufacturer provides various support while
identifying and solving technical problems independently.
In case of difficulties with operating Zortrax 3D printer, at first you should seek guidance in this User
Guide, check the manuals available at: http://support.zortrax.com/ or consult our technical specialists
©2017, Zortrax S.A. All rights reserved. All trade names, logos and trademarks mentioned in the following document are registered
trademarks of Zortrax and are subject to legal protection.
Page 46
46
through the Support Form available at: http://support.zortrax.com/support-form/.
The most common problems are listed below along with the list of possible solutions.
The printer does not load the material into the extruder or the material is not extruded from the nozzle:
1. Make sure that the material has not run out. If so, use a new spool and restart the printing process.
2. Check if the material is not tangled on the spool or blocked near the inlet of the material guide. If so,
unload the material using options from the menu. Cut off the tangled or blocked fragment of the material. Reload the material and restart the printing process.
3. Check if the spool is properly secured on the spool holder. The spool may be impossible to rotate if
it has been incorrectly installed.
4. Make sure that the material is not faulty or irregular, that is, it does not have swells on its surface. If
so, unload the material using options from the menu. Use a different spool.
5. Make sure that the extruder and hotend are clean from material remains. Especially check the extruder motor rack and the nozzle. Remove the material remains from the nozzle using the supplied tools.
6. Make sure that the end of the material loaded into the extruder has been cut at a right angle. Cut
the end of the material at an acute angle to make material loading easier.
7. For further help, visit our Support Center at: http://support.zortrax.com/.
The print cracks and does not adhere to the platform (it warps):
1. If the print does not adhere to the platform:
a. carry out platform calibration again,
b. make sure that the side covers are installed,
c. make sure that the model is correctly designed and arranged in the workspace,
d. try adjusting the print settings differently by changing the level of infill and the model’s arrangement
in the workspace,
e. provide proper temperature in the printing room,
f. before starting the printing process, make sure that the platform is sufficiently clean.
2. If the print cracks:
a. make sure that the side covers are installed,
b. make sure that the model is correctly designed and arranged in the workspace,
c. try adjusting the print settings differently by changing the level of infill and the model’s arrangement
in the workspace,
d. provide proper temperature in the printing room.
3. For further help, visit our Support Center at: http://support.zortrax.com/.
Whenever there is a technical issue caused by a hardware failure, negligence or inappropriate use of
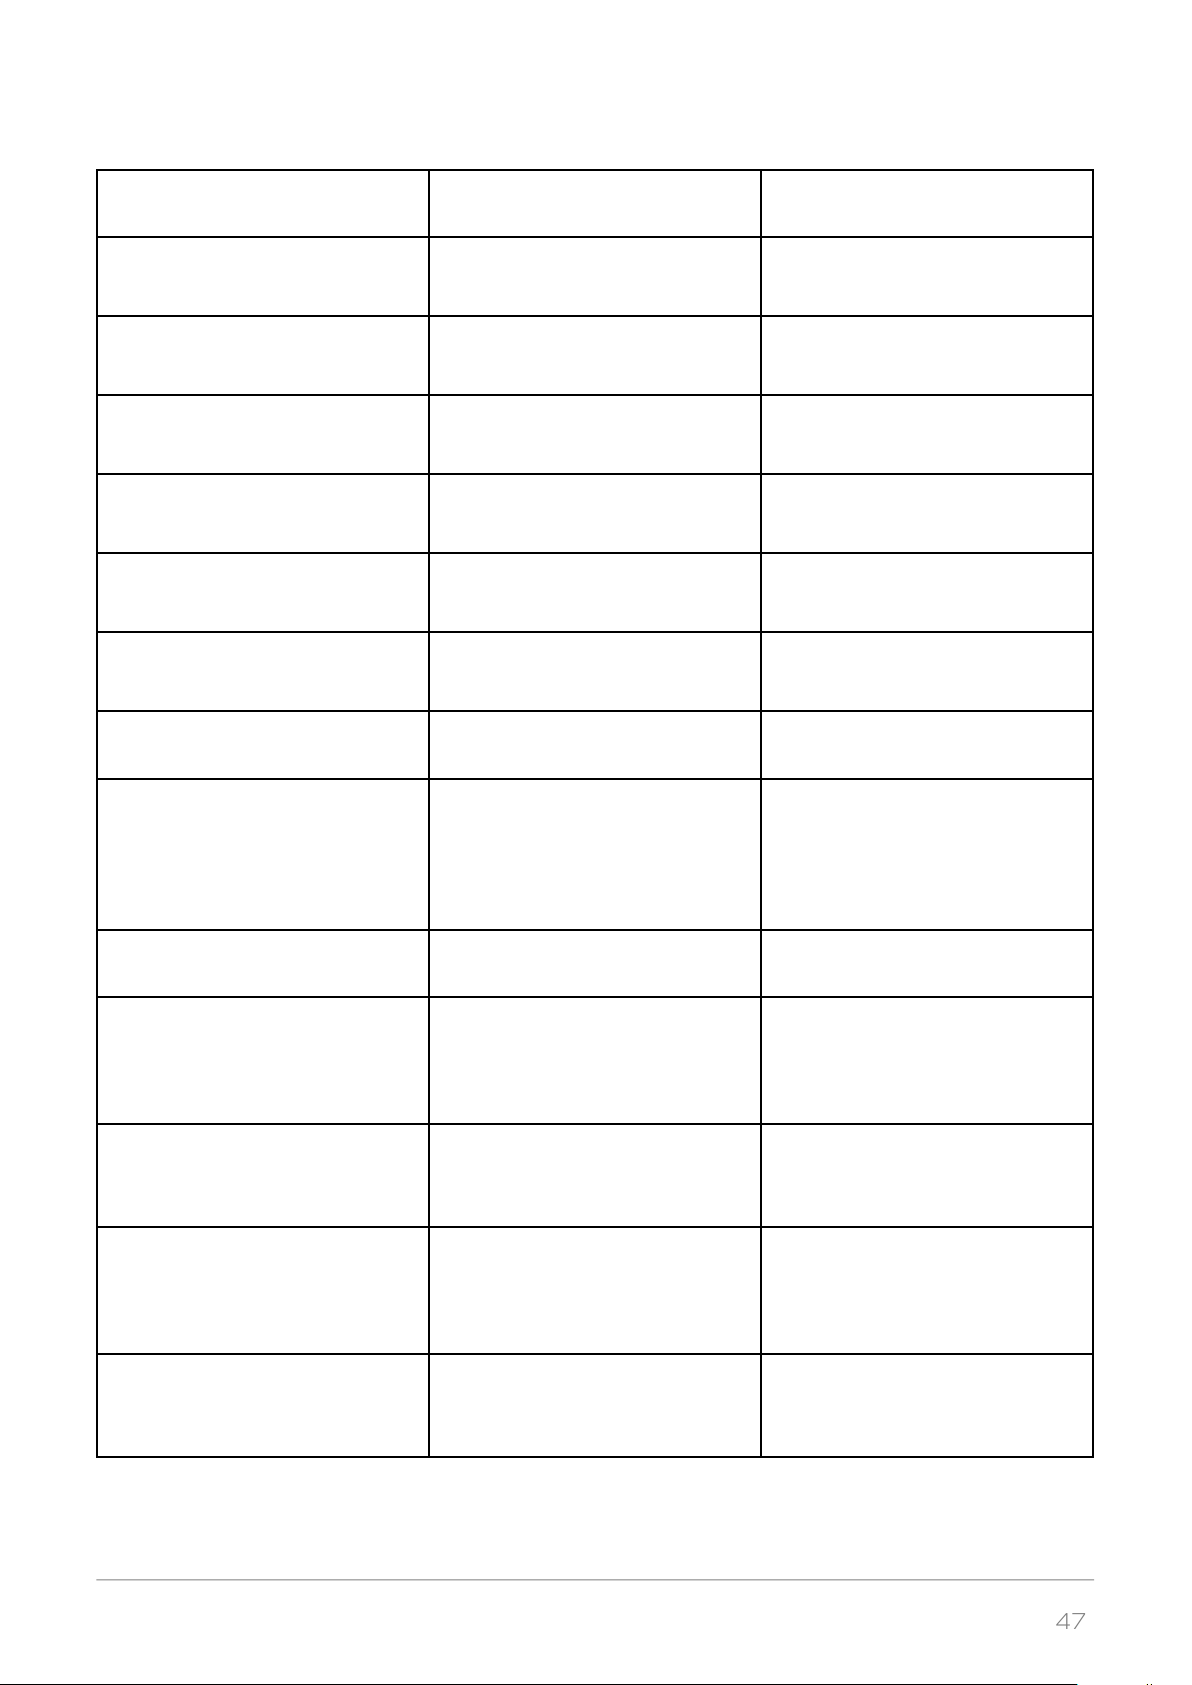
Zortrax printers, the firmware immediately displays an error message on the screen. The following list
explains all error messages and provides potential causes and suggested solutions.
©2017, Zortrax S.A. All rights reserved. All trade names, logos and trademarks mentioned in the following document are registered
trademarks of Zortrax and are subject to legal protection.
Page 47
47
Error Message Potential Cause Suggested Solution
Error #002 SD card reading error The SD card is unreadable or da-
maged
Error #003 File error. Please prepare your model again
Error #004 Print stopped due to SD
card timeout. Check SD card contacts or format/replace your card
Error #101 No models on SD card The card is unreadable or dama-
Error #010 Extruder heating error The thermocouple cannot detect
Error #011 Extruder temperature is
too high
Error #012 Heatbed temperature
is too high
Error #013 Unexpected extruder
temperature drop
Error #014 Heatbed thermistor error
The file cannot be read or the SD
card is damaged
The SD card is unreadable or damaged
ged; There are no models on the SD
card
an increase in temperature
The thermocouple has detected too
high extruder temperature
The heatbed thermistor has detected too high heatbed temperature
The thermocouple has detected
a decrease in temperature during
the printing process
No signal coming from the heatbed
thermistor
-Save the file again on the SD card
-Safely remove the card and use
another one
-Save the file again on the SD card
-Safely remove the card and use
another one
-Save the file again on the SD card
-Safely remove the card and use
another one
-Save the file again on the SD card
-Safely remove the card and use
another one
-Extruder cable / heater and thermocouple / extruder PCB replacement
-Extruder cable / heater and thermocouple / extruder PCB replacement
-Heatbed / heatbed cable replacement
-Make sure that the heater and
thermocouple haven’t been disconnected from the hotend
-Extruder cable / heater and thermocouple / extruder PCB replacement
-Heatbed / heatbed cable replacement
Error #030 Check build platform
small connector and restart the
printer
Error #031 Check the platform large connector and restart the printer
Error #032 Check the main extruder cable and restart the printer
Error #033 Check the perforated
plate contacts and restart the printer
No connection / short circuit between the perforated plate and the
heatbed
No connection / short circuit between the heatbed and the heatbed cable
No connection / short circuit between the extruder cable and the
extruder
No connection between the perforated plate and the heatbed or
short circuit on the perforated plate
(on calibration points)
-Check the connection between the
perforated plate and the heatbed
cable
-Perforated plate / heatbed cable
replacement
-Check the connection between the
heatbed and the heatbed cable
-Heatbed / heatbed cable replacement
-Check the connection between the
extruder and the extruder cable
and restart the printer
-Extruder cable / extruder PCB replacement
-Check the heatbed cable for
proper connection
-Perforated plate / heatbed cable
replacement
©2017, Zortrax S.A. All rights reserved. All trade names, logos and trademarks mentioned in the following document are registered
trademarks of Zortrax and are subject to legal protection.
Page 48
48
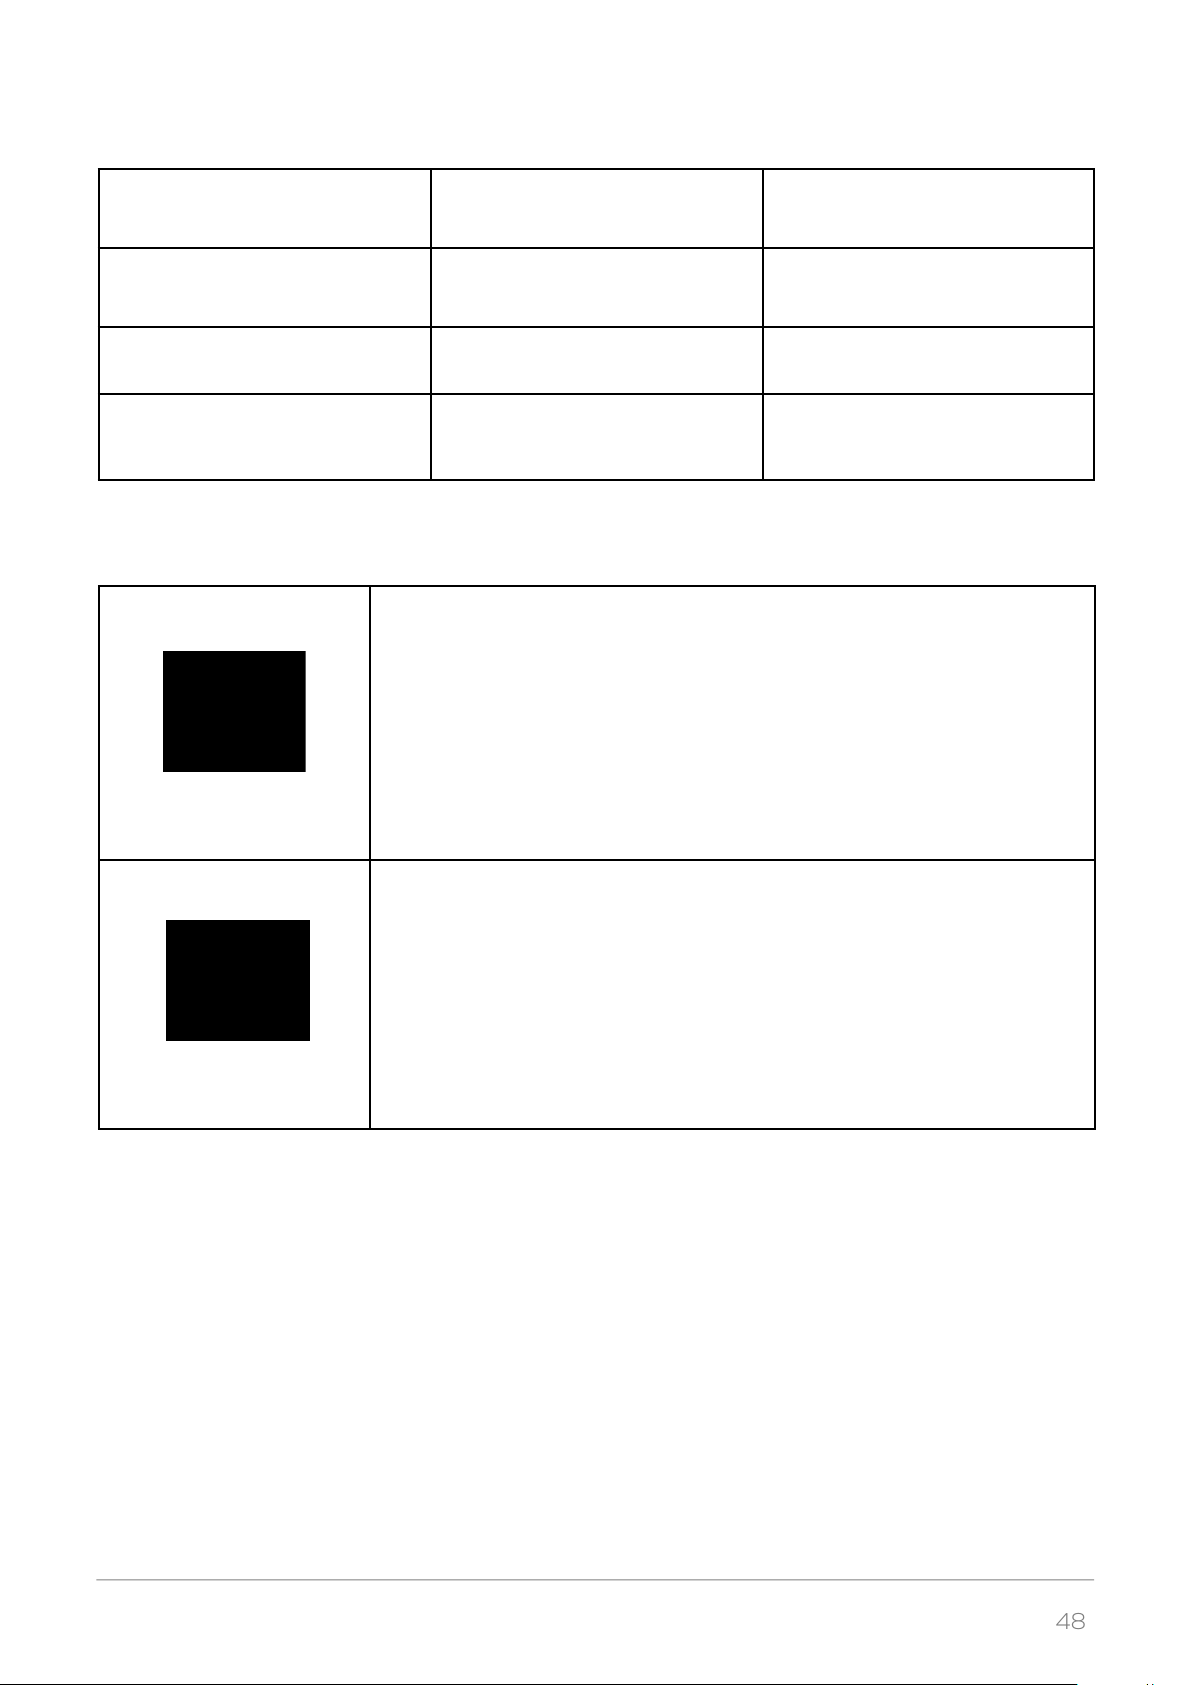
Error #034 Check the endstops and
restart the printer
Error #040 Please, update the Firmware to print
Error #075 Please prepare the file
using a newer Z-SUITE version
No signal from the endstops when
the extruder moves into the „home”
position (front left corner)
Z-SUITE blocks the printing process
for previous versions of firmware
due to safety reasons,
Z-SUITE is not up to date -Update the Z-SUITE to the latest
-Check the endstops for proper connection
-Carry out X/Y axes maintenance
-Update the firmware
version and prepare the file again
Error #076 This zcode file was
exported for a different printer mo-
del
If the device begins to operate in an unidentified way, safely unplug the
printer from the power supply and immediately contact the Support
Center specialists via the support form at:
http://support.zortrax.com/support-form/.
While shipping the device to the Manufacturer’s technical service, it is
extremely important to pack the printer properly. Use the original packaging. Detailed instructions on how to pack the device are available at:
M200 http://support.zortrax.com/packing-m200/,
M300 http://support.zortrax.com/m300-packing/.
The model has been prepared
for a different printer model
-Choose the proper printer model
while exporting the file in Z-SUITE
More manuals and tips & tricks articles are available at our Support Center.
www.zortrax.com
©2017, Zortrax S.A. All rights reserved. All trade names, logos and trademarks mentioned in the following document are registered
trademarks of Zortrax and are subject to legal protection.
Page 49
49
Specifications
Weight and Physical Dimensions
M200 M300
Without a Spool 345 x 360 x 430mm
[13.6 x 14 x 17 in]
With a Spool 345 x 430 x 430mm
[13.6 x 17 x 17 in]
Shipping Box 460 x 470 x 570mm
[18 x 18.5 22.4 in]
Shipping Weight 25kg [55 lbs] 56kg [124 lbs]
Net Weight 16kg [35 lbs] 30kg [66 lbs]
Printing
Printing Technology LPD (Eng. Layer Plastic Deposition)
Layer Resolution 90-400 microns 140-300 microns
Wall Thickness Optimal: 800 microns
Positioning Precision X/Y 1,5 microns
Z Single Step 1,25 microns
Dimensional Accuracy +/- 0,2%*
Angle Accuracy +/- 0,2%**
3D Printer
Workspace 200 x 200 x 180mm
[7.87 x 7.87 x 7.086 in]
Material Container Spool
Material Diameter 1,75mm [0.069 in]
Nozzle Diameter 0,4mm [0.015 in]
Support Structures Removed mechanically – printed with the same
material as the model
Extruder Single
Connectivity SD card [included]
Available Materials Full offer is available at: https://zortrax.com/ma-
terials/zortrax-m-series/
Additional Information each delivered print-
er may have worked
up to 50 hours during
the quality control test
prints
Temperature
490 x 490 x 590mm
490 x 560 x 590mm
576 x 576 x 842mm
300 x 300 x 300mm
[11.81 x 11.81 x 11.81 in]
each delivered printer may have worked
up to 90 hours during
the quality control test
prints
Extruder Maximum Temperature 380˚ C [716˚ F]
Platform Heated
Platform Maximum Temperature 110˚C [230˚ F]
Ambient Operating Temperature 20˚ - 35˚C [68° - 95° F]
Storage Temperature 0˚ - 35˚C [32 - 95° F]
©2017, Zortrax S.A. All rights reserved. All trade names, logos and trademarks mentioned in the following document are registered
trademarks of Zortrax and are subject to legal protection.
Page 50
50
Electrical
AC Input 110/240V ~ 2 A 50/60Hz
Power Requirements 24 V DC @ 11 A
Power Consumption max 300W max 500W
Software
Software Package Z-SUITE®
Supported File Formats .stl, .obj, .dxf, .3mf
Supported Operating Systems Mac OS X / Windows 7 and newer versions
*It should be noted that the model’s dimensions strongly depend on the technical condition of the printer as well as the shape,
form and size of a print, the material used and the printing process conditions. The accuracy in Z axis does not include a tole-
rance of +/- one layer. Bear in mind errors of measurement and measuring equipment.
**measurements were taken with an angle of 90˚
Recycling
Disposal of paper and plastic packaging
In order to protect the environment, it is recommended to place used paper and
plastic packaging in specially designated containers, according to your local recycling guidelines.
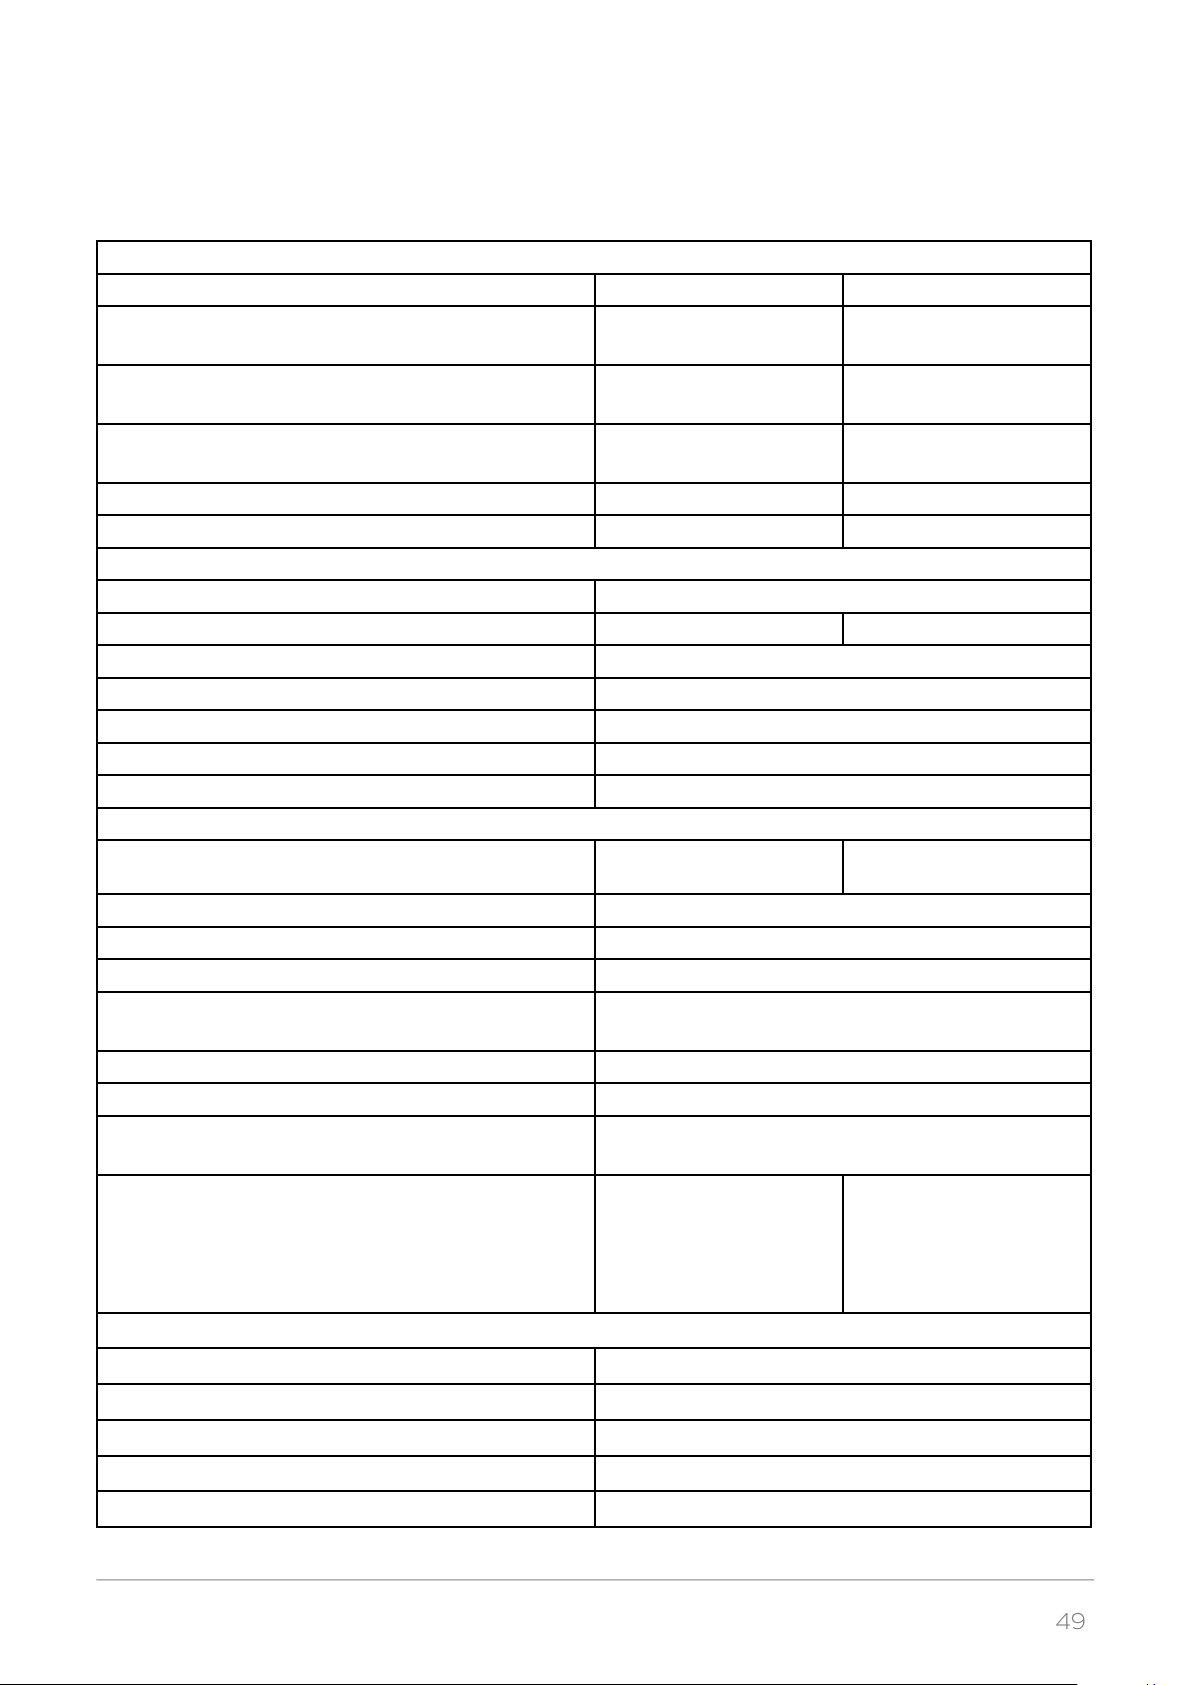
Waste electrical and electronic equipment
This symbol placed on the device indicates that it is electrical and electronic equipment which must not
be disposed of with household waste. Substances contained in the equipment may be harmful to the
natural environment. Waste electrical and electronic equipment cannot be disposed of in landfills and
must be recycled. For information on where to dispose of waste equipment, contact the seller, the Manufacturer or the importer of the product. Disposing of waste electrical and electronic equipment along
with other waste is prohibited by the EU Directive 2012/19/UE.
Certification
The Manufacturer ensures that the equipment complies with all relevant standards. In case of questions and problems contact the Manufacturer through the support form: http://support.zortrax.com/
support-form/.
©2017, Zortrax S.A. All rights reserved. All trade names, logos and trademarks mentioned in the following document are registered
trademarks of Zortrax and are subject to legal protection.
 Loading...