

Page 1
IN TER NATI ONA L MOD EL NUM BE R: SL 800 E/F
IN TER NATI ONA L MOD EL NUM BE R: SL 800 E/F
IN TER NATI ONA L MOD EL NUM BE R: SL 808 F
CLOSI NG THE ST ROLLE R FOR TRAVE L
OR STOR AGE
Each tim e, be fore c los ing y our st rol ler,
check th e fol lowi ng:
a. You r chi ld is cl ear o f mov ing parts
b. Th e rea r brak es ha ve bee n set
c. Th e bac kres t is in t he fu ll upr igh t pos iti on
d. Th e fro nt wh eels a re se cur e in the lock ed mo de
e. Th e can opy is r etr act ed
f. All i tem s hav e been r emo ved f rom the bas ket
g. Th e saf ety s car f is di scha rge d
To cl ose the str oll er, pus h in on t he ma in foldin g
lock loc ate d in th e midd le of t he st roller ha ndl e.
With the m ain l ock h eld in , pul l up on the sec ond ar y
lock whi le ea sin g the st rol ler h andle dow n, (Fi g 11) .
Check to b e sur e the r ed fra me lo ck se cures
to the loc kin g pin.
Fig. 11
PRESS
LOCKLOCK
PULLPULL
ATTAC HING THE CAN OPY
To at tach the ca nop y, inse rt th e plas tic s haf ts in to the
plasti c slo ts lo cate d on th e out side of the m ain s tro ller
tubes (F ig 9) . Lift u p to ch eck t hat each si de is l ocke d
into pos iti on. Op en th e can opy by push ing d own o n
the plas tic s ide c anop y bra ces. B e sur e to snap the
canopy t o the s eat a nd bac kre st fa bric w hen eve r the
seat is fu lly r ecl ined . Retr act t he ca nop y by fir st pu lli ng
up on the si de br ace s, the n push ing t he ca nop y hood
back. Th e can opy ca n be co nve rted t o all ow mo re ai r
flow thr oug h the s trol ler. U nzip the lo wer h alf o f the
canopy f rom t he up per ha lf. Th is will lea ve a me sh
cover th at ca n sna p to the b ack o f the s eat.“The
canopy m ay al so be u sed as a n app er ca nopy.
Loc ate t he zip per o n the r ear rib of th e can opy.
When unz ipp ed th e cano py wi ll fa ll forwa rd over the
bumper b ar, co mple tel y sha ding baby f rom t he wo rld.
To re move the ca nop y,fir st un do the s nap s. The n pre ss
in the rel eas e tab s, loc ated o n the p las tic slots ,
while pu lli ng up o n the ca nop y sha fts.
!
WAR NIN G The rear p ane l of th e cano py mu st
be snapp ed on to th e seat w hen eve r the seat is
fully re cli ned.
SAFET Y HARNE SS
Zooper p rov ide s a spec ial 5 -po int harne ss sa fet y
system . Use d prop erl y, this h arn ess will ke ep yo ur
child se ate d and s afe. To s ecu re you r chi ld in t he
harnes s, pus h buc kle s (A) an d (B) i nto t he bu ckle
housin g (C) u nti l the bu ckl e pro ngs snap in to po sit ion.
Carefu lly a dju st sli der ( D) to f it snugly a nd co mfo rtab ly
around y our c hil d see (F ig 10 ). Fol low t he same
proced ure t o adj ust th e sho uld er strap. Fo r inf ant u se,
we recom men d usi ng the e xtr a buc kle (E) for a dde d
securi ty. Alw ays r e-ti ght en th e harness w hen y our
child is i n a sit u p or la y back p osi tio n.
Fig.9
E
Sho ulder s
Str aps
C
A B
Fig.1 0
CAR SEAT COMPATIBIL ITY
Althou gh we h ave d one ou r bes t to ma ke the Z oop er
Tan go as unive rsa lly c ompa tib le as p ossi ble, the in fan t
seat you h ave c hos en may n ot fi t wel l in the stro lle r. The
models t hat w e hav e test ed an d app rove d are :
Evenfl o On My Wa y
Graco Sn ug Ri de an d Safe S eat
Britax C omp ani on
To in stall an in fan t car rier, f irs t be sur e tha t the i nfant
carrie r is no t att ache d to it s per mane nt ca r bas e. Loca te
the car se at ad apt er str ap th at wa s pack age d with your
stroll er. It s houl d hav e a buc kle in the ce nte r, and a cl ip
on each en d. Ne xt, ide nti fy th e D-r ings loca ted i n the h ip
points o f the s tro ller s eat. E nsu re that inf ant s eat h as
been rem ove d fro m its pe rma nen t car ba se.
Step 1 Rec lin e the st rol ler s eat to t he 3 or 4 pos iti on.
Step 2 Att ach t he ca r seat a dap ter s trap t o the s tro ller
Seat by cl ipp ing t he end s to th e D-r ing s. Adj ust
the stra p so th at it i s full y ext end ed. Un buc kle t he
center, a nd la y the en ds ou t ove r the armre sts o f
the trol ler s eat.
Step 3 Pla ce th e inf ant se at in to th e stro lle r sea t, so th at
the infa nt se at is f acin g the p are nt. Depend ing
On the siz e and d esi gn of yo ur se at, yo u will
Either p lac e it in side t he bu mpe r bar, or o ver t he
Bumper b ar.
Step 4 Bri ng th e end s of the a dap ter s trap b ack o ver t he
infant s eat, a nd bu ckle t he ce nte r. The be lt
Should b e pos iti oned s o tha t it tr avels ove r the
lap of the i nfa nt se at. Som e mod els h ave belt
D
guides l oca ted o n the si des, i f you r mod el does;
make sur e the s trap i s pos iti oned insi de th ese
guides .
Step 5 Tig hte n the s trap d own s o tha t infa nt se at is
secure ly fi xed i nto th e str oll er seat. Inf ant s eat
should n ot li ft ou t of the s tro lle r seat if pro per ly
strapp ed in .
rd th
PR ES S
User Guide
Waltz SL800E/F
!
WARNINGS
IMPORTANT CARE AND SAFET Y INFOR MATION
Avo id se riou s inj ur y from fall ing o r sli ding o ut, al way s use safet y har nes s prov ide d.
Always e nga ge th e rear b rak es whe n not h old ing o nto yo ur st rol ler.
Never le ave y our c hild u nat ten ded.
Never us e the s tro ller n ear a n ope n fire or exp ose d fla me.
Never al low t he st roll er to b e use d as a toy.
Never al low m ore t han on e chi ld at a t ime in the st rol ler, pe r sea t.
CC
Never ha ng ba gs or o ther i tem s fro m the handl e or on t he ca nopy. T his ma y cau se
the stro lle r to be come u nst abl e.
Never us e the s tro ller o n sta irs o r escalat ors.
Do not ove rlo ad th e bask et. Ma ximum loa d is 7 lb s. Exc ess ive we igh t may c aus e a
hazard ous u nst able c ond iti on to exist.
Do not ove rlo ad th e cano py po cket : Max imu m loa d is 2 lbs . Exce ssi ve we ight may
create a h aza rdo us uns tab le co ndition t o exi st.
Before e ach u se, ch eck t o make s ure t he stroll er is s et up p rope rly a nd th at all the
wheels a re pr ope rly an d sec ure ly attach ed.
This str oll er is n ot rec omm end ed for use wi th a ch ild o ver 55 l bs.
This str oll er is d esig ned a s a wal king stro lle r. We do no t reco mme nd ru nni ng,
roller b lad ing, o r oth er su ch activi tie s wit h this s tro lle r.
This str oll er is a s ingl e str oll er do not use a ny at tac hmen ts th at al low for a sec ond
child.
It may be un saf e to us e acce sso rie s other tha n tho se ap prov ed by t he
manufa ctu rer o r dist rib uto r.
Do not use i f any p art o f the st rol ler b ecomes da mag ed, br oke n, uns tab le or missi ng.
Discon tin ue us e imme dia tel y and conta ct cu sto mer se rv ice.
Fai lur e to follow t hes e war ning s and i nst ruction s cou ld re sult i n ser iou s injury o r dea th.
Never us e the p rod uct in a m ann er in consist ent w ith t he man ufa ctu rers inst ruc tio ns.
BB
DD
MAINTEN ANCE
Do not fol d you r str olle r whe n wet.
Machin e was h rem ovab le se at an d armrest c ove rs us ing ge ntl e cyc le,
cold wat er, an d a mild d ete rge nt. The cano py ca n onl y be spo t was hed.
Line dr y fab ric p arts .
Never us e ble ach w hen wa shi ng.
Do not lea ve yo ur st roll er in d ire ct sunlig ht fo r ext ende d per iod s of time.
Clean an d lub ric ate al l mov ing p arts on the s tro lle r fram e and w hee ls
as neede d. Us e only a p ene tra ting s ili con b ase d lubr ica nt.
Reg ula rly c heck f or lo ose s crew s, broken p art s, etc. U se on ly Zooper
approv ed re pla ceme nt pa rts a vail abl e thr oug h the se rv ice ce nte rs li sted belo w.
Wipe off a ny sa nd, sa lt or o the r corr osi ve re sid ue aft er ea ch us e wher e the s tro lle r
may be exp ose d to th ose el eme nts.
In order t o mai nta in the h igh est q uality st and ard s, the d istr ibu tor r eserve s the
right to i mpr ove o r alte r any Z oop er stroll er de sig n with out n oti ce or oblig ati on to
any prev iou s pur chas er. For q ues tio ns or serv ice n eeds , plea se co nta ct the
servi ce center l oca ted i n your c oun tr y of reside nce. S end ing i n your warr ant ee
card wil l hel p exp edit e any s erv ice n eed s.
6
IN TER NATI ONA L MOD EL NUM BE R: SL 800 E/F
IMPOR TAN T: READ TH ESE SAFETY I NSTRUCTI ONS CAR EFU LLY BEFO RE USING
YOUR ST ROLLE R AND K EEP THE M FOR FUTURE R EFERENCE . THE S AFETY O F
YOUR CH ILD DEP END S ON IT.
Thank y ou for ch oos ing Zoo per.
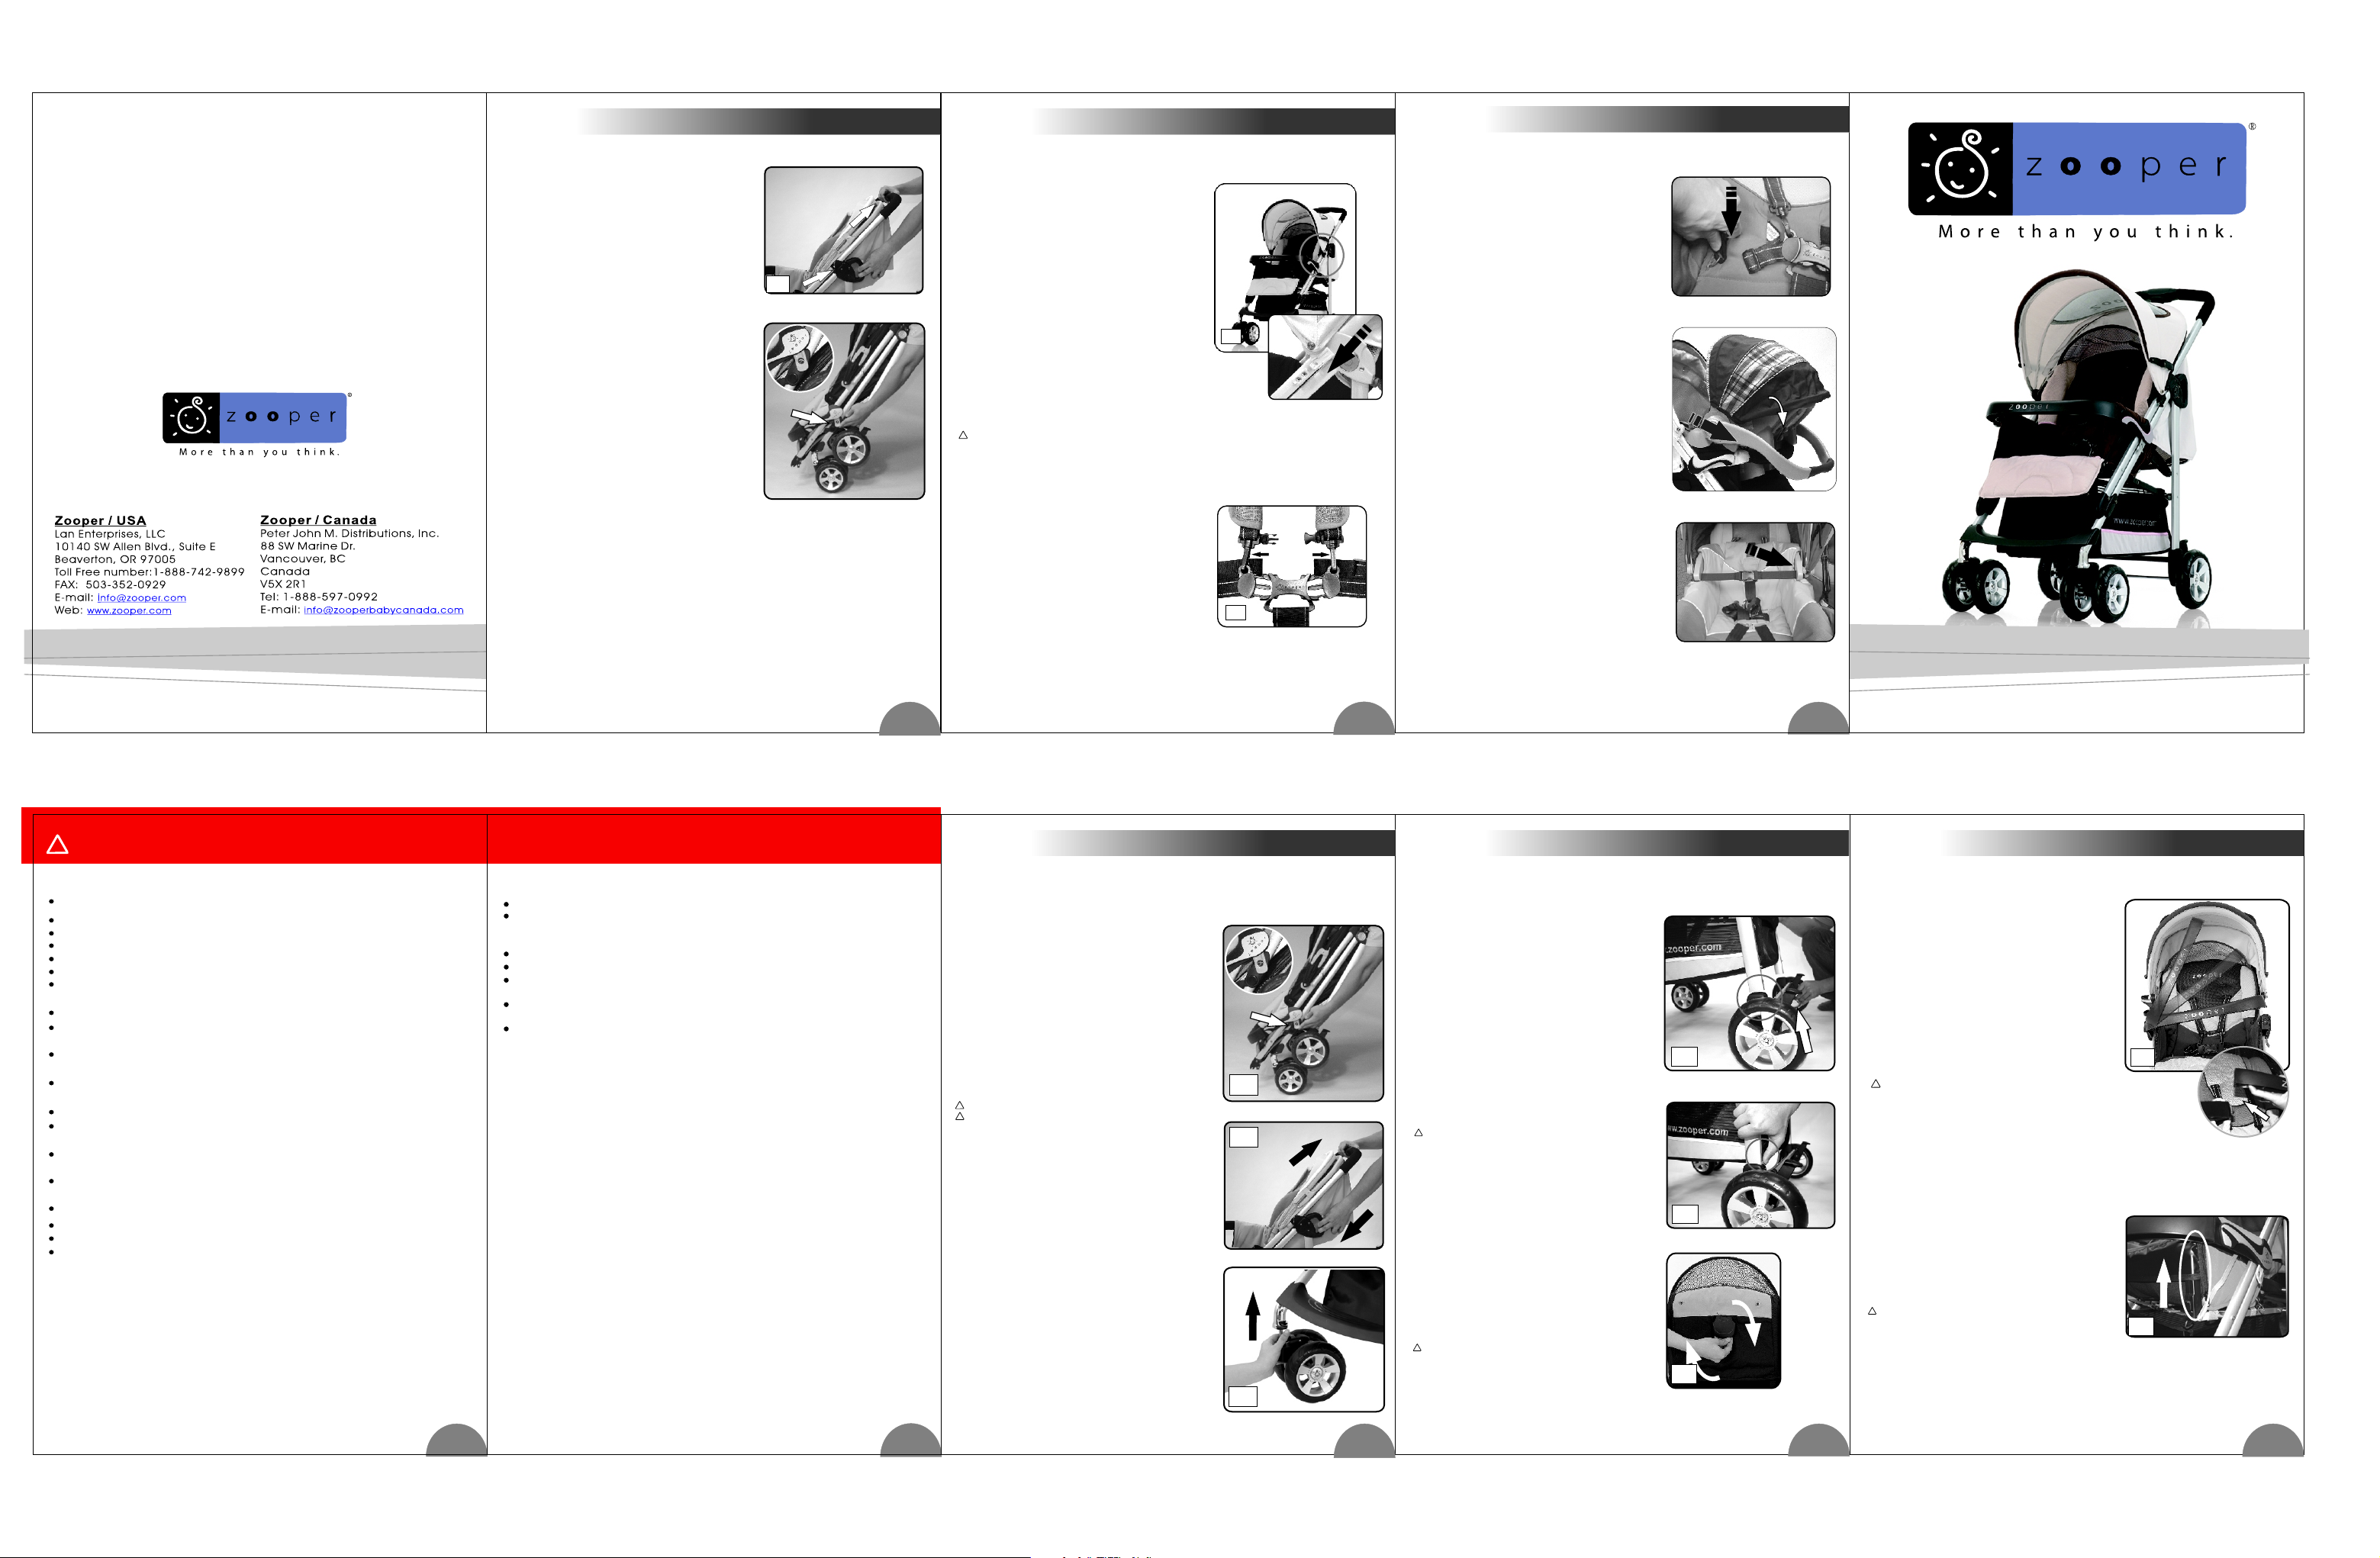
UNLOC KING & OP ENING T HE FRAME
To op en the stro lle r, firs t lif t up on t he gray col ore d fra me
lock loc ate d on th e left s ide o f the s troller, ( Fig 1) .
Be sure th e fra me lo ck det ach es fr om the meta l
lockin g pin . Then p ull u p on th e main stro lle r han dle
while pu shi ng do wn on th e top o f the s econdar y lock ,
(Fi g 2). U sin g your h and , push down o n the f ron t edge
of the sea t to en sur e the st rol ler f rame has lo cke d
proper ly in t he op en pos iti on. Do not pu sh do wn on t he
front ar mre st ba r.
!
WAR NING Be sure ch ild ren a re at a sa fe
!
distan ce an d can not re ach m ovi ng parts wh ene ver
openin g or cl osi ng the s tro lle r.
Fig .1
Fig .2
ATTAC HING THE FRO NT WHEE LS TO
THE FRA ME
The fron t whe els s lide i nto t he me tal ends of e ach
front le g tub e. Pre ss eac h whe el bl ock firml y ont o in
the meta l end t ube s unti l the y "cl ick" into p osi tio n (Fig 3 ).
Check to s ee th ey ha ve bee n pro per ly instal led b y
pullin g dow n on th e whee l blo ck.
It shoul d not m ove f rom th e leg t ube a t all. S hou ld
there be a n eed t o rem ove th e fro nt wh eels, first
locate t he ro und ed met al sp rin g lock on the s ide
of the met al wh eel h ousi ng. Pr ess t he sp rin g lock i n
while pu lli ng th e whee l off t he fr ont leg tub e.
Fig .3
5
IN TER NATI ONA L MOD EL NUM BE R: SL 800 E/F IN TER NATI ONA L MOD EL NUM BE R: SL 800 E/F
ATTAC HING THE REA R AXLE &
WHEEL S TO THE FRA ME
The rear w hee ls an d rear a xle c ome p re-asse mbl ed.
Insert b oth p las tic re ar wh eel h ousings o nto t he re ar
leg tube s of th e str olle r (Fi g 4). Make su re th e brak e
levers a re fa cin g out, aw ay fr om th e strolle r. The n
push in ea ch lo cki ng spr ing l oca ted on the re ar
stroll er tu bes. H old ing th e loc kin g pin i n, sli de ea ch
wheel bl ock o ver t he pin u nti l it lo cks into pl ace a nd
the silv er he ad of t he loc kin g pin c an be seen
protru din g fro m the wh eel h ous ing (Fig 5) .
Should t her e be a ne ed to re mov e the r ear wheel
assemb ly, pus h in on t he lo ckin g pin s whi le pu llin g
down on ea ch wh eel b lock .
When eng agi ng th e brak es,o nly p ress on the b rak e
lever lo cat ed on t he ins ide o f the w heels. Ne ver
press do wn on t he br ake be r.
!
WAR NIN G Do not use t he st rol ler if t he br ake
levers a re no t fac ing aw ay fr om th e strolle r and i f the
lockin g pin s are n ot vis ibl e as de scribed a bov e.
Contac t the a ppr opri ate s erv ice c ent er listed a t the
back of th ese i nst ruct ion s if yo u have ques tio ns.
ADJUS TING TH E SEATBACK
To lo wer the bac kre st, li ft up on t he pl ast ic lever
locate d in th e mid dle of t he se atb ack. W hil e
holdin g the l eve r up, mo ve the s eat bac k down
into des ire d pos itio n and t hen r elease th e lev er
(Fi g 6). To r ais e the b ackr est, p ush u p on the back
of the sea t unt il it c lick s int o the d esired po sit ion.
!
WAR NIN G Always k eep y our ch ild i n sig ht
when mak ing t hes e kind s of ad jus tments. C heck t he
fittin g of th e saf ety ha rne ss ea ch time the b ack res t
is adjus ted t o be su re a snu g, ye t comfort abl e
fittin g is ma int aine d.
Fig .4
Fig .5
Fig .6
PRESSPRESS
6
ATTAC HING THE ARMRE ST TO
THE STR OLLER S EAT
To at tach the fr ont a rmr est to t he st rol ler seat, li ne
up the ins ert s of th e armr est b ar wi th the two pl ast ic
slots on b oth s ide s of the s tro lle r seat (Fig 7 ).
Slide th e ins ert s comp let ely i nto these s lot s,
making s ure t hat b oth si des s ecu re into a loc ked
positi on. Pu ll ou t of ea ch sid e of th e arm res t to mak e
sure the a rmr est i s prop erl y loc ked in to th e slo ts.
The armr est s hou ld not r ele ase f rom the slo ts.
To re move the ar mre st, lo cate t he pl ast ic tabs
undern eat h whe re the a rmr est c onnects t o the
sides of t he st rol ler. Pr ess in the ta bs wh ile p ulli ng
up on the ar mre st.
!
WAR NIN G Nev er pi ck up y our s trol ler b y
the armr est. To avo id se riou s inj ur y, ensu re th at
childr en' s han ds, ar ms, an d feet are we ll cl ear
of the bum per b ar be fore o pen ing o r closing i t.
USING T HE SAFE TY SC ARF WHE N
SEATBA CK IS FUL LY RECLIN ED
The safe ty sc arf m ust b e use d when eve r the s eat is in
a fully re cli ned p osit ion . The safet y sca rf is c omb ine d
with
footre st. Wh en yo u use th e sca rf, ad jus t the f ootr est
into the u pri ght p osit ion . Then to lin e up th e zip per of
the foot res t and t he sca rf a nd zip t hem
togeth er. (Fi g 8).
!
WAR NIN G Your c hil d may s lip in to le g
openin gs an d str angl e. Nev er us e the s troller w ith
the back res t ful ly rec lin ed un less this b aby s afe ty
scarf i s looped ar oun d the a rmre st an d sec ured
in place.
Fig. 7
Fig .8
1
1
2
32
4
 Loading...