

Page 1
Do not fo ld your s troll er when w et.
Machi ne wash r emova ble sea t and arm rest co vers us ing gen tle cyc le,
cold wa ter, and a m ild det ergen t. The can opy can o nly be sp ot wash ed.
Line dr y fabr ic part s.
Never u se blea ch when w ashin g.
Do not le ave you r strol ler in di rect su nligh t for ext ended p eriod s of time .
Clean a nd lubr icate a ll movi ng part s on the st rolle r frame a nd whee ls
as need ed. Use o nly a pen etrat ing sil icon ba sed lub rican t.
Regul arly ch eck for l oose sc rews, br oken pa rts, etc . Use onl y Zoope r
appro ved rep lacem ent par ts avai lable t hroug h the ser vice c enter s liste d below.
Wipe of f any san d, salt o r other c orros ive res idue af ter eac h use whe re the st rolle r
may be ex posed t o those e lemen ts.
In orde r to main tain th e highe st qual ity sta ndard s, the di strib utor re serve s the
right t o impro ve or alt er any Zo oper st rolle r desig n witho ut noti ce or obl igati on to
any pre vious p urcha ser. For q uesti ons or se rvice n eeds, p lease c ontac t the
serv ice cen ter loc ated in y our cou ntry o f resid ence. Se nding i n your wa rrant ee
card wi ll help e xpedi te any se rvic e needs.
MAIN TENAN CE
IMPO RTANT CAR E AND SAFE TY INFO RMATIO N
BB
CC
DD
Avoid s eriou s injur y from f allin g or slid ing out, a lways u se safe ty harn ess pro vided .
Alway s engag e the rea r brake s when no t holdi ng onto y our str oller.
Never l eave yo ur chil d unatt ended .
Never u se the st rolle r near an o pen fir e or expo sed fla me.
Never a llow th e strol ler to be u sed as a to y.
Never a llow mo re than o ne chil d at a time i n the str oller.
Never h ang bag s or othe r items f rom the h andle o r on the ca nopy. Th is may
cause t he stro ller to b ecome u nstab le.
Never u se the st rolle r on stai rs or esc alato rs.
Do not ov erloa d the bas ket. Max imum lo ad is 7 lbs. E xcess ive wei ght ma y cause
a hazar dous un stabl e condi tion to e xist.
Do not ov erloa d the can opy poc ket: Ma ximum l oad is 2 lb s. Exces sive we ight
may cre ate a haz ardou s unsta ble con ditio n to exis t.
Befor e each us e, chec k to make su re the st rolle r is set up p roper ly and th at all th e
wheel s are pro perly a nd secu rely at tache d.
This st rolle r is not re comme nded fo r use wit h a child o ver 40 lb s.
This st rolle r is desi gned as a w alkin g strol ler. We do no t recom mend r unnin g,
rolle r bladi ng, or ot her suc h activ ities w ith thi s strol ler.
This st rolle r is a sing le stro ller do n ot use an y attac hment s that al low for a s econd
child .
It may be u nsafe t o use acc essor ies oth er than t hose ap prove d by the
manuf actur er or dis tribu tor.
WAR NI NG S
!
INTE RNATIO NAL MODE L NUMBE R: SL83 0D/B
IMPO RTANT: R EAD THE SE SAFE TY INST RUCTI ONS CAR EFULLY B EFORE U SING
YOUR S TROLL ER AND KE EP THEM F OR FUTU RE REFE RENCE . THE SAF ETY OF
YOUR C HILD DE PENDS O N IT.
Than k you for c hoosi ng Zoop er.
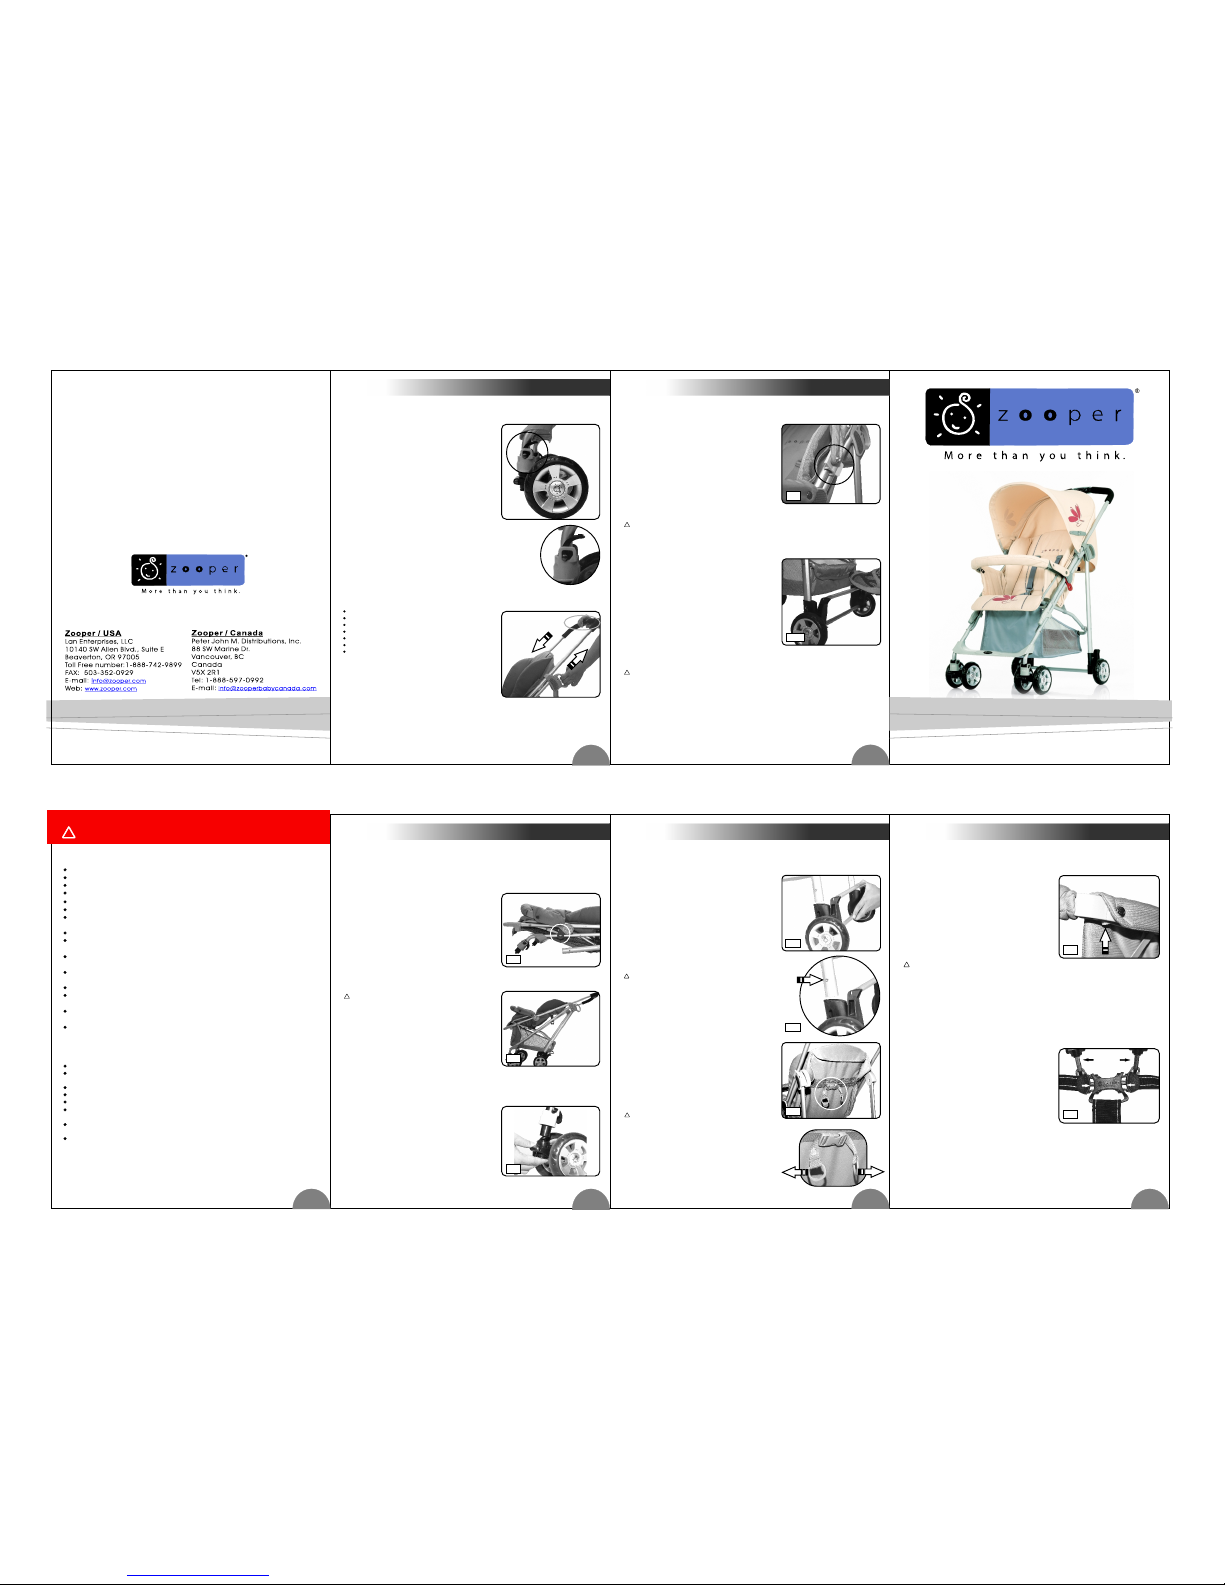
UNLO CKING & O PENIN G THE FRA ME
1 32
ATTACH ING THE RE AR AXLE &
WHEE LS TO THE FR AME
WARNI NG: Do no t use the s troll er if the b rake
lever s are not f acing a way fro m the str oller a nd if the
locki ng pins a re not vi sible a s descr ibed ab ove.
Conta ct the ap propr iate se rvic e cente r liste d at the
back of t hese in struc tions i f you hav e quest ions.
!
!
WARNI NG: Alw ays keep y our chi ld in sig ht
when ma king th ese kin ds of adj ustme nts. Ch eck the
fitti ng of the s afety h arnes s each ti me the ba ckres t
is adju sted to b e sure a sn ug, yet c omfor table
fitti ng is mai ntain ed.
ADJU STING T HE SEATB ACK
The rea r wheel s and rea r axle co me pre- assem bled.
Inser t both pl astic r ear whe el hous ings on to the re ar
leg tub es of the s troll er (Fig 4 ). Make s ure the b rake
lever s are fac ing out, a way fro m the str oller. T hen
push in e ach loc king sp ring lo cated o n the rea r
strol ler tub es. Hol ding th e locki ng pin in, s lide ea ch
wheel b lock ov er the pi n until i t locks i nto pla ce and
the sil ver hea d of the lo cking p in can be s een
protr uding f rom the w heel ho using ( Fig 5).
Shoul d there b e a need to r emove t he rear w heel
assem bly, pus h in on the l ockin g pins wh ile pul ling
down on e ach whe el bloc k.
4
INTE RNATION AL MODE L NUMBE R: SL83 0D/B INTE RNATIO NAL MODE L NUMBE R: SL83 0D/B
ATTACH ING THE ARM REST TO
THE ST ROLLE R SEAT
Us er Gu ide
Ska SL830 D/ B
5
INTE RNATION AL MODE L NUMBE R: SL83 0D/BINTE RNATIO NAL MODE L NUMBE R: SL83 0D/B
6
To open t he stro ller, fir st lift u p on the re d color ed fram e
lock lo cated o n the lef t side of t he stro ller, (F ig 1). Be
sure th e frame l ock det aches f rom the m etal lo cking
pin. Th en pull u p on the ma in stro ller ha ndle wh ile
pushi ng down o n the top o f the sec ondar y lock , (Fig 2) .
Using y our han d, push d own on th e front e dge of th e
seat to e nsure t he stro ller fr ame has l ocked p roper ly in
the ope n posit ion. Do n ot push d own on th e front
armre st bar.
WARNI NG: Be su re chil dren ar e at a safe
dista nce and c annot r each mo ving pa rts whe never
openi ng or clo sing th e strol ler.
!
FRON T WHEEL BL OCKS
Line up e ach fro nt whee l block w ith the f ront le g and
push fi rmly to gethe r (Fig. 6 ). Alwa ys chec k to see th at
the whe els hav e been pr operl y insta lled by p ullin g out
on the wh eel blo ck. It sh ould be l ocked t o the fro nt leg.
To remo ve, push i n on the lo oped me tal ret entio n clip
locat ed on the u nders ide of th e wheel b lock, a nd pull
the whe el bloc k off.
Fig.1
Fig.1
Fig.1
Fig.4
PRES S
Fig.5
To lowe r the sea tback, l oosen t he pull s traps b ehind t he
seat (F ig.6) . You may ad just th e angle o f the bac krest
by pull ing or lo oseni ng the pu ll-st raps. To r eclin e the
seatb ack to it s lowes t posit ion, un snap th e plast ic
buckl e betwe en the pu ll-st raps an d gentl y pull th e
seatb ack dow n.
PULL
To atta ch the ar mrest b ar to the s troll er seat, l ine up th e
two pla stic in serts o n the arm rest ba r with th e armre st
slots o n both si des of th e strol ler sea t. Slide t he inse rts
compl etely i nto the s lots, m aking s ure tha t both si des
snap in to plac e. To remo ve the ar mrest b ar, loca te the
plast ic tabs b eneat h each ar mrest a nd push t hem in,
one at a ti me, whi le pull ing out o n each si de of the b ar
(Fig. 7).
WARNI NG: Nev er pick u p your st rolle r by the
armre st.
!
SAFE TY HARN ESS
Zoope r provi des a spe cial 5- point h arnes s safet y
syste m. Used p roper ly, this ha rness w ill kee p your ch ild
seate d and saf e. To secu re your c hild in t he harn ess,
push bu ckles ( A) and (B ) into th e buckl e housi ng (C)
until t he buck le pron gs snap i nto pos ition . Caref ully
adjus t slide r (D) to fi t snugl y and com forta bly aro und
your ch ild see ( Fig 8). Follo w the sam e proce dure to
adjus t the sho ulder s traps . Alway s re-tig hten th e
harne ss when y our chi ld is in a si t up or lay b ack
posit ion.
PRES S
Fig.6
BB
CC
DD
AA
Shoul ders
Strap s
Fig.8
Fig.7
CANO PY
WARNI NG: Do no t try to r etrac t the can opy
when th e side ca nopy br aces ar e fully o pen or wi th the
sun vis or exte nded. T his may d amage t he cano py.
Whene ver the s eatba ck is in th e fully r eclin ed posi tion,
make su re that t he cano py snap s or mesh s naps ar e
butto ned ont o the bac k and sid es of the s eat fab ric.
Do not ov erloa d the can opy poc ket: Ma ximum l oad is
2 lbs (1 kg ). Exce ssive w eight m ay crea te a haza rdous
unsta ble con ditio n to exis t.
The can opy att aches o nto the s troll er fram e above
each si de armr est (Fi g. 9). Pus h firml y to inst all. Op en
the can opy by pu shing d own on th e plast ic side
canop y brace s. Be sur e to snap t he cano py to the
sides o f the sea t and bac krest f abric . Retrac t the
canop y by firs t pulli ng up on th e side br aces th en
pushi ng the ca nopy ho od back . The can opy can b e
conve rted to a llow mo re air fl ow thro ugh the s troll er.
Unzip t he lowe r half of t he cano py from t he uppe r half.
This wi ll leav e a mesh co ver tha t can sna p to the ba ck
of the se at. To rem ove the c anopy, fi rst und o the sna ps.
Then pr ess the r eleas e tabs, l ocate d on the pl astic
slots , while p ullin g up on the c anopy s hafts.
!
Fig.9
USIN G THE BRA KES
To enga ge the br akes, st ep down o n each re ar brake
lever l ocate d on each r ear whe el. (Fi g.10). T he brak e
lever s hould b e facin g out. Alw ays che ck that t he
brake s have fu lly eng aged by p ushin g forw ard on th e
strol ler to ma ke sure i t stays i n place. Lift th e brake l evers
with yo ur foot t o relea se the br akes.
WARNI NG: Alw ays eng age the b oth bra kes
when yo u are not h oldin g onto th e strol ler and c heck
that th e brake s have be en prop erly en gaged a s
descr ibed ab ove. Al ways en gage th e brakes w hen
putti ng your c hild in , or taki ng your c hild ou t, of the
strol ler.
!
Fig.10
SWIV EL WHEE LS
The swi vel-l ockin g lever i s locat ed on the b ack of th e
front w heel bl ock whe re it mee ts the fr ame (Fi g. 11).
Push th e lever u p to allo w the fro nt whee ls to swi vel. To
lock th e wheel s into a fi xed pos ition , push do wn on the
locki ng leve r and mov e the str oller f orwa rd. The w heels
will lo ck auto matic ally. Th e wheel s shoul d be locke d in
the fix ed posi tion wh en walk ing ove r uneve n surf aces.
CLOS ING THE S TROLL ER FOR
TRAVE L OR STORA GE
Each ti me, bef ore clo sing yo ur stro ller, che ck the
follo wing:
Your chi ld is cle ar of mov ing par ts
The rea r brake s have be en set
The bac krest i s in the fu ll upri ght pos ition
The fro nt whee ls are se cure in t he lock ed mode
The can opy is re tract ed
All ite ms have b een rem oved fr om the ba sket
The saf ety sca rf is di schar ged
To clos e the str oller, pu sh in on th e main fo lding l ock
locat ed in the m iddle o f the str oller h andle . With th e
main lo ck held i n, pull u p on the se conda ry loc k while
easin g the str oller h andle d own, (F ig 12). C heck to b e
sure th e red fra me lock s ecure s to the lo cking p in.
PRES S
 Loading...