

Page 1
A S S E M B L Y I N S T R U C T I O N S
M
T
1334 Parkview Avenue
Suite 100
Manhattan Beach, CA 90266
1-310-546-8186
[email protected]
www.ZON-Technology.com
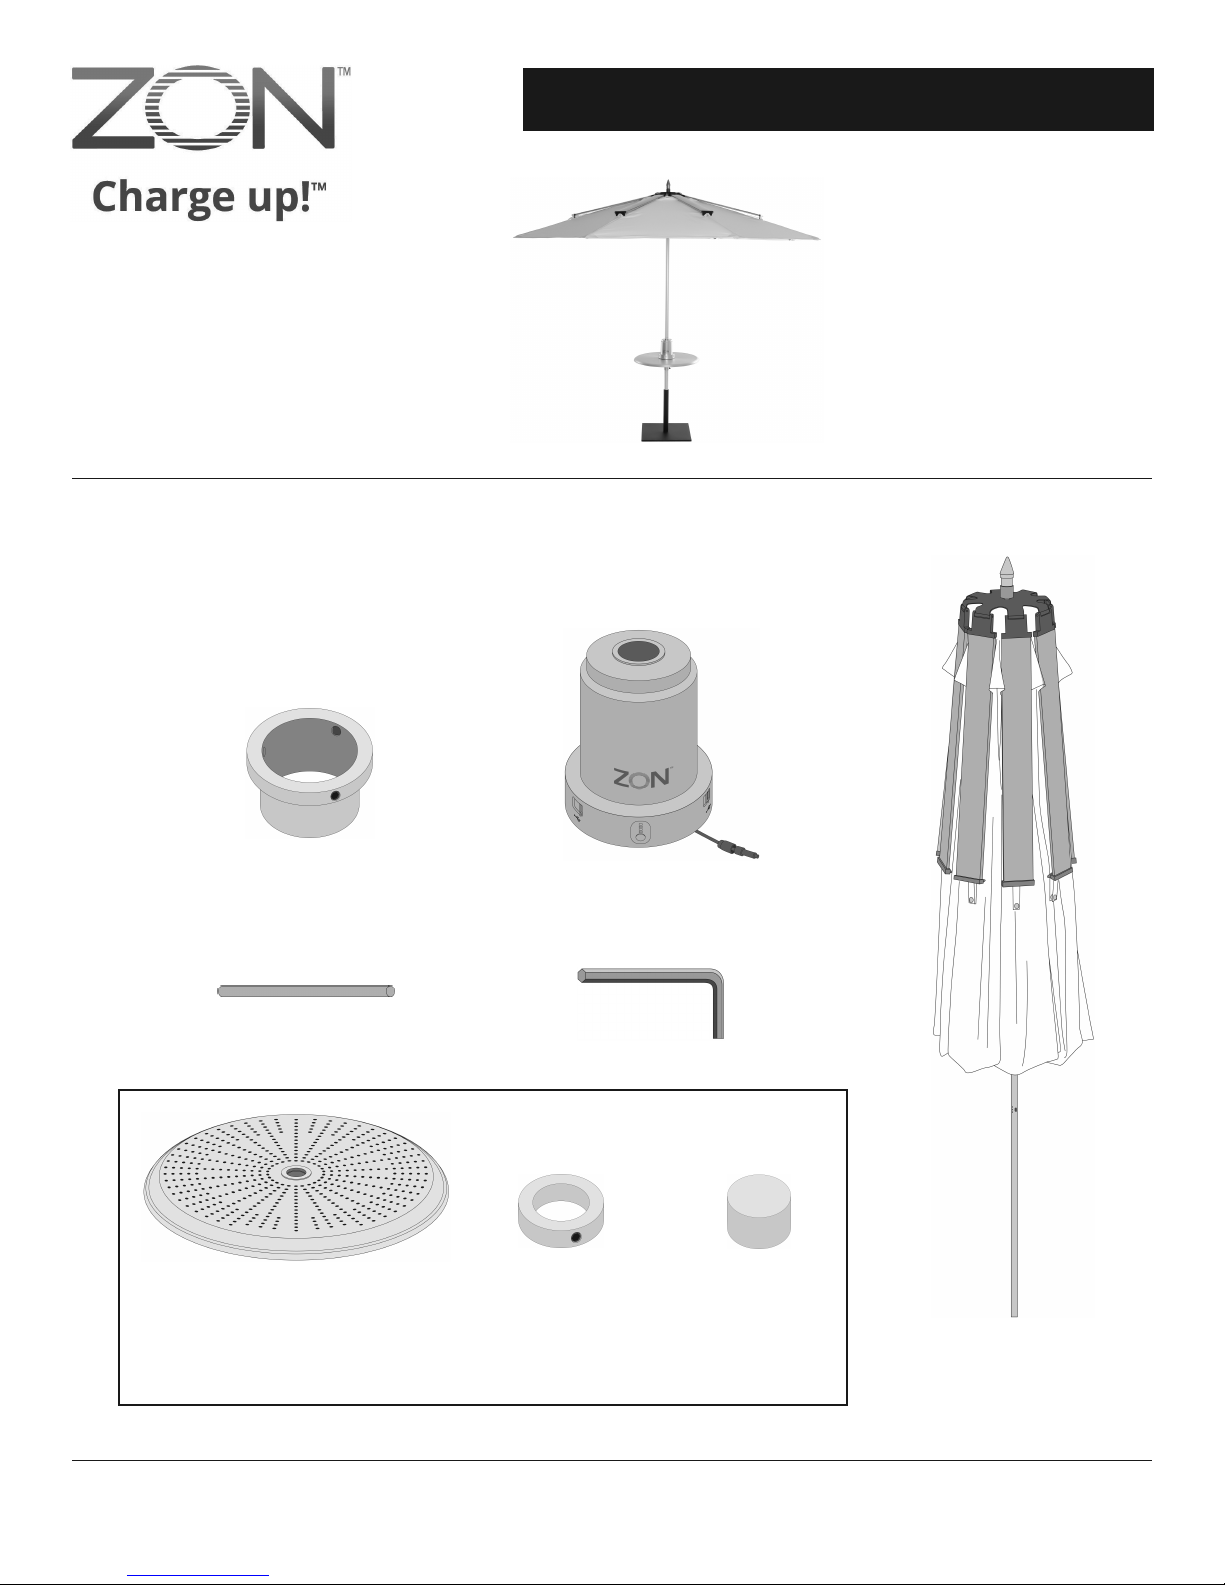
Parts List
(not drawn to scale)
Powersol
Solar Mobile Device
Charging Station
TOP
LOCKING CAP
PIN
TABLE
(sold separately*)
* To purchase these accessories, please visit our website at www.zon-technology.com
BOTTOM
LOCKING COLLAR
(sold separately*)
CHARGING
TOWER
HEX WRENCH
SPACER
(sold separately*)
UMBRELLA,
POLE, AND
SOLAR PANELS
U.S. Patent numbers D693,560; D693,561; D693,562; D693,563. Additional U.S. & International Patents Pending.
Copyright © 2015 by ZON. Designed and made in the USA.
Page 2
1
2
Female wire
connector
Keep oval
A
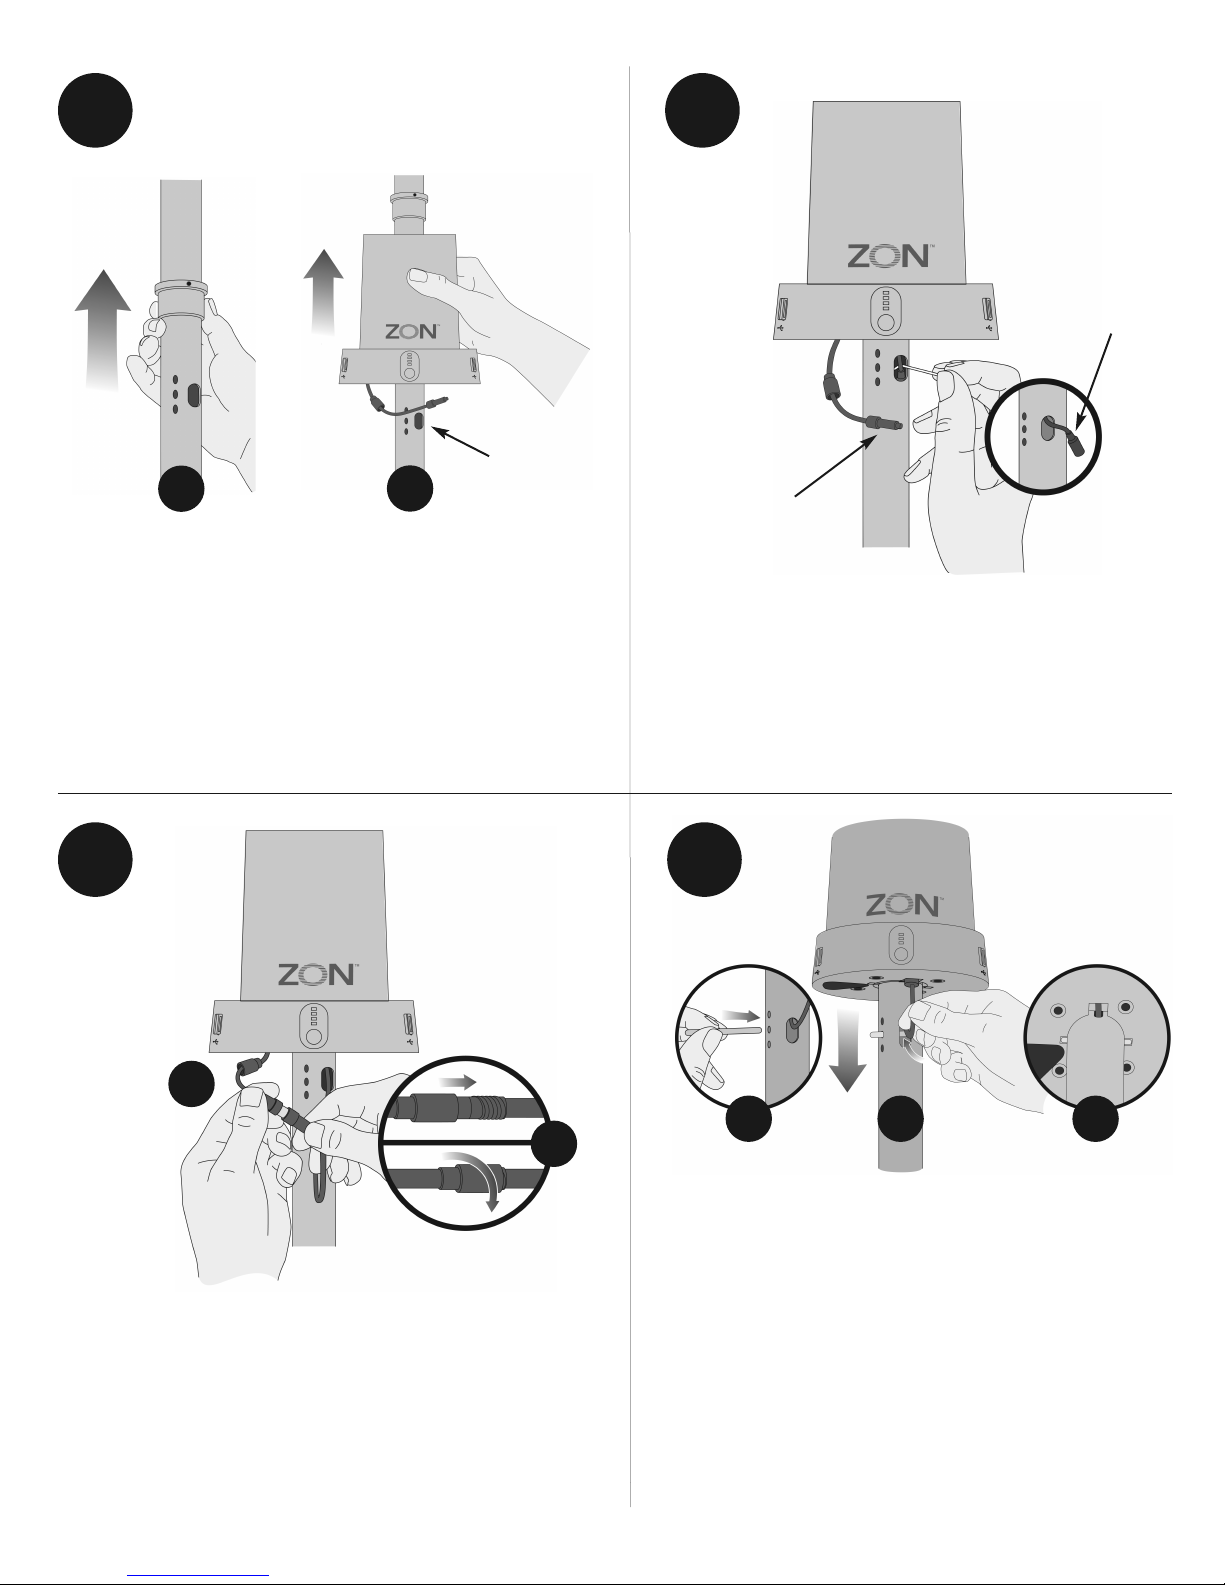
A. Slide the top locking cap up from bottom of the pole,
past the oval cutout.
B. Slide the charging tower up from the bottom of the
pole, past the oval cutout.
B
cutout below
charging tower!
3
Male wire
connector
Using the hex wrench, extract the female wire connector from the oval cutout in the pole.
Note: Remember to insert the female wire connector
back into the pole when disassembling Powersol.
4
A
A. Firmly insert the male wire connector into the female
wire connector.
B. Slide the male connector cap over the female connector, and twist clockwise until tight. The male and female wire connectors are now firmly connected, forming
the wire assembly.
B
A
A. Insert the pin into one of the three sets of predrilled holes (depending on the desired table height),
until both ends of the pin protrude from either side of
the pole.
B. While feeding the wire assembly into the oval
cutout of the pole, slide the charging tower downward.
C. Firmly insert the two protruding ends of the pin
into the slots in the bottom of the charging tower.
B
C
Page 3
5
6
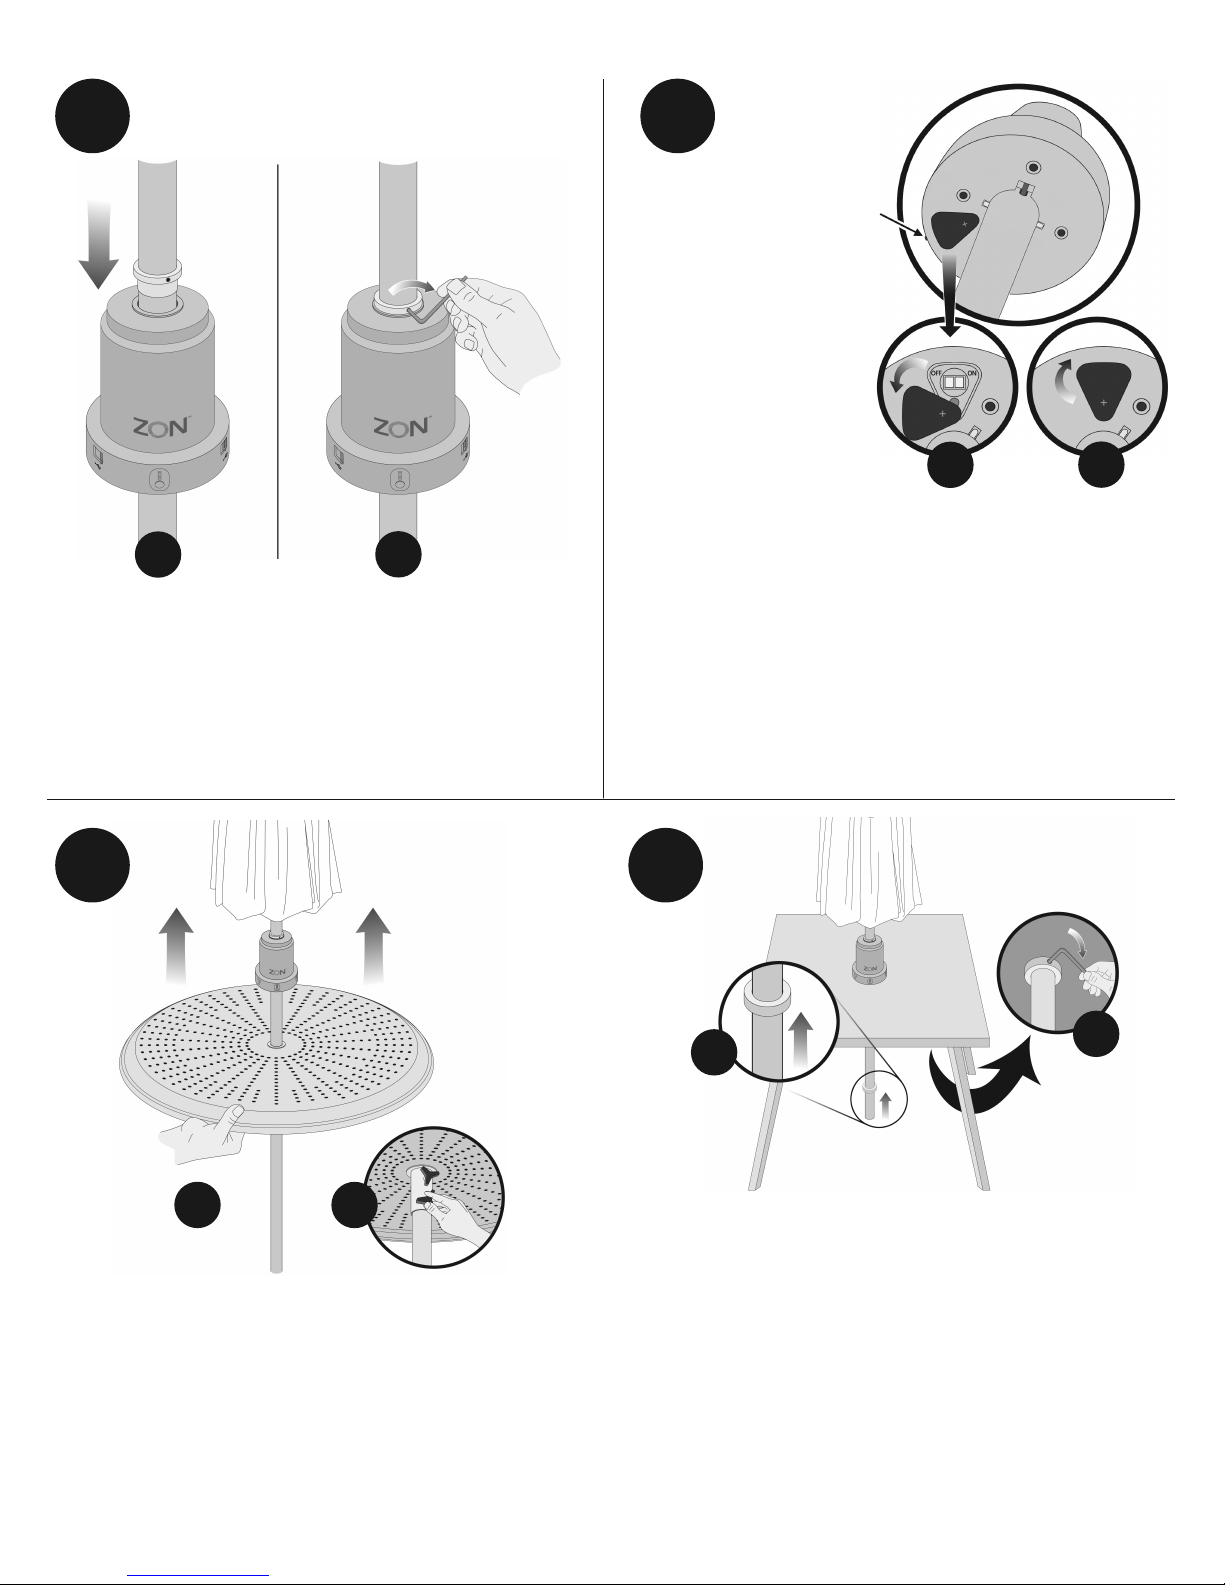
A. Swivel the cover
on the bottom of
the charging tower
to reveal the
ON/OFF switch.
Slide to the ON position to turn on the
tower. Note the
Reset button below
the
ON/OFF switch.
Bulge
A
B
A
A. Slide the top locking cap down until it sits flush on
the top of the charging tower.
B. Using the hex wrench, tighten the three screws on
the locking cap until the cap is fastened tightly to the
pole.
B
7a
B. Replace the cover by swiveling it and snapping into
place. To reset the charging tower at any time, press
the plus sign (
depressed.
Note the small bulge on the bottom of the charging
tower (shown in picture, above). This indicates the approximate location of the Reset button on the bottom of
the tower.
+ ) on the cover until the Reset button is
7b
A
B
Underside
surface of
table
A
To use the Powersol table (sold separately):
A. Slide the Powersol table up from the bottom of
the pole until flush with the bottom of the charging
tower.
B. Hand-tighten the two knobs on the bottom of
the Powersol table to secure it to the pole.
B
To use your own patio/picnic table with Powersol:
A. Insert the umbrella pole into the patio table. Slide the
bottom locking collar (sold separately) up from the bottom
of the pole until flush with the underside surface of the table.
B. Using the hex wrench, tighten the screw on the locking
collar until the collar is fastened tightly to the pole.
Note: When using a base or pedestal, you can raise the
height of the umbrella by inserting one or more spacers
(see Parts List) into the base insert.
Page 4
8
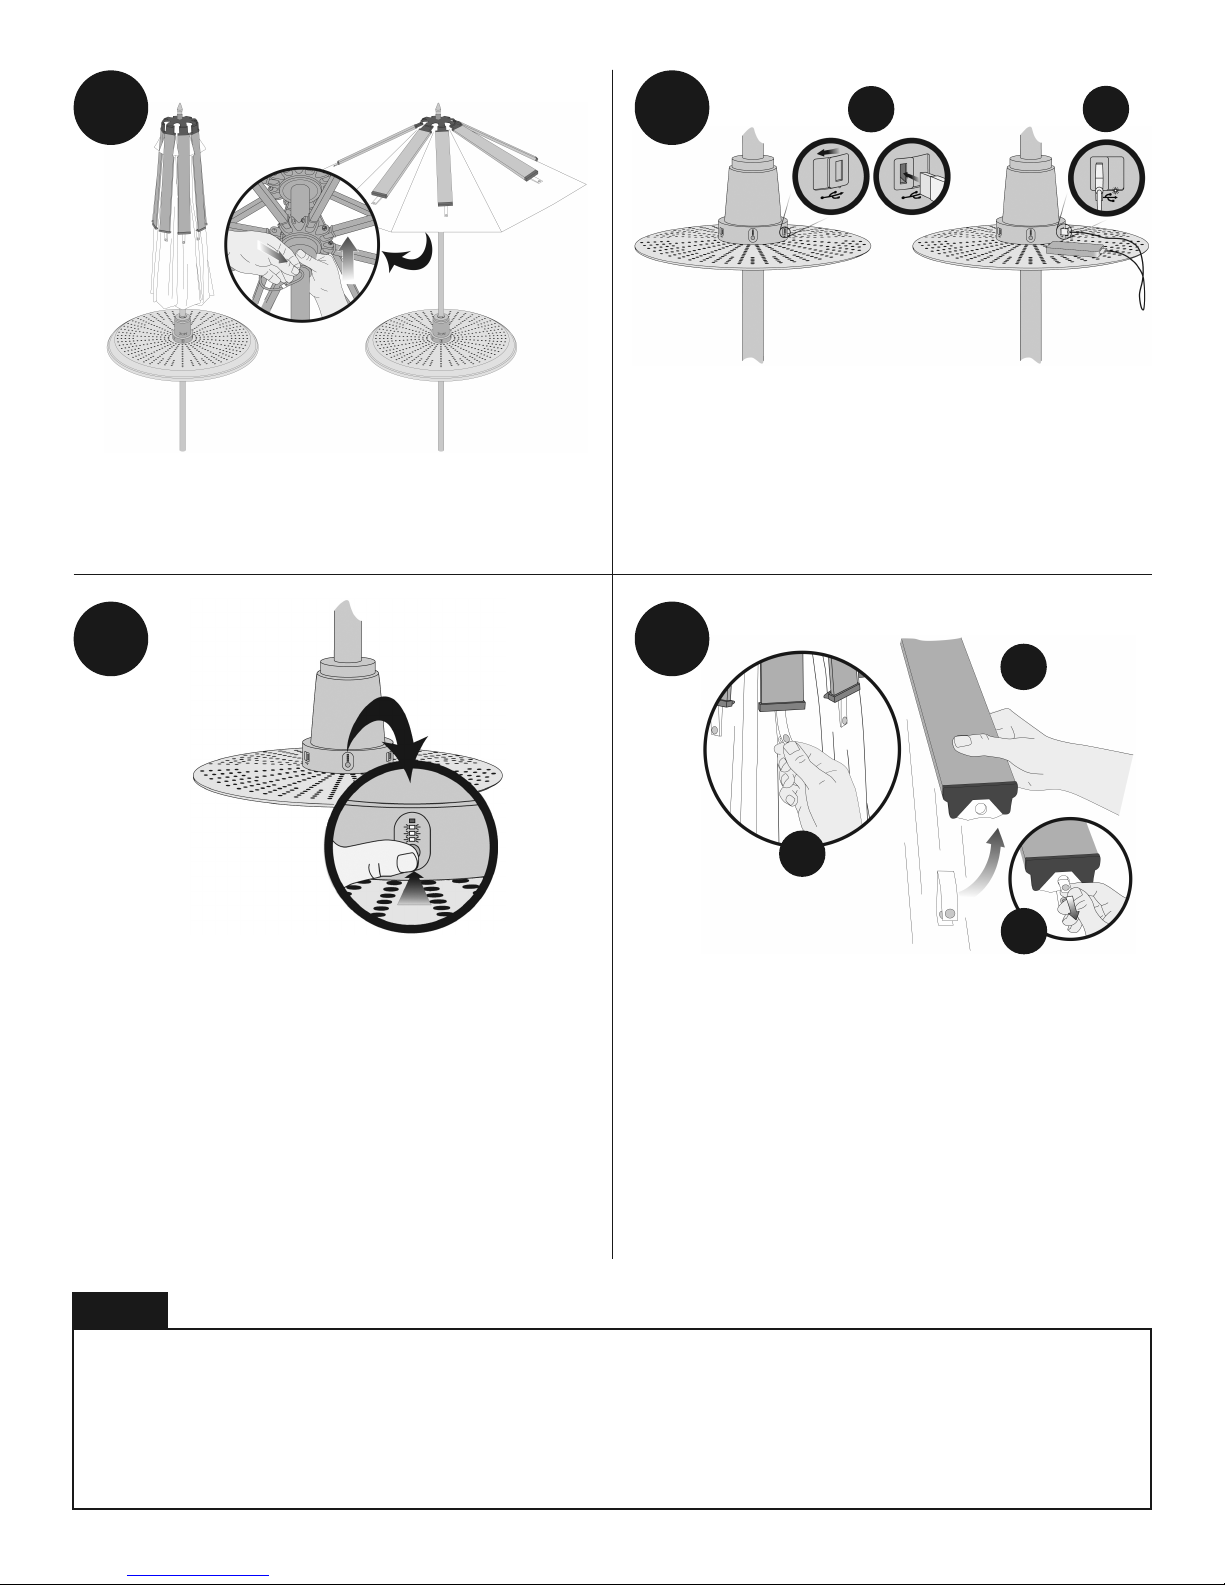
Hand-raise the umbrella canopy, and then lock the canopy
in the raised position by inserting the attached pin through
the hole in the umbrella pole.
9
To charge a USB device:
A. Slide the port cover to the left, then insert the USB
cable into the port.
B. The lower right LED will glow yellow while the device is
charging. When fully charged, the LED will turn green.
A
B
10
To show the charge level of the charging tower’s
internal battery:
Push and hold the button on the battery indicator panel.
When the internal battery is being charged, the four LEDs
will glow in rotation (from bottom to top).
When the battery level is very low, the lowest indicator
light will flash, indicating that the internal battery needs to
be charged. At that point, the three USB ports will be unusable until internal battery is charged.
11
B
A
C
To clean the umbrella fabric beneath a solar panel:
A. Unsnap the fabric loop that fastens the solar panel
to the umbrella.
B. Gently lift the solar panel away from the umbrella, and
clean the umbrella fabric.
C. When finished, insert fabric loop through the housing at
the end of solar panel, and snap tightly
.
NOTES
1. Use a base or pedestal of at least 150 lb (68 kg) with Powersol. This ensures the best stability and safety.
2. Do not drill holes through the pole, umbrella, solar panels, charging tower, or any other parts of Powersol.
3. Do not submerge Powersol’s charging tower in water.
4. When charging mobile devices with Powersol, only use USB cables that are approved by the device manufacturer.
5. Do not plug multi-purpose USB plugs or hubs into Powersol.
6. As stated in the Powersol warranty, improper assembly will void warranty.
 Loading...