

Zonet ZSR9104WE user manual

Copyright Statement
is the registered trademark of Zonet Technology Inc. All the products
and product names mentioned herein are the trademarks or registered trademarks of
their respective holders. Copyright of the whole product as integration, including its
accessories and software, belongs to Zonet Technology Inc. Without the permission of
Zonet Technology Inc., any individual or party is not allowed to copy, plagiarize, imitate
or translate it into other languages.

Table of Contents
Chapter 1 Introduction......................................................................... 1
Welcome.............................................................................................. 1
Contents of Package.............................................................................. 1
System Requirement ............................................................................. 1
Getting to Know Your ZSR9104WE .......................................................... 2
Chapter 2 Installation ......................................................................... 4
Hardware Installation ............................................................................ 4
Wall Mount Installation .......................................................................... 7
Chapter 3 Configure Your Computer................................................... 9
TCP/IP Address Setting .......................................................................... 9
How to Check the Network Connection....................................................15
Chapter 4 Basic Configurations ...........................................................16
How to Access the Web-based Configuration Utility ..................................16
Setup Wizard.......................................................................................17
Chapter 5 Advanced Settings ..............................................................21
LAN Settings .......................................................................................21
WAN Settings ......................................................................................22
MAC Address Clone ..............................................................................23
DNS Settings .....................................................................................26
Chapter 6 Wireless Settings ................................................................27
Basic Settings......................................................................................27
Wireless Security Settings .....................................................................29
Advanced Wireless Settings...................................................................30
WPS Settings.......................................................................................31
WDS Settings ......................................................................................32
Wireless Access Control ........................................................................36
Wireless Connection Status ...................................................................37
Chapter 7 DHCP Server .......................................................................38
DHCP Server .......................................................................................38
DHCP Server List & Binding ...................................................................39
Chapter 8 Virtual Server......................................................................40
Port Range Forwarding..........................................................................40
DMZ Settings.......................................................................................41
UPnP Settings......................................................................................41
Chapter 9 Traffic Control ...................................................................42

Chapter 10 Security Settings...............................................................43
Client Filter .........................................................................................43
URL Filter............................................................................................44
MAC Filter ...........................................................................................45
Prevent Network Attack ........................................................................45
Remote WEB Management ....................................................................46
Wan Ping ............................................................................................46
Chapter 11 Routing Settings ...............................................................47
Routing Table .....................................................................................47
Chapter 12 System Tools.....................................................................48
Time Settings ......................................................................................48
DDNS .................................................................................................48
Backup/Restore ...................................................................................49
Upgrade..............................................................................................49
Restore to Factory Default Settings ........................................................50
Reboot................................................................................................50
Change Password.................................................................................51
System Log .........................................................................................51
Appendix 1 Product Features & Specifications ..................................52
Appendix 2 Troubleshooting...............................................................54

Chapter 1 Introduction
Welcome
Thank you for purchasing Zonet ZSR9104WE – High Gain Wireless N Router!
This high cost-efficiency router is the best choice for Small office / Home office
users, all computers and network devices can share a single xDSL / cable
modem internet connection at high speed. Easy install procedures allows any
computer users to setup a network environment in very short time - within
minutes, even inexperienced. When the number of your computers and
network-enabled devices grow, you can also expand the number of network slot
by simple attach a hub or switch, to extend the scope of your network!
All computers and IEEE 802.11b/g/n wireless-enabled network devices
(including PDA, cellular phone, game console, and more!) can connect to
ZSR9104WE without additional cabling. The MIMO technology also gives you
the highest speed of wireless experience ever! With a compatible wireless card
installed in your PC, you can transfer file for up to 300Mbps! The radio coverage
is also doubled, so don’t worry if your office or house is really big!
Moreover, the user-friendly Setup Wizard on the installation CD can assist you
to set up ZSR9104WE easily. It also can be managed or configured through
Local/Remote easy-to-use Web-based utility.
Contents of Package
One ZSR9104WE
One CD w/User Manual
One Quick Installation Guide
Two 7dBi Antennas
One Antenna Base
One Wall Mount Kit
One Cradle
One Power Adapter
One RJ-45 Ethernet Cable
Contact your local authorized reseller or the store purchased from for any items
damaged and/or missing.
System Requirements
Internet connection, provided by xDSL or cable modem with a RJ-45
Ethernet port.
Computer or network devices with wired or wireless network interface card.
Web browser (Microsoft Internet Explorer 6.0 or above, Firefox 2.0 or
above).
An available power socket (100–240V, 50/60Hz)
1

Getting to Know Your ZSR9104WE
Top Panel
LED Indicator Status Description
POWER ON ZSR9104WE is switched on and correctly powered
SYS Flashing Indicates the system works normally.
ON Indicates WAN port is connected
WAN
Flashing
Indicates WAN activity (transferring or receiving
data)
WLAN Flashing Indicates the wireless signal is OK.
ON Indicates LAN port is connected
LAN(1/2/3/4)
Flashing
WPS Flashing
Indicates LAN activity (transferring or receiving
data)
Indicates ZSR9104WE is negotiating with WPS
clients in WPS Mode (PBC or PIN).
2

Rear Panel
Item Name Description
Antenna These antennas are 7dBi dipole antennas.
POWER Power connector, connects to power adapter
WAN Wide Area Network (WAN / Internet) port.
1-4 (LAN Ports) Local Area Network (LAN) ports 1 to 4
RESET/WPS
Reset ZSR9104WE to factory default settings (clear all
settings) or start WPS function. Press this button and hold
for 7 seconds to restore all settings to factory defaults,
and press this button for 1 second to start WPS function.
3
Chapter 2 Installation
Hardware Installation
Note: Before connecting ZSR9104WE, be sure to power off your computer, DSL/Cable
modem, and ZSR9104WE.
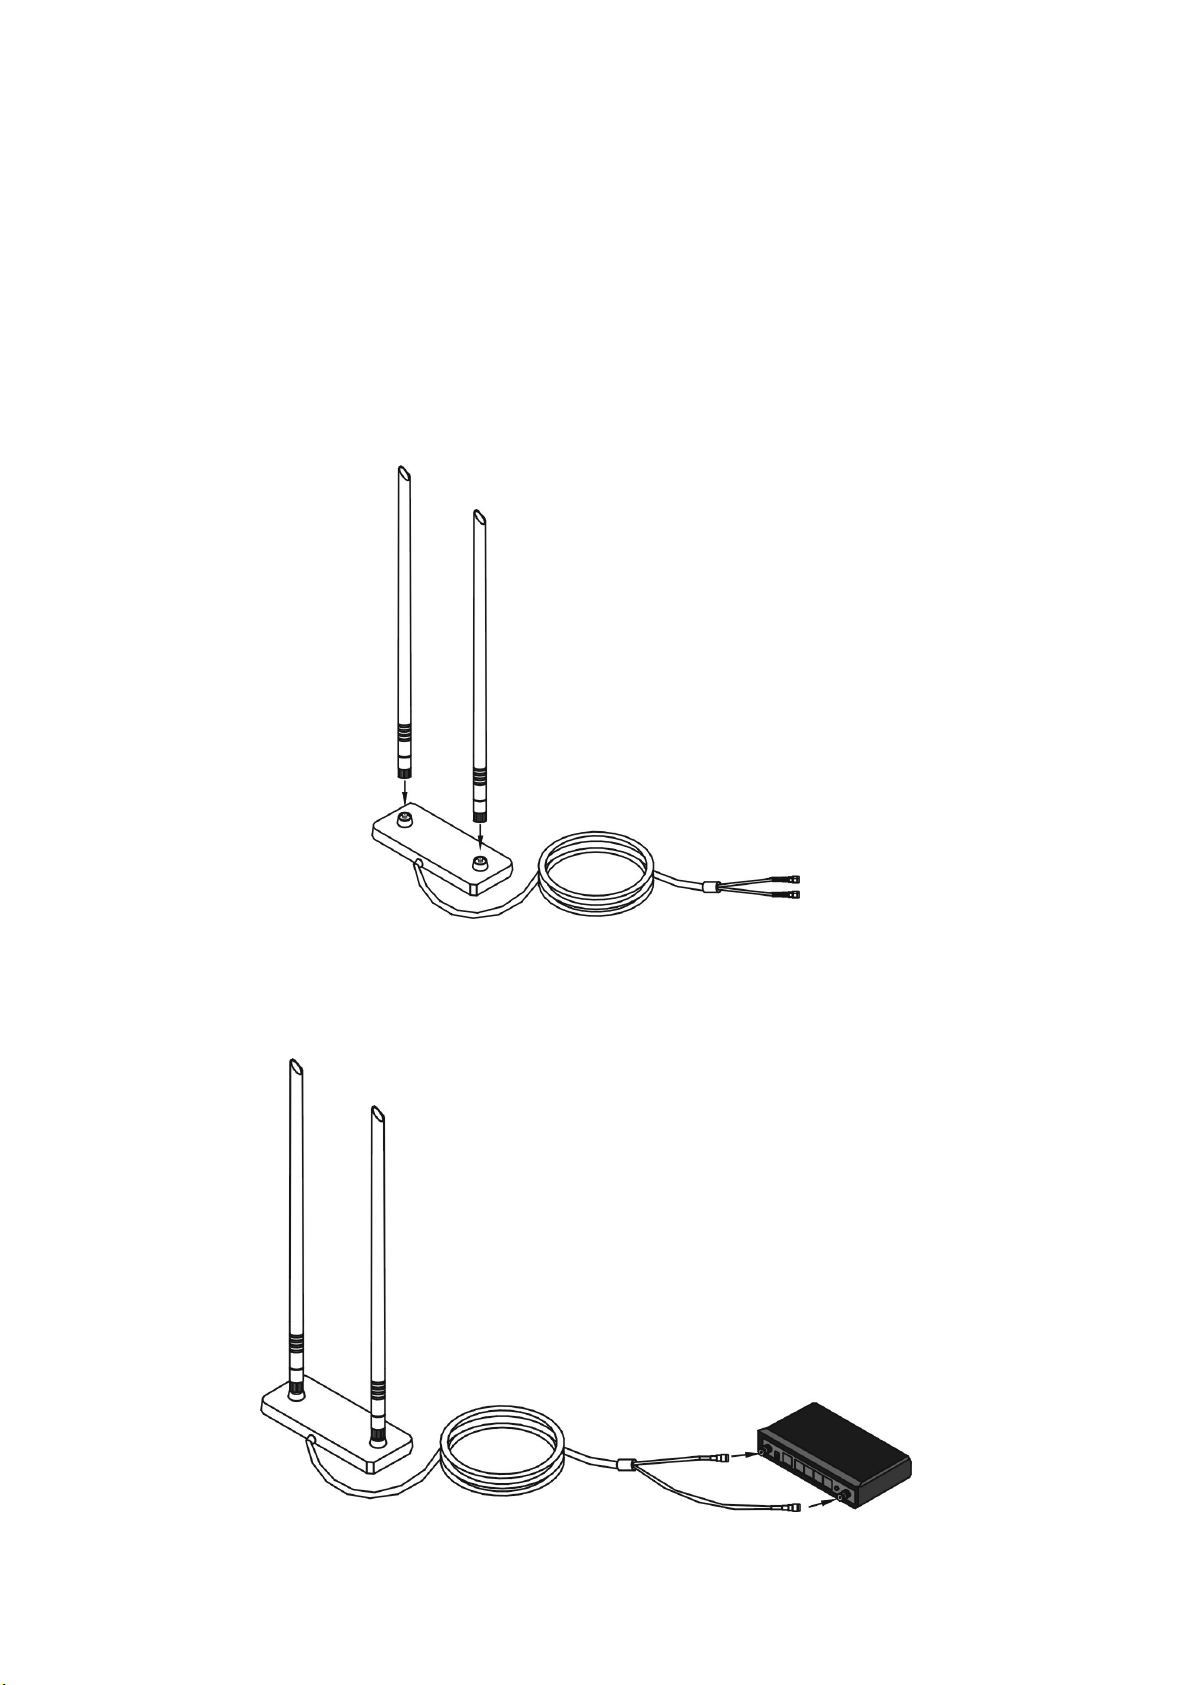
1. Screw 2 applied antennas to the antenna base.
2. Attach the antennas to ZSR9104WE by connecting 2 antenna connectors at
the end of the cable.
4
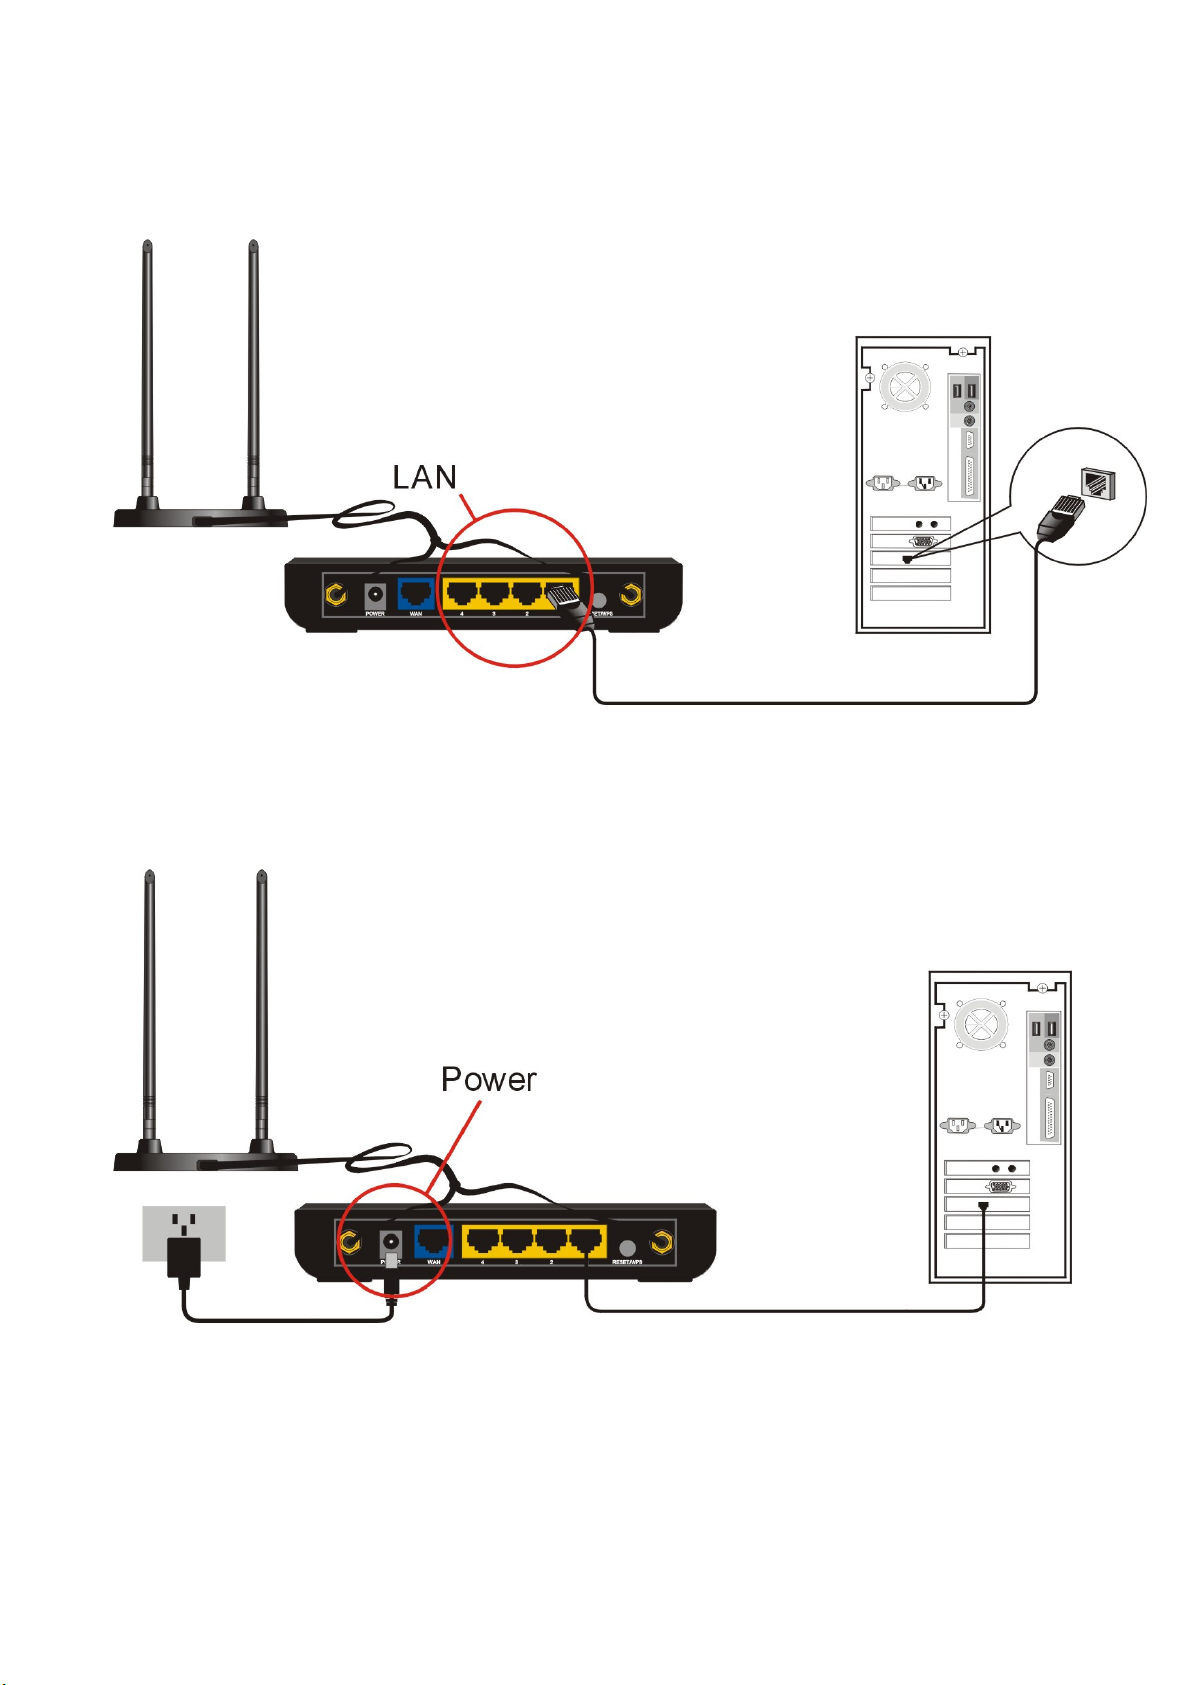
3. Connect all your computers, network devices (network-enabled consumer
devices other than computers, like game console, or switch / hub) to the LAN
port of ZSR9104WE.
4. Connect the power adapter to the wall socket, and then connect it to the
“Power” socket of ZSR9104WE.
5

5. Connect your xDSL / cable modem to the WAN port of ZSR9104WE by
Ethernet cable.
6. Please check all LEDs on the top panel.
POWER LED should be steadily on.
WAN and LAN LEDs should be on if the computer / network device
connected to the respective port of ZSR9104WE is powered on and
correctly connected.
Note: If any LED you expected is not on, please recheck the cabling, or jump to
“Troubleshooting” for possible reasons and solution.
6
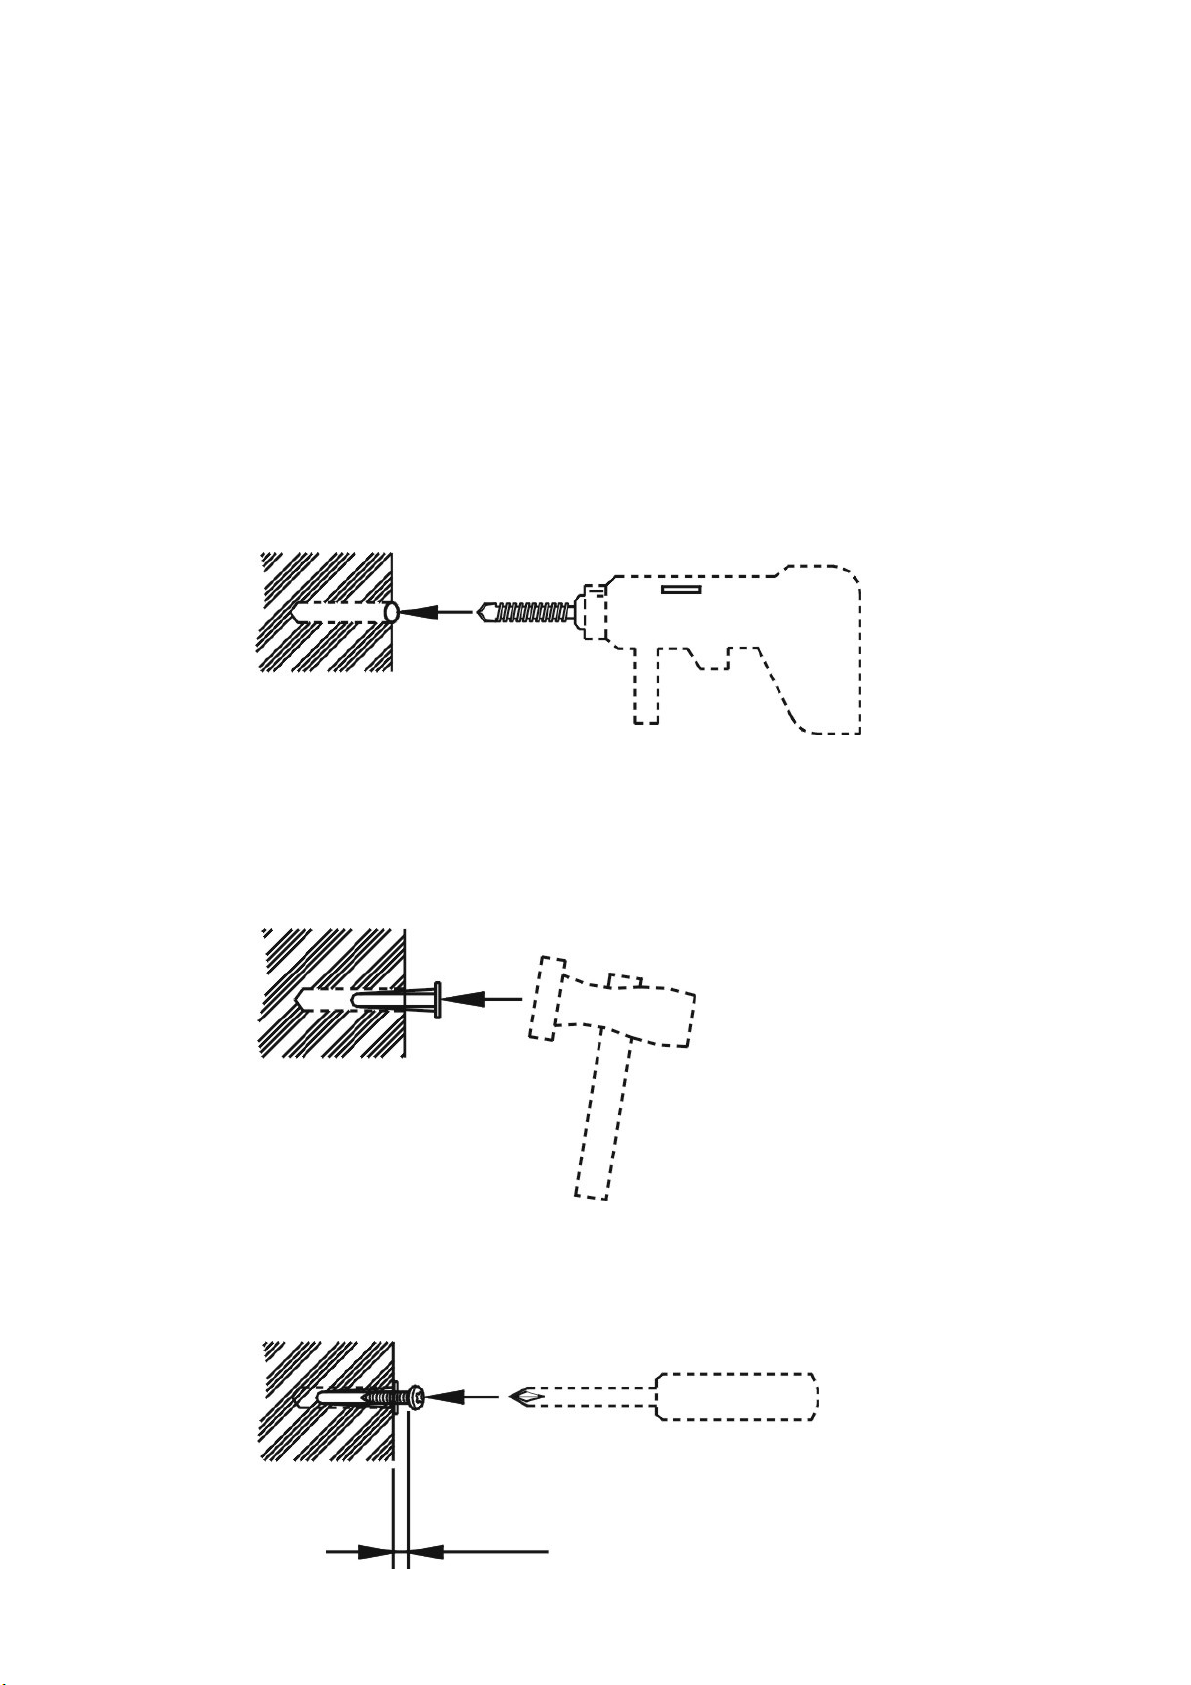
Wall Mount Installation
ZSR9104WE comes with an antenna base which can be mounted onto the wall.
When installing the antenna base on a wall, the mounting kit must be first installed
onto the wall.
1. Determine the optimal location for the antenna base before beginning.
2. Mark 2 holes 10cm apart from each other by pencil and drill the holes
into the wall.
Note: Ensure you are using the 3mm (1.8 inch) drill bit size and type for the
wall.
3. Hammer the included anchors into the wall until seated flush.
4. Drive the included screws into the anchors until leaving approx. 5mm
screw exposed.
Leave Approx. 5mm
7

5. Mount the antenna on to the wall.
6. For the best performance, adjust the antennas to an optimal position.
8
Chapter 3 Configure Your Computer
TCP/IP Address Setting
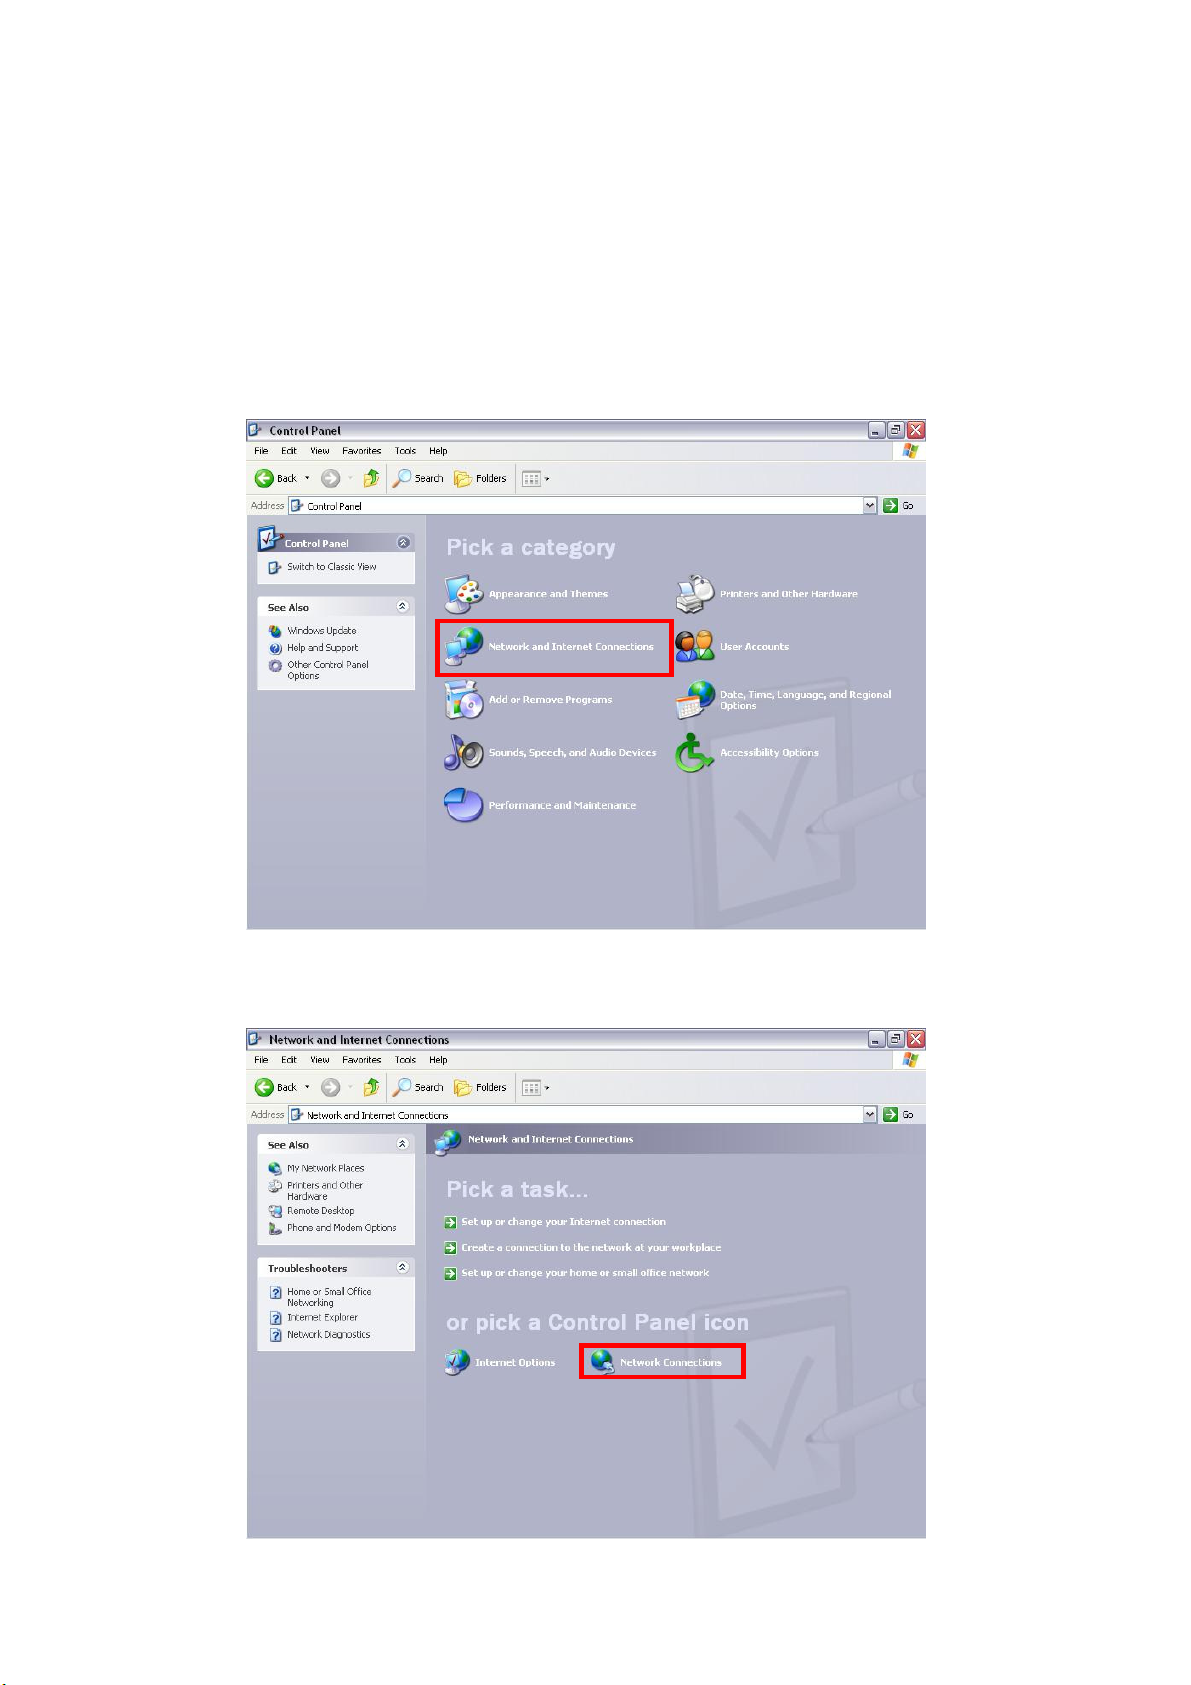
a. Windows 2000 / Windows XP
1. Click Start →→→→ Control Panel →→→→ Network and Internet Connections
2. Click Network Connections
9
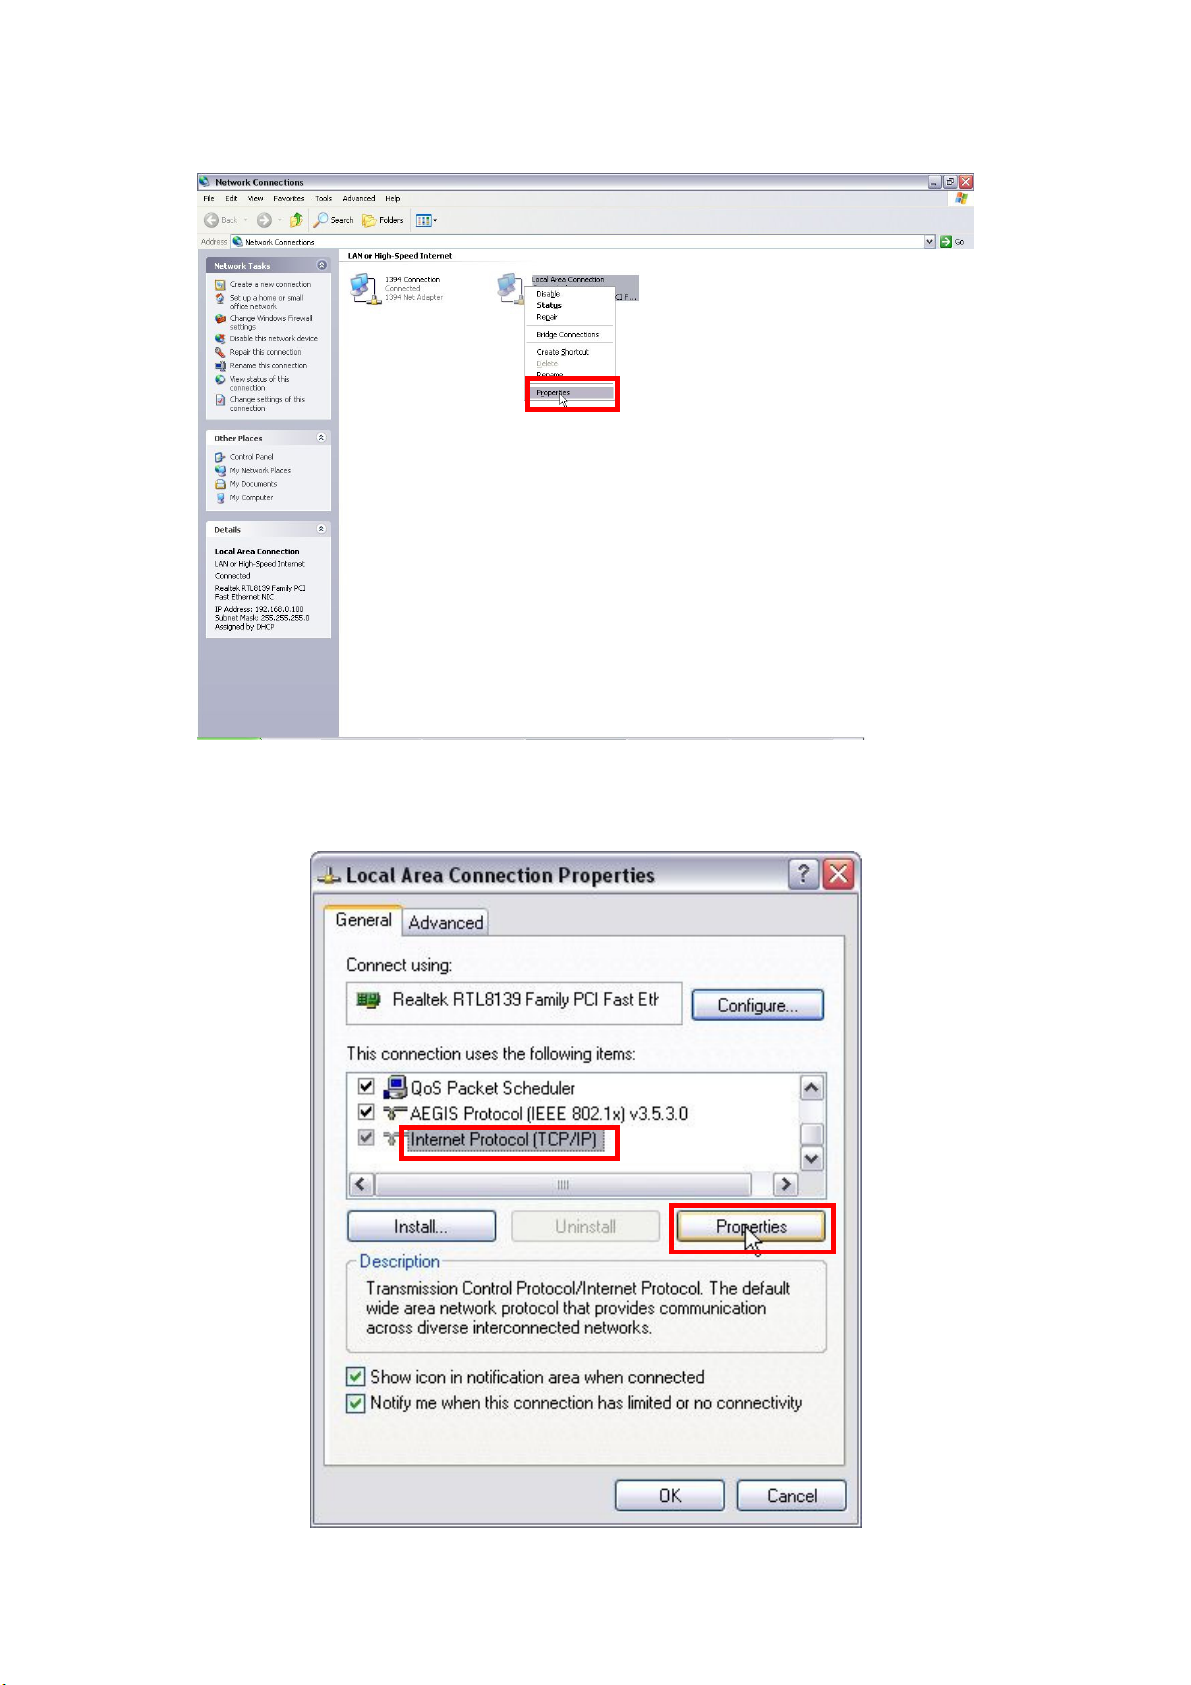
3. Right click Local Area Network Connection and select Properties.
4. Select Internet Protocol (TCP/IP) and click Properties.
10
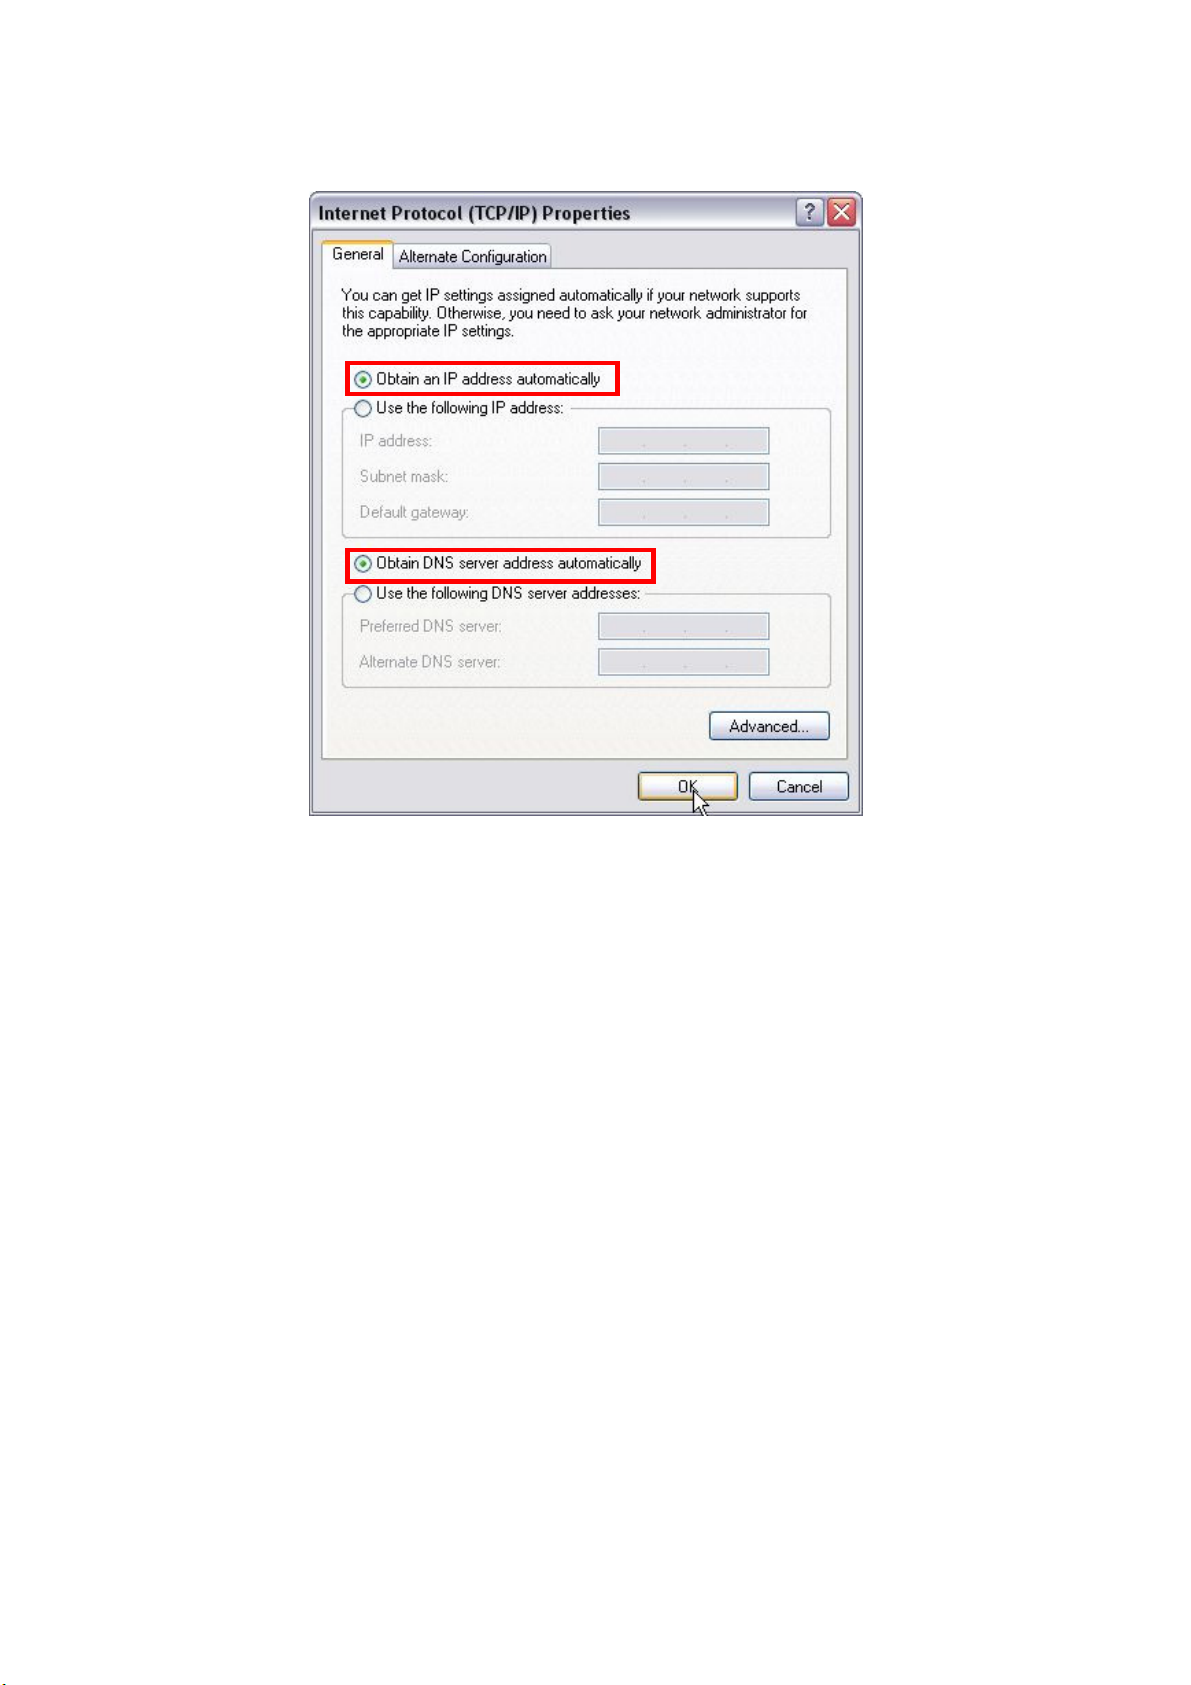
5. Select Obtain an IP address automatically and Obtain DNS server
address automatically. Click OK to save the configurations.
11
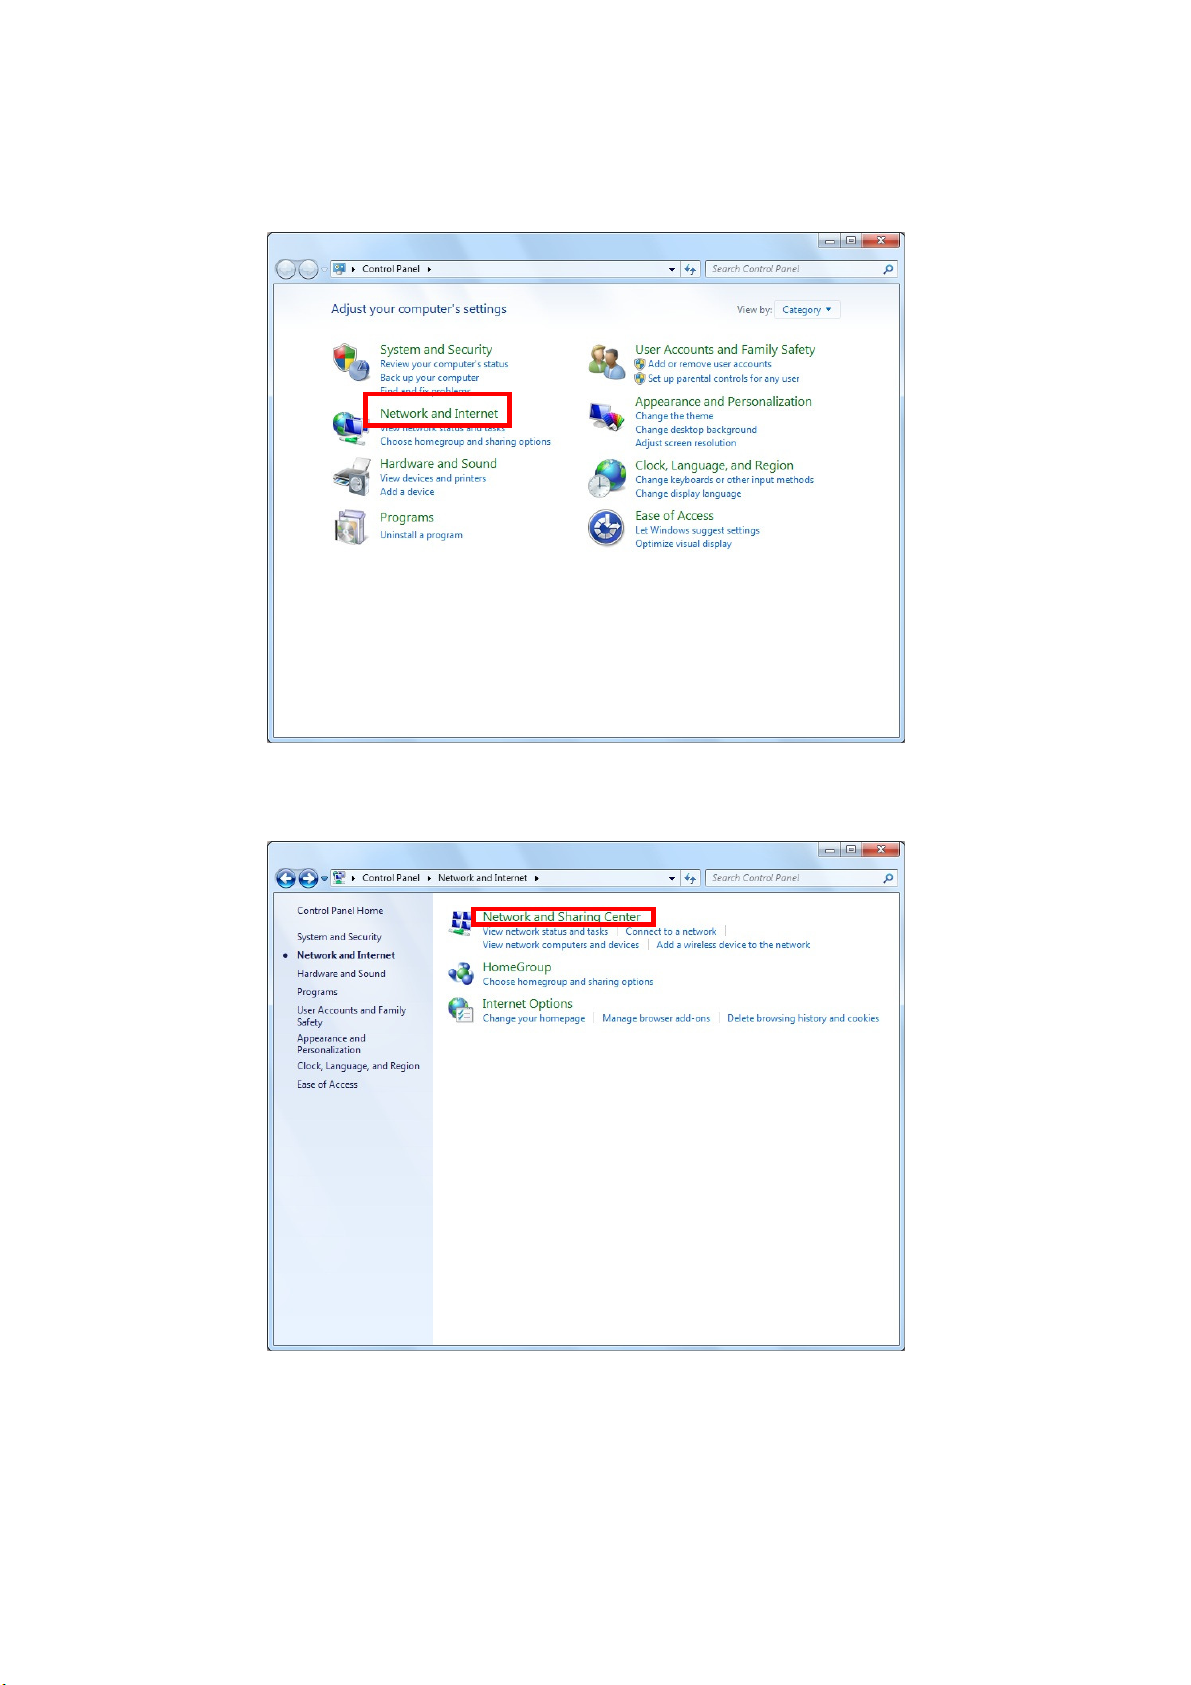
b. Windows Vista / Windows 7
1. Click Start →→→→ Control Panel →→→→ Network and Internet
2. Click Network and Sharing Center
12
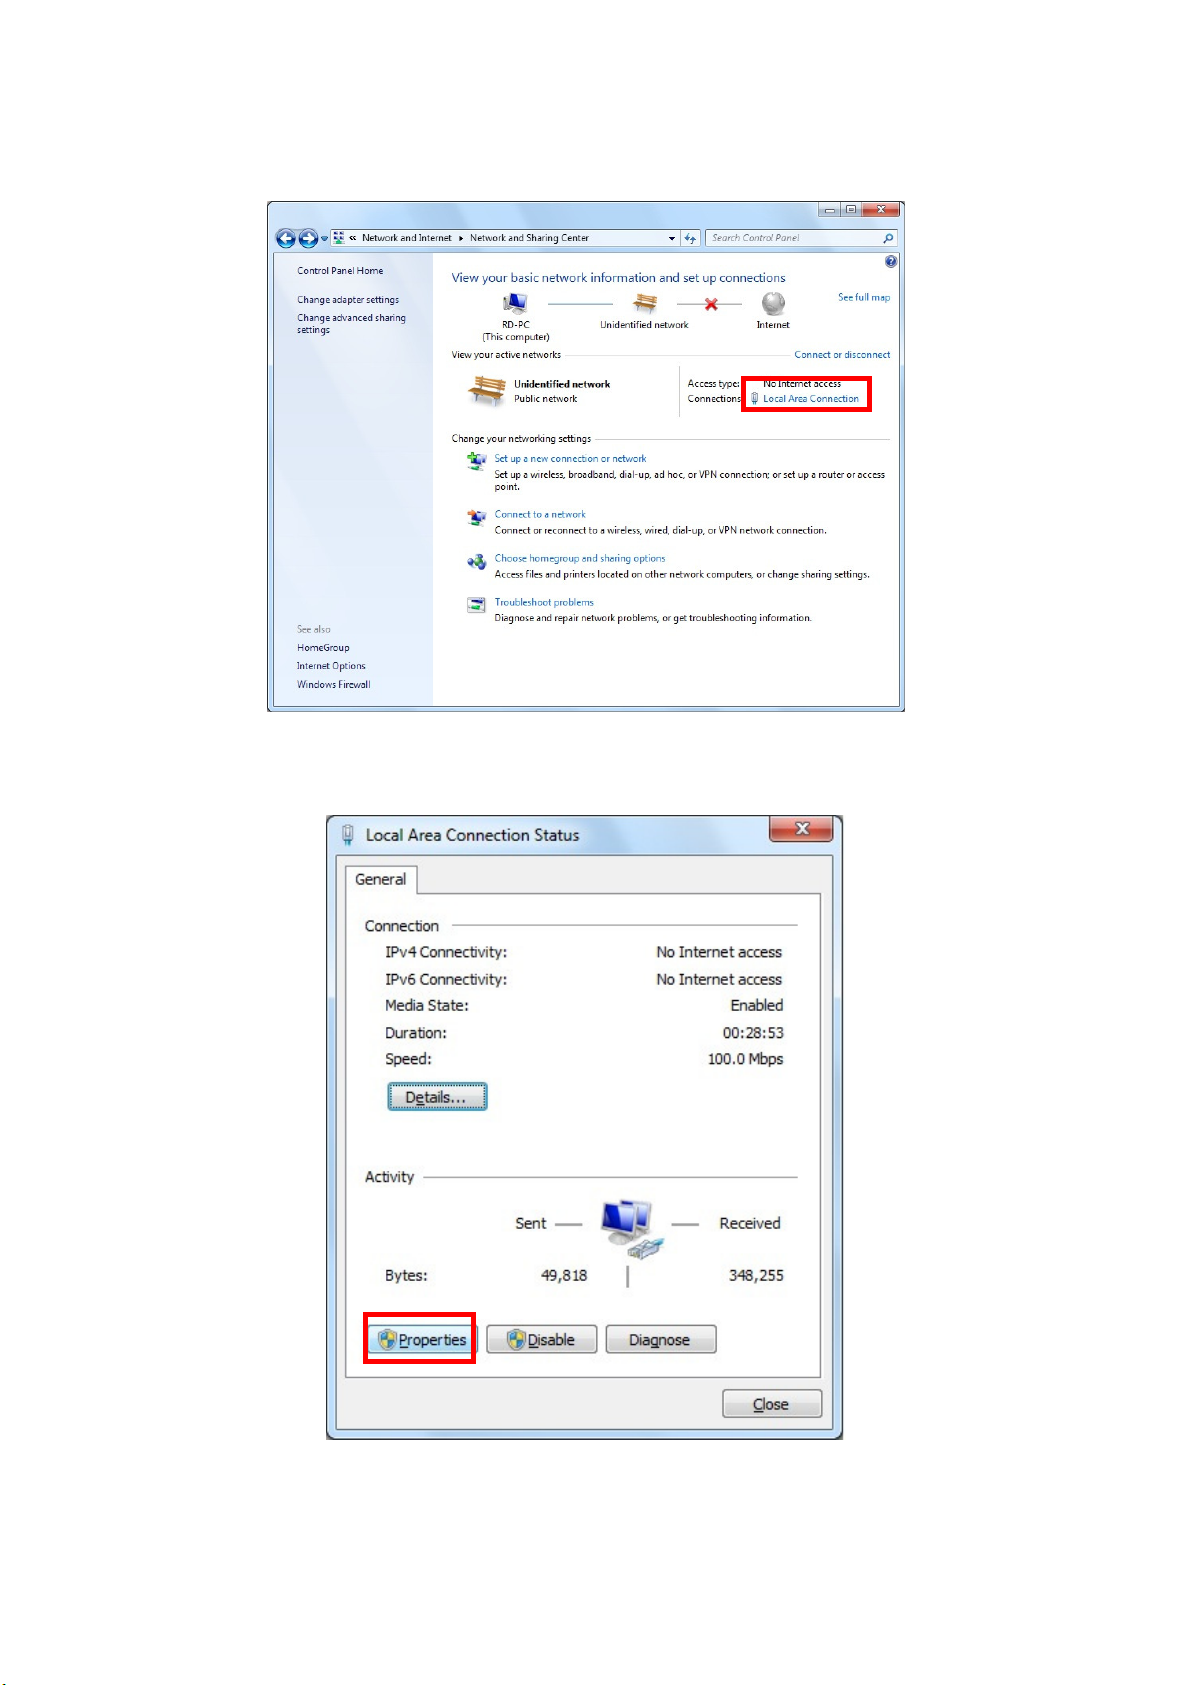
3. Click Local Area Connection and then Local Area Connection Status
window will pop-out.
4. Click Properties from Local Area Connection Status.
13
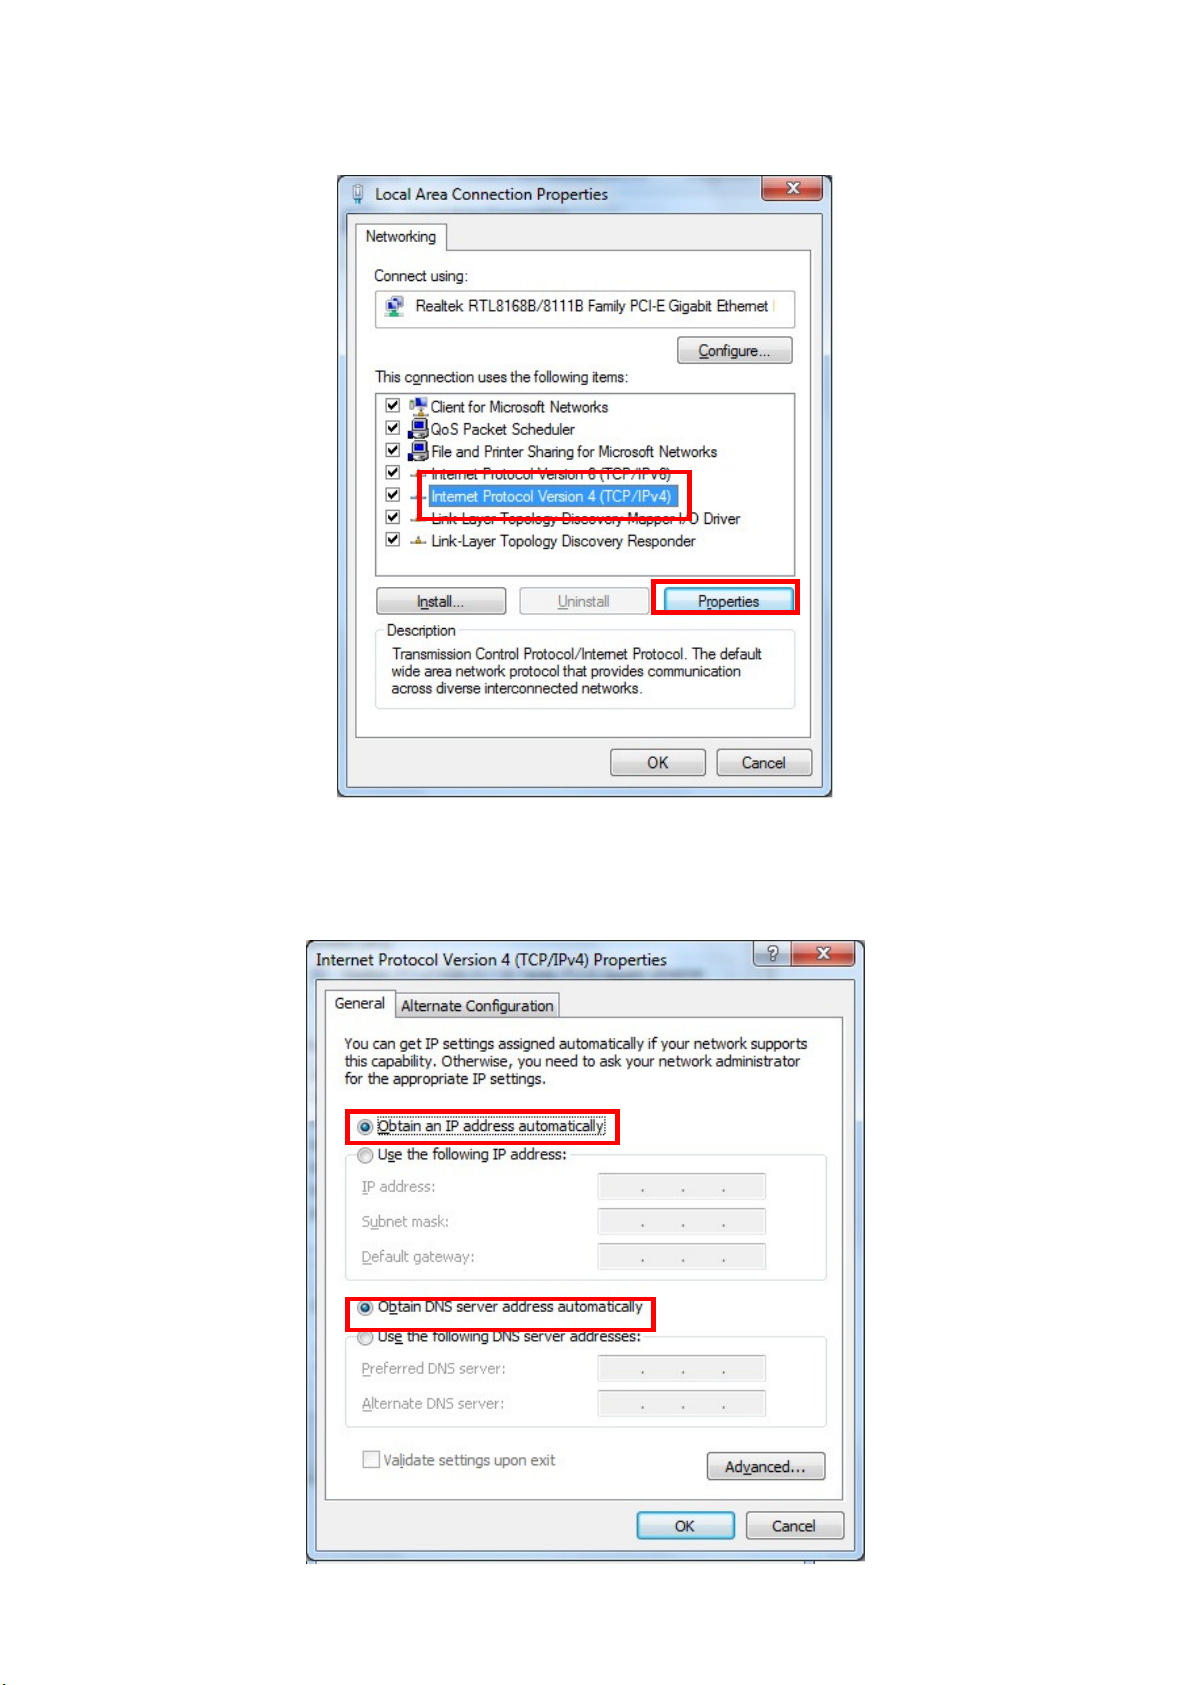
5. Select Internet Protocol Version 4 (TCP/IPv4) and click Properties.
6. Select Obtain an IP address automatically and Obtain DNS server
address automatically. Click OK to save the configurations.
14
 Loading...