

Page 1
Op
How t
o E
njoy Y
erating Instruc
tions & Recip
es
our Home Baker
y Supreme
BBCC – X20
CONTENTS
FEATURES
IMPORTANT SAFEGUARDS / SPECIFICATIONS
PARTS NAMES / HANDLING INSTRUCTIONS
CONTROL PANEL / HOW TO USE THE TIMER
ACCESSORIES / PREHEAT OFF FUNCTION
LET'S START BAKING
2
3
4
5
6
T
M
BEFORE BAKING
BASIC BREAD (BASIC, QUICK)
WHOLE GRAIN (BASIC WHEAT, QUICK WHEAT)
DOUGH (BASIC DOUGH, QUICK DOUGH)
JAM
CAKE
SOURDOUGH STARTER
HOME MADE
CLEANING / STORAGE
QUESTIONS AND ANSWERS / ABNORMAL CONDITION
TROUBLESHOOTING GUIDE
7~8
9~13
14~16
17~20
21
22~23
24~26
27~29
30
31~32
33
Page 2
FEATURES
Features
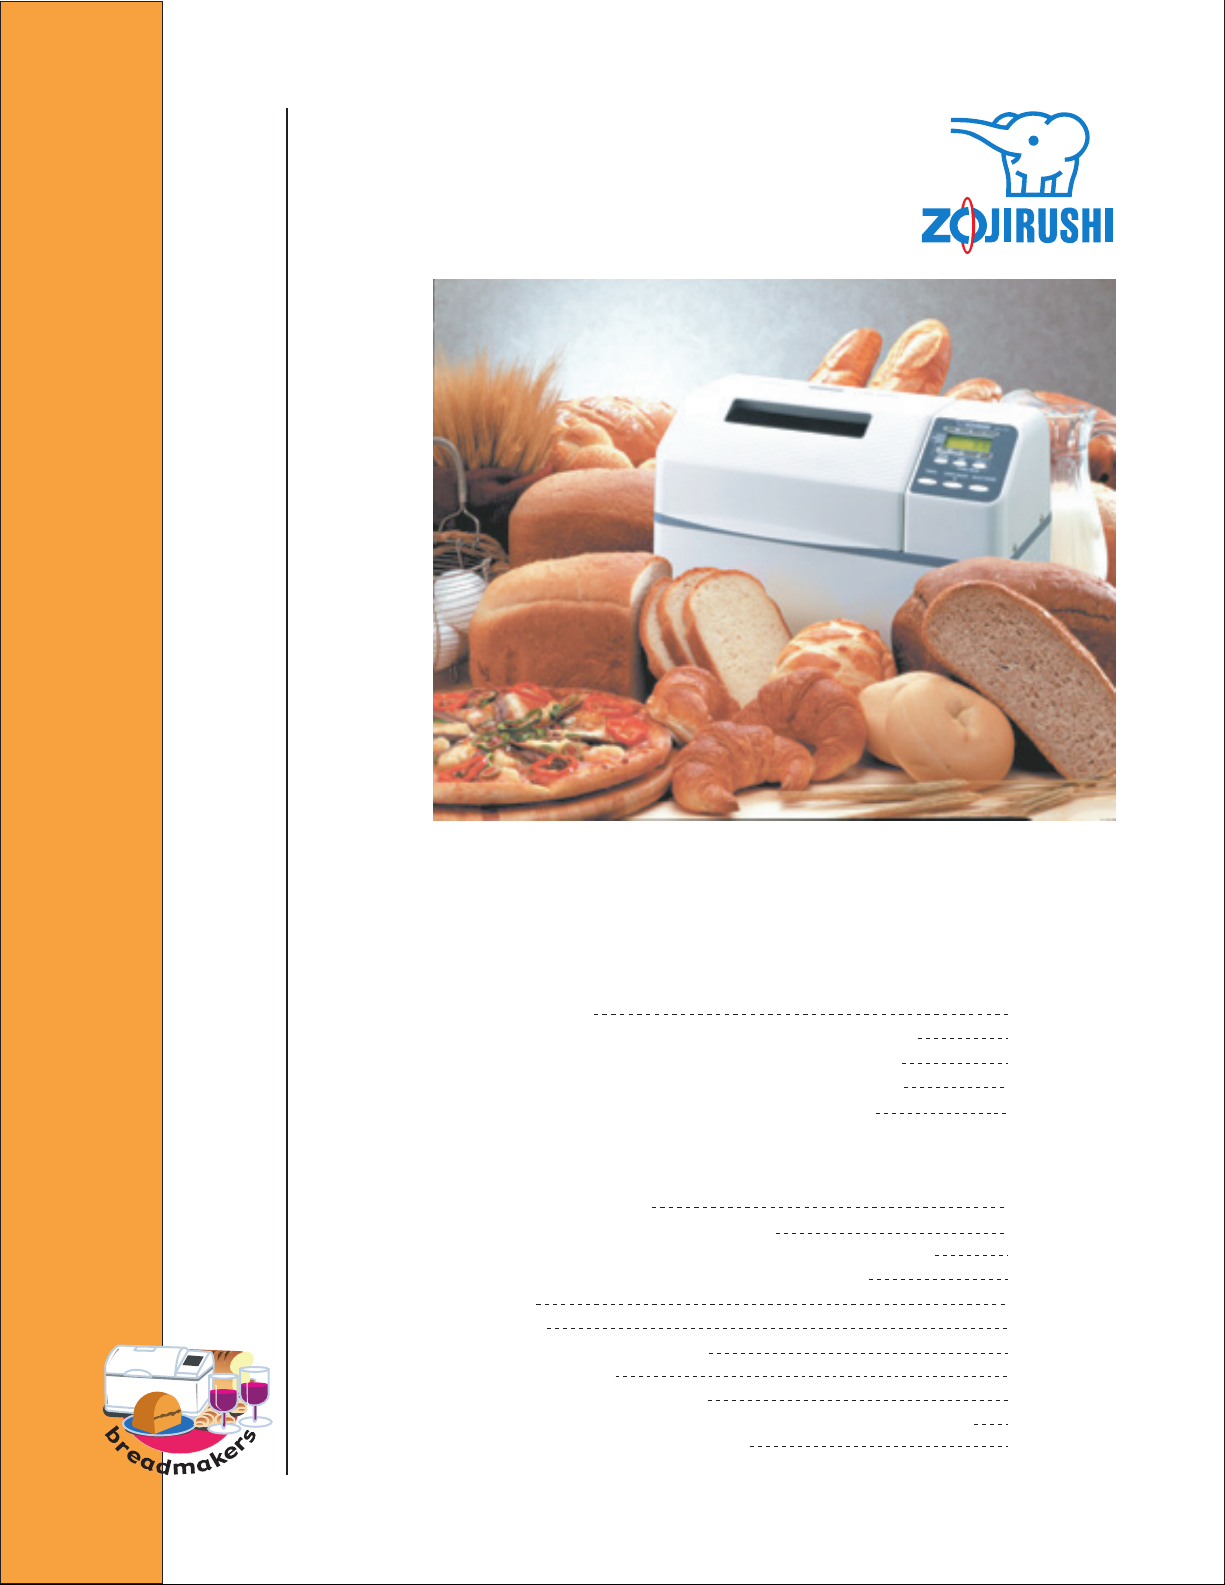
Now it's easy to enjoy the smell and delicious taste of freshly baked breads, cakes and
more! From fully automated, perfectly baked loaves of bread to cakes, fresh fruit jams
and more, the makes it easy to expand your homemade menu.
Features
*Bakes a large traditional rectangular shaped 2 Ib loaf
*Home Made Menu function
Includes 3 memory settings for your personal recipes
*Sourdough Starter function
Prepares a light sourdough starter in a little over 2 hours !
*Large viewing window
Allows you to watch the baking process
*Quick baking cycle prepares bread in under 2 hours
*Cake and Jam settings
*13 hour Programmable timer
*Crust Control function
Allows you to select light, medium or dark
- 2 -
Page 3

Important
Safeguards
Specifications
WELCOME TO THE ZOJIRUSHI HOME BAKERY
WHEN USING ELECTRICAL APPLIANCES, BASIC SAFETY PRECAUTIONS SHOULD
ALWAYS BE FOLLOWED, INCLUDING THE FOLLOWING:
Read all instructions carefully.
1.
Do not touch hot surfaces. Use handles or knobs.
2.
Do not close or clog the steam vent opening under any circumstances.
To protect against electrical shock, do not immerse cord, plug, or baking machine in water or other
3.
liquid.
4.
Close supervision is necessary when the appliance is used by or near children.
5.
Unplug the power cord when the appliance is not in use, or before cleaning.
Allow to cool before putting on or taking off any parts, and before cleaning the appliance.
6.
Do not use or operate the appliance with a damaged cord or plug, or after the appliance
malfunctions, or has been damaged in any manner. Return the appliance to the nearest authorized
service facility or dealer for examination, repair, or adjustment.
7.
The use of accessory attachments not recommended or sold by the appliance manufacturer may
cause injuries.
8.
Do not use outdoors.
9.
Do not let the power cord hang over the edge of a table or counter, or touch hot surfaces.
10.
Do not place the appliance on or near heat sources such as gas or electric stoves, ovens, or burners.
11.
Extreme caution must be given when moving the appliance containing hot contents or liquids.
12.
Always attach plug to appliance first, then plug cord into the wall outlet. To disconnect, press
RESET and remove plug from wall outlet. Never pull on cord.
13.
Do not use the appliance for other than intended or specified purposes.
14.
Avoid moving parts.
15.
Use only an electrical outlet rated at 15 amperes or more.
16.
Use only 120-VOLT AC electrical current.
17.
Do not scratch, damage, modify, forcefully bend, pull, twist, or fold the power cord.
18.
Do not place the appliance on unstable surfaces or on surfaces that are vulnerable to heat.
Save These Instructions
THIS APPLIANCE IS FOR HOUSEHOLD USE ONLY.
Note
A short power cord is provided to reduce the risk resulting from becoming entangled in or tripping
over a long cord.
Extension cords are available and may be used if care is exercised in their use.
A.
When an extension cord is used:
(1)the marked electrical rating of the extension cord should be at least as great as the electrical rating
B.
of the appliance, and
C.
(2)the longer cord should be arranged so that it will not drape over the countertop or tabletop where it
can be pulled on by children or tripped over unintentionally.
This appliance has a polarized plug (one blade is
wider than the other). As a safety feature, this plug
will fit in a polarized outlet only one way. If the plug
does not fit fully in the outlet, reverse the plug. If it
still does not fit, contact a qualified electrician. Do
not attempt to defeat this safety feature.
- 3 -
Specifications
Power consumption: Heater: 600W
Power consumption: Motor: 100W
Power supply: 120V, 60Hz
Dimensions: 17" x 10" x 12"
Weight: 17lbs.
Page 4
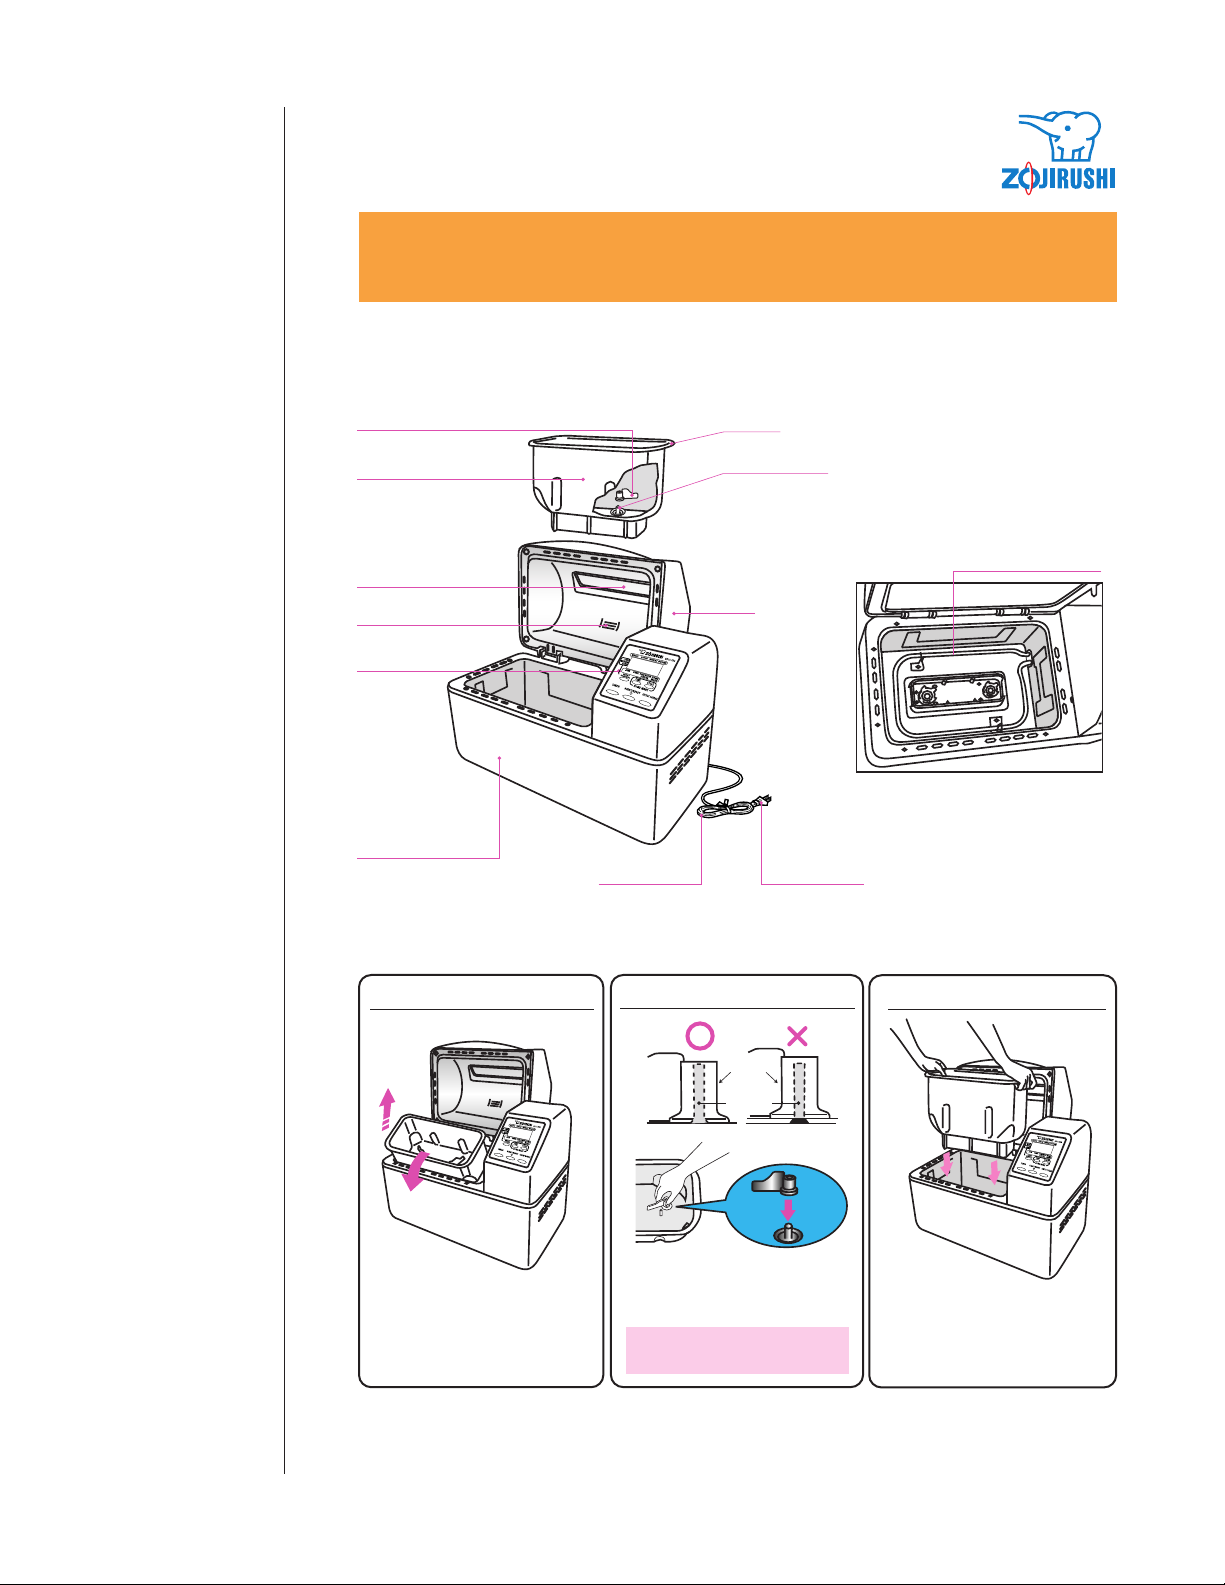
PARTS NAMES/HANDLING INSTRUCTIONS
Parts Names
Handling Instructions
Kneading Blade
Baking Pan
Viewing Window
Steam Vent
Control Panel
Main Body
How to remove the Baking Pan
Flange
Rotating Shaft
Lid
Power Cord
Power Plug
How to attach the Kneading Blade
Heating Element
How to install the Baking Pan
Grasp the Baking Pan's
shorter Flanges and pull
toward you to unlatch the
spring. Then lift to remove.
Use oven mitts for removing
a hot Baking Pan.
Kneading
Blade
Rotating
Shaft
Attach the Kneading Blade to
the Rotating Shaft and push
down firmly.
Be sure to attach the
Kneading Blade securely.
- 4 -
Hold the Baking Pan's shorter
Flanges and place it right in
the center of the oven cavity.
Press down until it clicks into
place.
Page 5
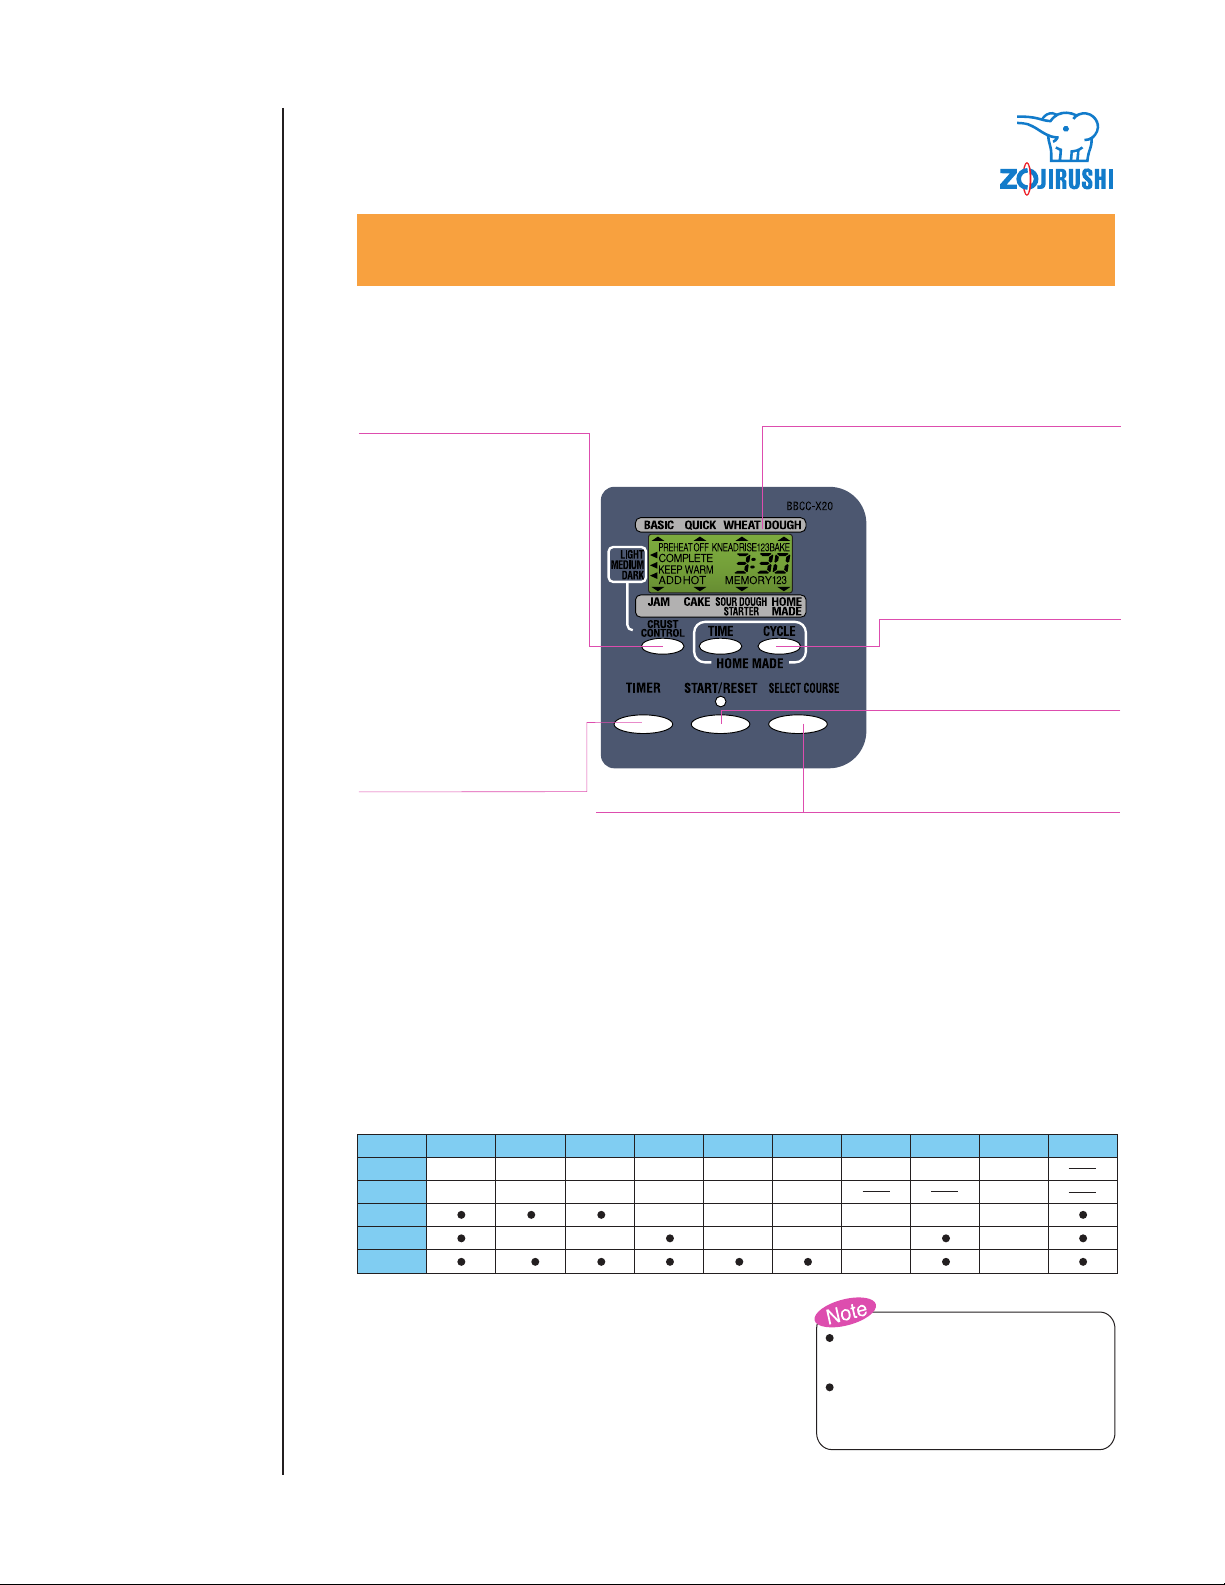
CONTROL PANEL
Control Panel
How to Use the Timer
CRUST CONTROL key
For choosing the crust color
desired: LIGHT, MEDIUM
and DARK (for BASIC,
QUICK, CAKE and HOME
MADE settings).
DISPLAY
Indicates the time up to
completion of baking, the
crust color, eta.
The display illustrated left
shows all menu and
information, which is for
reference only and it is not
• LIGHT
Light crust settings.
• MEDIUM
Regular crust settings.
• DARK
Darker crust setting.
going to appear during the
actual use.
HOME MADE COURSE
Allows you to program 3
bread baking processes to
your specifications.
START/RESET key
Press this key to start a
process or Timer operation.
Press and hold the key
TIMER key
Use this key when you
would like to delay the
completion of your bread
or dough. To set the
Timer, determine when
you would like your bread
or dough to be ready, then
set the Timer to reflect the
time difference between
the present time and the
time you determined. The
set time increases in units
of 10 minutes each time
you press the key. Once
the set time exceeds
maximum time of 13:00
(13 hours), the Display
returns to minimum time.
COURSE
STANDARD
TIME
(PREHEAT off)
TIMER
CRUST
CONTROL
ADD
INGREDIENTS
BEEP
BASIC
3:30 3:40 1:50 1:58 2:08 0:45 1:20 2:00 2:10
(3:10) (3:00) (1:28) (1:53) (2:03) (0:36) (2:05)
BASIC
WHEAT
SELECT COURSE key
Press this key to choose the dough
preparation / baking course you desire.
BASIC
This setting is for baking a basic
bread using active dry yeast.
BASIC WHEAT
This setting is for whole grain
bread using active dry yeast.
BASIC DOUGH
This setting is ideal for making
bread-style dough using active
dry yeast.
QUICK
This setting is used for quickly
baking a basic bread using rapid
rise yeast.
QUICK WHEAT
This setting quickly produces
whole grain bread using rapid rise
BASIC
DOUGH
QUICK JAM CAKE
QUICK
WHEAT
QUICK
DOUGH
slightly longer to cancel a
process or when the process
is completed.
yeast.
QUICK DOUGH
This setting lets you quickly
prepare bread-style dough using
rapid rise yeast.
JAM
Setting for making jam.
CAKE
Setting for baking cake.
SOUR DOUGH STARTER
Setting for sourdough starter.
HOME MADE
Allows you to program 3 bread
baking processes to your
specifications.
(*At the initial setting, no baking
process is programmed.)
SOUR DOUGH
STARTER
HOME MADE
**Selecting the PREHEAT OFF FUNCTION allows you to shorten the total cooking time (see page 6).
How to Use the Timer
You can use the Timer to complete baking at a desired time.
The Timer can be set in 10-minutes intervals for a maximum
setting of up to 13 hours.
1. Press the SELECT COURSE key to choose the setting.
2. Use the TIMER key to set your desired time.
3. Press the START/RESET key and make sure that the
operation lamp turns on. The Display reads time in units
of 1 minute increments.
- 5 -
The Timer can be used with only
Basic, Basic Wheat, Basic Dough,
and Home Made settings.
Do not use Timer settings for
recipes that contain milk, juice,
vegetables, eggs, eta. as they can
easily spoil.
Page 6

ACCESSORIES/PREHEAT OFF FUNCTION
Accessories
Preheat Off Function
Accessories
Measuring Cup:
Is for measuring liquids only;
filled to the brim it measures 1 cup.
200
150
100
50
CUP
Measuring Spoon:
May be used to measure yeast, sugar,
salt, dry milk and spices. The large
side measures 1 tablespoon; the small
side measures 1 teaspoon. The halfway
mark on each measures one-half
tablespoon and one-half teaspoon,
respectively.
(S) (L)
How to Measure the Ingredients
Dry Ingredients:
1. Spoon the dry ingredients into the cup filling it to overflowing. Do not press or shake down.
2. Level by sweeping off the excess with a knife. To measure 3/4 cup flour, for example, fill and level the
1/2 and the 1/4 measuring cups. Spices and small amounts of dry and liquid ingredients are measured
in the measuring spoon which comes with unit. Be sure to level off the same way.
Liquid:
1. The liquid should be poured into the
cup while the cup is place on a flat
surface and measured at eye level.
"Nested"
Measuring Cup
It is most important for the best possible result every time
you bake bread, that you measure accurately and correctly.
Dry Ingredients such as flour and sugar need to be
measured in "nested" measuring cups of the type that fit
inside each other. They come as 1/4, 1/3, 1/2, and 1 cup.
Liquid measuring cups are usually made of transparent
glass or plastic with lines marking the gradations. The
Home Bakery comes equipped with a measuring cup and
spoon USE THE MEASURING CUP FOR LIQUIDS
ONLY: it measure up to 1 cup when filled to the very
brim. The measuring spoon has a small and large side. The
large side measures 1 tablespoon to the top: it measures
1/2 tablespoon or 1-1/2 teaspoons to the halfway mark on
that side. The smaller side of the measuring spoon
measures 1 teaspoon to the top and 1/2 teaspoon to the half
mark.
Measuring Ingredients
Preheat Off Functions
As this function skips the preheat process, the total cooking time will be
•
shortened.
This function is not available for Jam, Cake or Home Made courses.
•
During the course selection, press both the TIME and CYCLE key at the
same time for more than 3 seconds to switch to PREHEAT OFF function.
During the PREHEAT OFF function, the Display shows PREHEAT OFF,
•
but it will not appear while it is cooking.
To cancel the PREHEAT OFF function, press both the TIME and CYCLE
•
key at the same time for more than 3 seconds.
The Preheat function is to warm up the ingredients prior to the baking.
•
The bread may not be able to bake well when the room temperature is low or
the ingredients are cold. Please note this well when switching off the Preheat
function.
- 6 -
Page 7

BEFORE BAKING
Characteristics of
Ingredients
Characteristics of Ingredients
• All purpose flour is a blend of refined wheat flour especially suitable for making cake, croissants and pizza.
• Bread flour is a type of wheat flour made from hard wheat that includes all of the gluten from the grain. Since
bread flour has a higher gluten and protein content than all purpose flour, it is well-suited for use in yeast
breads. Gluten gives structure and height to the loaf, thus bread flour rises better than other flours. It produces
a higher loaf and bread that has a coarser texture.
• Cracked wheat* is very coarse in texture. It comes from wheat kernels cut into angular fragments. It gives
whole grain breads a nutty flavor and crunchy texture.
• Gluten is an elastic protein found mainly in wheat flour (all flour contains some gluten). Gluten is an
important element in all yeast breads, as it gives bread its structure or framework. Flours with a high gluten
content make the best bread flours.
• Vital wheat gluten (also called vital gluten or wheat gluten) is the dried gluten protein obtained from high
protein, hard-wheat flour by rising off most of the starch. Adding gluten to bread recipes helps improve the
strength, texture and height of the loaf, it is especially useful in recipes that call for wheat bread flour or lowgluten flours.
• Whole wheat flour, ground from the entire wheat kernel, is heavier, and richer in nutrients.
• Seven-grain cereal blend** is a blend of cracked wheat, oats, bran, rye, corn meal, flax seeds, and hulled
millet.
• Active dry yeast feeds on sugar and ferments it, thus causing dough to rise. Active dry yeast (simply dried
granules of yeast) is made of tiny plants that change food (especially gluten and sugar) into bubbles of carbon
dioxide. As these bubbles expand, the bread rises.
The recipes developed for the Home Bakery used "Fleischmann's active dry yeast" or "Fleischmann's rapid
rise yeast".
Active dry yeast should be kept in the freezer or refrigerator.
Please be sure that fresh yeast is used. Using old yeast is not recommended and may adversely affect the
outcome of your bread.
• Butter and Oil tenderize the texture of yeast breads. French bread gets its unique crust and texture from the
lack of added oils. However, breads that call for oils stay fresh longer. Butter should be measured and cut into
small pieces. The recipes developed for the Home Bakery used unsalted butter; however, regular butter or
margarine can be substituted for unsalted butter.
• Eggs add richness and velvety texture to bread dough. Use large-size eggs in these recipes.
• Homogenized milk & Buttermilk add texture and flavor. You may substitute homogenized milk or
buttermilk for dry milk, but the loaf may come out shorter and the crust may be darker than dry milk breads.
• Salt is necessary when making yeast breads. It not only adds flavor but controls the growth of yeast, which
helps the bread rise. Too much salt can kill the yeast, but too little lets the dough rise so fast it may fall before
baking is complete. Salt also keeps bread from getting stale too quickly.
• Sugar is important for the color and flavor of breads, as well as to feed the yeast. Recipes that call for sugar
require granulated sugar. Do not substitute powdered sugar or brown sugar unless indicated.
•
Fructose* is a naturally occurring sugar found in fruits, berries, and honey. The taste of fructose is identical to
that of common sugar with the added benefit that it is 1-1/2 times as sweet as sugar.
Fructose is a carbohydrate which must be accounted for in the diet.
*Available at health food stores.
**Available at health food stores or in your local supermarket's hot cereal department.
* Available at health food stores.
** Available at health food store or in your local supermarket’s hot cereal department.
- 7 -
Page 8

BEFORE BAKING
Tips on Using Your
Bread Machine
Tips on Using Your Bread Machine
Creating Your Own Yeast Breads
The recipes on the following pages are unique to the Home Bakery by Zojirushi. Each one features
ingredients that best complement a particular loaf of bread, and each was tested in our machines. When
creating your own yeast bread recipes or baking an old favorite, use this book as a guide for converting
portions from your recipe to the Home Bakery. These portion guidelines will result in a heavier and
somewhat coarser dough.
• Liquid ingredients should be placed into the baking pan first, then the dry ingredients. The yeast should
be added last and sprinkled on the dry ingredients so that the yeast doesn’t come in contact with any
liquid.
• Again, check our recipes for guidelines on how much of these ingredients youcan add to your doughs.
Be aware that additions like these tend to make doughs heavier and somewhat coarser in texture.
• If the room temperature is above 77∞ F, it is recommended to use refrigerated liquids. Flour should be
fresh and at room temperature.
• Changes in humidity or baking in high altitudes may require ingredient adjustments. Humidity tends to
make dough moister. High altitudes tend to make the loaves rise too quickly. For humidity, try adding
and extra tablespoon of flour to improve the consistency. Repeat if necessary until the dough forms a
nice ball. For high altitudes, decrease the amount of yeast by approximately 1/2 tablespoon, and decrease
the sugar slightly.
• For recipes using the timer cycle, milk or eggs or other perishables should not be used for food safety
reasons.
Tips on Dark Breads
Breads made with whole-grain flours such as whole wheat, or rye, require a bit more tender loving care
to insure that they achieve the height of deliciousness. Notice that some whole-grain breads may also call
for substantial amounts of bread flour, too. That’s because the darker flours need to be "lightened" with
white flour for the best-tasting, best-looking loaf.
Special Glazes for Yeast Breads
Give your just-baked bread a professional finish. Select one of these special glazes to enhance your
bread.
Egg Glaze: Beat 1 large egg and 4 teaspoons of water together, brush generously over top crust of bread.
Melted Butter: Brush melted butter over just-baked bread for a softer, tender crust.
Milk Glaze: For a softer, shinier crust, brush just-baked bread with milk or cream.
- 8 -
Page 9
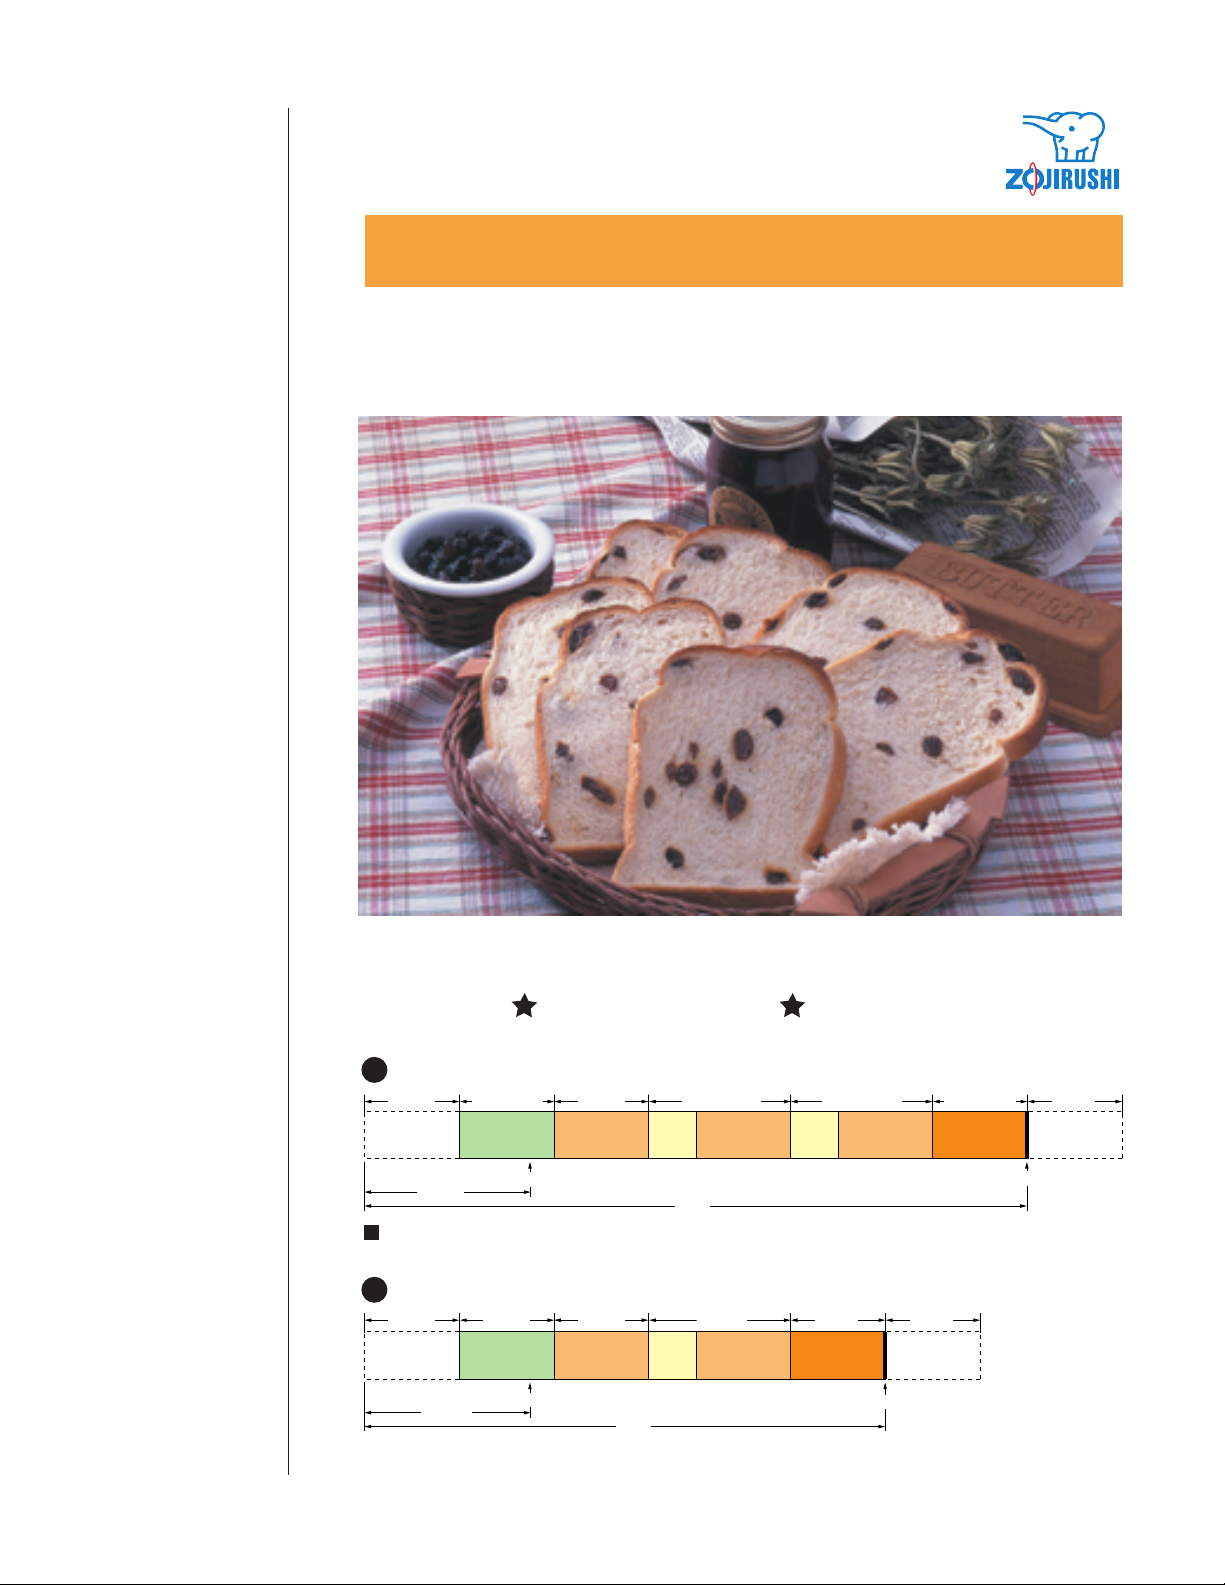
Basic Bread
(Basic, Quick)
BASIC BREAD (BASIC, QUICK)
Now you’re ready to bake a delicious loaf of bread!
Basic
Use active dry yeast.
Basic Setting
20 min 45 min
Preheating
The times of the Kneading, Second rising, Third rising and Baking cycle may vary depending on the
room temperature.
13 ~ 18 min
Kneading First rising Third rising Baking
about
30 min
Add Beep
Stir
down
20
3:30
~
25 min 40
Second
rising
Quick Setting
5 min 25 min 8 min
Preheating
Kneading First rising Baking
about
25 min
Add Beep
1:58
- 9 -
Stir
down
25 min
Second
rising
Quick
Use rapid rise yeast.
~
Stir
down
45 min
Complete Beep
62 ~ 67 min
60 min55 min
Keep warm
60 min
Keep warm
Complete Beep
Page 10
BASIC BREAD (BASIC, QUICK)
Basic Bread
(Basic, Quick)
Basic Steps
BASIC STEPS
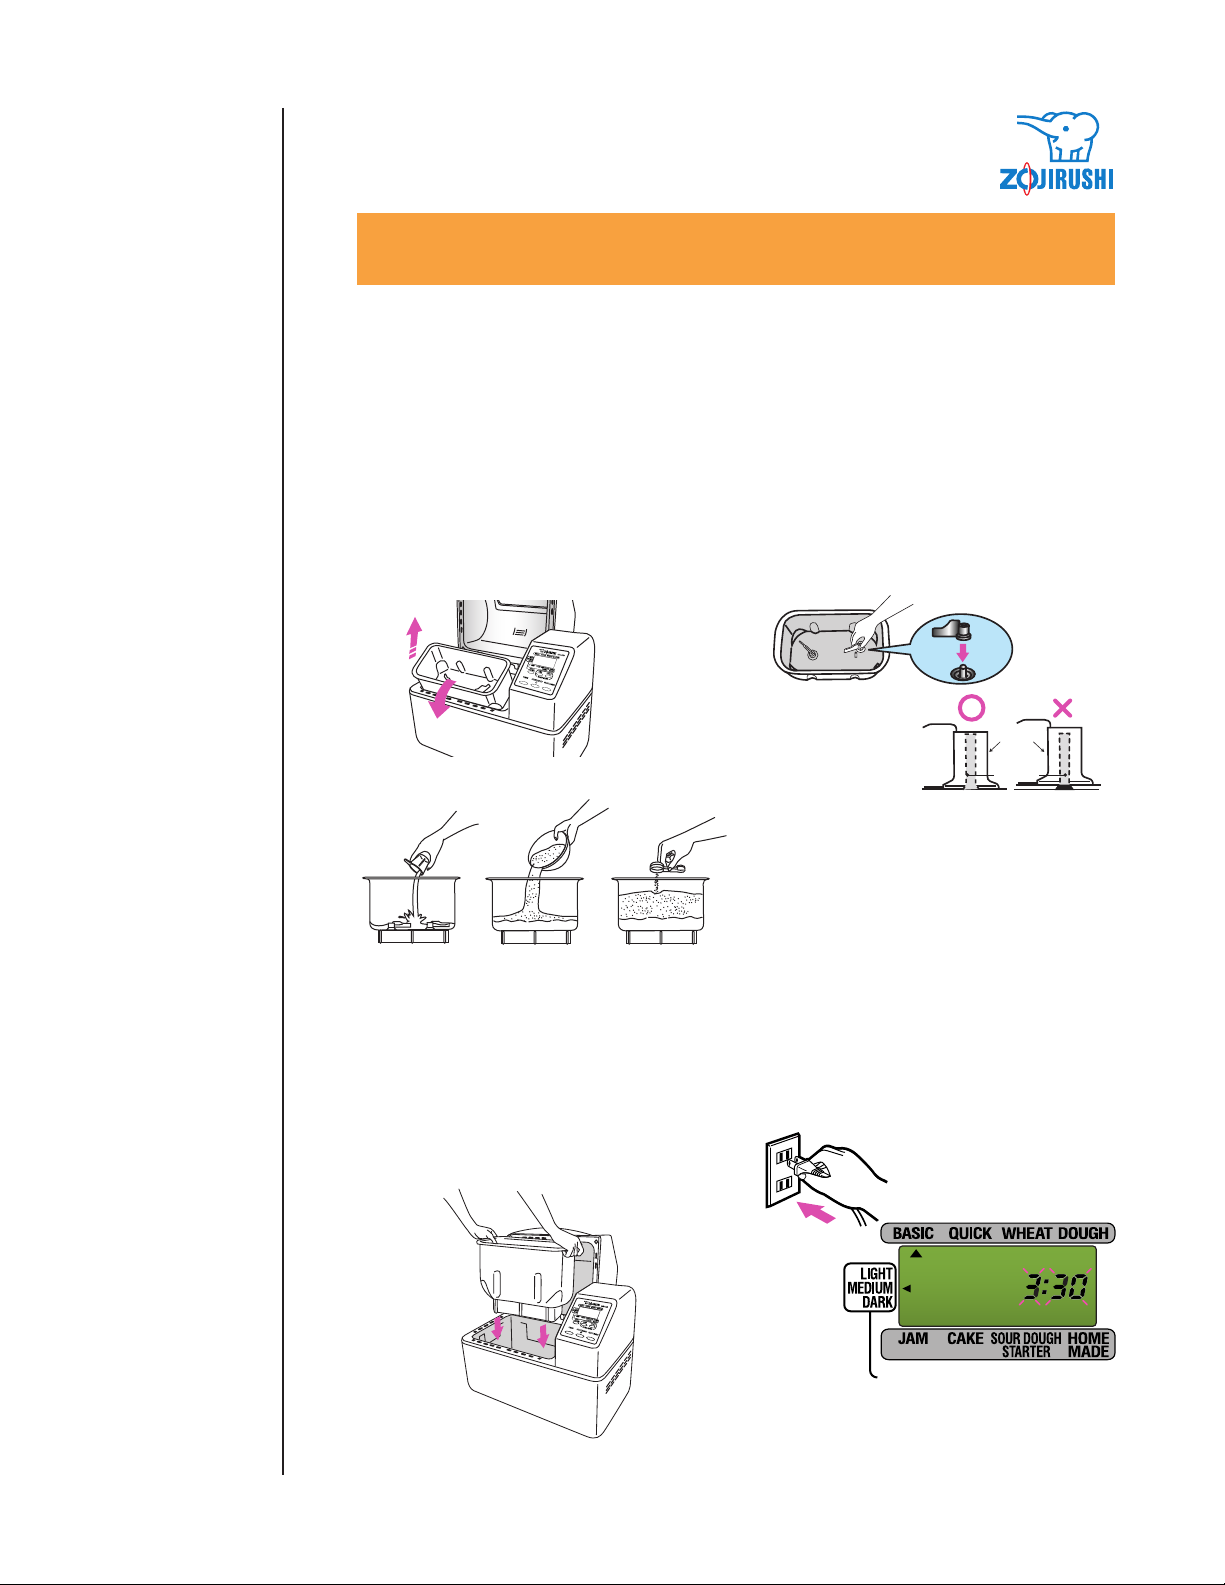
1. Remove the baking pan.
Open the lid, grasp the baking pan’s shorter
flanges and pull it toward you to unlatch the
spring. Then remove by lifting it straight up.
NOTE: If dry yeast contacts water, results may
not be ideal.
2. Attach the kneading blades to the
baking pan.
Attach the kneading blade to the rotating shaft
and push down firmly.
NOTE: Be sure attach the kneading blade
securely.
Kneading
Blade
Rotating
Shaft
3. Precisely measure ingredients and add
them into the baking pan in the
following order:
1) Water.
2) Add flour, sugar, dry milk, salt and butter.
3) Make a depression in the middle of the flour
and sprinkle yeast in it.
Make sure the yeast does not touch any
liquid.
4. Insert the baking pan into the unit
and close the lid.
Place the baking pan in the center of the oven
cavity and press down on it until it clicks into
place. Close the lid.
- 10 -
5. Plug the nit into outlet.
3:30 shows up in the display.
Page 11

BASIC BREAD (BASIC, QUICK)
Basic Bread
(Basic, Quick)
Basic Steps
6. Select the desired setting.
1) Press the SELECT COURSE key to set the arrow ( ) to "Basic" or "Quick"
2) Press the CRUST CONTROL key to set the arrow ( ) to either Light, Medium or Dark to choose the
crust you want.
3) Press the START/REST key.
• The Operation Light will go on and the first process is shown
(i.e.PREHEAT)
• As the process continues, the indication advances from PREHEAT,
KNEAD, RISE then to BAKE.
• The ADD indicator will flash for five minutes until the KNEAD
process is complete. When it’s time to add ingredients such as raisins or
nuts, the unit will beep for the first 30 seconds of the indicator flashing.
Open the lid and add appropriate ingredients according to the recipe.
• The unit will count down remaining time at one-minute intervals until
!CAUTI
e un
Th
when baking. Be careful.
N!
hot
O
y
remel
xt
e
is
it
the bread is done.
7. Beeps tell you the bread is done.
(1) When baking is complete, beeps alert you that the
bread is ready and the operation lamp will turn off.
(2) Press and hold the START/RESET key.
NOTE: This unit has a convenient function to prevent it
from resetting even if you accidentally press the
START/RESET key during the baking cycle.
(3) Remove the Baking Pan.
Open the Lid and use oven mitts to pull the Baking
Pan toward you by grasping the Pan's shorter Flanges.
This will unlatch the spring so you can lift the Pan to
remove.
(4) If the START/RESET key is not pressed after the
baking cycle is complete (after beeping stops), the
unit automatically goes into the KEEP WARM mode
for 60 minutes. Baking Pan should be removed as
soon as possible to avoid getting soggy.
(5) When the KEEP WARM cycle is over, the Display
appears as shown.
COMPLETE
COMPLETE
KEEP WARM
COMPLETE
!CAUTI
n
o
D
p
g
n
ki
ba
y he
n
a
r
o
Dama
N!
t
i
t
O
n
o
u
h
e
a
h
ri
t
ce
f
la
o
p
p
mate
t
o
t
t
o
ve
n
i
o
sit
n
n
a
t or ma
i
e
n
-s
.
u
t
t
l
a
he
t
o
t
y resu
e
g
ma
.
l
a
l
a
ri
e
8. Remove the bread.
Turn the Baking Pan over and shake the
loaf out. If the Kneading Blade remains in
the bottom of your loaf, allow the loaf to
cool then use a plastic spoon or rubber
spatula to remove the Blade.
If the bread is difficult to remove, let the
Baking Pan cool for 10 minutes.
However, the bread may become soggy if
you leave it in the Baking Pan longer.
- 11 -
N!
O
o
t t
o
n
l
f.
l
fu
re
rse
u
ca
o
!CAUTI
y
Be
rn
u
b
9. Be sure to unplug after using.
Do not tug on the Power Cord.
Page 12

BASIC BREAD (BASIC, QUICK)
Basic Bread
(Basic, Quick)
Basic Bread Loaf
Variations
Basic Bread Loaf Variations
Recipes listed in this section were originally
prepared for the Basic setting. By changing the
amounts of some ingredients, these recipes can also
be used for the Quick setting. Ingredient amounts
for the Basic setting are indicated in red and those
for the Quick setting in blue. Select the appropriate
amounts depending on the setting you’ve chosen.
BASIC WHITE BREAD
1-1/2 cups Water
4-1/4 cups Bread Flour
3 Tbsp. Sugar
2 Tbsp. Dry Milk
1-1/2 tsp. Salt
2 Tbsp. Butter
2 tsp. Active Dry Yeast
ITALIAN HERB BREAD
1-1/2 cups Water
4-1/4 cups Bread Flour
2 Tbsp. Sugar
1-1/2 tsp. Salt
2 Tbsp. Olive Oil
1 tsp. Basil
2 tsp. Active Dry Yeast
SUGAR FREE
WHITE BREAD
1-1/2 cups Water
4-1/4 cups Bread Flour
2 Tbsp. Fructose
1-1/2 tsp. Salt
2 Tbsp. Butter
2 tsp. Active Dry Yeast
3 tsp. Rapid Rise Yeast
CHEESE ‘N’
ONION BREAD
1-1/8 cups Water
4-1/4 cups Bread Flour
1 Tbsp. Sugar
1-1/2 tsp. Salt
2 Tbsp. Butter
1-1/4 cups American Cheese,
Shredded
1/3 cup Red Onion, Minced
2 tsp. Active Dry Yeast
3 tsp. Rapid Rise Yeast
SWEET BREAD
1-3/8 cups Milk
1 Large Egg
4-1/4 cups Bread Flour
3 Tbsp. Sugar
1-1/2 tsp. Salt
2 Tbsp. Butter
1 tsp. Orange Peel
2 tsp. Active Dry Yeast
- 12 -
3 tsp. Rapid Rise Yeast
CHOCOLATE BREAD
1-1/8 cups Milk
1 Large Egg
4-1/4 cups Bread Flour
3 Tbsp. Sugar
1-1/2 tsp. Salt
2 Tbsp. Butter
1 Tbsp. Unsweetened Cocoa
2/3 cup Chocolate Chips
2 tsp. Active Dry Yeast
Page 13

BASIC BREAD (BASIC, QUICK)
Basic Bread
(Basic, Quick)
Basic Bread Loaf
Variations
Gluten-Free Bread
RAISIN BREAD
1-1/2 cups Water
4-1/4 cups Bread Flour
3 Tbsp. Sugar
2 Tbsp. Dry Milk
1-1/2 tsp. Salt
2 Tbsp. Butter
1 tsp. Cinnamon
2 tsp. Active Dry Yeast
When beep sounds add:
1 cup Raisins
3 tsp. Rapid Rise Yeast
FAT FREE
APPLE OAT BREAD
1-2/3 cups Apple Juice
4-1/4 cups Bread Flour
1 Tbsp. Sugar
1-1/2 tsp. Salt
1 tsp. Cinnamon
2/3 cup Oats
2 tsp. Active Dry Yeast
When beep sounds add:
1/2 cup Diced Dried Apple
RUSSIAN KULICH
1-1/4 cups Milk
2 Large Eggs
1 tsp. Almond Extract
4-1/4 cups Bread Flour
2 Tbsp. Sugar
1-1/2 tsp. Salt
2 Tbsp. Butter
1/2 cup Silvered Almonds
2 tsp. Active Dry Yeast
When beep sounds add:
1/2 cup Chopped Dried Fruit
3 tsp. Rapid Rise Yeast
BASIC WHITE BREAD
(1.5 lbs. SIZE)
1-1/8 cups + 1 Tbsp.
Water
3-1/4 cups Bread Flour
2 Tbsp. Sugar
1-1/2 Tbsp. Dry Milk
1 tsp. Salt
1-1/2 Tbsp. Butter
1-1/2 tsp. Active Dry Yeast
2-1/2 tsp. Rapid Rise Yeast
APPLE OAT BREAD
1-2/3 cups Apple Juice
4-1/4 cups Bread Flour
1 Tbsp. Sugar
1-1/2 tsp. Salt
2 Tbsp. Butter
1 tsp. Cinnamon
2/3 cup Oats
2 tsp. Active Dry Yeast
When beep sounds add:
1/2 cup Diced Dried Apple
RAISIN BREAD
(1.5 lbs. SIZE)
1-1/8 cups + 1 Tbsp.
Water
3-1/4 cups Bread Flour
2 Tbsp. Sugar
1-1/2 Tbsp. Dry Milk
1 tsp. Salt
1-1/2 Tbsp. Butter
1/2 tsp. Cinnamon
1-1/2 tsp. Active Dry Yeast
When beep sounds add:
3/4 cup Raisins
Gluten-Free Bread
Gluten-free bread is baked for people with coeliac disease or gluten intolerance, and has no gluten
(wheat protein). Cornflour (wheat starch) or rice flour forms the basis of these loaves with soy flour,
guar or xanthan gum and cellulose providing the risen structure. They have a coarser more crumbly
texture than normal bread.
GLUTEN-FREE BROWN RICE BREAD
1-1/2 cups
3
1 Tbsp.
1/8 cup
2 Tbsp.
3-1/4 cups
1/2 cup
1/4 cup
1 tsp.
1 Tbsp.
1 Tbsp.
Milk
Eggs
Cider Vinegar
Vegetable oil
Honey
Brown Rice Flour
Corn starch
Potato starch
Salt
Xanthan Gum
Active Dry Yeast
For more gluten-free recipes, please call our customer
service department at (800)733-6270 or visit our
website at www.zojirushi.com
- 13 -
Page 14

Whole Grain
(Basic, Wheat,
Quick Wheat)
WHOLE GRAIN(BASIC, WHEAT, QUICK WHEAT)
Making whole-grain bread is easy
- and healthy!
Basic
Use active dry yeast.
Quick
Use rapid rise yeast.
Basic Wheat Setting
40 min 45 min
Preheating
The times of the Kneading, Second rising, Third rising and Baking cycle may vary depending on the
room temperature.
13 ~ 18 min
Kneading First rising Third rising Baking
about
50 min
Add Beep
Stir
down
20
3:40
~
25 min 30
Second
rising
Stir
down
~
35 min
62 ~ 67 min
Keep warm
Complete Beep
Quick Wheat Setting
5 min 25 min 8 min
Preheating
Kneading First rising Baking
about
25 min
Add Beep
2:08
Stir
down
35 min
Second
rising
Complete Beep
1-5. Follow the same procedure as steps 1-5 for Basic Bread (see page 10).
6. Select the desired setting.
1) Press the SELECT COURSE key to set the arrow ( )
to "Basic Wheat" or "Quick Wheat."
2) Press the START/RESET key.
• The Operation Light will go on and the first
process is shown (i.e. PREHEAT).
• As the process continues, the indication advances
from PREHEAT, KNEAD, RISE then to BAKE.
• The ADD indicator will flash for five minutes until
the KNEAD process is complete. When it’s time to
add ingredients such as raisins or nuts, the unit will
beep for the first 30 seconds of the indicator
flashing. Open the lid and add appropriate
ingredients according to the recipe
• The unit will count down remaining time at one minute intervals until the read is done.
!CAUTI
e
h
T
h
w
N!
O
me
re
xt
e
e
B
s
i
.
t
i
g
n
n
i
u
k
a
b
n
e
y
l
ca
t
o
h
l
u
f
re
60 min55 min
Keep warm
.
7-9. Follows the same procedure as steps 7 – 9 for Basic Bread (see page 11).
To use the Timer setting, please refer to "HOW TO USE THE TIMER" on page 5.
- 14 -
Page 15

WHOLE GRAIN(BASIC, WHEAT, QUICK WHEAT)
Whole Grain
(Basic, Wheat,
Quick Wheat)
Whole Grain Bread
Variations
Basic Bread Loaf Variations
Recipes listed in this section originally prepared for the
Basic Wheat setting. By changing the amounts of some
ingredients, these recipes can also be used for the Quick
Wheat setting. Ingredient amounts for the Basic Wheat
setting are indicated in red and those for the Quick Wheat
setting in blue. Select the appropriate amounts depending
on the setting you’ve chosen.
100% WHOLE
WHEAT BREAD
1-7/8 cups Water
5 cups Whole Wheat Flour
3 Tbsp. Sugar
2 Tbsp. Dry Milk
2 tsp. Salt
1-1/2 tsp. Salt
4 Tbsp. Vital Wheat Gluten
2 Tbsp. Butter
2 tsp. Active Dry Yeast
LIGHT RYE BREAD
1-1/2 cups Water
4-1/4 cups Bread Flour
2/3 cup Rye Flour
2 Tbsp. Sugar
1-1/2 tsp. Salt
2 Tbsp. Butter
1 Tbsp. Caraway Seed
2 tsp. Active Dry Yeast
3 tsp. Rapid Rise Yeast
WHOLE WHEAT NUT
BREAD
1-7/8 cups Water
5 cups Whole Wheat Flour
3 Tbsp. Sugar
2 Tbsp. Dry Milk
1-1/2 tsp. Salt
2 Tbsp. Butter
2/3 cup Walnuts Chopped
5 Tbsp. Vital Wheat Gluten
2 tsp. Active Dry Yeast
3 tsp. Rapid Rise Yeast
FAT FREE
BASIC WHEAT BREAD
1-2/3 cups Water
3-1/2 cups Bread Flour
1-1/2 cups Whole Wheat Flour
2 Tbsp. Sugar
1-1/2 tsp. Salt
2 tsp. Active Dry Yeast
100% WHOLE WHEAT
APPLE BREAD
2 cups Water
5 cups Whole Wheat Flour
3 Tbsp. Sugar
2 Tbsp. Dry Milk
1-1/2 tsp. Salt
2 Tbsp. Butter
1 tsp. Cinnamon
5 Tbsp. Vital Wheat Gluten
3 tsp. Active Dry Yeast
When beep sounds add:
1 cup Diced Dried Apple
- 15 -
3 tsp. Rapid Rise Yeast
100% WHOLE WHEAT
FRUIT BREAD
2 cups Water
5 cups Whole Wheat Flour
3 Tbsp. Sugar
2 Tbsp. Dry Milk
1-1/2 tsp. Salt
2 Tbsp. Butter
1 tsp. Allspice
5 Tbsp. Vital Wheat Gluten
3 tsp. Active Dry Yeast
When beep sounds add:
2/3 cup Chopped Dried Fruit
Page 16

Whole Grain
(Basic, Wheat,
Quick Wheat)
Whole Grain Bread
Variations
WHOLE GRAIN(BASIC, WHEAT, QUICK WHEAT)
HONEY WHEAT
BERRY BREAD
1-3/8 cups Water
4-1/4 cups Bread Flour
1/2 cup Cracked Wheat
3 Tbsp. Honey
1-1/2 tsp. Salt
2 Tbsp. Butter
2 tsp. Active Dry Yeast
SEVEN-GRAIN BREAD
1-1/2 cups Water
4-1/4 cups Bread Flour
2/3 cup Seven-Grain Cereal
2 Tbsp. Sugar
2 Tbsp. Dry Milk
1-1/2 tsp. Salt
2 Tbsp. Butter
2 tsp. Active Dry Yeast
3 tsp. Rapid Rise Yeast
ITALIAN WHEAT
BREAD
1-1/2 cups Water
2-2/3 cups Bread Flour
2 cups Whole Wheat Flour
2 Tbsp. Sugar
1-1/2 tsp. Salt
2 Tbsp. Olive Oil
1 tsp. Basil
2 tsp. Active Dry Yeast
3 tsp. Rapid Rise Yeast
PUMPERNICKEL BREAD
1-2/3 cups Water
2-1/3 cups Bread Flour
1 cup Whole Wheat Flour
1 cup Rye Flour
3 Tbsp. Molasses
1-1/2 tsp. Salt
2 Tbsp. Vegetable Oil
4 Tbsp. Cornmeal
2 tsp. Instant Coffee
2 Tbsp. Unsweetened Cocoa
5 Tbsp. Vital Wheat Gluten
2 tsp. Active Dry Yeast
100% WHOLE WHEAT
BREAD (1.5 lbs. SIZE)
1-1/2 cups Water
4 cups Whole Wheat Flour
2 Tbsp. Sugar
1-1/2 Tbsp. Dry Milk
1 tsp. Salt
1-1/2 Tbsp. Butter
3 Tbsp. Vital Wheat Gluten
1-1/2 tsp. Active Dry Yeast
2-1/2 tsp. Rapid Rise Yeast
100% WHOLE WHEAT
APPLE BREAD
(1.5 lbs. SIZE)
1-2/3 cups Water
4 cups Whole Wheat Flour
2 Tbsp. Sugar
1-1/2 Tbsp. Dry Milk
1 tsp. Salt
1-1/2 Tbsp. Butter
1/2 tsp. Cinnamon
4 Tbsp. Vital Wheat Gluten
2 tsp. Active Dry Yeast
When beep sounds add:
3/4 cup Diced Dried Apple
- 16 -
Page 17

DOUGH(BASIC DOUGH, QUICK DOUGH)
Dough
(Basic Dough,
Quick Dough)
Use the Dough Setting to prepare
dough for baking rolls, croissants,
or other favorites in your oven.
Basic
Use active dry yeast.
Basic Dough Setting Quick Dough Setting
22 min 45 min21 min 22 min
Stir
Preheating
about
30 min
Kneading First rising
Add Beep
1:50
Second
down
rising
Complete Beep
1-5. Follow the same procedure as steps 1-5 for Basic Bread (see page 10).
6. Select the desired setting.
1) Press the SELECT COURSE key to set the arrow ( ) to "BASIC
DOUGH" or "QUICK DOUGH"
2) Press the START/RESET key. The Operation Light will go on
and the first process is shown (i.e. PREHEAT).
• As the process continues, the indication advances from
PREHEAT, KNEAD, then to RISE.
• The ADD indicator will flash for 5 minutes until the KNEAD
process is complete. When it’s time to add ingredients such as
raisins or nuts, the unit will beep for the first 30 seconds of the
indicator flashing. The unit will count down remaining time at
one-minute intervals until the dough is done.
• The unit will count down remaining time at 1-minute intervals
until the bread is done.
9 min 21 min 10 min
Preheating
Kneading First rising
about
25 min
Add Beep
0:45
Quick
Use rapid rise yeast.
5 min
Second
Stir
rising
down
Complete Beep
7. Beeps tell you the dough is done.
1) When the cycle is complete, beeps alert
you that the dough is ready and the
Operation Light will turn off.
2) Press and hold the START/REST key.
3) Remove the baking pan. Open the lid and
pull the baking pan toward you by
grasping the pan’s shorter flanges. This
will unlatch the spring so you can lift the
pan to remove.
8. Remove the dough.
Prepare a lightly floured board. Gather the
dough at the center of the baking pan. Place it
on the board. Remove the dough carefully by
raising it gently. If the baking blade remains in
the bottom of your dough, remove the blade.
- 17 -
COMPLETE
COMPLETE
9. Be sure to unplug after using.
Do not tug on the cord.
10. Shape the dough and bake.
Shape the dough as you like and let it rise. Then
bake in an oven.
To use the Timer setting, please refer to "HOW TO
USE THE TIMER" on page 5.
Page 18

WHOLE GRAIN(BASIC, WHEAT, QUICK WHEAT)
DOUGH(BASIC DOUGH, QUICK DOUGH)
Dough
(Basic Dough,
Quick Dough)
Dough Variations
Dough Variations
Recipes listed in this section were originally prepared for the Basic Dough setting. By changing the
amounts of some ingredients, these recipes can also be used for the Quick Dough setting. Ingredient
amounts for the Basic Cough setting are indicated in red and those for Quick Dough setting in blue.
Select the appropriate amounts depending on the setting you’ve chosen.
CROISSANTS
2/3 cup Water
2 Large Eggs
2-1/4 cups Bread Flour
3/4 cup All-Purpose Flour
3 Tbsp. Sugar
3 Tbsp. Dry Milk
1 tsp. Salt
3 Tbsp. Butter
1-1/2 tsp. Active Dry Yeast
1 cup Butter, softened
(for kneading into dough)
METHOD
Follow basic steps 1-7 for making dough (see
page 17).
1. Remove dough from baking pan. Put into
greased bowl. Cover with plastic wrap. Place in
refrigerator and allow to rest 30 minutes.
2. Roll dough into 20 x 14 in. rectangle on a light
floured surface. Using about 7 Tbsp. of
softened butter, butter 2/3 of dough while
leaving 1/3 of dough unbuttered.
4. Cut dough into three pieces and roll each piece
to 1/4-in. thick. Cut dough into triangles. (Wide
end should be about 3-1/2 in.)
Egg Glaze:
1 Large Egg, beaten
4 tsp. Water
2 tsp. Rapid Rise Yeast
3. Fold dough into thirds and repeat step 2 twice
more. Add flour to rolling surface as needed to
prevent sticking. Cover completely with plastic
wrap and place in refrigerator for 1 to 2 hours
or overnight.
- 18 -
5. Roll each triangle loosely starting from the
wide end, lay with seam-side down. Curve
ends.
6. Place on greased baking pan. Allow to rise for
about 40 to 50 minutes or until size doubles.
7. Brush lightly with egg glaze.
8. Bake at 375∞ F for 10 to 15 minutes, or until
golden brown and flaky. Makes 24 croissants.
Page 19

WHOLE GRAIN(BASIC, WHEAT, QUICK WHEAT)
DOUGH(BASIC DOUGH, QUICK DOUGH)
Dough
(Basic Dough,
Quick Dough)
Dough Variations
TRADITIONAL
PIZZA DOUGH
1-1/2 cups Water
1-1/2 Tbsp. Olive Oil
3-3/4 cups Bread Flour
1-1/2 Tbsp. Sugar
1-1/2 tsp. Salt
1-1/2 tsp. Active Dry Yeast
Vegetable Oil
2 tsp. Rapid Rise Yeast
PIZZA DOUGH
WITH BEER
1-1/2 cups Flat Beer
3-3/4 cups All-Purpose Flour
3 Tbsp. Sugar
1-1/2 tsp. Salt
1-1/2 Tbsp. Butter
1-1/2 tsp. Active Dry Yeast
Vegetable Oil
2 tsp. Rapid Rise Yeast
THIN-CRUST PIZZA
1. Flour hands lightly. Shape dough into ball.
Divide ball in quarter.
Press each quarter of dough into greased, 12-in.
pizza pan, forming 1-in. edge.
2. Brush crust with oil. Cover and let stand 15
minutes.
3. Spoon tomato or pizza sauce over dough, top
with cheese and topping of your choice.
4. Bake 25 to 30 minutes at 400∞ F or until cheese
bubbly and crust is golden brown. Makes four
12-in. pizzas.
SOFT PRETZELS
Prepare Pizza Dough with Beer.
1. Put dough on lightly floured board, divide into
8 equal portions.
2. Cut each portion again into 6 equal portions.
Roll each piece of dough into pencil-thin line
about 20-in. long.
METHOD
Follow basic steps 1-7 for making dough
(see page 17).
1. Remove dough from baking pan.
2. Select shape variation of your choice.
THICK-CRUST PIZZA
1. Flour hands lightly. Shape dough into ball.
Divide ball in half. Press each dough into
greased, 12-in. pizza pan, forming a high edge.
2-4. Follow steps 2-4 for the Thin-Crust Pizza
recipe. Makes two 12-in. pizzas.
3. To shape into pretzel, pick up ends of line in
each hand and curve into circle, crossing ends
at top.
4. Twist ends once and lay down over bottom of
circle.
6. Bake at 400∞ F, 10 to 20 minutes.
7. For crispy pretzels, place cooked pretzels in cool oven on ungreased baking sheet. Allow to stand 3
hours or overnight. This process makes pretzels dry and crunchy.
8. For soft, chewy pretzels, serve warm from the oven. Serve with mustard. Makes 48 pretzels.
- 19 -
5. Place about 1 in. apart on well-greased baking
sheets. Brush with beaten egg and sprinkle
lightly with coarse salt, poppy seeds or sesame
seeds.
Page 20

WHOLE GRAIN(BASIC, WHEAT, QUICK WHEAT)
DOUGH(BASIC DOUGH, QUICK DOUGH)
Dough
(Basic Dough,
Quick Dough)
Dough Variations
BUTTER-RICH ROLL & BREAD DOUGH
1 cup Water
1 Large Egg
3-1/4 cups Bread Flour
4 Tbsp. Sugar
1 tsp. Salt
3 Tbsp. Dry Milk
1/4 cups Butter
1-1/2 tsp. Active Dry Yeast
Egg Glaze:
1 Large Egg, beaten
4 tsp. Water
2 tsp. Rapid Rise Yeast
CINNAMON-RAISON ROLLS
Prepare Butter-Rich Roll & Dough.
1. Put dough on lightly floured board. Divide
dough in three pieces.
2. Roll each half into an 8 x 9-in. rectangle.
Spread surface with 1/4 cup butter, thinly
sliced.
3. Sprinkle surface with 1/4 cup brown sugar, 1
tsp. cinnamon. Sprinkle 1/3 cup raisins over
dough.
4. Start with 8-in. side and roll dough jelly-roll
style, pinch seam to seal. With seam side down,
cut in eight 1-in pieces.
5. Place on greased baking sheet 2 in. apart.
Cover lightly with damp towel. Allow to rise in
warm place until size doubles - - about 40
minutes to 1 hour.
6. Bake at 375∞ F, 10 to 15 minutes. Makes 12
rolls.
CINNAMON-RAISIN SWIRL LOAF
Prepare Butter-Rich Roll & Bread Dough.
1. Put dough on lightly floured board. Divide
dough in three pieces, shape each piece into 8 x
5-in. rectangle. Melt 2 tbsp. butter or
margarine. Brush over dough.
2. Sprinkle dough with mixture of 1/4 cup sugar
and 1 tsp. ground cinnamon. Sprinkle 1/3 cup
raisins over dough.
3. Beginning with long side of dough, roll up jelly
roll-style. Seal ends by pinching edges of
dough together with fingertips.
4. Place dough in greased 5-1/2x3-in. loaf pan or
on large baking sheet.
5. Allow to rise in warm place until size doubles -
- about 40 minutes to 1 hour.
6. Bake at 375∞ F, 30 to 40 minutes or until golden
brown.
7. When loaf is cool, glaze with mixture of 2/3
cup sifted powdered sugar and 1 Tbsp. milk.
Makes 3 loaves.
- 20 -
METHOD
Follow basic steps 1-7 for making dough
(see page 17).
1. Remove dough from baking pan.
2. Choose shaping method.
3. Egg Glaze: beat together egg and water.
Brush generously over shaped loaves or
rolls prior to baking.
TRADIITONAL LOAF
Prepare Butter-Rich Roll & Dough.
1. Put dough on lightly floured board. Divide
dough in three pieces, shape each piece into
loaves.
2. Place in 3 greased 5-1/2 x 3-in. loaf pans.
3. Brush with egg glaze if desired.
4. Cover dough, allow to rise in warm place until
size double - - about 40 minutes 1 hour.
5. Bake at 375∞ F, 25 to 35 minutes. Makes 3
loaves.
PAN ROLLS
Prepare Butter-Rich Roll & Bread Dough.
1. Put dough on lightly floured board. Divide
dough into equal quarters. Cut each quarter into
6 pieces. Shape each piece into a ball.
2. Place one ball in each of 24 greased muffin
cups.
3. Brush with egg glaze if desired.
4. Cover dough, allow to rise in warm place until
size doubles - - about 40 minutes to 1 hour.
5. Bake at 375∞ F, 10 to 20 minutes.
Makes 24 rolls.
CLOVERLEAF ROLLS
Prepare Butter-Rich Roll & Bread Dough.
1. Put dough on lightly floured board. Divide into
quarter. Divide each quarter into 6 pieces. Cut
each piece into 3 sections. Shape each into ball
with palms of hands. Place 3 balls together in
each of 24 greased muffin cups.
2. Brush with egg glaze if desired.
3. Cover dough, allow to rise in warm place until
size doubles - - about 40
minutes to 1 hour.
4. Bake at 375∞ F, 10 to 20 minutes. Makes 24
rolls.
BREAD STICKS
Prepare Butter-Rich Roll & Bread Dough.
1. Put dough on lightly floured board. Divide into
24 equal pieces for 16-in. sticks. Roll each
piece of dough into thin 16-in. lines. Arrange
lines about 1-in. apart on a greased baking
sheet. Allow to rise 30 minutes.
2. Brush with 1 beaten egg white and 1 Tbsp.
water. Sprinkle with poppy seeds, sesame seeds
or coarse salt if desired.
3. Bake at 400∞ F, 10 to 15 minutes.
Page 21

JAM
Jam
Make delicious home-made jam
from fresh fruit!
Jam Setting
15 min 45 min 20 min
Heating Heating & Stirring Cooling
1:20
1, 2. Follow the same procedure as steps 1 and 2 for Basic Bread (see page 10).
3. Precisely measure ingredients and add them to the baking pan.
4, 5. Follows the same procedure as steps 4 and 5 for Basic Bread (see page 10).
6. Select the Jam setting.
1) Press the SELECT COURSE key to set the arrow ( ) to "Jam."
2) Press the START/RESET key.
• The Operation Light will go on and cooking will start.
• The unit will count down remaining time at one-minute
intervals until the jam is done.
T
e
s
i
t
!CAUTION!
i
n
ma
u
n
e
e
h
h
w
Be
t
y ho
l
me
m.
re
t
a
j
x
g
n
i
.
k
l
u
f
re
ca
7. Beeps tell you the jam is done.
1) When cycle is complete, beeps alert you that the jam is ready
and the Operation Light will turn off.
2) Press and hold the START/REST key.
3) Remove the baking pan. Open the lid and use oven mitts to pull the baking pan toward you by
grasping the pan’s shorter flanges. This will unlatch the spring so you can lift the pan to remove.
8. Remove the jam
Carefully remove the jam from the baking pan using a rubber
spatula. If the kneading blade remains in your jam, use a plastic
spoon or rubber spatula to remove the blade.
9. After use…
Be sure to unplug the unit. D not tug on the cord.
Complete Beep
p
t
o
!CAUTI
n
o
n
D
a
p
g
n
a
ki
ba
y he
n
a
e
g
r
o
Dama
T
AU
re
a
!C
e c
B
rn yourse
bu
N!
O
h
a
ce
la
o
p
o
t
ve
n
i
o
sit
n
e
n
-s
u
t
he
t
o
t
y resu
ma
!
N
O
I
to
not
lf.
ul
f
t
o
e
h
t
f
mate
t or ma
i
t
l
t
i
n
u
.
l
a
ri
l
a
ri
e
t
.
Normally, the jam will thicken with refrigeration.
To make the jam thicker, add 1 package (up to 2 oz.) of fruit pectin.
STRAWBERRY JAM
2 cups Strawberry, crushed
3/4 cup Sugar
1 Tbsp. Lemon Juice
Preparing
1. In microwaveable container, place apples and cover with water. Cook in microwave on High for 5 to
10 minutes or until tender.
2. Drain apples and mash with a potato masher.
APPLE JAM
2 cups Apples, cored and peeled
3/4 cup Sugar
1-1/2 Tbsp. Lemon Juice
- 21 -
MIXED JAM
1 cup Strawberry, crushed
1-1/2 cups Apples, cored and
peeled
3/4 cup Sugar
1 Tbsp. Lemon Juice
Page 22

CAKE
Cake
Home-baked cakes make a great treat for someone special!
1, 2. Follow the same procedure as steps 1
and 2 for Basic Bread (see page 10).
3. Precisely measure ingredients and add
them to the baking pan.
4, 5. Follow the same procedure as steps 4
and 5 for Basic Bread (see page 10).
6. Select the Cake setting
1) Press the SELECT COURSE key to set the arrow ( ) to "Cake."
2) Press the CRUST CONTROL key to set the arrow ( ) to either Light,
Medium or Dark to choose the crust you want.
3) Press the START/RESET key.
• The Operation Light will go on and the first process is shown (i.e.
KNEAD).
• As the process continues, the indication advances from KNEAD, then to
BAKE.
• About 10 minutes after baking starts, the ADD indicator will flash for five
minutes until the KNEAD process is complete. When it’s time to add
ingredients such as fruit or nuts, the unit will beep for the five minutes of
the indicator flashing. Open the lid and add appropriate ingredients
according to a recipe. Any flour that has accumulated inside the baking pan
should be gently dislodged using a rubber spatula.
Beware of moving Kneading Blades when working with the Baking Pan during operation.
• The unit will count down remaining time at one-minute intervals until the Bread is done.
Cake Setting
24 min 80 min 16 min
Mixing Baking Cooling
about
Add Beep
11 min
2:00
Complete Beep
xtre
e
CAUTI
!
it is
ng
ki
a
b
The un
n
e
h
w
ON!
m
Be
.
ly h
e
a
c
o
reful.
t
7. Beeps tell you the cake is done.
1) When baking is complete, beeps alert you that the cake is
ready and the Operation Light will turn off.
2) Press and hold the START/RESET key.
3) Remove the baking pan. Open the lid and use oven mitts to
pull the baking pan toward you by grasping the pan’s shorter
flanges. This will unlatch the spring so you can lift the pan to
remove.
!CAUTION!
Do not place a hot Baking Pan on top of the unit or any heat-sensitive material. Damage to
the unit or material may result.
8. Remove the cake.
Turn the baking pan over and shake the cake out. If the baking
blade remains in the bottom of your cake, allow the cake to cool
then use a plastic spoon or rubber spatula to remove the Blade.
Please be careful when removing the cake from the Baking Pan
for it may crumble or break.
9 Be sure to unplug the unit.
Do not tug on the cord.
- 22 -
COMPLETE
COMPLETE
re
ca
!CAUTI
Be
rn
u
b
N!
O
o
t t
o
n
l
f.
l
fu
rse
u
o
y
Page 23

CAKE
Cake
Cake
Variations
SHORTCUT POUND CAKE
See package label Egg
See package label Water or Milk
1-1/2 package (24oz.) Pound Cake Mix
CHOCOLATE CAKE
1/2 cup Water
3 Large Eggs, beaten lightly
1/2 cup Vegetable oil
2 tsp. Vanilla Extract
2 cups All Purpose Flour
3 tsp. Baking Powder
1 cup Sugar
7 Tbsp. Unsweetened Cocoa
When beep sounds add:
1/2 cup Chocolate Chips
SHORTCUT
CORN BREAD
See package label Egg
See package label Water or Milk
1-1/2 package (22.5 oz.) Cornbread Mix
DUTCH APPLE CAKE
3 Large Eggs, beaten lightly
1/2 cup Vegetable oil
1 tsp. Vanilla Extract
2 cups All Purpose Flour
3 tsp. Baking Powder
1 tsp. Baking Soda
1 cup Sugar
1/2 tsp. Salt
1/2 tsp. Allspice
2 tsp. Cinnamon
When beep sounds add:
1-1/2 cups Peeled and chopped
apple
- 23 -
SPICED
ZUCCHINI BREAD
3 Large Eggs,
beaten lightly
1/3 cup Vegetable oil
2 cups All Purpose Flour
2 tsp. Baking Powder
1 tsp. Baking Soda
3/4 cup Sugar
1/2 tsp. Salt
1/2 tsp. Allspice
1 tsp. Cinnamon
1 tsp. Orange Peel
When beep sounds add:
1 cup Shredded Zucchini
3/4 cup Chopped Walnuts
CITRUS FRUIT BREAD
3/4 cup Orange Juice
1-1/2 Tbsp. Lemon Juice
2 Large Eggs, beaten lightly
1/3 cup Vegetable oil
2 cups All Purpose Flour
3 tsp. Baking Powder
1 tsp. Baking Soda
3/4 cup Sugar
1/2 tsp. Salt
1/2 Tbsp. Orange Peel
1/2 Tbsp. Lemon Peel
Page 24

SOURDOUGH STARTER
Sourdough Starter
Light Sourdough
Bread
What is Sourdough starter?
Sourdough starter is a mixture
of flour, water, sugar and
natural leaven.
This batter is one in which both
yeast and bacteria grow in a
perfectly balanced condition.
The yeast actually helps and
feed the lactobacilli organism.
In other words, Sourdough is a
traditional form of the original
"leaven" for bread.
Sourdough Starter Setting
5 min 120 min5 min
Preheating Kneading Rising
Complete Beep
2:10
1-5. Follow the same procedures as steps 1-5 for BASIC BREAD (see page 10).
6. Select the Cake setting
1) Press the SELECT COURSE key to set the arrow ( ) to "SOUR DOUGH STARTER."
2) Press the CRUST CONTROL key to set the arrow ( ) to either Light,
Medium or Dark to choose the crust you want.
3) Press the START/RESET key.
• The Operation Light will go on and the first process is shown
(i.e. KNEAD).
• As the process continues, the indication advances from PREHEAT,
KNEAD, then to RISE.
• The unit will count down remaining time at 1-minute intervals until
the Bread is done.
7. Beeps tell you the cake is done.
1) When baking is complete, beeps alert you that the starter is ready and the operation lamp will turn off.
2) Press and hold the START/RESET key.
COMPLETE
Note:
This unit has a convenient function to prevent it from resetting even if you accidentally press the
START/RESET key during the baking cycle.
COMPLETE
Bread
1. Remove the Baking Pan with the Starter and add the ingredients for Light
Sourdough Bread.
(The Starter remains inside of the Baking Pan, and simply add the ingredients)
2. Bake the bread by following the BASIC STEPS (see page 10).
- 24 -
Page 25

Traditional
Sourdough Bread
TRADITIONAL SOURDOUGH BREAD
Starter
1. Follow the same procedure for Light Sourdough Bread to prepare the Starter (see page 24).
2. Remove the Baking Pan with the Starter and keep at room temperature for 7-10 days.
During this period, stir the starter 2-3 times everyday.
3. While the Starter is leavening, cover the Baking Pan with plastic wrap and puncture several holes with
a fork.
4. To ensure that the temperature is as steady as possible, wrap the Baking Pan with a towel.
In colder areas, the 24 hour RISE function in the HOME MADE COURSE is available (to keep the
Starter at a desired temperature). Please be sure to cover the Baking Pan with plastic wrap and puncture
several holes with a fork.
Bread
1. Feed the Starter 1 tsp. of Sugar and 2 Tbsp. of Bread Flour 1 hour prior to baking.
2. Bubbles on the surface indicate that the Starter is active.
3. Remove the Baking Pan with the Starter and add the ingredients for
Traditional Sourdough Bread.
(The Starter remains inside of the Baking Pan, and simply add the ingredients)
4. Bake the bread by following the BASIC STEPS (see page 10).
- 25 -
Page 26

TRADITIONAL SOURDOUGH BREAD
Traditional
Sourdough Bread
Light Sourdough
Bread
Traditional
Sourdough Bread
LIGHT SOURDOUGH BREAD
<Starter>
1-1/2 cups
2 cups
2 tsp.
Add the following ingredients to the Starter.
3 cups
1-1/2 tsp.
2 Tbsp.
2 tsp.
3 Tbsp.
2 Tbsp.
Note:
•
Sourdough bread becomes sourer the longer the Starter is leavened. The HOME MADE COURSE
conveniently allows you to increase the sour flavor. Let the Starter leaven at 80ºF to 85ºF.
•
When leavening for a long period, cover the Baking Pan with plastic wrap and puncture several holes
with a fork.
•
Try to keep the area and the Baking Pan as clean as possible while the Starter is leavening.
When leavening for more than 10 days, feed the Starter with 1 tsp. Sugar and 2 Tbsp. Bread Flour
•
once every 3-4 days.
If you would like to bake another bread while the Starter is leavening, transfer the Starter into a non-
•
corrosive bowl (we recommend glass, ceramic, or stainless) and cover with a plastic wrap with holes.
Both Sourdough Starter and bread are very sensitive to the environment. The baking results may vary
•
depending on the season and location.
Water
Bread Flour
Active Dry Yeast
Bread Flour
Salt
Sugar
Active Dry Yeast
Apple Cider Vinegar
Lemon Juice
TRADITIONAL SOURDOUGH BREAD
<Starter>
1-1/2 cups
2 cups
2 tsp.
When the Starter becomes active, add the Starter
and following ingredients to the Baking Pan.
3 cups
1-1/2 tsp.
2 Tbsp.
2 tsp.
Water
Bread Flour
Active Dry Yeast
Bread Flour
Salt
Sugar
Active Dry Yeast
- 26 -
Page 27

Home Made
HOME MADE
Home Made Setting
Preheating
Kneading First rising
Beep
Stir
down
Second
rising
Stir
down
Third rising
Keep warm
Baking
Complete Beep
Programmable setting lets you use your favorite recipes!
Allows you to program 3 bread baking processes ("Memory1", "Memory2" or "Memory3") to
your specifications.
On conventional bread makers, each bread baking cycle time is preprogrammed, and does not allow any
changes to baking or rising time. HOME MADE setting allows you to program each of the cycles in the baking
process for the desired time. This allows you to adapt your favorite bread recipes for use in the Home Bakery.
1-5,7-9. Follow the same procedures as steps 1-5,7-9 for BASIC BREAD (see page10~11).
6. Program the time for each process.
(1) Select one of the 3 Memories of HOME MADE using the SELECT
COURSE key.
(2) Press the CYCLE key. (The current process and current time setting are
displayed.)
• The factory default settings for HOME MADE are ALL OFF.
(3) If you want to change the time, press the TIME key. (The time display
flashes. To reset, press the START/RESET key.) After you complete the
setting, press the CYCLE key. (The displayed time stays on.)
(4) Display appears according to the process flow.
• Set the time for each process by following the above procedure,
referring to the table for maximum programmable time for each
process. (Each press of the TIME key increases the time in 1-minute
increments.)
• KEEP WARM time is not changeable. Set either ON (60 minutes) or
OFF.
(5) After KEEP WARM setting is complete, press the START/RESET key
to complete your setting. The time length required for completion is
displayed according to your setting.
• If you want to change it, repeat steps 6-(2) ~ 6-(4), above.
• To program your second and third memory, press the SELECT
COURSE key to select MEMORY 2 and 3 respectably, and follow
steps 6-(2) ~ 6-(4).
PREHEAT
KNEAD
RISE1
RISE2
OFF, 1-30 min. Stabilizing the temperature
of ingredients (about 82.4ºF).
OFF, 1-30 min. Bread Dough making. At a
setting of less than 3 minutes, this process
includes only mixing. At a setting over 5
minutes, beeps will sound to indicate the time to
add ingredients.
OFF, 1 min.- 24 hrs. Dough rises (about
82.4ºF).
OFF, 1 min.- 2 hrs. Dough rises after steam
is released (about 82.4ºF).
- 27 -
RISE3
BAKE
KEEP WARM
OFF, 1 min.- 2 hrs.
Dough rises after formed into a ball (about
100.4ºF).
OFF, 1 - 70 min.
Baking (about 254-290ºF)
3-step setting LIGHT, MEDIUM or DARK
OFF or 60min.
The baked bread is kept warm (about 194ºF).
Page 28

HOME MADE
Home Made
If you want to change the time for each process during baking ...
(1) Press the TIME key to display the ongoing process and the
remaining time. (After 5 seconds have passed, the display
automatically returns to the original state.)
(2) While the remaining time is displayed, you can move on to the next
process to shorten the cycle.
*Holding down the CYCLE key slightly longer while the time
display is flashing completes this process. After two seconds, the
display will show time remaining until the bread is ready, resuming
baking.
If you program the desired time by following the steps above, the unit
will remember your setting for your next bake. However, you can erase
all settings by the following procedure:
1. Unplug the power cord from the outlet.
2. Plug the power cord into the outlet, while holding down the
CYCLE key. The Home Made setting
memory is erased and reset. Please keep in mind that by resetting
the memory, all settings will be
erased.
Precautions when using recipes not included in this book: Please note
that we are not responsible for any baking or jam results using
ingredients, or amounts which are not listed. (This also applies to the
"Home Made" setting where you can change the baking process time as
desired.)
PREHEAT
Be sure not to place an excessive load on the motor as this may
cause unit damage, especially when:
* you decrease the amount of water.
* you increase the amount of flour.
* you add big or hard ingredients, etc.
To use the Timer setting, please refer to "HOW TO USE THE TIMER" on page 5.
- 28 -
Page 29
HOME MADE VARIATIONS
Home Made
Variations
Meatloaf Miracle
CRUSTY FRENCH CRUSTY FRENCH (1.5 lbs. SIZE)
1-1/2 cups
4-1/2 cups
1-1/2 tsp.
1 Tbsp.
3 tsp.
The suggested time cycle for French bread is as follows:
PREHEAT KNEAD RISE1 RISE2 RISE3 BAKE KEEP WARM
22 18 45 1:25 OFF 1:10 1:00
Since no sugar is used for French Bread, rising takes time and the dough is very delicate. With this in mind,
the French Bread requires extended time for RISE 2 process, which is carried out at a low temperature
Water
Bread Flour
Salt
Butter
Active Dry Yeast
1-1/8 cups
1/2 Tbsp.
1 tsp.
3-1/4 cups
1-1/2 tsp.
Water
Butter
Salt
Bread Flour
Active Dry Yeast
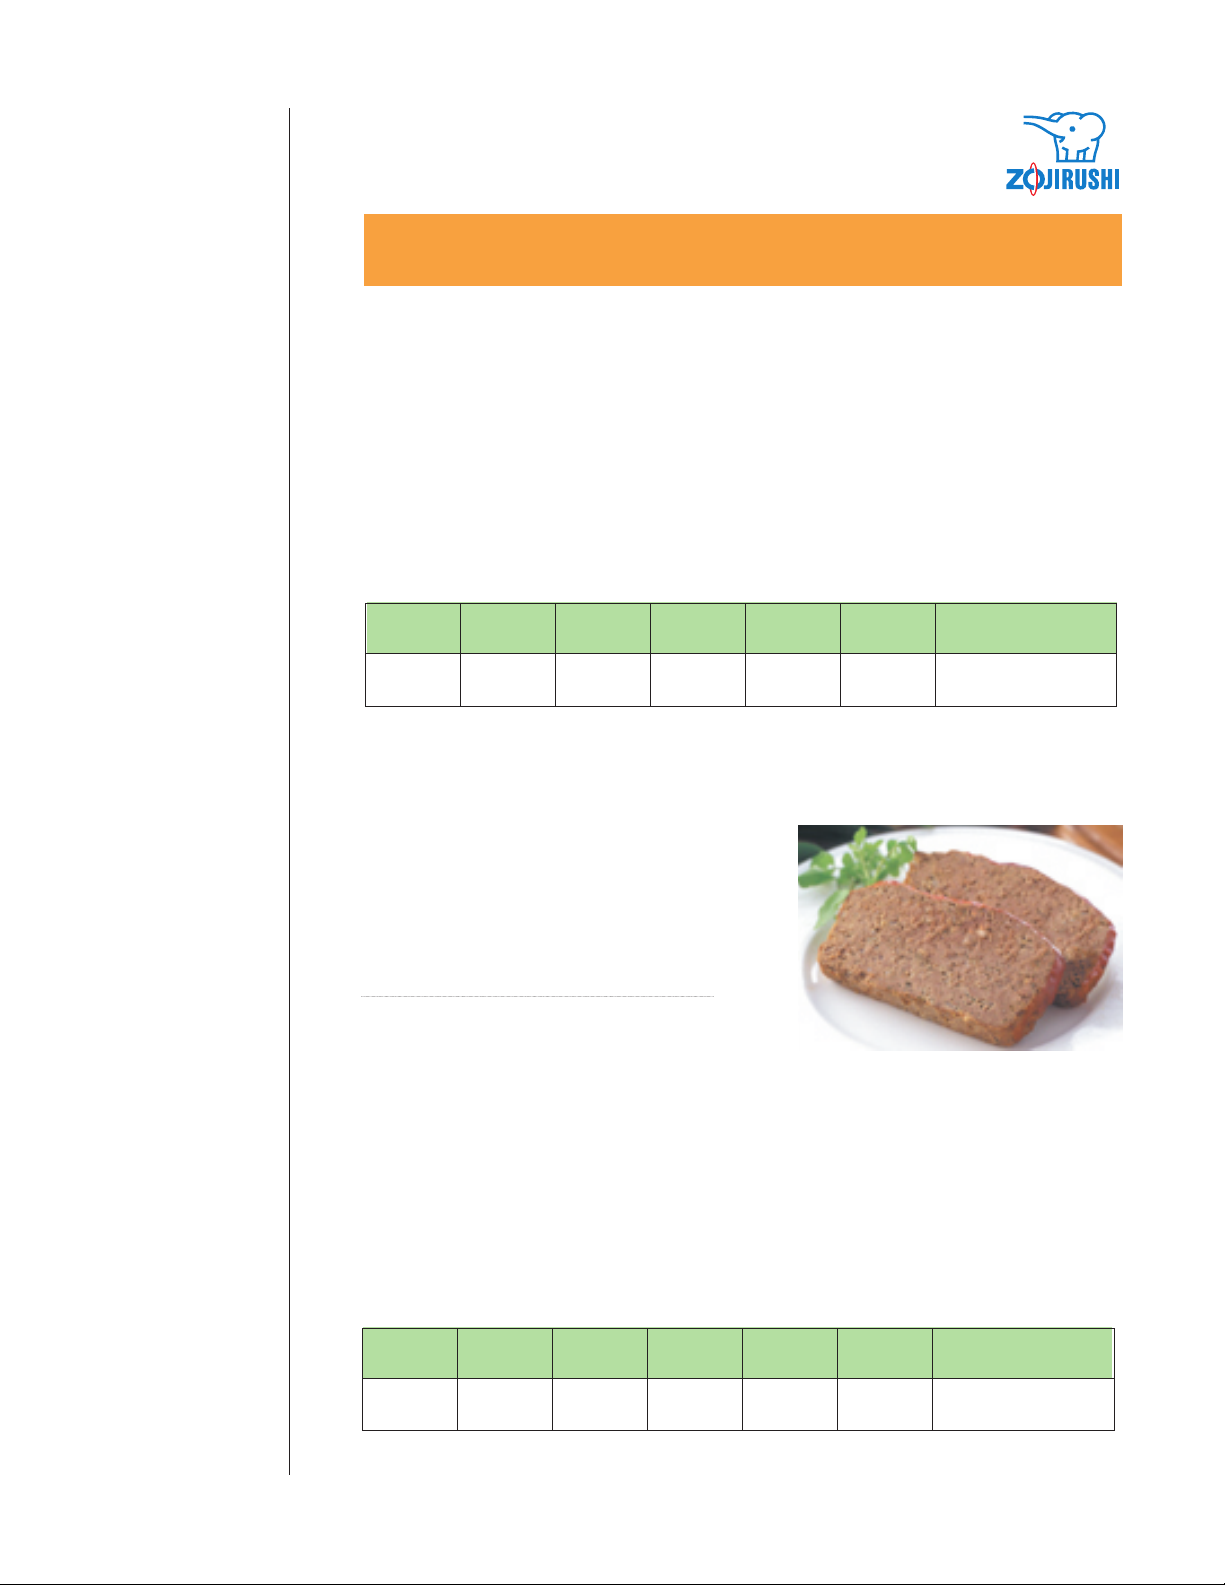
MEATLOAF MIRACLE
1
2 lbs
1 cup
2 tsp.
2 Tbsp.
1 tsp.
1/4 tsp.
1 cup
2
Medium Onion, Chopped
Ground Sirloin
Mushrooms, Sliced
Salt
Fresh Parsley, Chopped
Garlic Powder
Black Pepper
Bread crumbs
Eggs, Beaten
<GLAZE>
1/2 cup
1 Tbsp.
1 tsp.
1. In a large bowl, combine above ingredients, except for glaze. Mix well. Remove Kneading Blades
from Baking Pan. Press meat mixture into the Baking Pan.
2. In a small bowl, combine glaze ingredients and set aside.
3. Select "Home Made" setting on the bread machine. Press "cycle" key, turning OFF all cycles (Preheat,
Knead, and Rise cycles). Select "Bake" cycle and press "Start". Baking time is 1 hour and 10 minutes.
30 minutes prior to end of baking time, open Lid and pour glaze mixture on top of meatloaf. Close Lid
and continue baking. Allow meatloaf to cool slightly, drain juices, and remove from Baking Pan. Slice
and serve.
The suggested time cycle for MEATLOAF MIRACLE is as follows:
PREHEAT KNEAD RISE1 RISE2 RISE3 BAKE KEEP WARM
OFF OFF OFF OFF OFF 1:10 OFF
Ketchup or Barbecue Sauce
Brown Sugar
Prepared Mustard
- 29 -
Page 30

CLEANING & STORAGE
Cleaning & Storage
! CAUTION !
To avoid electrical shock, first unplug the Home Bakery and
allow it to cool before cleaning.
Dust and crumbs that collect inside the Home
Bakery may cause scorching or uneven baking,
so be sure to clean the unit and Baking Pan after
each use, following these steps.
Outer Body and Lid
Wipe off the Outer Body of the unit with a damp
cloth. Wipe the Lid as well. Clean the Viewing
Window with a moist paper towel, and wipe dry.
! CAUTION !
Do not immerse the unit in water or
any other liquid.
Baking Pan and Kneading Blade
Both the Baking Pan and Kneading Blade have
coated nonstick surfaces. Harsh cleaners (such as
abrasives and metal scrubbers) or utensils (such
as forks, knives and metal spatulas) must not be
used on these parts as you may scratch them.
Over time, the nonstick surface may change color
due to moisture and steam. This is absolutely
normal and has no effect on unit performance or
use.
Remove the Baking Pan from the oven cavity
prior to cleaning. Fill the empty Baking Pan with
lukewarm water and liquid detergent. Allow it to
sit for 30 minutes before emptying the Pan and
removing the Kneading Blade. If the Kneading
Blade is difficult to remove, hold the Kneading
Blade in one hand and use your other hand to
grasp the Rotating Shaft from beneath the Pan.
Turn both hands in opposite directions to free the
Blade. Clean the inside of the Baking Pan with a
soft sponge. You may use a very soft brush to
dislodge baked-on crumbs around the Shaft and
in the center of the Kneading Blade. Make sure
you reattach the Kneading Blade to the Baking
Pan after cleaning. Never use a dish washer or
dryer, as it may result in deformation or
discoloration of the components, or unit
malfunction.
! CAUTION !
Do not immerse the Baking Pan in
water or any other liquid.
Allow the unit to cool completely before storing
it. Keeping the Lid open helps. Clean it as
described above. Carefully dry all unit
components and wipe off any moisture inside the
unit. To avoid damage to the unit, do not place
any heavy objects on top of the Lid.
- 30 -
Page 31

QUESTIONS AND ANSWERS
Questions & Answers
Q1. Why do loaves sometimes vary in height and shape?
A1. Bread's height and shape is affected by several factors including room temperature, air conditioners, heaters,
weather, humidity, altitude, use of the Timer, and fluctuations in household current. It can also depend on how you
shaped the dough. The bread can also be affected if fresh ingredients are not used or measured incorrectly.
Q2. Why does some flour occasionally stick to cakes baked with the CAKE setting?
A2. You may not have added ingredients in the order listed. When it's time to add ingredients, and beep sounds, be
sure to remove flour that remains on the sides of Baking Pan using a rubber spatula.
Q3. Why does some flour occasionally stick to the side of the bread?
A3. During the initial mixing period, small amounts of flour may sometimes stick to the sides of Baking Pan and will
be baked onto the sides of the loaf. If this happens, scrape off that portion of the outer crust with a sharp knife.
Q4. Why do the loaves vary in shape depending on the season?
A4. In the Summer, loaves may sometimes rise too high or collapse, causing a dent in the middle. In the winter, you
may have trouble getting the bread to rise. This can be solved by increasing the water temperature to about 68ºF.
Q5. Why is my dough sometimes very sticky and difficult to work with?
A5. Dough may sometimes be sticky at the end of the dough cycle depending on room and water temperatures. If that
is the case, use cold water and put flour on the dough more frequently.
Q6. Why is the top of the bread very uneven?
A6. During the steam releasing process, the Kneading Blade turns the dough upside down, leaving an uneven surface
on the top. This happens occasionally, and does not indicate any unit malfunction.
Q7. Why can't the Timer be set for more than 13 hours?
A7. With any setting beyond 13 hours, ingredients may spoil and affect the quality of dough, resulting in
unsatisfactory baked bread.
Q8. Can I use this Home Bakery for favorite bread recipes found in other cookbooks?
A8. The accompanying recipes were specifically created for this Home Bakery; results may vary when using any
other recipes. We recommend you use the recipes in this book whenever possible.
Q9. Sometimes when I cut my bread, it's too sticky and falls apart or it starts to compress and will not slice
cleanly. What can I do?
A9. If your bread is sticky or compresses, it may be too hot. Be sure to allow your bread to cool down to room
temperature before slicing.
Q10. May I use home-ground or home-milled flour?
A10. No. Home-ground or home-milled flour is too coarse for bread baked in this Home Bakery.
- 31 -
Page 32

QUESTIONS AND ANSWERS
Questions & Answers
Abnormal Condition
ABNORMAL CONDITION
"HOT" appears.
The motor does not
operate during the
KNEAD process.
Keys do not operate.
The operation lamp
turns on but the unit
does not operate
(kneading does not start).
Beeps keep sounding.
The Baking Pan's inside temperature is over 104ºF. This
indication will appear if you attempt to use the unit
continuously.
Open the Lid and allow the Baking Pan interior to cool.
The motor protective device is activated due to an
excessive load on the motor.
The unit will automatically resume operation after 30
minutes. Discard the unfinished bread and start the
process again from the beginning using ingredients that
put less load on the motor.
The Power Plug is disconnected from the outlet.
Plug the unit into the outlet securely.
While "PREHEAT" is indicated, the temperature of
ingredients is adjusted, so kneading does not start.
This does not indicate any malfunction.
If in the KEEP WARM cycle, remove the baked
bread immediately and press the START/RESET key.
Condition CauseStatus
"3:30" flashes and the
operation lamp turn off
during baking/cooking.
The Home Bakery
makes noise during use.
The Home Bakery
rattles during operation.
Smoke comes out
from the Steam
Vent and a burning
smell is generated.
Condition CauseStatus
Power supply has been discontinued for more than 30
seconds due to power failure, disconnection of Power
Plug, a defective fuse or circuit breaker.
Discard the unfinished bread and start the process
again from the beginning using new ingredients.
The sound heard is the motor during the kneading
process.
This does not indicate any malfunction.
The Baking Pan is not installed securely.
Install securely.
Ingredients or baked product collect on the Heating
Element or inside the unit.
This does not indicate any malfunction. Make sure to
clean the unit after use. Unplug the unit and allow it to cool
before cleaning.
- 32 -
Page 33

WHOLE GRAIN(BASIC, WHEAT, QUICK WHEAT)
TROUBLESHOOTING GUIDE
This guide was created to help you through any difficulties you may encounter as you learn to use your Home Bakery. Be patient. If, at
first, the results of your baking are not completely satisfactory, please consult this guide. In most cases, you will find the solution, as well as
the answers to any question you may have.
We also offer our ZOJIRUSHI toll-free Customer Service as an additional source of help to ensure that you are happy with your baking.
Please take advantage of this guide and Customer Service before returning your Home Bakery to the store.
RESULTS:
CORRECTIONS:
Increase
Water
or Milk
Decrease
Increase
Salt
Decrease
Increase
Sugar or
Honey
MECHANICAL
INGREDIENT
Decrease
Increase
Flour
Decrease
Increase
Yeast
Decrease
Liquid used was too hot.
Liquid
Old flour was used.
Flour
Wrong type of flour was used.
No yeast was added.
Yeast
Yeast may not me fresh.
Used wrong type at wrong setting.
Unplugged or electric failure.
Ingredient supplied on heating element.
Pan not properly into unit.
Kneading blade installed incorrectly.
MEASUREMENT
Incorrect Menu selections was used.
Loaf rises
then falls.
1~2 Tbsp. 1~2 Tbsp.
1/4 tsp. 1/4 tsp.
1~2 Tbsp.
1/4~1/2 tsp. 1/4~1/2 tsp.
Loaf rises
too high.
1/2 tsp.
1~2 Tbsp.
Loaf does
not
rise enough.
1~2 Tbsp.
1/4 tsp.
1/2 tsp.
1/4~1/2 tsp.
Loaf is
short
and heavy.
Light crust. Uncooked. Over
cooked.
1/2 tsp.
1/2 tsp. 1/2 tsp.
Not mixed. Smoke
appears
from vent.
High
altitude
adjustment.
1~2 Tbsp.
1/4~1/2 tsp.
Measurement Adjustment:
According to the chart, first make the proper corrections for yeast;
and if the loaf is still not acceptable, make adjustment to liquids,
then dry ingredients.
Pan Alignment:
The pan should be level when it is properly into the unit.
Check the space between the pan and the front and back walls, the
front and back spaces should be equal.
Kneading Blade:
The kneading blades should be pushed to the bottom of the baking
pan.
Customer Service:
If you have any questions, please call ZOJIRUSHI Customer
Service Dept. at (800) 733-6270 or (323) 722-1700.
- 33 -
 Loading...