

Page 1
,,._<,-.-
HIGH
WSb2
SPEED
STRETCH
SEWING
MACHINE
ij@JD}jlBJJ~
OPERATION
MANUAL
*i~EJ=.flft
PARTS
BOOK
ttl Ill· ttJJI
ZOJE
SEWING
~ill!TI
mn
~~
MACHINE
ftt
'l5i
ae
CO.,
~
EI
LTD.
Page 2
I§
~
CONTENTS
$0~lli'M!iN.i:E~$J]lf(Safety
g;.~;§ii¥Jffl.~(Assembling
~Wltltft-.lg;.~(Sewing
Bi:ffi'~t?Jl1lft-J3>:~(1nstalling
i@~JJtlll¥.i:!i'Eft'J1iaJ(Operating
precautions and notes
for
procedure)···············:············································1-7
the machine rest board)····················································································8
machine installation)·····························································································8
the belt
cover)·····························································································S
direction
of
machine pulley)···········································································B
;)<Cf1!tilll(Lubrication)···························································································································9
!kHR~'iil!tilll(Silicone
Jif~fj{J::fj$(Th
reading)················································································································· ·11-12
ffJjj;jlff:IJft-JiJ!J'!I"(Adjusting
;"¥:
liJJ
tt
ll'liJ!J
'!~"(Adjusting
<tJ!liH~
!ltft-JiJ!J'!I"(Adjusting
~>!Xitll'liJ!J'!I"(Adjusting
~!>JJtllft-Jil!ff::J(Cieaning
tlt
<tl¥.l:!!!~(Replacing
tltfllii¥J:!!!~(Oil
Jjfiflift-J::tJi*(To
illlm~iili
··
..
iJ!Ji'i>l!i;il&ftl<t%x;J-!ffi
replacement)·············································································································· ·15
drain the
lli.lft-.lf&'!!tEi111"t::J(Checking
(Adjustment dimensions/Comparison table
'l"~%1Ji!;fi!l;jl<(Subclass
~f~-¥-IIIHParts
1
JJt'i\:~tZ/(1)
2JJt5\:~tZ/(2)
3.J-Jt5\:~tZ/(3)
list)·····················································································································19-60
(Machine bed frame(1) )·····················································································:·······20-21
(Machine bed frame(2) )········
(Machine bed frame(3)
4.1'3::!111il'O'liJJVl*Z!(Crank
s.J:3::!11111'!l;;IJ<Jt*ZI(Arm
6.<Hf~tZ/(Needle
·
7.1JHt~tZJ(Needle
8.
'11
Htlt*Z!
(Looper
9.~1\JVltZ/(Feed
O.~;;!JiJ!J'!I";fJ!tZ/(Differential
1
11.llil!!iltJt*Z!(Presser
12.!Jlll<tVl*Z!(Spreader
13.li!~N.~~w(Thread
14.Jit~tJttZ/(Needle
15.:fT~C.~VltZ/(Looper
16.i!iliiHJttZ/(1
17.~'lJil'HJttZ/(2)(Lubrication
)(Lubrication mechanism(1
18.'ffifli:<O:g;<j;fl;J(HR
.19.~!/,g(Thread
stand) ........ · .. ··· ........ · ........ ·· ............ · .. ·· .................. · .... · ..... · ......... ·· ... · ................... 57
20. i'itlli.:&llltf'f(Parts tor semi-submerged installation)
oil
tor
H.R.
device)·····························································································10
presser
foot
pressure)···················································································
the differential feed ratio)························:·························································· ·13
stitch length)····················································································· ···········13
the thread
tension)··························································································14
the machine)·········································:·························································14
the
needle)······································································································15
oil)···············································································································15
;jl</;f;J<;lJll
<t
and cleaning the
for
oil
filter)·····································································16
equivalent sizes/standard
needle)·······································
specifications)···································································································18
·····················································································22-23
)·····························································································24-25
shaft
drive
mechanism)··············································································26-27
shaft mechanism)······················································································· ···28-29
bar mechanism)··································································.-·····························30-31
guard mechanism)···································································· ... -..................... 32-33
drive
mechanism)· .... · .. ···· ...... · · · ...... · · ...... · ...... · · ...... ·
........
· · · ...... · .. · .. · .. · ........ · ...... 34-35
mechanism)······················································································- .................. 36-38
feed mechanism)
foot
mechanism)·· .. · .. ·· .. ·· .............. · ........................... ·· .......... ·
.................................................................................
........................
mechanism)···············································································'················43-44
tension mechanism)··· ................ · ..... ·· ........ · .. · .......
& spreader thread handling)··
............................................................................
·····
........ · ........................ 45-46
thread handling)·· ........................................................................................ 49-50
))
... · · ... · · · · · · · · · · ·
mechanism(2))·········
device)
........................ , ...................................................................................
................................................. , ............................
.......
:·
· · ..... · .. · .... · · ........ · .. · ..... · .... · .. · .... · .... · ...... 51-52
........................................................................
·13
···17
39-40
·41-42
47-48
53-54
55-56
-58
59-60
Page 3
1 ,
Wi
~
Introduction
·~~~~7~~~*~£®~m~~o
This
is
the instruction manual that describes how to use this product sately.
etE~~~&~illl,
Read
this instruction manual
~£the
prOcedures.
:%-&Hlil~Jit~,
and
tEJ't:JHlllNI*t!.!~Wm®liMt,
learn
very carefully how to operate,adjust
~'l!t,
ii!Ji!:,
and
service
this
sewing machine before heginning any
!l~~::lrti<~Fo,
:pj:Jttrrf<!!JIL
•~m~wm~tE~~~~.~~*~m#~ill~#®~Wm$#~~Jtt~~~®o
~~~*~~~~wm~~$#®~~tt.~~~?BAW,o
~Jit.~T~*~~.~~~~~~~~®F£,~*~~~~®~~oMr~~m~-~~~®~~~~~
Jl<o
~W:fJLf<!!ffl®~Mli\:%-~'ll'l!w;>f;:~~!ffi'~~li®~iJI.~~.
You should realize first that there
blank
range to them when you
For
safety it
is
essential that we
There may
Therefore, you should read
take
2,
Jllll>!\
>f<:0~
be
some safety measures that you yourself must take.
necessary safety measures
:ti:-:i:n\':6§
• §ti'J Applications, purpose I
Safety precautions
®~~m,
'!!!'~o
Our
industrial sewing machines
industry.Accordingly
never
is
always the
are
operating
supply
and
understand very carefully this instruction manual together with that
in
order
risk
of
contacting moving parts,such
industrial
safe products and you
to
use
sewing machines.
this
machine
use
them correctly
efficiently
~~~il!!iBIBIIi~®J.9t:i!:.fllot~$~
have
been
use
our
products for
developed
other
in
order
to increase quality and/or production
than
intended
tE"kti,~®~x1i!I'ZFc,
as
needles because you have to work
and
sately.
of
and
effectively.
13
®ilifliJf5/:0if£®Jilf
use
described
above.
£ o
~Jitl!l\~..tffl:iai~;VJ-,
:pj:J't:7J-bhmo
the
driving equipment
in
the
sewing
at
point-
and
~M;r;
::g)f~Jll'q;JJ');
~~~®~~:fJL,
The
environment
':h
T'l<:~tF',
I.;ff:fi;J!ii'l!i!l3i!i!f.~;f!L~~ot'fflt®;f!L~tl!:~#lfto
Do not use the machine
2.N;:lJJ,~i,?l!€"'1:"'1:3lt®lll!/J,
Do not
3.IDJ-,
Do not leave
4.ii'i!ll>l®lli\!JI.\
Do
S.ijlJ!r<l!,tt#ill!:JJt
Do
Circumstances
in
which our industrial sewing machines
i;\'iiJ:;'ETJt>F:tft~'fzT~o
near
use
or store
the
machine
i'l!illi\i'l!il<L
1i:~llilil'illfl:l'6®lll!/J
the
machine outside,in
lli\Lt1Itk,
not use the machine in
±
10%~
not
use
the
machine
on
*~®>F;ttt,
objects which make noise
lk~lE,\1,
in
the
~l!filMI'i~Wt!L®~,
are
used
may seriously affect their lives,functions,pertormance and/or satety.
For
safety,do not
such
as a high-frequency welder,etc.
~if&~lll!/J~~*'l!l'
air which
has
vapor from chemicals,
ttmll>t'l<::¥.1HIH~P)i;jo
use
the
machine
o.
or
do
not
expose
under
the
circumstances below.
the
device
to
chemicals.
o
high
temperatures
il:~W:fJL'IIl'*:I;F;l!>PJlJ®:lt!!/J
the
places of high
l:®Jttt~~ru11'8®:lt!!/J
the
condition
that
ambient
the
or
the direct sun.
o
temperature and humidity
that
seriously aftects sewing machines.
o
voltage fluctuation range is more than±
!0%
of
the
rated
voltage.
6.<1!.lli\W:I:7Gli<fli*i'l1t<J1b:i:i;;!ljl,tlf..tM~'!!!'®W:i!:~"
Do not use
::ID:ti:~tfilit
(1)
ilt~flE~*~'
the
machine
Safety measures
in
the
place
~®:~®'l<~*tp
where the
supply
voltage specified for
Safety precautions when you
the
penorm
control motor cannot
maintenance
on
the
he
properly obtained.
machine.
tE~~mJtt~~~,~~,~E~fttp~~~.ii!'~<l!.lli\~3C.~<I!.lli\~~~~L~T,#~~:fJL~~m
;r:{l;tWiJbzFo,
®'l<:~li!kftttJi!U
Always
tum
performing any maintenance,such as checking,repairing,cleaning,etc-However,if you need to pe:rfonn these procedures with
on. to prevent
follow them.
1'EuHT~T~.ill'.B;J',
Always
tum
1'filt11'~fto
,
Mt<'f-W~~I!OtF'JWi!U
off
the
power,unplug the machine
accident<; due
%-&,*:llli<l!.lli\~3<,
off the power and nnplug the machine betore performing the procedures shown below.
{§Jl',,
1i~,'!!!'~lm<l!.ll!!i!t11'ft.ill'.~,
to
the unexpected start
ftl>EI!Oll:~t!L~Wff~~~Mt~mi"l'~~
o
and
then
make sure
of
the machine and users misoperation.estabish your oun procedurf'.s
~<l!.iW~'Ii.M.~~..t~T:GFoilt~o
that
the
machine
does
not
run
by pressing
the
treadle before
for
the
safety
power
and
-1-
Page 4
•
i:JD:itiJ
Lubrication
•
Jl'iiJO
Threading
· trEU111. Cleaning
·
h#
Replacing
·
:i1Hr1Jiilill5iWt(i<JliU'lifll:i!!]~li1
·
:l!!~111.lilf
.
Urrtl r f!;.ill-.111,
•
i/lill\'#JlliJI!t
·
i/lill\';&ij/J
(2)
7f~~Jiij(i<J~~·J]J!
o~7f~~~~mliii.*~~~~m~*~$*,$~~m~.~~~~~~Ho
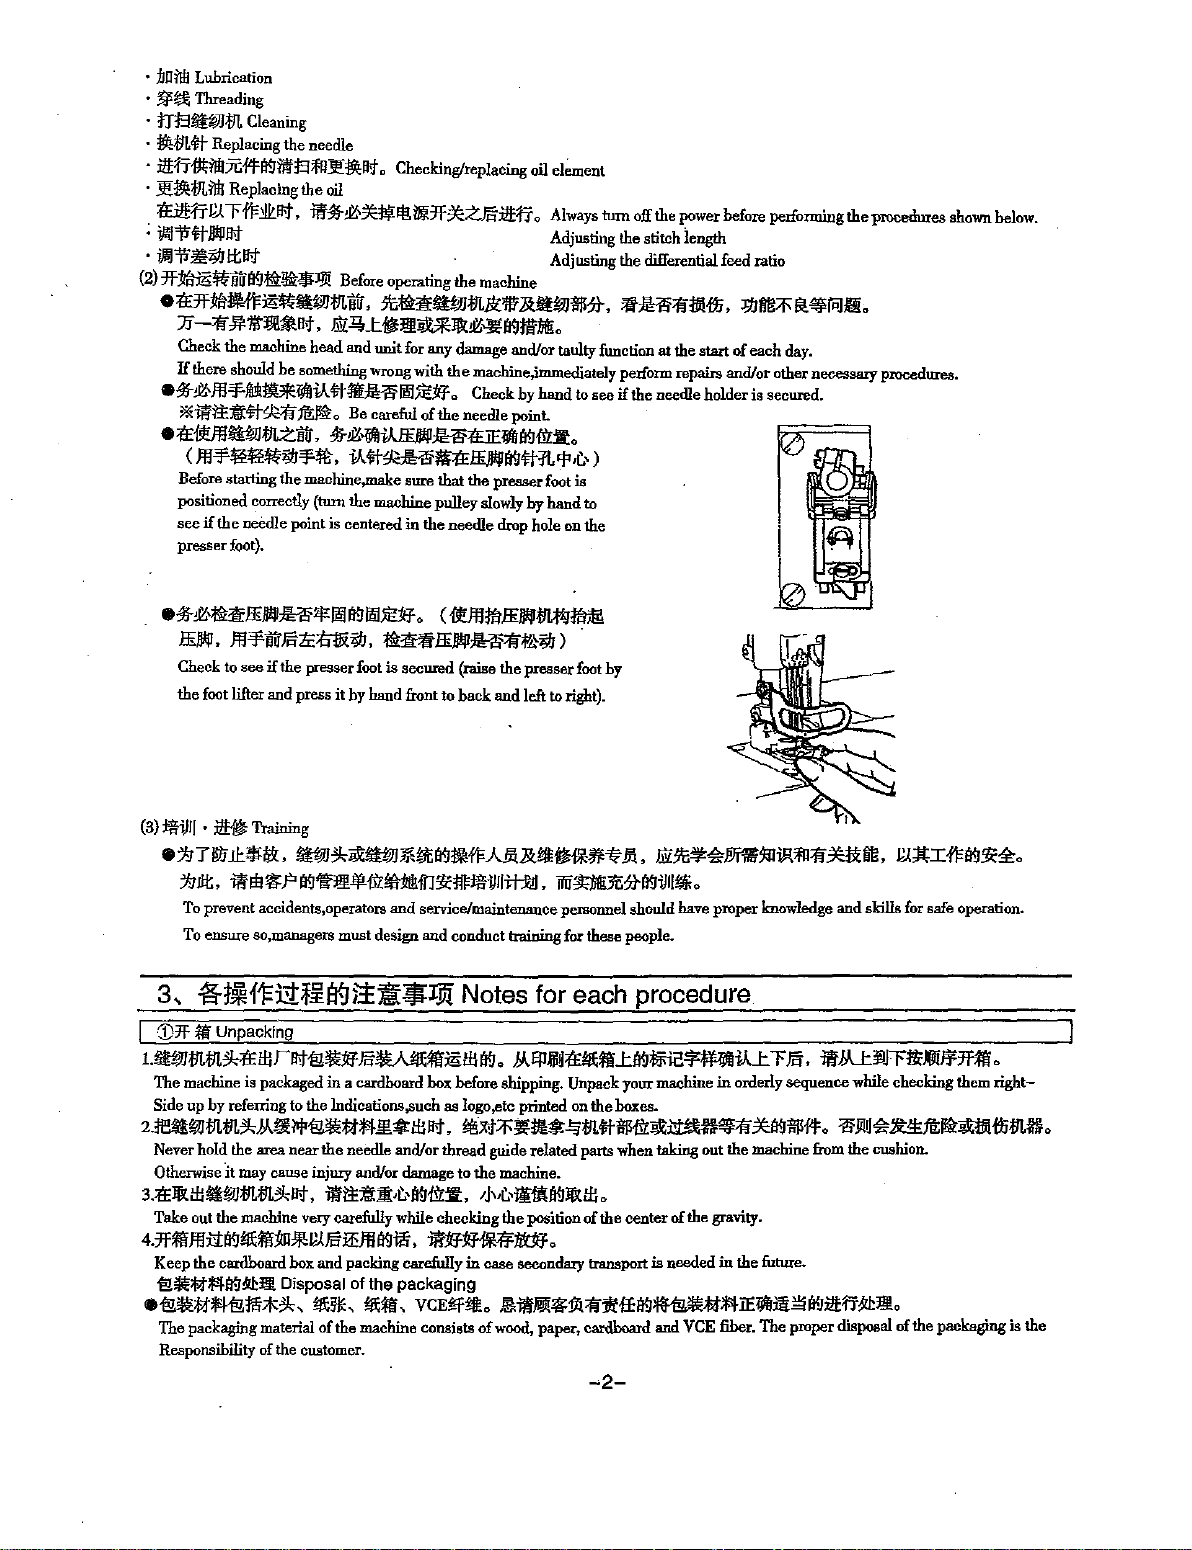
~-~~~~llt.@~L~~~~~~~m~o
Check
H
there
O%-liQJll'P!JlUlifliiJ..
>~<iWti::lK#~Ji!;~o
O~iVl'JDm;GJiii,
(
illHM£~ij/J'f'~,
Before
positioned correctly
see
if
the needle point is centered in the needle
presser
the
needle
Replacing the cil
i!f§!-J051(:jlj!<I!!Jl;:7f51(:;G!i"fi!J:rr
ltllt
the
machine
should
starting the
foot}.
head
he
something
machine,make
(tum
o Checking/replacing
Before
opern.ting
and
unit
wrong
#41!~1il!~
Be
careful of the needle point.
the machine
for
any
damage
with
the machine,im.mediately
o Check by hand
oil
element
o
Always
turn
off
the
power
Adjusting the stitch iength
Adjusting the differential feed ratio
and/or
taulty
function
at
the
petform
repairs
to
see
if
the needle holder is secured.
before performing the procedures
start
of
each
day.
and/or
other
neeessazy procedmes.
%-~>Jiflii.UfB!IJ:JH'tEiEJifli~fJtl!o
iJ..#~hM~#1L<P•C')
sure
that
the
presser
foot
is
the
machine
pulley slowly
drop
by
hole
hand
on
to
the
shown
below.
o%-liQ~~ffiJlliJ~*Iill~lill~o
M.!ll'Pliii!i"f~~ij/J,~~M~~~ij/J)
Check
to
see
if
the presser
the
foot
lifter and press it by hand front to back and left to right).
(3)
:flli/1/
.
~Training
O~T~k·~.D~~D*~(I<J~f!;A&~~~~~m.@*~~~~~iiii~**~·~~If!;~~~o
~Jlt.
iWJI!I'!=FfllJ'i!f~ijifft~:lli!l1tJ~jjl;:flliJJ/~,
To
prevent accidents,operators
To
ensure
so,managers
I
:)}If
m Unpacking
t.umm~~wrllt-!!!U!i"flltNIJ;~JEtll
The
machine
is
packaged
Side up
by
referring
2.Qfi!Jtll.111.~.Y.!JI!JIPM~#.m*tllllt,
Never hold
Otherwise
3.~~tllft~llt,
Take
4.7f~Jll:li(i<J!IJ;~:!4t~f!,(Ji"fJEJllJi9Ji'i'
Keep the
§ilil;~J/SIIi9~lllt
eM~ii"J.'i!!t.'i;f<~,
The
Responsibility
it
out
the
ea:rdhoard
packaging
to
the
area
near the needle and/or
may
cause
machine
box
Disposal of the packaging
material
of
the
foot
must design
in
a
cardboard
the lndications,such as logo ,etc
injury
and/or
iirl£lK:i:•L'Ii9fft:ilt,
very
carefully
and
packing carefully in case secondary
ll!;%:,
li!;~,
of
the
machine
customer.
<bmM~~
is
secured (raise the presser
and
service/maintenance personnel should have
and
conduct
training
Ji9
0
».fl!.!ili~~LfllJ~*:fil\lJlRJ:
box
before shipping.
~XH~ll*.Ei111.#$fft~~n51(:fllJ$#o
thread
guide related
damage
to the machine.
t),,t,Jljji;Ji9~tll
while checking the position of
foot
by
llii~*(I<JiJJI~o
for
these
people.
Unpack
your machine in orderly sequence while checking
printed
on
the boxes.
parts
when
o
the
center of
i#!Jf!£ff¥.fl'ttdffo
transport
VCE!!f~o
consists of
,\it.i!f!i!ii!l'!=fli.~"i!N:rfllJ~#J/SIIElifliJ!Ml(!<}i!J:ff~~o
wood,
paper,
cardboard
proper
taking
out
the
gravity.
is
needed in the
and
VCE
the
fiber.
knowledge
r
Fo,
machine
future.
The
proper
and
skills
for
safe operation.
iit.bU:~fFi'l<Xil!¥fflli
'6'9UlilcMJ11;~~~11l.Ho
from
the cushion.
disposal
of
the packaging is
them
o
right-
the
-2-
Page 5
!il!ill<!Jlll!V!I/Jti':J~!I
l.~!iJJ<!Jla<JJ£'11o,
2.ii!JJi!t~!iJJ<IJLEJi*JIIa<J#:tsf1H'Ji,
plastics.
3
-~~)J<!Jla<J
The machine waste is
commissioned
il!:flll!i¥51l!Jll!l#9H6~,1!li~:li!!>f:!!l:l¥o:IJ"ti':J:fl~r,
The
parts contaminated with
:ff®i'§:®i:li!!f':J:riilll!il!ill<IJL
•
~r:ffJ®!'i'r®i:li!!f':J:rilJIJ~!iJJm,
The
manufacturer assumes no
upright position avoiding it from dropping or
~~Transportation
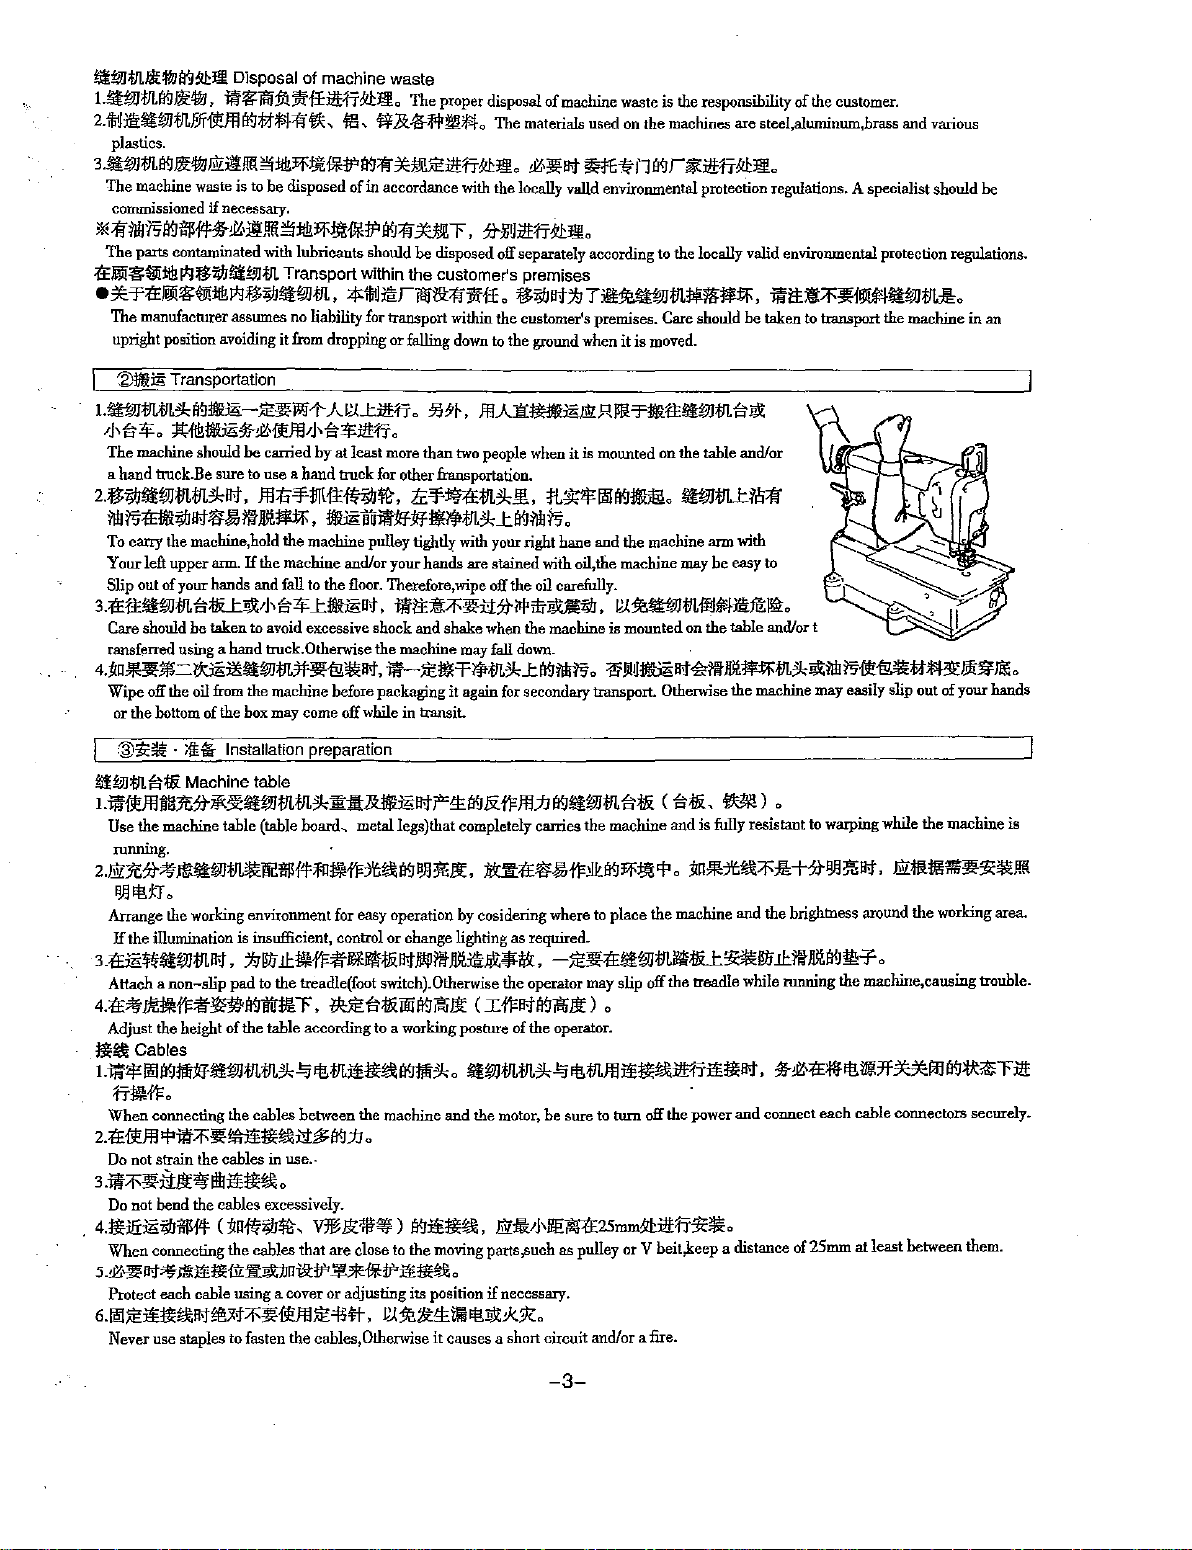
L~<IJLWka<J~~-"'J!jl)Ji"-
1)'~
~o
;)l;fl!!~%-&;•{j!JIIIj'~~Jl!'fl
The
machine should
a
hand
truck.Be
z.:§7YJ!J!!iJJ:IIL:III!kllt.
Disposal
of
machine
Jil'\!rjilj:flt)i\'f±J!t1-TJIJ:llllo
J£'11o
Jjlz~J!l!
~
:li!!>f~J¥,JF
to
be disposed of
if
necessary.
lubricants
Transport
liability
Jcl;(..tJ!!'fl
he
carried by
sure
to
use a hand
Jll:t"'¥-JIJ\1±~~,
at
truck
waste
The
proper disposal
fl'L
f¥.&AI·#i!l!:tsfo
a<J:fl
~:\IDEJ!t1-TJ1l:!l
in
accordance with the locally valld environmental protection regulations. A specialist should
of
The
materials
0
&·~II&
machine waste is
used
on
the
if<j'f;"'lf
n
a<J r li<J!t1-TJIJ:!Io
the
responsibility
machines
of
the
customer.
am
steel,alwninum,brass
:)t;l;Ui!t1-TJIJ:llllo
should
be
disposed off separately according to
within
the
customers
premises
:<l<ii!Jli!trlilltl!::fl'OfiE o :riiil.illt:k
for transport within
falling
o
~~·,
the
customer's premises. Care should
down
to
the ground when
fllA11'~.RJ!Il.r~tt~m
T>ifMW.J<IILJ>I:fil1m,
it
is moved.
the
locally valid environmental protection regulations.
Jil'tt;f;:FJ!f~!J!!iJJ~o
he
taken
to transport
the
~;;li;
o
least
more
than
two people when
for other fransportation.
li:'FlWiE:IIL~dlL
it
is
moWlted
on
the
'lt'll;¢11i!ti':JJIIU!i!o
~m_rr,s;a
table
and/or
and
various
machine
in
be
an
lllir5~lJIJI!t~£mM!1m,~nu~~~~m*_rll!lll!i~o
To
carry
the
machine,hold
Your
left
upper
arm. H
Slip
out
of
your hands and fall to
3.1'Ett!:i!W:IJL~;!IU;;Ii;1]'~~
Care should
ransferred using a
be
taken
4.im*~m=l?dEi5!iWHIIJMHl!ll!illt,
Wipe
off the oil from
or
the
bottom
of
the
the
the
machine
to
avoid excessive
hand
truck. Otherwise
the
machine
box may come
machine
pulley
tightl:r
and/or
your
the
floor. Therefore, wipe off
_t~~at,
iii'I'E~:F~:t:J::B-lll'i!rU;;Ir,
shock
and
the
machine
i'R-"'l!l!'Flt<IIL*ka<llll!~o
before
packaging
off
while
in
with your right
hands
are
shake
may fall down.
stained
when
with oil,tlie
the
oil carefully.
the
machine
hane
and
the
machine
machine
l;(fMW.J<IJL~*!Ji!tlitl!fto
is
mounted
1!i!i!tl~llt~II\'Jil!l1m<IIL*;;Ii;ll!i~{j!-B!llli#JI'!8>:!l!tlili!io
it again for secondary transport. Otherwise
transiL
may
on
arm
with
be
e.asy
to
the
table
and/or
the
machine may easily slip
t
out
of
your
hands
::ID$:~
·
:i.~
Installation preparation
!ilmm~t!i
Machine
table
Lw*JII~:J'E:B-*Sl':!:i!W<IJL<IIL*ll<:i!:.&.lilliilltFota<J&fl'JII;iJa<J!J!!iJJ<IJL~i&C~i&,~lo
Use
the
machine table (table
running.
2.1Jil:Jt;:)}~
IJI.I<Ilt:r
Arrange the working environment for easy operation
H
~!lWJ:IILll!iJ!!!ll!l#OII!~fl':J'G~
0
the
illumination
is
3.~~U<IJLII>t,
AHach a
non-slip
pad
4.1'£~-fF~l&'~tl':llitrt!!r.
Adjust
the
height
of
!3!1&
Cables
J.i'il'¢ilillj{]Ji~~mm*Ei<ll<llli!J3!~1j{]Jill:*o
IT~fl'o
When
connecting
z.iEAAIJ>iW:F~!;';J!n!~:i:J:$a<J;iJ
Do not
strain
the
the
cables
board--.
metallegs)that
insufficient, control
or
:klllf.!l:~fj;~q;j;'iiJ;jJl!li/1\'MJi!t~*$:,
to
the
treadle(foot switch). Otherwise
*"'~i&Wij{j/.16!Jl
the
table
cables
according
between
to a working posture of
the
machine
ti':J
IJil
change
'l'ii!Jl
and
completely carries
, U
:ff~ffi\fl;l&a<J>f~
by
cosidering where to
lighting
as
required.
the
machine
place
the
and
is
fully resistant to warping while
'I' o
~o*:l'G~:F:l!-Ht
machine
and
the
IJil'l\':11&
•
1Jili!Uiil1/il~J<ii!i,lff{
brightness around
the
machine
the
working area.
-~iE!J!!iJJ<IJLJiili;ffU'l8!1illlfll:~Jil!ti':Jm-To
the
operator may
c
Itl'llta<J/.16ll!:
the
operator.
!:i!!iJJ:IIL<IIL*Ei<ll<IILJII:i!n!~l!Mfitn!llt.
t.l}e
motor,
be
sure
l o
to
slip
tum
off
off
the
the
treadle
power
while
mnning
the
machine,causing trouble.
%-&•1'E1if<ll~7f~ffla<J>Iki!i<ri!t
and
connect
each
cable
connectors securely.
o
in use.-
is
3.Jii':F~iliit~III!J!Jt~o
Do not
bend
the
cables
excessively.
4.!3!J/i:€l9lllfl#
.
When
connecting
5.!J<:"Jl:'il'f;t;'Jl\(J3;1Jl;{i';"'l!':;;Ji;bUiil:JF!;'!?fc{JjljFJ3;Jit~o
Protect
6.11i!~ltlt~ll>t~:XHJ!AA"'45*,
Never
use
(
~O~;;IJ~,
the
each
cable
using a cover
staples to fasten
cables
V3f%'<'.il'!il')
that
are
close to
or
adjusting its position
the
cables,
ti':Ji!n!~,
the
moving parts ,such
jjizjl1NI!~1'E25mmJIJ:i!t1-T:l<ll!io
if
necessary.
ill*'lltotlli<!l;;ii;)<.)l{o
Otherwise
it
causes
a short
as
circuit
pulley or V
and/or
a fire.
beit,keep
a distance of
25mm
at
least
between
them.
-3-
Page 6
Jt:fll.
Motor
I.!iiW:fll.Jt:tJ!.Ii'J'i<~il!f.ili:J!!I
Install the machine motor correctly by reterring to the instruction manual supplied by
z.'b T
lliJ
.!l:1N~
.Alt1iH1ili'Jfli;~,
Select the machine motor
Jt:t1LI*i¥1fle11ii#.llil
Dl'll1li:flll!J
equipped
with the pulley cover so that
~,
iEl!IDii'J.it!:rr'i<~o
the
manufacturer.
.!l:~
Ali'JliiWJ:tJI.Jt:tJ!.o
any
part
of your
body
etc,is not caught
in
the belt.
~'1ll!/ll!il!~Jlfllilll
L1EiJ!Iil!:P3ll!:
Never start
2.:tJ!.iJ!I
i1!:A~IIit4lifti1Ut
If
machine oil gets in your eyes,it
protective glasses.
l!Of-ii!:Ai!Hii',
Should machine oil gets in your eyes, wash
3.:tJ!.iJlltil'i!!FlJl.tFo,
A void
skin
4.~X>J')f:J?fJ!!:tJ!.iJlli1f:A
Never
swallow
5
:tJ!.iJ!I~i!i!~1E:Wllt)f:?@J
*JJ
-ii!:A
Keep machine oil out
*H
swallowed,do not
6.~iJll,
~-'&'~li'JM:ll!!tt:fl&:,ffl:il!!l!~li'JJ<.%-,
Handling machine
1l
B:A
ill!
!!.(
lltrftX>J"
the
machine with
:&~
ilil'll'f'ltt7J<.liFmis?»P*ili~~i1!:rr#l~
ili'!'1..l:.ffl7J<.lll!mM'f'ltt
contact, immediately wash contacted areas completely
P~o
machine oil.
li'J:It!!/J
P
~,
;r--:J?~tt;PJi[l!±.,
of
the
reach
induce
oil
)f:J?.it!:D
no
oil
in
,
}jlj'
!!.(
may
0
of children.
vomiting immediately
)6~
the reservoir.
1Eftl'll
ll>J'ilii\1\Jil.r:t?
cause eye irritation.To prevent the machine oil
them
with
1li
..tili~~il!:rr#l~
o
IIJH!t
fresh water
o
o
go
to
see
a doctor.
i#~Jl!l~iEli.IDM:ll!!o
!!.(
fo
M:Jl!!o
Dispose
of
the waste oil and/or containers properly
or
shop at which you purchased it.
7.'fl
Tll!J.!l::IR~,
Mter opening the
direct sunlight.
7J<.?.tli'JffilA,
oil
container,be
fle11i%Ji"ii!i!~:tJ!.ill!ll>J'ilUfl~iJll*lili,
sure
to
seal it to prevent
as
demanded
dust
by
and water
:!lil:tJ!.iJll
.it!:A
~~lito
from
getting
in
your eyes.wear a pair of
0
15 minutes
with
law.H you have further questions on its disposal.consult the store
and
then
go to
see
a doctor.
water
and
soap.
:!m)f:%Jill:Q~Jli,J~ll\lf1li*~Ji"i,
Jil::tEll!::flJlS~J¥JJ!Ilm;:M:{!i!~
from
getting into the
oil
and
leep
o
it
in
the dark to avoid
iEli.ID.it!:rr
H:tJ!.
~of&
Machine table
Ll'T3fltlw.Ji!,
Before turning the power on, visually
and/or loosening.
2.1'EJ'T3fJtlJ!\Il>J',
Never bring your banes close to the
3.:l!t:W3f:!l€tJ6~H:tJ!.Il>J',
When the machine
The machine pulley should
4.~f);!iiW:tJL1!fJ.i!Z'b3t:!Vli~iJIIi.*,
i#li.IDt\.til'~~til'~:!Bl':fl~{%,
check
ilf)f:J!'>I'¥J'.$:1'E:fJL#Jllf:i
-.IDE*!if;.JJfllt:Jllr-Jit:~$I!Q
Lt£1fi:i!Jffi?DIH&,
Do not run
the
i?f.i$1!1,
machine with the safety devices removed,such
2.!.lW1JL:tEJE~'ft~11llfe;ll&i¥.J,
Never bring your
3.-IY.!JllJllfil-lm'I'\;~11!.11t~~l!!\ZFc1~11LiJ3?&~~.JiiE~~JLo
hands
Precautions while you are running the machine
#'i#J~t?.\11'.~:'lt~l!ti¥.JJ!:Ri$r,
t&x.t:or::J:O>I{F.P
'lUlder the needle while running
iiJl.A.11!.#
r;
the
ma~e.
il!FF!l'JE~~JJ11!.o
as
eye guard,linger guard,pulley cover,etc.
~llt~11Ll\M&ii'f011L~i#J~11ffl:W!i¥.J,
if~
:lJtlJj\'L'o
A clutch motor keeps
the machine could start running
4.!.l@J1JL:t£JE~'ft:J1Hil[J'O;iJ&i¥.J,
~llt.~:or::*'ilf~n,~r,I~~~:tE~k$m"
To prevent accidents,never brir.g any hart
up
and
needle
5.t£:or::MU11J.IIt~j!fj;!hfl'j!f)llf;Jf011J.IIt,
Always
tum
off the power while the machine is not
6.~~11t3}lll:''ilf~lJ!l~o
In
the event of a power failure,be
7.dfl'!.tW11LIIt,
While
opemtin~
I
CV!IH/',
L~iJ",
Well
lnstruction
2.~
m~~~1JJ.~:or::~~i#Jzii'i,lll'~tiYhil'o
If
press the treadle to make
~,.,,
~:lit,
trained people should
manual carefully.
T~t?,
it
~:l!f,
is
necessary to lay the machine backward for maintenance,check
3.:tE1t*llWfi!PVIDEi:11l'llt,
~i#JZ!i'i,
Before installing/removing the V belt,always turn off the power,unplug the machine
does not operate.
4.Mr011!.11LM9
Carry out daily maintenance work
s.~JJ11!.1¥.J~>ll!~'l!ll1'tl¥.i~il!f1VI!;;f<0i'!JI¥.J;!l;3i;$f'to
·
;;f<0i'!J'ilf~:flt-"W'iJf{fo
Employ Pegasus genuine harts when repairing
by any Improper repair/adjustment and substituting other harts for thoes manufactured
6.i#:or::'!l'i!t=lliiliJ!t:
Do not attempt to modify
7.rli\illtllil~>ll!,
Be
sure
to
replace
8.~!?,
~:lit,
After perlorming maintenance,check and repair,make
on
running for a while after the power
by
pressing the machine treadle.
J!ii't;lt@X;j:;r;~'ilf'f-J'!1,
of
your fingers,hair
bar.Also never leave scissors, tweezers, tools,etc,around these areas.
-JE~'ilf~l!!\Jf~o
used
sure
to
tum
off
the
is
turned off.Therefore,he careful
~2L
'I<:HJl~jft'f-~,
and
clothes
near
or
before leaving the machine table.
power.
even
VJfl'JSl11!''
the machine pulley
~1JL-IWJ~,
after
the
power is
,v
helt,motor pulley,thread take-
tumed
off as
Ji~lm,
#$o
i#'5i'ff~~1Jt11Lit'ffi.A.i¥.JHil*"
the
machine,wear clothes that cannot
il!il!
Maintenance,Chcek,Repair
~I¥.Jil'.ill0]\HlisH1~:lJUilll~i¥.J.Mt-tEJ'E~~~-fY.!JlliJI,I!fl~i¥.Jii>$2Ji'i,
pertorm
maintenance,check
~'ilf~JJmm~~fiiJIIt,
sure
that the machine dose not operate before beginning any of the procedures.
%&:''ilf~l!!\7f~l*".
be
caught
in
the machine.
l'l'liHJ'il'.!lko
and
repair
of
the
machine after studying these precautions
%-&:;'ilfll!.ll!i7foX:~.
and
ifl<l!ll!lllli~.!Allli.RIU::J;H,
Jell!.ll!lffi~»Jml!llk=t&rF,
repair,always
turn
off
the
power,unplug the machirie
Jtl9bil...llll~Q~1JL~:or::~
and
the
JtlffQV...RP~
and
Wlt!::frlll<fl'o
and
1'1'/it~:l!t~JEJ!Il~lt,
and
Jf>Ztl<!lll;;f<~~MiJI.I!fl~l¥.!f.i.iK,
periodical inspections properly
by
following these precautions
xHHl·~i¥.J~J11L
the
machine and/or replacing
§ B
i¥.J!J'UiiliWJtW11Llt!:=ITilli::li!t.
the
1113chine
at
your
j,iijJ!!:jijj'IJFf!PTWJ<-3>:!111l!t,
the safety devices and/or safety covers
~>11!1¥.Jfl'~'J\liitlii,
i#~:l!t~li1!~l!!\Zii'ffi'oi'i'lffQ3i;l!t;ff1tW!o
i'i'IJitlllililli::li!tW~i¥.1¥$:,
own
discretion.
:'tt-3>:!?>1<,
We
are not responsible for accidents caused by
i'tffl'~'J\lii'f
that
are
sure
that
%-&,l'I<W'*I¥.JJ!:RiMCU"
temporarily removed for maintenance and/or adjustment.
twning
on
the
press the treadle to make
"W3i;iUti¥.Jlt!:=IT.
and
j,iijJ!!:~iV!IiN'iilfh~'lillf'tft~l¥.!¥$:,
the
parts.
We
are
not responsible for accidents caused
by
Pegasus.
:;$:0
i'!J'ilf:;=f'
:fit
-"W'i!fffo
power does not pose any
danger
sure
the
machine
the instruction manuaL
the
mooiflcation.
to you.
-5-
Page 8
ii:
~
~
m ll!l;tf'HIIl
4,
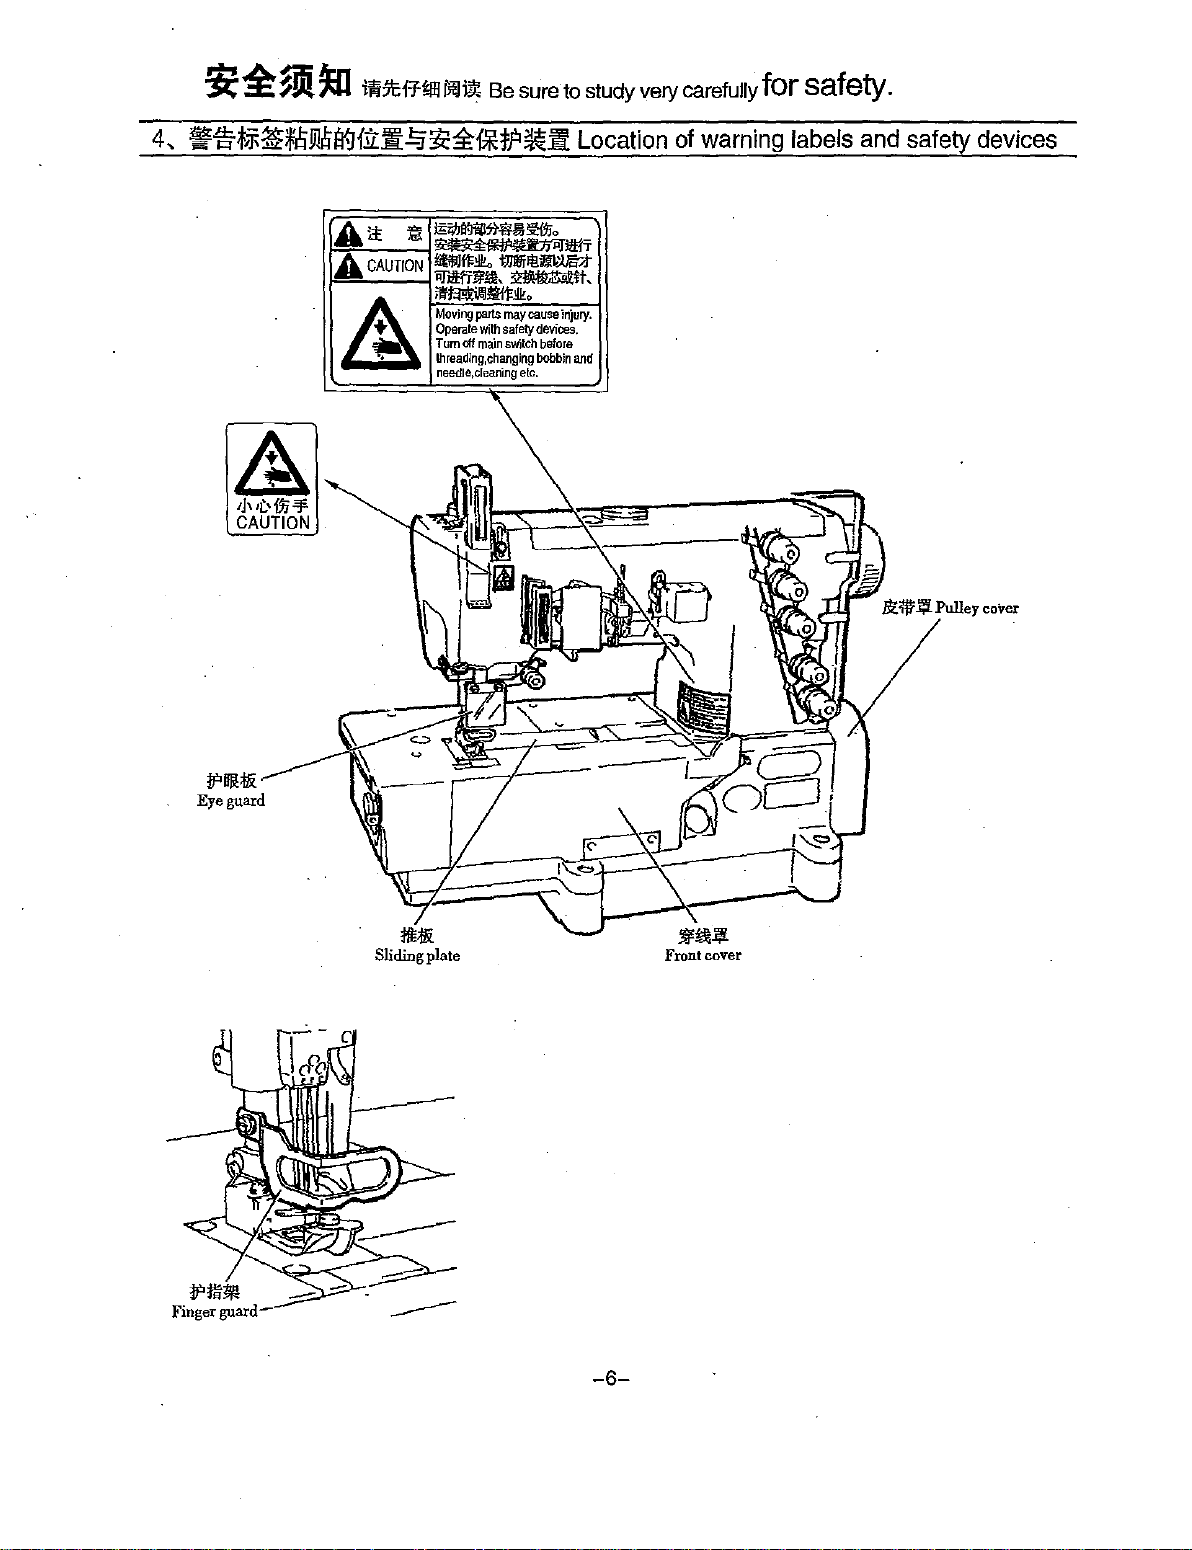
1'1\rtFiff~ijJ~I¥Jf:iit~~:i-·GiH?~it
mJii);
Be
sure
to
study
very
carefully
Location of warning labels and safety devices
for
safety.
ll"ll!!i&
Eye
guard
Sliding plate Front cover
-6-
Page 9
5,
~::£1:!H?~li[
Protectors for safety
This chapter describes each protector
(l)
:IPDJll:/.&.
Eye
guard
717
~~~i¥.1'1<:£:,
~jijj
1<~
i¥.J:IP
For
the
safety of eyes,do not
fM.t::r;J!:tEJT:tf:IPH~<&i¥.J~iffi;T~fF!itli1Jiit
DU!.
o
operate
for
safety.Therefore,read and study the
the
machine
with
the
eye guard open.
follov..-ing
o
:IPD~1&~71
The
carefully.
71'E!it*'JJ
eye guard will prevent any
.P#-t!li
TH<.t,
~t!li#-
pieces
of
the
::r;{lo
I!.
broken
AD~
needle from getting into your eyes if the needle shoul break during sewing.
(2)
:!Pf.l~
Finger
guard
717~~Lr~~i¥.Jiit#-~A~MW~~~®,1'Eiit#-mili'1<~7:1Pt!l~o~,1'E:!Pt!l~L~717~r~~Wmfl
fBJimto
:!m*Jil.f'f-11:1JAfBJ!li!{$A,
To prevent
needle.However,there is clearance ahove the finger guard for easy threa.ding.Be careful that
finiers
(3)
it'll!'
the
needle
that moves up and down from contacting any of
if
you insert it into this clearance.
'ill.
Pulley
cover
!itli1Jiiti¥.Jf!f~~;fnv:*Jt'lll'H1JI:JJ1'Elt'lll'llP3,
iJT.#flliJ6~{lo)jjljj1j'f-f.lJi!i)jjl;~®o
your
'i'EH'I'
body,the finger guard is
(
!Jil'JJIJ1'EJ1;;Jt~**)
installed
the
needle
~A~Ji!k:JiH!ffl;®i¥.Jo
close to
the
may
penetrate any of your
717Mfit
·®,~~*~~:IP~~r'J<~i¥.J~iffi;o
The
machine
sewing.
prevent
To
(4)
~~Pulley
~l!fiji/JiiWJiJT.f/f~~(p'JJUi*~(oj'
Check
(5)
~
JA#i:M<WffB!Jii¥.JL71-:11~5mmi!U,
pulley
accidents,operate
the
direction
Presser
foot
and V belt
in
which
are
cov~ed
the
machine
the
machine
with
the
pulley
cover.
The
with the
pulley
cover installed in place.
machine
pulley
and
the V belt
rotate
at
high
speed
during
JEl!fij(p'JJUiff~(oj1'£{~~~1)!tl~~(oj;tJ*I¥.Jo
puliey
rotates.It should rotate clockwise as
J!
-t-fBJ
imtfl!i<:'¥-t!li¥.Jfil;®o
:tEJllh:tf:ktil:fJ-JDii~Ji\\Jllll/1:1&
seen
from
the
pulley.
§
~til:fJ-
ID!iJ
~,
ilH'!l!:#t'¥-t!lf<!IAJDiir~
There
is a
clearance
fingers
are
caught
knee
switch
(6)
~~.\JFomt
of
more
in
this clearance.Never
or
automatically raising
cover
than
5mm between
o
it
with
insert
the
the
top surface
any
of
treadle.
of
your fingers
the needle
under
the
plate
presser
and
the
foot
presser
wP,en
foot.Be careful
raising
the
presser
that
none
foot with
of
the
your
~#i¥.J~~JAHiitiEW~~,~~rr~ti~~i¥.J~~E~o~7~~rr~~ill~i¥.J~#~A~Ji!k,~~w~~
.\Jffliri¥.J~;m;-r~tF!iiWm,
The
looper travels left
part
of
your
body
(7)
Jtili(
Sliding plate
r~Jii!;J&~tEH~~
Jt:!Jiffliri¥.J~iffi;r~fF!itWiito
The
looper
thread
thread
take-up
to
right while drawing
,he
sure
to operate
TJiitfl-
take-up
from contacting any of your hody,be
the
J£JI!:i¥.Jr~1'Ei;I!:IUi*ill~,
rotates
in
machine
order to
an
are
with
supply
as
seen
from
the
front of
the
front cover closed securely.
71
T~:!Mr1TIUi~~i¥.Jr~liW!~Atii!M,
the
required
sure
to operate
amount of looper
the
the
machine.To prevent
thread
machine with the
during
sewing. To prevent
sliding
plate
the
closed
looper
from contacting any
securely.
~&>wt£
the
looper
-7-
Page 10
~~@;1¥-.Jffi.~
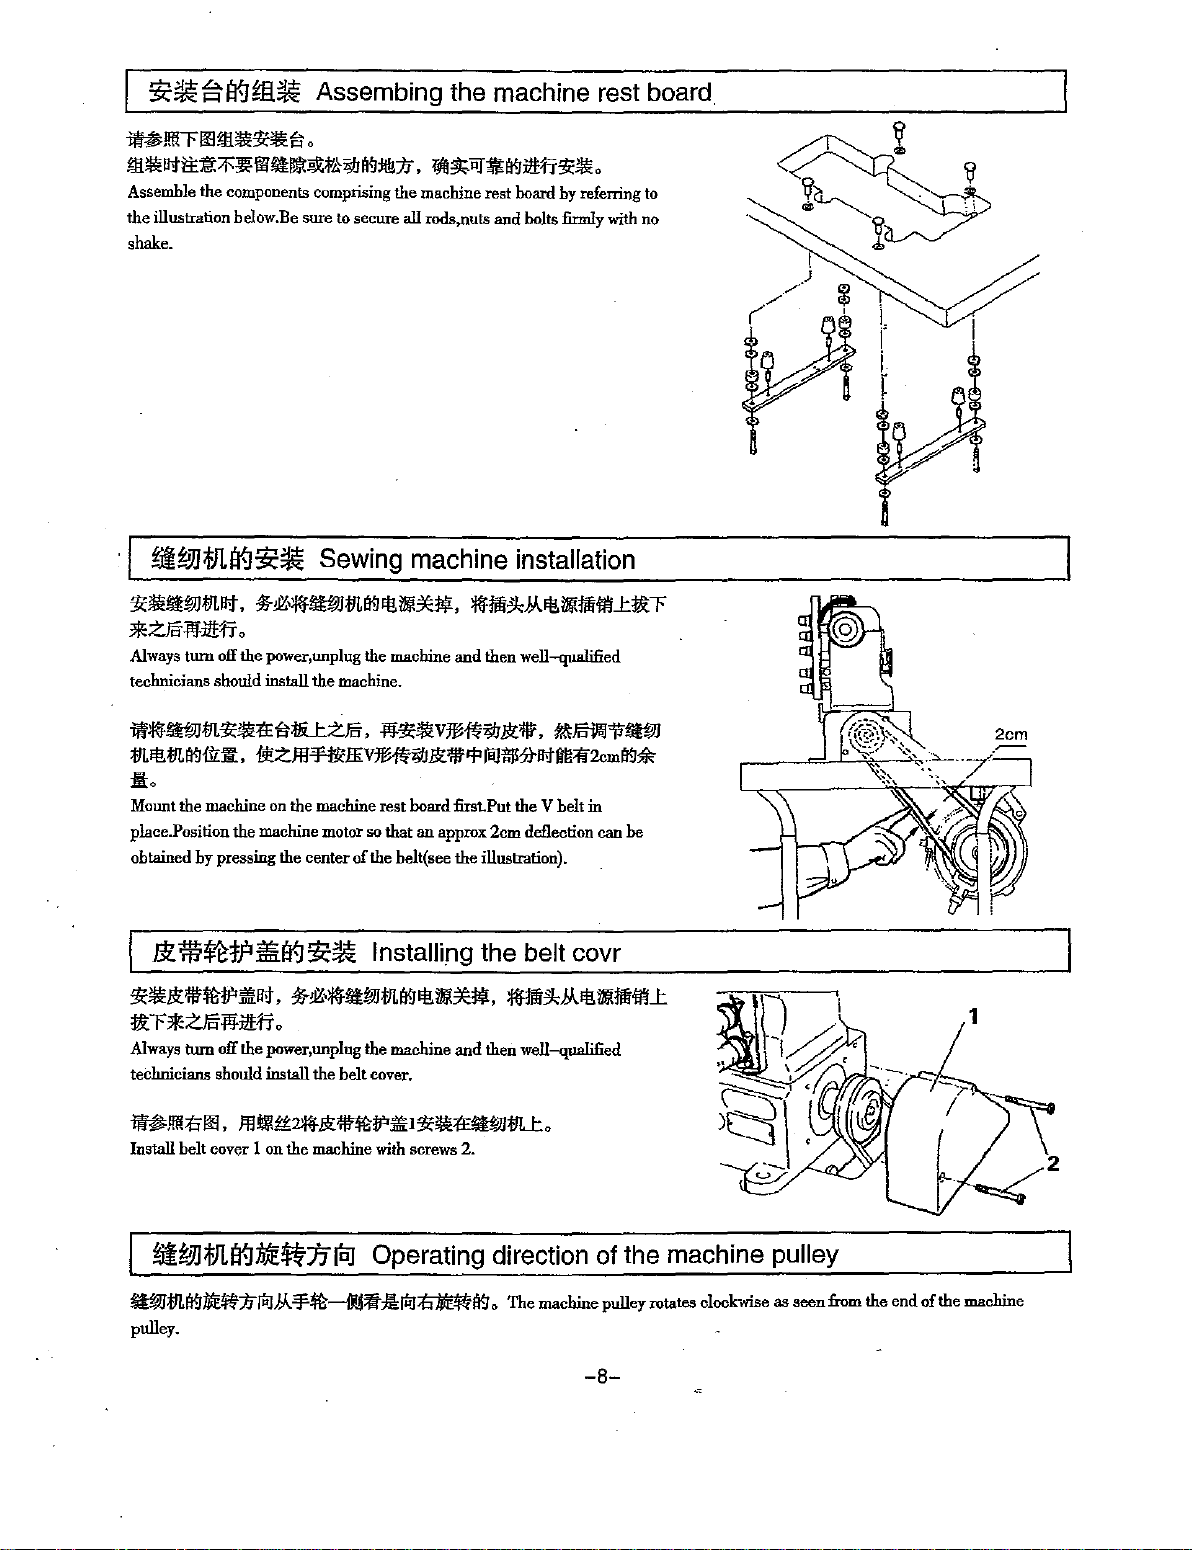
Assembing the machine rest board
u!!llTOOmi!li't<JIO'~
m!!li~~~~~m~~~*~~~».~~~#~~~'tt!!lio
Assemble the
the illustration below.Be sure
shake.
· I
fig,Mlla9~~
'tt~m~.~~~awm~~~~.~~~~~~~ML~T
*Z.Ji'i
Always tum
technicians shotdd
components
{!i:i1/:tr
0
off
the
o
comprising the machine rest
to
secure
all
rods,nuts
and
Sewing machine installation
power,unplug
install
the
the machine.
machine
and
then well-qualified
hoard
holts
by
refening
firmly
with
to
no
~~~m'tt!!li~~~Zfo"i,{!i:$:!!11V~~~~*·~~~~~
m~m~~~.~zm~Kv~~*~~$*~~fl~m~~
lil:o
Mount
the
machine
place.Position the machine
obtained by pressing the center
El"l'iHit.P~tr-.1~~
**~*~~~~.~~~~wm~~~~.~~~~~~~ML
~T*Zfo"i:pj:~~
Always
turn
technicians should
~.lfflti'OO,
Install belt cover 1
~g,Mlli¥-J»fE~jj"lcJ
um~~!WfiJlil~
pulley.
on
the
machine
rest
board
first.Put
motor
so
that
an
approx
of
the belt(see the illustration).
the
V belt
in
2cm deflection can
he
Installing the belt covr
o
off
the power,unplug the machine and
install
the belt cover.
fflli!lft~~ft!P~I't<J!O'~mLo
on
the machine
with
screws 2.
then
well-qualified
Operating direction of the machine pulley
'f~~'ll-:li!"lu~l¥.1
0 The machine pulley rotates clockwise as seen from the end of the machine
-8-
Page 11
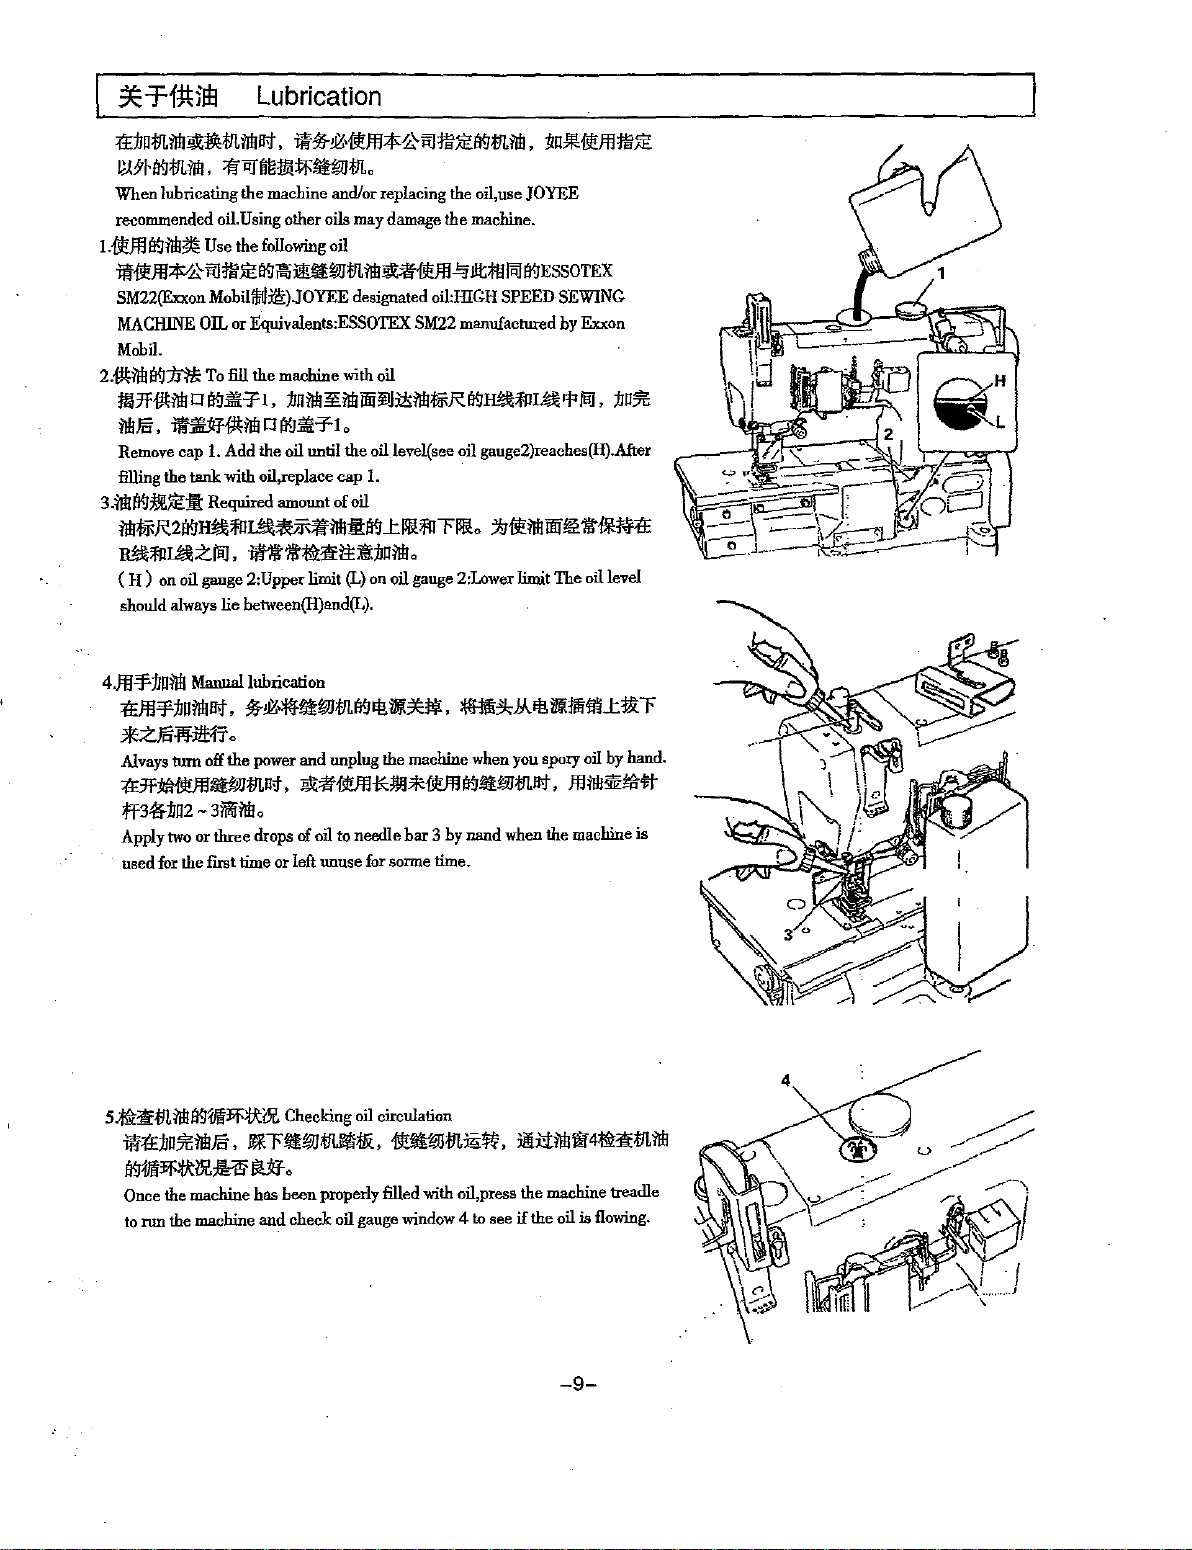
Lubrication
l'E:tm:IJT.iii!JiiG~tllilllllt.
I~H'rll{]:IJT.ii!J.
When lubricating the machine
recommended
L1VIJB{]ii!J~
iliVIl~~"-lill~ll{]~~W:IJT.iii!JiiG~~~~~il{]E~OrnX
SM22(Exxon
MACHINE
:{;fliJfmlll!tt;llWtllo
oil
Use
Mobiijj;IJJI!i:)JOYEE
Oil.
or
il%-&Hl!!ffl2f<0"-lil1~1l{]tllii!J.
and/or
Using
other
oils
may
the
following
oil
designated
Equivalents:ESSOrnx
replacing
damage the machine.
the
oil:HIGH
SM22
mannfactured
oil, use
:!m*Uill~
JOYEE
SPEED
SEWING
by
Exxon
Mobil.
2.-(jf;ii!Jil{]::iJ*
!S3ffAA!IOB{]llit-'FI,
iii!Fc.
Remove cap
filling
3.ii!Jil{]~~:lit
illlf-'FR21l{]~fn~~r,;gii!JJitll{]J:II!!fnl'"ll!!.
illil&fn~ziiil.
(H)
should
4JlFf-:fJRilll
l'Effl'f:builllut.
>ftt];'i:J't:l!t1T
Alvays
~~u~m~.~~~*~*~ll{]!lwm~.milll~~~
ff34f:IJU2-
Apply
used
To
fill
the
machine
:hUill!:?!':ii!Jiiiij;IJJ;!;ii!J:fli<Ril{]~;ftl~rpiBJ,
ilt""~illl
the
tank
on
oil
gange
always
0
ll{]lli(-'fl
1.
Add the
oil
with
oil,replace
Required
amonnt
ft~tl:~:builll
2:Upper
lie
hetween(H)and(L).
Mannallnbrication
%-&.:f{fll!Wtllll{]J!!l.!J!~l*.
0
tum
off the
power
and
3ii2Jii!Jo
two
or
three
drops
of
for
the first time
or
left unuse
with
0
until the
cap
of
oil
limit
(L)
unplug
oil
to
needle
oil
oillevel(see
!.
o
on
oil
gauge
the machine
bar 3 by
for
sorme
:/JU%
oil
gauge2)reaches(H).After
:*M!illlllif~iltf¥~
2:I.ower
limit
The
oil
level
o~»..l!!l.!l!'lfflmJ:*l'"
when
you
spory
oil
by
hand.
nand
when
the machine is
time.
s.tHr:!ll.illliltr'~l'Fitl:ll.
il1'E:IJU%iii!Fc.
ll{]1JQ:I'Fitl:li.Hii!f
Once the machine has
to
run the machine
Checking
oil
0!tl'"!JfWMiOC.
~
0
been
properly filled with oil,press the machine treadle
an~
check
oil
gauge window 4 to
circulation
HWtlllii~,
J!:liilll*<®1ttllilll
see
if
the
oil
is flowing.
-9-
Page 12
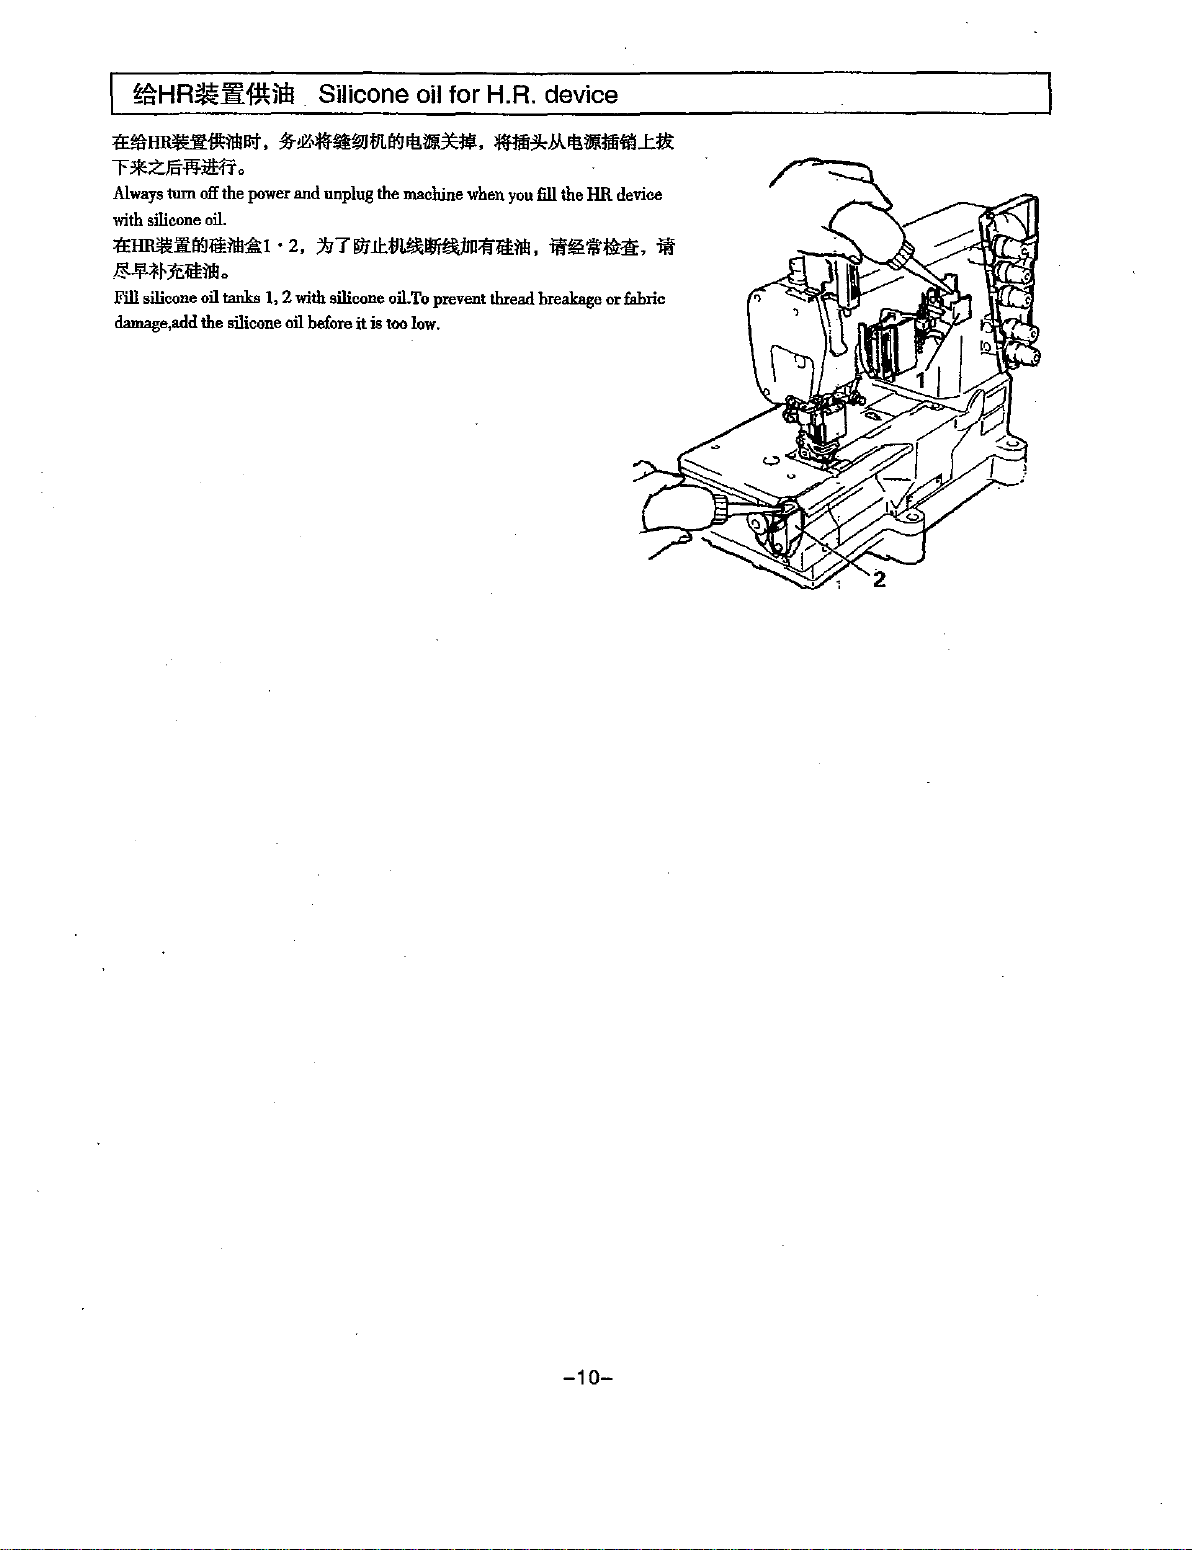
~HR~'i':milll
~~~~M~.~~~~m~~~~.~~R~~ffi~£~
""F*zll'fW::lll::ff
Always
tum
with
silicone oil.
~l!RJt!lit~li£M:iU
~:W1Eli£Mo
Fill silicone oil
damage,add
o
off
the
power
tanks
the
silicone oil before
Silicone oil for H.R. device
and
unplug
the
machine
·
2,
::h7~11:M-!m1ili£M,
1,
2
with
silicone oil.
it
is too
To
low.
when
prevent
you
thread
fill
ft"ii!"*1!t·
breakage
the
HR
device
or
fabric
if
-10-
Page 13
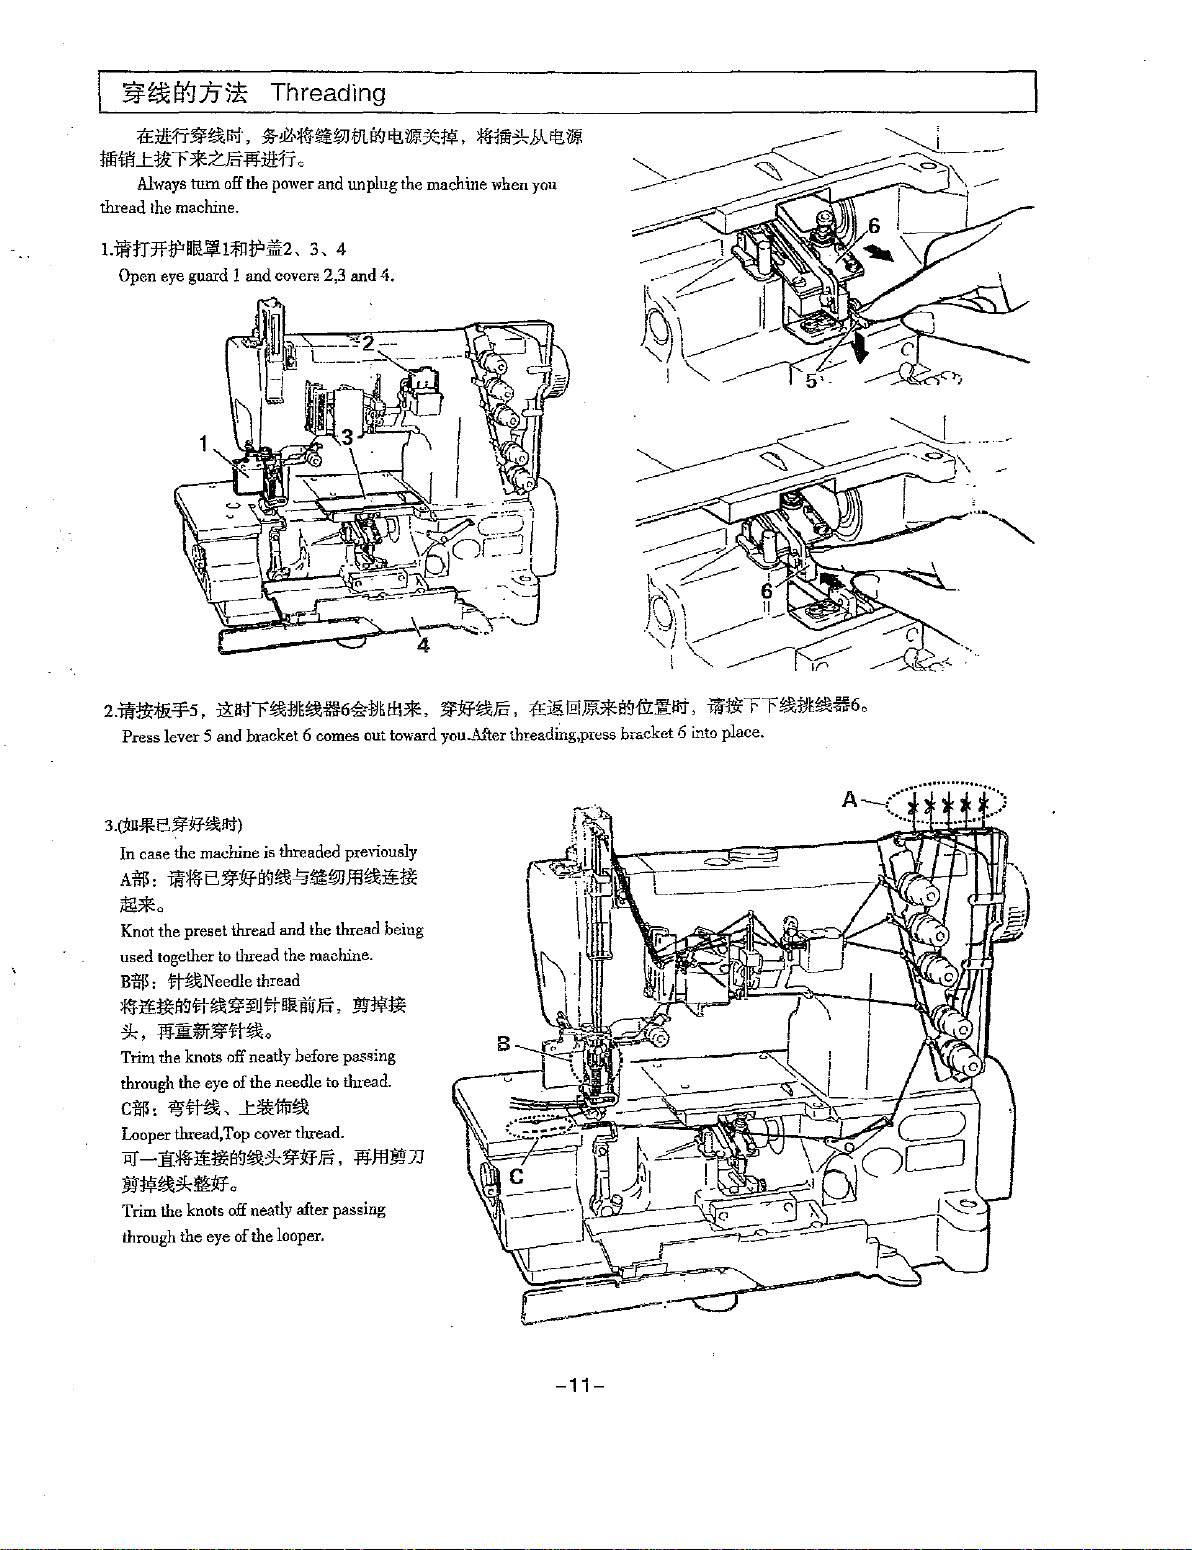
~&:lHF-r:1:J5*
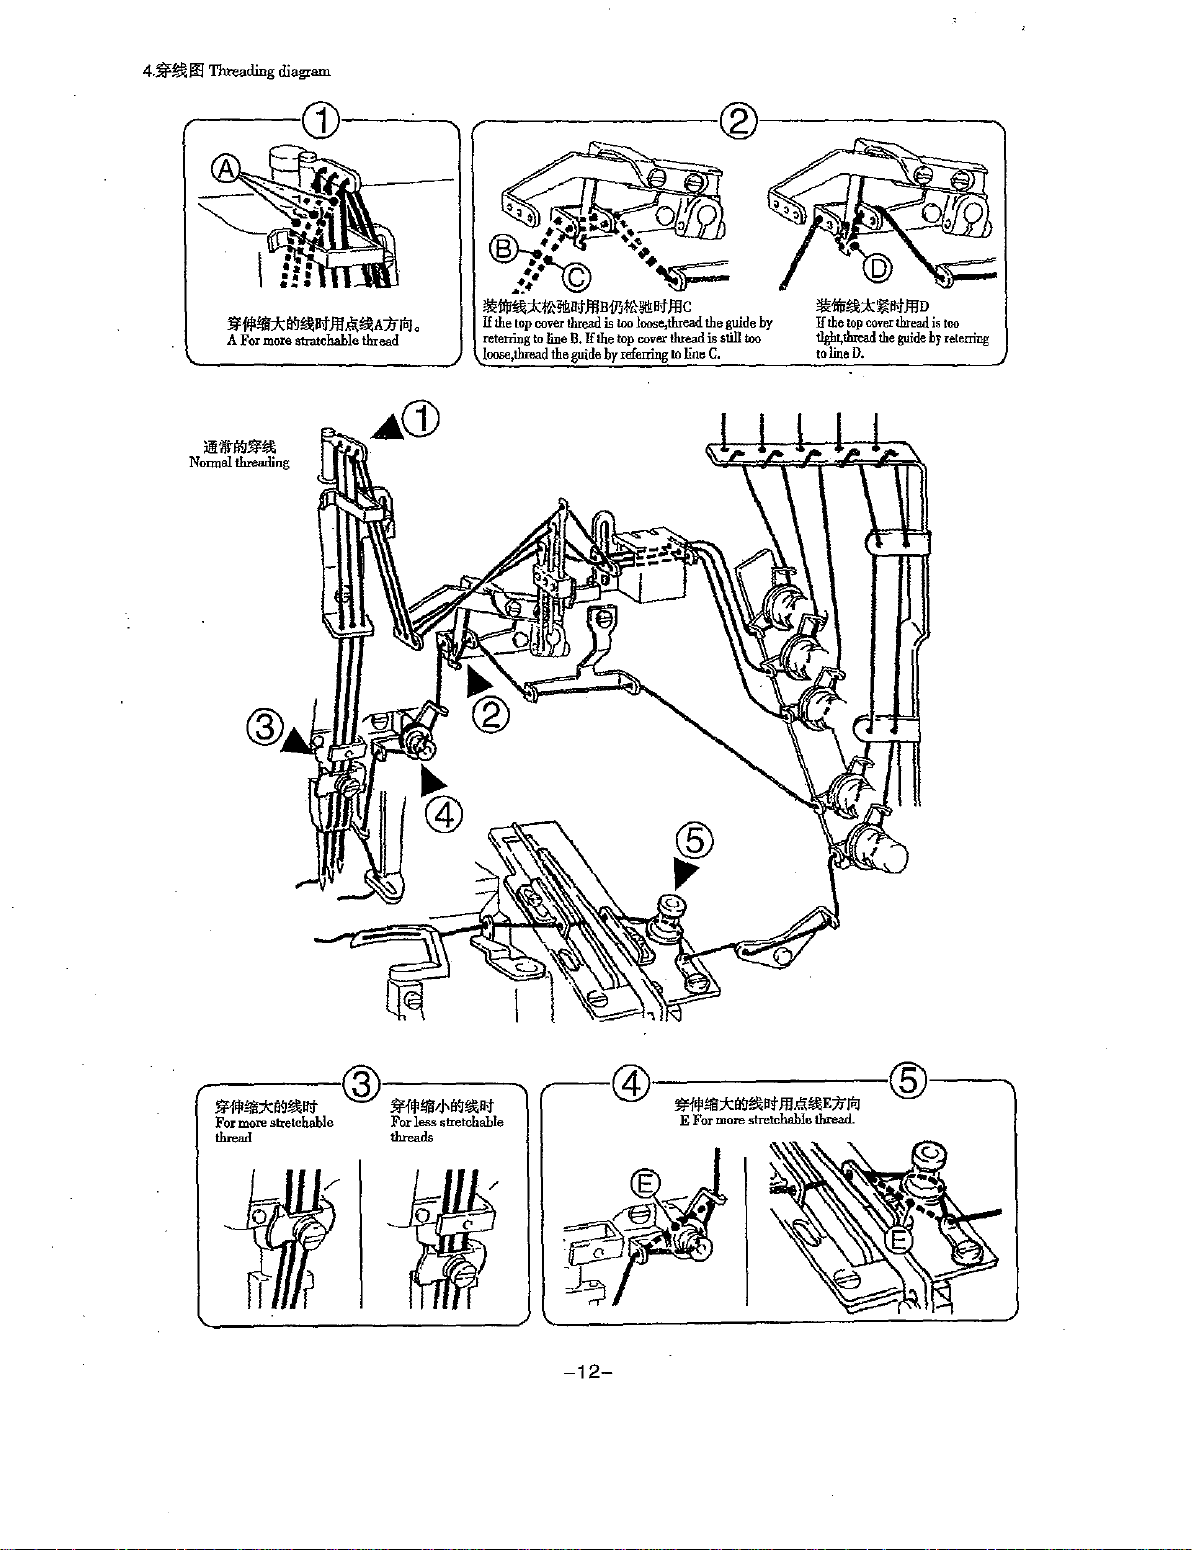
Threading
:tEittfi3J'~IP:I
li!Hi'L.tl'&r*Zfcf
Always
thread
the machine.
L'ii!fJTJHJ'Dii.\Jl;f!!i?Jlir2,
Open eye guard 1
z.w!'!<;f!i.-¥5.
Press lever 5 and bracket 6 comes out toward you.After threading,press bracket 6
,
%&•¥J-litW-lllfl9et\IJ!(*1J1:,
~:l!Hl',
turn
off the power
and
unplug
the
>!!fJlil*Aet\IJ!(
machine
when you
3, 4
and
coven'. 2,3
i!a-.tr~:1Jt~~64?:1Jttll*.
and
4.
3J':!<f~Fo
•
.fEit@ljJl<*fBi!I~a-.t.
-m~rf~:IJt~~6,
l."l.to
place.
3.(JlnJ!I,B3J':!<f~Bt)
In
case the machine is threaded previously
A$:w¥fB3J':!<ffl9~~litWffl~~~
JB!*,
Knot the preset thread and the thread being
used
together to thread the machine.
B$:
j;j-~Needle
¥J-~~Ji<Jj;f-~3J'i!J#!Iilltrfcf,
~'
~]l:;ilf3J'#~,
Trim
the knots off neatly before passing
through
the
C$:i'?;#~._t!ll'ftflj~
Looper thread,Top cover thread.
~-~¥J-~~Ii'l~*3¥:!<ffci.~m~n
~W~M!:I!f,
Trim
the knots off neatly after passing
through
the
eye
of
eye of
thread
the
needle to thread.
the
looper.
:®11(;:~
-11-
Page 14
4.:lf~l'l'l
Threading diag<am
lii'fifl!iiH<:il'JAAP>t
A
For
more
stratchable
Jll.<\ii1!<A:tiill
thread
o
~---------~----------~
ll!;it;!11<;t~ll<tJllD
II
the
top
cover
thread
is
tlght,tbread
to
line
D.
the
guide
too
hy
retening
-12-
Page 15
EE)l!;f!EE::fJI¥-Ji?ol:P
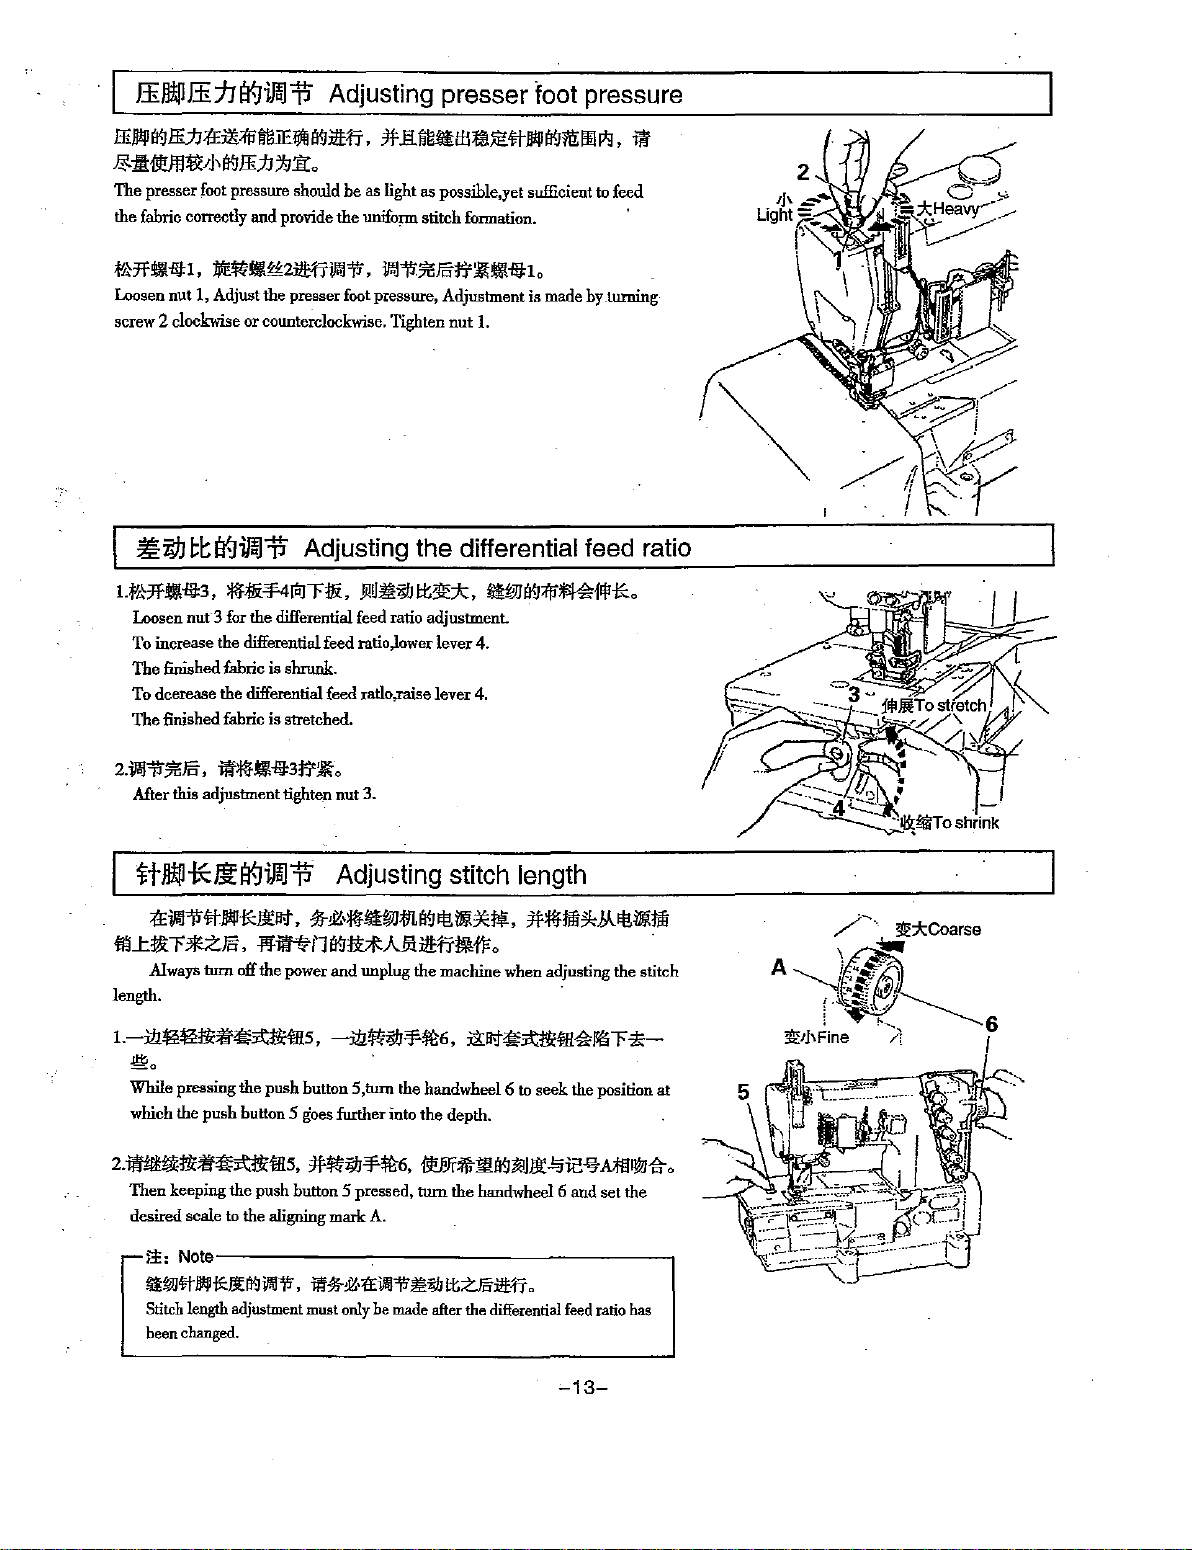
Adjusting presser foot pressure
ffi~~ffh~~~~~~~~~.*~~m~~~~~~oo~.~
..ey.
:l:fV!Jti(;j\
The
presser
the
fabric correctly
~
ffij:)
;h1!:.
foot pressure should
and
provide
he
as light
the
unifo~
as
possible,yet sufficient to
stitch
formation. '
feed
..
,.
tk7f!li1llol'
Loosen
screw 2 clockwise
~il!J
r.tk7f!ll1lio3,
Loosen
To
The
To
The
2.illl"'\'i%ii'f'
After this adjustment tighte.n
:M!~~~2JI!:~i/lill'i'
nut
1,
Adjust the presser foot pressure, Adjustment is made
or
counterclockwise. Tighten
tti¥-Ji?ol'P
Adjusting the differential feed ratio
:JIH1i-'¥4torFJ!i,
nut3
for
the
differential feed ratio adjustment.
i/lill'i%ii'f1'5'~'11!1!Jol,
Ji!tl£iill
increase the differential feed ratio ,lower lever 4.
finished fabric is shrunk.
dcerease
the
differential feed ratlo,.raise
finished fabric
is
stretched.
if:flf'll(1!Jo3j'j<~,
nut
3.
nut
1.
tt>Je:fc,
lever
4.
by
.turning
~w~~JIOI4l.'fljl*·
H)l!;fl*l!ti¥-Ji?ol"'W
~lll!l'i~~*jj;ilt,
m..t~r*Zii'f,
Always
length.
r.
-i11~~tl<31'~:<~:ruus,
.Jll.~i'1~'1tl:MJ£fflll'f!;.
tum
off
the
Adjusting stitch length
:%-~·:flfUi!L~I'!!M::X:l*,
power
and
unplug
the
machine
---iii~iill'¥~6,
*:flflm~.M..I'!!lllilm
when
adjusting
i:kllt~~4l.'JIIIr
®.
While pressing
which
the
2.ft~ti<31'~~W.5,
Then
keeping
desired
~:
Note-------,-------------,
~W$J"JI!Iiif:lli'l'J~l'",
Stitch length adjustment must only he made after the differential feed ratio has
been changed.
the
push
push
button 5 goes further into
the
push
button 5 pressed,
scale
to
the
aligning
button
5,tum
the
handwheel6
the
depth.
*~iill'¥~6,
mark
i!I':Jl-,g.:fE~l'"i!f!iJIJit:Ui~ff"
{iti!Jf~!I!~~Jjj;
tum
the
A.
to
seek
.!;;ie%Mil1Pi.Jii-
handwheel 6
the position
and
~13-
the
stitch
o~i:-
set
the
at
0
Page 16
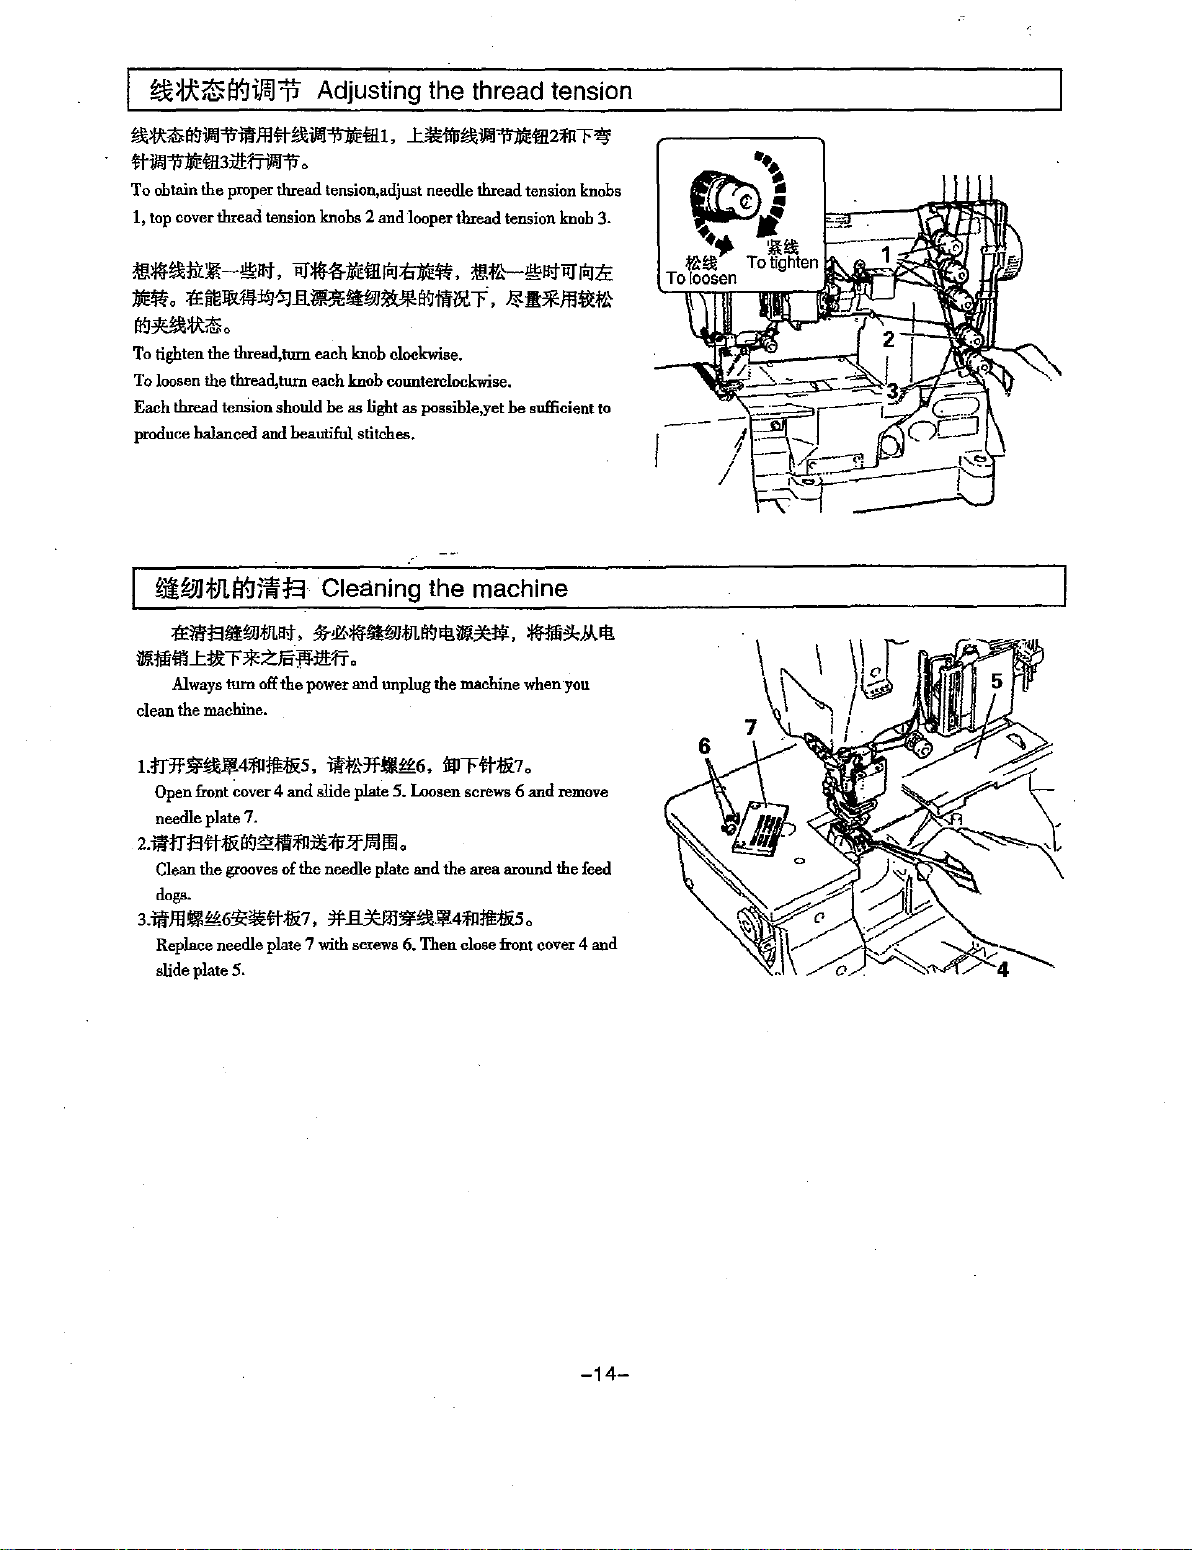
~~J;:~i'f.Jifol'P
Adjusting the thread tension
~>I!:~(I{Jilllll>ii!fll#~illll~ffil,
#illli1J~ffi3it!:ffi\\11J
To
obtain
the
proper
1, top cover
~*~~~-~~.~~~m~~~.~~~~~~~ft
thread
0
thread
tension
tension,adjust needle
knobs 2 and
L!ll'l1ili~illll~ffi2;IICF*
thread
tension
looper
thread
tension
knobs
knob
3.
~:.:-
~~
~
••
r.t!!
To
loosen
~~.~~~~~~~~~~(I{J~~T.~t*fll~~
(I{J~>Ii:~o
To
tighten the thread,turn each
To
loosen the
Each
produce balanced and beautiful stitches.
thread
thread,tum
tenSion
should
~~;f:JLI'f.J)Wt=l
~~~~~m~,*~*~m(I{J~~~w.~~R~
~JifimJ:tltf*Zii'f:jlj:1zH'f,
Always
turn
off the
clean
the
machine.
knob
cloekwise.
each
knob
counterclockwise.
he
as
light
as possihle,yet he sufficient
Cleaning the machine
power
and
unplug
the
machine
when-you
to
---
~I!
To
tighten
I.fl"'Jf~~·4fpf&;fi5'
Open
front
~ver
needle plate
2.
if/lTJ3#;f&(i{J'!i!li!lfll:i;lHfi
Clean
dogs.
3.Jff!l-~6'!i;ili€#;!&7,
Replace needle plate 7
slide plate
the
7.
grooves
5.
iilf'k'Jf!l~6,
4
and
slide
plate
Jf
)l!:l
Ill!
of
the
needle
plate
'If
l'!lkffl~~.\J4fp1!£;ji5o
with
screws 6. Then close
5.
Loosen
o
and
l!lff#;fi7 0
the
screws 6 and
area
around
front
remove
the
cover 4
feed
and
-14-
Page 17
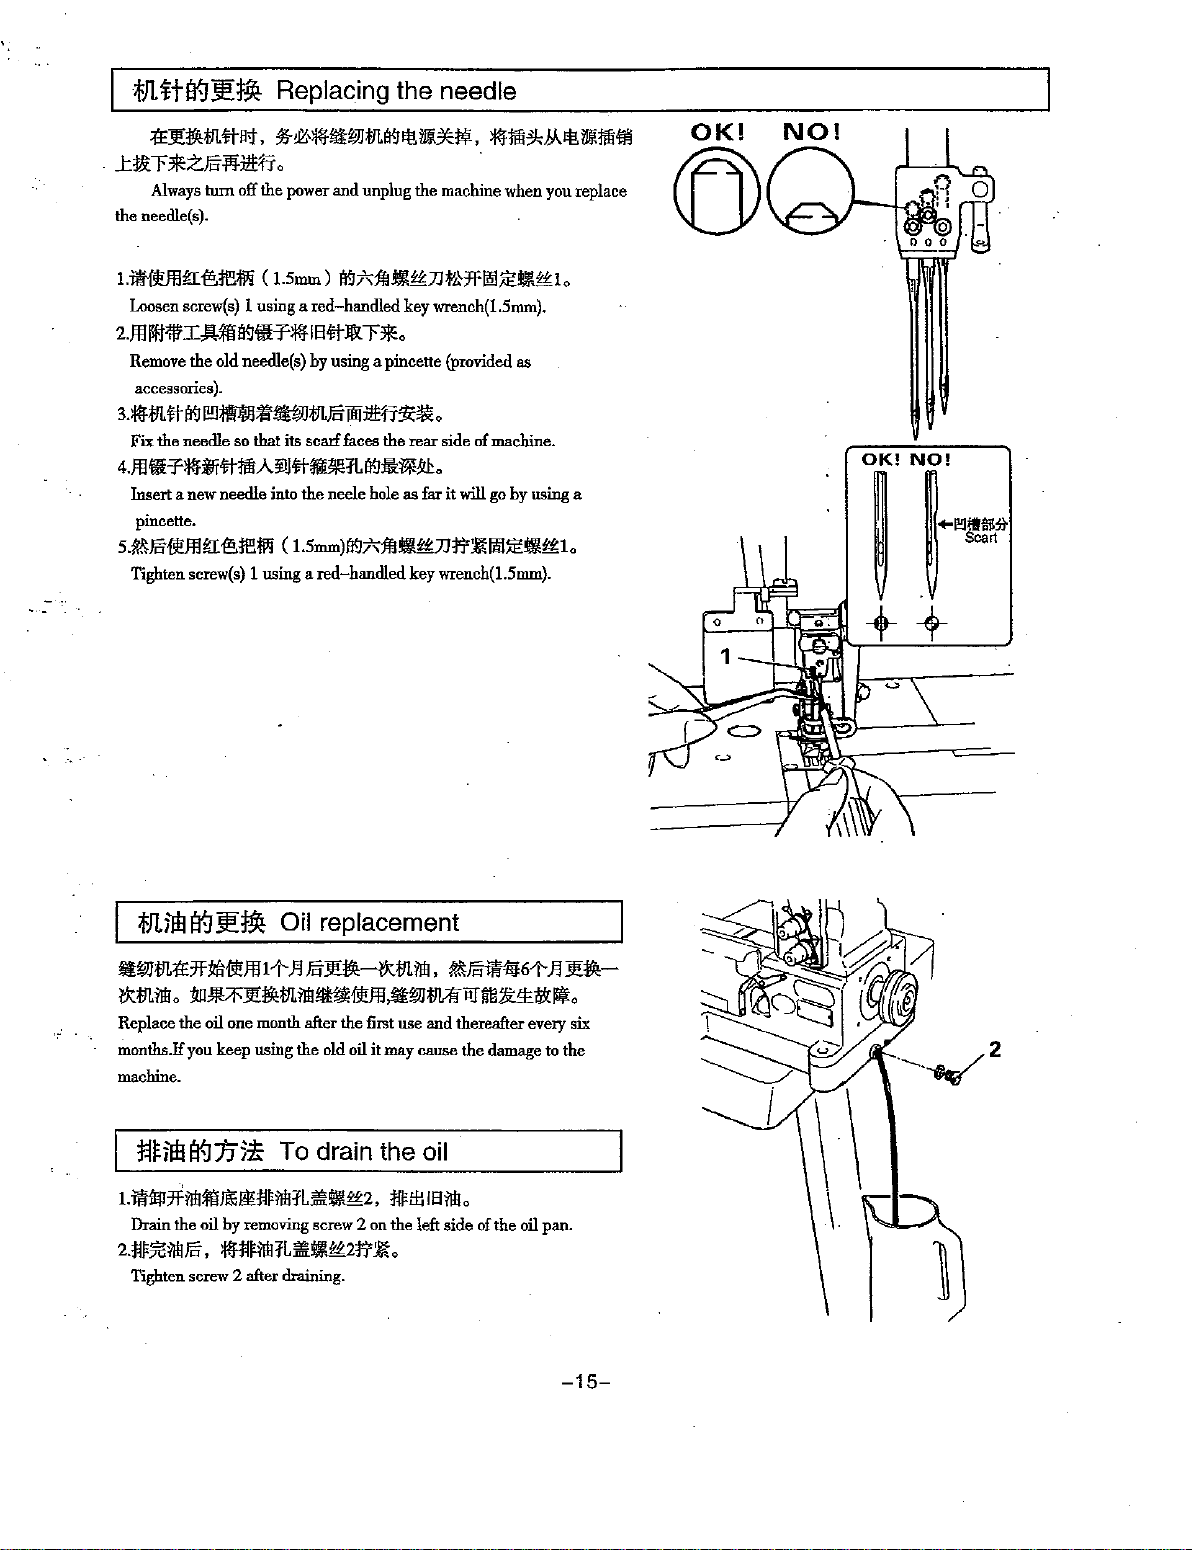
fMtW-J~~
Replacing the needle
:tE!l!l!RJJL<fta1'
J:~T*Z.FP:pj:J1t:il'
Always
tum
the needle(s).
J.~g[il\.1fi:flli
Loosen
screw(s) I using a red-handled
:%-1X,JW!ii~tll.(!9Jtl.ll!(:)'d>j1'
o
off the
power
and
unplug
the machine when
(
!.Smm)
(!9:t;Jfi.tll*JJ~Hf~iE~*Io
key
wrench(l.Smm).
JWl!ll:li;J,I.J{I.lJ!(l!llii!J
you
replace
OK!
CD
2.fflllft'I!'IJUfla9llii"lWIB#.llilT*o
Remove
3.lWtll.#a91!!lU.'I~MW:l1tfi':ti:illeo
Fix
Insert
s.~FPU~il\.1e:flli
Tighten
the
old
needle(s)
accessories).
the
needle
so
that
its scarl' faces the rear side
a
new
needle
into the
pincette.
(
l.Smm)l¥.J;>';ffdll!*JJJ'i'~~i£lill(*lo
screw(s) I using a red-handled
by
using a pincette
neele
hole as far
(provided
of
machine.
it
will go
key
wreoch(!.Smm).
as
by
using a
*ll111lW-J~~
l.iWtll.:tE7f:l!itill!ffli1-
l?ztll.lillo~~~tll.liii~U~~ey~~~-o
Replace the oil one
you
months.If
machine.
keep using the old oil
:t.I~1J:Ilf(.J:h5*
Ll#il1J7flill~miR!ti4Plill'fLlli<~*2,
Drain
the
oil
2JJp%li!IFP,
Tighten screw 2 after draining.
lW:II~illl1Llli<~*2ri'~o
Oil replacement
Jl
FP£~-l?ztll.lill,
month
after
the
To drain the
by
removing screw 2 on the
first
use
it
may
cause the
:liPlliiBlill
left
~~61-
and
thereafter every six
damage
oil
o
side
of
the oil pan.
Jl
to
£~
the
-15-
]
Page 18
1fll*il:!R1flliXX.li¥JtiLi!l-~)W1.::J
~*fl$*~$~~&~~~E~.~~~~wm~~~*~
~;'ll!,
~~~li~l>UliELtt.ltrW,
Always
turn
off
the
power,unplug
technicians
should
check
and
clean
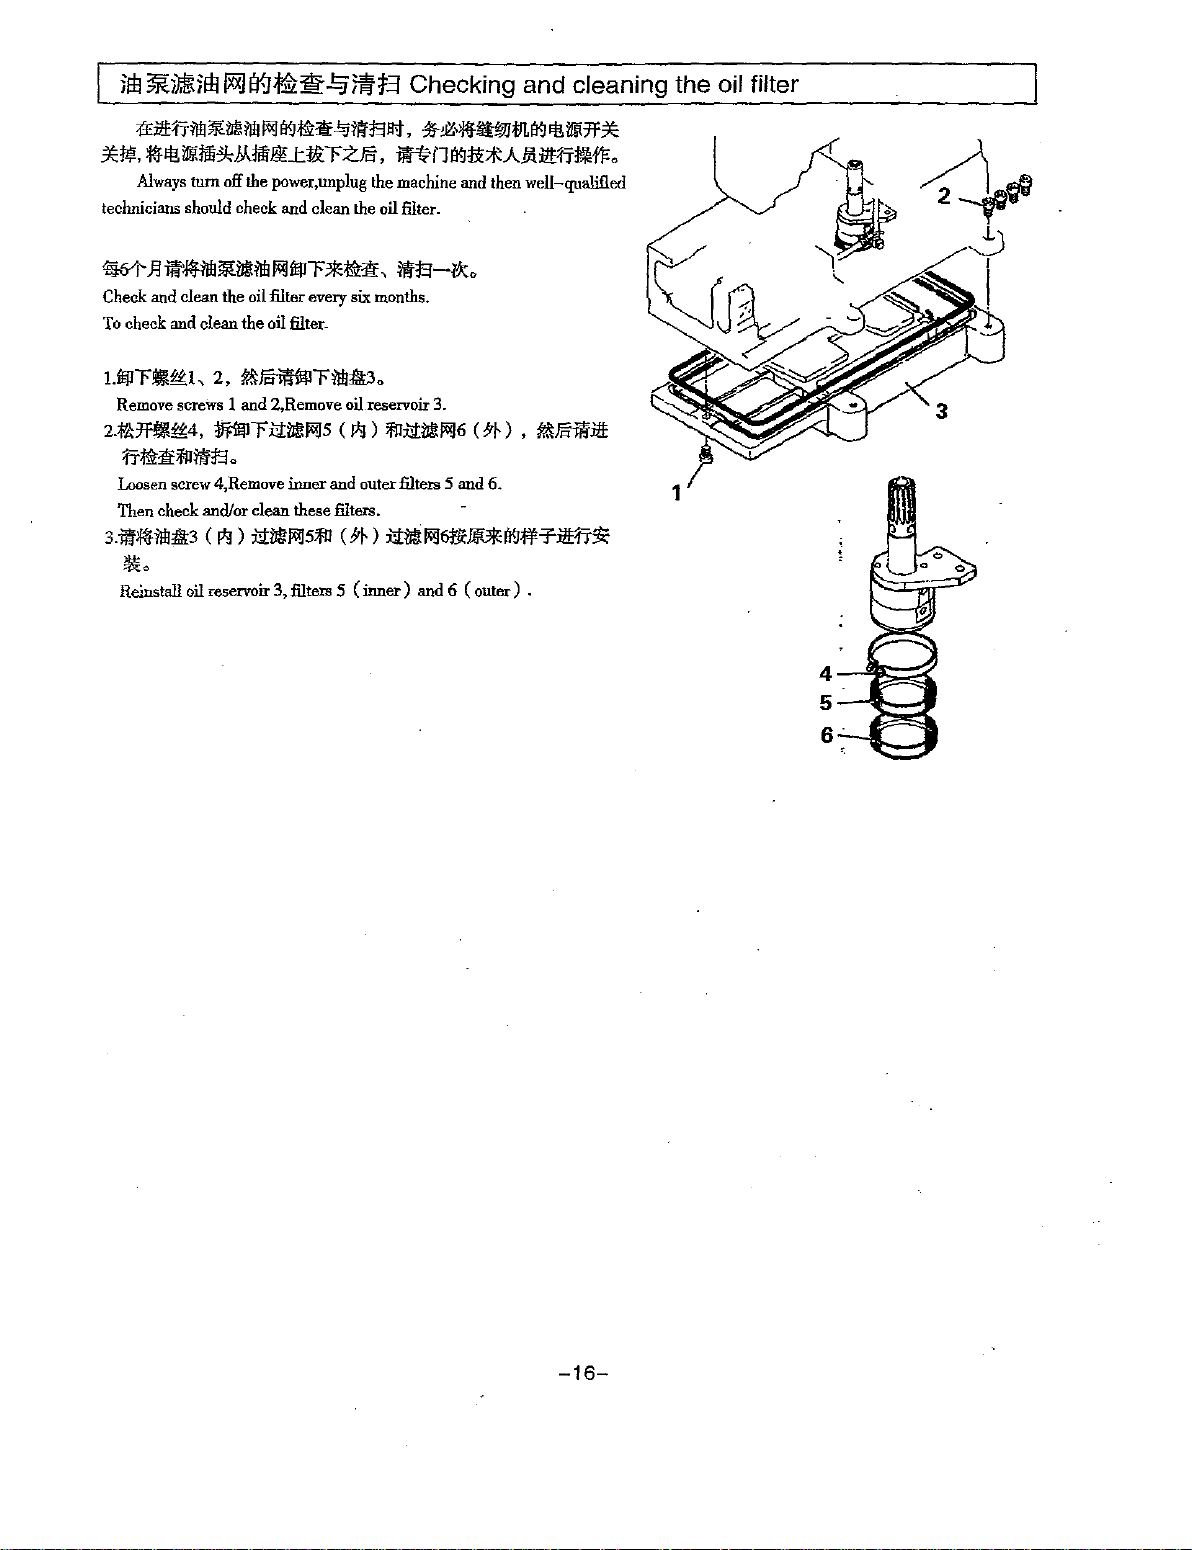
Checking
ftf1ii{J11i*A9l.it!:IT;flkfl'.
the
the
machine
oil
filter.
and
then
and
cleaning
well-qualified
the
oil filter
~~~*~*~~~~r*&~,~E-~.
Check
and
clean the oil filter every six
To
check and clean the oil filter-
months.
L~r'l!!££1,
Remove screws 1 and 2,Remove oil reservoir 3.
2-'**~££4,
rr~~ifll~E.
Loosen
Then check and/or clean these filters.
Hf*illtll3
2,
il:~r~:ll3.
jjf!ljlru~~s
screw
4,Remove inner
(
1*1)
J;;til!i~sifl!
and
<
I*J
>
ifl!uil!i~6
outer
filters 5
(
~~)
J;;tiJ!i~Gl'i<W-*ii{J:l'f-T~'ti:
!!!<.
Reinstall oil reservoir 3, filtenJ 5
(inner)
<
~~
> ,
and
6.
and 6 ( outer) -
il:~*
-16-
Page 19
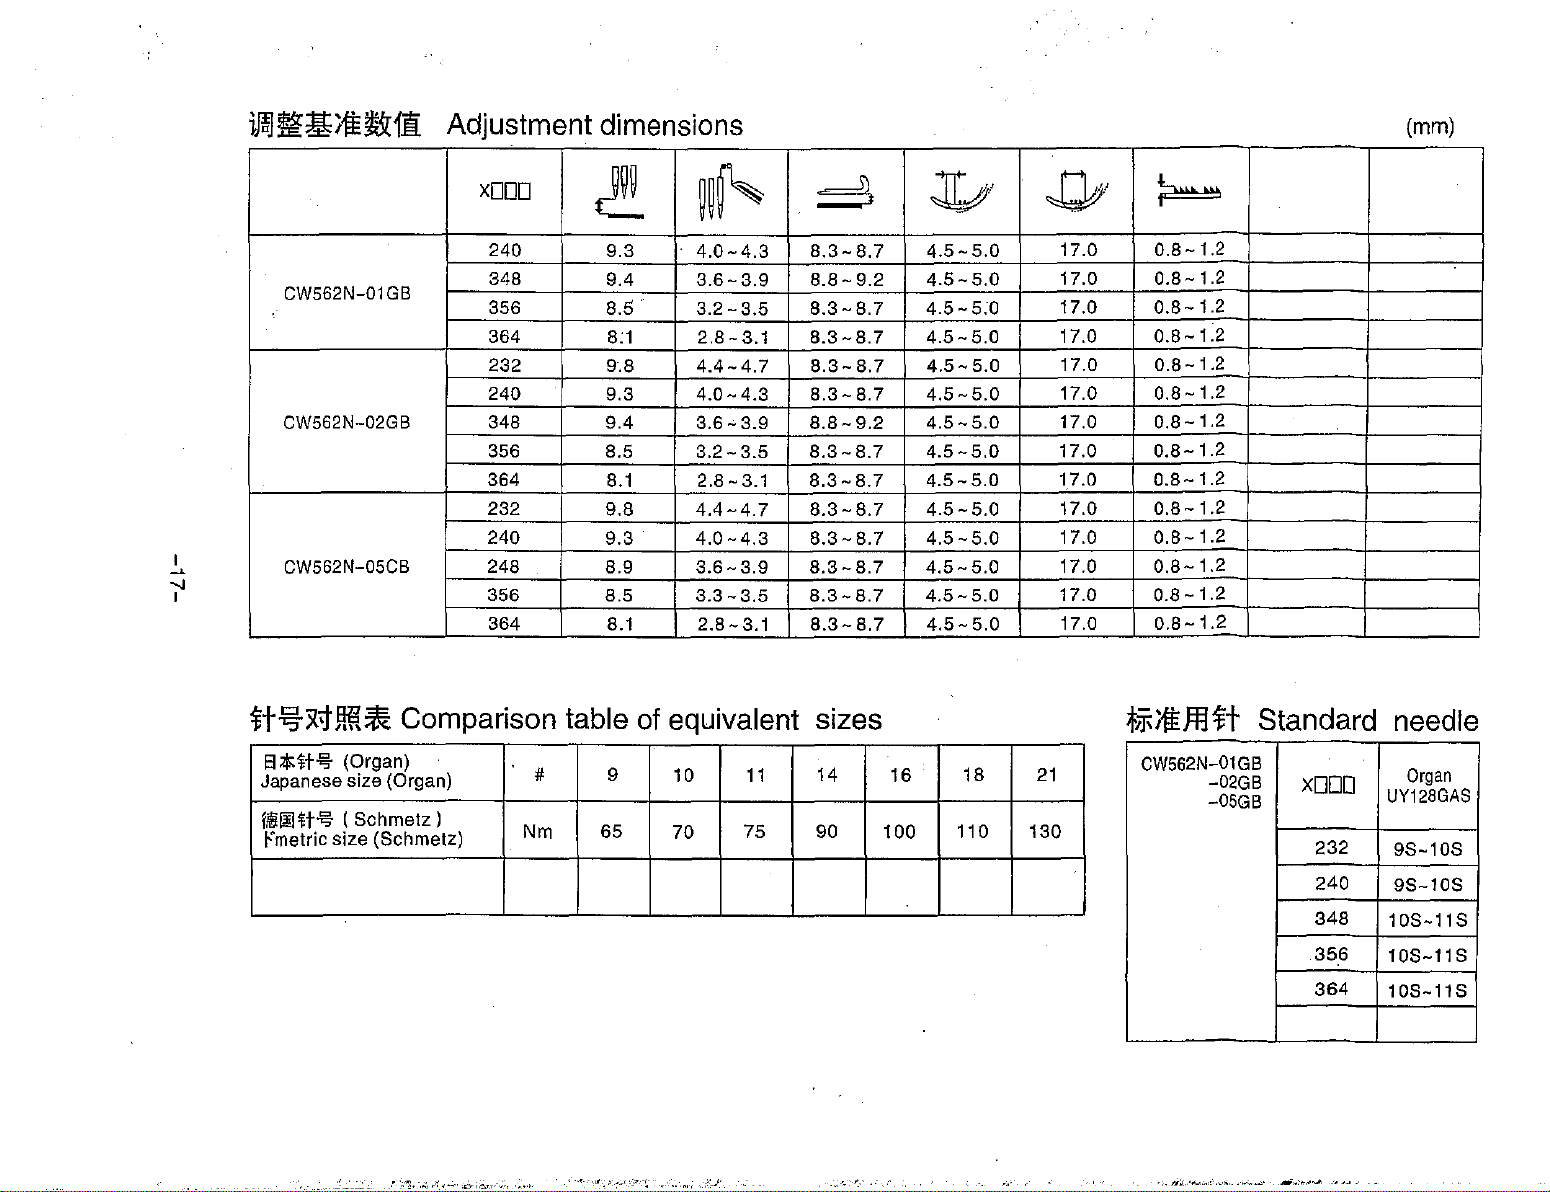
ilol!Jil¥1i~ii
Adjustment
dimensions
(mm)
~
-..j
xooo
t!
240
CW562N-01
CW562N-02GB
I
I
CW562N-05CB
H-9x;ffffi*
13:<is:*t-i%
Japanese size (Organ)
!ill~
tt-l%
rmetric size (Schmelz)
GB
Comparison
(Organ)
(Schmelz)
348
356
364
232
240
348
356
364
232
240
248
356
364
-
# 9
Nm
9.3
9.4
8.5
8:1
9.8
9.3
9.4
8.5
8.1
9.8
9.3
8.9
8.5
8.1
table
65
of
~i~
4.0-4.3
3.6-3.9
3.2-3.5
2.8-3.1
4.4-4.7
4.0-4.3
3.6-3.9
3.2-3.5
2.8-3.1
4.4-4.7
4.0-4.3
3.6-3.9
3.3-3.5
2.8-3.1
equivalent
10
70
_c__
11
75
___
~
8.3-8.7
8.8-9.2
8.3-8.7
8.3-8.7
8.3-8.7
8.3-8.7
8.8-9.2
8.3-8.7
8.3-8.7
8.3-8.7
8.3-8.7
8.3-8.7
8.3-8.7
8.3-8.7
sizes
14
90
.
16
100
~'
4.5-5.0
4.5-5.0
4.5-5.0
4.5-5.0
4.5-5.0
4.5-5.0
4.5-5.0
4.5-5.0
4.5-5.0
4.5-5.0
4.5-5.0
4.5-5.0
4.5-5.0
4.5-5.0
18
110
'
JJ;;!
17.0
17.0
17.0
17.0
17.0
17.0
17.0
17.0
17.0
17.0
17.0
17.0
17.0
17.0
21
130
.
~
0.8-1.2
0.8-
1.2
0.8-1.2
0.8-1.2
0.8-1.2
0.8-
1.2
0.8-1.2
0.8-1.2
0.8-1.2
0.8-
1.2
0.8-1.2
0.8-1.2
0.8-1.2
0.8-1.2
~li.ffilt
CW562N-01
Standard
GB
-02GB
-05GB
xooo
232
240
348
356
364
-
needle
Organ
UY128GAS
98-108
98-108
108-118
108-118
108-118
I
.,_._.,
__ , .,.
;o--_-~
•
'"""
·
..
·~
,;,.~.--
-"-~'-~~-·--
i;'j
·"n;v
.... -.•
'
·.·.·~---~*·-·
..r~o~,,_.
-••~
·
Page 20

CW500N
CWSOON
~~U
W\~IJTru~m*i~
CWSOON
CWSOON
Series
Series
subclass
specifications
~
00
........
~
Jll
~
.
Application
ili!;.<js;!ii
Versatile
I
I
~ill!ll
Binding
!I
:t:t<ill
:Ya
Aouching
elastic lace
*
~iW
tl:lil!Jll1 :1.3tLI:1!1,
It
you
use the machine
tape
'II€
*
- - - -
~
'l"m!~
Subclass
CW562N-01
CW562N-02GB
CW562N~05CB
with
GB
-·
i\1i1~
::titS1P3fmiiiJ:IIiltiE'I±3.2mm>;(
a differential feed ratio of more than 1:1.3 the main feed
I
tm
(:fl)
Number
of
needies
2
3
2
3
2
3
0
Mlll:
(;fl)
Number
of
threads
4
5
4
5
4
5
tHe(mm)
Needle
4.8
3.2.
4.8
3.2.
5.6.
H
space(mm)
• 5.6 •
• 5.6 • 6.4
4 4.4
6.4
4
4.
4.8
6.4
1',
~
!1:*:
ttJl!i!¥:
(mm)
Maxstilch
length
(mm)
4.4
4.4
4.4
4.4
4.4
dog
movement amount should
Ob
~ii!J~~
Diff feed tatio
0.5-1.3
0.5-
1.3
0.5-1.3
0.5-1.3
0.5-1.0
0.5-1.0
~
..L
ffiJI!i!11i7f-:ll
(mm)
Presser
foot
lift
(mm)
6.3
5
6.3
5
5.3
5
be
less than 3.2mm.
0
-~M£~ll:
(rpm)
Max
speed
(rpm)
6,000
6,000
6,000
6,000
5,500
5,500
~
1i
Remarks
tt/l!ilm:ot
Stitch type Net weight(head only)
lil!Jllfllltt
Needle size
!i!Hilfi!
-t(W
x D x H)
Machines
size(W x D x
H)
602, 605
UY128GAS
W:495mm
#98-#11
0:280mm H:414mm
S
'F:t.lll!1m:ll
.(;).a
:II
Gross
weight(with accessories)
llj~
Working noise level
41.5Kg
47.5Kg
n=5.400mm;
DIN 45635
LpA.;82.0dB
4BA-1
llllli
Page 21

•
itt:
..
flf}
PARTS LIST
-19-
. I
Page 22

-,
tJL~~t1;!(1)
MACHINE BED FRAME
(1)
-20-
-):)~·
(...
1
19
Page 23

,
*Jl.7'l:~#il(1)
1¥-liJ-
REF.
1
2
3
4
5
6
7
8
9
10
11
12
13
14
15
.
16
17
18
19
{'t
%
PART
NO
50010001
50010002
50010003
50010004
50010005
50010006
50010007
50010008
50010009
50010010
35.1-23
10.1-40
50010011
50010012
50010013
50010014
50010015
50010016
MACHINE BED FRAME (1)
m~~fJ"
lill:l!U~:iKll
fflffi4l!l!i'ilill~
t!L:!klill~
1f!ll!lill~
#;ffll!i~~fLlill~
Jl;jfL~I!!I
:l:tilt1WJ
Jffi~i!i
Jffiililli.~fJ
.==::ifl%i1;lil::jij<~
~fJ
tf;R:jij<~
~#~;/J~i!i
~#H~lill'!&
#Be~
#JI€ifirui<Wit'l&
#JI€ifirui<~fJ
ll'!%.1!$
11
DESCRIPTION
SHOULDER
OIL
LEVE
PLUG
PLUG
PLUG
PLUG
RETAINING
FILTER
COVER
SCREW
CAUTION
PIN
STICKER
TOP
COVETR
GASKET
TOP
CPVER
GASKET
BOLT
$
PIN
LGAUGE
RING
LABEL
(RIGHT)
PLATE
(LEFT)
f<:ll:
QTY
4
I
I
5
3
I
3
3
I
2
I
2
1
I
I
1
I
8
I
-21-
Page 24

::.,
*ll7le~#i!(2)
4
MACHINE BED FRAME (2)
\@
-22-
Page 25

_,
1JL~Hi1iti;J(2)
MACHINE BED FRAME
(2)
!¥%
REF.
1
2
3
4
5
6
7
8
9
10
11
12
13
14
15
16
17
18
19
20
21
22
23
24
25
26
27
28
29
30
31
%
14
PART
NO
50020001
50020002
50020003
50020004
50020005
50020006
50020007
50020008
50020009
50020010
50020011
50020012
50020013
50020014
50020015
50020016
50020017
50020018
50020019
50020020
50020021
50020022
50020023
50020024
50020025
50020026
50020027
50020028
50020029
50020030
50021000
-'~';
DESCRIPTION
Jlii;fli.
llii11i.il!!#~tr
Jlii;fli.\ll'#l!>l
l::l'it~tr
llii11i.il!!#~tr\ll'#i!
J::l'i[;fli.
l::l'itf/.3:Jk
ll!lfl!lr&
J::l'it\ll'#l!>l
jj~Jll:flP
l:J!KAA.\:Il~tr
iiAAill:flP
J!KAA
Ji.\;J1AA.\ll-11i.
J!l'ii?J:Il
J!l'ii?J:Il~tr
Jil;;l;ttllli~tt
~AAJ:Il~'lil:
~AAJ:Il~'lil:~tr
§ltll-'ll:'l<ll!t~fr
~AAJ:Illilf~llll
lilf:IP.\1!1.
lilf:IPJ;~tr
lilfJFl:llml!>l
lilfJFJ:IlU
lilfJF.\1!!.Y.:~Umlf!l
lilf:IPJ:Il~~~tr
lilfJF~~
lilfJFl;'ltll!t~tr
llli:IPJ:Il'ltll!t~trml!>l
~AA';11&.#
J:ll
~
lilf:IP
.!ll~fr
ARM
SCREW
0
RlNG
SCREW
WASHER
AR1v!
PLUG
OIL
SIGHT
0
RlNG
NEEDLE
SCREW
BARCKET
SCREW
LOOPER
PULLER
SCREW
SCREW
FLAT
SCREW
SCREW
CUSHION
EYE
GUARD
SCREW
WASHER
BRACKET
WASHER
SCREW
BRACKET
SCREW
WASHER
FRONT
COVER
COVER
BAR
TIIREAD
COVER
SPRING
COVER
f'-"
(LEFI')
(TOP)
WlNDOW
GUARD
GUIDE
COVER
~:lit
QTY
1
1
1
11
1
1
1
1
1
1
3
1
1
1
1
2
1
1
2
2
2
1
2
2
1
1
1
1
2
2
1
-23-
Page 26

=.,
1Jl~~1~(3)
MACHINE BED FRAME
(3)
-24-
Page 27

_,
*J1.?1Hi1it1il(3)
1¥%
REF.
1'1'
PART
-!}
NO
MACHINE BED FRAME
-
4;
DESCRIPTION
(3)
f}j;
~:li!:
Q1Y
50020004
I
50030001
2
3
10
11
12
13
14
15
16
17
18
19
20
50030002
50030003
4
50030004
5
50031000
6
50031001
7
8 50021006
9 50031002
50031003
50020029
50020021
50030005
50030006
50020011
50030007
50020019
50020017
50031004
50031005
!rHnlil~~~
!iiil'llil~iff.*~~
!iiil'Li:~
!iiil'ti'a
Jt~W.f'l'
Li:fl!~.\fi.W.
Li:1l!~~'i!<~J!J'lU.~~
Li:1l!~JJ'i!C~..t~~!l;F/ll
Li:1l!JJ-'I<~l£Hl~~
li!<iili*~~
'i!<M~
1'1'
llil-'1<1!40
~-l!j:
llli~~
llliJ!I<~~~
llillli~lli!-
llillli~lli!·~~
1ltrJli}Ej}[~~
Li:1l!JJ-'Il'i!<iii~
Li:-'11~
SCREW
SCREW
BFD
COVER(LEIT)
BFD
COVER(RIGIIT)
COVER
SIDE
COVER
SCREW
SPRING
PIN
SCREW
SCREW
CUSHON
NUT
BRACKLT
SCREW·
FLAT
SPRING
SCREW
SCREW
LINK
COVER
COVER(LEIT)
ASSY
6
I
I
I
I
I
1
4
I
2
3
2
1
I
2
1
2
1
1
1
-25-
Page 28

lm,
l'::E.~-ffl"i>!JtJHt.l
CRANK SHAFT DRIVE MECHANISM
-26-
Page 29

ll!l,
l'::E$1111~7JJ~M~
0
!¥-'%
REF.
1
2 50041000
3 50020004
4
5 50040003
6 50040004
7
8 50040006
9
10 50042000
11
12 50043000
13
14 50045000
15 50040008
16 50040009
17
18 50040011
19
20
21 50040014
22
23 50040016
24
25 50040018
26 50040019
27 50040020
#
7
PART
NO
50040001
50040002
50040005
50040007
50042002
50044000
50040010
50040012
50040013
50040015
50040017
CRANK SHAFT DRIVE MECHANISM
"f;llli~Ul'~
~#:i!i'FW.#
~#Ji;f'fj!~~tr
JOJ<d!i;Ji'j
JOJ<d!i;Ji'J~tr
JOJ<d!i;Ji'l~;;E~tr
*~~
li*~~;;E{]l~tf
~tr
"F~<P=WEim#
Om'
!II
lll!1iUili'fm1't
.:t;tJJjlj~'IIH&m#
r1ll!m:f<t~m#
lli~ml
lli~J;f~tf
J!l'lll'~
J,I..;IJ~~:<E~tr
J,I..;IJ~;;E{]l~tf
J>'..iW~!I!Illl
RiW~mm~m:<E~tr
Hlimll"1ll!
Jjlj~'lJl'
"F1ll!lll!:li!:lftlll"ilr#
J(_(:J
J(_(:J~tf
tf(:Jmm~
~
DESCRIPTION
1'$
CRANK
SHAFf
CONNECTION
SCREW
CRANK
BOLT
SCREW
JOINT
SCREW
SCREW
BUSHING
0
RING
BUSHING
GEAR
(LOWER)
BUSHING
COVER
SCREW
MACHINE
PULLER
SCREW
SCREW
WASHER
BOLT
SHAFf
T!MlNG
ADJUSTING
BELT
BAR
GUIDE
SCREW
WASHER
ASSY
ASSY
~:!i!:
QTY
1
1
4
1
1
1
1
2
12
1
1
1
1
1
1
2
1
1
1
1
1
1
1
1
1
1
1
-27-
Page 30

-28-
Page 31

Ji,
...t.:E~ill1t7;JJ*M~
fi'-1}
REF.
I 50051000
2 50051002
3 50051003
4
5
6
7 50050004
8
9
10 50050005
11
12
13 50040006
14
15
16 50050007
17
18
19
20
21
22
23
24
25
26
f'f
%
PART
NO
50050001
50050002
50050003
50052000
50020004.
50040003
50040005
50040007
50050006
50053000
50050009
50054000
50050010
50040011
50040012
50050011
I. 50050012
50050008
50050013
ARM
SHAFT MECHANISM
1'J
tr:ffilli1Wmf'f
#:ffilli1W'k'tm!lmu
#:ffilllm~'k't!lmu
iEill!lmu
.!l:.i#J!lmu
-LH!E~Em~u
..t1llni1rililll~
..t~ii:ffmf'f
li:ffJiMJ
..tjj];~:£Jtilli1W
:£Jtilli1W!lmu
Jl)(~~
~~iEill~u
~-n
-'1'-fl
..t-'f-~:!jl;!lmU
..t1l!nru=Wfl.:m
f'f
./A.i#JI!;J"!JMt
~#;f!;m.f'f
'¥4t
..t4t'k't~u
..t4l!JEifi:J:I(-B
..t4tlilll"'
..t~•-n
..t~~l>
..t~'Pl>
DESCRIPI'ION
MOTION
SCREW
SCREW
SCREW
SCREW
SCREW
CRANK
CONNECTION
SCREW
CRANK
BOLT
JOINT
SCREW
SCREW
BALANCE
SCREW
BUSHING
GEAR
BUSHING
HAND
SCREW
SCREW
WASHER
SCREW
SHAFT
SHAFT
ASSY
SHAFT
ASSY
(UPPER)
WHEEL
:m:
ASSY
WEIGHT
~:i:
QTY
I
I
2
I
I
I
1
1
4
1
1
1
2
10
1
2
1
1
1
1
1
1
1
1
I
1
-29-
Page 32

/,,
H*'f~j!jfj;_J
NEEDLE BAR MECHANISM
-30-
Page 33

H:ff~Ei:ft.l
!¥'-'%
REF.
I 5006000I
2
3
4
5
6
7
8
9
10 50020029
11
I2
13
I4
I5
16
17
18
I9
20
2I
22
23
{'/'
PART
50060002
50060003
50060004
50060005
50060006
50060007
50060008
50060009
50020004
50060011
50060012
50060013
500600I4
500600I5
50060016
500600I7
50020011
50040009
500600I8
500600I9
50060020
NEEDLE BAR MECHANISM
-'%
NO
~:f'f
~~9<
~:f'fruk~w
~:f'fi!:f'f
~:f'fi!mm
/!!~ill!~
#1'fl!:f'fml!
#:f'fl!\'~
#:f'fl!i'M
•u
#:f'fl!i'~&!imu
ilflfBJE{ii:[ij
ilfl'§;
#~
#~!!miT
~:I&
#Uu
#:!&~:!&
~:!&MIT
#Umr!imu
ll!iii¥
#:f'filfl~
#:f'f.l:~ilfl~~9<
~
DESCRIPTION
NEEDLE
NEEDLE
SCREW
LINK/NEEDLE
PIN
NEEDLE
WASHER
BWCK
SCREW
SCREW
LATCH
SPONGE
NEEDLE
SCREW
NEEDLE
SCREW
BRACKET
SCREW
SCREW
GUIDE
BWCKINEEDLE
CUSHION
OIL
WICK
OIL
WICK
$
BAR·
BAR
CLAMP
BAR
BEARING
HOLDER
PLATE
RUBBER
RETAINER
DRIVE
BAR
M
QTY
I
I
I
I
I
I
I
I
I
I
2
I
I
I
3
I
2
I
2
I
I
I
I
-31-
Page 34

--t,
{:ii!Jtffl.;f:tj
.NEEDLE GUARD MECHANISM
-32-
Page 35

-t,
!¥%
REF.
I
2
3
4
5
6
7
8
9
10
11
12
13
14
15
16
17
18
19
20
21
22
23
24
f*iHJLtt.l
{'f
%
PART
NO
50071000
50070001
50072000
50020004
50031004
50070003
50070004
50070005
50070006
50070007
50070008
50070009
50070010
50070011
50070012
50040014
50070013
50070014
50070015
50070016
50070017
50070018
50070019
50042002
NEEDLE GUARD MECHANISM
1'i
DESCRIPTION
Ffdrtmftm#
r~ooort~~~
1Jilfl-lt:ff@.{'f
i'il~lt:ff~~
i'ilfl-lt:ff~~~~
i'ilfl-il!Jil'l
i'il~il!Jil'l~~
i'il~il!!il'lfW
i'ilfl-~
i'ilfl-~i!l!~
ill!~
*~~fill!'ll
i'il~~Jfr:JJ~I!'ll
*~~1t$'il/ltii!l!l!'ll
i'il~lli
1Jil~lli~~
1Jil~lliflll!'ll
pgjJjlfl-~~
Foi'il~
iltri'il~
?'HJil~~~
*~~2!:~
*~~tl~
Ol!1il!'ll
ECCENTIUC
SCREW
CONNECTION
SCREW
SCREW
CRANK
SCREW
PIN
SHAFf
FELT
OIL
WICK
WASHER
RING
OIL
SEAL
LEVER
BOLT
WASHER
SCREW
NEEDLE
NEEDLE
SCREW
BUSHING
BUSHING
ORING
f;l:
ASS¥
ASSY
(REAR)
(FRON1)
(LEFT)
(RIGHT)
ASSY
ti
QTY
1
2
1
2
1
1
2
1
I
3
I
I
I
I
I
I
I
I
I
I
I
I
I
1
-33-
Page 36

J\.,
~Htll#il
LOOPER DRIVE MECHANISM
15
-34-
1
Page 37

J\.,
~iHJl#il
)¥-!;}
REF.
I
2
3
4
5
6
7
8
9
10
II
12
13
14
15
16
17
18
19
20
21
22
23
24
25
26
-!;}
#
PART
NO
50080001
50080002
50080003
50050012
50070013
50080004
50080005
50080006
50080007
50070001
50081000
50020004
50080008
50080009
50080010
50080011
50080012
50080013
50080014
50080015
50080016
50070004
50080017
50080018
50070010
50070009
LOOPER DRIVE MECHANISM
,g
DESCRIPTION
')f#
'llf#illlifi
'lftt~-rr
'lf#illlifi~-rr
.!1:11EmJt
~#!l!l:jfljillif1H~-rr
~#~JlJii!l!ll
i!lf#~
i!iH.'6~
6~~-rr
i!lf#Jt:f'H!I.
Jtff~-rr
T~M:!ik:
T~"'"~:!ik:~-rr
~#ifflllrm:ff
~#i!lillrtt
~#ifflllrttmll
~-llF
i!)f#JlJj.J!::f!j~
l'lf#ifflllr~ll
-!!M,,~Jm
~~m~-rr
illillrtt~-llF
'llf#ifflllrm~
m~JFo11'!mJ
#
l'li'#il!llrm:ffmil
LOOPER
LOOPER
SCREW
BOLT
WASHER
SCREW
OIL
SEAL
SHAFT
ECCENTRIC
SCREW
CONNECTION
SCREW
BALANCE
SCREW
CRANK
SCREW
WASHER
NUT
BLOCK
WASHER
COLLAR
SCREW
NUT
SHAFT
RING
WASHER
:fil;
HOLDER
ASSY
ASSY
WEIGHT
PIN
ASSY
u
./
QTY
I
I
I
I
I
I
I
I
I
3
I
2
. I
2
I
I
I
I
I
I
I
I
I
I
I
1
-35-
Page 38

11..,
~:(j];j;JH~
FEED MECHANISM
-36-
Page 39

n, *:filfMi.J FEED MECHANISM
rt~
REF.
1
2
3
4
5
6
7
8
9
!0
11
12
.
13
14
15
16
17
18
19
20
21
22
23
24
25
26
27
28
29
30
31
32
33
34
35
36
37
38
39
40
41
42
~
f'l'
PART
NO
50090001
50090002
50090003
50090004
50090005
50090006
50070001
50090007
50090008
50090009
500900!0
50090011
50090012
50090013
50090014
50090015
50090016
50090017
50020029
50090018
50090019
50090020
50090021
50090022
50090023
50090024
50090025
50090026
50090027
50090028
50090029
50050007
50090030
50090031
50090032
50090033
50090034
50090035
50090036
50090037
50090038
50090039
*0$>-f$1:!
:3:=:*0$>-f
>-F$\:!~tr
£lSIJ3.F$1:!
£lSIJ*'$>-F
i\1;{.-~'i:
:t~lllm~~tr
>.f$1:!{\l;,r,,m
1\l;,t_,~'i:~tr
>-F~~~
ill;,t.,mllm
1\l;'(}~~tr
>-F$\:!:tli!N.m~
>-f$\:!J:i!N.{JL~
i!N.{JL~~tr
IDC!I!Jf
m~
li:i!N.Ul~
li:i!N.ilLUtr
~#~~
>.F$\:!llfi~~
*'"'~;ffmll!l
*'"'·~;ff
~#~~
8~
:l!O$i!.!.ll>8$R
#lll!i!.!J'i:
fifJ~tr
IDI!ll'ii'lll~llm
ili!Mli
8~~1li!~~
ili!Mli~~~tr
*'"'~~~~~tr
*'"'~~
*'"'~~
~§.it
~~
~~~tr
:l!O$~;ffM'i:
:JfPJ§Il!l
£lSil*O$~;ff
#JIP::ft<!BI
~
DESCRIPTION
1$
MAIN
FEED
BAR
MAIN
FEED
DOG
SCREW
DIFFERNTIAL
DIFFERNTIAL
BUSIDNG
SCREW
ECCENTillC
SCREW
BLOCK/FEED
WASHER
SCREW
GUIDE(RIGHT)
GUIDE(LEFI')
SCREW
OIL
SHIEW
COVER
PLATE(LEFI')
SCREW
NEEDLE
BLOCK
WASHER
UNKIMAIN
NEEDLE
ECCENTillC
REGULATOR
ECCENTillC
SCREW
SPRll'IG
SPACER
NUT
SCREW
SCREW
BUSIDNG
GUIDE
WASHER
NUT
SCREW
BUSIDNG
Rll'IG
UNK/DIFFERENTIAL
Pll'l
FEED
FEED
Pll'l
BAR
BEARING
FEED
BEARING
RETAINER
BLOCK
BAR
DOG
GUIDE
FEED
.l&:il:
QTY
I
I
2
1
I
I
4
I
1
1
I
1
1
I
2
2
I
I
2
I
I
I
1
1
1
1
1
1
5
1
1
1
1
1
1
2
2
1
1
1
1
1
-37-
Page 40

Jr.,
~1'i11Mt)
!¥%
REF.
I
43
44
45
46
47
48
49
50
51
52
53
54
55
56
57
{'/'
-'%
PART
NO
50090040
50090041
50050011
50090042
50090043
50090044
50091000
50070017
50090045
50090046
50090047
50090048
50090049
50090050
5002001!
I
I
I
FEED MECHANISM
#lll!!f<m•
#NEb
Ol!!!JI
#lll!lf<f!!!l'!tlll!
~.Fil1Hl
t'i
J1
:J!;(pi!l'fiW
~;!J~~J.E~-tr
~;!J~W.#
~;!J~.!!I-tr
~;!J~i!lJ
~;!J~iJII~
illl~
£;!J~JWj~
~;!J~illl~
~#'Mi
~-tr
.:15
DESCRIPI10N
SPRING
0
RING
WASHER
RING
RIN
SCREW
CRANK
SCREW
SHAFf
FELT
OIL
WICK
SPACER
BUSHING
BRACKET
SCREW
$
l\£t
QTY
1
1
2
1
1
1
1
1
1
2
1
1
1
1
3
I
I
I
I
I
I
·I
I
I
I
-38-
Page 41

+,
~fdJiroT.itMt.l
DIFFERENTIAL FEED MECHANISM
-39-
Page 42

+,
~it~Ji?aJTi;J;JHtj
J'F%
REF.
{'f
PART
%
NO
DIFFERENTIAL FEED MECHANISM
~
DESCRIPTION
f$
ll'£:!1!:
QTY
I
2
3
4
5
6
7
8
9
10
II
12
13
14
15
16
17
18
19
20
21
22
500AOOOI
500A0002
500A0003
500A0004
500A0005
500A0006
500A0007
50020027
500A0008
.
500A0009
500AIOOO
50020011
SOOAOOIO
500AOOII
500AOOI2
50020004
500AOOI3
500AOOI4
500AOOI5
500A0018
500AOOI6
500A0017
t.t~
~;1Jlhlll11il:IN.
~;/Jlhlll11!1!1W
~;1Jlhlll11!1!1W~ir
~;iJlhlll>lilUu
~;/J~lf¥~lllil
~zJfrl&-'1'-~lllil~ir
~;u:tN.~u
~;1Jjllj1J~iiz~-
~;/Jl&-'J'-OII'IWMI!!I
:E:!N.W.f'f
~;~J:IN.M~~u
~~
~;IJJ&-'1'-
~?jlj~J/l:!N.
~J/J!:Uir
M!l:IN.I\%~
~-~iF
~J/l:IN.IillJE~ir
~ll'L!Itlf
:iltl/l:IN.~-IiF
~J/l:IN.~ir
BLOCK
GUIDE/BLOCK
LEVEW
BOLT
SCREW
COLLAR
SCREW
SCREW
SPRING
0
RING
BRACKET
SCREW
PLUG
LEVER
SCALE
SCREW
SPACER
STOPPER
SCREW
WASHER
THUMB
SCREW
ASSY
PLATE
NUT
I
I
I
I
I
I
2
I
I
I
I
5
I
I
I
2
2
2
2
3
I
I
-40-
Page 43

+-,
ffm!l*Jl~
PRESSER FOOT MECHANISM
-41-
33
Page 44

+-,
!¥%
REF.
ffiJl!il;fJH1;J
{'!' -!}
PART
NO
PRESSER FOOT MECHANISM
i';
DESCRIPTION
f$
~:lit
QTY
500B0001
I
500B0002
2
500B0003
3
500B0004
4
500B0005
5
500B0006
6
500B0007
7
500B0008
8
500B0009
9
16
17
18
19
500BOOIO
35.4-30
500B0012
500B0013
500B0014
500BOOI5
500B0016
500BIOOO
500B0017
500B2000
500BOOI8
500B0019
50070004
500B0020
500B0021
500B0022
500B0023
500B0024
500B0025
500B0026
500B0027
500B0028
500B0029
500B0030
50020011
500B0031
50080013
10
11
12
13
14
15
.
20
21
22
23
24
25
26
27
28
29
30
31
32
33
34
35
36
OOB<!Iill!tr
Wffi!liJl!-jij:
i!il.ffi:l'Hl!t1111:
B<1tffliJ!il!
B<1tff~tr
ffl.ffiJl!l!fflff
ffl.!EfflMtr
.ffiffliJ!ii!Jm
.ffiff.!il'ft!lill!tr
i!i]JE~j!jl-
ffijtfflllflill.\1<.
.ffijtftOlf!llil
.ffi1tff
ffi1ti!IJ1J'.\1<
ffi1ti!IJ1J'Utr
lllftF.\1<~001
ffiJl!l!m14'
.ffiJl!l!.!illtr
Jf!JEJl!l!~m#
jf).ffiJl!l!j/jl.
:f&ffiJl!l!~jtllil
ffl.ffiJl!l!~1tm!l:ll!tr
~f:!zjtllil
:f&lEJJ!ililill>il!!M
Jil.ffiJl!l!ilill>il!!M'l!l.tr
fflffiJl!l!
liHli
fflB<Jl!l!fflMtr
fflffil!!M
liH&il!tiPi'l!l.tr
.1.iiffflt
fflJEJl!l!j;'[jf
mffJmm~tr
ti~f:!zi&
ti~f:!z.J&mJ£!1:ll!tr
m.J&Il!if:!z.!illtr
j;'[.J&~f:!z'll!-llJ:
ADJUSTING
NUT
SPRING
PERSSER
SCREW
IJNK
SCREW
GUIDE
SCREW
SPRING
OIL
0
RING
PRESSER
SCREW
WASHER
PRESSER
SCREW
LEVER
SPRING
COLLAR
SCREW
COLLAR
BELL
SCREW
LINK
SCREW
BELL
SCREW
SHAFI'
LEVER
SCREW
BRACKET
SCREW
SCREW
NUT
BAR
BAR
CLAMP
ASSY
GUARD
BAR
FOOT
ASSY
CRANG(UPPER)
CRANK(LOWER)
1
I
I
I
I
1
2
I
2
I
3
I
1
1
1
I
I
I
1
I
I
3
1
I
I
1
2
I
I
I
I
I
I
2
1
1
-42-
Page 45

+=,
Wl~ftll:f1i!
SPREADER MECHANISM
-43-
Page 46

+=,
mlliHJif1;j
SPREADER MECHANISM
If% f'f %
REF. PART
1 500C0001
2
3
4
5
6
7
8
9
10
11
12
13
14
15
16
17
18
19
20
21
22
23
24
25
26
27
NO
500C0002
50020029
500C0003
500C0004
500C0005
500C0006
50070008
500C0007
500C0008
500C0009
50040007
500C0010
500C0011
500C0012
500C0013
500C0014
50021005
500COOI5
500COOI6
50040003
500COOI7
500C0018
50080013
500C0019
500C0021
50080005
;I;
DESCRIPTION
~#
~Wfmf
~#~JE'l!ltr
~Wfmi'f~JE'l!ltr
~#i!IJ1W
illD#~Iil
illD#~Iii~JE'l!ltr
~~
~~
iiJD#~'fl:'Oll!!lil
jljijtf"_tmf
jljijtf"_tmi'f~JE-tr
illD#it~:tl:
illDtt:m~
~#:m~~~~
7FJ:Jt,!llil
illD#8~
mi'f~tr
~#iti'f
illD#Wli>M
~ttWJi>mi'fil!ltr
illD#Wli>'l!ltr
illD#Wli>~tr~lil
~#Wli>illltr~~
illD#~'i'
illD#~'i'~M~Iil
illD#~'i'~M
..
SPREADER
I.EVER/ASSY
SCREW
SCREW
CRANKSHAFr
COllAR
SCREW
OIL
WICK
FELT 2
0
RING
CRANK
SCREW 2
BLOCK
SHAFf ·
WASHER 1
RING
ECCENTRIC
SCREW 2
CONNECTION
CRANK
BOLT
SCREW
WASHER
NUT
BUSHING
WASHER
OIL
SEAL
1$
ASSY
f<t
QTY
1
1
I
1
1
1
2
1
1
1
1
1
1
I
1
I
I
1
I
1
I
I
1
-44-
Page 47

+.:::.,
m~&~~~
12
THREAD TENSION MECHANISM
-45-
Page 48

+.=:,
:f1!~2l~~~
THREAD TENSION MECHANISM
1¥~
REF.
I
2 500D0002
3
4
5
6
7
8 500200ll
9
10
11
12
13
14 500Dl002
15
16
I7
18
I9 500DI007
20
21
22 500D1010
23
24
25
26
27
.
#
PART
500D0001
500D0003
500D0004
500A0004
500D0005
500D0006
500D0007
500D0008
50020030
500D1000
500D1001
500DI003
500D1004
500D1005
500D1006
500D1008
500D1009
SOOD!Oll
500D1012
500D1013
500Dl014
500D1015
~
NO
.4!1
m~~
l\l!i;
1\1!'1l;~-tr
tk~i!MIIl
:tk~dli:m~-n-
'l:lllfl!
~~
~~~
~'if
~'lfllii&
'l:lllfl!
:n:~:Ct~ilim#
Hili
~~
Hi&
ttl 'II{
HU-tr
~~i&Z
:Yt~~i&1
'l:lllfl!
:Yt~~-tr
:Yt~i&
*~~
l!il:Yt~-
ljij~-
.P:Ytl&:iit
~~t£111
:Yti&Ji!!-liJ:
DESCR1Pl10N
LEVER
SPACER
SCREW
CRANK
SCREW
WASHER
THREAD
SCREW
PIPE
BRACKET
WASHER
TENSION
BRACKET
THREAD
SPRING
SCREW
THREAD
THREAD
SPACER
SCREW
TENSION
SPRING
SPRING(HEA
SPRING(MEDIUM)
SPRING(LIFHT)
RATCHET
KNOB
GUIDE
RELEASEA
GUIDE
GUIDE
STUD
DISC
SHIELD
'f*
CONTROL
VY) 3
MECHANISM
~:I:
QTY
1
1
I
I
I
I
I
5
2
I
I
I
I
I
I
I
5
5
5
5
10
5
1
1
5
5
-46-
Page 49

+~
MN
'
T1C~*MZ1
. ·
DLE&SPREADER
NEE
YD
«@
THREAD
HANDLING
~
~
~
~~
19
20
®
3
-47-
Page 50

+ll!l
FF%
REF.
I
2
3
4
5
6
7
8
9
10
11
12
13
14
15
16
17
18
19
20
21
22
23
24
25
26
27
28
29
30
31
32
33
34
35
36
37
38
39
40
~~t.lHJHf;!
-
'
%
14
PART
NO
500EOOOI
. 500E0002
500E0003
500E0004
500E0005
500E0006
50080005
50070010
500E0007
50050012
50070013
500E0008
50020011
50020030
500E0009
50020023
500E0010
500E0011
500E0012
500B0016
500E0013
500E0014
500E0015
50060014
500B0015
500E0016
500E0017
500E0018
500E0019
500E0020
500E0021
500E0022
500E0023
500E0024
500E0025
500E0026
500E0027
500E0028
500E0029
50060014
NEEDLE&SPREADER THREAD HANDLING
jj~ffmB~I!Iil
litii.ltffmB~I!Iil~fr
li6ii.\t~
'!'llllll
J.l:ill.l!lil
J.l:ill.llll~llil~fl"
~it
Iii
~J'!Hf
1=1
t!!l!lil
likiiltff!lli
likii.ltff!lli::IE~~fr
J.1:1l'!'llllll
~ff
.@f)"
'!'lllf!l
#ffJ:i:tii.\t1;}
.@tr
:ttii.ltll!i:IP~Jlli
:ttii.\tll!ilPlJ~-fr
li~ll!i:IP
'!'lll!lil
l!t¥i!l:ttiilt!lli
~fl"!lli
:ttii.ltfl"
i:llifl"Jlli~JE~ff
:ttii.ltfl"!llilliliE~fr
,J,:ttii.\t!lli
#:fL:ttfi.lt;fJi
#1'L~lli1Ji
#:fL:ttii.lt•
#'I'L~~tr
J:X:Ytii.\tff
~ii.lt:ttii.lt!lli
91Eii.ltff
!JIIlii.lt:ttAAT:ttii.\t1Ji
!JIIlfi.lt~;jji
*~~f)"
:ttfi.lt.ffi;fji
~-
#'!'Loti
.@f)"
JJ
i:!:AA1Ji
~
DESCRIITION
f*
COLLAR
SCREW
SHAFT
WASHER
WASHER
BOLT
OIL SEAL
RING
LEVER
BOLT
WASHER
THREAD TAKE-UP
SCREW
WASHER
THREAD GUIDE
SCREW
THREAD
SCREW
THREAD SUPPORT
WASHER
THREAD
HOLDER
THREAD
SCREW
SCREW
THREAD TENSION BRACKET
THREAD
THREAD RETAINER
SPRING
SCREW
THREAD TAKE-UP 1
THREAD
THREAD
THREAD
THREAD
SCREW
THREAD RETAINER
SPRING
THREAD
SCREW
GUIDE
GUIDE
GUIDE
GUIDE
GUIDE
GUIDE
GUIDE
GUIDE
GUIDE
~:!!;
QTY
. 3
I
2
1
1
1
I
1
1
1
1
1
1
9
5
I
1
1
1
1
1
1
1
•
3
2
1
1
1
I
I
1
1
1
1
1
2
1
1
1
-48-
Page 51

+.n,
fT~:ld~~NM1iJ
LOOPER THREAD HANDLING
-49-
Page 52

+::n.,
Jf%
REF. PART
fTt&~tffitlWil
{4
%
NO
LOOPER THREAD HANDLING
,g
DESCRIPTION
f4;
QTY
~·
1 500F1000
2
50021005
3 500F2001
4 500F2002
5 500F200'3
6
7
8
10
11 500F2007
12
13 50020020
14
15 500F2010
16
17
18
19
20
21
22
23
24
25 50070017
26
27
28
29
30
31
32
33
500F2004
50090042
50060014
9 500F2005
500F2006
500F2008
500F2009
500F2011
50020030
500F2012
500F2013
500F2014
500F2015
500F2016
500F2017
500F2018
500F2019
500E0027
500F2020
500F2021
50030001
500F0001
50G20019
500F0002
6~Jtmf4
lil!tr
""f~ii
H1:1&.\¥'tt
ffi.~
""f
:li#&$'i!OJ!>im
1Hlt!!Jm
1\tr
""fl&i,Ji.\¥'tt
j(fiiJif¥
j({IrjJf¥~
j(fiiJlf¥~1m-tr
""f~~Jt-tr
""f:lii&~Jt
""f:lil&$'1!
""f:lil&ffi.:l&
~~~
1~7\:ffl~tr
""f~;ff
.
""f:lil&:l&
""f!ii~
""f
!ii:tt~&U.rr
""f:lil&
""F:l:l:~m~m
~.rr
U:l&~tr
~#&1]\ffi.:f&
~~~
~1&0~-IJJ:
~tr
1]\:li!&:f&
~t.rr
:lit&:!&
THREAD TAKE-UP 1
SCREW 2
BRACKEr 1
SHAFT 1
SPRlNG
0 RlNG 2
RlNG
SCREW
SHAFT 1
STOPPER
SPRlNG 1
SCREW
SCREW 2
WASHER
BRACKEr 1
THREAD GUIDE
WASHER 1
BOLT
THREAD SUPPORT
BRACKTE
THREAD GUIDE 1
SCREW
THREAD GUIDE
WASHER
SCREW 2
SCREW
THREAD RETAINER 2
SPRlNG 1
KNOB
SCREW
THREAD GUIDE
SCREW
THREAD GUIDE
1
2
3
1
1
1
1
1
1
1
1
2
2
1
1
2
1
1
1
-50-
Page 53

+
/\,
it!Jiff*M1il(1) LUBRICATION MECHANISM(1)
-51-
Page 54

+
.1¥%
REF.
/\,
ii'£J)fi*Jl#il(1)
{'!:
PART
%
NO
LUBRICATION MECHANISM(1)
«
DESCRIPTION
~
H
QTY
I
500GOOOI
500G0002
2
3 500G0003
4
50050007
5
500G0004
6 500G0005
7
500G0006
8
50020019
9
500G0007
10 500G0009
11
12 500G0012 J:1i!ljl
13
14 50030005
!5
16
20 500GOOI9
2I
22
23
SOOGOO!l
500G0013
500G0014
500G0015
17 500G0016
IS 500GOOI7
I9
500G0018
500G0020
500G002I
500G0022
#iflll!ffii:l:J:1ill'lf
#ifllflffiifjf;1i!lfli
~~~
Jl~
@lrffi'f.fli
~rm'lf
rm'lf~f:ll1il
Jl~
~1i!l'lf?H~
@11i!ltt'lf
~~
Hflf!t1ill'lf
Jl-1!1:
Hf!f!trmtt'lf
rrm'lf.m#
Hflf!t1illtt'lf
roil!
'of~~
Jl~roili1i!l~
tl'l~f!t1i!lft#
-~
Jj\JPGili1i!l~~
im1i!llml1t1i!l'lf
}jiJi!i'lf~~
OIL
PIPE
FELT
PIN
SCREW
FELT
PIPE
LATCH
SCREW
TUBE
TUBE
CLAMP
OIL
GUARD
OIL
DISTRIBUTOR
NUT
TUBE
OIL
DISTRIBUTOR
TUBE
JOINT
JOINT
SCREW
PIPE
JOINT
SCREW
TUBE
JOINT
1
1
1
I
I
1
1
4
1
1
8
I
1
I
1
I
1
I
3
I
I
1
2
-52-
Page 55

+-t,
)J!Jitl'*iUtl(2) LUBRICATION MECHANISM(2)
~------------~
1
Page 56

+-t
)t¥])-fHJl#il(2)
'
IF% f'l' %
REF. PART
NO
LUBRICATION MECHANISM(2)
~
DESCRIPTION
$
W!:JI
QTY
1 500H1000
500H1002
2
500H1003
3
500H1004
4
5 500H1005
6 500H1006
500H1007
7
8 500H1008
9 500H1009
10 50021005
11
12
13
14
15 500H0004
16
17 500H0006
18
19 500H0008
20
21
22
23
500A0004
500H0001
500H0002 .
500H0003
500H0005
500H0007
500H0009
500H0010
50020004
500H1010
24 500H1011
25 500H1001
ili!H
14
illl*1ll!
rt&~
J:i&~
~t&~
Jl\'i:fli
*•~
Jl\'i;j&li\l5£Jt~
ili!JJUiil~
ill!*jjl~·~
lill5£U~
illl*li!!ill!'lflll'~
ill!
:Ill:
ili!U~
-'&'M~
ii!J:Il!:r!l'!\~
ii!J:Il!:llcrill!~
IJ!iii!Jii
IJ!iii!Jii-~
IJ!iilllii<Wml
IJ!iill!ii'ilii
IJ!iilllii'iliilill;i£·~
ill!*')l';f*
..l:ill!*f*
lillJE;j&
OIL PUMP ASSY
SHAFT
ROTOR
ROTOR 1
ROTOR 2
COVER
SCREW
SCREW
WORM WHEEL
SCREW 2
BOLT 2
JOlNT SCREW
OIL RESERVOIR
SCREW 1
WASHER 1
BOLT 5
0 RlNG 1
FILTER ELEMENT
BRACKET/FILTER ELEMENT
0 RlNG 1
COVER
SCREW
OIL PUMP COVER
UPPER OIL PUMP
SETTING BOARD
1
1
1
1
2
2
1
1
1
1
1
1
3
1
1
1
-54-
Page 57

-55-
Page 58

R'%
REF. PART
f't
%
NO
.1';
DESCRIPTION
fF
'/&
..
QTY
1 500!0001
500B0015
2
3 500!0002
4 500G0003
5 500I0003
6 500I0004
50010010
7
50090047
8
500G0011
9
10
11
12
13
14
15
16
17
18
50010006
500!0007
50020004
500Il000
500Il001
500I1002
500!1003
500!0009
50020023
Jitil!!:;l[:;';;{:$:
!!!lfi"
I!Eil!!:;i[il!!fli
;IC!.#
I!Eil!!~il!!'!'
il!!~ff~
!!!lfi"
lil;il!!ii;:{!f;il!!~
'W.'!';!{::'J<
I!Eil!!!IU
I!Eil!!!fl::;l[Jlil
li!il!!!fl::;l[fi!IJE!i:lfi"
J:I!Eil!!~m.#
J:I!Eil!!:;l[
J:Ji!il!!:;i[Jlil
7fJ:I'W'IiHI!J
J:I!Eil!!fli
I!Eil!!~fi"
NEEDLE COOLER(LOWER) 1
SCREW
FELT
PIN
TUBE
BRACKET 1
SCREW
OIL
WICK
CLAMP
SILICONE OIL RESERVOIR(LOWER) 1
CAP
SCREW
SILICONE OIL RESERVOIR(UPPER)ASSY 1
SILICONE OIL RESERVOIR(UPPER)
CAP
FIN
FELT
SCREW
2
1
1
1
1
1
2
1
1
1
1
2
1
2
-56-
Page 59

··
:-J-:.:ft,
~~
1
THREAD STAND
@
®
@
4
3
-57-
Page 60

+n,
!'¥-'%
REF.
~~
{'!'
PART
THREAD STAND
-'%
NO
ii
DESCRIPTION
f$
H
QTY
50010000
I
3
4
5
6
7
9
8
50010001
50010002
50010003
500J0004
500]0005
50010006
50010007
50010008
50010009
500J0010
50010011
50010012
500]0013
500]0014
500J0015
500]0016
50010017
50010018
500]0019
50010020
500]0022
50010023
50010024
50010025
50010026
2
10
11
12
13
14
15
16
17
18
19
20
21
22 500J0021
23
24
25
26
27
~~{'f
..t:li~'lf
r~'lf
~*
~~
~-lij:
..t~!ll!
llir~!ll!
*-r
-~
~~llil~tt
l!li~Jil
~:ll
~H
~JG'~
.PJi~;j&*~~
·~
J.t-lij:
.P~l't!:f'f
-~
.P~l't!~
.P~:f'f
~if
..l::.:ll:tt:flht;J;t
mill
l!li~Jil
J.t-lij:
TIIREAD
TIIREAD
TIIREAD
JOINT
SCREW
NUT
BRACKTE(3-5ROOL)
BRACKTE(2-SROOL)
HOLDER
SCREW
SPOOL
WASHER
SPOOL
SPOOL
BRACKTE
SCREW
NUT
TIIREAD
SCREW
BRACKTE
TIIREAD
THREAD
RID
WASHER
WASHER
NUT
STAND
BAR(UPPER)
BAR(LOER)
PIN
TRAY
PETAINING
GUIDE
GUIDE
GUIDE
CAP
ASSY(5-SPOOL)
BAR
BAR(5-SPOOL)
FIN
I
I
I
I
2
7
2
2
4
4
5
5
5
5
5
I
l
4
1
3
1
1
5
I
2
1
1
-58-
Page 61

=+,
8~litlllt14=
PARTS FOR SEMI-SUBMERGED INSTALLATION
I
I
'
I
I
I
~0
"·
'
-59-
Page 62

=+,
Fl'%
REF.
1
2
3
4
5
6
7
8
9
§1'1UU1H'f:
%
1'1'
PART
NO
500Kl000
500KOOOI
500K0002
500K0003
500K0004
500K0005
500K0006
500K0007
500K0008
~;{&
fi';f!j(!\lifJ
¥:!\litr
m.~t
:kl!itm
1l'Mim
:iJ<:!il:;f!j(
:il<:!il:H<!llitr
~H<JN:m
PARTS FOR SEMI-SUBMERGED INSTALLATION
:l;
DESCRJPITON
SCREW
BOLT
WASHER
SPACER
SPACER
REST
SCREW
RUBBER
$
BOARD
CUSHION
Itt-"'
""
QTY
I{>j"
4
4
12
4
4
2
4
4
I
-60-
I
Page 63

.·
,
..
·-···
;_:-.-
,_
-
~--'
.,-
}-,
m
III•WH!fi!HiiJJIJiifR.I\;ilfi~;i'
ZOJE"
SEWING
~t~:.
·i!ia~Itx~!l!i7HtiK
ADD,
DAIIAIVU
IN
WAIIPIHG:
ZOIIE,
IIADE
~f!:-§~li!_j&,
YUIIUAN.
I'IUJIAIIG.
TE~,
80(1-857-6715
~CHIN~
'F~:::._u~·!tn:~~-_-):ys;?;'f;::
ZHEJI.ANG,
JIAN_GSU·,CHI
·-C:Q..-.-{~?fb~;i~·;·;
3!l60_;f.-CIUNA>.·;·_ ,
NA
·"··'<}f~.
-·
-~'
...
-'Lv
-~~
 Loading...