

Page 1
::Z:<:>.J
m ,.
EO:
HIGH
.SP
EED MULTI-NEE
DLE
INTERLOCK
SEWING
MACHINE SERI
ES
-
f!
m
il
aJJ
~
~i!J:Ef.M
OPERATION
PARTS
ttJIIJ·ttllltilmillllifR~BR~61
ZO
JE
SEW
IN
G
MANUAL
BOOK
MACHIN
E
CO
.,
LT
D .
Page 2

*~m•~~~~~·M~•
The
descripijon covered in this operation manual and parts book is subject to change for improvement
the commodity without notice.
.
~7~•~~~~~"•~~
- I .
.
~~~~ffl
.
of
Page 3
I
:
illlll!t
ll}l OPERATION GUIDE
I
I
:
~iiUDfol~~
I
I
I
~Jti!liit)\~)!~
itl!~
TO
INSTALL A MACHI
LUBHICANT OIL FILLING AND REPLACEMENT 2
TO
REPLACE NEEDLES 2
NE
1
~tl1Jit
THREADING 3
ti!!!iiUl THREAD TENSION ADJUSTMNET 3
!!BI!i/18!1
.Bi!.IIJHi::tJllll\lll.
~!!Ill
~t&lll
~~~~·iji\!ti!Jl
~f&f.J:!l
*~#:it.
STITCH LENGTH ADJUSTMENT 4
ADJUSTI'~G
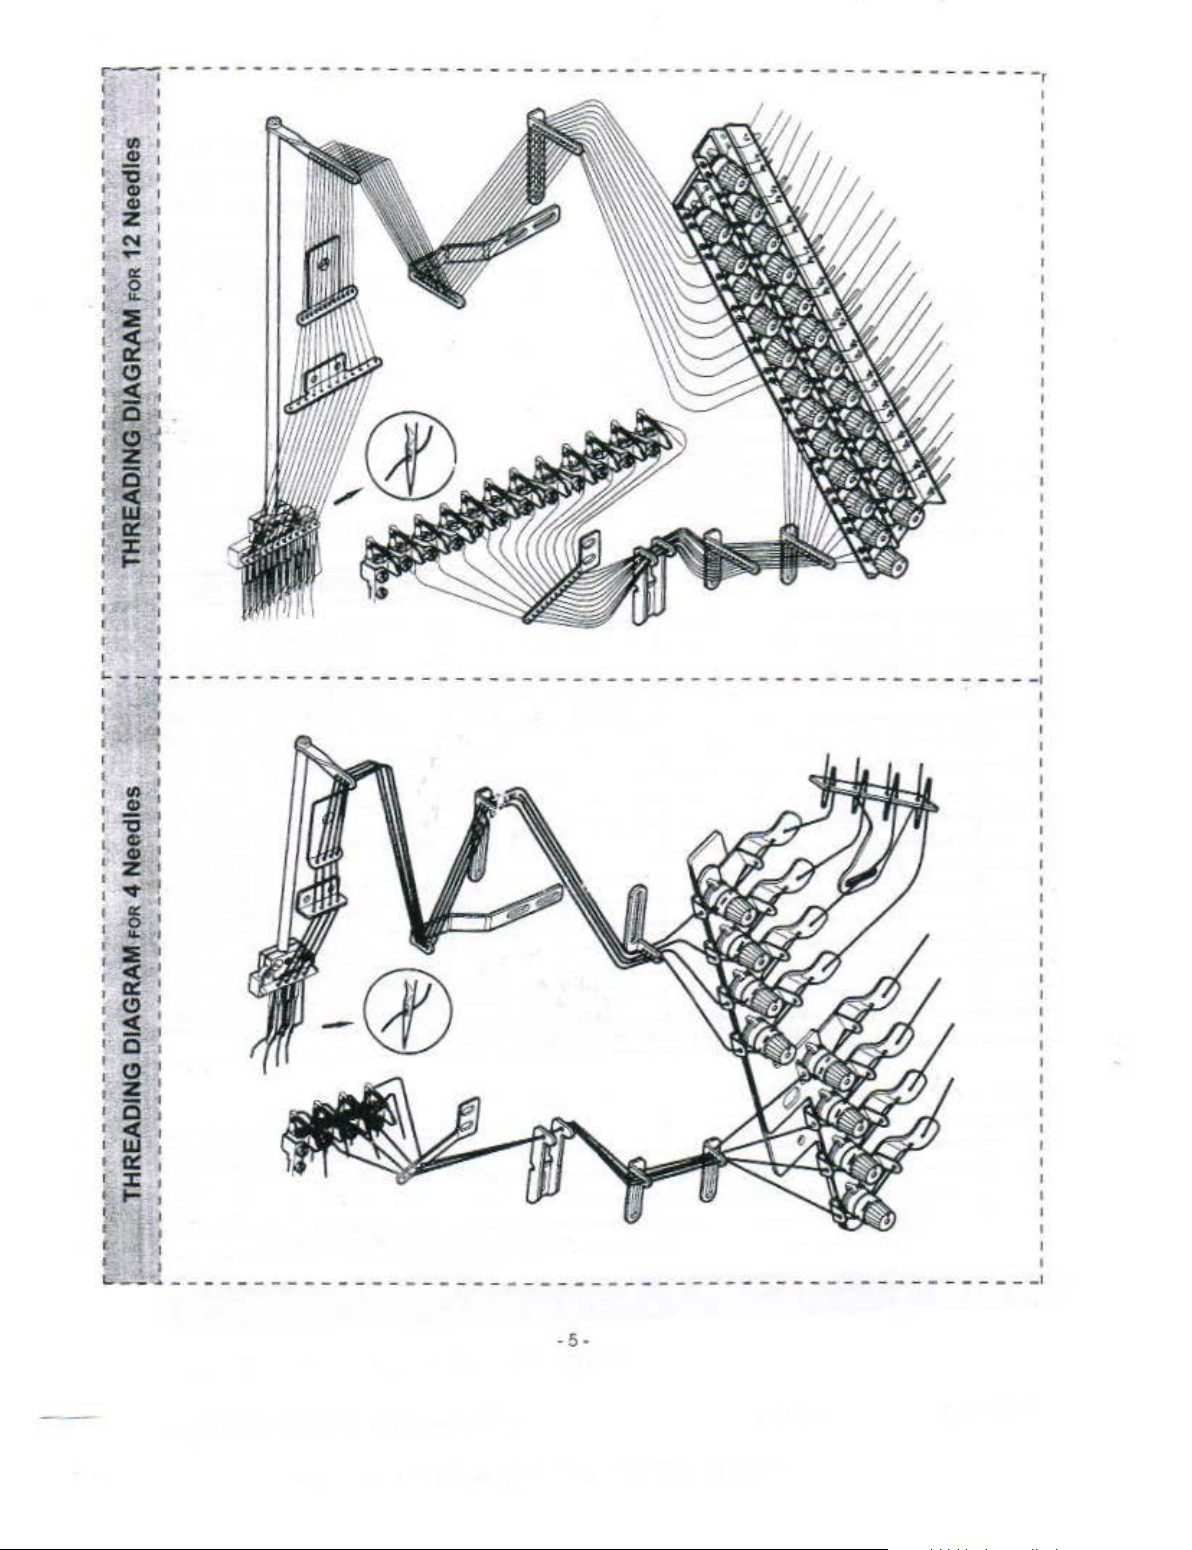
THREADING DIAGRAM
TABLE
IM
PORT SAFETY INSTRUCTlON
CONVERSION CHART
PARTSUST
CUT
THE
-OUT
PRESSURE
OF
PRESSER FOOT
4
5
6
10
11
13
-n -
Page 4
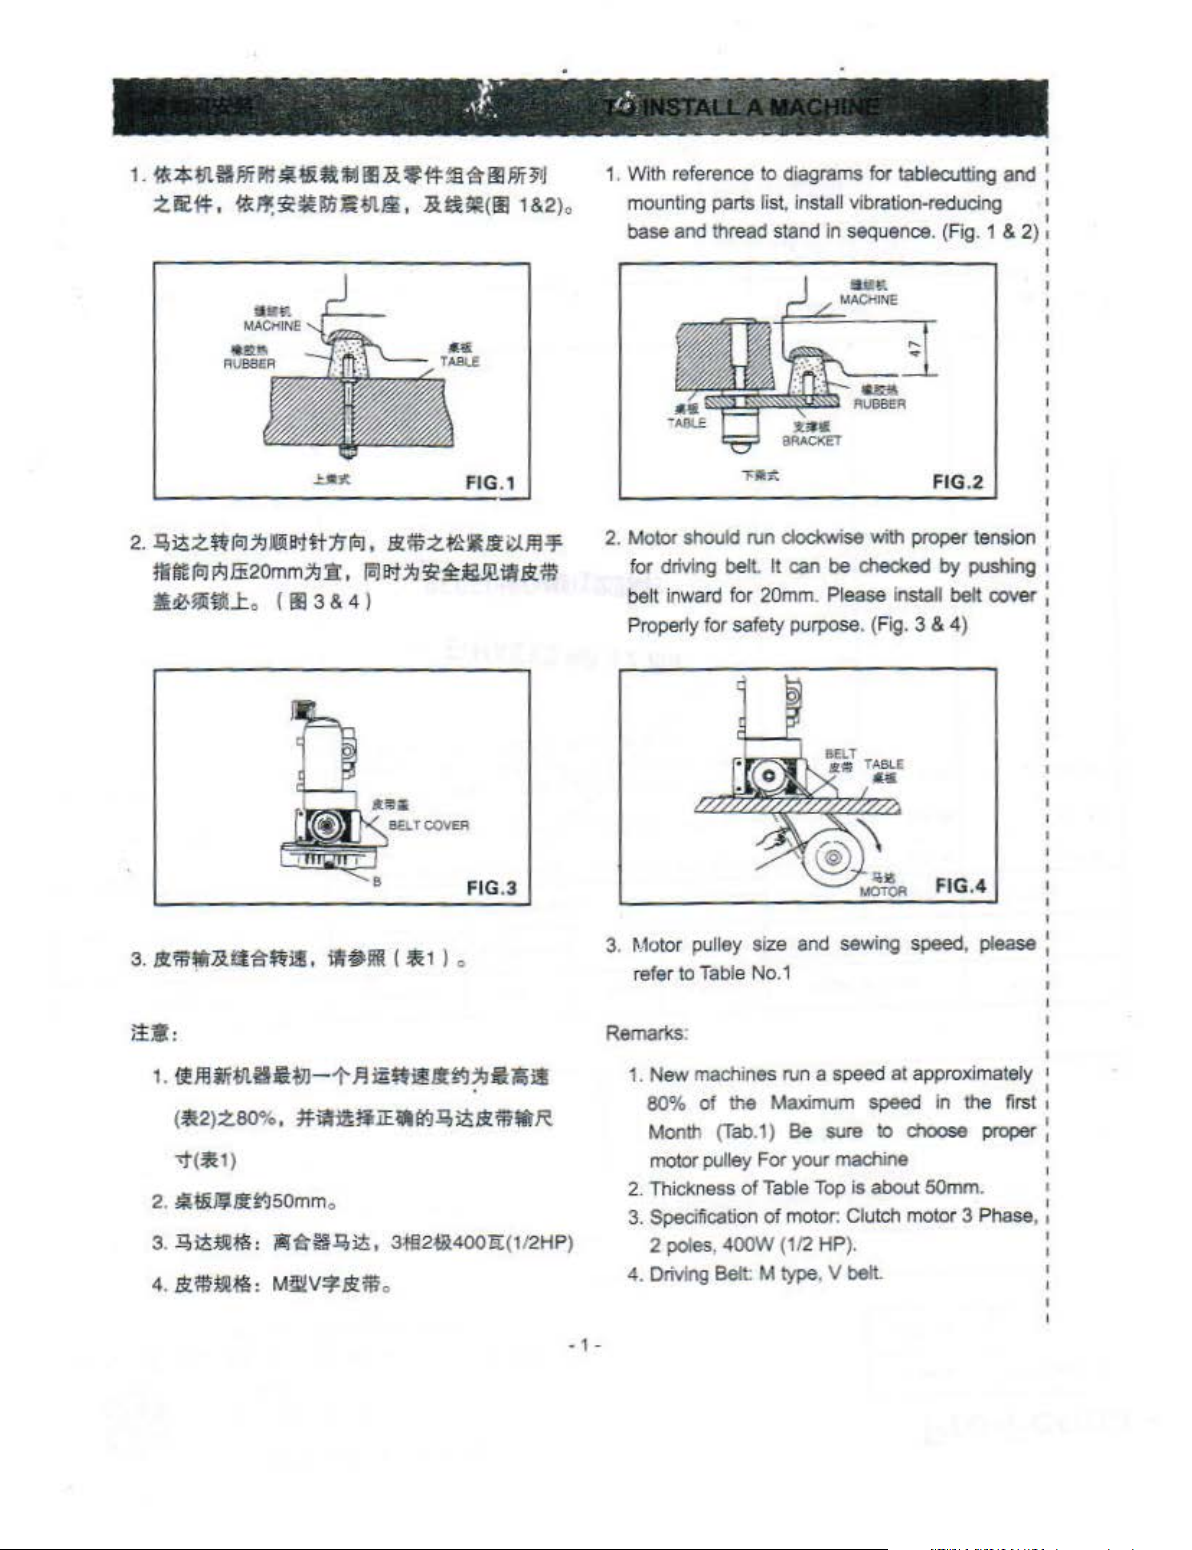
1.
~*l1LBmNI~~UUAIIl&~i*~\%iii.IWJtl
zli'.#.
~l'.~lUU~l1tlli.
&ti~(fll
t
&2).
1. With reference lo diagrams
moun
ting
parts li
base
and thread
for
tablecutting
st.
install vibration-redu
stand
ln sequence. (Ag. 1 & 2
,
....
BRACKET
cing
FIG.2
and
),
I
:
•
'
'
2.
.E;
it
z
*l
toJ
;~J
JOl
t-Ht
:1i
toJ
•
Jt
fi1
z
rca
lf
~.;LJ!l
tti~toJJI;Jffi20mm;IJil:.
·~llli~J:
.
( Ill 3 & 4 )
falil't;~J'iCHmlftJtm
COVER
FIG.3
it.:
1. ilJ!liil1tiliU7J-
!*2):2:80%.
'i"
(t<1)
2.
~!&l1Jnf~50mm
3.
];!it~#!:
4.
s.:m~#l:
1'
~
m*lil!!~~;~JiU~i!
~ilmtf.iE~U',)R,J;!;JtmttR
.
illlit~!l,l;!;
M~i!V!¥&
,
3:Kl2t!l400!i:(t12HP)
m
.
lf.
2. Motor should run clockwise with proper tension
for driving be
belt
inward
Properly for safety purpose. (Fig. 3 & 4)
3. Mr;tor pulley size
refer
to
Remarks:
1.
New machines run a speed at
80% of
Month (Tab.
motor pulley For your machine
2.
Thickness
3.
Specification
2
poles
4. Driv
ing
Tab
,
Belt
ll
II
can
be
checked
for
20mm
. Please Install belt oover
and
sewing speed, please
le No.I
aPProximately
the
Maximum speed in the first
I)
Be
sure
to
c:l1oose
of
Tab
le
Top
is about 50mm.
of
moto
r: Clutch motor 3 Phase.
400W
(112
HP).
M
type
. V belt.
by pushing
F
IG.4
proper
• 1 •
Page 5
:~m
a~
~n
~e~
I
iltr~~JmAiiilit~
I
~(A
)at!
7f
,
!.;L
lt~fflMOBIL#10lt
1JD.A.
.
Uiltll
~~~. ~ftmH~m
S~ii
P'l
Jili
ESS0#32
W
<Cl
P'lzEil!!~tl<llil
JHUf(A).
2.
~ll~1lllz:t:~,
<ll3J
PH
Zai
~ l!fiilltil!!
~i&z~l!iltil!!
lljliiT.
t~~
s
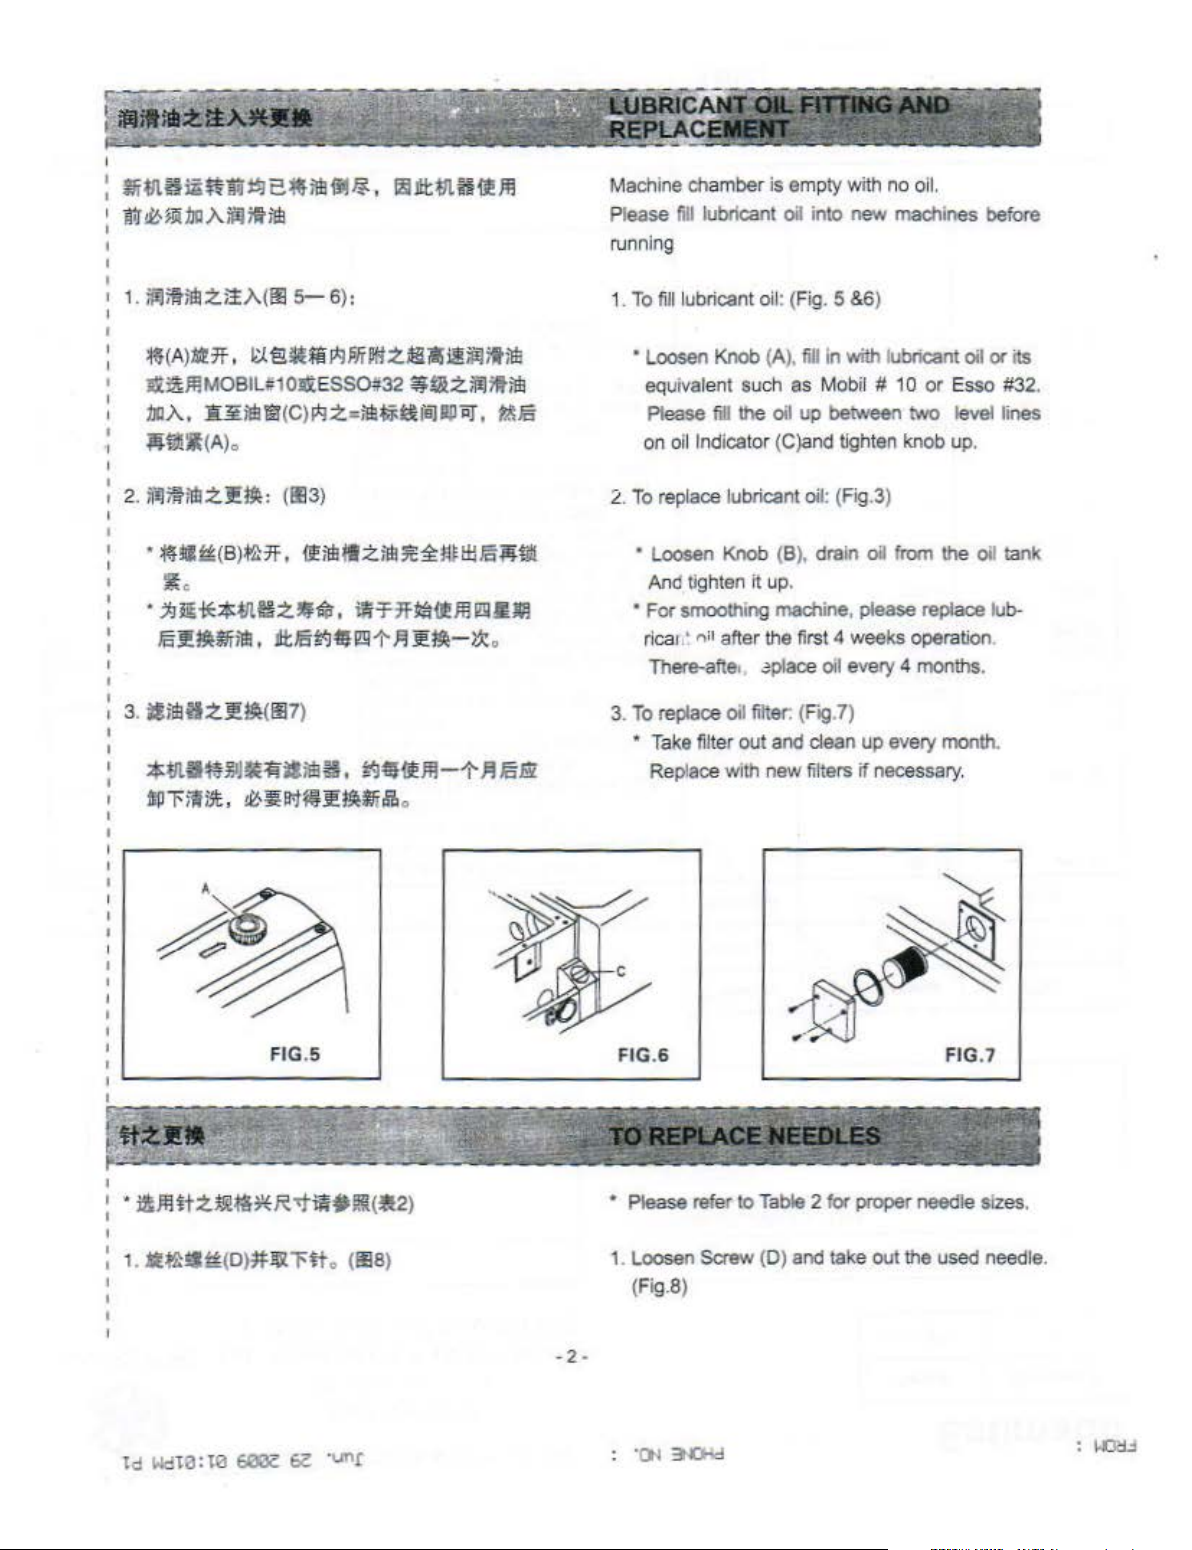
Machine chamber is empty with no oil.
Plea
se
fill lubricant
running
To
fill
1.
2.
lubricant oil: (Fig. 5 &6)
• Loosen
equival
Please
on
To replace lubricant oil: (Fig.3)
Knob
en
fill
oil Ind
oa
into new machines before
(A), fill
in
with lublicant oil
t such as Mobil #
the
oil up between
ica
tor (C)and tighten knob up.
10
two
or
or
its
Esso #32.
level tines
• ~ jjzi:to(B)tl}7f •
~
<
·~~**~ez•$·*
IS~~~ilb.~J5~-~~~£~-~
I
I
I
1 3.
atiJUJzJ!~<IIl7l
I
If
ilb
II
z
ilb
~
~
t4Hil!S
T*
~~m~•~
11Uii1
.
*m•~~~~-illl~.~•{fm-~~.15&
~"Fililt,
~~111f3
FIG
.5
£~~oib
.
• Loosen Knob (B
And
ti
ghten it up.
• For smoothing machine, please replaoe lub-
ricao
.·
" " after the first 4 weeks operation.
There-afle1,
3.
To
replace oil filter. (
•
Take
filter out and clean up every month.
Replace with new filters
FIG
.6 FIG.7
),
drain
~plaoe
FIQ
oil
eve
.7)
oU
from
ry
4
months.
if
necessary.
the
oil tank
I
•
: •
i!fflitz~~~R-.t~•lll<!l2
1.
td
jltl}.t!
Wc:na:
(D)
t0
#!ill"Ftt
eooc:
6G
o (IllS)
·unr
)
-2
Please refer to
1. Loosen Screw (D) and take out the used needle.
(Fig.8)
-
Table
2 for proper needle sizes.
Page 6
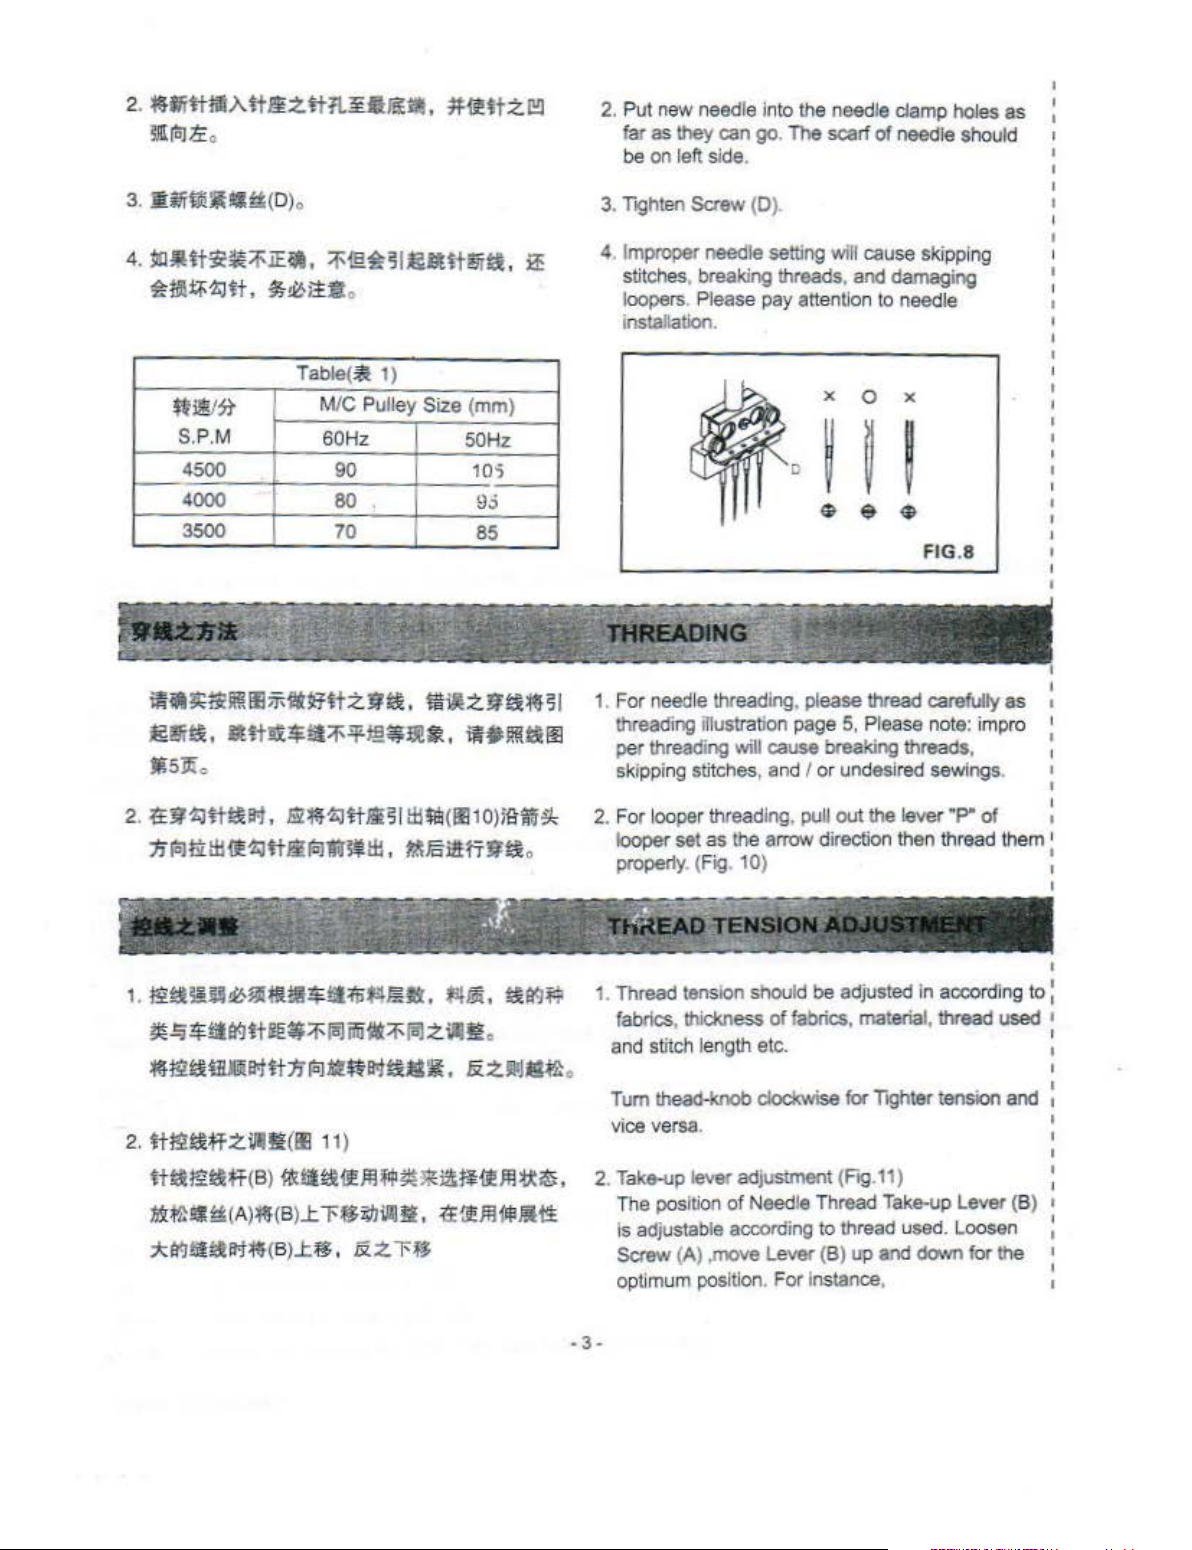
2.
~llitt!i.Mtl1£ztHt.~•~~•.
ii!Itolti:
.
3.
_.iiU!!\UI~(D)
4.
~-tt:ie~:fiHil,
~t!~Zltt,
https://manualmachine.com/:St
S.P.M
4500
4000
3500
o
:f@~~I81Jttf#jiti,
~&&iUt
.
Table(
M/C
60Hz
90
80
70
~
Pulley
1)
~~ttzl!!l
i1E
SiZe
{mm)
50Hz
105
g.;
85
2.
Pu1
new
needle into
far as
be
on left side.
Toghten
3.
4.
lmpi"O?Eir
lhey can
Screw (D).
go.
The scarf
needle setting wifl
stitches, breaking threads,
loopers. Please
installation.
pay
the
needle
and
attention
X 0 X
k--~··
~
sr_,t.-
-
~
-::..'
damp
of
needle should
cause
skipping
damaging
to
needle
FIG.8
~~
,
.•
..
holes as
1. For
~-~~llllil:if-iit~ttzJJt:!!.
m~z!!1~~5
1
~~~.-tt~$~:f~~~~~.~-llll~~
Jl\5~
.
2.
-?±;J~tt~ll't,
~toJttlti~~tt.litoJn~w.~s~rr!J~
1.
~t!lsU~&&~~~~*!!<ii~~•.
~
~
$tlll(Jtt
:tlf~tUl!UIIofttJ'ftoltt~B<JtU!IIIl(
Q:tlf~tt.li511ti~(lll10)iSliU:'k
.
Jll!§>.
~
ll(Jf:i
ietf:f
liJ
illii!H
liJ
z i.ll§.
. &z"'Jill~
.
needle
threading inustration page
per threading
skipping stitches,
2. For looper threading, pull out the lever "P" of
looper set as
properly. (Fig. 10)
1. Thread
fabrics,
and
stitch length etc.
threading. please thread carefully as
will cause breaking threads,
the
tensiOn
should be adjusted in
tl1ickness
Tum thead-knob dockwise for
vice versa.
2.
tt~t&~:tW§(III
tttl!£tl~(B)
~loll
f%!i
(A)~(B)l:
:kll(J!il!lt'.t~<B>..t3.
1
1)
R'<tiU!!~Jll
1'3
ifl!l
i;l)iiiJ
&z
~
*iiU
Jl ,
l'.\J
~if
lfltl:~,
f:E
(i}ll1'$Jit!£
2. T
akiH.I
p lever adjustment (Fig.11)
The position of Needle Thread
is adjustable according
Screw
(A) ,move Lever (B) up
optimum position. For instance,
5.
Please note: impro
and I or
undesired sewings.
arrow direction then thread them
accondlng
to :
of fabrics. material, thread used 1
T~ghter
to
thread used.
tension
Take-up
and
down for the
and
Lever (B) 1
Loosen
I
1
I
:
·3·
Page 7
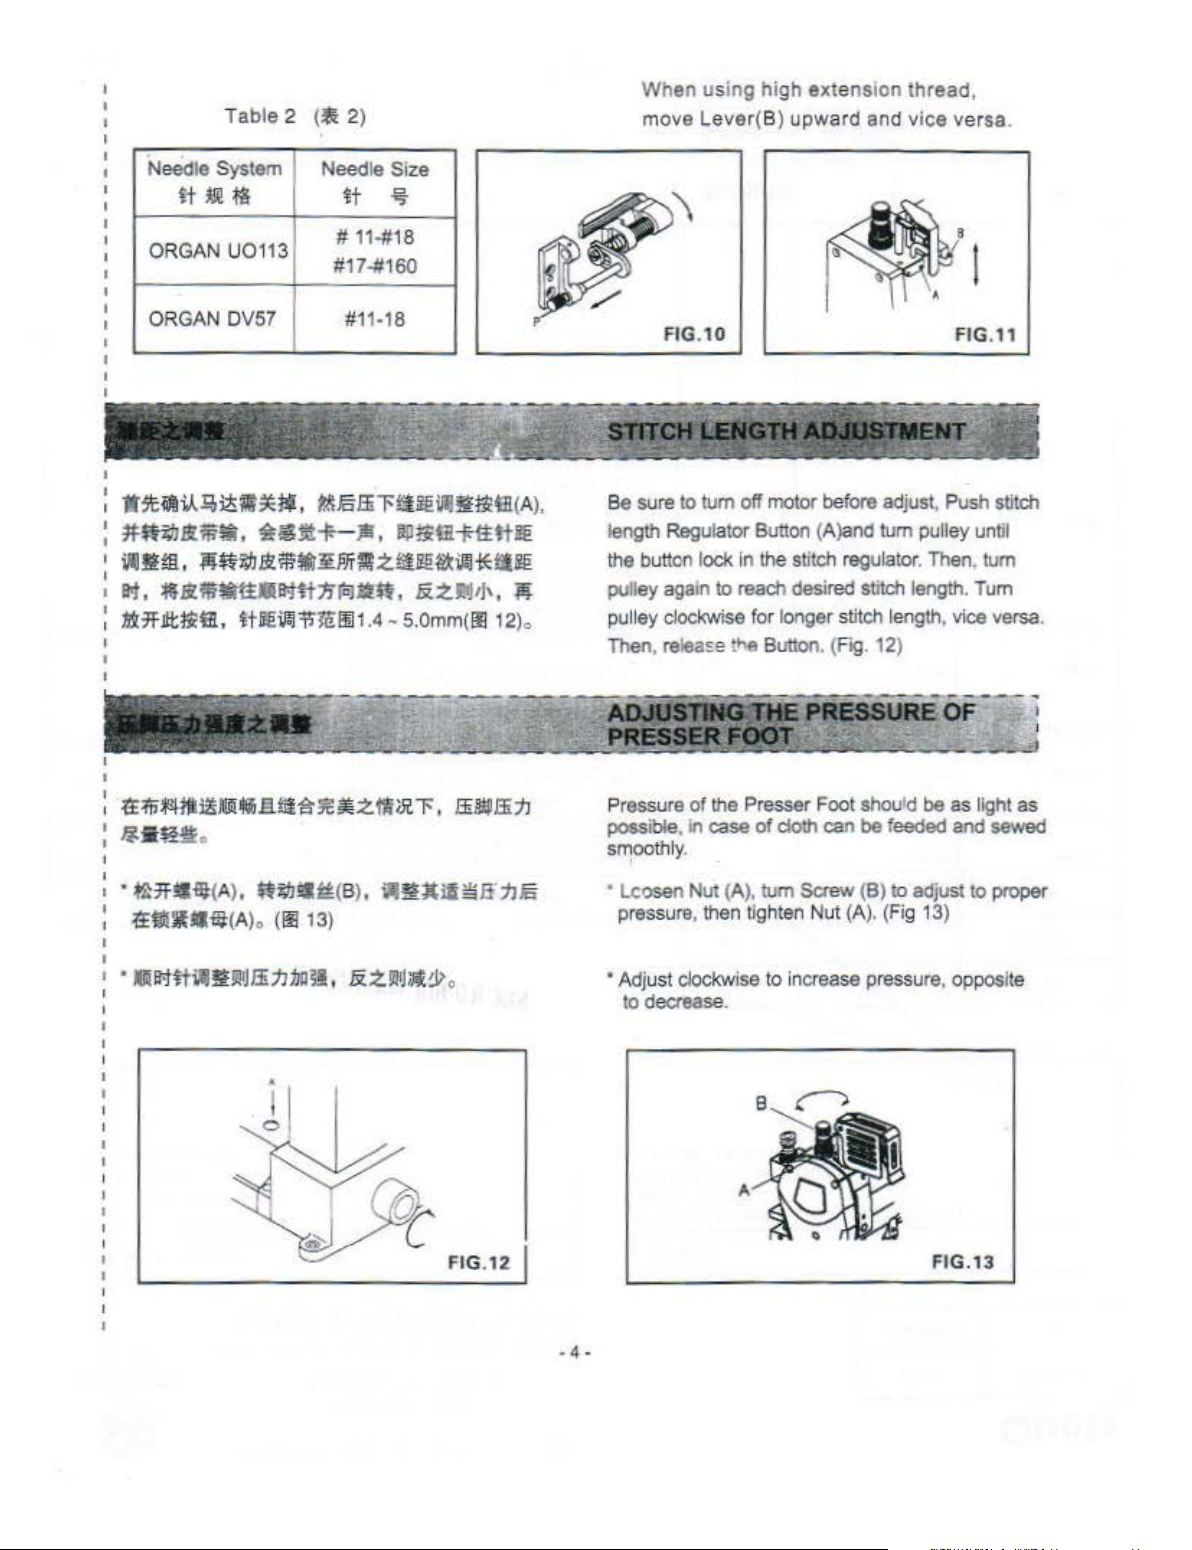
Table
When using high
2
(
~
2)
move
Lever(
B)
upward
extension
and
thread
vice
,
versa
.
Needle System Needle Size
»~~
ORGAN
ORGAN OV57
..
- .. . •
·~l'l.li,.l..!;oii;:~~~.
U01
. . - .
13
-~."f~
r
....
. :
~~:_
t.lilaffil'!il!aiJU~li~(A)
:~~affl~.~s~~-~.~~m~~~~
:
~•m.~~~am~~~~z~~~~*~~
I
111.
=M.Itf!Uifitt•~t-ttt1iicl1l$t.
:
$7flltlitl!.
~t~Vll~m!i1
c
...,.
»
# 11-#18
#17-#160
#11·18
.=.
-
,,
..
.4-
s.omm(lil12).
&Zflllj\.
~
,
length Regulator Button (A }and tum pulley until
pulley aga
pulley clockwise for longer stitch length. vice versa.
~I
FIG.10
Be
sure to
the button lock In the stitch regulator. Then, tum
Then,
tum
off
motor
before adjust, Push stitch
in
to reach desired stitch length. Tum
relea£e
~fl
Button. (
FIQ
. 12)
FIG.11
~~~~~~~g~~~~z~~"F.
~·
$!~
.
•
f'k7fC~
~l'li!!iUiilJ(A)
(A),
$t~ii~(B
o
(li!13)
).
;,llfUtilsli'nla
li
EE~ffin
FIG
.12
Pressure
possible, in case
smoothly.
of
the Presser Foot shou1d
of
doth
can
be
be
feeded
as light as
and
sewed
'
• Lcosen Nut (A
pressure, then tighten
• Adjust clockwise to increase pressure. opposite
to
decrease.
),
tum Screw (B) to adjust
Nut
(A). (Fig 13)
A
FIG.
to
proper
13
Page 8
r---,
f I
0 ' -
1 I
i
1 : I - - - - -
l !t;
r
, z
I N I
I
I
a:
..-
tr!
~
::E
- ------
----
--
- - - - -
-----
----------
----
- - -
---
--
~~I
o
Cl
'
~
f
:o"
:~4
~ol
I
o(
I
t W: I
~
~
:
-1
I
~--'--
1 i
' I
1 I - -
--------
1
I - - -
-----
- - - - -
--------
----------
'
: : I
I !i; 1
l
~
l
'Ot
l
I
l
~
1
~
::E
I
t < I
'
IX
I
o (!) I
"'(
I
I
s
·l
(!)
z
I Q
I
<(
o w
:
~
I
~
....
:
~-
I
I !
I
'
t,_.;;.
.t!
-------
----
- - - - -
-- -
- - - - -
----
---
-
----
---
----
-----
--
--------
I
-·
_,
-5
-
Page 9
r-------------------
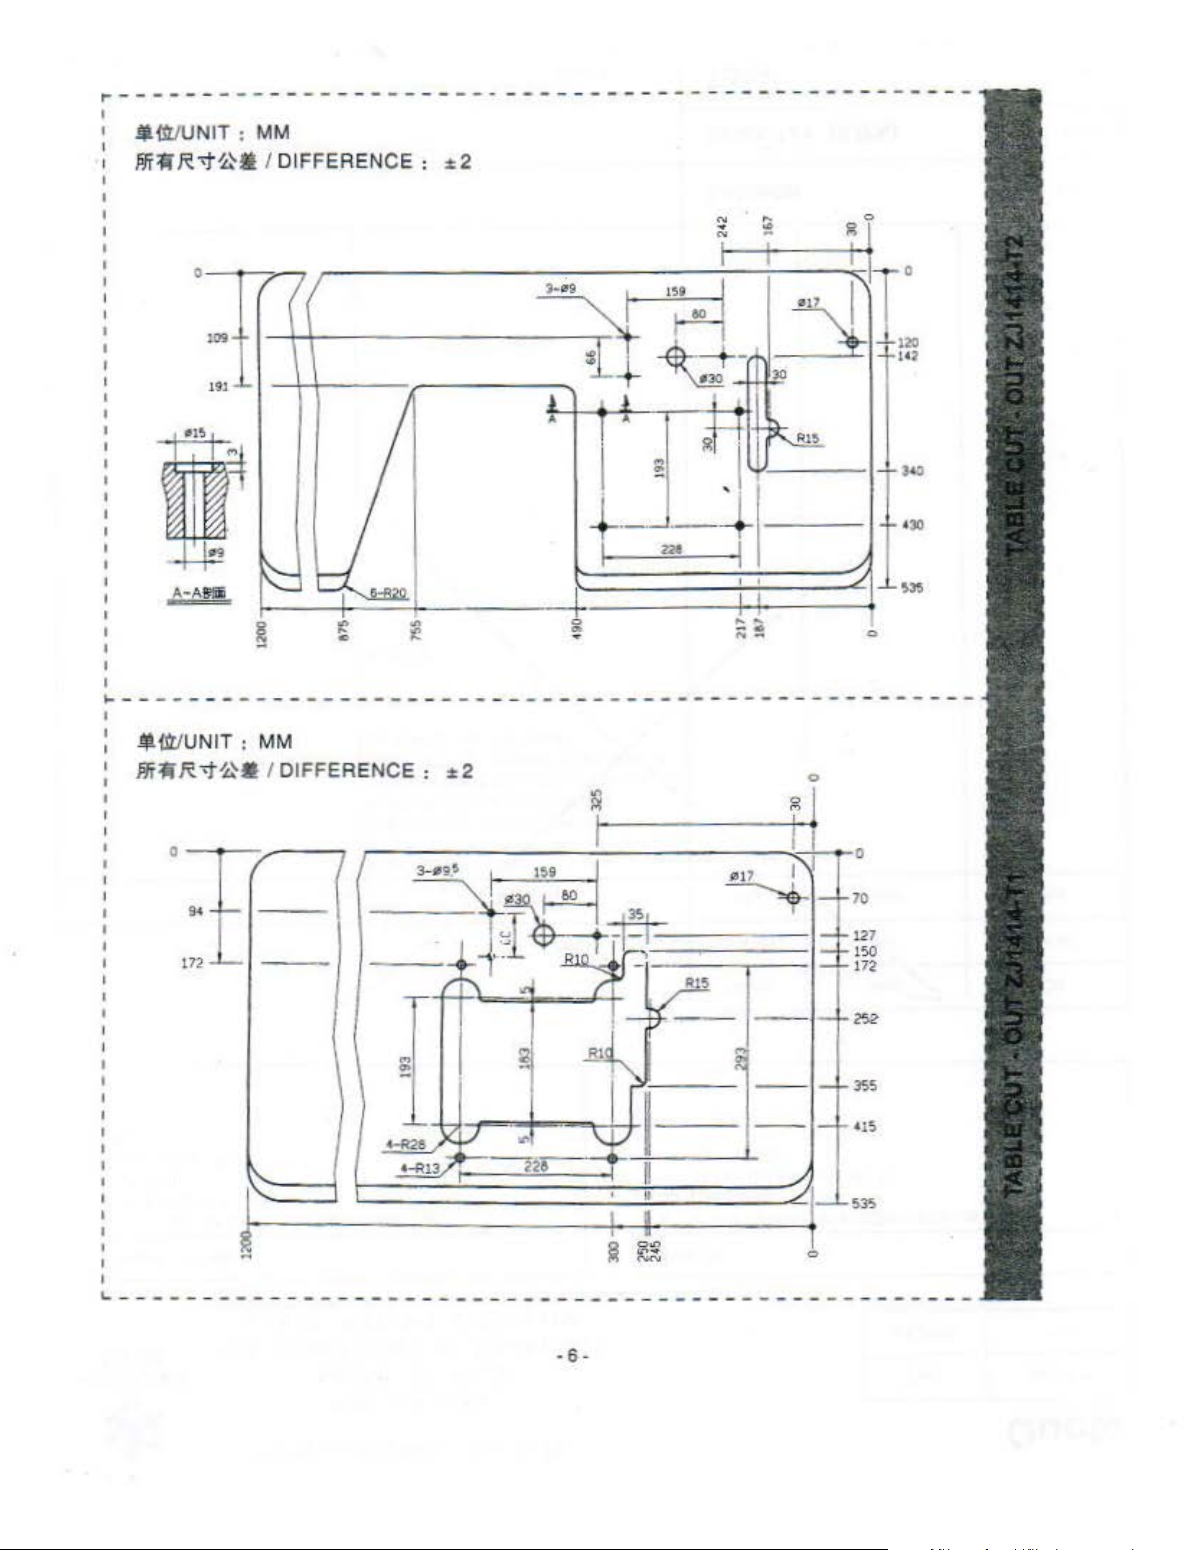
/jl.tt/UNIT:
I
' I
fili'=MR'<t0.
o
MM
/ DIF F
7 1
j1
109
191
ERENCE:
---·----
:2
:'j
3d
l
A
--------------- ---------
I I 0
..
. g I
~
~·
eo
!
120
,.
,
I l
~
-
. '
~I
-
:]9
k
l.
~
"I
+
·-
I - I
6-">
f::::
~-----------------------------
..
Ill:!
UN
IT : MM
ffi:Ji
R
-.t0•
'
1T-
172
I DIFFERENCE : ± 2
.J_
n
'
-
------
1
1---------H7
~ij)eo!_
+I
_,_-
·
-
··
M
!!:
/"'\
.,.
;!
l
~
l
I .
RIO
.1':.
'
~
J
~
-
llli~
·
-~
' '
I
~ '
,..
_
--
- -
------------
0
l
L
L-
I I
'"
'
~
- -
~
- -
- -
,_
==
-
-
./
o
70
127
150
172
•30
c
c
-
Ki/
<-R26
~
I
"'
~ &
~
i
ll
' •
•
L--------------------------
-------------------------
• 6 -
- - - -
/ 1
-'-
0
•15
Page 10

Jjld
lt'UNIT
HT
'Ii
R~ ~-
0
: MM
I DIFFERENCE : : 2
I/
~
I
I
·1-r 0
109+
191 L
'·
r
...
1
I
ltJ]
~
-------------
.ilif:it'UNIT : MM
Plf:f.i
R~~~
I
DI
FFERENCE : : 2
~
-----
-
~
~~
l--
.,.
------ ----------
+ - -
1 ! -
l
1 = I
--H
~
!
221
II
-------
-
~
~
' .
~ ~
42
H
430
8
0
--- --------1
0
I
I
I
[\. .!:!ill./1
1
'-
--
-----------
. I
~
~
226
-
--------~
' n ./
·
-*
·
----
II
~
~~
------------------------------------------
. 1 .
1-
----
----
--/
11
·
-
0
---------
252
•15
~5
' I
-·
Page 11

---------
-
~UNIT:
Jl'i~R"1"0~
--------------
MM
I
DIFFERI;NCE:
:t2
--------- ------------------r-
0
/
~
-
17
2
1-
(•10)
~-------------
4t1iVUNIT : MM
ifi~ R "<t0~
0
~
•90
1\,
I DIFFEREN
-..---/--------,
~
~~-l-~~ft
_
..; ~ .
/
~
"'
~
r
I
I
2
- --------
I
I
'V,:::::i.i.,.XJ
1-
CE
:
:t
~--~------~----------~+,
t$9
..
~
---------
2
I
1Wl
Lr::
~""'
..!!!:
!"'-.
I I
'
l
'
-
~
~
!
./
II
I
~ ·
~
-----------------
-../
0
0
n
7
1-
1-
3$$
...
---
o
'
~
--
----
~~~
172-
'-
4-RtO
(<10) -
1-
-
~
490
I-
_
L-J.
\..
I I
---------------
--
-
~
-~
1
~
1
1
'-V
j----z2-e
t:==~==========~
-
--
1 RIO
+
~
!!
"'
- - -
-8-
,.,
~
-~
----
!
~
~-~-
~
-
-
-
/ -
1·
;:J!:-
~
---
r-
-
---
·
·-
-
~
--"-~
:==
:~7
1-
150
1-
17
- -
1-
25
~
--
i
-I-
3$5
- - !-1-•ts
i
...:.
---
·
==!
·
::::::::::
I I
-----
..1..
-----
~
~~
-----
~~
- -
2
2
--
-
Page 12

~-
-
~
,r~·~-
(
~";;;?'-
...
~
-
"'\
TABLE
..
..._
~
-
--
...
- - - - -
--. --- - -
CUT·
...,
..-;>.._.--"-
OUT
_.._
----
~~- -
ZJ1•U4·T7
..
___
-~ -
---
- -. --- - - .-.
':',a...!
·'•
·",
-.
-....~---
"::~~-:~
- ·
-- --
__._~.,
''1.~
~:
-.: ·
_
_._.,_
-=--
,\:·.·
..:~~'.::1'.~
-~3i~~~~~
..
--::'~~
;~' ~.'
~·-:~
~
~..,;:t-""'-
;,
'
;j,~
'··
l"!
~L:!:;c:
-
........
• '
·t~C!f
~D
..
:.c.
--.
I " _
...-
~
,--
..,_
~
,.-~·
-•,.;..\
.. ..._...
""""'-
--.-
.
---~---
'i.rl·ll~~,;-
, · '
---
-
.-
~
I'~"'
- -
-~J
"'
::!il.
Jill
@
::Uc
4~
t-)
--t
Alii:
••
- ~
0~
.....
.....
m
JJ
m
z
(")
m
I>
1\)
1200-r-
17
~
..
..
..
.
id
,--
I I
I
I
1
93
I
"~
!Jd;
~
s 1
300-l-ltJ..~
m+-
H-1-
0 I
~
\_
f I I
&~
----------------------------------------------------------------------
--
1a3
-P
= -r·
•-
' ' ' I '
293
I l Ill .
1~ ~~
~
I
I!!:
J
-r~
::
w
IJt
~
11-1-
----
...
~g ~ ~
l
-rl1~
-
~
-
iao
o
0
1.
I I
~ t~
l!!lft~~tln
1!!1¥1"~
ttm
l!!lt-~~0$
l!!lt-
I
~~:U
$
l!!lttflll:t$
l!!ltH1~
l!!l~tlllm~
1\U~tl:trl
+-=tt-~H;fJl
+-=t~~ttm
+-=ttWi>Tt$
1-
-=
tttli1'ti$
+-
tli'i'f;
:$
+-tH~U
+-tt
lt.!l1l!l
$
~~::::-:
1-E
H~tHil.
1-
-tli
~ill
in
-=
+-tt~trn
-=-
I-
li~t~t~:tll
-+
:::
t-l'l~~~*'!Jl
- +
.=.
~4~~~fi11l.
!11"!tll-1£i.l!.l!l,
611t~uia
$B
.
6141\!l&!:U:f.ttr~$
oo
11t¥<~. OOJit~iil~
n:t
&12ft
..
. 615
---------
mr
Zl 1414-1 00
ZJI414
- I00-403-601-04085
ZJI414-100-403-601 -603-Q4034
ZJ 1414
-1 00-403-{;0 1-(J03-04085
7J 141
4-
100-403-
7J
1414-1 00-403-{;0 1-(,09-04641254
ZJ 1414-1 00-403-{i(JI-04A32
ZJ
1414-100-403-601-08064
7.
1 1
414-100-403·60
--
ZJ1dl4-
L.J
ZJ 1414- 100-403-601-613-12048
/'J 14 1
7.!
7.J
Zl1414-1 00-403-601-61
ZJ
z
7.JI4 14· 100-403-601- 1
ZJ
ZJ
7.J
ZJ 1414-100-403-601-614-33048
100-403-(,()l- 1
1414-1 00-403-<>0 1-612.()(>064
4-100-40
1
414-100-40:1~601-6
1
414-1~0
1414-100-401-{;0 1-
.r
1414-1 00-403-60 t- 1
1414-1~03-601
1414-100-40
1
414-100-403-{iQI -3
u .
6131~$$!1.
1~¥!11\ill~AO$
---
~
-403 -
C.O
60
3-601-
3-{i(JI·6
3-60
•~~. 609ft~nWM.
.
616fU;At!l1tt,15
-li}
1-04064
1-60'>-0464/1 <)I
1-1 204R
2064
61J-l2064
1
5-1
2048
1
5-1 20M
(,.12048
616-12064
3032
7032
-23
012
1-250.18
304~
o13~~
-
.
Page 13

1. Transportation
(1)
<UI~~=Jtit(f.JGU~:£~tllti~U~"'
ff>
.
I 3. tU!'l>
4.
lffr
ttM~ffi!r~
1.
tlli;i~fl;·~'
ff-
.:t
*
il
i!!l o
i#i!lt~J:.~!J"~Jl
.
( 1) The machine packed
that made
protect
(2) Put
(3)
Use
of
expanded polystyrene to
it.
the
machine into a carton.
a cart or by two men's hands to move
with
two
piece
covers
2. Storage
( 1) The machine must use duster -cover to oover
~
when it did not work.
(2) The machine avoid to storage
erature .. .ore than 45't
3. Working
Pay attention to this warning advice as
In
the
temp-
follow
a. Working area is dangerous.
b.
Never touch the needle
running.
c.
Be
careful
d.
Do not insert your finger between needle
and
if
you infeed fabri
roller
for transportation on fabric.
if
the machine is still
c.
it.
:
2-~~.~~.~§.ffl·~~i!·-
II!
il9.
0
~
-10·
Pay attention to this warning sticker:
a. Movable parts must
guard
b.
Pun
out the plug from socket when you adjust,
thread, change bobbin and needle dean.
when
you
be
enclosed
operate.
with
Page 14

-
~,~. ~{!'t;-_
t
;_ · ..
·--s.~r
··
·)
-~-
__,~·~Ci.#i.:!;?-.-P__!,:_;o::2~
I
I
I
I
I
I I
I
II
I -
•
MOD
I
~---
I
I
,_
•
I
•
I
I
I
I
I
1
----
I 1
~
I
I
I
1. -
I
I
I
I
I
I
ZJ1414-06/VPL
I
•
~
----
I
I
I
I
,_
I I
•
I
I I
I
I I
•
~.
________
EL
Mll'l
LJ1t.14-04
ZJ14H-0448
ZJ14
14
-0464
ZJ1414-12
--
-
·
-
r-
---
'
-
-
'----
- ·
____
~)~
Mit
SUB- NEEDLE
CLASS
·---
.IIlii
064P
08SP
095P
106P
127P
9tP
222P
254P
191P
1
27P
25
4P
048P
064P
048P
OSOP
064P 1/
..
GAUGE HOLDER
r--
tt~
1--
-----
3W
-
,.
t -
1/8
t
-·
1(4"
1-t/2
3/
16-3/4-3/16"
3116-7/1l
3116-1-3/16" M9404A E9404E
-
1/4-314-1/4" M9304A
1/4-
lfl
1/4· 1-1/4" M9104A E9104E D9104A P9104A
3/16"
114.
3/16"
5mm
4"
---------
.... __
-.--
~ -~
...
:...
_
~_. _ _,_,-~--
tiP
ilf;
• •
<Y
""':
-"'~ -----
~""!~~~"r.'F"""~ ~114_10_!1
CONVEASlON
........
~
..
CHART
' .
...
-·
I
-
.........
~
.,;..:;t:;;;;:
;;
~
~l£:.;~:...:~-~
!!
•
NEEDLE
--
ttlll
M9004
M9104 E6104D
" M9204
M9304 E93
2:f9404
M9504A
-3116" M9204A E9204E 09204A P9204A R9204A VESt VE49
-1/4"
M9004A D9004A
M9012 E9012 09012 P9412
M9112 E9112
M9012
M9612 E
M
9t12
·-
----
NEEDLE FEED
PLATE
tHi
~6001~
E92040
__
r!94
E~S04E
E9304E
E
9004E
E9012
9612
E9112
ia~lif
09004
---
09104
09204
'
....J:..
040
09404
04D
D9504A P9504A R9504A VaSt VC49
~09404A
09304A
r
09112
09012
09612
09112
r-
----
----
DOG
--
"'04
... ___
·
PRESSER
FOOT
IJ
P9004
--·-
P9104
P9204 R9204 VE51
P9304
--
P9404 R9404
--
P9404A
---
P9304A R9304A
P9004A R9004A
P9512
P95~
P9012
P9612 R9612
P9
----
RETAINER
-
r---
..
--
~93~-
HOLDER
lttUIII
R9004
R9104
LOOPER
-
9112
--
r
1--
--
~9404A
R9104A VE51 VE49 L9104A
R9012
---
R9112 VESt VE49 L9112 VE11P
R9012
112 R
----
NEEDLE
GUARD
f.ltt
VE51
VE51 VE49
VESt
VESt
l.Pttlt
1-
VE49
VE49
VE49
V&49
--·-
---
VE51 VE49
VE49
~:~-
VE51
VE51 VE49 L901? VE11P
VE51
ves
--
VE49 L9004A
-
VE49
VE49
-1-
VE4
9 L9112 VE1
----------------
~~:
~
~
--
LOOPE~
HOLDER BRACKET Uo113 :
~ttll
-
L9004
_l9104
__
r-:g~
l93'l4
L9404
c-!:9504A
L9204~
LWJ4A
~304A
LOOPER NEEDLE'
~"It!
;t
VE11
VEil
I-
VE11
-
VE11
VE11
Vall
VEil
---
VEil
~::;
,.Y
E11
L9012
VE11P #11- #
- I
-
L9612
VE11P
---
--
...2
'~·-·
~
-
-
1P
-
...
~~
f
ft
#11•
~14
#11·
#t4
#11-
#t4
#It
• #14 I
#11· #t4
#11
• #14 I
#11· 114
#11
· #14 I
1--
__.
#11
· #14 I
1---
#11-1114 1
#11• #14 I
14P
--
#11·
#14PI
#11
· #14PI
#11-#14P
1111·1114P
_
___
I
I
I
•
I
I
.I
I
I
;
I
;
1
,
1
1
:
1
I
I
I
I
I
_I
I
I
Page 15

f--:
L .
~.';.-""--~ --~
~c
:;.:
-
~_,.._
l,.l'::_.;.;.~~·
....
~.~~ ~cl-'
... _ ••
_ _ .-_ - -
"1-
:;;
..
-
::.,2-
~·:f·.:·
--
, , .
-~ • ....:...-~ -~-
-
-;,;
:;_;;:~
7«m·rt-~
--
.... ~ ..............
--c;;~;RSicm
• _
-....;..__
..._
_...-
-c~
HA~T
;1"111;"
..;..-~...,......-
~--;f~~~
~---=
-~-~;
::;.~·
:;-
~-,·
:.;.
__ .
.........,.
.
'"~"
-;;
;:.
.
'~[l
r:
-
-~-;,..;.
~~r·':i7'~
..
~--,J.J.~:-'-·-
~~:J~I'".
~~
-j
1
....
-
':"
:-
I
MOD
EL
: CLASS
:
.fl!!l!!
L-
1
I ZJ1414·12 QP I
I 064P 1/
1
ZJ141
: 032P ,
1
1 ZJ1
1
:
ZJ1414-12A 03
I
..-
I I
..
----
1-
- - - - il
I I
I I
~
-----1---1-------->·--
1 I
I I
'--
---
I I
I I
I ·
I I
I I
I I
I I
!.
- -
N 048P 3/16" M
. -
4-12NPL I 064P
ZJ
.414·13 · _ . _
414
·04A 032P
ZJ1414·04 064P
ZJ1414
----
!--'-'
--
-12 064P 1/4"
--
1-
--
1-
--\--
-----
-
k--
wm
SUB- NE
AAJt~~
· -
064P
2P
-I-
-
I-
--+------
·-
I-
EDL
E NEEDLE
GAUGE
m~
4.
1/4
" _ M_
114·1f8.118
114-118·1f8.1/4"
1/4-116·118·114''
· .
· I
·11
1/4
" M9 213
114"
fJ!<S>
NEEDLE
4"
HOLDER
fHtl ttt.lt Jt.*'l>r
9012
M9112
9112
M9113
M
9113
M9213
M9113
M921
-l
--r--
--·-
PLATE
--
E92
E9312
E9112
E9113
E9213
E9113
E9213
E9113
3
E9213
-+---
r-
--
-f---
·-
1--
r-
- - -
----
--
- -
----
----
•t;
FEED PRESS
DOG
·-
~·--
12 D9012
09312
_ _ 09_1_12_1 P
09113 ?3113
09213
09113
_09_
2_13
D9113 P9113
09213
r---
4-
---1-----+----~--,~--~
'---
1-
· - '
----
FOOT
Rilltil
1--
P92
P9312
9512B
P9213
P9113
--·--·--
_ P9213
P9213
--
- -
----
ER
12
·
-1---
/
RETAINER
HOLDER
uatllil
--
R90
R9112
R9112
R9113
R9213
R9113
R9213
R9113
R9213
--
~
LOOP
~tt
-
~
·--
12
VE51
V£51 VE49
--
....'i..E_S
VE5
VE51
VE51"4
....;..c:_
~-51_"4_
VE51'6 VE49
VE51
c..._
L..---------'--
, I
!~
ER NEED
1_ V
1P
'6
LE
LOOPER
GUARD HOlDER BRACK
!Pi'l
f1
1;1ml!
1-
VE49 L9012
- -
E49
VE49
VE49
VE49 L9002"4
VE49
L9112
L9112
L9113
1..9213
--
L0002"4
1..9002'6
1..9002'6
--
--
--
---
----
-·------- --·--J
t~P
LOOPER N
~»=
VE1
1P
VE11P
VE
11P
VI..
tiP
VE11P
-
VE11Q
------.
VE11Q
VF11Q
VE11Q
--'-
·-
I!
EEDLE
ET
Uo113 :
tl :
1--·-'
/11
1·
n14
1111
·111
#11·_#1
#11· #14:
1111·1114
#11· #14
1111·
#14
#11·111
#11-#14
--
._,
___
4 I
_4
4
I
1
1
1
1
1
1
I
.
I
Page 16

~-
' -
~
'
i
----
-
--
-- - - -
---.
--
--_,
'
'
'
'
-
·13·
• . I
--
--
-
--
-
--
--
-
- I
-----·
Page 17

~---------- -
1 - -
1
---
- -
---
--
-----
-
--
---
-
---
- - - -
---
- - -
--
-
. 14.
Page 18

-- ----
--- ---
- - - - -
--- -
---
-------
-
----
--
-- ---
-·,
I
-
--
---
----
-
--
----
-
----------
--
-- --- - _,
- I
-
---
--- ---
-----
-
----
-- -------- -
- 15 -
----
-- --
- - - - - --- ---
_,
Page 19

Ol
r-·-------------
---T--
"
...
]
wu-c
----
-,
~
Pol
•)l
Page 20

I
I
I
---
- - J
-
--..J
'
0
0
'
- - - - g
- - - - 0
---
--
-
---
. 17.
·- - -
_,
Page 21

,.- -- --
---T-
1
I
------------------
VK1
8P
SM•
--
-,
l l
-00
.
--·-
VK(1)
..-
--:--
ORO!
VK0
4
~~
I
I
...
-- -.-~-·~
--
KG
( n 1
-
,
04
...
"r
5.11
431
~4
8
'¥1(0
4P
IIXI
OP
11
)
Page 22

- - -
--------
....
....
-
lliloleU.••
-
---
~
,.
--
_.
l
--------,-
- - I
0
-
- - -
---
---
-
--
- I
-------
-- --·
I •
I
-
--------------------~----
-
--
- - -
- - - - - - - - - - - - - - - II
I
--
-----
-
-- -- ---
-
19-
-
_____________ ;
--
I
Page 23

r--
'
I
I
------
-
---
-
--
~-------
1
I
1..
---
-
---
-
20-
Page 24

-----------------------------
------------------
-----1
I
--------------------------------------
•
21
•
--- ------~
Page 25

~---------
1
.
d
~-----
1
I
L------
--
------
------
--
-
-
22-
Page 26

w
"'
PARTS.a.lsT
~R
vcl.o(a)
o
RouP
VCL.Oi•
(VQ.
OI!IP.Q
~T I V
>J
I
Ct.
l/112
7~
VO. l~lll
ll) -~
~
'\
\
~
_
-----------------------------------------------------------------------
I
I
I
Page 27

 Loading...