

Page 1
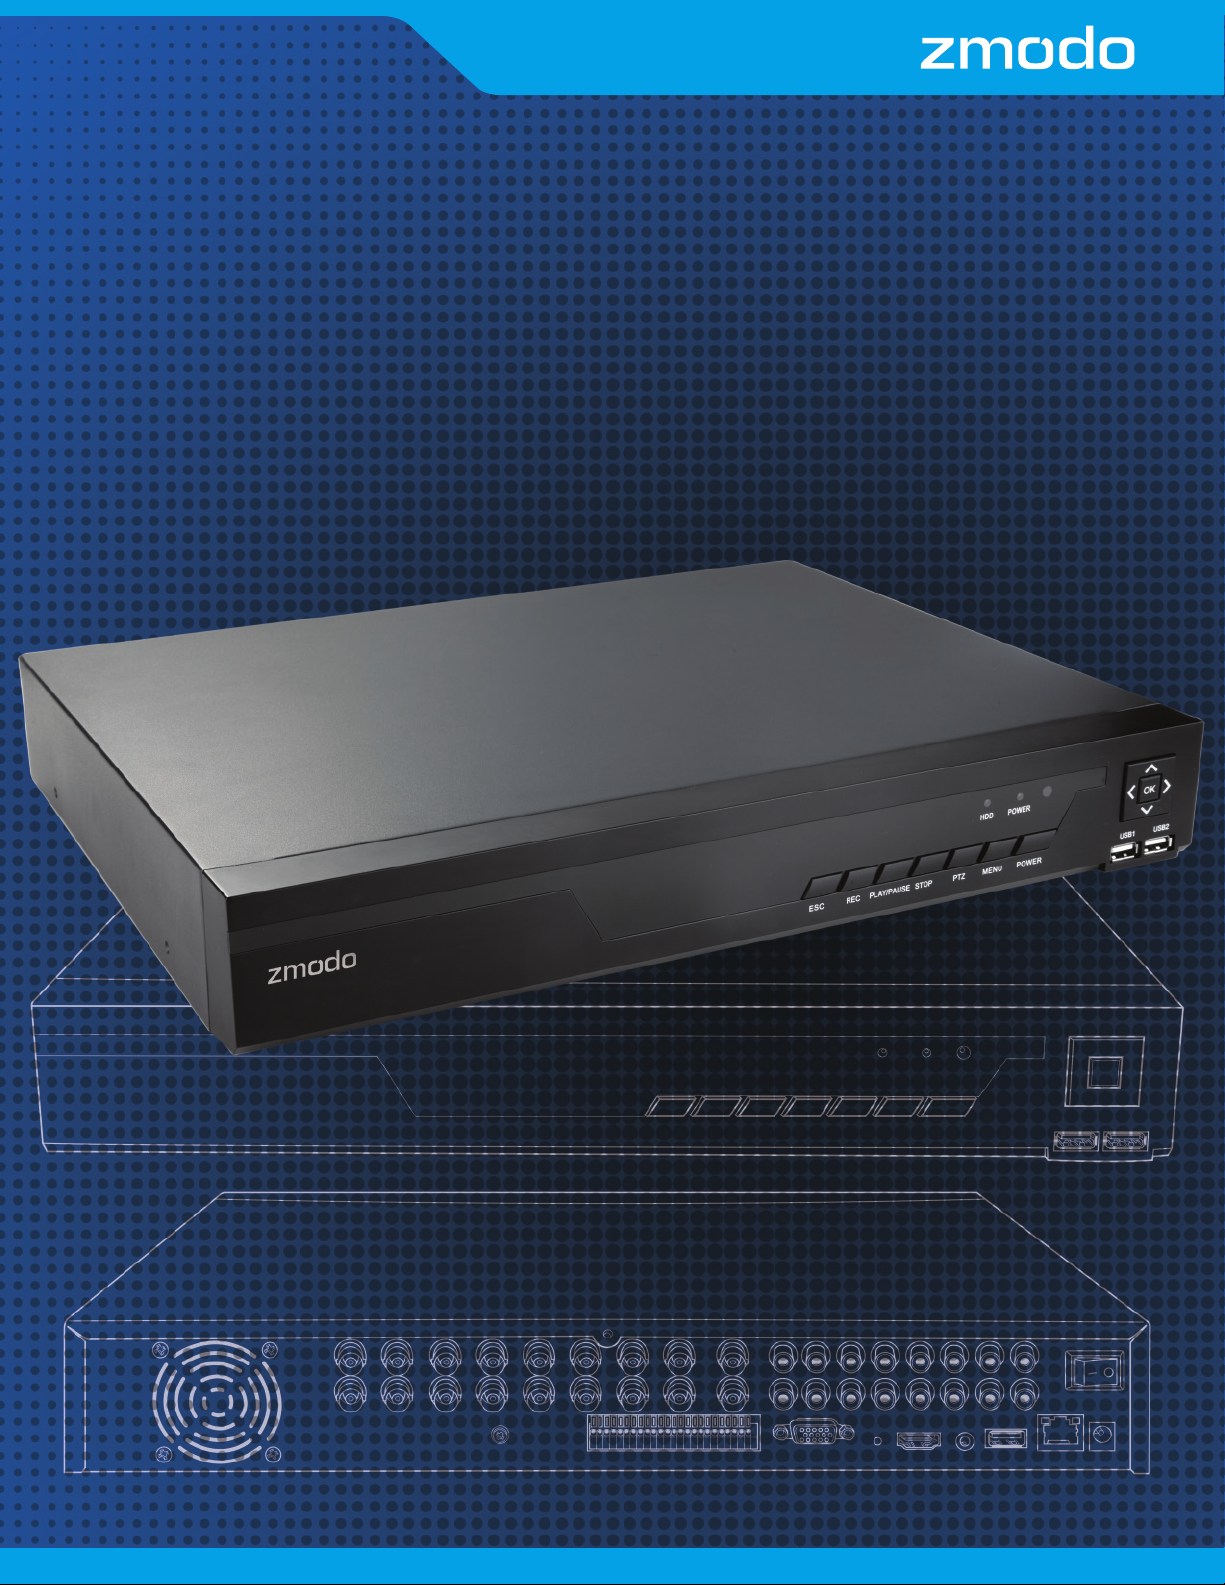
960H DVR16-channel
Digital Video Recorder for Security Surveillance
User manual
Model Number: ZMD-DT-SJN6
Page 2

1 Before using this product ....................................................................... 1.1
1.1 Understanding the manual .............................................................................................. 1.1
How this manual is organized ......................................................................................... 1.1
Manual Conventions .......................................................................................................... 1.2
1.2 Safety Precautions ............................................................................................................. 1.2
1.3 Minimum Requirements ................................................................................................... 1.3
2 Product Introduction .............................................................................. 2.1
2.1 Product Overview ............................................................................................................... 2.1
2.2 Technical Specifi cations .................................................................................................. 2.2
DVR (ZMD-DT-SJN6) .......................................................................................................2.2
2.3 Compatibility ....................................................................................................................... 2.3
2.4 Package Contents .............................................................................................................2.4
2.5 Getting Familiar with your DVR ...................................................................................2.5
Main Functions & Features ............................................................................................. 2.5
Rear Panel ............................................................................................................................2.6
Mouse .....................................................................................................................................2.6
3 First-time Setup ....................................................................................... 3.1
3.1 DVR Installation ................................................................................................................... 3.1
HDD Installation .................................................................................................................. 3.1
Connecting your DVR ......................................................................................................3.6
Connecting the Display ...................................................................................................3.6
Connecting Video & Audio using BNC cables ........................................................ 3.7
Connecting an External Alarm .....................................................................................3.8
3.2 Camera Installation ...........................................................................................................3.8
Connecting the cameras to the DVR .........................................................................3.9
Connecting a PTZ Camera .............................................................................................3.9
Mounting the Camera .................................................................................................... 3.10
3.3 DVR First-Time Startup ...................................................................................................3.11
Startup Guide Explained .................................................................................................3.11
3.4 Home Screen Introduction ............................................................................................3.12
Main Menu ...........................................................................................................................3.12
Hard Drive Notifi cation ...................................................................................................3.12
Event Notifi cation .............................................................................................................3.12
Single View ..........................................................................................................................3.13
Quad View ...........................................................................................................................3.13
8 Channel View ..................................................................................................................3.13
16 Channel View ................................................................................................................3.13
Playback ...............................................................................................................................3.13
Screenshot Gallery ...........................................................................................................3.13
Volume Control .................................................................................................................3.13
Logout / Shutdown ......................................................................................................... 3.13
2
Page 3

4 Using the DVR .......................................................................................... 4.1
4.1 Main Menu Detailed ...........................................................................................................4.1
General Settings .................................................................................................................. 4.1
Video Settings ....................................................................................................................4.8
Network Settings ...............................................................................................................4.11
Event Management ......................................................................................................... 4.14
4.2 Camera Controls .............................................................................................................4.20
Image Setting ...................................................................................................................4.20
Zoom .................................................................................................................................... 4.21
Snapshot ............................................................................................................................. 4.21
Playback ............................................................................................................................. 4.22
PTZ Control ....................................................................................................................... 4.23
4.3 Remote-viewing Setup ................................................................................................. 4.25
4.4 Updating your DVR ........................................................................................................ 4.29
From your Mobile Device (via Zsight) .................................................................... 4.29
From your DVR (via USB) ........................................................................................... 4.29
5 Support .................................................................................................. 5.1
5.1 Troubleshooting .................................................................................................................. 5.1
5.2 Warranty & RMA ................................................................................................................ 5.3
5.3 Zmodo Support ..................................................................................................................5.6
3
Page 4

Section 1 • Before Using this Product
1.1 How this manual is organized
This manual is specifi cally organized to provide comprehensive instructions for full
setup and basic operation of your DVR when read front-to-back. The contents of the
manual are conveniently organized for quick reference after you have read through the
entire manual. For further instructions, please visit our knowledge base at
http://kb.zmodo.com/ or our website at http://www.zmodo.com/support-software.
Chapter 1: Before using this product...
This chapter contains important information prior to reading the manual and installing
the system. It overviews the manual purpose and conventions to aid in installation, and
covers minimum system requirements to ensure successful setup and use. It is essential
that you read this chapter before reading the manual and installing the system.
Chapter 2: Product Introduction
This chapter describes the package contents and overviews some of the features and
capabilities of the DVR system.
Chapter 3: First-time Setup
This chapter covers the initial setup procedures of the DVR. This includes hardware
setup procedures such as DVR wiring, HDD installation, alarm installation and camera
installation. It also covers basic setup procedures to confi gure your DVR when setting
it up for the fi rst time.
Chapter 4: Using the DVR
The DVR’s full features can be utilized through the new and revolutionary user-friendly
menu system. This chapter covers detailed instructions on the function and navigation
of each menu element, use of the camera control interface, live remote-viewing
setup, and fi rmware update procedures for the DVR. Refer to this chapter for specifi c
instructions for advanced functions of the DVR.
Chapter 5: Support
This chapter covers common troubleshooting issues that can be easily resolved,
warranty information, and information for Zmodo support and other resources. Please
refer to this chapter before calling technical support.
1.1 Before Using this Product
Page 5

Manual Conventions
This manual uses several symbols, typographies and abbreviations that carry specifi c
defi nitions. In order to properly follow instructions, please familiarize yourself with the
following conventions.
[Text] Text enclosed in square [brackets] indicates a menu or an item
to select.
IMPORTANT: Denotes information or instructions that you MUST follow to
complete instructions.
NOTE: Denotes additional information or tips to aid you in completing
instructions.
DVR Acronym for digital video recorder. This is the main control
component of your system.
HDD Acronym for hard disk drive. This is the storage component of
your DVR system.
PTZ Acronym for Pan-Tilt-Zoom. This usually refers to a camera
with pan-tilt-zoom functionality. Also common are
PT cameras (pan-tilt).
1.2 Safety Precautions
Please read and follow these instructions for your safety while operating and setting up
the equipment.
• Use only the provided power adapter to power the DVR.
• Make sure that the rear power switch is o before unplugging or plugging the
DVR.
• Do not insert any objects into the DVR case or openings.
• Do not place heavy objects on top of the DVR.
• Keep the DVR surfaces clean and dry.
• Do not operate in wet or dusty environments.
• Keep the DVR away from all fl uids.
• Operate and keep the DVR in temperatures between 14 °F~122 °F.
• Do not install the DVR near any heat sources and avoid direct sunlight.
• Make sure there is good air circulation where the DVR is installed.
• Install the DVR in a stable environment.
• Handle the DVR carefully and avoid collisions and strong falls.
1.2Before Using this Product
Page 6
1.3 Minimum Requirements
Minimum requirements must be met for full and proper functionality of the DVR.
• Compatible display with corresponding cables. Please see 2.3 Compatibility
for more information.
• A wireless router with one empty port (for remote viewing).
• A physical internet connection such as Cable / DSL / Fiber—no satellite, 3G/4G
hotspots, or city-wide wireless (for remote viewing).
• A minimum upload speed of >256kbps at the location of the DVR (for remote
viewing).
• Android (v.2.2 and up) or iOS (v.6 and up) mobile device (for remote viewing).
Section 2 • Product Introduction
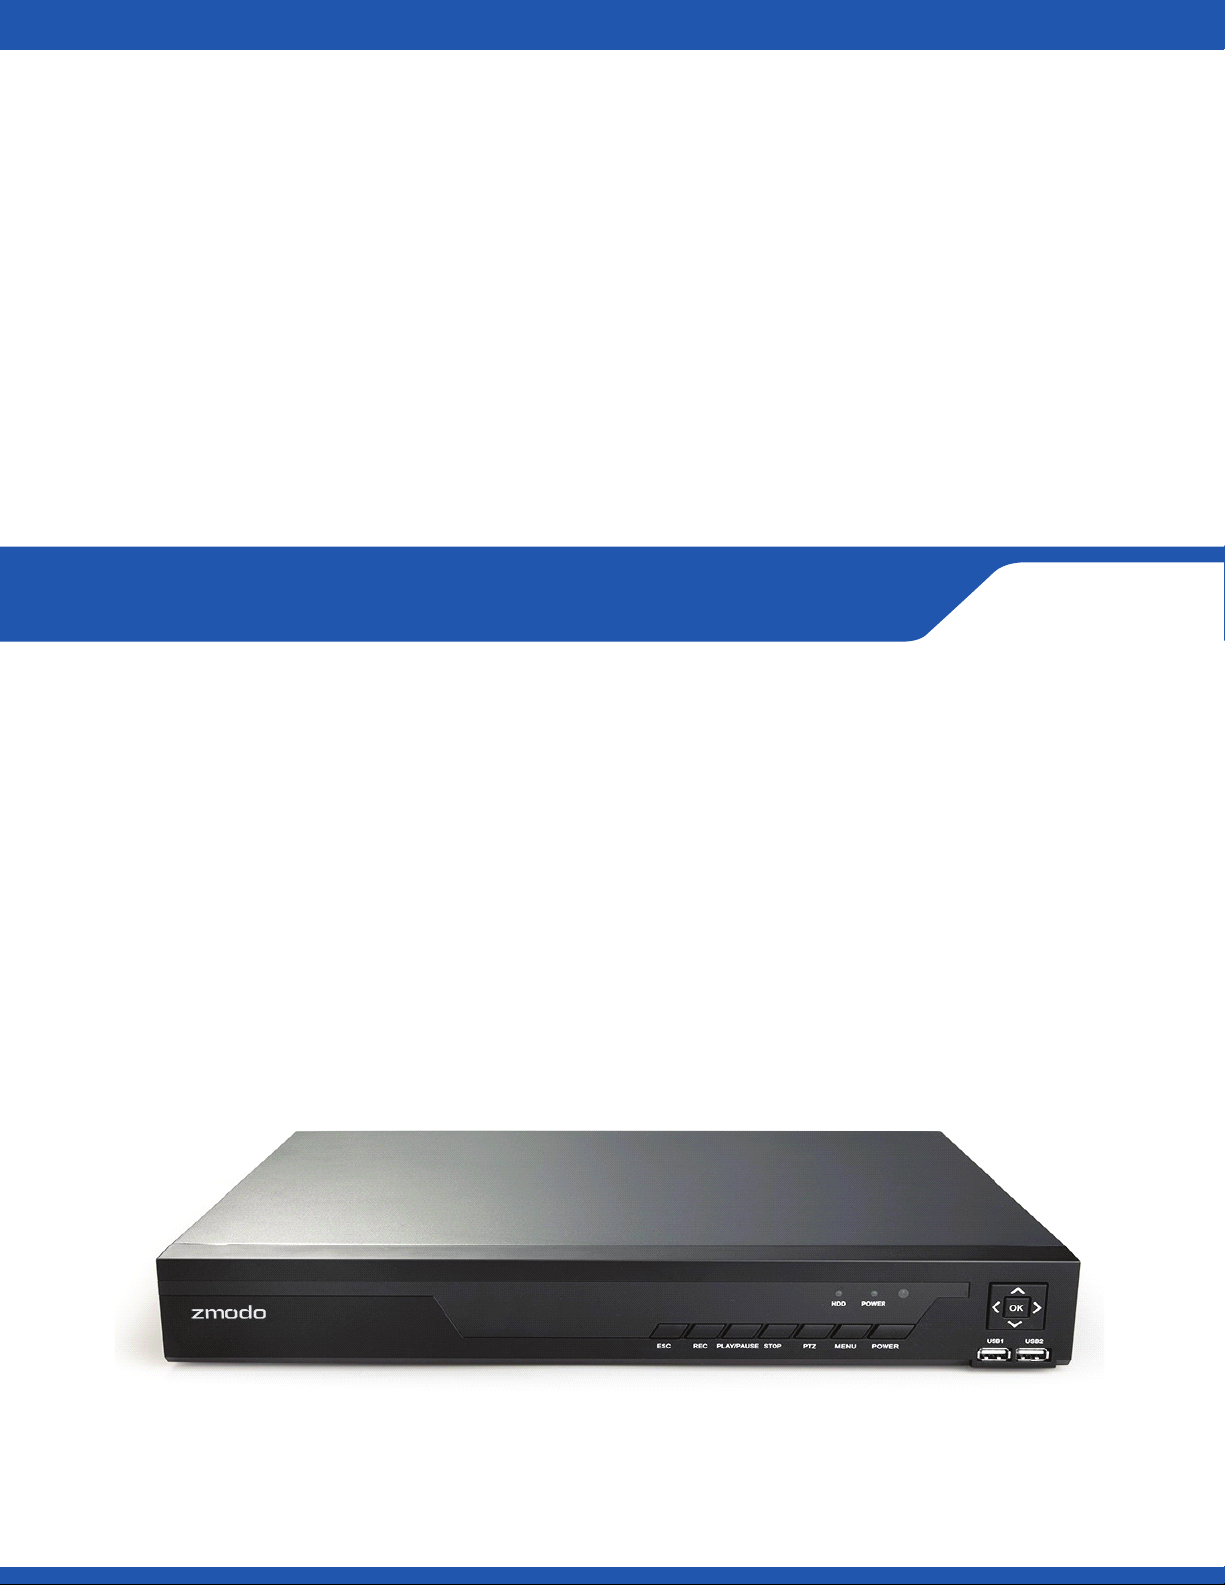
2.1 Product Overview
This Zmodo DVR system is specially designed to safeguard your home or business by
providing cutting-edge video surveillance and monitoring. Instant email notifi cations
and multiple live streaming and recording options make your DVR available and
accessible anywhere at anytime.
Using next generation plug-and-play technology and a revolutionized user interface,
this system delivers a revolutionarily user-friendly experience that is accessible to
anybody. Achieving security and peace of mind has never been easier. We provide top
products at low prices with setup procedures that anybody can follow. Our goal is to
bring security and safety to all people; making your security our priority.
2.1 Product Introduction
Page 7

2.2 Technical Specifi cations
DVR (ZMD-DT-SJN6)
Video
Input (Analog) 16 channel BNC
Video Output • HDMI x1 (1920x1080@60Hz)
• VGA x1 (1920x1080@60Hz, 1280x1024@60Hz,
1024x768@60Hz), 1280x720@60Hz, 1366x768@60Hz
• BNC x1 (PAL: 704x576, NTSC: 704x480)
Compression H.264
Multiple Stream Yes
Recording Resolution • 960H: 12 frames/sec (NTSC) / 12 frames/sec (PAL)
• D1: 20 frames/sec (NTSC) / 20 frames/sec (PAL)
• HD1: 20 frames/sec (NTSC) / 20 frames/sec (PAL)
• CIF: 30 frames/sec (NTSC) / 25 frames/sec (PAL)
Audio
Input 16 channel RCA + 1 channel MIC 3.5mm
Output 1 channel BNC
Compression G.711
Storage & Reviewing
Playback Up to 4 channels simultaneously
Functions Fast forward / Rewind / Slow play / Digital Zoom
Record Modes Continuous (Normal or Intelligent) / Motion Detected /
External Alarm Triggering
HDD Support 3 SATA (3.5”) up to 4TB each
Backup External USB Device
Network
Network Interface 1 RJ45 10 / 100M
Smart Phone Android (v.2.2 and up) or iOS (v.6 and up)
Protocol Support TCP/IP, UDP, DNS/DDNS, SMPT, UPNP, DHCP, HTTP, P2P, etc.
2.2Product Introduction
Page 8

General
Application Support Remote confi guration, video browsing, local recording,
local and remote playback
Motion Detection Yes
Alarm Notifi cation Yes
Operating System Linux-based
Power Supply DC 12V, 5A
Power consumption <12W (without HDD)
Serial Interface RS-485 (PTZ Control)
Operating Temperature 14 °F to 122 °F (-10 °C to 50 °C)
Dimensions 15.7” (W) x 12.2” (D) x 2.28” (H)/400mm (W) x 310 mm
(D) x 58 mm (H)
Weight 5.77lbs (without HDD)
Language Support 11 languages
2.3 Compatibility
This DVR is compatible with all Zmodo BNC surveillance cameras. Cameras can
be purchased at:
recommend that you check under the specifi cations to make sure that the video output
type is “BNC”. IP Network cameras will not be compatible with this system.
This DVR also supports and is compatible with three di erent display options: HDMI,
VGA and BNC. It is compatible with all displays, however some will perform better than
others. For HDMI displays, we recommend that you use the following major brands:
Samsung, Phillips or LG.
http://www.cctvhotdeals.com/. When purchasing cameras, we
2.3 Product Introduction
Page 9
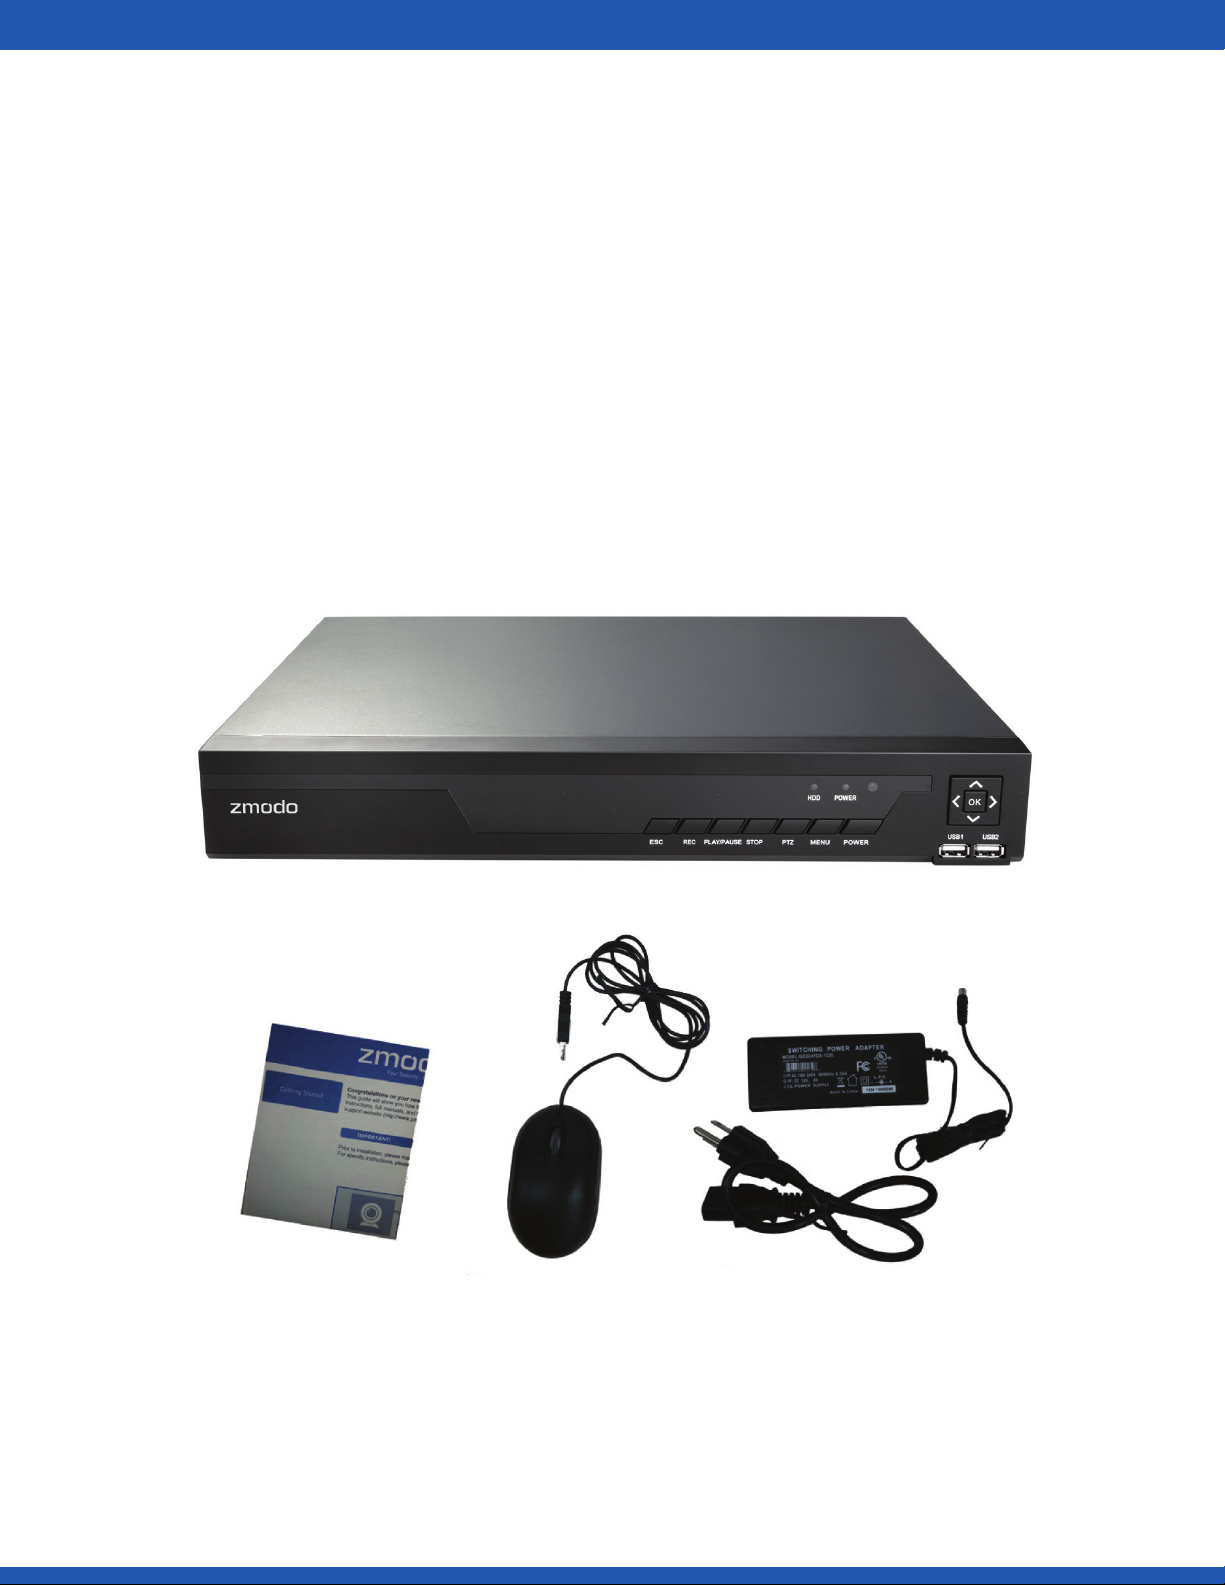
2.4 Package Contents
Before proceeding with any setup procedures, please make
sure that your package includes the following contents:
• 16-Channel Security DVR (ZMD-DT-SJN6)
• USB Mouse
• 12V 5A Power Adapter
• Quick Installation Guide
• Case Screws (not pictured)
2.4Product Introduction
Page 10

x
x
x
x
x
2.5 Getting Familiar with your DVR
Main Functions & Features
Live Remote Viewing
Access your DVR remotely from anywhere in the world on
your Android or iOS mobile device.
Intelligent Recording Mode
Intelligent recording identifi es surveillance footage
triggered by critical events such as motion detection and
alarm triggering and optimizes storage by increasing
recording quality when a critical event occurs.
Multitasking
Users can view, record, playback, backup, live-view and
remotely access the DVR simultaneously from multiple
devices.
Instant Notifi cation & Alarm System
Receive instant email alerts and push notifi cations with
snapshots to your mobile device when motion is detected,
an alarm is triggered, or video loss occurs.
Multi-level, Multi-user management
Di erent user privileges allow you to share video
surveillance without worrying about unpermitted setting
changes.
2.5 Product Introduction
Page 11
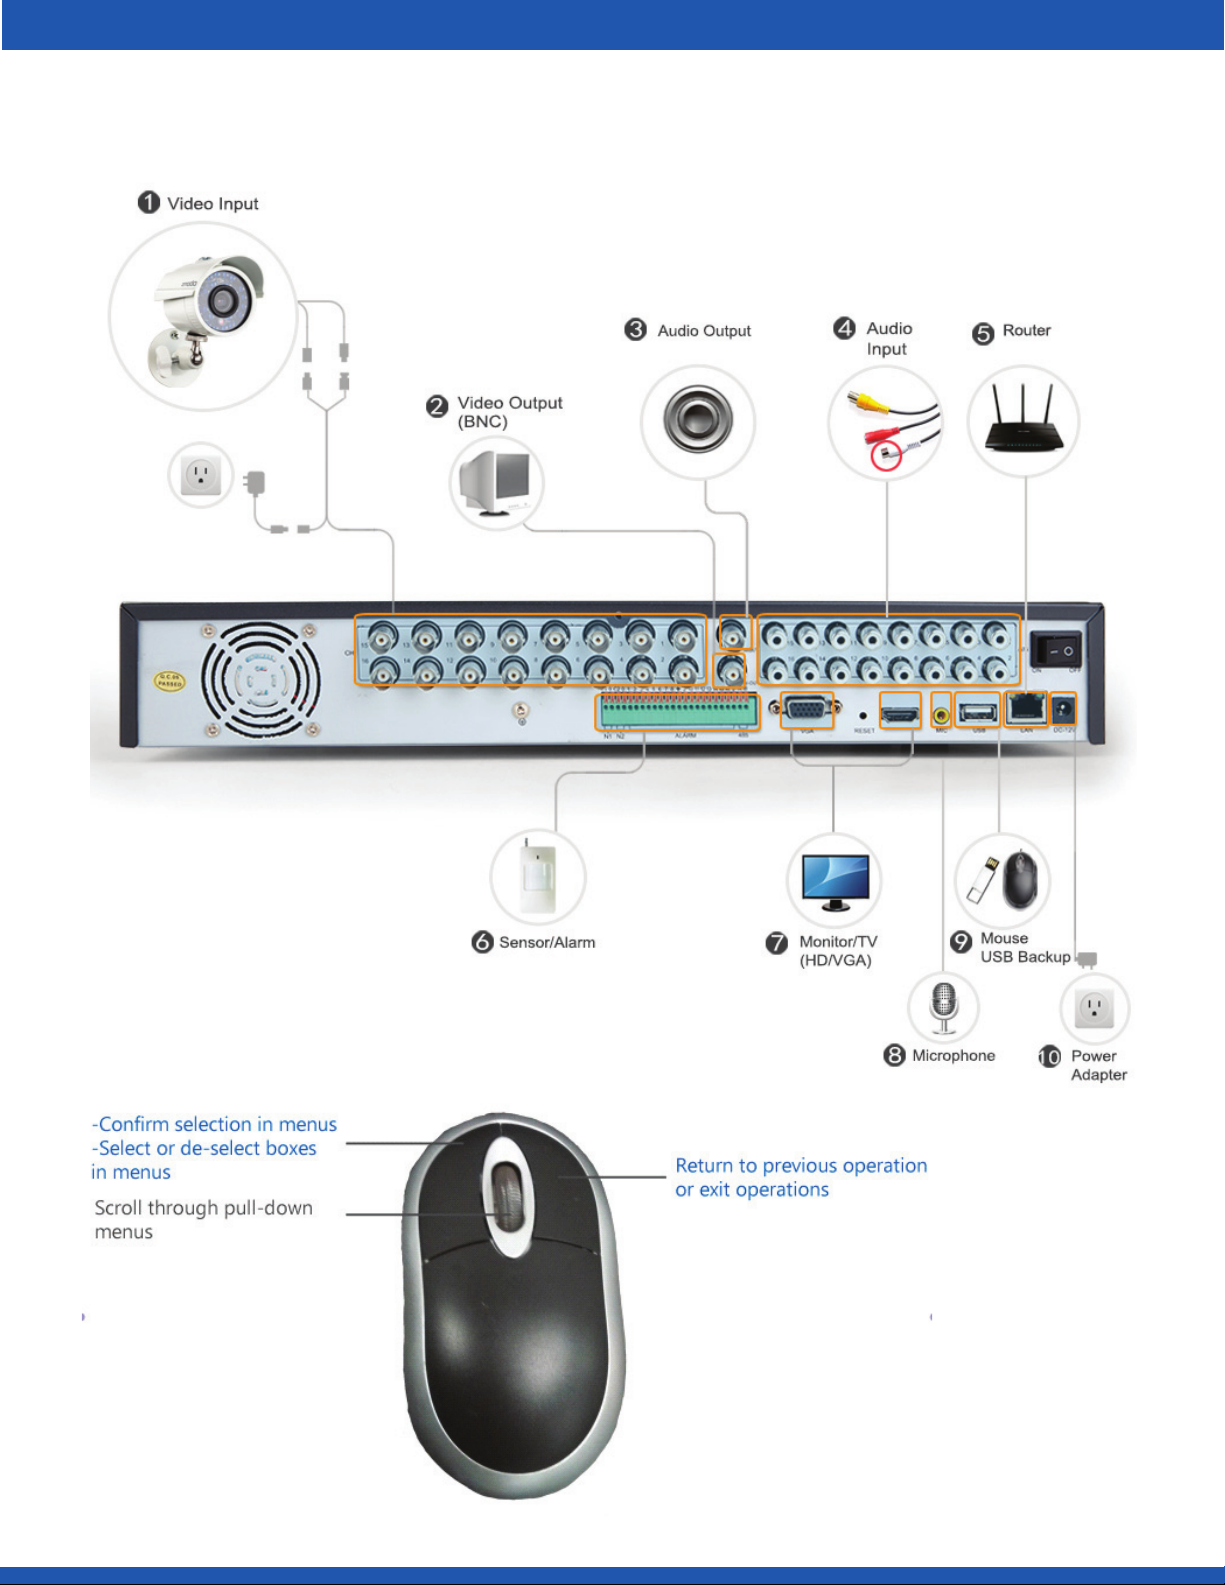
Rear Panel Connection
Mouse
2.6Product Introduction
Page 12
Section 3 • First-time Setup
3.1 DVR Installation & HDD Installation
IMPORTANT: Your system will not be preinstalled with a hard disk drive (HDD) unless
the system was specifi cally purchased with an included HDD. You may install a SATA
HDD between 250GB and 4TB of storage after receiving your system. We recommend
Western Digital Purple hard drives or Seagate Pipeline hard drives that are specifi cally
engineered for use in security camera environments. We also suggest that you make
your purchase from an o cial reseller (such as Newegg.com, Tiger-Direct, and Best
Buy) to ensure the quality of the HDD.
For the following HDD installation instructions, you will need:
1) Your DVR system
2) A SATA Hard Drive (not provided)
3) 4 silver Phillips screws (provided)
4) 7 black Phillips screws (provided)
5) A Phillips screwdriver (not provided)
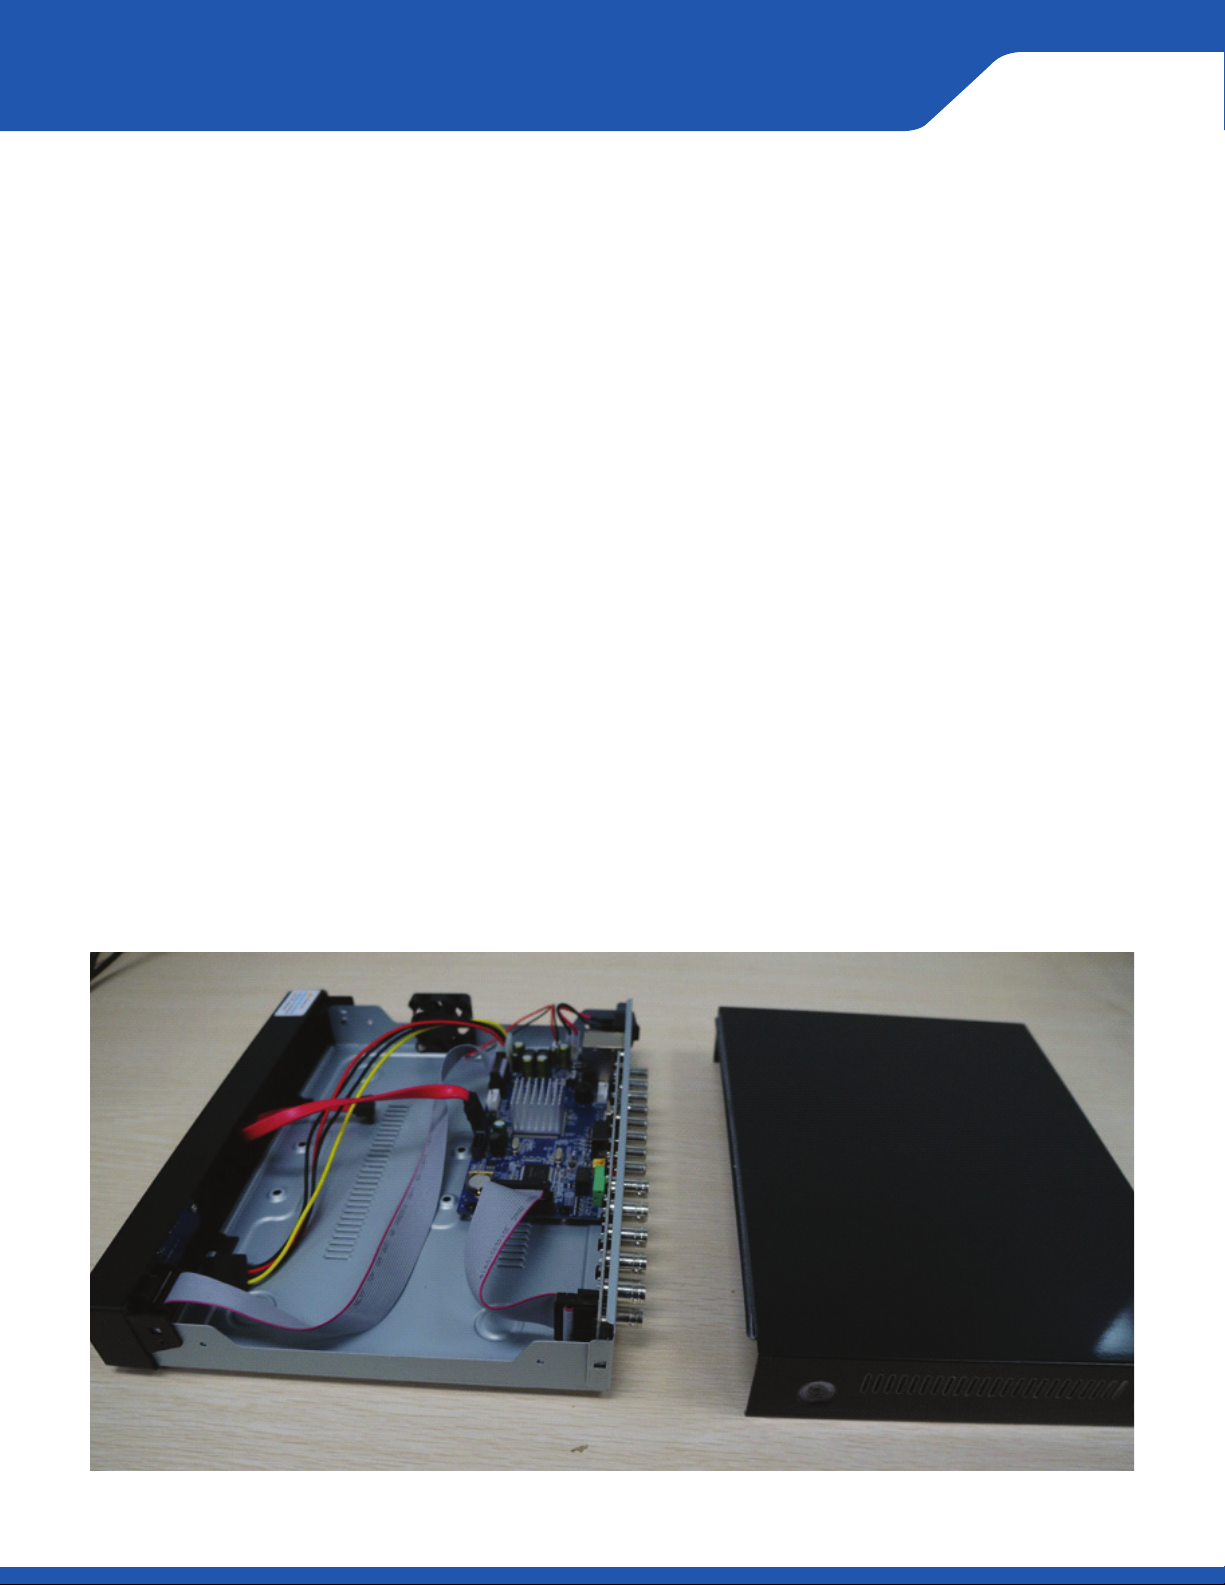
1. Make sure your DVR is unplugged from its power
source and slide the top panel o of the DVR.
3.1 First-time Setup
Page 13
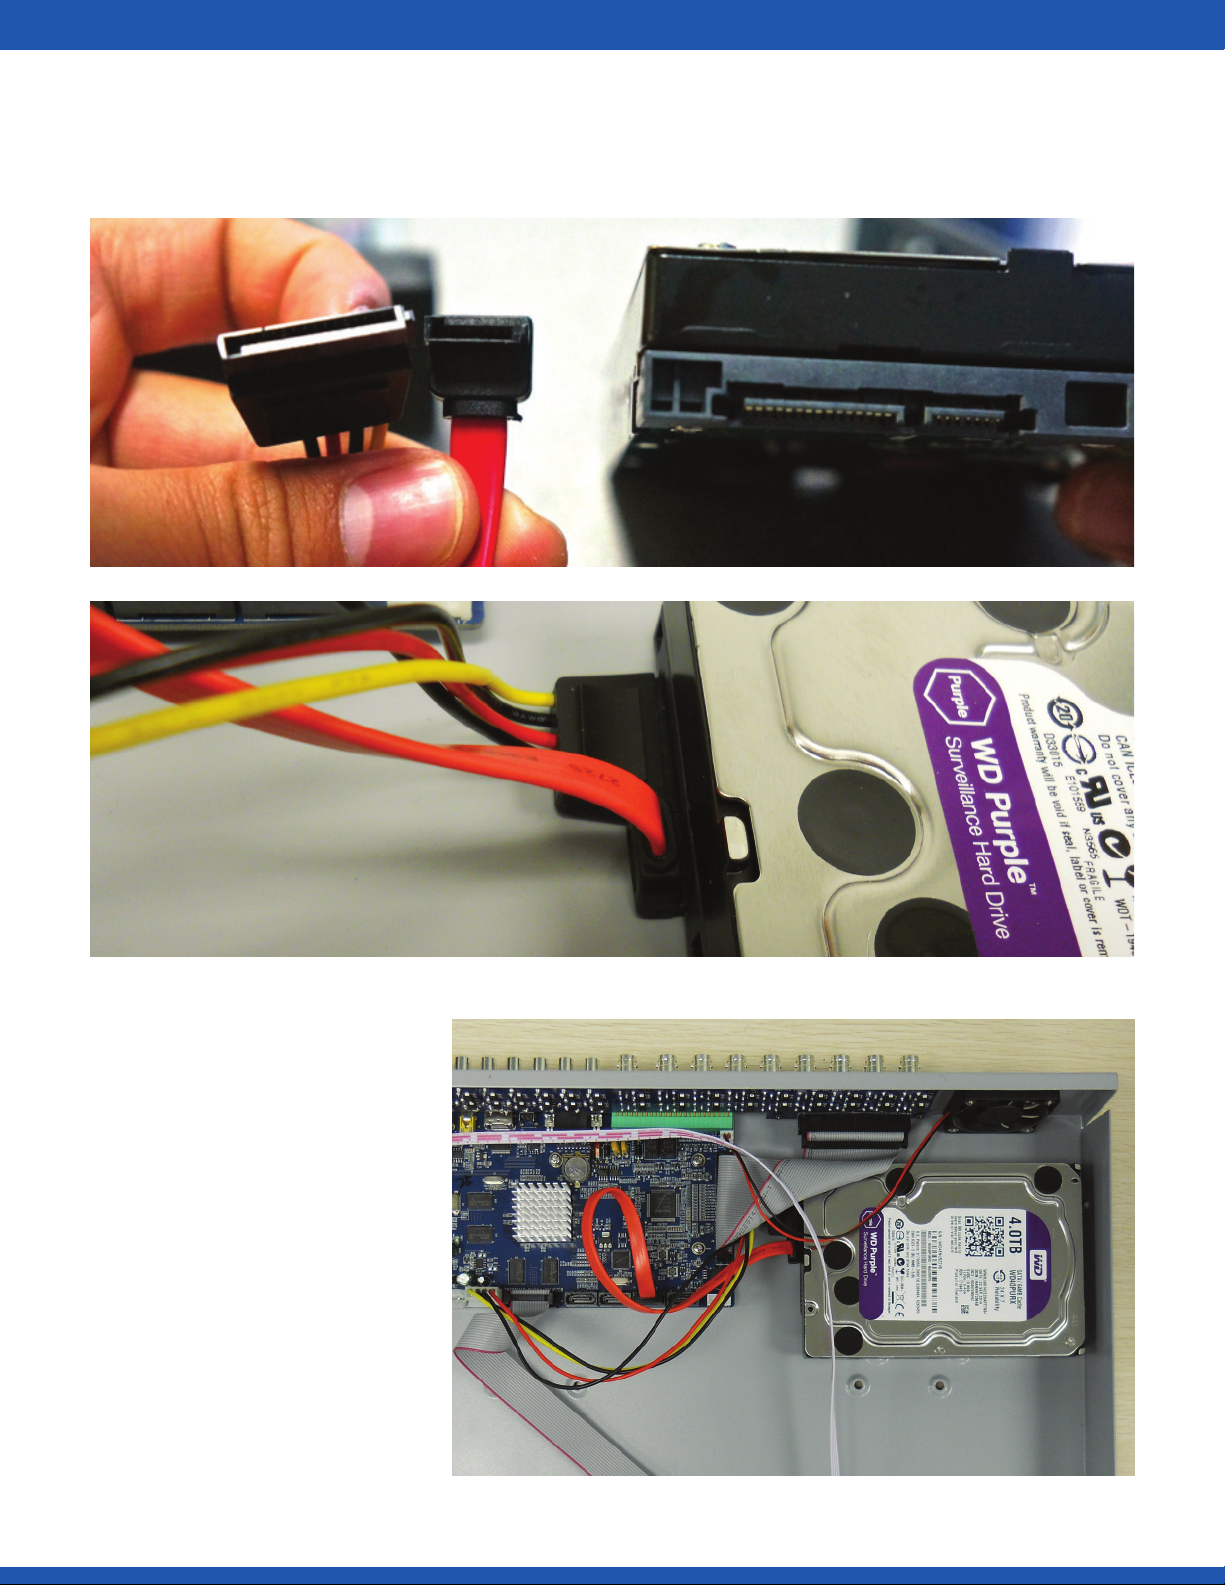
2. Connect the SATA power and data cables from
the DVR to the corresponding ports on your HDD (as
shown):
3. Once connected, place
the HDD into the DVR
with the cables placed as
shown.
sure that the cables do not
come into contact with the
cooling fan!
IMPORTANT: Make
3.2First-time Setup
Page 14
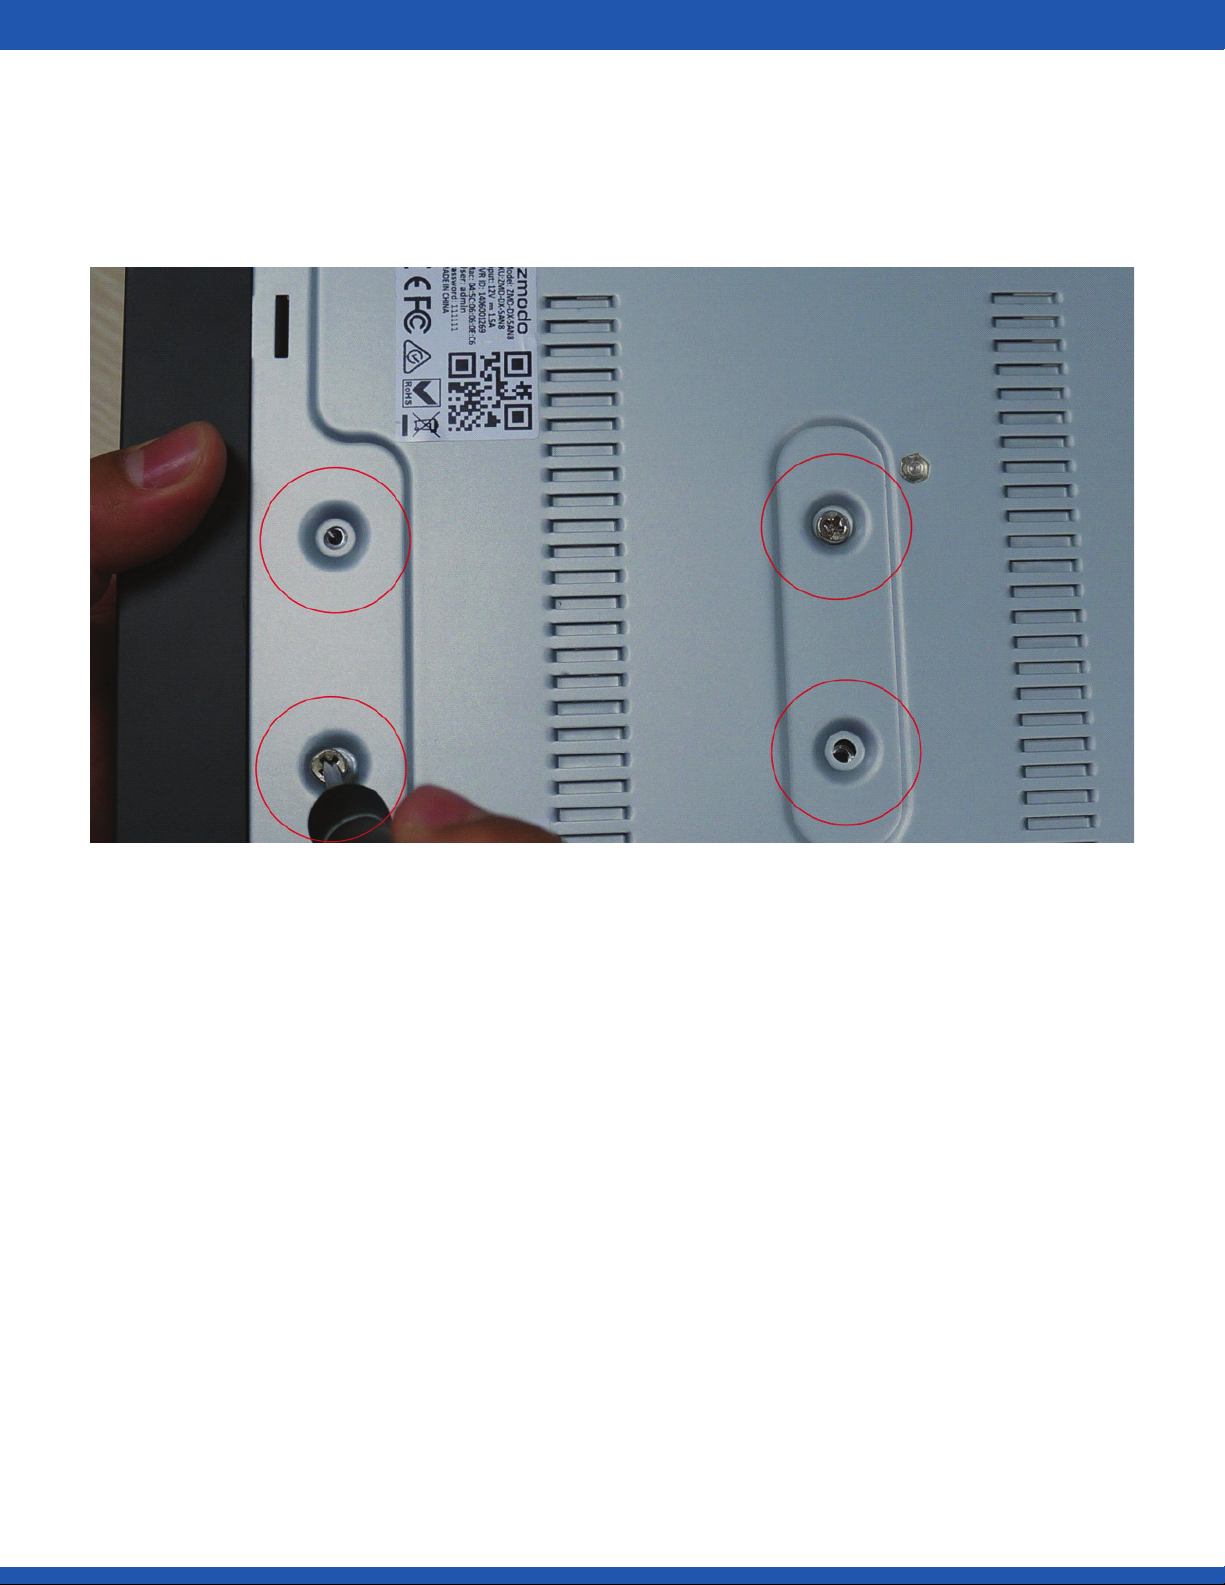
4. Holding the hard drive and the DVR, gently turn it over
and line up the holes on the hard drive with the holes on
the DVR. Using a Phillips screwdriver, screw the provided
screws into the holes.
3.3 First-time Setup
Page 15
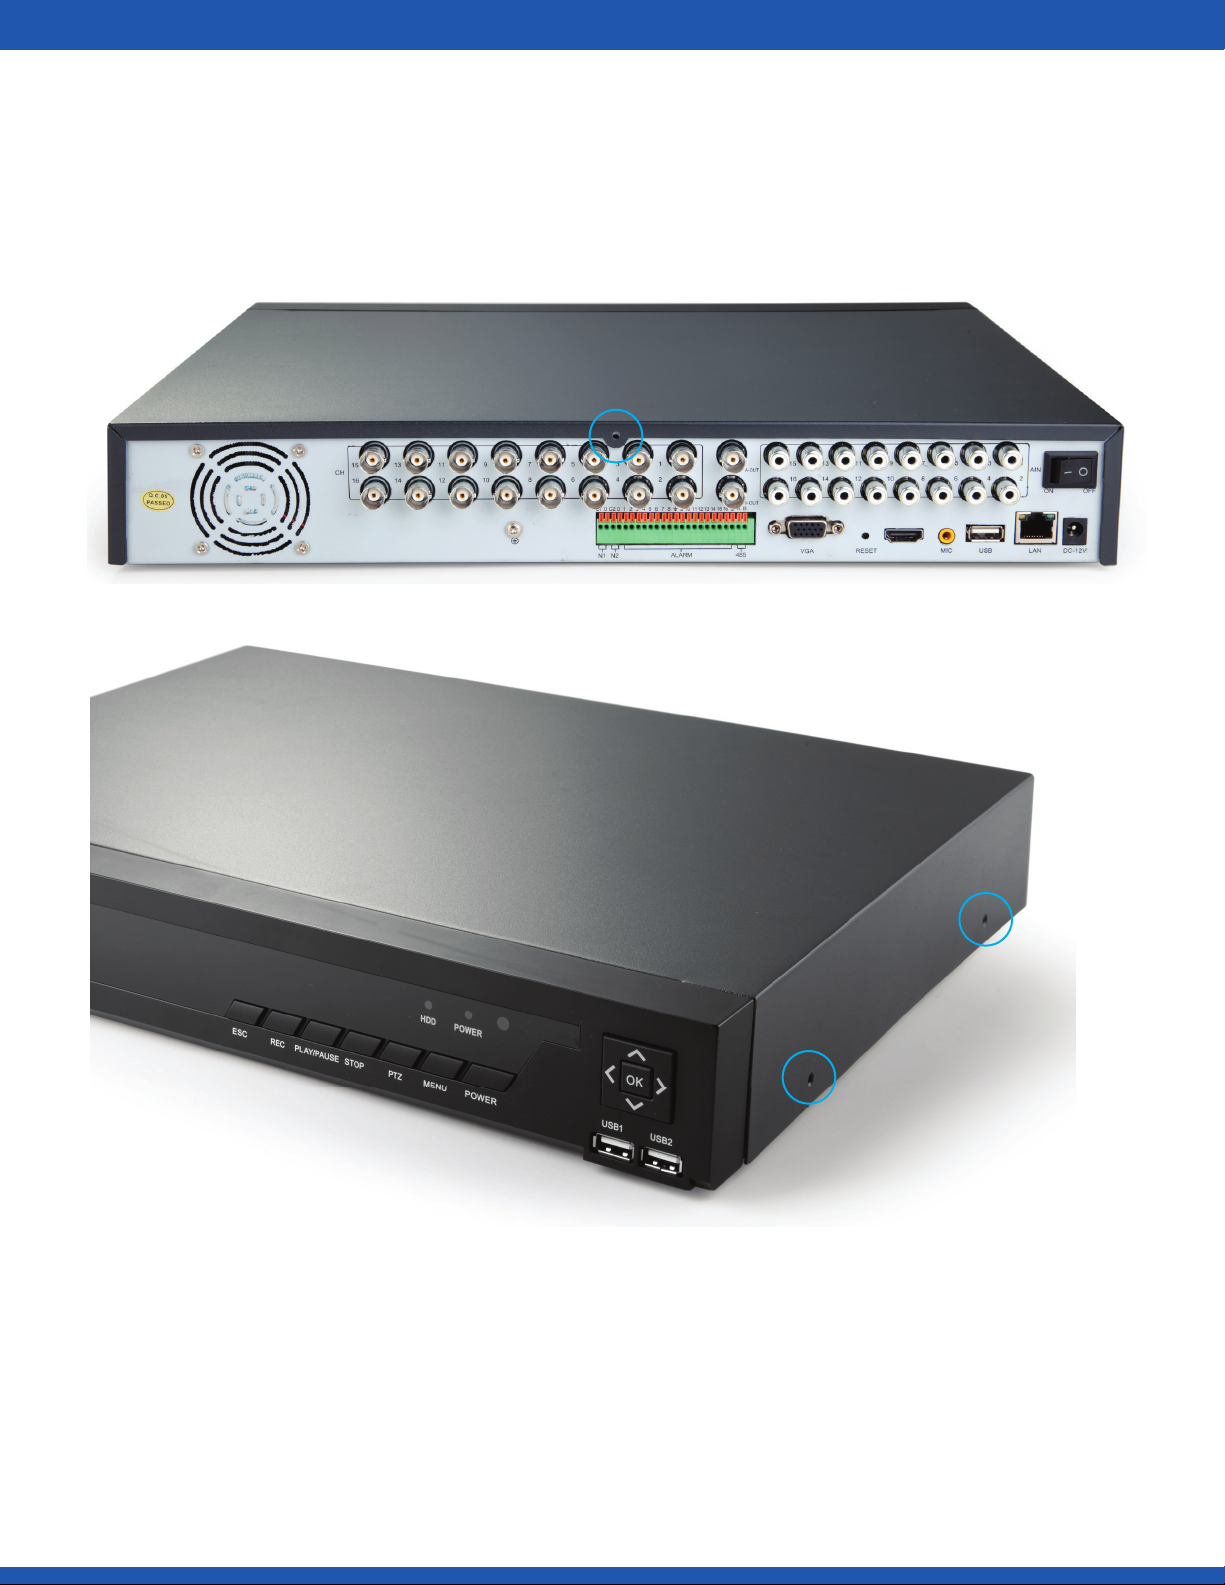
5. Slide the DVR panel back on and locate the 5 black
Phillips screws (found in kit). Apply the screw in the one
hole on the back panel, and the two holes on each of the
sides.
(Both sides)
3.4First-time Setup
Page 16
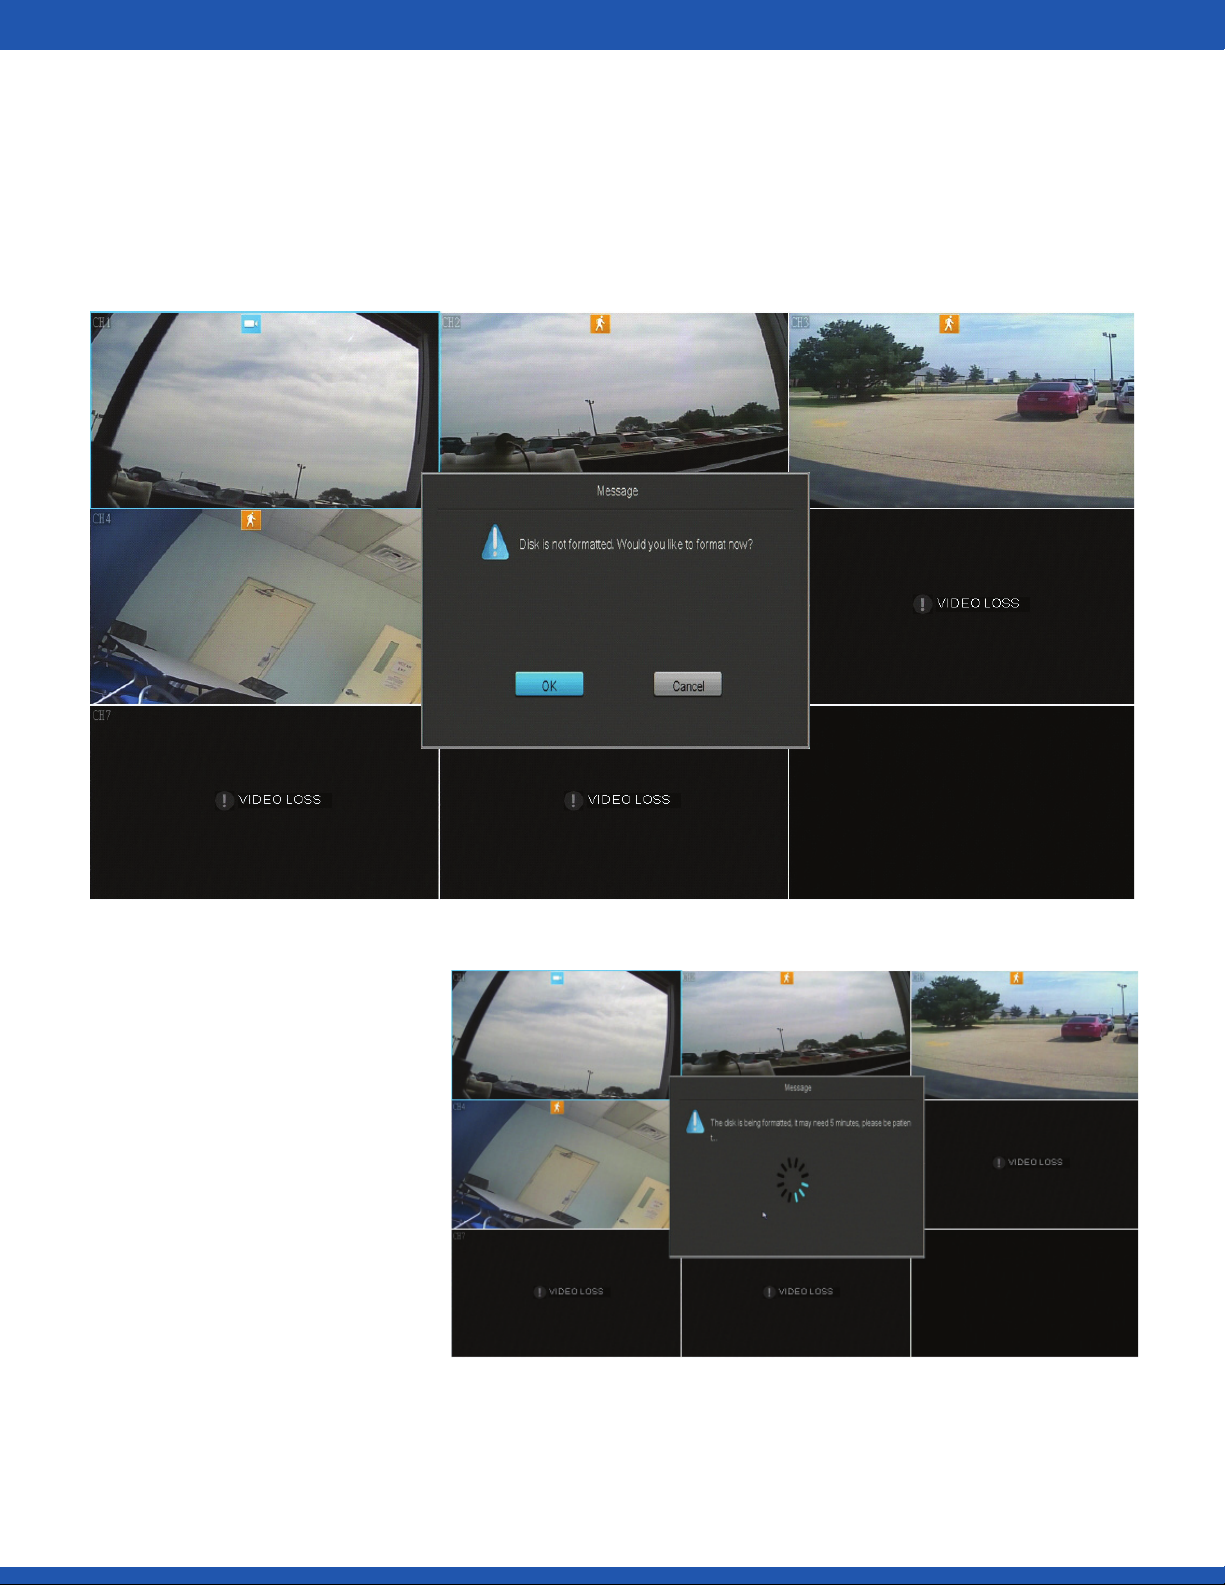
6. When you power on your system, you will see a popup
asking you to format your HDD. Press [OK] and wait
5-10 minutes. NOTE: If you do not see this popup, please
manually format your HDD by going to the Disk Drive
Info page (for more instructions, please refer to 4.1 Main
Menu Detailed).
7. The system will begin
formatting the HDD, and
will automatically reboot
once the formatting is
complete.
3.5 First-time Setup
Page 17
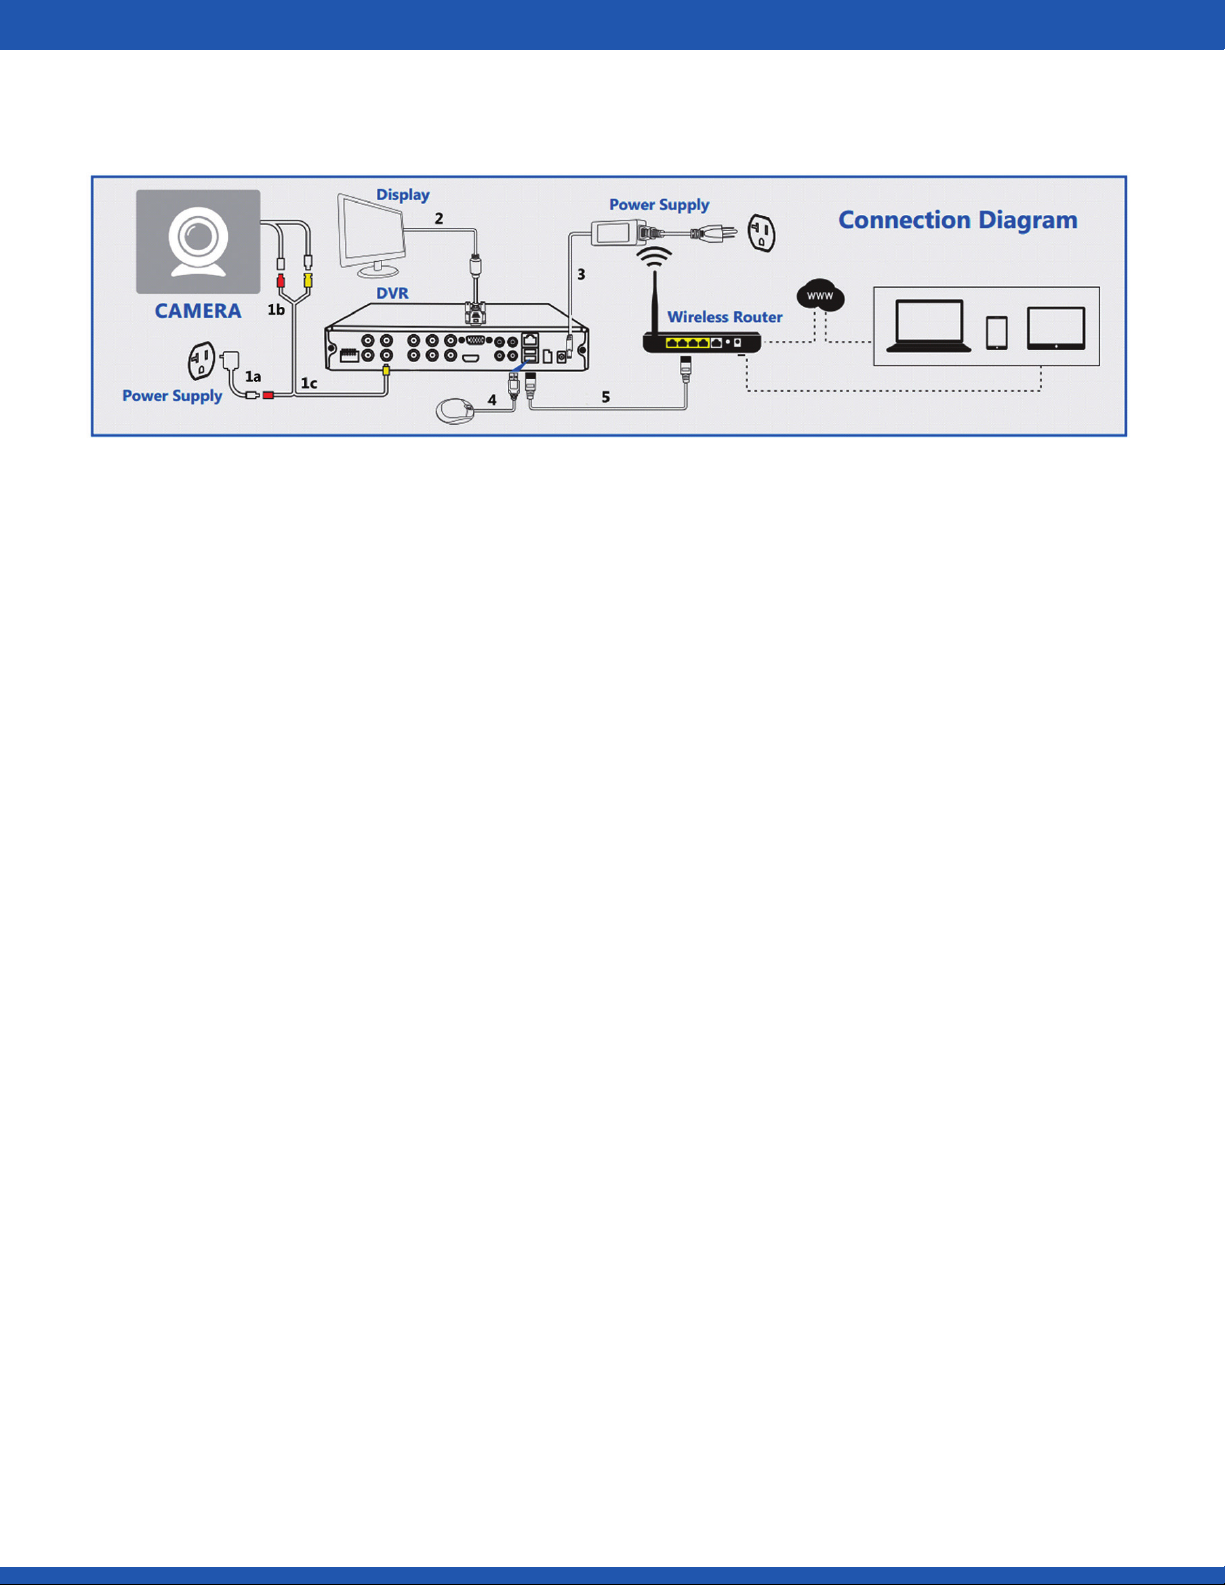
Connecting your DVR
1. Connect your analog cameras directly to the system with the correct cables as
shown. For detailed instruction, please refer to 3.2 Camera Installation.
2. Connect your display to the appropriate display input. For detailed instruction,
please refer to 3.1 DVR Installation – Connecting the Display.
3. Connect your system to a nearby power outlet with the provided power adapter as
shown.
4. Connect your USB mouse to the corresponding input as shown.
5. Connect your DVR system to your wireless router with the provided Ethernet cable
as shown.
Connecting the Display
This DVR can support up to three di erent display options: HDMI, VGA and BNC. The
following steps provide instructions that will ensure that you have a working HDMI or
VGA connection:
1. Make sure that you have the proper equipment. You will need a display and a
corresponding video cable. Monitors will typically support VGA cables, high defi nition
televisions will typically support both VGA and HDMI. You may need to purchase a
cable if you do not have one already.
2. Identify your connection type. If you already have the proper equipment, please
identify the type of connection that you will be using. For HDMI connections, we
recommend that you use one of the following brands: Phillips, LG or Samsung.
3. Connect to the corresponding port. Connect one end of the cable to the
corresponding port on the display, and the other end to the corresponding port in the
rear panel of the DVR.
3.6First-time Setup
Page 18
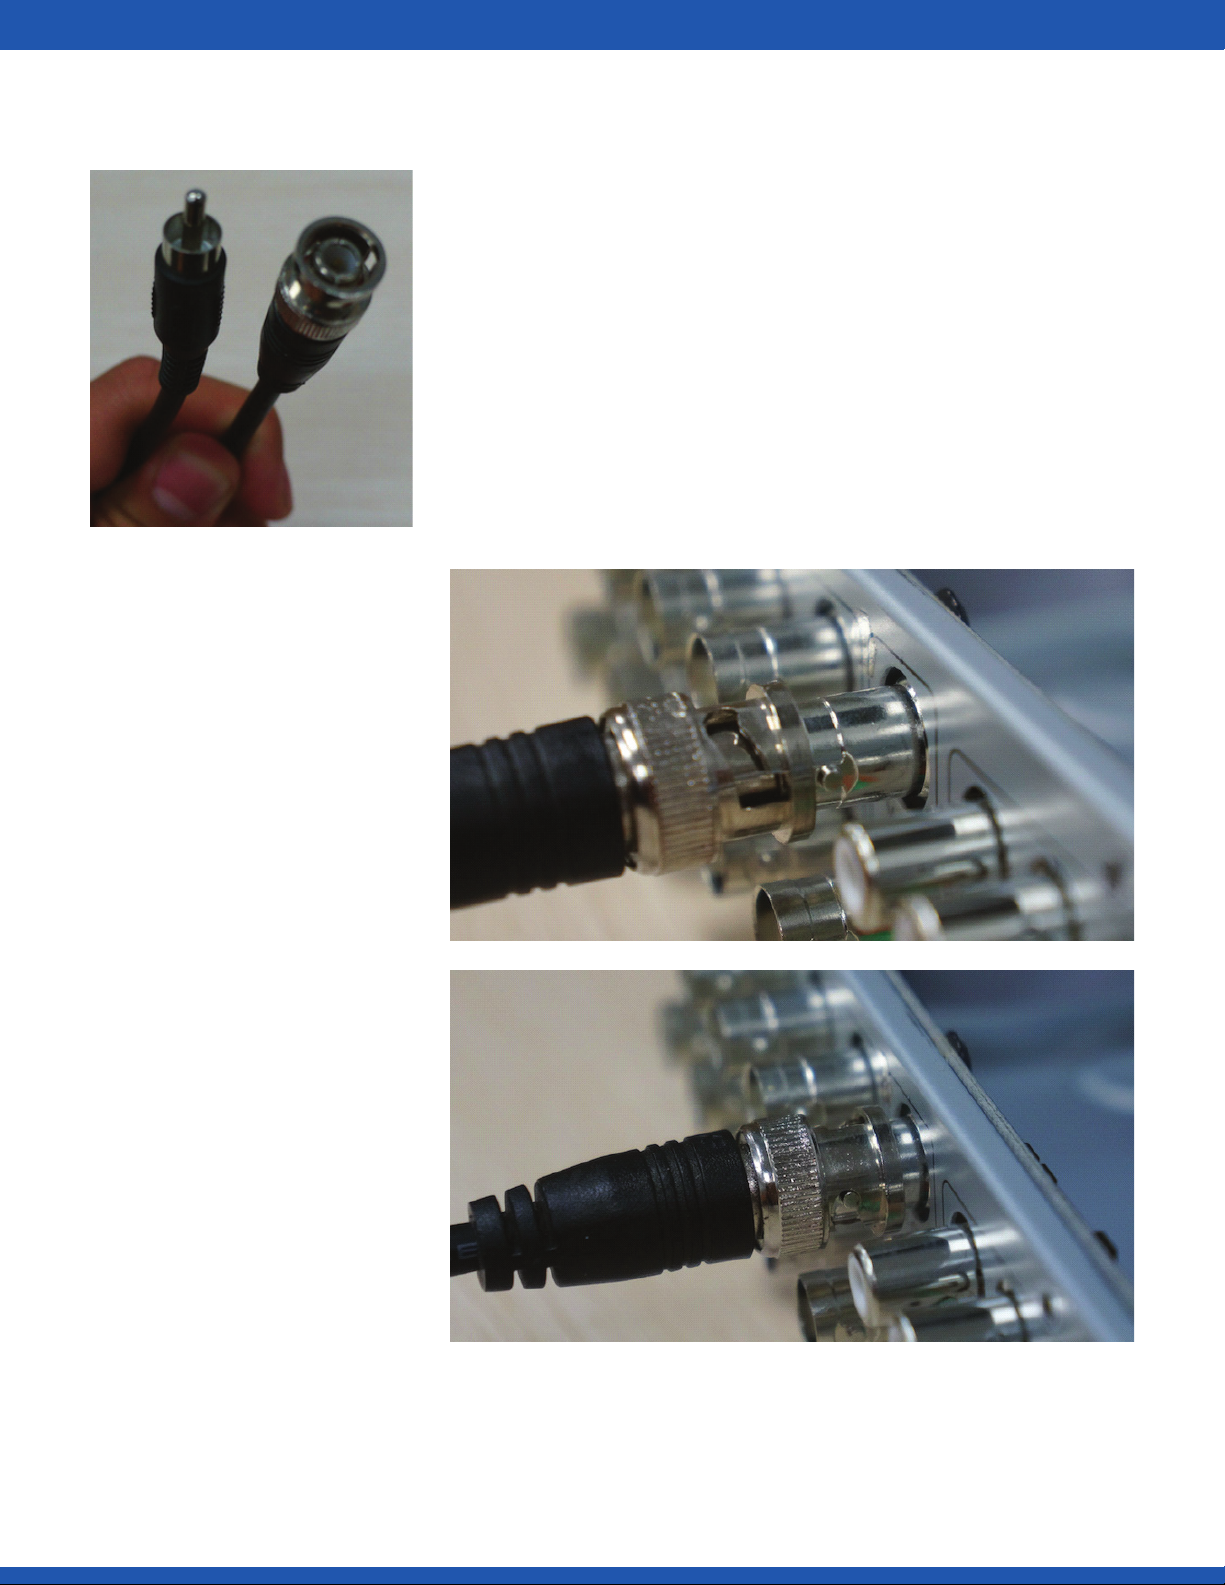
Connecting Video & Audio BNC cables
BNC connections are uncommon with the exception of
some very specifi c applications for it. If you are going
to connect to your display via BNC, you will need a BNC
male to RCA male cable (as shown on the right). If
you want to connect both a video and audio, you will
need two such cables. Please follow the instructions
to successfully connect your display and audio via BNC
connection:
1. On the output BNC
connectors on the rear
panel of your DVR, you
will see two protrusions
(one on each side of the
connector). On the male
BNC end of your cable,
you will see two slots.
Line up the slots with the
protrusions, as shown in
the picture below:
2. Push the connector
in, and twist until the
connection is secure, as
shown:
3. If you are making a video connection, plug in the RCA male end of the cable to the
yellow composite port on your display. If you are making an audio connection, plug in
the RCA male end of the cable to either the white or red ports on your monitor.
3.7 First-time Setup
Page 19

Connecting an External Alarm
NOTE: A large portion of the installation of an alarm will vary based on the type of
alarm. Because of this, the following instructions are not comprehensive, and will have
to be supplemented by specifi c instructions for your desired external alarms/systems.
Please refer to our knowledge base (http://kb.zmodo.com/) for more information.
Prior to installation, please locate the alarm input and output ports on the back panel
of your DVR. The following instructions will show you how to plug in the wires from the
external system to the DVR.
1. Push the orange tab on the alarm port (with your
fi nger nail or pen) in order to open the springloaded connection.
2. With the orange tab pushed in, insert the bare wire
from your alarm about 1/8-1/4 inches into the port.
3. Let go of the orange tab and the port should clamp
onto the cable. Give the wire a light tug to ensure that it
is securely clamped.
3.2 Camera Installation
This DVR system is compatible with all Zmodo analog video cameras, video
and audio cameras, and PTZ cameras and can support up to 16 cameras. Your
connection may vary depending on the specifi c camera purchased.
Quick guide to identifying male and female connectors:
The male connector will generally feature a protrusion
that is housed in the corresponding indentation found
on the female connector. The protrusion in some cases
can also be a pin that is housed inside of the female
component.
3.8First-time Setup
Page 20

Connecting the cameras to the DVR
1. Connect the power adapter to the
outlets.
adapter to a power outlet near the DVR.
In most cases, you will have a 4-port
power splitter cable. If so, connect the
female end of the 4-port splitter into the
male end of the power adapter. Refer to
1a on the diagram for reference.
2. Connect the cameras to the Siamese
power and video cables.
your cameras will come with a cable with
two separate connectors on each end.
One of the connectors is for the power,
and the other is for video. Connect the male power and video BNC end of the cables
to the female power and video BNC connectors on the camera. Refer to 1b on the
diagram for reference.
Connect the camera power
In most cases,
3. Connect the cameras to the DVR. Connect the male BNC connector at the end
of the cable that is not connected to the camera to the desired channel input on the
backside of the DVR.
4. Connect the cameras to the power. Connect the male power connector at the end
of the cable not connected to the camera to a female power connector from step 1.
5. Repeat. Repeat steps 1-4 until you have connected all desired cameras.
Connecting a PTZ Camera
1. Locate the RS-485 connectors on the back panel of your DVR.
2. Locate the positive wire on your PTZ camera. Please refer to
the manual provided with your camera to determine the wires.
3. Push the orange tab labeled ‘A’ on the PTZ port (with your
fi nger nail or pen) in order to open the spring-loaded connection.
4. With the orange tab pushed in, insert the bare positive wire from your camera about
1/8-1/4 inches into the port.
3.9 First-time Setup
Page 21

5. Let go of the orange tab and the port should clamp onto the cable. Give the wire a
light tug to ensure that it is securely clamped.
6. Repeat steps 2-5 for the negative wire, and the orange tab labeled ‘B’.
Mounting the Camera
IMPORTANT: Please complete the instructions for “Connecting the cameras to the
DVR” prior to mounting your cameras.
The following steps provide instructions to mount the camera on a drywall. Your
installation may vary depending on the specifi c camera purchased.
You will need:
1) Surveillance Camera (not provided)
2) Mounting Bracket (not provided)
3) Screws with matching anchor screws (not provided)
4) Power drill (not provided)
1. Choose a location. Find a suitable location to mount your IP camera.
2. Mark screw locations. Using a pencil and the holes in the mounting bracket as a
guide, mark three holes against the wall where you wish to mount the camera.
3. Drill holes. With a drill bit slightly smaller than the green plastic anchor screw, drill a
1” deep hole in each of the three marked locations.
4. Insert anchor screws. Place the anchor with the closed end evenly into the hole.
Gently tap the open end until the anchor is almost fl ush with the wall.
5. Attach the camera to the mounting bracket (if applicable). Fasten your camera to
the mounting bracket using either the hole found on the top or bottom of the camera.
Rotate until the camera is securely attached to the mounting bracket.
6. Mount the camera to the wall. Align your mounting bracket with the anchors and
slowly screw the bracket onto the wall with the 3 screws provided.
7. Adjust the camera position. To adjust the camera position, loosen the nob on the
bracket by turning it counterclockwise and adjust the camera accordingly. When the
desired camera position is achieved, tighten the nob by turning it clockwise.
3.10First-time Setup
Page 22

3.3 DVR First-time Startup
Power on your DVR and
double-click anywhere
on the screen. On the
login screen, a Startup
Wizard will appear to help
you quickly setup your
DVR. Please follow the
on-screen instructions
to quickly and easily
confi gure basic settings on
your DVR.
Startup Guide Explained
Network Time Protocol:
When enabled, the DVR
system will automatically
set the date and time
settings through the
internet connection. If you
do not enable this, you will
need to manually input
the date and time in the
corresponding forms.
Name, phone, email: This
information is added to
the default administrator
account of your DVR
system.
3.11 First-time Setup
Page 23

3.4 Home Screen Introduction
The home screen is the main screen of your DVR, displaying the live-video stream from
the connected cameras. There are several viewing options available locally on your
DVR. By default it will be set to the 16-channel view with the live-video streams from all
sixteen camera feeds. To access the new
of the screen using your mouse or press the menu button on your remote.
quick-menu, move your cursor to the bottom
The quick-menu includes the following options:
Main Menu
Use the main menu to access all of the full features of the DVR. Refer to 4.1
Main Menu Detailed for more information and specifi c instructions.
Hard Drive Notifi cation
This icon will only appear if a hard drive is not connected to the DVR.
Event Notifi cation
When your cameras have detected an event (see 4.1 Main Menu Detailed –
Event Management) a notifi cation will appear in your quick-menu. Clicking
on the icon will bring you to clips recorded at the time of the events.
3.12First-time Setup
Page 24

Single View
This option enables you to quickly view one camera feed in full-screen.
Click on the icon to select the camera feed to view. For further live-video
viewing options, refer to 4.1 Main Menu Detailed – Video Settings.
Quad View
Select four channels (1-4, or 5-8) to view simultaneously.
8 Channel View
Quickly toggle the viewing mode to eight simultaneous channel feeds.
16 Channel View
Quickly toggle the viewing mode to sixteen simultaneous channel
feeds.
Playback
Review and backup surveillance footage from this menu. Refer to 4.2
Camera Controls for more details.
Screenshot Gallery
View and backup saved screenshots.
Volume Control
Quickly access the system volume controls.
Shutdown & Restart
Quickly select the shutdown and restart options for the DVR.
Logout / Shutdown
Logout of your current user profi le or shutdown the system. Administrator
permission will be required to shutdown.
3.13 First-time Setup
Page 25

Section 4 • Using the DVR
4.1 Main Menu Detailed
Use the main menu to access all of the full features of the DVR. The following chapter
will explain how to navigate and perform the features through the menu.
General Settings
Use the General Settings menu to manage accounts, change the date & time, view the
system events log, view hard disk information, change PTZ settings, view and upgrade
your fi rmware and restore your device to factory settings.
Account Management
This DVR supports multiple user profi les with di erent permissions, which allow you
to share video surveillance without worrying about unpermitted tampering with the
system settings, playback fi les, etc.
The system can support up to 16 accounts, with two di erent account types:
Administrator: Has full access to all features of the DVR and full permission to change
all settings.
Operator: Can only view the live-video stream.
Managing your user accounts by simply highlighting a user account from the menu and
selecting a function to perform.
4.1Using the DVR
Page 26

Date & Language
Use this menu to change the date & time settings and the language settings of your
DVR.
NTP Enabling the Network Time Protocol (NTP) allows the system to automatically set
the date and time of your system. This requires an internet connection.
Language Choose a di erent language for your DVR system to display.
4.2 Using the DVR
Page 27

System Log
The DVR will provide notifi cations when certain events occur. Such events could be,
but are not limited to: a missing hard drive or hard drive failure, activated motion
sensors, activated alarms, etc. Use this menu to review the system log of all event
notifi cations.
Series Numbers the events in sequence
Type Describes the type of notifi cation (Alarm / System)
Start Time The time when the event occurred.
Event Gives detailed description of the notifi cation, e.g. Mo = Motion; 02 = motion
captured on channel 2; alarm = type of notifi cation.
4.3Using the DVR
Page 28

Disk Drive Info
This menu allows you to review important HDD information, format HDD’s and change
its settings.
Hard Disk Drive Full Defi nes how the DVR will behave when the HDD is full. When the
HDD has reached its storage capacity, the DVR will either stop recording or overwrite
the older playback fi les. The overwrite feature is generally recommended.
Refresh Update the HDD information shown on the page.
Total Space The total available storage space on the HDD in the DVR.
Free Space The amount of storage space left on the HDD in the DVR.
Format In order to format a drive, select it from the menu and press [Format]. The
system will automatically format the HDD.
4.4 Using the DVR
Page 29

PTZ Settings
Channel Select the channel that your PTZ camera is connected to.
Protocol Refers to the language of communication between your DVR and camera.
Address This allows the DVR to identify the di erent PTZ cameras connected to
the device. Refer to your camera’s manual for specifi c instructions on changing the
address.
Baud Rate Refers to the frequency of communications (this must match the camera’s
baud rate).
Data Bit This is typically set at 8.
Stop Bit This is typically set at 1.
Parity This is typically set at “No”.
In order to confi gure your PTZ camera, you will need to refer to the manual provided
with your PTZ camera for the correct baud rate and protocol information.
4.5Using the DVR
Page 30

System Settings
Use this menu to view and change basic settings and information of the DVR. From
this menu, you may enable the startup guide, change the display resolution and video
standard, view system information, upgrade the DVR fi rmware and reset the system to
factory default settings.
Startup Guide Check this box to enable the startup guide to appear (refer to 3.3 DVR
First-time Startup). The startup guide will appear the next time the system is powered
on.
Please refer to the following instructions to upgrade the fi rmware from the system
(required: a USB drive).
1. Download the updated fi rmware from the website on your computer.
2. Place the fi le onto the root directory of a USB drive.
3. Connect the USB drive to the USB port on your DVR.
4. Go to the [General Settings] menu in the Main Menu and access the [System
Settings] page.
5. Select [Upgrade] and wait 5-10 minutes.
4.6 Using the DVR
Page 31

Help & FAQ
Zmodo o ers comprehensive support for our users. This page provides links to some
of our resources that will help guide you to a maximal experience of our products.
Use a QR-code scanner on your mobile device and scan the QR-codes to access the
websites, or manually input the URL’s provided.
4.7Using the DVR
Page 32

Video Settings
Display Settings
The DVR o ers several options to best customize the content displayed on the homescreen of your DVR.
Channel Select a channel display to customize. Each channel can display a specifi c
channel name and the current time.
IMPORTANT: When changing the settings on a channel, press [Save] before editing
another channel or exiting the page otherwise all changes will be lost.
Channel Name You may set a name to describe the camera feed on your DVR. For
example, if you have set up a camera in the front yard on channel 1, you could name it
“Front Yard”.
Display When selected, the DVR will display the channel name on the corresponding
channel.
Enable Auto Sequence Selecting this option will activate sequential viewing. In
sequential viewing, the DVR will automatically cycle between certain channel feeds.
You may change the duration of each sequence and select which feeds to cycle
through under this menu.
4.8 Using the DVR
Page 33

Video Stream Settings
Adjusts the video quality, frame rate, resolution and streaming bit rate.
Channel Choose the channel that you would like to change the settings for.
IMPORTANT: When changing the settings on a channel, press [Save] before editing
another channel or exiting the page otherwise all changes will be lost.
Local Video Stream Changes the video streaming settings for devices that are
connected to the DVR locally (devices that are connected to the same internet
connection as the DVR).
Network Transmission Stream Changes the video streaming settings for devices that
are connected to the DVR remotely (devices that are connected through 3G/4G or a
di erent internet connection than the DVR).
Video Quality Change the overall quality of the video. Increasing the quality also
increases the bandwidth used.
Frame Rate (FPS) This changes the number of pictures (frames) per second that make
up the video stream. The higher this value, the smoother and better the video quality
is, however increasing this value also increases the bandwidth.
Resolution Change the resolution of the video stream. QVGA=320x240.
4.9Using the DVR
Page 34

Streaming Bit Rate This is the type of bit rate that the DVR uses to view video from the
camera. VBR stands for the variable bit rate, and CBR stands for the constant bit rate—
CBR is higher quality than variable, however it uses more bandwidth.
Video Mask
The DVR allows you to mask or hide certain areas of your camera feed from recording
and monitoring.
To create an area to mask you must fi rst select the channel to edit and select the draw
tool. Select an area by clicking and dragging down and to the right with your cursor. A
gray box will appear. Remove selected areas by selecting the eraser tool and clicking
on the selected area. After you are done, press [Save] and proceed to other channels
or return to the home-screen.
4.10 Using the DVR
Page 35

Network Settings
Basic Settings
Selecting DHCP will allow the DVR to manually confi gure the IP address and network
parameters.
The settings on this page enable access to the DVR over the internet. Unless you
are an advanced user, we do not recommend that you change these settings. These
defi nitions are not su cient for manual networking and confi guration.
Web Port This designates the port used when accessing the DVR through a web
browser.
Video Port This designates the port that the video feed is transmitted over.
Mobile Port This designates the port used when accessing the DVR through a smart
phone or mobile device.
4.11Using the DVR
Page 36

DDNS
NOTE: For advanced users only. Router port-forwarding is required. Use this page
to set up a DDNS (Dynamic DNS Server) for remote surveillance, please refer to the
knowledge base for full instructions.
4.12 Using the DVR
Page 37

UPNP
UPNP (Universal Plug and Play) is a protocol used to establish network connectivity
and interaction between devices. Enabling this feature will allow easier network
connectivity.
NOTE: The UPNP settings for the device are not the same as the UPNP settings on your
router and do not pose the same security risks.
NOTE*: For advanced users only. We do not recommend that you change any settings
under this page without prior networking knowledge.
4.13Using the DVR
Page 38

Event Management
This DVR system is specialized for continuous recording, and will automatically mark
recordings that are triggered by “critical events” (motion detection and alarms) in the
playback menu. Use this menu to defi ne “critical events” and best optimize recording
and storage on the system.
Schedule Recording
The system has two recording modes and a fully customizable recording schedule for
each camera channel.
Recording modes:
The basic recording profi le will record continuously at full frames. This means that all
recorded video fi les will be high quality, and the HDD will be able to store less footage
at one time.
The intelligent recording profi le will automatically manage the recording to optimize
storage capacity. During scenes of interest when “critical events” are triggered, the
DVR will automatically record in full frames to ensure higher quality. During stationary
scenes, the DVR will record at a lower framerate to optimize storage capacity.
4.14 Using the DVR
Page 39

Scheduled Recording
After selecting a recording mode, you can create a recording schedule. Your DVR will
only record during the highlighted time periods. Edit a channel’s recording schedule
by selecting the appropriate camera under [Channel]. Then Deselect (and reselect)
squares by left-clicking and dragging the cursor across the schedule.
NOTE: Selecting one of the channels in the bottom panel will apply schedule changes
to the highlighted channel immediately. In order to see the current recording schedule
for a specifi c channel, select that channel under the [Channel] menu.
Motion Alarm
This DVR supports advanced motion detection features for bolstered security. Please
follow the following instructions in order to properly confi gure and setup the motion
detection functions.
IMPORTANT: When changing the settings on a channel, press [Save] before editing
another channel or exiting the page otherwise all changes will be lost.
4.15Using the DVR
Page 40

1. Choose a channel to edit. Select a channel under the dropdown menu next to
[Channel].
2. Customize schedules for motion detection. Next to the [Their Time] option, press
the [Confi g] button and open the active schedule. The motion detection will be turned
on during the times that are highlighted blue. In order to select/deselect regions, you
must left-click and release or drag to edit more regions.
NOTE: You must press [Ok] after editing, otherwise all changes will be lost.
3. Select the motion detection area. Using the motion detection grid, defi ne a motion
detection area by left-clicking on a square. Click-and-drag to toggle large areas. You
may adjust the sensitivity of the motion detection with the [Sensitivity] drop-down
menu.
4. Defi ne how the system responds when motion is detected. There are four di erent
responses that the system can take when motion is detected. NOTE: The system will
automatically record video when motion is detected.
a. “Alarm Sounding Buzzer” The DVR’s built-in buzzer will sound.
b. “Snapshot” The DVR will take a snapshot and send it to your mobile device and
email address (when confi gured).
c. “Alarm Output” The DVR will activate any external alarms that have been
connected to the back panel (see: 3.1 DVR Installation – Connecting an
External Alarm).
d. “Alarm Duration” will adjust how long both the buzzer and the alarm output
will sound after motion is detected. NOTE: The alarm will sound continuously
while motion is being detected.
e. “Alarm Interval” This setting defi nes the interval between motion detection
notifi cations. For example, when set to 1 minute, the DVR will send an email
notifi cation every minute when motion is detected.
f. “Send E-mail” The DVR will send an email notifi cation. The DVR comes with
predefi ned server settings for common service providers, however you may
need to specify your own settings if your provider is not included. Choose an
email address using the specifi ed service provider to send theemail and input
the corresponding password to the existing email address.
5. Save and then select another channel to confi gure. If you do not save prior to
selecting another channel, all changes will be lost. You may also restore setting
defaults by pressing [Default].
4.16 Using the DVR
Page 41

External Alarm
The DVR supports up to four external alarm inputs and one external alarm output.
External alarm inputs may include, but are not limited to motion detectors, trip wires,
door sensors, etc. External alarm outputs may include, but are not limited to sirens,
visual alarms, silent alarms, etc.
Please follow the following instructions to properly confi gure the external alarm
features.
IMPORTANT: When changing the settings on a channel, press [Save] before editing
another channel or exiting the page otherwise all changes will be lost.
1. Choose an alarm to edit. In the dropdown menu, choose an alarm and select
[On] to enable the alarm input. Choose the type (normally open or normally closed)
that describes your specifi c alarm. You may need to refer to the instruction manual
provided with your device.
2. Customize the active period for your alarm. Next to the [Their Time] option, press
the [Confi g] button and open the active schedule. The alarm will be active during the
times that are highlighted blue. In order to select/deselect regions, you must left-click
and release or drag to edit more regions.
4.17Using the DVR
Page 42

3. Defi ne how the system responds when an alarm is triggered. There are four
possible responses when an alarm is triggered. Choose an option by selecting the
box next to it. NOTE: The system will automatically record video when an alarm is
triggered.
a. “Buzzer” The DVR’s built-in buzzer will sound.
b. “Alarm Output” The DVR will activate any external alarms that have been
connected to the back panel (see: 3.1 DVR Installation – Connecting an
External Alarm).
c. “Alarm Duration” will adjust how long both the buzzer and the alarm output
will sound after motion is detected.
d. “Send E-mail” The DVR will send an email notifi cation. The DVR comes with
predefi ned server settings for common service providers, however you may
need to specify your own settings if your provider is not included. Choose an
email address using the specifi ed service provider to send the email and input
the corresponding password to the existing email address.
e. “Snapshot Ch” When selected, the DVR will capture a screenshot from the
selected channel when the alarm is triggered.
Alarm Input Select the channel of the input alarm that you would like to edit. Select
“On” to enable this alarm.
Type Select the type of alarm that you are using. Please refer to your alarm’s manual if
you are unsure of this.
Video Loss
The camera’s video could be lost due to various reasons, and the potential
consequences could be serious. Use this menu to customize system response when
video is lost.
Please follow the following instructions to confi gure your DVR’s response to a lost
video signal:
4.18 Using the DVR
Page 43

1. Select a channel to edit. Select the channel you want to edit, and select [On] in order
to activate a video loss response for that channel.
2. Defi ne how the system responds when video is lost. There are four possible
responses when video is lost. Choose an option by selecting the box next to it.
a. “Send E-mail” The DVR will send an email notifi cation. The DVR comes with
predefi ned server settings for common service providers, however you may need to
specify your own settings if your provider is not included. Choose an email address
using the specifi ed service provider to send the email and input the corresponding
password to the existing email address.
b. “Buzzer” The DVR’s built-in buzzer will sound.
c. “Alarm Output” The DVR will activate any external alarms that have been connected
to the back panel (see: 3.1 DVR Installation – Connecting an External Alarm).
d. “Alarm Duration” will adjust how long both the buzzer and the alarm output will
sound after motion is detected.
4.19Using the DVR
Page 44

x
4.2 Camera Controls
When on the home screen, you can access the DVR’s camera controls by double-clicking on the desired channel feed and a blue menu will appear as shown. The icons represent the six control features: mute, image setting, zoom, snapshot, playback and PTZ.
Image Setting
This will adjust the image settings of the camera from
the DVR. NOTE: This will a ect everyone connected
to the DVR.
Image Orientation
Change the image orientation. “Flip” will fl ip
the image vertically, “Mirror” will fl ip the image
horizontally, and “Flip and Mirror” will apply both
functions.
Adjust the brightness settings of the camera.
Adjust the color saturation of the camera.
Adjust the contrast settings of the camera.
4.20 Using the DVR
Page 45

Zoom
Selecting this will bring you into the zoom-in mode. Use the scroll wheel to zoom in
and out, and click on areas of the screen in the bottom right corner to select viewing
areas.
Right click to exit out of the view.
Snapshot
You can quickly capture a snapshot at any time; in order to do so, click once on the
[Snapshot] button in the camera functions bar. A thumbnail will appear on the bottom
left of your screen. Access the snapshots gallery in the quick menu (see 3.4 Home
Screen Introduction).
4.21Using the DVR
Page 46

Playback
Access and review your surveillance footage from this menu.
Video Playback
1. Select the channel of your recording on the right panel under “Channel”. When you
select a channel, it will be highlighted in blue.
2. Select the month and year on the calendar in the right panel. The days that are
highlighted in blue will have recordings available. Select one of the days.
3. Use the Playback Controls to playback video.
4.22 Using the DVR
Page 47

PTZ Control
These control settings can only be used for cameras that have pan, tilt and/or zoom
features (PTZ).
Directional Arrows Move
the camera in the direction
of the arrow.
Start the PTZ patrolling function (the camera will automatically
patrol a certain movement path).
Adjust the camera focus
Adjust the lens aperture to optimize the image in specifi c
lighting conditions.
Zoom in or out
Begins automatic horizontal or vertical panning.
Adjust the movement speed of the camera.
Select Patrol Line Choose the preset patrol path for the
camera to follow.
Select Preset Select a preset location, and press OK to move
the camera to that location.
Dwell Time Select the duration that the camera will remain in
one preset location before it patrols to the next.
Set Up Presets Select a preset number. Move the camera with
the directional keys to a desired location, and press [OK] to
store the location in that preset value.
Delete Presets Remove a stored preset location.
4.23Using the DVR
Page 48

Backup
The system allows you to backup specifi c fi les from your machine onto an external USB
drive. The following instructions will show you how to fi nd specifi c fi les on your system
to backup.
1. Select the channel of your recording on the right panel under “Channel”. When you
select a channel, it will be highlighted in blue.
2. Once a channel is selected, select a month and year on the calendar. The days that
are highlighted in blue will have available recordings. Select one of the days.
3. Under “Event” choose which type of recording that you want to search for. You can
choose normal, alarm triggered or motion triggered recordings only, or you can choose
all recordings.
4. Choose the time frame that your recording will fall under. For example, if you are
looking for a video fi le that was recorded at 3:00 a.m. you will specify the time frame
0:00-6:00.
5. Press [Search]. If your DVR has saved any recordings during this time frame, they
will appear in the menu.
6. Select all of the videos that you would like to back up, and press [Back up]. Wait for
the progress bar to complete for each video fi le.
7. Repeat steps 1-7 for video fi les under di erent channels, days, events, time frames,
etc.
4.24 Using the DVR
Page 49

4.3 Remote-viewing Setup
Remote viewing allows you to access your DVR from any location in the world for
unprecedented surveillance versatility using any Android or iOS mobile device with
our ‘Zsight’ application installed. With our revolutionary user-friendly setup, we have
eliminated the need for complex port-forwarding procedures and other networking
hassles. Our product servers will automatically authenticate and confi gure your
hardware for remote-viewing. The following instructions will guide you through the
remote-viewing setup:
Minimum Requirements:
• Android or iOS mobile device with wireless/3G/4G internet connection
• ‘Zsight’ Application downloaded on your mobile device.
4.25Using the DVR
Page 50

1. Locate the DVR
information on the outer
casing of your system.
2. Connect your mobile
device to the same local
network as your DVR.
Please make sure your mobile
device is connected to the
internet through the same
wireless router as your DVR.
3. Open the Zsight app on your mobile device and
create a Zsight account. If this is your fi rst time using
Zsight, you will need to create a new account. Do so by
selecting the [Sign Up] option. If you already have an
account, press [Log In] and enter your login information.
4. Add a new device to your account. Once you
have logged in, you will enter a ‘Device List’ page.
Tap the [+] on the upper right hand corner to
open the ‘Add Device’ menu.
4.26 Using the DVR
Page 51

5. Add your DVR by scanning the QR code found in step 1.
Select the [Scan QR Code] option as shown in the image, and a QR code scanner will
open. Locate the QR code sticker found in step 1, point your camera at the QR code
and hold it steadily until it successfully scans.
6. Name your device.
When the device has been successfully added, you will be automatically prompted to
name your device. Choose any unique name for your device to distinguish it in your
device list.
4.27Using the DVR
Page 52

7. Select your system from the device list to view the live video stream.
Go back to the ‘Device List’ section and select your device from the list. Make sure that
a live video stream from your DVR appears.
8. Disconnect from your wireless network and access the DVR using 3G/4G.
Connect your mobile device to a di erent internet connection from your DVR (3G/4G
or any other wireless connection) and repeat step 6. Our product servers will
automatically authenticate your DVR for remote-viewing capabilities.
4.28 Using the DVR
Page 53

9. Your device is now activated for remote surveillance!
You will now be able to view your DVR on any Android or iOS device with internet
connection! In order to do so, simply download the Zsight app on the desired device
and log in to your account from step 1. You can also share your device with anyone
with a Zsight user account by accessing the settings menu for your device in the Zsight
app.
Congratulations, and thank you for choosing Zmodo!
4.4 Updating your DVR
From your Mobile Device (via Zsight)
Please refer to the following instructions to upgrade the fi rmware of your DVR from
your mobile device.
1. Make sure that both your mobile device and your DVR have a secure, consistent
network connection.
2. Open your ‘Zsight’ app and login with your account information.
3. Select your device from the device list.
4. Select the settings menu on the upper right hand corner.
5. Check the “Device Update” section towards the bottom of the menu. If it says that
an update is available, press on it and the device will automatically update! Please wait
5-10 minutes for the process to complete.
From your DVR (via USB)
Please refer to the following instructions to upgrade the fi rmware from the system
(required: a USB drive).
1. Download the updated fi rmware from the website on your computer.
2. Place the fi le onto the root directory of a USB drive.
3. Connect the USB drive to the USB port on your DVR.
4. Go to the [General Settings] menu in the Main Menu and access the [System
Settings] page.
5. Select [Upgrade] and wait 5-10 minutes.
4.29Using the DVR
Page 54

Section 5 • Support
5.1 Troubleshooting
Most problems encountered are common problems and are easily correctible. For your
convenience, please refer to the following table before calling our Zmodo Technical
Support.
Common Problem Possible Causes Solution
The system won’t turn
on.
The cables are not connected
properly.
The cables are connected
but the system still does not
receive power.
1. Make sure that the power brick is
properly connected to the wall plug
by unplugging and replugging it
until it fi ts snugly into the brick.
2. Make sure that your power
adapter is properly plugged into
the power outlet and your DVR
system.
1. Check your DVR front panel and
check if the POWER LED indicator
is on. If so, your monitor may be o
or it may not be properly plugged
into your DVR.
2. If the unit is connected to the
power outlet through a surge
protector, make sure that the surge
protector is on.
3. Make sure that there is power
coming from the outlet by plugging
in another device to the outlet.
If there is no power, please try
another outlet or power source.
Hard drive is not
detected by the system.
Hard drive cables may not be
properly connected.
Your hard drive may not be
compatible with the system.
Remove the cover and check that
the SATA power and data cables
are properly connected to the logic
board and the hard drive.
Check your HDD compatibility with
the recommendations under the
HDD Installation section of this
user manual.
5.1 Support
Page 55

Common Problem Possible Causes Solution
HDD is full and the unit
can’t record.
The mouse is not
working.
The system beeps at
startup.
The DVR is set to stop
recording when the HDD is
full.
The mouse is not properly
connected.
The mouse is connected but
it is still not recognized.
For some versions of the
DVR fi rmware, this beeping
will be normal.
1. Access the [General Settings] and
open the [Disk Drive Info] page.
2. Open the drop-down menu at
the top next to the “Hard Disk Drive
Full”, select “Overwrite” and press
save.
Check the back panel of your DVR
to make sure that the mouse is
connected to the corresponding
USB port.
Please disconnect and reconnect
the mouse to the system and
reboot the system using the power
switch on the back panel.
There is no issue with your system.
The system is
constantly beeping.
I cannot add the device
to my Zsight account.
My camera can’t zoom
in.
The DVR is beeping when
motion is detected.
The device is already
tethered to a pre-existing
Zsight account.
The camera does not support
the zoom functionality
Under the [Event Management]
menu, access the [Motion
Detection] page and confi gure the
motion detection settings. Please
visit Section 4.1 of this user manual
for further instructions.
For security purposes, our Zsight
servers restrict each device to one
linked Zsight account. It is possible
that your device is currently linked
to another account. Please email
support@zmodo.com providing
your Device ID and we will
promptly resolve the issue.
In many cases, cameras do not
support a zoom feature, but only
pan-tilt. These cameras are called
‘PT’ cameras. Please check to
see your camera’s supported
functionality.
5.2Support
Page 56

5.2 Warranty & RMA
Please visit http://www.zmodo.com/rma for complete information.
General Guidelines
Before returning any product to Zmodo for any reason, please fi rst obtain an RMA
(Return Merchandise Authorization) number. You can complete the online form to
request an RMA number. Online RMA requests are processed within 2 business days.
Zmodo customer support can also assist with obtaining an RMA number. The following
information may be required in order to complete the RMA request:
1. Your name
2. Company name
3. Address
4. Phone number
5. Original invoice
6. Zmodo product’s model number
7. Credit card number
8. A brief description of the problem that is occurring with the product to be returned
Part 1. Return within 30 Days for Refund with or without reason
Refund Policy for Product Purchased Directly from Zmodo
If the Zmodo product that you purchased directly from Zmodo does not function to
your satisfaction or does not apply to your installation application (the” Product for
Refund”), you may return your Product for Refund to Zmodo for a full refund within
30 days of the invoice date unless otherwise specifi ed in the products’ listing on our
website, on the receipt or packing slip, or in the purchase agreement terms.
For your own benefi t, we recommend that you use a traceable carrier that can provide
you with the delivery confi rmation to ship your Product for Refund back to the location
instructed in the RMA authorization. Zmodo shall not be responsible for any loss or
damage to the Product for Refund caused in transit.
To avoid any delay or denial of processing your refund request please verify your
Product for Refund satisfi es all of our following inspection criteria (the “Inspection
Criteria”).
The Product for Refund must be:
1. in the original manufacturers packaging, and shipped securely;
2. complete with all the accessories, documentations, and standard certifi cation labels
originally, including, but is not limited to, UL listing, capacity, brand name, UPC code;
3. free of any permanent alterations including, but not limited to paint, altered
connection inputs, severed wires or cables, or indication of removed screws/fasteners
5.3 Support
Page 57

or seals;
4. free from damages of any type, including, but not limited to dents, scratches, cracks,
abuse, defacement or damages resulting from power surges; and
5. labeled with a security seal, which is intact and not tampered wit
The Product for Refund will be thoroughly inspected by Zmodo when received and a
determination will be made whether the Inspection Criteria are met. If your Product
for Refund fails to satisfy the Inspection Criteria (the “Non-conforming Product for
Refund”) and has been shipped to Zmodo, your Non-conforming Product for Refund
will be rejected or subject to a restocking fee of up to 15% at Zmodo’s sole discretion.
The inspection may take up to 5 business days from the time your Product for Refund
is received.
If the Non-conforming Product for Refund is rejected by Zmodo, you will be billed with
the cost and fees of shipping the Non-conforming Product for Refund from Zmodo
back to you.
Refund Policy for Product Purchased from Third-Party Stores or Vendors
If the Zmodo product that you have purchased from the third-party stores or vendors
does not function to your satisfaction or does not apply to your installation, please
contact the third-party store or vendor where the product was originally purchased for
the return and refund policy. All the return and refund processes related to the Zmodo
products purchased from third-party stores or vendors are subject to the specifi c
policies of the third-party stores or vendors. Please refer to the return and refund
policy of the original store or vendor that you purchased your Zmodo product from for
specifi c information.
Part 2. Warranty Return
In the event that your Zmodo product becomes defective according to Zmodo’s limited
warranty and within the warranty period (2-year warranty for analog products and
3-year warranty for IP products from the invoice date), you may return your defective
product (the “Returned Product”) to us for repair or replacement.
Shipping of Returned Product to Zmodo
For your own benefi t, we recommend that you use a traceable carrier that can provide
you with delivery confi rmation to ship your Returned Product back to the location
instructed in the RMA authorization. Zmodo shall not be responsible for any loss or
damage to the Returned Product caused in transit.
Shipping of Repaired Product and Replacement from Zmodo to You
If the Returned Product is tested and found to be defective and covered by the
Zmodo’s limited warranty, Zmodo will ONLY provide free ground shipping for
the repaired product or replacement to the continental USA destination. If you
5.4Support
Page 58

are outside the continental USA, Zmodo reserves the right to charge you with the
additional shipping cost and other fees to ship the repaired product or replacement
back to you.
If the Returned Product is tested and found to be non-defective or not covered by
the Zmodo’s limited warranty by the certifi ed Zmodo RMA technicians, you should
be responsible for arranging shipment of the Returned Product from Zmodo to your
location.
Under no circumstance is Zmodo responsible to any customs clearance and/or duty,
tax, fees that are enacted by the shipping carriers.
Cross Shipment
In the event that a replacement product is needed immediately, a cross-shipment
option is available if the original purchase date is within 6 months of the crossshipment request. Zmodo will ONLY provide free ground cross shipment to the
continental USA destination. Any cross shipment to areas outside the continental USA
will be charged additional shipping cost and other fees.
Requesting this option implies that your Returned Product has the defective part and
you will ship it back to Zmodo within 25 calendar days of the authorization of the cross
shipment. You will be asked to secure the return by providing a credit card number.
BY REQUEST OF CROSS SHIPMENT, YOU AUTHORIZE ZMODO TO PUT A 30-DAY
CROSS-AUTHORIZATION PLACED ON THE CREDIT CARD EQUAL TO THE LIST PRICE
OF THE REPLACEMENT PRODUCT BEING SHIPPED. Zmodo will charge the full amount
that was authorized on the credit card under following circumstances:
1. If the Returned Product is not received by Zmodo within 25 calendar days from the
authorization date of the cross shipment;
2. If the Returned Product is determined not covered by Zmodo’s limited
warranty by the certifi ed Zmodo RMA technicians,
Zmodo will ship the replacement product within 2-3 business days from the
authorization date of the cross shipment.
Upgrade or Exchange Procedure
Zmodo is unable to exchange any Returned Product for a product of a di erent type
unless the Returned Product satisfi es all the following requirements:
1. The Returned Product is returned to Zmodo for repair or replacement
under the Zmodo’s limited warranty and within the warranty period (2-year warranty
for analog products and 3-year warranty for IP products from the invoice date);
2. The Returned Product is found to be defective and irreparable by the
certifi ed Zmodo RMA technicians; and
3. Products under the same model with the Returned Product are out of
stock.
5.5 Support
Page 59

If the Returned Product satisfi es the described requirements, Zmodo will o er, at its
sole discretion, a variety of options for substitution or an upgrade product.
Part 3. Missing Parts Procedure
For Order Shipped Directly from Zmodo’s Warehouse
If your ordered product arrived incomplete, Zmodo may require image confi rmations at
our discretion before replacements for any missing part is shipped out.
If your order included product with a hard-disk drive, and a hard-disk drive was not
installed in the product that you received, Zmodo may ask for image confi rmations
before exchanging the product you received with a complete one.
If your order was not delivered or the ordered product arrived damaged, please contact
Zmodo customer support. In the event that your ordered product arrived damaged or
incomplete due to external damages, please keep all interior and exterior packaging as
this is needed when we fi le the shipping claim with the carrier service we used to ship
your order.
For Order Shipped from Third-Party Stores or Vendors
If your order arrived incomplete, was not delivered, or the ordered product arrived
damaged, please contact the third-party store or vendor where the order was placed
and shipped from for the detailed policy or information.
Limitations of Warranty
This warranty does not include non-Zmodo installed components. This limited warranty
does not cover any damage to the product that results from abnormal mechanical or
environmental conditions, abuse, accident, improper installation, misuse, insu cient
or excessive electrical supply, natural disaster, or any unauthorized disassembly, repair,
or modifi cation. This limited warranty also does not apply to any product on which the
original product label and or UPC information has been altered, obliterated or removed,
has not been handled or packaged correctly, has been sold as second-hand, or has
been resold contrary to US export regulations.
This limited warranty covers only replacements for defective Zmodo products, as
described above. Zmodo does not cover under warranty and is not liable for any loss
of data or any costs associated with diagnosing the source of system problems or
installing, removing or servicing Zmodo products. This warranty excludes 3rd party
software, connected equipment or stored data. In the event of a claim, Zmodo’s sole
obligation shall be to replace our product with its equivalent or the best possible
substitute.
Under no circumstances shall Zmodo be liable in any way to the user for damages,
including any lost profi ts, lost savings or other incidental or consequential damages
arising out of the use of, or inability to use the Zmodo products. Zmodo reserves the
right to revise or update its products, software, or documentation in keeping with
technological advances without obligation to notify any individual or entity.
Page 60

Technical Support and fi rmware upgrades for Zmodo products are
restricted to the country/region of purchase. Please refer to www.zmodo.
com/Contact/ in order to contact us to clarify any concerns with the
warranty.
5.3 Zmodo Support
Online Resources
For full instructional manuals, software downloads, and more, please visit: http://www.
zmodo.com/support-software
For detailed and specifi c instruction, please our frequently updated knowledge-base:
http://kb.zmodo.com
Technical Support
If you ever have any problems setting up or using this product, call for additional
assistance: 217-903-5037
Telephone Service Hours: Mon-Fri 8:00am-8:00pm CST
Email: support@zmodo.com
Customer Service & RMA
Customer Service: support@zmodo.com
RMA: RMA@zmodo.com
General Inquiries & Sales
Sales/Inquiries from North America: sales-us@zmodo.com
Sales/Inquiries from other locations: sales@zmodo.com
5.6Support
 Loading...