

Page 1
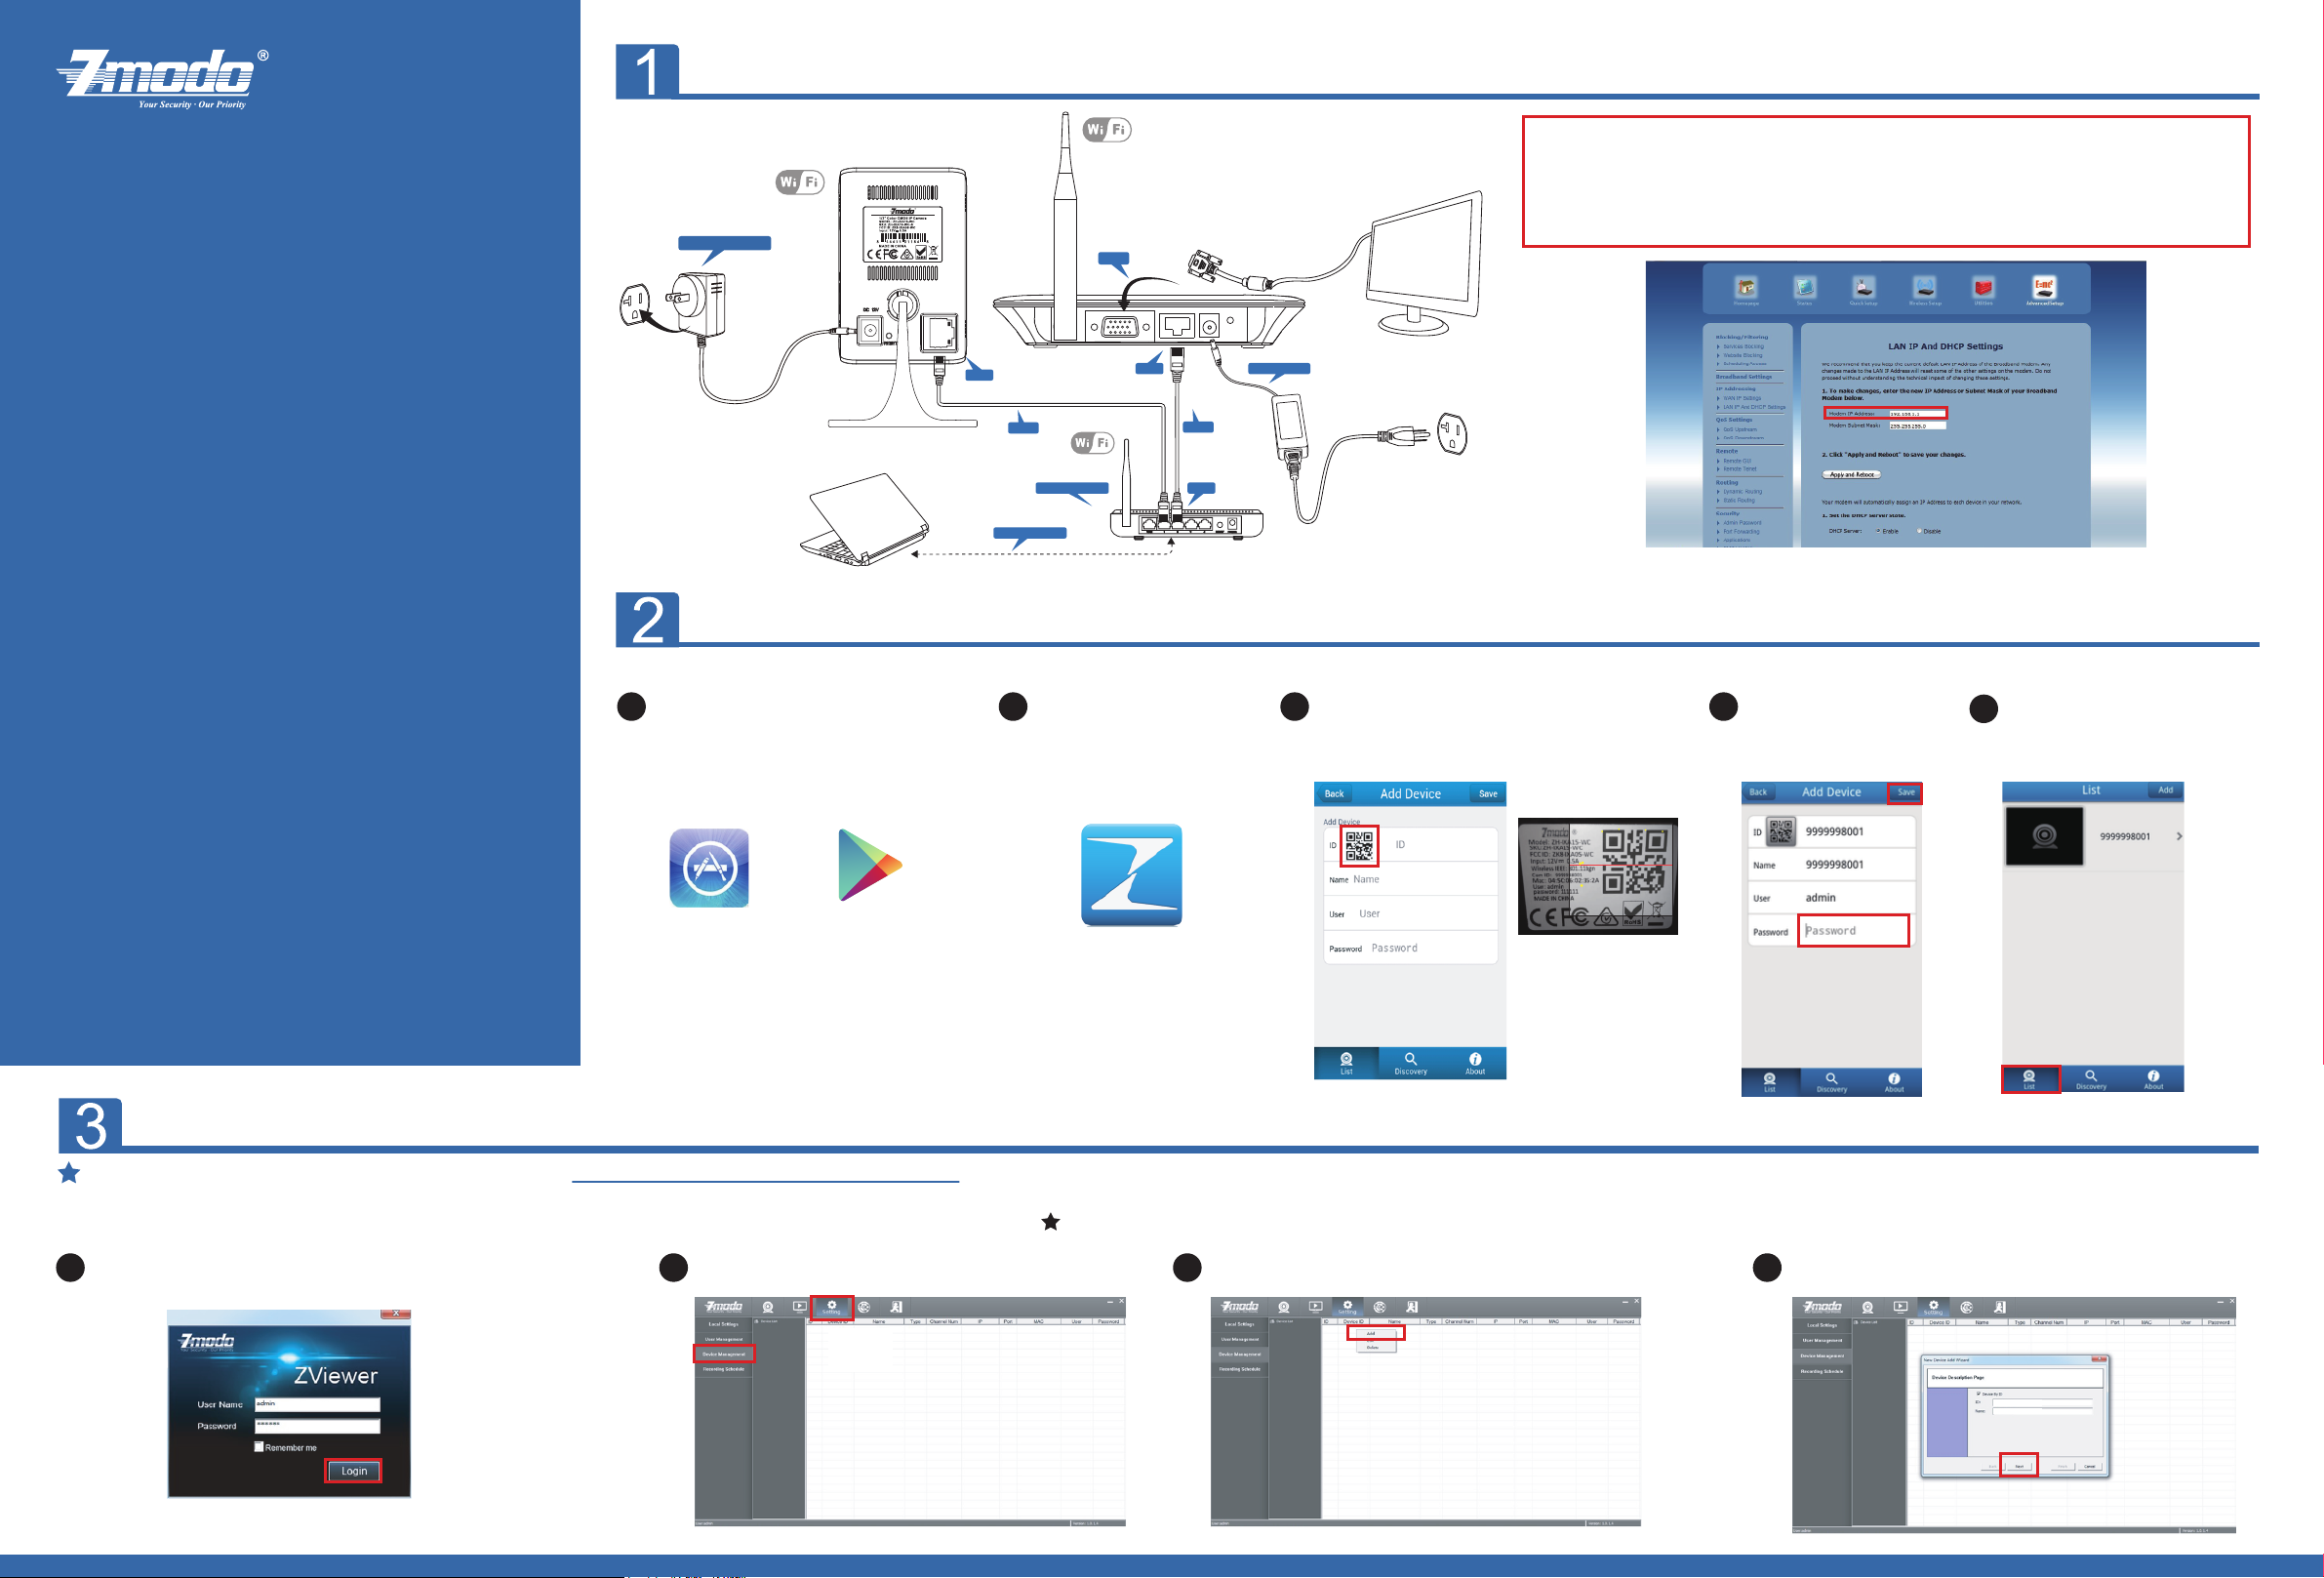
GETTING STARTED
Power Adapter
VGA
Note:
1. Please make sure that router’s UPNP is enabled before connecting camera.
2. Please make sure that your mobile device is connected to the same network as the NVR.
3. Please make sure that IP Cameras, NVR and router are in the same network. IP Cameras’ default IP
addresses are 192.168.1.151(Wireless), 192.168.1.153(Wireless). NVR’s default IP address is
192.168.1.10, so router’s IP address must be set 192.168.1.1. Here we have an Actiontec router as an
example:
Monitor
Quick Installation Guide
Zmodo MINI NVR/IP Cameras System
Package Includes
(1) 4 Channel MINI Wireless NVR
(2) IP Security Cameras
(2) 12V 1.5A Power Supply
(1) 12V 3A Power Supply
(1) 3ft Network Cable
(1) IR Remote Control & Mouse
(1) Quick Installation Guide
(2) User Manual
Download (Website: http://www.zmodo.com/support-software/)
List Includes:
Zsight-iOS(Software)
Zsight-Android (Software)
Zviewer-Windows (Software)
Zviewer-iOS(Software)
Zviewer-Android(Software)
Zmdplayer(Software)
IPCSearch(Software)
LAN
CAT5
Wireless Router
PC
CAT5/ Wireless
LAN
CAT5
Power Supply
LAN
CONNECTING TO YOUR CAMERA ON iOS AND ANDROID
System Requirements: iPhone: iPhone v4.3 up and a valid iTunes account. Android: Android v2.3 up.
Download and install Zmodo Zsight
1
software from the App store (iPhone)
or Google play (Android) or download
from website:
www.zmodo.com/support-software/
iPhone
Note:
If your phone can not scan QR code, please refer to Zviewer for phone (Android and iOS) Website:
www.zmodo.com/support-software/
Android
Tap the icon from the
2
home screen to open
Zmodo Zsight, and click
[Add], this will take you to
the “Add Device” section.
Tap the image of QR code, then
3
scan the QR code area on the
NVR with your phone.
Enter the default
4
password “111111”,
and click [Save].
Click the device from the
5
[List] on your mobile device,
and you will be able to see
the video stream.
CONNECTING TO YOUR CAMERA ON PC
Install the ZViewer windows software from www.zmodo.com/support-software/. There are two ways to connect your camera on PC.
First Method: Remote connection by adding NVR’s ID
1
Launch ZViewer on your PC, enter “User Name” (Default:
admin) and “Password” (Default: 111111), then click [Login].
2
Find "Setting", and click [Device Management].
Note: NVR and Internet must be connected.
3
Right click in the blank area on the right, then select [Add].
4
Click [Device by ID], enter ID number, and click [Next].
9999998001
9999998001
Page 2
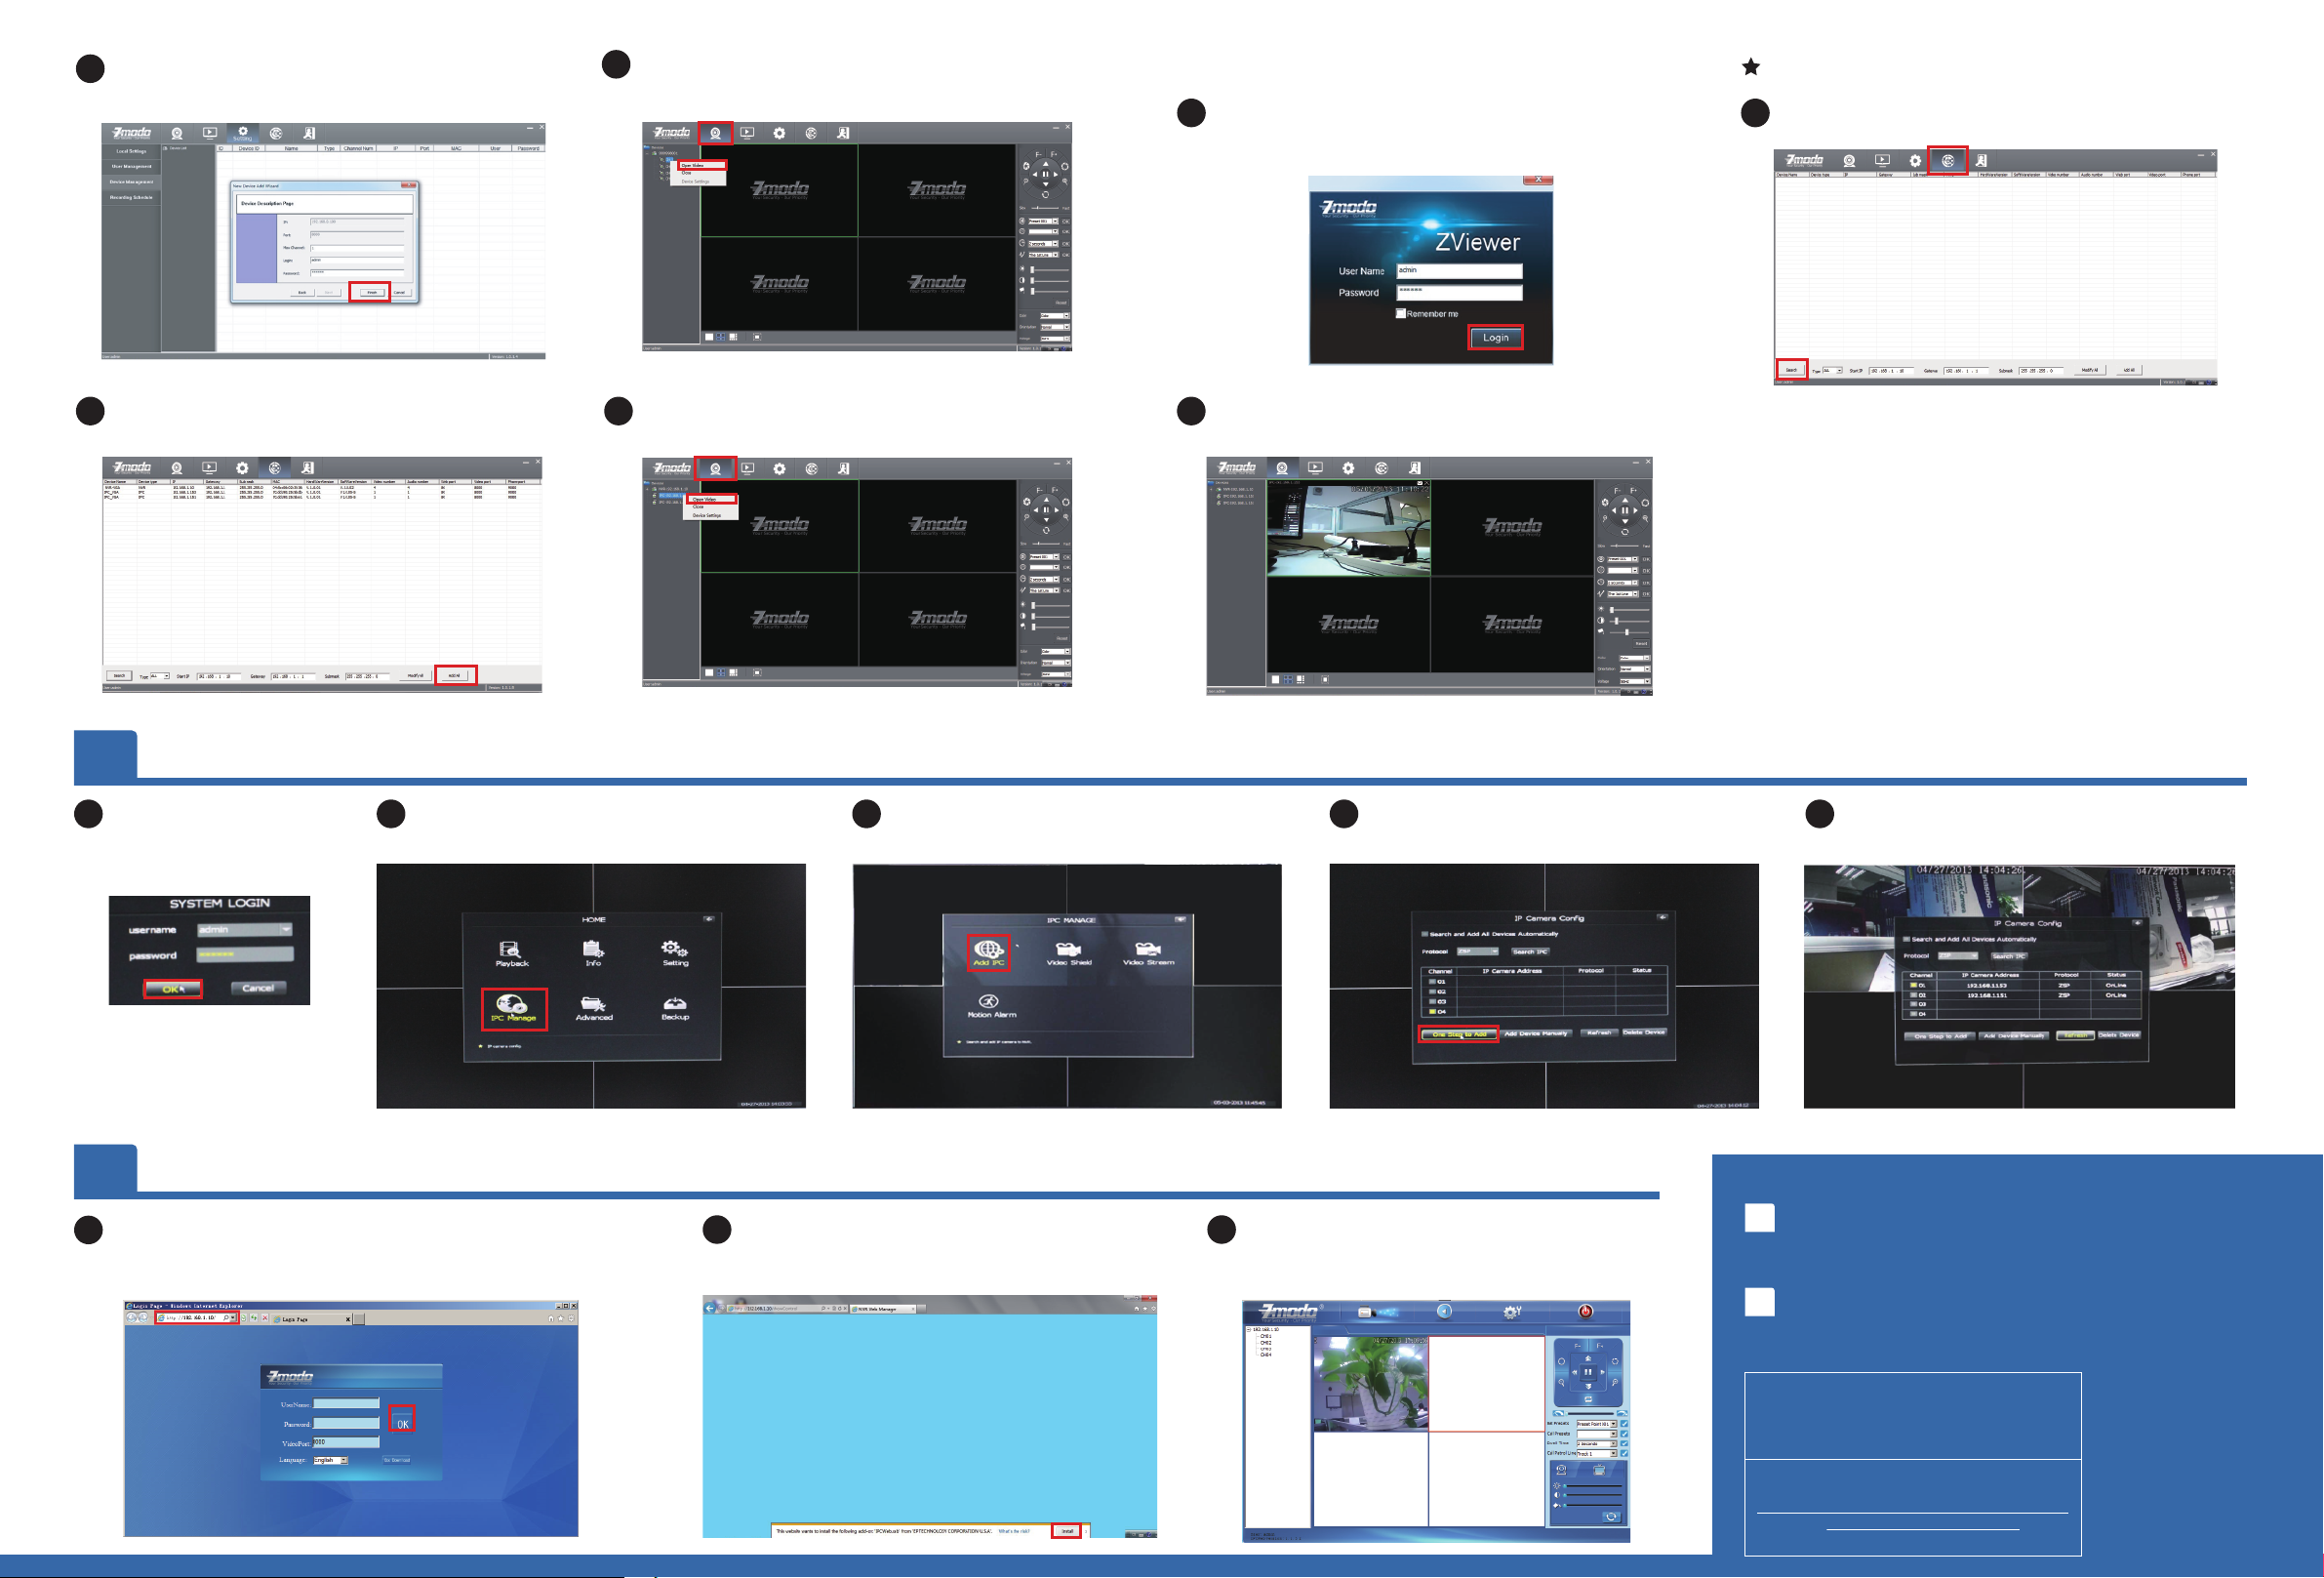
Enter “Login”(Default: admin) and “Password”
5
(Default: 111111), then click [Finish].
Go back to the Live interface, right click the device
6
from the list, and select "open video", the video stream
will display in the first available window.
Second Method: Search your LAN
Launch ZViewer on your PC, enter “User Name”
1
(Default: admin) and “Password” (Default: 111111),
then click [Login].
Note: NVR and PC must be in the same LAN.
Find “Discovery”, and click [Search] on left bottom
2
to search device.
Click [Add all] to add your devices, you will be
3
prompted after successfully adding them.
4
1
LIVE VIEW OF IP CAMERA ON MONITOR
Power on NVR, you will see
the NVR log interface, enter
the default password
“111111”, and click [OK].
Click [IPC Manage], this will take you to the
2
“IPC Manage” section.
Go back to the Live interface, right click a device
4
name from the Device List, then click [Open Video].
Click [Add IPC], this will take you the “IP
3
Camera Config” section.
The video can now be seen within your local
5
network.
Click [One Step to Add] to automatically
4
search the IP cameras in LAN. System will
automatically add 2 cameras at one time.
Just wait 5-10 seconds, you will be able to see
5
the video stream.
5
1
LIVE VIEW OF IP CAMERA ON INTERNET EXPLORER
Navigate to 192.168.1.10 (NVR’s default IP address, or search
by IPCSearch) in your browser, this will take you to the login
section. Enter the default UserName “111111” then Password
“admin”, and click [OK].
You will be prompted with “This website wants to
2
install the following add-on”. Click [Install] to run
the necessary controls.
It may need 30 seconds to download the controls.
3
System will automatically enter to the preview
interface. Double click the device or channel to
see the video.
Follow the steps below to troubleshoot issues.
1
Unable to access IP Camera by 3G or Internet
Ensure router’s hotspot is turned on.
Ensure [UPNP] is enabled on the router.
Unable to access Internet after your device was
2
successfully set-up.
Unplug the power of camera, wait 10 seconds then power the
device again. The Wi-Fi function will restart.
Wireless Security System
If you ever have any problems setting up or
using this product, call the TOLL-FREE
number below for additional assistance.
FREE
Telephone Service Hours: Mon-Fri 8:00am-8:00pm CST
Please go to www.zmodo.com/support-software/ to
download the installation software and user manual.
866-551-6881
 Loading...