

Page 1

H.264 Standalone DVR
16 CH
User Manual
DVR User Manual
For further help, please visit
kb.zmodo.com
Page 2

16-Channel H.264 DVR User Manual
Chapter 1: Overview .................................................................................... 1
1.1 Introduction ..................................................................................... 1
1.2 Packaging and Accessories ........................................................... 1
1.3 Main Features ................................................................................. 1
1.5 Product Appearance and Interface Definition ................................. 3
1.5.1 Front Panel .......................................................................... 3
1.5.2 Back Panel ........................................................................... 3
1.5.3 Setup Diagram ..................................................................... 4
1.6 Remote Controller .......................................................................... 4
1.7 Mouse ............................................................................................. 5
Chapter 2: Quick Installation ....................................................................... 6
2.1 HDD Installation .............................................................................. 6
2.2 Boot ................................................................................................ 6
2.3 System Login .................................................................................. 6
2.4 Shortcut Menu ................................................................................ 7
2.4.1 Main menu ........................................................................... 7
2.4.2 Key Lock .............................................................................. 7
2.4.3 Channel Switch .................................................................... 7
2.4.4 Video Search ....................................................................... 7
2.4.5 Start Sequence .................................................................... 7
2.4.6 Start Cruise .......................................................................... 7
2.4.7 PTZ Control.......................................................................... 7
2.4.8 Mute ..................................................................................... 8
2.4.9 Manual Recording /Stop Recording ..................................... 8
2.4.10 Zoom .................................................................................. 8
2.4.11 PIP……………………………………………….…………...10
Chapter 3: Menu Settings ......................................................................... 10
3.1 Main Menu ................................................................................... 10
3.2 Recording Mode .......................................................................... 11
3.3 Video Search ............................................................................... 12
3.4 Backup ......................................................................................... 13
3.5 Hard Disk Management ............................................................... 14
3.6 Basic Setup .................................................................................. 14
3.6.1 System Language ............................................................. 15
i
Page 3

16-Channel H.264 DVR User Manual
3.6.2 Time setup ........................................................................ 15
3.6.3 User Password ................................................................. 16
3.6.4 Cameras ........................................................................... 16
3.6.5 Video / Audio ..................................................................... 17
3.7 : Advanced ................................................................................... 18
3.7.1 Alarm ................................................................................. 18
3.7.2 System Info ....................................................................... 19
3.7.3 Motion Detection ............................................................... 20
3.7.4 Mobile Phone Monitoring .................................................. 21
3.7.5 System Maintenance ........................................................ 21
3.7.6 Zoom .................................................................................. 22
3.7.7 Network Setup .................................................................. 22
Chapter 4: DVR Network .......................................................................... 24
4.1 Functional Characteristics ........................................................... 24
4.2 Installation and Download of Controls ......................................... 24
4.3 IE Login ........................................................................................ 24
4.4 Real-Time Preview ...................................................................... 25
4.5 Record Playback ......................................................................... 25
4.6 Recording Mode .......................................................................... 26
4.7 Alarm Setup ................................................................................. 27
4.8 PTZ Control ................................................................................. 27
4.9 Network Setup ............................................................................. 27
4.10 System Setup ............................................................................. 28
4.11 Host Info ..................................................................................... 28
Appendix A: Android Setup ................................................................ 29
Appendix B: iOS Setup………………………………………………….30
Appendix C: FAQ ………………………………………………………..31
Page 4

16-Channel H.264 DVR User Manual
Thank you for buying our DVR
Dear Customer,
Thank you for choosing to purchase and use our product! If while using this product you
encounter any technical problems or problems with quality, please contact us. We are ready to
serve you. Before using this product, please carefully review the warranty information.
1. Service Contract
This device may be returned for a refund from the seller within 30 days. Outside the return
policy and within 90 days of the purchase a defective device will qualify for a replacement at the
discretion of Zmodo. This device otherwise comes with a 1 year limited parts and labor
warranty.
2. Requirements for Return or Replacement
The products outward appearance should have no scratches, dirt, dents, blemishes, or
alterations of any kind. A copy of the purchase invoice and warranty certificate will be
required.
3. Warranty Restrictions
In the event of the following situations, regardless of expiration Date, location, repair or part
replacement, our company must receive payment, and is not liable for any payment to the
consumer. All resulting losses will be the consumer’s responsibility:
• In cases of use causing the product’s malfunction or damage, or if the environment is
not suitable for the product’s usage and causes malfunction or damage;
• In cases of natural disasters, as defined by law, or unavoidable circumstances that are
not related to the product’s quality that cause the product’s malfunction or damage;
• In cases that the consumer’s purchase receipt and the product ID number/model number
written on the warranty card are inconsistent;
• In cases that the consumer’s use, care, or protection inadvertently cause the machine’s
malfunction or damage;
• In cases that the product’s up-to-standard certificate is damaged;
In cases that there is no purchase receipt or warranty card;
• In cases that the repair warranty has already expired.
4. No other warranties, other than Zmodo’s repair warranty rules are acknowledged by Zmodo.
5. In order to ensure consumer’s rights, please carefully read the repair warranty content.
6. Zmodo reserves the right to update and change product software at any time without notice.
This manual may not directly reflect all aspects of your DVR or your DVR version. Software
updates (when available) can be found on kb.zmodo.com.
Best regards,
Zmodo Customer Care
Page 5

16-Channel H.264 DVR User Manual
1
1.1 Introduction
Chapter 1: Overview
This SFN Series DVR is 16-channel standalone digital video record that uses H.264
video compression for playback main profile with multiplex functions: record, playback,
live preview, remote preview, and backup supported.
It is a professional, high performance, intelligent, audio & video solution with a
user-friendly GUI, and practical industrial design. This series DVR is suitable for use at
home, office, small business and most common security and surveillance applications.
1.2 Packaging and Accessories
Following parts are included in the package:
(1)ZMD-DR-SFN6 CCTV Safety DVR
(2) AA Batteries
(1)IR Remote Control & Mouse
(1)DVR Manual
(1) DC12V3A power adapter(12V5A is required if two HDDs are installed in DVR)
All relevant software can be downloaded at http://files.zmodo.com
1.3 Main Features
◎ Standard H.264 video compression format
◎ 16-bit true-color semi-transparent graphical menu interface, menu option tips
◎ Variety of recording modes including manual, timed, motion detected, and alarm
recording
◎ Optimized 4-channel simultaneous playback
◎ Multiple Backup Options (USB flash drive and network)
◎ One USB 2.0 for data backup and one USB1.1 for the mouse operation
◎ Multi-function operation, recording, playback, monitor, backup, and network
transmission can be realized at the same time
◎ Dual stream technology
◎ Supports network multi-screen, real-time viewing, parameter settings,
backup, or playback
◎ Supports mobile phone monitoring
◎ Supports event classification and precise time search and playback
◎ Default settings recovery
Page 6

16-Channel H.264 DVR User Manual
2
1.4 Technical Parameters
Features
Description
Operating System
Embedded LINUX
Video Compression
H.264
Video Input / Output
16channel BNC 1 VGA
Audio Input / Output
2/1 channel BNC
Alarm Input / Output
8 channel input 1 channel output (switch)
Display Split
1/4/9/16 channels
Multiplex Operation
Live, recording, network, mobile
phone, surveillance simultaneously
Recording Mode
Timer/Manual/Motion Detection/Alarm
Recording Frame Rate
Recording Quality
Best, Fine, Normal
Recording Resolution
CIF(352*288)
Recording Playback
4 channels playback simultaneously
(The playback channel is optional. Supports
remote playback)
Recording Backup
Supports USB drive backup, network backup,
backup files by time
HDD
Supports 2 SATA HDD, max capacity 2TB(ea.)
Network Transmission
16 channels with CIF resolution
Email Alarm
Send notification to the designated Email
PTZ Control
Supported
PTZ Protocol
PELCO-D, PELCO-P
PIP
Supported
Zoom
Supported
Network and Protocol
1 RJ-45 10/100M via Ethernet , support
TCP/IP,DHCP,DNS,DDNS,SMTP,NTP, etc.
Capture Function
Supported
IE Browser
Supported, max 5 users on line
Client Software
Supported, max 5 users on line
Dual stream
Multi-language
Supported
Mobile Phone Surveillance
Supports iPhone and Android; max 3 users on
line
SDK Package
Optional
Mouse Interface
USB1.1
Backup Interface
USB2.0
Remote Controller
Support
User Authority
Support multi-level user authority distribution
Power Adapter
DC12V/5A(2 HDD) or 12V/3A(one HDD)
Working Temperature
-20℃ - 60℃
Working Humidity
SIZE(mm)
354(W) * 230(D) * 45(H)
Page 7
16-Channel H.264 DVR User Manual
3
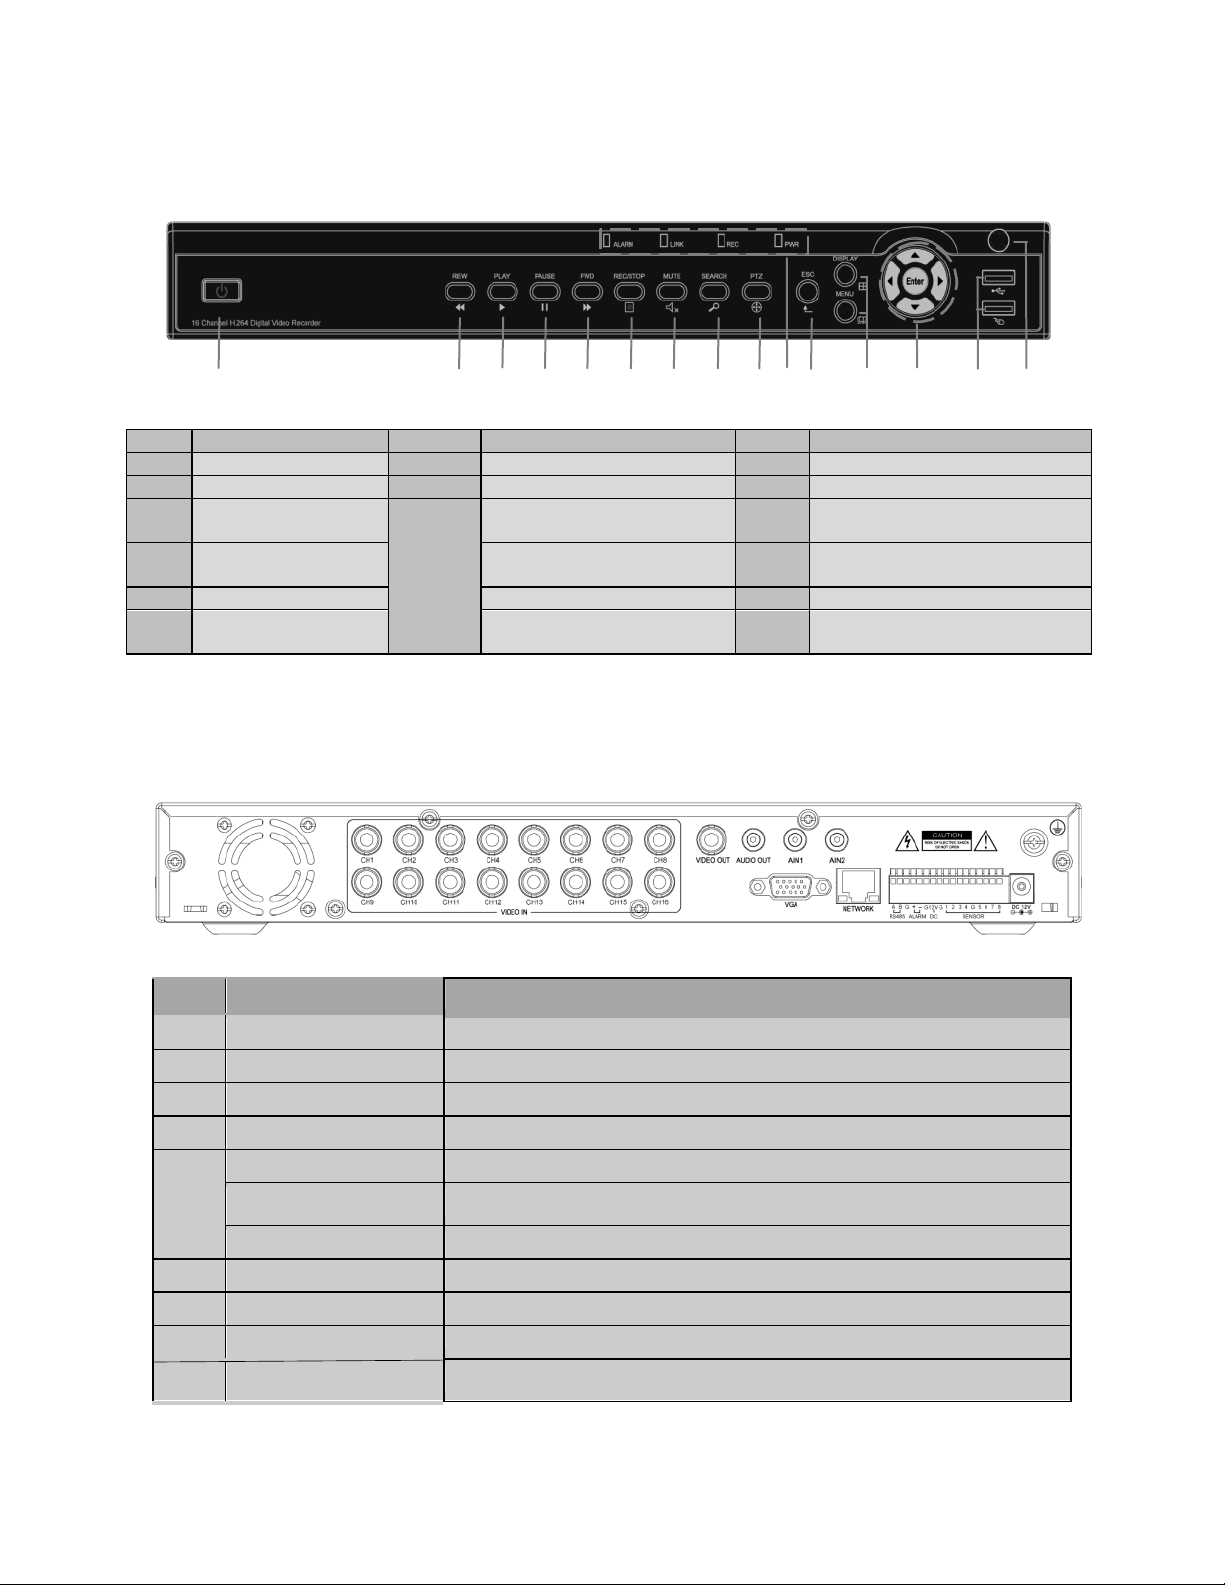
1.5 Product Appearance and Interface Definitions
1.5.1 Front Panel
1 2 3 4 5 6 7 8 9 10 11 12 13 14 15
No.
Definition
No.
Definition
No.
Definition
1
Power Switch
7
Mute
9
PTZ Control
2
Rewind
8
Video Search
11
Exit/Return
3
Play
10
(Refers
to LED
Lights)
ALARM: Alarm Indicator
12
Display: Display Mode
Menu: Main Menu
4
Pause
ALARM: Network
Connection Indicator
13
Up, Down, Left, Right, and
Enter
5
Forward
REC: Video Recording
14
USB Port
6
Manual Start/Stop
Recording
PWR: Power
15
Remote Control Infrared
Receiver
1.5.2 Back Panel
No.
Physical Interface
Interface Description
1
1-16CH Video-in ports
Connect analog video(camera) signal input, standard BNC
2
Video out
Connect to BNC video output
3
AIN1,AIN2
Connect active audio signals, such as pickup
4
Audio out
Connect the audio output
5
VGA
Connect VGA monitor, such as computer monitor
6
NETWORK
Connect the Ethernet
7
RS485 / ALARM / DC
PTZ control, alarm switch output, DC 12V output for assistance
8
SENSOR 1-8
Connect alarm switch input
9
ALARM
Connect alarm switch output
10
DC12V
Power input: DC 12V/5A or 12V/3A(one HDD)
11
G
Grounding
Page 8
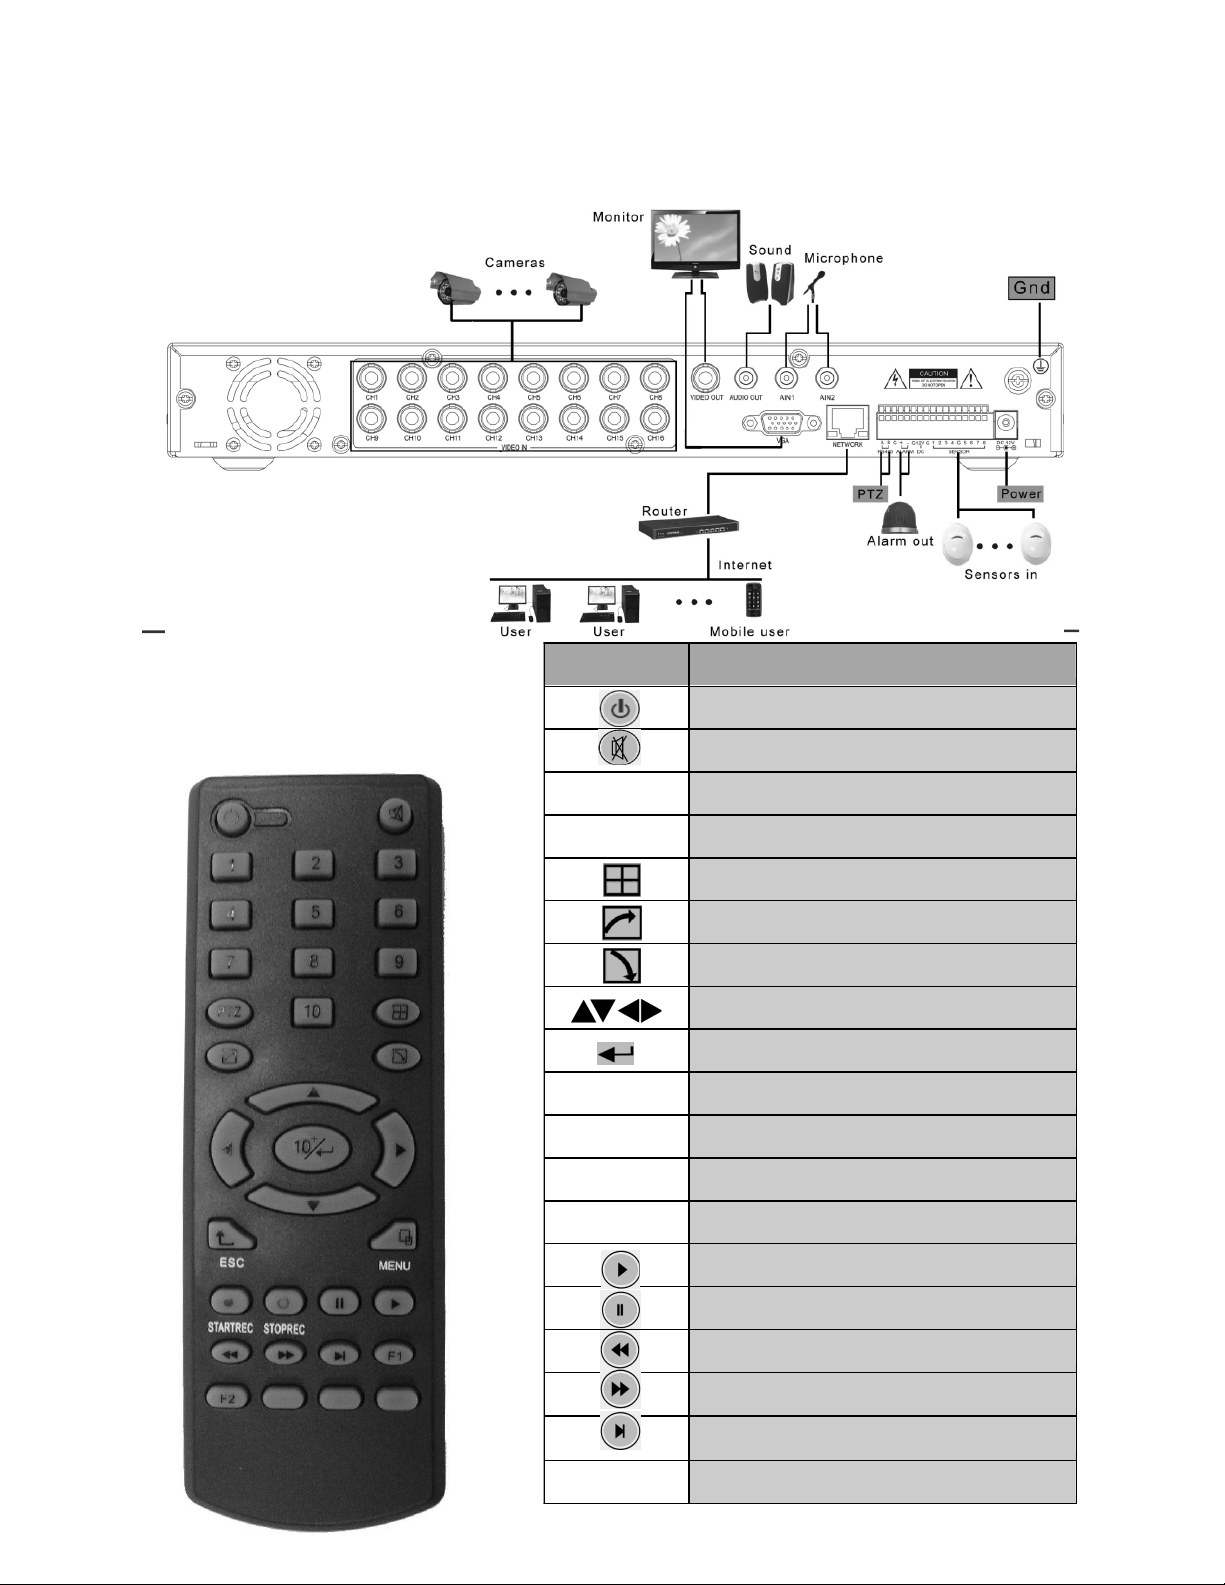
16-Channel H.264 DVR User Manual
4
Key
Functional definition
Not Used
Mute
0~10
Channel Selection; Number Keys
PTZ
PTZ Control
Single and Multi-Split Screen
Quit Shortcut Menu
Shortcut Menu
Direction Buttons
OK or 10+x Channel(x=1-6)
ESC
Exit / Return
MENU
Enter the Main Menu
STARTREC
Start Recording
STOPREC
Stop Recording
Video Search
Stop Playing
Fast Backward
Fast Forward
Step Forward
F1, F2
Not Used
1.5.3 Setup Diagram
1.6 Remote controller
For reference only
Page 9

16-Channel H.264 DVR User Manual
5
1.7 Mouse
This equipment supports a wired USB mouse that is used to navigate the DVR’s
menus. Insert the USB plug directly into the USB port. Mouse operation is similar to
WINDOWS operations.
Mouse
Action
Function
Right Button:
Enter System Main Menu. From the Main Menu, pressing the Right
Mouse Button will return to the previous page.
Double-clicking will apply to both live preview and playback.
Double
Left-Click
Left-Click
Click and
Drag
Double-click on a desired channel to zoom the selected channel to
full screen. Double click the zoomed-in screen again to return the
viewing method to multi-channel viewing.
Channel Selection: Left clicking on a desired active video channel
will move the highlight to that channel and cause any commands from
the PTZ menu to affect that channel
Menu Use: Left clicking on any icon on the menu will cause the DVR
to act upon that selection.
Drop down boxes can be opened by clicking the downward facing
arrow on the box.
Functions as Enter/Select button in all purposes
Left clicking in a blank field in the menu will bring up the virtual
keyboard allowing. Left-click to select letters, numbers, and symbols
to insert in to the field.
Click and drag in certain screens to select an area. In motion
detection, this will block off an area that will not be used. In playback
this will create a digital zoom in to the selected area.
Page 10

16-Channel H.264 DVR User Manual
6
Chapter 2: Quick Installation
2.1 HDD Installation
The manufacturer recommends that the hard disk be installed by a technician t o
avoid damage to the equipment and hard disk. The DVR must be powered off
before installation. This equipment supports a hard disk with a SATA interface. Please
see http://kb.zmodo.com for recommended hard drives and hard drive
requirements.
Installation procedures are as follows:
A. Unscrew the screws that secure the DVR cover and remove the cover. There will
be a bracket or an empty space where the hard drive will sit.
B. Connect the red data cable and multicolored power cable firmly.
C. Put the HDD into the bracket or open area above directly over the four screw
holes.
D. Affix the HDD onto the bracket or DVR base with screws and replace the DVR
housing.
Note: The new hard disk drive must be formatted to function with the DVR.
2.2 Boot
Connect the power adapter to the power cord socket in back panel, and press the
power button on front panel. The DVR will turn on, the power indicator POWER will light
up, and the monitor will display a 16-channel split image. If a non-formatted hard
disk exists in the DVR, it is required to format the HDD before recording video footage.
By default the DVR is set to begin immediately recording when turned on with a
working and formatted hard drive installed. The red REC LED light will confirm that the
DVR is recording.
Notes:
1. If hard disk is not installed when the DVR is powered on, or the newly installed hard
disk is not formatted on the DVR, the red H logo will be shown in video preview picture.
2.The newly installed hard disk cannot be used until formatted in the DVR as follows:
Main Menu → HDD → HDD Format. The system will be restarted after completion of
formatting.
2.3 System Login
The DVR Device ID is 000000 without any
password. The user can log in to the main
menu directly. The administrator can change
the DEVICE ID and PASSWORD in the Basic Settings – User Password menu. The
user can set an ordinary user password and administrator password. The
administrator has all the operating privileges, and an ordinary user can only monitor
video, search, and playback.
Note: Admin and User are differentiated solely by the password. Do NOT set them to
the same password as the system will default to the user and the DVR will be locked.
Page 11

16-channel H.264 DVR User Manual
7
2.4 Shortcut Menu
Click the right button on the DVR interface or right-click on the mouse after system
startup to open the Quick Operations popup menu. This menu has the following setting
options: MAIN MENU, KEYLOCK, CHANNEL SWITCH, VIDEO SEARCH, START
SEQUENCE, START CRUISE, PTZ CONTROL, MUTE, MANUAL RECORD, STOP
RECORD and PIP MODE.
2.4.1 Main Menu
Click MAIN MENU to enter the main menu interface. See 3.1 for more information about
the main menu.
2.4.2 Key Lock
When the password function is enabled (please see 2.3), click the right button in
live preview and select KEYLOCK in the pop-up menu. The system interface
will be locked immediately, and the password is required to log in to access the
menus.
2.4.3 Channel Switch
Allows the user to select a specific channel.
2.4.4 Video Search
Please see Chapter 3.
2.4.5 Start Sequence
Start video channel automatic sequence function. Right-click to exit this feature.
2.4.6 Start Cruise
Begin the PTZ cruise set by the user. This will be replaced with Stop
Cruise when this function is enabled.
Note: This feature can only be used after the user sets up PTZ control
parameters and preset points.
2.4.7 PTZ Control
Click right button in main interface and select PTZ Control. The following interface
will appear:
Page 12
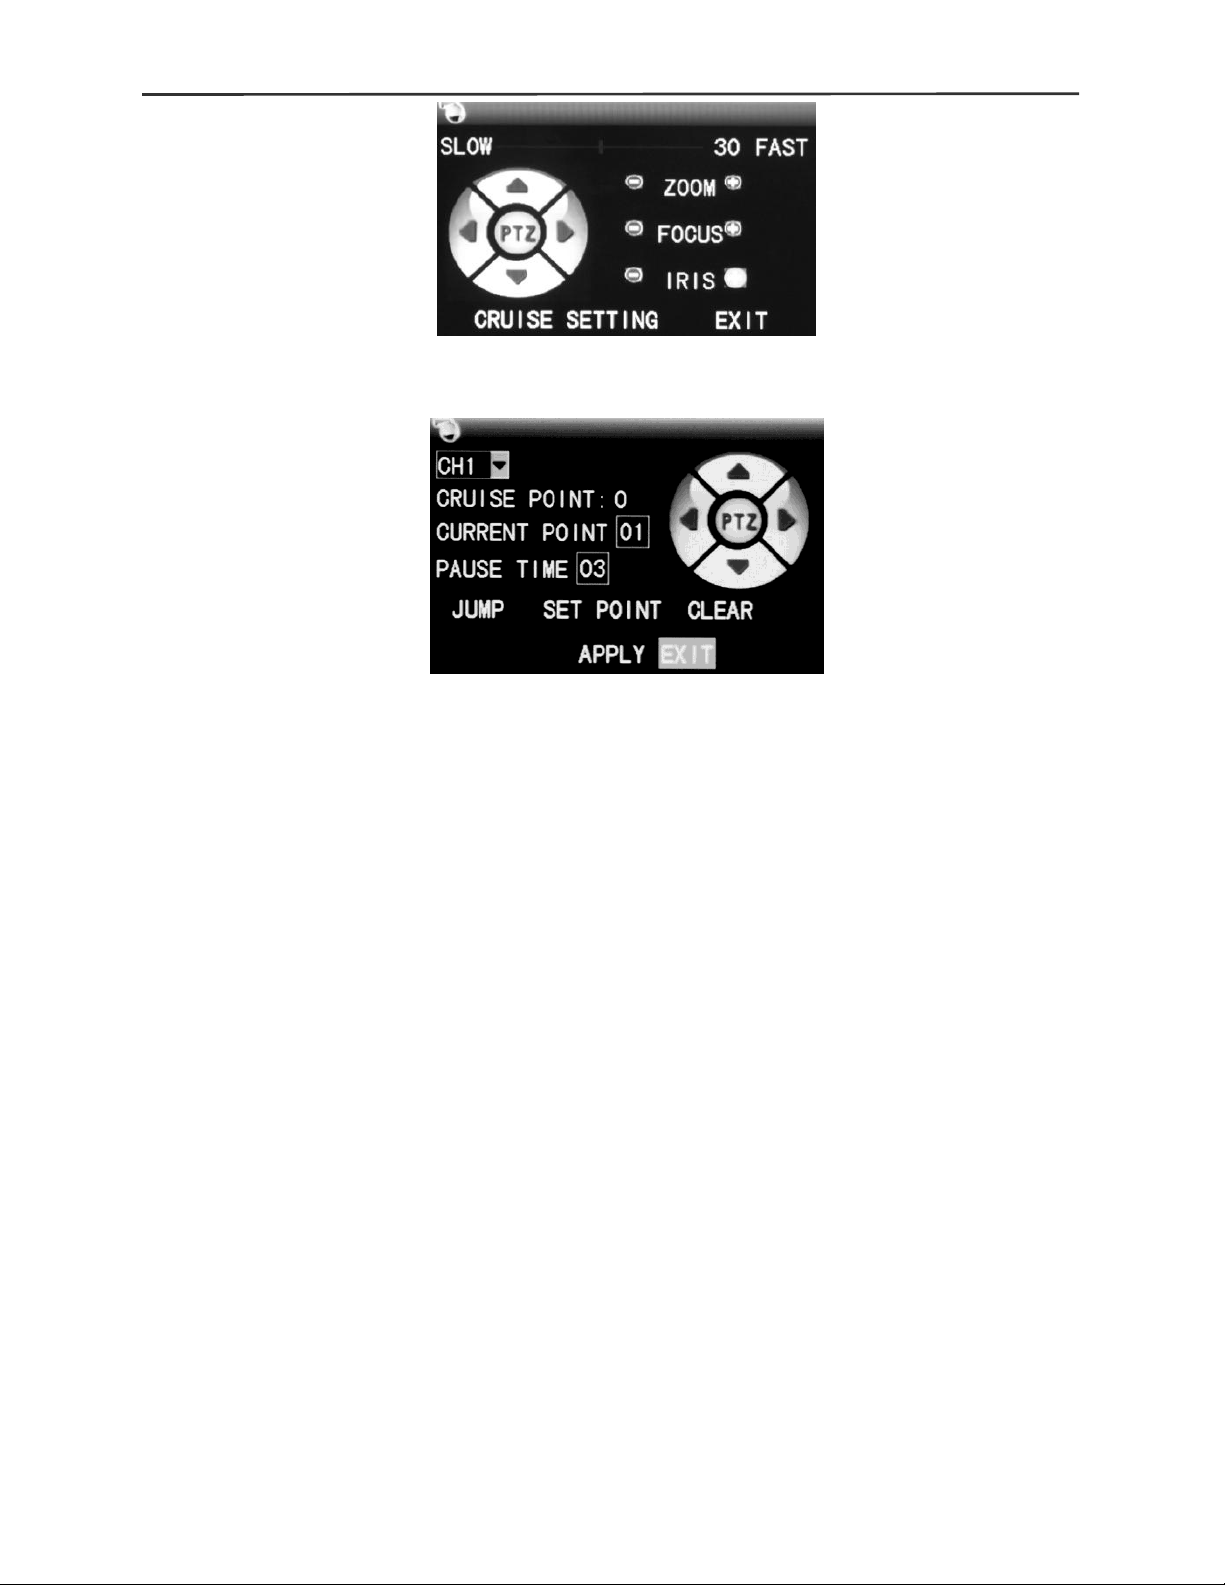
16-channel H.264 DVR User Manual
8
PTZ speed (fast or slow) can be controlled in this interface. Zoom, focus, and aperture
are also adjustable in this menu.
Cruise Setting:
1. Select the PTZ channel.
2. Set the pause time(s).
3. Adjust the arrow keys to the position which needs to be monitored.
4. Select SET POINT. Repeat steps 2–4 to set additional presets.
5. Select the APPLY button to save the settings.
6. Exit to live screen and select START CRUISE.
Notes:
1. To set up more points, repeat steps 2-5.
2. To view the current points already set position press JUMP.
3. To delete the point has been set, enter the point number and select CLEAR.
2.4.8 Mute
Turn on / off sound.
2.4.9 Manual Recording / Stop Recording
If timed recording is on (please see Chapter 3), and manual record is enabled
manual record will override any timed recording schedule. If “Record When powered
On Mode” is enabled, then this function is not available.
2.4.10 Zoom
In single-channel full-screen mode, this function can be done by dragging the
mouse to marquee area to enlarge
Page 13

16-channel H.264 DVR User Manual
9
2.4.11 PIP
In the single-channel full-screen mode, PIP enables floating images of other channels.
Chapter 3: Menu Settings
3.1 Main menu
The main menu has PLAYBACK, RECORD, HDD, BASIC, ADVANCED, and
EXIT options as shown below:
Notes:
1. The setup of all the submenus below will not take effect until ENTER is pressed..
2. When the cursor is moved to any option, a description message of this option will
be displayed in the lower part of the screen.
Page 14

16-channel H.264 DVR User Manual
10
3.2 Recording Mode
Enter the “Recording Mode” screen from MAIN MENU—RECORD, as shown below:
Video Channel: Select either a specific channel or all channels.
Resolution: CIF (352 x 288).
Quality: Available in BEST, FINE, and Normal.
Frame rate: Adjust frames per second.
Audio: Enables or disables audio recording. Audio uses more storage space on the
hard disk drive.
REC.MODE: Available in WHEN POWERED UP and BY TIME.
WHEN POWERED UP: Will automatically begin recording as soon as the DVR is turned
on and will continue until this is changed to BY TIME. Individual channels can still be
turned off in this menu for this purpose.
BY TIME: Records based on a schedule determined by the user. When BY TIME is
selected, the SCHEDULE button will appear on the right. Move the cursor here and
press ENTER to enter the recording schedule, as shown below:
CHANNEL: Choose either ALL or a single channel.
Time configuration: First select one of the three modes of recording: TIMED,
ALARM RECORDING, and NO RECORD. After clicking on the desired record type,
the user may fill in the grid blocks that correspond to an hour of the day. Each block
can be configured into different recording modes by marking them into different
colors representing the respective record modes.
FILE LENGTH: Left-click or press Enter to select the recorded file length, with the 4
options of 15 min, 30 min, 45 min, and 60 min.
Page 15

16-channel H.264 DVR User Manual
11
3.3 Video search
Enter the “Video Search” screen from SUB MENU →VIDEO SEARCH or MAIN
MENU→PLAYBACK as shown below: This unit supports 3 video search modes:
A. Time Based Playback
Time input: First, select the corresponding channel and then adjust the date
and time to be searched. Left-click or press Enter and the directional keys or enter
digits directly for year, month, date, hour, and minute, and then click Play to play back
the recording that covers this point in time. Up to four channels can play back
simultaneously.
B. Playback Based on Record Calendar
Mark the channel and enter the year, month, and date to be searched in the
DATE box and click SEARCH to load recorded videos in the calendar, as shown below:
Month: Displays recorded videos by month (Shown above as January). A green
block indicates normal recording, a red block indicates alarm recording, and the
background color indicates no recordings are on that day. Clicking or selecting a
day in the calendar will load that specific day’s recordings in the section below.
Date: Displays the recordings for a specified date (shown above as the 18th).
Color distinctions are the same as the month. Each hour is broken in to 2
segments and clicking one will take the user directly in to the playback for that time.
C. Playback Based on File list
Enter the year, month, and date to be searched in the DATE box, and click
SEARCH. Select the desired day of the MONTH bar and then FILE LIST and the
“File List” screen will pop up, as shown below:
Type: The user may narrow down the files shown by recording type (alarm,
timed, or all):
Page 16

16-channel H.264 DVR User Manual
12
Notes:
1. In file list the user will be given information pertaining to the channel, time frame
of the recording, size of the individual file, and the recording type. The operation
of backing up files to the USB port can be performed by checking the BACKUP
checkbox at the far right side of the file. Only files from one page may be backed
up at a time. To back up files from another page, the user must select them
separately.
2. When you have selected a certain recorded file from the record list by moving
the cursor up and down, press Enter to enter the “Playback” screen.
3. If Record Time has already been enabled in the Setup section, the playback
screen will display the timestamp. If Record Time is set as “Off” in the “Setup”
screen, there will be no timestamp displayed on the playback “Playback.”
4. During playback the user may use the playback features bar located at the bottom
of the screen to slow, rewind, fast forward, or exit the current recordings playback.
3.4 Backup
Enter the “File List” (see 3.3 Video Search) screen for the backup operation.
The recorded file may be backed up by a USB storage device. Before the record
file is backed up, the user must insert the peripheral storage device into the USB2.0
slot of this unit. This product supports the plug-and-play operation of USB devices (The
DVR does not support devices that require a driver installation).
Move the cursor up and down in the “Detailed File List” screen to select a
certain recorded file. After Enter is pressed in the Backup check box, a will appear
in this box, indicating that this record file has been selected. At this point the user
may move to the backup option in the bottom right of the window and press select. A
pop-up notification will show the progress of the file backup:
Notes:
1. When the available space of the backup device is less than the capacity of the
recorded file, the system will prompt the user with Not Enough Space.
2. After the recorded file has been backed up, unplug the backup device directly. See
Chapter 4: DVR Network for network backup.
Page 17

16-channel H.264 DVR User Manual
13
3.5 Hard Disk Management
Enter the “ HDD Management” screen from MAIN MENU →HDD, as shown below:
STATUS: After connecting the hard disk, the system will automatically detect if the
hard disk is formatted. If the hard disk needs formatting, UNFORMATTED will be
displayed in the hard disk state. Check the format box and select FORMAT HDD to
have the DVR format the disk. If the system detects any available hard disk, the hard
disk state will be ONLINE.
ALL/FREE: Refers to the total storage capacity and current remaining storage
capacity of the hard disk;
TIME LEFT: Refers to the time remaining for recording based on the currently set
picture resolution and quality.
FORMAT: Click the check box and a will appear in this box, indicating that this
HDD has been selected.
OVERWRITE: ENABLE: The hard disk will overwrite the earliest recordings
when its memory is full; DISABLE: Recording will stop when the memory of the hard
disk is full.
HDD FORMAT: If the hard disk is used for the first time, it is necessary to format
the hard disk. Check the FORMAT box, then click the FORMAT HDD button, and
then click ENTER for formatting in the pop-up prompt message dialog box,
otherwise click CANCEL. After clicking FORMAT HDD, the system will prompt, “You
will lose all data by formatting the hard disk. Will you continue?” Press Enter, and the
system will state: “Formatting…” then “ Format Successful.” The system will restart
automatically.
USB FORMAT: Allows the user to format a USB device that is not currently capable of
backup. The DVR must still be able to detect the device in order to do this.
The DEFAULT button is used to restore the factory default values.
Note: It is recommended that the hard drive be formatted before beginning recording
for the first time, even if it does not require it.
3.6 Basic Setup
Enter the “Basic Setup” screen from MAIN MENU →BASIC, as shown below:
Page 18

16-channel H.264 DVR User Manual
14
The “Basic Setup” includes the 6 options of LANGUAGE, DATE/TIME, PASSWORD,
CAMERAS, VIDEO/AUDIO SETUP, and EXIT.
3.6.1 System Language
Move the cursor to the LANGUAGE option (The icon is enlarged and highlighted to
indicate selection.), and press ENTER to enter the “Setup” screen of this option, as
shown below:
The system supports 15 languages. After choosing the desired language, click APPLY
button to save, and it will go into effect after a system restart.
3.6.2 Time Setup
Move the cursor to the DATE/TIME option (The icon is surrounded by a yellow frame
to indicate selection.) and press Enter to enter the “ Time Setup” screen of this
option, as shown below:
The system time, date format, time format, time zone and summer time can be set up
in this screen. If the DVR is networked it will automatically update to the set time zone.
Page 19

16-channel H.264 DVR User Manual
15
3.6.3 User Password
DEVICE ID: Enter digits to set a desired Device ID. This number will act the same as a
username.
PASSWORD: Press Enter to select ENABLE or DISABLE for the user password. If
this option is enabled, the user has to enter his/her password when logging in to gain
access to menu functions. If it is disabled, the main menu of the system can be logged
in directly.
USER PASSWORD: Set the User password. This password will only allow basic
functions and access to the DVR.
ADMIN PASSWORD: Set the Admin password. This password will allow access to all
functions of the DVR.
IMPORTANT: DO NOT SET BOTH PASSWORDS TO BE THE SAME.
Notes:
1. This unit has no initial password. When the user sets passwords, it is
recommended that the two passwords are set up at the same time. If any set
password is forgotten (or both are set to the same), please, contact Zmodo.
Zmodo will not reset a password without proof of ownership.
2. Only the locking, channel changeover, video search, log search, backup, PTZ
control, mute, manual recording, and stopping recording functions are available to
normal users.
3.6.4 Cameras
Move the cursor to the CAMERAS option (The icon is surrounded by a yellow frame to
indicate selections), and press Enter to enter the “Setup” screen of this option, as
shown below:
Page 20

16-channel H.264 DVR User Manual
16
Name: Move the cursor to the input box of this option, and press Enter to enter the
“Input” screen of this option. Numerical, English and Chinese pinyin input methods
are supported.
Position: Move the cursor to this option, and press Enter to change over between
name positions; there are 5 setup options: top left, bottom left, top right, bottom right
and off.
Color: Move the cursor to Setup on the corresponding channel, and press Enter to
enter the “Color Setup” screen as shown below:
Press Enter or drag the cursor to adjust the picture color, including the four options of
chromaticity, brightness, contrast, and saturation. Press Enter to exit and save the
parameters.
Preview:
On: The picture of this channel can be seen in the “Video Preview “screen;
Off: The Video Preview screen of this channel has been blocked, but the recording
settings do not change.
Preview Time: On: The system date and time are displayed in the “Live Preview”
screen.
Record Time: On: A timestamp can be displayed in the playback of a record file.
Channel SEQ: Adjust the channel sequence times and split view options.
3.6.5 Video / Audio
Move the cursor to the VIDEO/AUDIO option, (The icon is surrounded by a yellow
frame to indicate selection.) and press Enter to enter the “Setup” screen of this option,
as shown below:
CAMERA SYSTEM: Left-click or press Enter to change over between PAL and NTSC.
(All Zmodo Cameras sold in the US are NTSC).
Volume setup: Move the cursor to Volume Setup, left-click or press Enter to enter
the Volume “Setup” screen, and press Left, Right or drag the cursor with the mouse
directly to adjust the volume.
Note: The system will restart when the VGA resolution or the camera
resolution is modified.
Page 21

16-channel H.264 DVR User Manual
17
3.7 Advanced
Enter the following screen from MAIN MENU →ADVANCED:
The advanced functions include the seven options of ALARM, SYSTEM
INFORMATION, MOTION DETECTION, MOBILE PHONE SETTINGS, SYSTEM
MAINTENANCE, PTZ SETUP, and NETWORK SETUP.
3.7.1 Alarm
Move the cursor to the ALARM option, (The icon is surrounded by a yellow frame
to indicate selection.) and press Enter to enter the “Setup” screen of this option, as
shown below:
I/O CHANNEL/ALARM: Each channel corresponds to an I/O alarm state. When the
alarm input of a channel is triggered, the alarm record of the corresponding channel
will be started.
NO: Normally open.
NC: Normally closed.
OFF: Disable alarm circuit of this channel.
Note: When an alarm is produced, a red letter I will be displayed above the
corresponding channel in Live Preview.
HDD LOSS: On: When the system cannot identify the hard disk, an alarm will be
generated, and a red H will be displayed at the bottom left corner of Channel 1 in the
lower part of the “Video Preview” screen.
HDD SPACE: On: When the remaining space of the hard disk is less than 500M, the
lower part of the “Video Preview” screen will display. The space of the hard disk is
not enough. Please change the disk after shutdown.
VIDEO LOSS: On: When the video of a certain channel is lost, this channel will display
Page 22

16-channel H.264 DVR User Manual
18
in the lower part of the “Video Preview” screen: Video Loss.
ALARM MANAGE OUTPUT: The length of time of the DVR will output the alarm
signal when an alarm is generated, with the options of 0 sec, 10 sec, 20 sec, 40
sec, and 60 sec
BUZZER: The length of time of the buzzer will sound when an alarm is generated,
with the options of 0 sec, 10 sec, 20 sec, 40 sec and 60 sec.
Post Alarm Recording: The time the DVR will continue to record after the motion
detection alarm is triggered, with the options of 30 sec, 1 min, 2 min, and 5 min,
Email SETUP: This unit supports motion detection and e-mail alarm.
Note: To receive e-mail notifications, the user must connect the DVR to a router
with internet access. See Chapter 4 DVR Network for the setup process.
When motion detection is triggered, the system will extract a picture at the
time of triggering and send it to the corresponding mailbox.
SSL: A secure link transmission protocol, where the Off or On state is determined
by the mailbox server.
SMTP PORT: The port used by the SMTP server that some e-mail services employ.
SMTP: The server address of the mailbox used. All information must be obtained
from the e-mail service provider. Zmodo is not responsible for the performance and
upkeep of mail servers.
SEND EMAIL: The mailbox address used to send mails.
SEND PW: The password of the mailbox used to send mails.
RECV EMAIL: The address used to receive the picture transmitted after the
DVR alarm is triggered. Please mind the space limitations of the e-mail inbox.
3.7.2 System Info
Enter the “System Info” screen from MAIN MENU → ADVANCED FUNCTIONS, as
shown below:
The software version number, whole unit version number, MAC address and serial
number are listed in this screen.
Page 23

16-channel H.264 DVR User Manual
19
3.7.3 Motion Detection
Enter the “Motion Detection” screen from MAIN MENU →ADVANCED, as shown below:
MD CHANNEL and STATUS: Each channel has an independent status. Press Enter to
select motion detection On or Off.
SENSITIVITY: Each channel has a corresponding sensitivity setting, with the four
levels of 1, 2, 3 and 4, where 4 the is the most sensitive.
MD AREA: Each channel has a corresponding motion detection area setting. Move the
cursor to Setup of the corresponding channel, and press Enter to enter the motion
area setup screen of this channel. A red block indicates motion detection is
activated for this area and a transparent block indicates motion detection is not
activated, as shown below:
Operating Prompt:
Remote controller operation: Use (display mode) to select full screen or blank.
Mouse operation: Left-click the mouse and drag the motion box to set the area of
dynamic detection. Right-click when finished to return to the previous screen.
Motion Detection Setup Procedures:
A. Turn On the corresponding channel in the Channel Switch option;
B. Set the sensitivity level as necessary, usually set at 3 or 4;
C. Set the motion area of the corresponding channel in the Area Setup option;
D. In the “ Recording Mode” screen, set the corresponding channel to On in the
Channel option;
E. In the “ Recording Mode” screen, select BY TIME in the Record Mode option,
and click SCHEDULE to enter the “ Record Schedule Configuration” and set
the corresponding time to alarm recording (See timed recording in Recording
Mode for the setup method).
After the setup has been complet ed and motion is detection triggered, a red
letter M will appear in the screen of this channel. See Alarm Processes in Section
3.6.1 for alarm setup.
Page 24

16-channel H.264 DVR User Manual
20
3.7.4 Mobile Phone Monitoring
The mobile phone monitoring function of this series DVR is supported by
mobile phones of the Android and iOS operating system.
Mobile Phone Settings:
Enter the following screen from MAIN MENU →ADVANCED FUNCTIONS →MOBILE:
Mobile Username: The username that will be entered on the smart-phone when
connecting to the DVR. The default user name is admin. The username is case
sensitive.
Mobile Password: The password that will be entered in the smartphone when
attempting to connect to the DVR. The default is no password.
Service Port: This has a setting range of 1,024–65,535. This port has to be mapped
on the router, and its setup method is the same as the mapping method of the web
and media ports in the network section.
3.7.5 System Maintenance
Enter the “Maintain” screen from MAIIN MENU →ADVANCED, as shown
below:
AUTO RESET: When this option is set to On the user can set the restart frequency
and time of this device. On the new version this is called DVR Restart.
SYSTEM UPDATE: Copy the update file to the root directory of a USB flash drive,
then insert the USB drive into the USB slot of the DVR, and press SYSTEM UPDATE
to update the system. The screen will display the progress box of system update until
update is complete.
DO NOT unplug or turn of the DVR during updating. This can permanently disable the
DVR.
DEFAULT SETTING: Restore the system parameters to the default settings.
RESTART: Restart this DVR.
Page 25

16-channel H.264 DVR User Manual
21
3.7.6 PTZ
Enter the “PTZ” screen from MAIN MENU →ADVANCED, as shown below:
CHANNEL: Displays the channel for the PTZ settings that will be adjusted.
PROTOCOL: Select the protocol of the corresponding brand and model. Pelco-D and
Pelco-P are supported with Pelco-D being the default.
BAUD RATE: Select the baud rate used by the PTZ Camera, with the 4 options of
1200, 2400, 4800, and 9600
DATA BIT: 5, 6, 7 and 8 are available with 8 being the default.
STOP BIT: 1 and 2 are available with 1 being the default.
VERIFY: 5 options of None/Odd/Even/Mark/Space. None is the default setting.
ADDRESS: Set the address used by the PTZ camera connected to this channel.
AUTO CRUISE: Turn ON / OFF the channel PTZ cruise function. When Auto Cruise is
enabled, the user must activated is by selecting START CRUISE in the right-click
menu.
The PROTOCOL, BUAD RATE and ADDRESS must be set correctly in order for
the PTZ to function.
3.7.7 Network Setup
Enter the “Network” screen from MAIN MENU →ADVANCED, as shown below:
TYPE: Supports STATIC, DHCP, and PPPOE addressing.
STATIC: Configure the network parameters manually
DHCP: This will allow the DVR to auto-configure the network information.
Note: It is recommended to get an IP address by using DHCP: After selecting the
DHCP mode, select Apply then restart the DVR. After restarting, the system will
Page 26

16-channel H.264 DVR User Manual
22
establish a connection with the DHCP server automatically. When this is successful,
this unit will be allocated an IP address, which will be displayed on the screen.
Set the TYPE to STATIC after the DVR has successfully allocated an IP address to
the DVR, then select Apply and restart the DVR again. The DVR will keep the IP
address that was just allocated to the DVR.
PPPOE: Broadband dial-up network access, as shown below:
PPPOE User Name and Password: Fill in the PPPOE user name and
password provided by the Internet service provider.
MEDIA PORT: The port number used in the private protocol communication between
the DVR and the PC end; 9000 by default. If this port is occupied by any other
service, please modify it to an unused port.
WEB PORT: Set to 80 by default. If the administrator modifies the WEB port to any
port other than 80, such as 88, this port number must be included with the IP address,
for example: http://192.168.1.197:88 will be entered in the address bar when accessing
the DVR via the IE.
IP ADDRESS: The address in which the DVR will communicate on the network that it
is connected to. This address may not be in use by another device on the same
network.
SUBNET MASK: The subnet is dependent upon the network it is plugged in to. It will
have to use the same subnet as the router. Most home networks will have a subnet of
255.255.255.0
GATEWAY: The gateway should be set as the IP address of the router.
DNS: Domain Name Server; this is not essential for a basic hookup, but is required for
other functions like e-mail alerts and DDNS setup.
UPNP: Universal Plug n’ Play when connected to a compatible router this will allow
the router to automatically access the needed port forwarding rules with no extra
setup.
DDNS Setup
Click DDNS SETUP to enter the following screen:
DDNS: When a domain name resolution server is available, please select DDNS ON
SERVICE: The user may select their desired DNS service. Zmodo’s hosted DNS
Page 27

16-channel H.264 DVR User Manual
23
service is available free for use with all Zmodo DVRs. Please visit
http://www.zmododns.com/ for our free DNS service.
Host name: Enter the host name registered with the selected DNS service.
User name: Enter the user name registered with the DNS account created with the
specified DNS service.
Password: Enter the password registered with the DNS account created with the
specified DNS service.
Chapter 4: DVR Network
4.1 Functional Characteristics
Web access for the DVR software installation is run through the IE browser of
Windows itself. The DVR supports LAN and WAN access, as well as IP and domain
name access.
4.2 Installation and Download of Controls
Automatic Installation of Plug-ins Unit:
1. In order for IE to install the necessary plug-ins required by the DVR, the IE
security settings must be changed to allow the software to be installed. In order
to do this you will need to open an IE browser and go to TOOLS→ INTERNET
OPTIONS → SECURITY tab → CUSTOM LEVEL button. From this window, set
“Download and install unsigned ActiveX controls” and “Initialize and Script
ActiveX controls not marked as safe for scripting” both to Prompt. If you are on
IE version 9 or newer you will also need to disable “Allow ActiveX Filtering.”
2. After adjusting the ActiveX controls, enter the IP address of the DVR in the IE
address bar and press enter. Upon reaching the IP address of the DVR,
Internet Explorer will prompt the user with the installation of an ActiveX add-on.
Proceed with the installation as it directs. Once this is complete, the “User
Login” screen will display.
4.3 IE Login
If a password has not yet been set on the DVR click LOGIN. If a password has been
sent, enter it in the password field and then click LOGIN. This password is separate
from the DVR’s Device ID password and can be changed from within the web client.
Note: If the DVR host is in a LAN, but the INTERNET option has been selected, the
effect of the preview image will be non-real-time.
4.4 Real-Time Preview
Page 28

16-channel H.264 DVR User Manual
24
After logging in to the web client successfully, the live preview will automatically open
and all channels will be displayed as shown below.
Play control:
: Opens or closes the channel image
: Captures a still frame image of the highlighted channel
: Remote recording (See System Setup for the saving directory.)
: Divides the screen into 1, 4 parts respectively;
PTZ CONTROL: controls the upward, downward, leftward and rightward motion of
the PTZ remotely, and also the zoom, focus, aperture, and preset points of the lens.
4.5 Record Playback
Click PLAYBACK to enter the “Record Playback” screen, as shown on next page.
The user may select a date from the calendar from which you would like to review
video. The days with recordings will be denoted with bold numbers.
Once the day is selected, click REFRESH and it will load the specified day’s
video in the window below. Select the file to be played and double-click this file or
click PLAY to play it.
Click BACKUP and the file will begin downloading to the specified directory.
The progress bar will display above the video control keys place of the playback
timeline. (See section 4.10 for the Save Directory). After downloading a file, the
user may use the h.264>AVI button to convert the downloaded file into something that
can be played back in most standard media players.
Page 29

16-channel H.264 DVR User Manual
25
Shown to the right is the .264 to AVI conversion window. Click the … on the Source
File line to select the desired file to convert. Then select the … on the Destination File
line to select a location to save it. Finally, press the H.264 -> AVI button to convert the
file.
Page 30

16-channel H.264 DVR User Manual
26
4.6 Recording Mode
Click SETUP →RECORD to enter the remote recording mode, as shown below:
The setup method is the same as seen directly on the DVR’s monitor. See
Recording Mode in Chapter 3 for details.
4.7 Alarm Setup
Click SETUP →ALARM to enter the “Alarm Setup” screen, as shown below:
The setup method is the same as seen directly on the DVR’s monitor. See Alarm
Setup in Chapter 3 for details.
4.8 PTZ Control
Click SETUP →PTZ to enter the PTZ Control mode. See Figure 5-6:
Page 31

16-channel H.264 DVR User Manual
27
The setup method is the same as seen directly on the DVR’s monitor. See Chapter 3
Network Setup in this manual for the setup method.
4.9 Network Setup
Click SETUP →NETWORK SETUP to enter the “Network Setup” screen, as shown
below: See Chapter 3 Network Setup in this manual for the setup method and
explanation of ports and addresses. It is not recommended to change settings from this
menu because a DVR restart is required afterwards. The DVR will not function properly
until it is restarted.
Page 32

16-channel H.264 DVR User Manual
28
4.10 System Setup
Click SETUP →SETTING to enter the “Settings” screen, as shown below:
INTERNET: Here you may set the bandwidth that the video stream will use. The higher
you set the bandwidth, the clearer the image will be. Setting the bandwidth higher than
the resources available for the DVR will still result in lower video quality in addition to
video lag.
File SAVE PATH: This will allow you to set the location of files such as snapshots and
recordings that will be saved to the computer. This must be set before any of those
features will be available.
IE PASSWORD: Set a password for the IE login
Note: This password may be cleared in the main menu of the DVR.
4.11 Host Info
Click INFO to enter the “Host Info” screen. View the operating state of the hard disk,
the time remaining, the software version, and MAC address of this system.
EXPORT: Export current configuration information.
IMPORT: Import a saved configuration.
Page 33

Appendix A: Android Setup
Figure 1 Figure 2
Figure 3 Figure 4
Connecting to a Device
Playing Video
1.From the main interface, tap the settings gear
in the bottom left corner to enter the device list.
(Fig1)
2.If there are no devices added, you will be
prompted with “No device, please add.” Tap
Add new device. (Fig2)
3.Enter a name for the DVR. Then enter the
corresponding IP address, mobile port number,
case sensitive username and password, and
the number of channels your DVR has. Select
OK to save your device. (Fig3/Fig4)
4.To delete or edit a device, press and hold on its
name from the device list. (Fig2)
29
1. From the main page, tap any blank
window and you will see an orange
highlight around the perimeter of the
window. (Fig1)
2. Press the settings gear and select a
device from the device list. Upon selecting
a device its channel list will appear, then
select a channel that will then be played in
the previously highlighted box.
3. Repeat step 1 and 2 up to four times.
Each box may be connected to either the
same or separate devices from the list and
can be controlled independently.
Page 34

Appendix B: iOS Setup
Figure 1 Figure 2
Figure 3 Figure 4
Device Management:
1. From the home screen (Fig1) press the
settings arrow in the bottom left and select
“Device Manage” (Fig2).
2. From the management screen (Fig3)
select the “+” icon in the upper right hand
corner to add a device.
3. From the Add Device page (Fig4) enter a
name for the DVR. Now enter the
corresponding IP address, Mobile port
number, case sensitive username and
password, and the number of channels
your DVR has. Current channel is 0.
4. Select save to save your device. (Note:
Grayed out values must have something
input before you will be able to save.
Connecting to a Device
1. From the home screen (Fig1) select 1 of the 4
windows so that an orange highlight is around
the perimeter of the box.
2. Press the settings arrow in the bottom left and
select Connect to Device (Fig2).
3. From this device list step 1 will bring you to
you may select your device from the list. After
selecting your device you may choose a
channel to play. This will play your camera in
the box previously selected in step 1.
4. Repeat steps 1 through 3 up to four times.
Each box may be connected to either the
same or separate devices from the list and be
controlled independently.
30
Page 35

16-channel H.264 DVR User Manual
Appendix C: Q&A
1. How do I recover a forgotten password??
A: Please contact Zmodo Tech Support if you have forgotten the
password. Please set a password you will remember, or write the
password down and keep it with the DVR.
2. Why does my monitor say no signal?
A: Please confirm that the video output port or VGA port is connected to
the corresponding input on the desired monitor or television. If it says No
Signal the monitor may not be capable of displaying the resolution of the
signal the DVR is currently outputting. Try hooking up a different monitor or
follow these steps:
A. Reboot the DVR.
B. Wait about 120 seconds until it's booted all the way up.
C. Press the following buttons on the front panel:
*Menu button once.
*Down arrow once.
*Enter button once.
*Down button once.
*Right arrow once.
*Enter button once.
***Wait 5 seconds***
*Enter button once
*Up arrow once
*Enter button once
*Down arrow 3 times.
*Enter button once
***Wait 10 seconds***
*Enter button once\
D The DVR should reboot itself. This will lower the resolution to the
previous level. If resolution is still higher than what the monitor can
handle when the DVR comes back up, repeat process and it will
lower it down one more level.
3. My DVR won’t recognize the hard drive
A: If the system cannot detect the hard drive, please confirm that hard
disk data cable is connected securely along with the hard drives power
cable. If the connections are secure, the DVR is powered with the proper
power adapter, (12V3A) and the hard drive matches the requirements (3.5
low power SATA hard drive) then please call Zmodo’s technical support.
4. Is it ok that my DVR is warm?
A: The DVR will produce a certain amount of heat as it runs. Please put
DVR in a safe place with good ventilation to avoid to damage and
increase stability and service life of the system.
31
Page 36

16-channel H.264 DVR User Manual
5. Why won’t my mouse or remote, or the buttons on the front of the DVR
control anything??
A: The DVR has 2 video outputs, but it can only output the menu system
and control functions to one at a time. If you press and hold the rewind
button on the front of the DVR it will alternate which output is actively
showing the menu and should allow you to regain control of the DVR.
6. Is playback available while recording? Is multi-channel playback available?
A: Yes, this system can support playback while recording. It can support 4
channel playback at any given moment while continuing to record.
7. Why are my E-mail alerts not working??
A: Double check the spelling of your e-mail address in the DVR as well as
deleting and re-entering the password. Any single error will cause the entire
service to not function. If this is not the issue, and you applied the
appropriate settings elsewhere in the DVR contact the e-mail provider to
ensure your server settings are correct or your internet service provider to
ensure that the required server ports are not being blocked.
8. It is recording but it says no files found when I try to play back video.
A: You are required to press the search button before being able to select a
video file under all circumstances, regardless of which method of playback
you are attempting to use.
9. DVR will not control the PTZ after I plugged it in.
A: Please check the following settings and
cables:
Ensure the RS485 cable is secured at both ends correctly.
Check to see that the PTZ address, baud rate, and protocol are
set.
Verify the settings in the PTZ menu match the settings in the
PTZ camera.
10. Why won’t my motion detection record??
A: Check the record schedule to ensure you are recording based on
alarm. Also check the motion detection area setup. If you can see the
entire camera image in the “Setup” screen you have applied the area
setup backwards. Please refer to the motion detection section of this
manual.
11. Why doesn’t my alarm work?
A: Ensure that the alarm settings in the DVR’s menu area correct. Refer
to the alarm’s user manual to retrieve the needed settings and ensure its
proper use.
32
Page 37

16-channel H.264 DVR User Manual
12. Why does it continue to tell me Login Failed on the IE web interface?
A: Check to be sure you are using the right password. If you have
forgotten it, you may clear it from the DVR’s menu directly. If the
password has been cleared, and it is still not working check the network
connection. Your computer can still display the login page from memory
when the DVR is disconnected.
13. After I log in its showing user is configuring…. ?
A: Please exit all menus on the DVR and close all connections from
computers and mobile devices. Log back in on only 1 device. If the error
persists restart the DVR.
Visit our online knowledge base at kb.zmodo.com for more answers to
common questions.
Page 38

16-channel H.264 DVR User Manual
33
Page 39

16-channel H.264 DVR User Manual
Your Security · Our Priority
Zmodo encourages the customer to use a qualified installer for installation. The installer
should take full responsibility of installing the equipment properly and safely.
 Loading...