


®
OWNER’S MANUAL
English/Spanish/ French
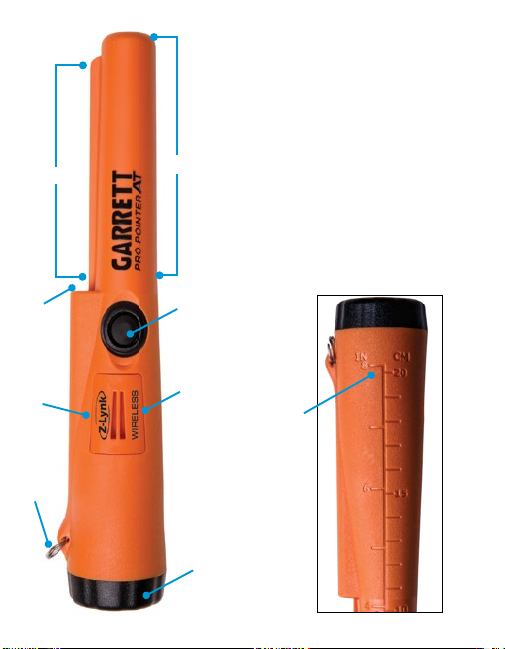
FEATURES
ON/OFF, Retune, Adjust Button
Pinpointing Tip
360° Side-Scan Area
Exclusive Scraping Blade
LED Flashlight
Waterproof Speaker
Lanyard Attachment Loop
Sealed Battery Cover
Ruler in Inches and Centimeters
Internal Wireless Transmitter
(Reverse side of pinpointer)
2

Powering On
Press and release the button () while holding the detector away from any
metallic objects. You will hear 2 beeps and the LED () will remain on.
Powering Off
Press and hold the button for a half second until you hear a single beep (or
single vibration in Silent Mode), indicating power down.
Changing Settings
The Pro-Pointer AT Z-Lynk has three Sensitivity settings and two detection
settings: Audio-plus-Vibrate or Vibrate-only (silent).
To enter adjustment mode, press and hold the button () for 2
seconds—indicated by a single beep followed by a dual-tone beep and
flashing LED. (Note: In Silent Mode, beeps are replaced by vibration pulses.)
The first button press after entering adjustment mode indicates the current
setting. Repeatedly press the button to cycle through the 6 settings:
1 beep = minimum Sensitivity, with audio
2 beeps = medium Sensitivity, with audio (Default setting)
3 beeps = maximum Sensitivity, with audio
1 vibrate = minimum Sensitivity/Silent
2 vibrate = medium Sensitivity/Silent
3 vibrate = maximum Sensitivity/Silent
To exit adjustment mode, press and hold the button for 2 seconds—
indicated by a dual-tone beep (dual vibrate in Silent Mode), or wait 5 seconds
for automatic exit.
3

Notes:
• Lower Sensitivity settings are recommended to prevent detection of
highly mineralized grounds.
• Detection remains operable during the adjustment mode.
• Settings will be remembered when the unit is switched off and back on.
Wireless Operation
Reconnecting: Once paired, the pinpointer will instantly reconnect to
the last paired receiver. The receiver must be powered on first. The pinpointer’s
external audio will switch off when paired.
Pairing: This product can be be paired wirelessly with any Garrett Z-Lynk
receiver using the following steps.
1. First, switch on the receiver (i.e. Garrett MS-3 Wireless Headphones or
Garrett WR-1 Z-Lynk device).
2. Hold the pinpointer within 6 inches (15cm) of the headphone or the
WR-1 device.
3. Switch the pinpointer on and wait (approximately 3 seconds) for the
light on the headphones (or WR-1) to go from blinking to steady.
4. If the units do not pair, switch the pinpointer off and then on again.
Note: If you have trouble pairing, make sure that the receiver is on first,
and that the two devices are within six inches of each other. Also, be
sure that a previously paired headphone or WR-1 is not powered on in
the vicinity (20 to 50 feet).
4

A solid red light on
the MS-3 Wireless
Headphones or
WR-1 Z-Lynk
receiver indicates
proper pairing with
the pinpointer.
Solid red light indicates pairing.
Solid red light
indicates pairing.
5

Fast Retune for Mineralized Ground
To tune out the detection of saltwater, wet sand or highly mineralized ground,
hold the tip of the Pro-Pointer AT Z-Lynk to the water, sand or soil and quick-
press the button () for an instant Retune.
If necessary, repeat this Fast Retune to further eliminate any environmental
response. Note: An alternate means of eliminating the ground response is to
reduce Sensitivity.
Fast Retune feature quickly
tunes out mineralized ground,
saltwater, wet sand, and other
challenging environments.
Precisely Pinpointing Large Targets
Slowly scan toward the object until the response increases to full/constant
alarm. Then quick-press the button to instantly retune and narrow the
detection field. Continue scanning toward the object to find its precise
location. Repeat this Fast Retune to further narrow detection field as needed.
Lost Pinpointer Alarm
After 5 minutes of being ON without a button press, the Pro-Pointer AT Z-Lynk
will begin emitting progressively faster warning chirps for 60 minutes. Press
the power button to reset.
6

Auto-Off Feature
After one hour of warning chirps, the Pro-Pointer AT Z-Lynk will power off
automatically.
Scraping Blade
This rugged edge is ideal for sifting through dirt while searching for the
target. The Pro-Pointer AT’s 360º-side-scan detection allows the detector
to alarm when the blade is passed in close proximity to a metallic target.
Lanyard Attachment Clip
Use to attach the Pro-Pointer AT to your belt, digging pouch or your
detector (if desired).
Holster
Secure to any standard size belt. A metal snap within the holster will cause
the pinpointer to alarm if put away while powered on.
Ruler
The Pro-Pointer AT has a ruler molded into its exterior to measure a target’s
depth in either centimeters or inches.
Low Battery Alarm
When the battery becomes low, the detector will sound an alternating
dual-tone alarm. Replace the 9V battery as soon as possible.
7

Battery Replacement
Simply rotate the battery cover counterclockwise to remove and
clockwise to tighten by hand. To properly install the 9V battery, match
the larger battery terminal to the larger opening in the compartment.
Remove the battery when the unit is to be stored more than 30 days.
Please dispose of used batteries in accordance with local codes and
regulations. Consult your local environmental control or disposal agency
for further details.
Operational Information and Tips
• Operation is completely automatic. All metals will be detected
including ferrous and non-ferrous.
• When a target is detected, the Pro-Pointer AT Z-Lynk will produce
an audio and/or vibration alert. The rate of the pulsing audio and
vibrations increase proportionately as the pinpointer is moved closer
to a metallic target.
• Maximum detection of very small targets is obtained against the side
about ½” from the tip.
• To avoid cancelling out a target, do not turn on the Pro-Pointer AT while
it is adjacent to the target.
• Because the Pro-Pointer AT is a static, non-motion detector, optimum
operation is achieved when the unit is switched off between uses.
• Avoid using the Pro-Pointer AT as a digging or pr ying tool. It is designed
for flat side-scanning and precise pinpointing with its tip. It is not
8
intended to be used with excessive force.

• For water use, do not exceed 20 feet (6 meters) depth. Make sure the
battery cap threads are free of sand, sediment, etc. and that O-ring is
periodically lubricated with silicone grease to maintain a tight seal.
• Radio signals do not transmit through water, so if you will be hunting fully
submerged, you must rely upon the Pro-Pointer’s vibration and audio
alerts without the benefit of headphones.
• To remove dried dirt, mud or other debris from the unit, simply hand
wash it with soap, water, and a soft cloth. Do not use any type of
abrasive or chemical cleaners which could scratch or erode its surface.
9

Regulatory
This device complies with part 15 of the FCC Rules. Operation is subject
to the following two conditions: (1) This device may not cause harmful
interference, and (2) this device must accept any interference received,
including interference that may cause undesired operation.
Changes or modifications not expressly approved by the party responsible
for compliance could void the user’s authority to operate the equipment.
This device complies with Industry Canada license-exempt RSS standard(s).
Operation is subject to the following two conditions: (1) this device may not
cause interference, and (2) this device must accept any interference, including
interference that may cause undesired operation of the device.
Ce produit est conforme aux normes RSS exemptes de licence d’Industry
Canada. Son fonctionnement est soumis aux deux conditions suivantes: (1) ce
dispositif ne peut pas provoquer d’interférences et (2) ce dispositif doit accepter
toute interférence, y compris celles pouvant entraîner un dysfonctionnement.
Wireless Transmitter Specifications
Audio Delay: 17 milliseconds (6x faster than Bluetooth®)
Audio Bandwidth: 30-18,000 Hz
Operating Frequency: 2406–2476 MHz
Transmit Power: 8.0 dBm EIRP
Certications: FCC, CE, IC, AS/NZ
10

MADE IN
THE USA
The Garrett Pro-Pointer AT Z-Lynk is manufactured in the United
States of America and in accordance with Garrett’s ISO 9001
internationally certified Quality Management System and meets the
following international standards:
• FCC • CE • RoHS • ICNIRP • IEC 529-IP 68
SPECIFICATIONS
Model Name: Garrett Pro-Pointer®AT Z-Lynk
Operating Temperatures: -4ºF (-20ºC) to 130ºF (54ºC)
Operating Frequency: 11.5 kHz
Waterproof Rating: 20 foot (6 meter) maximum depth; IP 68
Tuning: Automatic or manual retune
Indicators: Proportional audio/vibration pulse rate
Controls: Power, Retune, Adjust switch
Dimensions: Length: 9” (22.9 cm)
Thickness: 1.5” (3.8 cm) tapered to
.875” (2.2 cm)
Weight: 6.5 oz. (0.2 kg.), with battery
Battery: Single 9V (included). Alkaline batteries
are recommended to achieve longest
operating life.
Warranty: 2 Years, Limited Parts/Labor
Patent Information: US 7,575,065; D583,261
Garrett Metal Detectors, garrett.com, Z-Lynk, and
PRO-POINTER are trademarks and registered trademarks
of Garrett Electronics Inc. © 2018 Garrett Metal Detectors.
1538820.B.0418
 Loading...