

Page 1

Installation Manual
MONUMENT WINE &
BEVERAGE COOLERS
www.zlinekitchen.com
Page 2

ZLINE Kitchen and Bath provides Attainable Luxury, where the kitchen and bath of your
dreams is never out of reach. Through our unique designs and unparalleled quality,
we’re dedicated to providing you an elevated experience in the heart of your home.
With an endless selection of features and finishes, our inspiration is your reality.
Page 3

ZLINE is fueled by a passion for innovation; A relentless pursuit of
bringing the highest end luxury designs and professional features into
everyone’s homes.
Because we continually strive to improve our products, we may change
specifications and designs without prior notice.
Scan the QR code to view the most up-to-date version of the Installation
Manual and User Manual.
WARNING: This product can expose you to chemicals including nickel, which is known to the
State of California to cause cancer. For more information, go to www.P65Warnings.ca.gov.
Page 4

TABLE OF CONTENTS
IMPORTANT SAFETY INSTRUCTIONS . . . . . . . . . . . . . . . . . . . . . . . 1
BEFORE INSTALLATION . . . . . . . . . . . . . . . . . . . . . . . . . . . . . . . . . . . 8
INSTALLATION . . . . . . . . . . . . . . . . . . . . . . . . . . . . . . . . . . . . . . . . . 12
WARRANTY . . . . . . . . . . . . . . . . . . . . . . . . . . . . . . . . . . . . . . . . . . . . 17
Page 5

IMPORTANT SAFETY INSTRUCTIONS
If the information in this manual is not followed exactly, a fire
WARNING
• Before beginning installation, please read and follow these important
instructions for the safety of your home and the people living in it. Always read
and obey all safety measures.
• It is recommended that installation and service be performed by a qualified
installer. The appliance should not be adjusted or repaired by anyone except
properly qualified service personnel.
• IMPORTANT: The installer should leave these instructions with the consumer
who should retain for local inspectors’ use and for future reference.
• The manufacturer will not be responsible for any damage to property or to
persons caused by incorrect installation, improper use of the appliance, or
or explosion may result causing property damage, personal
injury, or death.
failure to heed the warnings listed, and the warranty will be voided.
• The manufacturer reserves the right to make changes to its products when
considered necessary and useful, without affecting the essential safety and
operating characteristics.
• This appliance has been designed for non-commercial, domestic use only.
• Please observe all local, state, and national codes and ordinances.
Please ensure the appliance is properly grounded. The plug should always
be accessible.
• Use this appliance only as described in this manual. Other uses not
recommended may cause fire, electric shock, or personal injury.
• This appliance is not intended for use by children unless they are adequately
supervised by a responsible person to ensure that they can use the
appliance safely.
• Young children should be supervised to ensure that they never play with
the appliance.
• To protect against the risk of electric shock, never immerse the unit, cord, or
General Safety
plug in water or spray with any cleaning product or other liquid.
1
Page 6

IMPORTANT SAFETY INSTRUCTIONS
• Unplug the appliance from the electrical outlet when not in use, when moving
from one location to another, and before cleaning.
• To disconnect the appliance from power, grip the plug and pull it from the
electrical outlet. Never pull by the cord.
• Never operate the unit in the presence of explosive and/or flammable liquids
or fumes; doing so may create a fire hazard or explosion.
• Never install the unit or any of its parts near an open-flame, cooking,
microwave, or any other heating appliance.
• Never operate the unit with a damaged electrical cord or plug, if the product
malfunctions beyond simple troubleshooting measures, or if it is dropped or
damaged in any manner.
• The use of attachments not recommended by the manufacturer may be
hazardous to your safety.
• Never operate the unit if the door or cooling system is removed or damaged.
• A loose fit between the electrical wall outlet and plug may cause overheating
and/or a distortion of the plug. Contact a qualified electrician to replace loose
or worn electrical outlets.
• This appliance is CFC- and HFC-free and contains small quantities of isobutane
(R600a), an environmentally friendly coolant.
• You must ensure that the sealed cooling system is undamaged when installing
the appliance. If damaged, keep the product away from potential fire sources
that may cause it to catch fire and ventilate the room where the product is placed.
• Never use an appliance with a damaged cooling system. If system is damaged
upon arrival, contact ZLINE at 1-614-777-5004
• Ensure that the ventilation openings to and from a built-in wine cooler or
beverage fridge are never blocked or covered.
• No liability will be accepted for any damage caused by misuse of the
appliance, or as a result of repairs carried out by unqualified people. In this
case, neither the warranty nor any other liability claims will apply.
General Safety
2
Page 7

IMPORTANT SAFETY INSTRUCTIONS
WARNING
Never operate any other electrical appliance inside this unit.
• Never attempt to repair or replace any part of your appliance unless it
is specifically recommended in this manual. All other servicing should be
referred to a qualified electrician, technician, or service provider.
• Ensure all access panels are appropriately installed before operating.
• It’s recommended to use two or more people to move and install the unit
due to its weight.
• Never clean the unit or its parts with flammable liquids. These fumes can
create a fire hazard or explosion.
• Never connect or disconnect the electric plug with wet hands.
• It’s recommended that a dedicated electrical circuit suitable for a NEMA
5-15 outlet serving only your appliance be used; please ensure the outlet
is easily accessible.
To reduce the risk of fire, electric shock or personal injury,
WARNING
unplug or disconnect the appliance from the power supply
before servicing.
General Safety
3
Page 8

IMPORTANT SAFETY INSTRUCTIONS
SAVE THESE INSTRUCTIONS
This manual contains important information regarding the proper installation, use,
and maintenance of your beverage fridge and wine cooler. Following this manual
will ensure that your product will work at its peak performance and efficiency.
If you are experiencing problems, check the “Troubleshooting” section of the
User Manual.
DISPOSAL OF REFRIGERATION APPLIANCES
Dispose of your appliance packaging properly. Refrigeration equipment must be
properly disposed of in an environmentally-friendly manner. This applies to any
old appliances and to your new unit once it reaches the end of its service life.
Please ensure that old or worn appliances are rendered unusable
WARNING
before disposal by removing the plug, cutting the power cable,
and removing or destroying any snap fastenings or bolts. This will
prevent children from locking themselves in the appliance (risk of
suffocation) and endangering their lives in any other way.
Risk of child entrapment. To avoid safety and suffocation risks for
WARNING
The cooling system, particularly the heat exchange located at the back/bottom
of the unit, must not be damaged during installation or when using the appliance.
• This product is not to be handled as normal household waste — it should be
taken to a recycling collection point for electrical and electronic goods.
• By correctly disposing of this product you are contributing to the protection of
the environment. Improper disposal endangers health and the environment.
• Further information about the proper recycling of the product may be obtained
children or pets, before you dispose of the appliance, take off the
doors and drawers and leave the shelves in place so children or
pets may not climb inside.
from your local government agency or waste collection department.
General Safety
4
Page 9

IMPORTANT SAFETY INSTRUCTIONS
BEFORE USING YOUR APPLIANCE
• Remove all exterior and interior packing materials.
• Before connecting the appliance to the electrical source, let it sit upright for
approximately 2 hours. This will reduce the possibility of malfunctions in the
cooling system caused by handling during shipping.
• Prior to use, clean the interior surface with warm water using a soft cloth.
• The door on this appliance is designed so it may be opened from either the left
or the right side. The unit is delivered with the door opening on the left side and
swinging out to the right. Should you wish to open the door from the right, see
installation instructions on page 15.
INSTALLATION OF YOUR APPLIANCE
WARNING
Do not store or install the appliance outdoors.
• Wine coolers and beverage fridges are designed for either built-in or free-
standing installation.
• Place your unit on a floor that is strong enough to support it when it is fully
loaded. Please note the units weigh roughly 136 to 144 pounds (62 to 65
kilograms) when empty, so adjust accordingly.
• To level your appliance, adjust the 4 legs by twisting clockwise or counter-
clockwise as needed until level.
• Install the appliance indoors and away from direct sunlight and sources of
heat (stove, heater, radiator, etc.). Sunlight may affect the acrylic coating,
and heat sources may increase electrical consumption. Extreme cold ambient
temperatures may also cause the unit not to perform properly.
• Never install the unit in damp or overly humid areas.
• Any questions concerning power and/or electrical connection should be
General Safety
directed toward a qualified electrician, technician, or service provider.
• The air vent located at the bottom front of the appliance must never be covered
or blocked in any way.
5
Page 10

IMPORTANT SAFETY INSTRUCTIONS
• The unit must be appropriately installed to all electrical connections in
accordance with state and local government codes.
• Please note that the cooler may experience decreased cooling efficiency if air
flow is restricted due to a fully loaded cabinet.
• Install the wine cooler or beverage fridge in a well-ventilated area where the
ambient temperature is above 50 °F and below 90 °F (above 10 °C and
below 32 °C).
ATTENTION
• Never overload the unit’s cabinet.
• Do not open the door unless necessary.
• Never cover shelves with aluminum foil or any other material that may prevent
air circulation.
• It’s recommended to unplug the appliance if it sits empty for long periods. After
cleaning, leave the door ajar to allow air to circulate to avoid condensation,
mold, or odors from forming.
ELECTRICAL CONNECTION
Improper use of the grounded plug can increase the risk of
WARNING
• This appliance must be properly grounded for your safety. The power cord
provided with this unit is equipped with a NEMA 5-15 plug that mates with
standard NEMA 5-15 wall outlets to minimize the possibility of electrical shock.
• Using an outlet with a ground fault circuit interrupter (GFCI) is not recommended.
• Never cut or remove the third-ground prong from the supplied power cord.
electrical shock. If the power cord is damaged, have it replaced by
a qualified electrician or authorized service provider.
General Safety
6
Page 11

IMPORTANT SAFETY INSTRUCTIONS
• Have a qualified electrician check the wall outlet and electrical circuit to ensure
the appliance is properly grounded. When a standard two-prong wall outlet is
encountered, it is your responsibility and obligation to have it replaced with a
properly grounded NEMA 5-15 wall outlet.
• To prevent injury, the electrical cord should be secured behind the appliance
and not left exposed or dangling.
• The appliance should always be plugged into its own dedicated NEMA
5-15 electrical outlet. This provides the best performance while preventing
overloading wiring circuits that could cause a fire hazard from overheating.
• Have an electrician or qualified professional immediately repair or replace all
power cords that have become frayed or otherwise damaged. Never use a
cord that shows cracks or abrasion damage. When moving the appliance, be
careful not to damage the power cord.
• Never use your appliance with an extension cord unless this cord has been
checked and tested by a qualified technician or service person. The extension
cord must be a UL/CUL Listed, 3-wire grounding extension cord that has
a grounding plug and outlet and an electrical rating of 120 volts and at
least 10 amps.
WARNING: We do not recommend using an extension cord. If
WARNING
one is used on this appliance, it may void warranty.
Electrical Connection
7
Page 12
BEFORE INSTALLATION
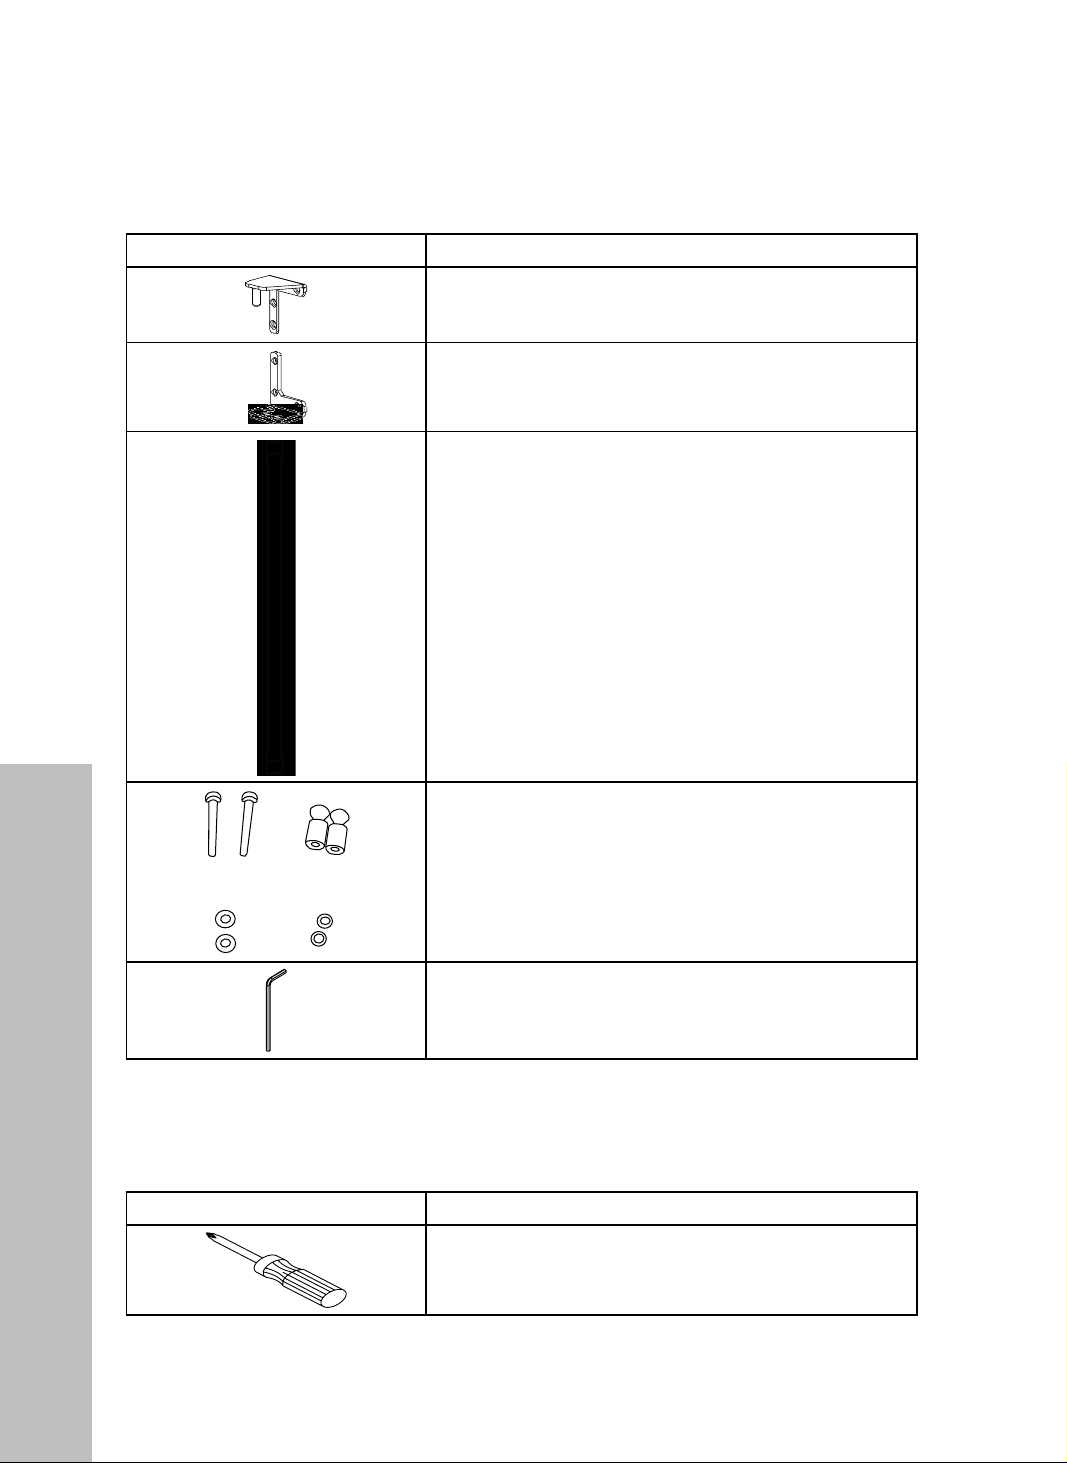
PROVIDED MATERIALS
IMAGE DESCRIPTION
Reversible door upper hinge bracket (1)
Reversible door lower hinge bracket (1)
Door handle (1)
Handle hardware kit (1) - refer to page 14
Allen/hex key
MATERIALS NEEDED
IMAGE DESCRIPTION
Phillips-head screwdriver
Parts
8
Page 13
BEFORE INSTALLATION
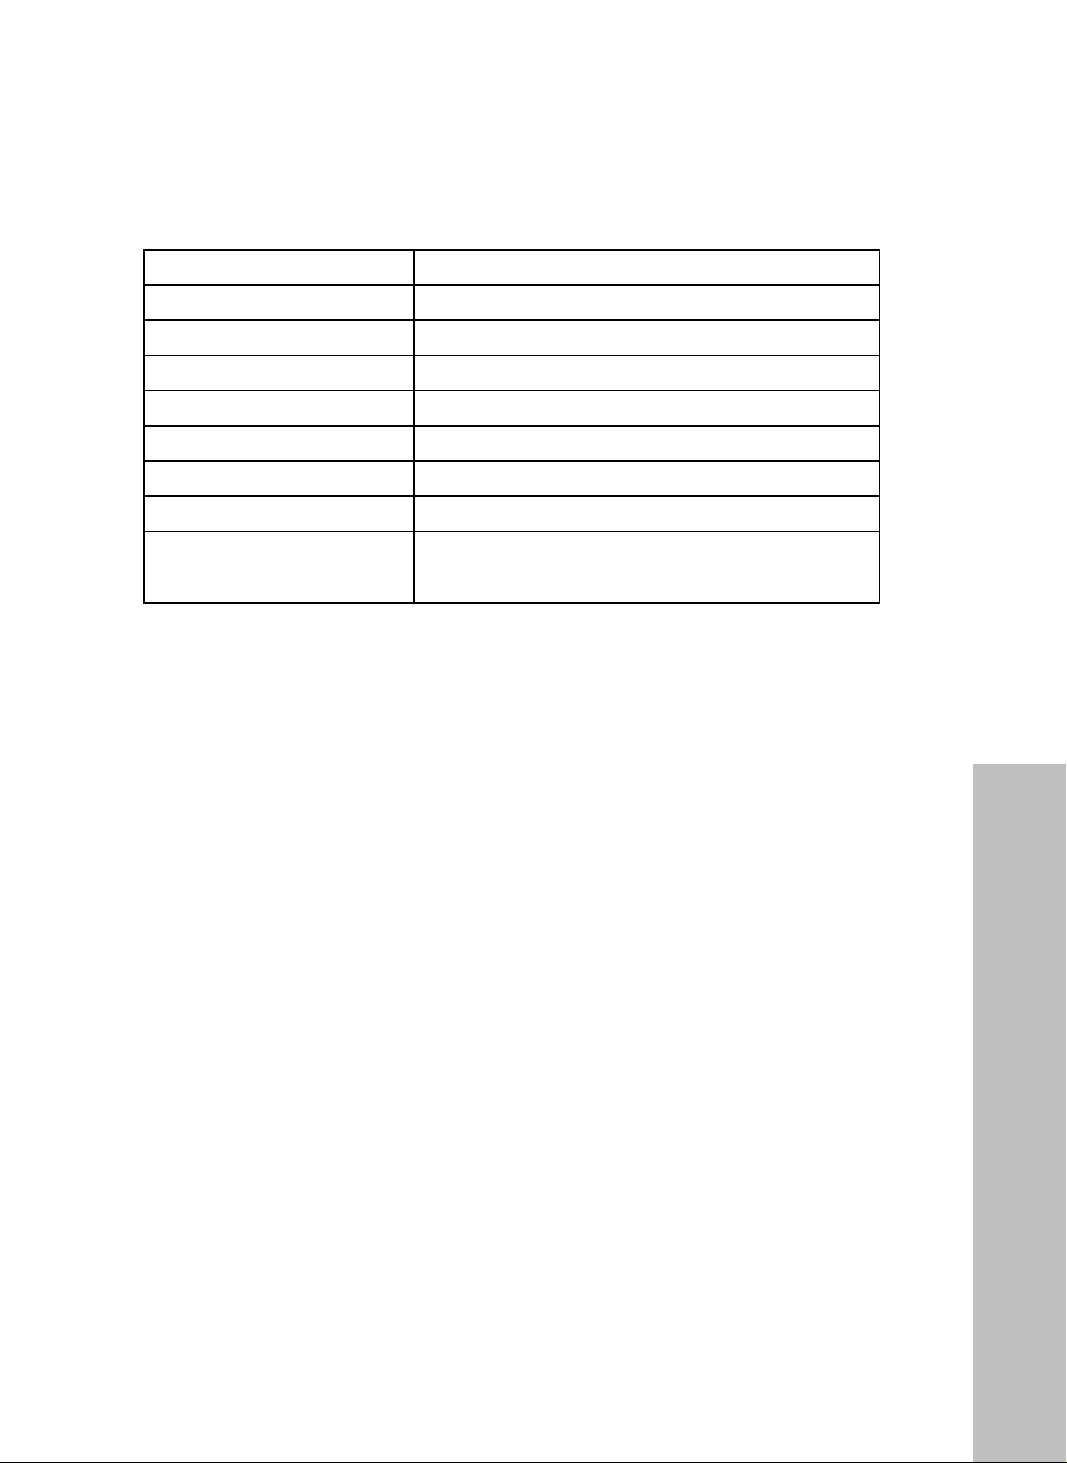
BEVERAGE FRIDGE PRODUCT SUMMARY
This appliance requires a standard 120VAC/60Hz electrical ground outlet.
SPECIFICATION MONUMENT BEVERAGE FRIDGE
Model RBV-US-24
Voltage/Frequency 120VAC/60Hz
Amperage 1.2A
Color Black Cabinet with Stainless Steel Door
Storage Capacity* 154 cans (12oz)
Refrigerant R600a
Temperature Range 34°F–50°F (1°C–10°C)
Dimensions**
23 7/16" W x 22 1/2" D x 33 3/4" H
(595 mm W x 571 mm D x 857 mm H)
*Storage capacity is based on standard 12 oz. beverage cans. Shelves can
be adjusted to fit bottles of wine or other beverages; capacity will vary.
**Product height varies depending on adjustable legs; 33 3/4" (857 mm)
is the minimum height based on legs at their lowest position.
INTERNAL STORAGE
Product Specifications
9
Page 14
BEFORE INSTALLATION
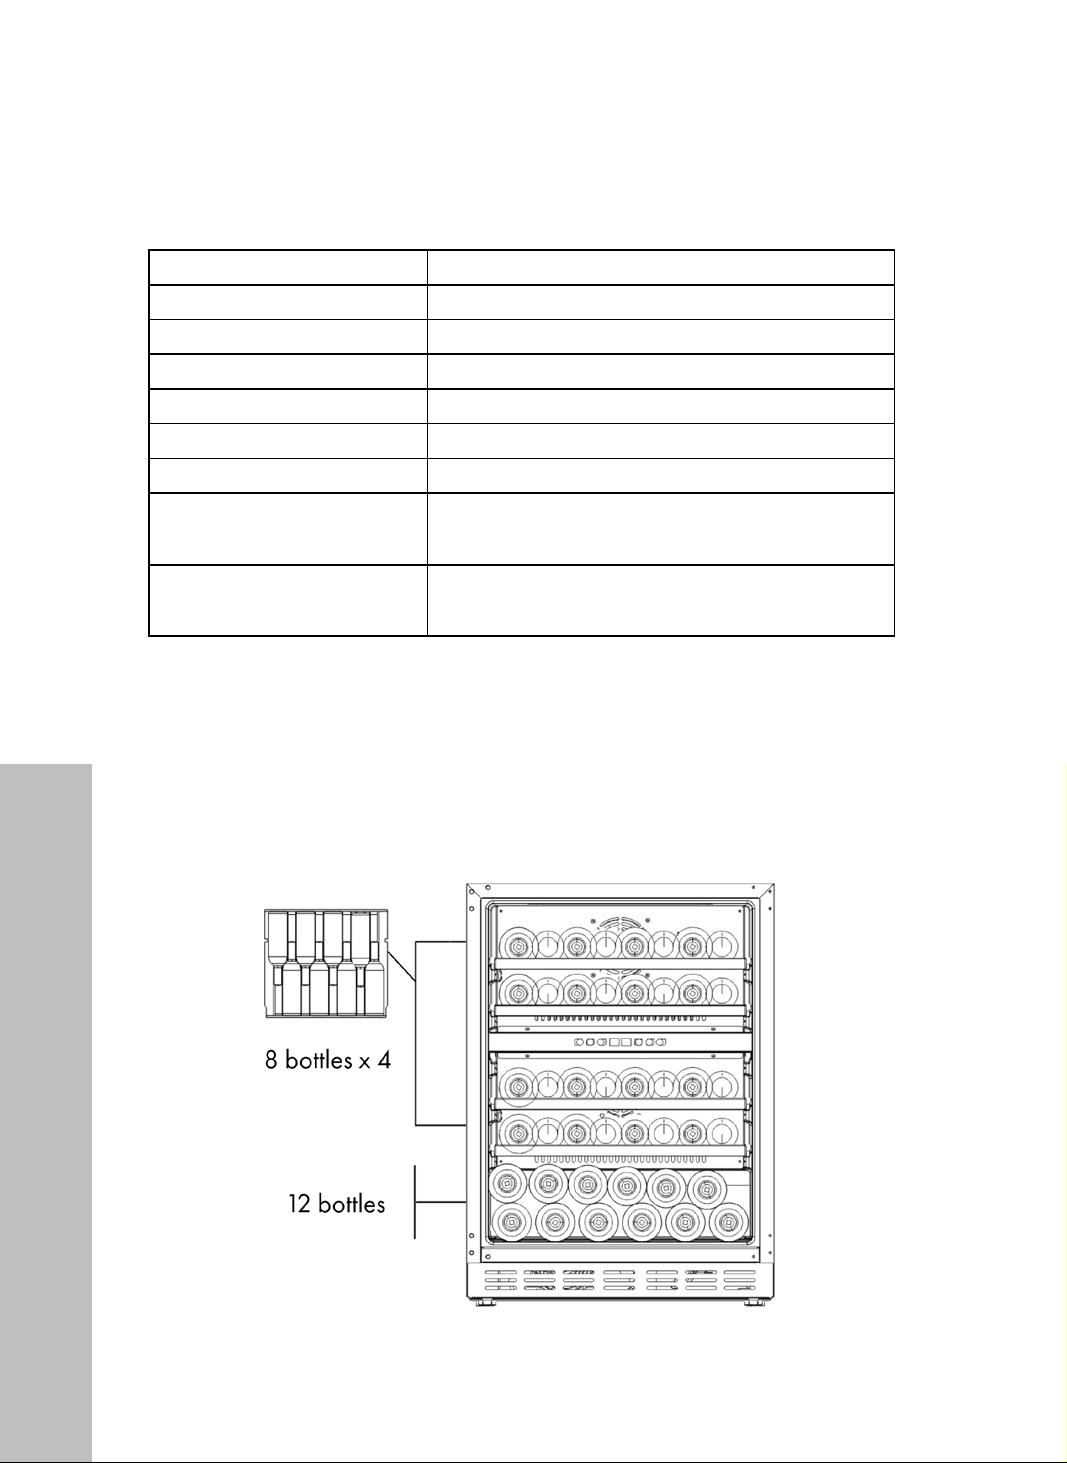
WINE COOLER PRODUCT SUMMARY
This appliance requires a standard 120VAC/60Hz electrical ground outlet.
SPECIFICATION MONUMENT WINE COOLER
Model RWV-UD-24
Voltage/Frequency 120VAC/60Hz
Amperage 2.0A
Color Black Cabinet with Stainless Steel Door
Storage Capacity* 44 Bottles (750ml)
Refrigerant R600a
Temperature Range
Dimensions**
*Storage capacity is based on standard 750 ml Bordeaux-style wine bottles
Upper zone: 39°F–50°F (4°C–10°C)
Lower zone: 50°F–68°F (10°C–20°C)
23 7/16" W x 22 1/2" D x 33 3/4" H
(595 mm W x 571 mm D x 857 mm H)
with a 3 3/8" (86 mm) diameter.
** Product height varies depending on adjustable legs; 33 3/4" (857 mm)
is the minimum height based on legs at their lowest position.
INTERNAL STORAGE
Product Specifications
10
Page 15
BEFORE INSTALLATION
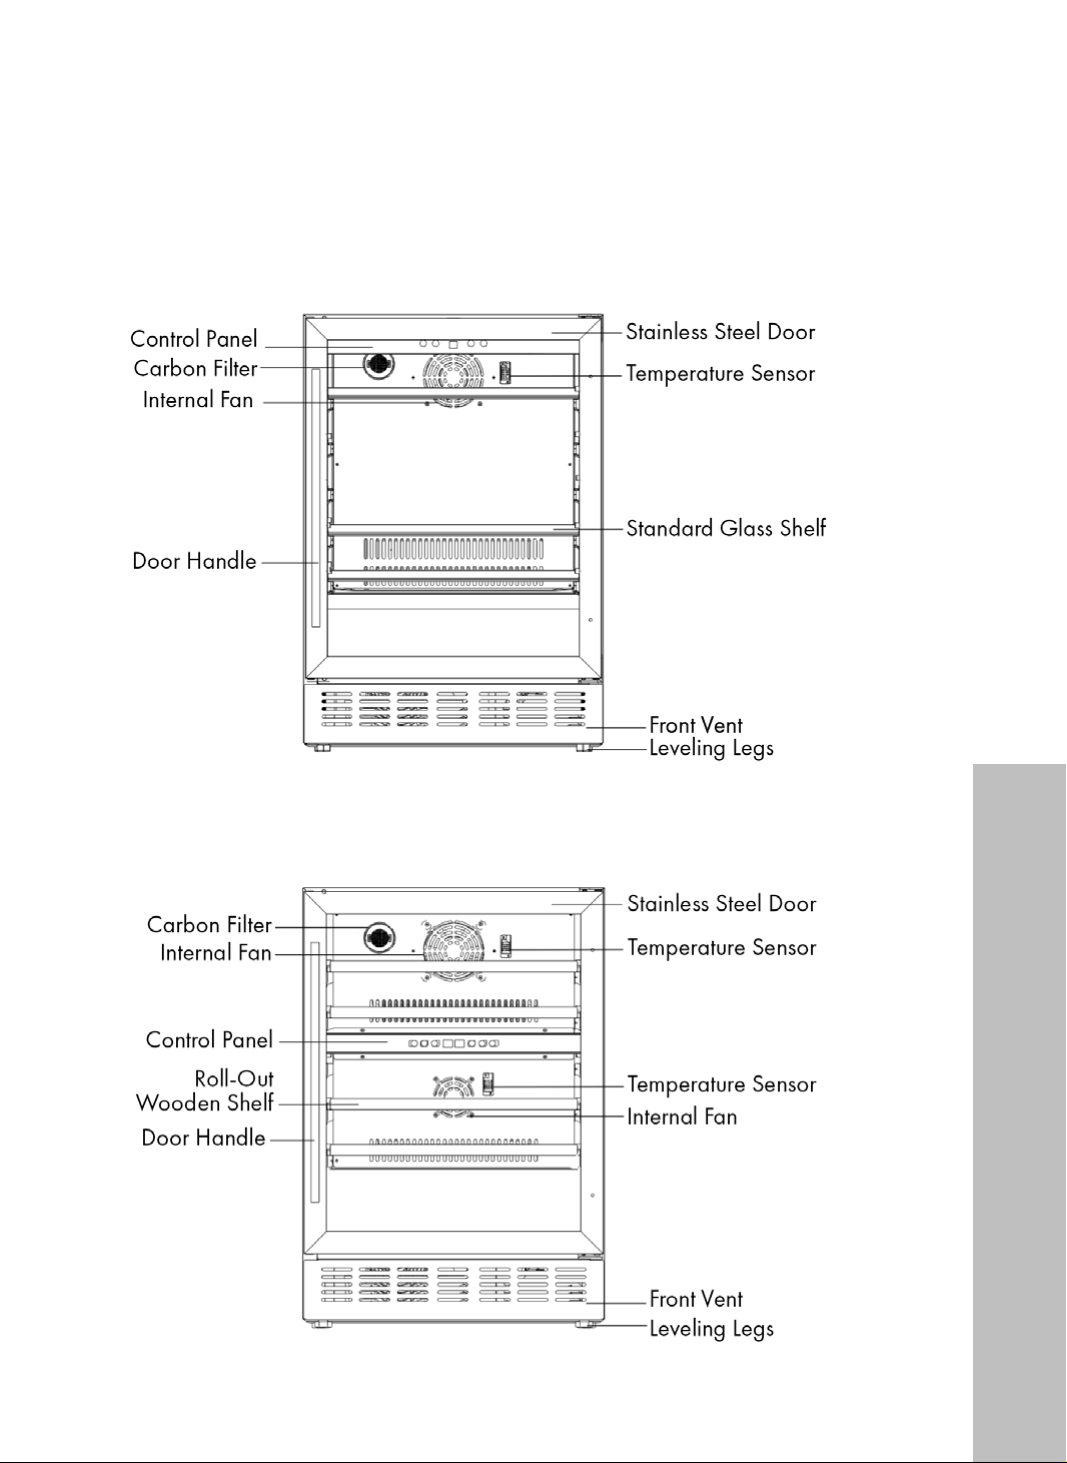
PARTS IDENTIFICATION
Monument Beverage Fridge (RBV-US-24)
Monument Wine Cooler (RWVUD24)
Product Specifications
11
Page 16
INSTALLATION
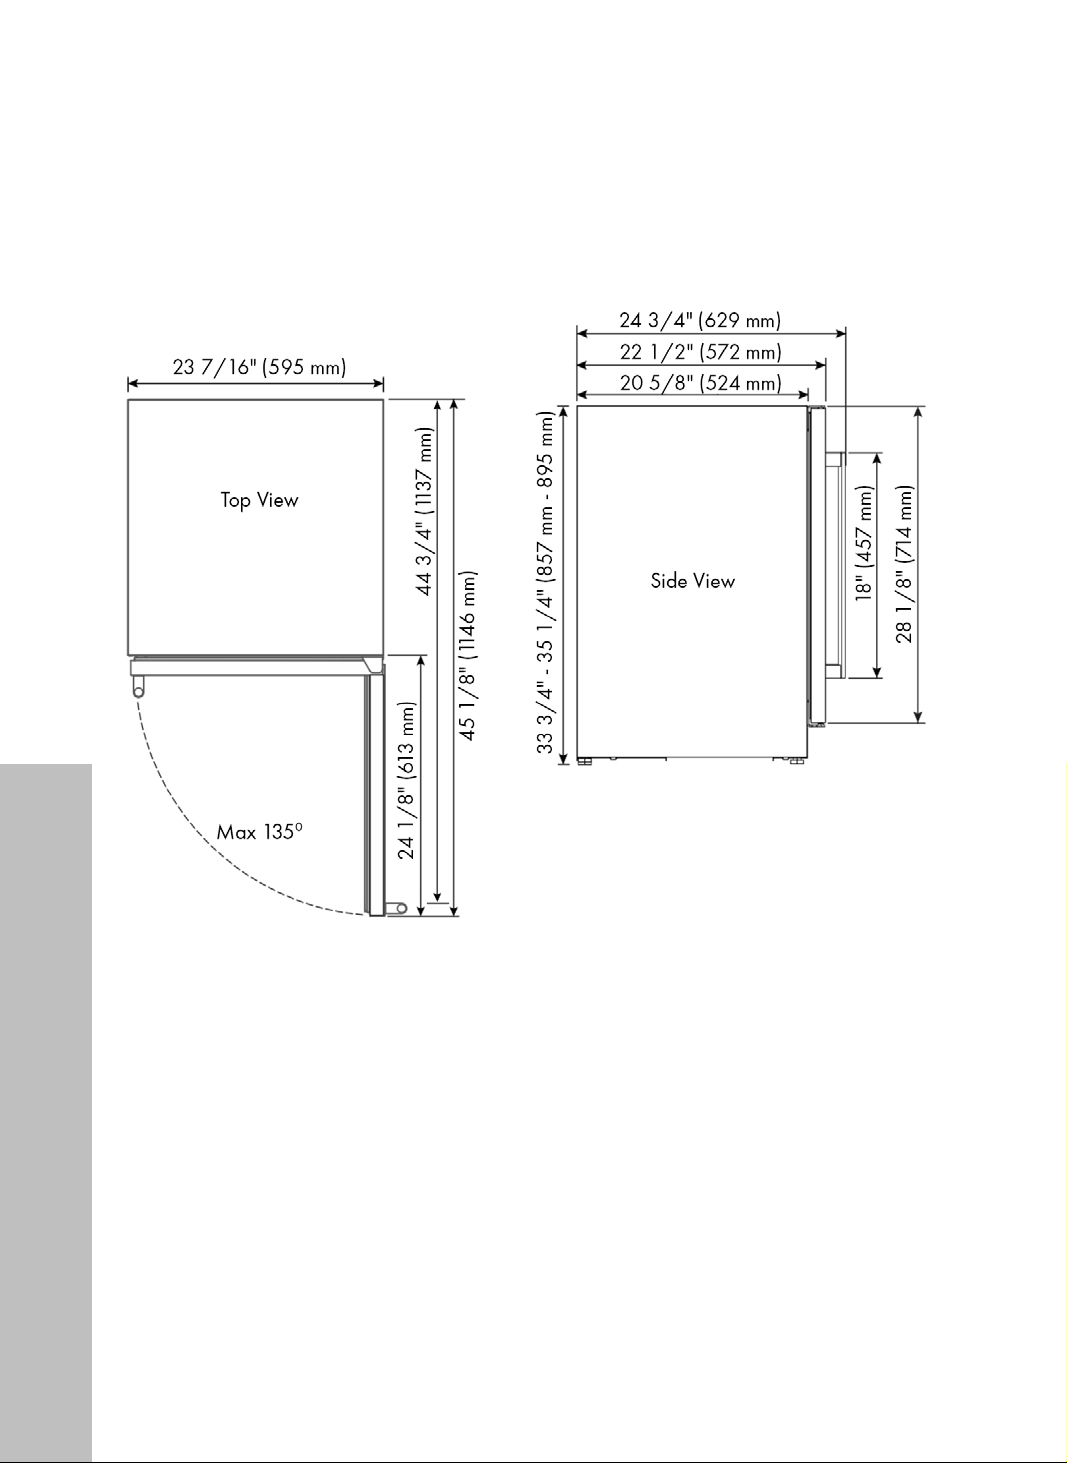
DIMENSIONS
DIMENSIONS
Dimensions outlined in the images below are the same for both Monument Wine
Dimensions outlined in the images below are the same for both Monument Wine
& Beverage Fridges (RWV-UD-24 & RBV-US-24).
& Beverage Fridges (RWV-UD-24 & RBV-US-24).
Clearance Requirements
12
* NOTE: Product height varies depending on adjustable legs, which can be
* NOTE: Product height varies depending on adjustable legs, which can be
extended by roughly 1 1/2" (38 mm).
extended by roughly 1 1/2" (38 mm).
Page 17
INSTALLATION
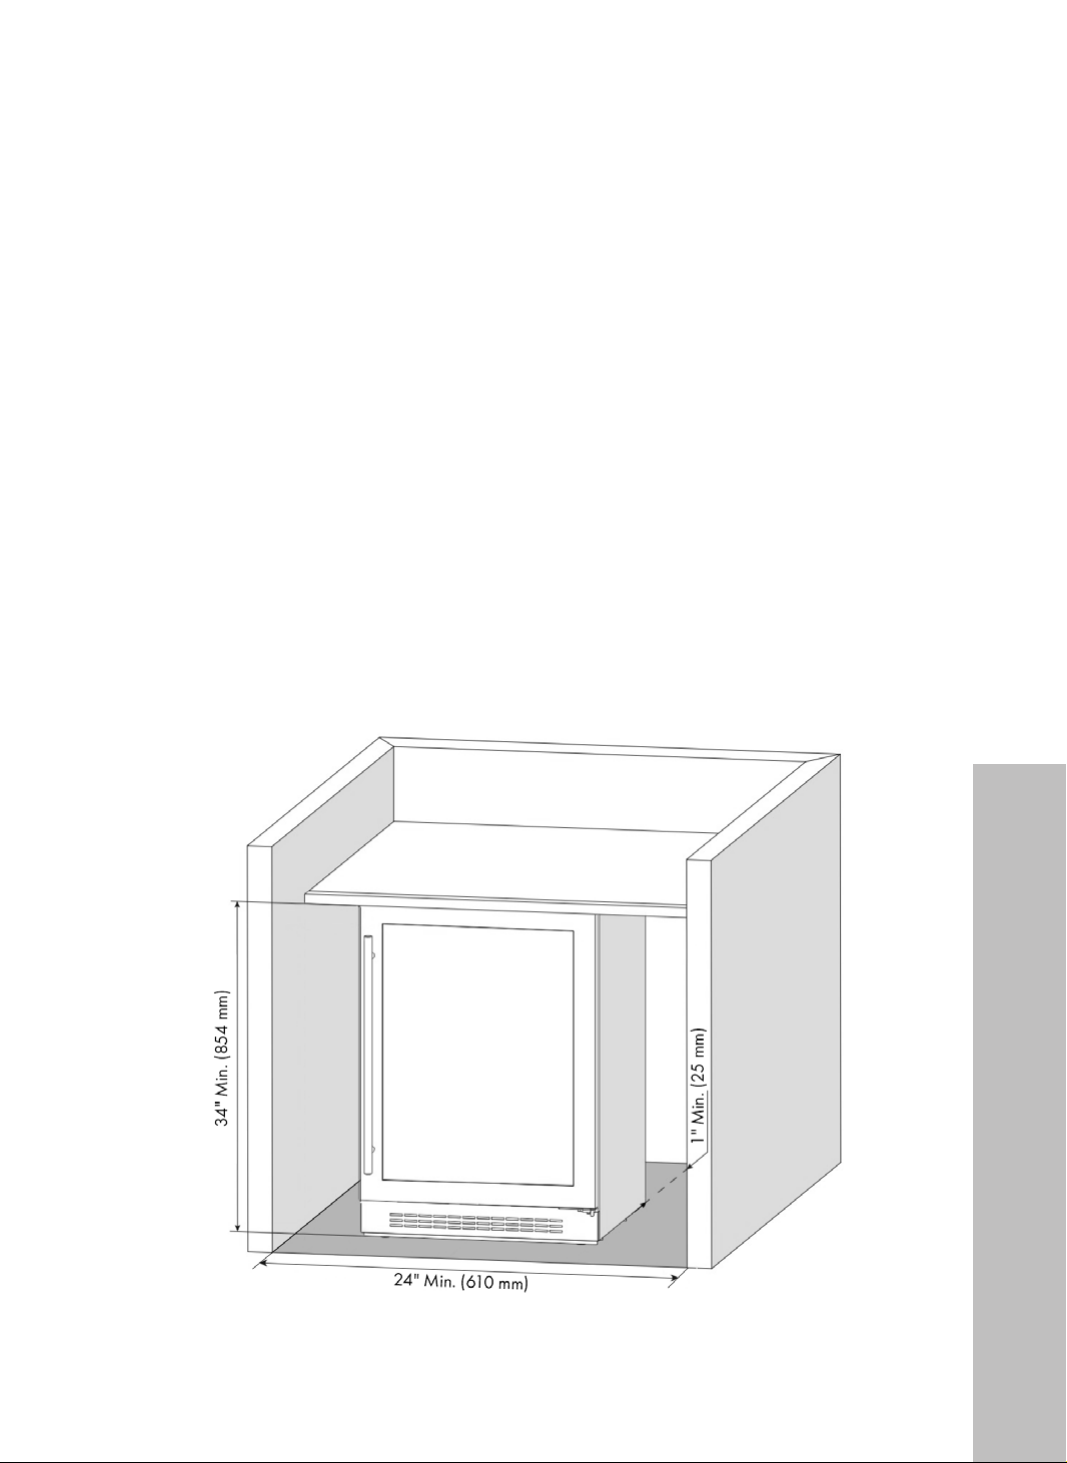
INSTALLATION CLEARANCE REQUIREMENTS
When installing the beverage fridge or wine cooler under a counter, follow the
recommended spacing dimensions:
• For proper clearance of the electrical plug, allow at least 1" (25 mm) of
clearance behind the appliance.
• Installation next to a wall will require a minimum 2 1/4" (57 mm) door
clearance to accommodate the handle to open at least 90°.
• The cabinet should allow at least 24" (610 mm) for width and 34" (864 mm)
for height to accommodate the beverage fridge or wine cooler.
• The power cable is located on the bottom back right (left when facing the unit)
and is 60" (1524 mm) to accommodate multiple outlet locations.
• Once ready to install, adjust the back two feet to the desired height. Slide into
place and adjust the front two feet to ensure the unit is level.
• Installation should allow the unit to be pulled forward for servicing.
Cabinet Requirements
13
Page 18
INSTALLATION
CARBON FILTER
A built-in carbon filter protects your beverages by acting as a natural barrier against
harmful odors. The filter should be replaced every 3-6 months. To replace the filter,
search for BWC-003 on www.zlineparts.com, ZLINE’s official parts distribution partner.
To replace the filter, first remove racks/shelves from the top of the unit to access the filter.
Then, using a pair of needle-nose pliers, stick the ends into the slots on each side of the
filter, turn either clockwise or counter-clockwise until the slots are at the top and bottom,
and then pull out the filter from the rear panel. Put the new filter in and reverse the order.
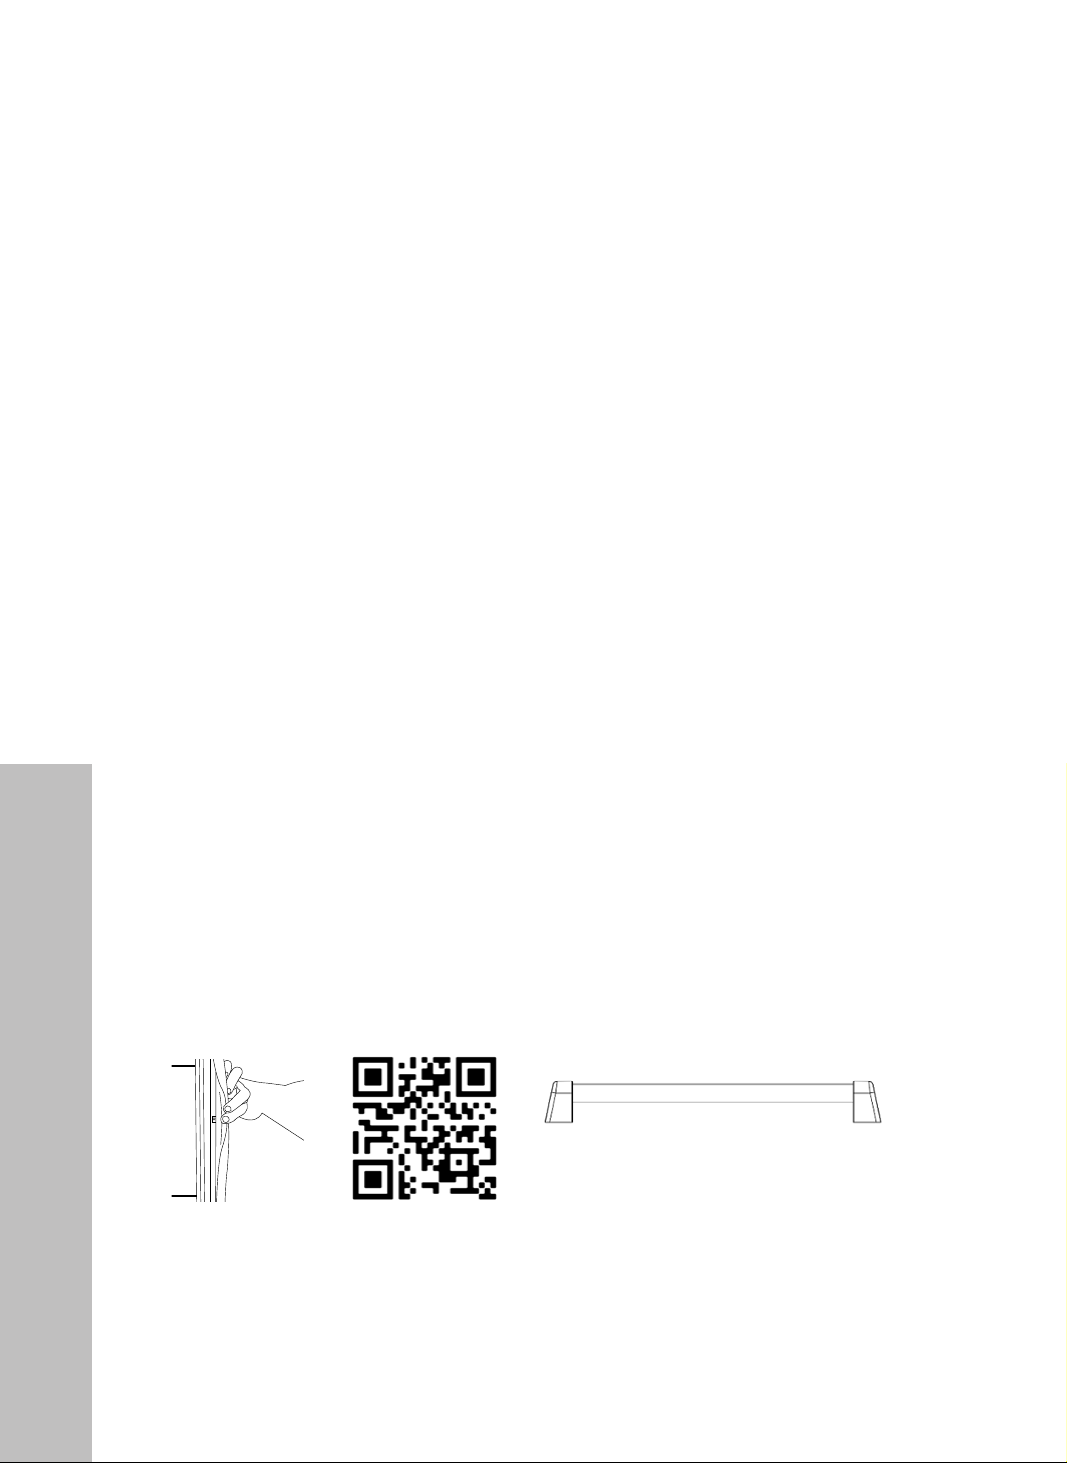
INSTALLING THE HANDLE*
1. Pull back slightly on the door gasket (see image below) to access both screw holes.
2. Place a split lock washer on each screw and insert both into the holes.
3. Facing the front of the door, place the flat washers on both screws and then tighten
the mounting studs on each screw until snug.
4. Assemble the handle onto both mounting studs, making sure to note stud direction.
5. Tighten each screw part way using the provided Allen/hex wrench. Once both
screws are started, tighten each to be snug. Do not over tighten.
Scan to follow along with a video.
*Each wine cooler / beverage fridge comes with a handle hardware kit containing
two door screws, two mounting studs, two split lock washers, and two flat washers.
Installing the Handle
14
Page 19

INSTALLATION
REVERSING THE DOOR SWING OF YOUR APPLIANCE
REVERSING THE DOOR SWING OF YOUR APPLIANCE
If you want to reverse the opening direction of the door, follow the instructions below
If you want to reverse the opening direction of the door, follow the instructions below
as if the door handle is on the left side of the unit and the door swings out toward you
as if the door handle is on the left side of the unit and the door swings out toward you
to the right. A second person is recommended to tilt the cooler roughly 30° to help
to the right. A second person is recommended to tilt the cooler roughly 30° to help
with this task. NOTE: Do not tilt the cooler more than 45° or lay it on its back, as that
with this task. NOTE: Do not tilt the cooler more than 45° or lay it on its back, as that
may damage the sealed cooling system. It’s recommended to lift the appliance onto a
may damage the sealed cooling system. It’s recommended to lift the appliance onto a
workbench for easier access.
workbench for easier access.
1. Remove the two Phillips-head screws from the axis plate at the bottom of the door
1. Remove the two Phillips-head screws from the axis plate at the bottom of the door
to remove the plate; set it and screws aside. Pull out the door from the top and
to remove the plate; set it and screws aside. Pull out the door from the top and
bottom hinge brackets.
bottom hinge brackets.
2. Take out the three screws from the bottom right hinge bracket and remove. Set the
2. Take out the three screws from the bottom right hinge bracket and remove. Set the
screws aside and hold onto the bracket for future use if you wish to reverse the door
screws aside and hold onto the bracket for future use if you wish to reverse the door
swing again.
swing again.
3. Remove the three screws from the upper right bracket and remove. Set the screws
3. Remove the three screws from the upper right bracket and remove. Set the screws
aside and hold onto the bracket for potential future use.
aside and hold onto the bracket for potential future use.
4. Using your fingers or a thin object, remove the three black decorative tabs from
4. Using your fingers or a thin object, remove the three black decorative tabs from
the top left of the cabinet. Push those tabs in the three holes where the bracket was
the top left of the cabinet. Push those tabs in the three holes where the bracket was
removed in step 3.
removed in step 3.
5. Install the upper hinge bracket from the hardware package included with this
5. Install the upper hinge bracket from the hardware package included with this
manual at the top left of the cabinet with the three screws removed in step 3.
manual at the top left of the cabinet with the three screws removed in step 3.
6. Install the new lower hinge bracket at the bottom left of the cabinet with the three
6. Install the new lower hinge bracket at the bottom left of the cabinet with the three
screws removed in step 2.
screws removed in step 2.
7. Take the axis plate removed in step 1 and slide it onto the bottom of the door with
7. Take the axis plate removed in step 1 and slide it onto the bottom of the door with
your hand. No screws are needed yet; push the top of the door into the top bracket
your hand. No screws are needed yet; push the top of the door into the top bracket
and then slide the door into the bottom bracket with the axis plate between the
and then slide the door into the bottom bracket with the axis plate between the
door and the bracket.
door and the bracket.
8. Making sure the axis plate is lined up with the bottom bracket, put in the two screws
8. Making sure the axis plate is lined up with the bottom bracket, put in the two screws
removed from step 1. NOTE: This last step is best for two people — one person to
removed from step 1. NOTE: This last step is best for two people — one person to
hold the door so the screw holes are aligned, and the other to fasten the screws.
hold the door so the screw holes are aligned, and the other to fasten the screws.
NOTE: The door opens to a maximum of 135° with a door stop on the bottom hinge
NOTE: The door opens to a maximum of 135° with a door stop on the bottom hinge
bracket preventing the door from opening further.
bracket preventing the door from opening further.
Scan to follow along with a video.
Scan to follow along with a video.
Reversing the Door
15
Page 20

INSTALLATION
REMOVING THE SHELVES
1. Open the door completely.
2. Remove all of the contents loaded on the shelf, if applicable.
3. Pull the shelf toward yourself until it is fully extended outward.
4. The shelf has plastic tabs on both sides indicated in the diagram below. While
facing the unit, press the plastic tab on the right side down while pulling up on
the left tab.
5. Evenly pull out the shelf from the track until it is completely removed from the
inner compartment.
• To prevent damaging the door or door gasket, make sure the door is open at
least 90° when pulling shelves out of the rail compartment.
16
Removing the Shelves
NOTE: These installation instructions are for wooden shelves that come with the
dual zone wine cooler. ZLINE beverage fridges are equipped with glass shelves.
To adjust or remove, open the door completely and simply slide the shelves in and
out of the pre-installed metal brackets on the beverage fridge.
Page 21

WARRANTY
COVERAGE
ZLINE Kitchen and Bath ("ZLINE") wine coolers and beverage refrigerators have a two year
parts and service warranty and a five year parts warranty on the unit's sealed cooling system.
ZLINE warranty periods begin from the original purchase date of the product and solely cover the
original purchaser of the product, delivered new and in its original carton. The limited warranty
covers all parts and labor for necessary repairs if any part of the product, or the product itself,
proves to be defective in materials or workmanship.
The product must be deemed serviceable via troubleshooting with the ZLINE Customer Experience
team. All service on ZLINE products under warranty must be performed by ZLINE-approved and
ZLINE-certified service providers unless otherwise specified by ZLINE. Service will be provided
during normal business hours.
Products must be unobstructed and accessible to the service provider at the time of service.
ZLINE’s liability is limited to the original purchase price of the product. Additional injuries, losses,
damages, or other inconveniences caused by product malfunction or defects in materials are not
covered under the terms of this warranty.
TERMS
ZLINE warranties apply only to the original purchaser of a ZLINE product installed for normal
residential use. This is defined as a single-family, residential dwelling in a non-commercial setting.
Any warranty claim stemming from installation, operation, or any other use within a commercial
setting is not covered under this limited warranty. Commercial settings include, but are not limited
to: schools, churches, hotels, restaurants, vacation rentals such as Airbnb, daycare centers,
private clubs, fire stations, common areas in multi-family dwellings, nursing homes, food service
locations, and institutional food service locations such as hospitals or correctional facilities.
This warranty is non-transferable and will not under any circumstance be extended based on the
date of installation — the warranty period takes effect from the date of purchase and only covers
the original purchaser. The warranty applies only to products installed in the contiguous United
States and the District of Columbia.
Page 22

WARRANTY
Failure to secure certified warranty service per these terms will result in a forfeiture of the
remaining warranty. Out-of-pocket payments will not be reimbursed unless prior approval is
received from ZLINE and/or ZLINE-certified service contract partners. Unapproved out-of-
pocket payments for service will not be reimbursed. All warranty procedures must be followed to
maintain warranty coverage.
If a product qualifies within the service window provided under these warranty terms, and ZLINE
is unable to repair the product or a defective part of the product after a reasonable number of
attempts, ZLINE reserves the right to offer to replace the defective part or the product or provide
the original purchaser a full refund of the purchase price of the product (not including installation,
removal, or other charges that were not included in the original purchase price).
The original purchaser of the product must provide the original proof of purchase, including the
purchase date, when filing a claim to obtain replacement parts, service, or refunds. Additionally,
the original purchaser of the product must provide the serial number of the product when filing a
claim to obtain replacement parts, service, or refunds.
This warranty shall not apply to any ZLINE product in which the original factory serial number
has been removed, altered, or cannot be readily determined for any reason. Further, ZLINE is
not responsible for damage resulting from, but not limited to: shipment, delivery, or improper
installation; negligence or improper maintenance, misuse, or abuse of the product; unauthorized
alteration, modification, or tampering with the product; accident, fire, floods, pest infestations,
pandemics, natural disasters, or any other unpreventable or unexplained acts of nature,
commonly referred to as “acts of God”; flare-up fires or damages caused by improper electric
supply, electrical line current, voltage, or power surges; and service to correct installation not
in accordance with the instructions contained in ZLINE’s product manuals and/or with local
government codes.
In the event service is dispatched, and it is discovered that the reported issue is not covered under
warranty based on the disclaimers above, the customer will be responsible for all service fees.
Failure to pay these fees will result in the forfeiture of remaining warranty coverage.
Page 23

WARRANTY
Information contained within ZLINE’s installation and user manuals, in addition to product
information included on ZLINE’s website and all related digital listings, do not cover every possible
condition and situation that may occur during the installation or operation of ZLINE products.
ZLINE reserves the right to make changes at any time to its products when considered safe,
necessary, and useful. Always check the ZLINE website for the most up-to-date version of its
product manuals: www.zlinekitchen.com/pages/manuals.
Do not install or operate any ZLINE product if it has missing or broken parts or if it arrives damaged
due to shipping. If ZLINE products arrive damaged, contact ZLINE Customer Experience at
1-614-777-5004 for help. Failure to report a damaged appliance prior to installation or
operation may void the warranty.
ZLINE disclaims responsibility for damage or injury caused by improper installation or use of
any of its products. ZLINE is under no obligation, by law or otherwise, to provide concessions,
including repairs, prorates, rebates, discounts, or replacements, once the warranty has expired.
SERIAL NUMBER LOCATION
Please write down the model number and serial number
of your appliance. The model number is located on the
rating label on the back of your unit. The serial number
is located on the top center of the interior on your
appliance. Both are needed to obtain warranty service.
Do not remove permanently affixed labels, warnings,
or plates from the product. This will void the warranty.
You may also consider attaching your receipt or proof
of purchase to this manual.
Page 24
WARRANTY
SERVICE
For warranty service, please contact our Customer
Service team at 1-614-777-5004 or visit
www.zlinekitchen.com/contact to utilize our online
Customer Experience Portal.
Scan the QR code to view the most up-to-date version of
our Installation Manual and User Manual.
Need to purchase a part or accessory for your ZLINE
product? Visit www.zlineparts.com, ZLINE’s official parts
distribution partner.
Page 25

 Loading...