

Zline FMTF-SS, FFCS-OR, FPBC-SS, FPBL-CH, FPBL-MB Installation Manual And User's Manual
...Page 1

F a u c e t
Page 2

CONTENTS
Faucets
SAFETY INSTRUCTIONS 1
Prior to Installation
Safety Tips
Care and Maintenance
SPRING KITCHEN FAUCETS 2
Models: FSNZ-CH FSTB-CH
FSNZ-SS FSTB-SS
FSNZ-MB FSTB-MB
Dimensions
Parts
Assembly
PULL DOWN KITCHEN FAUCETS 5
Models: FPBL-CH
FPBL-SS
FPBL-MB
Dimensions
Models: FPTB-CH FPTF-CH FPNZ-CH
FPTB-SS FPTF-SS FPNZ-SS
FPTB-MB FPTF-MB FPNZ-MB
Dimensions
Models: FPBC-CH
FPBC-SS
Dimensions
Parts
Assembly
Page 3

CONTENTS
Faucets
SMART KITCHEN FAUCET 11
Model: FMTF-SS
Dimensions
Parts
Assembly
KITCHEN FAUCETS WITH SPRAYER 14
Models: FFCS-CH FFCC-CH
FFCS-OR FFCC-OR
Dimensions
Parts
Assembly
TROUBLESHOOTING 20
Page 4

Safety Instructions
Prior to Installation
Make sure that the cold and hot water lines are turned off.
Wrap all threaded connections with Teflon tape. Always wrap in a clockwise
direction.
Cover your drain to avoid losing parts.
Do not disassemble the main faucet body, as it has been installed and commissioned
correctly and precisely before delivery to the factory.
To keep the faucet from jamming, flush the water pipe before installation.
Using condition: Working pressure at 0.05-1.0 MPa (including cold and hot water
pressure) with applicable water temperature: 39.2°F - 1 94°F.
Care and Maintenance
To keep the product clean and shining, follow the steps below:
1. Rinse clean with water and dry with a soft cloth.
2. Do not clean with soaps, acid, polish, abrasives, or harse cleaners.
3. Do not use cloth with a course surface.
4. Unscrew the aerator and clean when necessary.
If soldering the water connections when installing the faucet, remove the O-rings,
cartridges, and washers before applying any heat.
Protect your eyes when cutting or soldering.
Do not over tighten screws/nuts. Finger tighten, then use a wrench/screwdriver to
tighen the fixing screw/nut until snug.
1
Page 5

Spring Kitchen Faucets
Spring Kitchen Faucet Models
FSNZ-CH FSTB-CH
FSNZ-SS FSTB-SS
FSNZ-MB FSTB-MB
Dimensions
105 mm
4 ¹/₈ in
5
524 mm
10 ¹/₈ in
52
2 ¹/₁₆ in
273 mm
10 ³/₄ in
220 mm
8 ¹¹/₁₆ in
6 in
153 mm
2
Page 6

Spring Kitchen Faucet
Parts for Models:
FSNZ-CH FSTB-CH
FSNZ-SS FSTB-SS
FSNZ-MB FSTB-MB
1
6
2
3
1. Faucet Body
2. Base O-Ring
3. Rubber Washer
4. Metal Washer
5. Fixing Nut and Screws
6. Spray Head
4
5
3
Page 7

Spring Kitchen Faucet
Assembly for Models:
FSNZ-CH FSTB-CH
FSNZ-SS FSTB-SS
FSNZ-MB FSTB-MB
Hot
(Red)
Hot
Hot
9/16-24 UNEF
Cold
Cold
(Blue)
Cold
4
Page 8

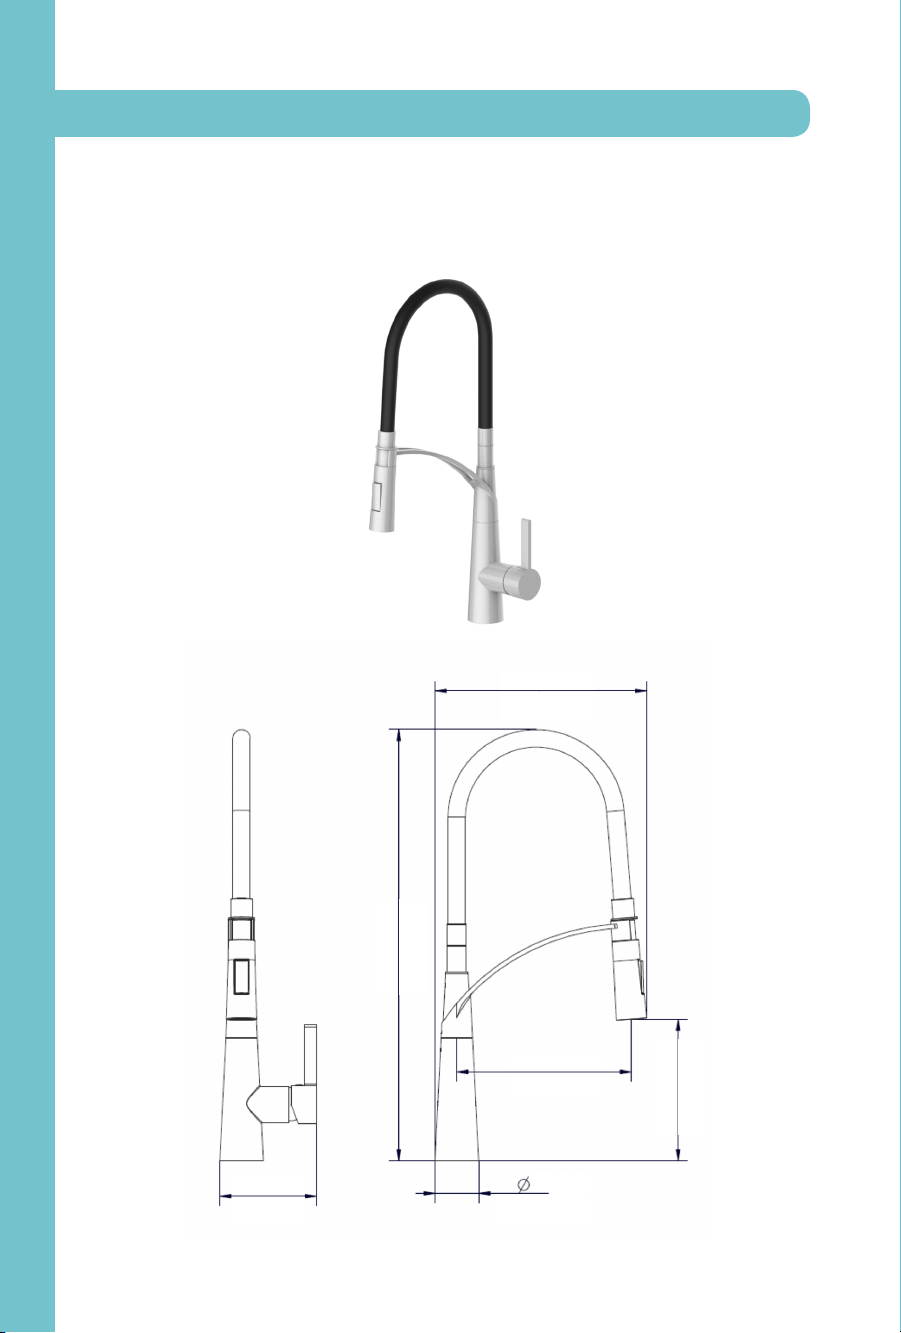
Pull Down Kitchen Faucets
Pull Down Kitchen Faucet Models
FPBL-CH
FPBL-SS
FPBL-MB
Dimensions
5
107 mm
3
4 ¹/₁₆ in
399 mm
15 ¹¹/₁₆ in
10 ³/₄ in
52 mm
2 ¹/₁₆ in
273 mm
221 mm
8 ¹¹/₁₆ in
172 mm
6 ³/₄ in
Page 9

Pull Down Kitchen Faucets
Pull Down Kitchen Faucet Models
FPTB-CH FPTF-CH FPNZ-CH
FPTB-SS FPTF-SS FPNZ-SS
FPTB-MB FPTF-MB FPNZ-MB
Dimensions
105 mm
8 ¹/₄ in
15 in
382 mm
277 mm
15
10 ¹/₁₆ in
235 mm
9 ¹/₄ in
3
187 mm
7 ¹/₈ in
6
Page 10

Pull Down Kitchen Faucets
Pull Down Kitchen Faucet Models
FPBC-CH
FPBC-SS
Dimensions
7
120 mm
4 ³/₄ in
451 mm
17 ³/₄ in
261 mm
10 ¹/₄ in
211 mm
5
8 ¹/₁₆ in
53 mm
2 ¹/₁₆ in
9
243 mm
4 ¹/₁₆ in
Page 11

Pull Down Kitchen Faucets
Parts for Models:
FPBL-CH FPTB-CH FPTF-CH FPNZ-CH FPBC-CH
FPBL-SS FPTB-SS FPTF-SS FPNZ-SS FPBC-SS
FPBL-MB FPTB-MB FPTF-MB FPNZ-MB
1. Faucet Body
2. Base O-Ring
3. Rubber Washer
4. Metal Washer
5. Fixing Nut and Screws
6. Spray Head
7. Weight
8. Water Line
1
9. Check Valve Assembly
6
3
2
4
8
9
5
7
8
Page 12

Pull Down Kitchen Faucets
Assembly for Models:
FPBL-CH FPTB-CH FPTF-CH FPNZ-CH FPBC-CH
FPBL-SS FPTB-SS FPTF-SS FPNZ-SS FPBC-SS
FPBL-MB FPTB-MB FPTF-MB FPNZ-MB
Hot
(Red)
Hot
Hot
Cold
Cold
(Blue)
9/16-24 UNEF
Open
Cold
Open
Assembly continued on next page.
9
Page 13

Pull Down Kitchen Faucets
Assembly Continued for Models:
FPBL-CH FPTB-CH FPTF-CH FPNZ-CH FPBC-CH
FPBL-SS FPTB-SS FPTF-SS FPNZ-SS FPBC-SS
FPBL-MB FPTB-MB FPTF-MB FPNZ-MB
51mm (2”)
76 mm (3”)
10
Page 14
Smart Kitchen Faucet
Smart Kitchen Faucet Model
FMTF-SS
Dimensions
243 mm
9
9 ¹/₁₆ in
11
111 m m
4 ³/₈ in
20 in
508 mm
200 mm
7
7 ¹/₈ in
50 mm
15
1 ¹/₁₆ in
7
163 mm
6 ¹/₁₆ in
Page 15

Parts for Model:
FMTF-SS
1
Smart Kitchen Faucet
6
1. Faucet Body
2. Base O-Ring
2
3. Rubber Washer
4. Metal Washer
5. Fixing Nut and Screws
6. Spray Head
3
4
5
12
Page 16

Smart Kitchen Faucets
Assembly for Model:
FMTF-SS
Hot Cold
Hot
(Red)
Hot
Cold
(Blue)
9/16-24 UNEF
Cold
13
Page 17

Kitchen Faucets with sprayers
Kitchen Faucet with Sprayer Models:
FFCS-CH
FFCS-OR
Dimensions
134 mm
5 ¹/₄ in
/
42 mm
O
5
1 ¹/₈ in
6 in
150 mm
7
316 mm
12 ¹/₁₆ in
277 mm
15
10 ¹/₁₆ in
236 mm
4 ¹/₁₆ in
60 mm
2 ³/₈ in
249 mm
5
9 ¹³/₁₆ in
14
Page 18
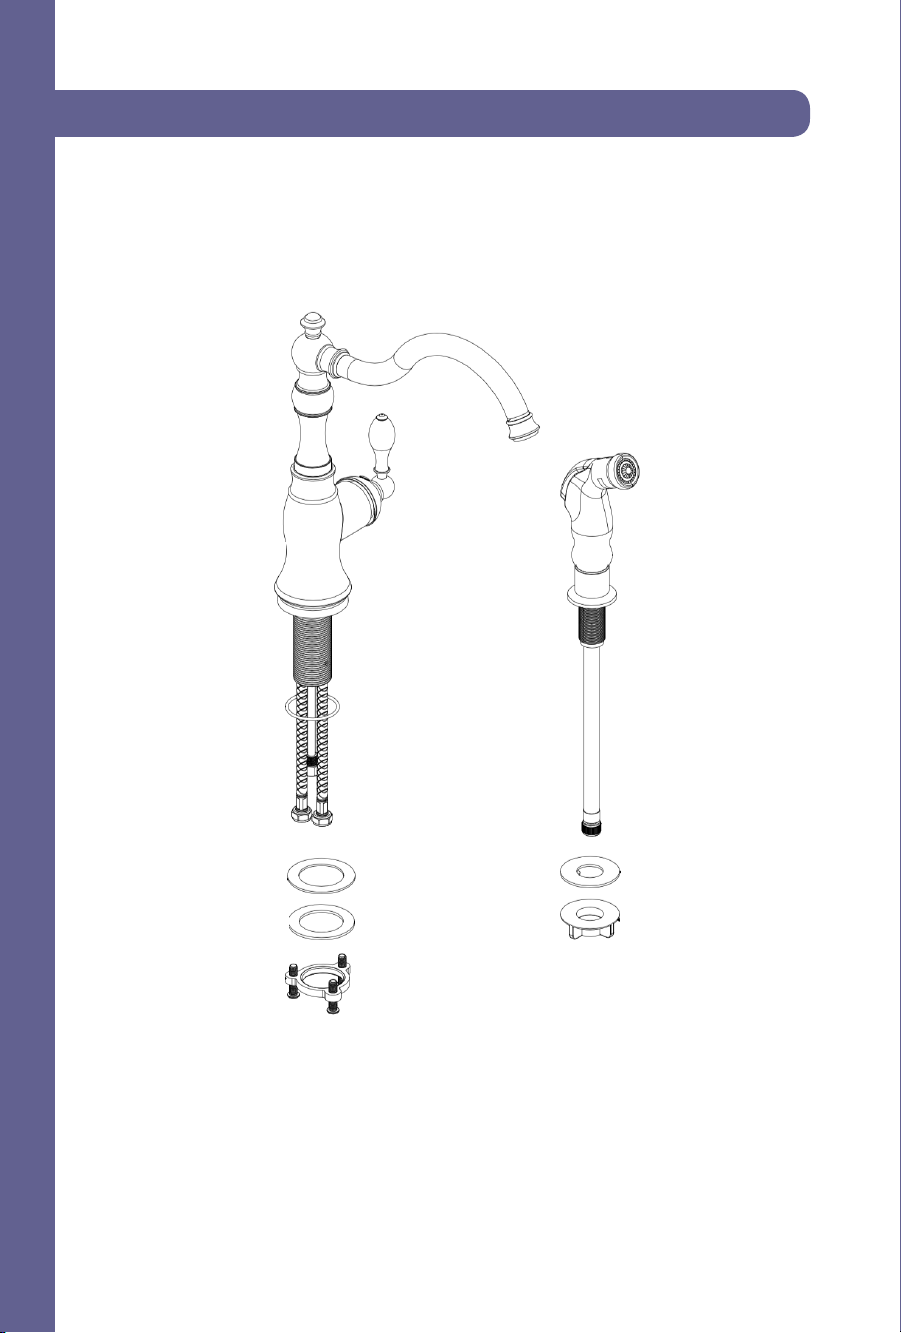
KITCHEN Faucets with Sprayers
Parts for Models:
FFCS-CH
FFCS-OR
15
1
6
2
3
4
7
8
5
1. Faucet Body
2. Base O-Ring
3. Rubber Washer
4. Metal Washer
5. Fixing Nut and Screws
6. Spray Head
7. Washer
8. Nut
Page 19

KITCHEN FAUCETS WITH SPRAYERS
Assembly for Models:
FFCS-CH
FFCS-OR
Hot Cold
Hot
(Red)
Hot
Cold
(Blue)
9/16-24 UNEF
Cold
16
Page 20

Kitchen Faucets with sprayers
Kitchen Faucet with Sprayer Models:
FFCC-CH
FFCC-OR
Dimensions
/
O
60 mm
2 ³/₈ in
17
203 mm
8 in
/
24 mm
O
15
/
O
¹/₁₆ in
/
O
42 mm
5
1 ¹/₈ in
6 in
150 mm
13
123 mm
4 ¹/₁₆ in
250 mm
101 in
215 mm
7
8 ¹/₁₆ in
356 mm
3
238 mm
9 ¹/₈ in
14 in
Page 21

KITCHEN FAUCETS WITH SPRAYERS
Parts for Models:
FFCC-CH
FFCC-OR
1
6
2
7
3
8
4
5
1. Faucet Body
2. Base O-Ring
3. Rubber Washer
4. Metal Washer
5. Nut
6. Spray Head
7. Washer
8. Nut
18
Page 22

Kitchen Faucets with sprayers
Assembly for Models:
FFCC-CH
FFCC-OR
Hot
(Red)
Cold
(Blue)
19
Hot
Cold
Hot
Cold
Page 23

Troubleshooting
Problem
There is leakage under the
handle.
Water will not shut off
completely.
Possible Cause
The locking nut has
come loose.
Cartridge may be
defective.
Solution
Unscrew the lever on the
handle by hand. Loosen set
screw with a hex wrench.
Remove the handle and
unscrew trim cap by hand.
Tighten locking nut with an
adjustable wrench.
Unscrew the level on the
handle by hand. Loosen set
screw with a hex wrench.
Remove the handle and
unscrew trim cap by hand.
Unscrew the locking nut with
an adjustable wrench. Remove
ceramic disc cartridge. Check
for cracks.
There is a leak between the
spray head and the hose.
The spray head may be
loose or the washer is
not seated correctly in
the hose connection.
Tighten the spray head by
hand until snug. Make sure the
washer is seated correctly.
20
Page 24

Kitchen and Bath
Two Locations:
916 Delaware Avenue
Marysville, Ohio 43040
350 Parr Circle
Reno, NV 89512
www.zlinekitchen.com
1-614-777-5004
 Loading...