

ZKTeco K40 User Manual

About This Manual
This document describes the GUIs and menu operations of the K series economic models.
K Series Economic Models User Manual
Version: 1.0
Date: July 2014
About this manual
I

About this manual
About this manual
Not all the devices have the function with. The real product prevails.
The photograph in this manual may be different from that of the real product. The real product
prevails.
I

K Series Economic Models User Manual
Contents
1 Instruction for Use .................................................................................... 1
1.1 Recommended Operation Steps ................................................................................................... 1
1.2 Finger Placement ........................................................................................................................... 1
1.3 Verification Modes.......................................................................................................................... 2
1.3.1 Fingerprint Verification .......................................................................................................... 2
1.3.2 Password Verification ........................................................................................................... 3
1.3.3 Card Verification ............................................................................................................... 3
1.4 Terminal Interface .......................................................................................................................... 4
2 Main Menu ................................................................................................. 5
3. User Management .................................................................................... 7
3.1. Add a User .................................................................................................................................... 7
3.1.1 Enter a User ID and Name ................................................................................................... 7
3.1.2 Enroll a Fingerprint ............................................................................................................... 8
3.1.3 Enroll a Password ................................................................................................................. 8
3.1.4 Enroll an Card ................................................................................................................... 8
3.1.5 Verification Type ................................................................................................................... 9
3.1.6 Select Department ............................................................................................................ 9
3.1.7 Select Privilege Settings ....................................................................................................... 9
3.2 User Management........................................................................................................................ 10
3.2.1 Search a User ..................................................................................................................... 11
3.2.2 Query a Record .................................................................................................................. 11
3.2.3 Edit a User .......................................................................................................................... 11
3.2.4 Delete a User ...................................................................................................................... 12
3.2.5 Add a User .......................................................................................................................... 12
4 Department Set ................................................................................... 13
4.1 Add a Department ........................................................................................................................ 13
4.2 Edit a Department ........................................................................................................................ 13
4.3 Delete a Department .................................................................................................................... 14
5 Shift Set ............................................................................................... 15
6 Report Management ........................................................................... 19
5.1 Attendance Rule ........................................................................................................................... 15
5.2 Shift Setting .................................................................................................................................. 15
5.3 Schedule ...................................................................................................................................... 16
5.3.1 Department-based Scheduling ........................................................................................... 16
5.3.2 Individual-based Scheduling ............................................................................................... 17
6.1 Download Att. Report ................................................................................................................... 19
I

Contents
6.2 Download Att. Setting Report ...................................................................................................... 21
6.3 Upload Att. Setting Report ........................................................................................................... 22
7 System Setting ........................................................................................ 23
7.1 System Setting ............................................................................................................................. 23
7.2 Date/Time ..................................................................................................................................... 25
7.3 Communication Setting ................................................................................................................ 25
7.4 Timing State Switching Setting .................................................................................................... 26
7.5 SMS Setting ................................................................................................................................. 27
7.5.1 Add an SMS Message ........................................................................................................ 27
7.5.2 Edit an SMS Message ........................................................................................................ 28
7.5.3 Delete an SMS Message .................................................................................................... 28
7.5.4 View an SMS Message....................................................................................................... 28
7.6 Daylight Saving Time (DST) Setting ............................................................................................ 29
7.7 Bell Settings ................................................................................................................................. 30
7.8 Work code .................................................................................................................................... 31
7.8.1 Add a Work Code ............................................................................................................... 32
7.8.2 Edit a Work Code ................................................................................................................ 32
7.8.3 Delete a Work Code ........................................................................................................... 32
7.8.4 Use a Work Code ............................................................................................................... 32
7.9 Update firmware ........................................................................................................................... 33
7.10 Reset Opts. ................................................................................................................................ 33
7.11 Access Function ......................................................................................................................... 34
8 Data Management ................................................................................... 35
8.1 Download/Upload ......................................................................................................................... 35
8.2 Delete/Clear ................................................................................................................................. 36
9 Record Query .......................................................................................... 38
10 System Information .............................................................................. 39
11 Appendix ............................................................................................... 40
Appendix 1 T9 Input ........................................................................................................................... 40
Appendix 2 Quick Query of Attendance Records .............................................................................. 40
Appendix 3 K Series Economic Models FAQs .................................................................................. 41
Statement on Human Rights and Privacy .......................................................................................... 47
Environment-Friendly Use Description .............................................................................................. 48
II
K Series Economic Models User Manual
The finger is flat to the surface and
centered in fingered guide.
Slanting
Off-center
Not flat to the surface
Off-center
1 Instruction for Use
1.1 Recommended Operation Steps
Step 1: Set a department (not required if the default department is used). For details, see 4 Department Set.
Step 2: Enroll users. For details, see 3. User Management.
Step 3: Set attendance rules (not required if the default rule is used). For details, see 5.1 Attendance Rule.
Step 4: Set shifts (not required if the default shift is used). For details, see 5.2 Shift Setting.
Step 5: Arrange schedules of employees (not required if the default schedule is used). For details, see 5.3 Schedule.
Step 6: Record employees' attendance. Check that the device time is precise and start attendance.
Step 7: Download and review reports. For details, see 6.1 Download Att. Report.
(K Series machines support connecting Attendance Software through TCP/IP mode and download Attendance
Logs by Attendance Software, and then calculating Attendance and statistical report.)
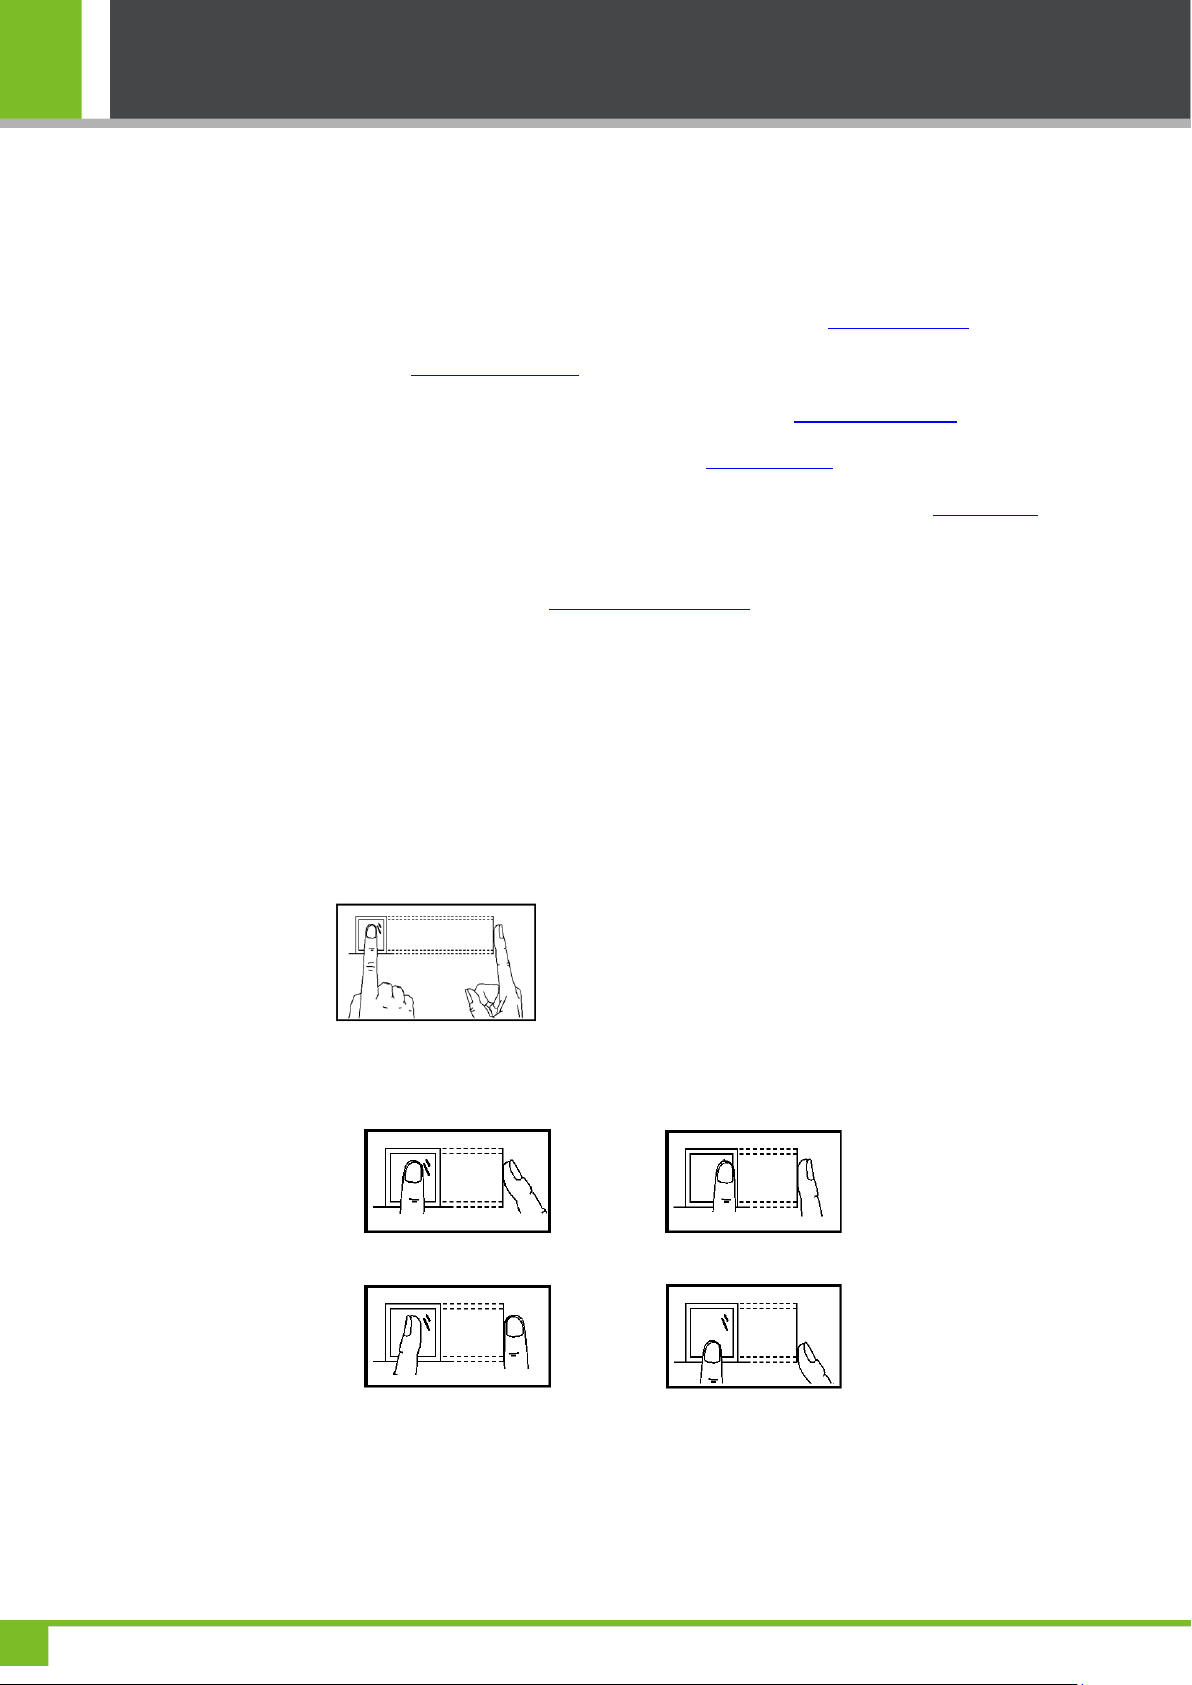
1.2 Finger Placement
Recommended fingers: The index finger, middle finger or the ring finger; the thumb and little finger are not
recommended (because they are usually clumsy on the fingerprint collection screen).
1. Proper finger placement:
2. Improper finger placement:
1
1 Instruction for Use
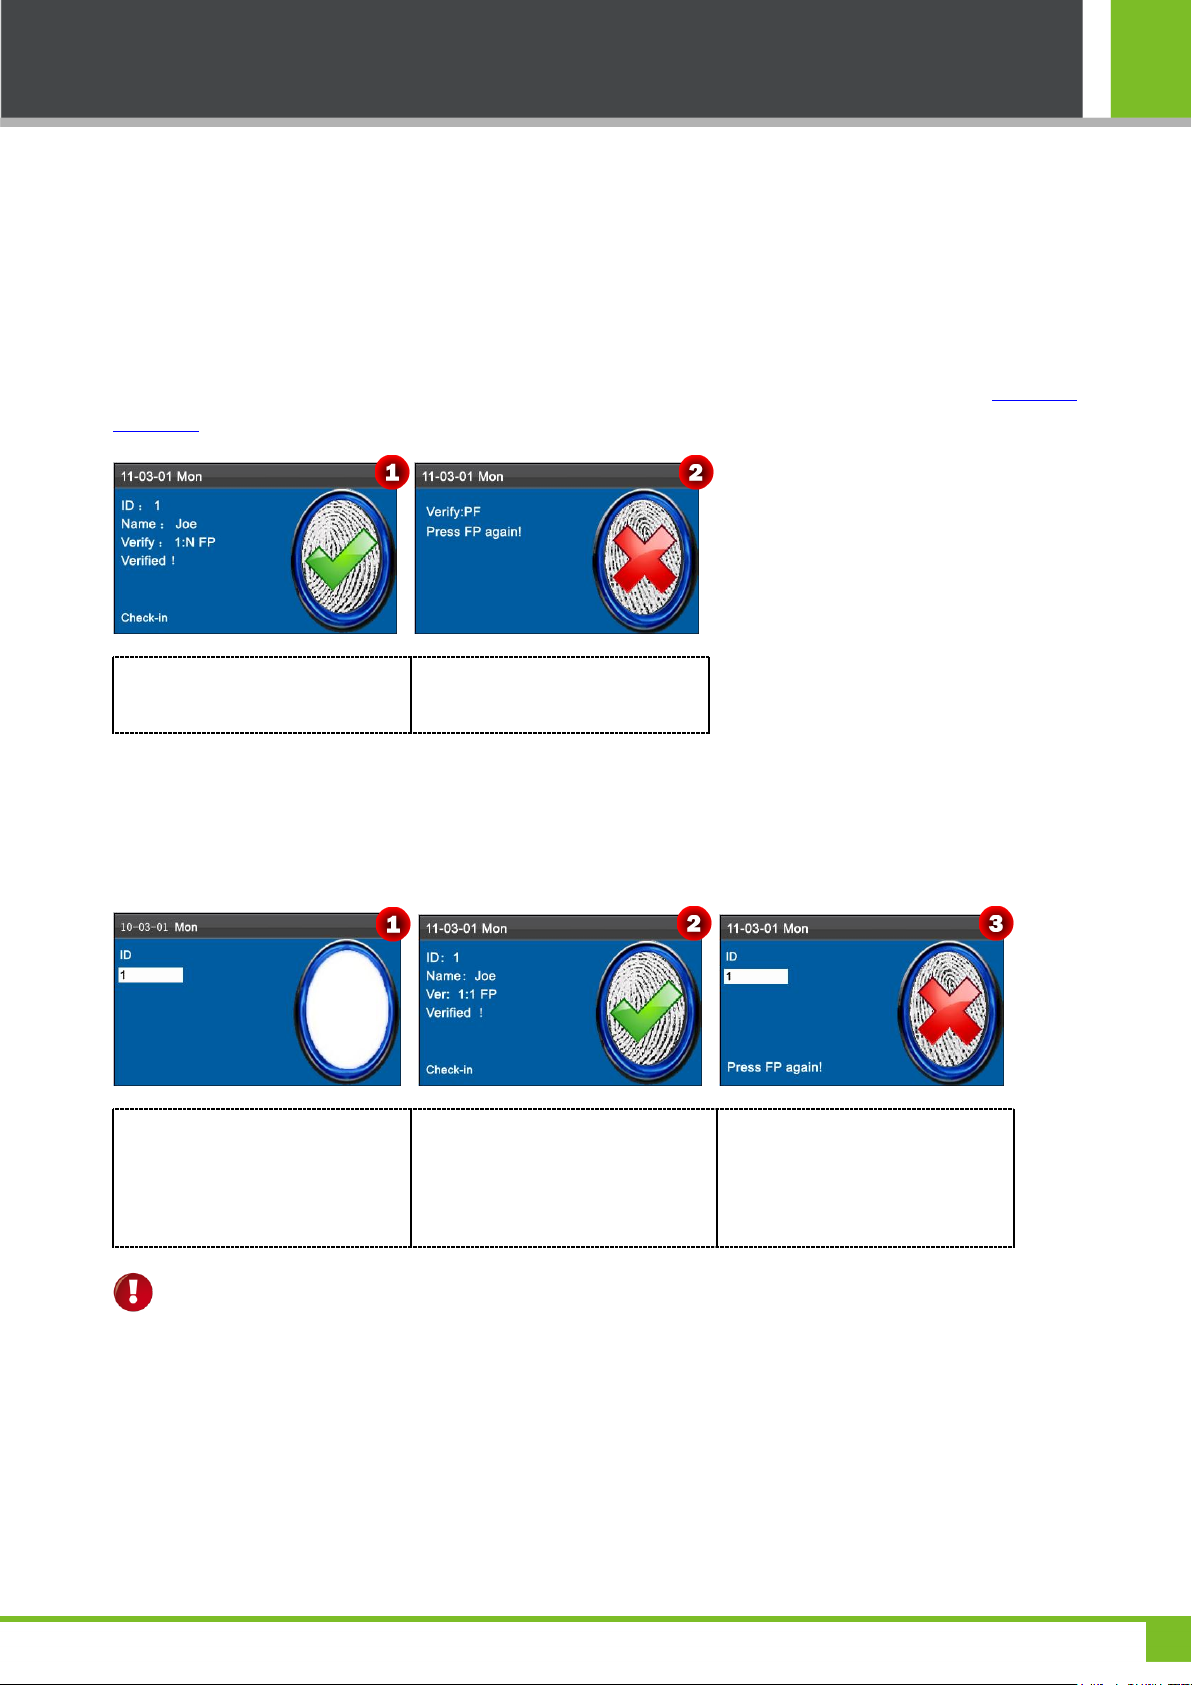
When verification successful, the
interface shown as figure 1.
When verification failed, then
interface shown as figure 2.
Enter the user ID on the initial
interface. Then press the enrolled
FP on the fingerprint sensor
properly.
When verification successful, the
interface shown as figure 2.
When verification failed, the
interface shown as figure 3.
1.3 Verification Modes
1.3.1 Fingerprint Verification
1. 1: N Fingerprint Verification
The terminal compares current fingerprint collected by the fingerprint collector with all fingerprint data on the terminal.
Press your finger on the fingerprint collector by adopting the proper finger placement. For details, see 1.2 Finger
Placement.
2. 1:1 Fingerprint Verification
In the 1:1 fingerprint verification mode, the terminal compares current fingerprint collected through the fingerprint collector
with that in relation to the user ID entered through keyboard. Adopt this mode only when it is difficult to recognize the
fingerprint.
Notes:
1. If it says “Invalid ID”, it means that there is no such ID or the employee doesn’t enroll fingerprint.
2. If the device says "Please try again", place the finger on the fingerprint sensor again. You can try another 2 times by
default. If it fails after 3 times, return Step 1 for second operation.
2
K Series Economic Models User Manual
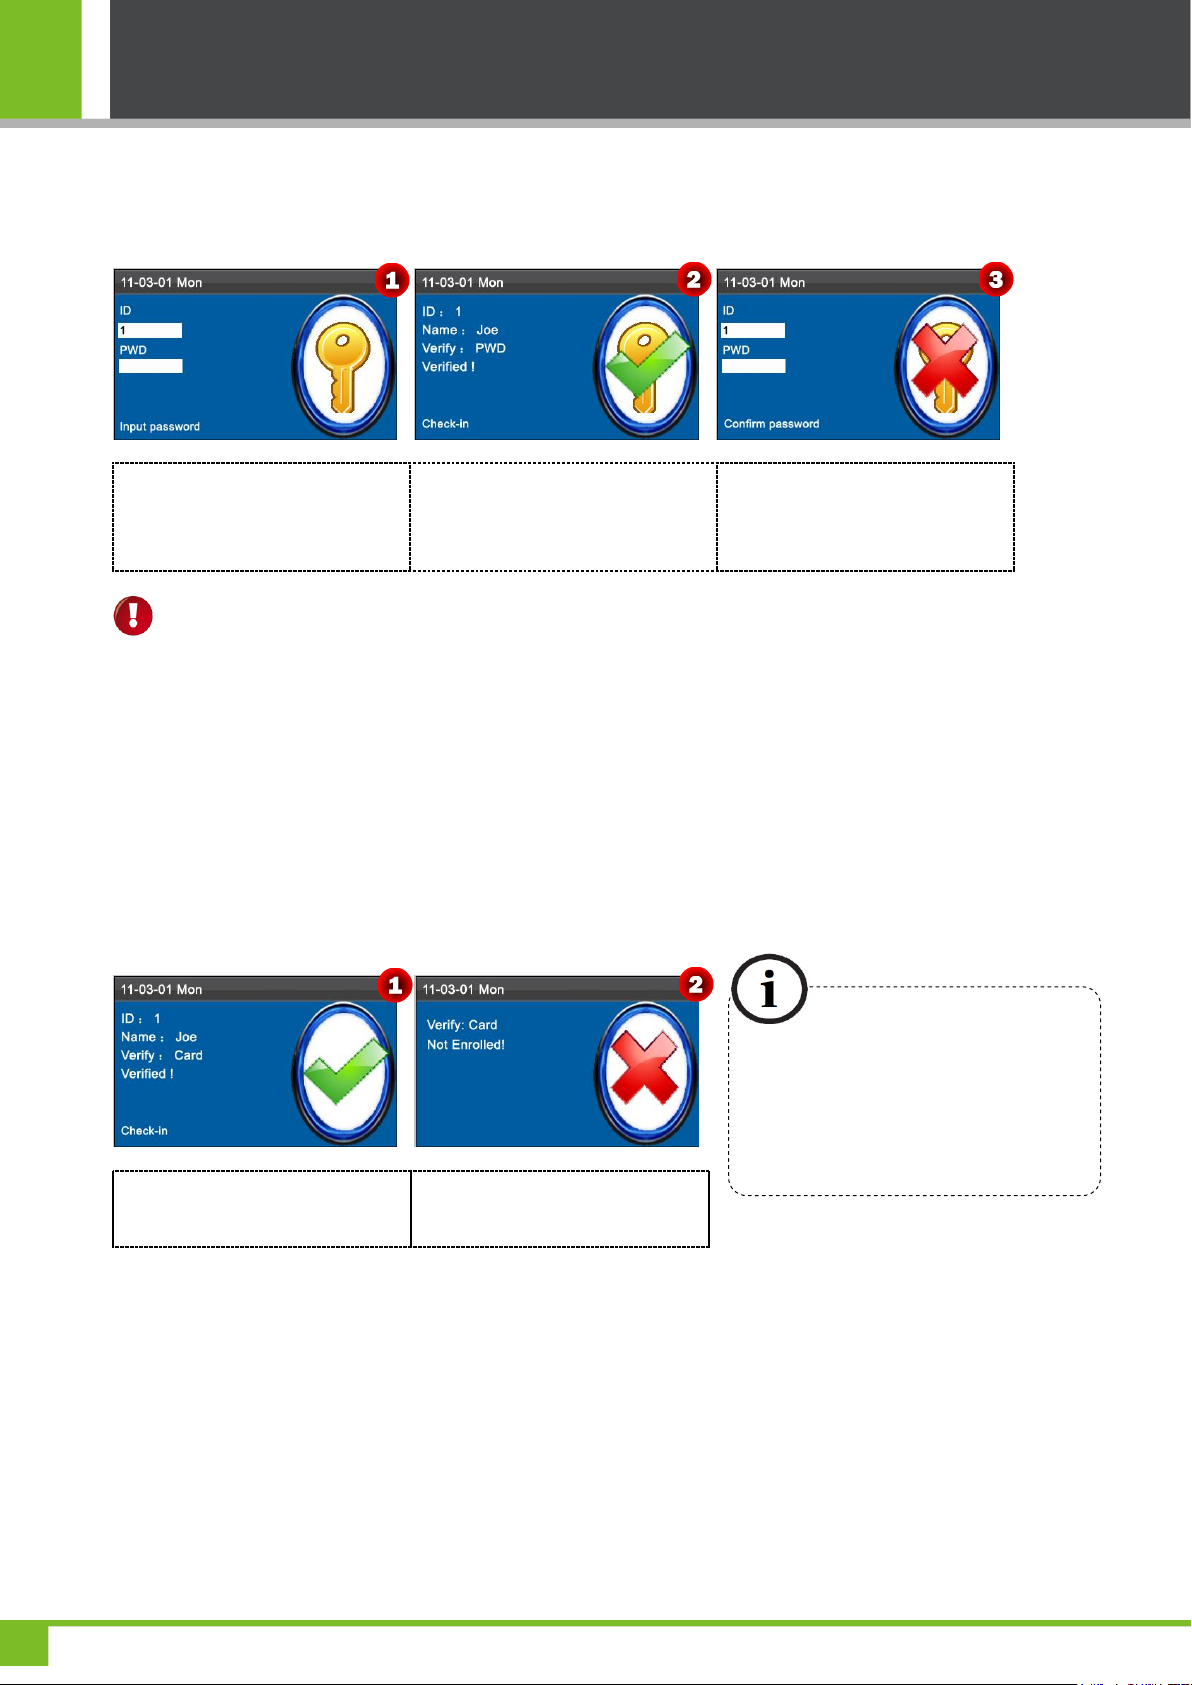
Enter the user ID on the initial
interface. Then press [M/OK] to
enter the enrolled PWD properly.
When verification successful, the
interface shown as figure 2.
When verification failed, the
interface shown as figure 3.
If the verification is successful, the
interface as shown above.
If the verification is not successful,
the interface as shown above.
Note: If a device is connected to a
computer through a USB cable, the Mifare
card of the device is unavailable and a text
prompt message is displayed on the initial
interface. The Mifare card restores after the
device is disconnected from the computer.
1.3.2 Password Verification
In the password verification mode, the terminal compares the password entered with that in relation to the user ID.
Notes:
If the device says "Incorrect password", enter the password again. You can try another 2 times by default. If it fails after 3
times, return Step 1 for second operation.
1.3.3 Card Verification
It is optional function. If needs, please contact business representative or pre-sales engineer, you can use this function
after obtaining license and activating.
K Series devices have an embedded ID or Mifare card module, providing the verification function. A device compares the
read card ID with all card IDs enrolled in the device during verification.
Notice: The card area is round the fingerprint sensor.
3
1 Instruction for Use
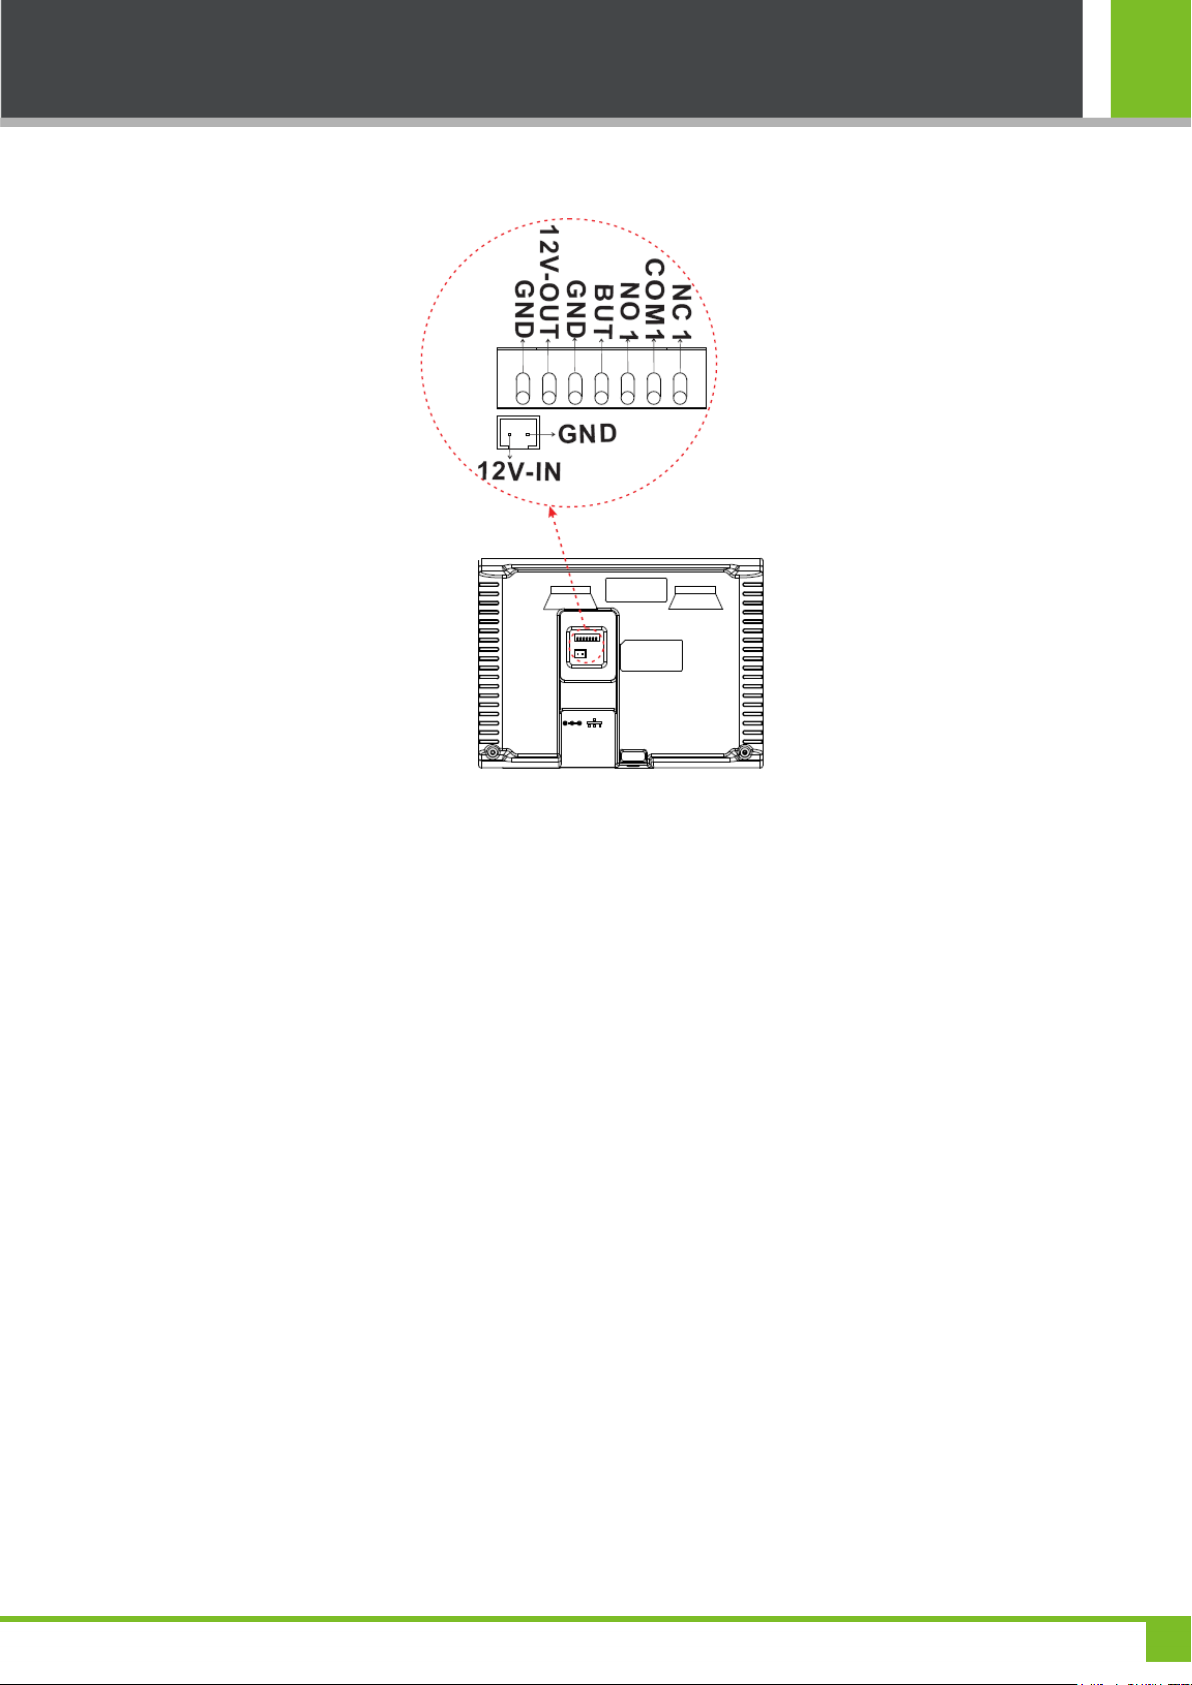
1.4 Terminal Interface
BUT: Connecting Exit Button.
NO: Normal Open.
NC: Normal Close.
4
K Series Economic Models User Manual
User
Shift set
Report
Record
Data Mgt.
Dept.set
System
SSR Type
No-SSR Type
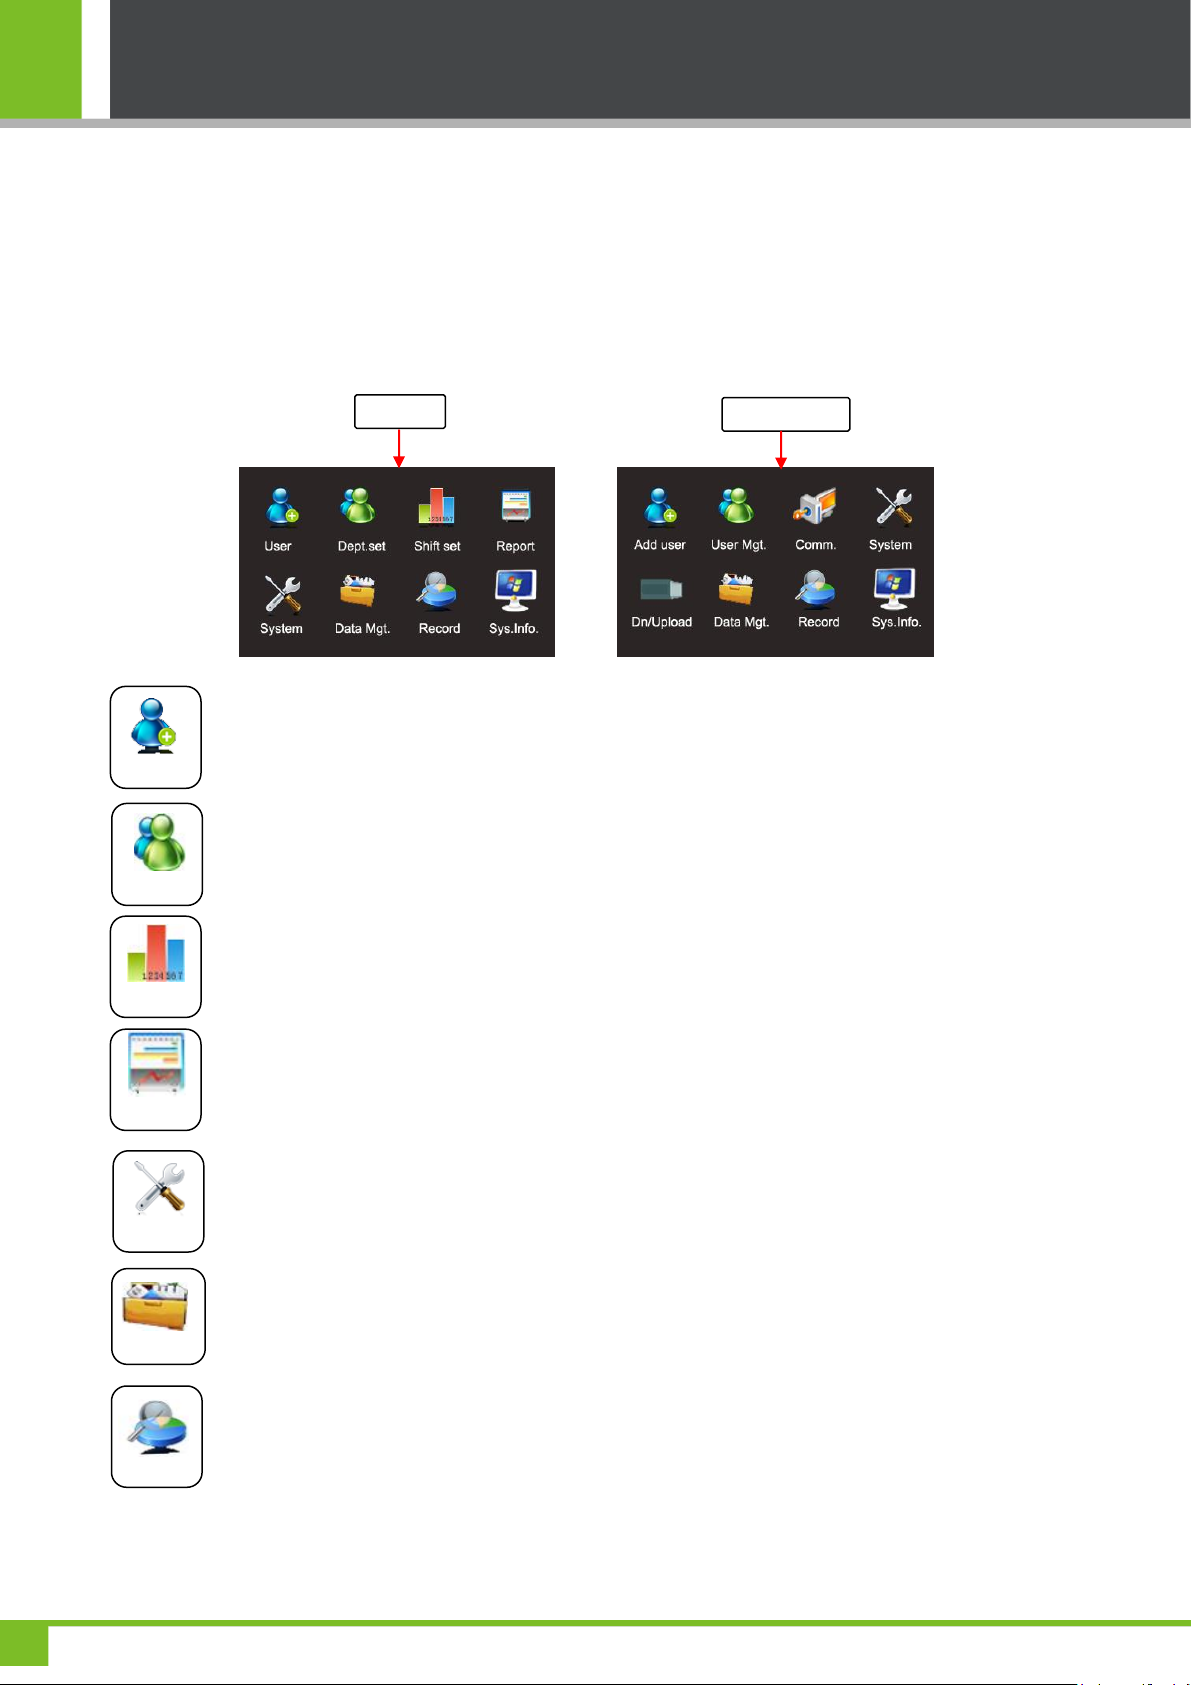
2 Main Menu
One type of K Series attendance machine that integrates the prevalent SSR technology in Europe and America is
launched to reduce management costs effectively, provide convenience for employees, and minimize the requirement for
computer skills of users. The device allows setting attendance rules, shifts, and schedules for employees, without the
need for attendance software. Users can download attendance reports for review and statistics. Other type can only do
some simple operations such as add and manage user, upload or download user data or attendance data etc.
This menu item include Add user and User Mgt., which allows you to add, browse, and manage user
information, including the employee ID, name, fingerprint, password, card ID, department, and rights. You
can add, edit, or delete basic information about employees.
This menu item allows you to browse department information, add, edit, or delete department.
This menu item allows you to set attendance rules and required shifts and to arrange schedules for
employees. The device supports a maximum of 24 Shifts.
This menu item allows you to download statistical reports of attendance or attendance setting reports to a
USB flash drive, or to upload attendance setting reports in which shifts are set and employees' schedules are
arranged. The device gives priority to the schedules in an attendance setting report.
This menu item allows you to set system-related parameters, including the basic parameters, Date/Time,
Communication option, Timing State Switching Setting, SMS Setting and so on, to enable the terminal to
meet user requirements to the greatest extent in terms of functions and display.
This menu item allows you to upload or download user data or attendance data, delete attendance data
and all user data, and revoke management rights. Through a USB disk, export user information and
attendance data from this device to related software or other fingerprint recognition devices.
This menu item allows you to easily query the attendance records saved on the device.
5

2 Main Menu
Sys. info.
Comm.
Dn/Upload
This menu item allows you to check the storage status as well as version information of the device.
This menu item allows you connect this device with PC to access attendance data, you need set IP
Address, Subnetmask, Gatway, DHCP and the communication password first.
This menu item allows you to download attendance data and user data, or upload user data.
6
K Series Economic Models User Manual
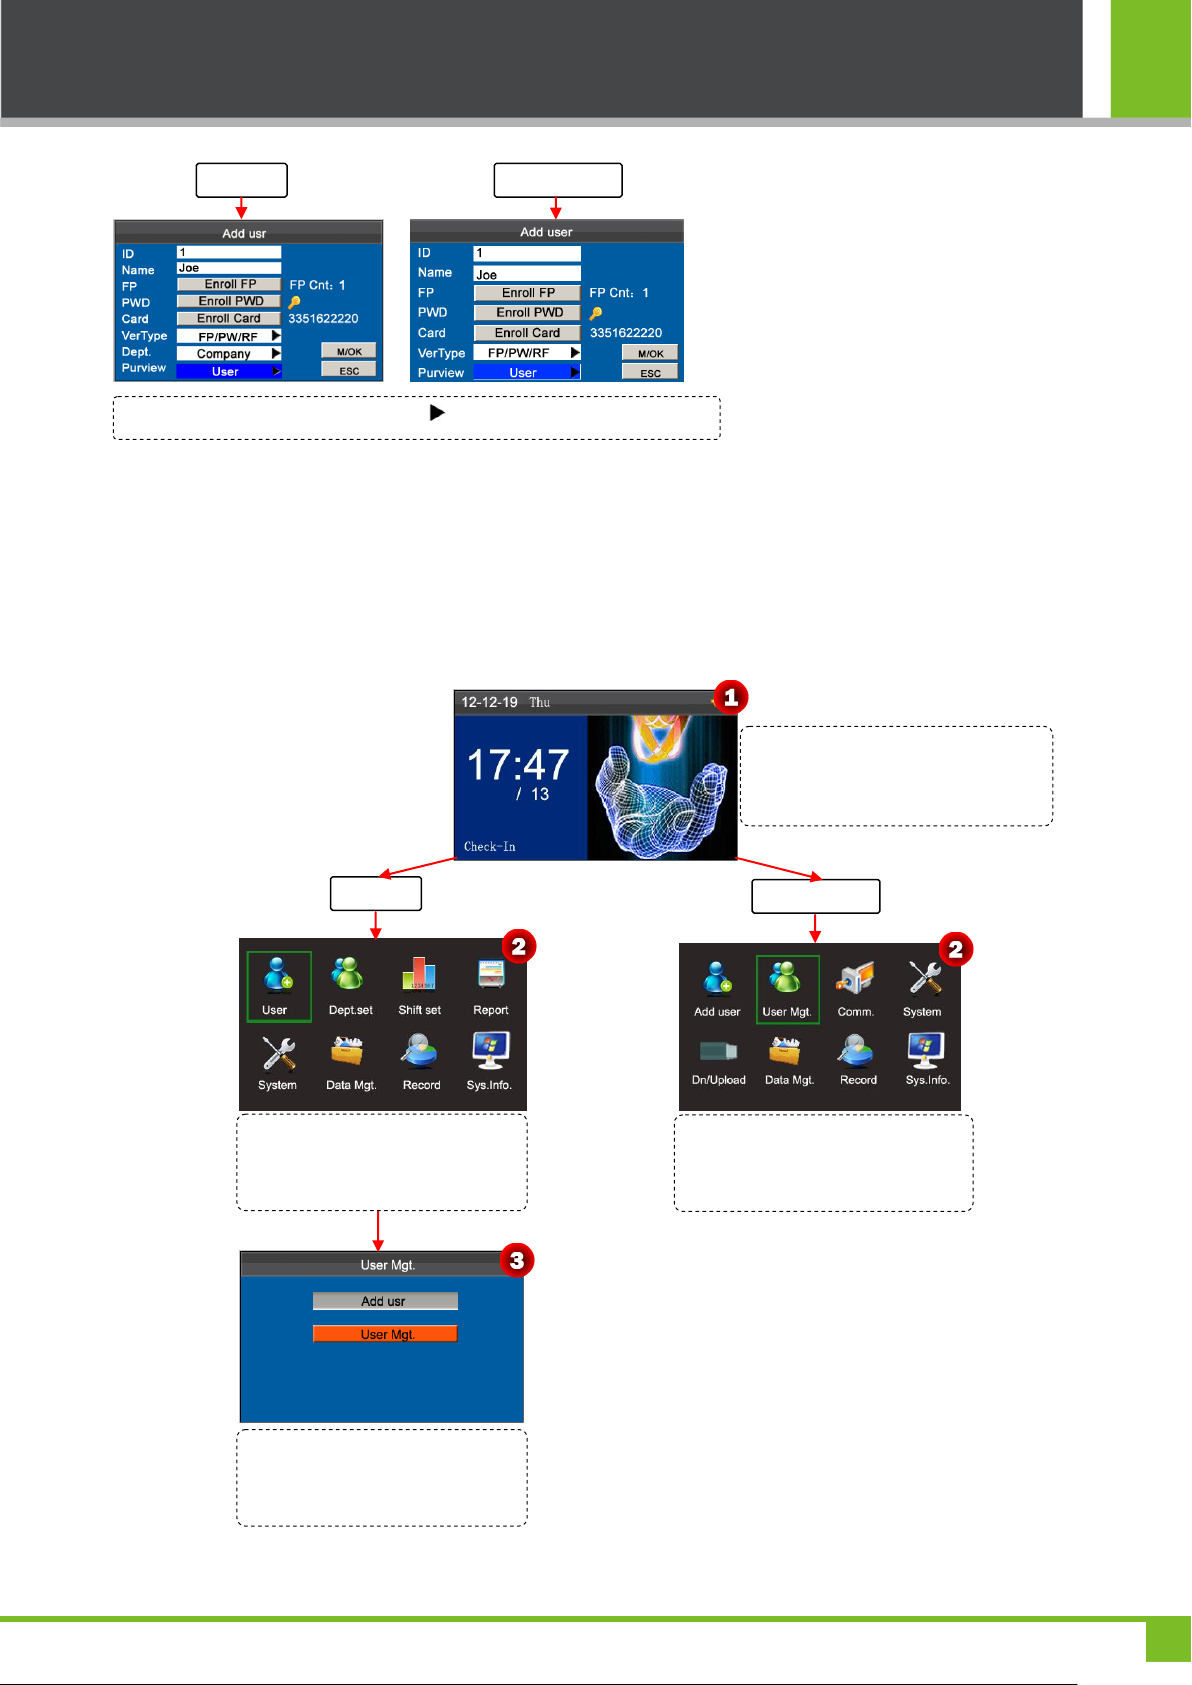
SSR Type
No-SSR Type
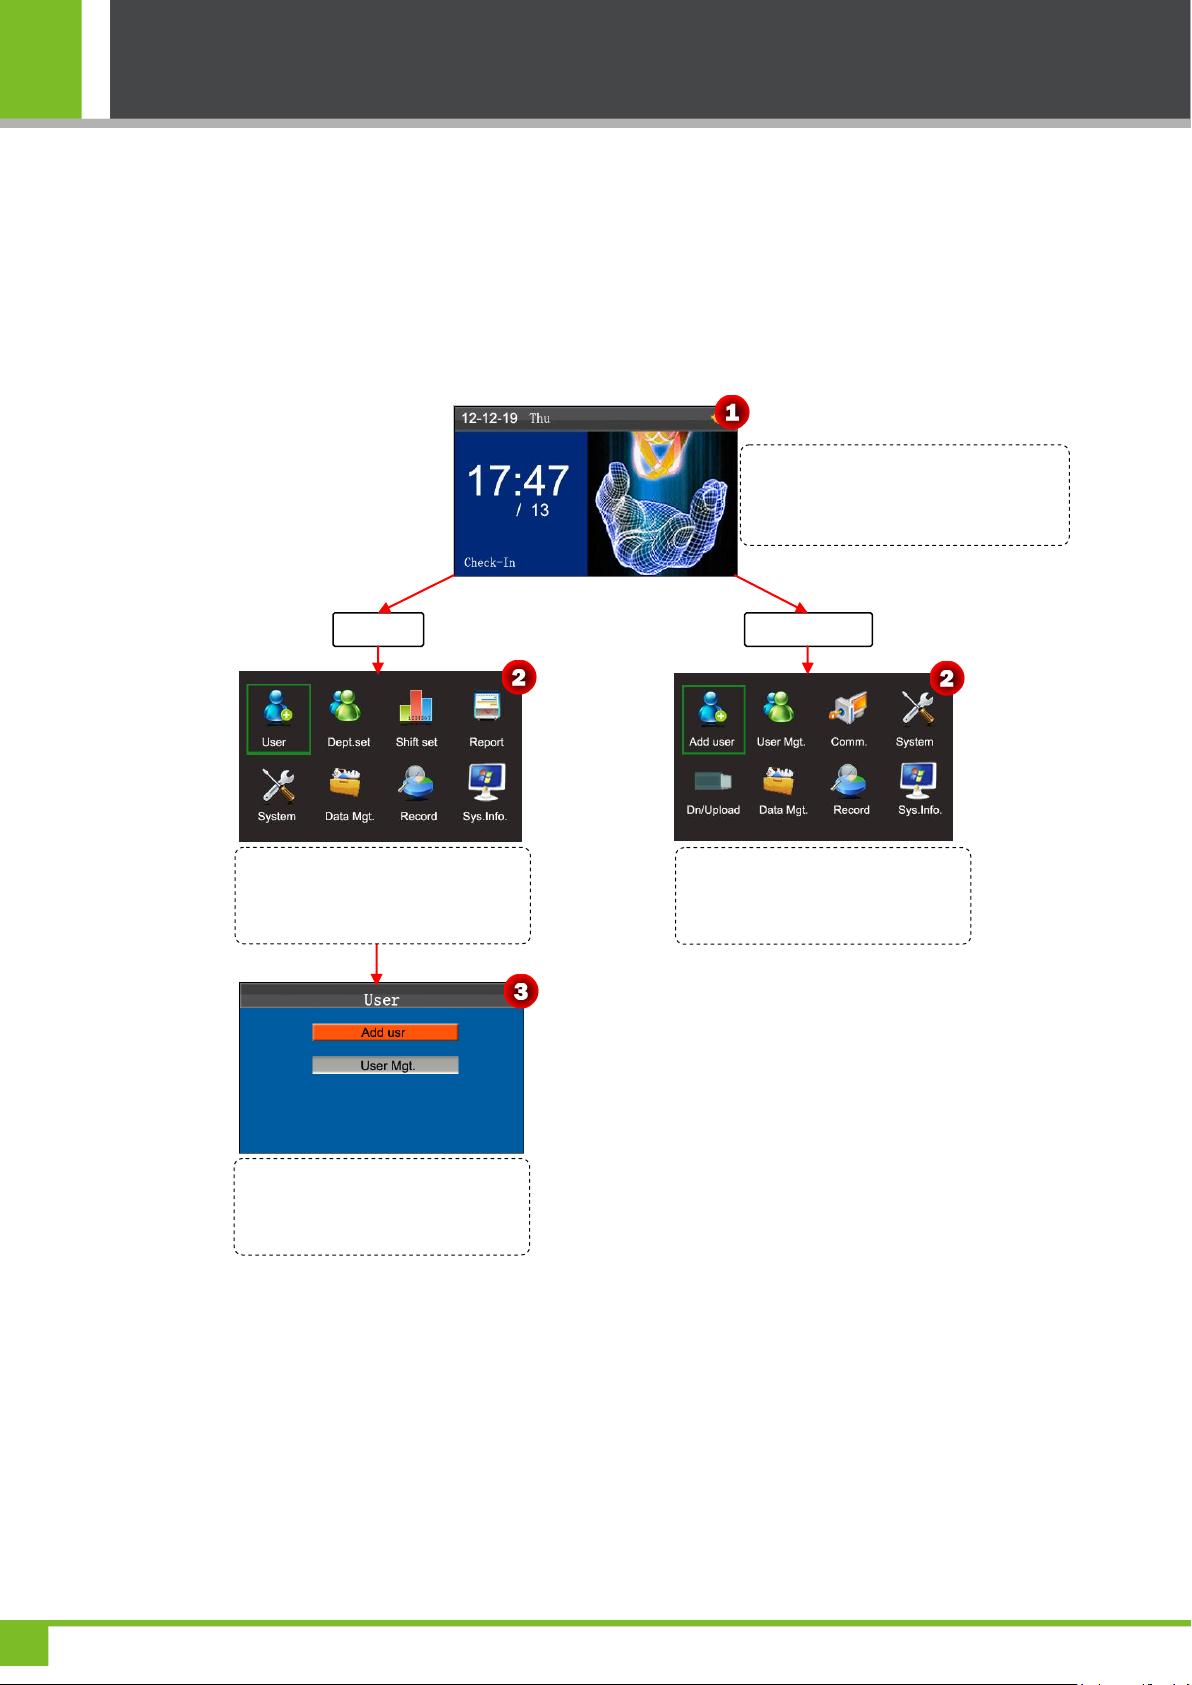
Press and hold the [M/OK] key on the
initial interface to enter the Main Menu
interface.
Press◄/►key to select User menu
and press [M/OK] to enter the User
interface.
Press◄/►key to select Add User
menu and press [M/OK] to enter the
Add User interface directly.
Press ▼key to select Add user and
press [M/OK] to enter the Add user
interface.
3. User Management
3.1. Add a User
Through this menu, you can add a new user to the device, including the user ID, Name, Fingerprint, Password, Card,
VerType, Department and Purview.
3.1.1 Enter a User ID and Name
The device automatically allocates an ID starting from 1 for every user in sequence. If you use the ID allocated by the
terminal, you may skip this section.
7
3. User Management
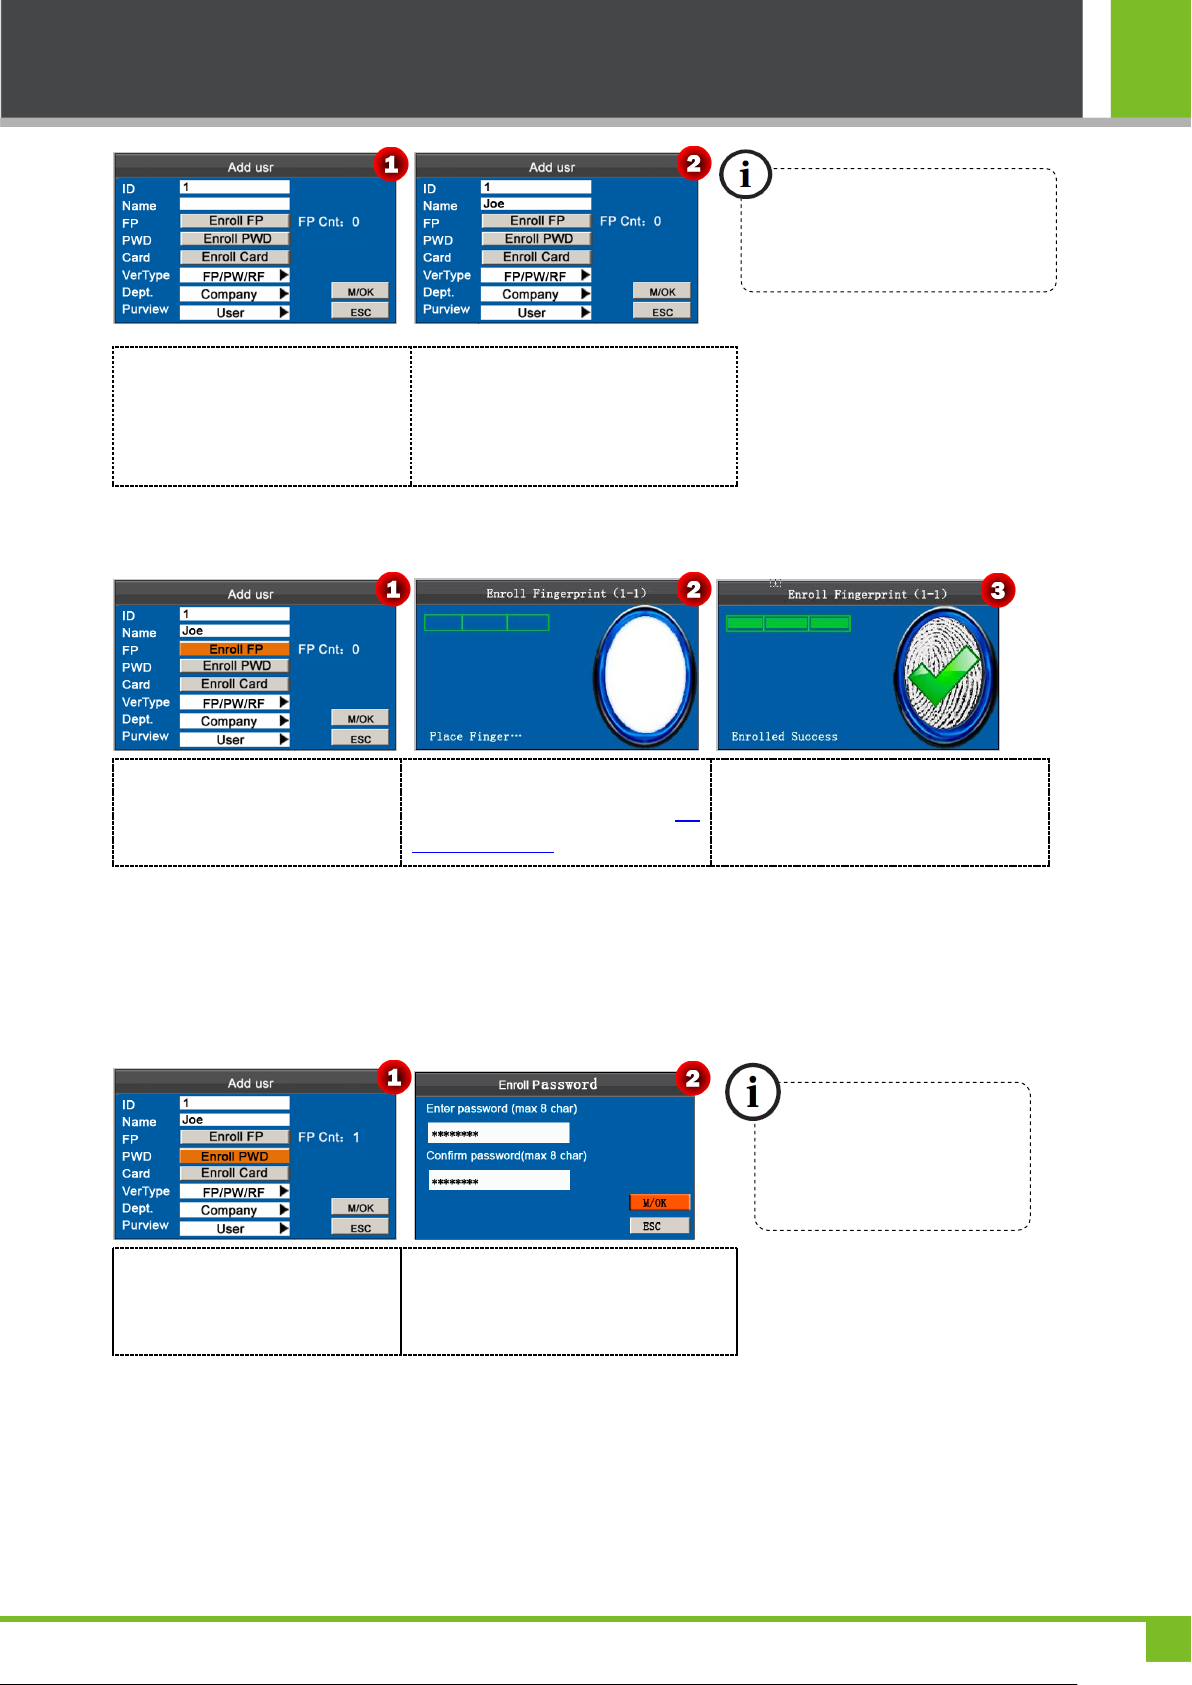
Press ▼ key to select ID. Press
numeric key to enter ID. (You can
press key to delete input.)
Press ▼ key to select Name. Press
[M/OK] to open T9 input method, and
then use T9 input method to enter
the Name.
Press ▼ key to select Enroll FP
and press [M/OK] to enter the
Enroll Fingerprint interface.
Place your finger on the fingerprint
sensor properly. For details, see 1.2
Finger Placement.
Place the same finger on the fingerprint
collector for three consecutive times
correctly until enrollment succeeds.
Press ▼ key to select Enroll
PWD. Press [M/OK] key to enter
the Enroll PWD interface.
Enter password and Re-enter the
password, press [M/OK] key to save
and return to the Add user interface.
For details of operations on keyboard
interface, see Appendix 1 T9 Input.
The device supports the 1- to
8-digit passwords by default.
3.1.2 Enroll a Fingerprint
Note: If the enrollment fails, the system will display a prompt message and return to the [Enroll Fingerprint]
interface. In this case, you need to repeat the operations of step 2.
3.1.3 Enroll a Password
3.1.4 Enroll an Card
This is optional function. If needs, please contact business representative or pre-sales engineer, you can use this function
after obtaining license and activating.
8
K Series Economic Models User Manual
Press▼ key to select Enroll Card
and press [M/OK] key to enter the
Enroll Card interface.
Swipe your card properly in the
swiping area.
Read Successfully!
Press ▼ key to select Dept. Press
key to select department.
Press ▼ key to select VerType, and Press ◄/► key to select Verification Type.
There are 15 types for verification by default: FP/PW/RF, FP, PIN, PW, RF,
FP/PW, FP/RF, PW/RF, PIN&FP, FP&PW, FP&RF, PW&RF, FP&PW&RF,
PIN&FP&PW, FP& (RF/PIN).
The devices have an embedded ID and Mifare card module, providing the Card verification function.
3.1.5 Verification Type
3.1.6 Select Department
Some devices have this function, you can select department that the new added user belongs to.
3.1.7 Select Privilege Settings
You can select privilege of the new added employee as Administrator or User in Purview option.
Administrator: An administrator is granted rights to operate all menus in addition to the fingerprint- and password- and
card-based attendance recording.
User: User is only allowed to record attendance through fingerprint, password or card verification and query attendance
9
3. User Management
Press ▼ to select Purview. And press to select User or Administrator.
SSR Type
No-SSR Type
Press and hold the [M/OK] key on the
initial interface to enter the Main Menu
interface.
SSR Type
No-SSR Type
Press◄/►key to select User menu
and press [M/OK] to enter the User
interface.
Press ◄/►key to select User Mgt.
Menu and press [M/OK] to enter
user management interface directly.
Press ▼ key to select User Mgt.
and press [M/OK] to enter the User
Management interface.
records.
Finally, press ▼ key to select [M/OK] button and press [M/OK] to save user information.
3.2 User Management
Generally the user information stored on the device needs to be modified in the wake of the personnel changes in a
company. To facilitate modification of user information, our device allows users to add, delete, query and edit user
information conveniently.
10

K Series Economic Models User Manual
Press numeric key '1' on User
Mgt. interface to enter the
Search User interface.
Enter the user ID, such as 3, and
press [M/OK] key to view the result.
Place the cursor on the user, which
ID=3.
Press ▲/▼ to select a user and
press numeric key '2' to view
records.
Press ▲/▼ to view the attendance
record row by row. Press / to view
the attendance record page by page.
Press [M/OK] to view the details
of the employee's record.
Press ▲/▼ to select a user and
press [M/OK] key to enter the Edit
user interface.
The User ID cannot be modified, and the other operations are similar
to those performed to add a new user. After modifying, press ▼ to
select [M/OK] button, and then press [M/OK] key to save.
Notes displayed at the bottom of the screen explain all letter meanings.
Verify: Verification Type.
F: Fingerprint Verification. P: Password Verification I: Card Verification
State: Attendance Status.
0: Check-in 1: Check-out 4: Overtime Check-in 5: Overtime Check-out
3.2.1 Search a User
Note: '#' as shown in the figure above means the user is an administrator, and '*' means the user has already
enrolled a password or card.
3.2.2 Query a Record
3.2.3 Edit a User
11

3. User Management
Press▲/▼ to select user and
press numeric key '0', pop-up the
Prompt box.
Press [M/OK] to delete the
user or [ESC] to cancel.
Press numeric key '3' on User Mgt.
interface to enter the Add User interface.
The option 'Delete user' is in either of the
following cases to delete all information of an
employee from the device:
① The fingerprint or password of this employee
is no longer required.
② This employee has resigned.
The option 'Add user' is similar with 3.1. Add a
User, you can see it for detail.
3.2.4 Delete a User
Note: Deleting a user will not result in the deletion of the user's attendance records which can be downloaded to
related software for query.
3.2.5 Add a User
12
 Loading...