

ZKTECO F18I Users Manual

F18 User Manual
Version: 1.3
Date: June 15, 2013
Introduction:
This document mainly introduces interface and operation of 2.4 Inches
color products.

About this manual
1. “ ”Means optional functions, not all devices have this function.
2. There is a slight difference between the photo and the real product.
The later prevails.
3. Key functions of various models are different. Please read the key
board instruction in appendix firstly.
4. Due to the constant renewal of products, the company can not
undertake the actual product in consistence with the information in
the document, also any dispute caused by the difference between
the actual technical parameters and the information in this
document. Please forgive any change without notice.
5. All rights Reserved.

Contents
Contents
1. Operating Instruction ............................................................................. - 1 -
1.1 Abbreviated Operating Procedures ....................................... - 1 -
1.2 Introduction to Fingerprint Recognition technology ............ - 2 -
1.3 About Verification Mode ...................................................... - 3 -
1.4 Connection with PC ............................................................ - 11 -
1.5 Main menu .......................................................................... - 13 -
2. User Management ................................................................................ - 15 -
2.1 Add user .............................................................................. - 15 -
2.2 Manage user ........................................................................ - 19 -
2.2.1 Search user ............................................................... - 20 -
2.2.2 Query attendance record .......................................... - 21 -
2.2.3 Edit user ................................................................... - 22 -
2.2.4 Delete user ............................................................... - 23 -
2.2.5 Add user ................................................................... - 24 -
2.3 Card management★ ........................................................... - 25 -
2.3.1 Enroll card ............................................................... - 25 -
2.3.2 Enroll fingerprint card ............................................. - 27 -
2.3.3 Clear card information ............................................. - 29 -
2.3.4 Copy card information ............................................. - 29 -
2.3.5 Set card parameter value .......................................... - 30 -
2.4 Access Control Option★ .................................................... - 32 -
2.4.1 Time Zone Setting .................................................... - 33 -
2.4.2 Holidays Setting ....................................................... - 34 -
2.4.3 Group time zone setting ........................................... - 36 -
2.4.4 Set Unlock Combination .......................................... - 38 -
2.4.5 Access Control Parameters ...................................... - 40 -
2.4.6 Duress Alarm Parameters......................................... - 42 -
I

Contents
2.4.7 Anti-passback Setting★ .......................................... - 43 -
2.4.8 RS485 Reader Function★ ....................................... - 46 -
3.1 Network option ................................................................... - 47 -
3.2 Serial port option★ ............................................................ - 48 -
3.3 Security ............................................................................... - 49 -
3.4 Wiegand option★ ............................................................... - 50 -
3.4.1 Input configuration .................................................. - 51 -
3.4.2 Output configuration ................................................ - 52 -
4. System Option ...................................................................................... - 54 -
4.1 System parameters .............................................................. - 54 -
4.2 Data management ............................................................... - 56 -
4.3 Upgrade firmware ............................................................... - 57 -
4.4 Display Setting ................................................................... - 58 -
4.4.1 Verification .............................................................. - 58 -
4.4.2 Time display............................................................. - 58 -
4.4.3 Picture cycle interval ............................................... - 59 -
4.4.4 Clock display delay .................................................. - 59 -
4.4.5 Interface style ........................................................... - 59 -
4.5 Reset ................................................................................... - 60 -
4.6 Other options ...................................................................... - 61 -
5. Date Time ............................................................................................. - 63 -
5.1 Date Time option ................................................................ - 63 -
5.2 DLST★ .............................................................................. - 63 -
6. PenDrive Management ........................................................................ - 66 -
6.1 Download data .................................................................... - 66 -
6.2 Upload data ......................................................................... - 67 -
7. Auto Test .............................................................................................. - 69 -
7.1 TFT display test .................................................................. - 69 -
7.2 Audio test ............................................................................ - 69 -
II

Contents
7.3 Keyboard test ...................................................................... - 70 -
7.4 Sensor test ........................................................................... - 70 -
7.5 Real-time clock ................................................................... - 70 -
8. Query Record ....................................................................................... - 71 -
9. System Information .............................................................................. - 74 -
9.1 Record capacity .................................................................. - 74 -
9.2 Device information ............................................................. - 74 -
10. Appendixes ......................................................................................... - 75 -
10.1 Keyboard .......................................................................... - 75 -
10.2 USB .................................................................................. - 78 -
10.3 Quick query of attendance record ..................................... - 78 -
10.4 Propaganda picture upload rules ....................................... - 79 -
10.5 Card support (ID/EM, MIFARE Card) ★ ....................... - 80 -
10.6 Web time & attendance★ ................................................. - 81 -
10.7 9 Digit Code★ .................................................................. - 82 -
10.9 Daylight Saving Time★ ................................................... - 82 -
10.10 Master-slave function ★ ............................................... - 83 -
10.11 About the human rights privacy statement ...................... - 85 -
10.12 Environmental protection ............................................... - 86 -
III

1. Operating Instruction
1. Operating Instruction
1.1 Abbreviated Operating Procedures
Step 1: Install the device and power it up.
Step 2: Enroll users by registering his/her fingerprints, passwords or
card. Assign users’ security privileges directly on the device.
Step 3: After enrolling users, verify that his/her enrolled fingerprint,
passwords or card is valid.
Step 4: Configure the device communication settings. Then download
the users’ newly enrolled information from the device onto the
Attendance Management on the computer. Data can be transmitted via
TCP/IP, RS232, RS485 and USB client or by using a USB flash drive.
Step 5: Modify users’ information in the Attendance Management, and
upload this newly information to the device after connected. Then the
users’ newly information will be displayed on the screen upon
attendance. (Some models allow directly name edition and other
operation on the device. Therefore, it is no necessary to connect device.)
Step 6: Verify the device displays the correct day and time. Then start to
attendance.
Step7: Download attendance records to the Attendance Management
and statistics them at the end of the month.
- 1 -
2.4 inch color screen series User Manual
proper
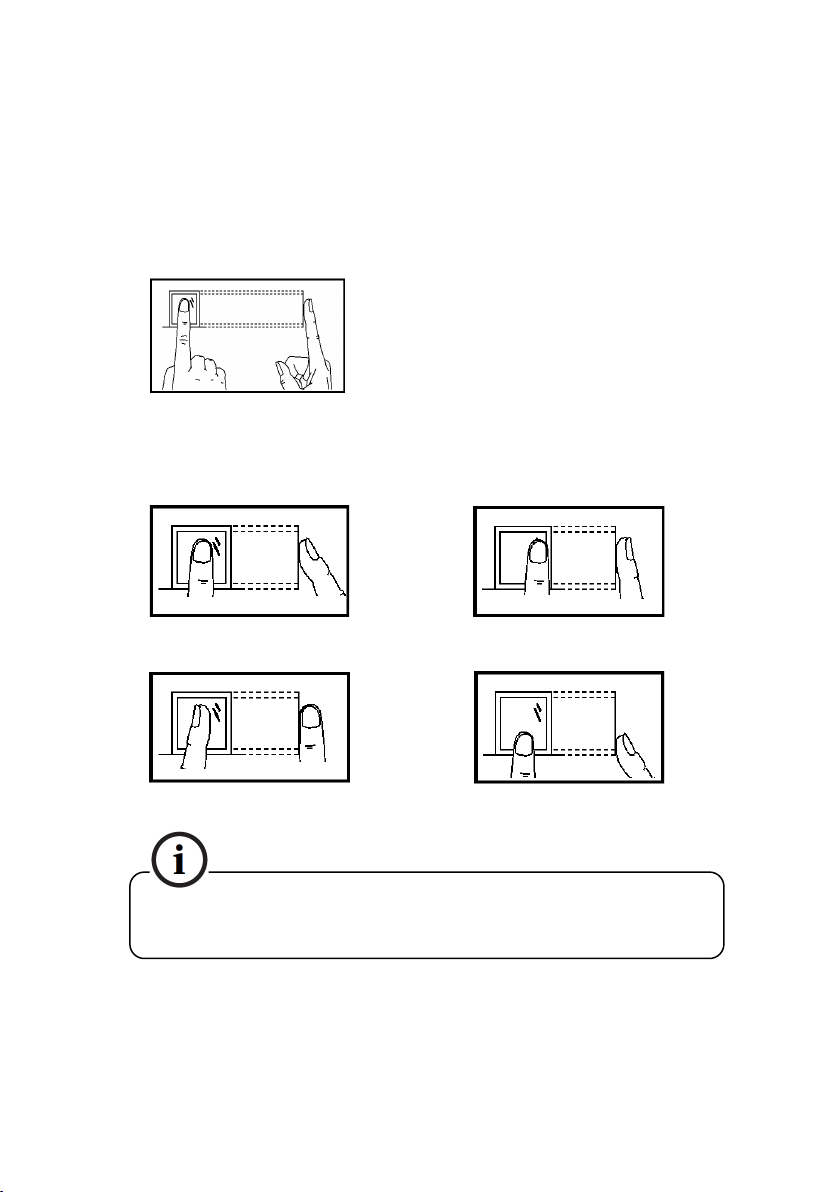
1.2 Introduction to Fingerprint Recognition technology
Enroll fingerprint by pressing index finger, middle finger or ring finger .
Proper press:
Improper press:
Upright
Slant
Please adopt the correct way to place the finger to avoid im
operation led to the identification performance degradation.
Make finger center pressed
on the sensor window
Too lean
Too downward
- 2 -

1. Operating Instruction
1.3 About Verification Mode
When the device is on initial interface, only after successful fingerprint or
password or Card verification, user can save attendance record on the device.
Initial Interface (As shown below):
Notice:
1) If the device have ID module, so Interface of Matrix and Magic style
can be displayed "Press fingerprint or punch card". When have not ID
module, it can be displayed "Please Press fingerprint" only.
2) The device has three interface styles for option. Each style displayed
different contents on the screen. For details please refer to 4.4 Display Setting.
3)As above the "Name" of screen, you can edit different names can be
executed by "Access Control Management Software ".
- 3 -
2.4 inch color screen series User Manual
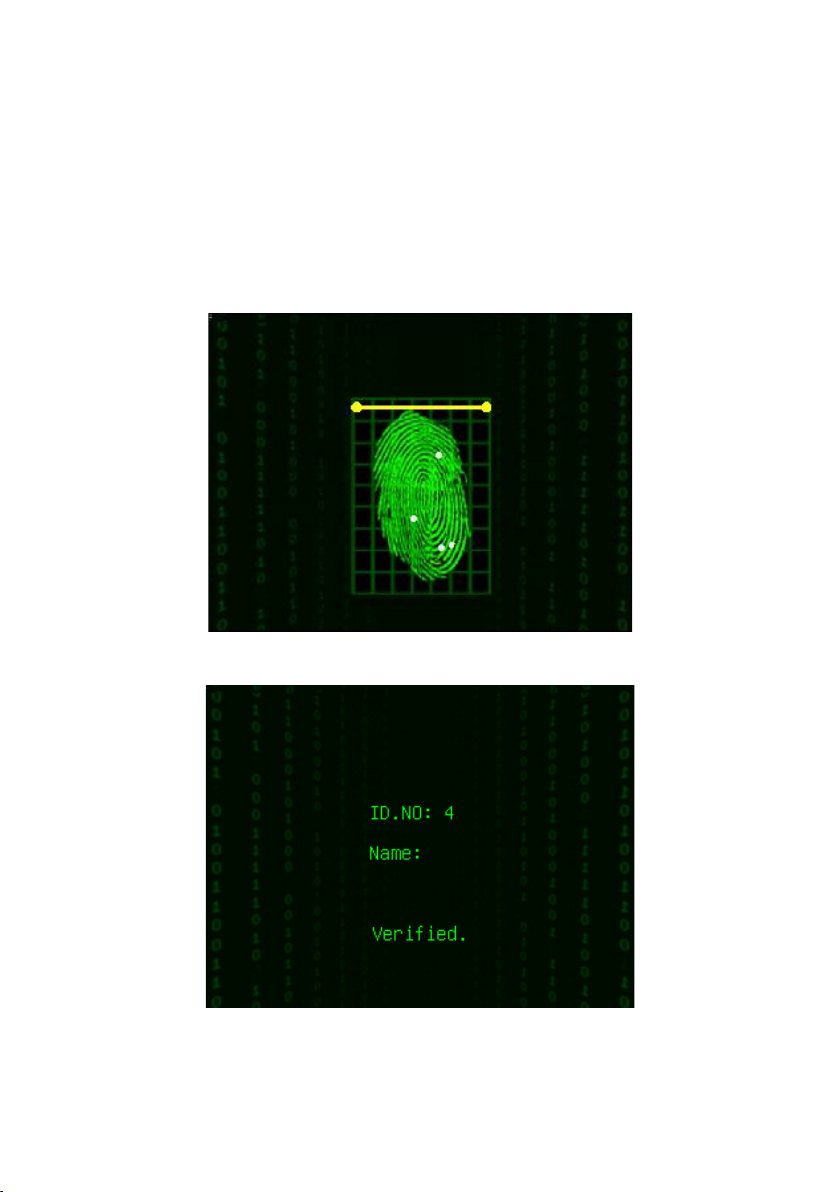
Fingerprint Matching
(1) 1:N fingerprint matching
Verify the fingerprint pressed on the sensor at present with all
fingerprint data in the fingerprint reader.
Step 1: Press fingerprint properly on the sensor on initial interface.
Step 2: If device says ‘Thank you”, the verification is completed.
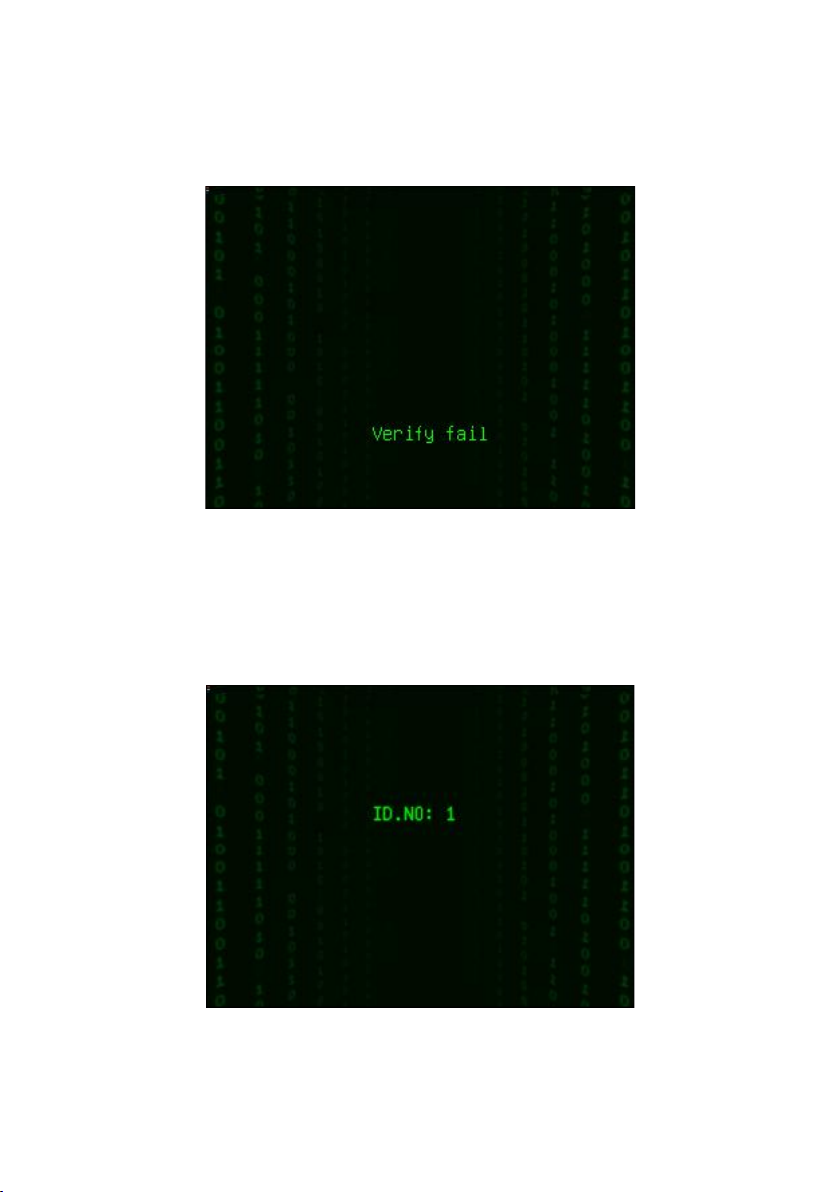
If device says " Please press again", and displayed "Verify fail" on the screen.
- 4 -
1. Operating Instruction
Return Step 1 for the second operation.
(2) 1:1 fingerprint match(User ID+fingerprint)
Verify the fingerprint pressed on the sensor at present with the
fingerprint related with user number. Use this method when it is difficult
to identify user’s fingerprint.
Step 1: Input User ID of employee to be verified on initial interface.
- 5 -
2.4 inch color screen series User Manual
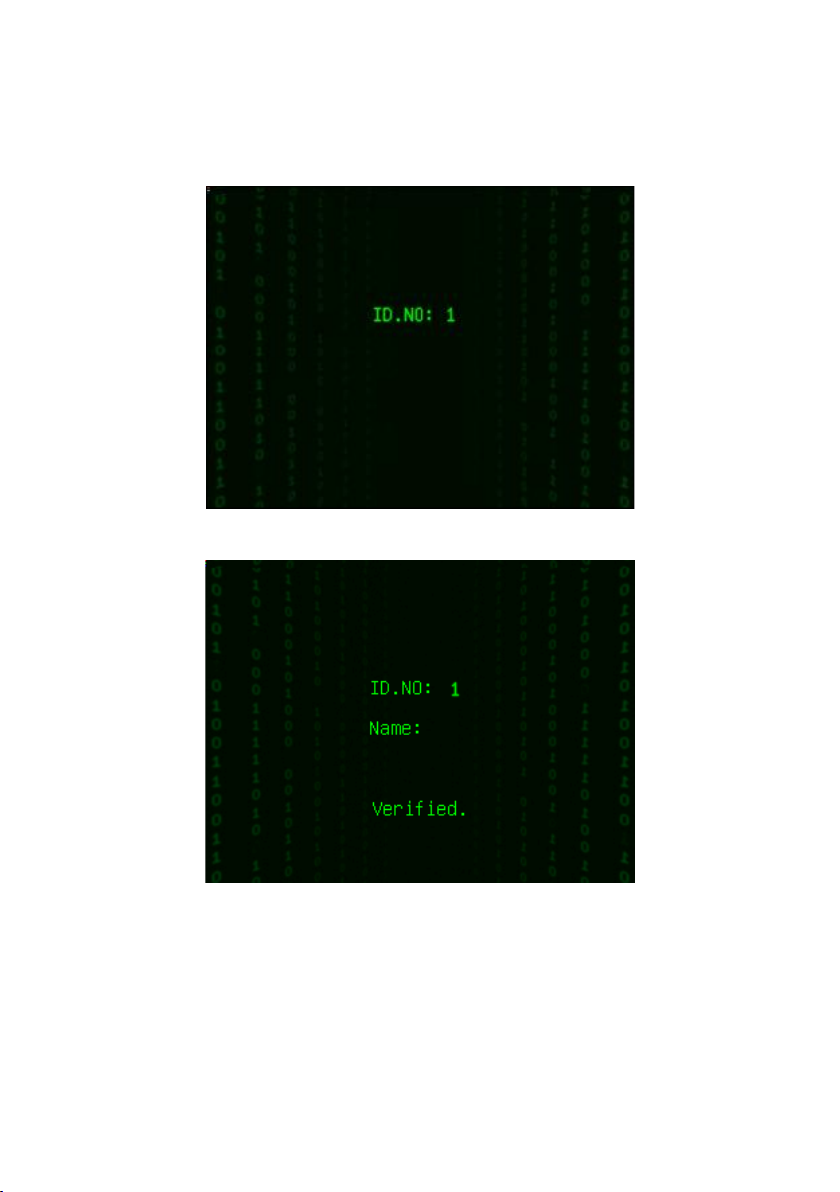
Step 2: Press fingerprint properly on the sensor.
Step 3: If device says ‘Thank you”, the verification is completed.
Notice:
If device says “Please press again”, return Step 2 for the second operation.
- 6 -
1. Operating Instruction
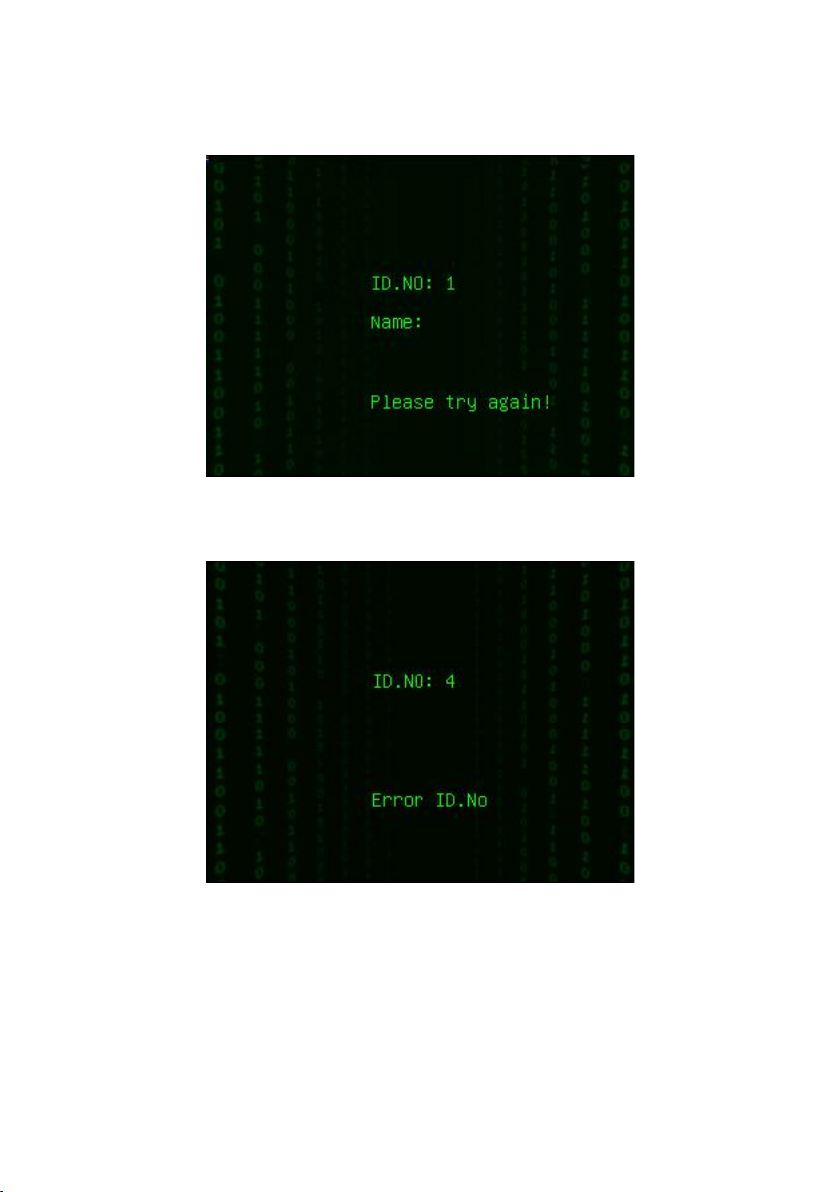
If device says “Error ID”, that means you input ID number is wrong, please
return Step 1 for the second operation.
Password Matching
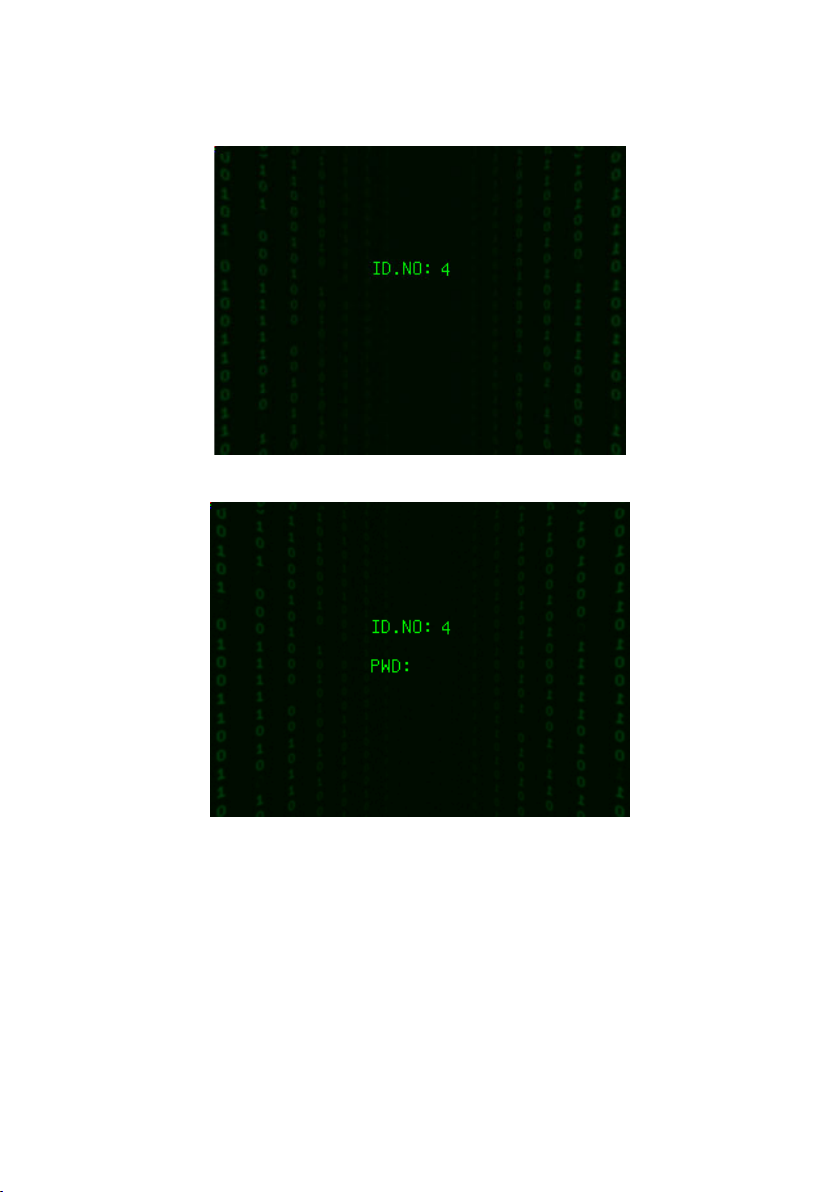
Step 1: Input User ID of employee to be verified on initial interface.
Then press OK.
Step 2: If it says that the enroll number is wrong, it means that there is
no such number or the employee does not enroll password.
- 7 -
2.4 inch color screen series User Manual
Step3: Input password when the interface appears.
Step 4: If device says ‘Thank you”, the verification is completed.
- 8 -
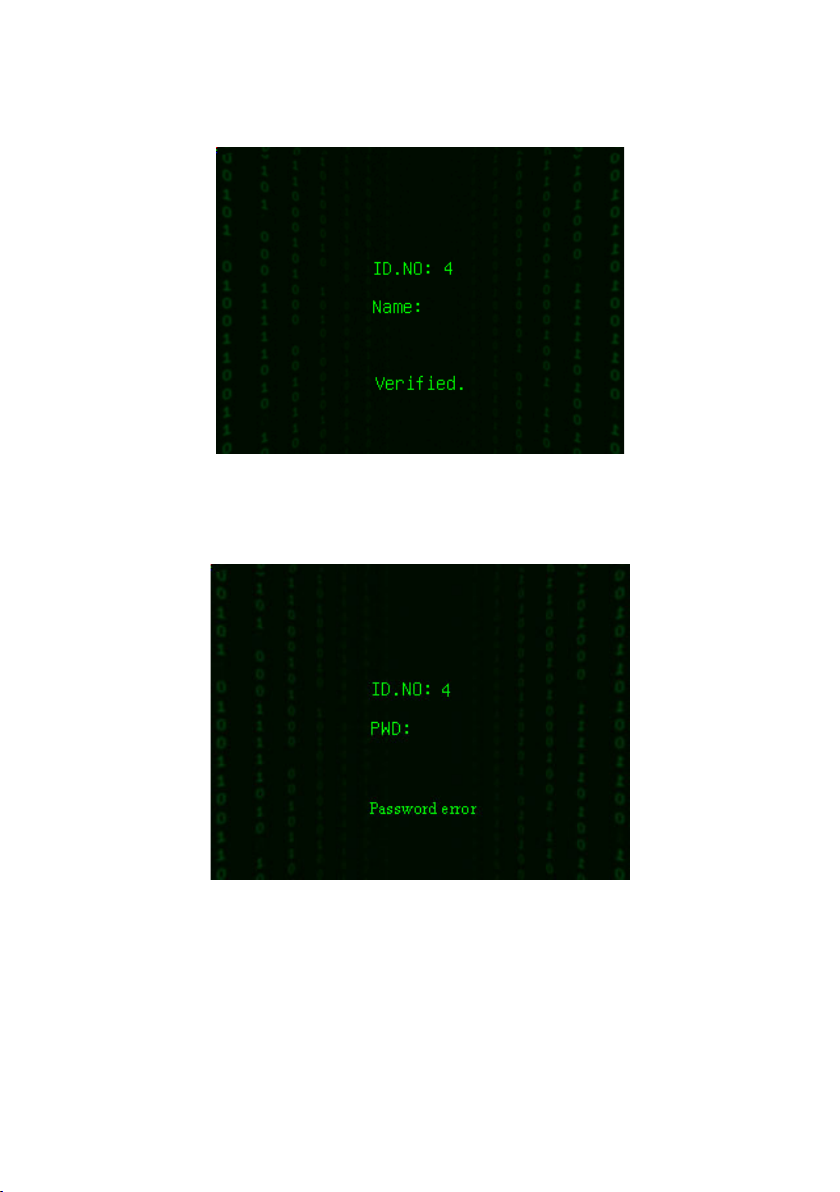
1. Operating Instruction
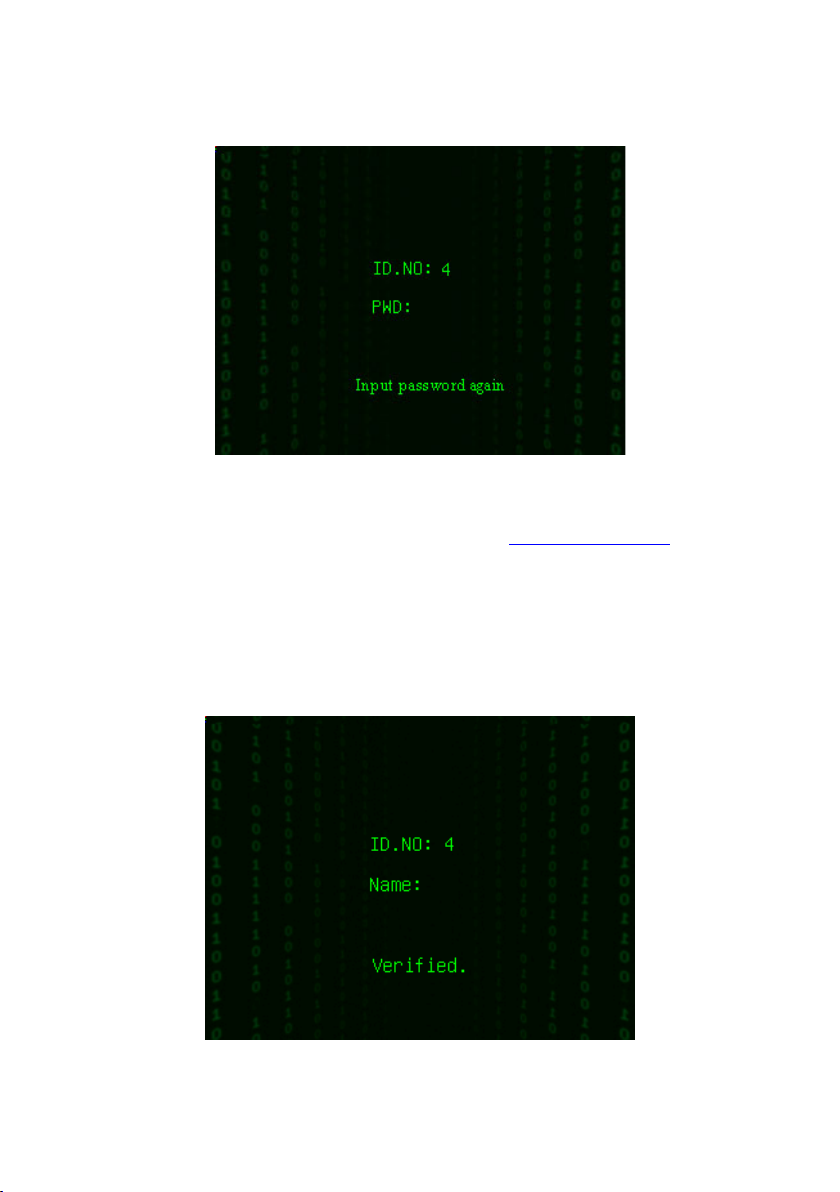
When the screen displayed "password error" and "Input password again"
as shown below:
- 9 -
2.4 inch color screen series User Manual
Please return Step 3 input password again for the second operation.
Ranges of the input password time is 0~9. Employee can set default
time what you want. For details please refer to 4.4 Display Setting
.
Card Matching ★
The card area is round the keyboard.
Step 1: Wave the card near the induction area on initial interface, after
the induction equipment finding the card, please remove the card.
Step 2: When the equipment gives the tip "Thank you", the certification completed.
- 10 -

1. Operating Instruction
Step 3: If the card has not registered yet, prompt that card is not registered.
1.4 Connection with PC
The device only records attendance time. The statement can be disposed
by software on PC. Therefore, it is necessary for device to connect PC to
download attendance record to attendance software.
The following is some connection methods:
Ethernet:
(1) Through hub: Use parallel net cable (to connect network card and
hub) to connect device into the network.
(2) Direct connection: use cross net cable(connect two Ethernet
terminals directly) to connect device and PC.
Set device: Enter Menu-Communication option-Network to set the
following items:
IP address: Default IP as 192.168.1.201.You can modify it if it is
necessary.
- 11 -

2.4 inch color screen series User Manual
Subnet mask: Default subnet mask as 255.255.255.0. You can modify it
if it is necessary.
Gateway address: Default gateway address0.0.0.0. You can modify it if
it is necessary.
Network speed: There are three options: ATUO, 10M, and 100M.
Connection password: Set it in “Menu-Communication option-
Security”. It can be set or not. If it is set, input corresponding numerical
value on connection interface of PC software.
RS232: Use RS232 serial port wire for connection.
Set device: Enter Menu-Communication option to set the following
options:
Baud rate: Set it in “RS232/485”. Communication speed rate (with
computer),if the communication speed is high, RS232 (115200, 57600)
is recommended.
RS232: Set it in “RS232/485”.Select “Yes” for RS232.
Communication password: Set it in “Security”. It can be set or not set. If
it is set, input corresponding numerical value on connection interface of
PC software.
RS485
set device: Enter Menu-Communication option to set the following
options:
Device ID: Set it in “Security”. It can be set from 1-254.
Baud rate: Set it in “RS232/485”.Communication speed rate (with
computer),if the communication speed is low and stable, RS 485
(9600, , 38400) is recommended.
RS485: Set it in “RS232/485”.Select “Yes” for RS485
Communication password: Set it in “Security”. It can be set or not. If it
- 12 -

1. Operating Instruction
is set, input corresponding numerical value on connection interface of
PC software.
USB
Set device: Enter Menu-Communication option to set the following
items:
Device ID: Set it in “Security”. It can be set from 1-254.
USB: Set it in “RS232/485”.Select “Yes” for USB communication.
Communication password: Set it in “Security”. It can be set or not. If it
is set, input corresponding numerical value on connection interface of
PC software.
1.5 Main menu
On the initial interface, press the Menu key about 3 seconds to open the
Main Menu, as shown in the following figure:
User management: Browse the users’ basic information like ID, name,
fingerprint, card, password and privilege and so on; Increase, edit or
delete operation the basic information; Set the work code for user and
card management.
- 13 -

2.4 inch color screen series User Manual
Communication: Set up communication parameters between the
equipment and the PC, including IP address, gateway, subnet mask,
baud rate, device number, communications password etc.
System: Manage the data and set the system parameters, including basic
parameters, interface parameters, fingerprint and attendance parameters,
to maximize meet user’s needs in the functional, display and other areas.
Date/Time: Device time date should set accurate to ensure the accurate
attendance time.
PenDrive: By USB, the user info and attendance data etc. can be
imported to the accordingly software to deal or import the user
information for other fingerprint devices to use.
Auto Test: automatically test the function of each module if it is
workable, including the screen, sensor, voice, keyboard and clock tests.
Record: For query the record saved in the device convenience, query
record function is provided.
Sys Info: Use system information to check the current device’s saving
status, its version information and so on.
- 14 -

2. User Management
2. User Management
The user’s basic information on the device includes fingerprint,
password and management access. In company’s attendance
management, for employee’s change, the information on the device
also needs modification. Therefore, operations including “add, delete,
check, modify and so on” can be done on the device.
2.1 Add user
Firstly, enroll employee’s fingerprint or password in the device.
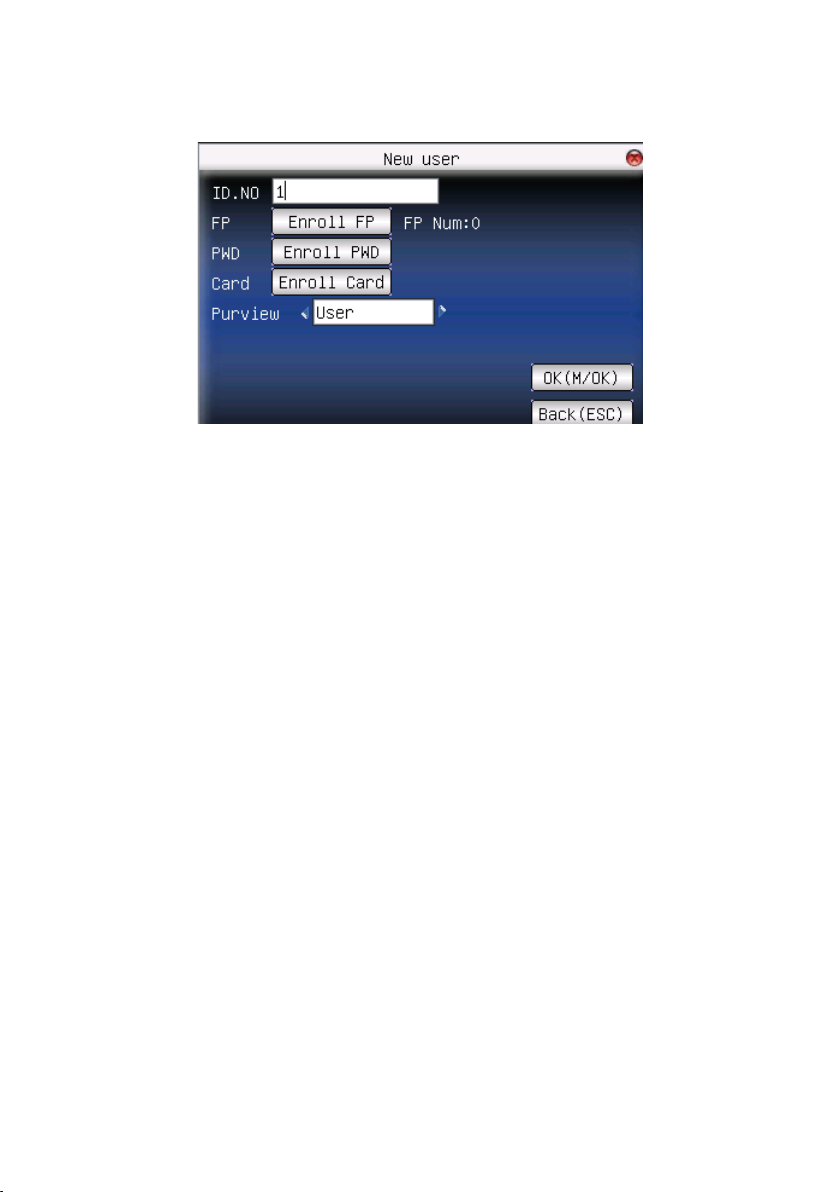
Enter New User interface:
- 15 -
2.4 inch color screen series User Manual
Notice: Only some models have name and card options.
ID.NO: Staff's attendance number.
FP (Fingerprint): enroll employee’s fingerprint. Ten fingerprints can be
enrolled at most.
The employee with fingerprint enrolled can use fingerprint to record
attendance.
PWD (Enroll password): enroll user’s password. The effective digit is
1~8. The employee with password enrolled can use password to record
attendance.
Card: Registered staff's Card, only the registered card is possible to
check attendance.
Purview: Users are people whose identity must be authenticated before
enter a menu. The ordinary consumer can track attendance by the card
or the password only; the manager already may equally carry on the
daily checking attendance with the ordinary consumer, but may enter the
menu to operate each option.
Notice: When there is no appointed the manager, any person all
may entry the menu operation; after the manager is appointed, anyone
- 16 -
2. User Management
is unable to entry the menu until the manager status is confirmed, after
the success can entry the menu:
For example: the following is the flow for add user.
Input User ID
1) Allocate User ID by default.
2) Press “
from keyboard. If the User ID is wrong, press “
” to delete the allocated User ID by default. Input User ID
” to input it again.
Input name ★
Use T9 input to input employee’s name.
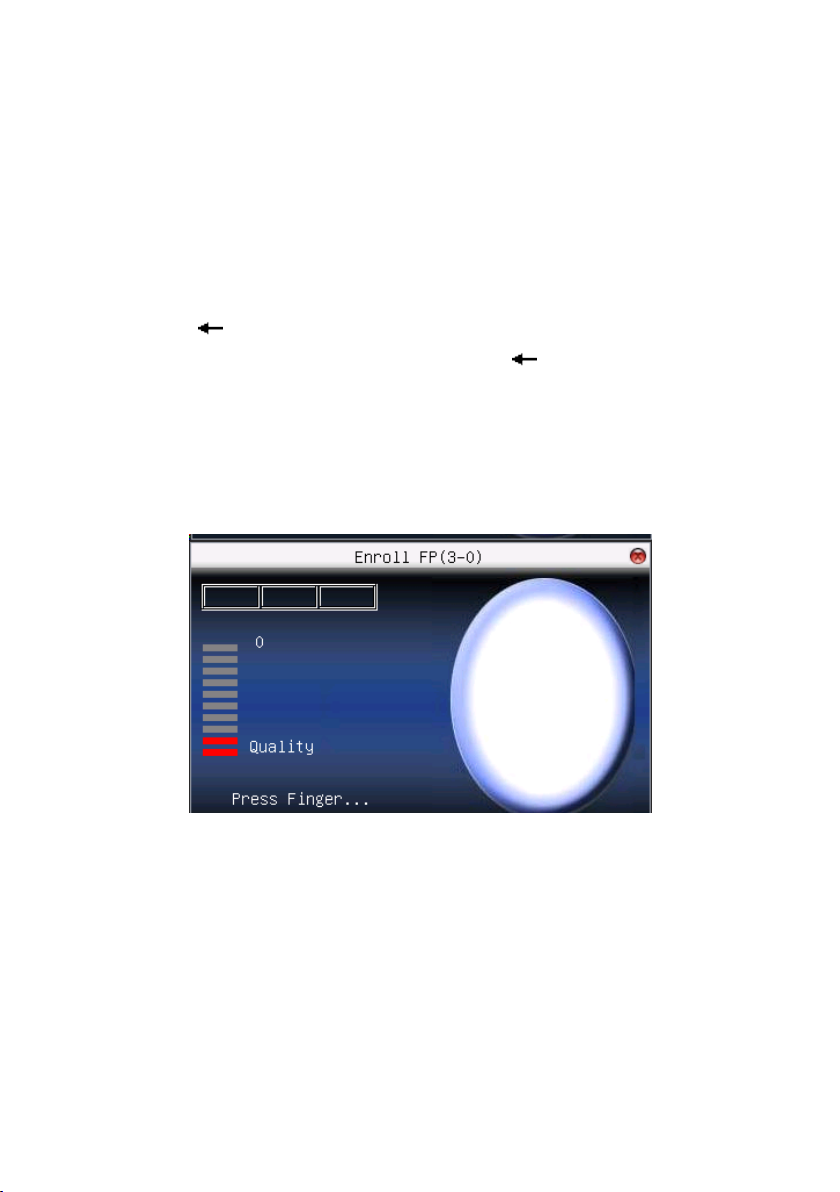
Press OK or ▲/▼ to select “enroll fingerprint”, then press OK to start
fingerprint.
Enroll fingerprint
Press finger according to device’s prompt. Press the finger three times in
the proper way.
If one fingerprint is enrolled successfully, press OK to continue another
finger, then press menu and ESC to return the last interface.
Press ▲/▼ to select “enroll password” and press OK to enroll
password.
Enroll password
- 17 -
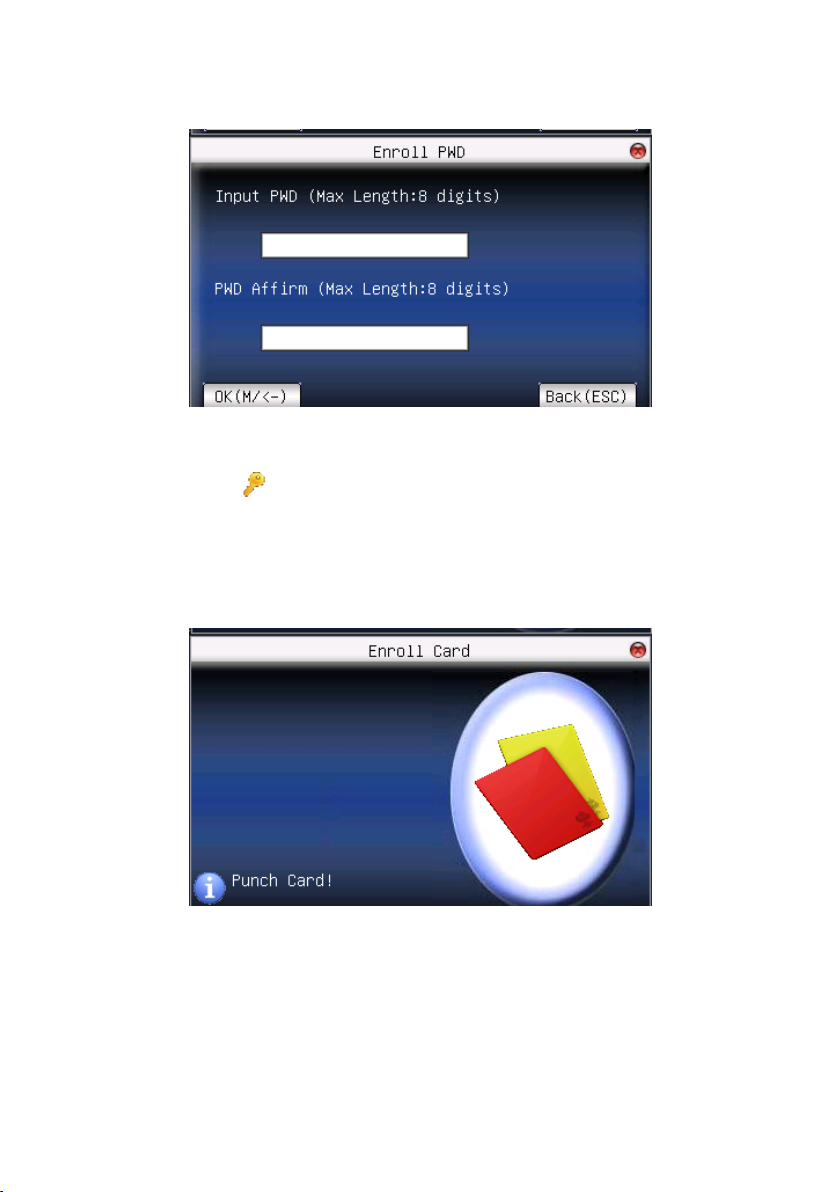
2.4 inch color screen series User Manual
Input password (1~8) according to device’s prompt, and press OK to
verify it. Then press OK save it or press ESC to exit without saving it.
After saving,
display will be on the device, which means the
password has been set.
Enroll card★
Scroll ▲ / ▼keys to locate the cursor on "enroll card" button, and press
"OK" to enter the registration card
Slight ware the card near the induction area, after the equipment found
the card number, press OK key to save, press to give up, then remove
the card from the equipment, after the "Enroll successfully" the card
number will display on the register button.
Privilege setting
- 18 -

2. User Management
Scroll the▲/▼ key and local cursor on the "Privilege" option box, scroll
/ key to choose privilege.
Save/exit user registration
To confirm the registration information is correct, after getting
confirmation, save it.
The way for saving:
1) Scroll ▲/▼key to locate cursor on the "completes (
)"button,
please press "OK" key again, the prompt "the data has been changed, Are you
sure to save it?” on the equipment, press "OK" the key to save it, if you do not
want saving, press "ESC" to exit. If the prompt, “Save successfully!
Continues to input?" appear on equipment, want continuing to press "OK", if
you abandon this operation, press "ESC" key.
2) Press the ESC key or scroll ▲/▼key to locate the cursor on the "
return (ESC)"button, please press "OK" key again, the prompt "the data
has been changed, Are you sure to save it" appear on equipment, press
"OK" key to save and return to the preceding of menus, does not serve
and return to the preceding of menus, press "ESC" key.
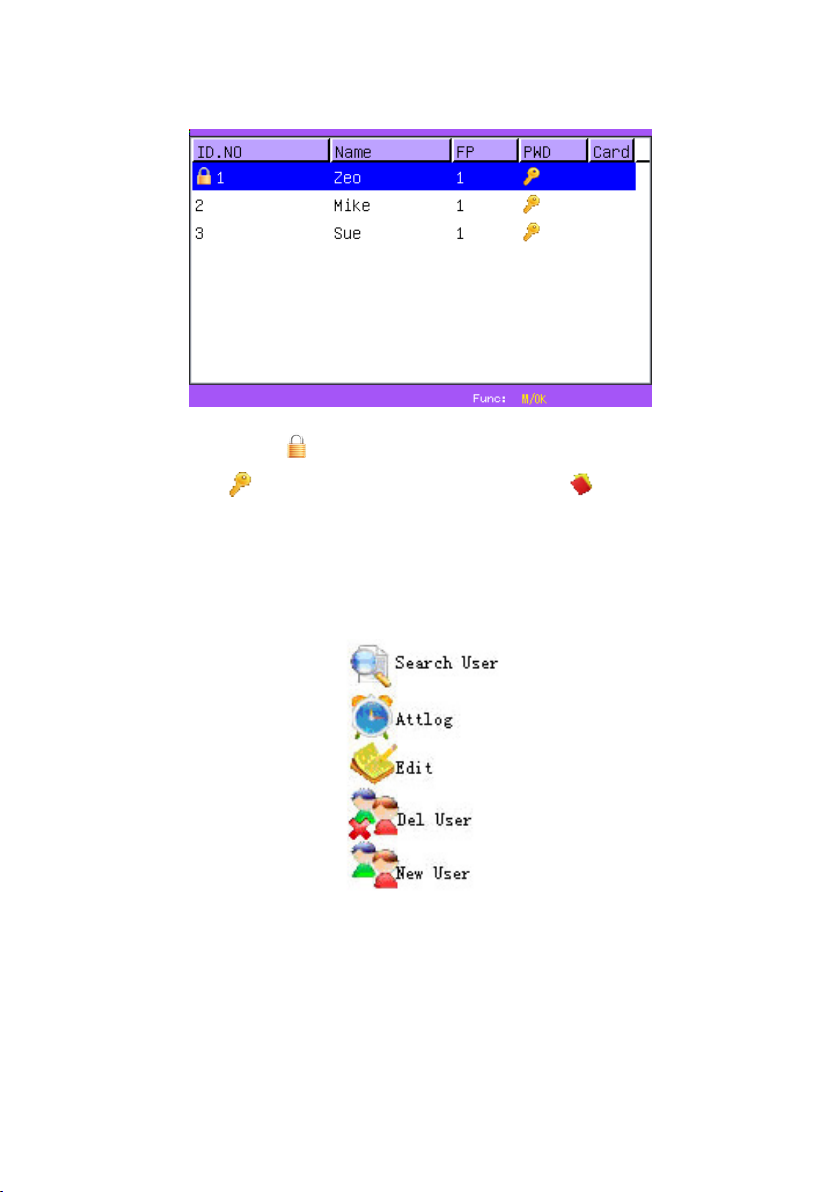
2.2 Manage user
All users’ information saved in the current device can be queried in
manage user, including user name, fingerprint count, whether to enroll
password or card, user attendance record and so on. Editing or deleting
user can also be done here.
- 19 -
2.4 inch color screen series User Manual
Notice:1) means this employee is the administrator.
means password has been enrolled. means ID Card
has been enrolled.
2) The picture may be different from your device. The
real product prevails.
Press menu on the above interface, and the operating menu will pop out:
Press ▲/▼ to select the item.
2.2.1 Search user
If many users are enrolled, in order to find an employee quickly, the
- 20 -

2. User Management
device has provided “User ID” to search the employee.
Press menu on manage user interface to get operating menu. Select
“Search user” or press any numeric key to enter the following page:
Input User ID of employee to be queried. Press OK, after successful
query, the blue cursor will point to the employee. If there is no such
employee, “no enrolled data” will appear.
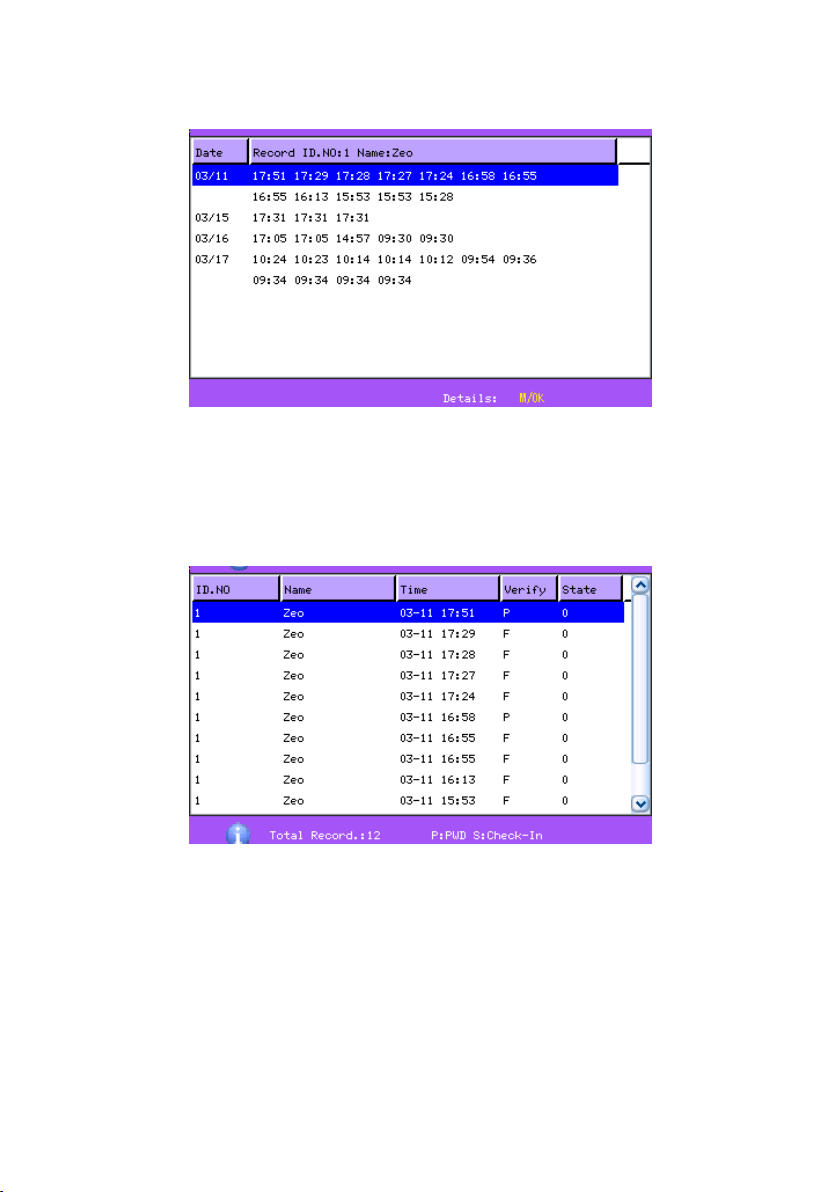
2.2.2 Query attendance record
When administrator is checking employee’s fingerprint and other
enrolled information, he can also check the employee’s attendance
record during that month.
Press menu on manage user interface to get the operating menu, select
“record”, and the employee’s monthly attendance record can be checked:
- 21 -
2.4 inch color screen series User Manual
Notice: The picture may be different from your device. The real
product prevails.
Press ▲/▼ to read attendance record.
Press OK/menu to query detailed information.
Then press “ESC” to return to manage user interface.
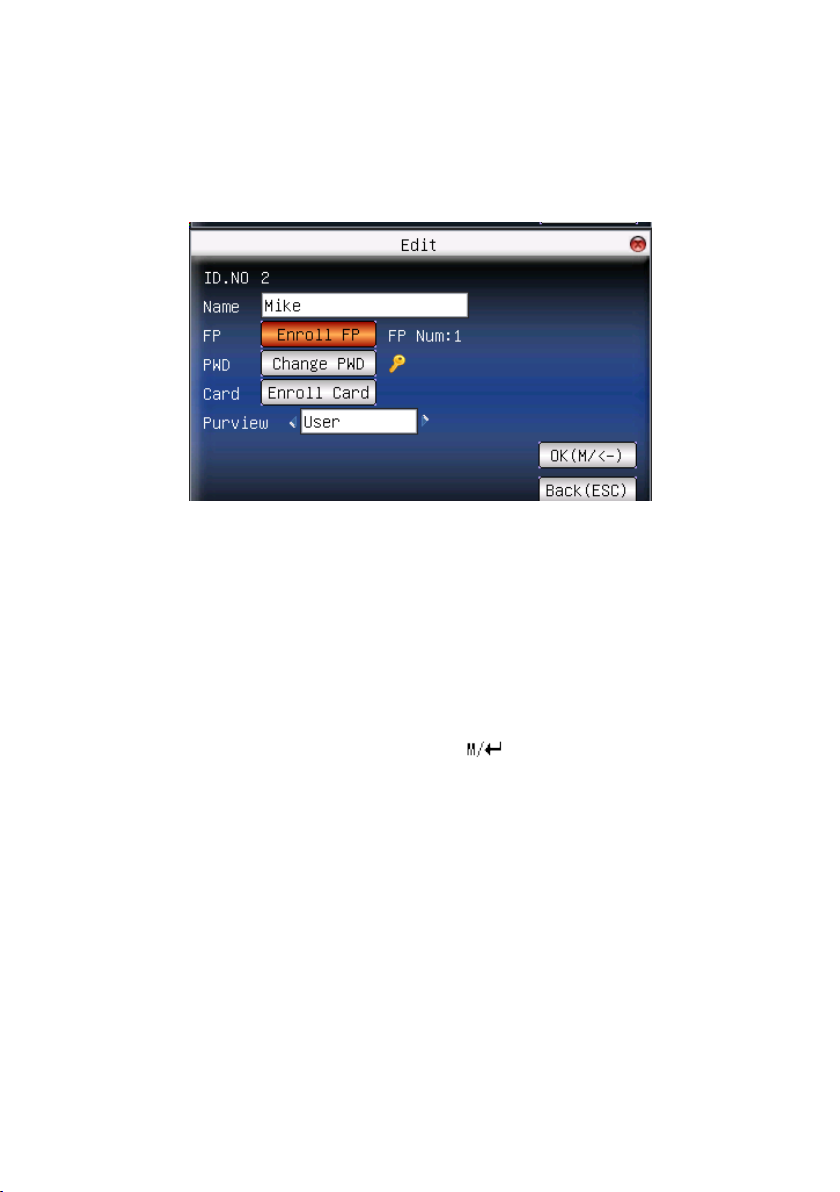
2.2.3 Edit user
Edit user information saved in the device. For example, the former
enrolled fingerprints are unusable, enter “edit user” to re-enroll
fingerprint, password or card.
- 22 -
2. User Management
Use ▲/▼ or query user on manage user interface to select employee
to be edited. Then press menu to select “edit” or press shortcut to
verify it, and all enrolled information can be displayed on the device:
Notice: Only some models have name and card options.
User ID cannot be modified. The operation is similar to that of add user.
Fingerprint can be re-enrolled. Click “enroll password” directly to set
password or modify password. The access can also be modified.
Save edition/exit edition
Press menu or ▲/▼ to select “complete
and return to manage user interface.
Press “ESC” or ▲/▼ to select “return(ESC) ” and then press OK, and
the device will prompt “data has been changed. Are you sure to save?”.
If you want to save it, press OK and return to the last menu. Or press
“ESC” to return the last menu.
)”, press OK, save edition
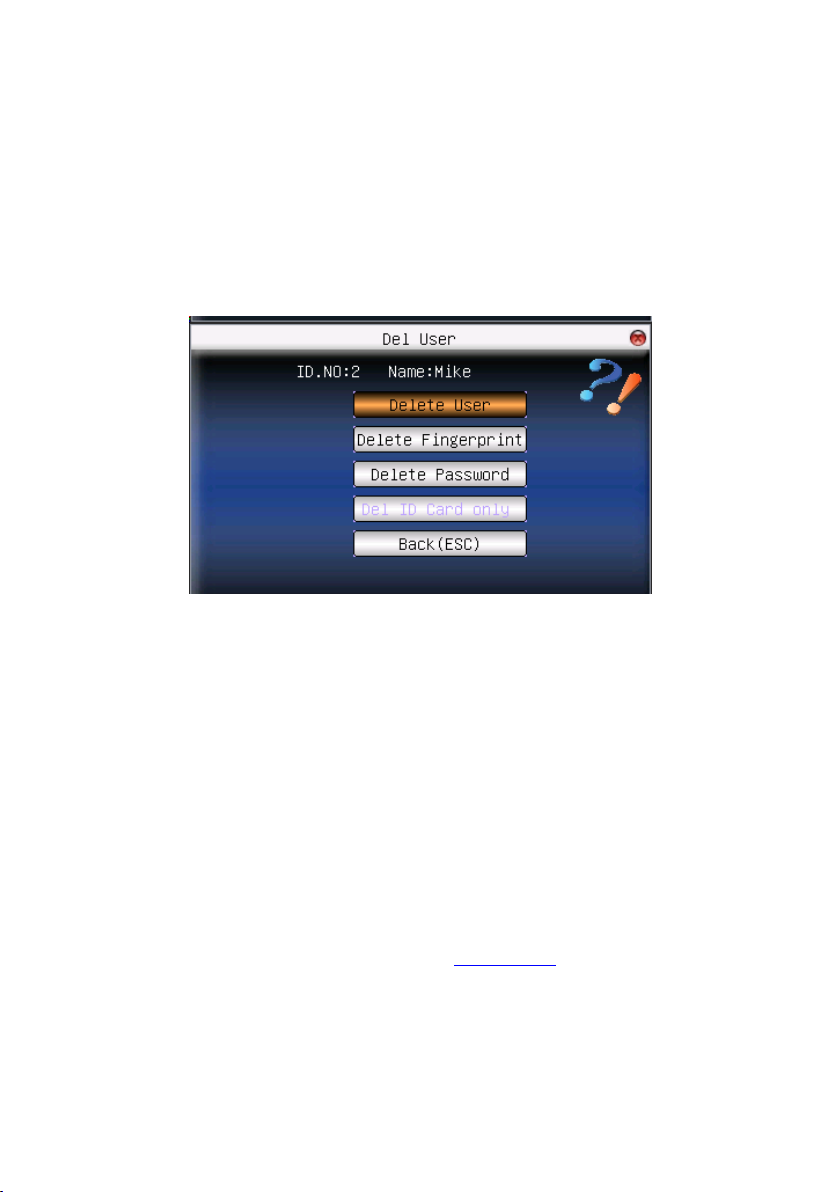
2.2.4 Delete user
“Del user” is to delete employee’s partial information or all information
from the device. It is used when the following states happen:
- 23 -
2.4 inch color screen series User Manual
1) When employee’s fingerprint or password is not needed any more.
2) When employee leaves the position.
Press ▲/▼ on manage user interface or use query user to select the
employee to be edited. Click menu to get operating menu, and then
select “delete user”.
Delete user
Notice: Only some models have Del ID Card Only options.
If the user has no fingerprint or password, the corresponding item is blue
and cannot be operated. Press ▲/▼ to select the item to be operated.
Press OK to pop out dialog box and verify whether to delete this item or
not. Then the device will give corresponding prompt. Press “ESC” to
return to manage user page.
2.2.5 Add user
In order to add user conveniently for operator, add user is configured
here. The function is the same as that of 2.1 add user
- 24 -
.
 Loading...