

Page 1

User Manual
ZKBioBL
www.zkteco.com
Page 2

Due to constant renewal of products, our company does not guarantee that the
Important Statement
Thank you for choosing our product. Before use, please read this manual carefully to avoid unwanted
damages caused, ensuring high effectiveness and authentication speed under proper use.
It is informed that without our company's written consent, no copy or any other forms of distribution
of this guide's content may be allowed.
The products described in the manual may contain copyrights shared by licensors including our
company. Except having permission from license holder, no any copying, distribution, revision,
modification, extraction, decompilation, dissembling, decryption, leasing, transferral, sublicensing, or
other acts of copyright infringement will be allowed.
information and technical parameters of this guide are exactly consistent with the
actual product, nor do we make prior notice on any updates of the product. Our
company will not undertake any disputes caused by the above problems.
I
Page 3

Contents
Contents ................................................................................................................................................................................ 1
Necessity for ZKBioBL .................................................................................................................................................... 3
ZKBioBL Administrator Operating Procedures ............................................................................................. 4
Connecting ZKBioBL with Lock .............................................................................................................................. 5
Setting Administrator .................................................................................................................................................... 8
Unlocking the Door ..................................................................................................................................................... 11
Visitor Password ............................................................................................................................................................. 13
Creating New Phone User ....................................................................................................................................... 15
User Management........................................................................................................................................................ 16
Time table Management ......................................................................................................................................... 21
Checking Access Record .......................................................................................................................................... 25
1
Page 4

Device Management .................................................................................................................................................. 26
ZKBioBL Settings ............................................................................................................................................................ 28
Setting App Password .................................................................................................................................... 28
One touch to Open .......................................................................................................................................... 29
Enable APP Login ............................................................................................................................................... 30
2
Page 5

Necessity for ZKBioBL
Necessity for ZKBioBL
IPhone with system above IOS 7.0, such as iPhone4S/iPhone5/iPhone5S/iPhone5C/iPhone6/iPhone6
plus/iPhone7/iPhone7 plus/iPhone8
iOS OS Requirement: 7.0 and above
Android OS Requirement: 4.3 and above
Bluetooth Requirement: Bluetooth 4.0
A lock with Bluetooth function, such as DL30B, DL30DB
The app may not operate normally when a low battery warning is displayed on the lock. Please
renew the batteries
It is recommended to open and manage the lock using a phone within a distance of 3 meters.
For a longer distance, the performance depends on the actual environment
Please do not operate the lock while connecting it with a mobile, or the lock may stop working.
The lock would restart automatically, or you need to reinstall the battery
3
Page 6

ZKBioBL Administrator Operating Procedures
Use phone to download and install ZKBioBL. Turn on Bluetooth to search for lock device, and
connect ZKBioBL and the lock after pairing password verification
Enter supervisor password and set the privilege as Administrator
Unlock the door
Create visitor password
Create new phone user: create new phone app users for other users
User management: change user information and privileges, allocate time table, delete user etc
Time Table Management: edit and allocate time table
Search for access records
Device Management: manage device settings
4
Page 7
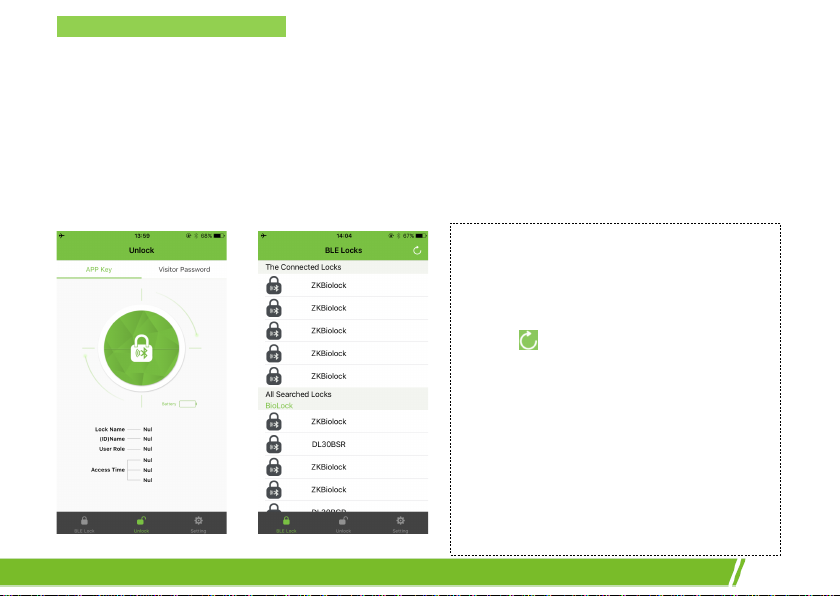
Connecting ZKBioBL with Lock
Note:
Connecting ZKBioBL with Lock
Note: Please confirm that the Bluetooth function on the Phone device is turned on before using
ZKBioBL to connect with the lock.
1. Turn on ZKBioBL and click [BLE Lock] on the main interface to enter the devices listing interface;
the app will automatically search for surrounding Bluetooth devices.
1. When lock is not yet connected, click the
Unlock button on the main interface,
“Please connect to the lock first” will be
displayed.
2. Click
3. The default device name of the lock
4. Please do not operate the lock while
or slide the finger down on the
screen to refresh the “All Searched Locks”
list.
equipped with Bluetooth is ZKBiolock.
connecting it with phone or the lock
would stop working. If you face any issue
with the lock, please take out the battery
and re-insert it to restart.
5
Page 8

2. After the app searches for the lock, click the lock for connection on the device list and enter the
correct Bluetooth connection password (the default connection password is 000000), and click [OK]:
Note: If a wrong connection password is input, “Connection failed” will be shown. Click [OK] to
re-enter the password for matching.
6
Page 9
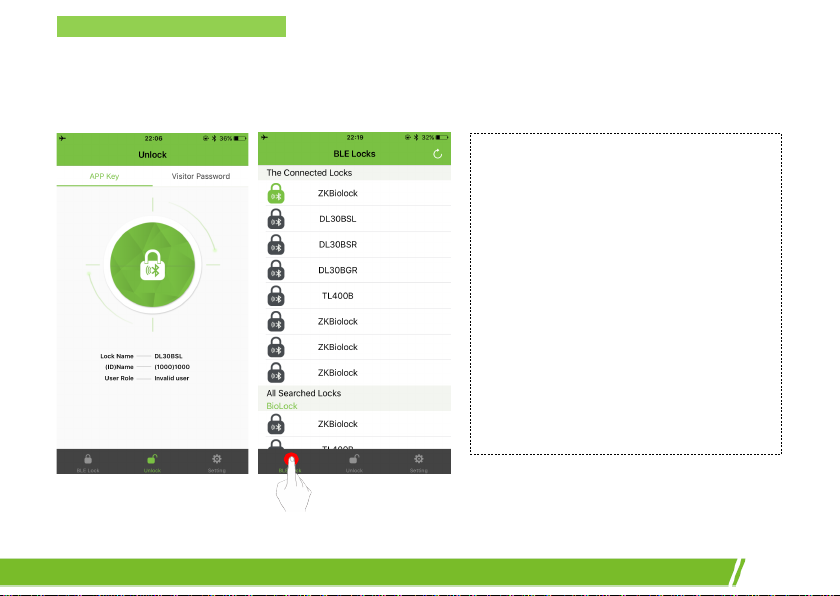
Connecting ZKBioBL with Lock
After the device is connected to a lock, the LED green light of the fingerprint sensor will blink, and
the app will return to the main interface automatically. You can see the connected devices list on the
[BLE Lock] interface:
Note:
1. The default privilege for ZKBioBL new
users is “Invalid User”. Administrator
requires to assign privileges for new
users by using admin password.
2. After successfully connected with the
lock, the app will generate a number
for the user’s default name. The user
number and name can be changed,
but the number cannot be duplicated;
it can only be an integer within
1~65534.
7
Page 10
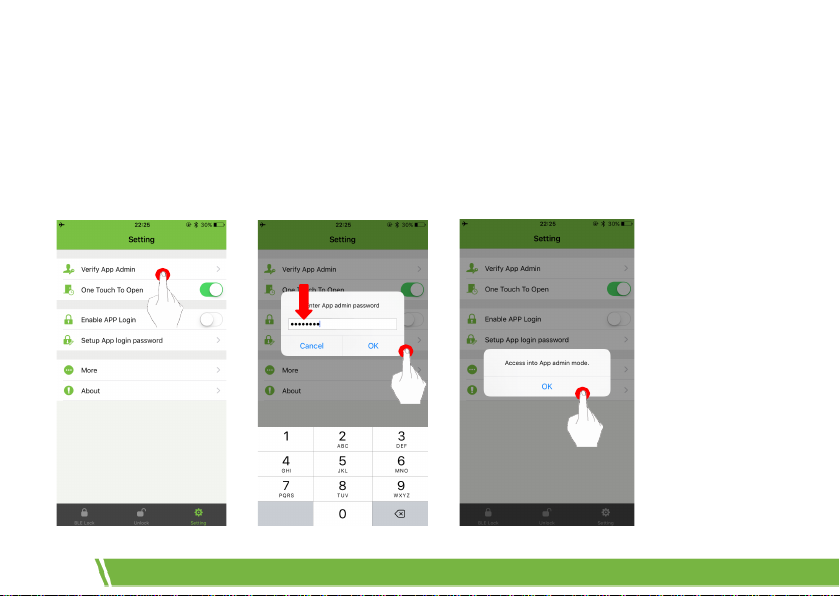
Setting Administrator
After successfully connect the app with the lock, enter the [App Setting] interface and click
[Supervisor password mode], and then enter the password (the default supervisor password is
12345678) and click [OK]. When entering the [Open] interface, the privilege has become
“Administrator”:
8
Page 11

Setting Administrator
Please note that the administrator is temporary at this stage; the user privilege is still Invalid User. You
need to change privileges on the user information interface.
Click the > at the top right corner, slide down the screen to refresh the user list, and select
the user corresponding to your number and name on the user list. Choose Administrator privilege on
the editing interface and then click [Save]:
9
Page 12

Return to the user list interface, you can see your logo has been changed from Invalid User to
Administrator.
Icons Meanings
Administrator
Normal User
Temporary User
Invalid User
App. User
Fingerprint User
Password User
Note: As shown in above figure, the user list needs to be
refreshed by sliding down the screen so as to display the newly connected locks.
10
Card User
Page 13

Unlocking the Door
Unlocking the Door
1. If a lock is connected but the user privilege has not been changed, when clicking the open button,
“Access Denied” will be displayed, as shown in figure
2. If a lock has not been connected, when clicking the open button, the app will automatically search
for the surrounding BLE locks, if you haven’t connect the lock or your privilege can’t unlock the door
“Access Denied” will be displayed, as shown in figure
3. If you have privilege to open the door and once connected the lock, the lock will be unlocked.
11
Page 14

12
Page 15

Visitor Password
Visitor Password
After setting administrator, enter the [Unlock] interface and click” Visitor password” to access the
visitor password generation interface. Enter admin password of the lock, then click Create Visitor
password button at the center, the visitor password is created done, and you can copy the code and
send to others who are temporary users.
Note:
·You must know the admin password.
·The visitor password is limited to use one time in 5 minutes.
·Lock match the time of phone that last connection, so the phone time must same with the lock
before using this function.
13
Page 16

14
Page 17

Creating New Phone User
Creating New Phone User
Create new phone user by installing ZKBioBL on the phone device of other users.
Administrator uses the app on the user’s phone device to connect to the lock, and enter admin
password to assign privilege to the phone user (Admin, Normal User, and Temporary User), and also
edit and save the user information (number and name).
After setting, the phone user can use the app to carry out operation corresponding to the set
privilege.
Note:
The procedure of creating new phone user is similar to that of setting administrator, with the main
process of the administrator using the admin password to assign privileges for app users. For security
reason, we strongly recommend the administrator not to disclose the password to anyone else.
Each app for connecting with the lock is regarded as 1 user, occupying the storage of 1 user.
The storage of lock is 100 users.
15
Page 18

User Management
Users can be classified into four types according to the creating methods:
1. Fingerprint User: users directly registered in the lock.
2. Card User: users directly registered in the lock.
3. Password User: users directly registered in the lock.
4. Phone User: users created by app.
Administrator can manage all users who registered in the lock and phone users.
To change user information and privilege and to allocate time table
1. Administrator enters the [User] interface, refreshes the user list and then synchronizes the user
information in the lock with the app. Click the to-be-edited user on the user list, and change user PIN,
name privilege and time table on the user information interface;
2. Click [Save] after editing.
16
Page 19

User Management
17
Page 20

Pin: Default PIN denotes the user’s position in the system’s sequence. It should be numerical, which
can be changed but cannot be duplicated. PIN ranges from 1 to 65534.
Name: Default name denotes the user’s position in the system’s sequence. It can be changed to any
numbers, letters or signs, with the maximum length of 24 characters.
Privileges: Administrator, Normal User, Temporary User and Invalid User. Administrator can gain
access anytime, check access logs, and change information of user, time table and device etc.; normal
18
Page 21

User Management
user and temporary user can gain access anytime as well, but no other permissions are allowed;
Invalid user cannot gain access anytime, no does he/she have other permissions.
Registration Time: This denotes when the user registered on the lock or when the phone user was
connected with the lock; it cannot be edited.
Time table: The time table in which the user can gain access. In default setting, administrator uses
Time table 1 ,invalid user uses Time table 2 and both two Time table are unchangeable; normal user
and temporary user use Time table 3-12 and it is changeable; for more details, please refer to the
Setting Time table below.
Remarks: To add user remarks.
Note: There is no correlation between phone user and lock user. For instance, when one person is
both lock user and phone user, since these two types of user use different codings, 2 out of 100 user
capacity are occupied.
To Delete User
Administrator enters the [User] interface, refreshes the user list and then synchronizes the user
information in the lock with the app. Click the to-be-deleted user on the user list, and slide the
screen to the left and click the delete button, so that all information of the user in the app and the
lock are deleted.
19
Page 22

Note: For the procedure of deleting users in batches, please refer to the lock user manual.
20
Page 23

Time table Management
Time table Management
Time table is set for regulating user ’s valid access time. Each user must belong to one time table.
Time Table: There are 12 time tables in the time table list, in which
Time table 1 and 2 cannot be edited.
Time table 1: It includes anytime on every day, which means
users applying this time table can gain access anytime.
Time table 2: It does not include any time, which means users
applying this time table cannot gain access anytime.
Other Time table: To set at what time on which days within a
week can users gain access in the other 10 time tables.
After editing time tables, you can distribute time tables to users
except administrator.
Upload: To upload time table settings to the lock.
21
Page 24

To Edit Timetable
1. Click
2. Choose on which day can users gain access (multiple selection is enabled), for example, select
3. Set the start time and end time for each day, and then click [Done].
22
in the “Time Table”, and select any time table from the 10 editable time tables;
“Sun” and “Mon” for allowing users to unlock the door on Sunday and Monday;
Page 25

Time table Management
To Allocate Timetable
1. Choose the edited time table and click [Select Users], and select the user who uses that time table
on the user list (multiple selection is enabled);
23
Page 26

Note: Only Normal User and Temporary User can choose time table; administrator uses Time table 1
and it is unchangeable.
2. Return to the time table setting interface, and click Save to upload the time table settings to the
lock.
After uploading successfully, the lock will beep and the fingerprint sensor will be activated.
Note: You can also allocate the time table in User Management.
24
Page 27

Checking Access Record
Checking Access Record
Administrator can check all access records after entering the [Records] interface; all access records
within 7 days will be shown. It supports searching for records within 30 days by choosing the date
manually. It also supports quick search for records of a user or within a time period by inputting user
name or ID.
25
Page 28

Device Management
When administrator enters the [Setting] menu (as the below figure), he/she can change the Admin
password of the app, Lock name, and Pairing password. He/she can set the always open mode.
Note: A lock can only have one connection password. Once the password is changed, the
connection password for all app users is also changed.
26
Page 29

Device Management
Admin Password: The default supervisor password is 12345678. After
changing the admin password, a new password needs to be entered
in supervisor password verification. The password should be in 8
digits.
Lock Name: Lock name, which is ZKBiolock as default. The lock name
cannot be blanked; it supports at most 10 letters or numbers. After
change, “Update Finish. BLE lock will disconnect soon!” will be
displayed. The system will automatically search for devices after
disconnection, and a device can be connected after returning to the
[BLE Lock] interface.
Paring Password: The default connection password is 000000. After
connection password is changed, the system will request user to
re-enter the password when logging in the app to connect with the
lock. The password should be in 6 digits.
Always Open Mode: This mode will enable the lock to open without
identifying the validation, once the verification that is registered on
the lock opens, this mode will be closed.
27
Page 30

ZKBioBL Settings
Setting App Password
After turning on and setting the app password, only after the password verification for turning on
ZKBioBL succeeds can the user continues to use the app.
Click [Setting] on the main interface and turn on the [Setup App login password], the system will
then enter the password entering interface:
28
Page 31

ZKBioBL Settings
One touch to Open
The major function of One touch to open is to simplify the access procedure. Turn on the One touch
to Open function and click open on the main interface, the app will automatically search the
surrounding for lock devices which have been ever connected, and automatically matches with
Bluetooth password and open the door.
29
Page 32

Enable APP Login
Increase a step of verify code to enhance security for the app.
Note:
1. If the connection password is changed, the password needs to be re-entered when using One
touch to Open.
2. When “One touch to Open” function is enabled, after then Bluetooth name is changed and the
Bluetooth is disconnected, the system will automatically search for lock devices which have been
ever connected and connect with one of them.
This device complies with part 15 of the FCC Rules. Operation is subject to the following two conditions:
(1) This device may not cause harmful interference, and
(2) this device must accept any interference received, including interference that may cause undesired operation.
NOTE: This equipment has been tested and found to comply with the limits for a Class B digital device, pursuant to Part 15 of the FCC Rules.
These limits are designed to provide reasonable protection against harmful interference in a residential installation. This equipment generates,
uses and can radiate radio frequency energy and, if not installed and used in accordance with the instructions, may cause harmful interference
to radio communications. However, there is no guarantee that interference will not occur in a particular installation.
If this equipment does cause harmful interference to radio or television reception, which can be determined by turning the equipment off and on,
the user is encouraged to try to correct the interference by one or more of the following
measures:
-- Reorient or relocate the receiving antenna.
-- Increase the separation between the equipment and receiver.
-- Connect the equipment into an outlet on a circuit different from that to which the receiver is connected.
-- Consult the dealer or an experienced radio/TV technician for help.
Note: The manufacturer is not responsible for any radio or TV interference caused by unauthorized modifications to this equipment.
such modifications could void the user’s authority to operate this equipment
Changes or modifications not expressly approved by the party responsible for compliance could void the user's authority to operate the equipment.
The device has been evaluated to meet general RF exposure requirement. The device can be used in portable exposure condition without restriction.
30
Page 33

31
 Loading...