

ZKTeco 8000 Quick Start Manual

Quick Start Guide
8000 Series Digital Video Recorder
Version: 3.0
Date: October 2018

Thank you for purchasing our device!
Declaration
The user’s manual is designed to be a reference tool for your system.
As our products are regularly updated, we cannot guarantee exact consistency
between the actual product and the written information in the manual.
Screenshots shown are for illustration purpose only. Pictures in this manual may not
be exactly consistent with the actual products.
If you have any questions, please contact our after-sales service department to obtain
a copy of the latest product-related documents.
Important Safeguards and Warnings
1. Electrical safety
Installation and operations should conform to your local electrical safety codes. We
assume no liability or responsibility for any fires or electrical shocks caused by
improper handling or installation.
2. Transportation
Avoid heavy pressure, furious and frequent vibration or water splashing during
transportation, storage and installation.
3. Installation
Keep upright, handle with care.
Do not connect the DVR to the power before completion of installation.
Do not place objects on top of the DVR.

4. Qualified engineers needed
All examination and repair should be carried out by qualified service engineers.
We assume no responsibility for any damages caused by unauthorized modification
or repair.
5. Environment
The DVR should be installed in a cool and dry place away from direct sunlight and
inflammable or explosive substances.
This product should be transported, stored and operated in the specified
environments.
6. Accessories
Please open the package to check if all components are included before installation.
Contact your local retailer if any component is broken or missing.
7. Lithium battery
Improper battery use may result in fire, explosion, or personal injury.
Please replace the battery with that of the same model .
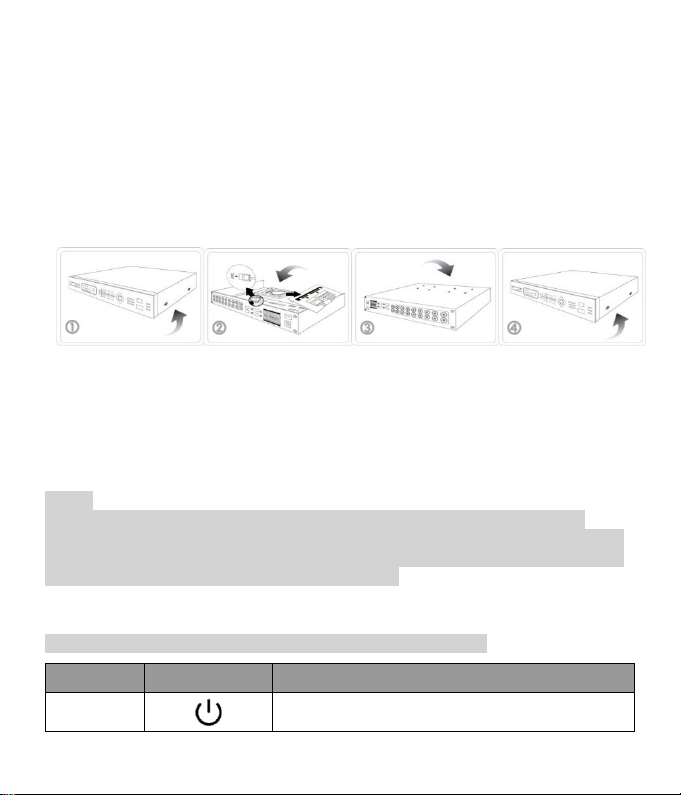
1 Installation
Remove the
Install the HDD
Fix the HDD at
Reinstall and fix
Power
Switch
Power button; press this button to boot up or shut
down the DVR.
1.1 Unpacking Inspection
When you receive the device, please check if all items are in the box according to the
packing list in the box.
1.2 HDD Installation
Tools: A cross screwdriver.
①
screws of the
device and
disassemble the
cover.
②
into the HDD
bracket and
connect it to the
HDD interface.
③
the bottom of
the chassis.
④
the cover with
screws.
1. The environment temperature should be below 35℃.
2. Reserve a distance of 15 cm (6 inches) in the device for sufficient ventilation interface.
Notes:
1. Our equipment will format the HDD once it boots up, please back up all HDD data.
2. We recommend using the surveillance HDD, which is suitable for long term usage and is
capable of reading and writing large amount of data. If you are interested, please purchase
from our official channels to ensure the product quality.
1.3 Front Panel Instruction
Note: different modes of devices are equipped with different features.
Name Identification Descriptions
1
USB Port
USB2.0 interface:
videos or upgrade the firmware.
1. Assisting functions such as PTZ menu;
and the next channel.
Go to the previous menu, or cancel the current
operation.
1. Go to the SEARCH interface;
playback.
Fast/
Playback
Previous/
Record
Menu Menu Access the menu interface.
Rec
Direction
Key
Enter Enter, OK Confirm the current operation.
1. Connecting the mouse;
2. Connecting the USB with the device to back up
Start recording.
2. During monitoring, press the keys to switch
between multiple-window and one-window;
3. Activate the digital input box and choose a
number;
4. Activate a drop-down list and select different
options;
5. Activate a checkbox to change the status;
6. Activate the control box to move the slider;
7. Activate a display window to select the previous
ESC
Shift Shift Switch input methods.
Play/Pause
Backward
Next
Power Light Power Red light indicates that the device is powered on.
Esc,
2. In PTZ channel: ZOOM+;
3. During normal playback, click on this button to
pause;
4. In pause mode, click on this button to resume
Multiple fast-forward and fast-backward speeds.
Play the next or previous video recording.
2
HDD Light HDD When it is lit, there is no HDD or HDD error.
When the device is connected to the network cable,
flash.
Recording
Light
1
4
567
8
Network
Light
Net
the light is on; when there is IP conflict, the light will
Rec Light Rec It is lit during recording.
IR IR Receive remote control signals.
Alarm Light Alarm It is lit when an alarm is triggered.
1~16 Green light indicates that the channel is recording.
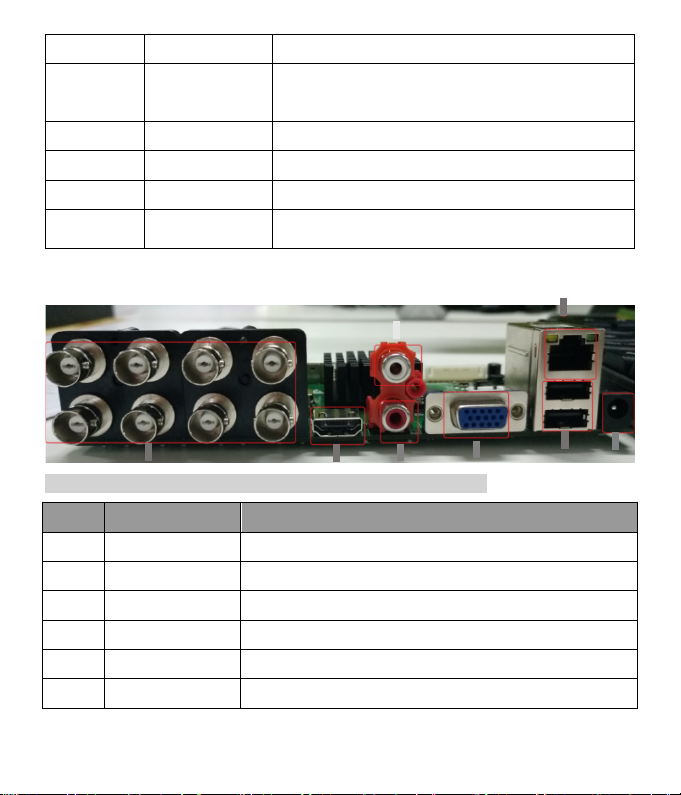
1.4 Back Panel Instructions
2
Note: different modes of devices are equipped with different features.
Index Name Descriptions
1 Video input The composite video signal (CVBS) input.
2 HDMI interface High-resolution video output interface.
3 Audio input The audio signal input interface.
4 Audio output The audio signal output interface.
5 VGA interface Video output interface.
6 Network interface 10M/100M self-adaptive Ethernet interface(RJ45).
3
3
 Loading...