


C-121-Pro
D121-L
TM
DVD/CD Disc Duplicator
Users Guide (Rev 2. 4 )

___ ZipSpin
2
Table of Contents
Chapter 1 Quick Start Guide
Chapter 2 Product Information
Chapter 3 Safety Information & Set Up
Chapter 4 Control Panel
Chapter 5 System Overview
Chapter 6 Operation Guide
1. Making a Copy with AutoStart
2. Making a Copy with different bur n Speed
3. Making a Composite CD (Copy Tracks)
4. Music System
Chapter 7 Troubleshooting Guide and FAQ’s

___ ZipSpin
3
Chapter 1. Quick Start Guide
QUICK START GUIDE
Step 1: Plug in power cord S t ep 2: Turn on power
switch
Step 3: Eject top tray and insert Master Disc. Close top tray.
Step 4: Eject lower drive and insert Blank Disc. Close lower tray.
That’s all!! Your duplicator will do the rest and eject the copied disc in a few
minutes automatically.
Product Introduction

___ ZipSpin
4
T
Chapter 2. Product Introduction
Thank you...
...for choosing the ZipSpin Tracer Pro C-121-Pro (D121-L) Standalone duplication
system. ZipSpin is the new brand name of the great CONDRE duplicators. These
duplicators continue to be second to none in terms of speed and accuracy and we hope
it will be a valuable addition to your organization, business or home for years to come.
he ZipSpin C-121-Pro is a stand-alone duplicator that requires no computer
connection to operate. Low cost and high performance, the C-121-Pro will fulfill
your duplication requirements.
Specifically designed for home and office applications, the ZipSpin C-121-Pro
duplicator is based upon a controller with a large LCD display and simple 4 button
navigation, which make steps easy to follow during the duplication process. Should you
encounter any difficulty, please refer to the "Troubleshooting" section or contact
Technical Support f or assi st ance.
We strongly suggest you locate your ZipSpin C-121-Pro in a dust free environment.
Dirty discs may cause duplication rejects or even total failure. Do not
items on the unit.
For recordable media selection, we recommend you choose high-speed rated and
certified brand name discs (i.e. Sony, Taiyo Yuden, Fuji, Pioneer, Imation, etc.) and
make sure to reserve some discs for possible troubleshooting issues in the future.
Under no circumstance does ZipSpin encourage users to duplicate copyrighted or
copy-protected materials.
*** Only DVD Model will read/copy both CD and DVD Discs. CD Model reads/copies CD disc only ***
Supported Formats: DVD-R/RW/RAM/DL, DVD+R/RW/DL, CD-R/RW
Supported Burning Speed: DVD up to 22X, CD up to 52X
Approximate Duplicating Time: 2 hour DVD - 10 min, 70 min CD - 3 min
place unnecessary
**
PDE Technology Corporation
www.pdetechnology.com
11522 Markon Drive
Garden Grove, CA 92841
Tech Support Line 714-892-8212 (M-F 9 to 5 pm PT)
Tech Support Email support@pdetechnology.com

___ ZipSpin
5
1. Read these instructions - All the safety and operating
9. Do not defeat the safety purpose of the grounding-type
heat, does not operate normally, or has been dropped.
Chapter 3. Safety Information and Set up
Please be aware of the following installation and operation precautions.
instructions should be read before use of this system.
2. Keep these instructions - The safety and operating
instructions should be retained for future reference.
3. Heed all warnings - All warnings on the system and in
the operating instructions should be adhered to.
4. Follow all instructions - All operating and use
instructions should be followed.
5. Do not use this system near water - for example, near
a bathtub, washbowl, kitchen sink, laundry tub, in a wet
basement or near a swimming pool, etc.
6. Clean only with a damp cloth. This system should be
cleaned only as recommended by the manufacturer.
7. Install in accordance with the manufacturers
instructions. Do not block any of the ventilation
openings. For example, the system should not be situated on
a bed, sofa, rug, or similar surface or placed in a built-in
installation, such as a bookcase or cabinet that may impede
the flow of air through the ventilation openings.
8. Do not install near any heat sources such as radiators,
heat registers, stoves, or other products that produce heat.
Unpacking and Inspection
When unpacking your unit, inspect th e carton and packaging material for damage. Damages that ma y
have occurred during shipping could cause alignment and operation errors. Any dam ages found upon
receipt of your unit should be immediately reported to the dealer you purchased it from.
Important!: Keep your packaging! In the ev ent you need to s h ip the un it b ac k to t he f act or y for r epa ir, t h e
product must be s hipped in the manner in wh ich it was received. Other containers are not satisfactory
will void your warranty
and
reseller.
! If the container is lost or destroyed, another may be purch ased from your
Choosing a Location
Placing your unit in an unsuitable location can cause a number of problems. Many problems can be
avoided by following these guidelines.
• The unit must be placed on a flat, level surface. A tilt to the unit’s base can cause errors in
calibration during use. The surface must also be relatively stable and resistant to bumps and
jarring.
• The surface the unit is placed on must be able to hold 15+ pounds and be resi stant to bowing
under such weight.
• Place the unit in a loc ation with adequate air cir culation. Closets or ca binets are not suitable as
heat build-up can cause t he unit to malfunction. Likew ise, do not place the unit on or near any
heat sources such as heating vents or server racks.
plug. A grounding type plug has two blades and a third
grounding prong. The third prong is provided for your safety.
When the provided plug does not fit into your outlet, consult an
electrician for replacement of the obsolete outlet.
10. Protect the power cord from being walked on or pinched
particularly at plugs, convenience receptacles, and the point
where they exit from the system.
11. Only use attachments/accessories specified by the
manufacturer.
12. Use only with a cart, stand,
bracket, or table specified by the
manufacturer, or sold with the system.
When a cart is used, use caution
when moving the cart/system
combination to avoid injury from tipover.
13. Unplug this system during lightning storms or when
unused for long periods of time.
14. Refer all servicing to qualified service personnel.
Servicing is required when the system has been damaged in
any way, such as power-supply cord or plug is damaged, liquid
has been spilled on, been exposed to moisture or extreme

___ ZipSpin
6
LCD Control Panel
• The unit must not be place d in an area with direct su nlight, excessive d ust, mechanical vibr ation
or shock.
Chapter 4. System Overview
System Overview
Reader Drive (for source disc)
Writer Drive (for blank disc)
Control Panel Overview
There are 4 control buttons: ENT ESC
UP Button: move selection up or left in the system menu to select target function
Down Button: move selection down or right in the system menu to select target function
ENT or OK Button: enter, execute the function selected
ESC Escape Button: Cancel, Go back to previous function

___ ZipSpin
7
(actual display layout may vary)

___ ZipSpin
8
Chapter 5 Menu Overview
1. COPY DISC: Copy CD or DVD disc.
2. TEST COPY DISC: Simulate copying process but does not write the disc. For testing purposes.
3. COPY TRACK: Select and combine audio tracks from various CDs into one single audio CD
4. CLOSE DISC: Finalize customized audio CD.
5. QUICK ERASE DISC: Erase table of contents of re-writable discs in Writer drive.
6. FULL ERASE DISC: Full erase of re-writable discs in the W r iter drive.
7. SYSTEM
Show Reader:
7.1
and firmware version)
7.2
Show Burner:
firmware version)
7.3
Update BIOS:
7.4
Machine Info
7.5
Set Up Parameters
1. AutoStart Time: Default is 5 Seconds. Adjust the le ngt h of time (1 to 99 seconds)
2. Copy CD Speed: Default is 40x. Adjust data CD write speed if AutoStart is
3. Copy Audio CD Speed: Default is 24x. Adjust audio CD write speed if AutoStart
4. Copy DVD Speed: Default is 8x. Adjust DVD write speed if AutoStart is turned
5. Copy DVD DL Speed: Default is 2.4x. Adjust DVD double layer write speed if
6. Button Beep: This function will let you enable or disable the button beeping
7. Buzzer sound: This function will let you enable or disa ble the bu zze r soun d
Provide information about READER drive (manufacturer, model number
Provide information about Writer drive (manufacturer, model number and
Update your duplicator’s firmware provided by ZipSpin tech support only.
: Provides information about duplicator.
for the system to start copying the disc automatically without pressing "GO".
turned on.
is turned on.
on.
AutoStart is turned on.
sound.
Burn in:
7.6
7.7
Disc Info:
8. MUSIC PLAYER
This function will make the duplicator function like a music CD player when amplified speakers are
attached.
This function is to run continuous emulate function. For factory use only.
This function will display the disc information in the reader drive or writer drive.
*** Only DVD Model will read/copy both CD and DVD Discs. CD Model reads/copies CD disc only ***

___ ZipSpin
9
<<< ZIPSPIN >>>
1 . Copy Disc
write speed
total disc length [MM:SS]
Write 32x [32:22]
Audio CD 00:12
disc type actual progress
Chapter 6 Operation Guide
1. Making a Copy with AutoStart.
This operation will guide you to make a copy from the Master Source Disc to a Blank CD/DVD disc.
A. Power on the systems by pressing the button on the lower right front of the unit. You will then
see the system initializing and forming a self test on the front panel LED. The LCD will show
“System Check”, and then switch to “1. Copy Disc” mode automatically. Insert the master disc in
the top drive and blank disc in the lower drive.
B. The system will analyze the discs and then begin copying. During the copying, the LCD screen
will display Master Source Disc’s data size and copying progress.
C. After completion, the system will synchronize the copied disc and eject the bottom tray
automatically. Insert another blank disc for additional copy or replace the master disc for a new
copy.
☆ Note: You can also change the AutoStart burn speed for CD, Audio CD and DVD. Go to
Menu function 7.5 to select different speed. Default speed is
CD 40X, Audio CD 24X, DVD 8X, DL DVD 2.4X
(lower burn speed normally can produce better quality copies)

___ ZipSpin
10
<<< ZIPSPIN >>>
1 . Copy Disc
W r ite Sp eed =
CD
40 36 32 24 20 16
DVD
16 12 8 4 2 1
2. Making a Copy with different Burn Speed (with AutoStart Off)
This operation will guide you to make a copy from the Master Source Disc to a Blank CD/DVD disc
by setting your own burn speed. Choose lower burn speed usually can provide better quality copies.
A. Follow the below steps to disable AutoStart function:
1. Copy Disc 7. System 7.5 Setup Para AutoStart Off
B. Return to copy function by pressing ESC and Insert the master disc in the top drive and blank
disc in the lower drive.
C. Press ENT to select the different burn speed options:
D. Press ENT and the system will analyze the discs and then begin copying. During the copying,
the LCD screen will display Master Source Disc’s data size and copying progress.
E. After completion, the system will synchronize the copied disc and eject the bottom tray
automatically. Insert another blank disc for additional copy or replace the master disc for a new
copy.
F. To activate the AutoStart function again, follow Step A and set AutoStart to 5 seconds.

___ ZipSpin
11
<<< ZIPSPIN>>>
3. Copy Track
a b c
1 2 3 4 5 6 7
c d e
Track 01 04:39
Copy.... 00:04
Track Used 59:15
3. Making a Composite CD
This process will guide you to select audio trac ks from various aud io CDs and c om bine them into one
customized Audio CD.
Select function #3. Copy Track from main menu
Ins ert an Audio CD with your favorite tacks in the R eader drive and Insert Blank CD-R disc
into the writer drive.
As soon as both audio CD and blank CD-R are recognized, you will see the # of tracks
(1,2,3,4,5………) on the duplicator LCD screen.
Navigate , t o the track number that you would lik e to select, and then press ENT to
confirm your selection. The track will be played through the rear end audio jacks (if amplified
speakers are connected) after each selection is made. Continue with your selection of
tracks from the disc. You will see a letter of “ a, b, c, d,….” on top of each selected track.
** You do not have to wait for each track to finish playing. Press ENT button to make your
selection at any time. The duplicator is not copying the tracks at this point.
O nce you f inished selec ting t he trac k s you want t o co py, you can pr ess to m ove curs or to
the end with the “OK” display. And press ENT to confirm and submit your selection.
7 8 9 10 OK_
O nce you have entered your selections, you will see “ Copying Audio Tr acks…..” on your
LCD screen.
When copying was finished, the LCD will show CD-R’s usage and free space.
You can repeat above step 1-6 to select Audio track f rom other source discs, and copy to
.
★ Note: Once you have finished copy Audio Tracks, you NEED to execute function #4. C lose
15 Free 20:42
the same blank disc.
Disc on this CD. This function will finalize the CD or otherwise it will not be able to
play on any audio CD player.
___ ZipSpin
12
1 2 3 4 5 6 7
[Play Mode]
Once Repeat?
a b c
<<< ZIPSPIN >>>
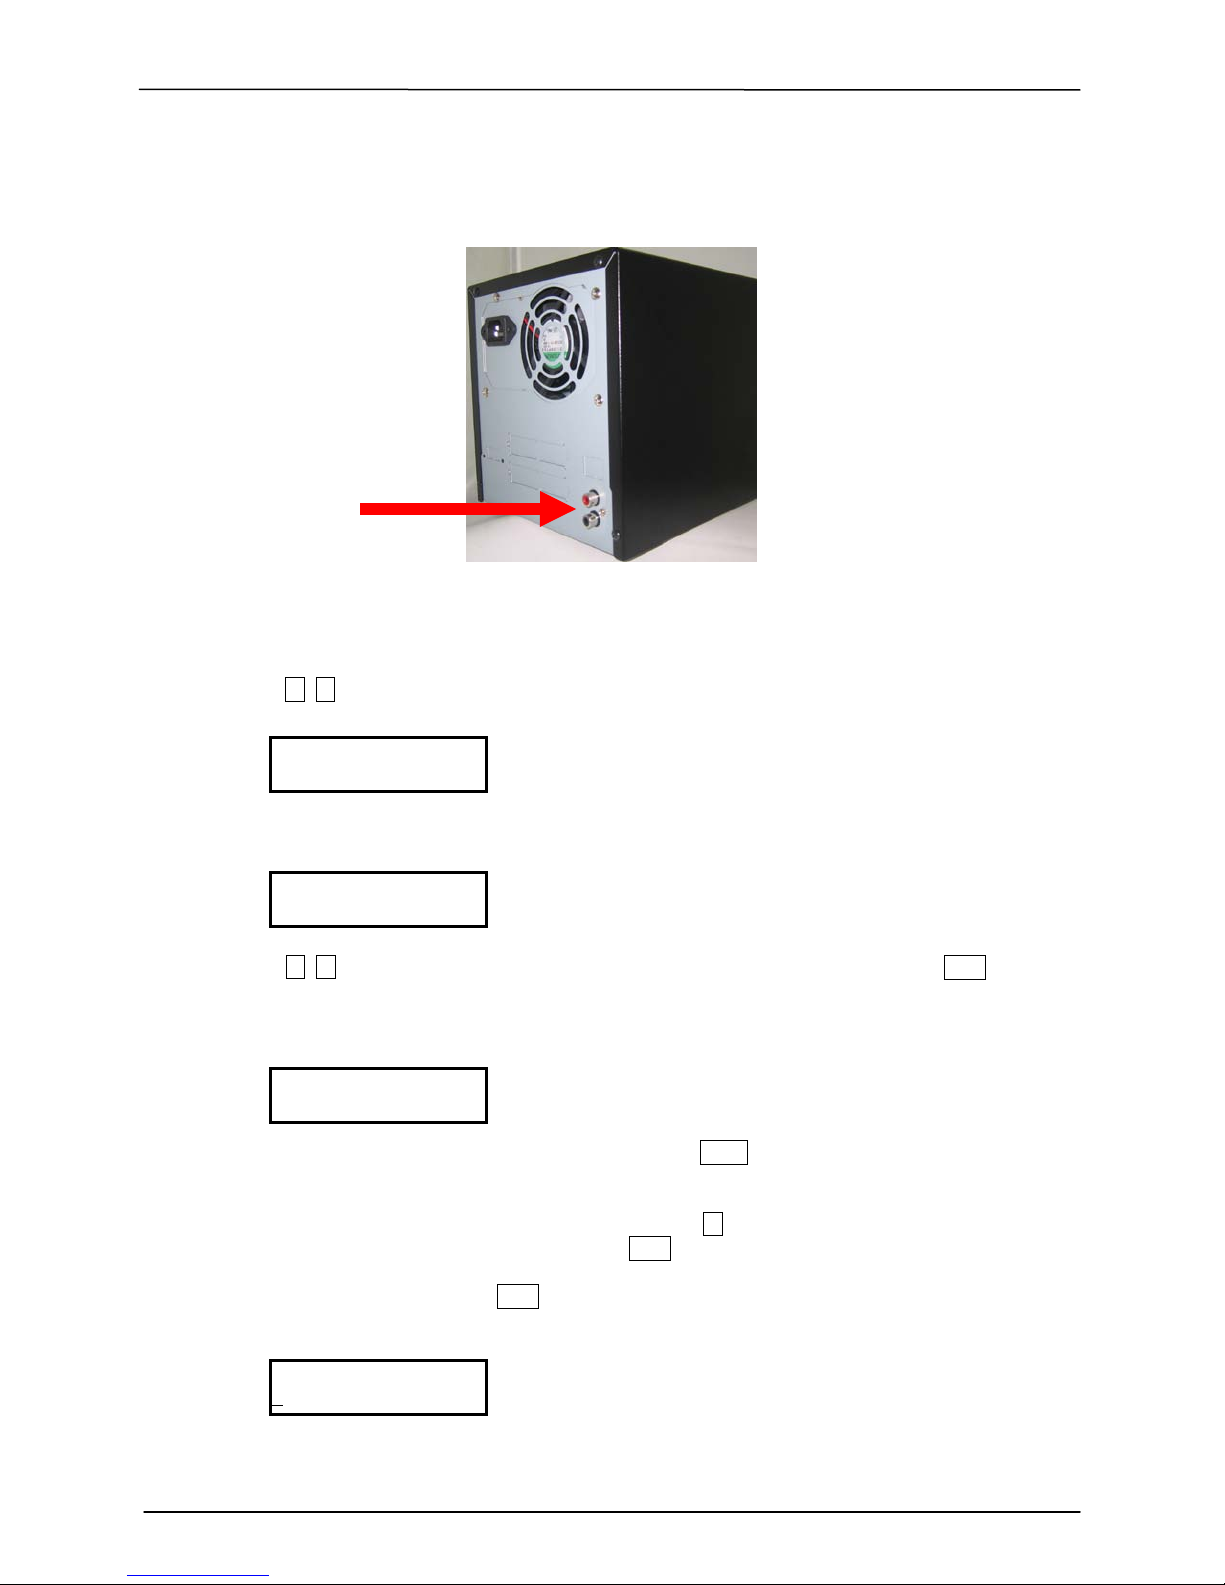
Audio Jacks
4. MUSIC PLAYER (with Amplified Speakers Plugged in to the rear audio Jacks)
A. Place the audio CD into the Reader Drive.
B. Move , to 8. Music Pl a yer and Pres s ENT
C. The LCD will show
D. Move , to select all tracks or move to each track number you like and press ENT. Select on
E. The selected track will be marked a b c … above the track number.
F. If you would like to de-select the tracks just press ENT again on that track.
G. When you have finished selection, please mov e to the right end of LCD screen. You
H. Select Play Mode and press ENT to start playing music
8. Music Player
All
each track you would like to play.
1 2 3 4 5 6 7
will see OK on the end of all tracks. Press ENT to finish your selection.

___ ZipSpin
13
Chapter 7. Troubleshooting Guide and FAQ’s
*** Only DVD Model will read/copy both CD and DVD Discs. CD Model reads/copies CD disc only ***
There are no end-user serviceable components that can be replaced in the CD/DVD
Duplicator. Please contact your dealer for warranty repairs and service.
No LCD display.
- Please check if the power cord is connected properly and the push button is
pushed in all the way.
Error message shown on LCD.
- Blank Disc Not Enough – your master disc contains bigger size than your blank
disc. Use the blank disc that has bigger capacity. (e.g. double layer 8G DVD Disc)
- Can’t cop y CSS disc – your master disc is copy protected. Try another master.
CD Drive doesn’t read disc and shows error message.
- Check the format of master disc.
- Use other Master disc or other duplicator to test master.
Switches do not function.
- Task busy. Please wait.
- Restart unit.
- Faulty controller board. Call for Technical support
Copy completed but disc is not readable / playable or has skipping sound
- try burn the disc again with lower burn speed (4X for DVD and 12X for CD)
- make sure you use original disc as master, not a copy or copy’s copy
- clean the master disc and try again
- try re-create your master disc with lower burn speed
- try different brand of blank discs.
Failure rate is high.
- Use original source CD and not a Copy or Copy’s Copy
- Lower writing speed and try again.
- Quality of blank disc is poor. Try another brand.
- Quality of master disc is poor. Try clean the disc.
- Rated speed of discs does not match writers. Ensure discs meet writers rated
speed.
- Update the latest BIOS version. See manufacturer for latest firmware updates.
Can't boot up or upgrade BIOS.
- Contact your dealer.
- Check if the BIOS program is correct.

___ ZipSpin
14
FAQ’s
What if the Duplicator will not power on?
Make sure the unit is plugged into a power outlet and the on/off switch is pushed in all the way.
What if the duplicator is having trouble making a copy, what can be done?
The most common problem with discs playing but not duplicating can be attributed to overall quality.
Some factors affec ting disc qual it y include brand of blank media used, p hysica l dam age, and writ e qualit y.
It is important that t he dis c is f r ee of damage or blemishes an d pro duc e d o n a hi g h qu al ity brand of media.
Make sure that the “master” DVD has been finalized.
Make sure the “master” DVD is not encrypted or is not a copy protected original.
Make sure you have high quality, blank pieces of media.
Make sure your master disc and blank disc are the same format. (-R to –R or +R to +R)
Make sure you’re not trying to copy a CD to a DVD or DVD to CD.
Try using a different brand of blank media.
What if the duplicator is having trouble reading a DVD, what can be done?
Make sure you have Content on the “master” disc.
Make sure the “master” disc in good condition. (Disc is not scratched)
Make sure the disc is placed in the drive properly. (Data side down)
Make sure the “master” disc has been finalized.
What does "Stand-Alone" mean?
No computer is required to make copies of DVDs. Plug it in, turn it on, insert source DVD and blank media,
close the drive trays and the duplicator starts copying.
Can I copy Hollywood DVD movies with a ZipSpin duplicator?
No, commercial movies are copy protected and cannot be copied with this or any duplicator. You can
copy your own video creations.
Can I copy CDs in a ZipSpin DVD duplicator?
Yes, you can copy CDs in this duplicator. Just use blank CD-R Media that is certified at least 40X, and
use the same process used to duplicate a DVD.
Can I copy DVDs to CD Media in ZipSpin duplicators?
No, DVDs will only copy to blank DVD Media.
Can I copy DVD+R to DVD-R in ZipSpin Duplicators?
No, you can only copy DVD-R to DVD-R or DVD+R to DVD+R.
Can I connect this ZipSpin duplicator to my PC?
No. You would need to purchase a model that has USB or FireWire Connectivity. If it does, you can
connect to a PC, and create your own custom DVDs and CDs.
How do I clean my ZipSpin duplicator?
The best maintenance for your ZipSpin duplicator is preventive maintenance. Using a system in an area
with excessive dust, smoke, or other contaminants is not recommended since it will increase error rates
and reduce hardware life expectancy. Some light cleaning can be performed; you can use a can of
compressed air for dusting out drives.
If you are unable to solve your technical problems, do not return the unit right
away. Please call 714 892- 8212 or email us at support@pdetechnology.com
 Loading...