

Page 1
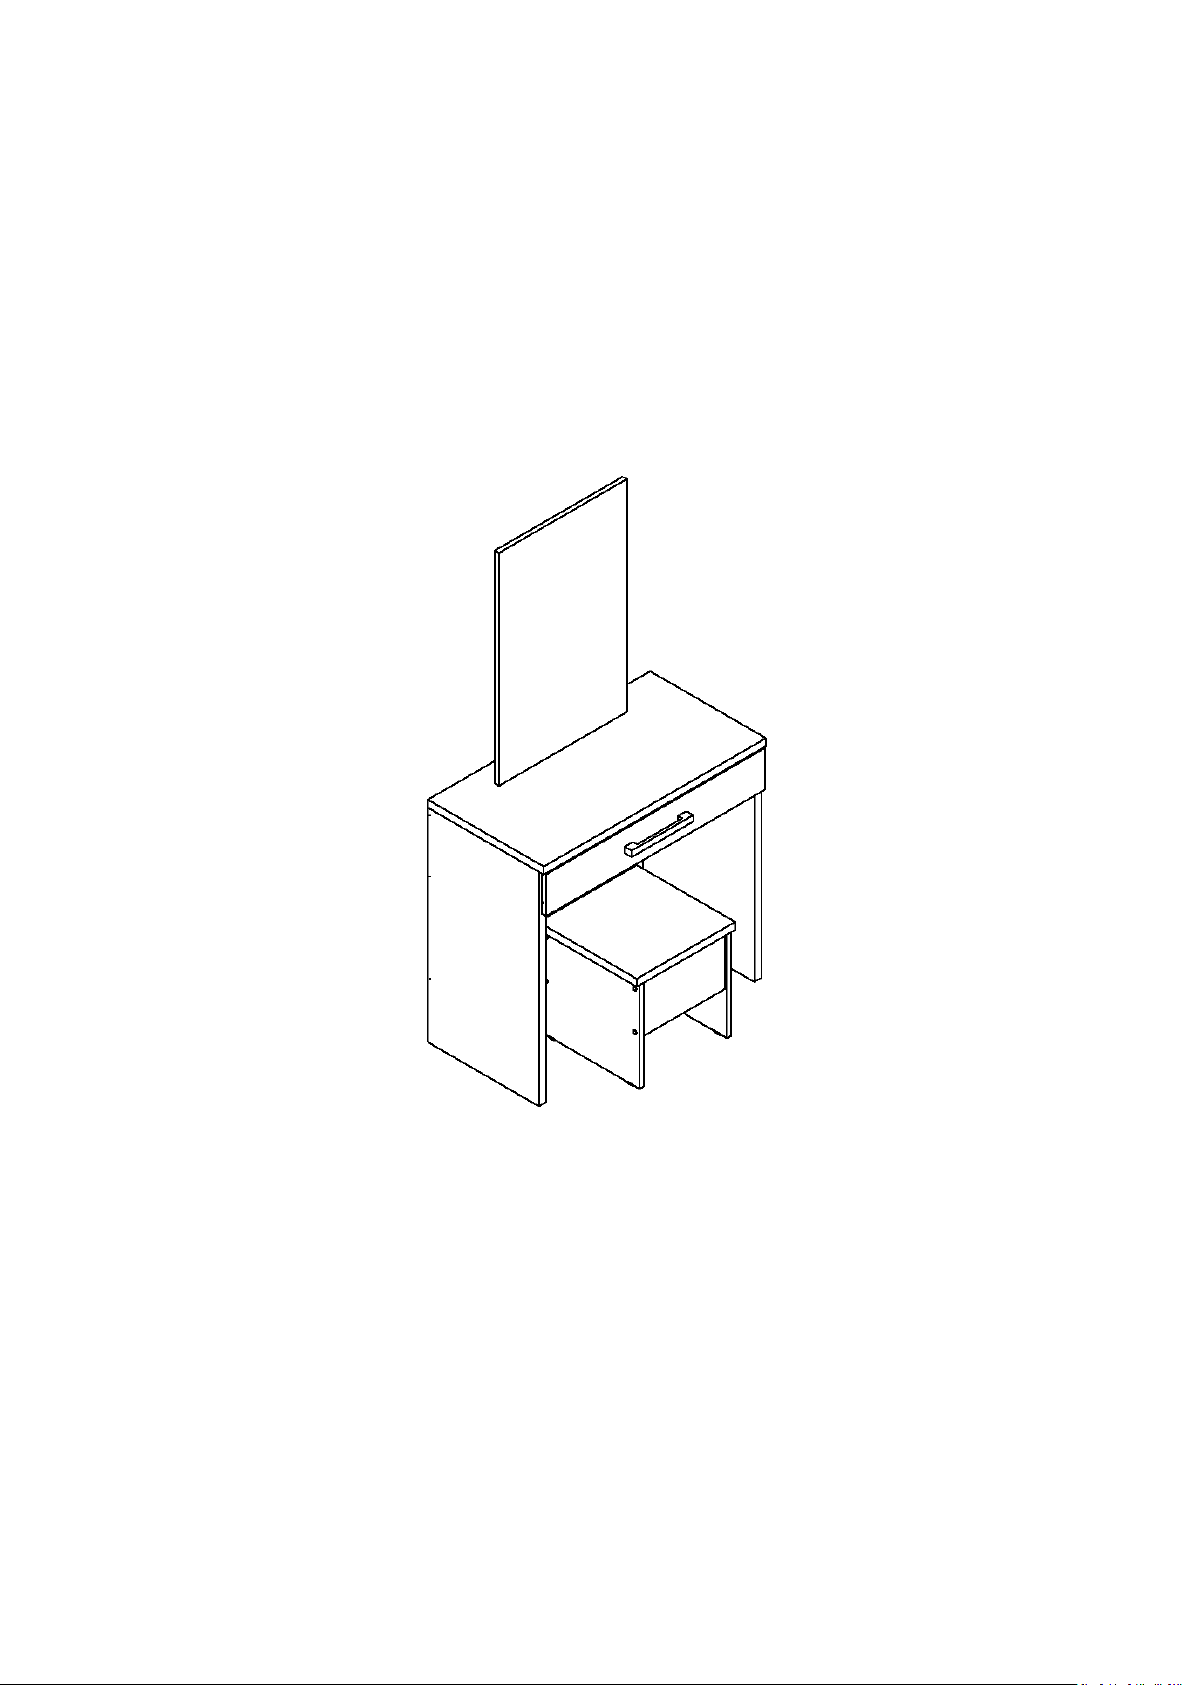
ASSEMBLY INSTRUCTIONS
INSTRUCCIONES DE ARMADO
DRESSING TABLE WITH MIRROR
Tocador con espejo
Aprox. product weight 68.3 lbs. / 31 Kg. *
*Weight may vary +/- 5%
THIS INFORMATION BOOKLET CONTAINS IMPORTANT SAFETY INFORMATION. PLEASE READ AND KEEP FOR FUTURE REFERENCE.
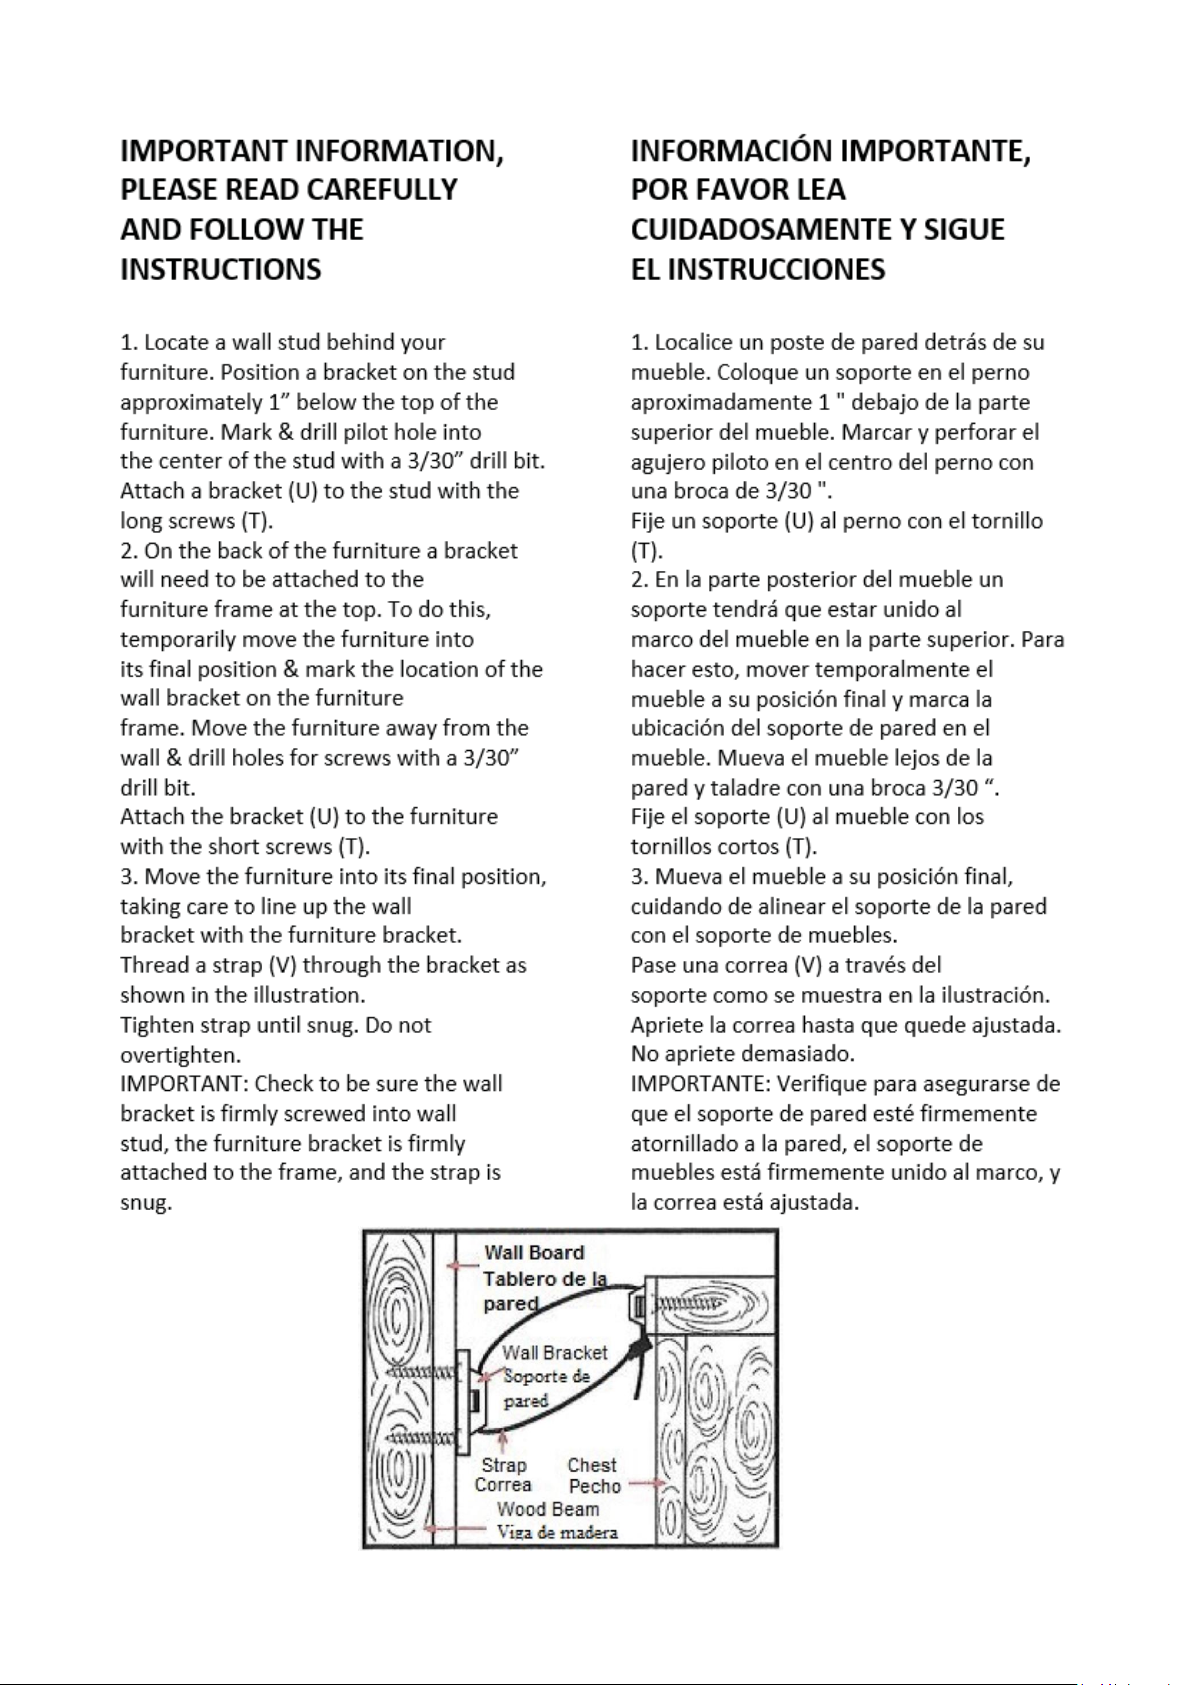
ESTE FOLLETO CONTIENE INFORMACIÓN DE SEGURIDAD IMPORTANTE. POR FAVOR, LEA Y GUÁRDELO PARA REFERENCIA FUTURA.
Page 2

GENERAL SAFETY INFORMATION
1. Please read the Assembly Instructions prior to assembling this product.
2. Remove all the hardware from the box and sort by type.
3. Check to see that all the hardware and parts are present BEFORE assembling.
4. To avoid damage, assemble the product on a sturdy, level and protective surface.
5. Please wait until all steps are completed before fully tightening bolts.
6. Make sure all bolts are tightly fastened before the unit is used.
7. To move the product, you must lift it. DO NOT drag it, if you drag it can cause overturning.
8. This product is sold with a hardware kit to be fixed on the wall. You must install this kit to
prevent any accidents or damages. When properly installed, this restrain can provide protection
against the unexpected tipping of the unit due to smalls tremors, bumps or climbing. The restrain
is only a deterrent and is not a substitute for proper adult supervision. Use of tip-over restraints
may only reduce, but not eliminate, the risk of tip-over
INFORMACIÓN GENERAL DE SEGURIDAD
1. Lea las instrucciones de armado antes de ensamblar este producto.
2. Extraiga todo el hardware de la caja y ordene por tipo.
3. Verifique que todo el hardware y las piezas están presentes ANTES de ensamblar.
4. Para evitar daños, ensamble el producto sobre una superficie resistente, nivelada y con protección.
5. Espere hasta que todos los pasos se hayan completado antes de apretar completamente los
tornillos y accesorios.
6. Asegúrese de que todos los tornillos y accesorios estén bien apretados antes de usar la unidad.
7. Para mover el producto debe levantarlo. NO lo arrastre, si lo arrastra puede causar volcamiento.
8. Este producto se vende con un kit de accesorios para ser fijado en la pared. Debe instalar este kit
para evitar accidentes o daños. Cuando se instala correctamente, esta restricción puede
proporcionar protección contra la inclinación inesperada de la unidad debido a temblores
pequeños, golpes o al treparse. La restricción es solo un elemento disuasivo y no es un sustituto
de la supervisión adecuada de un adulto. El uso de restricciones de vuelco solo puede reducir,
pero no eliminar, el riesgo de volcarse.
3
Page 3
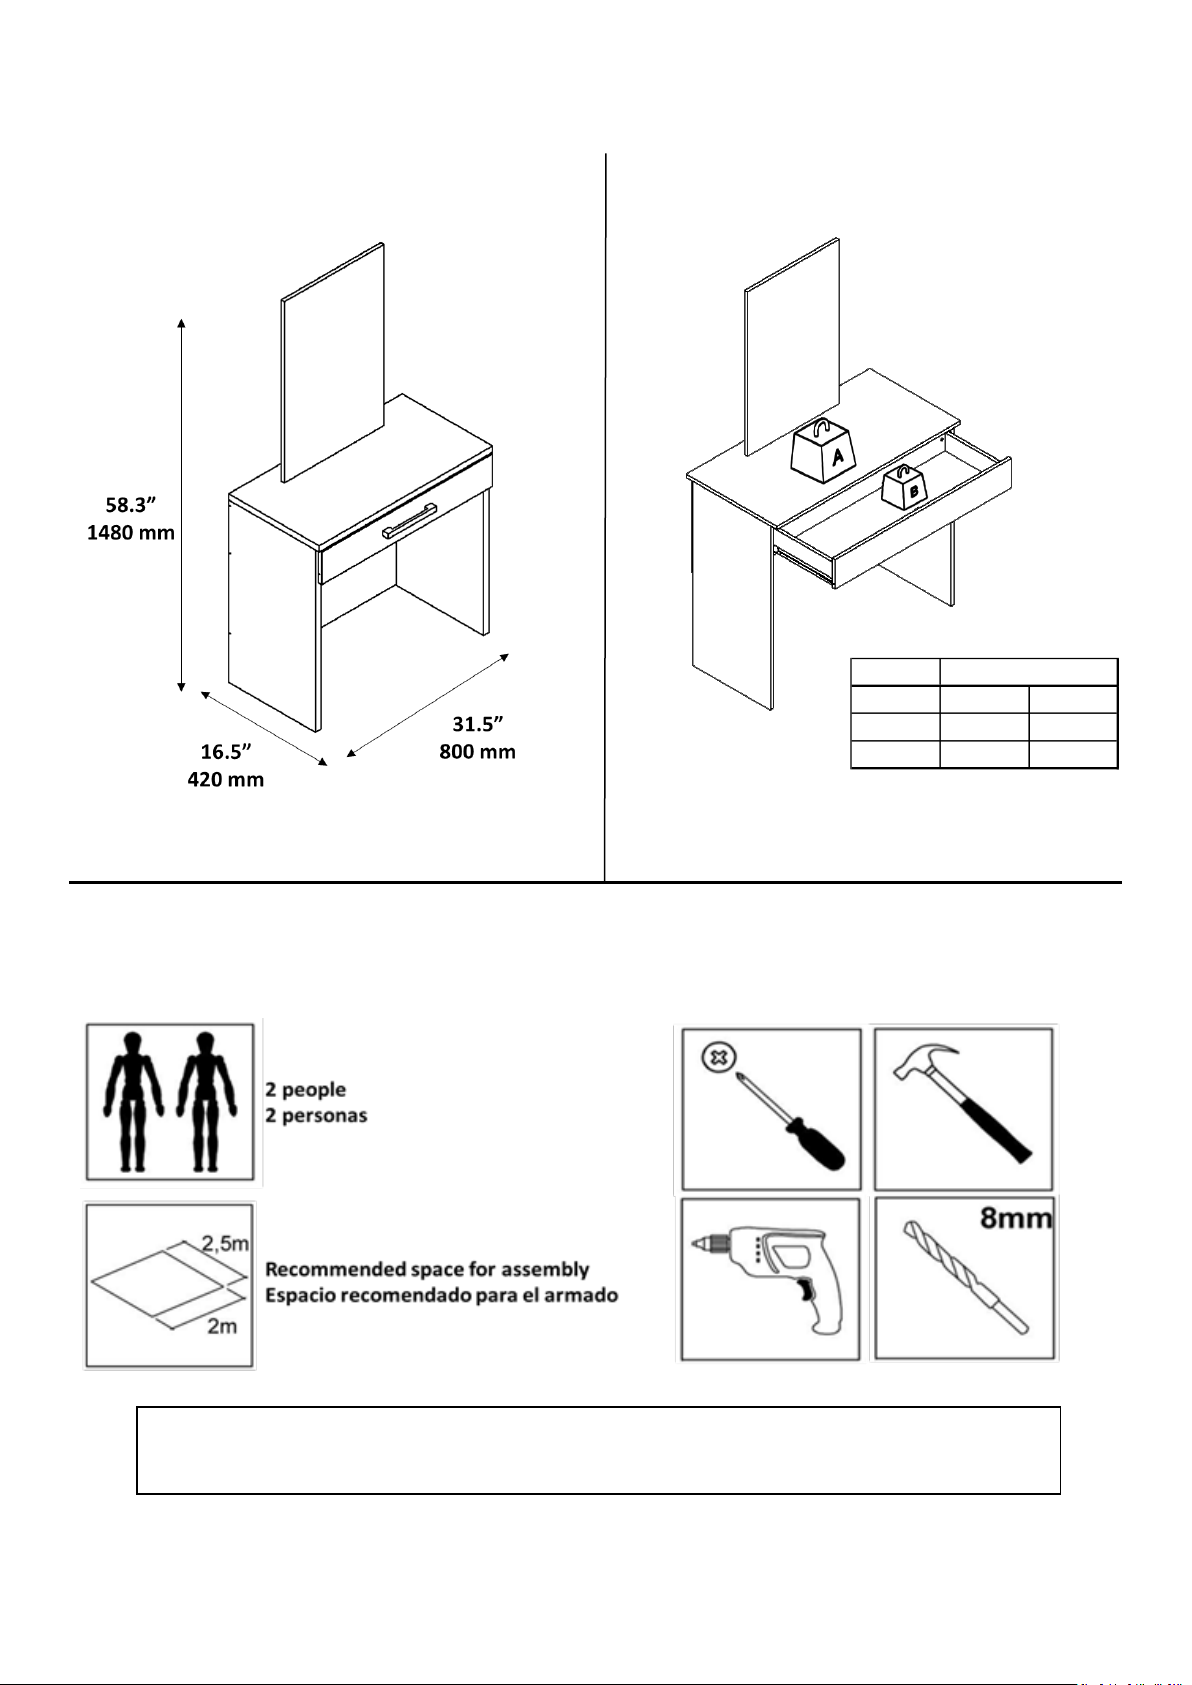
General Dimensions / Dimensiones Generales
Maximum weight supported
Peso máximo soportado
Note: weight must be evenly distributed.
Note: Place a carpet or blanket in the assembly area to avoid damage to the parts during the process.
Nota: Colocar una alfombra o manta en el area de armado para evitar daños en las piezas durante el
proceso.
LBS KG
A 44 20
B 6.6 3
WEIGHT / PESO
You will need / usted necesitará:
Tools not included / herramientas no incluidas
4
Page 4
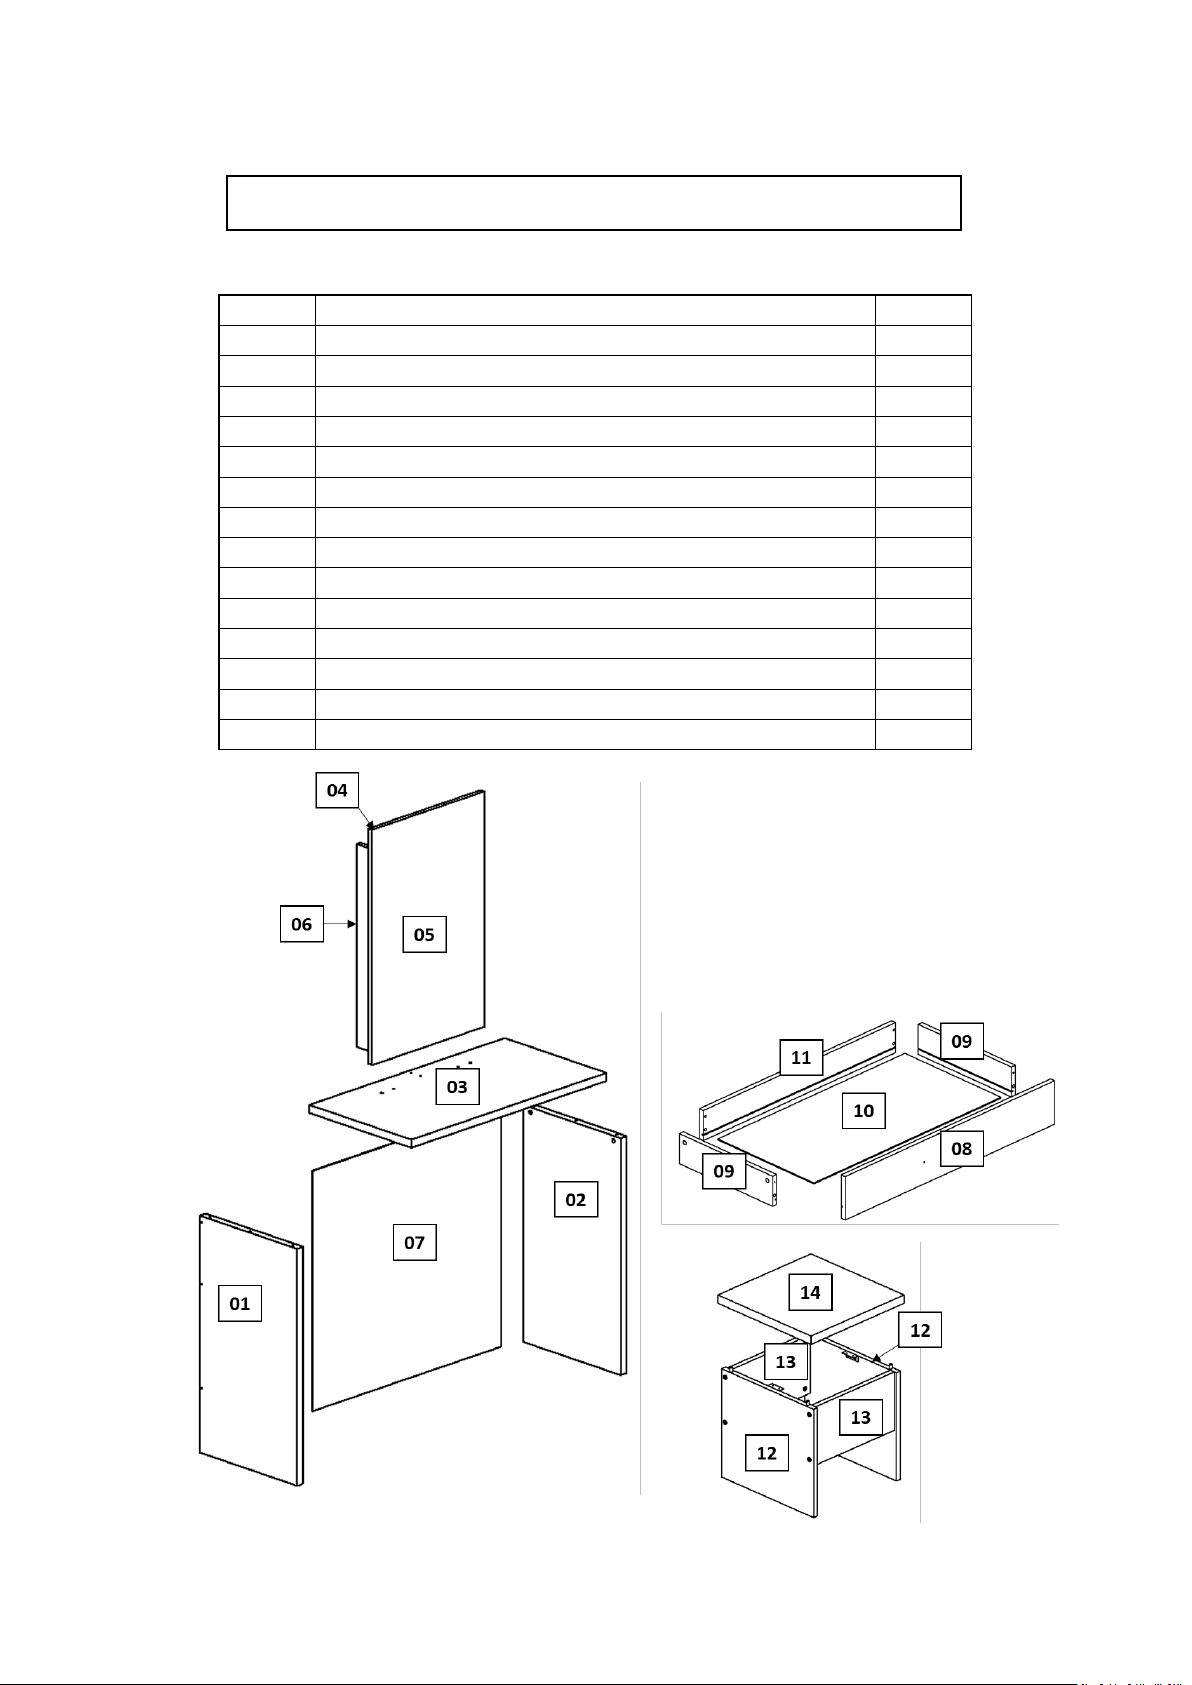
Nº
DESCRIPTION - DESCRIPCIÓN
QTY.
1
Left side / Lateral izquierdo
1
2
Right side / Lateral derecho
1
3
Top base / Base superior
1
4
Mirror panel / Fondo de espejo
1
5
Mirror / Espejo
1
6
Mirror tray / Traviesa de espejo
1
7
Backboard / Fondo
1
8
Drawer front / Frente del cajón
1
9
Drawer side / Lateral del cajón
2
10
Drawer bottom / Fondo del cajón
1
11
Drawer back / Trasero de cajón
2
12
Side of seat / Lateral de asiento
2
13
Front and back of seat / frontal y porterior de asiento
1
14
Top of seat / Parte superior del asiento
1
PARTS IDENTIFICATION / IDENTIFICACION DE PARTES
5
Page 5
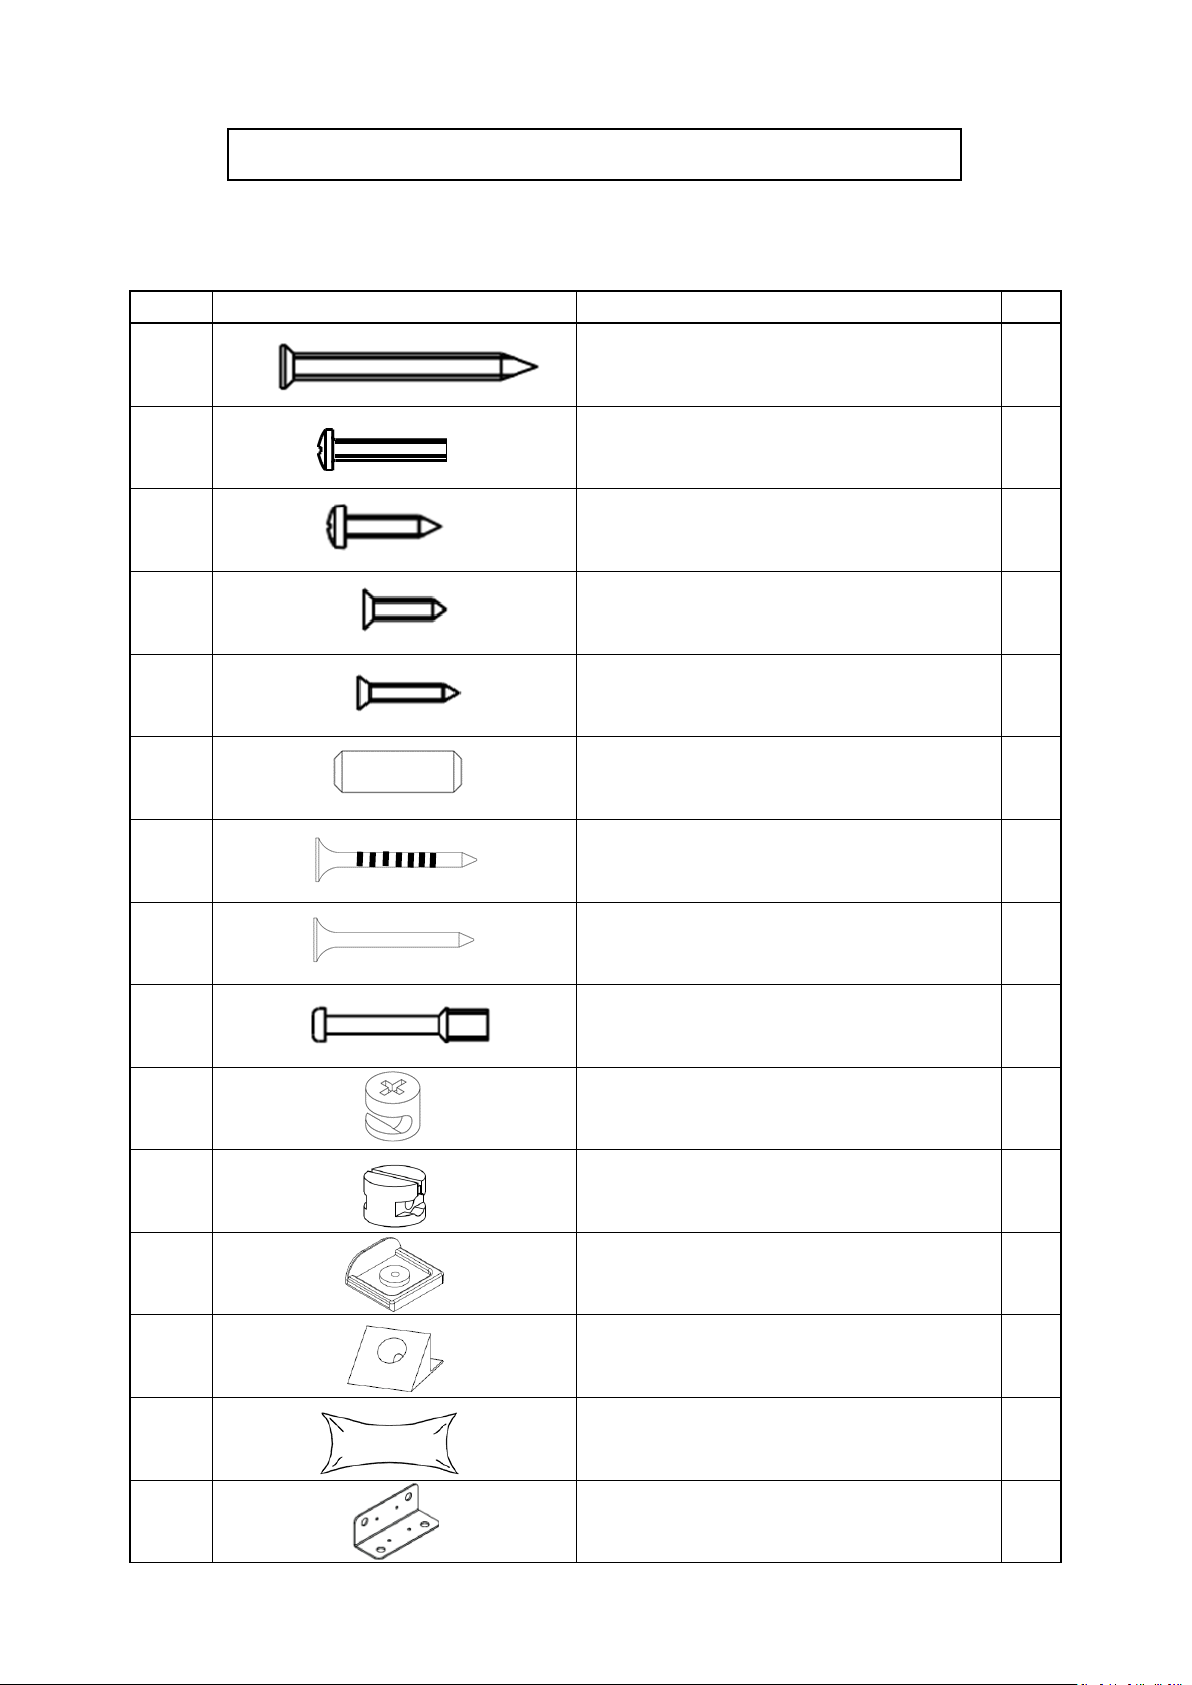
CODE
DESCRIPTION
QTY
A
Flat head screw / Tornillo cabeza plana (4,5 x
60 mm)
11
B
Flat head screw / Tornillo cabeza plana (3,5 x
25 mm)
2
C
Flange head screw / Tornillo cabeza
flangeada (3.5 x 14 mm)
16
D
Flat head screw / Tornillo cabeza plana (3.5 x
12 mm)
8
E
Flat head screw / Tornillo cabeza plana (3 x
16 mm)
2
F
Wooden dowel / Pin
13
G Ringed Nail / Clavo anillado
8
H
Nail / Clavo
21
I Simple minifix screw / Tornillo minifix simple
10
J
Drum lock / Tambor minifix
10
K Cylindrical nut / Tuerca cilíndrica
9
L
L shoe / Zapata
8
M Drawer support / Soporte cajon
2
N
Glue / Pegamento
1
O
Angle / Ángulo
4
IDENTIFICATION OF ACCESSORIES / IDENTIFICACION DE ACCESORIOS
Note: the separation of the accessories before starting the assembly will facilitate it.
Nota: la separación de los accesorios antes de empezar el armado facilitará el mismo.
6
Page 6
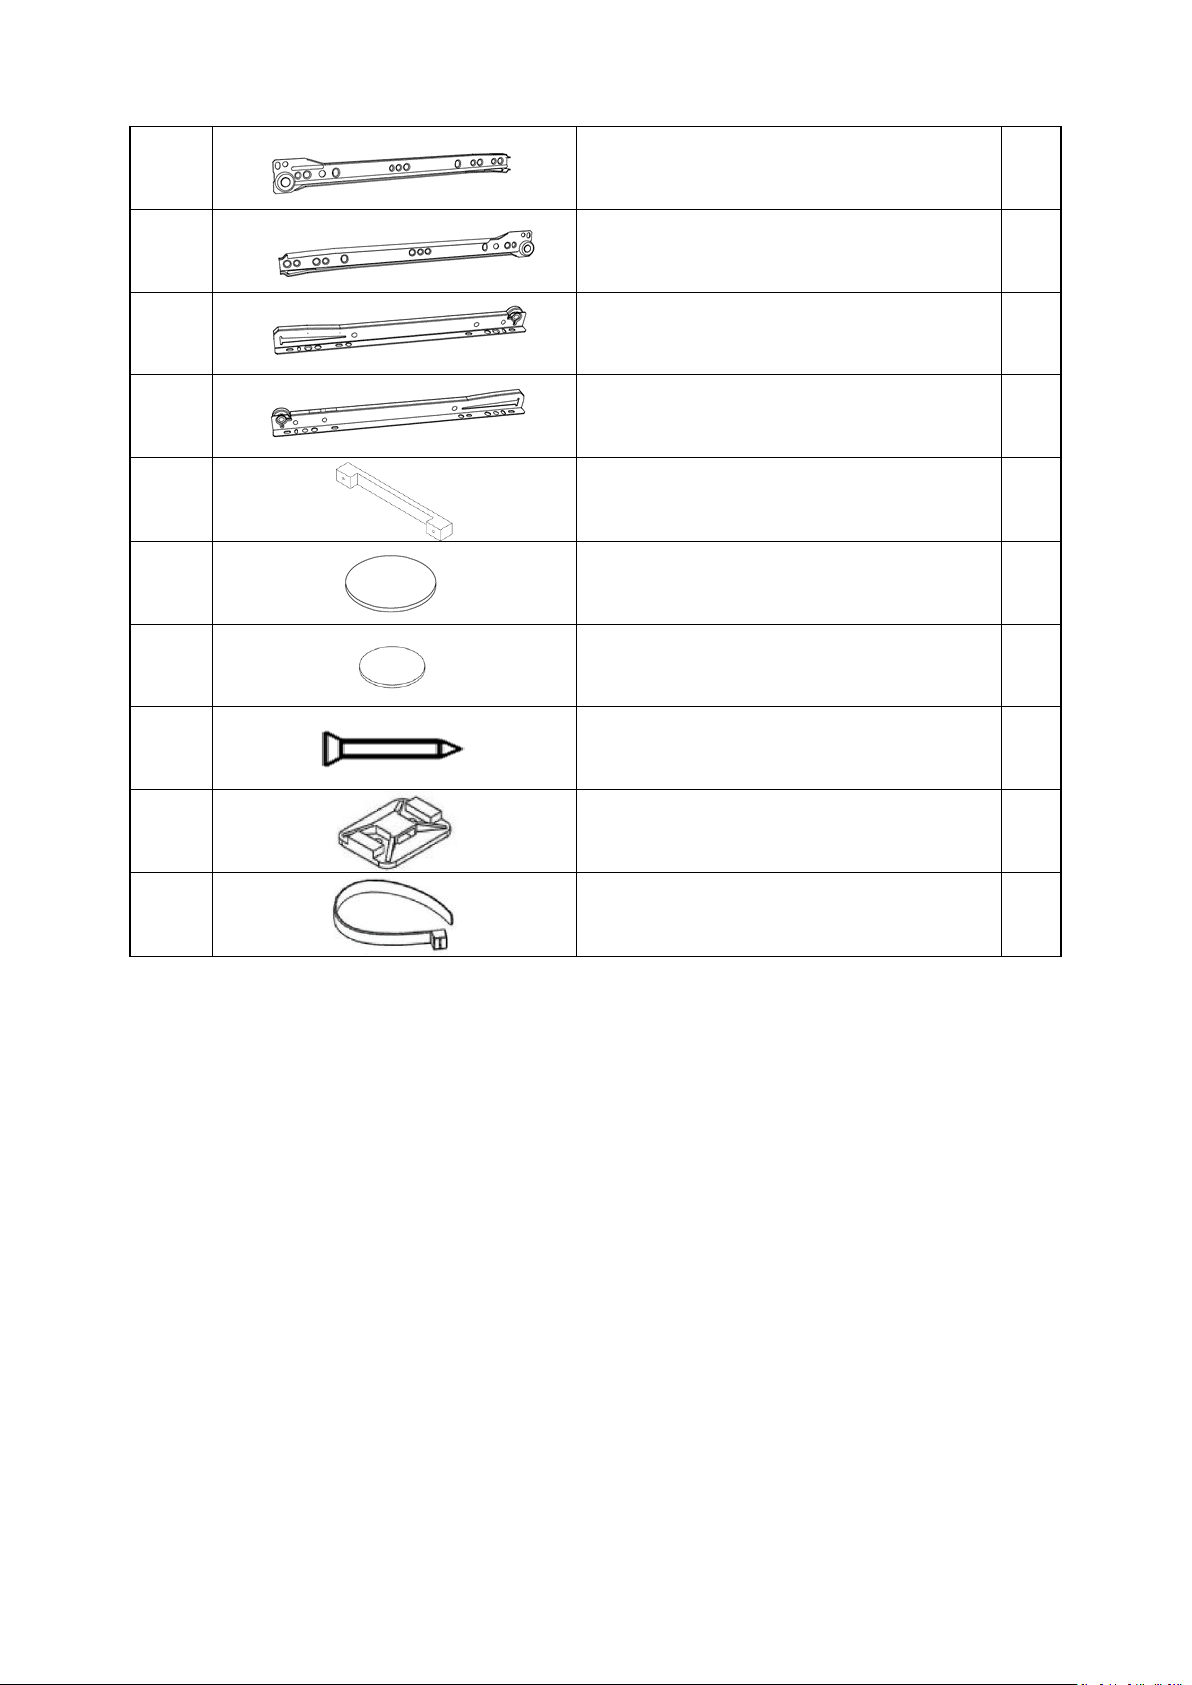
P1
Metallic left slide / Corredera lateral
izquierda
1
P2
Metallic right slide / Corredera lateral
derecha
1
P3
Left drawer slide / Corredera de cajón
izquierda
1
P4
Right drawer slide / Corredera de cajón
derecha
1
Q
Handle / Manilla
1
R
Bore patch adhesive / Tapón adhesive 17
mm
2
S
Bore patch adhesive / Tapón adhesive 10
mm
8
T
Flat head screw / Tornillo cabeza plana (3 x
30 mm)
4
U Wall bracket / Soporte pared
2
V
Strap / Correa
1
7
Page 7
8
Page 8
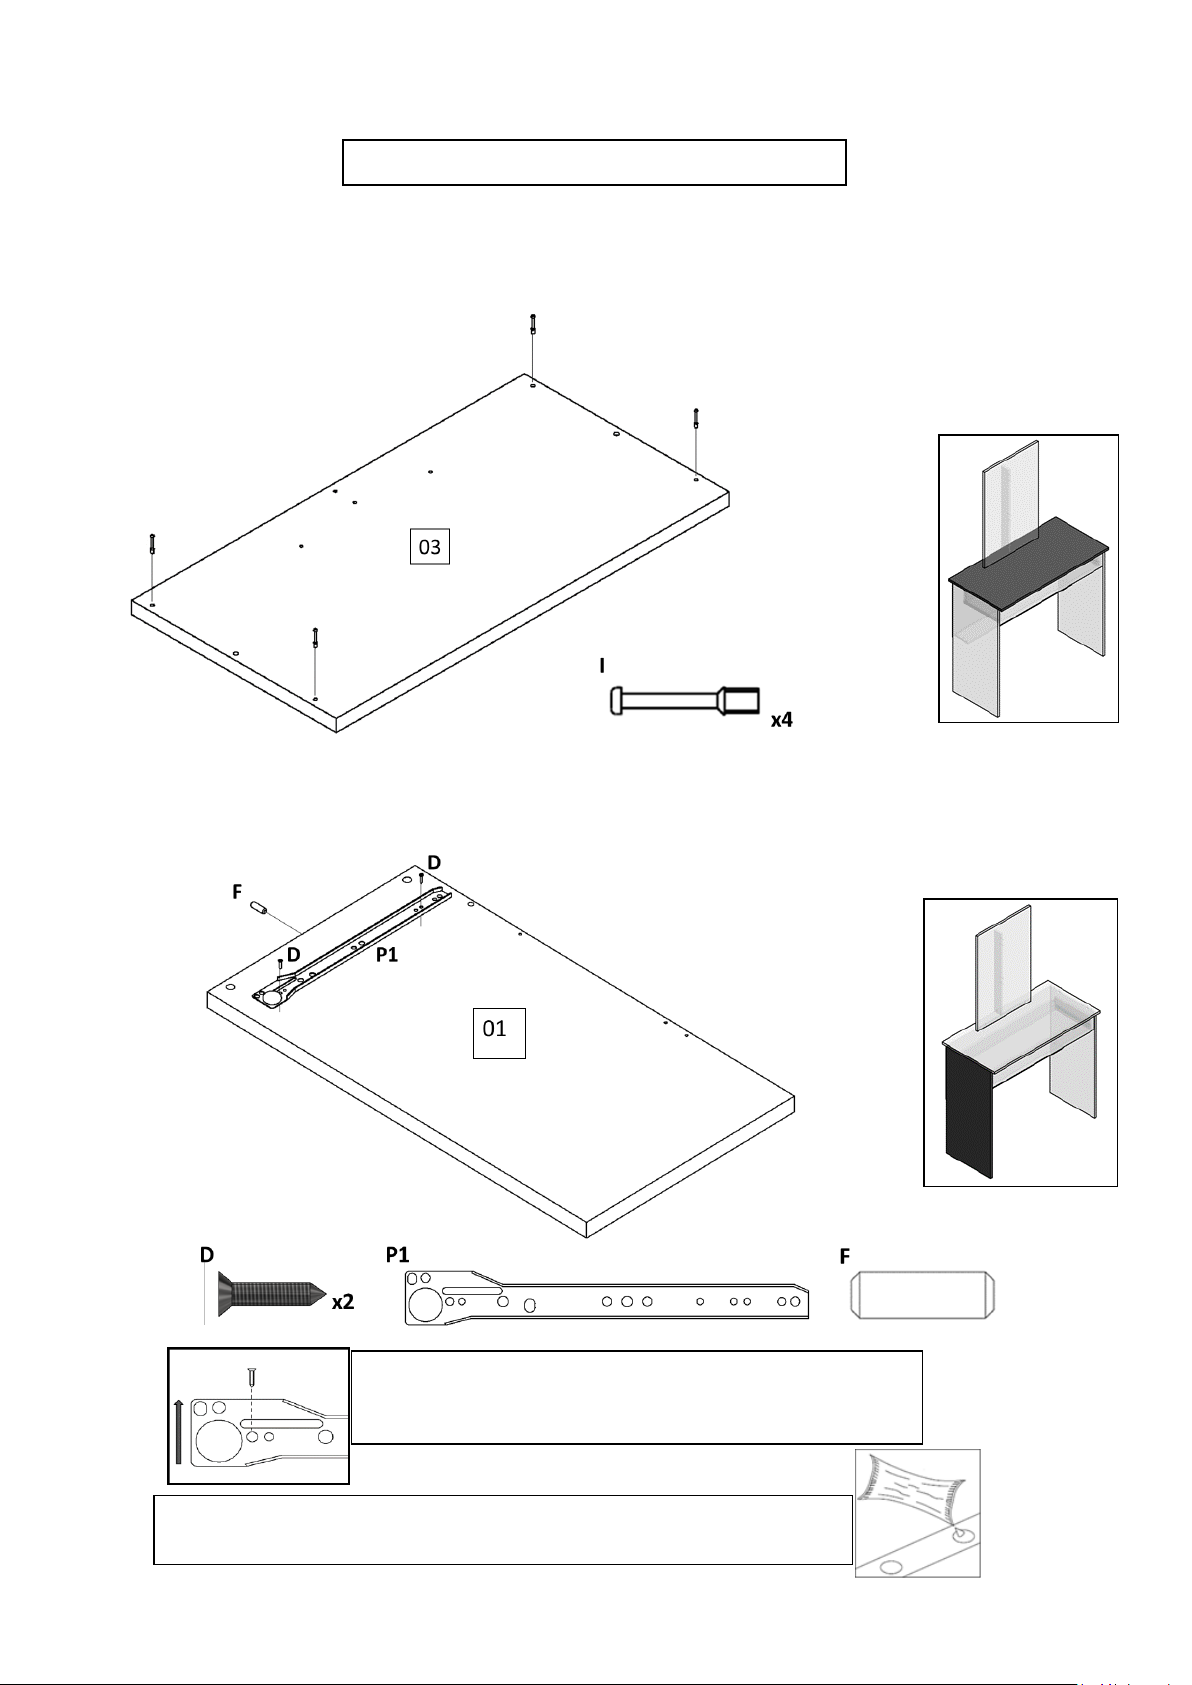
PRE-ASSEMBLY / PRE- ARMADO
Note: the two upper holes have to be facing up.
Nota: los dos agujeros superiores deben estar hacia arriba.
Note: add glue (N) in the holes before placing the wooden dowel
Nota: agregue el pegamento (N) en los agujeros antes de colocar el pin.
1. Fix simple minifix screw (I) to top base (3).
Fijar tornillo minifix simple (I) a base superior (3).
2. Fix wooden dowel (F) and metallic left slide (P1) to left side (1).
Fijar pin (F) y corredera lateral izquierda (P1) a lateral izquierdo (1).
9
Page 9
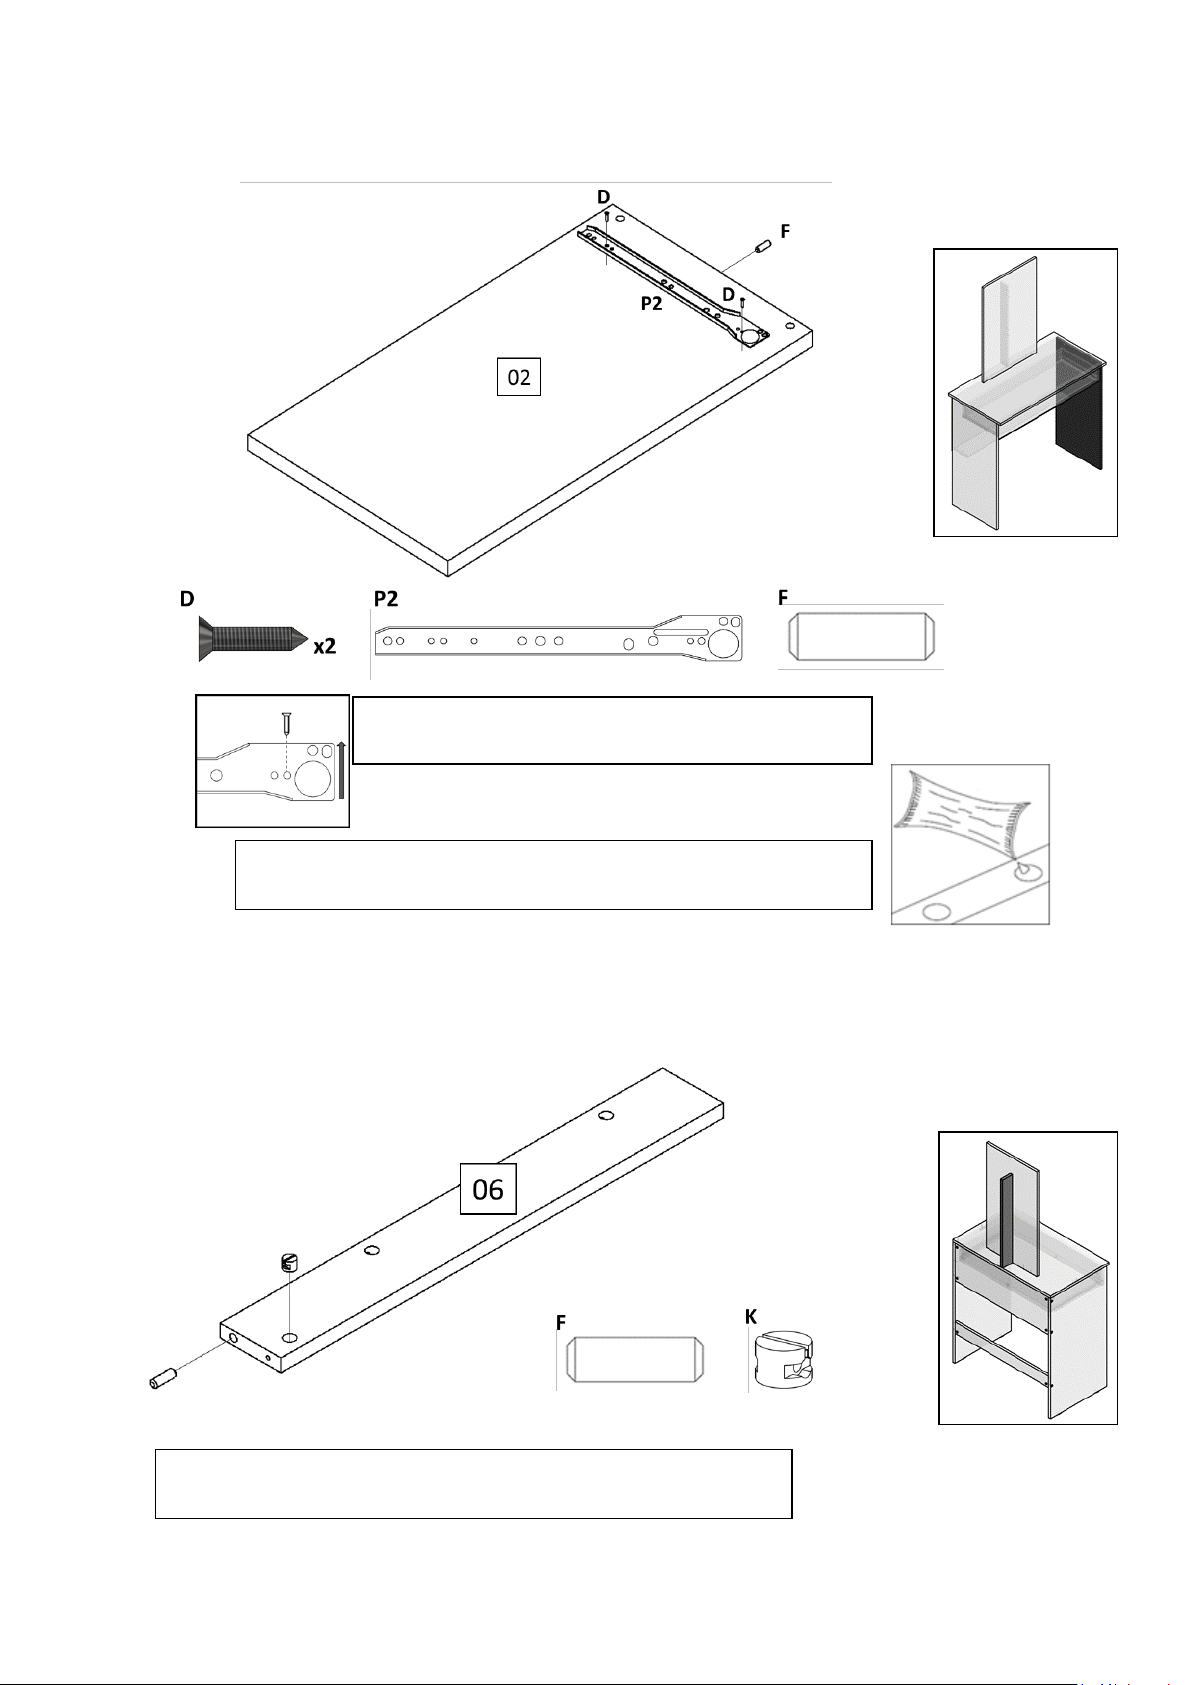
3. Fix wooden dowel (F) and metallic right slide (P2) to right side (2).
Note: the two upper holes have to be facing up.
Nota: los dos agujeros superiores deben estar hacia arriba.
Note: add glue (N) in the holes before placing the wooden dowel
Nota: agregue el pegamento (N) en los agujeros antes de colocar el pin.
Note: add glue (N) in the holes before placing the wooden dowel
Nota: agregue el pegamento (N) en los agujeros antes de colocar el pin.
Fijar pin (F) y corredera lateral derecha (P2) a lateral derecho (2).
4. Fix wooden dowel (F) and cylindrical nut (K) to mirror tray (6).
Fijar pin (F) y tuerca cilíndrica (K) a traviesa de espejo (6).
10
Page 10
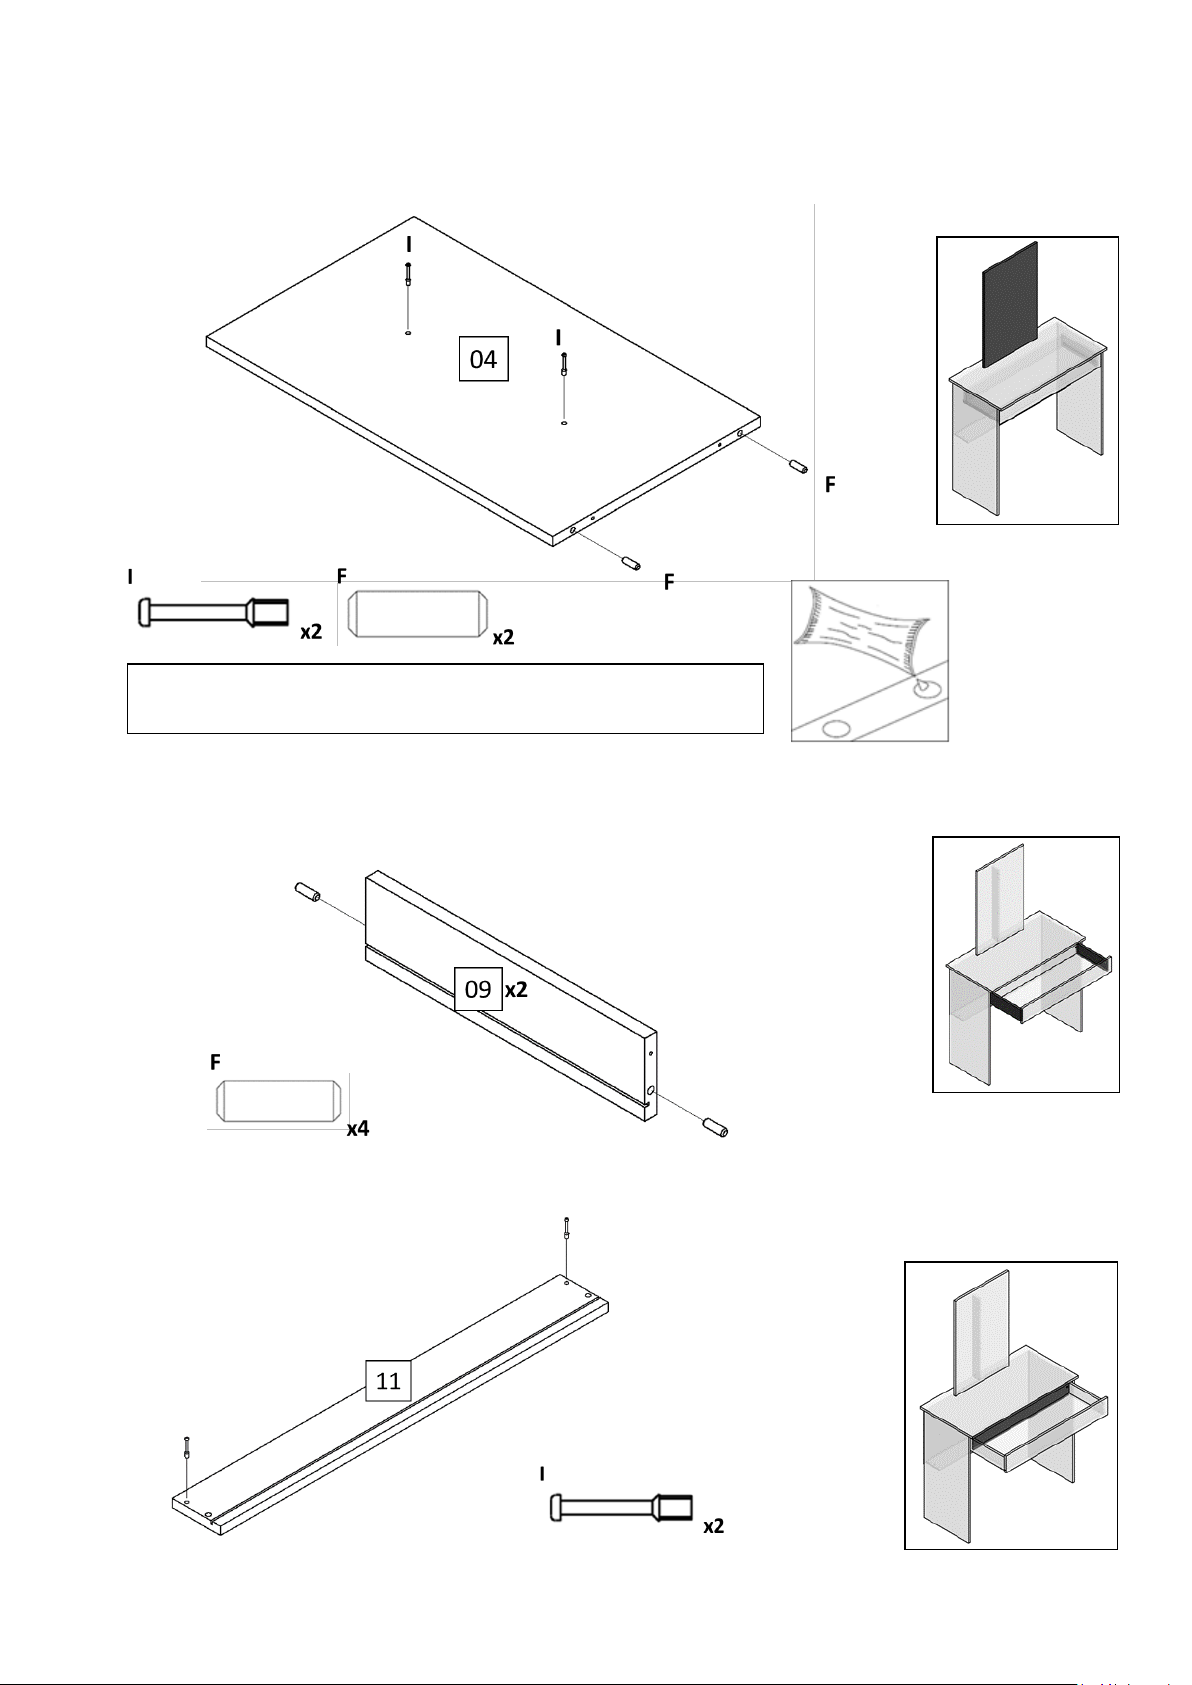
5. Fix wooden dowel (F) and simple minifix screw (I) to mirror backboard (4).
Note: add glue (N) in the holes before placing the wooden dowel
Nota: agregue el pegamento (N) en los agujeros antes de colocar el pin.
Fijar pin (F) y tornillo minifix (I) a fondo de espejo (4).
6. Fix wooden dowel (F) to side of drawer (9) x2.
Fijar pin (F) a lateral de cajón (9) x2.
7. Fix simple minifix screw (I) to back of drawer (11).
Fijar tornillo minifix simple (I) a trasero de cajón (11).
11
Page 11
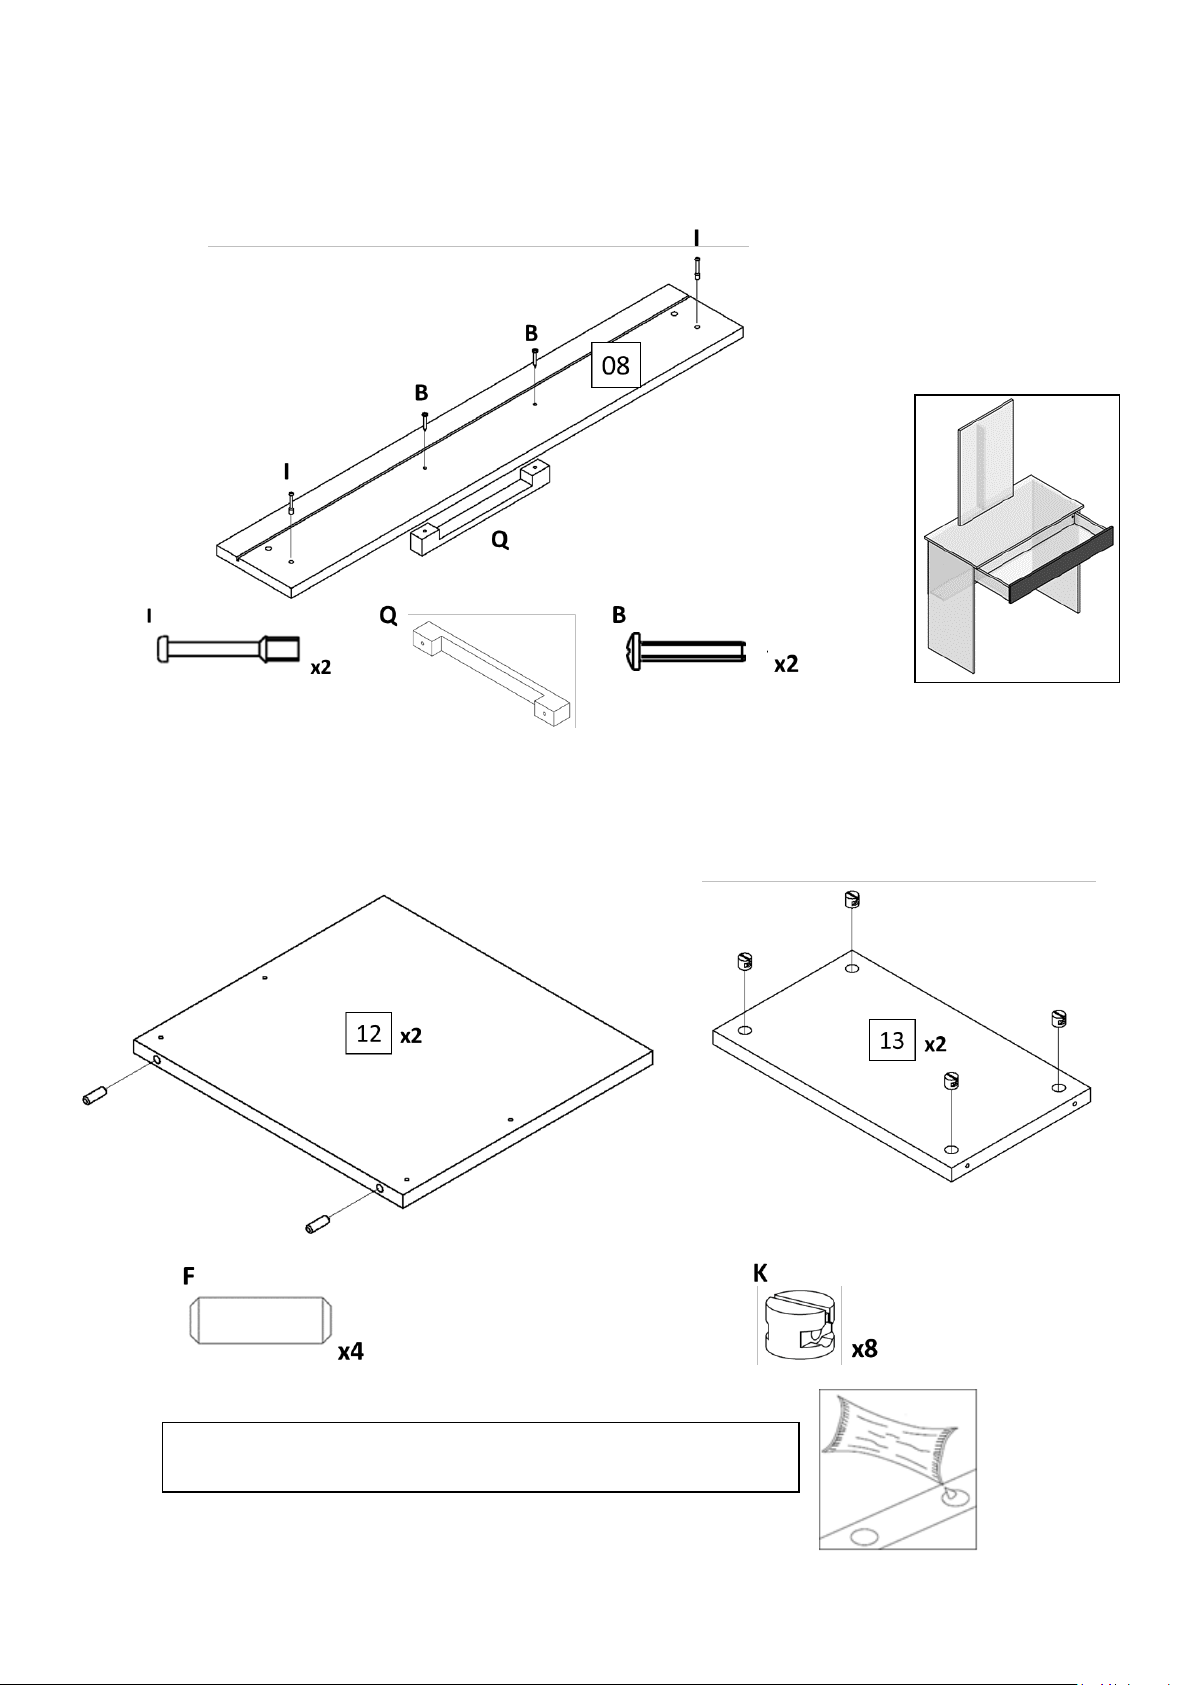
Note: add glue (N) in the holes before placing the wooden dowel
Nota: agregue el pegamento (N) en los agujeros antes de colocar el pin.
8. Fix simple minifix screw (I) and handle (Q) to front of drawer (8).
Fijar tornillo minifix simple (I) y manilla (Q) a frontal de cajón (8).
9. Fix wooden dowel (F) to seat side (12)x2 and fix cylindrical nut (K) to front and back of seat (13)x2
Fijar pin (F) a lateral de asiento (12)x2 y tuerca cilíndrica (K) a frontal/trasero de asiento (13).x2
12
Page 12
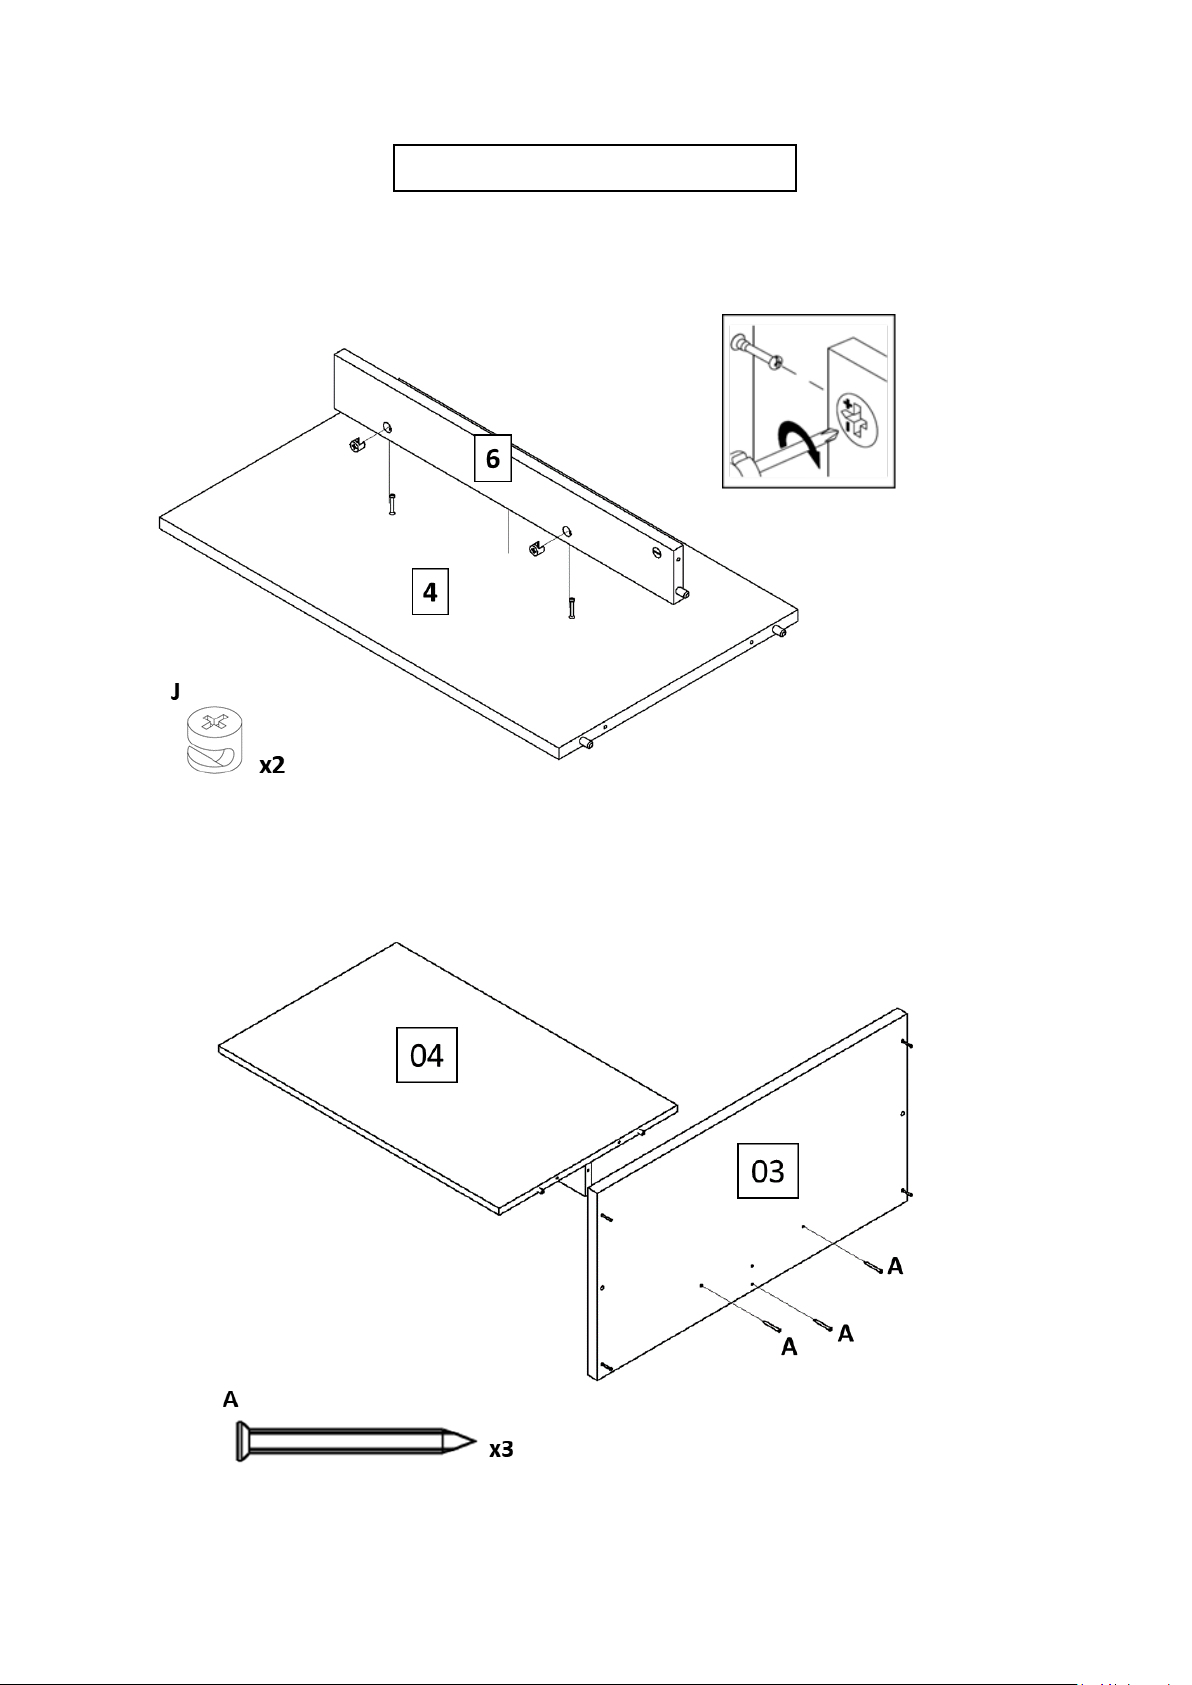
ASSEMBLY / ARMADO
10. Fix mirror tray (6) to mirror backboard (4).
Fijar traviesa de espejo (6) y fondo de espejo (4).
11. Fix previous assembly to top base (3).
Fijar ensamble previo a base superior (3).
13
Page 13
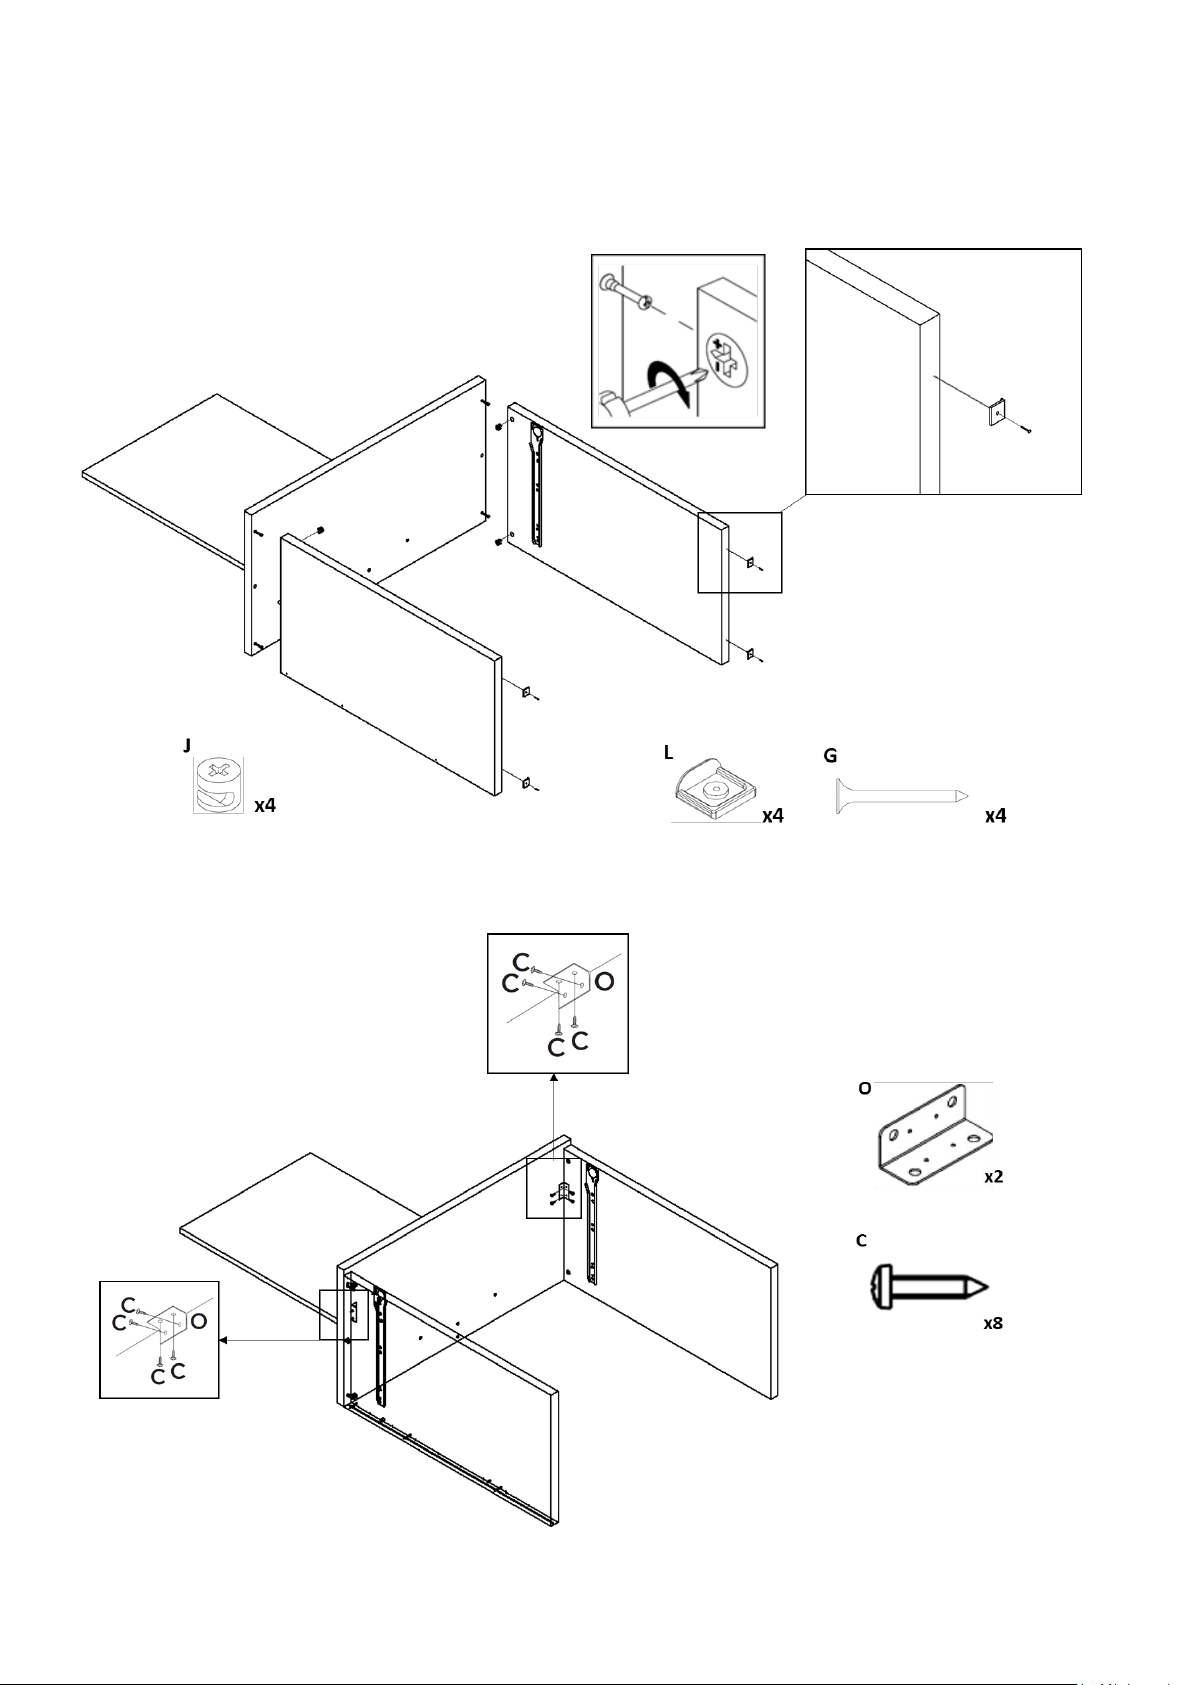
12. Fix left side (1) and right side (2) to previous assembly. Then fix small plastic foot (K).
Fijar lateral izquierdo (1) y lateral derecho (2) a ensamble previo. Luego fijar pie plástico (K)
13. Fix angle (O) to previous assembly.
Fije el ángulo (O) al ensamble previo.
14
Page 14
x21
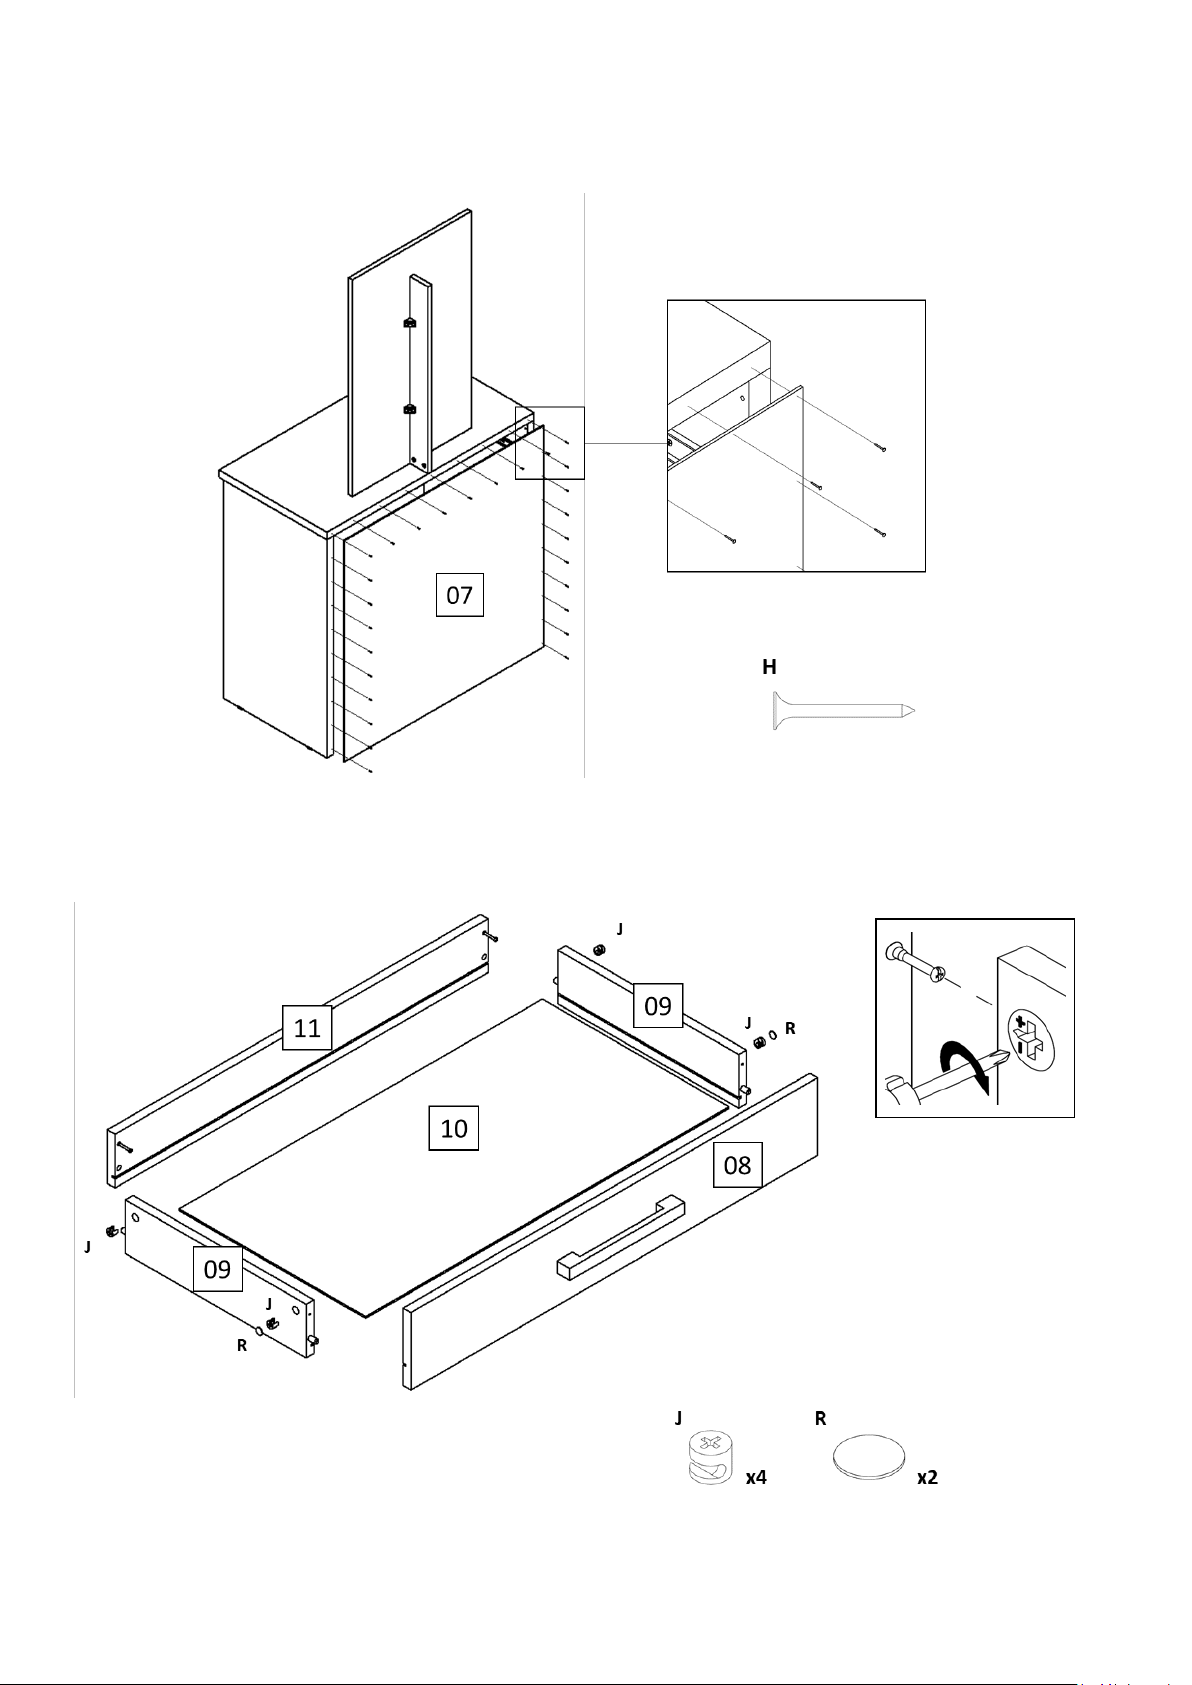
14. Fix backboard (07) to previous assembly.
Fije el fondo (07) al ensamble previo.
15. Assemble drawer.
Ensamblar cajón.
15
Page 15
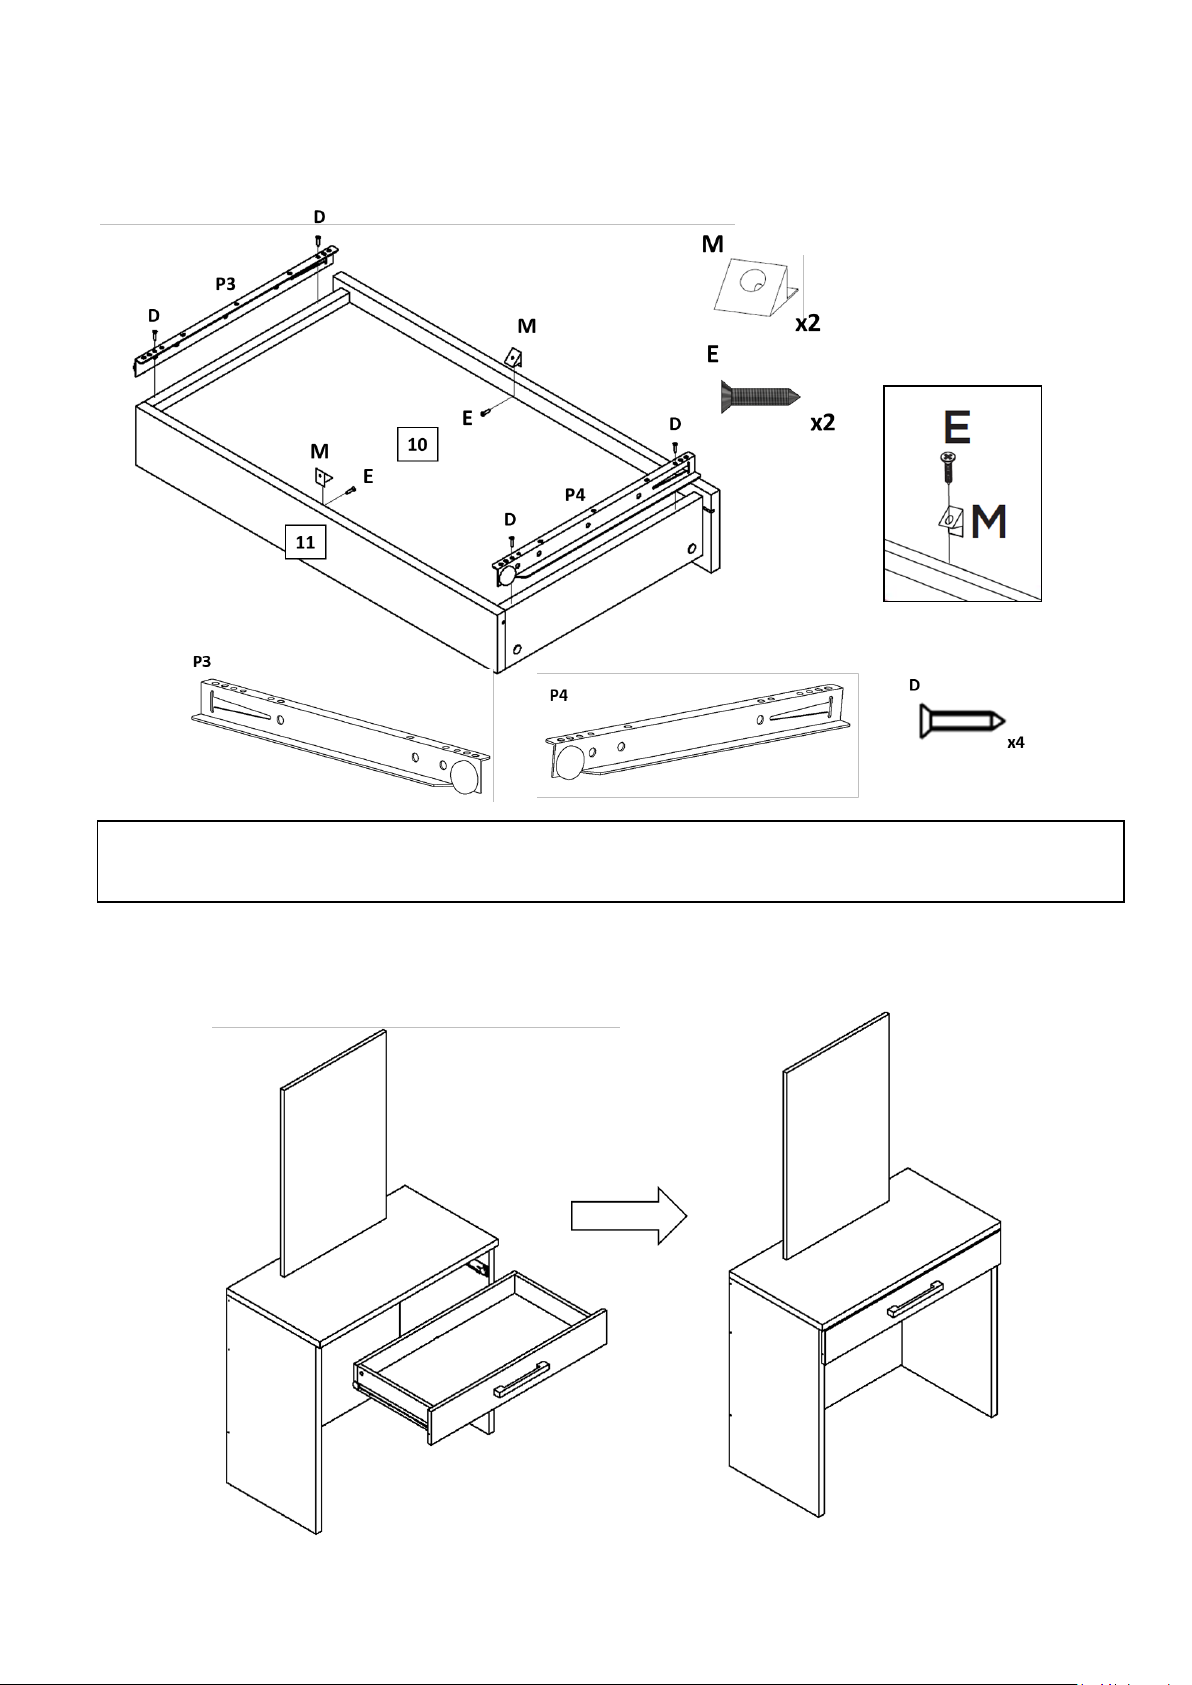
16. Fix left drawer slide (P3), right drawer slide (P4) and drawer support (M) to drawer.
Note: the missing holes must be made with the screwdriver and the corresponding screw.
Nota: los agujeros faltantes deben hacerse con el destornillador y el tornillo correspondiente.
Fijar corredera de cajón izquierdo (P3), corredera de cajón derecho (P4) y soporte de cajón (M) a
cajón.
17. Place drawer.
Colocar el cajón.
16
Page 16
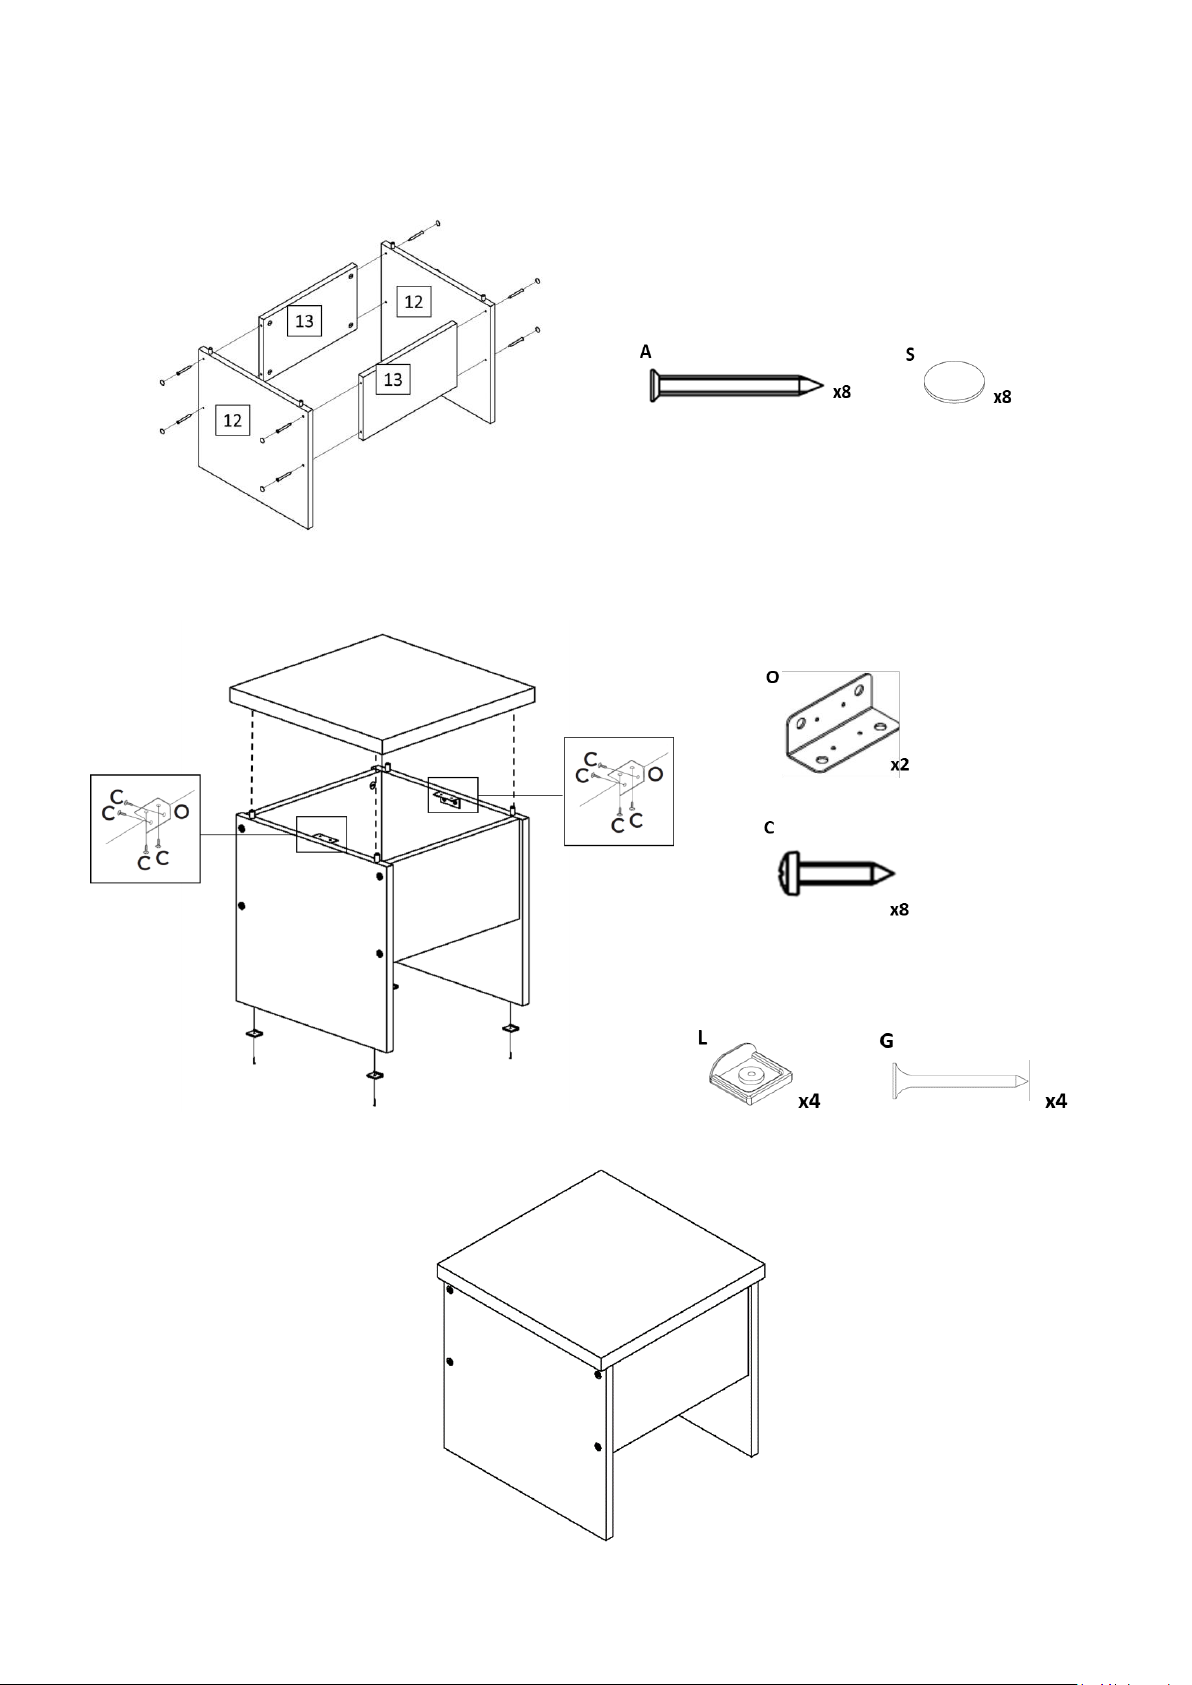
18. Assemble seat
Ensamblar el asiento.
17
Page 17
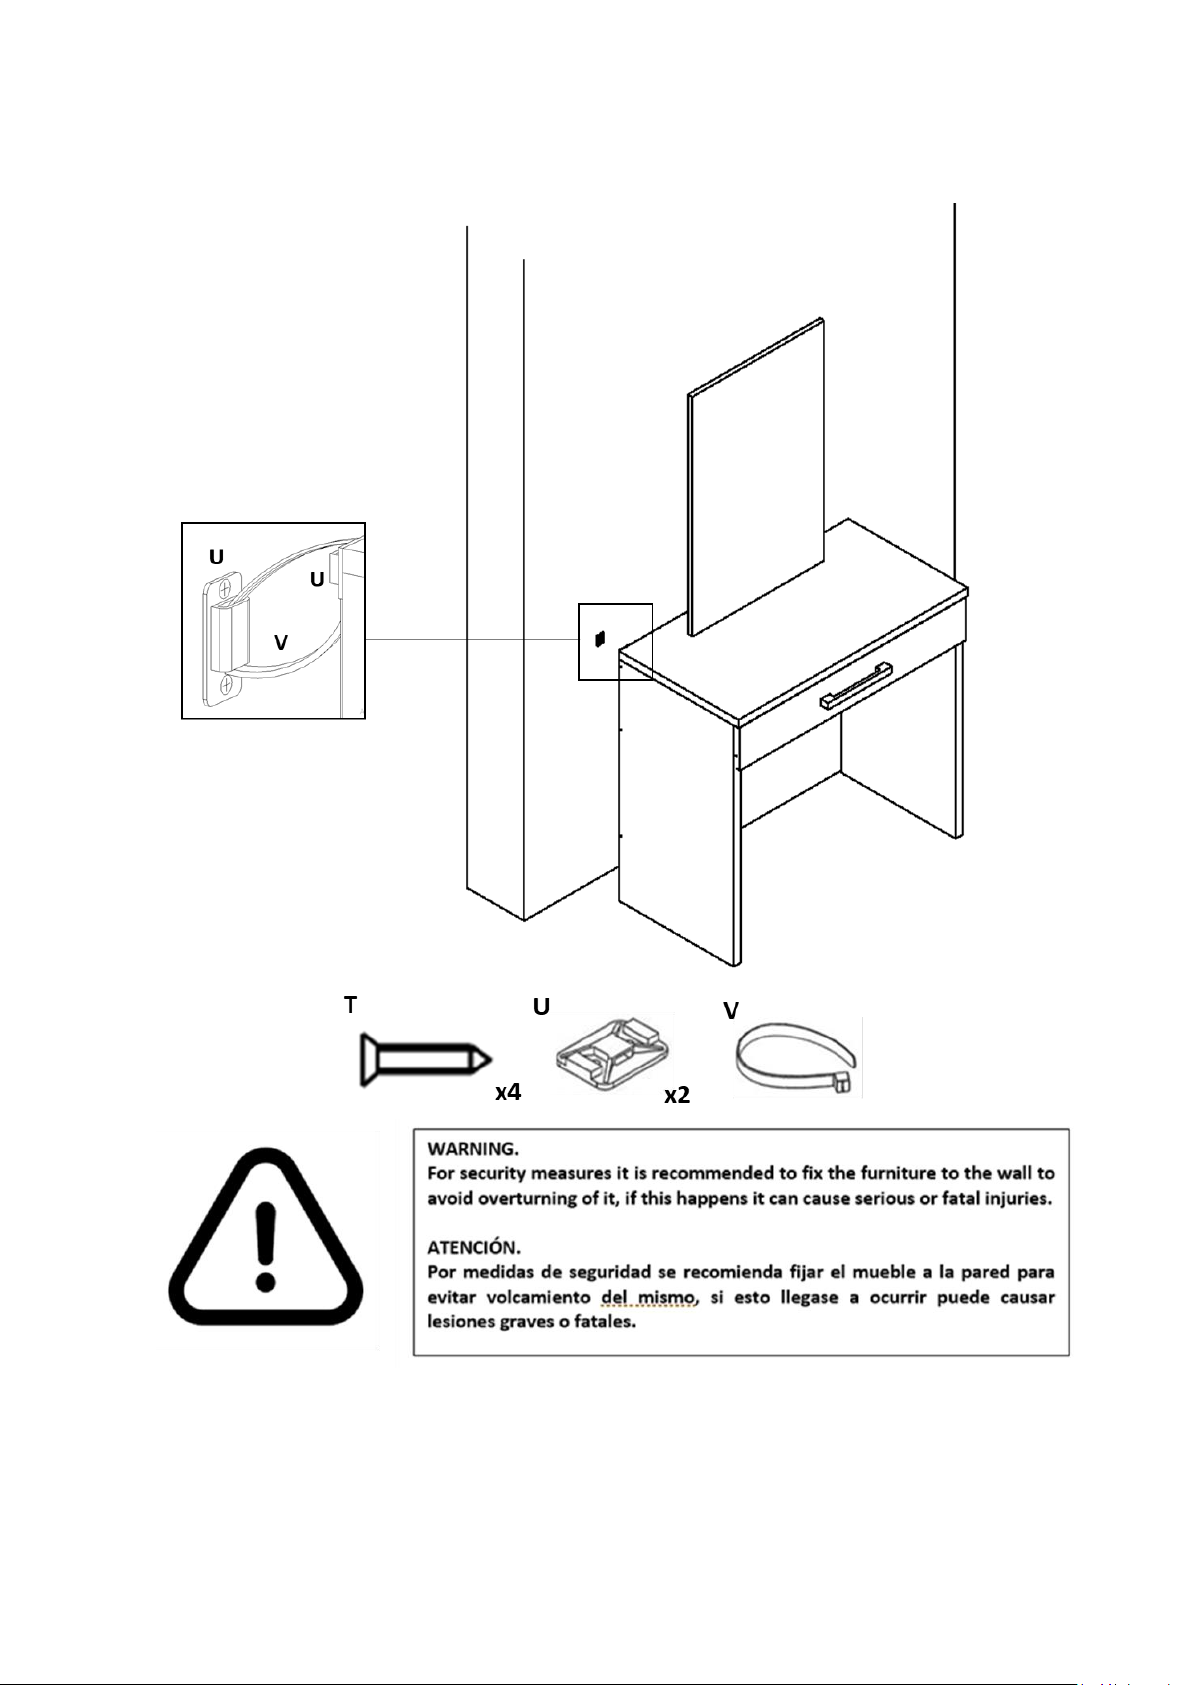
19. Fix furniture to the wall.
Fije el mueble a la pared.
Congratulations, you have assembled your Dressing Table with Mirror!!!
¡¡¡Felicitaciones, has armado tu Tocador con Espejo!!!
18
Page 18
19
Page 19

Dressing Table with Mirror Warranty
6-Months Limited Warranty
1. We LLC provides limited warranty coverage to the original purchaser of this product for a period of six
months from the date of purchase against defects in materials or workmanship of furniture
components. As used in this Warranty, “defect” means imperfections in components which
substantially impair the utility of the product. This Warranty gives you specific legal rights, and you may
also have other rights which vary from state to state.
2. There is no warranty coverage for defects or conditions that result from the failure to follow product
assembly instructions, information or warnings, misuse or abuse, intentional damage, fire, flood,
alteration or modification of the product, or use of the product in a manner inconsistent with its
intended use, nor any condition resulting from incorrect or inadequate maintenance, cleaning, or care.
There is also no warranty coverage for rented products or any products purchased “used” or “as is”, at
a distress or going-out-of business sale, or from a liquidator.
3. As the exclusive remedy under this Warranty, will (at its sole option) repair, replace or refund the value
of any defective furniture component. may require independent confirmation of the claimed defect
and proof of purchase. Replacement parts will be warranted for only the remaining period of the
original Warranty. SHALL HAVE NO LIABILITY for ANY INCIDENTAL OR CONSEQUENTIAL
DAMAGES OF ANY KIND and all such damages are EXCLUDED FROM THIS WARRANTY, such as loss of
use, disassembly, transportation, labor or damage to property on or near the product. Some states
do not allow the exclusion or limitation of incidental or consequential damages, so the above
limitation or exclusion may not apply to you.
4. This Warranty applies only to warranted defects that first arise and are reported to within the warranty
coverage period. The Warranty cannot be transferred to subsequent owners or users of the product,
and it shall be immediately void in the event the product is resold, transferred, leased or rented to
any third party or person other than the original purchaser.
5. THERE ARE NO OTHER WARRANTIES APPLICABLE TO THIS PRODUCT. Under the laws of certain states,
there may be no implied warranties from and all implied warranties, INCLUDING ANY IMPLIED
WARRANTY OF MERCHANTABILITY OR FITNESS FOR A PARTICULAR PURPOSE are disclaimed where
allowed by law. TO THE EXTENT ANY IMPLIED WARRANTIES ARE APPLICABLE, ANY IMPLIED
WARRANTIES, INCLUDING ANY IMPLIED WARRANTY OF MERCHANTABILITY OR FITNESS FOR A
PARTICULAR PURPOSE, ARE LIMITED IN DURATION TO THE DURATION OF THIS EXPRESS WARRANTY or
the minimum period allowed by law, whichever is shorter. Some states do not allow limitations on how
long an implied Warranty lasts, so the above limitation may not apply to you.
20
Page 20

Garantía de Tocador con Espejo
Garantía limitada de 6 meses
1. We LLC proporciona cobertura de garantía limitada al comprador original de este producto por un
período de 6 meses a partir de la fecha de compra contra defectos en materiales o mano de obra de
componentes de muebles de Como se especifica en esta Garantía, "defecto" significa
imperfecciones en componentes que perjudican sustancialmente la utilidad del producto. Esta
Garantía le otorga derechos legales específicos y también puede tener otros derechos que varían de un
estado a otro.
2. No hay cobertura de garantía por defectos o condiciones que resulten del incumplimiento de las
instrucciones del producto, o advertencias, uso indebido o abuso, daño intencional, incendio,
inundación, alteración o modificación del producto o uso del producto de manera inconsistente con su
uso previsto, o cualquier condición resultante de mantenimiento incorrecto o inadecuado, limpieza o
cuidado. Tampoco hay cobertura de garantía para productos alquilados o cualquier producto
comprado "usado" o "tal cual", en una venta de emergencia o de salida de la empresa, o de un
liquidador.
3. puede requerir una confirmación independiente del defecto reclamado y un comprobante de compra.
Las piezas de repuesto estarán garantizadas durante el período restante de la garantía original.
NO TENDRÁ NINGUNA RESPONSABILIDAD POR CUALQUIER DAÑO INCIDENTAL y todos estos daños
ESTÁN EXCLUIDOS DE ESTA GARANTÍA, tales como pérdida de uso, desmontaje, transporte, mano
de obra o daños a la propiedad en o cerca del producto. Algunos estados no permiten la
exclusión o limitación de daños incidentales o consecuentes, por lo que la limitación o exclusión
anterior puede no aplicarse a usted.
4.
Esta Garantía se aplica únicamente a los defectos garantizados que surgen y se informan a
dentro del período de cobertura de la garantía. La garantía no puede ser transferida a los
propietarios o usuarios posteriores del producto, y será inmediatamente nula en caso de que
el producto sea revendido, transferido, arrendado o alquilado a cualquier tercero o
persona que no sea el comprador original.
5. NO HAY OTRAS GARANTÍAS APLICABLES A ESTE PRODUCTO. Bajo las leyes de ciertos estados, no puede
haber garantías implícitas de y todas las garantías implícitas, INCLUYENDO CUALQUIER
GARANTÍA
exoneradas cuando permitido por la ley. TODAS LAS GARANTÍAS IMPLÍCITAS SON APLICABLES, LAS
GARANTÍAS IMPLÍCITAS, INCLUIDAS CUALQUIER GARANTÍA IMPLÍCITA DE
ADECUACIÓN PARA UN PROPÓSITO PARTICULAR,
ESTA GARANTÍA EXPRESA o el período mínimo permitido por la ley, cualquiera que sea más corto.
Algunos estados no permiten limitaciones sobre la duración de una garantía implícita, por lo que es
posible que la limitación anterior no se aplique a usted.
IMPLÍCITA DE COMERCIABILIDAD O ADECUACIÓN PARA UN PROPÓSITO
ESTÁN LIMITADAS EN DURACIÓN A LA DURACIÓN DE
EN PARTICULAR, están
COMERCIABILIDAD O
21
 Loading...