

Page 1
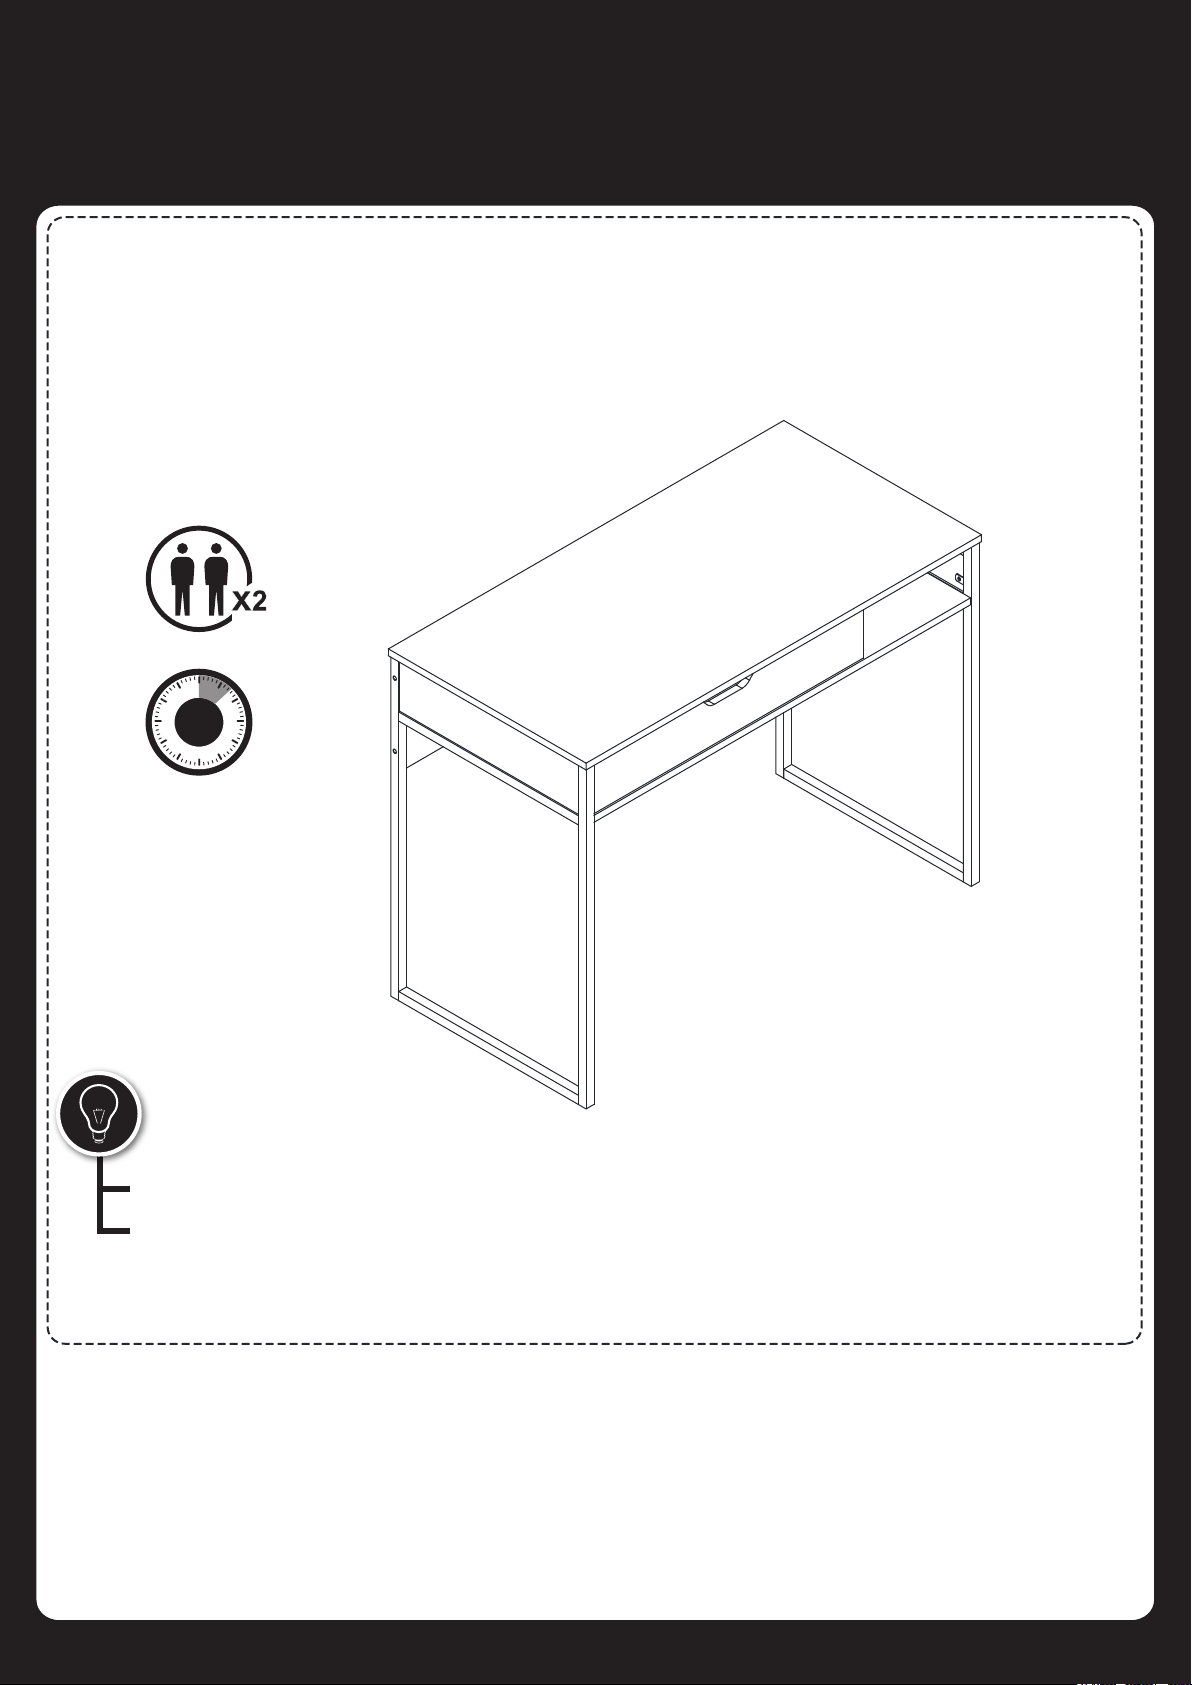
Assembly Instructions
Instrucciones de Ensamblaje
90mns
SAVE THESE INSTRUCTIONS
GUARDE ESTAS INSTRUCCIONES
1-Drawer Desk
Escritorio de 1 cajón
C1930026/C2030010
Page 2
Helpful advice
Consejos útiles
1. Follow the assembly instructions carefully.
2. Check to ensure all parts, fasteners and hardware
are present.
3. To prevent product damage, assemble the furniture
on top of the carton.
4. Clean surface of furniture with a duster or damp
cloth only. Do not use abrasive cleaners.
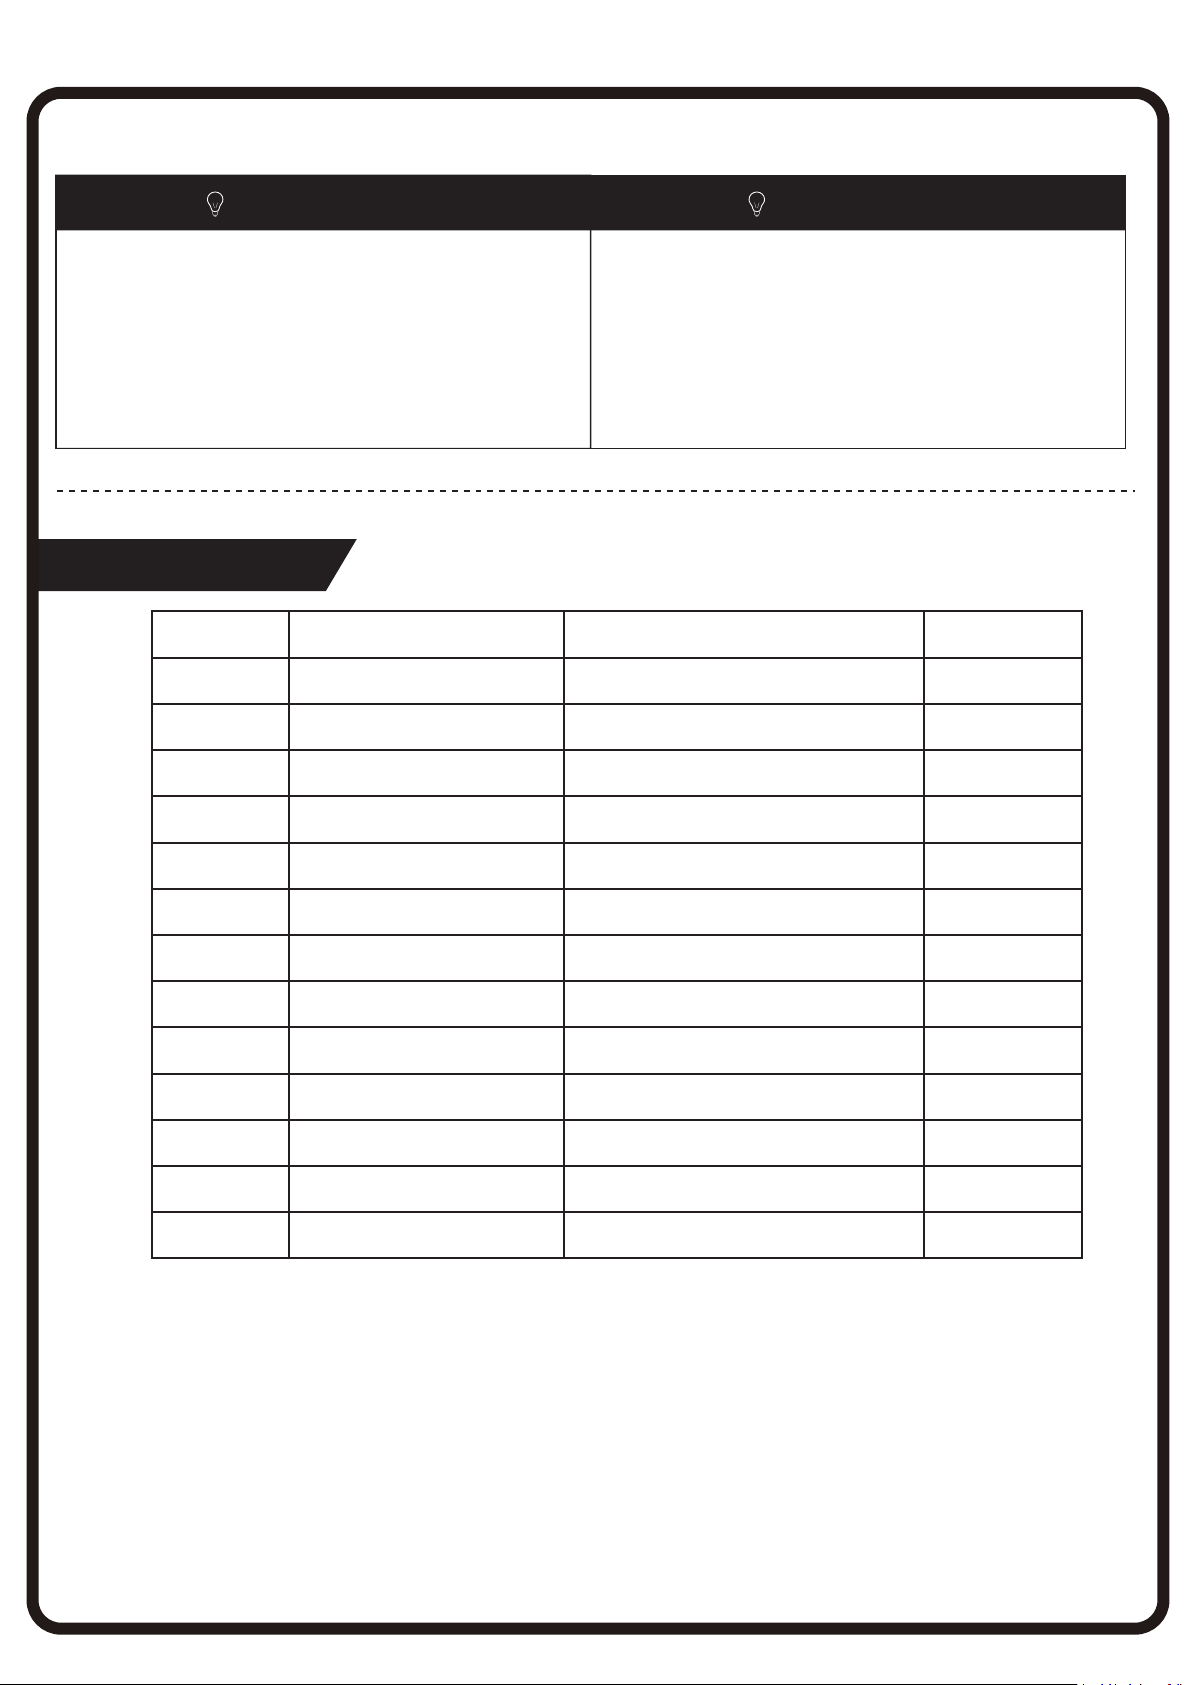
Parts list/Lista de piezas
ITEM
1
2
3
4
DESCRIPTION
Top Panel superior
Gable left
Gable right
Divider
1. Siga a tentamente las instrucciones de montaje.
2. Asegúrese de que la caja contiene todas las piezas,
sujeciones y materiales.
3. Monte el mueble sobre la caja para evitar dañarlo.
4. Limpie la superficie del mueble utilizando solamente
un plumero o un paño húmedo, no use productos de
limpieza abrasivos
DESCRIPCIÓN
QUANTITY
1
Marco izquierdo
Marco derecho
Tablero vertical
1
1
1
5
6
7
8
Bottom
Rail
Back panel
Drawer side left
9 Drawer side right
Tablero izquierdo de cajón
Tablero inferior
Barrar
Tablero posterior
Tablero derecho de cajón
10 Drawer back Tablero posterior de cajón
11 Drawer bottom rail Barrar inferior de cajón
12 Drawer bottom Tablero inferior de cajón
13 Drawer front Tablero frontal de cajón
1
1
1
1
1
1
1
1
1
01
Page 3
Ha
dwar
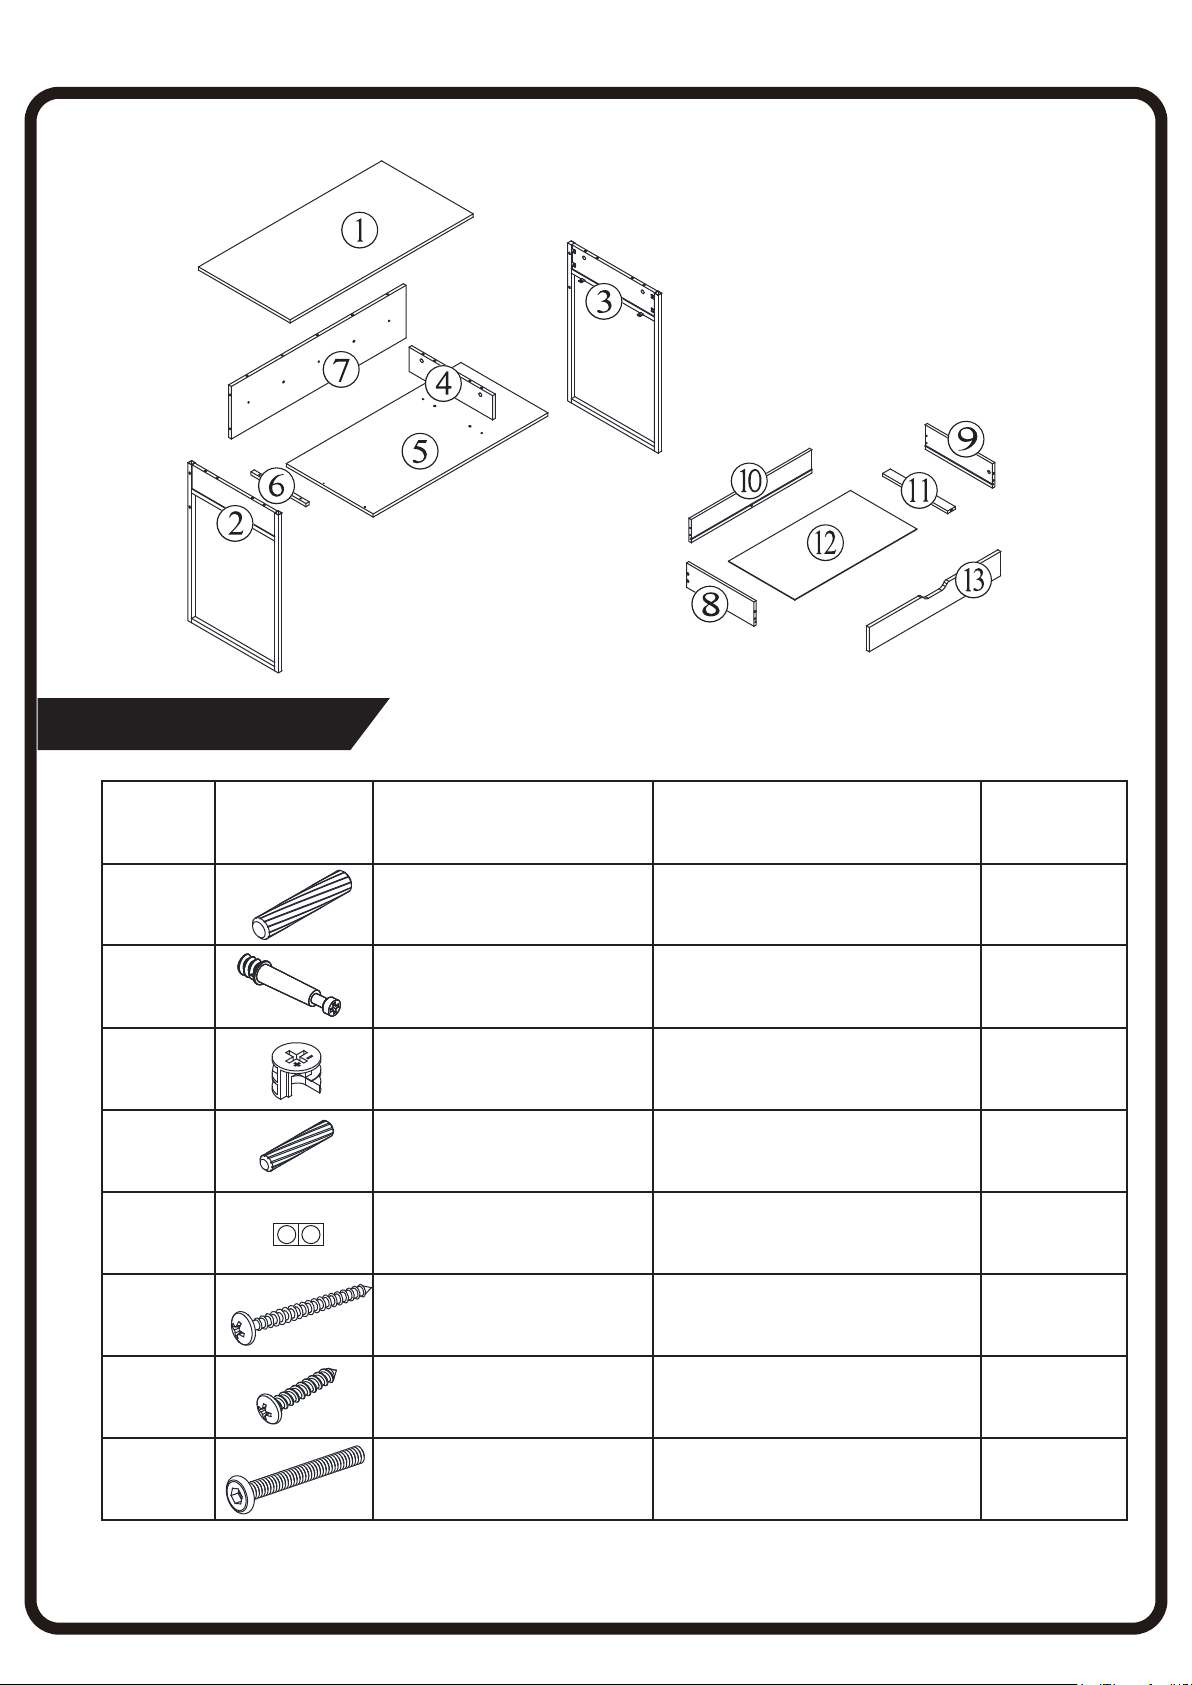
Hardware/Lista de materiales
r
Har
ITEM IMAGE DESCRIPTION DESCRIPCIÓN QUANTITY
A
B
C
D
E
F
G
Ø7.8×30 mm Wood dowel
Cam bolt (large)
Cam lock (large)
Ø5.8×30 mm wood dowel
Sticker
Φ4×40 mm Screw
Φ4×25 mm Screw Φ4×25 mm Tornillo
Ø7.8×30 mm Perno madera
Perno metálico (Grande)
Bloqueo metálico (Grande)
Ø5.8×30 mm Perno madera
Pegatina
Φ4×40 mm Tornillo
12
9
9
2
2
5
2
H
M6×50 mm Bolt M6×50 mm Tornillo hexagonal
4
02
Page 4
Har
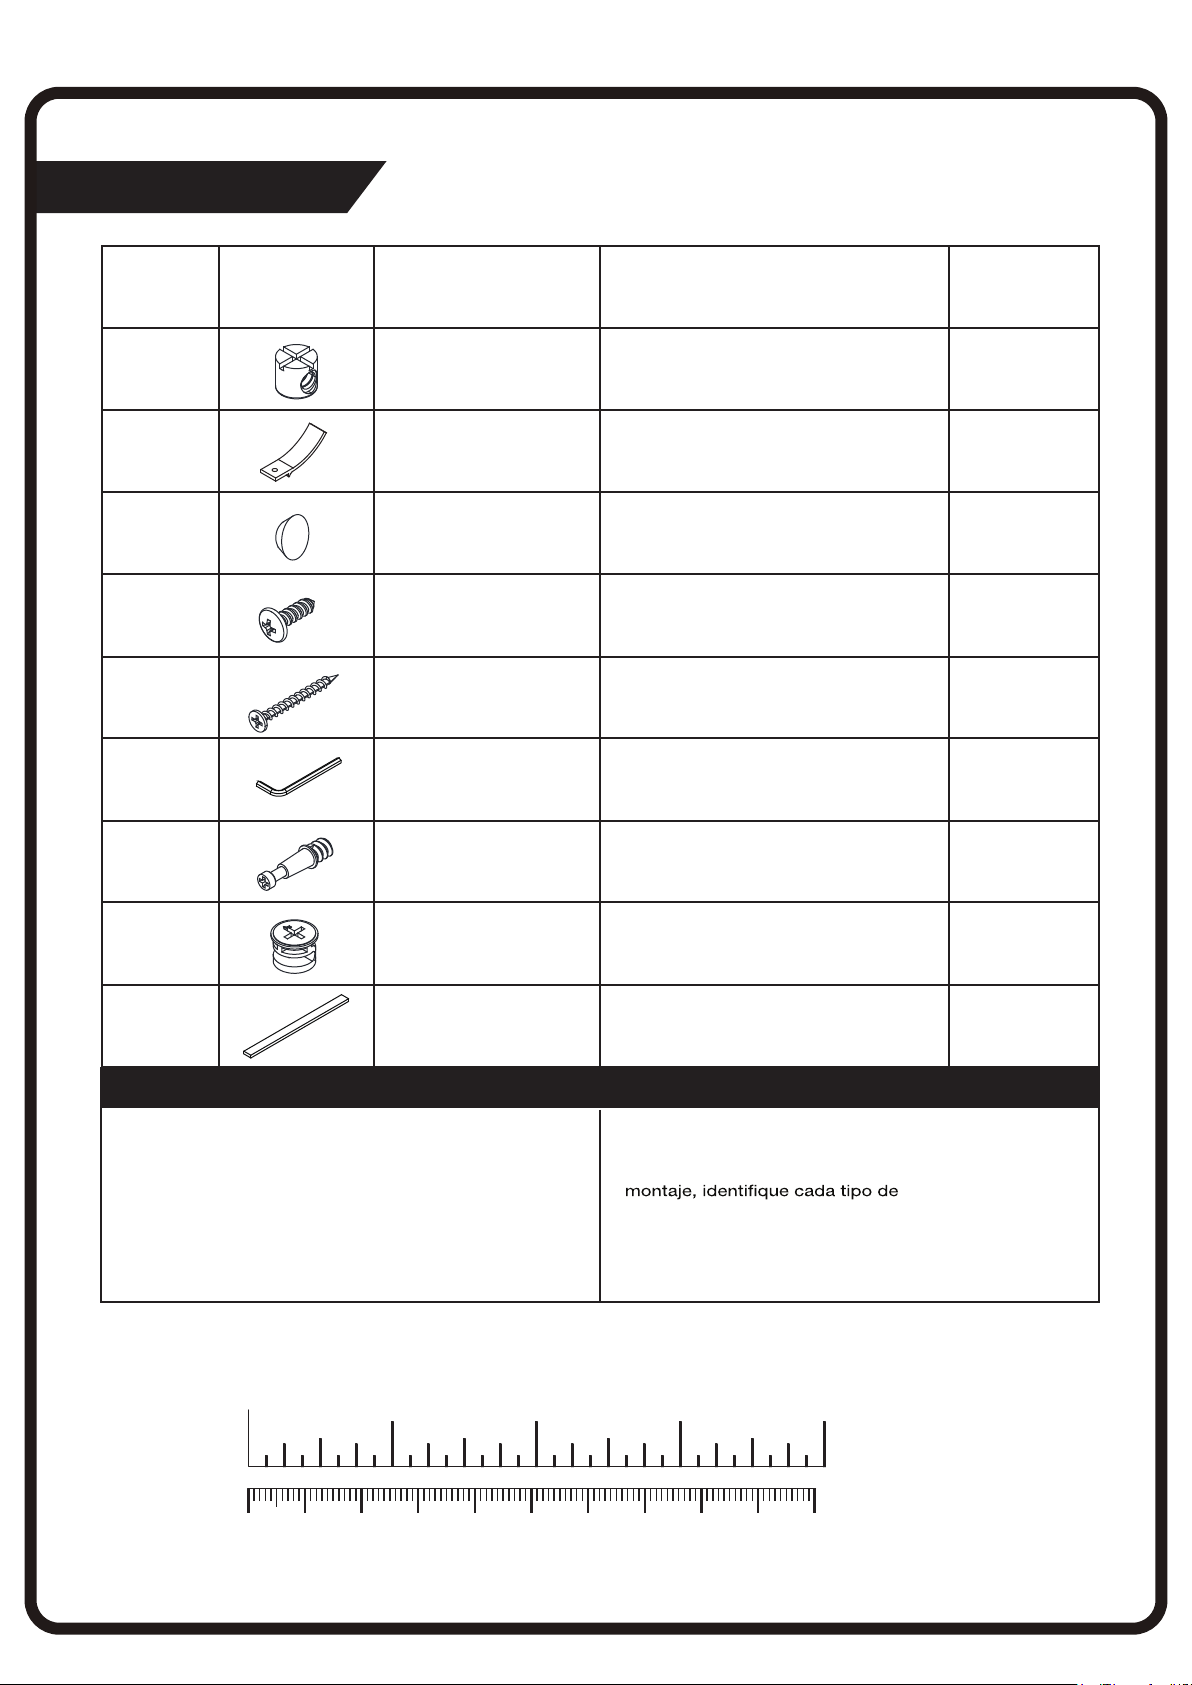
Hardware/Lista de materiales
ITEM IMAGE DESCRIPTION
I
J
K
L
M
N
Crosshead nut
Drawer stop
Crash pad
Φ4×14 mm Screw
Φ3.8×35 mm Screw
Hex wrench Llave Allen
DESCRIPCIÓN QUANTITY
Tuerca
Accesorio plástico
Amortiguador
Ø4×14mm Tornillo
Ø3.8×35mm Tornillo
4
2
2
6
5
1
O
P
Q
Note/Rema rque/Nota
Using the wrong screw will cause
damage.
Before you begin assembly check
to ensure all parts are present.
Screws are actual size.
ACUTAL SIZE / ESCALA REAL
inches
Cam bolt(small) Perno metálico (pequeño)
Cam lock(small) Bloqueo metálico (pequeño)
Felt Fieltro
El uso del tornillo incorrecto puede
provocar daños al producto.
Antes de iniciar la operación de
tornillo.
Estudie detenidamente las siguientes
ilustraciones de los tornillos
(ESCALA REAL)
1 2 3 4
3
3
2
03
10 20 30 40 50 60 70 80 90 100mm
Page 5
WARNING
This product can expose you to chemicals including
Formaldehyde, which is known to the State of California to
cause cancer or birth defects or other reproductive harm. For
more information go to www.P65Warnings.ca.gov/furniture
ADVERTENCIA
Este producto puede exponerlo a sustancias quím icas,
incluyendo el formaldehído, el cual es conocido en el estado
de California como causante de cáncer, defectos de nacimiento
u otros daños reproductivos. Para obtener más información
vaya a www.P65Warnings.ca.gov/furniture
04
Page 6
Har
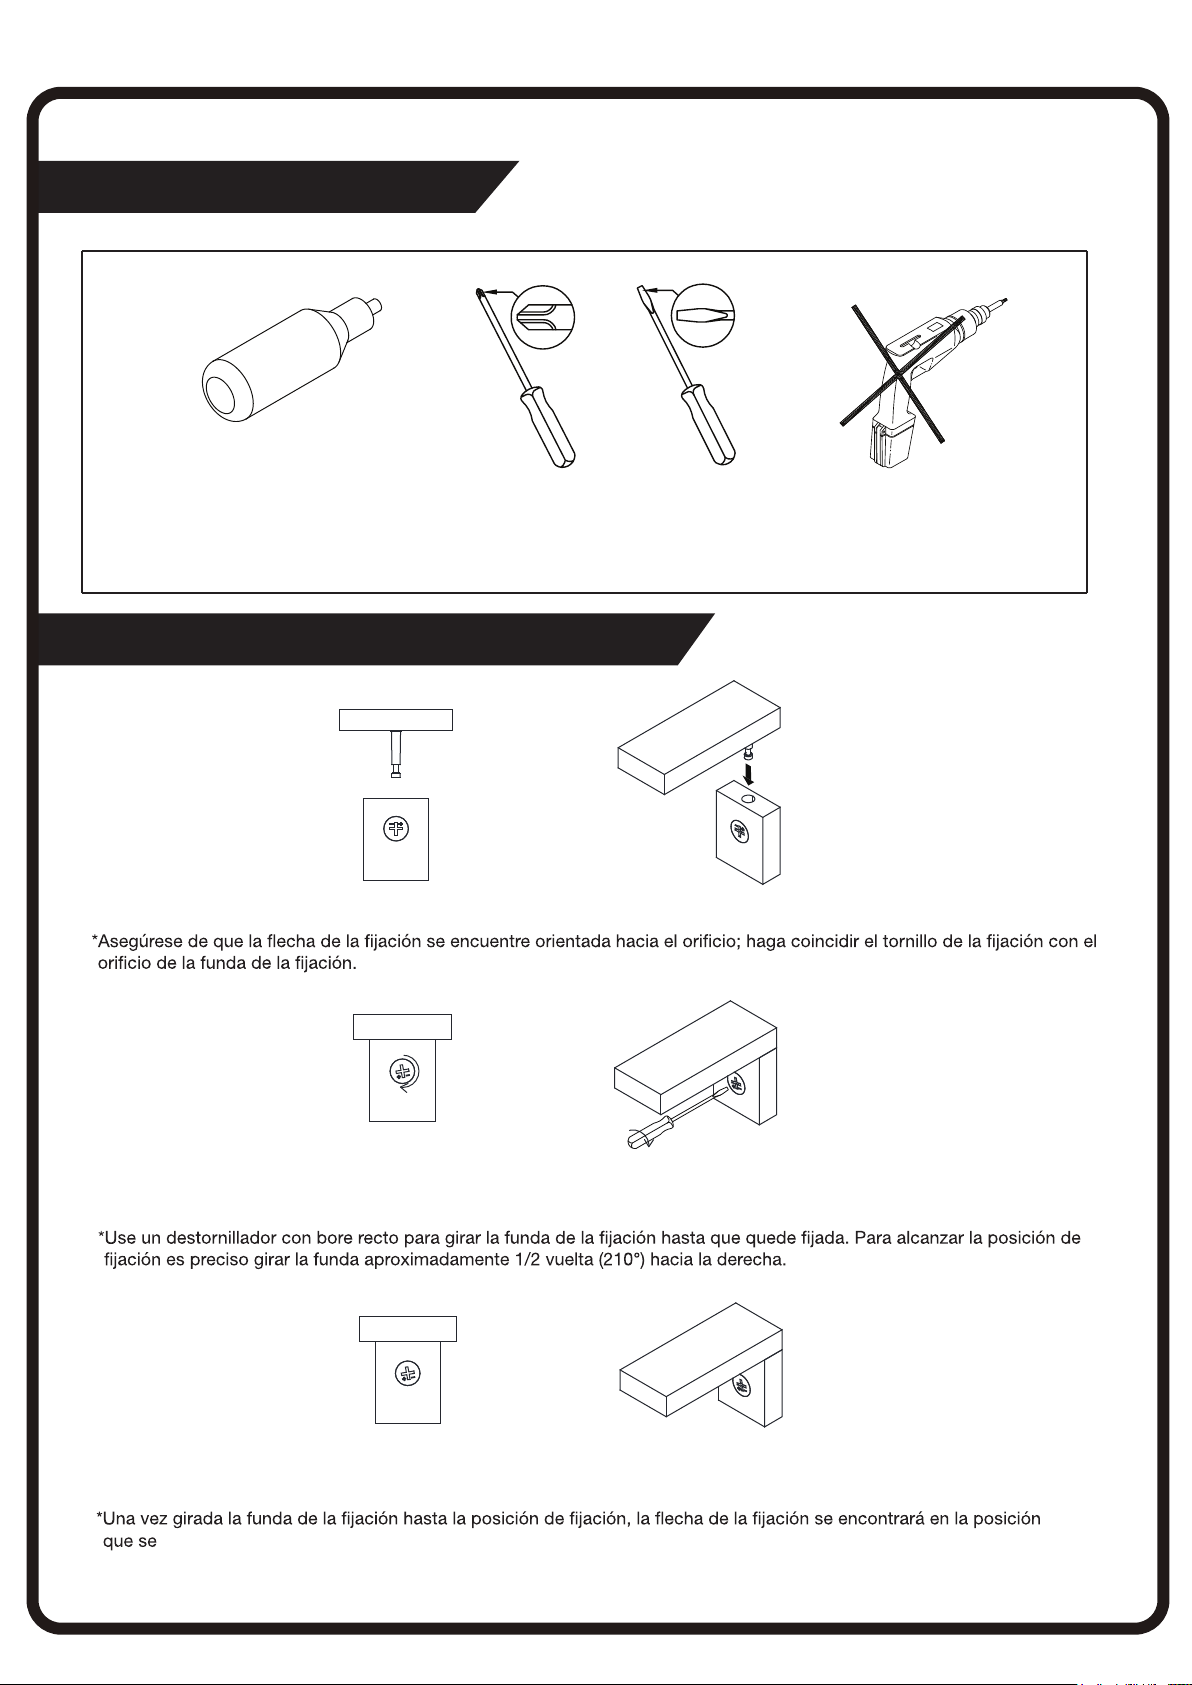
Necessary tools/Herramientas necesarias
Glue not included ( We recommend to apply some glue into holes before inserting wood dowels .)
Cola, no incluida (Le recomendamos colocarunas gotas de cola en los oricios antes de insertar las clavijas de madera.)
How to use cam lock system/Cómo usar el sistema de jación
Unlocked
Déverrouillé
*Ensure that the cam lock arrow is pointed to the hole, align the cam lock screw to the hole of the cam lock case.
Locked
Desbloqueado
*Use a straight edge scr
clock-wise.
ewdriver to turn cam lock case until it is locked.Locked position is approximately 1/2 turn(210°)
#1
Nº1
#2
Nº2
#3
Nº3
*After turnning the cam lock case to the locked position,the cam lock arrow will be located in the position shown above.
muestra en la ilustración anterior.
05
Page 7
Attention: In order to help your assembly, do not lock the screw tightly until
you have assembled all the other parts.
Atención: Con el fin de facilitar su montaje, no apretar el tornillo firmemente
hasta que haya ensamblad o todas las otras partes.
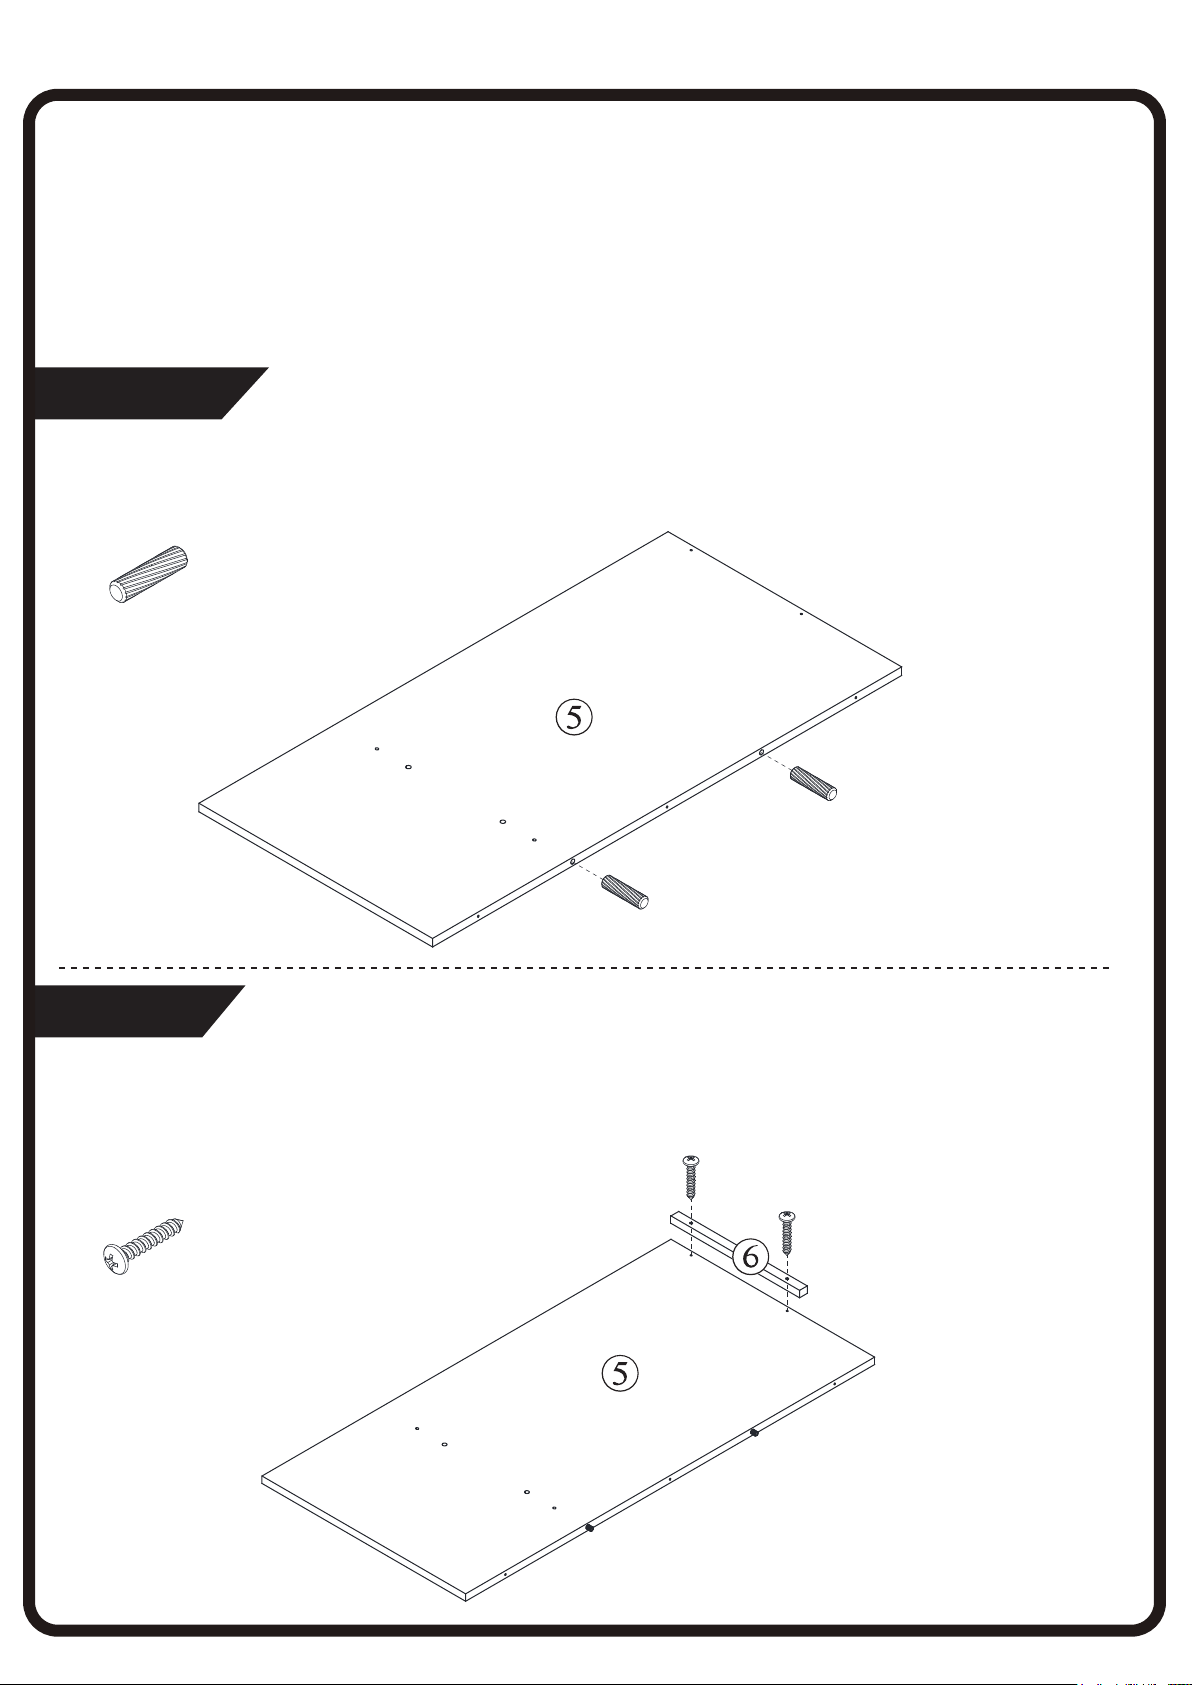
Step 1/Paso 1
Insert 2 wood dowels (A) into the large end holes on the edge of bottom (5).
Inserte 2 Pernos maderas (A) en el Tablero inferior (5).
A x 2
Step 2/Paso 2
Insert rail (6) into bottom (5) with 2 screws (G).
Fije la Barra inferior (6) en el Tablero inferior (5) con 2 Tornillos (G).
G x 2
A
G
06
Page 8
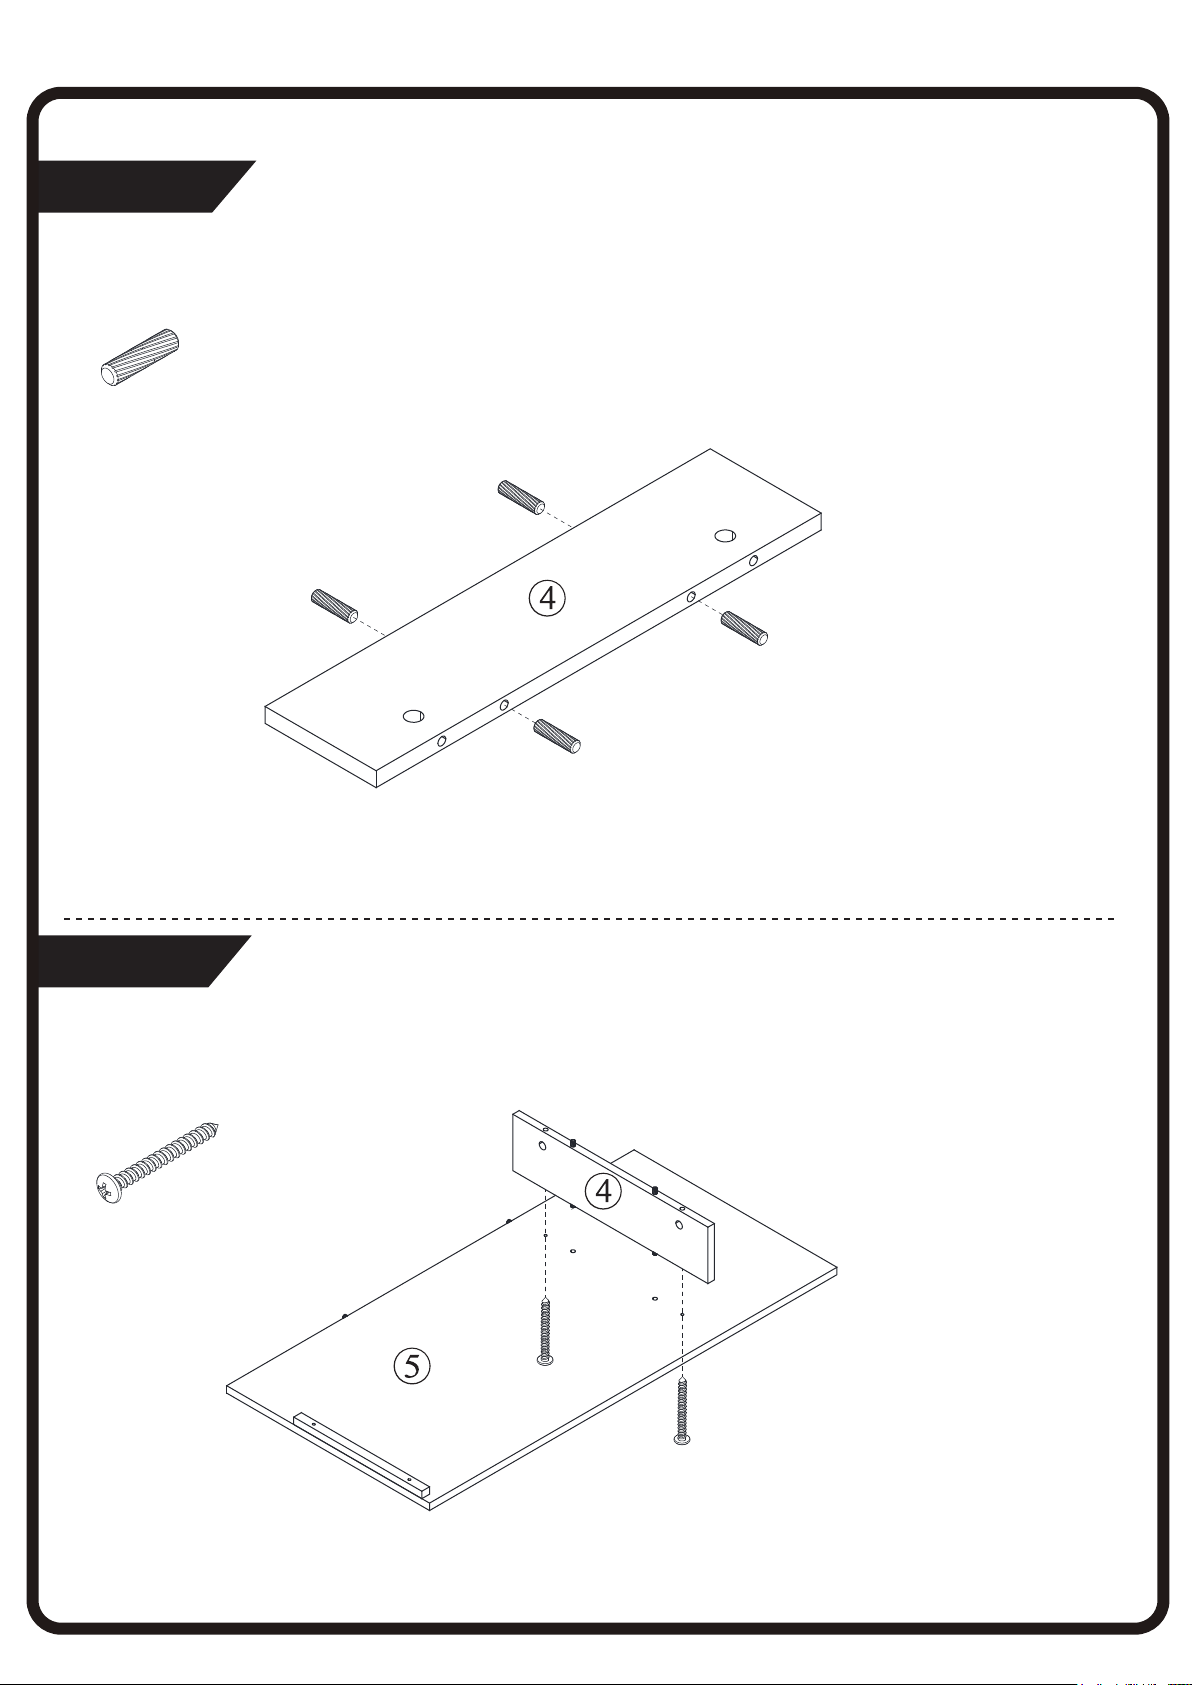
Step 3/Paso 3
Insert 4 wood dowels (A) into the holes on the edge of divider (4).
Inserte 2 Pernos maderas (A) en el Tablero vertical (4).
A x 4
A
Step 4/Paso 4
Insert divider (4) into bottom (5) with 2 screws (F).
Conecte el Tablero vertical (4) al Tablero inferior (5) con 2 Tornillos (F).
F x 2
07
F
Page 9
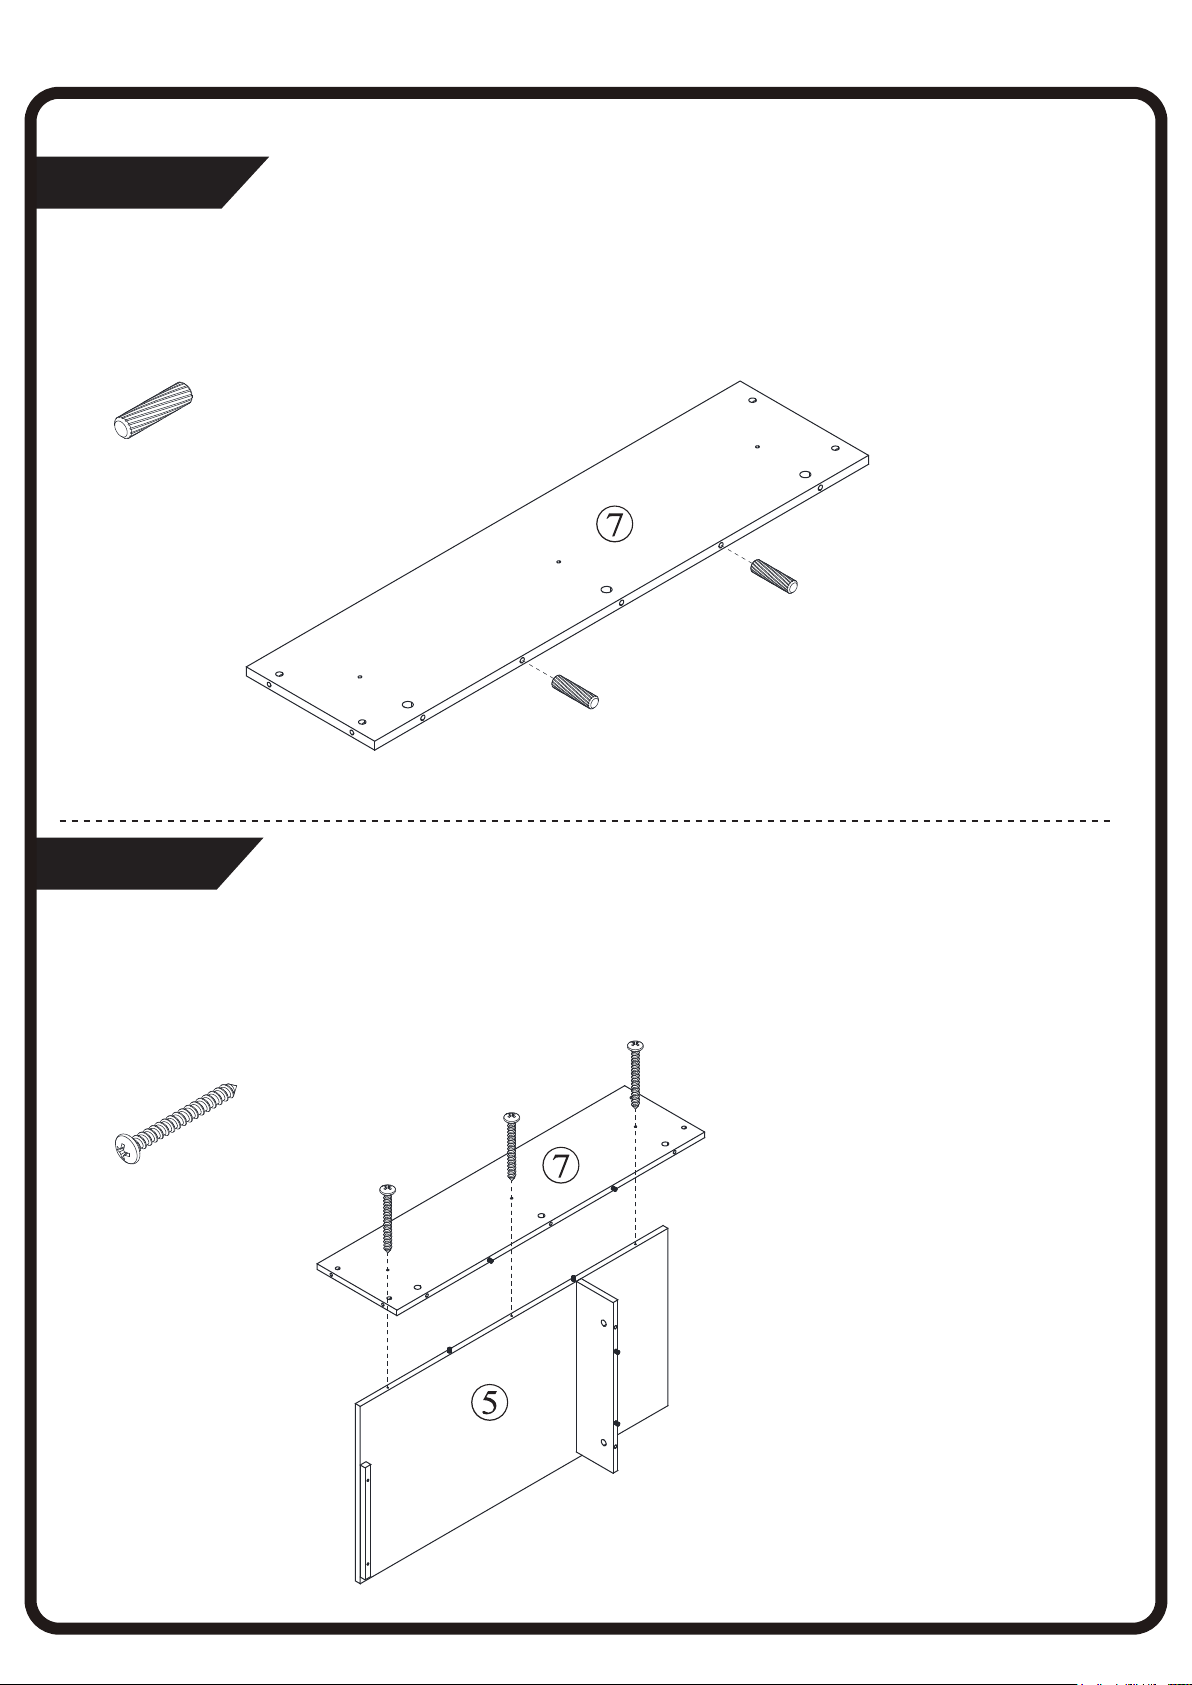
Step 5/Paso 5
Insert 2 wood dowels (A) into the holes on the edge of back panel (7).
Inserte 2 Pernos maderas (A) en el Tablero posterior (7).
A x 2
A
Step 6/Paso 6
Insert back panel (7) into bottom (5) with 3 screws (F).
Conecte el Tablero posterior (7) al Tablero inferior (5) con 3 Tornillos (F).
F
F x 3
08
Page 10
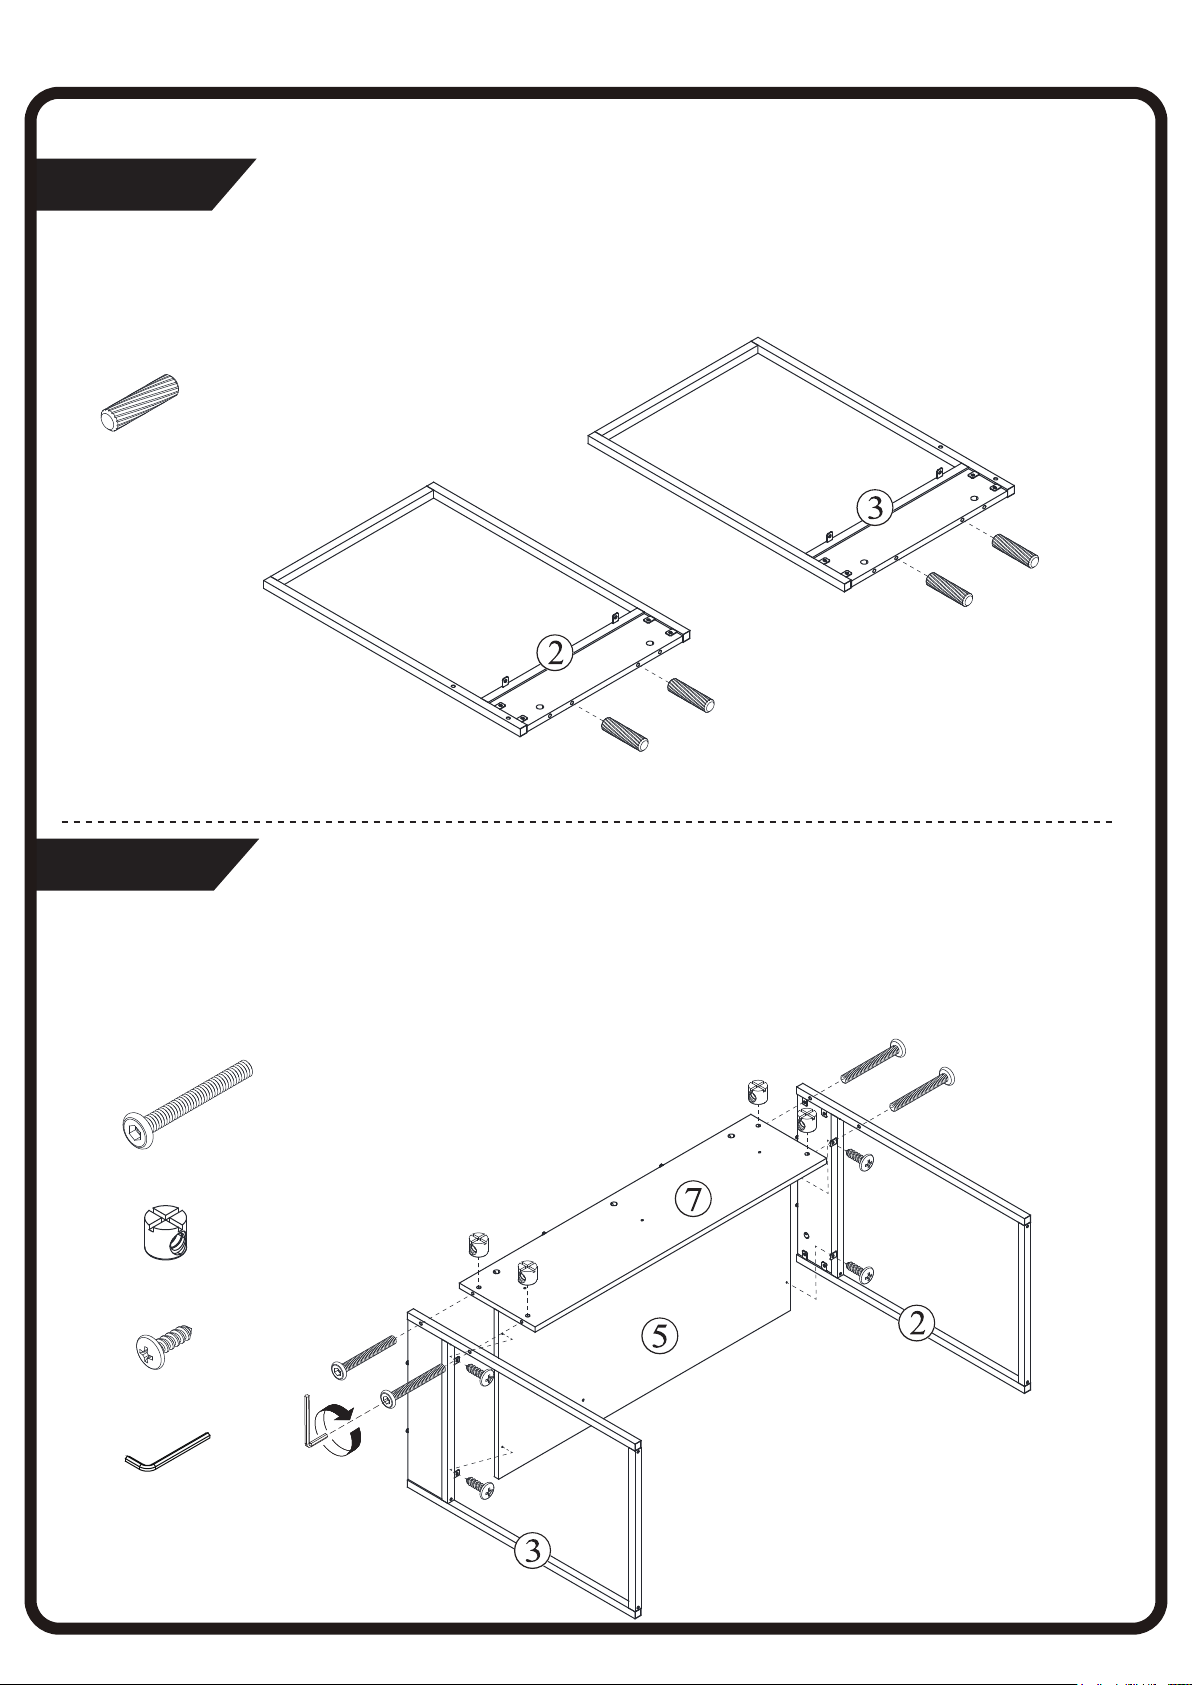
Step 7/Paso 7
Insert 4 wood dowels (A) into the holes on the gable left (2) and gable right (3).
Inserte 4 pernos maderas (A) en los Marcos (2)(3).
A x 4
A
A
Step 8/Paso 8
Combine back panel (7) with gable left (2) and gable right (3) with 4 bolts (H) and 4 nuts (I), tighten with hex wrench
(N). Combine bottom (5) with gable left (2) and gable right (3) with 4 screws (L).
Conecte el Tablero posterior (7) a los Marcos (2)(3).con 4 Tornillos hexagonales (H) y 4 Tuercas (I), cierralos bien
con la Llave Allen (N). Conecte el Tablero inferior (5) al los Marcos (2)(3) con 4 Tornillos (L).
H x 4
I
I x 4
H
09
L x 4
N
N
L
Page 11
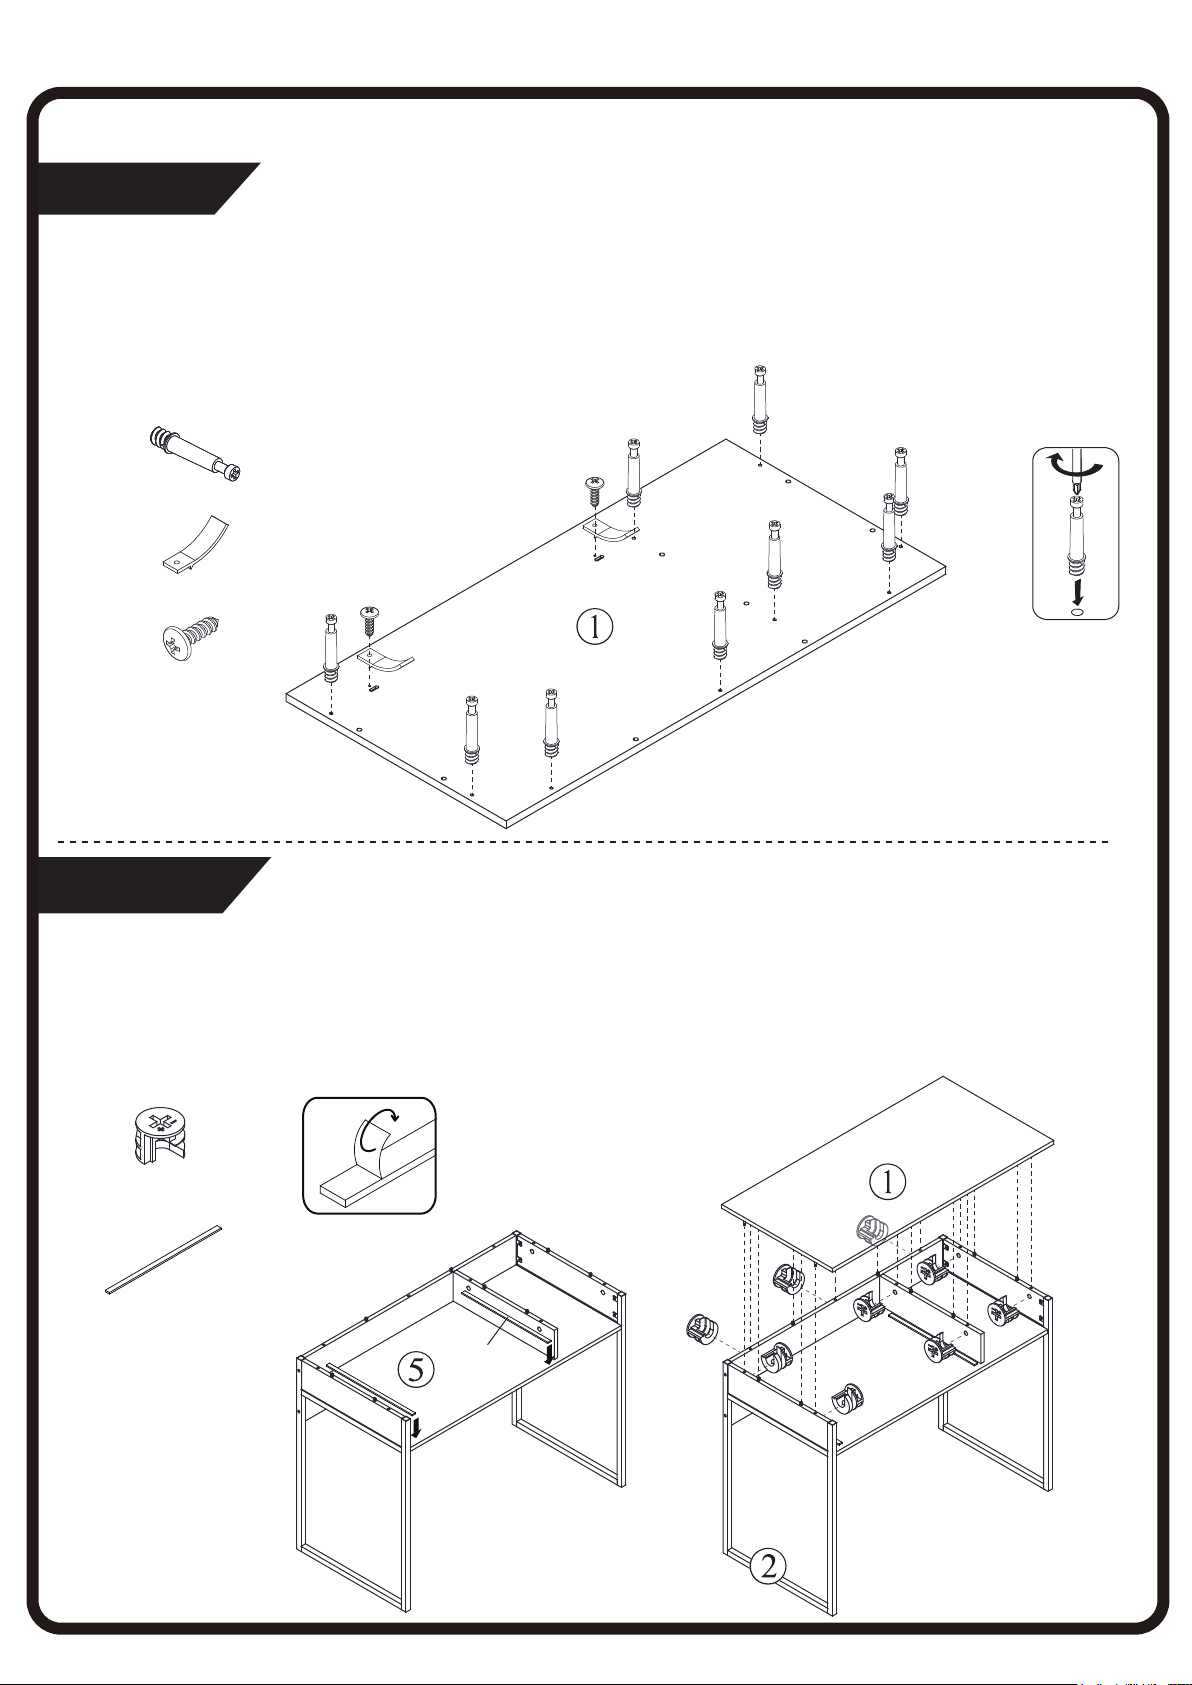
Step 9/Paso 9
Insert 9 cam bolts (B) into the top (1). Insert 2 drawer stops (J) into the top (1) with 2 screws (L).
Inserte 9 Pernos metálicos(B), je 2 Accesorios plásticos (J) en el Planel superior (1) con 2 Tornillos (L).
B x 9
B
J x 2
L x 2
Step 10/Paso 10
Stick 2 felts (Q) on the bottom (5). Insert top (1) into stand assembly with 9 cam locks (C).
Peque 2 Fieltros (Q) en el Tablero inferior (5). Conecte el Planel superior (1) al ensamblaje con 9 Bloqueos metálicos
(C).
L
J
B
C x 9
Q x 2
Q
C
10
Page 12
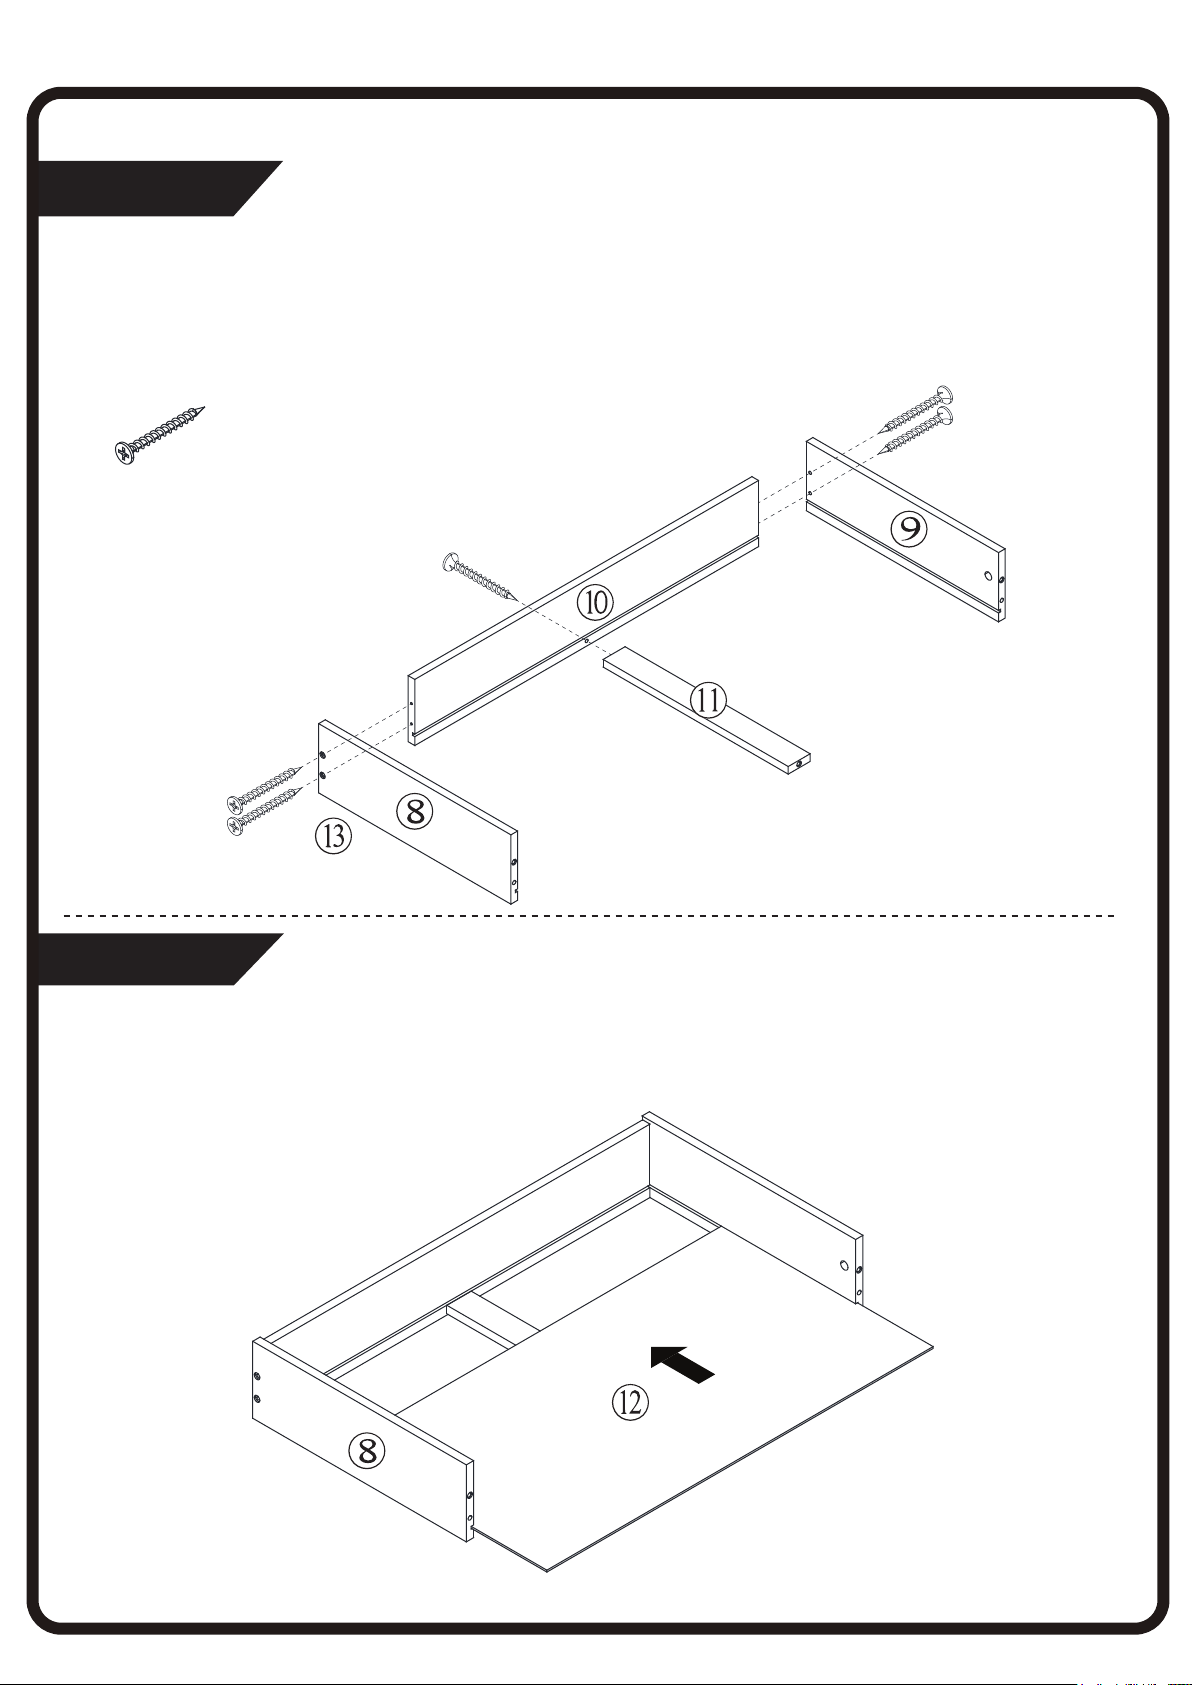
Step 11/Paso 11
Combine drawer side left (8), drawer side right (9) with drawer back (10) and drawer bottom rail (11) with 5 screws (M).
Conecte el Tablero izquierdo de cajón (8), el Tablero derecho de cajón (9), el Tablero posterior de cajón (10) y la
Barrar inferior de cajón (11) con 5 Tornillos (M).
M x 5
M
Step 12 /Paso 12
Insert drawer bottom (12) into the assembly part.
Inserte el Tablero inferior de cajón (12).
11
Page 13
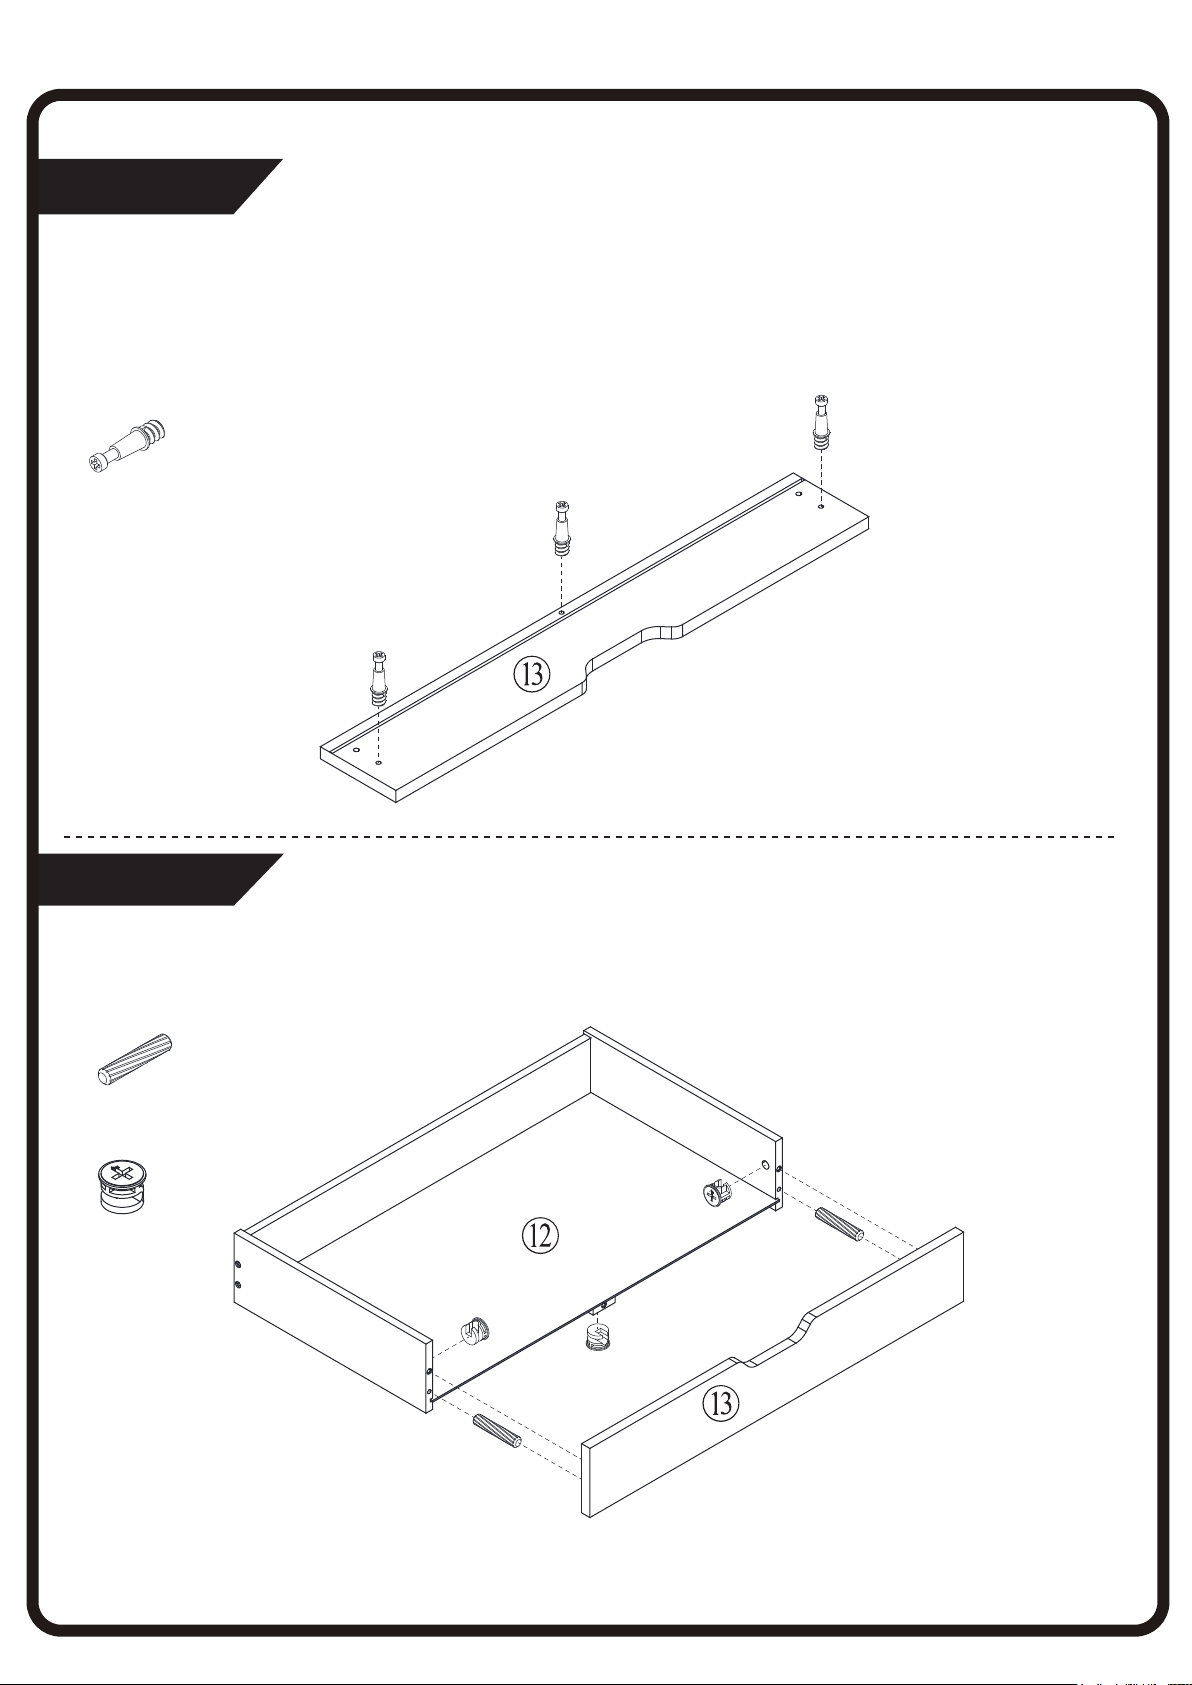
Step 13/Paso 13
Insert 3 cam bolts (O) into the drawer front (13).
Inserte 3 Pernos metálicos (O) en el Tablero frontal de cajón (13).
O
O x 3
Step 14 /Paso 14
Attach drawer front (13) to the inner drawer with 3 cam locks (P) and 2 wood dowels (D).
Conecte el Tablero frontal de cajón (13) al ensamblaje con 3 Bloqueos metálicos (P) y 2 Pernos maderas (D).
D x 2
P x 3
P
D
12
Page 14
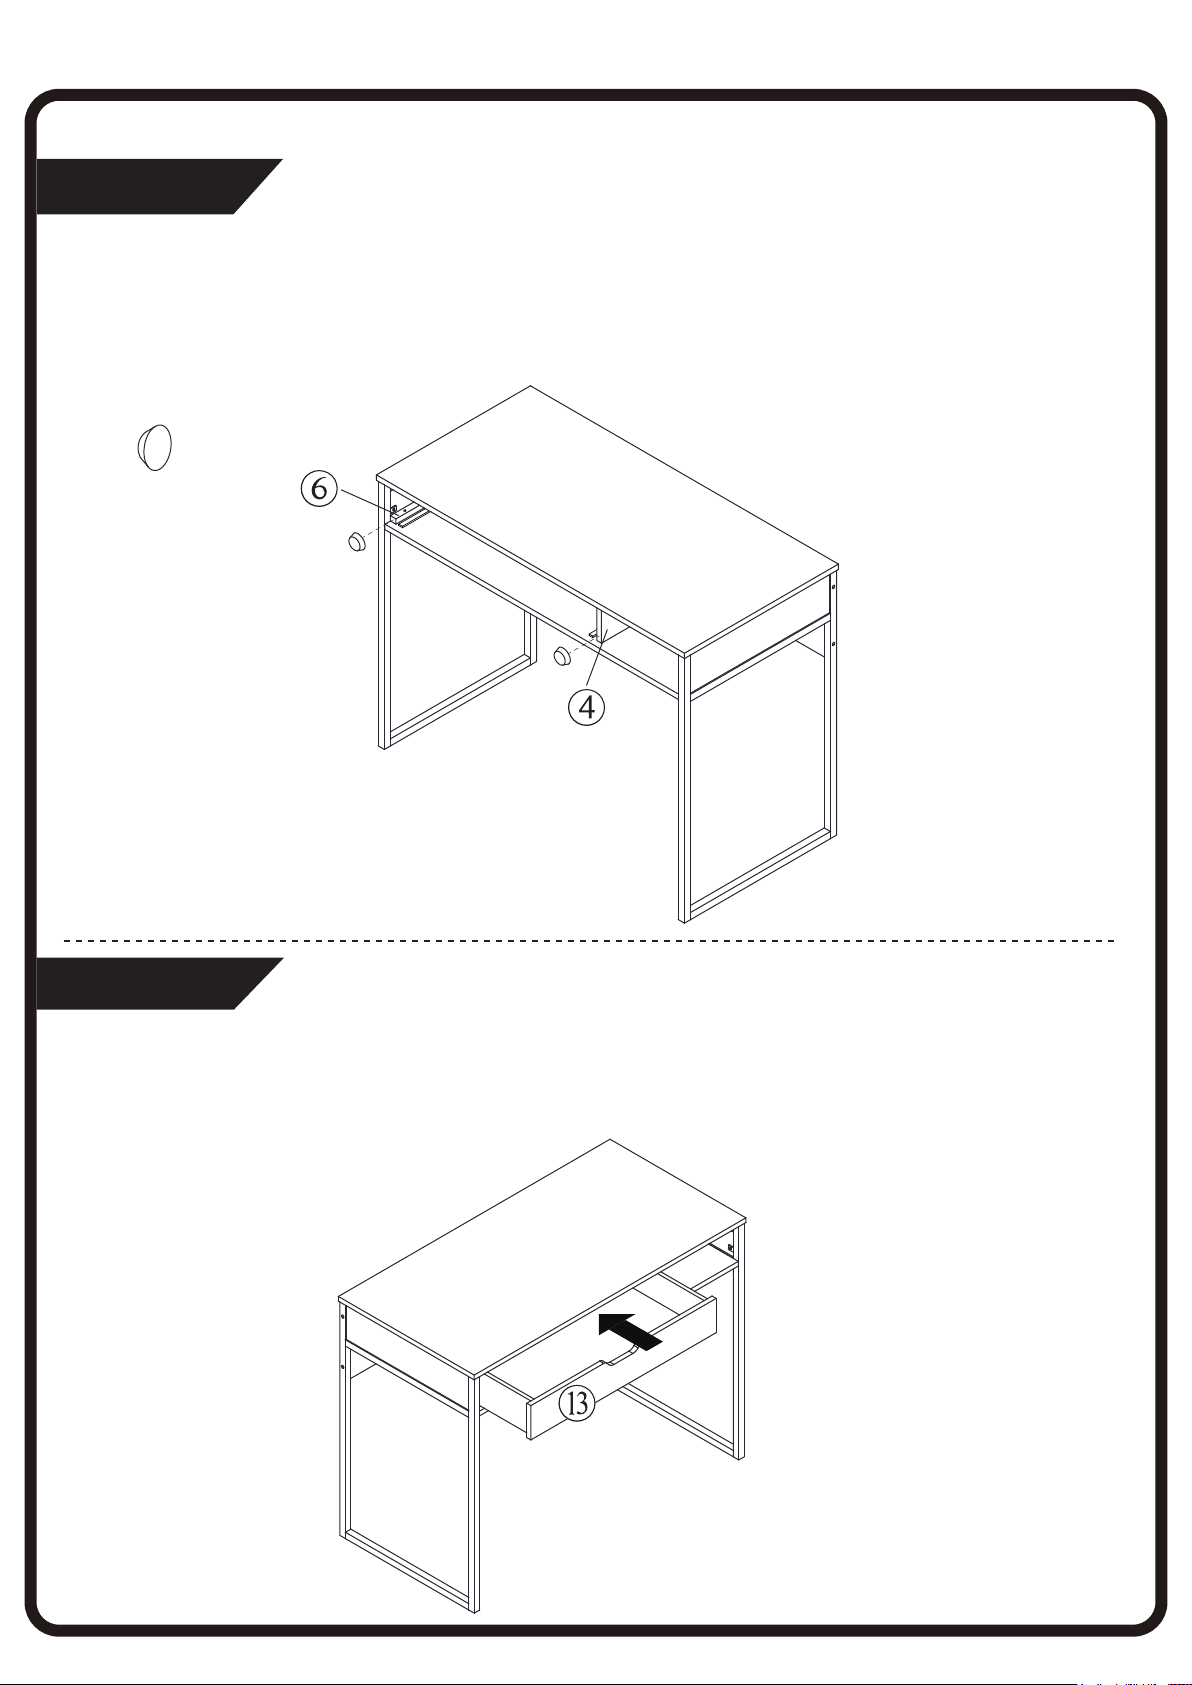
Step 15/Paso 15
Attach 2 crash pads (K) in the front of divider (4) and rail (6).
Fije 2 Amortiguador (K) en frente del Tablero vertical (4) y la Barrar (6).
K x 2
K
Step 16 /Paso 16
Put the drawer into the desk.
Inserte el cajón en la mesa.
13
Page 15
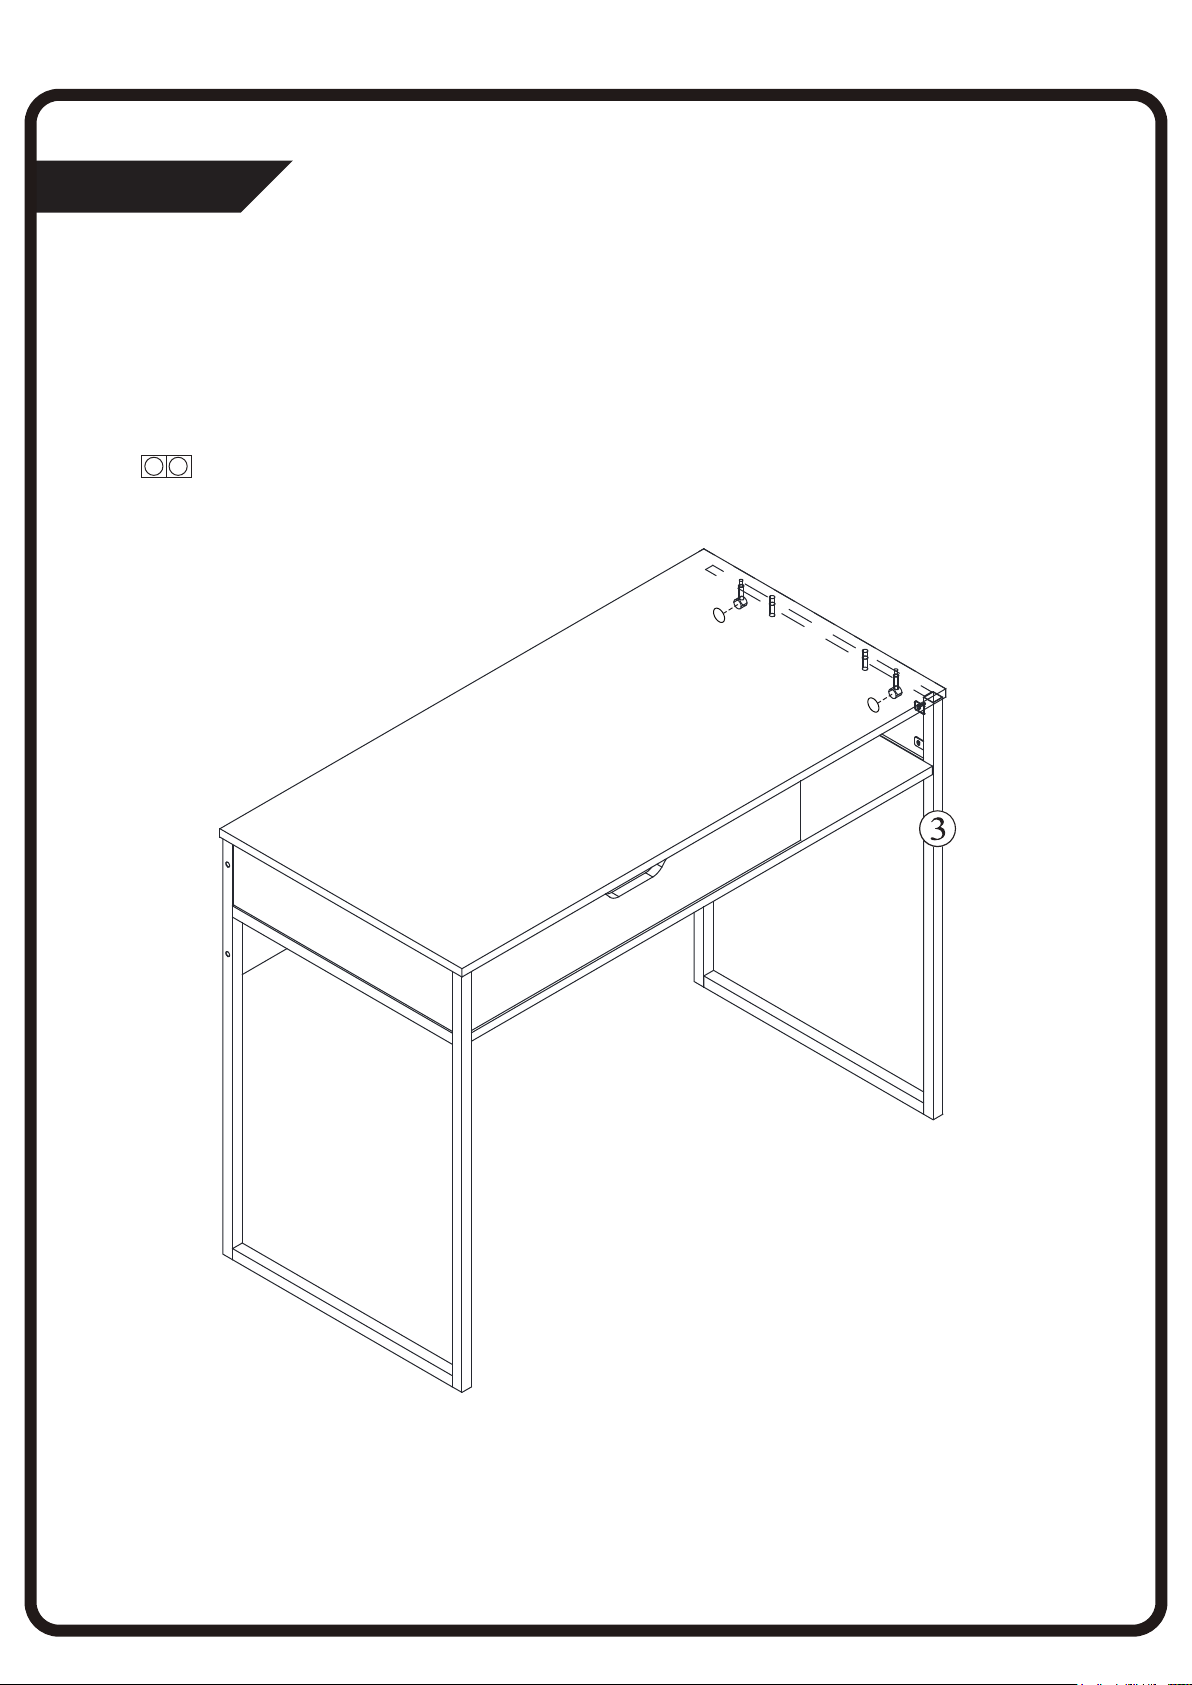
Step 17/Paso 17
Cover the cam lock holes on gable right (3) with 2 stickers (E).
Cubre los agujeros con 2 Pegatinas (E).
E x 2
E
14
Page 16
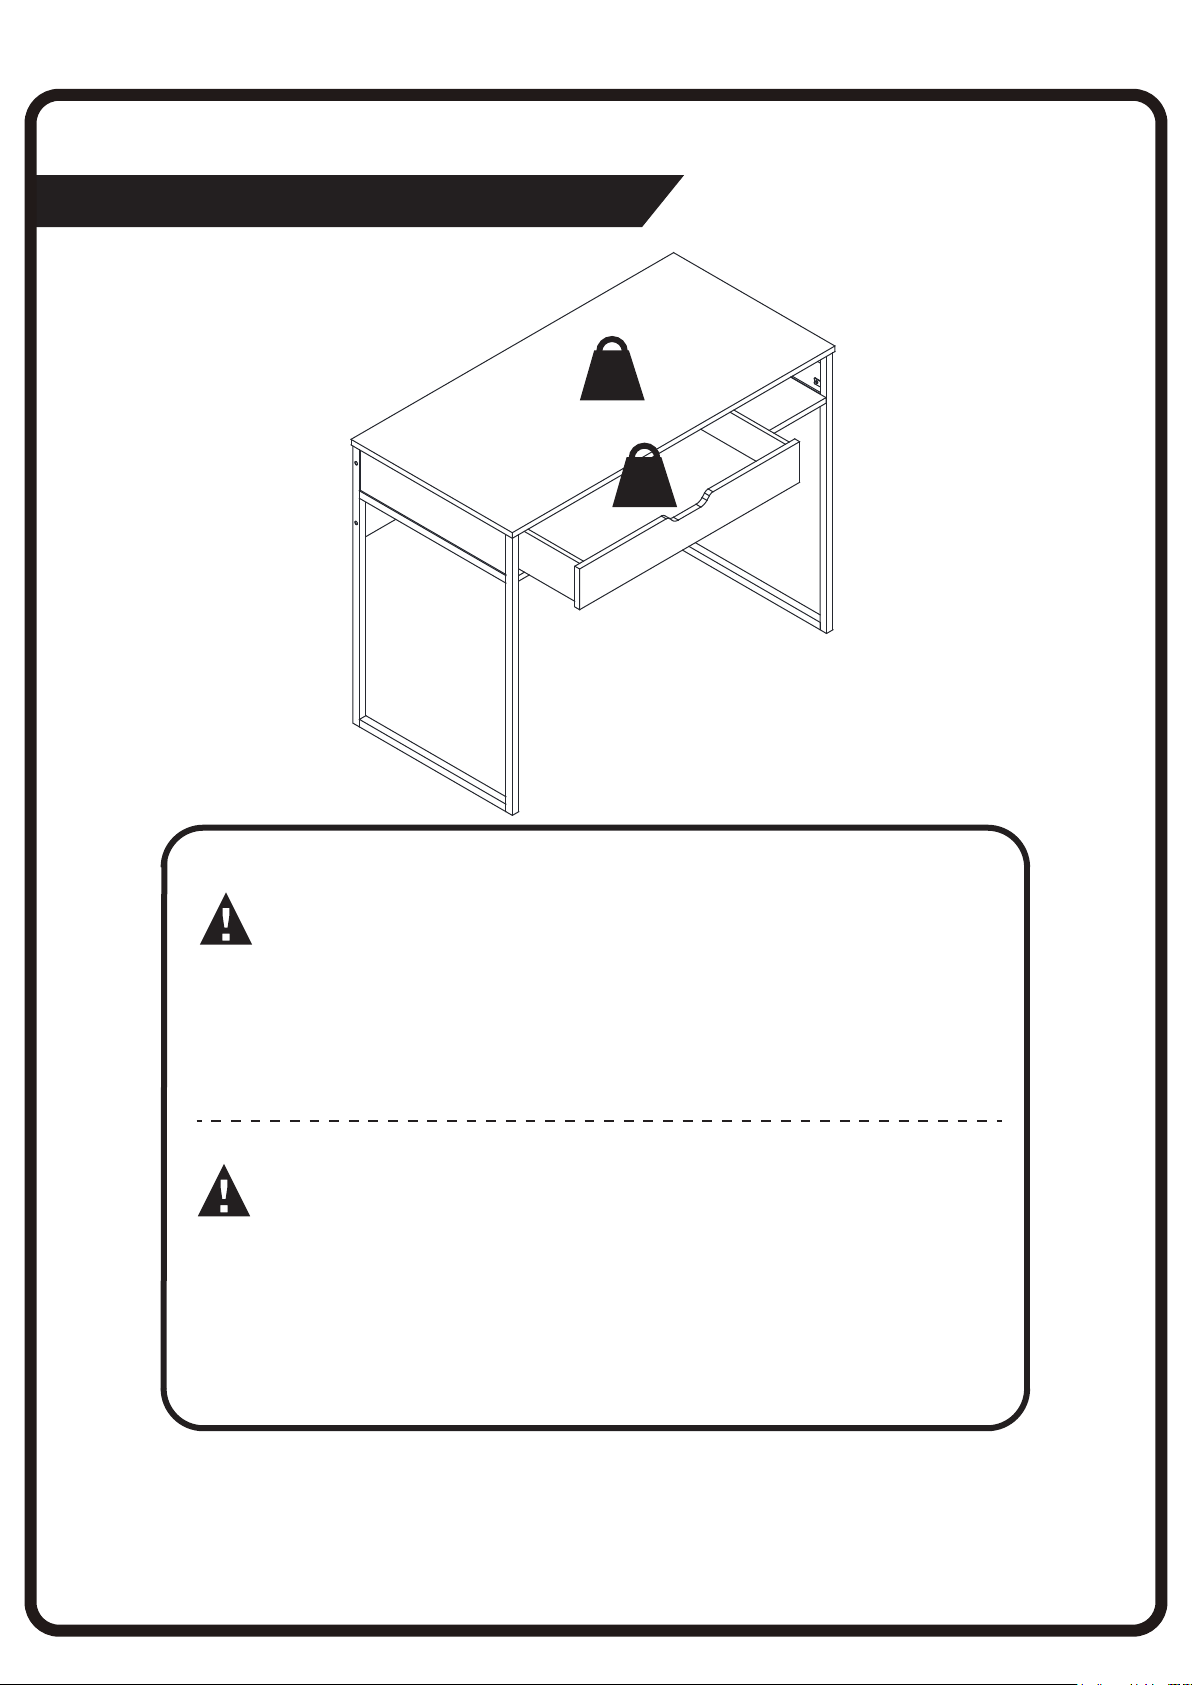
Maximum weight capacities/Capacidades de carga máxima
30 kg
66 lbs.
4.1 kg
9 lbs.
WARNING
Please use your furniture correctly and safely. Improper use can cause safety hazards, or damage to your furniture or household
items.
-This product is intended to hold maximum weight indicated. Exceeding the maximum weight will result in instability and may cause serious injury.
-Do not allow children to climb or jump on furniture due to possible accident, injury or death.
-Never push or pull furniture that is not designed with casters as this may cause injury or damage to the unit.
ADVERTENCIA
Utilice sus muebles correcta y segura. El uso inadecuado puede provocar riesgos para la seguridad, o dañar a sus muebles o
artículos para el hogar.
-Este producto ha sido diseñado para soportar la carga máxima indicada. Si la carga máxima se superase, el producto perdería su estabilidad y
podría provocar lesiones graves.
-No permita que los niños suban al mueble y ni salten sobre él. Podrían producirse accidentes, lesiones o muertes.
-Nunca empuje o tire los muebles que no están diseñados con ruedas ya que puede causar lesiones o daños a la unidad
15
Page 17
1 YEAR WARRANTY
BASIC WARRANTY:
urniture is warranted by us to the original purchaser for a period of one year from the date of purchase, subject to the following
F
conditions and limitations.
1. Install and operate this item in accordance with the Installation and
operating instructions provided with the product at all times. Any
alteration, willful abuse, accident, or misuse of the product shall nullify this
warranty.
2. This warranty is non-transferable and is made to the original owner,
provided that the purchase was made through an authorized supplier of
the product.
3. This warranty is limited to the repair or replacement of part(s) found to
be defective in material or workmanship, provided that such part(s) have
been subjected to normal conditions of use and service, after said defect
is confirmed by the manufacturer's inspection.
4. The manufacturer may, at its discretion, fully discharge all obligations
with respect to this warranty by refunding the wholesale price of the
defective part(s).
5. Any installation, labour, construction, transportation, or other related
costs/expenses arising from defective part(s), repair, replacement, or
otherwise of same, will not be covered by this warranty, nor shall the
manufacturer assume responsibility for same.
6. The owner/user assumes all other risks, if any, including the risk of any
direct, indirect, or consequential loss or damages arising out of the use, or
inability to use the product, except as provided by law.
7. All other warranties expressed or implied with respect to the product,
its components and accessories, or any obligations/liabilities on the part
of the manufacturer are hereby expressly excluded.
8. The manufacturer neither assumes nor authorizes any third part to
assume, on its behalf, any other liabilities with respect to the sale of the
product.
9. The warranties as outlined within this document do not apply to any
accessories used in conjunction with the installation of this product.
GARANTIA 1 AÑO
GARANTÍA BÁSICA:
Meubles estan garantizados por al comprador original por un período de un año desde la fecha de compra, sujeto a las
siguientes condiciones y limitaciones.
1. Instale y utilice este tema de conformidad con las instrucciones de
instalación y funcionamiento proporcionadas con el producto en todo
momento. Cualquier alteración, abuso intencional, accidente o mal uso del
producto deberá anular esta garantía.
2. Esta garantía no es transferible y se hace al dueño original, siempre que
la compra se hizo a través de un proveedor autorizado del producto.
3. Esta garantía está limitada a la reparación o reemplazo de la parte (s)
que se encuentre defectuoso en materiales o mano de obra, siempre que
dicha parte (s) han sido sometidos a las condiciones normales de uso y
servicio, después de que dicho defecto se confirma mediante inspección
del fabricante .
4. El fabricante podrá, a su discreción, cumplir plenamente todas las
obligaciones con respecto a esta garantía reembolsando el precio de venta.
5. Cualquier instalación, mano de obra, construcción, transporte u otros
costos relacionados / gastos derivados de la pieza defectuosa (s), la
reparación, reemplazo o de otro tipo de las mismas, no serán cubiertos
por esta garantía, ni tampoco podrá el fabricante asumirá la responsabili
dad de la misma.
6. El propietario / usuario asume todos los otros riesgos, en su caso,
incluyendo el riesgo de las pérdidas o daños que surjan del uso directo,
indirecto o consecuente, o la imposibilidad de usar el producto, salvo lo
dispuesto por la ley.
7. Todas las demás garantías expresas o implícitas, con respecto al
producto, quedan expresamente excluidas de sus componentes y
accesorios, o cualquier obligaciones / responsabilidades por parte del
fabricante.
8. El fabricante no asume ni autoriza a ninguna tercera parte para asumir
en su nombre, cualquier otra responsabilidad con respecto a la venta del
producto.
9. Las garantías como se indica en este documento no se aplican a los
accesorios usados en conjunción con la instalación de este producto.
,
16
 Loading...