


ASSEMBLY INSTRUCTION
PAGE 01 OF 05
PART LIST
NO.
QTY
F
12PCS
6/8" NAIL
1PC
1 BOARD 1
2
1PC
BOARD 2
3
4
5
6
1PC
2PCS
1PC
1PC
BOARD 3
BOARD 4
BOARD 5
BOARD 6
7
3PCS
8
9
10
BOARD 7
HARDWARE
ITEM
QTY
A
B
C
D
16PCS
16PCS
16PCS
12PCS
CAM
BOLT
LEG (L)
LEG (R)
BACK
RAIL
1PC
1PC
1PC
H
JCBB SCREW
M6 x 45mm
K
L
E
1PC
L-KEY
M4 x 65mm
J
9PCS
9PCS
4PCS
9PCS
I
4PCS
JCBB SCREW
M8 x 16mm
G
1PC
L-KEY
M5 x 65mm
M
16PCSCOVER CAP
CAM
STEP 1 STEP 2
1
2
4
4
3
C
*The arrow
must on south
2
4
1
1
STEP 3 STEP 4
(SECTION A)
WOOD DOWEL
M8 x 30mm
SPRING WASHER
(SMALL)
SPRING WASHER
(BIG)
4PCS
N
FLAT WASHER
(SMALL)
FLAT WASHER
(BIG)
PIN
LOCK
2
4
4
3
1
B
A
6
1
D
(SECTION A)
Please do not tighten an the hardware until the entire assembly is completed.
ASSEMBLY INSTRUCTION
PAGE 02 OF 05
STEP 5 STEP 6
STEP 7 STEP 8
(SECTION A)
6
6
*The arrow
must on
north
2
1
6
3
E
5
6
2
6
5
F
5
1
2
3
4
4

ASSEMBLY INSTRUCTION
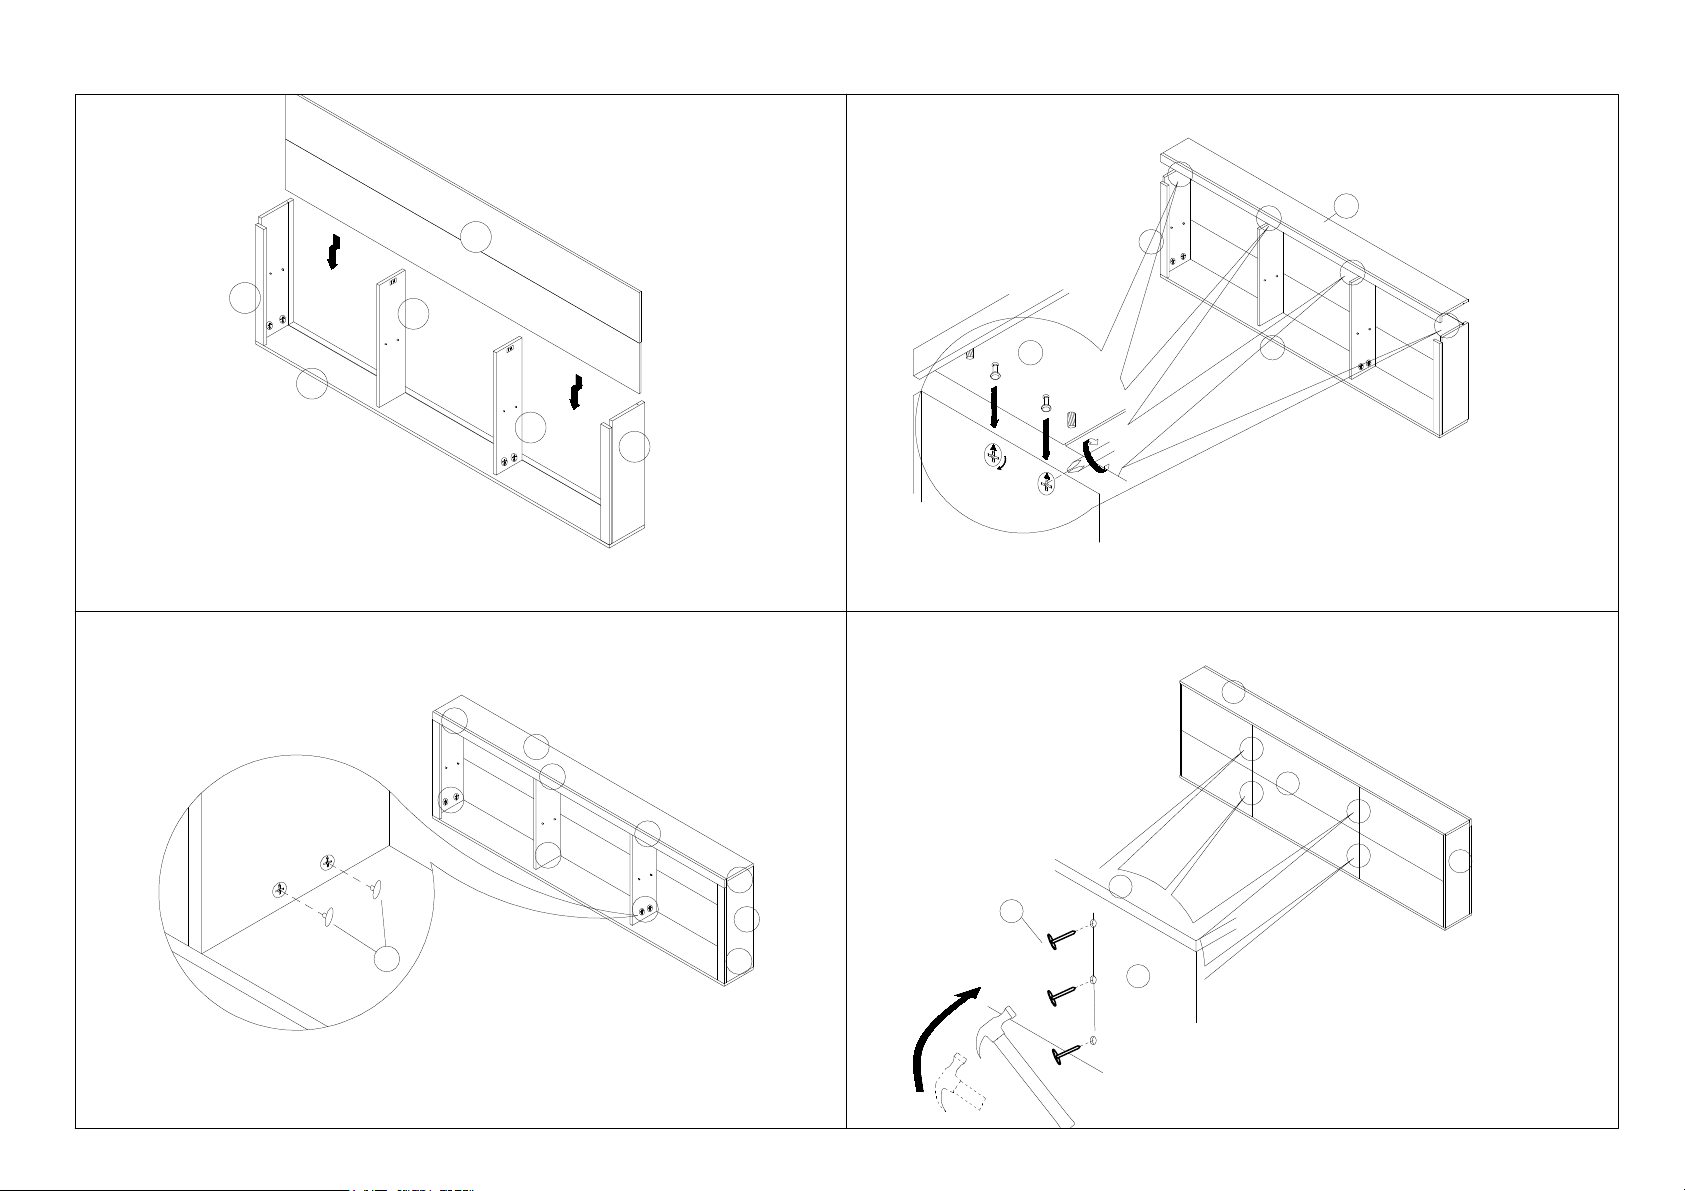
PAGE 03 OF 05
STEP 1
(SECTION A)
N
L
10
J
8
STEP 2
Noted:
Do not tighten until all
the JCBC placed in the
right position.
G
I
K
M
STEP 3
H
10
9
8
STEP 4
8
10
9
6
7
8
3
7
7
9
CONTINUE TO
SECTION C

PART LIST
NO.
QTY
ASSEMBLY INSTRUCTION
PAGE 04 OF 05
HARDWARE
ITEM QTY
STEP 1
STEP 2
STEP 3 STEP 4
CONTINUE TO
SECTION D
11
11
D
C
11
13
A
B
E
13
21
22
A
D
E
11
12
13
21
22
2PCS
1PC
1SET
1PC
3PCS
6PCS
8PCS
3PCS
SCREW
M4 x 32mm
JCBB SCREW
M8 x 16mm
JCBB SCREW
M6 x 50mm
SIDE RAIL
FOOTBOARD
SLAT
CENTER
SUPPORT
SUPPORT
LEG
(SECTION C)
B
1PC
L-KEY
M4 x 65mm
C
1PC
L-KEY
M5 x 65mm
12
Facing to footboard
(SECTION C)

PART LIST
NO.
QTY
ASSEMBLY INSTRUCTION
PAGE 05 OF 05
HARDWARE
ITEM
QTY
ASSEMBLY
COMPLETE
A
B
C
D
14
15
16
17
18
19
STEP 1 STEP 2
STEP 3 STEP 4
STEP 5 STEP 6
A
B
15
17
14
20
E
4PCS
32PCS
16PCS
1PC
32PCS
WOOD DOWEL
A
A
19
19
20
C
A
B
19
19
16
8PCS
A
A
STEP 6.2
D
E
STEP 6.1
2PCS
4PCS
2PCS
2PCS
2PCS
2PCSDRAWER FRON
DRAWER BACK
DRAWER SIDE
DRAWER SIDE
BOTTOM PANEL
RAIL
CASTER
SCREW
M4 x 32mm
SCREW
M4 x 16mm
SCREW
M6 x 35mm
L-KEY
M4 x 65mm
G
4PCS
F
F
4PCS
HANDLE
HANDLE BOLT
M4 x 38mm
G
(SECTION D)
(SECTION D)
15
17
14
18
 Loading...