

Page 1

PLEASE READ BELOW BEFORE
PROCEEDING WITH YOUR ASSEMBLY
Unless you're particularly adept at assembling
Flatpack/Knockdown Furniture, we understand building
ready to assemble furniture can be a frustrating
experience for some and you'll probably spend at least half
a day per item. No need to panic, though! Here are some
tips on assembling flat-pack furniture so you're not left
with an impossible Lego project and give up in frustration.
Follow these tips for your item and you’ll end up with
beautiful, fully-assembled furniture!
• Do Not throw away packaging material until assembly
is complete.
• Assemble item on a soft surface, such as cardboard or
carpet, to protect finish.
Page 2

• Choose a spacious, open area near where the piece
will be located. It is easier to move parts than to
relocate the furniture after it is fully assembled,
depending on its size and weight.
• Organize everything and count it twice. If you
organize the items by parts, you'll find it much easier
to grab each piece as you build.
• Check each one for cracks or flaws, such as
improperly drilled holes, and count multiple parts. If
there are any problems or missing pieces, contact the
manufacturer with the part number, model number
of the finished piece, and a description of the
problem to arrange a replacement.
• It is best to use any tools the kit provides, such as a
hex key, because they may be specially sized for that
piece of furniture. But when in need, a Phillips-head
screwdriver & Power Drill are highly suggested for
large projects.
• Read the entire list of instructions, arranging your
parts in order of use as you go.
• Finally, Enlist a help from friends and family since
proper assembly of most items require 2 people.
Page 3
Page 4
Page 5
Page 6
Distance of panel (#5) to the
edge of panel (#6) is farther.
Distance of panel (#5) to the edge
of panel (#6) is closer.
Finished side facing down.
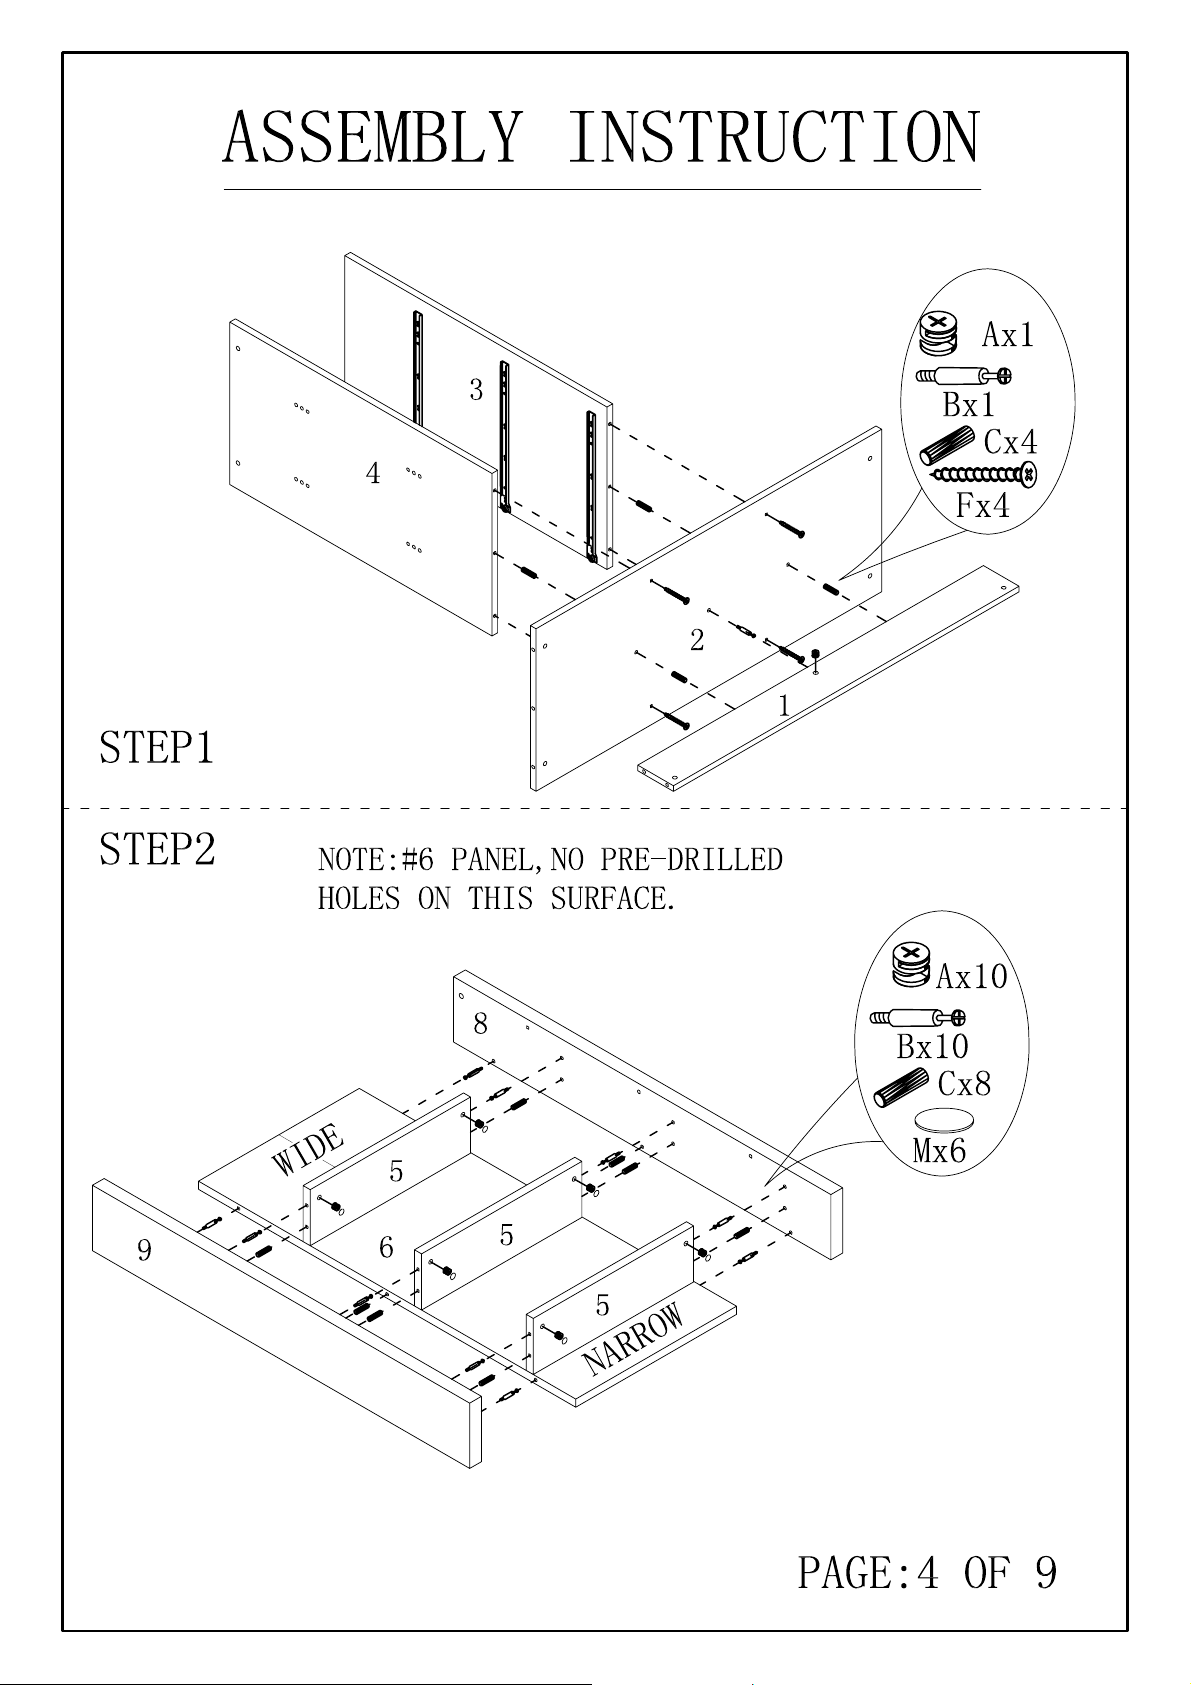
1) Insert dowels (#C) to holes of panels (#3,4).
Align panel (#2) to panels (#3,4), then secure
by using screws (#F).
2) Attach dowels (#C) and cam bolts
(#B) to the holes of panel (#2). Align
panel (#1) to the dowels and cam
bolts of panel (#2). Secure cam bolt
by using cam lock (#A).
1) Attach cam bolts (#B) and dowels (#C) to the holes of panels (#8,9) as shown in
the diagram.
2) Align panels (#8,9) to the holes of panels (#6) and panels (#5). Make sure to
align panel (#5) to the cam bolts (#B) and dowels (#C) of panels (#8,9) when they
are aligning to panels (#6).
3) Place stickers (#M) to cover the
holes of the cam locks (#A).
Page 7
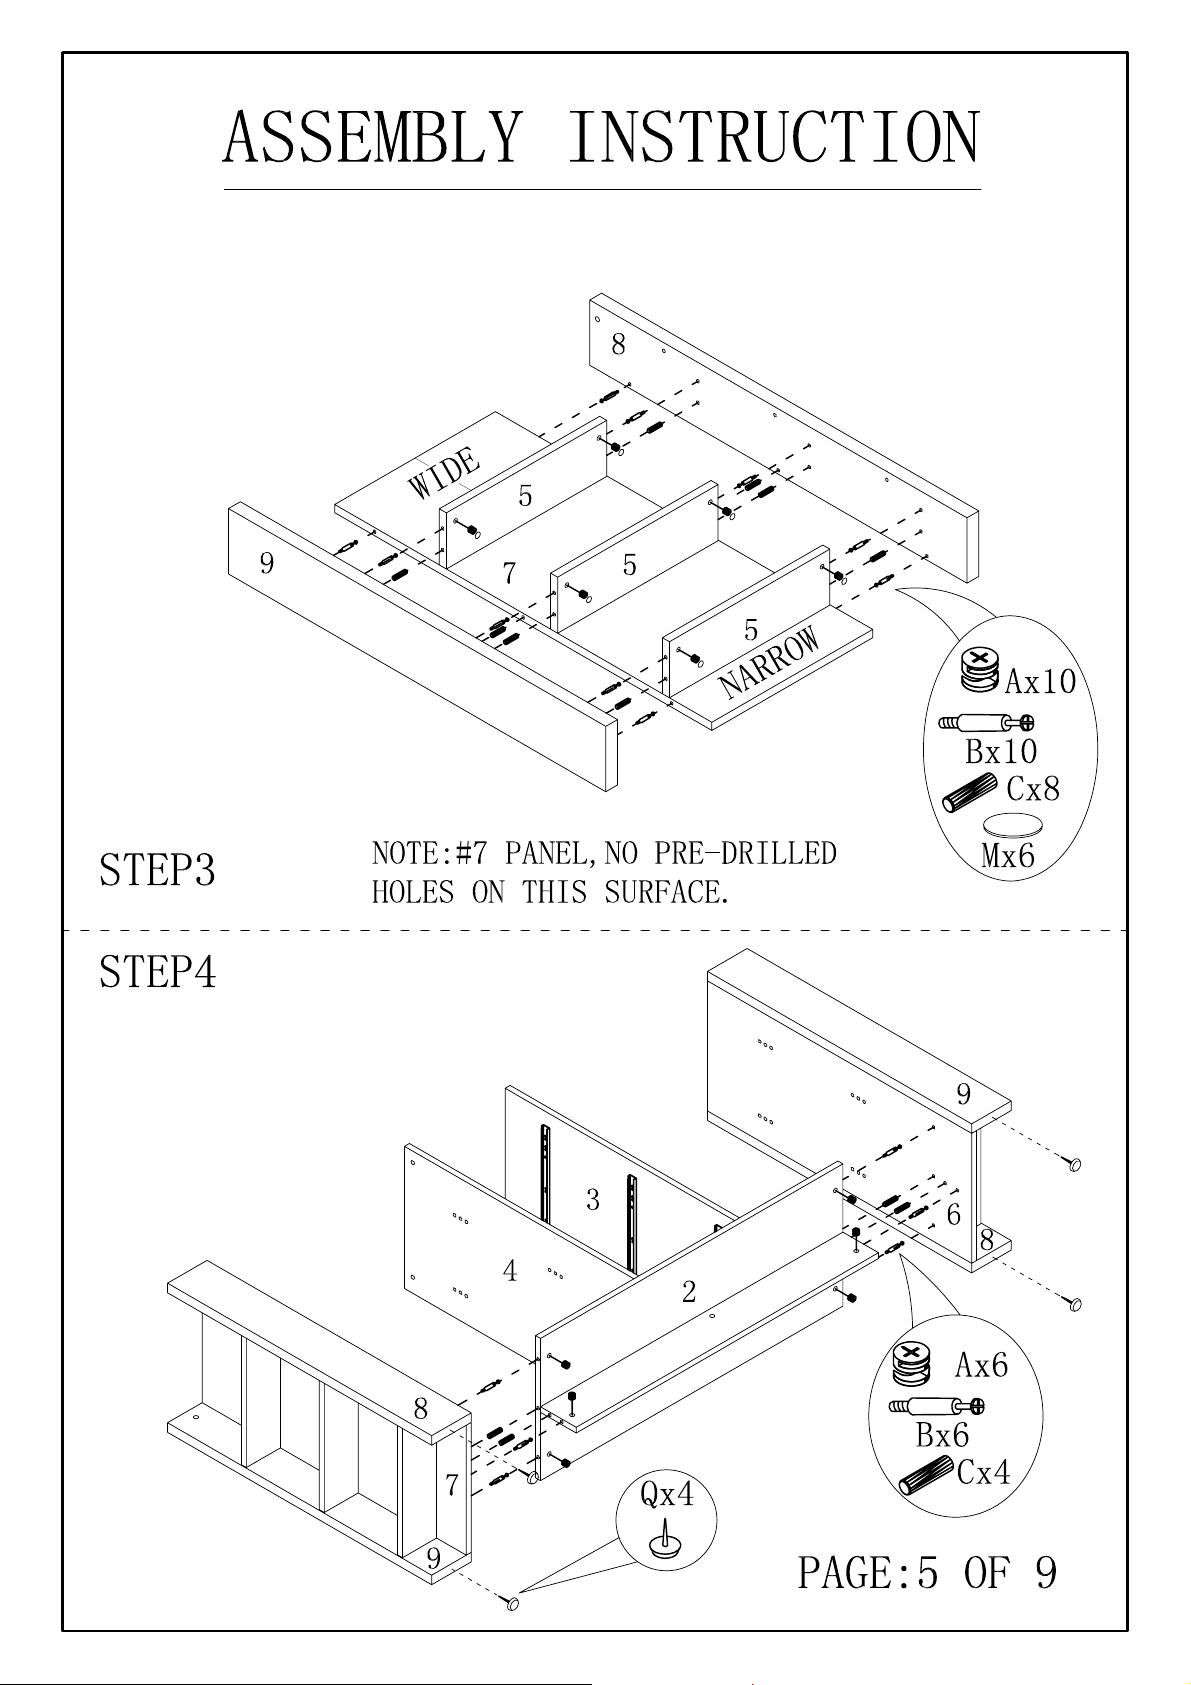
Distance of panel (#5) to the edge
of panel (#6) is farther.
Distance of panel (#5) to the edge
of panel (#6) is closer.
2) Align panels (#8,9) to the holes of panels (#7)
and panels (#5). Make sure to align panel (#5) to
the cam bolts (#B) and dowels (#C) of panels
(#8,9) when they are aligning to panels (#7).
3) Place stickers (#M) to cover the
holes of the cam locks (#A).
Unfinished
Attach cam bolts (#B) and
dowels (#C) onto panels (#6,7).
Align panels (#6,7) to the holes
of bottom panels (#1,2). Secure
by using cam locks (#A).
Page 8
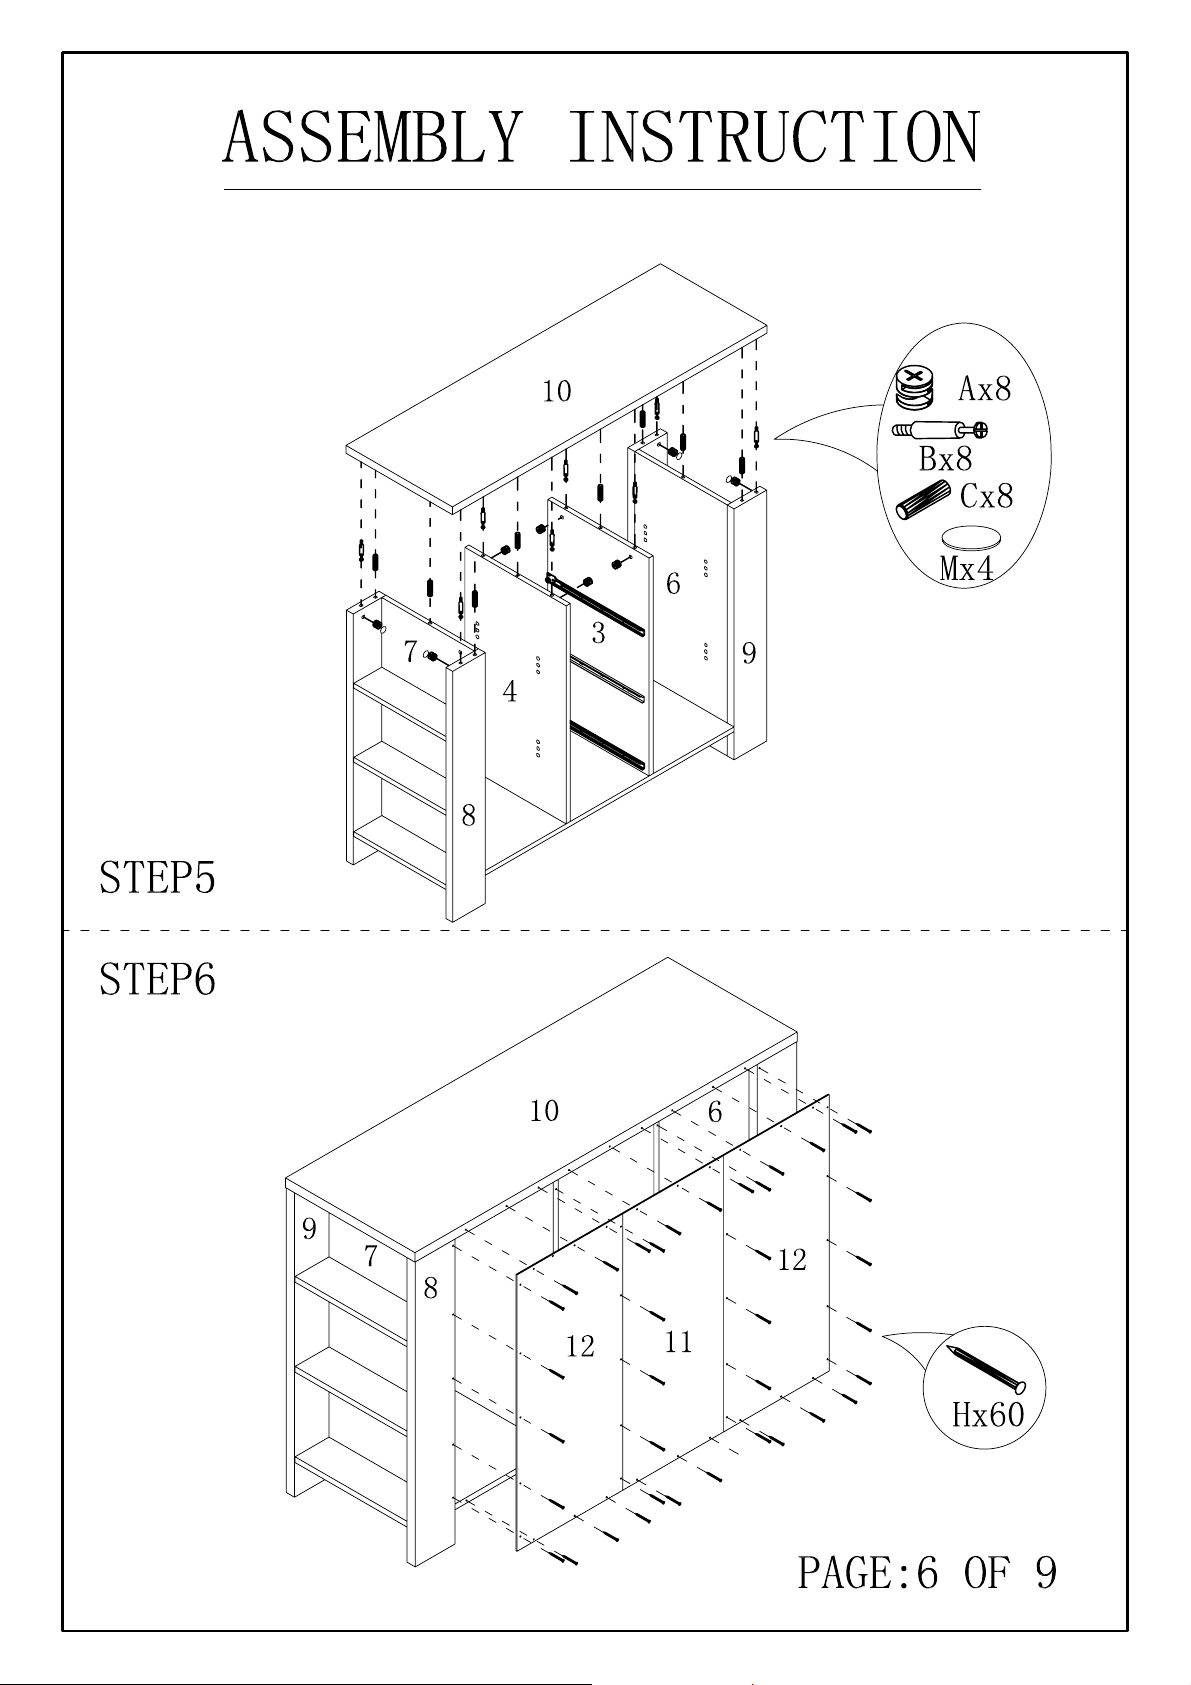
Attach cam bolts (#B) and dowels (#C) to the holes of the top
panel (#10). Align top panel (#10) to the holes of the base
panels as shown in the picture. Secure by using cam bolts (#A).
Completely finished on this side.
Align back panels (#11,12) to the back of
the product. Secure by using nails (#H).
Page 9
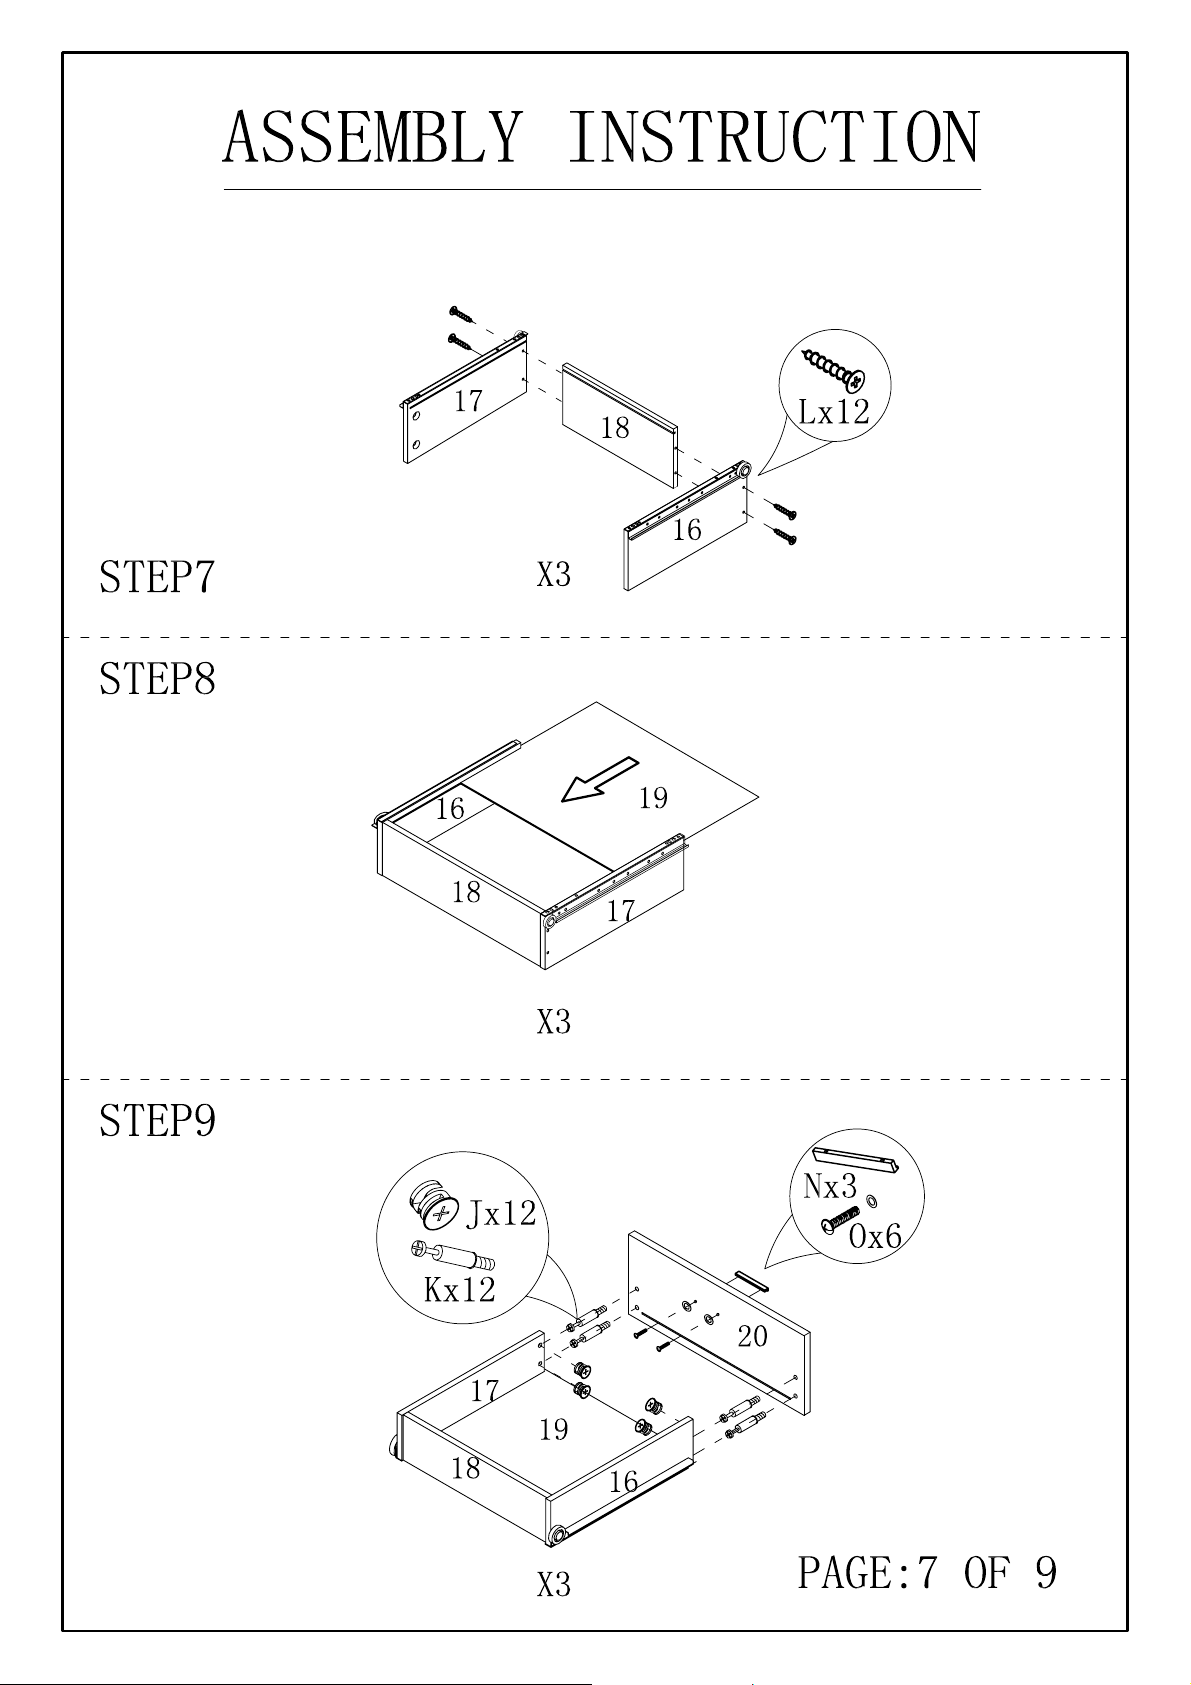
Align drawer side panels (#16,17) to the
drawer back panel (#18). Secure by
using screws (#L).
Slide drawer bottom panel (#19) through the tin
lines of panels (#16,17,18).
1) Align and secure drawer handle (#N)
to front drawer panel (#20) by using
bolts (#O).
2) Attach cam bolts (#K) to the holes of
the front drawer panel (#20). Align
drawer front panel (#20) to the holes of
the drawers, then secure by using cam
locks (#J).
Page 10
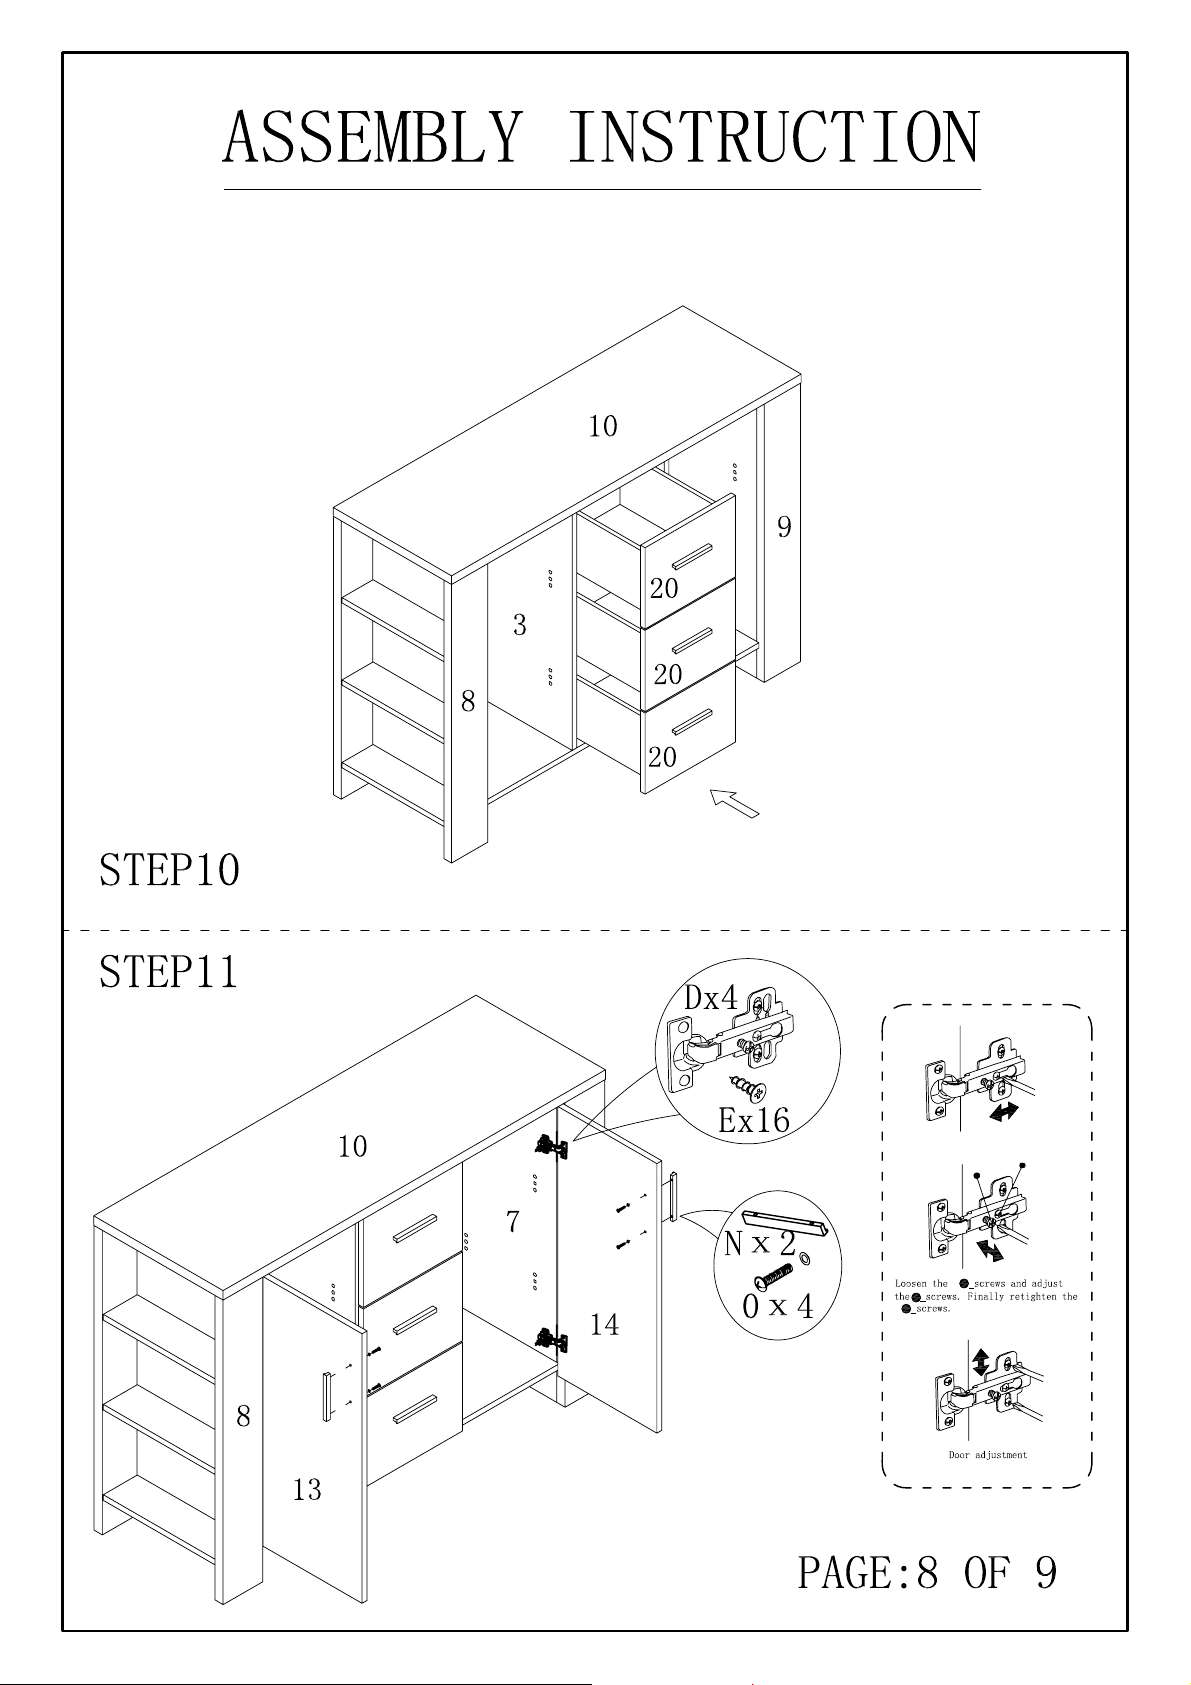
Insert drawers.
Page 11
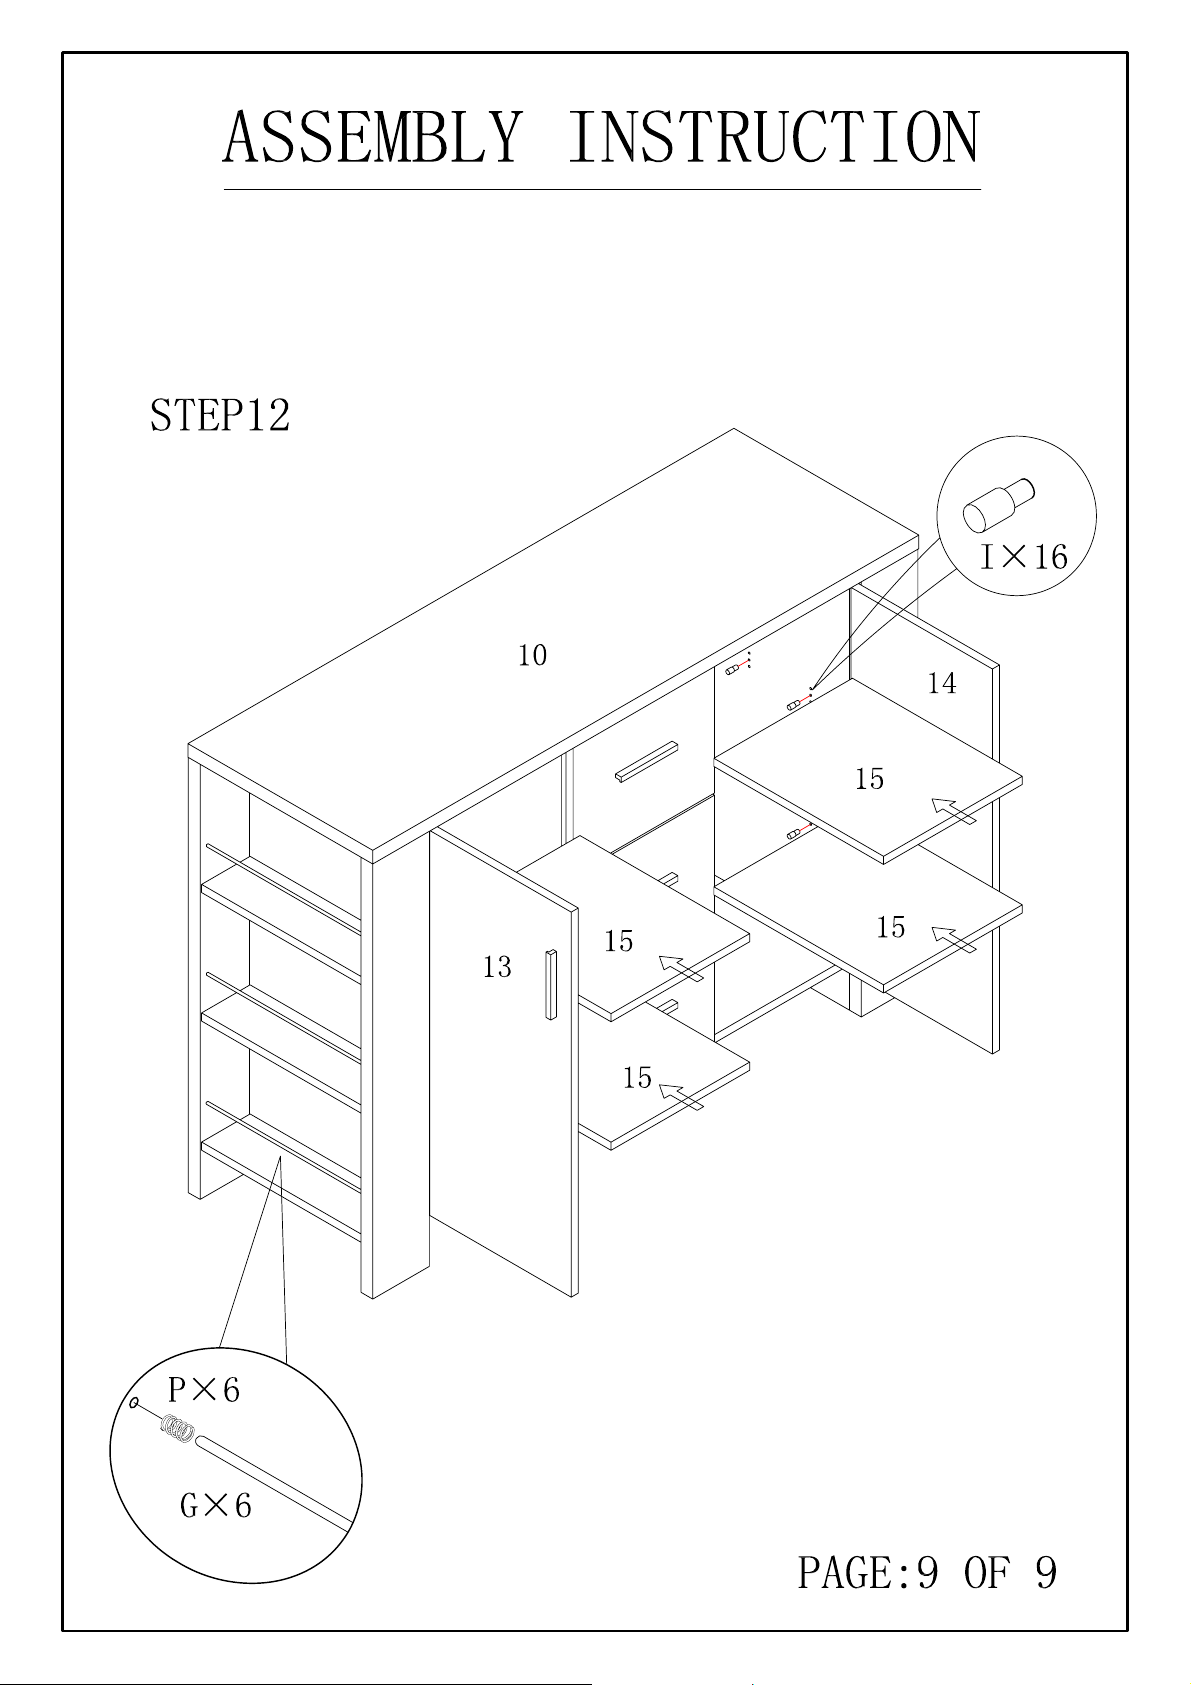
Insert shelf pins (#I) to the desired
height of the shelves (#15).
Insert plugs (#P) and bars (#G) to the holes of the side shelves.
 Loading...