

Page 1
www.zipato.com
INTRODUCTION
Zipato PIR Motion Sensor is a passive infrared detector or physical sensor, the
sensor doesn’t emit any energy, but only passively receive and detect infrared
radiation. Sensor sends messages via Z-Wave network to the Z-Wave main
controller. In the communication between the PIR and Z-Wave main controller, PIR
sensor can only send messages and not receive them. When sensor is triggered, it
will send message to the main controller and associate devices to work through the
Z-Wave main controller. Sensor isbattery powered, small and can be installed
easily.
SPECIFICATION
Motion detection
Measure the light sensitivity
Compatible with 300 and 500 series
Range: up to 50m outdoor; 30m indoor
Power supply: CR123A x 1
Standby current: 16uA
Battery life: 1 year
Protocol: Z-Wave Plus
Detection range: 7 meters
Viewing angle: 110 degree
Operation temperature: 0 - 40 °C
Storage temperature: 0 - 60 °C
Size: 45 x 45 x 48 mm
INSTALLATION STEPS
• Holder installation
• Battery installation
• Fix PIR on the holder
HOLDER INSTALLATION
• OPTION 1
Fix the holder with screws
and screw stopper
BATTERY INSTALLATION FIX PIR ON THE HOLDER
• OPTION 2
Fix the holder with double-sides
sticker
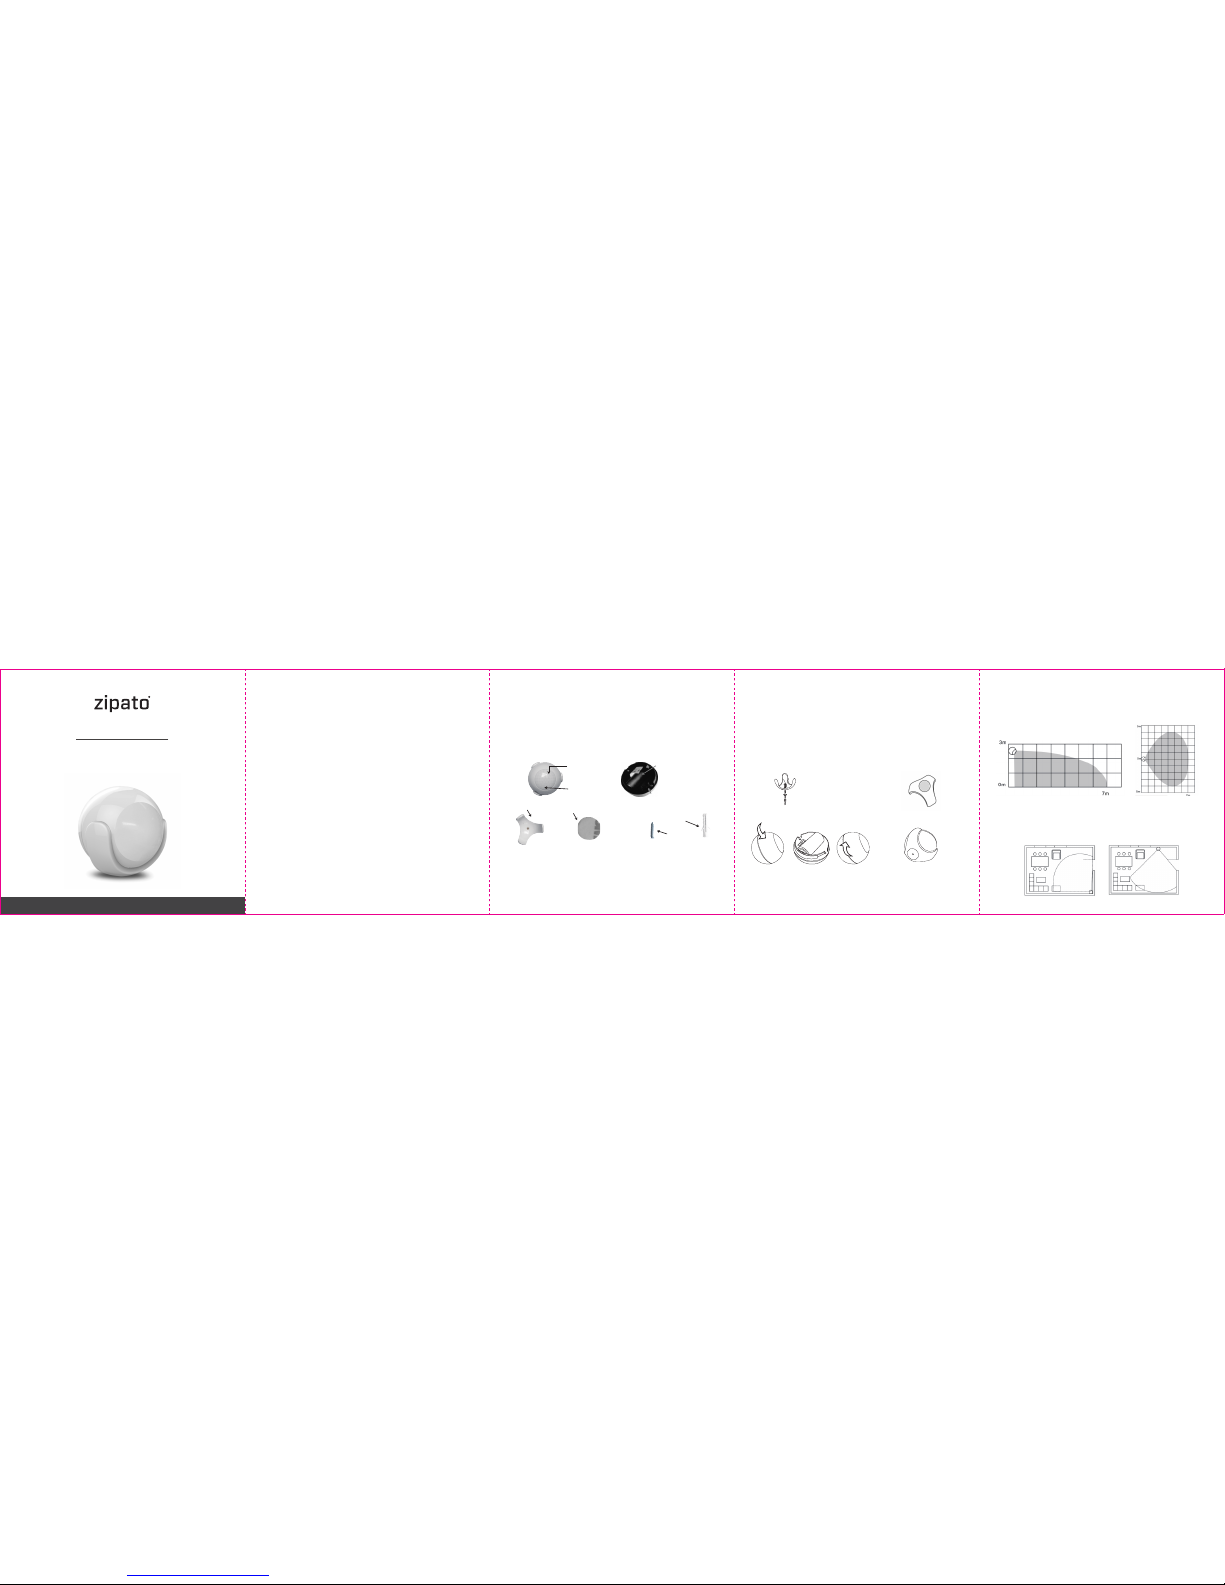
doors. Actual detection range of the sensor can be influenced by environment
conditions. If there are false alarms, check for any moving objects withing the
sensor’s detection area, such as trees blowing in the wind, cars passing by, etc.
False motion alarms may be caused by moving masses of air and heat as well. If
sensor keeps on reporting the false alarms, install the sensor in another place.
Work schematic diagram of PIR:
DETECTION RANGE AND WORKING CONDITIONS
PIR Sensor has to be installed in a corner of the room or perpendicularly to the
WORKING CONDITIONS
If there is someone moving withing the detection area, alarm will be triggered and
LED lights will flash in the inductive area at the same time.
TECHMICAL INFORMATION
• Use passive IR sensor to detect what is mocing
• When the sensor is triggered, LED light will flash in the detection area
• When there are people or animals moving in detection area, PIR sensor will send
alarm messages to the Z-Wave main controller
• Compatible with any Z-Wave main controller
PRODUCT CONFIGURATION
PACKAGE CONTENT
PIR Motion Sensor - 1pc Probe - 1pc
Holder - 1pc User manual - 1pc
Battery - 1pc Screw - 2pcs
Screw stopper - 2pcs
QUICK INSTALLATION GUIDE
v1.0
PIR MOTION SENSOR
Holder
Screw stopper
Screw
Sticker
Inductive area
LED light
Battery
Code button
1. 2. 3. 4.
Page 2

controller, or Z-Wave gateway.
1. Remove the sensor cover
2. Make sure the sensor is powered
4. Press the button for 10 seconds, LED will blink once
5. Release the button
WAKEUP MOTION DETECTOR
You can press the button once to wake up the device and send wakeup notification to
controller. LED will blink once.
ASSOCIATIONS (Association Command Class Version 2)
This sensor supports 4 association groups; each group suppoerts max 4 associated
nodes. This has the effect that when the sensor is triggered, all devices associated
with the sensor will receive the relevant reports.
GROUP 1 is lifeline service that is assigned to sensor status - Open/Close. It enables
the sensor to send reports and readings to Z-Wave controller or Z-Wave Gateway
whenever the sensor is triggered. This group supports:
NOTIFICATION_REPORT_V4
SENSOR_BINARY_REPORT_V2
SENSOR_MULTILEVEL_REPORT_V7
BATTERY_REPORT_DEVICE_RESET_LOCALLY_NOTIFICATION
GROUP 2 allows sending control commands to associated devices such as relay
module, lighting, etc. This association group is configured through the advanced
parameters no. 2, 3, 5 and 8. This griup supports: BASIC_SET
GROUP 3 allows sending notifications to associated devices int his group. This group
supports: NOTIFICATION_REPORT_V4
GROUP 4 allows sending sending Sensor Binary Report to associated devices in this
group. This group supports: SENSOR_BINARY_REPORT_V2
Parameter number: 1
Parameter size: 1 byte
Available settings: 8 ~ 255
Default setting: 12
ADVANCED CONFIGURATION
The follwing information is for someone that has some experience in setting up a
Z-Wave system or someone that has computer software running a Z-Wave
controller or Gateway.
1. SENSITIVITY LEVEL SETTING
This parameter defines the sensitivity of PIR sensor. It’s recommended to test the
sensor with moevements from a farthest end of the coverage area at the first time
of use. If movements cannot be detected sensitively, simply adjust the sensitivity
level with this parameter. This parameter can be configured with the value of 8
through 255, where 8 means high sensitivity and 255 means low sensitivity.
Function: Sensivity Level Setting
Parameter size: 1 byte
Parameter number: 1
Available settings: 8 ~ 255
Default settings: 12
2. ON / OFF DURATION
This parameter determines how long the associated devices should have ON status.
For instace, if this parameter is set to 30 (sec), the PIR sensor will send a BASIC_SET
command to associated device with valu BASIC_SET level if PIR sensor is triggered
and associated device will be turned on 30 seconds begore it’s turned off. This
parameter value must be large as Parameter #. If user set this parameter to default
by Configure CC, the parameter # will be set to default value.
Function: ON / OFF duration setting
Parameter size: 2 byte
Parameter number: 2
Available settings: 5~600 (seconds)
Default setting: 30
3. BASIC SET LEVEL
BASIC_SET command will be sent when PIR sensor is triggered. The receiver will
take it into consideration; for instance, if a lamp module is receiving the BASIC_SET
command of which value is decisive as to how bright of dim level of lamp module
shall be.
Function: Basic Set Level
Parameter size: 1 byte
Parameter number: 2
Available settings: 0,1 ~ 99 or 255 0 - OFF, Alarm cancelling or turning device off
1 ~ 99 or 255 - ON (Binary Switch Device)
Dim level (Multilevel Switch Device)
Default setting: 255
4. PIR DETECTION FUNCTION ENABLED / DISABLED
This parameter can enable or disable the PIR sensor detecting function.
Function: Enabled / Disabled PIR function
Parameter size: 1 byte
Parameter number: 4
Available settings: 0 (disable) or 255 (enable)
Default setting: 255
5. AMBIENT ILLUMINATION LUX LEVEL
This parameter can set Lux value which determines when the light sensor is
activated. If the ambient illumination level falls bellow this value and a person moves
across or within the detection area, PIR sensor will send Z-Wave ON command (i.e.
BASIC_set (value = parameter 3) to an associated device and activate it.
Function: Lux Level Set
Parameter size: 2 byte
Parameter number: 5
Available settings: 0~1000 (Lux)
Default setting: 100 (Lux)
6. RE-TRIGGER INTERVAL SETTING
This parameter can be used to adjust the interval of being re-triggered after the PIR
sensor has been triggered. This parameter value must be less than Paramater #2.
If user sets this parameter to default by Configure CC, the parameter #2 will be set
to default value.
Function: Re-trigger interval setting
Parameter size: 1 byte
LED STATUS
1. When sensor is triggered, LED flashes red once.
2. When battery is installed, LED will flash red 5 times
3. Quickly, triple click on the code button to add the PIR sensor to the Z-Wave
network or delete PIR sensor
4. Press the code button for 10 seconds, the PIR sensor will be restored to factory
default settings
5. In normal conditions, the LED light is off
6. Press the button once to wakeup the device and send wakeup notification to
controller, LED flashes red once
ADDING TO Z-WAVE NETWORK
1. Remove the sensor cover
2. Make sure the sensor is powered
3. Set Z-Wave controller or Z-Wave Gateway into inclusion mode
4. Press the button 3 times within 1.5 seconds and the device will enter inclusion
mode. LED will flash on and off 5 times.
REMOVING FROM Z-WAVE NETWORK
1. Remove the sensor cover
2. Make sure the sensor is powered
3. Set Z-Wave controller or Z-Wave Gateway into exclusion mode
4. Press the button 3 times within 1.5 seconds and the device will enter exclusion mode.
RESTORE TO DEFAULT SETTINGS
Reset procedure will delete all information on the Z-Wave network and Z-Wave
6.5. 7. 8. 9.
Page 3

controller, or Z-Wave gateway.
1. Remove the sensor cover
2. Make sure the sensor is powered
4. Press the button for 10 seconds, LED will blink once
5. Release the button
WAKEUP MOTION DETECTOR
You can press the button once to wake up the device and send wakeup notification to
controller. LED will blink once.
ASSOCIATIONS (Association Command Class Version 2)
This sensor supports 4 association groups; each group suppoerts max 4 associated
nodes. This has the effect that when the sensor is triggered, all devices associated
with the sensor will receive the relevant reports.
GROUP 1 is lifeline service that is assigned to sensor status - Open/Close. It enables
the sensor to send reports and readings to Z-Wave controller or Z-Wave Gateway
whenever the sensor is triggered. This group supports:
NOTIFICATION_REPORT_V4
SENSOR_BINARY_REPORT_V2
SENSOR_MULTILEVEL_REPORT_V7
BATTERY_REPORT_DEVICE_RESET_LOCALLY_NOTIFICATION
GROUP 2 allows sending control commands to associated devices such as relay
module, lighting, etc. This association group is configured through the advanced
parameters no. 2, 3, 5 and 8. This griup supports: BASIC_SET
GROUP 3 allows sending notifications to associated devices int his group. This group
supports: NOTIFICATION_REPORT_V4
GROUP 4 allows sending sending Sensor Binary Report to associated devices in this
group. This group supports: SENSOR_BINARY_REPORT_V2
Parameter number: 1
Parameter size: 1 byte
Available settings: 8 ~ 255
Default setting: 12
ADVANCED CONFIGURATION
The follwing information is for someone that has some experience in setting up a
Z-Wave system or someone that has computer software running a Z-Wave
controller or Gateway.
1. SENSITIVITY LEVEL SETTING
This parameter defines the sensitivity of PIR sensor. It’s recommended to test the
sensor with moevements from a farthest end of the coverage area at the first time
of use. If movements cannot be detected sensitively, simply adjust the sensitivity
level with this parameter. This parameter can be configured with the value of 8
through 255, where 8 means high sensitivity and 255 means low sensitivity.
Function: Sensivity Level Setting
Parameter size: 1 byte
Parameter number: 1
Available settings: 8 ~ 255
Default settings: 12
2. ON / OFF DURATION
This parameter determines how long the associated devices should have ON status.
For instace, if this parameter is set to 30 (sec), the PIR sensor will send a BASIC_SET
command to associated device with valu BASIC_SET level if PIR sensor is triggered
and associated device will be turned on 30 seconds begore it’s turned off. This
parameter value must be large as Parameter #. If user set this parameter to default
by Configure CC, the parameter # will be set to default value.
Function: ON / OFF duration setting
Parameter size: 2 byte
Parameter number: 2
Available settings: 5~600 (seconds)
Default setting: 30
3. BASIC SET LEVEL
BASIC_SET command will be sent when PIR sensor is triggered. The receiver will
take it into consideration; for instance, if a lamp module is receiving the BASIC_SET
command of which value is decisive as to how bright of dim level of lamp module
shall be.
Function: Basic Set Level
Parameter size: 1 byte
Parameter number: 2
Available settings: 0,1 ~ 99 or 255 0 - OFF, Alarm cancelling or turning device off
1 ~ 99 or 255 - ON (Binary Switch Device)
Dim level (Multilevel Switch Device)
Default setting: 255
4. PIR DETECTION FUNCTION ENABLED / DISABLED
This parameter can enable or disable the PIR sensor detecting function.
Function: Enabled / Disabled PIR function
Parameter size: 1 byte
Parameter number: 4
Available settings: 0 (disable) or 255 (enable)
Default setting: 255
5. AMBIENT ILLUMINATION LUX LEVEL
This parameter can set Lux value which determines when the light sensor is
activated. If the ambient illumination level falls bellow this value and a person moves
across or within the detection area, PIR sensor will send Z-Wave ON command (i.e.
BASIC_set (value = parameter 3) to an associated device and activate it.
Function: Lux Level Set
Parameter size: 2 byte
Parameter number: 5
Available settings: 0~1000 (Lux)
Default setting: 100 (Lux)
6. RE-TRIGGER INTERVAL SETTING
This parameter can be used to adjust the interval of being re-triggered after the PIR
sensor has been triggered. This parameter value must be less than Paramater #2.
If user sets this parameter to default by Configure CC, the parameter #2 will be set
to default value.
Function: Re-trigger interval setting
Parameter size: 1 byte
LED STATUS
1. When sensor is triggered, LED flashes red once.
2. When battery is installed, LED will flash red 5 times
3. Quickly, triple click on the code button to add the PIR sensor to the Z-Wave
network or delete PIR sensor
4. Press the code button for 10 seconds, the PIR sensor will be restored to factory
default settings
5. In normal conditions, the LED light is off
6. Press the button once to wakeup the device and send wakeup notification to
controller, LED flashes red once
ADDING TO Z-WAVE NETWORK
1. Remove the sensor cover
2. Make sure the sensor is powered
3. Set Z-Wave controller or Z-Wave Gateway into inclusion mode
4. Press the button 3 times within 1.5 seconds and the device will enter inclusion
mode. LED will flash on and off 5 times.
REMOVING FROM Z-WAVE NETWORK
1. Remove the sensor cover
2. Make sure the sensor is powered
3. Set Z-Wave controller or Z-Wave Gateway into exclusion mode
4. Press the button 3 times within 1.5 seconds and the device will enter exclusion mode.
RESTORE TO DEFAULT SETTINGS
Reset procedure will delete all information on the Z-Wave network and Z-Wave
Function: Lux Level Report
Parameter size: 2 byte
Parameter number: 9
Available settings: 0~1000 (Lux)
Default setting: 1
NOTIFICATION COMMAND CLASS
Once the sensor detects a movement, it will send NOTIFICATION_REPORT and
SENSOR_BINARY_REPORT to the nodes of lifeline to inform there is an intrusion
event. When the movement is stopped, NOTIFICATION_REPORT and SENSOR_BINARY_REPORT will be sent again to the nodes in lifeline.For compliant Z-Wave 300
seires, there is also the Binary Sensor Command Class.
Notification Report Command:
Event prsent:
Command class: COMMAND_CLASS_NOTIFICAITON
Command: NOTIFICTION_REPORT
Notification type: NOTIFICATION_TYPE_HOME_SECURITY
Event: NOTIFICATION_EVENT_HOME_SECURITY_MOTION_DETECTION_
UNKNOWN_LOCATION
Event clear:
Command class: COMMAND_CLASS_NOTIFICAITON
Command: NOTIFICTION_REPORT
Notification type: NOTIFICATION_TYPE_HOME_SECURITY
Event: NOTIFICATION_EVENT_HOME_SECURITY_NO_EVENT
Binary Sensor Report Command:
Event present:
Command class: COMMAND_CLASS_SENSOR_BINARY
Command: SENSOR_BINARY_REPORT
Sensor type: SENSOR_MOTION
Value: 0xFF
Event clear:
Command class: COMMAND_CLASS_SENSOR_BINARY
Command: SENSOR_BINARY_REPORT
Sensor type: SENSOR_MOTION
Value: 0x00
MULTILEVEL SENSOR
PIR Motion Sensor supports ambient luminance meassurement, the scale is LUX.
And the default Multilevel sensor is luminance too. The settings of luminance
sensor measurement are listed under “Advanced Configuration”
WAKEUP COMMAND CLASS
Majority of time sensor is in sleep status in order to conserve battery life.
The minimum wakeup interval is 300s.
The maximum wakeup interval is 16,777,200s (about 194 days)
Allowable interval among each wakeup interval is 60seconds, such as 360, 420, 480...
NOTE: The deault value is 12 hours. The value is longer, the battery life is greater.
BATTERY CHECK COMMAND:
The users can also enquire the battery status of the motion sensor by sending
BATTERY_GET command. Once the sensor receives the command, it will return
BATTERY_REPORT command. The motion sensor will send BATTERY_LEVEL =
0xFF command to the Z-Wave controller to inform that the motion sensor is in dead
battery status, otherwise BATTERY_LEEL value range is 0% to 100%.
COMMAND CLASSES
This sensor supports following Command Classes:
COMMAND_CLASS_ZWAVEPLUS_INFO (V2)
COMMAND_CLASS_VERSION (V2)
COMMAND_CLASS_MANUFACTURER_SPECIFIC (V2)
COMMAND_CLASS_DEVICE_RESET_LOCALLY (V1)
COMMAND_CLASS_POWERLEVEL (V1)
LIMITED PRODUCT WARRANTY
GENERAL TERMS
Nothing in this Limited Product Warranty affects your statutory rights as a
consumer.
The Limited Product Warranty set forth below is given by Tri plus grupa d.o.o.
(Europe) (herein referred to as “ZIPATO”). This Limited Product Warranty is only
effective upon presentation of the proof of purchase. Upon further request by
ZIPATO, this warranty card has to be presented, too.
EXCEPT AS EXPRESSLY SET FORTH IN THIS LIMITED WARRANTY, ZIPATO MAKES
NO OTHER WARRANTIES, EXPRESS OR IMPLIED, INCLUDING ANY IMPLIED
WARRANTIES OF MERCHANTABILITY AND FITNESS FOR A PARTICULAR
PURPOSE. ZIPATO EXPRESSLY DISCLAIMS ALL WARRANTIES NOT STATED IN
THIS LIMITED WARRANTY. ANY IMPLIED WARRANTIES THAT MAY BE IMPOSED BY
LAW ARE LIMITED IN DURATION TO THE LIMITED WARRANTY PERIOD. TO THE
EXTENT ALLOWED BY LOCAL LAW, THE REMEDIES IN THIS WARRANTY
STATEMENT ARE CUSTOMER’S SOLE AND EXCLUSIVE REMEDIES AGAINST
ZIPATO. THEY DO NOT, HOWEVER, AFFECT OR RESTRICT THE RIGHTS YOU HAVE
AGAINST THE BUSINESS YOU BOUGHT A ZIPATO PRODUCT FROM. IN NO EVENT
WILL ZIPATO BE LIABLE FOR LOSS OF DATA OR FOR INDIRECT, SPECIAL,
INCIDENTAL, CONSEQUENTIAL (INCLUDING LOST PROFIT OR DATA), OR OTHER
DAMAGE, WHETHER BASED IN CONTRACT, TORT, OR OTHERWISE. HOWEVER,
NOTHING IN THIS AGREEMENT LIMITS ZIPATO’S LIABILITY TO YOU (I) IN THE
EVENT OF DEATH OR PERSONAL INJURY TO THE EXTENT RESULTING FROM
ZIPATO’S NEGLIGENCE, OR (II) TO THE EXTENT RESULTING FROM ANY
FRAUDULENT MISREPRESENTATION ON THE PART OF ZIPATO, OR (III) TO THE
EXTENT ARISING UNDER PART 1 OF THE CONSUMER PROTECTION ACT 1987 OF
THE UNITED KINGDOM. SOME STATES OR COUNTRIES DO NOT ALLOW: (1) A
DISCLAIMER OF IMPLIED WARRANTIES; (2) A LIMITATION ON HOW LONG AN
IMPLIED WARRANTY LASTS OR THE EXCLUSION; OR (3) LIMITATION OF
INCIDENTAL OR CONSEQUENTIAL DAMAGES FOR CONSUMER PRODUCTS. IN
SUCH STATES OR COUNTRIES, SOME EXCLUSIONS OR LIMITATIONS OF THIS
LIMITED WARRANTY MAY NOT APPLY TO YOU. THIS LIMITED WARRANTY GIVES
YOU SPECIFIC LEGAL RIGHTS. YOU MAY ALSO HAVE OTHER RIGHTS THAT MAY
VARY FROM STATE TO STATE OR FROM COUNTRY TO COUNTRY. YOU ARE ADVISED
TO CONSULT APPLICABLE STATE OR COUNTRY LAWS FOR A FULL DETERMINATION OF YOUR RIGHTS.
This Limited Product Warranty applies to ZIPATO branded hardware products
(collectively referred to as “ZIPATO Hardware Products”) sold by ZIPATO (Europe),
its European subsidiaries, affiliates, authorized resellers, or country distributors
(collectively referred to as “ZIPATO Resellers”) with this Limited Product Warranty.
The term “ZIPATO Hardware Product” is limited to the hardware components and
all its internal components including firmware.
Parameter number: 6
Available settings: 1~8 (s)
Default setting: 8
7. LIGHT SENSOR POLLING INTERVAL
This parameter can set the light sensor to measure ambient illumination level
interval time. NOTE: This value must be less than Wakeup Interval Time!
Function: Light Sensor Polling Interval
Parameter size: 2 byte
Parameter number: 7
Available settings: 60~3600 (seconds)
Default setting: 180 (s)
8. LUX LEVEL FUNCTION ENABLE
If this parameter is set to “1” and when Lux level is less than the value defined by
parameter #5, PIR sensor will send a BASIC_SET command frame (i.e. BASIC_SET
(value = parameter 3) to an associated device and activate it. If Lux level is greater than the
value defined by parameter #5, PIR sensor will not send BASIC_SET command frame.
Function: Lux Level Enable
Parameter size: 1 byte
Parameter number: 8
Available sttings: 0, 1
Default setting: 0
9. AMBIENT ILLUMINATION LUX LEVEL REPORT
This parameter defines by how much Lux level must change in Lux to be reported to
the main controller.
11.10. 12. 13. 14.
Page 4

controller, or Z-Wave gateway.
1. Remove the sensor cover
2. Make sure the sensor is powered
4. Press the button for 10 seconds, LED will blink once
5. Release the button
WAKEUP MOTION DETECTOR
You can press the button once to wake up the device and send wakeup notification to
controller. LED will blink once.
ASSOCIATIONS (Association Command Class Version 2)
This sensor supports 4 association groups; each group suppoerts max 4 associated
nodes. This has the effect that when the sensor is triggered, all devices associated
with the sensor will receive the relevant reports.
GROUP 1 is lifeline service that is assigned to sensor status - Open/Close. It enables
the sensor to send reports and readings to Z-Wave controller or Z-Wave Gateway
whenever the sensor is triggered. This group supports:
NOTIFICATION_REPORT_V4
SENSOR_BINARY_REPORT_V2
SENSOR_MULTILEVEL_REPORT_V7
BATTERY_REPORT_DEVICE_RESET_LOCALLY_NOTIFICATION
GROUP 2 allows sending control commands to associated devices such as relay
module, lighting, etc. This association group is configured through the advanced
parameters no. 2, 3, 5 and 8. This griup supports: BASIC_SET
GROUP 3 allows sending notifications to associated devices int his group. This group
supports: NOTIFICATION_REPORT_V4
GROUP 4 allows sending sending Sensor Binary Report to associated devices in this
group. This group supports: SENSOR_BINARY_REPORT_V2
Parameter number: 1
Parameter size: 1 byte
Available settings: 8 ~ 255
Default setting: 12
ADVANCED CONFIGURATION
The follwing information is for someone that has some experience in setting up a
Z-Wave system or someone that has computer software running a Z-Wave
controller or Gateway.
1. SENSITIVITY LEVEL SETTING
This parameter defines the sensitivity of PIR sensor. It’s recommended to test the
sensor with moevements from a farthest end of the coverage area at the first time
of use. If movements cannot be detected sensitively, simply adjust the sensitivity
level with this parameter. This parameter can be configured with the value of 8
through 255, where 8 means high sensitivity and 255 means low sensitivity.
Function: Sensivity Level Setting
Parameter size: 1 byte
Parameter number: 1
Available settings: 8 ~ 255
Default settings: 12
2. ON / OFF DURATION
This parameter determines how long the associated devices should have ON status.
For instace, if this parameter is set to 30 (sec), the PIR sensor will send a BASIC_SET
command to associated device with valu BASIC_SET level if PIR sensor is triggered
and associated device will be turned on 30 seconds begore it’s turned off. This
parameter value must be large as Parameter #. If user set this parameter to default
by Configure CC, the parameter # will be set to default value.
Function: ON / OFF duration setting
Parameter size: 2 byte
Parameter number: 2
Available settings: 5~600 (seconds)
Default setting: 30
3. BASIC SET LEVEL
BASIC_SET command will be sent when PIR sensor is triggered. The receiver will
take it into consideration; for instance, if a lamp module is receiving the BASIC_SET
command of which value is decisive as to how bright of dim level of lamp module
shall be.
Function: Basic Set Level
Parameter size: 1 byte
Parameter number: 2
Available settings: 0,1 ~ 99 or 255 0 - OFF, Alarm cancelling or turning device off
1 ~ 99 or 255 - ON (Binary Switch Device)
Dim level (Multilevel Switch Device)
Default setting: 255
4. PIR DETECTION FUNCTION ENABLED / DISABLED
This parameter can enable or disable the PIR sensor detecting function.
Function: Enabled / Disabled PIR function
Parameter size: 1 byte
Parameter number: 4
Available settings: 0 (disable) or 255 (enable)
Default setting: 255
5. AMBIENT ILLUMINATION LUX LEVEL
This parameter can set Lux value which determines when the light sensor is
activated. If the ambient illumination level falls bellow this value and a person moves
across or within the detection area, PIR sensor will send Z-Wave ON command (i.e.
BASIC_set (value = parameter 3) to an associated device and activate it.
Function: Lux Level Set
Parameter size: 2 byte
Parameter number: 5
Available settings: 0~1000 (Lux)
Default setting: 100 (Lux)
6. RE-TRIGGER INTERVAL SETTING
This parameter can be used to adjust the interval of being re-triggered after the PIR
sensor has been triggered. This parameter value must be less than Paramater #2.
If user sets this parameter to default by Configure CC, the parameter #2 will be set
to default value.
Function: Re-trigger interval setting
Parameter size: 1 byte
LED STATUS
1. When sensor is triggered, LED flashes red once.
2. When battery is installed, LED will flash red 5 times
3. Quickly, triple click on the code button to add the PIR sensor to the Z-Wave
network or delete PIR sensor
4. Press the code button for 10 seconds, the PIR sensor will be restored to factory
default settings
5. In normal conditions, the LED light is off
6. Press the button once to wakeup the device and send wakeup notification to
controller, LED flashes red once
ADDING TO Z-WAVE NETWORK
1. Remove the sensor cover
2. Make sure the sensor is powered
3. Set Z-Wave controller or Z-Wave Gateway into inclusion mode
4. Press the button 3 times within 1.5 seconds and the device will enter inclusion
mode. LED will flash on and off 5 times.
REMOVING FROM Z-WAVE NETWORK
1. Remove the sensor cover
2. Make sure the sensor is powered
3. Set Z-Wave controller or Z-Wave Gateway into exclusion mode
4. Press the button 3 times within 1.5 seconds and the device will enter exclusion mode.
RESTORE TO DEFAULT SETTINGS
Reset procedure will delete all information on the Z-Wave network and Z-Wave
Function: Lux Level Report
Parameter size: 2 byte
Parameter number: 9
Available settings: 0~1000 (Lux)
Default setting: 1
NOTIFICATION COMMAND CLASS
Once the sensor detects a movement, it will send NOTIFICATION_REPORT and
SENSOR_BINARY_REPORT to the nodes of lifeline to inform there is an intrusion
event. When the movement is stopped, NOTIFICATION_REPORT and SENSOR_BI-
NARY_REPORT will be sent again to the nodes in lifeline.For compliant Z-Wave 300
seires, there is also the Binary Sensor Command Class.
Notification Report Command:
Event prsent:
Command class: COMMAND_CLASS_NOTIFICAITON
Command: NOTIFICTION_REPORT
Notification type: NOTIFICATION_TYPE_HOME_SECURITY
Event: NOTIFICATION_EVENT_HOME_SECURITY_MOTION_DETECTION_
UNKNOWN_LOCATION
Event clear:
Command class: COMMAND_CLASS_NOTIFICAITON
Command: NOTIFICTION_REPORT
Notification type: NOTIFICATION_TYPE_HOME_SECURITY
Event: NOTIFICATION_EVENT_HOME_SECURITY_NO_EVENT
Binary Sensor Report Command:
Event present:
Command class: COMMAND_CLASS_SENSOR_BINARY
Command: SENSOR_BINARY_REPORT
Sensor type: SENSOR_MOTION
Value: 0xFF
Event clear:
Command class: COMMAND_CLASS_SENSOR_BINARY
Command: SENSOR_BINARY_REPORT
Sensor type: SENSOR_MOTION
Value: 0x00
MULTILEVEL SENSOR
PIR Motion Sensor supports ambient luminance meassurement, the scale is LUX.
And the default Multilevel sensor is luminance too. The settings of luminance
sensor measurement are listed under “Advanced Configuration”
WAKEUP COMMAND CLASS
Majority of time sensor is in sleep status in order to conserve battery life.
The minimum wakeup interval is 300s.
The maximum wakeup interval is 16,777,200s (about 194 days)
Allowable interval among each wakeup interval is 60seconds, such as 360, 420, 480...
NOTE: The deault value is 12 hours. The value is longer, the battery life is greater.
BATTERY CHECK COMMAND:
The users can also enquire the battery status of the motion sensor by sending
BATTERY_GET command. Once the sensor receives the command, it will return
BATTERY_REPORT command. The motion sensor will send BATTERY_LEVEL =
0xFF command to the Z-Wave controller to inform that the motion sensor is in dead
battery status, otherwise BATTERY_LEEL value range is 0% to 100%.
COMMAND CLASSES
This sensor supports following Command Classes:
COMMAND_CLASS_ZWAVEPLUS_INFO (V2)
COMMAND_CLASS_VERSION (V2)
COMMAND_CLASS_MANUFACTURER_SPECIFIC (V2)
COMMAND_CLASS_DEVICE_RESET_LOCALLY (V1)
COMMAND_CLASS_POWERLEVEL (V1)
LIMITED PRODUCT WARRANTY
GENERAL TERMS
Nothing in this Limited Product Warranty affects your statutory rights as a
consumer.
The Limited Product Warranty set forth below is given by Tri plus grupa d.o.o.
(Europe) (herein referred to as “ZIPATO”). This Limited Product Warranty is only
effective upon presentation of the proof of purchase. Upon further request by
ZIPATO, this warranty card has to be presented, too.
EXCEPT AS EXPRESSLY SET FORTH IN THIS LIMITED WARRANTY, ZIPATO MAKES
NO OTHER WARRANTIES, EXPRESS OR IMPLIED, INCLUDING ANY IMPLIED
WARRANTIES OF MERCHANTABILITY AND FITNESS FOR A PARTICULAR
PURPOSE. ZIPATO EXPRESSLY DISCLAIMS ALL WARRANTIES NOT STATED IN
THIS LIMITED WARRANTY. ANY IMPLIED WARRANTIES THAT MAY BE IMPOSED BY
LAW ARE LIMITED IN DURATION TO THE LIMITED WARRANTY PERIOD. TO THE
EXTENT ALLOWED BY LOCAL LAW, THE REMEDIES IN THIS WARRANTY
STATEMENT ARE CUSTOMER’S SOLE AND EXCLUSIVE REMEDIES AGAINST
ZIPATO. THEY DO NOT, HOWEVER, AFFECT OR RESTRICT THE RIGHTS YOU HAVE
AGAINST THE BUSINESS YOU BOUGHT A ZIPATO PRODUCT FROM. IN NO EVENT
WILL ZIPATO BE LIABLE FOR LOSS OF DATA OR FOR INDIRECT, SPECIAL,
INCIDENTAL, CONSEQUENTIAL (INCLUDING LOST PROFIT OR DATA), OR OTHER
DAMAGE, WHETHER BASED IN CONTRACT, TORT, OR OTHERWISE. HOWEVER,
NOTHING IN THIS AGREEMENT LIMITS ZIPATO’S LIABILITY TO YOU (I) IN THE
EVENT OF DEATH OR PERSONAL INJURY TO THE EXTENT RESULTING FROM
ZIPATO’S NEGLIGENCE, OR (II) TO THE EXTENT RESULTING FROM ANY
FRAUDULENT MISREPRESENTATION ON THE PART OF ZIPATO, OR (III) TO THE
EXTENT ARISING UNDER PART 1 OF THE CONSUMER PROTECTION ACT 1987 OF
THE UNITED KINGDOM. SOME STATES OR COUNTRIES DO NOT ALLOW: (1) A
DISCLAIMER OF IMPLIED WARRANTIES; (2) A LIMITATION ON HOW LONG AN
IMPLIED WARRANTY LASTS OR THE EXCLUSION; OR (3) LIMITATION OF
INCIDENTAL OR CONSEQUENTIAL DAMAGES FOR CONSUMER PRODUCTS. IN
SUCH STATES OR COUNTRIES, SOME EXCLUSIONS OR LIMITATIONS OF THIS
LIMITED WARRANTY MAY NOT APPLY TO YOU. THIS LIMITED WARRANTY GIVES
YOU SPECIFIC LEGAL RIGHTS. YOU MAY ALSO HAVE OTHER RIGHTS THAT MAY
VARY FROM STATE TO STATE OR FROM COUNTRY TO COUNTRY. YOU ARE ADVISED
TO CONSULT APPLICABLE STATE OR COUNTRY LAWS FOR A FULL DETERMINA-
TION OF YOUR RIGHTS.
This Limited Product Warranty applies to ZIPATO branded hardware products
(collectively referred to as “ZIPATO Hardware Products”) sold by ZIPATO (Europe),
its European subsidiaries, affiliates, authorized resellers, or country distributors
(collectively referred to as “ZIPATO Resellers”) with this Limited Product Warranty.
The term “ZIPATO Hardware Product” is limited to the hardware components and
all its internal components including firmware.
Parameter number: 6
Available settings: 1~8 (s)
Default setting: 8
7. LIGHT SENSOR POLLING INTERVAL
This parameter can set the light sensor to measure ambient illumination level
interval time. NOTE: This value must be less than Wakeup Interval Time!
Function: Light Sensor Polling Interval
Parameter size: 2 byte
Parameter number: 7
Available settings: 60~3600 (seconds)
Default setting: 180 (s)
8. LUX LEVEL FUNCTION ENABLE
If this parameter is set to “1” and when Lux level is less than the value defined by
parameter #5, PIR sensor will send a BASIC_SET command frame (i.e. BASIC_SET
(value = parameter 3) to an associated device and activate it. If Lux level is greater than the
value defined by parameter #5, PIR sensor will not send BASIC_SET command frame.
Function: Lux Level Enable
Parameter size: 1 byte
Parameter number: 8
Available sttings: 0, 1
Default setting: 0
9. AMBIENT ILLUMINATION LUX LEVEL REPORT
This parameter defines by how much Lux level must change in Lux to be reported to
the main controller.
environment and protect human health. At Zipato, we understand and are
committed to reducing any impact our operations and products may have on the
environment. To minimize this impact Zipato designs and builds its products to be
as environmentally friendly as possible, by using recyclable, low toxic materials in
both products and packaging.
COPYRIGHT
© 2017 Tri plus grupa d.o.o. All Rights Reserved.
No part of this manual may be reproduced or transmitted in any form without the
expressed, written permission of Tri plus grupa d.o.o.
is in conformity with the standard(s) reckognized as giving presumption of
compliance with the essential requirements in the specified European Directive.
The following harmonized standards were applied:
EN 300 220-1 V2.4.1:2012
EN 300 220-2 V2.4.1:2012
EN 301 489-1 V1.9.2 (2011-09)
EN 301 489-3 V1.6.1 (2013-08)
EN 62479:2010
EN 60950-1:2006+A11:2009+A1:2010+A12:2011+A2:2013
Changes or modifications not expressly approved by Tri plus grupa d.o.o. for
compliance could void the user’s authority to operate the equipment.
DISPOSING AND RECYCLING YOUR PRODUCT
When it reaches end of life, dispose of the product according to your local
enviromental laws, guidelines and regulations.
This symbol on the product or packaging means that according
to local laws and regulations needs to be disposed of separately from household
waste. Once this product has reached the end of its life, please take it to a
collection point (recycle facilites) designated by your local authorities, some will
accept your product for free or simply drop it off at your Zipato re-seller store. By
recycling the product and its packaging in this manner you help to conserve the
The term “ZIPATO Hardware Product” DOES NOT include any software applications
or programs.
GEOGRAPHICAL SCOPE OF THE LIMITED PRODUCT WARRANTY
This Limited Product Warranty is applicable to Hardware Products sold by Zipato
Resellers in all countries listed at the beginning of this document under the heading
“Countries in which this ZIPATO Limited Product Warranty applies”. The Limited
Product Warranty will be honored in any country where ZIPATO or its authorized
service providers offer warranty service subject to the terms and conditions set
forth in this Limited Product Warranty. However, warranty service availability and
response times may vary from country to country and may also be subject to
registration requirements.
LIMITATION OF PRODUCT WARRANTY
ZIPATO warrants that the products described below under normal use are free from
material defects in materials and workmanship during the Limited Product
Warranty Period set forth below (“Limited Product Warranty Period”), if the product
is used and serviced in accordance with the user manual and other documentation
provided to the purchaser at the time of purchase (or as amended from time to
time).
ZIPATO does not warrant that the products will operate uninterrupted or error-free
or that all deficiencies, errors, defects or non-conformities will be corrected.
This warranty shall not apply to problems resulting from: (a) unauthorized
alterations or attachments; (b) negligence, abuse or misuse, including failure to
operate the product in accordance with specifications or interface requirements; (c)
improper handling; (d) failure of goods or services not obtained from ZIPATO or not
subject to a then-effective ZIPATO warranty or maintenance agreement; (e)
improper use or storage; or (f) fire, water, acts of God or other catastrophic events.
This warranty shall also not apply to any particular product if any ZIPATO serial
number has been removed or defaced in any way.
ZIPATO IS NOT RESPONSIBLE FOR DAMAGE THAT OCCURS AS A RESULT OF YOUR
FAILURE TO FOLLOWTHE INSTRUCTIONS FOR THE ZIPATO HARDWARE
PRODUCT.
LIMITED PRODUCT WARRANTY PERIOD
The Limited Product Warranty Period starts on the date of purchase from ZIPATO.
Your dated sales or delivery receipt, showing the date of purchase of the product, is
your proof of the purchase date. You may be required to provide proof of purchase
as a condition of receiving warranty service. You are entitled to warranty service
according to the terms and conditions of this document if a repair to your ZIPATO
branded hardware is required within the Limited Product Warranty Period.
[Other than in respect of products for domestic use (in particular those listed in the
first and last boxes in the table below), this Limited Product Warranty extends only
to the original end user purchaser of this ZIPATO Hardware Product and is not
transferable to anyone who obtains ownership of the ZIPATO Hardware Product
from the original end-user purchaser.
PRODUCT WARRANTY PERIOD
Product type: Water sensor
Product warranty period: One (1) year
IMPORTANT
The content of “Product Type” listed above is subject to change; please refer to the
www.zipato.com for latest update.
PERFORMANCE OF THE LIMITED PRODUCT WARRANTY
If a product defect occurs, ZIPATO’s sole obligation shall be to repair or replace any
defective Zipato Hardware Product free of charge provided it is returned to an
Authorized ZIPATO Service Centre during the Limited Warranty Period. Such repair or
replacement will be rendered by ZIPATO at an Authorized ZIPATO Service Centre. All
component parts or hardware products that are replaced under this Limited Product
Warranty become the property of ZIPATO. The replacement part or product takes on the
remaining Limited Warranty Period of the replaced part or product. The replacement
product need not be new or of an identical make, model or part; ZIPATO may in its
discretion replace the defective product (or any part thereof) with any reconditioned
equivalent (or superior) product in all material respects to the defective product.
WARRANTOR
Tri plus grupa d.o.o.
Banjavciceva 11
10 000 Zagreb
CROATIA
TEL +385 (0)1 4004 404 Fax +385 (0)1 4004 405
DECLARATION OF CONFORMITY
The manufacturer Tri plus grupa d.o.o declares under our sole responsibility that
the product:
Marketing model: PIR Motion Sensor
Regulatory model: ne-nas-pd01z
Trade/Brand name: Zipato
16.15. 17. 18. 19.
 Loading...