


58MM Portable MINI Thermal Printer
Instruction Manual
Version
F b, 2017e
No t i c e
Declaration
All rights reserved. Reproduction of any pa rt o f th is m an ua l in a ny f or m
whatsoever, without manufacturer’ s ex pr es s p er mi ss io n i s forb id de n.
The contents of this manual are subject to ch an ge w it ho ut n ot ic e.
Al l ef for ts h a ve b een m ad e to en su re th e ac cura c y of t h e co nte nt s o f
th is m anua l a t th e t im e o f go ing t o p re ss . H ow eve r, s ho ul d a ny e r ro rs
be d et ecte d , ma nuf ac tur er w ould gr ea tly a pp reci a te bei n g in fo r me d
of t he m.
The above notwithstanding, manufactur er c an a ss um e no r es po ns ib il it y
for any errors in this manual
We ha ve b ee n ca re fu ll y ha nd li ng t he m an ua l an d tr yi ng ou r be st to
ensure the accuracy of th e co nt en ts of this m an ua l. But we sti ll c an ’t
promise it is always correct due to our pro du ct s ar e b ei ng impr ov ed and
updated all the time. The c on te nt s of t hi s ma nu al w il l be u pd at ed w it ho ut
notice at any time.
All of our products must be us ed u nd er e nv ir on me nt s/l ocations whic h
are taken care by human being. We a re n ot re sp on si bl e f or any l os s or
damages caused by any ac ci de nt whil e the p ro du ct s a re u se d wit ho ut
taken-care by human being. If there are a ny p ro du ct s fa il ur es c au se d by
human behaviors or n at ur al d is as te r, we w il l no t prov id e or j us t p rovi de
partial free maintenance.
Please contact local agents for the lates t in fo rm at io n of t he p ro du ct s.
FCC ID:RVUZJ-5801DD

Inst ru cti on M annua l
58MM P or tab le M INI The rm al Prin te r
1 2
Notes on safety
Thi s se ct io n pr es en ts i mp or ta nt i nf or ma ti on i nt en de d to en su re sa fe ty
and eff ec ti ve u se o f th e pr in te r. Pl ea se r ea d ca re fu ll y.
Be sure to use the specified battery an d po we r so ur ce prov id ed by our
company. Con ne ct io n to an im pr op er po we r so ur ce ma y c au se fire ,
explosion or damage to the printer.
Don’t put the battery into the fire or wa te r, do n’ t di sa ss em bl e or m od if y
the battery, don ’t b e sh or t ci rc ui t, o th er wi se m ay r es ul t in i nj ur y or f ire
even explosion.
If the p rinte r wou ld not be used for a lon g time, be sure to take o ff the
bat ter y, oth erw ise the bat ter y may l eak the co rrosi ve l iquid o u t, if
impro per o p e ratio n cau se s ba tte ry leak , and t he li quid is spat tered on
the ski n or clothes, plea se wa sh it w ith wat er im media tel y, if spa ttere d in
the e yes , ple as e rins e t h e m wit h water t hor oughl y and see a docto r.
Please don’t open the paper room cover when it is printin g or j us t wh en
printing is ov er, d o no t to uc h th e pr in t he ad w it h ha nd or b od y, over he at
may cause scald.
Notes on using
1、 Do not st or e th e pr in te r in h ot a nd h um id c on di ti on s.
2.、Th e lit hi um ba ttery h ave a c har ac ter t hat i f it is n ot us ed fo r sever al mo nt hs,
i t possib ly ca n’t be char ged e ver.
3、 The pr in te r ’s pow er a da pt er i s to b e co nn ec te d to a s ta bl e po we r 110 ~2 20
Volts , please do not use other devices o n th e sa me p ow er s oc ke t, t o av oi d
voltage fluctuations.
4、 Avo id w at er or con du ct iv e ma te ri al ( fo r ex am pl e: m et al ). I f wa te r is p re se nt
on th e s ur fa ce p le as e tu rn o ff th e po we r im me di at el y.
5、 Pl ea se ens ur e th at a t he rm al p ap er r ol l is a lw ay s in se rt ed i n th e pr in te r to
avoi d damaging the printing roller and th e pr in te r he ad .
6、 P le as e en su re that y ou r pr in te r is se rv ic ed and repa ir ed b y a q ua li fi ed
tec hn ic ia n. No re sp on si bi li ty is take n for mis us e an d/ or n on -q ua li fi ed
ser vi ci ng .
7、T he po we r ad ap te r th at c om es w it h th is p ri nt er i s sp ec if ic al ly d es ig ne d to b e
only used with the printer, please do not use an a lt er na ti ve p ow er a da pt er. or
use 9V-2A The s ta nd ar d po we r ad ap te r.
8、In orde r to e ns ur e pr in t qu al it y an d lo ng ev it y of y ou r pr in te r, pl ea se e ns ur e
tha t onl y go od q ua li ty t he rm al p ap er r ol ls a re u se d.
9、P le as e ke ep this m an ua l in a s af e pl ac e, w he re i t ca n be a cc es se d ea si ly
and used for your reference.
1.Features & Application area
一.Fe ature s
It can print 58mm width therm al p ap er
High-speed,Clear printing
Super power lithium electricity, s ta nd by t im e ca n re ac h 5- 6 da ys
Aut o sleep, auto awake, save electrici ty
Small s iz e、light weight、reliable performance、simple to co nn ec t、
easy to use
二.Ap plica tion ar ea
2.Specification
PrintingMethod: Direct The rm al
Spee d:≤9 0mm /s ec
Reliability TPH L if e: 1 00 km
Resolution: 203DPI (8dot/mm)
Relative to the traditional the rm al r ec ei pt p ri nt er, M in i po rt ab le p ri nt er h as
smaller body, mo re r el ia bl e ca pa bi li ty, m or e co nv en ie nt p ri nt in g an d po rt ab le
advantages. The M in i pr in te r ca n be w or ke d on a l ot s of l oc at io ns , su ch a s th e
TAXI b il l pr in ti ng , ad mi ni st ra ti ve f ee s re ce ip t pr in ti ng , po st r ec ei pt p ri nt in g,
restaurant ordering information printin g, o nl in e pa ym en t in fo rm at io n pr in ti ng , et c.
With the rapid popularity of smart- mo bi le , Mi ni p ri nt er w il l be m or e wi de ly u se d
in the near future.
3
4
Inst ru cti on M annua l
58MM P or tab le M INI The rm al Prin te r
Printing Width: 48mm (384dot)
Paper Width: 58±01mm
Roll Diameter: φ≤40mm
Paper Type : Th er ma l Pa pe r
Power: rechargeable lithium battery/N I- MH b at te ry
Battery: 7.4VDC, 1500mAh
Charging mode: DC 9V/1.5A
Print parameters: support to do wn lo ad t he L og o tr ad em ar k, s up po rt b ar -c od e
print.
Support bar-code types: UPC-A / UPC- E / JA N 13 ( EA N1 3) / J AN 8 (E AN 8) /
CODE39 / ITF / CODABAR / CO DE 93 / C OD E1 28 ; Tw o- di me ns io na l co de :
QR CODE
Character size: 384 dots/line
FontA:12*24dots,1.5(W)* 3. 0( H) mm
FontB: 9*17dots, 1.1(W)*2 .1 (H )m m
FontC: 9*24dots, 1.1(W)*3.0 (H )m m
Simplified/Tr ad it io na l: 24 *2 4d ot s, 3. 0( W) *3 .0 (H )m m
Printing Chinese character: Ch in es e: s im pl if ie d C hi ne se 2 4x 24 p oi nt . su pp or t
GB18030 font library, su pp or t Taiw an a nd H K tr ad it io na l( co mp le x fo nt )
ANK: ANKcharacters
Language: support for multiple languages
(Support Traditional, Korean, Japanese, et c. m us t be i ns tr uc te d be fo re
purchased )Extended character tab le :
OEM437/Katakana/OEM850/OE M8 60 /O EM 86 3/ OE M8 65 /W es t E ur op e/ Gr ee k
/Hebrew/EastEurope/Iran /W PC 12 52 /O EM 86 6/ OE M8 52 /O EM 85 8/ Ir an I I /
Latvian/Arabic/PT15112 51 /O EM 74 7/ WP C1 25 7/ Vi et na m/ OE M8 64 /H eb re w/
WPC1255/Thai
Emulation: ESC/POS command
Interface: standard RS232/USB, Bluetooth 3.0&4.0(option)/SPP agreement or
infrared/IRCOMM agreement (optional)/Android up to 4.0 operation system. Driver:
Win2003/Win2000/Win7/WinXP/VISTA/WIN8/Win10/LINUX
Wor ki ng Tem pe ra tu re : -1 0~50 ℃
; Humidity: 10~90%
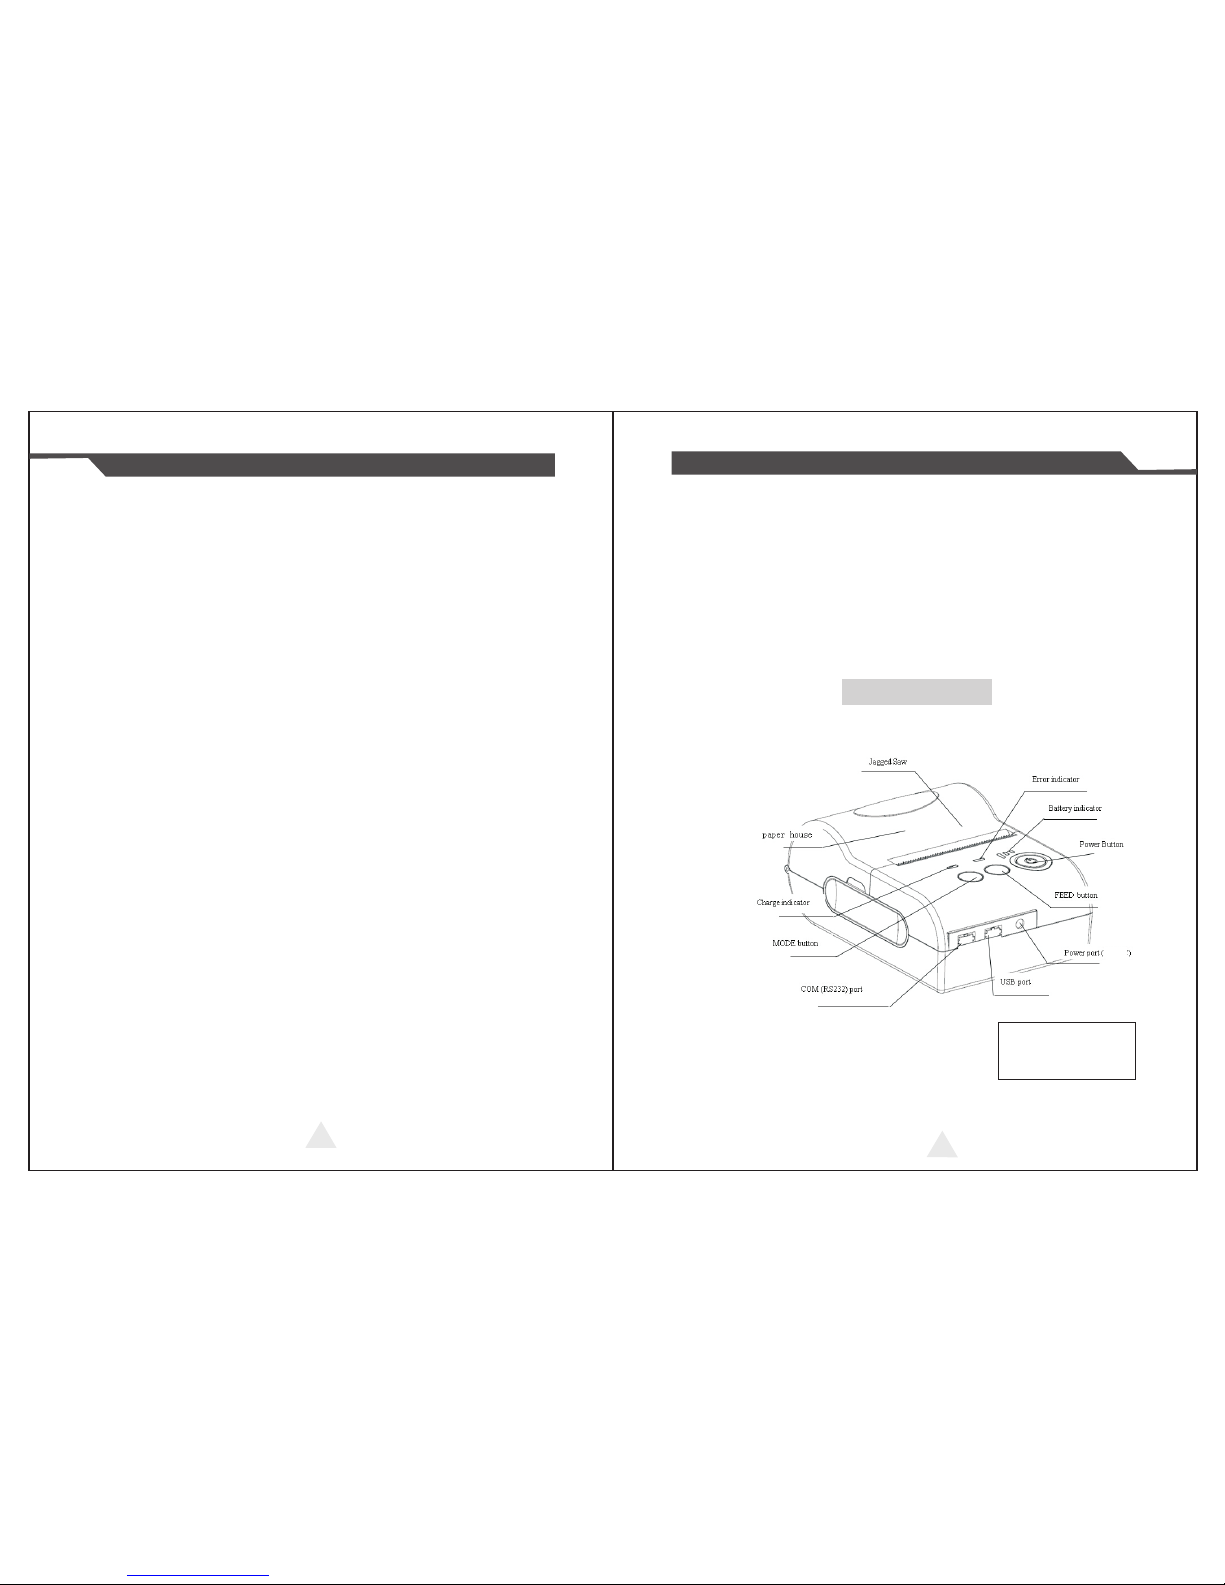
3.Appearance
Mod el:5 801
Siz e:10 3*75 *46m m
Wei ght: 134g (wit hout b atte ry)
Charging: Red Light
Full: Blue Light
9V D C

5
6
Inst ru cti on M annua l
58MM P or tab le M INI The rm al Prin te r
4.Communication Interface
1. RS232(COM):standard RS232 Communications Protocol
2. Bluetooth 3.0/4.0:standard Bluetooth 3.0/4.0 Communications Protocol
3. USB:standard USB Communications Protocol
Mod el:5 802
Siz e:10 2*78 *46m m
Wei ght: 134g (wit hout b atte ry)
Charging: Red Light
Full: Blue Light
9V D C
Charging: Red Light
Full: Blue Light
9V DC
Mod el:5 805
Siz e:10 7*79 *51. 5mm
Wei ght: 192g (wit hout b atte ry)
Charging: Red Light
Full: Blue Light
Unco nnect : Light o ff
Conn ect: Li ght (Gr een )
Mod el:5 807
Siz e:112 *82* 53mm
Wei ght: 210g (wit hout b atte ry)

7 8
Inst ru cti on M annua l
58MM P or tab le M INI The rm al Prin te r
RS-232 is de ve lo pe d ac co rd in g to t he EIA s ta nd ar d asynchronous
transmission, the specificati on s ar e as f ol lo wi ng :
Data transmission: serial interfa ce
Synchronization: asynchronous
Signal Level: RS-232 level, logic 1:-5. 4v, l og ic 0 : + 5. 4v
Hardware Flow Control: None
Baud rate: 2400pbs to 1152 00 pb s is o pt io na l
Data word length: 8 bits
Stop bit: 1bit
Parity: None
4-1 . RS-23 2 Seria l (COM) I nterf ace
Users can g et t he c ur re nt b au d ra te f ro m th e pr in te r se lf -t es ti ng pa ge .
Serial cable: We ha ve m ad e th e ca bl e sp ec ia ll y us in g mini por t li ke M in i
USB port which co nn ec ts t he p ri nt er . Th e fol lo wi ng p ic tu re sh ow s t he
signal definiti on o f th e RS -2 32 S er ia l in te rf ac e:
The connection between the p ri nt er a nd h os t fol lo ws the fo ll ow in g
rules:
Printer
TXD
RXD
GND
Host
RXD
TXD
GND
Printer
RXD
GND
Host
TXD
GND
However, the printer usually works o nl y on r ecei vi ng data, it doesn’t
have to respond anything back to the host , the n TX D si gn al c an b e ig no re d ,
and then the connection can be sampled as following:
Bluetooth is a proprietary op en w ir el es s te ch no lo gy sta nd ar d f or exchanging
data ove r sho rt distances (u si ng s ho rt -w av el en gt h ra di o t ra ns mi ss io ns i n the
ISM ba nd from 2 40 0– 24 80 MHz ) fr om fi xe d an d mob il e de vi ce s,c rea ti ng per so na l
area netwo rk s (PAN s) w it h hi gh l ev el s of s ec ur it y.
4-2 . Bluet ooth Co nnect ion
4-2 -1. Blu etoot h speci ficat ion
Using blueCore4-Ext chipset, fully compatible with Bluetooth 3.0;
Hig h- se ns itivi ty r ec ei ve sign al , sm al l siz e, l ow er c onsum pt io n
Sup po rt in g 1200b ps ~ 1 38 24 00bps v ar ie ty of bau d ra te ;
Sup po rt in g SPP agr ee ment, t he m ax imum tr an sf er s peed is u p to 3 Mbit / s;
4-2 -2. Use “ AT” com mand to m odify B lueto oth Mod ule’s p arame ters
Noti ce: The fo llo wing chang es can’t be done by user, thes e shoul d be
done in factor y by Manu facture r. So if user wants to change th ese pa rame ter s,
pleas e info rm our sa les person be fore order ing ou r prin ters .
Modify name---Send characte r st ri ng “ AT+ NA ME XX XX , fe ed ba ck “ Ok na me ”;
For example, if you w an t ch an ge n am e to “ Bl ue to ot h Pr in te r” , pl ea se
send string “AT+ NA ME B lu et oo th P ri nt er ”.
Modify PIN code--- Send character s tr in g “AT +P IN XX XX , fe ed ba ck “ Ok se tp in ”;
For example, if you want change PIN code to “ 88 88 ”, pl ea se s en d st ri ng ” AT
+PIN8888”.

9 1 0
Inst ru cti on M annua l
58MM P or tab le M INI The rm al Prin te r
(Note: Default PIN co de i s “1 23 4” , yo u on ly c an r es et P IN c od e wi th f ou r
figures.)
Clear Bluetooth address--- Send charact er s tr in g “AT +C LR 00 ”, f ee db ac k
“Okclear”;
Modify baud rate--- Send character st ri ng “ AT+ BA UD X, f ee db ac k “O k+
current baud rate”; X repre se nt s th e ba ud r at e co de , as f ol lo wi ng :
1-----1200 7- -- -- - 5 76 00
2----- 2 40 0 8 -- -- -- 115 20 0
3----- 480 0 9- -- --- 2 3040 0
4----- 9600 A-- -- -- 4 60 80 0
5----- 1 92 00 B--- -- - 921600
6------384 00 C------1382400
For example, if you want to c ha ng e ba ud r at e to 11 52 00 bp s, p le as e se nd
string “AT+B AU D8 ”.
4-2 -3. Bui ld conn ectio n.
1. Turn on the printer;
2. Search for the Bluetooth device wi th h os t de vi ce ;
3. If there are other Bluetooth devices , pl ea se s el ec t “LY 58 ”( fo r ex am pl e)
printer;
4. Enter default pairing code “1234”
5. Pairing succeed.
4-3 . USB Int erfac e
The printer is connected by standard Mi ni U SB c ab le (i nc lu de d in a cc es so ri es )
for communication. Th e US B ty pe b el on gs t o sl av e de vi ce t yp e.
5.The installation of the paper roll
The p ri nt er u se 5 8M M th er ma l pa pe r, an d ad op t to e as y pa pe r lo ad in g. S o
the paper is very convenient install.
Paper diameter Max 40mm.
Thermal paper installation method is as fol lo ws :
(1) Open the printer top cover
(2) Thermal Paper as follow Graph to put in to p ap er s to re ho us e
(3)Put out a little of the paper outside pri nt er, th en c lo se t he t op c ov er.
(4)Use paper sawtooth tear off r ed un da nt p ap er
But ton Ope ratin g Instr uctio ns
POW ER(Blue L ight) FE ED(Red Li ght ) P rinte r Statu s
OFF OFF P rinte r Close
ON(Al ways) OFF Pri nter op en and ha ve pape r
ON( Alway s) Flas h Prin ter Ope n , wi tho ut pape r
Und er the no rmal wo rking s tatus , the pap er feed ing
beg ins whe n press 【F EED】 b ut to n, a nd st op when
loo sen【FEE D】 bu tt on .
The p rinte r paper f eed
Pow er off th e pr in ter, t hen hol d down t he【FE ED】
but ton and p ress th e power b utton a t the sam e
tim e. Wait 2 s ec ond s ,then l oosen t he【FEED】
but ton,t he curr ent set ting wi ll be pri nted ou t.
The p rinte r Self te st
Pow er off th e pr in ter, t hen hol d down t he【FE ED】
but ton and p ress th e power b utton a t the sam e
tim e. Wait u nt il th e power i ndica tor &【ERR OR】
led a re both o n, and th en 【ERRO R】led goe s off,
the n loose n the【FEE D】butto n, the la nguag e
set ting st atus wi ll be pri nted ou t.
Tra ns for matio n in both
Eng lish an d Chine se

1 1
1 2
Inst ru cti on M annua l
58MM P or tab le M INI The rm al Prin te r
Pow er o ff th e pr int er, then h ol d dow n th e【FEE D】
but to n an d pre ss t he po wer but to n at th e sa me
tim e. Wa it u nti l the pow er i ndi ca to r &【ERR OR】
led a re b oth o n, and th en 【E RRO R】le d go es ou t,
aft er, 【E RRO R】led goe s on a gai n ,t he n loo se n
t he【F EED】b ut to n, th e de nsity sett ing s ta tus
will b e pr int ed o ut . (I t ha s thr ee leve ls sett in g for
pri nt in g den si ty, it i s a ci rcl e Lo w lev el Midd le
lev el H ig h lev el L ow le vel…, P le ase s wi tc h
the d en sit y statu s by r epe at in g ope ra ti on pr es en ted
abo ve .)
Set p rinti ng dens ity
out , then lo osen th e【MODE】bu tton. T he p ri nte r
tur ns into t he hexa decim al prin ting mo de and
pri nt the pr esent ation .Way to q ui t hex adeci mal
pri nting : T he w ay t o qui t hexad ecima l print ing
mod e is swit ch off th e pr in ter .
Pow er off th e pr in ter, h old do wn th e【MODE】
but ton and p ress th e power b utton a t the sam e
tim e. Wait u nt il th e power i ndica tor &【ERR OR】
led a re both o n, and th en 【ERRO R】led goe s
Hex adeci mal pri nting
6.Operating Manual for Android OS
7.Operating Manual for IOS APP
Thi s ma nu al a pp li es t o al l of o ur a nd ro id O S co mp at ib le p ri nt er s
( both 58mm & 80mm width printer)Currently, the common communication ports we
used for android OS are ( USB、Ethernet、Bluetooth )
If you want to use Android De vi ce c on ne ct ed w it h ou r pr in te r, fi rs t of a ll
make sure that printers can be su pp or te d An dr oi d Op er at e Sy st em , pr oc ee d
as follows ( Bluetooth as example):
Step 1:
- Insert the CD driver disc into the CD -R OM , co nn ec t yo ur An dr oi d de vi ce
with your computer;
Step 2:
- Find the File Named “ SDK” from the C D dr iv er, T he n fo ll ow t he p at h : “ And ro id
SDK---BLUETOO TH DE MO - -- -b in -- -- BT- PO SP ri nt er. AP K “ , an d in st al l it i nt o yo ur
Android device.
Step 3:
- Connect your Android device with our printer once th e in st al la ti on d on e .
Step 4:
- Find this icon on the Androi d de vi ce , an d cl ic k “C on ne ct P ri nt er ” to s ea rc h th e
Bluetooth printer, (Default pairing pass wo rd f or B lu et oo th c on ne ct io n is “ 1 23 4” ) .
After the connection successfully, cl ic k on t he " Pr in t Test P ag e" , th e pr in te r wi ll w or k
.
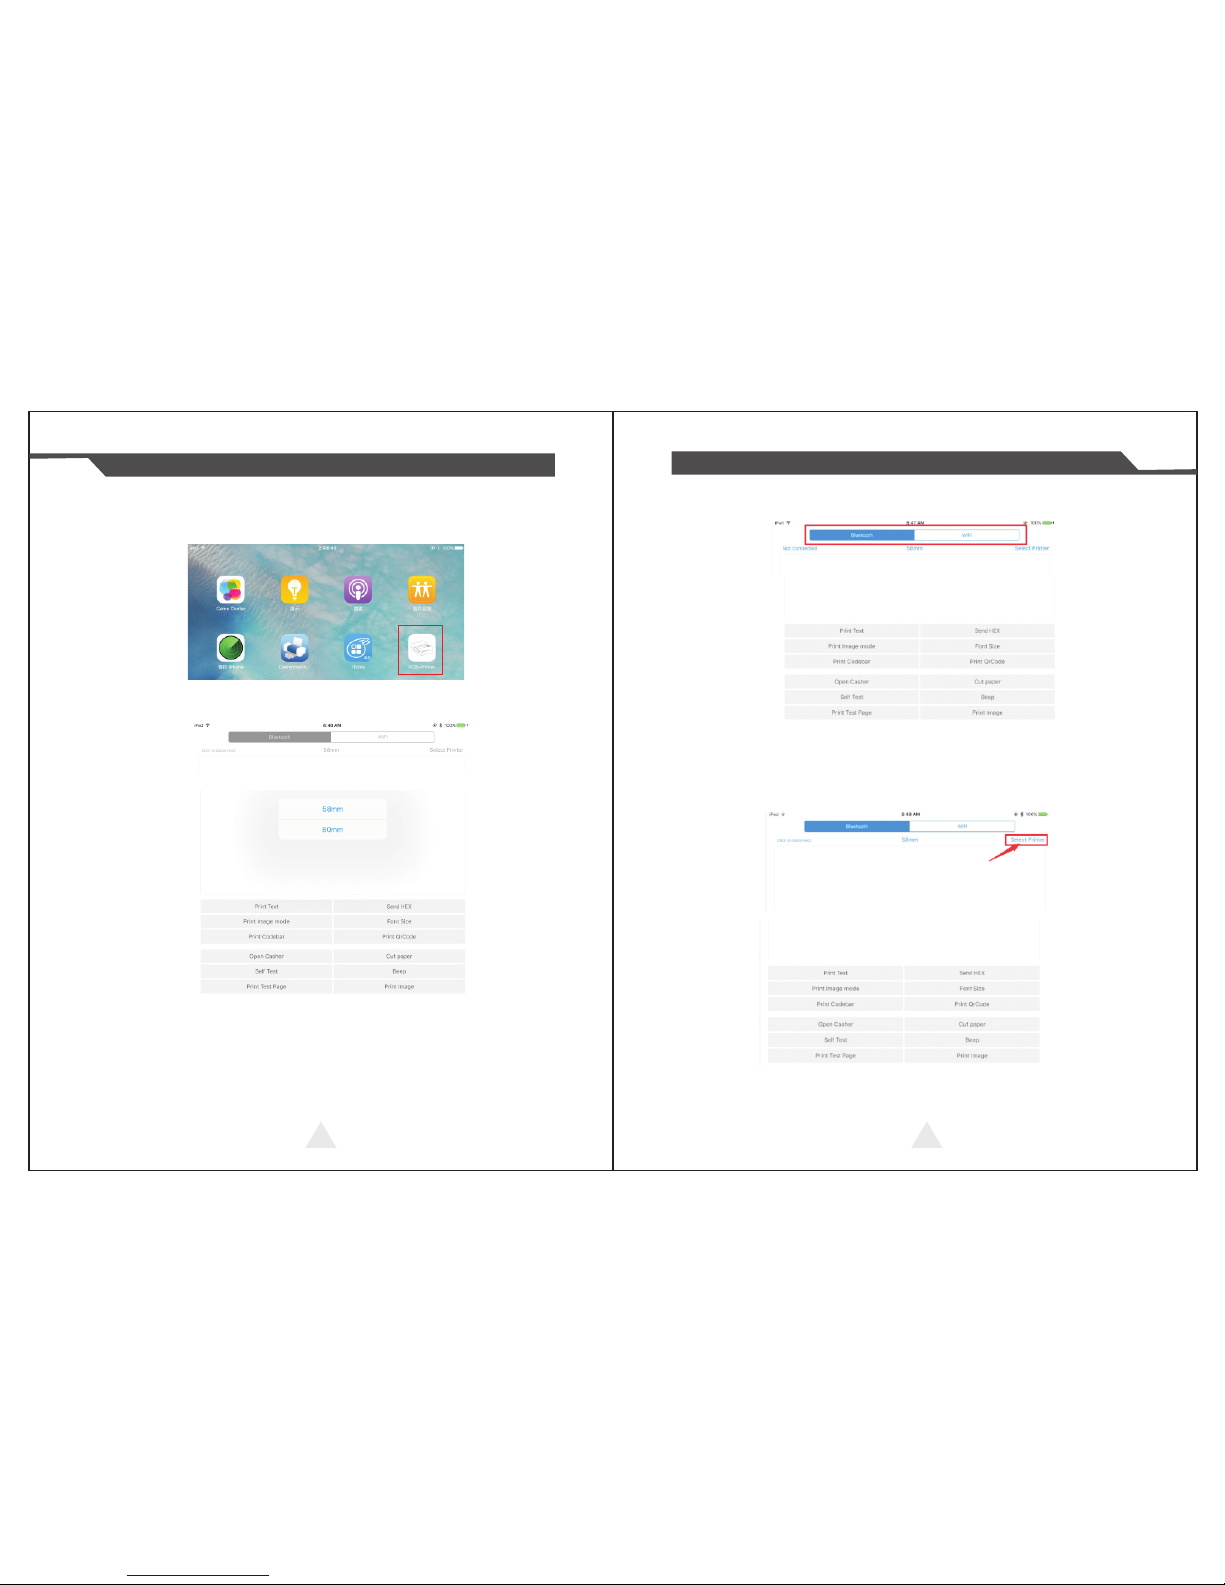
1. Download the Test Tool s “P OS -P ri nt er V1 .0 ” fr om Ap p St or e, as b el ow :
(I ma ge 1 )
If you use the "Ethernet interface", "USB" communication, replace "
BLUETOOTHDEMO" from "Step 2" into the corresponding "NETDEMO", "USBDEMO" .
Please noted, the customers can get all the original code from below path if you need to
develop your own APK ( Path is
src com z
: )
j printdemo
1 3
1 4
Inst ru cti on M annua l
58MM P or tab le M INI The rm al Prin te r
2. Turn on the Bluetooth setting of IO S de vi ce , t he n cl ic k “P OS -P ri nt er ”:
3. Into the App of “POS-Printer” , se le ct t he p ap er w id th a s be lo w:
(I ma ge 3 )
4. Select the way of communication of printers, “Bluetooth” :
5, If connect with Bluetooth, the n yo u ca n cl ic k “ Se le ct P ri nt er ” fi rs t, y ou w il l se ar ch
the “Bluetooth Printer” (th e de fa ul t na me o f pr in te r is B lu et oo th P ri nt er ), c li ck i t to
be connected.

1 5
1 6
Inst ru cti on M annua l
58MM P or tab le M INI The rm al Prin te r
6, If above steps are successful, then you can print text to have a test:
① Send HEX: In the text box, ente r th e he xa de ci ma l da ta , cl ic k “S en d HE X” , th en
can send text box hexadecimal data to t he p ri nt er.
② Print Image mode: input data in the tex t bo x, c li ck " Pr in t Im ag e mo de ", y ou w il l
be able to convert the contents of th e te xt b ox i nt o a im ag e pr in te d
③ Open Casher: If your printer is conne ct ed w it h th e ca sh d ra we r, cl ic k "o pe n
casher", the drawer will be opened (porta bl e pr in te rs w it ho ut d ra we r in te rf ac e,
this feature does not work).
④ Cut paper: After click on it, the paper wi ll b e fe ed o ut a nd c ut ( po rt ab le p ri nt er s,
58 series of printers witho ut c ut te r, th is f ea tu re d oe s no t wo rk ).
⑤ Self Test : Cl ic k th e "s el f- te st ", t he p ri nt er w il l pr in t ou t a se lf -t es t pa ge ( be ca us e
the Bluetooth printer has been connec te d to t he d ev ic e, t he n th e Bl ue to ot h
name or MAC address will be not displayed i n th e se lf -t es t pa ge ) .
⑥ Beep: Click the "Beep", the printer wil l be ep s ou nd ( po rt ab le p ri nt er s, 5 8 se ri es
of printers without buzzer, th is f ea tu re d oe s no t wo rk ).
⑦ Print test page: Click the "Pri nt Tes t Pa ge ", t he t ex t wi ll p ri nt a s ec ti on o f th e
test, to confirm th at t he p ri nt er
7, Other features of this APP:
9.The applicable version: can be compatible with IO S6 .0 o r ab ov e ve rs io ns .
8.The Bluetooth configuration
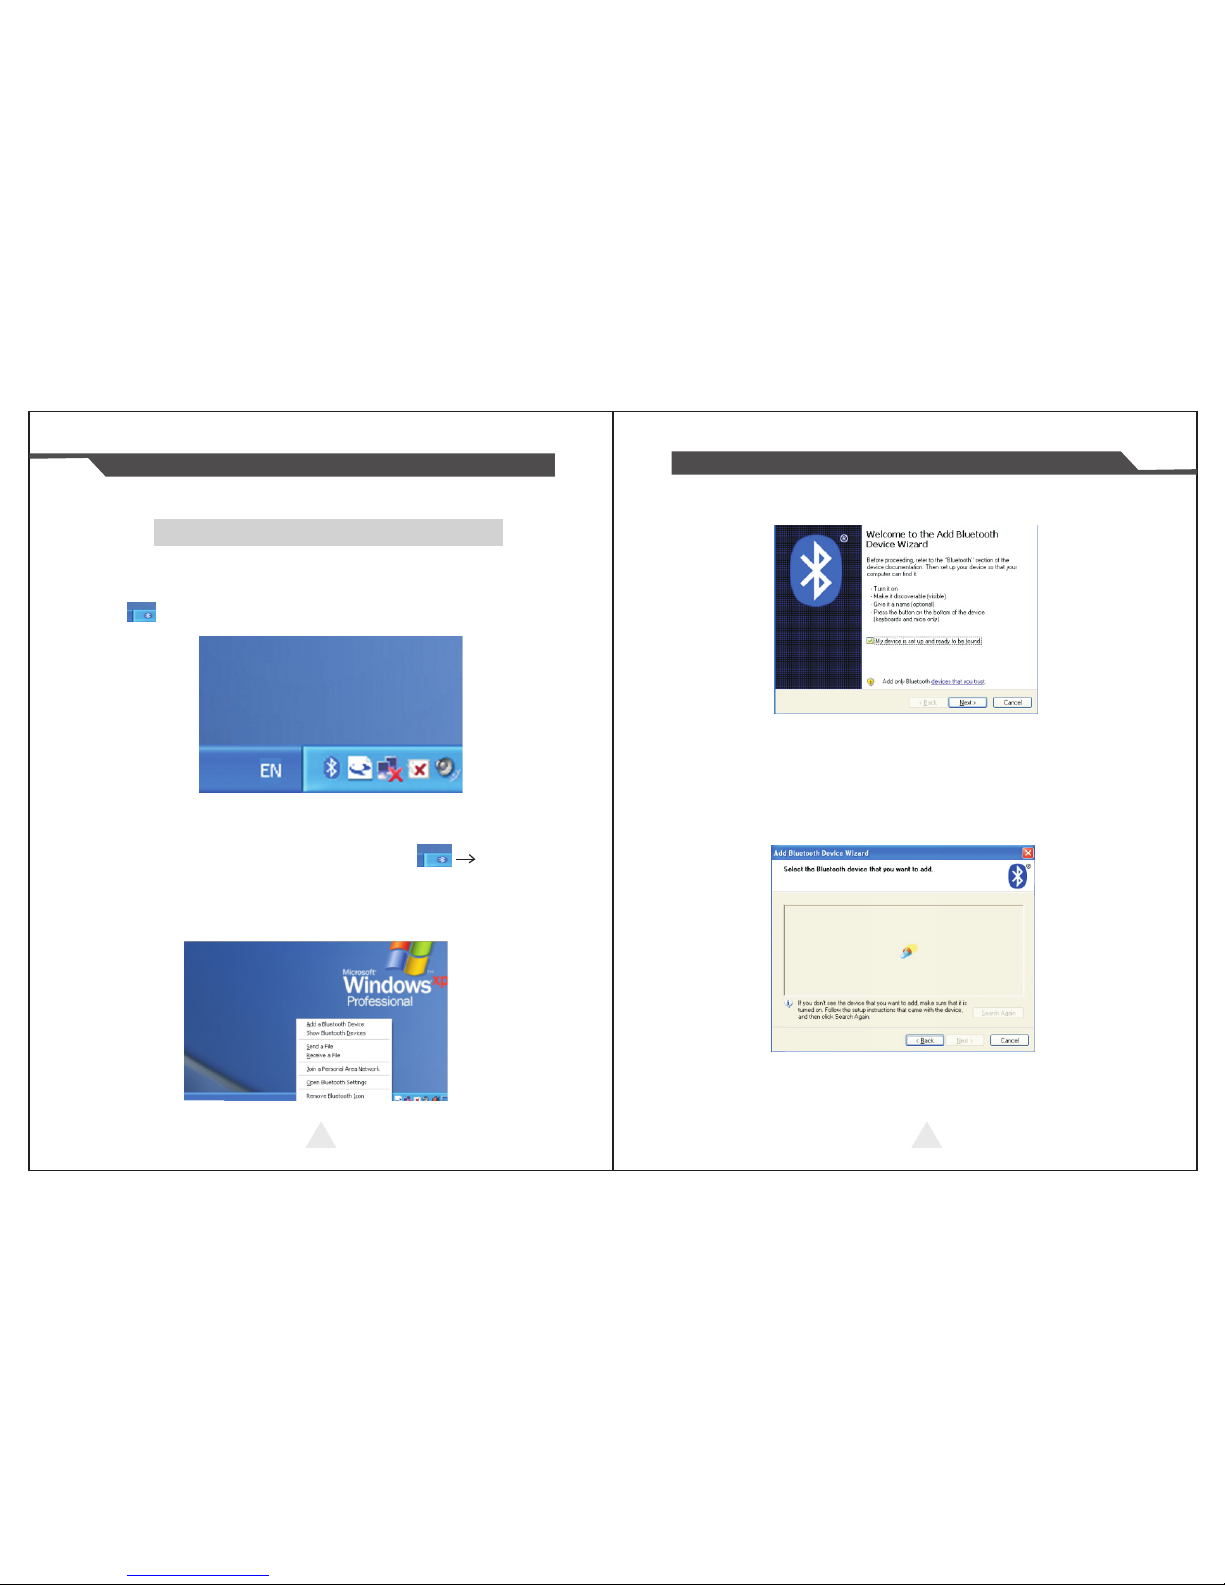
Step1: Make sure your de vi ce ( lik e PC , No te B oo k ) has Bl ue to ot h fun ct io n,
then once the Bluetooth for your device is ac ti va te d, y ou w il l se e th e Bl ue to ot h
sign showed in the right bott om s id e of y ou r de vi ce (l ik e PC ) sc re en .
1 7
1 8
Inst ru cti on M annua l
58MM P or tab le M INI The rm al Prin te r
Step2:Power on the Bluetooth printer.
Step3:To add the Bluetooth printer, please left- cl ic k th e cl ic k “A dd
a Bluetooth Device” ,then you will ent er wizard sc re en , p le as e c ho os e “M y
device is set up according and ready to be found”click “N ex t” (s ho we d as b el ow ).
Step4:if you can see screen as below,then th e devi ce i s se ar ch in g th e bl ue to ot h
printer,please wait.

1 9
2 0
Inst ru cti on M annua l
58MM P or tab le M INI The rm al Prin te r
Step5:Once the Bluetooth printe r is f ou nd . You ca n se e it l is te d on t he s cr ee n,
click “Next”
St ep 6: Ch oo se “L et m e ch oo se my o wn p as sk ey” , th en e nt er “1 23 4” ( thi s is
fa ct or y de fa ult p as sk ey, i f yo u wan t to c ha ng e it, y ou ha ve to inf or m us t o
se t th e ne w pa ssk ey f or y ou i n o ur f ac to ry b efo re s hi pp in g), the n c li ck “Ne xt ”.
Step7:if you can see the screen as below, that mea ns t he B lu et oo th p ri nt er i s
already connected. Please notice th e as si gn ed C OM p or ts , th en C li ck ”F in is h” .
(N ot e: T he B lu et oo th d ev ic e wi ll a ut om at ic al ly a ss ig n a CO M po rt .)
Step8: Now if you want to test if the p ri nt er i s OK t o pr in t, y ou c ou ld u se a c om
tool , and send printed data to Outgoing COM po rt ( ju st a s ab ov e im ag e sh ow n:
COM5).
(Com tool setting is 9600,N,8,1.)
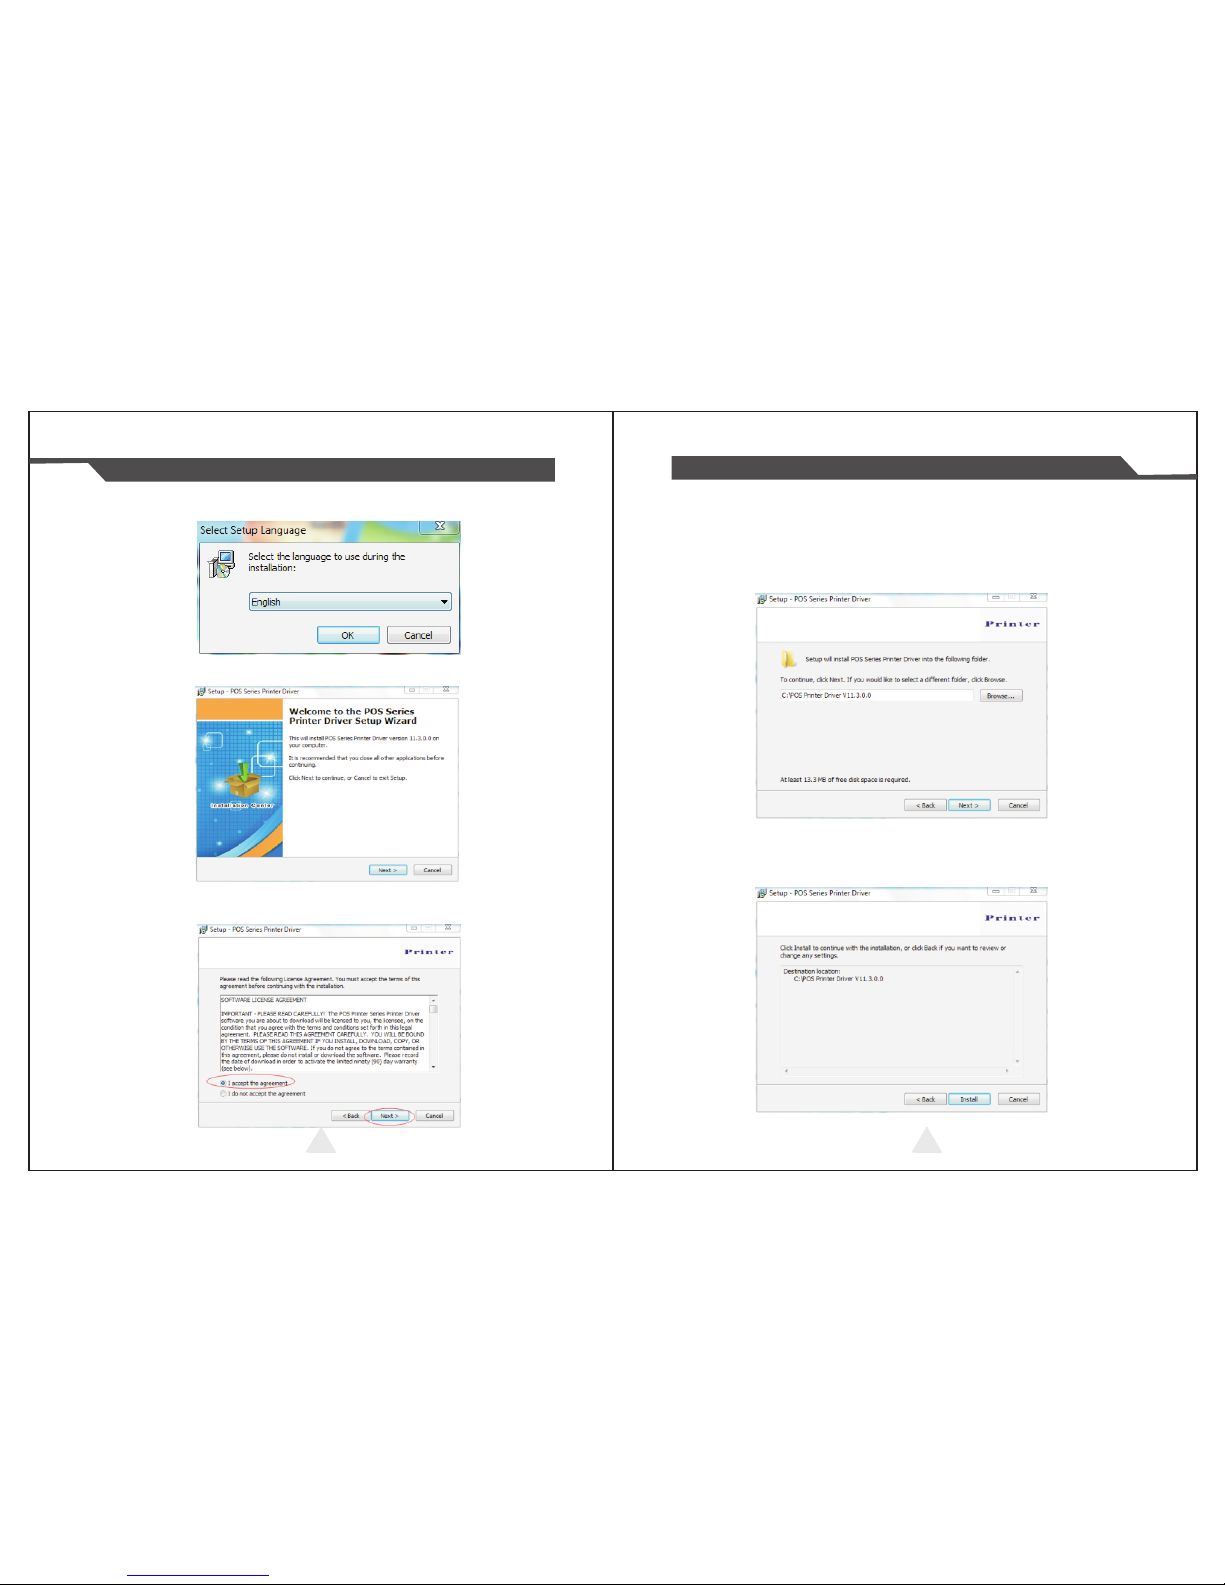
1.Insert the CD-ROM,click o n th e fi le (5 8/ 80 s er ie s pr in te r dr iv er s of tw ar e )t o
star to installation ,select th e la ng ua ge a pp ea rs a s yo u ne ed t o in st al l th e
driver,as shown below:
9. USB port to be used
2 1
2 2
Inst ru cti on M annua l
58MM P or tab le M INI The rm al Prin te r
2.Then select the language click “OK” ,a s sh ow n be lo w ,c li ck ”C on ti nu e” to n ex t
step.
3.please read the following License Agreement ,accept an d co nt in ue t he
installation , as shown below:
4.Click :Next”after the operat io n in t he b el ow f ig ur e( Cu st om er c an a ls o mo di fy
the path of the driver can choose the d ef au lt i ns ta ll at io n pa th )
5.Then click”Next”after the o pe ra ti on a s sh ow n be lo w ,c ho os e “i ns ta ll ”, i f yo u
computer has antivirus software , ap pe ar s to b lo ck t he i ns ta ll at io n of t he
windows allow this operation.
2 3 2 4
Inst ru cti on M annua l
58MM P or tab le M INI The rm al Prin te r
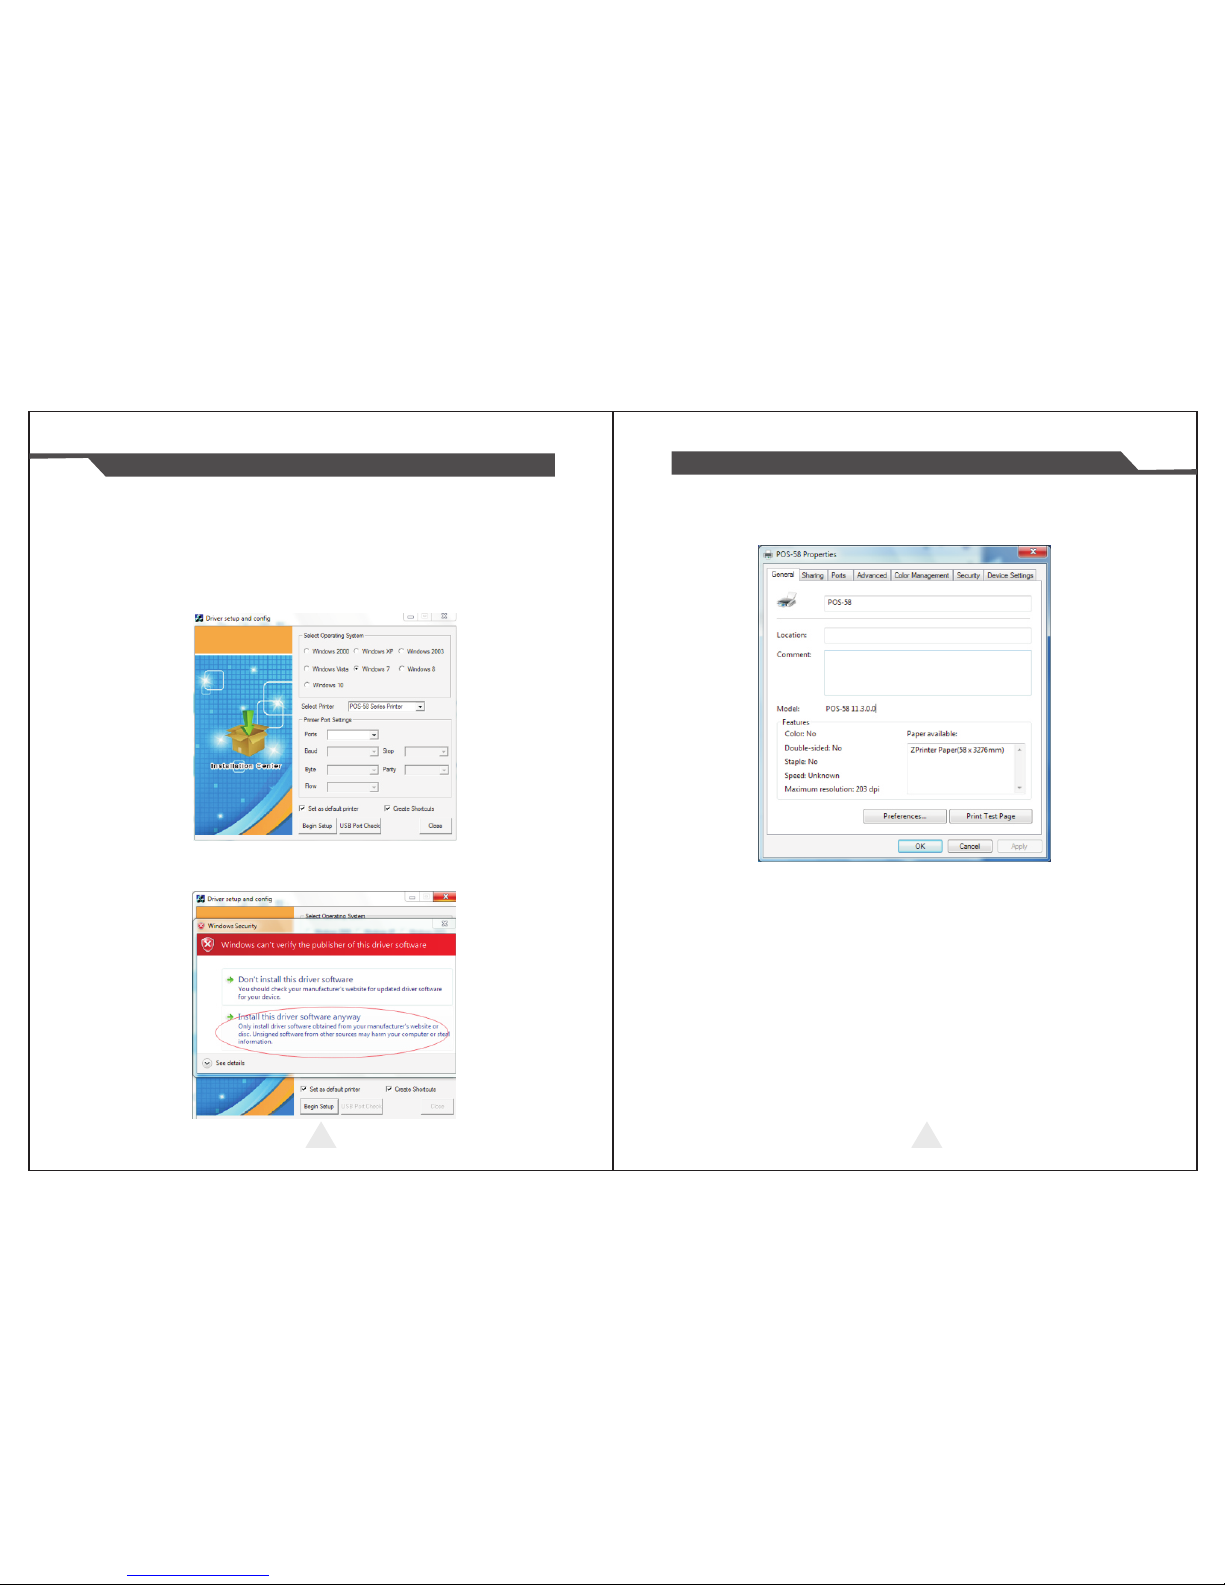
6.Wai t fo r th e in st al la ti on i nt er fa ce a pp ea r as f ol lo ws a ft er t he c om pl et io n ,
choose your computer ’s o pe ra ti ng s ys te m ,t he n se le ct t he p ri nt er m od el
(POS58 series printer),if y ou u se a U SB i nt er fa ce t o co mm un ic at e , cl ic k
“USB Port Check”automatical ly r ec og ni ze t he c om pu te r US B po rt , cl ic k
Next to continue ,as shown below:
7.Click Begin Setup ,as shown below appears ,se le ct “ in st al l” or “ i ns ta ll t hi s
driver software anyway”
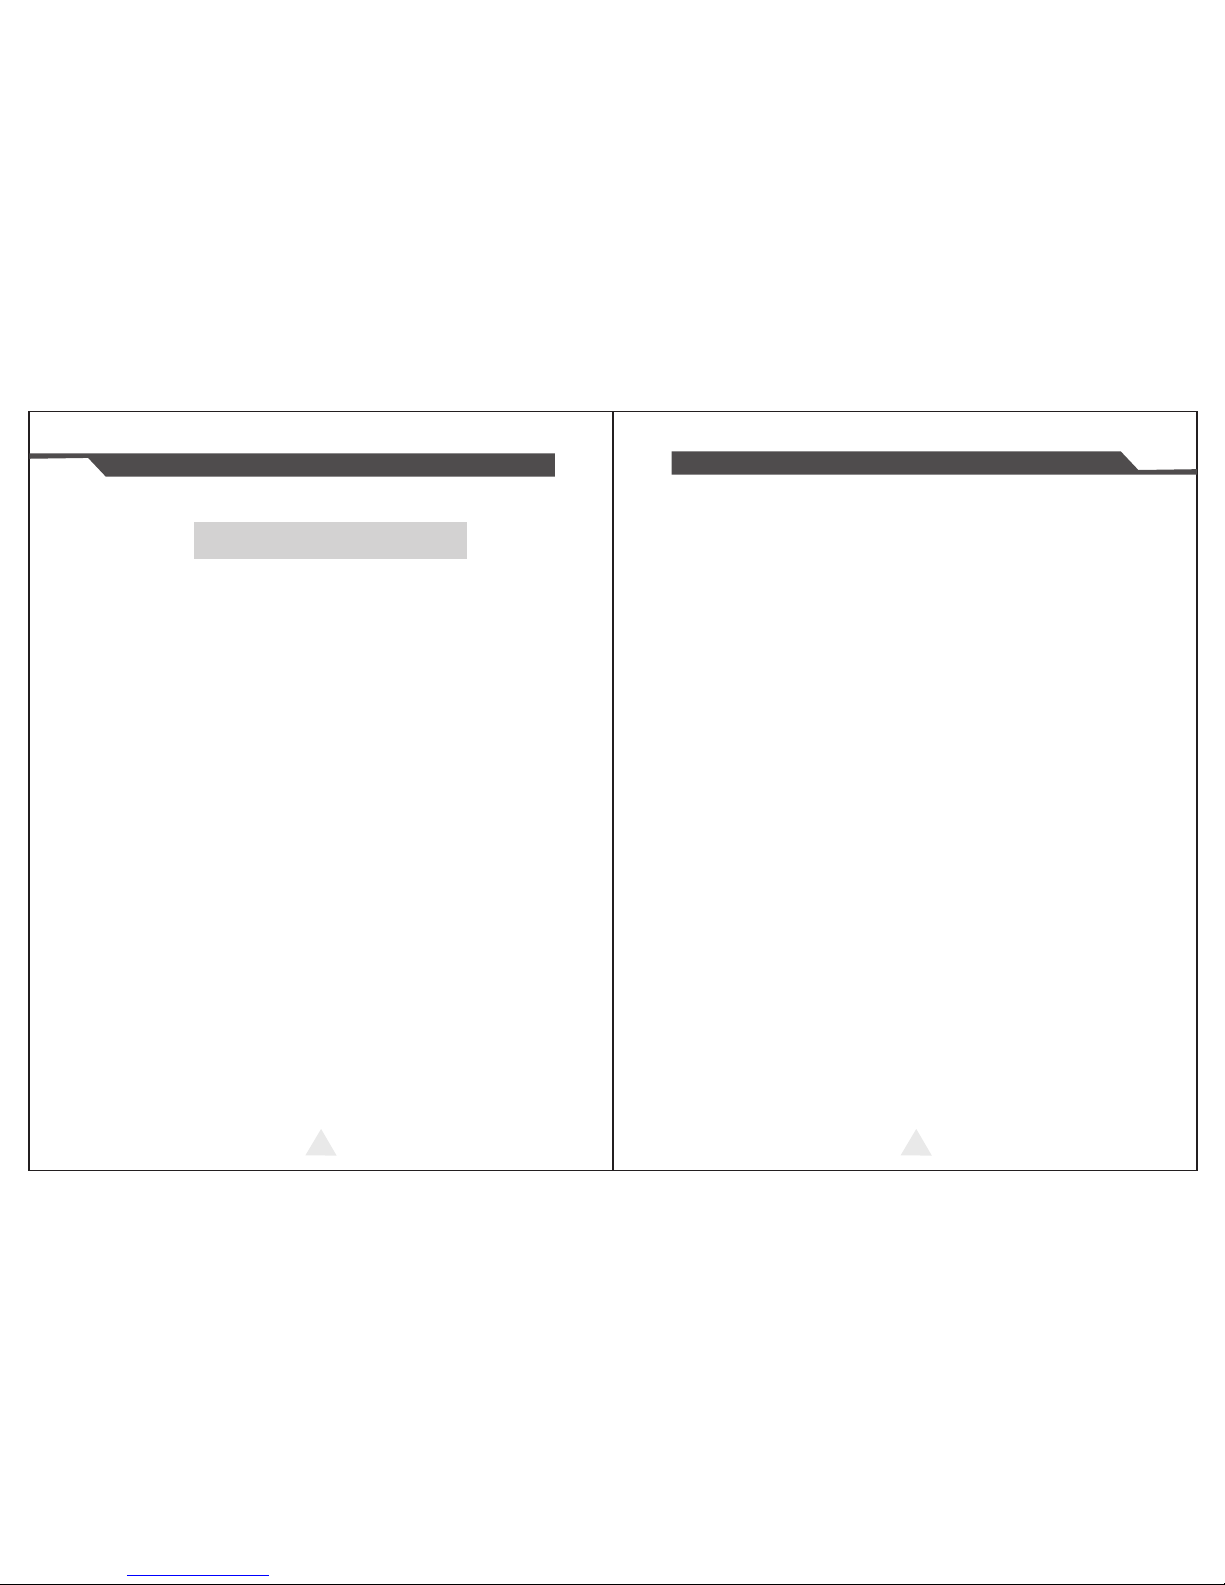
8.Completing the driver installation ,as sh ow n be lo w:
If the printer prints a normal page, th en i t sh ow s th at t he w or k wa s su cc es sf ul .
Note: If the printer prompts "P ri nt E rr or ", p le as e re tu rn t o th e "p or t" o pt io n fr om
the "USB001" started trying to ch oo se

2 5
2 6
Inst ru cti on M annua l
58MM P or tab le M INI The rm al Prin te r
10. Serial (COM) port to be used
1. Open the Printer Properties sc re en , an d th en s el ec t th e "P or t" i te m, a s sh ow n
below:
2.Select the list of ports "COM 1" → " C on fi gu re Port", the printer factory
default settings as shown below:
You ca n se e th e se tt in g pa ra me te rs o f se ri al p or t fr om s el f- te st p ag e, C li ck
"Apply", then click "OK" (Note: T hi s se tt in g mu st c on si st en t wi th t he s et ti ng
parameters of serial port from th e pr in te r se lf -t es t pa ge , ot he rw is e it w il l be
garbled case) appears as shown below:
11520 0

2 7
2 8
Inst ru cti on M annua l
58MM P or tab le M INI The rm al Prin te r
Click "Apply" again.
3.Return to the "General" tab, cl ic k "P ri nt Tes t Pa ge " as s ho wn b el ow :
If the printer prints a normal page, th en i t sh ow s th at t he w or k wa s su cc es sf ul .
If you feel the print speed is slow, please cl ic k on t he " De vi ce S et ti ng s" →
"P ri nt M od e" → C ho os e "s of t fo nt " bu tt on a s sh ow n be lo w:
11.Cleaning of printer head
Cleaning of printer
The printer does not print clearly and the ther ma l pa pe r is O k.
The printer Print pages lengthways is not cle ar
I t’ s ge tt in g to o no is y wh il e fe ed in g pa pe r or p ri nt in g.
When the printer has th e fo ll ow in g co nd it io ns , yo u sh ou ld c le an
the printer head:
1
2
3
Pri nter he ad clea ning st eps are a s follo ws:
1. Power off th e pr in te r an d op en t he p ap er r oo m co ve r. Re mo ve t he
thermal paper roll.
2. If the printer just finished pri nt in g , pl ea se w ai t fo r th e pr in t he ad t o
cool down.
3. With a soft cotton cloth d ip pe d in e th an ol ( pl ea se m ak e su re t he re i s
no dripping), wipe the thermal printer he ad g en tl y an d re mo ve a ny
dust or stains.
4. Wa it f or t he c om pl et e ev ap or at io n of a ny e th an ol , th en p la ce t he
thermal paper roll back in the printer and close th e pa pe r ro om c ov er,
then print a test page.
Notes:
When the printer maintenance must ensure th at t he p ow er i s sh ut d ow n
Hand s or o th er m et al t oo ls a wa y fr om t he s ur fa ce of th e p ri nt er h ea d,
do not u se twe ez er s to s cr at ch t he s ur fa ce of t he pr in te r head an d
other sensitive p a rts.
Do not use gaso li ne , ace to ne a nd o th er org an ic s ol ve nt s for pr in te r
head cleaning.
2 9
Inst ru cti on M annua l
2: Self printing test is ok,but pri nt er d oe s no t wo rk a ft er d ri ve r in st al la ti on .
A: Recheck the installation accordi ng t o ab ov e in st al la ti on w iz ar d an d se e
if we selected the right port or ask serv ic e ce nt er f or a dv ic e if n ee de d.
3: Malfunction of paper feeding?
A: Use soft brush to clean the paper se ns or a nd t ry a ga in o r se nd i t to t he
service center for repair.
4.Malfunction of the indicator light
A: Check the cable connecting way / adapter / p ow er c or d / sw it ch o n or o ff ?
Or contact the service center f or r ep ai r.
5.Messy code printing except Arabic numeral prin ti ng .
A: language switching incorrectly, ple as e us e ou r to ol " IP ri nt er " (y ou c an f in d it
on the enclosed CD) to change the language what you want print.
6.Red indicator keep flashing during the printing.
A: Usually it is due to the high temperat ur e of t he p ri nt h ea d. I f pr in ti ng s to pp ed ,
please contact the service center for r ep ai r.
7. Printing speed is very slow for seri al p ri nt er
A: follow this path and change the set acco rd in gl y : Dr iv er - - Pr op er ti es - - De vi ce
Settings -- Print Mode -- Print as so ft f on t.
9. Th e pr in te r ca n' t wo rk
A:The battery maybe without electrici ty,p le as e us e po we r ad ap te r to
charge. The n yo u tr y to s ta r th e pr in te r, if t he p ri nt er h as s am e pr ob le m, p le as e
send to service center for repai
r.
10. Can not search the Bluetooth printer
A:Please check the equipment "Bluetooth " fu nc ti on w he th er o pe ne d, t he
communication whether normal, then replug the p ri nt er " Bl ue to ot h Mo du le "
try to connect and search “Bluetooth” a ga in , if t he p ro bl om a re s ti ll e xi st ed ,
please send the specified location repair.
12.General Troubleshooting
1: Why serial port printer printing mes sy c od e?
A: Ensure the baud rate setting in th e PC i s sa me a s th e pr in te r ba ud r at e.
( we can see printer baud rate from self te st p ag e)
8. Wa te r or o th er l iq ui d sp il ls i nt o th e pr in te r
A: Cut off th e po we r,w e ca n dr y th e ma in b oa rd o r pr in te r he ad w it h a ha ir d ry er,
careful of the temperature ( averag e 50 d eg re e is o k )
3 0
58MM P or tab le M INI The rm al Prin te r

FCC warnings:
Changes or modifications not expressly approved by the party responsible for compliance could void the user’s authority to operate the equipment.
This device complies with Part 15 of the FCC Rules. Operation is subject to the following two conditions: (1) this device may not cause harmful interference, and (2) this
device must accept any interference received, including interference that may cause undesired operation.
This equipment has been tested and found to comply with the limits for a Class B digital device, pursuant to Part 15 of the FCC Rules. These limits are designed to
provide reasonable protection against harmful interference in a residential installation. This equipment generates, uses and can radiate radio frequency energy and, if
not installed and used in accordance with the instructions, may cause harmful interference to radio communications. However, there is no guarantee that interference
will not occur in a particular installation.
If this equipment does cause harmful interference to radio or television reception, which can be determined by turning the equipment off and on, the user is
encouraged to try to correct the interference by one or more of the following measures:
-- Reorient or relocate the receiving antenna.
-- Increase the separation between the equipment and receiver.
-- Connect the equipment into an outlet on a circuit different from that to which the receiver is connected.
-- Consult the dealer or an experienced radio/TV technician for help.
This modular complies with FCC RF radiation exposure limits set forth for an uncontrolled environment. This transmitter must not be co-located or operating in
conjunction with any other antenna or transmitter.
 Loading...