

Page 1
ITALIANO
IT
ENGLISH
DEUTSCH
ESPAÑOL
FRANÇAIS
РУССКИЙ
GB
D
E
F
RUS
MODEL : CIS 321.60 BX
IT
PIANO INDUZIONE VETROCERAMICA
GB
INDUCTION GLASS CERAMIC COOKTOP
D
ELEKTRO GRASKERAMIK INDUKTIONS KOCHFELD
E
PLANO INDUCCION VIDRIOCERAMICA
F
TABLE INDUCTION VETROCERAMIQUE
RUS
ОБЩАЯ ИНФОРМАЦИЯ
- Istruzioni d'uso e manutenzione
- Use and maintenance instructions
- Bedienungs und Wartungsanleitung
- Instrucciones de uso y mantenimiento
- Instructions pour l’utilisation et manutention
Page 2
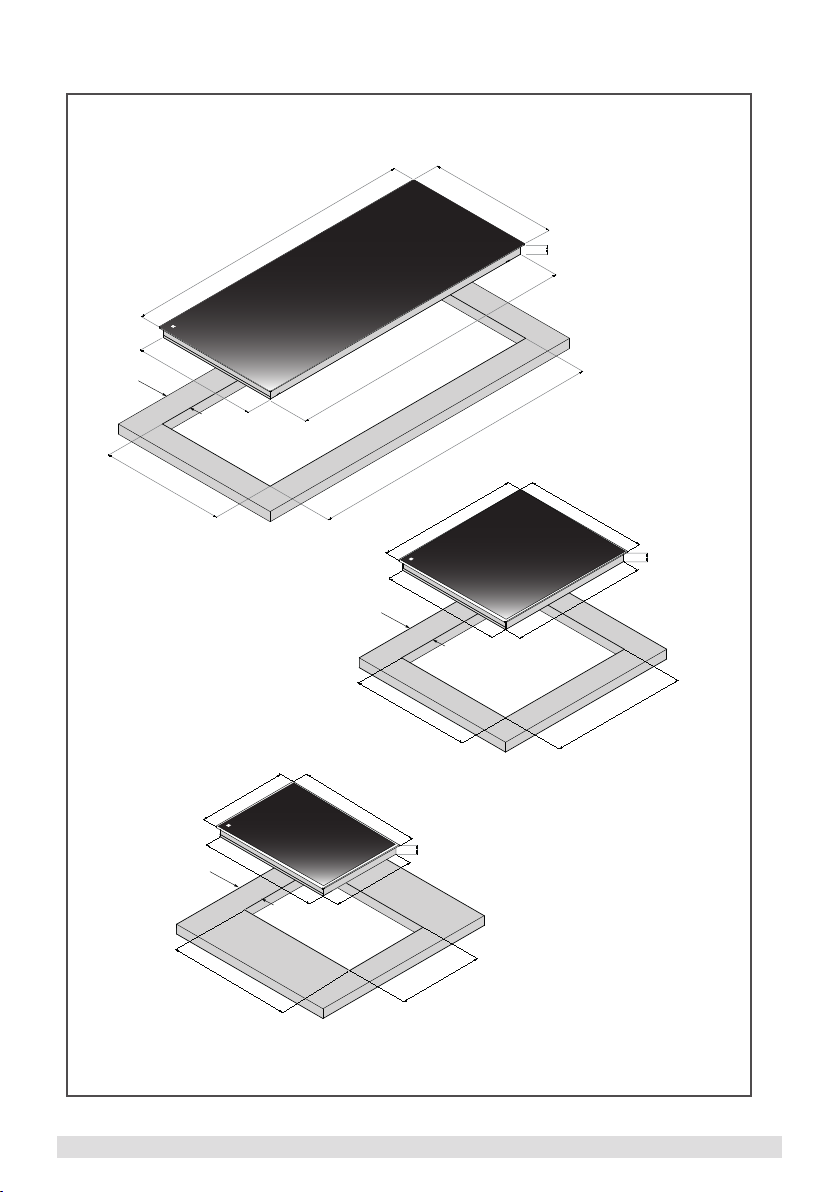
Fig. 1
506 mm
50 mm
482 mm
490 mm
286 mm
780 mm
510 mm
506 mm
50 mm
490 mm
740 mm
480 mm
47 mm
750 mm
506 mm
576 mm
47 mm
550 mm
560 mm
50 mm
490 mm
485 mm
47 mm
275 mm
280 mm
- 2 -
Page 3
40 mm
51
mm
Fig. 9
NO
YES
Fig.7
30 mm
Fig.2
Fig.5
Induction
20 mm
Fig.6
min. 50 mm
H05V2V2/F - 4 mm
AC 220-240V 50/60Hz 40A
L1
220-240V
N
Fig.8A
Fig.8B
Fig.3
1 2 3 4 5
BIU 960-T
~ 2 mm
Fig.4
2
H05V2V2/F - 2,5 mm
AC 220-240V 50/60Hz 25A
1 2 3 4 5
L
220-240V
N
BIU 320-T
BIU 640-T
2
min
I
H
F
E
D
AB C
Fig.10
- 3 -
Page 4

ITALIANO
IT
GENERALITÀ
Leggere attentamente il contenuto del presente libretto
in quanto fornisce importanti indicazioni riguardanti la
sicurezza di installazione, d’uso e di manutenzione.
Conservare il libretto per ogni ulteriore consultazione.
Tutte le operazioni relative all’installazione (connessioni
elettriche) devono essere effettuate da personale
specializzato in conformità delle norme vigenti.
AVVERTENZE PER LA SICUREZZA
Questo apparecchio non e adatto per l’uso da parte di
bambini o persone che necessitano di supervisione.
Per ragioni di sicurezza, non appoggiare mai oggetti
ferromagnetici di grandi dimensioni (ad es. placche
da forno per torte) sulla zona di cottura del piano in
vetroceramica.
Per i portatori di pacemaker si consiglia di consultare un
medico prima di utilizzare le zone di cottura ad induzione.
Oggetti metallici quali coltelli, forchette, cucchiai o coperchi
non dovrebbero essere posti sulla supercie del piano di
cottura perchè possono scaldarsi.
IMPORTANTE:
Dopo l’uso, spegnere il piano di cottura tramite il suo
dispositivo di comando.
- Evitare le fuoriuscite di liquido, pertanto per bollire o
riscaldare liquidi, ridurre l’alimentazione di calore.
- Non lasciare gli elementi riscaldanti accesi senza
recipienti o con recipienti vuoti.
- Una volta terminato di cucinare, spegnere la relativa
resistenza tramite il comando indicato in seguito.
ATTENZIONE :
L’utilizzo di recipienti appropriati è un fattore essenziale
per la cottura ad induzione. Vericate che le vostre pentole
siano idonee per il sistema ad induzione.
I recipienti devono quindi contenere ferro.
ISTRUZIONI PER L’INSTALLAZIONE
Le presenti istruzioni sono rivolte ad un installatore
specializzato e fungono da guida per l’installazione, la
regolazione e la manutenzione in conformità delle leggi e
delle norme vigenti. Se un forno da incasso o qualsiasi altra
apparecchiatura che genera calore deve essere montato
direttamente sotto il piano di cottura in vetroceramica,
È NECESSARIO CHE TALE APPARECCHIATURA
(forno) E IL PIANO DI COTTURA IN VETROCERAMICA
SIANO ADEGUATAMENTE ISOLATI, in modo tale che
il calore generato dal forno, misurato sul lato destro del
fondo del piano di cottura, non superi i 60°C.
Il mancato rispetto di tale precauzione potrebbe
determinare l’errato funzionamento del sistema TOUCH
CONTROL.
POSIZIONAMENTO
L’elettrodomestico è realizzato per essere incassato in un
piano di lavoro, come illustrato nella gura (Fig.1).
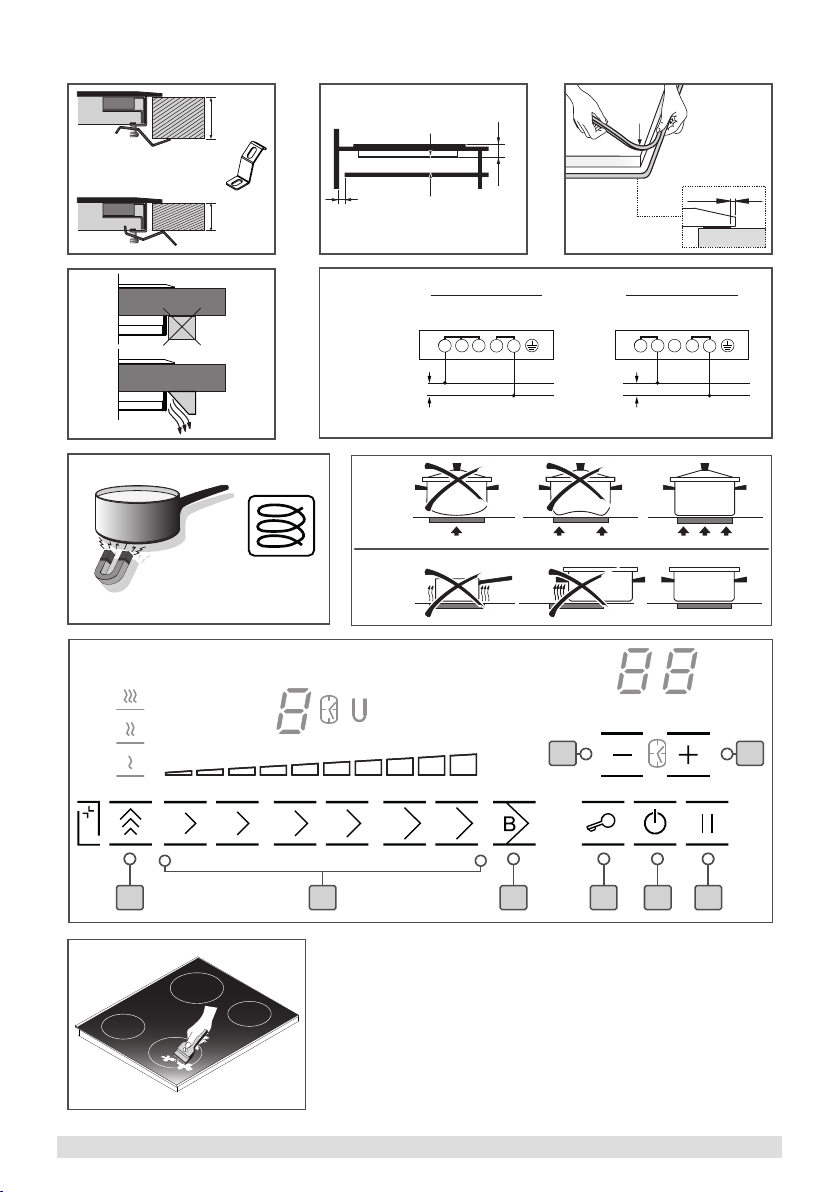
Predisporre materiale sigillante (Fig.4) lungo l’intero
perimetro (dimensioni del taglio (Fig.1). Bloccare
l’elettrodomestico sul piano di lavoro mediante i 4 sostegni,
tenendo presente lo spessore del piano di lavoro (Fig.2).
Se la parte inferiore dell’apparecchio, dopo l’installazione,
è accessibile dalla parte inferiore del mobile è necessario
montare un pannello separatore rispettando le distanze
indicate (Fig.3).
VENTILAZIONE (Fig.5)
La distanza tra il piano di cottura e i mobili da cucina o gli
apparecchi da incasso deve essere tale da garantire una
sufciente ventilazione ed un sufciente scarico dell’aria.
Non utilizzare il piano di cottura se nel forno è in corso il
processo di pirolisi.
CONNESSIONI ELETTRICHE (Fig.6)
Prima di effettuare le connessioni elettriche assicurarsi
che:
- il cavo elettrico della terra deve essere di 2 cm più lungo
rispetto agli altri cavi;
- le caratteristiche dell’impianto siano tali da soddisfare
le indicazioni sulla targhetta identicativa applicata sulla
parte inferiore del piano di lavoro;
- l’impianto sia dotato di una messa a terra efciente
conforme alle norme e alle disposizioni di legge in vigore.
La messa a terra è obbligatoria per legge.
Nel caso in cui l’elettrodomestico non sia dotato di cavo
e/o della relativa spina, utilizzare materiale adatto per
l’assorbimento indicato nella targhetta identicativa e
per la temperatura di funzionamento. Se si desidera
una connessione diretta alla linea elettrica, è necessario
interporre un interruttore omnipolare, con un’apertura
minima di 3mm fra i contatti, appropriato al carico
indicato nella targhetta e conforme alle norme vigenti
(il conduttore di terra giallo/verde non deve essere
interrotto dal commutatore). Terminata l’installazione
dell’apparecchiatura, l’interruttore omnipolare deve essere
facilmente raggiungibile.
USO
La caratteristica fondamentale del sistema ad induzione
è il trasferimento diretto dell’energia riscaldante dal
generatore al recipiente di cottura.
Vantaggi:
- Il trasferimento di energia avviene solo quando il
recipiente è posto sulla zona di cottura.
- Il calore viene generato solo sul fondo del recipiente e
trasmesso direttamente al cibo da cuocere.
- Tempi di riscaldamento ridotti e basso consumo di
energia durante l’inizio cottura, consentono un risparmio
globale di energia.
- Il piano in vetroceramica rimane freddo. Il calore che si
avverte sul piano di cottura è quello riesso dal fondo del
recipiente.
RECIPIENTI PER LA COTTURA
L’utilizzo di recipienti appropriati è un fattore essenziale
per la cottura ad induzione. Vericate che le vostre pentole
siano idonee per il sistema ad induzione. I recipienti
devono quindi contenere ferro. Potete vericare se
il materiale della pentola è magnetico con una semplice
- 4 -
Page 5
calamita (Fig.7). Si consigliano recipienti a fondo piatto
(Fig.8A). Non utilizzare recipienti con base ruvida, per
evitare di grafare la supercie termica del piano. In questo
modo l’energia può essere utilizzata in modo ottimale. Un
fattore non trascurabile nella cottura ad induzione sono
inne le dimensioni della pentola in relazione alla piastra
utilizzata (Fig.8B). Le zone di cottura consentono l’utilizzo
di recipienti con fondi di vari diametri. E’ comunque
preferibile utilizzare la zona di cottura appropriata al
diametro della pentola che si vuole utilizzare.
ACCENSIONE PIANO COTTURA:
• Collegare il piano alla rete elettrica
• ACCENSIONE DEL PIANO
Premere il tasto A
Tutti i display relativi alle zone di cottura si accenderanno
in posizione di standby .
L’unità di controllo rimarrà attiva per un tempo di 10
secondi. Se entro questo termine non verrà selezionata
nessuna zona di cottura il piano cottura si spegnerà
automaticamente.
• SELEZIONE DELLA ZONA DI COTTURA
Premere o trascinare il tasto E per attivare la piastra
dalla minima alla massima potenza . Regolare la potenza
desiderata agendo sul tasto a slider E, questo funziona a
trascinamento o con la modalità di un comune tasto.
La potenza della singola zona di cottura può essere
regolata in 9 differenti posizioni, e sarà visualizzata nel
relativo display luminoso con un numero da “1 a 9”.
• REGOLARE LA POTENZA DI COTTURA
Per aumentare / diminuire la potenza della zona di cottura selezionata, agire sul tasto E. La potenza può essere
impostata da 0 a 9.
• FUNZIONE BOOSTER
Questa funzione riduce ulteriormente il tempo di cottura
di una data zona portando la temperatura alla massima
potenza per un intervallo di 10 minuti. Al termine di
questo intervallo la potenza della zona di cottura torna
automaticamente al livello 9.
L’uso di questa funzione è indicato per il riscaldamento in
tempi brevissimi di grandi quantità di liquidi (es. acqua per la
cottura della pasta) o pietanze.
Dopo aver selezionato una zona di cottura è possibile
slezionare la funzione booster premendo il pulsante D,
questa funzione per un tempo di 10 minuti alimenta la
piastra selezionata alla massima potenza
•
PAUSA
Premendo il tasto C quando almeno una zona di cottura
è in azione è possibile mettere in pausa l’apparecchio,
interrompendo momentaneamente la cottura. Il relativo led
si accende.
La pausa ha una durata di 10 minuti allo scadere dei quali
l’apparecchio si spegne automaticamente.
La funzione pausa può essere disattivata premendo il tasto
C e, entro 10 secondi, un qualsiasi tasto dell’area comandi.
L’uso della funzione pausa interrompe gli eventuali timer
attivi.
• USO DEL TIMER
Questa funzione permette di stabilire il tempo (da 1
minuto no a 1 ora e 59 minuti) per lo spegnimento
per accendere il piano.
.
automatico della zona di cottura selezionata. Abilitare il
timer premendo contemporaneamente i tasti H e I.
Premere uno dei due tasti per regolare il tempo di cottura
che verrà visualizzato sul relativo display.
zona di cottura desiderata con uno dei tasti E una barra
led sotto il diplay della zona attivata, indicherà l’avvenuta
selezione. Impostare la potenza della zona tra 1 e 9 con
gli stessi tasti E. Impostare a questo punto il tempo di
spegnimento desiderato tramite i tasti H o I della zona
timer. L’inserimento della funzione timer verrà visualizzata
con il simbolo dell’orologio di anco al display della zona di
cottura selezionata. Il conto alla rovescia verrà visualizzato
sul display sopra i tasti H - I. Allo scadere del timer la zona
cottura si spegnerà automaticamente e verrà emesso un
segnale acustico che potrà essere disattivato premendo
un qualsiasi tasto dell’area comandi. Per disattivare il
timer, premere contemporaneamente i tasti H e I del timer.
• FUNZIONE EGG TIMER/PROMEMORIA:
E’ possibile impostare un promemoria acustico premendo
contemporanemente i tasti C e D. Il led centrale della
zona timer lampeggia. Attraverso il tasto C o D regolare
un tempo per il promemoria da 1 a 99 minuti. Allo scadere
del tempo impostato verrà emesso un segnale acustico
che potrà essere disattivato premendo un qualsiasi tasto
dell’area comandi. Le zone cottura precedentemente
in funzione rimarranno attive. La funzione egg timer/
promemoria rimane attiva anche dopo lo spegnimento
dell’apparecchio. Per disattivare questa funzione premere
contemporaneamente i tasti C e D e successivamente il
tasto D no al valore .
• FUNZIONE
Se per errore si spegne il piano cottura è possibile
richiamare i settaggi precedentemente attivi sulle zone
cottura riaccendendo il piano con il tasto A entro 6 secondi
e premendo il tasto C entro 6 secondi. Quando questa
funzione è disponibile alla riaccensione del piano il led del
tasto C è illuminato.
• BLOCCO COMANDI
E’ possibile bloccare i comandi per evitare il rischio di
modiche non intenzionali alle regolazioni (bambini,
operazioni di pulizia, ecc.). Premendo il tasto B i
comandi si bloccano e la relativa spia si illumina. Per per
sbloccare i comandi e tornare ad agire sulle regolazioni
(es. interrompere la cottura) è necessario premere il tasto
B. Quando il blocco dei comandi è attivo è comunque
possibile spegnere il piano di cottura. In questo caso il
blocco comandi rimane attivo anche alla riaccesione del
piano.
• CALORE RESIDUO:
Se la temperatura di una zona di cottura è ancora
elevata (superiore a 50°) dopo essere stata spenta, il
display relativo a quella zona mostra il simbolo (calore
residuo). L’indicazione scompare solo quando non vi è più
alcun rischio di ustioni.
• RICONOSCIMENTO PENTOLE:
Se su uno dei display, che indica la potenza, di una zona
di cottura, dovesse comparire il simbolo , signica che:
1) il recipiente utilizzato non è idoneo per la cottura ad
induzione.
2) il diametro della pentola utilizzata è inferiore a quello
consentito dall’apparecchio.
3) sulla piastra non è presente nessuna pentola.
- 5 -
RICHIAMA
Selezionare la
Page 6
DIAMETRO ZONA COTTURA DIAMETRO MINIMO PENTOLA
Ø 160 mm 110mm
Ø 200 mm 145mm
•
FUNZIONE BRIDGE
Questa funzione consente di collegare, in verticale, le due
zone di cottura ampliando quindi l’area dove appoggiare le
pentole, è particolarmente indicata quando si deve cuocere
con pentole di grandi dimensioni. La funzione si attiva
premendo contemporaneamente i tasti D delle due zone
cottura adiacenti, l’avvenuta selezione viene visualizzata
di lato ai display con i simboli e La regolazione della
potenza della zona di cottura è abilitata solo dal tasto
E della zona cottura inferiore. La funzione può essere
disattivata premendo comtemporaneamente i tasti D.
•
PROGRAMMI SPECIALI
Il piano è dotato di tre programmi speciali che possono
essere impostati premendo il tasto F . I programmi
hanno le temperatura già impostate e sono : fusione ,
lavora a 42 gradi , per sciogliere cioccolata, burro o simili
; riscaldamento, lavora a 70 gradi, per riscaldare cibi
precedentemente cotti ; ebollizione, lavora a 94 gradi,
per portare a ebollizione lentamente zuppe e minestre o
preparare sughi e stufati.
•
SPEGNIMENTO ZONE COTTURA
Per spegnere una zona di cottura strisciare il tasto E verso
il valore
•
SPEGNIMENTO PIANO COTTURA
Per spegnere completamente il piano di cottura premere
il tasto A.
• SPEGNIMENTO DI SICUREZZA:
L’apparecchio è provvisto di un sistema di sicurezza che
spegne automaticamente il grill trascorso il tempo limite di
accensione ad una data potenza.
PULITORE A VAPORE.
DISMISSIONE DEGLI ELETTRODOMESTICI
La direttiva Europea 2002/96/CE sui riuti di
apparecchiature elettriche ed elettroniche
(RAEE), prevede che gli elettrodomestici non
debbano essere smaltiti nel normale usso
dei riuti solidi urbani. Gli apparecchi dismessi
devono essere raccolti separatamente per
ottimizzare il tasso di recupero e riciclaggio dei materiali
che li compongono ed impedire potenziali danni per la
salute e l’ambiente. Il simbolo del cestino barrato è
riportato su tutti i prodotti per ricordare gli obblighi di
raccolta separata. Per ulteriori informazioni, sulla corretta
dismissione degli elettrodomestici, i detentori potranno
rivolgersi al servizio pubblico preposto o ai rivenditori.
SI DECLINA OGNI RESPONSABILITÀ PER EVENTUALI
DANNI PROVOCATI DALLA INOSSERVANZA DELLE
SUDDETTE AVVERTENZE. LA GARANZIA NON E’ VALIDA
NEL CASO DI DANNI DERIVANTI DALLA INOSSERVANZA
DELLE SUDDETTE AVVERTENZE.
POTENZA TEMPO LIMITE ACCENSIONE (ore)
1 - 2 6
3 - 4 5
5 4
6 - 7 - 8 - 9 1,5
•
MANUTENZIONE
Rimuovere eventuali residui di cibo e gocce di unto dalla
supercie di cottura utilizzando lo speciale raschietto
fornito su richiesta (Fig.10).
Pulire l’area riscaldata nel miglior modo possibile
utilizzando prodotti idonei ed un panno-carta, quindi
sciacquare con acqua e asciugare con un panno pulito.
Mediante lo speciale raschietto rimuovere immediatamente
dall’area riscaldata di cottura frammenti di fogli di alluminio
e materiale plastico scioltisi inavvertitamente o residui di
zucchero o di cibi ad elevato contenuto di zucchero. In
questo modo si evita ogni possibile danno alla supercie
del piano. In nessun caso si devono utilizzare spugnette
abrasive o detergenti chimici irritanti quali spray per forno
o smacchiatori.
ATTENZIONE: NON DEVE ESSERE UTILIZZATO UN
- 6 -
Page 7

ENGLISH
GB
GENERAL
Carefully read the contents of this leaet since it provides
important instructions regarding safety of installation, use
and maintenance.
Keep the leaet for possible future consultation. All the
operations relating to installation (electrical connections)
must be carried out by specialised personnel in
accordance with current regulations.
SAFETY INSTRUCTIONS
This apparatus is not suitable for use by children or
people who need supervision.
For safety reasons, never place large ferromagnetic
objects (e.g. oven plates for cakes) on the cooking zone
of the breglass top.
People carrying pacemakers are advised to consult a
doctor before using the induction cooking zones.
Metal objects such as knives, forks, spoons or covers
must not be placed on the surface of the cooking top
because they can become heated.
IMPORTANT:
After use, switch the cooking top off with the command
device.
IMPORTANT:
- Avoid spilling liquid, therefore to boil or heat liquids,
reduce the heat.
- Please ensure when the appliance is turned on, that
there are no empty pots left on top.
- When you have nished cooking, switch off the relevant
heating element with the command indicated below.
WARNING
If the surface of the hob is cracked, turn off the
appliance and disconnect from the electrical main in
order to avoid any possible electric shocks.
INSTALLATION INSTRUCTIONS
These instructions are for a specialized installer and
are a guide for the installation process, regulations and
maintenance in accordance with the law and current
standards.
If the built-in oven or any other appliances that produce
heat, need to be installed directly underneath the
cooking hobs in ceramic glass, IT IS NECESSARY THAT
THE APPLIANCE (oven) AND THE COOKING HOBS
IN CERAMIC GLASS ARE ADEQUATELY ISOLATED,
in such a way that the heat generated from the oven,
measured on the right hand side of the bottom of the
cooking hobs, does not exceed 60°C.
Failure to follow this precaution, could cause a
malfunction in the TOUCH CONTROL system.
POSITIONING
The domestic appliance was built in order to be
encased on a work surface, the way it is illustrated in
the graph (Fig.1). Predispose sealing material (Fig.4)
along the whole perimeter (for dimensions of the cut
see Fig.1). Lock the domestic appliance into place with
4 supporters, keeping in mind the width of the surface
(Fig.2). If the lower part of the appliance after installation,
is accessable via the lower part of the furniture, it is
necessary to mount a separating panel keeping in mind
the distances indicated (Fig.3).
VENTILATION (Fig.5)
the distance between the cooktop and built-in kitchen’s
furnitures or cooking apparatuses must guarantee
sufcient ventilation of the air. Not to use the cooktop if in
the oven is in course the pyrolysis process.
ELECTRICAL CONNECTIONS (Fig.6)
Before making the electrical connections, check that:
- the ground wire is 2 cm longer than the other cables;
- the system ratings meet the ratings indicated on the
identication plate xed on the lower part of the worktop;
- the system is tted with efcient ground wires in
accordance with the laws and current standards.
Grounding is mandatory by law. If the domestic appliance
is not supplied with a cable and/or suitable plug, use
material suitable for the absorption value indicated on
the identication plate and the operating temperature.
If wishing to make a direct connection to the mains, an
omnipolar switch must be installed with a minimum 3
mm opening between the contacts and appropriate for
the load indicated on the plate and in accordance with
current standards (the yellow/green ground conductor
must not be disconnected by a switch). When the
appliance has been installed, the omnipolar switch must
be easily reachable.
USE
The fundamental characteristic of the induction system is
the direct transference of heat from the generator to the
cooking recipient.
Advantages:
- The transference of power takes place only when the
recipient is placed on the cooking zone.
- The heat is generated only at the base of the recipient
and transferred directly to the food to be cooked.
- Reduced heating time and low consumption of power
during the beginning of cooking, allowing a global
saving of power.
- The breglass top remains cold, the heat felt on
the cooking top is that reected from the base of the
recipient.
COOKING RECIPIENTS
The use of appropriate recipients is an essential factor
for induction cooking. Check that your pots are suitable
for the induction system.
The recipients must contain iron. You can check
whether the material of the pot is magnetic with a simple
- 7 -
Page 8
magnet (Fig.7). We advise recipients having a at base
(Fig.8A). This way you can use the power optimally.
Do not use recipients with a rough base to avoid
scratching the thermal surface of the top.
A very important factor in induction cooking is the dimension
of the pot compared to the plate used (Fig.8B).
cooking zones allow the use of recipients with bases of
various diameters. It is, however, preferable to use the
appropriate cooking zone for the dimension of the pot:
- if pot diameter is 160 mm, the Pot.detection. is 90 mm
and the Pot.max is 180 mm;
- if pot diameter is 200 mm the Pot.detection is 120 mm,
and Pot. max. 210 mm.
The
SWITCHING THE COOKING TOP ON
• Connect the stovetops to the mains
• SWITCHING THE COOKING TOP ON
Press A key to switch the top on.
All the displays relative to the cooking zones switch on in
the standby position.
The control unit remains active for 10 seconds.
If no cooking zone is selected within this time, the
ccoking top switches off automatically.
• SWITCHING THE COOKING AREA ON
Select the desired cooking zone and press or crawl one
of the E keys.
Press key E to go to position 9 (max. power) or to go to
position 1 (min. power).
The power of the single cooking zone can be adjusted
in 9 different positions and will be shown on the relative
luminous display E with a number from “1 to 9”.
• ADJUST THE POWER OF COOKING
To increase / decrease the power of the cooking zone
selected, crawl in a clockwise / counterclockwise
E keys. The power can be set from 0 to 9.
• QUICK / BOOSTER HEATING
This function further reduces cooking time in a given area
taking the temperature to the maximum power for a 10
minute interval. At the end of this interval, the cooking
area power automatically returns to level 9.
The use of this function is indicated for the short time heating
of large quantities of liquid (eg water for cooking pasta) or
dishes.
After selecting a cooking zone can be selected by
pressing the D booster function, this function for a time
of 10 minutes the plate selected feeds at
maximum power .
• PAUSE
When at least one cooking zone is operating it is possible
to momentaneously pause the appliance switching off the
heating elements by pressing the C key. When the pause
function is active the relative led is on. The pause may
last for 10 minutes. If the status is not terminated within
this time the appliance switches off. The pause function
can be deactivated by pressing the C key and within 10
seconds any of the control keys. Previously programmed
timers will be stopped during the pause.
• TIMER
This function allows establishing the time (from 1 to 99
minutes) for automatically switching the selected cooking
zone off. Switch on at least one cooking zone and adjust
the temperature.
Press simultaneously the H and I key to enter the
timer function. Press either button to adjust the cooking
time is shown on its display. Select the required cooking
zone with one of the buttons and LED bar under the
diplay of the area activated, indicating the selection. Set
the power of the area between 1 and 9 keys with the
same E. Set at this point the desired sleep time using
the keys H or I timers in the area. The inclusion of the
timer with the clock symbol will appear next to the display
of the cooking zone selected. The countdown will be
displayed on the display above the keys H - I. The timer
will automatically turn off the cooking area and you will
hear a beep that can be turned off by pressing any of
the commands. To disable the timer, press the keys H
and I of the timer.
• EGG TIMER / REMINDER
To set a ‘reminder time’ press simultaneously the C and
D key. The led located at the bottom-center of the timer
display will be ashing. Set the ‘reminder time’ (from 1
to 99 minutes) by pressing the C or D key. An acoustic
signal will indicate the ‘reminder time’ expiration. Press
any key to stop the acoustic signal. The egg timer
remains active even if the appliance is switched off. In
order to disable the egg timer press simultaneously the
C and D key to enter the egg timer function. Press the
D key until reaching position .
• RECALL
When the appliance has been switched off by mistake it
is possible to quickly recall the previously active settings
by pressing the on-off A key withing 6 seconds, then
pressing the C key within another 6 seconds. If the recall
function is available the relative led C will be enlighted
when the appliance is swithcehd on again.
• CONTROL PANEL LOCK
It is possible to block the controls to prevent the risk
of unintentional modication of the settings (children,
cleaning etc.). By pressing the B key, the controls are
blocked and the relative warning light switches on.
To release the controls and change the settings
(e.g.interrupt cooking), the B key must be pressed. The
cooking top can however be switched off even when the
controls block is activated. In this case the controls block
remains active when the top is switched on again.
• RESIDUAL HEAT
If the temperature of the cooking zone is still high (over
50°) after it has been switched off, the relative display will
indicate the symbol (residual heat). The symbol will
only switch off when the burn risk in no longer present.
• POT DETECTION
If the symbol should appear on one of the cooking
area displays, it means that:
1)The recipient being used is not suitable for induction
cooking.
2)The diameter of the recipient used is inferior to that
allowed by the appliance.
3) No recipient is present.
- 8 -
Page 9

COOKING ZONE DIAMETER MINIMUM PAN DIAMETER
Ø 160 mm 110mm
Ø 200 mm 145mm
• BRIDGE FUNCTION
This feature allows you to connect, vertically, the two
cooking zones enlarging the area where to put the pots,
it is particularly suitable when it comes to cooking with
large pans. The function is activated by pressing the D
key areas of the two adjacent kitchenette, has been selected is displayed to the side to display the symbols
and The power control of the cooking zone is only
enabled by the ring button and the area below. The
function can be disabled keys pressed together D.
• SPECIAL PROGRAMS
The cooktop has three special programs that can be set
by pressing the F key. The programs have already been
set and the temperatures are melting, working at 42
degrees to melt chocolate, butter or the like; warm-
ing, working at 70 degrees, when reheating previously
cooked; simmering, working at 94 degrees, to bring
to a boil slowly preparing sauces or soups and stews.
• SWITCHING THE COOKING AREA OFF
To switch a cooking zone off, press or crawl the E key of
the relative zone until reaching position .
• SWITCHING THE COOKING TOP OFF
To turn off the cooking top entirely hold down the A key.
• SAFETY SWITCH
The appliance has a safety switch that automatically
switches off the cooking zones when they have been
operating for a certain amount of time at a given power
level.
DISPOSAL OF OLD ELECTRICAL APPLIANCES
The European Directive 2002/96/EC on
Waste Electrical and Electronic Equipment
(WEEE), requires that old household
electrical appliances must not be disposed
of in the normal unsorted municipal waste
stream. Old appliances must be collected
separately in order to optimise the recovery and recycling
of the materials they contain and reduce the impact on
human health and the environment.
The crossed-out dustbin symbol on the product reminds
you of your obligation regarding separated waste
collection. Consumers should contact their local public
service or their local dealer for more information on the
correct disposal of exhausted household appliances.
THE MANUFACTURER DECLINES ALL
RESPONSIBILITY FOR EVENTUAL DAMAGES
CAUSED BY BREAKING THE ABOVE WARNINGS.
THE WARRANTY IS NOT VALID IN THE CASE OF
DAMAGE CAUSED BY FAILURE TO COMPLY WITH
THE ABOVE-MENTIONED WARNINGS.
POWER LEVEL OPERATING TIME LIMIT (hours)
1 - 2 6
3 - 4 5
5 4
6 - 7 - 8 - 9 1,5
• MAINTENANCE
Remove any residues of food and drops of grease from
the cooking surface by using the special scraper supplied
on request (Fig.10).
Clean the heated area as thoroughly as possible using
suitable products, and a cloth/paper, then rinse with
water and dry with a clean cloth.
Using the special scraper immediately remove any
fragments of aluminium and plastic material that have
unintentionally melted on the heated cooking area, or
residues of sugar or food with a high sugar content.
In this way, any damage to the cooktop surface can be
prevented. Under no circumstances should abrasive
sponges, or corrosive chemical detergents, such as oven
sprays or stain removers, be used.
• WARNING: STEAM CLEANERS MUST NOT BE
USED.
- 9 -
Page 10

DEUTSCH
D
ALLGEMEINE
Lesen Sie den Inhalt dieses Handbuchs, da sie wichtige
Informationen zur sicheren Installation, Einsatz und Wartung
zur Verfügung stellt.
Halten Sie Anweisungen zum späteren Nachschlagen.
Alle damit verbundenen Aufgaben (elektrische Verbindungen)
muss durch geschultes Personal in Übereinstimmung mit
den Vorschriften durchgeführt werden.
SICHERHEIT
Dieses Gerät eignet sich nicht zur Verwendung durch Kinder
oder Personen, die eine Überwachung erfordern.
Aus Sicherheitsgründen stellen Sie niemals große
ferromagnetische Gegenstände (zB Backbleche für Kuchen)
auf die Kochzone der Glaskeramik.
Für Personen mit Herzschrittmachern wird empfohlen, einen
Arzt, bevor Sie Induktionskochzonen konsultieren.
Metallische Gegenstände wie Messer, Gabeln, Löffel oder
Deckel sollte nicht auf der Oberäche der Kochmulde
gestellt werden, da sie heiß werden können.
WICHTIG: Nach dem Gebrauch schalten
Sie das Kochfeld durch seine Steuerung.
- Vermeiden Sie Verschütten von Flüssigkeit daher, Kochen
oder Erhitzen von Flüssigkeiten, reduzieren Sie die Zufuhr
von Wärme.
- Halten Sie die Heizungen eingeschaltet ohne Container
oder leere Container.
- Sobald Sie fertig sind Kochen, schalten Sie seine Stärke
durch den Befehl unten gezeigt.
ACHTUNG
Wenn die Oberäche des Bodens geknackt wird, das Gerät
ausschalten und vom Netz trennen, um die Möglichkeit
eines elektrischen Schlags zu vermeiden.
INSTALLATIONSANWEISUNGEN
Diese Anleitung ist für einen professionellen Installateur
und geben Hinweise für die Installation, Betrieb und
Instandhaltung in Übereinstimmung mit den Gesetzen
und Vorschriften. Wenn eine integrierte Ofen oder andere
Geräte, die Wärme erzeugt, muss direkt unter dem Kochfeld
Ofen montiert werden,
ES IST müssen solche Geräte (Backofen) und IN
Glaskeramik-Kochfeld richtig isoliert sind, so dass die
Wärme aus dem Ofen nehmen, auf der rechten Seite von
der Unterseite des Kochfeldes gemessen, nicht mehr als
60 ° C erzeugt.
Die Nichtbeachtung dieser Vorsichtsmaßnahme kann zu
einer Fehlfunktion des Systems führen TOUCH CONTROL.
POSITIONIERUNG
Das Gerät ist so konzipiert, dass in einer Arbeitsplatte
ummantelt, wie in der Abbildung (Abb. 1) dargestellt.
Geben Dichtungsmittel (Abb. 4) entlang des gesamten
- 10 -
Umfangs (cut Größe (Abb. 1). Block Apparatur auf der
Arbeitsäche mit den 4 Stützen, unter Berücksichtigung
der Dicke der Ebene (Abb. 2). Wenn der Unterseite des
Gerätes, nach der Installation ist von der Unterseite des
Gehäuses, eine Unterteilungszuschnitt Einhaltung der
angegebenen Maße (Abb. 3),
LÜFTUNG
Der Abstand zwischen dem Kochfeld und Küchenmöbel
und Geräte in der Brust müssen so sein, ausreichende
Belüftung und eine ausreichende Abluft zu gewährleisten.
Verwenden Sie nicht das Kochfeld, wenn der Ofen ist in
den Prozess der Pyrolyse.
ANSCHLÜSSE (Abb. 6)
Vor dem Verlegen der elektrischen Anschlüsse, um
sicherzustellen, dass:
- Das Netzkabel des Landes müssen 2 cm länger als die
anderen Kabel sein;
- Die Eigenschaften der Anlage sind wie die Angaben auf
dem Typenschild auf dem unteren Teil des Arbeitsplans
angewendet zu treffen;
- Die Anlage ist mit einer Erdung in Übereinstimmung
mit den Regeln und Gesetzen in Kraft ausgestattet. Die
Erdung ist gesetzlich vorgeschrieben.
Im Falle, dass das Gerät nicht mit Kabel und / oder die
relative ausgestattet war, zeigte die Verwendung von
Material für die Absorption in dem Typenschild und der
Betriebstemperatur. Wenn Sie eine direkte Verbindung mit
der Stromleitung wollen, müssen Sie einen zweipoligen
Umschalter mit einem Minimum von 3 mm zwischen
Kontakten, angemessen auf die Last auf dem Etikett
angegeben und entspricht der aktuellen Gesetzgebung
(der Dirigent gelb / grün sein sollte unterbrochen durch
den Schalter). Nach der Installation des Gerätes muss
der Pol-Schalter leicht zugänglich sein.
VERWENDEN
Das Hauptmerkmal der Sauganlage ist die direkte
Übertragung von Energie von der Wärmequelle mit dem
Kochgefäß.
Vorteile:
- Die Energieübertragung erfolgt nur, wenn der Behälter
auf die Kochzone gestellt wird.
- Die Wärme wird nur an der Unterseite des Behälters
erzeugt und direkt in der Lebensmittel gekocht werden.
-Reduzierte Aufheizzeiten und geringer Energieverbrauch
während des Kochens Startzeit, so dass ein Gesamt-
Energieeinsparung.
- Die keramische Glasoberäche bleibt kühl. Die Wärme,
die auf dem Herd Filz ist der von dem Boden des
Behälters reektiert.
CONTAINER ZUM KOCHEN
Der Einsatz von geeigneten Gefäßen ist ein wesentlicher
Faktor für Induktion. Achten Sie darauf, Ihre Töpfe
eignen sich für die Sauganlage. Die Behälter müssen
daher enthalten Eisen. Sie können überprüfen, ob
das Material der Pfanne ist magnetisch mit einem
einfachen Magneten (Abb. 7). Wir empfehlen, acher
Boden Empfänger (8A). Verwenden Sie keine Pfannen
Page 11

mit einem rauen Grundlage, um Kratzer zu vermeiden die
Oberächentemperatur des Plans. Auf diese Weise kann
die Energie optimal genutzt werden. Ein wesentlicher
Faktor bei der Induktion Kochen sind letztlich die Größe
des Pots in Bezug auf die Platte verwendet (Abb. 8B).
Die Kochzonen erlauben die Verwendung von Behältern
mit unterschiedlichen Durchmessern Fonds. Es „immer
noch vorzuziehen, die entsprechende Kochzone dem
Durchmesser des Topfes Sie verwenden möchten,
verwenden:
- Wenn der Durchmesser des Topfes 160 mm, die Pot.
detection ist. beträgt 90 mm und 180 mm Pot.max ist;
- Wenn der Durchmesser des Topfes beträgt 200 mm, ist die
Pot.detection 120 mm und der Pot max. 210 mm.
POWER-HOB
• Verbinden Sie die Herdplatten an das Stromnetz
•
POWER-HOB
Drücken Sie die Taste A, um auf dem Boden drehen.
Alle Display-Bereiche zum Kochen in den Standby
schalten. Die Steuereinheit bleibt für eine Zeit von 10
Sekunden aktiviert. Wenn innerhalb dieser Frist nicht
wählen wird jeder Bereich der Küche Heizofen schaltet sich
automatisch ab.
•
ON KOCHZONE
Drücken oder ziehen Sie die Schaltäche, um die Platte
und vom Minimum zum Maximum einschalten. Stellen
Sie die Macht, indem Sie die gewünschte Schaltäche
und Schieberegler, das unktioniert oder wie man einen
gemeinsamen Schlüssel zu fahren. Die Macht der einzige
Zone kann in 9 verschiedenen Positionen eingestellt werden
und wird in seinem hellen Display mit einer Reihe von
angezeigt werden „1-9“.
•
RESTWÄRME
Wenn die Temperatur der Kochzone noch hoch (mehr als
50 °) nach dem Ausschalten, wird die Anzeige in Bezug
auf diesen Bereich angezeigt (Restwärme). Die Anzeige
verschwindet, wenn es keine Gefahr von Verbrennungen.
•
ANERKENNUNG PANS
Wird auf einem Display, das die Macht einer Kochzone
zeigt an, das Symbol erscheinen soll, bedeutet dies, dass:
1) der Behälter verwendet wird, ist nicht geeignet für
Induktionsherde.
2) der Durchmesser des Topfes ist kleiner als der von der
Maschine erlaubt.
3) auf der Platte nicht vorhanden ist, keinen Topf.
BEREICH DER KOCHMESSER MINDESTDURCHMESSER PAN
Ø 160 mm 110mm
Ø 200 mm 145mm
•
TIMER
Mit dieser Funktion können Sie die Zeit (von 1 Minute bis 1
Stunde und 59 Minuten) zum automatischen Ausschalten
des gewählten Kochzone gesetzt.
Aktivieren Sie den Timer durch Drücken der Tasten H und
I.
Drücken Sie eine Taste, um die Garzeit auf dem Display
angezeigt wird. Wählen Sie die gewünschte Kochzone mit
einer Bar von Tasten und ein LED unter dem Display
umfasst der Bereich aktiviert, was die Auswahl. Setzen Sie
die Macht der Bereich zwischen 1 und 9 mit gleichen
Schlüsseln E. Setzen Sie an dieser Stelle verlangte die
Shutdown-Zeit mit den Tasten H oder I zu Zone-Timer. Die
Einbeziehung der Timer mit dem Uhr-Symbol wird neben
der Anzeige der Kochzone ausgewählt erscheinen.
Der Countdown wird auf dem Display über den Tasten H
angezeigt werden - I. Wenn die Zeit abgelaufen der
Kochbereich wird automatisch ausgeschaltet, und Sie
werden einen Piepton aus, der durch Drücken einer der
Befehle können gedreht werden hören. Um den Timer zu
deaktivieren, drücken Sie die Taste H und den Timer.
•
EGG TIMER / ERINNERUNG
Und ‘möglich, eine Erinnerung einstellen, Sound
gleichzeitiges Drücken der Tasten C und D. Das Gebiet
der zentralen LED-Timer blinkt. Durch die Taste C oder D
stellen Sie eine Zeit für Erinnerungen 1 bis 99 Minuten. Zur
eingestellten Zeit ertönt ein Signalton, der durch Drücken
einer der Befehle gedreht werden kann. Die Kochstellen
auf vorher aktiv bleiben. Die Funktion der Eieruhr /
Erinnerung bleibt auch nach dem Ausschalten aktiv. Um
diese Funktion zu deaktivieren, drücken Sie gleichzeitig
die C und D und dann die D-Taste, um Wert.
•
PAUSE
Drücken Sie die Taste C, wenn mindestens eine Zone ist in
Aktion können Sie das Gerät anhalten, vorübergehend
Unterbrechung des Kochens. Die entsprechende LED
leuchtet auf. Die Pause dauert 10 Minuten danach wird sie
automatisch abgeschaltet. Die Pause-Funktion kann durch
Drücken der Taste C und innerhalb von 10 Sekunden, eine
der wichtigsten Befehle deaktiviert werden. Verwenden Sie
die Pause-Funktion stoppt alle aktiven Timer.
•
RECALL
Wenn Sie das Gerät aus Versehen den Herd können Sie
die gespeicherten Einstellungen vorher aktiven Kochzone
wieder auf dem Boden mit der A-Taste innerhalb von 6
Sekunden und drücken Sie die Taste C innerhalb von 6
Sekunden. Wenn diese Funktion zur Verfügung, um die
Ebene der C-Taste, LED- eustart ist leuchtet.
•
CONTROL-BLOCK
Und ‘möglich, die Bedienelemente sperren, um das Risiko
von unbeabsichtigten Änderungen an den Einstellungen
(Kinder, Reinigung, etc..) Zu vermeiden. Durch Drücken
der Taste B, die Tasten sind gesperrt und die Kontrolllampe
leuchtet auf. Um die Steuerelemente wieder zu aktivieren
und kehren Sie an den Einstellungen (zB um den
Garvorgang zu unterbrechen) zu handeln, müssen Sie
die Taste B. Wenn der Block von Befehlen aktiv ist kann
möglich sein, schalten Sie das Kochfeld. In diesem Fall
wird der Steuerblock bleibt auch riaccesione an den Plan.
•
COOK OFF ZONE
So schalten Sie eine Kochzone Crawl und den Schlüssel
auf den Wert.
•
OFF HOB
Um das Gerät vollständig das Kochfeld ausschalten, drücken
Sie A.
•
BOOSTER-FUNKTION
Dieses Feature reduziert die Kochzeit in einem bestimmten
Gebiet, wobei die Temperatur bei maximaler Leistung
- 11 -
Page 12
für einen 10-Minuten-Intervall. Am Ende dieses Bereichs
die Macht der Kochzone schaltet automatisch wieder auf
Stufe 9. Der Einsatz dieser Funktion ist für die kurze Zeit
Beheizung von großen Mengen an Flüssigkeit (zB Wasser
zum Kochen Teigwaren) oder Speisen angegeben.
Nach der Auswahl einer Zone ist möglich Dok fuznione der
Booster durch Drücken der Taste D, speist diese Funktion für
eine 10 Minuten Zeit, die ausgewählte Platte mit voller
Leistung .
•
BRIDGE_FUNKTION
Mit dieser Funktion können Sie eine Verbindung herstellen,
vertikal, die beiden Kochzonen Vergrößerung der Fläche,
wo die Töpfe setzen, ist es besonders nützlich, wenn Sie
mit großen Töpfen kochen müssen. Die Funktion wird
durch Drücken der Tasten D der beiden Kochstellen neben
dem ausgewählten Status auf der Seite angezeigt wird,
um die Symbole und die Macht die Kontrolle über
die Kochstelle Anzeige ist nur mit dem Schlüssel und dem
unteren Kochzone aktiviert aktiviert. Die Funktion kann durch
Drücken der Tasten gleichzeitig, D. deaktiviert werden.
•
SPEZIELLE PROGRAMME
Der Plan hat drei spezielle Programme, die durch Drücken
der Taste F eingestellt werden können. Die Programme
wurden bereits eingerichtet und die Temperaturen
schmelzen, arbeitet bei 42 Grad zu Schokolade, Butter oder
dergleichen, Erhitzen schmelzen, arbeitet bei 70 Grad, beim
Aufwärmen vorher gekocht, Kochen, arbeitet bei 94 Grad,
bis zum Kochen bringen, langsam Zubereitung von Saucen
oder Suppen und Eintöpfe.
•
SAFETY OFF
Das Gerät ist mit einem Sicherheitssystem ausgerüstet,
schaltet automatisch den Grill nach Ablauf der Frist
der Zündung einer bestimmten Leistung zur Verfügung
gestellt.
ENTSORGUNG DES GERÄTS IN DER ZUKUNFT
Gemäß der Europäischen Richtlinie 2002/96/
EC über Elektro- und Elektronik-Altgeräte
(WEEE) dürfen Elektrohaushalts-Altgeräte nicht
über den herkömmlichen Haushaltsmüllkreislauf
entsorgt werden. Altgeräte müssen separat
gesammelt werden, um die Wiederverwertung
und das Recycling der beinhalteten Materialien zu optimieren
und die Einüsse auf die Umwelt und die Gesundheit zu
reduzieren. Das Symbol „durchgestrichene Mülltonne“ auf
jedem Produkt erinnert Sie an Ihre Verpflichtung, dass
Elektrohaushaltsgeräte gesondert entsorgt werden müssen.
Endverbraucher können sich an Abfallämter der Gemeinden
wenden, um mehr Informationen über die korrekte Entsorgung
ihrer Elektrohaushaltsgeräte.
FÜR SCHÄDEN, DIE AUF DIE NICHTBEACHTUNG
DER OBEN STEHENDEN ANWEISUNGEN
ZURÜCKZUFÜHREN SIND, WIRD KEINERLEI
HAFTUNG ÜBERNOMMEN.
POTENCIA TIEMPO LÍMITE DE ENCENDIDO (horas)
1 - 2 6
3 - 4 5
5 4
6 - 7 - 8 - 9 1,5
•
WARTUNG
Nehmen Sie alle verbleibenden Lebensmittel-und Tropfen
Fett von der Kochäche mit einem speziellen Schaber auf
Anfrage (Abb. 10) geliefert.
Reinigen Sie den beheizten Bereich so gut wie möglich mit
geeigneten Produkten und Papier-Tuch, dann mit Wasser
und trocknen Sie mit einem sauberen Tuch gründlich.
Unter Verwendung der speziellen Schaber, um umgehend
entfernen aus beheizten Koch Stücke aus Aluminiumfolie
und Kunststoff scioltisi versehentlich oder Rückstände von
Zucker oder Lebensmittel mit hohem Zuckergehalt. Auf
diese Weise verhindert eine mögliche Beschädigung der
Oberäche des Bodens. Unter keinen Umständen sollten
Sie kratzende Schwämme oder reizende chemische
Reinigungsmittel wie Backofenspray oder Fleckenentferner.
ACHTUNG: Sollte nicht verwendet werden
Dampfreiniger.
- 12 -
Page 13

ESPAÑOL
E
GENERALIDADES
Lea atentamente el contenido de este libro que le
proporcionará importantes instrucciones en cuanto a la
seguridad de instalación, uso y mantenimiento.
Conservar el manual para cada ulterior consulta.
Todas las operaciones relativas a la instalación (conexión
eléctrica) deben ser realizadas por personal especializado
conformes a las normas vigentes.
ADVERTENCIAS DE SEGURIDAD
No se aconseja el uso de este aparato por niños o
personas que necesitan supervisión.
Por razones de seguridad, no apoye nunca objetos
ferromagnéticos de grandes dimensiones (ej. placas de
horno para tartas) sobre la zona de cocción de la placa de
vitrocerámica.
Para los portadores de marcapasos, se aconseja consultar
a un médico antes de utilizar las zonas de cocción a
inducción.
Objetos metálicos como cuchillos, tenedores, cucharas o
tapas no deberían ser puestos sobre la supercie de la
placa de cocina porque pueden calentarse.
IMPORTANTE
Después del uso, apague la placa de cocina a través de su
aparato de mando.
- Evite el derramamiento de liquidos, por tanto para hervir o
calentar liquidos, reduzca la alimentación del calor al punto
necesario.
- Una vez terminado de cocinar, apague el elemento
calefactor mediante el mando correspondiente.
ATENCION
Si observa que la supercie de la placa está
resquebrajada, apague inmediatamente el aparato,
desconectelo de la red, para evitar eventual descarga
eléctrica
INSTRUCCIONES PARA LA INSTALACION
Las presentes instrucciones están dirigidas a un instalador
especializado y sirven de guía para una correcta instalación,
regulación y mantenimeinto en conformidad con las leyes
y normas vigentes.
Si un horno de encastrar o cualquier otro aparato que
genera calor debe ser montado directamente debajo de
la Vitrocerámica, ES NECESARIO QUE TAL APARATO
(Horno) Y EL VIDRIO QUEDEN ADECUADAMENTE
AISLADOS, de modo que el calor generado por el horno
(medido en la parte derecha-frontal del fondo de la Vitro),
no supere los 60º C.
La falta de tal precaución podría producir un mal
funcionamiento del sistema TOUCH CONTROL.
POSICIONAMIENTO
Este electrodomestico ha sido realizado para ser
encastrado en una encimera, tal y como ilustra la gura
(Fig.1). Instalar el material aislante (Fig.4) de la dotación
a lo largo de todo el perímetro del oricio practicado
para acoger la Placa (Fig.1).
Fijar el aparato a la encimera mediante las 4 grapas,
teniendo en cuenta el espesor de la encimera (Fig.2). Si
despues de la instalación se puede acceder a la parte
inferior del aparato desde la parte inferior del mueble
es necesario montar un panel separador respetando las
distancias indicadas (Fig.3).
VENTILACIÓN (Fig.5)
La distancia entre el electrodomestico y los muebles o
los aparatos que cocinan de la cocina incorporada debe
garantizar la suciente ventilación del aire.
No utilizar el electrodomestico si en el horno es en curso
el proceso de la pirolisis.
CONEXIÓN ELECTRICA (Fig.6)
Antes de efectuar la conexión eléctrica, asegurese que:
- El cable eléctrico correspondiente a la toma a tierra
sea 2 cm más largo que los otros dos.
- Las características de la acometida y tendido se
puedan corresponder con las necesidades indicadas
en la placa de características del aparato.
- La instalación esté dotadas de la correspondiente
toma a tierra, según normas y leyes vigentes.
La toma a tierra es obligatoria por ley.
En el caso que el aparato no estuviera dotado de cable
y/o correspondiente enchufe, utilice material adaptado
a la absorción eléctrica indicada en el Placa de
caracteristicas, y a la temperatura de funcionamiento.
Si se desea una conexión directa a la línea eléctrica, es
necesario interponer un interruptor omnipolar, con una
apertura mínima de 3 mm entre contactos, apropiado
a la carga indicada en la placa y conforme a normas
vigentes (el conductor a tierra amarillo/verde no debe
ser interrumpido por el conmutador).
Terminada la instalación del aparato, el interruptor
omnipolar debe quedar siempre facilmente accesible.
USO Y MANTENIMIENTO
La característica principal del sistema a inducción, es el
traslado directo de la energía de calentamiento desde el
generador al recipiente de cocción.
Ventajas:
- El traslado de energía ocurre solamente cuando el
recipiente es puesto sobre la zona de cocción.
- El calor se genera solo en el fondo del recipiente y
se transmite directamente a los alimentos que han de
cocinarse.
- El tiempo de calefacción reducido y el bajo consumo
de energía durante el inicio de la cocción, permiten un
ahorro total de energía.
- La placa de cocina en vitrocerámica queda fría. El
calor que se advierte sobre la placa de cocina, es el
reejado por el fondo del recipiente.
RECIPIENTES PARA LA COCCIÓN
El uso de recipientes apropiados, es un factor esencial
para la cocción a inducción. Averigüe que sus ollas
sean idóneas para el sistema a inducción. Por lo tanto,
los recipientes tienen que contener hierro. Puede
- 13 -
Page 14
averiguar si el material de la olla es magnético con un
simple imán (Fig.7). Se aconseja el uso de recipientes de
fondo plano (Fig.8A).
No utilice recipientes con base ruda, para evitar rasguñar
la supercie térmica de la placa. De este modo, la energía
puede ser utilizada de modo optimal. Un factor importante
en la cocción a inducción, es el tamaño de la olla en relación
a la placa utilizada (Fig.8B). Las zonas de cocción permiten
el empleo de recipientes con fondos de varios diámetros.
En todo caso, es preferible utilizar la zona de cocción
apropiada al diámetro de la olla que se quiere utilizar:
- Diametro 160mm > Pot.det. 90mm > pot. max 160 mm
- Diametro 200 mm >Pot.det 120mm > pot.max 210 mm
ENCENDIDO DE LA PLACA DE COCCIÓN
• Conecte la placa a la red eléctrica
• ENCENDIDO DE LA PLACA DE COCCIÓN
Pulse el botón A para encender la placa. Todos los displays
de las zonas de cocción se activarán en posición de
standby .
La unidad de control permanecerá activa durante 10
segundos.
Si en este plazo no se selecciona ninguna zona de cocción,
la placa se apagará automáticamente.
• ENCENDIDO DE LAS ZONAS DE COCCIÓN
Escoja la zona de cocción deseada, pulsando una de las
teclas E. Pulse o pase la tecla E para ir a la posición 9
o para ir a la posición 1. Efectuada esta operación, es
posible escoger las regulaciones de temperatura con las
misma teclas.
La potencia de la zona individual de cocción, puede ser
regulada en 9 posiciones diferentes y será visualizada por
el display luminoso E con un número de “1 a 9”.
• CALOR RESIDUAL
Si la temperatura de una zona de cocción es todavía
elevada (superior a 50°) después de haberla apagado,
su display mostrará el símbolo (calor residual). Esta
indicación desaparecerá solamente cuando cese el riesgo
de quemaduras.
• RECONOCIMIENTO OLLAS
Si en un display de una zona de cocción apareciera el
símbolo , signica que:
1) el recipiente utilizado no es adecuado para cocción por
inducción.
2) el diámetro del recipiente es inferior al admitido.
3) no hay ninguna olla en la placa.
DIÁMETRO DE LA ZONA DE COCCIÓN
Ø 160 mm 110mm
Ø 200 mm 145mm
•
TEMPORIZADOR
Esta función permite establecer el tiempo (de 1 a 99
minutos) para el apagamiento automático de la zona de
cocción escogida. Activar una zona de cocción y ajustar
el nivel de potencia. Habilitar el temporizador pulsando
contemporáneamente la tecla H y la tecla I. Pulse cualquier
botón para ajustar el tiempo de cocción se muestra en su
pantalla. Seleccione la zona de cocción deseada con uno
DIÁMETRO MÍNIMO DE LA OLLA
de los botones y la barra de LED en el diplay de la zona
activa, lo que indica la selección. Establecer la potencia de
la zona comprendida entre 1 y 9 teclas con el mismo E.
Establecido en este punto, el tiempo deseado utilizando
las teclas de temporizadores H o I en el área. La inclusión
del temporizador con el símbolo del reloj aparecerá al
lado de la pantalla de la zona de cocción. La cuenta atrás
se mostrará en la pantalla encima de las teclas H - I. El
temporizador se apagará automáticamente la zona de
cocción y se escuchará un pitido que se puede desactivar
pulsando cualquiera de los comandos. Para desactivar el
temporizador, pulse la tecla H llaves y el temporizador.
•
EGG TIMER/ MEMORIA
Es posible programar un aviso acústico pulsando
contemporáneamente las teclas C y D. El led central de la
zona temporizador parpadea.
Mediante las teclas C y D se puede ajustar un intervalo
para el aviso acústico entre 1 y 99 minutos.
Al terminar el intervalo programado se emitirá una alarma
acústica que puede ser desactivada pulsando una tecla
cualquiera del panel de mandos.
Las zonas de cocción precedentemente en funcionamiento
quedarán activadas.
La función egg timer-memoria queda activada aunque el
aparato esté apagado.
Para desactivar esta función pulsar contemporáneamente
las teclas C y D, y luego la tecla D hasta el valor 0.
•
PAUSA
Al pulsar la tecla C cuando al menos una zona de cocción
está en la acción puede detener la unidad, interrumpiendo
momentáneamente el proceso de cocción. Las luces LED.
La pausa tiene una duración de 10 minutos después de
que el dispositivo se apaga automáticamente.
La función de pausa se puede desactivar pulsando la
tecla C y, dentro de los 10 segundos, cualquiera de las
combinaciones de botones.
El uso de la función de pausa detiene los temporizadores
activos.
•
RECUPERACIÓN
Si erróneamente se apaga el plano de cocción es posible
recuperar las conguraciones activadas precedentemente
en la zona de cocción, reencendiendo el plano con la tecla
A dentro de 6 segundos, y pulsando la tecla C dentro de
6 segundos.
Cuando esta función será disponible para reencender el
plano, el led correspondiente se iluminará.
• BLOQUEO DE LOS MANDOS
Los mandos pueden ser bloqueados para que no puedan
ser modicados accidentalmente (por niños, durante la
limpieza, etc.). Los mandos se bloquean pulsando el botón
B, y su correspondiente testigo se ilumina. Para que los
mandos vuelvan a ser operativos (p.ej., para interrumpir
la cocción), pulsar el botón B. Con el bloqueo de mandos
activo es posible, de todas formas, apagar la placa.
En este caso el bloque de mandos continuará a estar activo
al volver a encender la placa.
• APAGADO ZONAS DE COCCIÓN
Para desactivar una zona de cocción a gatear y la clave E
para el valor.
• APAGADO PLACA DE COCCIÓN
Para apagar completamente el plano de cocción pulsar el
botón
.
A
- 14 -
Page 15

•
FUNCIÓN DE SEGURIDAD
Después de seleccionar una zona de cocción puede
doc.number fuznione el refuerzo pulsando el botón D,
esta función por un tiempo de 10 minutos de la placa de
alimentación seleccionada a la máxima potencia .
• CALENTAMIENTO RÁPIDO / BOOSTER
Esta función reduce ulteriormente el tiempo de cocción
de una zona determinada llevando la temperatura a la
máxima potencia en un intervalo de 10 minutos.
Al nal de este intervalo la potencia de la zona de
cocción vuelve automáticamente al nivel 9.
El uso de esta función está indicada para la calefacción a
corto plazo de grandes cantidades de líquido (por ejemplo,
agua para cocinar pasta) o los platos.
Para activar esta función, cuando esté disponible,
seleccione la zona de cocción y pulse el botón D en la
pantalla y el símbolo aparecerá .
La función sólo está disponible en las zonas de cocción Ø
200 mm de diámetro.
•
FUNCTION DE PUENTE
Esta característica le permite conectar, vertical, las dos
zonas de cocción ampliación de la zona donde poner las
macetas, es particularmente conveniente cuando se trata
de cocinar con ollas de gran tamaño. La función se activa
pulsando la tecla D áreas de la cocina dos adyacentes, se
ha seleccionado a un lado para mostrar los símbolos y
el control de la potencia de la zona de cocción sólo se activa
mediante el botón E por debajo de la zona de cocción. La
función se puede desactivar las teclas presionadas juntas
D.
•
PROGRAMMAS ESPECIALES
El plan tiene tres programas especiales que se pueden
establecer pulsando la tecla F. Los programas ya se
han establecido y las temperaturas se están derritiendo,
trabajando a 42 grados para derretir el chocolate, la
mantequilla o la calefacción como, trabajando a 70
grados, cuando se recalientan previamente cocidos, hervir,
trabajando a 94 grados, para llevar a ebullición lentamente
la preparación de salsas o sopas y guisos.
• APAGADO DE SEGURIDAD
El aparato cuenta con un sistema de seguridad que lo
apaga automáticamente una vez transcurrido el tiempo
límite de encendido a una determinada potencia, como se
ilustra en la siguiente tabla.
otros con alto contenido de él. Así evitará posibles daños a
la supercie vitrocerámica. En ningun caso se deben usar
estropajos abrasivos o detergentes químicos irritantes,
como sprays para horno o quitamanchas.
ATENCION: NO SE DEBE UTILIZAR UN APARATO DE
LIMPIEZA A VAPOR
ELIMINACION DE LOS ELECTRODOMESTICOS
La regla Europea 2002/96/CE sobre los
desperdicios de los apáratos eléctricos y
electrónicos (RAEE), provee que los
electrodomésticos no deben ser eliminados
en el normal ujo de los desperdicios sólidos
ser recogidos separadamente para optimizar la taza de
recuperación y de reciclaje de los materiales que los
componen y para evitar potenciales daños para la salud y
el ambiente. El símbolo del cesto de basura tachado se
encuentra en todos los productos, para recordar las
obligación del recogido separado. Para ulteriores
informaciones, sobre la correcta eliminación de los
electrodomesticos, el comprador se puede dirigir al servicio
publico propuesto o a el vendedor.
EL FABRICANTE NO SE HACE RESPONSABLE
DE LOS DAÑOS PRODUCIDOS POR EL
INCUMPLIMIENTO DE ESTAS ADVERTENCIAS. LA
GARANTÍA NO ES VÁLIDA EN EL CASO DE DAÑOS
PROVOCADOS POR EL IRRESPETO DE DICHAS
ADVERTENCIAS.
urbanos. Los aparatos para desechar deben
POTENCIA TIEMPO FINAL DE CARRERA (horas)
1 - 2 6
3 - 4 5
5 4
6 - 7 - 8 - 9 1,5
• MANTENIMIENTO
Limpie de eventuales residuos la supercie utilizando una
rasqueta con hoja de afeitar (Fig.10). Limpie las zonas
de calentamiento, usando productos idoneos y un pañopapel de cocina, enjuegue y sequecon un paño limpio.
Los eventuales fragmentos de papel-aluminio o material
plástico deben ser inmediatamente rascados y limpiados.
Esto es tambien válido para restos de azucar o pasteles y
Page 16

FRANÇAIS
F
CARACTÉRISTIQUES GÉNÉRALES
Lire attentivement le contenu du présent livret, étant donné
qu’il fournit d’importantes indications concernant la sécurité
d’installation, d’utilisation et d’entretient. Conserver le livret
pour toute consultation ultérieure. Toutes les opérations
concernant l’installation (et le câblage électrique) doivent
être effectuées par le Personnel Qualié Conformément à
Tous les Codes & Normes Applicables en Vigueur.
AVERTISSEMENTS DE SECURITE
Cet appareil n’est pas adapté à l’utilisation par des enfants
ou des personnes devant être surveillées. Pour des motifs
de sécurité, ne jamais poser d’objets ferromagnétiques de
grande dimension (par exemple, les moules à tarte pour
four) sur la zone de cuisson du plan en vitrocéramique.
Les personnes ayant un pacemaker doivent consulter leur
médecin avant d’utiliser les plaques de cuisson à induction.
Les objets métalliques tels que couteaux, fourchettes,
cuillères ou couvercles ne devraient pas être posés sur la
surface du plan de cuisson car ils peuvent s’échauffer.
IMPORTANT:
Après utilisation, éteindre le plan de cuisson à l’aide de son
dispositif de commande.
- éviter les débordements de liquide, ainsi pour faire bouillir
ou chauffer des liquides, réduire l’alimentation de chaleur;
- ne pas laisser les plaques chauffantes allumées sans
récipients ou avec des récipients vides;
- après avoir terminé de cuisiner, éteindre la résistance
correspondante au moyen de la commande indiquée ci
après.
ATTENTION
Si la surface est fêlée, éteindre l’appareil et déconnecter
l’alimentation électrique pouréviter d’éventuelles
décharges
INSTRUTIONS POUR L’INSTALLATION
Les instructions suivantes s’adressent à un installateur
spécialisé et servent de guide pour l’installation, le réglage
et l’entretient en conformité avec les lois et les normes en
vigueur. Si un four encastrable ou n’importe quel autre
appareil produisant de la chaleur doit être directement
monté sous la surface de cuisson en vitrocéramique,
IL EST NÉCESSAIRE QUE CET APPAREIL (four) ET
LA SURFACE DE CUISSON EN VITROCÉRAMIQUE
SOIENT CONVENABLEMENT ISOLÉS, de manière à ce
que la chaleur produite par le four, mesurée sur le côté droit
du fond de la surface de cuisson, ne dépasse pas 60°C.
Le manque de respect de cette précaution pourrait
déterminer le fonctionnement erroné du système
TOUCHCONTROL.
POSITIONNEMENT
Cet appareil électroménager est réalisé pour être
- 16 -
encastré dans un plan de travail, comme l’indique la
(Fig.1). Appliquer le matériel collant (Fig.4) tout le long
du périmètre (dimensions de la coupe Fig.1). Bloquer
l’appareil électroménager sur le plan de travail au moyen
des 4 appuis, compte tenu de l’épaisseur du plan de
travail (Fig.2). Si la partie inférieure de l’appareil, après
l’installation, est accessible du côté inférieur du meuble,
il faut monter un panneau de séparation en veillant de
respecter les distances indiquées (Fig.3).
VENTILATION (Fig.5)
La distance entre les meubles de cette appareil et de
cuisine intégrée ou les équipements de cuisson doit garantir
la ventilation sufsante d’air. Ne pas employer le cooktop si
dans le four est dans le cours le procédé de pyrolyse.
CÂBLAGE ÉLECTRIQUE (Fig.6).
Avant d’effectuer le câblage électrique, s’assurer que:
- le câble électrique de la terre soit bien de 2 cm plus long
par rapport aux autres câbles;
- les caractéristiques du réseau électrique soient
conformes aux indications de la plaquette d’identication
appliquée sur la partie inférieure du plan de travail;
- le réseau soit doté d’une mise à terre efcace conforme
aux normes et aux dispositions de la loi en vigueur. La
mise à terre est obligatoire aux termes de la loi.
Au cas où l’appareil électroménager ne serait pas doté d’un
câble et/ou d’une che relative, utiliser du matériel apte
pour l’absorption indiquée sur la plaquette d’identication
et pour la température de fonctionnement.
Si on souhaite un branchement directe à la ligne électrique,
il est nécessaire d’interposer un interrupteur omnipolaire,
ayant un orice minimum de 3 mm entre les contacts,
s’adaptant à la charge gurant sur la plaquette et conforme
aux normes en vigueur (le conducteur de terre jaune/
vert ne doit pas être coupé par le commutateur). Une fois
l’installation de ‘appareil terminée, on doit pouvoir arriver
aisément à l’interrupteur omnipolaire.
MODE D’EMPLOI
La caractéristique fondamentale du système à induction est
le transfert direct de l’énergie de chauffe du générateur au
récipient de cuisson.
Avantages:
- Le transfert d’énergie a lieu uniquement lorsque le
récipient est placé sur la zone de cuisson.
- La chaleur est générée uniquement sur le fond du
récipient et transmise directement aux aliments à cuire.
- Temps de chauffe réduits et faible consommation
d’énergie au début de la cuisson, entraînent une épargne
globale d’énergie.
- La surface en vitrocéramique reste froide.
La chaleur ressentie sur le plan de cuisson est celle
émanant du fond du récipient.
RECIPIENTS POUR LA CUISSON
L’utilisation de récipients appropriés est un facteur essentiel
pour la cuisson à induction.
Vérier que les casseroles soient adaptées à un système à
induction. Les récipients doivent contenir du fer.
Vérier que le matériau de la casserole est magnétique
Page 17

avec un simple aimant. (Fig.7).
Des récipients à fond plat sont conseillés (Fig.8A).
Ne pas utiliser de récipients à base rugueuse pour éviter
de griffer la surface thermique du plan de cuisson. De cette
manière, l’énergie peut être utilisée de façon optimale.
Enn, un facteur important pour la cuisson à induction est
le dimensionnement de la casserole par rapport à la plaque
utilisée (Fig.8B).
Les zones de cuisson permettent l’utilisation de récipients
de différents diamètres.
Il est de toute façon préférable d’utiliser la zone de cuisson
adaptée au diamètre de la casserole que l’on souhaite
utiliser:
- Diamétre 160mm > Pot.detection 90mm > pot.max
180mm
- Diamétre 200mm > Pot.detection 120m > pot.max 210
mm
ALLUMAGE PLAN DE CUISSON
• Connectez les cuisinière au réseau électrique
•
ALLUMAGE PLAN DE CUISSON
Appuyer sur la touche A pour allumer le plan de cuisson.
Tous les afchages relatifs aux zones de cuisson
s’allumeront en position standby .
L’unité de contrôle restera active pendant 10 secondes.
Si pendant ce laps de temps aucune zone de cuisson
n’est sélectionnée, le plan de cuisson s’éteindra
automatiquement.
•
ALLUMAGE ZONES DE CUISSON
Appuyez sur ou faites glisser le bouton pour allumer la
plaque et du minimum au maximum de puissance. Réglez
la puissance en appuyant sur le bouton souhaité et le
curseur, cela fonctionne pour de fuite avec un mode de
commun avec le bouton.
La puissance de la zone de cuisson unique peut être ajusté
en 9 positions différentes, et il sera afché dans son écran
lumineux avec un certain nombre de 1 à 9.
•
CHALEUR RESIDUELLE
Si, après avoir été éteinte, une zone de cuisson est
encore à une température élevée (plus de 50º), l’afchage
correspondant à cette zone montre le symbole (chaleur
résiduelle).
L’indication ne disparaît que quand il n’y a plus aucun
risque de brûlure.
•
IDENTIFICATION CASSEROLES
Si un des afchage d’une zone de cuisson devait montrer le
symbole , cela signie que:
1) le récipient utilisé n’est pas adéquat à la cuisson à
induction.
2) la casserole utilisée a un diamètre inférieur à celui admis
pour l’appareil.
3) il n’y a aucune casserole sur la plaque.
ZONE DE CUISSON DE DIAMÈTRE
Ø 160 mm 110mm
Ø 200 mm 145mm
DIAMÈTRE MINIMUM DU POT
•
TIMER
Cette fonctionnalité vous permet de régler l’heure
(de 1 minute à 1 heure et 59 minutes) pour éteindre
automatiquement la zone de cuisson sélectionnée.
Activer la minuterie en appuyant sur les touches et le H - I.
Appuyez sur le bouton pour ajuster le temps de cuisson
est indiqué sur son écran. Sélectionnez la zone de cuisson
avec l’un des boutons et barres de LED sous le diplay de la
zone est activée, indiquant la sélection. Réglez la puissance
de la zone comprise entre 1 et 9 touches avec le même
E. Set à ce point le temps de sommeil désiré en utilisant
les touches minuteries H ou I dans la région. L’inclusion
de la minuterie avec le symbole de l’horloge apparaîtra à
côté de l’afchage de la zone de cuisson sélectionnée. Le
compte à rebours sera afché sur l’écran du dessus des
touches H - I. La minuterie s’éteint automatiquement la
zone de cuisson et vous entendrez un bip sonore qui peut
être désactivé en appuyant sur l’une des commandes. Pour
désactiver la minuterie, appuyez sur les touches H et I de
la minuterie.
•
EGG TIMER/MÉMORANDUM
Et ‘possible de dénir un son de rappel en appuyant
simultanément sur les touches C et D. La zone centrale
clignote minuterie. Grâce à la touche C ou D mis un temps
pour les rappels de 1 à 99 minutes. A l’heure programmée,
vous entendrez un bip qui peut être désactivé en appuyant
sur l’une des commandes. La zone de cuisson restera actif
auparavant. La fonction de minuterie d’oeuf / rappel reste
actif même après mise hors tension.
Pour désactiver cette fonction, appuyez sur les touches C
et D puis sur la touche D pour la valeur.
•
PAUSE
Pressant la touche C quand au moins une zone de
cuisson est active on peut mettre en pause l’appareil en
interrompant momentanément la cuisson.
La led correspondante s’allume. La pause a une durée
égale à 10 minutes, après quoi l’appareil s’éteint
automatiquement.
La fonction pause peut être désactivée en pressant la
touche C et, en 10 secondes, une touche quelconque de
la zone des commandes.
L’utilisation de la fonction pause interrompt les éventuelles
minuteries actives.
•
RAPPEL
Si par erreur le plan de cuisson s’éteint, on peut rappeler
les réglages actifs auparavant sur les zones de cuisson en
rallumant le plan avec la touche A en 6 secondes et en
pressant la touche C en 6 secondes. Quand cette fonction
est disponible au moment du rallumage du plan la led de la
touche est éclairée.
•
BLOCAGE DE COMMANDES
Il est possible de bloquer les commandes pour éviter des
modications non souhaitées (enfants, nettoyage, etc.).
En appuyant la touche B, les commandes se bloquent
et le voyant correspondant s’allume. Pour débloquer les
commandes et récupérer le contrôle sur les réglages, (ex.
interrompre la cuisson), il faut enfoncer la touche B Il est
cependant toujours possible d’éteindre le plan de cuisson
même avec les commandes bloquées. Dans ce cas, le
blocage des commandes restera en fonction au rallumage
du plan.
- 17 -
Page 18

•
ETEINDRE LES ZONES DE CUISSON
Pour désactiver une zone de cuisson à ramper et à la clé
de la valeur .
•
ETEINDRE LE PLAN DE CUISSON
Pour éteindre complètement le plan de cuisson, appuyer
la touche A.
•
FONCTION BOOSTER
Cette fonctionnalité réduit encore le temps de cuisson d’une
zone donnée, d’amener la température à la puissance
maximale pour un intervalle de 10 minutes. A la n de cette
gamme de la puissance de la zone de cuisson revient
automatiquement au niveau 9.
L’utilisation de cette fonction est indiqué pour le chauffage
de temps de grandes quantités de liquide (eau par exemple
pour la cuisson des pâtes) ou plats.
Après avoir sélectionné une zone de cuisson peut doc.
number fuznione le booster en appuyant sur le D, cette
fonction pour un temps de 10 minutes, le nourrit plaque
sélectionnée à la puissance maximale .
•
FONCTION DE PONTE
Cette fonctionnalité vous permet de connecter, à la
verticale, les deux zones de cuisson élargir la zone où
mettre les pots, il est particulièrement adapté quand il
s’agit de cuisiner avec de grandes casseroles. La fonction
est activée en appuyant sur la touche D domaines de la
kitchenette deux voisines, a été sélectionné est afché sur
le côté pour afcher les symboles et le contrôle de la
puissance de la zone de cuisson est activé uniquement par
le bouton E-dessous de la zone de cuisson. La fonction
peut être désactivée touches pressées ensemble D.
•
PROGRAMMES SPECIAUX
Le plan comporte trois programmes spéciaux qui peuvent
être réglées en appuyant sur la touche F. Les programmes
ont déjà été xés et les températures sont de fusion, de
travail à 42 degrés pour faire fondre le chocolat, le beurre
ou similaires, chauffage, travaillant à 70 degrés, pour
réchauffer préalablement cuits, faire bouillir, en travaillant
à 94 degrés, pour porter à ébullition lente préparer des
sauces ou des soupes et des ragoûts.
•
EXTINCTION DE SÉCURITÉ
L’appareil est doté d’un système de sécurité qui éteint
automatiquement l’appareil au moment où expire le temps
limite d’allumage à une puissance donnée selon le tableau
suivant.
racloir (en option) éliminer immédiatement de la surface
de cuisson chauffée les fragments de feuilles d’aluminium
et de matière plastique qui ont fondu par mégarde ou les
résidus de sucre ou d’aliment ayant un contenu de sucre
élevé. N’utiliser en aucun cas des éponges abrasives ou
des détergents chimiques irritants tels que spray pour four
ou dégraisseurs.
ATTENTION: NE PAS UTILISER UN NETTOYEUR À
VAPEUR.
ENLÈVEMENT DES APPAREILS MÉNAGERS
USAGÉS
La Directive Européenne 2002/96/EC sur
les Déchets des Equipements Electriques et
Electroniques (DEEE), exige que les appareils
ménagers usagés ne soient pas jetés dans
le ux normal des déchets municipaux. Les
appareils usagés doivent être collectés séparément an
d’optimiser le taux de récupération et le recyclage des
matériaux qui les composent et réduire l’impact sur la santé
humaine et l’environnement. Le symbole de la “poubelle
barrée” est apposée sur tous les produits pour rappeler les
obligations de collecte séparée. Les consommateurs devront
contacter les autorités locales ou leur revendeur concernant
la démarche à suivre pour l’enlèvement de leur vieil appareil.
TOUTE RESPONSABILITÉ EST DÉCLINÉE POUR
LES ÉVENTUELS DÉGATS PROVOQUÉS PAR
L’INOBSERVATION DES SUSDITES INSTRUCTIONS.
LA GARANTIE N’EST PAS VALABLE EN CAS DE
DOMMAGES PROVOQUES PAR LE NON RESPECT DES
MISES EN GARDE CITEES CI-DESSUS.
PUISSANCE TEMPS LIMITE ALLUMAGE (heures)
1 - 2 6
3 - 4 5
5 4
6 - 7 - 8 - 9 1,5
•
ENTRETIENT
Éliminer tous résidus de nourriture éventuels ainsi que
les gouttes de graisse de la surface de cuisson à l’aide
du racloir spécial fourni sur demande (Fig.10). Nettoyer
le mieux possible la surface chauffée avec des produits
appropriés et un chiffon papier, ensuite rincer avec de
l’eau et essuyer avec un chiffon bien propre. Au moyen du
- 18 -
Page 19

- 19 -
Page 20

РУССКИЙ
О Б Щ А Я И НФОРМА Ц И Я
Внимательно прочитайте данную инструкцию - в
ней содержатся важные указания по безопасной
установке, использованию и уходу.
Пожалуйста, храните данную инструкцию для
последующего использования.
Любые работы по установке (соединение
с электросетью) должны выполняться
квалифицированными специалистами в
соответствии с действующими нормами.
У КА З А НИ Я ПО Б Е ЗО П А СН О С ТИ
Данный прибор не предназначен для
использования детьми или лицами,
нуждающимися в контроле.Для безопасности,
никогда не размещайте ферромагнитные
предметы больших размеров (например.
лотки для выпечки торта) на варочной зоне
стеклокерамической поверхности. Для лиц,
использующих кардиостимулятор, рекомендуется
проконсультироваться с врачом перед
использованием индукционной варочной
поверхности. Металлические предметы, такие
как ножи, вилки, ложки или крышки, не должны
находиться на варочной поверхности, поскольку
они могут нагреться.
ВА ЖНА Я ИН ФОРМ АЦИЯ :
После использования, выключите варочную
поверхность при помощи панели управления.
-Избегайте утечки воды - необходимо уменьшить
подачу тепла при кипячении или подогреве
жидкостей.
-Не оставляйте нагревающие элементы без посуды
или с пустой посудой.
-Как только вы закончили готовить, необходимо
выключить соответствующую конфорку с
помощью регулятора, показанного ниже.
ВНИМАНИЕ :
Для использования индукционных плит очень
важно использовать соответствующую посуду.
Убедитесь в том, что ваша посуда подходит для
использования с индукционной системой.
Посуда должна содержать железо.
ИНСТРУКЦИИ ПО УСТАНОВКЕ
Данные инструкции предназначены для
квалифицированного специалиста по установке
и служат в качестве руководства по монтажу,
наладке и техническому обслуживанию в
соответствии с действующим законодательством
и нормами безопасности. Если встроенная печь
или любой другой генерирующий тепло прибор
должен быть установлен непосредственно под
стеклокерамический варочной поверхностью,
НЕОБХОДИМО ПРАВИЛЬНО ИЗОЛИРОВАТЬ
ДАННЫЙ ПРИБОР (печь) И ВАРОЧНУЮ
ПОВЕРХНОСТЬ, таким образом, чтобы тепло,
вырабатываемое печью, при замере температуры
с правой стороны дна варочной поверхности, не
превышало 60°C.
Невыполнение этого требования может привести
к сбоям в работе СЕНСОРНОЙ СИСТЕМЫ
УПРАВЛЕНИЯ.
РАЗМ ЕЩЕНИЕ
Данное устройство должно быть встроено в
столешницу, как это показано ра рисунке (Рис.1).
Нанесите герметизатор (Рис. 4) по всему периметру
(размер резки (Рис.1)). Зафиксируйте прибор
на столешнице при помощи 4 кронштейнов,
RUS
учитывая толщину столешницы (Рис. 2). Если
нижняя часть прибора после установки доступна
из нижней части шкафа. необходимо установить
разделительную панель, соблюдая указанные
расстояния (Рис. 3).
ПРОВЕТРИВАНИЕ
(Рис.5)
Расстояние между варочной поверхностью и
кухонной мебелью или встраиваемыми приборами
должно быть достаточным для обеспечения
вентиляции и оттока воздуха.
Не пользуйтесь варочной поверхностью, если
печь включена на процесс пиролиза.
ЭЛЕКТРИЧЕСКОЕ ПОДКЛЮЧЕНИЕ
(Рис.6)
Перед подключением варочной поверхности
убедитесь в том, что:
- электрический провод заземления должен быть
на 2 см. длиннее остальных проводов;
- технические данные системы отвечают
требованиям, указанным на табличке с заводской
маркой, которая располагается в нижней части
столешницы;
- электросистема оснащена заземлением,
соответствующим действующим правилам и
законодательству. Заземление обязательно по
законодательству.
В том случае, если электроприбор не
оснащен проводом и/или соответствующей
вилкой, используйте материал, пригодный
для поглощения, указанного на заводской
табличке, и выдерживающий рабочую
температуру. Если вы хотите подсоединить
напрямую прибор к электросети, необходимо
использовать двухполюсный выключатель с
минимальным разъемом 3 мм. между контактами,
соответствующий нагрузке, указанной на
заводской табличке, и отвечающий действующим
нормативам (желтый/зеленый провод заземления
не должен прерываться коммутатором). После
завершения установки прибора, биполярный
выключатель должен быть всегда легко доступен.
ИСПОЛЬЗОВАНИЕ
Основной характеристикой системы
индукционного нагрева является прямая передача
энергии нагрева от генератора к посуде.
Преимущества:
-Передача энергии происходит только тогда,
когда посуда располагается на соответствующей
варочной поверхности.
-Тепло генерируется только на дне посуды и
передается напрямую на приготовляемую пищу.
-Ускоренный разогрев и низкое потребление
электроэнергии в начале приготовления
пищи позволяют уменьшить общий расход
электроэнергии.
- Стеклокерамическая поверхность остается
холодной. Тепло, которое ощущается на варочной
поверхности - это тепло, отражающееся от дна
посуды.
ПОС УД А Д ЛЯ П РИГ ОТОВ ЛЕН ИЯ
Правильно подобранная посуда - ключевой
фактор для готовки на индукционной плите.
Убедитесь в том, что ваши кастрюли подходят для
индукционной системы. Посуда для приготовления
должна содержать железо. Вы можете проверить
это при помощи простого магнита (Рис. 7).
Рекомендуются кастрюли с плоским дном (Рис.
8А). Не используйте посуду с шероховатым дном,
чтобы не поцарапать поверхность плиты. Таким
образом, энергия будет оптимально использована.
Еще один важный момент в использовании плиты
- размер кастрюли по отношению к используемой
- 20 -
Page 21

конфорке (Рис. 8В). Различные конфорки
предусмотрены для посуды различного диаметра.
Предпочтительно использовать конфорку,
соответствующую диаметру используемой
кастрюли.
ВКЛЮЧЕНИЕ ПЛИТЫ:
• Подключить плиту к электропитанию.
Нажать кнопку А для того, чтобы включить плиту.
Все дисплеи, связанные с конфорками, включатся
в режиме ожидания.
Блок управления будет работать в течение 10
секунд. Если в этот промежуток времени ни
одна из конфорок не будет выбрана, плита
автоматически выключится.
• ВЫБОР КОНФОРКИ
Нажать или перетащить кнопку Е, чтобы включить
конфорку с минимальной до максимальной
мощности. Отрегулируйте мощность при помощи
кнопки слайдера Е, которая работает при помощи
перетаскивания или как обычная кнопка.
Мощность каждой конфорки регулируется на 9
различных позиций, которые будут отображаться
на соответствующем световом дисплее с номером
от 1 до 9.
• РЕГУЛИРОВАНИЕ МОЩНОСТИ ПРИГОТОВЛЕНИЯ
Для того, чтобы увеличить/уменьшить мощность
выбранной конфорки, использовать кнопку Е.
Мощность может быть установлена с 0 до 9.
• ФУНКЦИЯ БУСТЕР
Данная функция дополнительно уменьшает
время приготовления на конфорке, устанавливая
максимальную температуру приготовления на
промежуток в 10 минут. По завершении этого
промежутка времени мощность приготовления
автоматически возвращается на уровень 9.
Использование этой функции рекомендуется
для быстрого разогрева большого количества
жидкости (к примеру, вода для приготовления
макарон) или различных блюд.
После того, как вы выбрали конфорку, можно
активировать функцию бустер, нажав кнопку D, и
данная функция будет работать 10 минут в режиме
максимальной мощности.
• ПАУЗА
Нажав кнопку С, когда работает хотя бы
одна конфорка, можно мгновенно прервать
приготовление, поставив его на паузу. При этом
включится соответствующий индикатор.
Пауза длится 10 минут, и по истечении этого
времени плита автоматически выключается.
Функция пауза может быть выключена нажатием
кнопки С и, в течение последующих 10 секунд,
любой кнопки управления.
Использование функции пауза прерывает
действие установленных таймеров.
• ИСПОЛЬЗОВАНИЕ ТАЙМЕРА
Данная функция позволяет установить время (от
1 минуты до 1 часа 59 минут) для автоматического
выключения выбранной конфорки. Таймер
включается при одновременном нажатии кнопок
H и I.
Нажать одну из кнопок для установки времени
приготовления, которое отобразится на
соответствующем дисплее. Выберите нужную
конфорку одной из кнопок E, косая линия под
дисплеем выбранной конфорки просигналит
о выбранной функции. Установить мощность
конфорки с 1 до 9 при помощи тех же кнопок.
Установить желаемое время выключения
при помощи кнопок H или I в разделе таймер.
Установка функции таймер будет отображаться
значком часов рядом с дисплеем выбранной
конфорки. Обратный отсчет будет отображаться
на дисплее над кнопками H - I. По истечении
заданного времени конфорка автоматически
выключится и сработает звуковой сигнал, который
можно отключить нажатием любой кнопки
управления. Для того, чтобы отключить таймер,
необходимо одновременно нажать кнопки таймера
H и I.
• ФУНКЦИЯ ТАЙМЕР/НАПОМИНАНИЕ
Можно установить звуковое напоминание, нажав
одновременно кнопки C и D. Центральный
светодиод таймера мигает. Посредством кнопок
C или D установить время напоминания от 1 до
99 минут. По истечении установленного времени
включается звуковой сигнал, который можно
отключить нажатием любой кнопки управления.
Остальные конфорки продолжат работать в
установленном ранее режиме. Функция таймера/
напоминания продолжает работать после
выключения плиты. Чтобы отключить эту
функцию, необходимо одновременно нажать
кнопки C и D, после чего кнопку D до значения.
• ФУНКЦИЯ ЗАПОМИНАНИЯ
Если по ошибке вы выключили плиту, можно
установить параметры, заданные до выключения,
включив плиту удерживая кнопку А на 6 секунд,
а затем кнопку С на 6 секунд. Когда эта функция
доступна, при включении плиты светодиод кнопки
С светится.
• БЛОКИРОВКА УПРАВЛЕНИЯ
Можно заблокировать управление, чтобы
избежать возможности случайного изменения
настроек (дети, уборка. и т.п.). Нажав кнопку
B, вы блокируете управление, и загорается
соответствующая лампа. Для того, чтобы
разблокировать управление и снова регулировать
приготовление (напр., прервать приготовление),
необходимо нажать кнопку B. Когда блокировка
управления включена, можно выключить плиту.
В таком случае блокировка управления остается
активной при последующем включении плиты.
• ОСТАТОЧНОЕ ТЕПЛО
Если температура конфорки после выключения
все еще высокая (выше 50°), это отображается на
дисплее соответствующим значком (остаточное
тепло). Этот сигнал выключается только тогда,
когда риск ожога исчезает.
• РАСПОЗНАВАНИЕ КАСТРЮЛИ:
Если на одном из дисплеев конфорок,
отображающем мощность приготовления,
появится знак , это означает:
1)используемая посуда не подходит для
приготовления на индукционной плите.
2)диаметр используемой кастрюли превышает
допустимый размер.
3) на конфорке нет кастрюли.
ДИАМЕТР КОНФОРКИ МИНИМАЛЬНЫЙ ДИАМЕТР КАСТРЮЛИ
Ø 160 mm 110mm
Ø 200 mm 145mm
• ФУНКЦИЯ МОСТ
Данная функция позволяет вертикально
соединить две конфорки, увеличивая площадь
приготовления, и особенно рекомендуется в тех
случаях, когда для приготовления используются
очень большие кастрюли. Функция включается при
- 21 -
Page 22

одновременном нажатии кнопок D двух соседних
конфорок, выбранный режим отображается на
дисплее символами и . Управление мощностью
конфорки возможно только при помощи кнопки E
нижней конфорки. Эту функцию можно отключить
одновременным нажатием кнопок D.
• СПЕЦИАЛЬНЫЕ ПРОГРАММЫ
У плиты есть три специальных программы,
которые можно включить, нажав кнопку F. У
программ есть уже заданная температура:
плавление, работающее на 42 градусах , для
плавления шоколада, масла или других продуктов;
разогрев, работающий на 70 градусах, для
разогрева готовых блюд; кипячение, работает на
94 градусах, для медленного кипячения супов или
приготовления соусов или рагу.
• ВЫКЛЮЧЕНИЕ КОНФОРОК
Чтобы выключить конфорку, передвиньте кнопку
E на значение
• ВЫКЛЮЧЕНИЕ ПЛИТЫ
Для того, чтобы полностью выключить плиту,
нажмите кнопку A.
• БЕЗОПАСНОЕ ВЫКЛЮЧЕНИЕ:
Плита оборудована системой безопасности,
которая автоматически отключает решетку
по истечении ограничения периода времени
включения на определенной мощности.
МОЩНОСТЬ ПРЕДЕЛ ВРЕМЕНИ РАБОТЫ (час.)
1 - 2 6
3 - 4 5
5 4
6 - 7 - 8 - 9 1,5
возможный ущерб здоровью и окружающей среде.
Знак перечеркнутого мусорного бака наносится на
всю продукцию и напоминает о необходимости
отдельной утилизации этих продуктов. Для
получения более детальной информации о
правильной утилизации бытовых приборов вы
можете обратиться в специализированные
организации или в магазин бытовой техники.
ПРОИЗВОДИТЕЛЬ СНИМАЕТ С СЕБЯ
ОТВЕТСТВЕННОСТЬ ЗА ВОЗМОЖНЫЙ УЩЕРБ,
ПРИЧИНЕННЫЙ ВСЛЕДСТВИЕ НЕСОБЛЮДЕНИЯ
ВЫШЕПРИВЕДЕННЫХ УКАЗАНИЙ. ГАРАНТИЯ НЕ
РАСПРОСТРАНЯЕТСЯ В СЛУЧАЯХ, КОГДА ВРЕД
БЫЛ ПРИЧИНЕН ВСЛЕДСТВИЕ НЕСОБЛЮДЕНИЯ
ВЫШЕУКАЗАННЫХ ПРЕДУПРЕЖДЕНИЙ.
• ЧИСТКА И УХОД
Убрать остатки пищи и капли жира с поверхности
плиты при помощи специального скребка,
поставляемого по заказу (Рис.10).
Тщательно очистите поверхность при помощи
соответствующих чистящих средств и тканевой
бумаги, после чего промойте водой и просушите
чистой тканью. При помощи специального
скребка немедленно удалите с разогревающейся
поверхности алюминиевые листы и детали
из пластика, случайно расплавившиеся на
поверхности, или остатки сахара или пищи с
высоким содержанием сахара. Таким образом вы
избежите повреждения варочной поверхности.
Ни при каких обстоятельствах не используйте
абразивные губки или раздражающие химические
чистящие средства, такие как спрей для духовки
или пятновыводитель.
ВНИМАНИЕ: НЕЛЬЗЯ ИСПОЛЬЗОВАТЬ
ПАРООЧИСТИТЕЛЬ.
УТИЛИЗАЦИЯ БЫТОВОЙ ТЕХНИКИ
Европейская директива 2002/96/CE по
утилизации электрического и
электронного оборудования (RAEE),
предусматривает утилизацию, которая
не должна производиться вместе с
обычными твердыми городскими
быть собраны отдельно для того, чтобы
оптимизировать восстановление и переработку
составляющих материалов и предотвратить
отходами. Старые приборы должны
- 22 -
Page 23

Page 24

24/04/2014
3PCLIOBIU.1
 Loading...