

Page 1

induction
induction
induction
PIANO INDUZIONE VETROCERAMICA
IT
INDUCTION VITROCERAMIC HOB
EN
ELEKTRO GLASKERAMIK INDUKTIONS KOCHFELD
DE
PLACA INDUCCION VIDRIOCERAMICA
ES
TABLE INDUCTION VETROCERAMIQUE
FR
СТЕКЛОКЕРАМИЧЕСКАЯ ПЛИТ
RU
- Use and maintenance instructions
- Инструкции по пользованию
∅ 145
w 1200
(w 1600)
- Istruzioni d'uso e manutenzione
- Bedienungs und Wartungsanleitung
- Instrucciones de uso y mantenimiento
- Instructions pour l’utilisation et manutention
∅ 145
w 1200
(w 1600)
∅ 210
w 1500
(w 2000)
Assorbimento / Absorption / Anschlusswert : 5,2 kW
1
C
Page 2
490 mm
430mm
50
440mm
510mm
min. 50 mm
54 mm
20 mm
~ 2 mm
30 mm
Fig.
Fig.
D
B
Fig.
Ⓐ
Ⓑ
C
54 mm
Fig.
E
40 mm
2
54 mm
Page 3
H05V2V2/F - 2,5 mm
2
F
F
E
B
A
D
C
Fig.F
Fig.
G
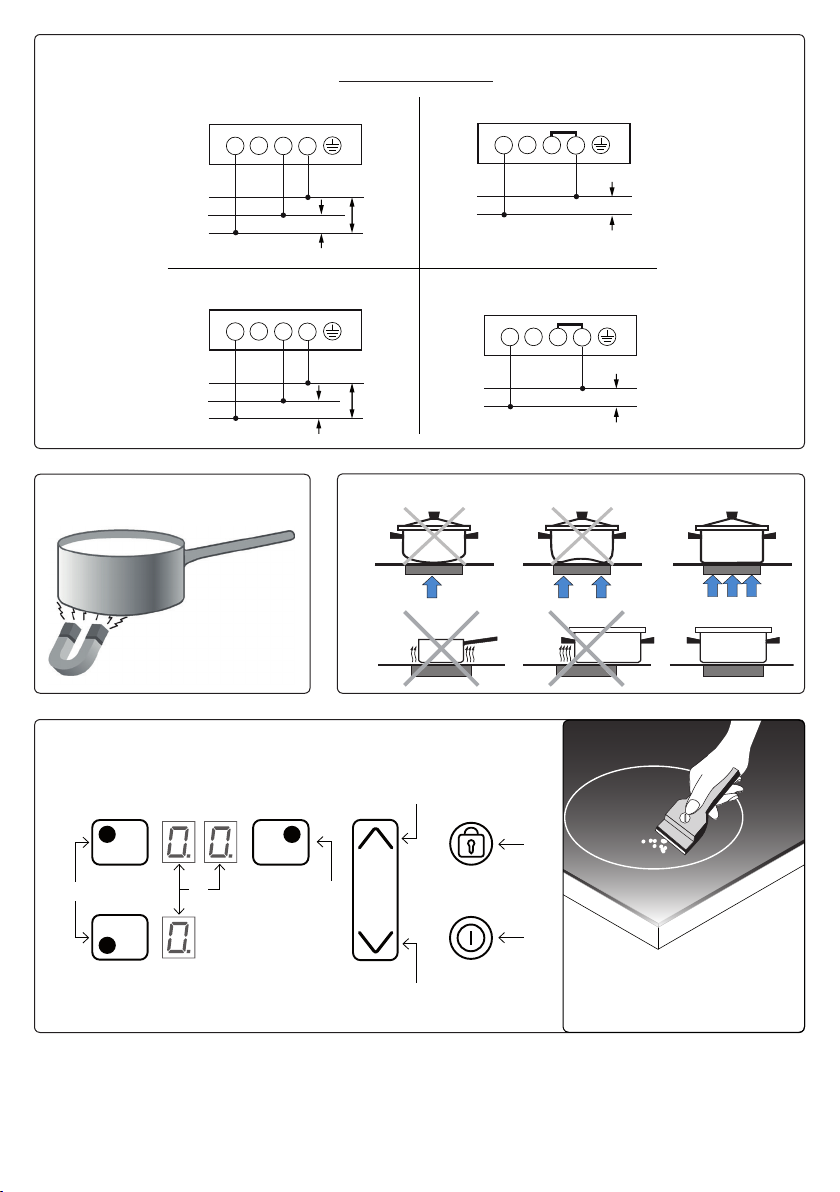
2N AC 380-415V
4 3 2 1
L1
L2
N
3 AC 220-240V
4 3 2 1
L1
L2
L3
220-240V
220-240V
Fig.
Ⓐ
Ⓑ
220-240V
220-240V
H
1N AC 220-240V
4 3 2 1
L1
N
2 AC 220-240V
4 3 2 1
L1
L2
220-240V
220-240V
Fig.
I
Fig.
J
3
Page 4

PIANO VETROCERAMICA
IT
Istruzioni per l’uso
Leggere attentamente il contenuto del
presente libretto in quanto fornisce importanti
indicazioni riguardanti la sicurezza di
installazione, d’uso e di manutenzione.
Conservare il libretto per ogni ulteriore
consultazione.
Tutte le operazioni relative all’installazione
(connessioni elettriche) devono essere
effettuate da personale specializzato in
conformità delle norme vigenti.
AVVERTENZE PER LA SICUREZZA
• Il piano di cottura deve essere utilizzato
sempre nei limiti del normale uso domestico
per preparare e tenere in caldo le pietanze.
Qualsiasi altro impiego non è ammesso.
• Le persone che per le loro capacità
siche, sensoriali o psichiche o per la loro
inesperienza o non conoscenza non siano
in grado di utilizzare in sicurezza il piano
di cottura, non devono farne uso senza
la sorveglianza e la guida di una persona
responsabile.
• I bambini sotto gli 8 anni di età devono
essere tenuti lontani dal piano di cottura
a meno che non siano sotto controllo
costante di un adulto.
• I bambini al di sopra degli 8 anni possono
eventualmente utilizzare l’apparecchio
da soli, se sono in grado di usarlo
correttamente. È importante che sappiano
riconoscere i pericoli che possono derivare
da un uso non corretto.
• Non permettere ai bambini di giocare con
l’apparecchio.
• I bambini non devono effettuare operazioni
di pulizia o manutenzione del piano di
cottura a meno che non siano sotto la
supervisione di un adulto.
• Lavori di installazione e manutenzione,
nonché riparazioni, devono essere
eseguiti da personale specializzato. Lavori
o riparazioni non correttamente eseguiti
possono creare seri pericoli per l’utente.
• PERICOLO DI SCOSSA ELETTRICA!
Non mettere in funzione o spegnere
subito il piano di cottura se la lastra in
vetroceramica è danneggiata o crepata.
Staccare l’apparecchio dalla rete elettrica.
• ATTENZIONE: Se il cavo di alimentazione
dell’apparecchio è danneggiato deve
essere sostituito dal produttore, dal servizio
assistenza autorizzato o da personale
qualicato al ne di evitare rischi.
• ATTENZIONE: L’apparecchio e le sue parti
accessibili diventano caldi durante l’uso.
Si deve prestare attenzione per evitare di
toccare gli elementi riscaldanti.
• ATTENZIONE: La cottura con olio o grasso
può essere pericolosa e può provocare
incendi. Non utilizzare MAI acqua per
cercare di spegnere il fuoco. Soffocare le
amme ad es. con un coperchio, un panno
da cucina umido o simili.
• ATTENZIONE: Il piano di cottura è molto
caldo quando è in funzione e rimane caldo
anche per un certo tempo dopo averlo
spento. Il rischio di ustione non sussiste
più solo quando si spengono le spie del
calore residuo.
• ATTENZIONE: Il normale processo di
cottura deve essere sorvegliato. Un
processo di cottura di breve durata deve
essere sorvegliato continuamente. Pentole
dalle quali evaporano completamente i
liquidi possono provocare danni al piano in
vetroceramica. Grasso o olio surriscaldati
possono iniziare a bruciare e provocare un
incendio.
• PERICOLO DI INCENDIO! Non conservare
oggetti sulle superci di cottura! Oggetti
metallici quali coltelli, forchette, cucchiai
e coperchi non devono essere posti sulla
supercie del piano di cottura in quanto
possono surriscaldarsi.
• Spegnere sempre le zone di cottura dopo
l’uso!
• L’apparecchio non è destinato ad essere
utilizzato per mezzo di un timer esterno
o un sistema di comando a distanza
separato.
ISTRUZIONI PER L’INSTALLAZIONE
Le presenti istruzioni sono rivolte ad un
installatore specializzato e fungono da
guida per l’installazione, la regolazione e
la manutenzione in conformità delle leggi
e delle norme vigenti. Se un forno da
incasso o qualsiasi altra apparecchiatura
che genera calore deve essere montato
4
Page 5

direttamente sotto il piano di cottura in
vetroceramica, È NECESSARIO CHE TALE
APPARECCHIATURA (forno) E IL PIANO
DI COTTURA IN VETROCERAMICA
SIANO ADEGUATAMENTE ISOLATI, in
modo tale che il calore generato dal forno,
misurato sul lato destro del fondo del piano
di cottura, non superi i 60°C. Il mancato
rispetto di tale precauzione potrebbe
determinare l’errato funzionamento del
sistema TOUCH CONTROL.
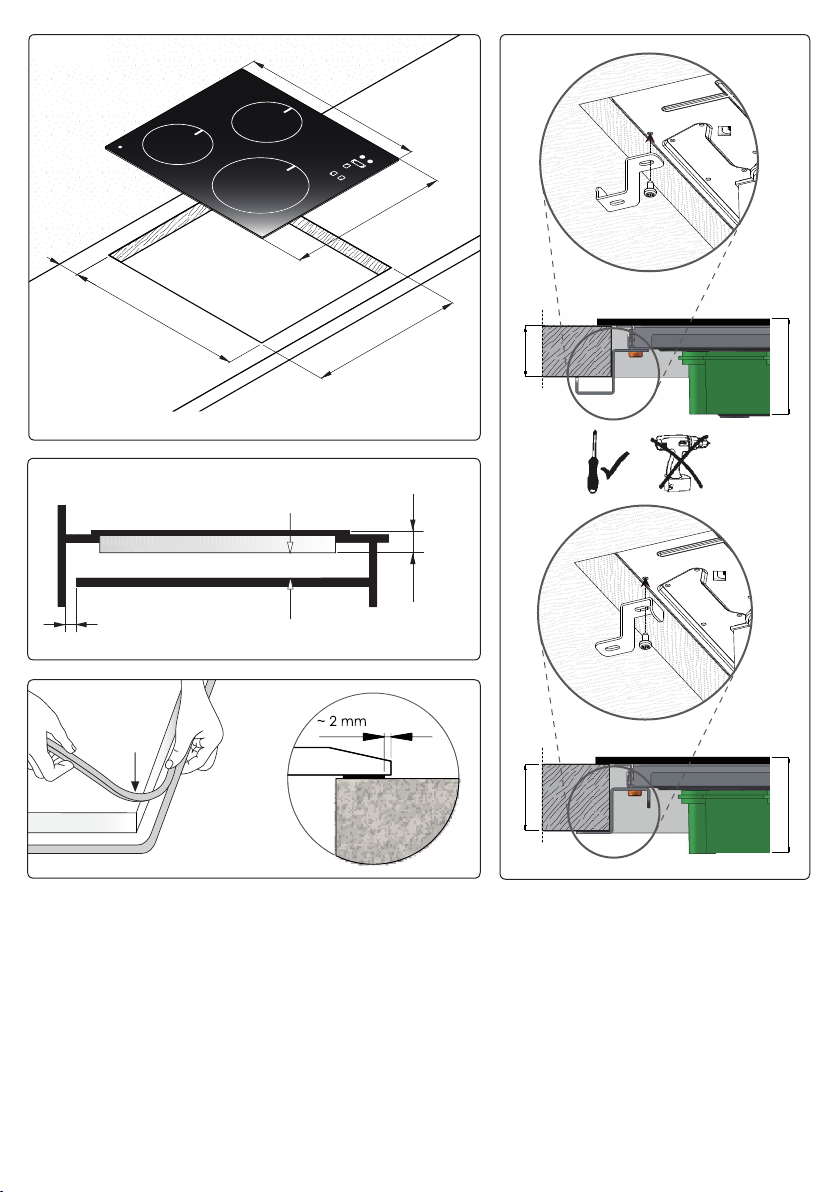
POSIZIONAMENTO
L’elettrodomestico è realizzato per essere
incassato in un piano di lavoro, come
illustrato nella gura (Fig.1). Predisporre
materiale sigillante (Fig.4) lungo l’intero
perimetro (dimensioni del taglio (Fig.1).
Bloccare l’elettrodomestico sul piano di
lavoro mediante i 4 sostegni, tenendo
presente lo spessore del piano di lavoro
(Fig.2). Se la parte inferiore dell’apparecchio,
dopo l’installazione, è accessibile dalla parte
inferiore del mobile è necessario montare un
pannello separatore rispettando le distanze
indicate (Fig.3); se si installa sotto un forno
questo non è necessario.
VENTILAZIONE
La distanza tra il piano di cottura e i mobili
da cucina o gli apparecchi da in casso deve
essere tale da garantire una sufciente
ventilazione ed un sufciente scarico
dell’aria. Non utilizzare il piano di cottura se
nel forno è in corso il processo di pirolisi.
CONNESSIONI ELETTRICHE (Fig.5)
Prima di effettuare le connessioni elettriche
assicurarsi che:
- le caratteristiche dell’impianto siano tali
da soddisfare le indicazioni sulla targhetta
identicativa applicata sulla parte inferiore
del piano di lavoro;
- l’impianto sia dotato di una messa a terra
efciente conforme alle norme e alle
disposizioni di legge in vigore.
La messa a terra è obbligatoria per legge.
Nel caso in cui l’elettrodomestico non sia
dotato di cavo e/o della relativa spina,
utilizzare materiale adatto per l’assorbimento
indicato nella targhetta identicativa e
per la temperatura di funzionamento. Se
si desidera una connessione diretta alla
linea elettrica, è necessario interporre un
interruttore omnipolare, con un’apertura
minima di 3mm fra i contatti, appropriato al
carico indicato nella targhetta e conforme
alle norme vigenti (il conduttore di terra
giallo/verde non deve essere interrotto dal
commutatore). Terminata l’installazione
dell’apparecchiatura, l’interruttore
omnipolare deve essere facilmente
raggiungibile.
USO E MANUTENZIONE
La caratteristica fondamentale del sistema
ad induzione è il trasferimento diretto
dell’energia riscaldante dal generatore al
recipiente di cottura.
Vantaggi:
- Il trasferimento di energia avviene solo
quando il recipiente è posto sulla zona di
cottura.
- Il calore viene generato solo sul fondo del
recipiente e trasmesso direttamente al cibo
da cuocere.
- Tempi di riscaldamento ridotti e basso
consumo di energia durante l’inizio cottura,
consentono un risparmio globale di
energia.
- Il piano in vetroceramica rimane freddo. Il
calore che si avverte sul piano di cottura è
quello riesso dal fondo del recipiente.
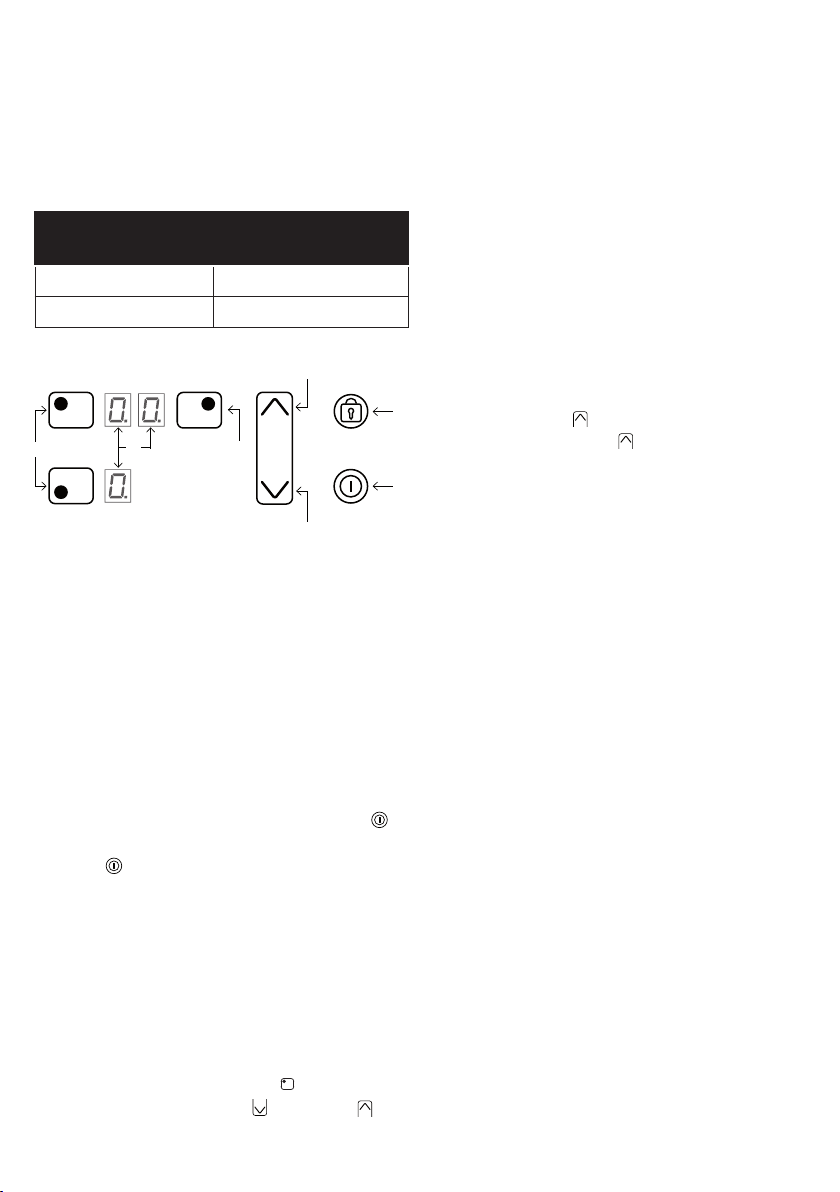
RECIPIENTI PER LA COTTURA
L’utilizzo di recipienti appropriati è un fattore
essenziale per la cottura ad induzione.
Vericate che le vostre pentole siano idonee
per il sistema ad induzione.
I recipienti devono quindi contenere
ferro.
Potete vericare se il materiale della pentola
è magnetico con una semplice calamita
(Fig.6).
Si consigliano recipienti a fondo piatto
(Fig.7A).
Non utilizzare recipienti con base ruvida,
per evitare di grafare la supercie termica
del piano.
In questo modo l’energia- può essere
utilizzata in modo ottimale. Un fattore non
trascurabile nella cottura ad induzione sono
5
Page 6
inne le dimensioni della pentola in relazione
D
alla piastra utilizzata (Fig.7B).
Le zone di cottura consentono l’utilizzo
di recipienti con fondi di vari diametri. E’
comunque preferibile utilizzare la zona di
cottura appropriata al diametro della pentola
che si vuole utilizzare.
DIAMETRO
ZONA COTTURA
DIAMETRO
MINIMO PENTOLA
Ø 145 mm 80 mm
Ø 210 mm 130 mm
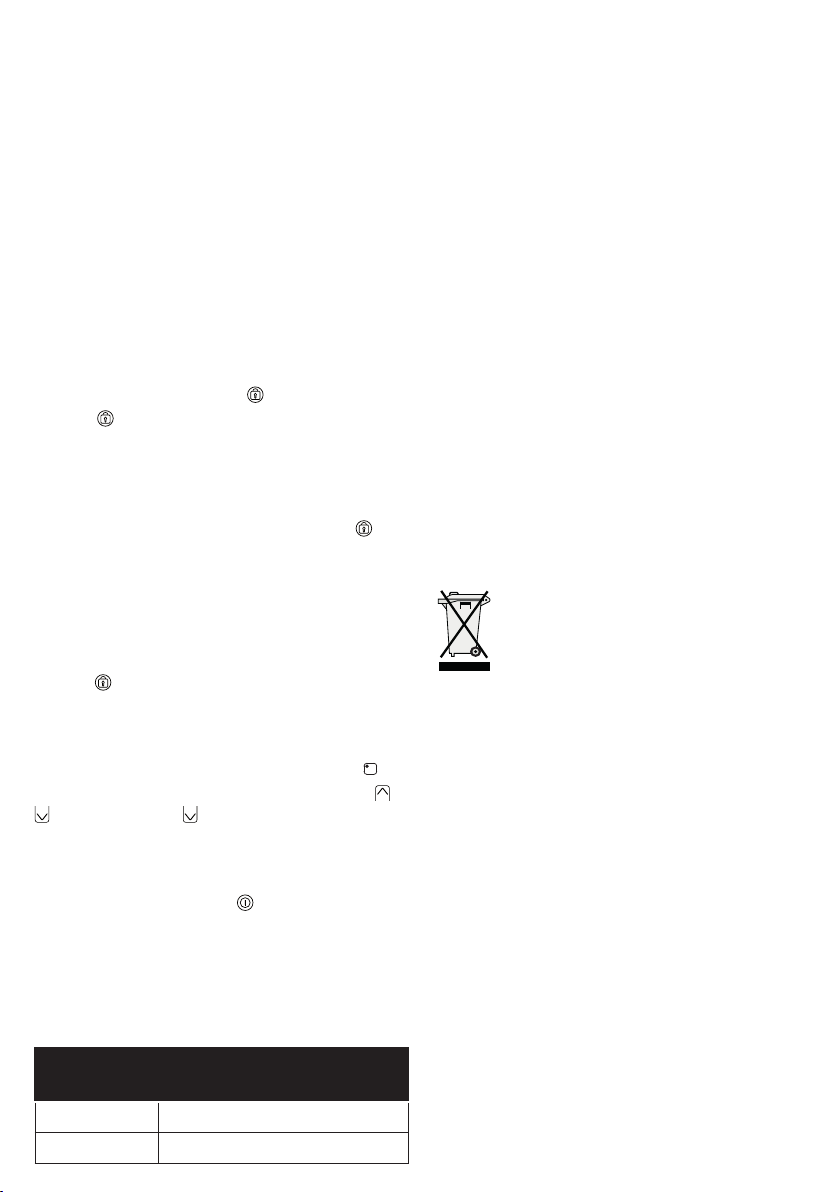
USO (Fig.8)
F
E
F
C
B
A
A - Tasto ON/OFF > accende e/o spegne
l’apparecchio
B - Tasto chiave > attiva il blocco comandi
/ sicurezza bambini
C - Tasto + > aumenta la potenza di cottura
D - Tasto - > riduce la potenza di cottura
E - Display zona > mostra i valori impostati
sulla zona di cottura
F - Zona di cottura > attiva la zona di
cottura desiderata
ACCENSIONE PIANO COTTURA
Per accendere l’apparecchio premere
il tasto , i display si accenderanno in
posizione standby « .».
L’unità di controllo rimarrà attiva per un
tempo di 10 secondi. Se entro questo
termine non verrà selezionata nessuna
zona di cottura il piano cottura si spegnerà
automaticamente.
ACCENSIONE ZONE COTTURA
Per selezionare la zona di cottura desiderata
premere il relativo tasto e premere
entro 10 secondi il tasto o il tasto per
regolarne la potenza.
La potenza della singola zona di cottura
può essere regolata in 9 differenti posizioni,
e sarà visualizzata nel relativo display
luminoso con un numero da “1 a 9”.
RISCALDAMENTO VELOCE /
POWER BOOSTER
«P»
Questa funzione riduce ulteriormente il
tempo di cottura di una data zona portando
la temperatura alla massima potenza per un
intervallo di 10 minuti. Al termine di questo
intervallo la potenza della zona di cottura
torna automaticamente al livello 9.
L’uso di questa funzione è indicato per il
riscaldamento in tempi brevissimi di grandi
quantità di liquidi (es. acqua per la cottura
della pasta) o pietanze. Per attivare questa
funzione selezionare la zona di cottura e
premere il tasto no al livello 9. Premere
nuovamente il tasto . Verrà emesso un
segnale acustico ed il simbolo «P» sarà
visualizzato nel display relativo alla zona.
CALORE RESIDUO «H»
Se la temperatura di una zona di cottura
è ancora elevata (superiore a 50°) dopo
essere stata spenta, il display relativo a
quella zona mostra il simbolo «H» (calore
residuo). L’indicazione scompare solo
quando non vi è più alcun rischio di ustioni.
RICONOSCIMENTO PENTOLE «u»
Se su uno dei display di una zona di cottura,
dovesse comparire il simbolo «u», signica
che:
1) il recipiente utilizzato non è idoneo per la
cottura ad induzione.
2) il diametro della pentola utilizzata è inferiore
a quello consentito dall’apparecchio.
3) sulla piastra non è presente nessuna
pentola.
TIMER «t»
Questa funzione permette di stabilire il
tempo (da «01» a «99» minuti) per lo
spegnimento automatico della zona di
cottura selezionata.
Attivare una zona cottura premendo uno dei
tasti F e regolare la potenza tramite i tasti
C o D.
Per attivare il timer premere nuovamente
il tasto F relativo alla zona selezionata,
6
Page 7
verrà emesso un segnale acustico e la
«t» comparirà nel display della zona
selezionata. Regolare il tempo tramite i tasti
C e D. Se la zona cottura selezionata si
trova nella parte inferiore del piano il tempo
timer verrà mostrato nel display della zona
cottura situata nella parte superiore del
piano e viceversa. Premere di nuovo il tasto
F per confermare. Allo scadere del timer la
zona cottura si spegnerà automaticamente
e verrà emesso un segnale acustico.
Per disattivare il timer premere il tasto F
della zona precedentemente abilitata e
portare a «00» il valore del timer tramite il
tasto D.
BLOCCO COMANDI
Il tasto blocca il funzionamento del piano
nello stato in cui si trova, impedendo ogni
operazione non intenzionale (es. da parte
di bambini). In questo stato nessuna
azione sui tasti ha effetto. Per attivare la
funzione di sicurezza premere il tasto no
all’accensione della spia. Quando il blocco
dei comandi è attivo è comunque possibile
spegnere il piano di cottura. In questo caso
il blocco comandi rimane attivo anche alla
riaccensione del piano.
Per disattivare il blocco dei comandi premere
il tasto no allo spegnimento della spia.
SPEGNIMENTO ZONE COTTURA
Per spegnere una zona di cottura
selezionarla premendo il relativo tasto poi
premere contemporaneamente i tasti e
oppure il tasto no alla posizione «0».
SPEGNIMENTO PIANO COTTURA
Per spegnere completamente il piano di
cottura premere il tasto .
SPEGNIMENTO DI SICUREZZA
L’apparecchio è provvisto di un sistema di
sicurezza che spegne automaticamente la
zona di cottura trascorso il tempo limite di
accensione ad una data potenza.
POTENZA TEMPO LIMITE
ACCENSIONE (ore)
1 - 8 10
9 3
PULIZIA E MANUTENZIONE
Rimuovere eventuali residui di cibo e gocce
di unto dalla supercie di cottura utilizzando
lo speciale raschietto fornito su richiesta
(Fig.9).
Pulire l’area riscaldata nel miglior modo
possibile utilizzando prodotti idonei ed
un panno-carta, quindi sciacquare con
acqua e asciugare con un panno pulito.
Mediante lo speciale raschietto rimuovere
immediatamente dall’area riscaldata di
cottura frammenti di fogli di alluminio e
materiale plastico scioltisi inavvertitamente
o residui di zucchero o di cibi ad elevato
contenuto di zucchero. In questo modo si
evita ogni possibile danno alla supercie del
piano. In nessun caso si devono utilizzare
spugnette abrasive o detergenti chimici
irritanti quali spray per forno o smacchiatori.
ATTENZIONE: NON DEVE ESSERE
UTILIZZATO UN PULITORE A VAPORE.
DISMISSIONE DEGLI
ELETTRODOMESTICI
La direttiva Europea 2002/96/CE
sui riuti di apparecchiature
elettriche ed elettroniche (RAEE),
prevede che gli elettrodomestici
non debbano essere smaltiti nel
normale usso dei riuti solidi urbani. Gli
apparecchi dismessi devono essere raccolti
separatamente per ottimizzare il tasso di
recupero e riciclaggio dei materiali che li
compongono ed impedire potenziali danni
per la salute e l’ambiente. Il simbolo del
cestino barrato è riportato su tutti i prodotti
per ricordare gli obblighi di raccolta separata.
Per ulteriori informazioni, sulla corretta
dismissione degli elettrodomestici, i
detentori potranno rivolgersi al servizio
pubblico preposto o ai rivenditori.
SI DECLINA OGNI RESPONSABILITÀ PER
EVENTUALI DANNI PROVOCATI DALLA
INOSSERVANZA DELLE SUDDETTE
AVVERTENZE.
LA GARANZIA NON E’ VALIDA NEL
CASO DI DANNI DERIVANTI DALLA
INOSSERVANZA DELLE SUDDETTE
AVVERTENZE.
7
Page 8

GLASS CERAMIC HOB
EN
User instructions
Carefully read the contents of this leaet
since it provides important instructions
regarding safety of installation, use
and maintenance. Keep the leaet for
possible future consultation. All the
operations relating to installation (electrical
connections) must be carried out by
specialised personnel in accordance with
current regulations.
SAFETY WARNINGS
• Use the cooktop only in householdtype situations for the preparation and
warming of food. All other types of use
are not permitted.
• Individuals who are incapable of using the
appliance safely because of their physical,
sensory or mental capabilities or their
lack of experience or knowledge must not
use this appliance without supervision or
instruction by a responsible person.
• Children under 8 years of age must be
kept away from the cooktop unless they
are under constant supervision.
• Children 8 years and older must only be
allowed to use the cooktop if they have
been given supervision or instruction
concerning use of the appliance in a
safe way and understand the hazards
involved.
• Children shall not play with the appliance.
• Cleaning and user maintenance shall not
be made by children without supervision.
• Installation, repair and maintenance
work should only be performed by an
authorized service technician. Work by
unqualied persons could be dangerous
for the user.
• RISK OF ELECTRIC SHOCK! If the
cooktop is defective or chipped, cracked
or broken in any way, immediately
switch it off and do not continue to use
it. Disconnect it from the electrical power
supply.
• WARNING: If the supply cord of the
appliance is damaged, it must be replaced
by the manufacturer, its service agent
or similarly qualied persons in order to
avoid a hazard.
• WARNING: The appliance and its
accessible parts become hot during use.
Care should be taken to avoid touching
heating elements.
• WARNING: Unattended cooking on a hob
with fat or oil can be dangerous and may
result in re. NEVER try to extinguish a
re with water, but switch off the appliance
and then cover ame e.g. with a lid or a
re blanket.
• WARNING: The cooktop is hot during use
and remains so for some time after being
switched off. The risk of burns remains
until the residual heat indicators have
gone out.
• CAUTION: The cooking process has to be
supervised. A short term cooking process
has to be supervised continuously.
• DANGER OF FIRE: Do not store items
on the cooking surfaces! Metallic objects
such as knives, forks, spoons and lids
should not be placed on the hob surface
since they can become hot.
• Always switch the cooking zones off after
use!
• The appliance is not intended to be
operated by means of an external timer
or separate remote-control system.
INSTALLATION INSTRUCTIONS
These instructions are for a specialized
installer and are a guide for the installation
process, regulations and maintenance
in accordance with the law and current
standards.
If the built-in oven or any other appliances
that produce heat, need to be installed
directly underneath the cooking hobs in
ceramic glass, IT IS NECESSARY THAT
THE APPLIANCE (oven) AND THE
COOKING HOBS IN CERAMIC GLASS
ARE ADEQUATELY ISOLATED, in such
a way that the heat generated from the
oven, measured on the right hand side of
the bottom of the cooking hobs, does not
exceed 60°C.
Failure to follow this precaution, could
cause a malfunction in the TOUCH
CONTROL system.
8
Page 9

POSITIONING
The domestic appliance was built in order to
be encased on a work surface, the way it is
illustrated in the graph (Fig.1). Predispose
sealing material (Fig.4) along the whole
perimeter (for dimensions of the cut see
Fig.1). Lock the domestic appliance into
place with 4 supporters, keeping in mind
the width of the surface (Fig.2).
If the lower part of the appliance after
installation, is accessible via the lower part
of the furniture, it is necessary to mount
a separating panel keeping in mind the
distances indicated (Fig.3). This is not
necessary if underneath the induction hob
is installed an oven.
VENTILATION
The distance between the cooktop and
built-in kitchen’s furniture or cooking
apparatuses must guarantee sufcient
ventilation of the air. Not to use the cooktop
if in the oven is in course the pyrolysis
process.
ELECTRICAL CONNECTIONS (Fig.5)
Before making the electrical connections,
check that:
- the system ratings meet the ratings
indicated on the identication plate xed
on the lower part of the worktop;
- the system is tted with efcient ground
wires in accordance with the laws and
current standards.
Grounding is mandatory by law.
If the domestic appliance is not supplied
with a cable and/or suitable plug, use
material suitable for the absorption value
indicated on the identication plate and the
operating temperature.
If wishing to make a direct connection to
the mains, an omnipolar switch must be
installed with a minimum 3 mm opening
between the contacts and appropriate
for the load indicated on the plate and in
accordance with current standards (the
yellow/green ground conductor must not
be disconnected by a switch).
When the appliance has been installed, the
omnipolar switch must be easily reachable.
USE AND MAINTENANCE
The fundamental characteristic of the
induction system is the direct transference
of heat from the generator to the cooking
recipient.
Advantages:
- The transference of power takes place
only when the recipient is placed on the
cooking zone.
- The heat is generated only at the base
of the recipient and transferred directly to
the food to be cooked.
- Reduced heating time and low
consumption of power during the
beginning of cooking, allowing a global
saving of power.
- The breglass top remains cold, the heat
felt on the cooking top is that reected
from the base of the recipient.
COOKING RECIPIENTS
The use of appropriate recipients is an
essential factor for induction cooking.
Check that your pots are suitable for the
induction system. The recipients must
contain iron. You can check whether
the material of the pot is magnetic with a
simple magnet (Fig.6).
We advise recipients having a at base
(Fig.7A). This way you can use the power
optimally.
Do not use recipients with a rough base
to avoid scratching the thermal surface of
the top.
A very important factor in induction cooking
is the dimension of the pot compared to
the plate used (Fig.7B).
The cooking zones allow the use of
recipients with bases of various diameters.
It is, however, preferable to use the
appropriate cooking zone for the dimension
of the pot.
COOKING ZONE
DIAMETER
MINIMUM PAN
DIAMETER
Ø 145 mm 80 mm
Ø 210 mm 130 mm
9
Page 10

USE (Fig.8)
F
C
for heating a large quantity of liquid in a
very short time (i.e. water for cooking
B
pasta) or other dishes. To activate this
E
F
D
function, select the cooking area and press
the key up to level 9. Press the key
again. An acoustic signal will be emitted
A
and a symbol
«P»
will be visualised on the
display E relative to the area.
A- ON/OFF key > switch the appliance on
and off
B- Lock key > activate control panel lock /
child lock
C- Plus key > increase power level of the
cooking zone
D- Minus key > reduce power level of the
cooking zone
E- Display area > shows the values set for
the cooking zone
F- Cooking Zone > select and activate the
desired cooking zone
SWITCHING THE COOKING TOP
ON
Press the on-off key to switch the
appliance on. The displays will turn on in
the stand-by
« .»
position.
The control unit remains active for 10
seconds.
If no cooking zone is selected within
this time, the cooking top switches off
automatically.
SWITCHING THE COOKING AREA ON
Press the relative key to select the
desired cooking zone and press the or
key within 10 seconds to set the power
level.
The power of the single cooking zone can
be adjusted in 9 different positions and will
be shown on luminous display B with a
number from “1 to 9”.
QUICK / BOOSTER HEATING
«P»
This function further reduces cooking time
in a given area taking the temperature
to the maximum power for a 10 minute
interval. At the end of this interval, the
cooking area power automatically returns
to level 9.
The use of this function is recommended
RESIDUAL HEAT
«H»
If the temperature of the cooking area is still
high (over 50°) after it has been switched
off, the relative display will indicate the
symbol (residual heat). The symbol will
only switch off when the burn risk in no
longer present.
POT DETECTION
If the symbol
«u»
«u»
should appear on one of
the cooking area displays, it means that:
1) The recipient being used is not suitable
for induction cooking.
2) The diameter of the recipient used is
inferior to that allowed by the appliance.
3) No recipient is present.
TIMER
«t»
This function allows you to set the time (from
«01»
to
«99»
minutes) to automatically
switch off of the selected cooking zone.
Select a cooking zone by pressing one of
the F keys and set the power by pressing
the C or D keys.
To activate the timer press again the F key,
an acustic signal will be heard and the
symbol will appear on the display of the
selected cooking zone.
Set the time by pressing the C or D keys.
If the cooking zone is in the lower part of
the cooktop the time will be shown on the
display of the cooking zone in the upper
part of the cooktop and vice versa. Press
the key F again to conrm your selection.
When the timer function elapses, the
cooking zone will automatically switch off
and an acoustic signal will be heard.
To disable the timer function, press the F
key on the cooking zone previously started,
bring the timer value back to
«00»
by using
the D key, then press the B key again to
conrm your selection.
10
«H»
«t»
Page 11

CONTROL PANEL LOCK
The
key blocks the hob functioning,
in order to prevent any unintentional
operation (e.g. by children). In this state no
action on the keys has effect. To activate
the safety function, press the key until
the warning light switches on. The cooking
top can however be switched off even when
the controls block is activated. In this case
the controls block remains active when the
top is switched on again. To deactivate the
safety function press the key until the
warning light switches off.
SWITCHING OFF THE COOKING
ZONES
To switch a cooking zone off, press the
relative key to select it then press
simultaneously the and key, or press
the key until reaching position .
SWITCHING THE COOKING TOP
OFF
To turn off the cooking top entirely hold
down the key.
SAFETY SWITCH
The appliance has a safety switch that
automatically switches off the cooking
zones when they have been operating for
a certain amount of time at a given power
level.
plastic material that have unintentionally
melted on the heated cooking area, or
residues of sugar or food with a high sugar
content.
In this way, any damage to the cooktop
surface can be prevented. Under no
circumstances should abrasive sponges,
or corrosive chemical detergents, such as
oven sprays or stain removers, be used.
WARNING: STEAM CLEANERS MUST
NOT BE USED.
DISPOSAL OF OLD ELECTRICAL
APPLIANCES
The European Directive 2002/96/
EC on Waste Electrical and
Electronic Equipment (WEEE),
requires that old household
electrical appliances must not be
disposed of in the normal unsorted municipal
waste stream. Old appliances must be
collected separately in order to optimise the
recovery and recycling of the materials they
contain and reduce the impact on human
health and the environment. The crossed-out
dustbin symbol on the product reminds you
of your obligation regarding separated waste
collection. Consumers should contact their
local public service or their local dealer for
more information on the correct disposal of
exhausted household appliances.
POWER
LEVEL
OPERATING TIME
LIMIT (hours)
1 - 8 10
9 3
MAINTENANCE
Remove any residues of food and drops of
grease from the cooking surface by using
the special scraper supplied on request
(Fig.9).
Clean the heated area as thoroughly as
possible using suitable products, and a
cloth/paper, then rinse with water and dry
with a clean cloth.
Using the special scraper immediately
remove any fragments of aluminium and
THE MANUFACTURER DECLINES ALL
RESPONSIBILITY FOR EVENTUAL
DAMAGES CAUSED BY BREAKING THE
ABOVE WARNINGS.
THE WARRANTY IS NOT VALID IN
THE CASE OF DAMAGE CAUSED BY
FAILURE TO COMPLY WITH THE ABOVE
WARNINGS.
11
Page 12

ELEKTRO-GLASKERAMIK-
DE
INDUKTIONS-KOCHFELD
Lesen Sie den Inhalt dieses Handbuchs,
da sie wichtige Informationen zur sicheren
Installation, Einsatz und Wartung zur
Verfügung stellt.
Halten Sie Anweisungen zum späteren
Nachschlagen.
Alle damit verbundenen Aufgaben (elektrische
Verbindungen) muss durch geschultes
Personal in Übereinstimmung mit den
Vorschriften durchgeführt werden.
SICHERHEITSHINWEISE
• Verwenden Sie das Kochfeld ausschließlich
im haushaltsüblichen Rahmen zum
Zubereiten und Warmhalten von Speisen.
Alle anderen Anwendungsarten sind
unzulässig.
• Personen, die aufgrund ihrer physischen,
sensorischen oder geistigen Fähigkeiten
oder ihrer Unerfahrenheit oder Unkenntnis
nicht in der Lage sind, das Kochfeld sicher
zu bedienen, müssen bei der Bedienung
beaufsichtigt werden.
• Kinder unter acht Jahren müssen vom
Kochfeld ferngehalten werden - es sei denn,
sie werden ständig beaufsichtigt.
• Kinder ab acht Jahren dürfen das Kochfeld
nur ohne Aufsicht bedienen, wenn ihnen das
Gerät so erklärt wurde, dass sie es sicher
bedienen können. Kinder müssen mögliche
Gefahren einer falschen Bedienung
erkennen und verstehen können.
• Lassen Sie Kinder niemals mit dem Gerät
spielen.
• Kinder dürfen das Kochfeld nicht ohne
Aufsicht reinigen oder warten.
• Durch unsachgemäße Installations- und
Wartungsarbeiten oder Reparaturen können
erhebliche Gefahren für den Benutzer
entstehen. Der Hersteller haftet nicht für
diese Schäden.
• Stromschlaggefahr! Nehmen Sie das
Kochfeld bei einem Defekt oder bei
Brüchen, Sprüngen oder Rissen in der
Glaskeramikscheibe nicht in Betrieb bzw.
schalten Sie es sofort aus. Trennen Sie es
vom Stromnetz.
• ACHTUNG:
beschädigt ist, muss es vom Hersteller,
Kundendienst oder Fachpersonal ersetzt
Falls das Stromkabel
12
werden, um jede Gefahr zu verhindern.
• ACHTUNG: Das Gerät und die zugänglichen
Geräteteile werden während des Betriebs
heiß. Berühren Sie nicht die Heizelemente.
• ACHTUNG: Öle und Fette können sich
bei Überhitzung entzünden. Löschen Sie
niemals Öl- und Fettbrände mit Wasser.
Schalten Sie das Gerät aus und ersticken
Sie die Flammen vorsichtig mit einem Deckel
oder einer Löschdecke.
• ACHTUNG: Das Kochfeld wird bei
Betrieb heiß und bleibt es noch einige Zeit
nach dem Ausschalten. Erst wenn die
Restwärmeanzeigen erloschen sind, besteht
keine Verbrennungsgefahr mehr.
• ACHTUNG: Lassen Sie das Kochfeld
während des Betriebs nicht unbeaufsichtigt.
Einen kurzfristigen Kochübergang ständig
überwachen. Leerkochende Töpfe können
zu Schäden an der Glaskeramikscheibe
führen. Öle und Fette können sich bei
Überhitzung entzünden.
• Brandgefahr: Verwenden Sie das Kochfeld
nicht als Ablageäche! Legen Sie keine
Metallgegenstände wie Messer, Gabeln,
Löffel oder Topfdeckel auf die Oberäche des
Kochfelds, da diese heiß werden können.
• Schalten Sie die Kochzonen nach Gebrauch
aus!
• Das Kochfeld ist nicht für den Betrieb mit
einer externen Zeitschaltuhr oder einem
Fernbedienungssystem bestimmt.
STROMANSCHLUSS
Die Anschlussschemata für die verschiedenen
Stromarten, Spannungen und die
einzusetzenden Kabel sind in Abbildung
5 (Abb.5) für den Fachmann eindeutig
dargestellt.
Vor dem elektrischen Anschluss ist
sicherzustellen, dass die Stromversorgung
einer der für das Glaskeramikfeld
vorgesehenen Stromarten und Spannungen
(Abb.6) entspricht.
Es ist ein entsprechend der Stromart und der
Spannung zugelassenes Anschlusskabel zu
verwenden, das den gesetzlichen Vorschriften
entspricht.
Das Glaskeramikfeld ist unbedingt zu erden.
Das Glaskeramikfeld ist unbedingt mit
einer Festanschlussdose anzuschließen.
Der Betrieb über einen Stecker und eine
Steckdose ist nicht zulässig. Es ist bei diesem
Page 13

Festanschluss eine allpolige Trennvorrichtung
mit einer Kontaktöffnungsweite von
mindestens 3 mm vorzusehen.
Die Erdleitung darf nicht durch den Schalter
unterbrochen werden. Dieser Hauptschalter
muss jederzeit gut zugänglich sein.
Die Kabelführung ist so zu wählen, dass
Vorbemerkungen zur Sicherheit
• Personen, die einen Herzschrittmacher
sich das Kabel an keinem Punkt über 50°C
über Zimmertemperatur erwärmen kann. Bei
unsachgemäßem Anschluss ist jede Haftung
des Herstellers ausgeschlossen
• Stellen Sie keine großen ferromagnetischen
MONTAGEABLAUF
Zwischen dem Gerät und der Arbeitsplatte ist
• Nur Kochgeschirr mit ebenem und
auf dem gesamten Umfang das mitgelieferte
Dichtungsband anzubringen (Abb.4). Diese
Dichtung verhindert das Eindringen von
Flüssigkeit zwischen dem Glaskeramikfeld
und der Arbeitsplatte.
Die Befestigung des Glaskeramikfeldes im
• Das Kochgeschirr darf keinen rauen
Ausschnitt der Arbeitsplatte erfolgt mit den
mitgelieferten Klammern (Abb. 2). Durch
Drehen der Klammern kann die Montage
• Die Kochzonen dürfen nicht aufgeheizt
alternativ in Arbeitsplatten mit der Stärke 30
mm oder 40 mm ausgeführt werden.
• Nichts direkt auf der heißen Kochzone ohne
GEBRAUCH
• Keine Gegenstände auf das Kochfeld legen.
Vorbemerkungen zum Induktionskochen
• Darauf achten, dass das Kochgut nicht
Die wesentliche Eigenschaft des
Induktionssystems ist die direkte Übertragung
der Energie zum Erhitzen der Speisen von
• Schalten Sie die Kochzone ab, bevor Sie
der Induktionsquelle auf das Kochgeschirr.
Vorteile:
• Die Energieübertragung geschieht nur dann,
2.3 Regelung (Abb.8)
wenn ein Topf auf der Kochäche steht.
• Die Wärme wird nur am Topfboden erzeugt
und direkt auf die zu garenden Speisen
übertragen.
• Kürzere Erwärmungszeiten und geringerer
F
Stromverbrauch zu Beginn der Garzeit
erlauben insgesamt eine Energieeinsparung.
• Die Glaskeramikäche bleibt kalt. Auf dem
Kochfeld wahrgenommen wird nur die
Wärme, die von dem Boden des Topfes
reektiert wird.
• Vergewissern Sie sich bitte, dass Ihr
Kochgeschirr für das Induktionssystem
geeignet ist. Die Töpfe und Pfannen müssen
aus ferromagnetischem Material sein, d.h.
Eisen enthalten. Ob das Material Ihres
Kochgeschirrs ferromagnetisch ist, können
Sie ganz einfach mit einem Magneten
BEDIENUNGSSPERRE
Es besteht die Möglichkeit, die
Bedienungsfunktionen zu sperren, wodurch
die Gefahr von ungewollten Änderungen
der Kochfeldeinstellungen ausgeschlossen
werden kann (Kinder, Reinigung, etc.).
Zum Aktivieren der Bedienungssperre die
Taste
aktiviert ist, kann man das Kochfeld dennoch
13
feststellen (Abb.7). Es wird empfohlen
Kochgeschirr aus Gusseisen, emalliertem
Stahl oder speziellem Edelstahl für das
Induktionskochen zu verwenden.
tragen, sollten Ihren Arzt zu Rate ziehen,
bevor sie die Induktionskochäche
verwenden.
Gegenstände (z.B. Backbleche) auf die
Glaskeramikkochäche.
ausreichend dickem Boden benutzen. Der
Boden muss wenigstens dem Durchmesser
der Kochzone entsprechen oder darf
höchstens leicht größer sein als diese.
(Abb.7)
Boden haben, um nicht die Glaskeramik zu
verkratzen.
werden, ohne dass ein gefülltes Kochgeschirr
darauf steht.
Kochgeschirr braten oder grillen.
überkocht und direkt auf die heiße Kochzone
läuft.
das Kochgeschirr vom Kochfeld nehmen.
C
B
E
F
A
D
drücken. Wenn die Bedienungssperre
Page 14

abschalten. In diesem Fall bleibt die Sperre
auch beim neuerlichen Einschalten des
Kochfelds aktiv. Um die Bedienungssperre
endgültig auszuschalten die Taste
EINSCHALTEN DES KOCHFELDES
Drücken Sie die Taste
einzuschalten. Alles Displays E der einzelnen
Kochzonen schalten sich in Stand-by Position
« .»
ein. Die Kontrolleinheit bleibt für die Dauer
von 10 Sekunden eingeschaltet. Wird innerhalb
dieses Zeitraumes das Kochfeld nicht betätigt,
geht die Elektronik automatisch wieder in die
OFF-Position über. Es muss dann der eben
beschriebene Vorgang wiederholt werden, um
das Kochfeld einzuschalten.
EINSCHALTEN DER KOCHZONEN
Zum Auswählen der gewünschten Kochzone
drücken Sie die entsprechende Taste
(Abb.8). Innert 10 Sekunden die Taste
oder die Taste
zu regulieren. Die Leistung der einzelnen
Kochzonen kann in 9 verschiedene Positionen
eingestellt werden und wird auf dem Display E
mit einer Zahl von “1 bis 9” angezeigt.
SCHNELLE ERWÄRMUNG /
POWER BOOSTER
Diese Funktion verkürzt die Garzeit auf einem
bestimmten Feld noch weiter, indem die
Temperatur für einen Zeitraum von 10 Minuten
auf Höchstleistung gebracht wird. Nach
Ablauf dieses Zeitraums kehrt die Leistung
automatisch zur Stufe 9 zurück.
Die Verwendung dieser Funktion ist für die
besonders schnelle Erwärmung großer
Mengen an Flüssigkeit (z.B. Wasser zum
Kochen von Teigwaren) oder an Gerichten
angezeigt. Zur Aktivierung dieser Funktion das
Kochfeld wählen und die Taste
9 drücken.
Erneut die Taste
Es ertönt ein akustisches Signal, und das
Symbol
Kochfeldes auf dem Display E.
ERKENNUNG DES KOCHGESCHIRRS
Sollte auf dem Display E der Kochzonen das
Symbol
hinsichtlich des Kochgeschirrs mindestens
eine der folgenden Voraussetzungen nicht
erfüllt ist:
«P» erscheint in Entsprechung des
«u»
erscheinen, so bedeutet dies dass
A um das Kochfeld
druecken, um die Temperatur
«P»
drücken.
drücken.
C
bis zur Stufe
«u»
F
1. Das verwendete Kochgeschirr ist nicht
für das Induktionskochen geeignet (siehe
Abschnitt 2.1).
2. Der Durchmesser des Kochgeschirrs ist
geringer als der der Kochzone (vgl. Abb.8)
3. Auf der Kochzone bendet sich kein
Kochgeschirr.
DURCHMESSER
KOCHFELD
MINDESTDURCHMESSER
KOCHTOPF
Ø 145 mm 80 mm
Ø 210 mm 130 mm
RESTWÄRMEANZEIGE
Wenn eine Kochzone auf OFF gestellt wird und
die Temperatur auf dem Glas des Kochfeldes
50°C überschreitet, erscheint der Buchstabe
«H»
«H» auf der Anzeige E, die der noch warmen
Kochzone entspricht. Diese Anzeige erlischt
erst, wenn keine Verbrennungsgefahr mehr
besteht.
TIMER
Mit dieser Funktion kann auf der gewünschten
Kochzone eine Garzeit von
Minuten eingestellt werden.
Die Taste F der gewünschten Kochzone drücken
und die Leistungsstufe mit den Tasten C und
D eingeben. Um die Timer einzuschalten Die
Taste F der gewünschten Kochzone wieder
drücken, eine akustische Signal wird ertönt
und auf dem Display ein
Garzeit mit den Tasten C und D eingeben. Falls
die gewählte Kochzone im unteren Teil des
Kochfeldes bendet, wird die Garzeit auf dem
Display der oberen Kochzone erscheint und
umgekehrt. Die Taste F wieder drücken um zu
bestätigen. Am Ende der eingestellten Garzeit
schaltet sich die Kochyone automatisch aus und
es ertönt ein akustisches Signal. Um den Timer
zu deaktivieren, die Taste F der gewünschten
Kochzone drücken und mit der Taste D der
Timer-Wert zurück auf
ABSCHALTEN DER KOCHZONEN
Um eine Kochzone auszuschalten, gleichzeitig
die Tasten
Kochzone drücken, bis zur Position
ABSCHALTEN DES KOCHFELDES
Um die Kochäche komplett auszuschalten,
die Taste
14
«t»
«01»
«t»
leuchtet auf. Die
«00»
bringen.
C und D der entsprechenden
A drücken.
bis
«0».
«99»
Page 15

SICHERHEITSABSCHALTUNG
Das Gerät ist mit einer Sicherheitsabschaltung
4. ENTSORGUNG DES GERÄTS IN
DER ZUKUNFT
ausgestattet, die automatisch das Gerät
ausschaltet, wenn an der Temperatureinstellung
des Kochfeldes keine Veränderungen
vorgenommen werden. Nach welcher Zeit die
Sicherheitsabschaltung in Kraft tritt, hängt von
der gewählten Temperaturstufe ab.
werden. Die Geräte müssen am Ende ihrer
Lebensdauer separat gesammelt werden, um
Temperaturstufe
max. Betriebszeit
(in Stunden)
1 - 8 10
9 3
WARTUNG
Pege
Übergelaufenes Kochgut und Fett können
mit einem handelsüblichen Schaber für
Glaskeramikfelder entfernt werden (Abb.9).
Es wird empfohlen die Glaskochäche mit
Papiertüchern und nicht ätzenden oder
kratzenden Reinigungsmitteln wie z.B. Stahlx
oder ähnlichen Produkten zu säubern.
HINWEIS: ES DARF KEIN
DAMPFREINIGUNGSGERÄT VERWENDET
WERDEN.
die Wiederverwertungs- und Recycling-Quote
der beinhalteten Materialien zu verbessern und
mögliche Schäden auf Umwelt und Gesundheit
zu verhindern. Das Symbol „durchgestrichene
Mülltonne“ auf jedem Produkt weist Sie auf Ihre
Picht hin, Elektrohaushaltsgeräte gesondert
zu entsorgen. Endverbraucher können sich an
die kommunalen Ämter für Abfallentsorgung
oder die Händler wenden, wo sie weitere
Informationen zur ordnungsgemäßen
Entsorgung ihrer Elektrohaushaltsgeräte
erhalten.
FÜR SCHÄDEN, DIE AUF DIE
NICHTBEACHTUNG DER OBEN
STEHENDEN ANWEISUNGEN
ZURÜCKZUFÜHREN SIND, WIRD
KEINERLEI HAFTUNG ÜBERNOMMEN.
Gemäß der Europäischen Richtlinie
2002/96/EG über Elektro- und
Elektronik-Altgeräte (WEEE) dürfen
Elektrohaushalts-Altgeräte nicht mit
dem normalen Hausmüll entsorgt
Technische Eingriffe und Kundendienst
Technische Eingriffe am Gerät dürfen nur
von Personen durchgeführt werden, die zum
Kundendienst autorisiert sind. Nur diese
Personen verfügen über die erforderlichen
technischen Unterlagen und Kenntnisse. Nicht
autorisierte Eingriffe am Gerät führen zum
Erlöschen der Gewährleistung.
BITTE NOTIEREN SIE HIER ZUM NACHWEIS DES ORDNUNGSGEMÄSSEN
ANSCHLUSSES:
Montagerma
Name des Monteurs
Qualikation bzw. Ausbildung des Monteurs
Datum der Montage
Rechnungsnummer
Datum der Rechnung
Für den Fall, dass im Reklamationsfall diese Daten nicht nachweisbar sind, erlischt die
gesetzliche Gewährleistung des Herstellers.
15
Page 16

PLACA EN VIDRIOCERAMICA
ES
Manual de utilización
Lea atentamente el contenido de este
libro que le proporcionará importantes
instrucciones en cuanto a la seguridad de
instalación, uso y mantenimiento. Conservar
el manual para cada ulterior consulta. Todas
las operaciones relativas a la instalación
(conexión eléctrica) deben ser realizadas
por personal especializado conformes a las
normas vigentes.
ADVERTENCIAS PARA LA
SEGURIDAD
• La placa vitrocerámica se tiene que usar
siempre dentro de los límites del normal
uso doméstico para preparar y mantener
calientes los alimentos, y no para un uso
profesional. No se admite ningún otro uso.
• Las personas que por sus capacidades
físicas, sensoriales o psiquicas o por
su inexperiencia o desconocimiento no
fueran capaces de utilizar de manera
segura la placa vitrocerámica, no tienen
que utilizarla sin la supervisión y la guía de
una persona responsable.
• Los niños que tengan menos de 8
años tienen que estar lejos de la placa
vitrocerámica excepto si estuvieran
acompañados por un adulto que los
controle.
• Eventualmente, los niños que tengan una
edad superior a los 8 años podrían utilizar
solos el aparato, si fueran capaces de
hacerlo correctamente. Es importante que
sepan reconocer los peligros que puedan
derivar de una utilización incorrecta.
• No permitir que los niños jueguen con la
placa vitrocerámica.
• Los niños no tienen que limpiar ni realizar
mantenimiento a la placa vitrocerámica
a menos que no estén vigilados por un
adulto.
• Trabajos de instalación y mantenimiento,
así como reparaciones, tienen que ser
realizados por personal especializado. Si
los trabajos o reparaciones no se realizan
correctamente, pueden causar graves
peligros para el usuario.
• ¡Riesgo de descarga eléctrica! No poner
en marcha o apagar enseguida la placa
vitrocerámica si la misma presenta grietas
16
o està dañada. Desconectar el aparato de
la red eléctrica.
• ATENCIÓN: Si el cable de alimentación
está dañado,para evitar riesgos, este
tiene que ser cambiado por el fabricante,
por el servicio de asistencia autorizado o
por personal cualicado
• ATENCIÓN: El aparato y sus piezas
accesibles alcanzan temperaturas
elevadas durante el uso. Procure no tocar
las partes calientes.
• ATENCIÓN: La cocción con aceite o grasa
puede ser peligrosa y puede provocar
incendios. Si el aceite o la grasa se
incendiaran, no usar NUNCA agua para
tratar de apagar el fuego. Sofoque las
llamas por ejemplo con una tapa, un trapo
de cocina húmedo o algo por el estilo.
• ATENCIÓN: La placa vitrocerámica se
calienta mucho cuando està en función
y queda caliente por un rato hasta
después de haberla apagado. El riesgo
de quemaduras deja de existir cuando se
apagan los indicadores del calor residual.
• ATENCIÓN: vigilar el normal proceso de
cocción. Un proceso de cocción de corta
duración tiene que ser continuamente
vigilado. Ollas de las que continuamente
se evaporan líquidos pueden provocar
daños a la placa vitrocerámica. Grasa y
aceite que se calienten demasiado pueden
empezar a quemar y provocar un incendio.
• ¡Riesgo de incendio! No colocar objetos
sobre la supercie de cocción!
Objetos metálicos como cuchillos,
tenedores, cucharas y tapas no tienen
que apoyarse en la supercie de la placa
vidrocerámica porque se pueden calentar
demasiado.
• ¡Apagar siempre las zonas de cocción
después de haberlas usado!
• El destino del aparato no es el de ser usado
mediante un temporizador externo o un
sistema de control remoto por separado.
INSTRUCCIONES PARA LA
INSTALACION
Las presentes instrucciones están dirigidas
a un instalador especializado y sirven
de guía para una correcta instalación,
regulación y mantenimiento en conformidad
con las leyes y normas vigentes.
Page 17

Si un horno de encastrar o cualquier
otro aparato que genera calor debe
ser montado directamente debajo de la
Vidriocerámica, ES NECESARIO QUE TAL
APARATO (Horno) Y EL VIDRIO QUEDEN
ADECUADAMENTE AISLADOS, de modo
que el calor generado por el horno (medido
en la parte derecha-frontal del fondo de el
plano de cocción), no supere los 60º C. La
falta de tal precaución podría producir un
mal funcionamiento del sistema TOUCH
CONTROL.
POSICIONAMIENTO
Este electrodoméstico ha sido realizado para
ser encastrado en una encimera, tal y como
ilustra la gura (Fig.1). Instalar el material
aislante (Fig.4) de la dotación a lo largo de
todo el perímetro del oricio practicado para
acoger la Placa (Fig.1). Fijar el aparato a la
encimera mediante las 4 grapas, teniendo
en cuenta el espesor de la encimera (Fig.2).
Si después de la instalación se puede
acceder a la parte inferior del aparato desde
la parte inferior del mueble es necesario
montar un panel separador respetando las
distancias indicadas (Fig.3); si se instala un
horno debajo la placa de inducción, esto no
es necesario.
VENTILACIÓN
La distancia entre el electrodoméstico y
los muebles o los aparatos que cocinan de
la cocina incorporada debe garantizar la
suciente ventilación del aire. No utilizar el
electrodoméstico si en el horno es en curso
el proceso de la pirolisis.
CONEXIÓN ELECTRICA (Fig.5)
Antes de efectuar la conexión eléctrica,
asegurese que:
- Las características de la acometida y
tendido se puedan corresponder con las
necesidades indicadas en la placa de
características del aparato.
- La instalación esté dotadas de la
correspondiente toma a tierra, según
normas y leyes vigentes.
La toma a tierra es obligatoria por ley.
En el caso que el aparato no estuviera
dotado de cable y/o correspondiente
enchufe, utilice material adaptado a la
17
absorción eléctrica indicada en el Placa
de caracteristicas, y a la temperatura de
funcionamiento. Si se desea una conexión
directa a la línea eléctrica, es necesario
interponer un interruptor omnipolar, con
una apertura mínima de 3 mm entre
contactos, apropiado a la carga indicada en
la placa y conforme a normas vigentes (el
conductor a tierra amarillo/verde no debe
ser interrumpido por el conmutador).
Terminada la instalación del aparato, el
interruptor omnipolar debe quedar siempre
fácilmente accesible.
USO Y MANTENIMIENTO
La característica principal del sistema a
inducción, es el traslado directo de la energía
de calentamiento desde el generador al
recipiente de cocción.
Ventajas:
- El traslado de energía ocurre solamente
cuando el recipiente es puesto sobre la
zona de cocción.
- El calor se genera solo en el fondo del
recipiente y se transmite directamente a
los alimentos que han de cocinarse.
- El tiempo de calefacción reducido y el
bajo consumo de energía durante el inicio
de la cocción, permiten un ahorro total de
energía.
- La placa de cocina en vidriocerámica
queda fría. El calor que se advierte sobre
la placa de cocina, es el reejado por el
fondo del recipiente.
RECIPIENTES PARA LA COCCIÓN
El uso de recipientes apropiados, es un
factor esencial para la cocción a inducción.
Averigüe que sus ollas sean idóneas para
el sistema a inducción. Por lo tanto, los
recipientes tienen que contener hierro.
Puede averiguar si el material de la olla es
magnético con un simple imán (Fig.6).
Se aconseja el uso de recipientes de
fondo plano (Fig.7A). No utilice recipientes
con base ruda, para evitar rasguñar la
supercie térmica de la placa. De este
modo, la energía puede ser utilizada de
modo optimal. Un factor importante en la
cocción a inducción, es el tamaño de la olla
en relación a la placa utilizada (Fig.7B). Las
zonas de cocción permiten el empleo de
Page 18

recipientes con fondos de varios diámetros.
D
C
En todo caso, es preferible utilizar la zona
de cocción apropiada al diámetro de la olla
que se quiere utilizar.
DIÁMETRO ZONA
COCCIÓN
DIÁMETRO MÍNIMO
CACEROLA
Ø 145 mm 80 mm
Ø 210 mm 130 mm
USO (Fig.8)
B
E
F
A
A. Tecla ON/OFF > enciende o apaga el
aparato
B. Llave > activa y desactiva la función
Bloqueo mandos/Seguridad niños
C. Tecla + > aumenta la potencia de la
zona de cocción
D. Tecla - > reduce la potencia de la zona
de cocción
E. Visualizador zona > muestra los
valores congurados para la zona de
cocción
F. Zona de cocción > activa la zona de
cocción deseada
ENCENDIDO DE LA PLACA DE
COCCIÓN
Pulse el botón
ON-OFF
para encender la
placa. Todos los displays B de las zonas de
cocción se activarán en posición de standby
« .». La unidad de control permanecerá
activa durante 10 segundos.
Si en este plazo no se selecciona ninguna
zona de cocción, la placa se apagará
automáticamente.
ENCENDER UNA ZONA DE COCCION
Para seleccionar la zona de cocción,
pulsar su respectivo botón
segundos pulsar el botón
y antes de 10
o el botón
para regular la potencia de cocción.
La potencia de la zona de cocción, puede
ser regulada en 9 posiciones diferentes y
18
será visualizada por el respectivo display
luminoso E con un número de “1 a 9”.
CALENTAMIENTO RÁPIDO / POWER
BOOST «P»
Esta función reduce ulteriormente el tiempo
de cocción de una zona determinada
llevando la temperatura a la máxima
potencia en un intervalo de 10 minutos.
Al nal de este intervalo la potencia de la
zona de cocción vuelve automáticamente al
nivel 9. El uso de esta función es apropiado
para calentar, en tiempos muy breves,
grandes cantidades de líquido (ej. agua
para la cocción de pasta) o comidas.
Para activar esta función seleccione la zona
de cocción y apriete la tecla
9. Apriete nuevamente la tecla
hasta el nivel
.
Se emite una señal acústica y aparece el
símbolo «P» en la pantalla E correspondiente
a la zona.
CALOR RESIDUAL «H»
Si la temperatura de una zona de cocción
es todavía elevada (superior a 50°) después
de haberla apagado, su display mostrará el
símbolo «H» (calor residual).
Esta indicación desaparecerá solamente
cuando cese el riesgo de quemaduras.
RECONOCIMIENTO OLLAS «u»
Si en un display de una zona de cocción
apareciera el símbolo «u», signica que:
1) el recipiente utilizado no es adecuado
para cocción por inducción.
2) el diámetro del recipiente es inferior al
admitido.
3) no hay ninguna olla en la placa.
TEMPORIZADOR «t»
Esta función permite establecer el
tiempo (de «01» a «99»
minutos) para el
apagado automático de la zona de cocción
seleccionada.
Activar una zona de cocción pulsando
una de las teclas F y regular la potencia
mediante las teclas C o D.
Para activar el temporizador pulsar de
nuevo la tecla F. Se emitirà una señal
acústica y el símbolo «t» aparecerà en
la pantalla correspondiente. Regular el
tiempo mediante las teclas C y D. Si la
Page 19

zona de cocción seleccionada está en
la parte inferior de la placa el tiempo del
temporizador se mostrará en la pantalla
de la zona de cocción que està en la parte
superior del plano, y viceversa.
Pulsar de nuevo la tecla F para conrmar
el tiempo. Cuando el temporizador llegue
a su n, la zona de cocción se apagará
automáticamente y se emitirá una señal
acústica. Para desactivar el temporizador
pulsar la tecla F de la zona anteriormente
habilitada, y colocar en «00» el valor del
temporizador con la tecla D.
BLOQUEO DE LOS MANDOS
Es posible bloquear los mandos a n
de evitar el riesgo de modicaciones no
intencionales a las regulaciones de la
supercie de cocción (niños, operaciones
de limpieza, etc.).
Los mandos se bloquean pulsando el
botón
ilumina. Para que los mandos vuelvan
a ser operativos (p.ej., para interrumpir la
cocción), pulsar el botón
Con el bloqueo de mandos activo es posible,
de todas formas, apagar la placa. En este
caso el bloque de mandos continuará a
estar activo al volver a encender la placa.
APAGAR UNA ZONA DE COCCION
Para apagar una zona de cocción, pulsar
su respectivo botón
zona de cocción y después pulse al mismo
tiempo la tecla
tecla
APAGADO PLACA DE COCCIÓN
Para apagar completamente el plano de
cocción pulsar el botón
APAGADO DE SEGURIDAD
El aparato cuenta con un sistema de
seguridad que lo apaga automáticamente
una vez transcurrido el tiempo límite de
encendido a una determinada potencia,
como se ilustra en la siguiente tabla.
POTENCIA TIEMPO LÍMITE DE
, y su correspondiente testigo se
.
por seleccionar la
y la tecla o pulse la
hasta la posición «0».
ON-OFF.
ENCENDIDO (horas)
1 - 8 10
9 3
19
MANTENIMIENTO
Limpie de eventuales residuos la supercie
utilizando una rasqueta con hoja de afeitar
(Fig.9). Limpie las zonas de calentamiento,
usando productos idoneos y un pañopapel de cocina, enjuegue y sequecon un
paño limpio. Los eventuales fragmentos de
papel-aluminio o material plástico deben ser
inmediatamente rascados y limpiados. Esto
es tambien válido para restos de azucar o
pasteles y otros con alto contenido de él.
Así evitará posibles daños a la supercie
vidriocerámica.
En ningun caso se deben usar estropajos
abrasivos o detergentes químicos irritantes,
como sprays para horno o quitamanchas.
ATENCION: NO SE DEBE UTILIZAR UN
APARATO DE LIMPIEZA A VAPOR
ELIMINACION DE LOS
ELECTRODOMESTICOS
La regla Europea 2002/96/CE
sobre los desperdicios de los
apáratos eléctricos y electrónicos
(RAEE), provee que los
electrodomésticos no deben ser
eliminados en el normal ujo de los
desperdicios sólidos urbanos. Los aparatos
para desechar deben ser recogidos
separadamente para optimizar la taza de
recuperación y de reciclaje de los materiales
que los componen y para evitar potenciales
daños para la salud y el ambiente. El
símbolo del cesto de basura tachado se
encuentra en todos los productos, para
recordar las obligación del recogido
separado. Para ulteriores informaciones,
sobre la correcta eliminación de los
electrodomesticos, el comprador se puede
dirigir al servicio publico propuesto o a el
vendedor.
EL FABRICANTE NO SE HACE
RESPONSABLE DE LOS DAÑOS
PRODUCIDOS POR EL INCUMPLIMIENTO
DE ESTAS ADVERTENCIAS.
LA GARANTÍA NO ES VÁLIDA EN EL
CASO DE DAÑOS PROVOCADOS POR EL
IRRESPETO DE DICHAS ADVERTENCIAS.
Page 20

TABLE VETROCERAMIQUE
FR
Notice d’utilisation
Lire attentivement le contenu du présent
livret, étant donné qu’il fournit d’importantes
indications concernant la sécurité
d’installation, d’utilisation et d’entretient.
Conserver le livret pour toute consultation
ultérieure. Toutes les opérations concernant
l’installation (et le câblage électrique) doivent
être effectuées par le Personnel Qualié
Conformément à Tous les Codes & Normes
Applicables en Vigueur.
CONSIGNES POUR LA SÉCURITÉ
• Utilisez la table de cuisson pour préparer
et chauffer des aliments seulement dans
des situations domestiques. Tout autre type
d’utilisation est interdit.
• Les personnes qui, en raison de capacités
physiques, sensorielles ou mentales
réduites, ou d’un manque d’expérience ou
de connaissances, ne sont pas en mesure
d’utiliser cet appareil de façon sécuritaire
doivent être supervisées ou formées par
une personne responsable.
• Ne laissez pas les enfants âgés de moins
de 8 ans s’approcher de la table de cuisson
sans surveillance.
• Les enfants âgés de 8 ans et plus ne
peuvent utiliser la table de cuisson sans
surveillance seulement si le fonctionnement
de l’appareil leur a été expliqué de façon à
ce qu’ils puissent l’utiliser en toute sécurité.
Ils doivent comprendre et reconnaître
les dangers éventuels d’une utilisation
inadéquate.
• Ne laissez pas les enfants jouer avec
l’appareil.
• Les enfants ne doivent pas nettoyer la table
de cuisson sans surveillance.
• Les travaux d’installation, de réparation et
d’entretien ne doivent être effectués que
par un technicien autorisé par le fabricant.
Il peut être dangereux pour l’utilisateur de
l’appareil de coner ces travaux à des
personnes non qualiées.
• Attention, risque de choc électrique!
Si vous découvrez des ébréchures, des
égratignures ou des bris de quelque sorte
que ce soit sur la table de cuisson, éteignezla immédiatement et cessez de l’utiliser.
Débranchez-la de la source d’alimentation
20
électrique.
• ATTENTION: Si le cordon d’alimentation
de l’appareil est endommagé, il doit être
remplacé par le producteur, un centre de
service autorisé ou un personnel qualié
an d’éviter tout risque.
• ATTENTION: L’appareil et ses composants
deviennent très chauds lors l’utilisation.
Faites attention et ne touchez pas aux
éléments chauds.
• ATTENTION: Les huiles et les graisses
peuvent s’enammer en cas de surchauffe.
Ne laissez pas l’appareil sans surveillance
lorsque vous cuisinez avec de l’huile ou
de la graisse. N’utilisez pas d’eau pour
éteindre un feu d’huile ou de graisse.
Éteignez la table de cuisson et utilisez un
couvercle ou un linge à vaisselle humide
pour étouffer les ammes.
• ATTENTION: L’appareil devient chaud
pendant son utilisation et reste chaud
pendant un certain temps après avoir été
éteint. Le risque de brûlure subsiste jusqu’à
ce que les voyants de chaleur résiduelle se
soient éteints.
• ATTENTION: Ne laissez jamais la table
de cuisson sans surveillance lors son
fonctionnement. Le contenu d’un récipient
qui dessèche par ébullition et qui surchauffe
peut endommager la vitrocéramique.
La graisse ou l’huile surchauffée peut
s’enammer et provoquer un incendie.
• Danger d’incendie: N’utilisez pas
l’appareil comme surface de rangement!
Les objets métalliques comme les
couteaux, les fourchettes, les cuillères et
les couvercles ne doivent pas être déposés
sur la surface de cuisson puisqu’ils peuvent
devenir très chauds.
• Éteignez toujours les zones de cuisson
après utilisation!
• La table de cuisson n’est pas conçue pour
être utilisée avec une minuterie externe ou
un système de commande à distance.
INSTRUCTIONS POUR
L’INSTALLATION
Les instructions suivantes s’adressent à un
installateur spécialisé et servent de guide
pour l’installation, le réglage et l’entretient
en conformité avec les lois et les normes
en vigueur. Si un four encastrable ou
Page 21

n’importe quel autre appareil produisant de
la chaleur doit être directement monté sous
la surface de cuisson en vitrocéramique, IL
EST NÉCESSAIRE QUE CET APPAREIL
(four) ET LA SURFACE DE CUISSON
EN VITROCÉRAMIQUE SOIENT
CONVENABLEMENT ISOLÉS, de manière
à ce que la chaleur produite par le four,
mesurée sur le côté droit du fond de la
surface de cuisson, ne dépasse pas 60°C.
Le manque de respect de cette précaution
pourrait déterminer le fonctionnement erroné
du système TOUCH CONTROL.
pas doté d’un câble et/ou d’une che relative,
utiliser du matériel apte pour l’absorption
indiquée sur la plaquette d’identication et
pour la température de fonctionnement.
Si on souhaite un branchement directe
à la ligne électrique, il est nécessaire
d’interposer un interrupteur omnipolaire,
ayant un orice minimum de 3 mm entre
les contacts, s’adaptant à la charge gurant
sur la plaquette et conforme aux normes en
vigueur (le conducteur de terre jaune/vert ne
doit pas être coupé par le commutateur). Une
fois l’installation de ‘appareil terminée, on
doit pouvoir arriver aisément à l’interrupteur
POSITIONNEMENT
omnipolaire.
Cet appareil électroménager est réalisé
pour être encastré dans un plan de travail,
comme l’indique la (Fig.1). Appliquer le
matériel collant (Fig.4) tout le long du
périmètre (dimensions de la coupe Fig.1).
Bloquer l’appareil électroménager sur le plan
de travail au moyen des 4 appuis, compte
tenu de l’épaisseur du plan de travail (Fig.2).
Si la partie inférieure de l’appareil, après
l’installation, est accessible du côté inférieur
du meuble, il faut monter un panneau de
séparation en veillant de respecter les
distances indiquées (Fig.3); ceci n’est pas
nécessaire si l’installation se fait dessus un
four.
MODE D’EMPLOI
La caractéristique fondamentale du système
à induction est le transfert direct de l’énergie
de chauffe du générateur au récipient de
cuisson.
Avantages:
- Le transfert d’énergie a lieu uniquement
lorsque le récipient est placé sur la zone de
cuisson.
- La chaleur est générée uniquement sur le
fond du récipient et transmise directement
aux aliments à cuire.
- Temps de chauffe réduits et faible
consommation d’énergie au début de la
cuisson, entraînent une épargne globale
VENTILATION
La distance entre les meubles de cette
appareil et de cuisine intégrée ou les
équipements de cuisson doit garantir la
d’énergie.
- La surface en vitrocéramique reste froide.
La chaleur ressentie sur le plan de cuisson
est celle émanant du fond du récipient.
ventilation sufsante d’air. Ne pas employer
le plan de cuisson si dans le four est dans le
cours le procédé de pyrolyse.
RECIPIENTS POUR LA CUISSON
L’utilisation de récipients appropriés est un
facteur essentiel pour la cuisson à induction.
CÂBLAGE ÉLECTRIQUE (Fig.5).
Avant d’effectuer le câblage électrique,
s’assurer que:
- les caractéristiques du réseau électrique
soient conformes aux indications de la
plaquette d’identication appliquée sur la
partie inférieure du plan de travail;
- le réseau soit doté d’une mise à terre efcace
conforme aux normes et aux dispositions de
la loi en vigueur.
La mise à terre est obligatoire aux termes
de la loi.
Au cas où l’appareil électroménager ne serait
Vérier que les casseroles soient adaptées à
un système à induction.
Les récipients doivent contenir du fer.
Vérier que le matériau de la casserole est
magnétique avec un simple aimant. (Fig.6).
Des récipients à fond plat sont conseillés
(Fig.7A).
Ne pas utiliser de récipients à base rugueuse
pour éviter de griffer la surface thermique du
plan de cuisson.
De cette manière, l’énergie peut être
utilisée de façon optimale. Enn, un facteur
important pour la cuisson à induction est
21
Page 22

le dimensionnement de la casserole par
D
rapport à la plaque utilisée (Fig.7B).
Les zones de cuisson permettent l’utilisation
de récipients de différents diamètres. Il est
de toute façon préférable d’utiliser la zone de
cuisson adaptée au diamètre de la casserole
que l’on souhaite utiliser.
DIAMETRE ZONE
DE CUISSON
DIAMETRE MINIMUM
CASSEROLE
Ø 145 mm 80 mm
Ø 210 mm 130 mm
UTILISATION (Fig.8)
C
B
F
E
F
A
A. Touche ON/OFF > allume et/ou éteint
l’appareil
B. Clé > active et désactive la fonction Bloc
des commandes / Sécurité enfants
C. Touche + > augmente la puissance de la
plaque
D. Touche - > réduit la puissance de la
plaque
E. Afcheur zone > montre les valeurs
congurées dans la zone de cuisson
F. Zone de cuisson > active la zone de
cuisson souhaitée
ALLUMAGE DU PLAN DE CUISSON
Appuyer sur la touche
pour allumer le plan
de cuisson. Tous les afchages B relatifs aux
zones de cuisson s’allumeront en position
standby « .».
L’unité de contrôle restera active pendant
10 secondes. Si pendant ce laps de temps
aucune zone de cuisson n’est sélectionnée, le
plan de cuisson s’éteindra automatiquement.
ALLUMAGE DES ZONES DE CUISSON
Pour sélectionner la zone de cuisson
souhaitée, enfoncer la touche
correspondante et endéans les 10 secondes,
enfoncer la touche
ou pour en régler la
puissance. La puissance de chaque zone
de cuisson peut être réglée sur 9 positions
différentes, du niveau 1 (minimum) au niveau
9 (maximum), qui seront visualisées sur le
display lumineux par un numéro de “1 à 9”.
RECHAUFFEMENT RAPIDE /
POWER BOOSTER «P»
Cette fonction réduit ultérieurement le temps
de cuisson d’une zone déterminée en amenant
la température à la puissance maximum
pendant un intervalle de temps de 10 minutes.
Une fois cet intervalle écoulé, la puissance de
la zone de cuisson retourne automatiquement
au niveau 9. L’utilisation de cette fonction est
indiquée pour le réchauffement très rapide de
grandes quantités de liquides (ex. l’eau pour
la cuisson des pâtes) ou d’aliments. Pour
activer cette fonction, sélectionner la zone de
cuisson et appuyer sur la touche
jusqu’au
niveau 9. Appuyer de nouveau sur la touche
. Un signal sonore sera émis et le symbole
«P» sera visualisé sur l’afcheur E relatif à la
zone.
CHALEUR RESIDUELLE «H»
Si, après avoir été éteinte, une zone de
cuisson est encore à une température élevée
(plus de 50º), l’afchage correspondant à
cette zone montre le symbole «H» (chaleur
résiduelle). L’indication ne disparaît que
quand il n’y a plus aucun risque de brûlure.
IDENTIFICATION CASSEROLES «u»
Si un des afchage d’une zone de cuisson
devait montrer le symbole
«u»
, cela signie
que:
1) le récipient utilisé n’est pas adéquat à la
cuisson à induction.
2) la casserole utilisée a un diamètre inférieur
à celui admis pour l’appareil.
3) il n’y a aucune casserole sur la plaque.
MINUTERIE / TIMER «t»
Le minuteur peut être réglé pour éteindre
automatiquement un foyer après un temps
prédéterminé (de «01»
à «99» minutes).
Sélectionnez une zone de cuisson par l’une
des touches F et réglez la puissance par
les touches C et D. Pour activer le minuteur
appuyez de nouveau la touche F. Vous
entendrez un signal sonore et le symbole
22
Page 23

«t» apparaît dans l’afchage de la zone
sélectionnée. Réglez le temps de cuisson
souhaité par les touches C et D. Si la zone
de cuisson sélectionnée est dans la partie
inférieure du plan le temp de le minuter sera
afché sur l’afcheur de la zone de cuisson
dans la partie supérieure du plan et vice
versa. Appuyez de nouveau la touche B
pour conrmer le temp de cuisson.
Une fois écoulé le temps programmé, le foyer
s’éteint automatiquement et émet un signal
sonore. Pour désactiver le minuteur, appuyez
sur la touche F du foyer correspondant et
sélectionnez la valeur «00» par la touche D.
BLOCAGE DE COMMANDES
On peut bloquer les commandes pour éviter
le risque de modications non voulues aux
réglages de la table (enfants, opérations de
nettoyage, etc,). En appuyant la touche
, les commandes se bloquent et le voyant
correspondant s’allume. Pour débloquer
les commandes et récupérer le contrôle sur
les réglages, (ex. interrompre la cuisson), il
faut enfoncer la touche
. Il est cependant
toujours possible d’éteindre le plan de cuisson
même avec les commandes bloquées. Dans
ce cas, le blocage des commandes restera
en fonction au rallumage du plan.
ETEINDRE LES ZONES DE CUISSON
Pour éteindre une zone de cuisson, enfoncer
la touche
pour sélectionner la zone de
cuisson, appuyer en même temps les
touches
jusquà la position
ETEINDRE LE PLAN DE CUISSON
et , ou appuyer la touche
.
Pour éteindre complètement le plan de
cuisson, appuyer la touche
.
EXTINCTION DE SÉCURITÉ
L’appareil est doté d’un système de sécurité
qui éteint automatiquement l’appareil au
moment où expire le temps limite d’allumage
à une puissance donnée selon le tableau
suivant.
PUISSANCE TEMPS LIMITE
1 - 8 10
9 3
ALLUMAGE (heures)
ENTRETIENT
Éliminer tous résidus de nourriture éventuels
ainsi que les gouttes de graisse de la surface
de cuisson à l’aide du racloir spécial fourni
sur demande (Fig.9). Nettoyer le mieux
possible la surface chauffée avec des
produits appropriés et un chiffon papier,
ensuite rincer avec de l’eau et essuyer avec
un chiffon bien propre. Au moyen du racloir
(en option) éliminer immédiatement de la
surface de cuisson chauffée les fragments de
feuilles d’aluminium et de matière plastique
qui ont fondu par mégarde ou les résidus
de sucre ou d’aliment ayant un contenu
de sucre élevé. N’utiliser en aucun cas
des éponges abrasives ou des détergents
chimiques irritants tels que spray pour four
ou dégraisseurs.
ATTENTION: NE PAS UTILISER UN
NETTOYEUR À VAPEUR.
ENLÈVEMENT DES APPAREILS
MÉNAGERS USAGÉS
La Directive Européenne 2002/96/
EC sur les Déchets des Equipements
Electriques et Electroniques (DEEE),
exige que les appareils ménagers
usagés ne soient pas jetés dans le
flux normal des déchets municipaux. Les
appareils usagés doivent être collectés
séparément afin d’optimiser le taux de
récupération et le recyclage des matériaux qui
les composent et réduire l’impact sur la santé
humaine et l’environnement. Le symbole de
la “poubelle barrée” est apposée sur tous les
produits pour rappeler les obligations de
collecte séparée. Les consommateurs devront
contacter les autorités locales ou leur
revendeur concernant la démarche à suivre
pour l’enlèvement de leur vieil appareil.
ON DÉCLINE TOUTE RESPONSABILITÉ
POUR LES ÉVENTUELS DÉGÂTS
PROVOQUÉS PAR L’INOBSERVATION
DES SUSDITES INSTRUCTIONS.
LA GARANTIE N’EST PAS VALABLE
EN CAS DE DOMMAGES PROVOQUES
PAR LE NON RESPECT DES MISES EN
GARDE CITEES CI-DESSUS.
23
Page 24

Инструкция пользователя
RU
Внимательно ознакомьтесь с
содержанием данной брошюры, так как
в ней содержатся важные инструкции
относительно безопасной установки,
использования и технического
обслуживания.
Сохраните брошюру для возможных
дальнейших консультаций. Все
операции относительно установки
(электрические соединения) должны
выполняться специальным персоналом
в соответствии с действующими нормами
и правилами.
МЕРЫ ПРЕДОСТОРОЖНОСТИ
• Плита должна всегда применяться в
пределах бытового использования, для
приготовления и разогрева пищи, но не
для профессионального применения.
Любое другое применение плиты
запрещено.
• Лица, не способные безопасно
использовать плиту в силу их
физических, психических или
сенсорных способностей, или же изза незнания правил использования,
не могут использовать плиту
без присмотра или без контроля
ответственного лица.
• Дети в возрасте до 8 лет должны
находиться на расстоянии от плиты,
за исключением тех случаев, когда
они находятся под постоянным
наблюдением взрослого.
• Дети старше 8 лет могут пользоваться
плитой самостоятельно, если они умеют
ею правильно пользоваться. Очень
важно ознакомить детей с опасностью
неправильного использования плиты.
• Следите за детьми, находящимися у
плиты, и не позволяйте им играть с ней.
• Дети не должны проводить чистку или
обслуживание плиты, если они не
находятся под наблюдением взрослого.
• Опасность поражения
электрическим током! Не включайте
или немедленно выключите плиту,
если на керамической поверхности
присутствуют повреждения или
трещины. Отключите устройство от
сети.
• ВНИМАНИЕ: Если кабель питания
поврежден, он должен быть заменен
изготовителем, уполномоченной
службой или квалифицированным
персоналом, чтобы избежать рисков.
• ВНИМАНИЕ: Плита и её доступные
части нагреваются во время
использования. Следите за тем,
чтобы не касаться нагревательных
элементов.
• ВНИМАНИЕ: Готовка с использованием
масла или жира может быть опасной и
может привести к пожару. Если масло
или жир загораются, НИКОГДА не
используйте воду, чтобы потушить
пламя. Погасите пламя, к примеру,
накрыв его крышкой или влажным
полотенцем.
• ВНИМАНИЕ: Поверхность плиты
горячая во время её использования, и
остается горячей в течение некоторого
времени после её выключения. Риск
ожогов исчезает только тогда, когда
погасает индикатор остаточного тепла.
• ВНИМАНИЕ: Необходимо постоянно
следить за приготовленем
пищи. Процесс краткосрочного
приготовления должен находиться
под постоянным контролем. Кастрюли
или сковородки, из которых жидкость
полностью испаряется, могут привести
к повреждению стеклокерамики.
Перегретый жир или масло может
загореться и привести к пожару.
• Опасность возникновения пожара: Не
держите предметы на поверхности
плиты! Металлические предметы,
такие как ножи, вилки, ложки и
крышки, не должны находиться на
поверхности плиты, поскольку они
могут раскалиться.
• Всегда выключайте конфорки после их
использования!
• Прибор не предназначен для
использования с помощью внешнего
таймера или отдельной системы
дистанционного управления.
24
Page 25

ИНСТРУКЦИЯ ПО УСТАНОВКЕ
Данные инструкции предназначены
для профессионального монтажника
и представляют собой руководство
для процесса установки, регулировки
и технического обслуживания
в соответствии с действующим
законодательством и стандартами.
Если требуется установить
встроенную духовку или другое
устройство, вырабатывающее
тепло, непосредственно под
стеклокерамическими варочными
панелями, то НЕОБХОДИМО ЧТОБЫ
ЭТО УСТРОЙСТВО (духовка) И
ВАРОЧНАЯ СТЕКЛОКЕРАМИЧЕСКАЯ
ПАНЕЛЬ БЫЛИ СООТВЕТСТВУЮЩИМ
ОБРАЗОМ ИЗОЛИРОВАНЫ, таким
образом, чтобы тепло, генерируемое
духовкой и измеренное с правой
стороны днища варочных панелей, не
превышало 60оС. Несоблюдение этого
может вызвать неправильную работу
системы СЕНСОРНОГО УПРАВЛЕНИЯ.
ПОЗИЦИОНИРОВАНИЕ
Эта бытовая техника была создана
для того, чтобы вставляться в рабочую
поверхность, как это показано на рисунке
(рисунок 1). Предварительно уложите
изоляционный материал (рисунок 4)
вдоль всего периметра (размеры для
обрезки указаны на рисунке 1). Данная
операция необходима для того, чтобы
воспрепятствовать проникновению
каких-либо жидкостей в рабочую панель,
так как невозможно гарантировать,
что панель, стекло и их соединение
будут полностью плоскими. Закрепите
устройство по месту установки
посредством 4 подставок, учитывая при
этом ширину поверхности (рисунок 2).
Если нижняя часть устройства после
установки доступна через нижнюю часть
мебели, тогда необходимо укрепить
разделительную панель, учитывая
указанные расстояния (рисунок 3).
Это не обязательно, если под нижней
частью варочной панели располагается
духовка.
ВЕНТИЛЯЦИЯ
Расстояние между варочной панелью
и встроенное кухонной мебелью или
кухонными принадлежностями должно
гарантировать достаточную вентиляцию
воздуха. Не используйте варочную
панель, если духовка находится в
состоянии процесса пиролиза.
ЭЛЕКТРИЧЕСКИЕ СОЕДИНЕНИЯ
(рисунок 5)
Прежде чем выполнить электрические
подсоединения убедитесь в том, что:
• Паспортные данные системы
(напряжение сети) соответствуют
данным, указанным на табличке с
паспортными данными, прикрепленной
к нижней части рабочей панели;
• Система снабжена эффективными
проводами заземления в соответствии
с действующим законодательством и
стандартами.
Заземление обязательно в соответствии
с законом.
Если устройство бытовой техники
поставляется без сетевого шнура и /или
соответствующей вилки, используйте
материал, подходящий по потребляемой
мощности, указанной на табличке с
паспортными данными и подходящий по
рабочим температурам. Если вы хотите
осуществить прямое подключение к
розетке, то следует установить вводной
многополюсный выключатель, с
минимальным размыканием контактов
в 3 мм и соответствующий нагрузке,
указанной на табличке с паспортными
данными, а также соответствующий
действующим стандартам (желтый/
зеленый проводник «земля» не должен
отсоединяться этим выключателем).
Поле установки устройства данному
выключателю должен быть обеспечен
легкий доступ.
ИСПОЛЬЗОВАНИЕ И
ТЕХНИЧЕСКОЕ ОБСЛУЖИВАНИЕ
Основной характеристикой
индукционной системы является прямая
передача тепла от генератора кухонной
посуде.
25
Page 26

Преимущества:
F
• Передача мощности имеет место только
тогда, когда посуда расположена в зоне
нагрева;
• Тепло генерируется только у основания
посуды и передается непосредственно
продуктам, которые необходимо
приготовить;
• Сокращенное время приготовления
нагрева и низкий уровень потребления
мощности во время начала
приготовления пищи обеспечивает
значительную глобальную экономию
энергии;
• Стекловолоконная панель остается
холодной, тепло, которое ощущается на
варочной панели, это тепло, отраженное
от основания посуды.
КУХОННАЯ ПОСУДА
Использование соответствующей
посуды является основным фактором
для индукционного приготовления
пищи. Убедитесь в том, что ваша посуда
соответствует требованиям индукционной
системы. Кухонная посуда должна
содержать железо. Вы можете убедиться
в том, что материал кастрюлю магнитится
с помощью простого магнита (рисунок 6).
Мы рекомендуем использовать кухонную
утварь с плоским днищем (рисунок 7А).
Таким образом, вы сможете оптимально
использовать мощность. Не используйте
посуду с шероховатым днищем для
предотвращения нанесения царапин
на термическую поверхность варочной
панели. Важным фактором при
приготовлении пищи индукционным
способом является размер кастрюли
в сравнении с используемой зоной
нагрева (рисунок 7В). Зоны нагрева
позволяют использовать посуду с разным
диаметром основания. Тем не менее,
предпочтительнее использовать зоны
нагрева, соответствующие размерам
кастрюли.
ДИАМЕТР
КОНФОРКИ
Ø 145 mm 80 mm
Ø 210 mm 130 mm
МИНИМАЛЬНЫЙ
ДИАМЕТР КАСТРЮЛИ
ИСПОЛЬЗОВАНИЕ (рисунок 8)
C
E
F
D
A. ONN/OFF (Вкл/Выкл) клавиша -
включает или выключает устройство
В. Клавиша замка (блокиратора) -
активирует замок панели управления/
замка от детей
С. Клавиша плюс - увеличивает
уровень мощности зоны нагрева
D. Клавиша минус - уменьшает уровень
мощности зоны нагрева
Е. Дисплей конфорки - показывает
значения, установленные на
конфорке.
F. Зона нагрева - выбрать и
активировать желаемую зону нагрева
ВКЛЮЧЕНИЕ ВАРОЧНОЙ
ПАНЕЛИ
Нажмите клавишу , чтобы включать
варочную панель.
Все дисплеи В относительно зон нагрева
включаются в положении готовности .
Блок управления остаетсчя активным
в течение 10 секунд. Если в этот
промежуток времени не выбрана
никакая зона нагрева, то варочная
панель автоматически отключается.
ВКЛЮЧЕНИЕ ЗОН НАГРЕВА
Пожалуйста, нажмите соответствующую
клавишу для выбора нужной зоны
нагрева (рисунок 8) и нажимайте в
течение 10 секунд клавиши или для
установки нужного уровня мощности.
Если в течение этого момента не
выбрана никакая зона нагрева, то
электронное устройство автоматически
вернется в положение OFF (ВЫКЛ).
Клавиши и используются для
регулировки уровня мощности панелей
от уровня в 1 (минимум) до уровня 9
(максимум).
26
B
A
Page 27

БЫСТРЫЙ НАГРЕВ / БУСТЕР
«P»
Эта функция ещё больше сокращает
время готовки на определённой
конфорке, доводя температуру до
максимальной и удерживая её в
течение 10 минут.
После истечения этого времени
мощность конфорки автоматически
возвращается к уровню 9. Данную
функцию рекомендуется использовать
для нагрева за очень короткое время
большого количества жидкости (напр.,
воды для варки макарон) или блюд.
Для включения данной функции
выберите конфорку и держите в
нажатом состоянии кнопку до тех
пор, пока не будет показан уровень 9.
Снова нажмите на кнопку . Прозвучит
звуковой сигнал и будет показан знак
«P»
на дисплее E, соответствующий
конфорке.
ОСТАТОЧНОЕ ТЕПЛО
«H»
Если температура зоны нагрева все
еще высокая (выше 50оС) после
выключения, то соответствующем
дисплее будет индицирован сигнал
«H»
(остаточное тепло). Индикация сигнала
прекратится, когда риск ожога исчезнет.
ОПРЕДЕЛЕНИЕ КАСТРЮЛИ
Если символ
«u»
появляется на дисплее
«u»
одной из зон нагрева, то это означает,
что:
1) Используемая посуда не подходит
для индукционного нагрева;
2) Диаметр используемой посуды
меньше того, который допускается
использовать с данным устройством;
3) В зоне нагрева нет посуды.
ТАЙМЕР
«t»
Данная функция позволит установить
время (от
«01»
до
«99»
мин.) для
автоматического отключения выбранной
конфорки.
Включите конфорку нажав на одну
из кнопок F, отрегулируйте уровень
нагрева, используя кнопки C/D.
Нажмите ещё раз кнопку F для
активации таймера по выбранной зоне
до появления буквы
«t»
на дисплей и
акустического сигнала. Урегулируйте
время нажав на кнопок C/D.
Если выбранная варочная зона
находится на нижней части поверхности
время таймера будет указано в дисплей
верхней варочной зоне и наоборот.
Подтвердите еще раз нажав на кнопку
F.
По истечении установленного времени
конфорка автоматически отключается и
звучит акустический сигнал.
Для отключения нажмите кнопку G,
ранее включенной зоны, довести до
«00»
показатель таймера, используя
кнопку D.
БЛОКИРОВКА ПАНЕЛИ
УПРАВЛЕНИЯ
С помощью клавиши можно
заблокировать блокировки органов
управления для воспрепятствования
непреднамеренного срабатывания
(например, детьми).
В этом случае никакие действия с
клавишими ни к чему не приведут за
исключением выключения устройства.
Для активации функции безопасности
следует нажать клавишу до тех
пор пока не загориться сигнал
предупреждения.
Для деактивации функции безопасности
следует нажать клавишу до тех пор
пока не поганет сигнал предупреждения.
ОТКЛЮЧЕНИЕ ЗОН НАГРЕВА
Для отключения зоны нагрева нажмите
соответствующую клавишу для выбора
нужной зоны, а затем одновременно
нажмите клавиши и или нажимайте
клавишу до достижения положения
«0»
.
ОТКЛЮЧЕНИЕ ВАРОЧНОЙ
ПАНЕЛИ
Для полного отключения всего
устройства удерживайте в нажатом
положении клавишу
27
.
Page 28

ПРЕДОХРАНИТЕЛЬНЫЙ
ВЫКЛЮЧАТЕЛЬ
Устройство снабжено
предохранительным выключателем,
который автоматически выключает зоны
нагрева, после того, как они проработали
определенное количество времени при
заданном уровне мощности.
УРОВЕНЬ
МОЩНОСТИ
1 - 8 10
9 3
ПРЕДЕЛЬНОЕ ВРЕМЯ
РАБОТЫ (часов)
ТЕХНИЧЕСКОЕ ОБСЛУЖИВАНИЕ
Удалите все остатки пищи и капли
жира с поверхности варочной панели
используя специальный скребок,
поставляемый по запросу (рисунок 9).
Вытрите нагреваемую зону как
можно тщательнее, используя
соответствующие вещества и материю/
салфетки, затем промойте водой
и просушите чистой тряпочкой.
Используйте специальный скребок
сразу же для удаления фрагментов
алюминия и пластмассы, которые
случайно расплавились на варочной
панели, или остатки сахара или пищи
с высоким содержанием сахара.
Таким образом, вы воспрепятствуете
возможным повреждениям варочной
панели. Ни при каких обстоятельствах
нельзя использовать абразивные
губки или едкие химические моющие
средства, как например, аэрозоли для
духовки или пятновыводители.
ВНИМАНИЕ! НЕ РЕКОМЕНДУЕТСЯ
ИСПОЛЬЗОВАТЬ ПАРОВУЮ
ОЧИСТИТЕЛЬ
ИЗБАВЛЕНИЕ ОТ СТАРОЙ
БЫТОВОЙ ЭЛЕКТРОТЕХНИКИ
Европейская Директива 2002/96\
ЕС «Утилизация отходов
производства электрического и
электронного оборудования»
(WEEE) требует, чтобы старая
бытовая электротехника не
выбрасывалась в несортированный
городской мусор. Устройства старой
бытовой электротехники должны
собираться отдельно для оптимизации
восстановления и повторного
использования материалов, которые они
содержат, чтобы таким образом снизить
влияние на здоровье человека и
окружающую среду. Перечеркнутый
символ мусорного бачка на изделии
напоминает о вашей обязанности
раздельного сбора мусора. Потребители
должны связаться со своими
поставщиками коммунальных услуг или
их местным дилером, чтобы получить
более подробную информацию о там, как
правильно избавляться от отработавшей
свой срок бытовой техники.
ПРОИЗВОДИТЕЛЬ НЕ НЕСЕТ НИКАКОЙ
ОТВЕТСТВЕННОСТИ ЗА ВОЗМОЖНЫЙ
ВРЕД И УЩЕРБ В РЕЗУЛЬТАТЕ
НАРУШЕНИЯ ВЫШЕУПОМЯНУТОГО
ПРЕДУПРЕЖДЕНИЯ.
ГАРАНТИЯ БУДЕТ СЧИТАТЬСЯ
НЕДЕЙСТВИТЕЛЬНОЙ В СЛУЧАЕ
ПОЛОМКИ В РЕЗУЛЬТАТЕ
НАРУШЕНИЯ ВЫШЕУПОМЯНУТЫХ
ПРЕДУПРЕЖДЕНИЙ.
28
Page 29

Рекомендации по эксплуатации электрических
варочных поверхностей
Не рекомендуется использование посуды весом более 5 кг (общего веса
с продуктами), даже на самой большой зоне нагрева.
Помните, что все бытовые варочные поверхности предназначены
только для приготовления на них пищи в домашних условиях и не
являются профессиональным оборудованием.
Page 30

Page 31

Page 32

Displaying Special Statuses
The corresponding heater display alternates between two characters depending on the status.
Event
Heater with residual
heat
Heater
status
Off Heater
Heater without pan On No pan or not suitable
Induction generator
over temperature
Induction generator
over temperature
Off Heat sink
On No power is
Start
conditions
Temperature > 50ºC
pan over the heater
Temperature > 90ºC
End
conditions
Heater
Temperature < 40ºC
Heater Off In 1 minute
Heat sink
Temperature < 80ºC
Action
---------- ‘H’ ‘H’ 3
Heater off
---------- ‘ ’ or ‘H’ ‘c’ 2
delivered to
the heater
Heater
Display fore
(1 sec.)
‘Power’ ‘υ’ 1
‘Power’
Heater
Display back
(1 sec.)
Errors/Alarms
The corresponding heater display alternates between two characters depending on the Error.
APPLIANCE ERRORS
Event
(Visualization Priority Order)
Description Action End
All Heater Displays
(fore 0.5 sec./ back 0.5 sec)
FalloKeyOnOffEmitter Security Key Error App Off (*) ---------- FA
FalloKeyOnOffReceiver Security Key Error App Off (*) ---------- FC
FalloNtcShort Touch NTc Error App Off (*) ---------- FE
FalloNtcOpen Touch NTc Error App Off (*) ---------- FP
FalloOverTemp Touch NTc Error App Off (*) T < 90ºC Fc
FalloEepromChecksum Eeprom Checksum Error App Off (*) ---------- FH
FalloAdc Security Key Error App Off (*) ---------- FJ
FalloSw Software Error App Off (*) ---------- F0
FalloAmbientLight Keyboard Error App Off (*) Light Condition FL
FalloDivisor Security Key Error App Off (*) ---------- FU
FalloTestLedOnOff OnOff Led Error App Off (*) ---------- Fd
FalloTetGroupSelection Keyboard Error App Off (*) ---------- Fb
(*) All heaters switched Off and locked
HEATER ERRORS
Event
(Visualization Priority Order)
Description Action End
FalloComunicaciones Communication Error
FalloNtcFocoShort Induction Heater Ntc Error
FalloNtcFocoOpen Induction Heater Ntc Error
FalloNtcFoco Induction Heater Ntc Error
FalloNtcGeneradorShort Induction Ntc Error
FalloNtcGeneradorOpen Induction Ntc Error
FalloNtcGenerador Induction Ntc Error
FalloNoRedGenerador Induction Error
FalloOverLoadGenerador Induction Error
Induction Heaters Off(**)
Heater Off(**)
Heater Off(**)
Heater Off(**)
Generator Off (***)
Generator Off (***)
Generator Off (***)
Generator Off (***)
Generator Off (***)
Comm. OK F5
Serial Comm. F1
Serial Comm. F2
Serial Comm. F7
Serial Comm. F3
Serial Comm. F4
Serial Comm. F8
Serial Comm. F6
Serial Comm. F9
Heater Display
(fore 0.5 sec./ back 0.5 sec)
Priority
(**) Heater switched off and locked
(***) Generator Heaters switched off and locked
31
Page 33

3PCLIOBIM430.2 27 marzo 2017
 Loading...