

Page 1

IT LIBRETTO ISTRUZIONI
EN INTRUCTION BOOK
RU РУКОВОДСТВО ПОЛЬЗОВАТЕЛЯ
UK КЕРІВНИЦТВО З ЕКСПЛУАТАЦІЇ
Page 2

ITALIANO 3-12
IT
EN
ENGLISH 13-22
RU
РУССКИЙ 23-32
УКРАЇНСЬКОЮ МОВОЮ 33-42
UK
Page 3
ITALIANO
Gentile Cliente,
La ringraziamo per aver scelto un nostro prodotto.
La preghiamo di leggere attentamente le istruzioni per l’uso
prima dell’allacciamento e dell’utilizzo della macchina.
La conoscenza dei principi di funzionamento garantirà un corretto e sicuro sfruttamento dell’apparecchio. Le istruzioni per l’uso contengono molte indicazioni utili circa il funzionamento, oltre
ai particolari tecnici della lavatrice che La aiuteranno ad ottimizzare l’utilizzo di questa macchina.
In caso di vendita, oppure di cessione della lavatrice, bisogna ricordarsi di consegnare al nuovo
utilizzatore anche il libretto delle istruzioni per l’uso.
MODELLO: ............................................................................................. DATA D’ACQUISTO: .............../.............../.............................
NUMERO DI FABBRICAZIONE: ..................................................................................................................................................................
INDICE
NOTE E CONSIGLI PER L’UTILIZZATORE 4-5
DESCRIZIONE DELLA MACCHINA 5
INSTALLAZIONE DELLA MACCHINA 6-8
• Disimballo e sbloccaggio della macchina 6
• Messa in piano della lavatrice 6
• Collegamento all’impianto idrico 7
• Collegamento all’impianto elettrico 8
3
UTILIZZO DELLA LAVATRICE 8-10
• Avvertenze prima dell’uso 8
• Uso de detersivi 9
• Come eliminare alcune macchie 10
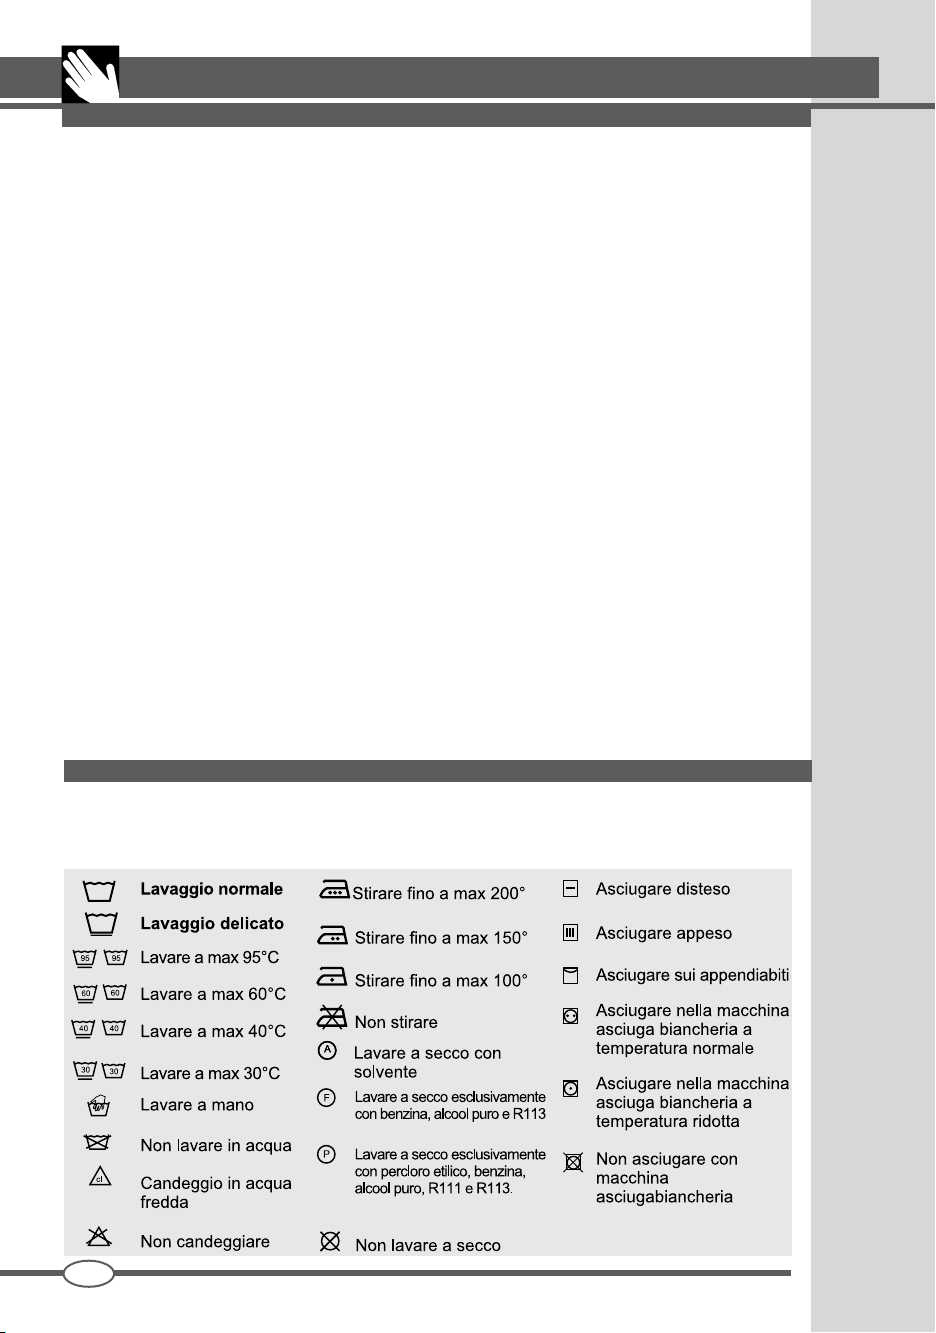
• Simboli internazionali per il trattamento vestiti 10
MANUTENZIONE 11-12
• Pulizia della lavatrice 11
• Pulizia del filtro 11
• Soluzione dei problemi 12
Il simbolo del cestino barrato riportato sul prodotto indica che i Rifiuti derivanti dalle
Apparecchiature Elettriche ed Elettroniche (RAEE) secondo l’attuazione della direttiva
2012/19/UE, non devono essere buttati nella spazzatura indifferenziata (cioè insieme ai “rifiuti
urbani misti”), ma devono essere gestiti separatamente così da essere sottoposti ad apposite
operazioni per il loro riutilizzo, oppure a uno specifico trattamento, per rimuovere e smaltire
in modo sicuro le eventuali sostanze dannose per l’ambiente ed estrarre le materie prime
che possono essere riciclate. In Italia i RAEE devono perciò essere consegnati ai Centri di
Raccolta (chiamati anche isole ecologiche o piattaforme ecologiche) allestiti dai Comuni o
dalle Società di igiene urbana. Quando si acquista una nuova apparecchiatura, inoltre, si può
consegnare il RAEE al negoziante, che è tenuto a ritirarlo gratuitamente (ritiro “uno contro
uno”); i RAEE di “piccolissime dimensioni” (nei quali cioè nessuna dimensione supera i 25
cm) possono essere consegnati gratuitamente ai negozianti anche quando non si compra
nulla (ritiro “uno contro zero” - che però è obbligatorio solo per i negozi con superficie di
vendita superiore a 400 mq).
SM3173
IT
Page 4
4
NOTE E CONSIGLI PER L’UTILIZZATORE
Prima di collegare l’apparecchio leggere attentamente le istruzioni.
Le riparazioni per inappropriate connessioni o uso dell’apparecchio non
sono coperte dalla garanzia.
LA DITTA PRODUTTRICE DECLINA QUALSIASI RESPONSABILITÀ PER EVENTUALI INCIDENTI PROVOCATI DALLA NON OSSERVANZA DELLE NORME DI
SICUREZZA NONCHÉ DELLE ISTRUZIONI D’USO
▼ L’apparecchio può essere utilizzato
da bambini di età non inferiore a 8 anni
e da persone con ridotte capacità fisiche,
sensoriali o mentali, o prive di esperienza o
della necessaria conoscenza, purché sotto
sorveglianza oppure dopo che le stesse
abbiano ricevuto istruzioni relative all’uso
sicuro dell’apparecchio e alla comprensione dei pericoli ad esso inerenti. I bambini
non devono giocare con l’apparecchio.
La pulizia e la manutenzione destinata
ad essere effettuata dall’utilizzatore non
deve essere effettuata da bambini senza
sorveglianza.
▼ I bambini con età inferiore ai 3 anni
dovrebbero essere tenuti lontani, a meno
che non siano sorvegliati di continuo.
▼ L’apparecchiatura deve essere collegata correttamente all’impianto con i tubi
nuovi forniti. I tubi usati non devono essere
riutilizzati.
▼ La pressione di esercizio dell’acqua
(minima e massima) deve essere compresa tra 0.5bar (0.05MPa) e 10 bar (1MPa).
▼ Se il cavo di alimentazione è danneggiato, esso deve essere sostituito dal costruttore o dal suo servizio assistenza tecnica
o comunque da una persona con qualifica
similare, in modo da prevenire ogni rischio.
▼ Le aperture di ventilazione alla base,
ove previste, non devono essere ostruite
da un tappeto.
▼ Rispettare il volume massimo di carico
asciutto come indicato nel capitolo “Tabella
programmi”.
▼ Per arrestare le funzioni consultare la guida
lavaggio.
▼ Prima dell’attivazione della lavatrice, togliere
l’intero imballaggio e il bloccaggio usato per il
trasporto (viti di protezione). In caso contrario,
si potrebbe danneggiare seriamente sia la
macchina sia l’ambiente della Vostra abitazione.
▼ Qualsiasi modifica o tentativo di manomissione
dell’apparecchio possono essere pericolosi per
l’utilizzatore e provocare danni alla lavatrice.
▼ Considerato il notevole peso della lavatrice,
bisogna osservare particolari norme di sicurezza durante il suo spostamento.
▼ Durante il funzionamento dell’apparecchio
evitare il contatto con l’acqua che fuoriesce dal
tubo di scarico in quanto potrebbe avere una
temperatura elevata,evitare inoltre il contatto
con il vetro dell’oblò perché durante il lavaggio
tende a scaldarsi
▼ Lavare esclusivamente tessuti destinati al
lavaggio in lavatrice. Per qualsiasi dubbio è
possibile controllare le indicazioni del produttore riportate sulle etichette dei vestiti (vedi
„Simboli per il trattamento dei vestiti”)
▼ Prima di inserire i vestiti nella lavatrice è ne-
cessario controllare che tutte le tasche siano
state vuotate. Oggetti duri e appuntiti come,
ad esempio, monete, spille, chiodi, viti oppure
sassi potrebbero provocare seri danni.
▼ Non è possibile lavare in lavatrice vestiti sporchi
di sostanze contenenti benzina. Nel caso in cui
le macchie siano state eliminate con prodotti
vaporizzanti, prima del carico in lavatrice,
bisogna attendere la totale vaporizzazione di
queste sostanze dalla superficie dei tessuti.
▼ Uso e quantità di detersivi, ammorbidenti e
candeggianti devono rispettare le istruzioni
riportate sulla confezione.
▼ Non utilizzare detersivi per lavaggio a mano in
quanto la schiuma abbondante che si formerebbe potrebbe danneggiare le parti interne.
▼ Alla fine del lavaggio di passatoie, coperte oppu-
re di altri tessuti a fibre lunghe bisogna ricordarsi
di controllare il filtro e, se necessario, pulirlo.
▼ Si consiglia di lasciare aperto l’oblò al termine
del ciclo di lavaggio.
▼ Non si può tentare di riparare da soli i guasti
dell’apparecchio perché le riparazioni effettuate da non professionisti possono provocare
seri danni e tolgono il diritto alle riparazioni di
garanzia.
▼ Le riparazioni dell’apparecchio possono es-
sere effettuate esclusivamente da personale
autorizzato dei centri di assistenza. Per le
riparazioni devono essere usate solo parti di
ricambio originali.
▼ Non attaccare oppure staccare la spina dalla pre-
sa della corrente elettrica con le mani bagnate.
▼ La lavatrice deve essere collegata ad una
IT
SM3173
Page 5
NOTE E CONSIGLI PER L’UTILIZZATORE
5
presa di corrente elettrica provvista di messa
a terra e conforme alle esigenze di sicurezza.
▼ E’ vietato collegare la lavatrice alla presa
elettrica utilizzando prolunghe o spine multiple.
▼ Non esporre l’apparecchio ad agenti atmosferici.
▼ Si può aprire la lavatrice soltanto dopo che
il led, o il display indichi la fine del ciclo. Su
alcuni modelli questo viene segnalato dal
lampeggio del tasto start.
PER VERSIONI LAVASCIUGA:
▼ Non asciugare capi non lavati.
▼ Non asciugare capi lavati o smacchia-
ti con prodotti chimici.
▼ Non asciugare capi sporchi di olio per
cucinare, petrolio, acetone, alcool, benzina, kerosene, smacchiatori, acqua ragia,
cera. Eliminare queste sostanze mediante
un lavaggio a caldo e con un abbondante
dose di detersivo prima di caricare i capi
nell’asciugatrice.
▼ Non asciugare oggetti in gommapiuma,
lattice, impermeabili, tessuti impermeabilizzati, materassini di gomma, oggetti
stampati, vestiti o cuscini imbottiti con
▼ Eseguendo le revisioni o le pulizie ricordarsi
di staccare l’apparecchio dalla presa della
corrente elettrica.
▼ Nel caso si voglia staccare la lavatrice dalla
presa della corrente non tirare il cavo elettrico
ma la spina.
▼ Dopo aver terminato ogni lavaggio si consiglia
di staccare la spina della corrente elettrica e
chiudere il rubinetto dell’acqua.
trebbero sciogliersi e danneggiare gli altri
capi di biancheria o lo stesso apparecchio.
▼ Gli ammorbidenti o prodotti simili
dovrebbero essere impiegati attenendosi
alle istruzioni allegate all’ammorbidente.
▼ I bambini di con età inferiore ai 3 anni
dovrebbero essere tenuti lontani, a meno
che non siamo sorvegliati di continuo.
▼ L’apparecchio non deve essere
installato dietro una porta richiudibile a
chiave, una porta scorrevole o una porta
con cerneira sul lato opposto a quello
dell’apparecchiatura, che impedirebbe la
totale apertura dello stesso.
gommapiuma, poiché questi materiali po-
LA PARTE FINALE DI UN CICLO D’ASCIUGATURA È DI RAFFREDDAMENTO, NON ARRESTARE MAI L’ASCIUGABIANCHERIA PRIMA DELLA
FINE DEL CICLO, A MENO CHE TUTTA LA BIANCHERIA NON VENGA
RITIRATA RAPIDAMENTE E STESA PER DISSIPARE IL CALORE.
DESCRIZIONE DELLA MACCHINA
▼ La struttura é stata realizzata in pannelli
di lamiera trattati e verniciati in modo che
le sue qualità estetiche possano rimanere
inalterate nel tempo.
▼ Il motore e tutte le parti in movimento sono
state studiate e realizzate in modo da garantire il massimo della silenziosità.
▼ Il cestello in acciaio inossidabile é ampio e
di facile accesso per una migliore qualità del
lavaggio e per una maggiore durata della
biancheria.
▼ Il pannello comandi racchiude in se la pos-
sibilità di utilizzare facilmente tutti i lavaggi
e le asciugature desiderate (vedi pannello
comandi,e tabella programmi).
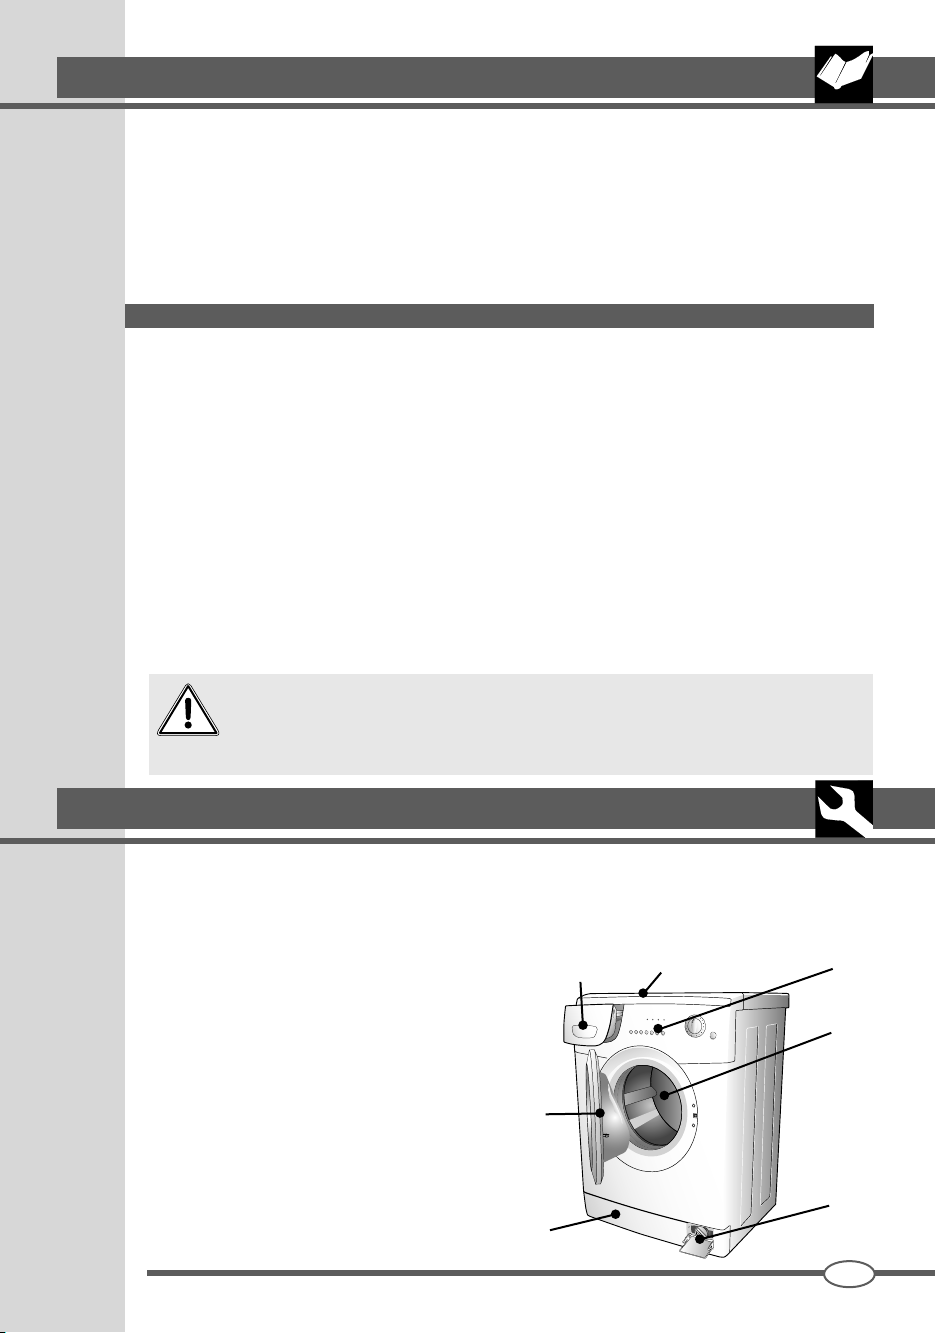
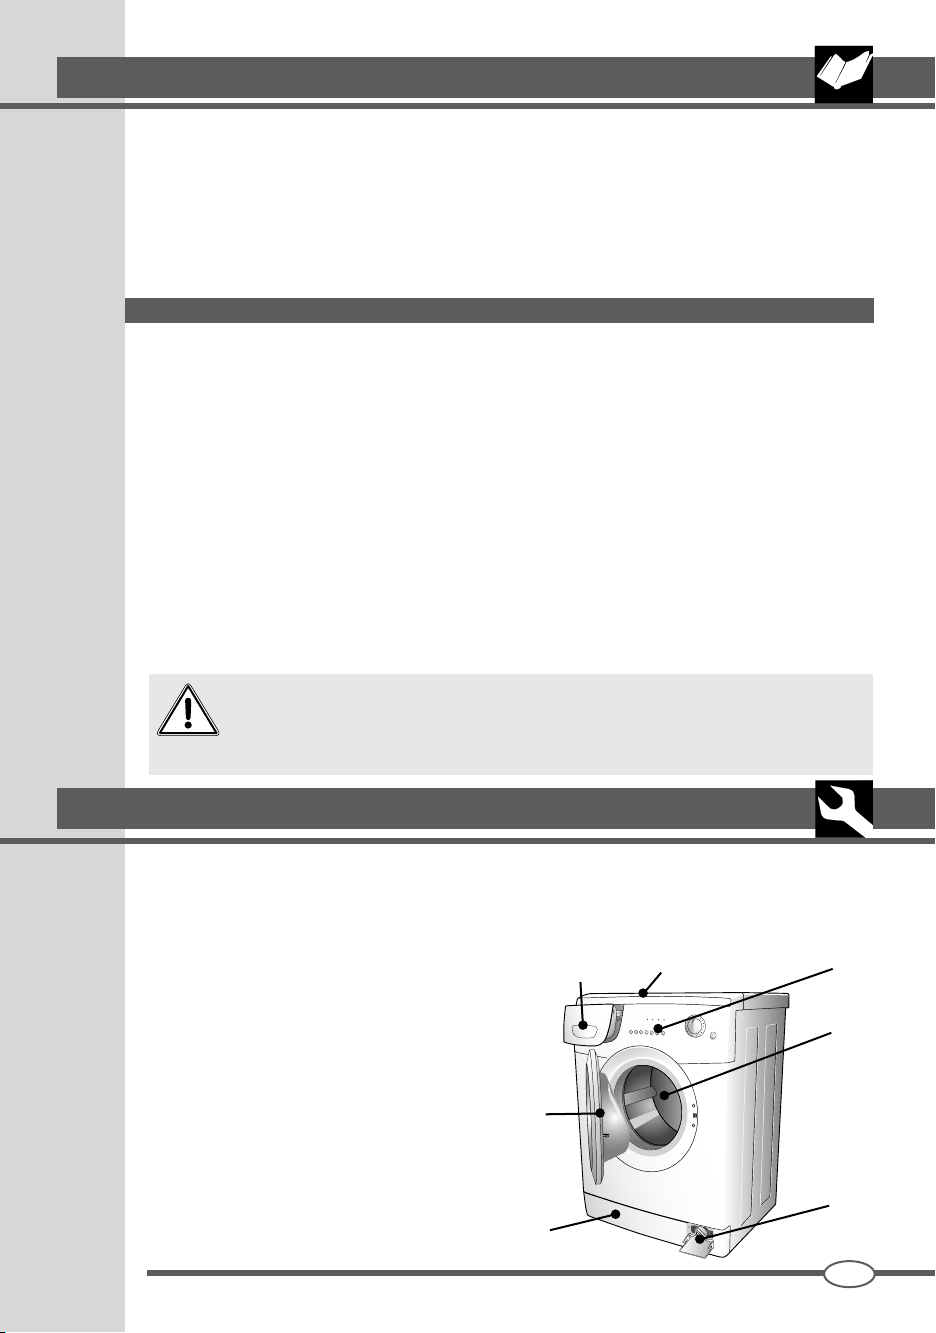
A - Oblò
B - Filtro
C - Piedini regolabili
D - Coperchio superiore
SM3173
E - Cestello
F - Quadro comandi
G - Cassetto detersivo
▼ L’oblò molto ampio facilita il carico e scarico
▼ La stabilità altissima é data dalla costante
della biancheria.
ricerca dei tecnici sugli equilibri delle masse
in movimento.
G
A
C
D
F
E
B
1
IT
Page 6

6
L’installazione deve essere effettuata da personale professionalmente qualificato, secondo le istruzioni
del costruttore, perché una errata installazione può causare danni a persone e cose.
La macchina può essere installata in qualsiasi posto purché la temperatura ambiente non sia inferiore
ai 3°C ed i cavi o i tubi posti sul retro della macchina non siano schiacciati.
Questo apparecchio è destinato ad uso domestico a applicazioni similari, come:
▼ In negozi, uffici e altri luoghi di lavoro similari;
▼ In aziende agricole o similari
▼ Da clienti di alberghi, motel e altri ambienti di tipo residenziale;
▼ In ambienti del tipo bed and breakfast.
Chiudere i fori con gli appositi tappi in dotazione che troverete
all’interno del sacchetto documenti.
INSTALLAZIONE DELLA MACCHINA
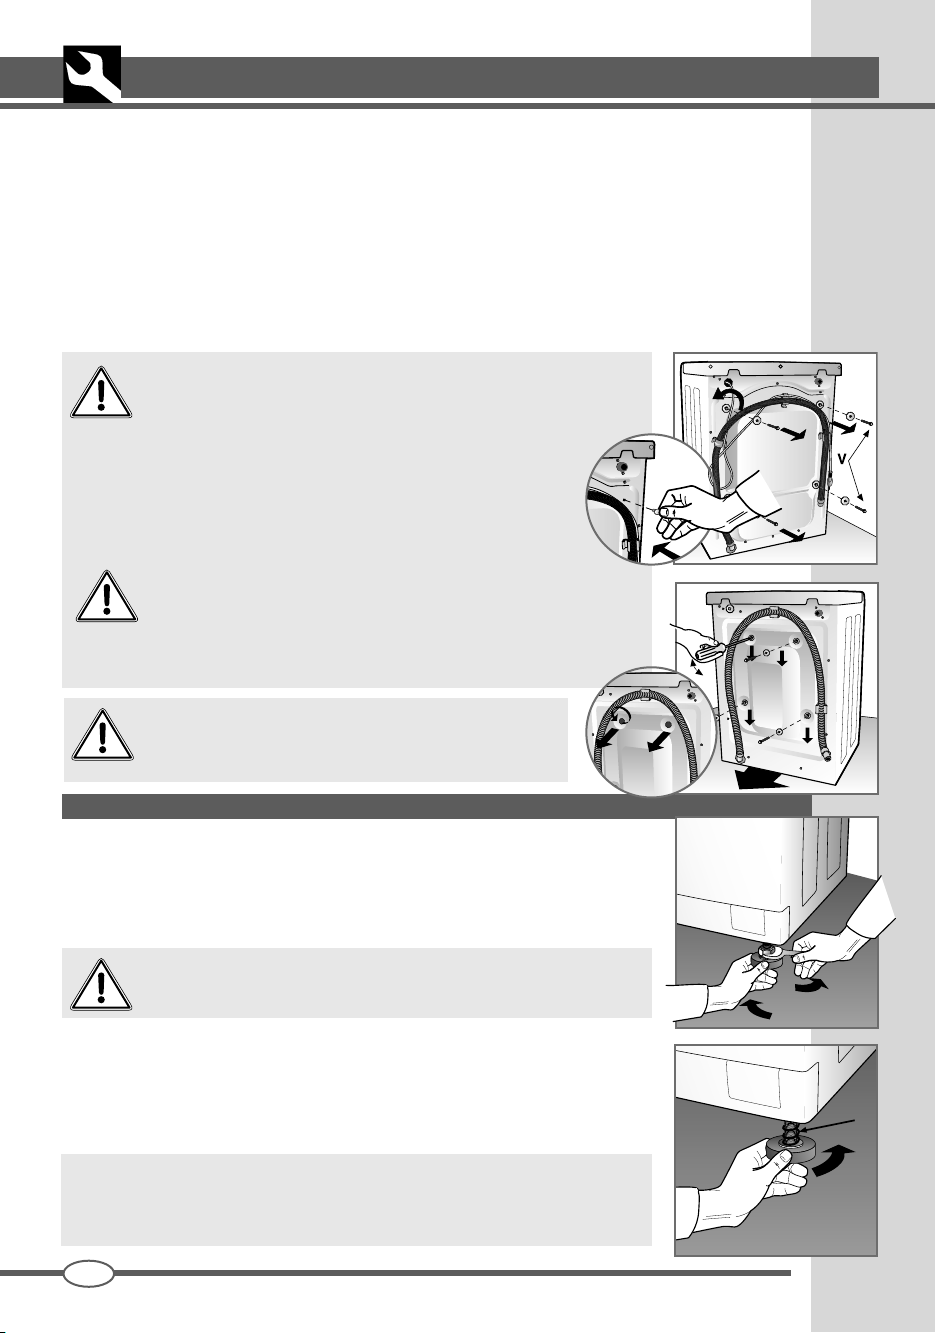
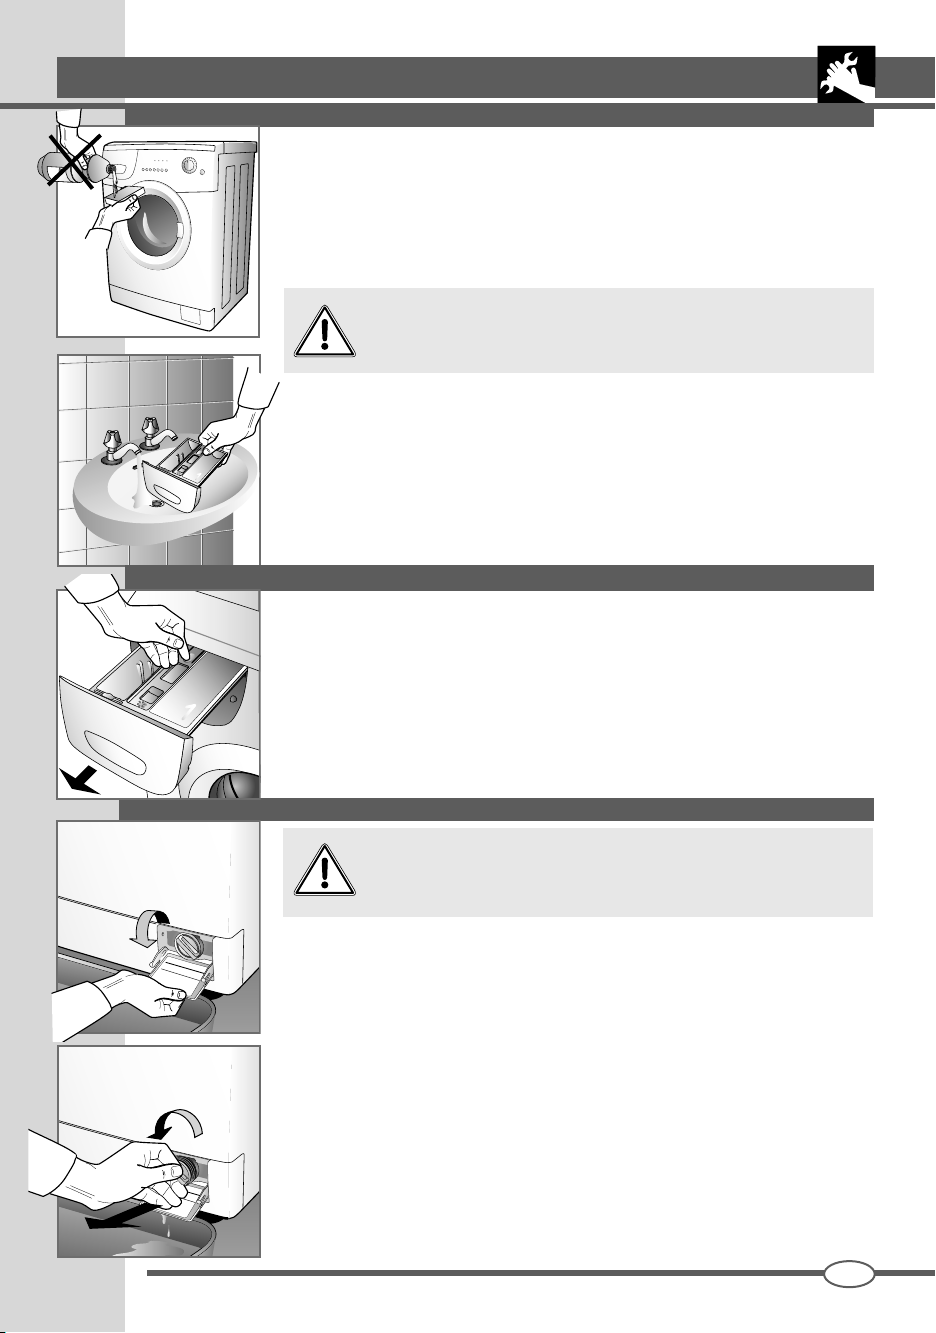
Per motivi di trasporto il gruppo oscillante della macchina viene
bloccato da 4 distanzieri con viti. Prima di mettere in funzione la
macchina togliere i distanzieri, e le viti di bloccaggio, recuperare
le viti e i distanzieri per eventuali traslochi.
(in base al modello)
3
Per motivi di trasporto il gruppo oscillante della macchina
viene bloccato da 4 distanzieri con viti. Prima di mettere in funzione
la macchina togliere le viti di bloccaggio con una chiave.
Inserire nei fori un giravite e agire come in figura per poter recuperare i
4 distanzieri in plastica.
2
La versione lavasciuga non deve essere installata dietro
una porta richiudibile a chiave, una porta scorrevole o
una porta con cerniera sul lato opposto a quello della
lavasciuga stessa.
MESSA IN PIANO DELLA LAVATRICE
Dopo aver scelto il posto adatto, regolare bene in piano la macchina utilizzando i
piedini regolabili (Fig. 6).
Porre particolare attenzione alla scelta della posizione, al livellamento della lavatrice
stessa ed alla sicurezza dei controdadi.
Nel caso in cui la messa in piano non sia stata eseguita correttamente, la lavatrice sarà instabile ed il funzionamento rumoroso
con conseguenti danni.
Nel caso in cui la macchina sia posta su pavimento in moquette, bisogna assicurarsi
che fra la lavatrice e il pavimento l’aria circoli liberamente.
Non è consigliabile il montaggio della macchina in vani in cui la temperatura potrebbe
scendere sotto 0°C.
Nelle versioni sotto tavolo avvitare i piedini fino a che la molla completamente
compressa permetta l’installazione della macchina sotto il piano di lavoro
(Fig. 6B).
5
IT
4
6
6B
SM3173
Page 7

INSTALLAZIONE DELLA MACCHINA
ALLACCIAMENTO IDRICO
La pressione nella rete idrica deve essere compresa fra 0,05 e
1,00 MPa (0,5 - 10 bar.)
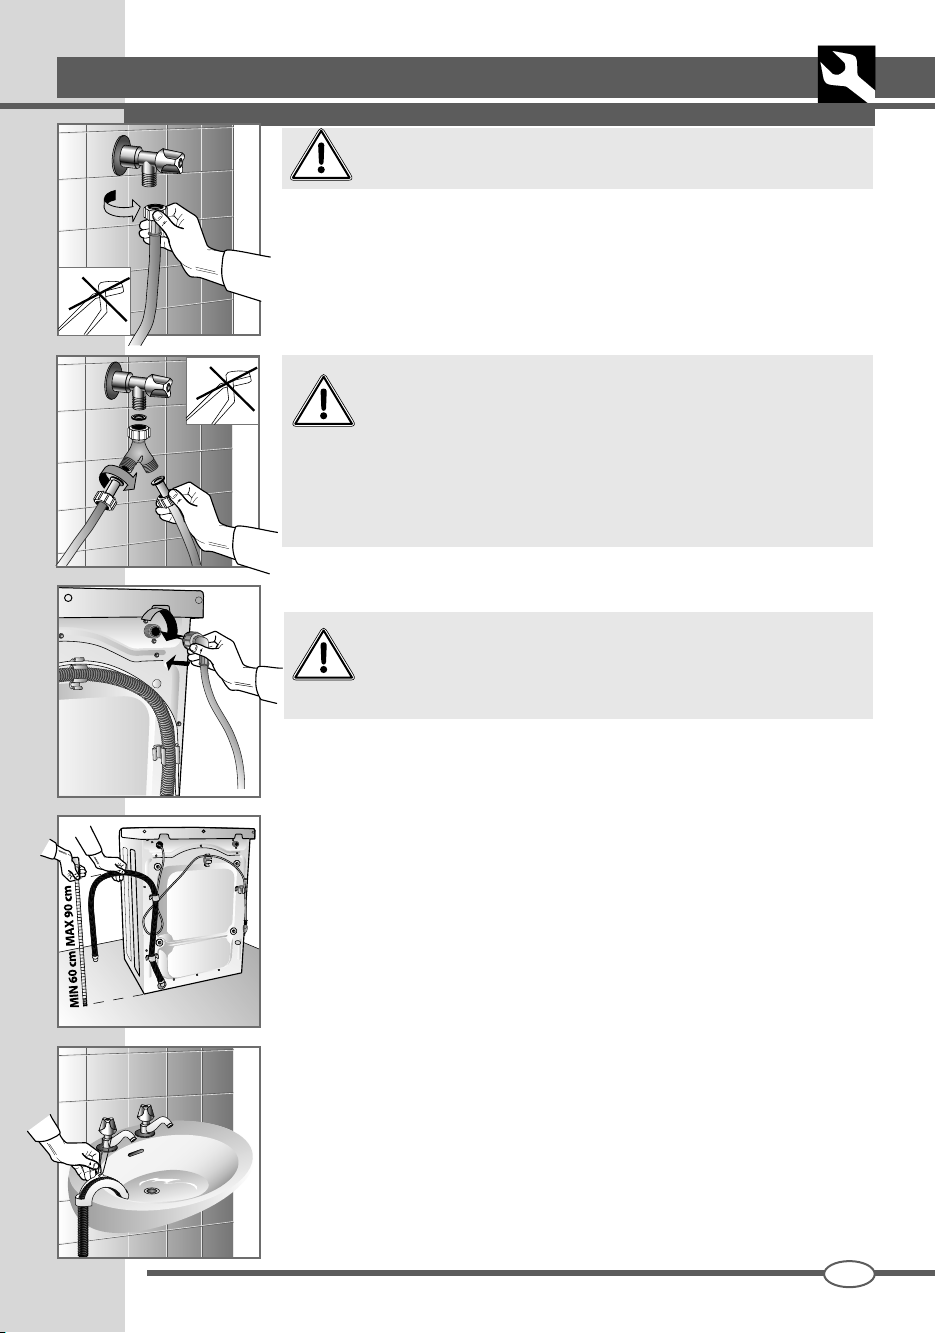
▼ Prima dell’allacciamento, aprire il rubinetto e far defluire ura certa quantità
d’acqua per pulire i tubi da impurità come sabbia, ruggine (questa operazione
è particolarmente importante nel caso in cui la lavatrice sia rimasta a lungo
inattiva o venga collegata ad una tubazione nuova dell’acqua).
▼ Il tubo di alimentazione dell’acqua deve essere collegato alla presa d’acqua
7
fredda con bocca filettata da 3/4”.
Nelle lavabiancheria elettroniche dotate di doppia elettrovalvola
(acqua calda e fredda), collegare il tubo rosso al rubinetto di acqua
calda e, l’altro tubo al rubinetto di acqua fredda. In caso non fosse
possibile utilizzare un rubinetto di acqua calda, i due tubi dovranno essere
collegati entrambi a quello di acqua fredda, tramite l’apposito raccordo in
dotazione (vedi fig. 8).
Non collegare alla rete di approvvigionamento dell’acqua calda.
8
▼ Collegare il tubo di alimentazione (fig. 9).
9
La lavabiancheria e la lavasciuga del tipo a condensazione desti-
nate ad essere allacciate alla rete idrica devono essere collegate
utilizzando il nuovo set di tubi in dotazione alla macchina e non
riutilizzando i vecchi.
7
SM3173
10
11
▼ Durante il lavaggio la presa di alimentazione dell’acqua deve essere completa-
mente aperta.
▼ Il tubo di scarico dell’acqua deve essere ad un’altezza compresa fra 60 cm e
90 cm (fig. 10).
▼ Se è previsto lo scarico dell’acqua direttamente nella conduttura di scarico,
l’estremità libera del tubo della macchina dovrà essere inserita nella conduttura
con diametro interno non inferiore a 40 mm.
▼ E’ importante non allacciare ermeticamente il tubo della macchina alla conduttura
di scarico per evitare di riempire d’aria il sifone e, di conseguenza, di provocare
la fuoriuscita dell’acqua.
▼ Nel caso in cui l’acqua debba essere scaricata nel lavabo o in un’altra zona di
scarico, l’estremità libera del tubo deve essere preventivamente rinforzata nel
punto della piegatura con un gancio apposito in dotazione alla lavatrice. Quindi,
porre il tubo sull’orlo del lavabo e fissare il gancio in modo tale da non far cadere
il tubo (fig. 11). Il lavabo deve avere lo scarico pulito per permettere all’acqua di
scorrere liberamente.
IT
Page 8

8
COLLEGAMENTO ELETTRICO
Salvavita, cavi elettrici e presa della rete devono avere parametri tali da permettere di sopportare il carico massimo indicato sulla targhetta stessa.
A seguito dell'installazione, l'accesso all'alimentazione di rete deve essere
garantito da un interruttore onnipolare.
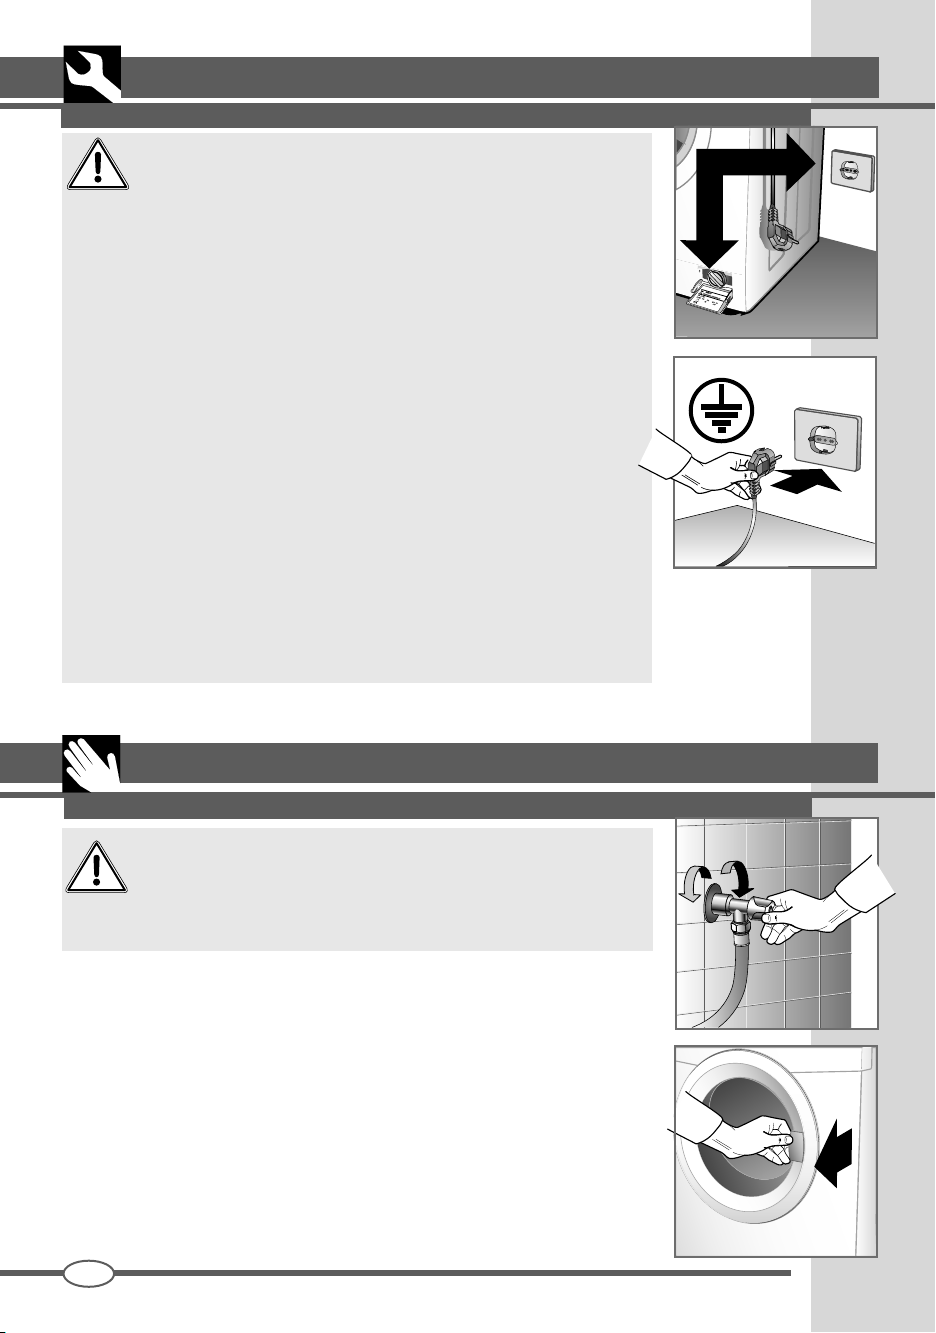
La presa di corrente alla quale viene allacciata la macchina deve essere munita
di messa a terra. In caso contrario, il produttore declina qualsiasi responsabilità
per eventuali incidenti (fig. 13).
Se la presa nella quale viene inserita la spina non funziona oppure non è adatta,
deve essere sostituita da un elettricista qualificato.
E’ vietato allacciare la lavatrice alla rete attraverso elementi indiretti come
prolunghe e prese multiple.
Durante la manutenzione la spina della lavatrice deve essere staccata dalla
fonte di corrente.
Non inserire e non togliere la spina dalla presa con le mani bagnate.
Se il cavo d’alimentazione è danneggiato in qualche modo,contattare il centro
di assistenza tecnica specializzato.
La spina di connessione alla rete elettrica non deve essere posta dietro alla
macchina ma in posizione facilmente accessibile in casi di emergenza.
INSTALLAZIONE DELLA MACCHINA
Accertarsi che la tensione elettrica indicata nei dati tecnici della
targhetta posta sul lato interno dello sportellino filtro, corrisponda
a quella della rete elettrica (fig. 12).
12
13
UTILIZZO DELLA LAVATRICE
AVVERTENZE PRIMA DELL’USO
Prima di procedere al primo lavaggio della biancheria si prega di
eseguire un breve ciclo di lavaggio senza panni.
Questo permette di verificare il funzionamento della lavatrice e
di pulire il cestello.
Ad ogni lavaggio assicurarsi che:
▼ i collegamenti idraulici siano corretti, il tubo di scarico sia ben posizionato (vedi
collegamento idraulico) che il rubinetto sia aperto (fig. 14).
▼ con le mani asciutte inserire la spina nella presa di corrente.
▼ suddividere la biancheria secondo il tipo di tessuto (vedi etichettatura capi).
▼ controllare che non vi siano oggetti nelle tasche degli indumenti da lavare, che
potrebbero causare danni alla biancheria, alla macchina o al filtro
IT
Aperto
Chiuso
14
15
SM3173
Page 9
UTILIZZO DELLA LAVATRICE
USO DEI DETERSIVI
9
16
17
2
NO
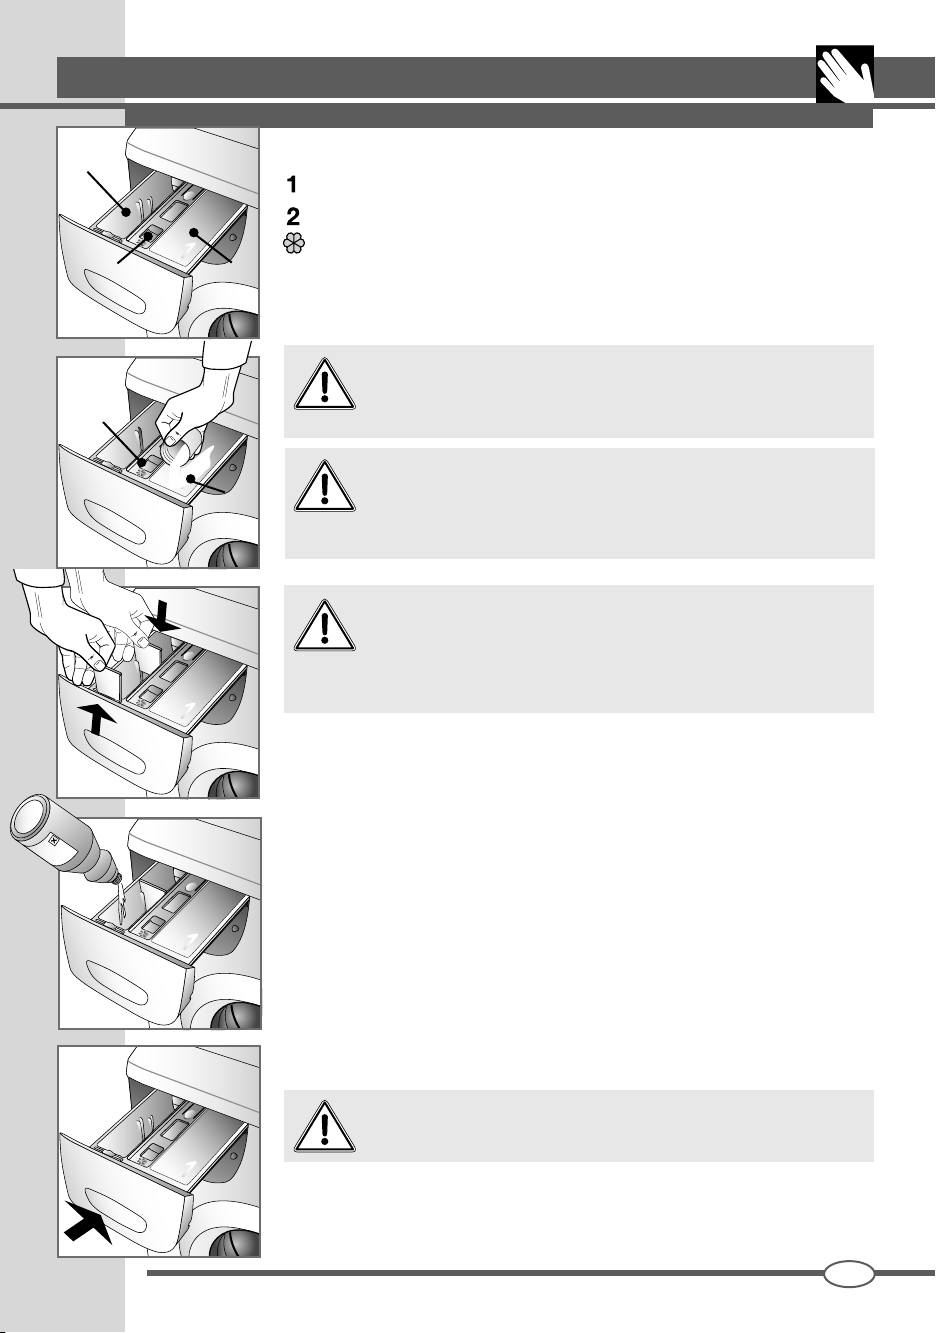
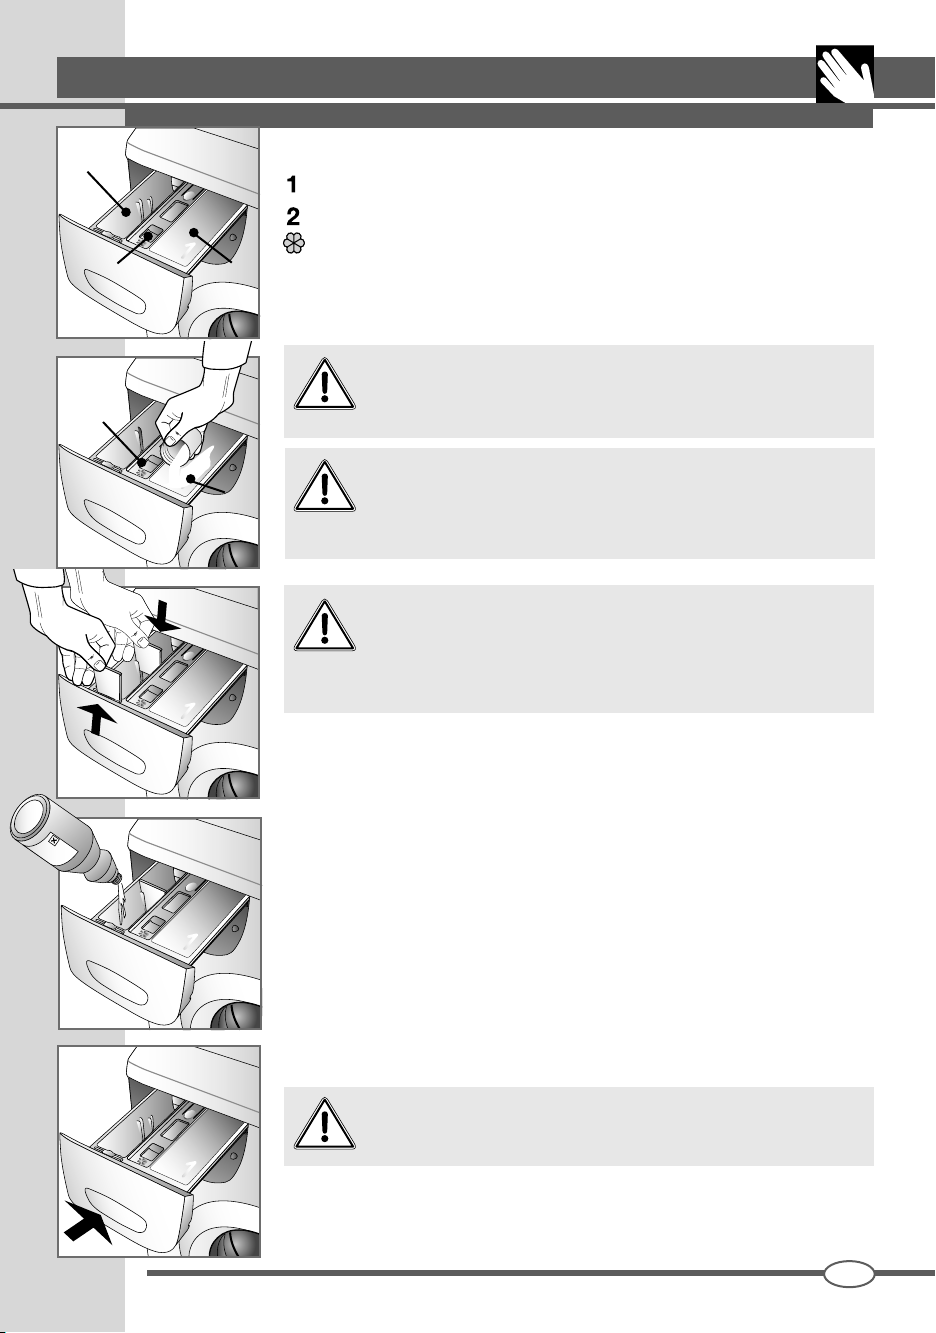
La lavatrice è dotata di uno scomparto per i detersivi a tre vaschette .
vaschetta per detersivo in polvere per il prelavaggio oppure per l’ammollo (1)
vaschetta per detersivo in polvere per il lavaggio normale (2)
vaschetta per ammorbidente (3)
3
1
utilizzare un detersivo a schiuma frenata e ammorbidente (se è il caso) indicato per
lavatrici automatiche. Per i dosaggi seguire le indicazioni sulla confezione.
Quantità troppo elevate di detersivo possono produrre troppa
schiuma ed influire negativamente sul risultato del lavaggio.
Quantità troppo basse possono provocare un lavaggio non
soddisfacente.
Quando si riempie il cassetto del detersivo é importante che
SI
rimanere macchiati di bianco. Viceversa se l’ammorbidente entrasse nella
sezione del detersivo ne ridurrebbe l’efficacia.
di fronte allo scomparto 2 inserirla nelle apposite guide verso il centro
dello stesso scomparto.
quest’ultimo non entri nella sezione dell’ammorbidente in quanto
si avrebbe un risciacquo con schiuma, ed i tessuti potrebbero
Quando si usa il detersivo liquido ( raccomandato per i pro-
grammi senza prelavaggio) bisogna agire nel seguente modo:
estrarre la paratia dalla propria sede che si trova nel cassetto
18
19
20
SM3173
▼ chiudere il cassetto del detersivo prima di iniziare il lavaggio.
Non togliere il cassetto detersivo durante i funzionamento della
macchina, poiché potrebbe uscire acqua.)
IT
Page 10
10
Esistono alcune macchie che non possono essere asportate dai vestiti soltanto con lavaggio in lavatrice.
Prima di pulire a mano macchie di ogni genere bisogna eseguire una prova su una parte poco visibile
del capo, iniziando dall’orlo della macchia e procedendo verso il suo centro per evitare, in questo modo,
la formazione di aloni. Qui sotto riportiamo vari modi per eliminare le macchie.
▼ Cera: Raschiare la cera con una punta arro-
tondata per non provocare danni al tessuto,
quindi, mettendo il tessuto fra due fogli di
carta assorbente, passare la macchia sotto
il ferro caldo.
▼ Penne a sfera e Pennarelli: pulire con un
panno morbido imbevuto di alcol etilico. Fare
attenzione a non allargare la macchia.
▼ Umidità e mUffa: se il tessuto tollera bene
l’uso della candeggina, eseguire il ciclo di
lavaggio aggiungendo candeggina. In caso
contrario, bagnare la parte sporca con acqua
ossigenata a 10 volumi e lasciare agire per
10 o 15 minuti.
▼ BrUCiatUre leggere da ferro da stiro: seguire
le indicazioni per la muffa e l’umidità.
▼ rUggine: usare prodotti per macchie di rug-
gine seguendo le indicazioni del produttore
poste sulla confezione.
▼ gomma da mastiCare: passare sul tessuto
con il ghiaccio, sfregare il più possibile e poi
passare con un panno di cotone imbevuto di
acetone.
▼ VerniCe: non lasciare asciugare la vernice.
UTILIZZO DELLA LAVATRICE
COME ELIMINARE ALCUNE MACCHIE
Passare sulla zona sporca il solvente indicato
sulla confezione della vernice (ad es. acqua,
trementina, tricloroetilene), insaponare e poi
sciacquare.
▼ rossetto Per laBBra: le macchie sul cotone
oppure sulla lana si eliminano con un panno
imbevuto di etere. Per la seta, invece, usare
il tricloroetilene.
▼ smalto Per Unghie: mettere sul tessuto mac-
chiato la carta assorbente, quindi, inumidire
il rovescio del tessuto con acetone cambiando spesso la carta assorbente posta sulla
macchia. Procedere in questo modo fino alla
totale eliminazione della macchia.
▼ morChia o Catrame: spalmare sulla macchia
un po’ di burro fresco, lasciare riposare e poi
lavare con essenza di trementina.
▼ erBa: insaponare delicatamente, utilizzare
candeggiante diluito. Per tessuti in lana si
può ottenere un buon risultato anche con
alcol al 90%.
▼ sangUe: mettere a mollo nell’acqua fredda
con l’aggiunta di sale, quindi, lavare con il
sapone da bucato.
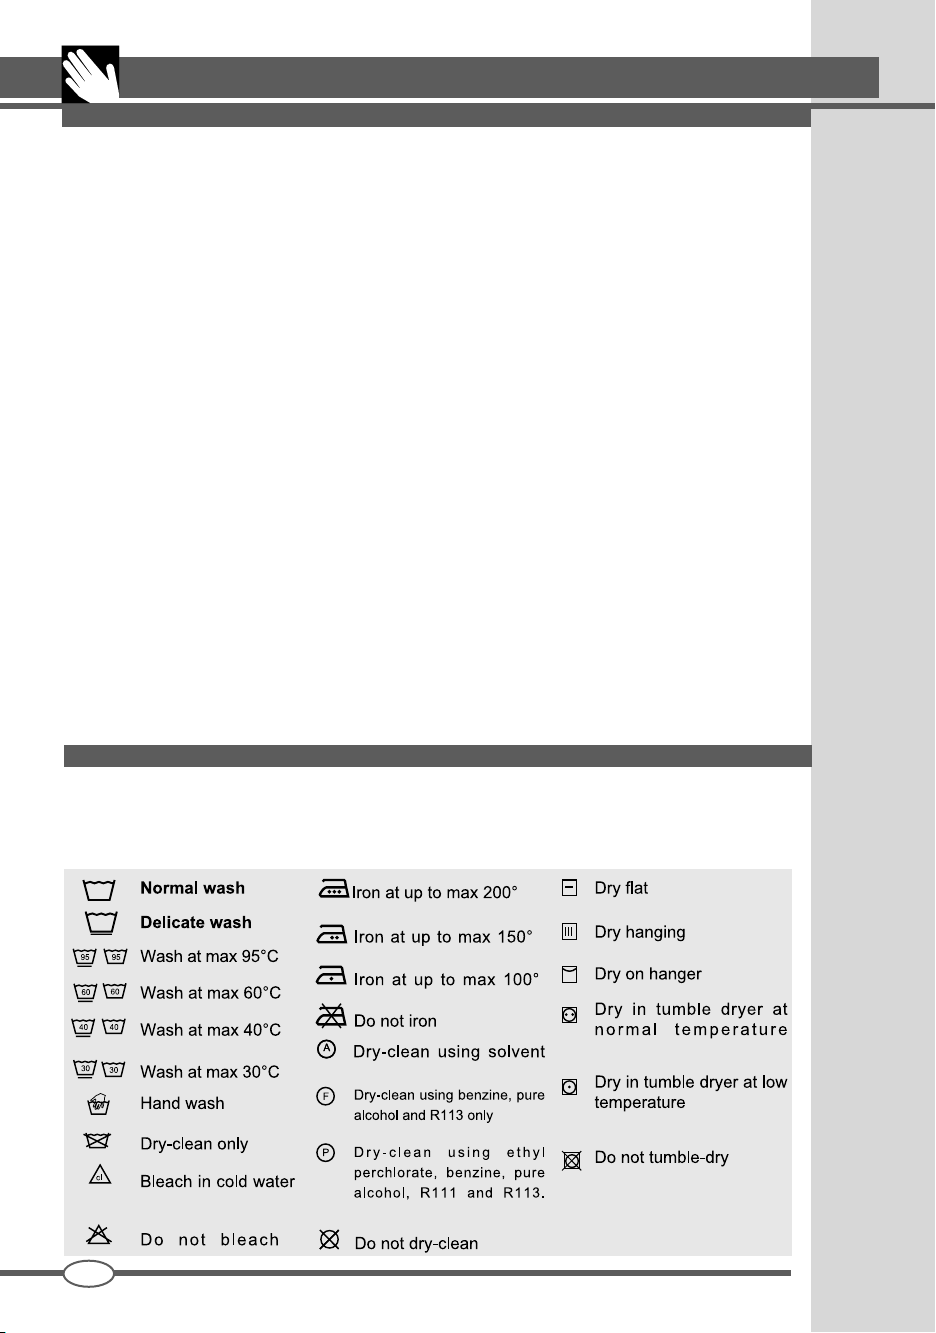
SIMBOLI INTERNAZIONALI PER IL TRATTAMENTO DEI VESTITI
Prima di mettere i vestiti in lavatrice e di selezionare il relativo programma è consigliabile esaminare i
simboli posti sulle etichette del produttore. La tabella qui di seguito può essere utile per la lettura dei
simboli.
IT
SM3173
Page 11

21
22
MANUTENZIONE
PULIZIA DELLA LAVATRICE
La lavatrice è stata progettata per ridurre al minimo la manutenzione. E’ comunque
importante ricordarsi di pulirla regolarmente.
Prima della pulizia assicurarsi che l’apparecchio sia stato staccato dalla rete elettrica
e che sia stata chiusa l’alimentazione dell’acqua.
La struttura esterna e le parti in plastica della lavatrice devono essere pulite unicamente con un panno morbido umido.
Non utilizzare assolutamente per la pulizia della macchina sostanze
chimiche, prodotti abrasivi, alcol, sapone, benzine o altri solventi
in quanto potrebbero danneggiare la macchina. (fig. 21)
Al termine del lavaggio lasciare aperto per qualche tempo l’oblò per far asciugare
le parti in gomma.
Lavare periodicamente le vaschette dei detersivi. A tal fine estrarre lo scomparto
detersivi e sciacquarlo sotto l’acqua corrente (fig. 22). Quindi, inserirlo nuovamente
COME ESTRARRE LO SCOMPARTO DETERSIVI
23
▼ aprire lo scomparto detersivi;
▼ premere con la mano destra sulla scritta “PUSH” e, sfilare con l’altra mano il
cassetto tirandolo verso di se .(fig. 23)
11
SM3173
24
25
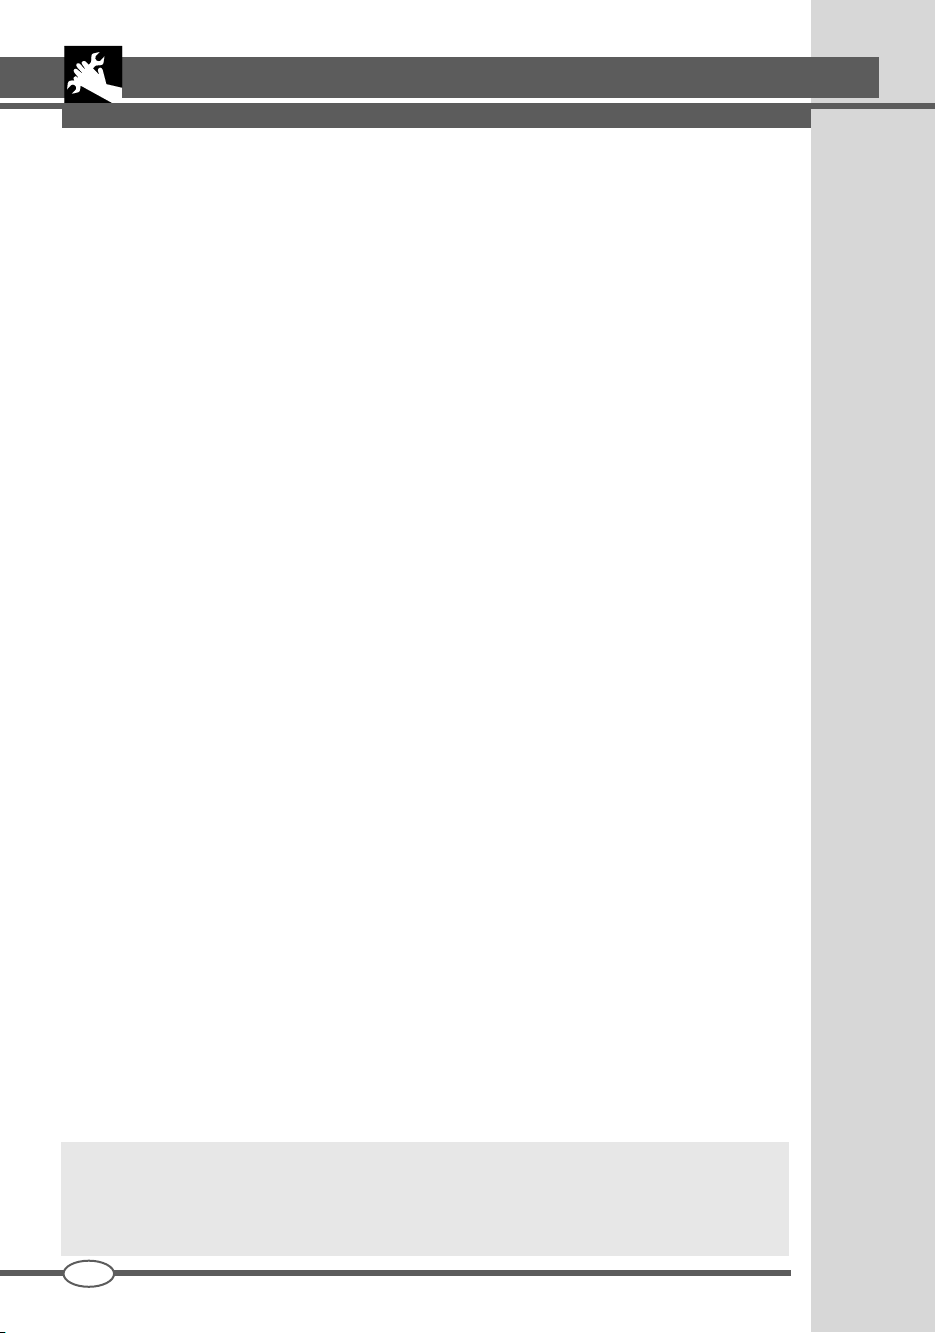
PULIZIA DEL FILTRO
Prima di iniziare le operazioni sotto descritte, assicurarsi che la
lavatrice sia stata svuotata. Non togliere il filtro durante il funzio-
namento della macchina o quando quest’ultima è piena d’acqua.
Mettere sotto il filtro un panno oppure un piatto piano per raccogliere l’acqua rimasta
al suo interno. Aprire lo sportellino del filtro, svitare e togliere quest’ultimo girando
in senso antiorario (fig. 24/25).
Il filtro deve essere pulito periodicamente.
Sciacquare il filtro sotto l’acqua corrente ed eliminare ogni residuo. Riavvitare il filtro
in senso orario assicurandosi che sia chiuso ermeticamente.
IT
Page 12

12
SOLUZIONE DEI PROBLEMI
In caso di mancato funzionamento della macchina, prima di chiamare l’assistenza autorizzata è consigliabile verificare che la causa non sia fra quelle di seguito illustrate. In alcuni modelli le anomalie
vengono evidenziate con un codice a fine ciclo.
Codice: E:00 Effettuare i controlli elencati nel paragrafo contrassegnato *
E:01 Effettuare i controlli elencati nel paragrafo contrassegnato **
E:02 Anomalia tecnica “Chiamare il servizio assistenza”
E:03 Anomalia tecnica “Chiamare il servizio assistenza”
La lavatrice non funziona (le spie di controllo
non sono accese) (Display spento)
• assicurarsi che:
1) Vi sia la tensione nella rete
2) La spina sia inserita correttamente nella presa
di corrente
3) Il pulsante On/Off sia premuto,o se non previsto, che la manopola programmatore sia
posizionata su di un programma.
La lavatrice non funziona (le spie di controllo
sono accese) (Display illuminato)*
• assicurarsi che:
1) Il programma sia stato selezionato
2) L’oblò sia chiuso correttamente
3) Il pulsante ”Start” sia stato premuto (solo per
modelli elettronici)
4) Verificare, le indicazioni seguenti ”La lavatrice
non carica acqua”
La lavatrice non carica acqua*
• controllare che:
1) Vi sia l’acqua nelle tubature
2) Il tubo di carico sia collegato alla lavatrice
3) Il rubinetto di alimentazione dell’acqua sia aperto
4) Il filtro non sia otturato. In caso, procedere alla
sua pulizia staccando l’apparecchio dalla rete
elettrica
La lavatrice carica e scarica acqua in continuazione**:
• controllare che:
1) Il tubo di scarico si trovi all’altezza adeguata
(60-90 cm)
2) L’estremità del tubo di scarico non sia immersa
nell’acqua
La lavatrice non scarica acqua e non centrifuga**:
• controllare che:
1) Il tubo di scarico sia allacciato correttamente
2) Il tubo di scarico non sia piegato
3) Il filtro dello scarico non sia chiuso
4) Non sia stata selezionata la funzione di esclusione della centrifuga
5) Non sia stata selezionata la funzione di stop
con acqua.
La lavatrice vibra e fa rumore
• assicurarsi che:
1) Tutte le protezioni per il trasporto siano state tolte.
MANUTENZIONE
2) La lavatrice sia perfettamente in piano
3) La biancheria voluminosa come lenzuola,
tovaglie ecc. non sia concentrata in una sola
parte del cestello
L’oblò non si apre
• assicurarsi che:
1) Il ciclo di lavaggio sia terminato.
2) Non sia stata selezionata la funzione stop con
acqua (automatica su alcuni modelli).
La biancheria non è sufficientemente centrifugata
• assicurarsi che:
1) La biancheria sia stata distribuita uniformemente nel cestello
2) Sia stata scelta la corretta velocità di centrifuga
La lavatrice si blocca durante il lavaggio
• assicurarsi che:
1) Non manchi la corrente
Resta troppo detersivo nella vaschetta
• assicurarsi che:
1) Il rubinetto di alimentazione dell’acqua sia
aperto
2) Il filtro che si trova tra il rubinetto e il tubo di
alimentazione sia pulito
Dopo il lavaggio la biancheria non è pulita
• assicurarsi che:
1) Il cestello non sia stato caricato troppo
2) Sia stata utilizzata l’adeguata quantità di
detersivo
3) sia stato scelto il programma di lavaggio
corrispondente
La biancheria si è ristretta oppure si è scolorita
• assicurarsi che:
1) Sia stato scelto il programma di lavaggio
corretto
2) Sia stata selezionata la giusta temperatura di
lavaggio
La lavatrice non asciuga (solo per modelli lavasciuga)
• assicurarsi che:
1) Il rubinetto di alimentazione dell’acqua sia
aperto
2) Il filtro di scarico sia pulito
3) La lavatrice sia accesa (spia di controllo o
display illuminato)
4) Il programma asciugatura sia selezionato
5) Il tempo di asciugatura sia stato impostato
Se dopo l’esecuzione delle funzioni descritte, l’apparecchio continua a non funzionare correttamente
segnalare il difetto al centro assistenza tecnica autorizzato più vicino.
Si prega cortesemente di comunicare il modello, il numero di fabbricazione ed il tipo di guasto. I dati
dell’apparecchio si trovano sulla tabella informativa posizionata sullo sportellino del filtro.
Queste informazioni permettono all’operatore dell’assistenza tecnica di procurarsi le parti di ricambio
necessarie e, quindi, garantiscono una veloce ed efficace esecuzione della riparazione.
IT
SM3173
Page 13
ENGLISH
Dear Customer,
Thank you for choosing our product.
Please read these instructions carefully before connecting and using the appliance.
Knowledge of the operating principles will help guarantee correct and safe use of the appliance.
This instruction booklet contains the technical characteristics of the washing machine and is full
of useful information regarding its operation, all designed to help you get the best out of your appliance. If the appliance is sold or handed over for use by others, remember to give the new user
the instruction booklet.
MODEL: ................................................................................................. DATE OF PURCHASE: .............../.............../.............................
SERIAL NUMBER: ...........................................................................................................................................................................................
CONTENTS
NOTES AND ADVICE FOR THE USER 14-15
ì DESCRIPTION OF THE APPLIANCE 15
13
INSTALLING THE WASHING MACHINE 16-18
• Unpacking the washing machine and removing the locking devices 16
• Levelling the washing machine 16
• Connecting to the mains water supply 17
• Connecting to the mains electricity supply 18
USING THE WASHING MACHINE 18-20
• Recommendations prior to use 18
• Use of detergents 19
• How to remove some stains 20
• International clothing care symbols 20
MAINTENANCE 21-22
• Cleaning the washing machine 21
• Cleaning the filter 21
• Resolving problems 22
This appliance is marked as complying with European Directive 2012/19/EU, Waste Electrical
and Electronic Equipment (WEEE). Make sure that the product is disposed of in a correct
manner. The user is obliged to contribute towards preventing negative consequences for
health and the environment.
The symbol affixed to the product or accompanying documents signifies that the product
must not be treated as normal domestic refuse, but must be delivered to an authorised collection centre to enable the electric and electronic equipment to be recycled. When disposing
of the appliance, comply with local waste disposal regulations. For further information on
the treatment, recovery and recycling of this product, refer to the appropriate offices, local
domestic waste collection service or the retailer from where the appliance was purchased.
SM3173
EN
Page 14

14
NOTES AND ADVICE FOR THE USER
Before connecting the appliance read these instructions carefully.
Repairing the failure arising from inappropriate connections or use of
the appliance is not covered by the guarantee.
THE MANUFACTURER WILL NOT BE HELD RESPONSIBLE FOR ANY INCIDENTS
RESULTING FROM NON-COMPLIANCE WITH SAFETY STANDARDS OR THE
REQUIREMENTS OF THIS INSTRUCTION BOOK.
▼ This appliance can be used by children
aged from 8 years and above and person
with reduced physical, sensory or mental
capabilities or lack of experience and
knowledge if they have been given supervision or instruction concerning use of the
appliance in a safe way and understand
the hazard involved. Children shall not
play with the appliance. Cleaning and user
maintenance shall not be made by children
without supervision.
▼ Children of less than 3 years should be
kept away unless continuously supervised.
▼ The appliance must be properly connected to the system with new hoses provided. Used hoses must never be reused.
▼ The operating pressure of water
(minimum and maximum) must be between
0.5bar (0.05MPa) and 10 bar (1 MPa).
▼ If the supply cord is damaged, it must
be replaced by the manufacturer, its service
agent or similar qualified person in order to
avoid a hazard.
▼ Ventilation opening in the base must
not be obstructed by a carpet.
▼ Observe the maximum volume of dry load
as indicated in the section “Program Table”.
▼ To stop the functions, refer to the washing guide.
▼ Before using the washing machine, remove all
the packing and locking devices used for the
transport (locking screws). If this is not done,
serious damage may be caused to both the
appliance and your home.
▼ Any modifications or attempts to interfere with
the washing machine can be dangerous for the
user and may damage the appliance itself.
▼ Considering the substantial weight of the wash-
ing machine, specific safety standards must be
observed during handling.
▼ When the appliance is in operation, avoid any
contact with the water being discharged through
the drain hose, as it may be very hot. Do not
EN
touch the door glass either, as this will tend to
heat up during washing.
▼ Use the washing machine for machine-washa-
ble items only. In the case of any doubts, refer
to the manufacturer’s instructions on the label
attached to the item to wash (see “Clothing
care symbols”)
▼ Before placing the washing in the washing
machine, make sure that all pockets are empty.
Hard or pointed objects such as coins, pins,
nails, screws or stones can cause serious
damage to the appliance.
▼ Never wash items that have been soiled with
substances containing petrol. In the case
where stains have been removed using vaporising products, wait until these substances have
fully evaporated from the surface of the material
before loading into the washing machine.
▼ The use and quantities of detergent, softener
and bleach must comply with the instructions
reported on the packaging.
▼ Do not use detergents designed for hand wash-
ing, in that the excessive suds produced could
damage the internal components.
▼ After washing mats, blankets or any other long-
fibre materials, remove the filter and clean it if
necessary.
▼ It is advisable to leave the door open at the end
of the wash cycle.
▼ Do not attempt to repair any appliance faults
alone, in that repairs carried out by a non-professional may cause serious damage and will
invalidate any rights to repairs under guarantee.
▼ Repairs to the appliance can only be carried
out by personnel authorised by the customer
service centres. All repairs must make use of
original spare parts only.
▼ Never insert or remove the plug from the mains
socket with wet hands.
▼ The washing machine must be connected to
a mains socket fitted with an efficient earth
complying with current safety standards.
▼ Do not use extension leads or multiple plug
adapters to connect the washing machine to
the mains electricity supply.
SM3173
Page 15
NOTES AND ADVICE FOR THE USER
15
▼ Do not expose the appliance to atmospheric
agents.
▼ The washing machine can only be opened
once the led or display indicates that the cycle
has finished. On some models, this is signalled
by a flashing start button.
▼ When servicing or cleaning the washing
machine, remember to disconnect it from the
FOR WASHER/DRIER VERSIONS:
▼ Never dry unwashed items.
▼ Do not dry items that have been
washed or had stains removed using
chemical products.
▼ Never dry items that have been soiled
with substances such as cooking oil,
petroleum, acetone, alcohol, petrol, kerosene, stain removers, turpentine, wax.
Remove these substances in a hot wash
using an abundant quantity of detergent
prior to loading the items in the drier.
▼ Do not dry items such as foam rub-
ber, latex, raincoats, waterproof fabrics,
rubber mats, preformed items, clothes or
mains electricity supply.
▼ Do not pull the power supply cable to unplug
the washing machine from the mains supply.
Pull the plug only.
▼ It is advisable to unplug the washing machine
from the mains electricity supply and close-off
the water supply after each wash.
cushions with foam rubber padding, as
these may melt and damage other items
in the washing or even the appliance itself.
▼ Fabric softeners, or similar products,
should be used as specified by the fabric
softener instructions.
▼ Children of less than 3 years should
be kept away unless continuously supervised.
▼ That the appliance must not be in-
stalled behind a lockable door, a sliding
door or a door with a hinge on the opposite
side to that of the appliance, in such a way
that a full opening of the appliance door is
restricted.
THE FINAL PART OF A DRYING CYCLE IS THE COOLING DOWN PHASE.
CONSEQUENTLY, NEVER SWITCH OFF THE DRIER BEFORE THE CYCLE
HAS BEEN COMPLETED. OTHERWISE, THE WASHING MUST BE TAKEN
OUT QUICKLY AND HUNG OUT TO ALLOW THE HEAT TO DISSIPATE.
DESCRIPTION OF THE APPLIANCE
▼ The washing machine has been constructed
in steel panels which have been treated and
painted to guarantees that its aesthetic qualities remain unaltered over time.
▼ The motor and all moving parts have been
designed and manufactured to guarantee the
minimum possible noise levels
▼ The large easily-accessible stainless steel
drum will ensure a better quality wash and
help to prolong the life of your washing
▼ The easy to use control panel will satisfy all
washing and drying needs (see control panel
and programme table).
▼ The wide door makes loading and unloading
A - Door
B - Filter
C - Adjustable feet
D - Top cover
SM3173
E - Drum
F - Control panel
G - Detergent drawer
▼ The very high stability of the appliance is the
the washing much easier.
result of constant research by our technicians
into the equilibrium of masses in movement.
G
A
C
D
F
E
B
1
EN
Page 16
16
Installation must be carried out by qualified personnel in line with the instructions supplied by the manufacturer. Incorrect installation may result in damage and injury.
The appliance can be installed anywhere providing that the ambient temperature is not less than 3°C
and that the wires or pipes on the rear of the machine are not squashed.
This appliance is intended to be used in household and similar applications such as:
▼ Staff kitchen areas in shops, offices and other working environments;
▼ Farm houses;
▼ By clients in hotels, motels and other residential type environments;
▼ Bed and breakfast type environments.
Close off the holes using the plugs supplied. The plugs can be
found in the bag containing the documents.
INSTALLING THE WASHING MACHINE
For transport reasons, the washing machine’s oscillating group
is locked in place by 4 spacers and screws. Before using the machine, remove the spacers and locking screws. Keep the screws
and spacers for future use.
(according to the model)
3
For transport reasons, the washing machine’s oscillating group
is locked in place by 4 spacers and screws. Before using the
machine, remove the locking screws with a suitable tool.
Insert a screwdriver in the holes and lever out the 4 plastic spacers as
shown in the figure.
2
The washer/drier version must not be installed behind
a locked door, a sliding door or with a hinged door on
the opposite wall to the washer/drier itself.
LEVELLING THE WASHING MACHINE
After having selected the most suitable location for the appliance, make sure it is
level by regulating the adjustable feet (Fig. 6).
Pay particular attention to the positioning and levelling of the washing machine and
make sure that the lock nuts are tight.
If the appliance is not levelled correctly, it will be unstable and
noisy and may cause damage.
If the washing machine is installed on a carpeted floor, leave sufficient space between
the appliance and the floor to guarantee the free circulation of air.
It is not advisable to install the appliance in rooms where the temperature could fall
below 0°C.
In the under-worktop versions, screw in the feet until the spring is fully
compressed, thus allowing the appliance to be installed under the worktop
(Fig. 6B).
5
EN
4
6
6B
SM3173
Page 17
INSTALLING THE WASHING MACHINE
CONNECTING THE WATER SUPPLY
The mains water pressure must be between 0.05 and 1.00 Mpa
(0.5 - 10 bar.)
▼ Before connecting the washing machine, open the valve and allow a certain
quantity of water to flow out in order to clean the pipes of any sand or rust.
This operation is particularly important in the case where the washing machine
has been left standing for a long time or when connecting to a new water supply
system.
▼ The fill hose must be connected to the mains supply using a ¾” threaded con-
7
nection.
On electronic washing machines fitted with a dual solenoid valve
(hot and cold water), connect the red hose to the hot water supply
valve and the other hose to the cold water supply valve.
If a hot water supply is not available, both hoses must be connected to the
cold supply using the fitting supplied (see fig. 8).
Do not connect to the hot water supply.
8
▼ Connect the fill hose (fig. 9).
9
Washing machines and condensation type washer/driers must
be connected to the mains water supply using the new hoses
provided with the appliance. The old hoses must not be re-used.
17
SM3173
▼ During the wash, the water supply valve must be fully open.
▼ The drain hose must be positioned at a height of between 60 cm and 90 cm
(fig. 10).
▼ If the water is drained directly into the drainage system, the free end of the
drain hose must be inserted in a pipe of internal diameter not les than 40 mm.
▼ The drain hose connection to the drainage system must not be hermetically
sealed, as this would cause a build up of air in the siphon and allow water to
leak out.
10
▼ If the wash water is drained into a washbasin, sink or other similar system, the
free end of the hose must be reinforced at the bend using the bracket supplied
with the washing machine. Place the hose over the edge of the washbasin and
anchor the bracket in such as manner that prevents the hose from falling (fig.
11). The washbasin outlet must be clean and must allow the water to flow freely.
11
EN
Page 18
18
All cut-outs, electric wiring and mains sockets must have a rating such that
enables them to support the maximum load indicated on the identification plate.
Once the appliance has been installed, it must be connected to the mains supply
through a single-pole switch.
The mains supply to which the appliance is connected must be fitted with an
earthing system. If this is not the case, the manufacturer will not be held liable
for any incidents that may occur (fig. 13).
If the mains socket to which the appliance is connected is faulty or unsuitable,
it must be replaced by a qualified electrician.
The washing machine must not be connected to the mains supply using indirect
methods such as extension leads or multiple adapters.
During maintenance work, the washing machine must be disconnected from
the mains electricity supply.
Do not insert or remove the plug from the mains socket with wet hands.
If the power supply cable is damaged in any way, contact the appropriate specialised service centre.
The plug used to connect the machine to the power supply must never be fixed
behind the machine, but must be in a position easily accessible in an emergency.
INSTALLING THE WASHING MACHINE
CONNECTING TO THE MAINS ELECTRICITY SUPPLY
Make sure that the voltage indicated on the identification plate
attached to the inside of the filter door corresponds to that of the
mains supply (fig. 12).
12
13
USING THE WASHING MACHINE
RECOMMENDATIONS PRIOR TO USE
Before carrying out the first wash, allow the washing machine to
effect a short wash cycle without any washing.
This will allow the operation of the washing machine to be checked
and will clean the drum.
Before each wash make sure that:
▼ the water connections are correct, the drain hose is properly positioned (see
connecting to the water supply) and that the water supply valve is open.
▼ with dry hands, insert the plug in the mains socket.
▼ sort the wash into types of fabric (refer to clothing care symbols).
▼ check that there are no objects left in any of the pockets of the items to wash,
as these may damage the washing, the appliance or the filter.
EN
Open
Closed
14
15
SM3173
Page 19
USING THE WASHING MACHINE
USE OF DETERGENTS
19
16
17
2
NO
The washing machine is fitted with a three-compartment detergent drawer
compartment for pre-wash or soak soap powder (1)
compartment for normal wash soap powder (2)
softener compartment (3)
YES
1
Use a low-suds detergent and softener (if required) recommended for automatic
washing machines. Follow the dosage instructions written on the packet.
Too much detergent can produce excessive suds and may result
in a poor wash.
Too little detergent will produce an unsatisfactory wash.
When adding detergent to the dispenser, remember to avoid any
spillage into the softener compartment, in that this would create
a soapy rinse and stain the fabrics white. Vice versa, if softener
is added to the detergent compartment, the quality of the wash
will be compromised.
When using a liquid detergent (recommended for programmes
without pre-wash) proceed as follows: remove the baffle from its
housing at the front of compartment 2 and insert it in the guides
near the centre of the same compartment.
3
18
19
20
SM3173
▼ close the detergent drawer before starting the wash.
Do not attempt to remove the detergent drawer while the washing machine is in operation, as this will cause water to flow out.
EN
Page 20
20
Stains exist that cannot be removed by machine washing alone. Before trying to remove any type of
stain by hand, first try the removal procedure on a small area of hidden fabric. Start from the edge of
the stain and working inwards, this will prevent a dark ring from forming around the site of the stain. A
few methods to adopt for removing stains are reported below.
USING THE WASHING MACHINE
HOW TO REMOVE SOME STAINS
▼ Wax: Scrape the wax using a rounded point
in order not to damage the fabric. Then, with
the fabric placed between two pieces of absorbent paper, run a hot iron over the stain.
▼ Ball Point Pens and felt-tiP Pens: clean using
a soft cloth soaked in ethyl alcohol. Take care
not to spread the stain.
▼ damP and moUld: if the fabric supports the
use of bleach, carry out a wash cycle adding
bleach. Otherwise, soak the soiled part in
hydrogen peroxide (10 volumes) and leave
for 10 to 15 minutes.
▼ light sCorCh marks left By ironing: follow the
instructions for mould and damp.
▼ rUst: use products specially designed for rust
stains, following the manufacturer’s instructions written on the packet.
▼ CheWing gUm: rub ice over the fabric, scrape
away as much chewing gum as possible
and then rub with a piece of cotton soaked
in acetone.
INTERNATIONAL CLOTHING CARE SYMBOLS
Before placing the clothes in the washing machine and selecting the wash programme, examine the
symbols on the manufacturer’s label. The table reported below will provide a useful guide to reading
the symbols.
▼ Paint: do not allow the paint to dry. Rub the
area with the solvent recommended by the
paint manufacturer (e.g. water, turps, trichloroethylene), soap and then rinse.
▼ liPstiCk: stains on cotton or wool can be elimi-
nated using a cloth soaked in ether. Stains
on silk require the use of trichloroethylene.
▼ nail Varni sh: place a sheet of absorbent
paper on the stained material, then dampen
the back of the fabric with acetone, frequently
changing the absorbent paper placed over
the stain. Continue in this manner until the
stain has disappeared.
▼ tar or dirt: spread a little fresh butter over
the stain, allow to stand and then wash with
oil of turpentine.
▼ grass: delicately soap the stain, use diluted
bleach. Good results can be obtained on
woollen fabrics using 90% alcohol.
▼ Blood: put into soak in cold water with added
salt, then wash with washing soap.
EN
SM3173
Page 21
MAINTENANCE
CLEANING THE WASHING MACHINE
The washing machine has been specifically designed to reduce maintenance to a
minimum. Nevertheless, it is important that it is cleaned regularly.
Before cleaning, make sure that the appliance has been disconnected from the power
supply and that the water supply valve has been closed.
The external structure and the parts of the washing machine in plastic must be
cleaned with a soft damp cloth only.
21
21
22
Never use chemicals, abrasive products, alcohol, soap, petrol or
other solvents to clean the appliance as these may cause damage. (fig. 21)
After washing, leave the door open for a short time to allow rubber parts to dry.
Periodically wash out the detergent compartments. To do this, remove the detergent
compartment and rinse it under running water (fig. 22). Then replace it.
REMOVING THE DETERGENT DRAWER
23
▼ open the detergent drawer;
▼ press on the word “PUSH” with the right hand and pull out the drawer with the
left hand (fig. 23).
CLEANING THE FILTER
24
Before starting the operations described below, make sure that
the washing machine is empty. Do not remove the filter while the
washing machine is running, or when full of water.
SM3173
25
Place a cloth or tray under the filter to collect any water that may still be inside Open
the filter door, unscrew the filter and remove it by turning it in an anticlockwise direction (fig. 24-25).
The filter must be cleaned periodically.
Rinse the filter under running water to eliminate any residues. Replace the filter by
screwing it in clockwise, making sure it closes and seals properly.
EN
Page 22
22
If the appliance is not working properly, check through the following troubleshooting guide before calling for technical assistance. In some models malfunctions are indicated by an error code displayed at
the end of the cycle.
Code: E:00 Carry out all the checks listed in paragraphs marked with *
E:01 Carry out all the checks listed in paragraphs marked with **
E:02 Technical malfunction “Call Customer Service”
E:03 Technical malfunction “Call Customer Service”
The washing machine does not work (warning
lights are off) (Display off)
• Make sure that:
1) The mains power supply is working
2) The plug is inserted correctly in the socket
3) The On/Off button has been pressed, or if not
present, check that the programming knob is
positioned on a programme.
The washing machine does not work (warning
lights are off) (Display lit)*
• Make sure that:
1) The programme has been selected
2) The door is closed properly
3) The “Start” button has been pressed (electronic models only)
4) Refer to the information provided for “The
washing machine does not fill with water”
The washing machine does not fill with water*
• Check that:
1) There is water in the water supply system
2) The water fill pipe is connected to the washing
machine
3) The mains water supply valve is open
4) The filter is not blocked If it is, clean the filter
after first unplugging the appliance from the
power supply
The washing machine continuously fills and
drains the water**
• Check that:
1) The drain hose has been installed at the correct height (60-90 cm)
2) The end of the drain hose is not under water
The washing machine does not drain or spin**
• Check that:
1) The drain hose is properly connected
2) The drain hose is not kinked
3) The drain filter is not blocked
4) The no-spin function has not been selected
5) The Stop with water function has not been
selected.
The washing machine vibrates and is noisy
• Make sure that:
1) All the locking elements used for transporta-
If, after all these checks have been carried out, the appliance still does not work, inform the nearest customer service centre. When contacting the service centre, inform them of the appliance
model, serial number and type of fault. The data relating the appliance can be found on the rating
plate affixed to the inside of the filter door. This information will help the service centre operator
in procuring the necessary spare parts, thus guaranteeing a speedy and efficient repair.
MAINTENANCE
RESOLVING PROBLEMS
tion have been removed.
2) The washing machine is perfectly level
3) Bulky items such as sheets, tablecloths etc.
are not all bundled in one part of the drum
The door will not open
• Make sure that:
1) The wash cycle has finished.
2) The Stop with water function has not been
selected (automatic on some models).
The washing has not been spun properly
• Make sure that:
1) The washing is evenly distributed in the drum
2) The correct spin speed has been selected
The washing machine stops during a wash
• Make sure that:
1) The mains power supply is working
There is still a lot of detergent in the compartment
• Make sure that:
1) The mains water supply valve is open
2) The filter between the valve and the supply
hose is clean
The washing is not clean at the end of the
wash cycle
• Make sure that:
1) The drum has not been overloaded
2) The correct amount of detergent has been
used
3) The correct programme has been selected
The washing has shrunk or faded
• Make sure that:
1) The correct washing programme has been
selected
2) The correct washing temperature has been
selected
The washing machine does not dry (washerdryer models only)
• Make sure that:
1) The mains water supply valve is open
2) The drain filter is clean
3) The washing machine is switched on (indicator
light or display lit)
4) The drying program has been selected
5) The drying time has been set
EN
SM3173
Page 23

РУССКИЙ
Уважаемый покупатель,
благодарим Вас за выбор нашего изделия.
Прежде чем подключить прибор и приступить к его использованию, просим Вас внимательно прочитать инструкцию по
эксплуатации.
Знание принципов работы прибора обеспечит его правильную и надежную эксплуатацию. Инструкции по эксплуатации содержат много полезных рекомендаций
относительно работы и технических особенностей стиральной машины, которые
помогут Вам использовать ее оптимальным образом. В случае продажи или передачи стиральной машины другому лицу не забудьте отдать новому пользователю и
инструкцию по эксплуатации.
23
МОДЕЛЬ
ЗАВОДСКОЙ НОМЕР
: ................................................................................
: ........................................................................................................................................................................
ДАТА ПРИОБРЕТЕНИЯ
: .............../.............../......................
СОДЕРЖАHИЕ
РЕКОМЕНДАЦИИ И СОВЕТЫ ДЛЯ ПОЛЬЗОВАТЕЛЯ 24-25
ОПИСАНИЕ МАШИНЫ 25
УСТАНОВКА МАШИНЫ 26-28
• Снятие упаковки и транспортировочных деталей 26
• Выставление машины по уровню 26
• Подключение к водопроводной сети 27
• Подключение к электрической сети 28
ЭКСПЛУАТАЦИЯ СТИРАЛЬНОЙ МАШИНЫ 28-30
• Прежде чем пользоваться машиной 28
• Применение моющих средств 29
• Выведение пятен 30
• Международные символы по уходу за одеждой 30
УХОД 31-32
• Очистка стиральной машины 31
• Очистка фильтра 31
• Решение возникающих проблем 32
Прибор отмечен знаком в соответствии с Европейской директивой 2012/19/EU по утилизации
электрического и электронного оборудования (WEEE). Обеспечив правильную утилизацию данного изделия, пользователь помогает предотвратить потенциальные негативные
последствия для окружающей среды и здоровья человека.
Символ на самом изделии или сопроводительной документации указывает, что при
утилизации данного изделия с ним нельзя обращаться как с обычными бытовыми отходами.
Прибор следует сдать в соответствующий пункт приема электрического и электронного оборудования для последующей утилизации. Сдача на слом должна производиться в соответствии
с местными правилами по утилизации отходов. За более подробной информацией о правилах
обращения с изделием, его утилизации и переработки обращайтесь в соответствующие местные
органы, в службу сбора бытовых отходов или в магазин, в котором прибор был приобретен.
SM3173
RU
Page 24

24
РЕКОМЕНДАЦИИ И СОВЕТЫ ДЛЯ ОЛЬЗОВАТЕЛЯ
Перед присоединением устройства внимательно прочитайте инструкции. Гарантия не покрывает ремонт неисправностей, которые
были вызваны неправильными соединениями или ненадлежащим
использованием устройства.
ИЗГОТОВИТЕЛЬ ОТКЛОНЯЕТ ВСЯКУЮ ОТВЕТСТВЕННОСТЬ ЗА
НЕСЧАСТНЫЕ СЛУЧАИ, ВЫЗВАННЫЕ НЕСОБЛЮДЕНИЕМ ПРАВИЛ
БЕЗОПАСНОСТИ И РУКОВОДСТВА ПО ЭКСПЛУАТАЦИИ.
▼ Этот прибор может использовать-
ся детей в возрасте от 8 лет и выше,
и человек с ограниченными физическими, сенсорными или умственными
способностями или нехваткой опыта
и знаний, если они находятся под
контролем или инструктирования по
во-просам использования прибора
безопасным способом и понять опасность участие. Дети не должны играть
с прибором.
▼ Очистка и пользователь обслу-
живание не принимается детей без
присмотра. Дети в возрасте до трех
лет должны находиться на расстоянии,
если они не находятся под контролем
постоянно.
▼ Прибор должен быть подключен к
системе с новыми шлангами услуг. Подержанные шланги никогда не должны
быть использованы повторно.
▼ Рабочее давление воды (мини-
мум и максимум) должно быть между
0,5бар (0.05Mpa) и 10бар (1 МПа).
▼ Если шнур питания поврежден, он
должен быть заменен производителем,
его агентом по обслуживанию или аналогичным квалифицированным специалистом во избежание опасности.
▼ Вентиляционное отверстие в
основании не должно быть закрыты
ковром.
▼ Соблюдайте максимальный объем
сухогруза, как указано в разделе “Программа таблице”..
▼ Чтобы остановить видеть стиральная на-
правляющие функции.
▼ Прежде чем включить стиральную машину,
следует полностью снять с нее упаковку и
используемые для транспортировки детали
(транспортировочные болты). В противном
случае может быть причинен серьезный
ущерб как машине, так и вашей квартире.
▼ Любая модификация или попытка повредить
прибор могут оказаться для пользователя
опасными и вызвать повреждение машины.
▼ Учитывая значительный вес стиральной
машины, следует соблюдать особые нормы
безопасности во время ее перемещения.
▼ Во время работы прибора не подставляйте
руку под воду, вытекающую из сливного
шланга, так как она может быть горячей.
Не следует также прикасаться к стеклу
дверцы, которое во время стирки тоже нагревается.
▼ Стирайте только вещи, предназначенные
для стирки в стиральной машине. При наличии сомнений посмотрите указания производителя на этикетках одежды (смотри
“Символы по уходу за одеждой”).
▼ Прежде чем положить одежду в машину, не-
обходимо проверить, чтобы все карманы были
пусты. Твердые и заостренные предметы,
такие как монеты, булавки, гвозди, винты или
камни могут серьезно повредить машину.
▼ Нельзя стирать в стиральной машине
вещи, испачканные содержащими бензин
веществами. При удалении пятен летучими
веществами, прежде чем положить вещи
в машину, дождитесь полного испарения
таких веществ с поверхности тканей.
▼ Использование и количество моющих
средств, смягчителей для стирки и отбеливателей должны соответствовать инструкциям, которые приводятся на упаковке.
▼ Не используйте моющие средства для
ручной стирки, поскольку образующаяся
от них обильная пена может повредить
внутренние части прибора.
▼ По завершении стирки половиков, покры-
вал и прочих изделий из длинных волокон,
не забывайте проверять фильтр и при необходимости его очищать.
▼ Рекомендуется оставлять дверь машины
открытой после завершения цикла стирки.
▼ Не пытайтесь самостоятельно устранить
неисправности прибора, так как ремонт, выполненный лицами, не имеющими специальной подготовки, может вызвать серьезные
повреждения и привести к потере права на
гарантийный ремонт.
▼ Ремонт прибора должен проводиться специ-
алистами авторизованных сервисных центров. Для ремонта должны использоваться
только оригинальные запасные части.
▼ Стиральная машина должна быть под-
ключена к соответствующей правилам
безопасности электрической розетке с
RU
SM3173
Page 25

РЕКОМЕНДАЦИИ И СОВЕТЫ ДЛЯ ПОЛЬЗОВАТЕЛЯ
25
заземлением.
▼ Не вставляйте и не вынимайте вилку из
розетки мокрыми руками.
▼ Запрещается подключать машину к элек-
трической розетке через удлинители и
тройники.
▼ Не подвергайте прибор воздействию ат-
мосферных явлений.
▼ Стиральную машину можно открыть толь-
ко после того, как индикатор или дисплей
указали на завершение цикла. В некото-
ТОЛЬКО ДЛЯ СТИРАЛЬНО-СУШИЛЬНЫХ МАШИН:
▼ Запрещается сушить немытые вещи.
▼ Не сушите в машине вещи, постиранные
или обработанные химическими составами.
▼ Не сушите вещи, испачканные растительным маслом, нефтью, ацетоном,
спиртом, бензином, керосином, пятновыводителями, скипидаром, воском. Прежде
чем положить вещи в сушильную машину,
удалите с них указанные вещества посредством стирки в горячей воде с большим количеством моющего средства.
▼ Не сушите в машине изделия из губчатой резины и латекса, плащи, непромокаемые ткани, резиновые коврики,
набивные изделия, предметы одежды
рых моделях на это указывает мигание
пусковой клавиши.
▼ При проведении проверок и очистки ма-
шины не забудьте отсоединить прибор от
электрической розетки.
▼ Если Вы хотите отсоединить машину от
электрической розетки, беритесь не за
электрический провод, а за вилку.
▼ После завершения каждой стирки ре-
комендуется вынуть вилку из розетки и
закрыть кран подачи воды.
и подушки из губчатой резины, т. к. они
могут расплавиться и повредить другие
вещи или сам прибор.
▼ Смягчители ткани, или аналогичные
продукты, должны использоваться в качестве соответствии с инструкциями по
кондиционера для белья.
▼ Дети менее 3 лет следует держать
подальше, если постоянно не контролируется.
▼ Это прибор не должен быть установлен за
запирающейся дверью, раздвижной дверью
или дверью с шарнира на противоположной
стороне, что прибора, таким образом, что
полное открытие дверцы ограничен.
Конечная часть цикла сушки – это охлаждение. Запрещается
останавливать сушилку для белья до окончания цикла, за исключением случаев, когда бельё быстро забирается и развешивается
для рассеивания тепла.
ОПИСАНИЕ МАШИНЫ
▼ Конструкция машины изготовлена из специ-
ально обработанного и окрашенного металлического листа, что обеспечивает неизменность ее эстетических свойств во времени.
▼ Мотор и все подвижные части машины
разработаны и сконструированы в целях
обеспечения максимальной бесшумности
работы прибора.
▼ Барабан большого размера из нержаве-
ющей стали сконструирован так, чтобы
обеспечить высокое качество стирки и
длительный срок службы белья.
▼ Панель управления предоставляет все возмож-
ности для простого выполнения выбранных
программ стирки и сушки (смотри панель
управления и таблицу программ).
▼ Большие размеры дверцы упрощают за-
грузку и выгрузку белья.
A - Дверца
B - Фильтр
C - Регулируемые ножки
D - Верхняя крышка
SM3173
E - Барабан
F - Панель управления
G - Контейнер моющего сред-
ства
▼ Отличная устойчивость стиральной машины
является результатом углубленных технических исследований, направленных на поиск
равновесия подвижных частей прибора.
G
F
E
A
B
D
C
1
RU
Page 26

26
Установка машины должна выполняться профессионально подготовленными специалистами
в соответствии с инструкциями изготовителя, поскольку неправильная установка прибора
может нанести ущерб людям и предметам. Машина может быть установлена в любом помещении, при условии, что температура в нем не ниже 3°C, а провода и шланги с задней
стороны машины не пережаты.
Данный прибор предназначен для домашнего использования в подобных приложениях,
таких как:
▼ В магазинах, офисах и других аналогичных рабочих мест;
▼ В ферме или аналогичный
▼ От клиентов гостиниц, мотелей и других средах жилого типа;
▼ В средах, как кровать и завтрак.
Для транспортировки прибора его качающийся узел блокирован 4 распорками с болтами. Прежде чем подключить
машину, следует вынуть распорки и транспортировочные
болты и сохранить их на случай переезда.
Закройте отверстия специальными заглушками, находящимися в пакете с документами.
УСТАНОВКА МАШИНЫ
(В ЗАВИСИМОСТИ ОТ МОДЕЛИ)
Для транспортировки прибора его качающийся
узел блокирован 4 распорками с болтами.
Прежде чем подключить машину, при помощи
гаечного ключа следует вынуть транспортировочные
болты.
Вставьте в отверстия отвертку и поступите, как показано на
рисунке, чтобы вынуть 4 пластиковые заглушки.
Нельзя устанавливать стирально-сушильную
машину за закрываемой на ключ или за раздвижной дверью, а также за дверью, дверные
петли которой находятся с противоположенной
относительно петель машины стороны.
ВЫСТАВЛЕНИЕ МАШИНЫ ПО УРОВНЮ
Выберите подходящее место и отрегулируйте машину по уровню при помощи
регулируемых ножек (Рис. 6).
Обратите особое внимание на выбор места, выставление стиральной машины
по уровню и на степень затяжки контргаек.
Если выставление машины по уровню не выполнено правильно, она будет неустойчива, уровень шума при работе
будет повышенным, и это может привести к неполадкам.
При установке стиральной машины на пол, покрытый ковролином, следует
проверить, чтобы между машиной и полом свободно циркулировал воздух.
Не рекомендуется устанавливать машину в помещениях, где температура
может опускаться ниже 0°C.
3
5
2
4
6
При наличии модели стиральной машины для установки под рабочим
столом завинтите ножки, чтобы полностью сжатая пружина позволила
установить ее под столешницей (Рис. 6B).
RU
6B
SM3173
Page 27

УСТАНОВКА МАШИНЫ
ПОДКЛЮЧЕНИЕ К ВОДОПРОВОДНОЙ СЕТИ
Давление в водопроводной сети должно быть в пределах
от 0,05 до 1,00 мПа (0,5 - 10 бар).
▼ Прежде чем подключить машину, откройте кран и дайте стечь воде,
чтобы смыть из труб загрязнения типа песка или ржавчины (это
имеет особо большое значение, когда стиральная машина долго не
использовалась или подключается к новой водопроводной трубе).
▼ Присоедините шланг подачи воды к резьбовому патрубку холодной
7
воды 3/4”.
В электронных стиральных машинах, оборудованных
двойным электроклапаном (горячей и холодной воды),
соедините красную трубку с краном горячей воды, а дру-
гую трубку - с краном холодной. Если кран горячей воды
использовать нельзя, обе трубки должны быть подсоединены к
крану холодной воды при помощи специального прилагаемого
патрубка (смотри рис. 8). Не подключайте к сети горячего водоснабжения.
8
▼ Присоедините трубу подачи (рис. 9).
9
мого к машине комплекта шлангов; старые шланги использовать
не надо.
Стиральные и сушильные машина конденсационного
типа, предназначенные для соединения с водопроводной
сетью, следует подключать при помощи нового прилагае-
27
SM3173
▼ Во время стирки кран подачи воды должен быть полностью открыт.
▼ Сливной шланг должен находиться на высоте от 60 см до 90 см от
пола (рис. 10)
▼ Если предусмотрен стационарный слив, в него следует вставить
свободную оконечность шланга; внутренний диаметр слива должен
быть не менее 40 мм.
▼ Важно, чтобы сливной шланг не был соединен герметически со слив-
ным отверстием. Таким образом, в сифоне не будет скапливаться
воздух, что предотвратит перелив воды.
▼ Если вода из машины должна сливаться в мойку или в другое место
10
слива, закрепите свободную оконечность шланга в точке сгиба специальным входящим в комплект крюком. Положите шланг на край
мойки и закрепите крюк так, чтобы шланг не упал на пол (рис. 11).
Сливное отверстие мойки не должно быть засорено, чтобы обеспечить свободный сток воды.
11
RU
Page 28

28
ПОДКЛЮЧЕНИЕ К ЭЛЕКТРИЧЕСКОЙ СЕТИ
Проверьте, чтобы напряжение, указанное на табличке технических данных, расположенной с внутренней стороны
крышки фильтра стиральной машины, соответствовало
напряжению электрической сети (рис. 12).
Параметры дифференциального выключателя, электрических проводов и электрической розетки должны выдерживать максимальную
силовую нагрузку, указанную на табличке.
После установки машины доступ к сетевому питанию должен обеспечиваться многополюсным выключателем.
Электрическая розетка, к которой подключается стиральная машина,
должна быть оснащена системой заземления. В противном случае изготовитель не несет ответственности за несчастные случаи (Рис. 13).
Если розетка, в которую должна быть вставлена вилка, не работает
или не соответствует требованиям безопасности, она должна быть
заменена квалифицированным электриком.
Запрещается подключать стиральную машину к электрической сети
через удлинители и тройники.
Во время проведения технического обслуживания машина должна быть
отключена от источника тока.
Не вставляйте и не вынимайте вилку из розетки мокрыми руками.
Если питающий провод поврежден, следует обратиться в авторизованный сервисный центр.
В аварийных ситуациях вилка подключения машины к электрической
сети должна быть легкодоступна и не должна находиться сзади машины.
УСТАНОВКА МАШИНЫ
12
13
ЭКСПЛУАТАЦИЯ СТИРАЛЬНОЙ МАШИНЫ
ПРЕЖДЕ ЧЕМ ПОЛЬЗОВАТЬСЯ МАШИНОЙ
Прежде чем приступить к первой стирке, рекомендуется
выполнить короткий цикл работы машины без белья.
Это дает возможность проверить действие стиральной
машины и очистить ее барабан.
Перед каждой стиркой белья проверяйте:
▼ подключение машины к системе водоснабжения, положение сливного
шланга (смотри раздел подключения к водопроводной сети), а также,
чтобы кран подачи воды был открыт (рис. 14);
▼ сухими руками вставьте вилку в розетку;
▼ рассортируйте белье по типам тканей (смотри этикетку на одежде);
▼ проверьте, чтобы в карманах не осталось предметов, которые могут
повредить одежду, машину или фильтр.
RU
Открыто
Закрыто
14
15
SM3173
Page 29

16
2
нет
ЭКСПЛУАТАЦИЯ СТИРАЛЬНОЙ МАШИНЫ
ПРИМЕНЕНИЕ МОЮЩИХ СРЕДСТВ
В стиральной машине имеется контейнер для моющих средств с тремя
отделениями.
отделение для стирального порошка для предварительной стирки
или замачивания белья (1)
отделение для стирального порошка для основной стирки (2)
3
отделение для кондиционера (3)
Для стирки следует использовать порошок с низким пенообразованием
и кондиционер (если нужно), предназначенные для автоматических стиральных машин. Дозировка этих средств указана на упаковках.
Слишком большое количество порошка может привести
к образованию излишнего количества пены и отрица-
тельно сказаться на результатах стирки. Недостаточное
количество моющего средства может привести к неудовлетворительным результатам стирки.
29
17
18
19
20
да
При загрузке стирального порошка важно, чтобы он не
попадал в отделение для кондиционера, так как при по-
лоскании будет образовываться пена, и на вещах могут
остаться белые пятна. И, наоборот, если кондиционер
попадет в отделение для стирального порошка, ухудшится качество стирки.
В том случае, когда используется жидкое моющее сред-
ство (рекомендуется для программ без предварительной
стирки), следует действовать следующим образом: выньте
перегородку из установочного положения в контейнере напротив отделения 2 и вставьте ее в специальный желобок в центре
контейнера.
▼ прежде чем начать стирку, закройте контейнер для стирального по-
рошка и других моющих средств.
SM3173
Не вынимайте контейнер для стирального порошка во время
работы машины, так как из него может вылиться вода.
RU
Page 30

30
ЭКСПЛУАТАЦИЯ СТИРАЛЬНОЙ МАШИНЫ
ВЫВЕДЕНИЕ ПЯТЕН
Некоторые пятна невозможно вывести с одежды при обычной стирке в машине. Прежде чем
приступить к выведению любых пятен вручную, сначала следует попробовать пятновыводитель
на незаметной части одежды, а затем начать обработку пятна с края в сторону центра, чтобы
избежать образования разводов. Ниже описываются способы выведения некоторых пятен.
▼
Во ск
:соскрести воск закругленным
предметом, чтобы не повредить ткань,
положить под и на ткань промокательную бумагу и прогладить пятно горячим
утюгом.
▼
шарикоВые ручки и фломастеры
:промокнуть
мягкой тряпкой, смоченной в этиловом
спирте. Следить за тем, чтобы пятно не
расползлось.
▼
Влажность и плесень
:если ткань не портится от отбеливателя, выполнить цикл
стирки с добавлением отбеливателя. В
противном случае, смочить загрязненный участок 10% перекисью водорода
и оставить на 10 - 15 минут.
▼
легкие ожоги от утюга:
выполнить указания по выведению пятен плесени и
влажности.
▼
ржаВчина :
использовать составы для
выведения пятен ржавчины, указанные
производителем на упаковке.
▼
жеВательн ая рези нка :
охладить пятно
льдом, соскрести по возможности всю
жвачку и стереть смоченной ацетоном
▼
краска
:не дать краске высохнуть. Смочить испачканный участок растворителем, указанным на упаковке краски
(например, вода, скипидар, трихлорэтилен), намылить и сполоснуть.
▼
губная помада
: пятна на хлопке и шерсти
можно вывести смоченной в эфире
тряпкой. Для шелка использовать
трихлорэтилен.
▼
лак для ногтей
: положить на пятно промокательную бумагу, смочить материал
с изнанки ацетоном, часто меняя
положенную на пятно бумагу. Действовать так до полного выведения пятна.
▼
смола или деготь
: нанести на пятно немного сливочного масла, дать впитаться и постирать со скипидаром.
▼
траВа
: осторожно намылить, воспользоваться разведенным отбеливателем.
На шерстяных изделиях можно добиться хороших результатов также 90%
спиртом.
▼
кроВь
:замочить в холодной воде с со-
лью, постирать хозяйственным мылом.
хлопчатобумажной тряпкой.
МЕЖДУНАРОДНЫЕ СИМВОЛЫ ПО УХОДУ ЗА ОДЕЖДОЙ
Прежде чем положить одежду в стиральную машину и выбрать соответствующую программу,
рекомендуется сначала изучить этикетки производителя с символами. Приведенная ниже
таблица может быть полезна для понимания символов.
RU
SM3173
Page 31

21
22
УХОД
ОЧИСТКА СТИРАЛЬНОЙ МАШИНЫ
Стиральная машина сконструирована так, чтобы свести к минимуму необходимость проведения операций по ее уходу. Следует, однако, не забывать
регулярно проводить очистку машины.
Прежде чем приступить к очистке машины, убедитесь, что она отсоединена
от электрической розетки, и что закрыт кран подачи воды. Для уборки
внешнего корпуса и пластмассовых частей стиральной машины следует
использовать только мягкую влажную тряпку.
Для уборки машины ни в коем случае не пользуйтесь химическими веществами, абразивными составами, спиртом,
мылом, бензином и прочими растворителями, так как они
могут ее повредить. (рис. 21)
По завершении стирки оставьте на некоторое время дверцу машины открытой, чтобы высохли ее резиновые детали.
Периодически следует мыть контейнер для стирального порошка и моющих
средств. Для этого выньте контейнер для стирального порошка и помойте
его под струей воды (рис. 22). Поставьте контейнер на место.
КАК ВЫНУТЬ КОНТЕЙНЕР ДЛЯ МОЮЩИХ СРЕДСТВ
23
▼ откройте контейнер для моющих средств;
▼ правой рукой нажмите на надпись “PUSH” и выньте контейнер, по-
тянув его на себя (рис. 23)
31
SM3173
24
25
ОЧИСТКА ФИЛЬТРА
Прежде чем приступать к выполнению описанных ниже
операций, проверьте, чтобы из стиральной машины была
слита вода. Не вынимайте фильтр во время работы машины и, когда машина заполнена водой.
Чтобы собрать воду, оставшуюся в фильтре, положите под него тряпку
или подставьте плоскую миску. Откройте крышку фильтра, открутите его
против часовой стрелки и выньте (рис. 24/25).
Необходимо периодически очищать фильтр.
Промойте фильтр под струей воды и удалите из него все посторонние
частицы. Вставьте и закрутите фильтр по часовой стрелке, затем проверьте его герметичность.
RU
Page 32

32
РЕШЕНИЕ ВОЗНИКАЮЩИХ ПРОБЛЕМ
При обнаружении неисправности прибора прежде чем обращаться в авторизованный центр
технического обслуживания, следует проверить, не вызвана ли неисправность одной из перечисленных ниже причин. В некоторых моделях на неисправности указывает код в конце цикла.
Код: E:00 Выполнить проверки, перечисленные в разделе с обозначением *
E:01 Выполнить проверки, перечисленные в разделе с обозначением **
E:02 Техническая неисправность “Обратиться в обслуживающий центр”
E:03 Техническая неисправность “Обратиться в обслуживающий центр”
Стиральная машина не работает (не горят
контрольные лампочки) (Дисплей не освещен)
• проверьте, чтобы:
1) в сети было напряжение;
2) вилка была правильно вставлена в розетку;
3) кнопка On/Off была нажата, или если ее нет,
чтобы ручка программирования была установлена на какую-либо программу.
Стиральная машина не работает (горят контрольные лампочки) (Дисплей освещен)*
• проверьте, чтобы:
1) была выбрана программа;
2) была хорошо закрыта дверца;
3) была нажата кнопка “Start” (только в электронных моделях);
4) прочитайте раздел инструкции “Стиральная
машина не заливает воду”.
Стиральная машина не заливает воду*
• проверьте, чтобы:
1) в водопроводе была вода;
2) шланг подачи воды был присоединен к машине;
3) был открыт кран подачи воды;
4) не был засорен фильтр. В случае необходимости прочистите его, отсоединив прибор
от электрической сети.
Стиральная машина непрерывно заливает и
сливает воду**
• проверьте, чтобы:
1) сливной шланг находился на нужной высоте
(60-90 см);
2) оконечность сливного шланга не была погружена в воду.
Стиральная машина не сливает воду и не отжимает**
• проверьте, чтобы:
1) сливной шланг был присоединен правильно;
2) сливной шланг не был перегнут;
3) сливной фильтр не был закрыт;
4) не была выбрана функция исключения отжима;
5) не была выбрана функция остановки машины
с водой.
Стиральная машина вибрирует и шумит
• проверьте, чтобы:
1) все транспортировочные болты были сняты;
2) стиральная машина была выставлена по
Если после выполнения описанных выше операций прибор все же не работает должным образом, следует сообщить о неисправности в ближайший авторизованный центр технического
обслуживания. При этом нужно указать модель машины, заводской номер и тип неисправности.
Данные прибора указаны на маркировочной табличке, закрепленной на крышке фильтра. Характеристики стиральной машины дают специалистам сервисного центра возможность найти к ней
необходимые запасные части и, соответственно, быстро и качественно провести обслуживание.
УХОД
уровню;
3) объемные вещи, типа простыней, скатертей
и проч. не были сконцентрированы только в
одной части барабана.
Дверца не открывается
• проверьте, чтобы:
1) цикл стирки был завершен;
2) не была выбрана функция останова с водой
(автоматическая в некоторых моделях).
Вещи недостаточно отжаты
• проверьте, чтобы:
1) вещи были равномерно распределены в барабане;
2) была выбрана соответствующая скорость
отжима.
Стиральная машина останавливается во время
стирки
• проверьте, чтобы:
1) в сети был ток.
В контейнере остается большое количество
стирального порошка
• проверьте, чтобы:
1) был открыт кран подачи воды;
2) фильтр между краном и шлангом подачи воды
был чистым.
Вещи после стирки остаются грязными
• проверьте, чтобы:
1) барабан не был перегружен;
2) использовалось нужное количество стирального порошка;
3) была выбрана соответствующая программа
стирки.
Вещи садятся или линяют
• проверьте, чтобы:
1) была выбрана правильная программа стирки;
2) была выбрана правильная температура стирки.
Машина не высушивает вещи (только в моделях
стирально-сушильных машин)
• проверьте, чтобы:
1) был открыт кран подачи воды;
2) сливной фильтр был чист;
3) стиральная машина была включена (контрольная лампочка или дисплей освещены);
4) была выбрана программа сушки;
5) было настроено время сушки.
RU
SM3173
Page 33

УКРАЇНСЬКА
Шановний користувачу!
Дякуємо за те, що ви вибрали нашу продукцію.
Перед тим, як підключити _прилад до електромережі та розпочати
ним користуватися, просимо уважно ознайомитися з цією
інструкцією з експлуатації.
Ознайомлення з принципами роботи гарантує надійне та безпечне користування машиною.
Інструкція містить багато корисних порад щодо роботи пральної машини, а також відповідну
технічну інформацію, яка допоможе вам оптимізувати використання цього побутового
електроприладу. У випадку продажу або передачі пральної машини в інші руки потрібно
передати новому власнику також і цю інструкцію.
33
МОДЕЛЬ
ФАБРИЧНИЙ НОМЕР
: .................................................................................................
: .......................................................................................................................................................................
ДАТА КУПІВЛІ
: .............../.............../............................
ЗМІСТ
ПРИМІТКИ І ПОРАДИ ДЛЯ КОРИСТУВАЧА 44-45
ОПИС МАШИНИ 45
УСТАНОВЛЕННЯ ПРАЛЬНОЇ МАШИНИ 46-48
• Розпакування та розблокування приладу 46
• Регулювання рівня пральної машини 46
• Підключення до водопроводу 47
• Електричне підключення 48
КОРИСТУВАННЯ ПРАЛЬНОЮ МАШИНОЮ 48-50
• Попередження 48
• Застосування пральних засобів 49
• Як вивести деякі плями 50
• Міжнародні символи догляду за одягом 50
ДОГЛЯД 51-52
• Чистка приладу 51
• Чистка фільтра 51
• Проблеми та їх вирішення 52
Цей пристрій позначений символами згідно з вимогами Європейської директиви
про відходи електричного та електронного обладнання 2012/19/EU, Waste
Electrical and Electronic Equipment (WEEE). Гарантуючи правильну переробку
обладнання як відходу, користувач сприяє запобіганню можливого негативного
впливу на навколишнє середовище та на здоров’я.
Знак на виробі чи на супроводжуючій його документації вказує на те, що
цей виріб не вважається домашнім відходом, а повинен здаватися у відповідний
пункт збору для утилізації електричної та електронної апаратури. Виріб повинен
перероблятися згідно місцевих норм для переробки відходів. Для одержання
додаткової інформації про обходження, відновлення та вторинну переробку
цього приладу звертайтеся у компетентний місцевий відділ, до служби збору і
переробки домашніх відходів або у магазин, у якому був куплений цей прилад.
SM3173
UK
Page 34

34
ЗАУВАЖЕННЯ ТА ПОРАДИ ДЛЯ КОРИСТУВАЧА
Перш ніж підключити прилад, уважно ознайомтеся з інструкціями.
Гарантійному ремонту не підлягають ушкодження, отримані внаслідок неправильного підключеня або використання приладу не за
призначенням.
КОМПАНІЯ-ВИРОБНИК НЕ НЕСЕ ЖОДНОЇ ВІДПОВІДАЛЬНОСТІ ЗА МОЖЛИВІ НЕЩАСНІ ВИПАДКИ, ВИКЛИКАНІ НЕДОТРИМАННЯМ НОРМ БЕЗПЕКИ ТА
ІНСТРУКЦІЇ З ЕКСПЛУАТАЦІЇ
▼ Дозволяється користуватись цим
приладом дітям віком від 8 років, а також особам з обмеженими фізичними,
сенсорними або розумовими можливостями або особам без належного досвіду
і знань, якщо вони перебувають під
постійним контролем або проінструктовані щодо правил з небезпечного
використання приладу і усвідомлюють
ступені ризику. Не дозволяти дітям гратися з приладом. Операції з очищення і
догляду не повинні виконуватися дітьми
без належного контролю.
▼ Діти віком молодше 3 років повинні
знаходитися на безпечній відстані від
сушильної машини або перебувати під
безперервним контролем поблизу від неї.
▼ Для правильного підключення
приладу до системи використовувати
шланги з комплекту постачання. Не
використовувати шланги, які вже були
у використанні.
▼ Робочий тиск води (мінімальний та
максимальний) має знаходитися у діапазоні
від 0.5 бар (0.05MПa) до 10 бар (1 MПa).
▼ Якщо шнур живлення пошко-
джений, він повинен бути замінений
виробником, його працівником центру
технічного обслуговування або кваліфікованим фахівцем, щоб уникнути
ризику отримання травм.
▼ Не закривати вентиляційні канали вни-
зу машини (де вони передбачені) килимом.
▼ Не перевантажувати максималь-
ний обсяг білизни для сушіння, який
зазначено в “Таблиці програм”.
▼ Перш ніж приступити до використовування
пральної машини, зняти упаковку і блокуючі деталі, необхідні під час перевезень
(запобіжні гвинти). У протилежному випадку можна серйозно пошкодити прилад
та інтер’єр вашого житла.
▼ Це обладнання призначене для прання
білизни у домашніх умовах. Будь-яке інше
його застосування вважається непридатним, а звідси - небезпечним.
▼ Будь-яка модифікація або спроба змінити
характеристики приладу можуть стати небезпечними для користувача і пошкодити
сам прилад.
▼ Враховуючи значну вагу пральної машини,
потрібно дотримуватися особливих норм
безпеки під час її переміщення.
▼ Під час роботи приладу уникати контакту
з водою, що витікає із зливного шланга,
тому що вода може бути надто гарячою. Не
торкатись завантажувального люку, бо пiд
час прання люк нагрiватиметься.
▼ Прати виключно тканини, призначені для
прання у пральній машині. У сумнівному
випадку перевірити вказівки виробника,
зазначені на етикетці Вашого одягу (див.
“Символи догляду за одягом”).
▼ Перш ніж покласти одяг у пральну машину,
необхідно перевірити, чи всі кишені були
випорожнені. Тверді та загострені предмети
такі як, наприклад, монети, шпильки, цвяхи,
гвинти чи камінці можуть серйозно пошкодити прилад.
▼ У пральній машині не можна прати одяг,
забруднений розчинами з вмістом бензину.
Якщо плями були виведені за допомогою
летучих розчинів, перед пранням одягу потрібно дочекатися повного випаровування
цих розчинів з поверхні тканин.
▼ Використання та кількість пральних засобів,
засобів для пом’якшення та відбілювання
мають відповідати інструкціям, наданим на
їх упаковці.
▼ Не користуватися пральними засобами,
призначеними для ручного прання, оскільки надлишок піни, яка формується, може
пошкодити внутрішні частини приладу.
▼ Після прання доріжок, покривал або інших
тканин з довгими волокнами не забути перевірити та, якщо необхідно, очистити фільтр.
▼ Після кожного циклу прання рекомендуємо
залишати відкритим завантажувальний люк.
▼ Не намагайтеся самостійно усунути не-
справності на обладнанні, тому що ремонт,
виконаний не спеціалістами, може призвести до серйозних пошкоджень і позбавляє
права на гарантійний ремонт.
▼ Ремонт приладу може здійснюватися ви-
ключно компетентним персоналом центрів
технічного обслуговування. Для ремонту
пральних машин можуть використовуватися
тільки оригінальні запчастини.
▼ Не вмикати і не вимикати штепсель з елек-
тричної розетки мокрими руками.
UK
SM3173
Page 35

ЗАУВАЖЕННЯ ТА ПОРАДИ ДЛЯ КОРИСТУВАЧА
35
▼ Пральна машина повинна бути підключена
до електричної розетки з заземленням,
відповідно до вимог норм безпеки.
▼ Забороняється підключати пральну маши-
ну до елекричної розетки за допомогою
подовжувачів чи штепсельних багаточисленних вилок.
▼ Не виставляти прилад під дію атмосфер-
них агентів.
▼ Пральну машину можна відкрити тільки
після того, як лампочка-індикатор або
дисплей вкажуть на закінчення циклу
ДЛЯ ВЕРСІЙ ПРАЛЬНОЇ / СУШИЛЬНОЇ МАШИНИ:
▼ Ніколи не сушити брудний одяг.
▼ Не сушити речі, які були випрані або на яких
були видалені плями за допомогою хімічних
продуктів.
▼ Ніколи не сушити речі, які були забруднені
такими розчинами як харчова олія, нафта,
ацетон, алкоголь, бензин, керосин, рідина для
очищення плям, терпентин, віск. Такі речі мають пратися у гарячій воді з більшою кількістю
прального засобу, після чого висушуватися у
сушільній машині.
▼ Не сушити в машині виробів з губчатої ре-
зини, каучукового латексу, водонепроникних
виробів, тканин, що не пропускають воду,
резинових килимків, виробів чи одягу, а також
Остання частина циклу сушіння - це фаза Охолодження. Отже, ніколи не вимикати сушильну машину, якщо цикл не було завершено.
В іншому випадку, Необхідно швидко дістати і розвісити всі речі,
щоб розсіялось тепло.
прання. На деяких моделях закінчення
циклу прання позначається блиманням
кнопки пуск.
▼ Під час технічного огляду чи миття машини
не забувайте вийняти штепсель з розетки,
щоб відключити прилад від електромережі.
▼ У випадку відключення пральної машини
від електромережі не тягнути за шнур
живлення, а лише за штепсель.
▼ Після закінчення кожного циклу прання
радимо виймати штепсель з електричної
розетки і закривати водопровідний кран
подушок з каучукового латексу, оскільки вони
можуть розплавитися і пошкодити іншу білизну
і сам прилад.
▼ Пом’якшувачі для білизни або схожі засоби
слід використовувати згідно з вказівками щодо
їхнього використання.
tДіти віком молодше 3 років повинні знаходитися на безпечній відстані від сушильної машини
або перебувати під безперервним контролем
поблизу від неї.
▼ Прилад не повинен бути встановленим
за дверима, що замикаються, за розсувними
дверима або дверима з петлями, які відкриваються у бік, протилежний завантажувальному
люку, щоб не обмежувати його повне відкриття.
ОПИС ПРИЛАДУ
▼ КПральна машина побудована з сталевих
оброблених та пофарбованих панелей, щоб
гарантувати незмінність її естетичних якостей
протягом довгого часу.
▼ Двигун і всі рухомі частини розроблені і
виготовлені таким чином, щоб гарантувати
мінімальні можливі рівні шуму.
▼ Великий легкодоступний барабан з нержа-
віючої сталі гарантує кращу якість прання і
допомагає продовжити термін служби вашої
пральної машини.
▼ Зручна панель керування задовольнить будь-
які потреби у пранні та сушінні (див. панель
управління і таблицю програм).
▼ Широкий завантажувальний люк забезпечує
більш простий процес завантаження-виванта-
A - Завантажувальний люк
B - Фільтр
C - Регульовані ніжки для вирівнювання машини
D - Верхня панель
E - Барабан
F - Панель керування
G - Висувний контейнер для пральних засобів
SM3173
▼ Дуже висока стійкість приладу є результатом
ження білизни.
постійного дослідження рівноваги тіл в русі,
проведеного нашими фахівцями.
G
F
E
A
B
D
1
UK
Page 36

36
Установлення приладу повинно здійснюватися кваліфікованими фахівцями згідно з інструкціями
виробника, тому що неправильне установлення може призвести до травм людей або до
пошкодження речей. Пральну машину може бути встановлено у будь-якому місці, за умови, що
температура в ньому не падає нижче 3°C. Електричні шнури і шланги, розміщені на задній панелі
машини, не повинні придавлюватися.
Прилад призначений лише для домашнього використання в подібних програмах, таких як:
▼ В магазинах, офісах і інших аналогічних робочих місць;
▼ В фермі або аналогічний
▼ Від клієнтів готелів, мотелів та інших середовищах житлового типу;
▼ В середовищах, як ліжко і сніданок.
Закрийте отвори за допомогою відповідних пробок, які
ви знайдете в пакеті з документами.
УСТАНОВЛЕННЯ ПРАЛЬНОЇ МАШИНИ
При перевезенні рухомий блок машини закріплюється
за допомогою 4 запобіжних гвинтів з дистанційними
втулками. Перед експлуатацією машини потрібно викрутити запобіжні гвинти, зняти дистанційні втулки
та зберігати їх для інших можливих перевезень.
(ВІДПОВІДНО ДО МОДЕЛІ)
3
При перевезенні рухомий блок машини закріплюється
за допомогою 4 запобіжних гвинтів з дистанційними
втулками. Перед включенням машини викрутіть запобіжні гвинти за допомогою відповідного ключа.
Вставте в отвори викрутку та повертайте її, як показано на
рисунку, щоб вийняти 4 пластмасові дистанційні втулки.
2
Моделі з сушкою не повинні встановлюватись за
дверима, що зачиняються на ключ, розсувними
дверима або дверима з шарнірними петлями на
протилежній стороні від петлі віконця машини.
ВИВІРКА РІВНЯ ПРАЛЬНОЇ МАШИНИ
Після вибору відповідного місця розташування відрегулюйте рівень обладнання
за допомогою регулювальних ніжок (Рис. 6).
Будьте особливо уважними до вибору положення та вивірки рівня пральної
машини, а також до безпеки контргайок.
У тому випадку, якщо вирівнювання обладнання не відповідає вимогам, пральна машина буде нестійкою, з послідуючим
шумом під час роботи та можливими пошкодженнями.
Якщо машина встановлена на килимове покриття, необхідно запевнитися, що
між нею та покриттям повітря циркулює без перешкод.
Не рекомендується монтаж обладнання у приміщеннях, у яких температура
може бути нижчою 0°C.
У версіях для розміщення під стільницею потрібно закрутити ніжки до
такого стану, коли повністю стиснута пружина дозволить встановити
машину під робочою поверхнею (Рис. 6B).
5
UK
4
6
6B
SM3173
Page 37

УСТАНОВЛЕННЯ ПРАЛЬНОЇ МАШИНИ
ПІДКЛЮЧЕННЯ ДО ВОДОПРОВОДНОЇ МЕРЕЖІ
Тиск у водопроводі повинен бути в межах 0,05 - 1,00 Mпа
(0,5 - 10 бар).
▼ Перед підключенням до водопроводу відкрийте кран і дайте
стекти певній кількості води, щоб очистити труби від такого бруду,
як пісок чи іржа (ця операція особливо важлива у тому випадку,
коли пральна машина тривалий час не використовувалася або
була підключена до нових водопровідних труб).
▼ Наливний шланг слід приєднати до різьбового патрубка трубопро-
7
воду подачі холодної води діаметром 3/4”.
у випадку електронних пральних машин з подвійним
електроклапаном (гаряча і холодна вода)_підключіть
червоний шланг до крана гарячої води, а інший шланг
- до крана холодної води. Якщо кран гарячої води не
може бути використаний, обидва шланги підключаються до
крана холодної води за допомогою спеціального патрубка, що
входить до комплекту (див. Рис. 8).
Не користуйтеся мережі гарячого водопостачання.
8
▼ Приєднайте наливний шланг (Рис. 9).
9
Пральна та сушильна машина конденсаційного типу
підключаються до водопроводу за допомогою нового
комплекту шлангів, що додаються у комплекті з машиною. Не використовуйте старі шланги.
37
SM3173
▼ Під час прання кран подачі води повинен бути повністю відкритий.
▼ Зливний шланг повинен знаходитись на висоті від 60_ до 90 cм.
(Рис. 10).
▼ Якщо передбачено злив води безпосередньо у каналізацію, по-
трібно вставити вільний кінець зливного шланга машини в каналізаційну трубу з внутрішнім діаметром не менше 40 мм.
▼ Не слід вставляти зливний шланг машини в каналізаційну трубу
герметично, щоб уникнути заповнення сифона повітрям і, таким
чином, виходу води назовні.
10
▼ Якщо вода зливається в умивальник або в інший зливний отвір,
вільній кінець шланга необхідно попередньо закріпити у точці
згинання за допомогою спеціального гачка, що додається у комплекті з пральною машиною. Для цього помістіть шланг на край
умивальника та закріпіть гачок так, щоб шланг не падав (Рис. 11).
Умивальник повинен мати незакупорений стік, щоб вода протікала
без перешкод.
11
UK
Page 38

38
ЕЛЕКТРИЧНЕ ПІДКЛЮЧЕННЯ
Переконайтеся, що напруга, вказана у технічній характеристиці приладу на етикетці, розміщеній на внутрішній
стінці кришечці фільтра машини, відповідає напрузі вашої
електромережі (Рис. 12).
Параметри запобіжників, електричних кабелів і розетки повинні
бути розраховані на максимальну потужність, вказану на етикетці
з технічними характеристиками.
Після встановлення приладу доступ до мережі електроживлення
повинен забезпечуватися багатополюсним перемикачем.
Електрична розетка, до якої підключена машина, повинна мати
заземлення. У протилежному випадку виробник не несе жодної
відповідальності за можливі нещасні випадки (Рис. 13).
Якщо розетка, до якої підключається вилка шнура живлення, не
працює або не відповідає встановленим вимогам, її повинен замінити
кваліфікований електрик.
Забороняється підключати пральну машину до електромережі за
допомогою проміжних засобів, таких як подовжувачі та трійники.
Під час догляду пральна машина повинна бути відключеною від
електромережі.
Не вставляйте і не виймайте штепсель з розетки мокрими руками.
Якщо шнур живлення пошкоджено, слід звернутися у спеціалізова-
ний центр технічного обслуговування.
Розетка для підключення приладу до електромережі не повинна
знаходитися позаду машини, а бути у легкодоступному до неї положенні у аварійних випадках.
УСТАНОВЛЕННЯ ПРАЛЬНОЇ МАШИНИ
12
13
ЕКСПЛУАТАЦІЯ ПРАЛЬНОЇ МАШИНИ
ПОПЕРЕДЖЕННЯ ПЕРЕД ВИКОРИСТОВУВАННЯМ
Перед першим використанням радимо виконати короткий цикл прання без білизни.
Це дозволить перевірити роботу пральної машини і
очистити барабан.
Перед кожним циклом прання потрібно:
▼ переконатися, що всі підключення до водопроводу виконано вірно,
зливний шланг правильно розміщено (див. розділ «Підключення до
водопроводу»), а кран є відкритим (Рис. 14);
▼ сухими руками увімкнути штепсель в електричну розетку;
▼ посортувати білизну відповідно до типу тканини (див. етикетки на одязі);
▼ перевірити, щоб у кишенях одягу, який ви збираєтеся прати, не було
предметів, котрі б могли пошкодити білизну, машину чи фільтр.
UK
Відкрито
Закрито
14
15
SM3173
Page 39

16
17
ЕКСПЛУАТАЦІЯ ПРАЛЬНОЇ МАШИНИ
ЗАСТОСУВАННЯ ПРАЛЬНИХ ЗАСОБІВ
Пральна машина оснащена контейнером для пральних засобів з трьома
2
3
HI
TAK
ванночками:
ванночка для прального порошку для попереднього прання або
замочування білизни (1);
ванночка для прального порошку для звичайного прання (2);
ванночка для пом’якшуючого засобу (3)
1
користуйтеся пральним засобом з низьким утворенням піни та пом’якшуючим засобом (якщо це є доцільним), придатним для автоматичних
пральних машин. Дозування вказано на упаковці.
Надто велика кількість прального засобу може призвести до
утворення надлишку піни і негативно вплинути на результат
прання. Надто мала кількість засобу може не дати бажаних
результатів прання.
Під час заповнення контейнера для пральних засобів
будьте уважними, щоб останні не потрапили у ванночку
для пом’якшуючих засобів, тому що це може призвести
можуть залишитися білі плями. Навпаки, якщо пом’якшуючий
засіб потрапляє у ванночку для пральних засобів, він може
зменшити їх ефективність.
знаходиться в контейнері навпроти відділення 2, і вставити її у
відповідні направляючі у напрямку центру цього ж відділення.
до появи піни під час циклу полоскання, і на тканинах
При вживанні рідкого миючого засобу (рекомендовано для програм без попереднього прання) необхідно
діяти таким чином: витягнути з місця перегородку, яка
39
18
19
20
SM3173
▼ перед пранням закрити контейнер для пральних засобів.
Не виймати контейнер для пральних засобів під час
роботи машини, тому що з нього може вилитися вода.
UK
Page 40

40
Деякі плями не можуть бути виведеними з одягу тільки одним пранням в машині. Перш
ніж очистити плями різного роду вручну, потрібно спробувати зробити це на невидимій
частині одягу, починаючи від краю плями і рухаючись до її центру, щоб уникнути появи
брудного контуру. Нижче наводимо різні способи виведення плям.
▼ Віск: відскребти віск за допомогою
негострого леза, щоб не порізати тканину, після чого помістити тканину між
двома листками промокального паперу і пройтись по ній гарячою праскою.
▼ Кулькові ручки і фломастери: чи-
стити за допомогою м’якого клаптика
тканини, змоченого в етиловому спирті. Намагайтеся не розширити пляму.
▼ ВОЛОГІ ПЛЯМИ І ПЛІСНЯВА: якщо
тканина добре переносить відбілювач,
здійсніть цикл прання з добавленням
цього розчину. У протилежному випадку зволожте забруднену частину водою
з 10-процентним розчином перекису
водню і залиште на 10-15 хвилин.
▼ ЛЕГКІ ПІДПАЛИНИ ВІД ПРАСКИ:
діяти за вказівками для виведення
плісняви і вологих плям.
▼ ІРЖА: використовувати засоби для
подібних плям згідно вказівок виробника, нанесених на упаковці.
▼ ЖУВАЛЬНА ГУМКА: протерти льо-
дом, зішкребти по можливості, після
чого пройтися бавовняною тканиною,
просякнутою ацетоном.
▼ ФАРБА: не дати фарбі висохнути.
Перш ніж помістити одяг у пральну машину і обрати відповідну програму, радимо
перевірити символи, вказані на етикетках виробника. Табличка, що наведена нижче,
допоможе вам зрозуміти ці символи.
ЕКСПЛУАТАЦІЯ ПРАЛЬНОЇ МАШИНИ
ЯК ВИВЕСТИ ДЕЯКІ ПЛЯМИ
Обробити забруднену частину одягу
розчинником, вказаним на упаковці
фарби (наприклад, водою, скипидаром, трихлоретиленом), намилити і
прополоскати.
▼ ГУБНА ПОМАДА: плями на бавовня-
ній чи на шерстяній тканині виводяться ганчіркою, змоченою ефіром. Для
шовку користуватися трихлоретиленом.
▼ ЛАК ДЛЯ НІГТІВ: покласти на пляму
промокальний папір, змочити тканину зі
зворотного боку ацетоном, часто міняючи
папір, покладений на пляму. Повторюйте
дану процедуру, поки пляма повністю не
щезне.
▼ ЖИРНІ ПЛЯМИ чи смола: натерти пляму
свіжим вершковим маслом, залишити на
деякий час, після чого випрати з добавкою скипидару.
▼ ТРАВА: обережно намилити, вико-
ристовуючи розчинний білильний
засіб. Для шерстяних тканин добрих
результатів також можна досягти, використовуючи 90%-ний розчин спирту.
▼ КРОВ: замочити в холодній воді з
добавкою солі, а потім випрати з господарським милом.
МІЖНАРОДНІ СИМВОЛИ ДОГЛЯДУ ЗА ОДЯГОМ
UK
SM3173
Page 41

ДОГЛЯД
ЧИСТКА ПРАЛЬНОЇ МАШИНИ
Пральна машина була спроектована таким чином, щоб звести до мінімуму догляд за нею. Важливо, однак, пам’ятати про необхідність її
регулярної чистки.
Перед чисткою машини переконайтеся, що вона відключена від
електромережі, а кран подачі води перекрито. Зовнішню структуру
та пластмасові деталі пральної машини потрібно чистити тільки за
допомогою вологої м’якої тканини.
41
21
22
Для миття пральної машини забороняється використо-
вувати хімічні розчини, абразивні матеріали, спирт,
мило, бензин чи інші розчинники, які б могли пошкодити
машину. (Рис. 21).
Після закінчення прання залиште на деякий час дверцята машини
відкритими, щоб висохли гумові частини.
Періодично промивайте ванночки для пральних засобів. Для цього
вийміть контейнер для пральних засобів та прополощіть його проточною водою (Рис. 22). Після цього знову встановіть контейнер на місце.
ЯК ВИЙНЯТИ КОНТЕЙНЕР ДЛЯ ПРАЛЬНИХ ЗАСОБІВ
23
▼ відкрийте контейнер для пральних засобів;
▼ натисніть правою рукою на напис “PUSH” (“ШТОВХНУТИ”), а
другою рукою, потягнувши на себе, вийміть контейнер (Рис. 23).
ЧИСТКА ФІЛЬТРА
24
Перш ніж розпочати описані нижче дії, переконайтеся,
що пральна машина була спорожнена. Не виймайте
фільтр під час роботи приладу, або якщо машина заповнена водою.
SM3173
25
Покладіть під фільтр ганчірку або пласку тарілку, щоб зібрати воду, що
залишилася всередині. Відкрийте кришечку фільтра, викрутіть фільтр
в напрямку проти годинникової стрілки та вийміть його (Рис. 24-25).
Фільтр потрібно періодично очищати.
Прополощіть фільтр проточною водою та видаліть накип і осади.
Закрутіть фільтр за годинниковою стрілкою, переконавшись, що він
герметично закритий.
UK
Page 42

42
ПРОБЛЕМИ І ЇХ ВИРІШЕННЯ
У випадку несправної роботи приладу перед тим, як звернутись до уповноваженого центру
технічного обслуговування, радимо перевірити, що причина неполадки не відноситься до нижчезазначених. У деяких моделях неполадка відображується у формі коду наприкінці циклу.
Код: E:00 Здійснити необхідні перевірки,_ перелічені в зазначеному розділі*
E:01
E:02
E:03
Пральна машина не працює (індикатори не
світяться) (дисплей відключено)
• Переконайтеся, що:
1) в електромережі є напруга
2) штепсель правильно увімкнено в розетку
3) кнопка On/Off (Вкл/Викл) натиснута або,
якщо не передбачено, ручка програмування встановлена на одній з програм.
Пральна машина не працює (індикатори
світяться) (дисплей світиться)*
• Переконайтеся, що:
1) програму було вибрано
2) дверцята закриті правильно
3) кнопка “Start” (“Пуск”) натиснута (тільки
для моделей з електронним управлінням)
4) перевірте поради, наведені у пункті “Пральна машина не набирає воду”.
Пральна машина не набирає воду*:
• перевірте, щоб:
1) у водопроводі була вода
2) наливний шланг був підключений до пральної машини
3) наливний кран був відкритий
4) фільтр не був забруднений. Якщо фільтр
забруднений, слід його прочистити, відключивши прилад від електромережі.
Пральна машина безперервно набирає і
зливає воду**:
• перевірте, щоб:
1) зливний шланг було розміщено на відповідній висоті (60-90 cм)
2) кінець зливного шлангу не був занурений
у воду.
Пральна машина не зливає воду і не вмикає
центрифугу**:
• перевірте, щоб:
1) зливний шланг було підключено правильно
2) зливний шланг не був зігнутий
3) фільтр стоку не був закупорений
4) не була вибрана функція виключення
центрифуги
5) не була увімкнена функція “стоп” з водою.
Пральна машина вібрує і шумить
• Переконайтеся, що:
1) усі захисні компоненти для транспортуван-
Якщо після виконання наведених вище порад прилад продовжує працювати
неправильно, повідомте про несправність у найближчий уповноважений центр
технічного обслуговування. Прохання вказати при цьому модель, фабричний номер та
характер несправності. Технічні дані приладу ви можете знайти на табличці, розміщеній
на кришечці фільтра. Ця інформація дозволить працівникам центру технічного
обслуговування підготувати завчасно необхідні запчастини і, таким чином, гарантувати
швидке та ефективне виконання ремонтних робіт.
Здійснити необхідні перевірки,_ перелічені в зазначеному розділі**
Технічні неполадки “Подзвонити до центру технічного обслуговування”
Технічні неполадки “Подзвонити до центру технічного обслуговування”
ДОГЛЯД
ня були зняті
2) рівень машини виставлено правильно
3) велика за розміром білизна, така як простирадла, скатертини _та ін., не скупчилася з одного боку барабана.
Віконце-ілюмінатор не відкривається
• Переконайтеся, що:
1) цикл прання завершився
2) не була увімкнена функція “стоп” з водою
(автоматична для деяких моделей).
Білизна погано віджата
• Переконайтеся, що:
1) білизна розміщена в барабані рівномірно
2) була встановлена правильна швидкість
центрифуги.
Пральна машина зупиняється під час прання
• Переконайтеся, що:
1) в електромережі є струм
У ванночці залишається надто багато праль-
ного засобу
• Переконайтеся, що:
1) наливний кран відкритий
2) фільтр між краном і наливним шлангом чистий.
Після прання білизна не є чистою
• Переконайтеся, що:
1) барабан не був перевантажений
2) була використана правильна кількість
прального засобу
3) була вибрана відповідна програма прання.
Білизна збіглася або вицвіла
• Переконайтеся, що:
1) була вибрана правильна програма прання
2) була вибрана правильна температура прання
Пральна машина не сушить білизну (тільки
для моделей з сушкою)
• Переконайтеся, що:
1) наливний кран відкритий
2) фільтр стоку чистий
3) пральна машина увімкнута (лампочка
контролю чи включений дисплей)
4) вибрана програма сушіння
5) була встановлена програма і час сушіння.
UK
SM3173
Page 43

Page 44

461000001 CF SM3173 20/12/2017
IT EN RU UK
Page 45

IT GUIDA PROGRAMMI LAVAGGIO
EN WASHING GUIDE
RU РУКОВОДСТВО ПО ВЫБОРУ ПРОГРАММ СТИРКИ
UK ПОСІБНИК З ВИБОРУ ПРОГРАМ ПРАННЯ
Page 46

ITALIANO 3-8
IT
ENGLISH 9-14
EN
РУССКИЙ 15-20
RU
УКРАЇНСЬКОЮ МОВОЮ 21-26
UK
Page 47

MODELLO:
WDOI 1475 L
Vaschetta detersivo:
1 Prelavaggio
Ammorbidente
2 Lavaggio
GUIDA AL LAVAGGIO
Pannello comandi:
A Display LCD
B Pulsante ritardo/blocco comandi
C Pulsante centrifuga
D
Pulsante prelavaggio/disinfezione
E Pulsante turbo
F Pulsante risciacquo
G Pulsante antipiega
H Pulsante avvio/pausa
I
Manopola selettore programmi
3
LAVARE IN MODO CORRETTO
Prima di mettere in funzione la lavabiancheria assicurarsi che l’installazione sia stata eseguita
correttamente come riportato nel libretto di istruzioni.
Utilizzo quotidiano
1. Prima di inserire i capi nella lavabiancheria vuotare le tasche da oggetti duri e appuntiti (chiodi, viti,
monete, spille, sassi) che potrebbero danneggiare la macchina e gli indumenti.
2. Per migliorare le performance di lavaggio introdurre la biancheria distesa senza comprimerla evitando
di sovraccaricare la macchina. Un carico intero di tessuti particolarmente assorbenti, ad esempio
accappatoi ed asciugamani di spugna, può sbilanciare la macchina durante la fase di centrifuga.
Il sistema automatico di bilanciamento del carico dispone il bucato nella maniera più omogenea
possibile ed imposta l’ottimale velocità di centrifuga per ridurre al minimo l’eventuale presenza di
vibrazioni.
3. Chiudere l’oblò accertandosi che tra lo sportello e la guarnizione non rimangano chiusi degli
indumenti.
4. Dosare la giusta quantità di detersivo nell’apposita vaschetta 2. Inserire la paratia in dotazione nel
caso in cui si utilizzino detersivi liquidi. Se si desidera attivare l’opzione prelavaggio aggiungere il
detergente nella vaschetta 1. Per l’ammorbidente adoperare la vaschetta contraddistinta dall’apposito
simbolo . Dopo aver versato il detergente richiudere delicatamente il cassetto.
5. Selezionare il programma di lavaggio adatto alla tipologia di tessuti tramite la manopola I seguendo
le indicazioni riportate nella tabella programmi. Il display LCD visualizzerà la durata del programma
scelto con il massimo carico. Il tempo residuo potrebbe variare nel corso del ciclo di lavaggio in
funzione del carico inserito. La scritta end compare sul display a fine ciclo.
6. Premendo il tasto C è possibile impostare una velocità di centrifuga differente da quella proposta
dal programma selezionato. Il tasto B consente di posticipare l’avvio del ciclo di lavaggio fino a un
massimo di 19 ore. Entrambi i valori vengono visualizzati sul display LCD.
7. Tramite i pulsanti D, E, F e G è possibile selezionare le funzioni supplementari. Le opzioni scelte
vengono visualizzate sul display LCD. La durata del ciclo di lavaggio varia in funzione delle opzioni
attivate.
8. Premere il pulsante avvio H per avviare il ciclo di lavaggio. Sul display verrà visualizzata la durata
del ciclo con carico massimo. Il sistema easy logic aggiornerà il tempo residuo durante il ciclo in
base al reale carico inserito.
9. La fine del ciclo di lavaggio è segnalata sul display con la scritta end. Riportare la manopola I in
posizione di ed aprire l’oblò per prelevare tutto il bucato.
10. In qualsiasi momento è possibile annullare il programma riportando la manopola I in posizione di .
11. Per spegnere la macchina in caso di emergenza, posizionare l’indice della manopola
programmi in posizione di “ ”, la selezione sarà confermata da un riscontro tattile e lo
spegnimento di tutti i LED/LCD.
.
SM3174
IT
Page 48

4
DISPLAY LCD: L’ampio display LCD garantisce un utilizzo veloce ed intuitivo della
lavabiancheria. Sul display vengono visualizzate le opzioni di lavaggio attivate, l’eventuale partenza ritardata, la velocità di centrifuga selezionata e il tempo residuo
alla fine del ciclo. La scritta end avverte dell’avvenuto sblocco dell’oblò.
PARTENZA RITARDATA: Questa funzione permette di posticipare la partenza del
ciclo di lavaggio fino ad un massimo di 19 ore. Premere ripetutamente il pulsante B
fin quando sul display non verrà visualizzato il ritardo di partenza desiderato. L’icona
h lampeggerà sul display fino all’avvio del ciclo di lavaggio.
RISCIACQUO: Premendo il pulsante F si attiva la funzione extra risciacquo, che
effettua un risciacquo aggiuntivo. L’opzione è raccomandata per pelli particolarmente
sensibili agli enzimi contenuti nei detergenti.
PRELAVAGGIO: Per effettuare il prelavaggio premere il pulsante D ed aggiungere il
detersivo nell’apposita vaschetta 1. La lavabiancheria effettua un prelavaggio a 40°C
max. Il prelavaggio è indicato nel caso di indumenti sporchi di polvere, terra, sabbia
o in presenza di macchie particolarmente resistenti. Vedere la tabella programmi
per ulteriori informazioni.
PANNELLO COMANDI
TURBO: Premere il pulsante E turbo per ridurre il tempo di lavaggio. I parametri
di funzionamento vengono regolati automaticamente per garantire l’efficacia di
lavaggio e per consentire un risparmio di tempo. Vedere la tabella programmi per
ulteriori informazioni.
CENTRIFUGA REGOLABILE: Premendo il pulsante C la velocità di centrifuga può
essere regolata in funzione del programma di lavaggio scelto e della tipologia di
tessuti. Sul display LCD verrà mostrato il valore di velocità selezionato. Per escludere
la centrifuga a fine ciclo selezionare il valore “00”.
N.B.: La velocità massima di centrifuga varia in funzione del modello. La velocità
abbinata ad ogni programma è quella consigliata.
Questa lavatrice è dotata di uno speciale sistema di controllo elettronico per il corretto bilanciamento
del carico. Il sistema, prima di ogni centrifuga, fa in modo che i panni si dispongano nel cestello,
nel modo più uniforme possibile. In caso di distribuzione irregolare della biancheria, per motivi di
sicurezza, la velocità di centrifugazione finale verrà ridotta e in casi di alto sbilanciamento del carico,
non verrà effettuata.
IT
Controllo antisbilanciamento del carico in centrifuga:
SM3174
Page 49

PANNELLO COMANDI
ANTIPIEGA: Attivando l’opzione antipiega tramite il pulsante G, la lavabiancheria
regola i parametri di lavaggio per diminuire la formazione di pieghe facilitando le
operazioni di stiratura.
La velocita di centrifuga viene impostata automaticamente a 500 giri/min.
AVVIO/PAUSA: Durante la fase di selezione dei programmi e delle opzioni di lavaggio
il LED avvio resta spento. Per confermare le scelte ed avviare il ciclo di lavaggio
premere il pulsante H. Il LED si accende.
Durante il programma di lavaggio in corso, è possibile fermare il ciclo premendo, per
qualche secondo, il pulsante AVVIO/PAUSA.
A questo punto il programma di lavaggio si ferma ed è possibile apportare delle modifiche alle opzioni
di lavaggio (abilitate in funzione della fase di avanzamento lavaggio).
Se la temperatura dell’acqua è inferiore ai 50°C è possibile aprire l’oblò (dopo circa 2 minuti dall’attivazione della funzione pausa) per caricare/svuotare eventuali panni. Per riattivare la fase di lavaggio
ripremere il pulsante AVVIO/PAUSA.
N.B. se durante la pausa non viene effettuata nessuna operazione, dopo 5 minuti la fase di lavaggio
viene riavviata automaticamente.
5
BLOCCO COMANDI (sicurezza bimbi): per attivare il blocco del pannello comandi tenere premuto il
tasto B (partenza ritardata) fi nchè sulla sinistra del display compaiano tre barrette orizzontali.
Se durante il ciclo di lavaggio, o a fi ne ciclo, si desidera riattivare la funzionalità dei comandi, tenere
premuto il tasto B (partenza ritardata) fi no alla cancellazione delle tre barrette dal display.
N.B. la funzione blocco comandi può essere abilitata esclusivamente in modo manuale tenendo
premuto per alcuni secondi il tasto partenza ritardata.
DISINFEZIONE VASCA: Effettuare spesso lavaggi a basse temperature può favorire la formazione
di muffe e cattivi odori all’interno della lavabiancheria. La funzione DISINFEZIONE VASCA pulisce
a fondo la macchina con uno speciale ciclo a 90°C.
DISINFEZIONE VASCA suggerisce automaticamente, attraverso il lampeggio della sul display,
di avviare il programma di pulizia dopo un determinato numero di lavaggi, se nel periodo considerato
non sono stati eseguiti cicli ad alte temperature.
Togliere tutto il bucato all’interno del cestello, posizionare la manopola I sul programma DISINFE-
ZIONE VASCA, premere il pulsante start H per avviare il ciclo.
E’ possibile effettuare il programma DISINFEZIONE VASCA ogni qualvolta lo si desidera o quando
le condizioni lo richiedono. Vuotare il cestello della lavabiancheria e richiudere l’oblò. Posizionare la
manopola I sul programma DISINFEZIONE VASCA, tenere premuto il pulsante PRELAVAGGIO fi
nchè non comparirà sul display la sigla. Premere H start per avviare il ciclo DISINFEZIONE VASCA.
EASY LOGIC: Il sistema EASY LOGIC regola automaticamente il tempo di lavaggio, i consumi di
acqua e di energia in base alla reale quantità di biancheria caricata nella macchina. La funzione 1/2
carico è superflua perchè il sistema EASY LOGIC imposta automaticamente i parametri di lavaggio.
SM3174
IT
Page 50

6
500
500
800
800
800
800
800
800
Bianchi in lino e cotone molto sporchi, con macchie anche di natura
organica.
I programmi di cotone standard a 60°C e 40°C sono adatti per lavare
la biancheria di cotone con un grado di sporco normale e sono i
programmi più efficienti in termini di consumo combinato di energia
e acqua per lavare il determinato tipo di biancheria in questione. I
succitati programmi sono conformi ai Regolamenti Europei
1015/2010 e 1061/2010 in merito alle specifiche per la progettazione ecocompatibile. La temperatura effeattiva dell’acqua può essere
diversa dalla temperatura dichiarata dello specifico ciclo. I programmi di cotone standard a 60°C e 40°C sono stati verificati in accordo
con la Norma EN60456.
Lo speciale programma misti consente di lavare insieme tessuti di
diversa natura (cotone, sintetici, misti) con un risultato perfetto.
Il programma lana è ideale per il lavaggio dei capi delicati che
riportano in etichetta la dicitura “lavabile in lavatrice”. Garantisce la
cura dei colori e la consistenza originale degli indumenti nel tempo.
Il ciclo di lavaggio rapido è adatto per rinfrescare, in soli 20 minuti,
la biancheria leggermente sporca. Rapido ti permette di risparmiare
tempo prezioso effettuando un ciclo di lavaggio a 35°C.
I capi delicati richiedono una cura particolare e normalmente si
lavano a mano. Lo specifico lavaggio a mano ti assicura la massima
delicatezza nel trattamento degli indumenti.
Il programma igiene assicura la rimozione di germi e batteri presenti
nella biancheria. Il programma garantisce la massima igiene per i
tessuti bianchi, colorati e fi bre sintetiche.
Il programma colorati permette di lavare insieme capi di diverso
colore; si possono lavare in tutta sicurezza biancheria chiara e scura
senza correre alcun rischio di scolorimenti.
Lo speciale programma jeans, effettua un lavaggio delicato a 40°C
che si prende cura di tutte le fibre in denim e allo stesso tempo ne
previene lo scolorimento rispettando i colori. I vestiti in tessuto
denim delavé rimarranno sempre come nuovi.
Il programma camicie riduce il tempo dedicato alle operazioni di stiro.
La temperatura, il livello dell’acqua, l’intensità di lavaggio e la velocità
di centrifuga vengono regolate elettronicamente per diminuire la
formazione di pieghe e facilitare la stiratura di bluse e camicie.
Il programma sport è pensato per gli indumenti sportivi e casual. Il
ciclo di lavaggio a 40°C mantiene intatta la forma dei tessuti e
l’elasticità delle moderne fibre sintetiche.
Ideale per lavare velocemente capi che non necessitano di stiratura.
Il ciclo di lavaggio a freddo è adatto a tutti i tessuti delicati.
Il programma risciacqui è utile per risciacquare biancheria lavata a
mano o rinfrescare indumenti riposti per lungo tempo.
La velocità della centrifuga è regolabile per adattarsi a tutti i tipi di
tessuti.
Programmi Tipologia di bucato Opzioni
Massima
velocità di
centrifuga
(giri/min)
Simbolo
Carico massimo
in funzione del
modello e del
programma scelto
(kg)
Temperatura
(*)
8.0
4.0
2.0
8.0
8.0
8.0
4.0
2.0
4.0
2.0
8.0
8.0
4.0
8.0
2.0
90°C
20°C
40°C
35°C
30°C
40°C
30°C
40°C
40°C
40°C
60°C
40°C
(*) La reale temperatura dell’acqua può differire da quella indicata nel programma.
IT
TABELLA PROGRAMMI
SM3174
Page 51

Carico massimo
.................................................................................................................................................................................................
.................................................................................................................................................................................................
.................................................................................................................................................................................................
.................................................................................................................................................................................................
CARATTERISTICHE TECNICHE
BWM01.0814W
59.5
82.0
54.5
1400
8.0
NOTE
7
.................................................................................................................................................................................................
.................................................................................................................................................................................................
.................................................................................................................................................................................................
.................................................................................................................................................................................................
.................................................................................................................................................................................................
.................................................................................................................................................................................................
.................................................................................................................................................................................................
.................................................................................................................................................................................................
.................................................................................................................................................................................................
.................................................................................................................................................................................................
.................................................................................................................................................................................................
.................................................................................................................................................................................................
SM3174
IT
Page 52

8
.................................................................................................................................................................................................
.................................................................................................................................................................................................
.................................................................................................................................................................................................
.................................................................................................................................................................................................
.................................................................................................................................................................................................
.................................................................................................................................................................................................
.................................................................................................................................................................................................
.................................................................................................................................................................................................
.................................................................................................................................................................................................
.................................................................................................................................................................................................
NOTE
.................................................................................................................................................................................................
.................................................................................................................................................................................................
.................................................................................................................................................................................................
.................................................................................................................................................................................................
.................................................................................................................................................................................................
.................................................................................................................................................................................................
.................................................................................................................................................................................................
.................................................................................................................................................................................................
.................................................................................................................................................................................................
.................................................................................................................................................................................................
.................................................................................................................................................................................................
.................................................................................................................................................................................................
IT
SM3174
Page 53

MODELLO:
WDOI 1475 L
Detergent drawer:
1 Prewash
Softener
2 Washing
WASHING GUIDE
Control panel:
A LCD display
B Delay/lock control button
C Spin button
D Prewash/disinfection button
E Turbo button
F Rinse button
G Anti-crease button
H Start/pause button
I Program setting knob
9
WASH IN THE CORRECT WAY
Before attempting to operate the washing machine, ensure that the installation has been performed correctly, as described in the instruction booklet.
Daily use
1. Before putting clothes in the washing machine, empty the pockets of any hard or sharp object (nails,
screws, coins, pins and stones) that may damage the machine and garments.
2. To improve washing performance, introduce laundry into the washing machine without compressing
it or overloading the machine. A whole load of highly absorbent fabrics, such as bathrobes and
towels, can unbalance the machine during the spin cycle. The automatic load balancing system
arranges laundry in the most even manner possible, and sets the optimum spin speed to minimise
any vibrations.
3. Close the door making sure that garments are not caught between the seal and the door.
4. Put the correct amount of detergent in the drawer 2. Insert the bulkhead supplied if you are using
liquid detergent. If you want to enable the prewash option, add the detergent in the drawer 1. Use
the drawer marked with the special symbol for the softener. After adding the detergent, gently close
the drawer.
5. Select the wash program most suitable to the type of fabrics by using knob I following the instructions
in the programs table. The LCD display will show the duration of the selected program with a full
load. The remaining time may vary during the course of the wash cycle according to the load. The
word end will appear on the display at the end of the cycle.
6. Pressing the C button, a different spin speed to that provided by the selected program can be set.
The B button allows you to delay the start of the wash cycle up to a maximum of 19 hours. Both
values are shown on the LCD Display.
7. Buttons D, E, F and G allow the selection of supplementary functions. The options selected are
shown on the LCD display. The duration of the wash cycle varies depending on the options enabled.
8. Press the start button H to start the wash cycle. On the display, the duration of the cycle with full
load will be displayed. The easy logic system will update the remaining time during the cycle based
on the actual load inserted.
9. The end of the wash cycle is indicated on the display with the words end. Turn the knob I to the
position and open the door to take out all the laundry.
10. The program can be cancelled at any time by turning knob I to the position .
11. To switch the machine off in case of an emergency, place the index of the program knob in the
“ ” position. The selection will be confirmed by touch and all the LED/LCDs switching
off.
SM3174
EN
Page 54

10
LCD DISPLAY: The large LCD display ensures quick and intuitive use of the washing
machine. The display shows the wash options enabled, any delayed start, spin speed
selected and the time remaining until the end of the cycle. The word end means that
the door has been released.
DELAYED START: This feature allows you to delay the start of the wash cycle up to
a maximum of 19 hours. Press the B button repeatedly until the display shows the
desired start delay. The icon h flashes on the display until the start of the wash cycle.
RINSE: Press the F button to activate the extra rinse function. This option is recommended if your skin is particularly sensitive to enzymes in detergents.
PREWASH: To perform a prewash, press the D button and put the detergent in the
drawer 1. The washing machine performs a prewash cycle at 40°C, max. Prewash
is recommended for garments soiled with dust, dirt and sand or with particularly
stubborn stains. See the program table for further information.
CONTROL PANEL
TURBO: Press the E turbo button to reduce the wash time. The operating parameters
are automatically adjusted to ensure washing effectiveness and to allow time to be
saved. See the program table for further information.
ADJUSTABLE SPIN: Pressing the C button, the spin speed can be adjusted depending on the wash program selected and the type of fabric. The LCD display will show
the speed selected. The “00” value will exclude the spin cycle at the end of the cycle.
N.B.: The maximum spin speed varies depending on the model. The speed matched
to each program is the one recommended.
This washing machine is equipped with a special electronic control system for proper load balancing. Prior to every spin, the system makes sure that the cloths are spread as evenly as possible in
the drum. In the case of uneven laundry distribution, for safety reasons, the final spin speed will be
reduced and in cases of high load imbalance, will not be performed.
EN
Unbalanced load control during spin cycle:
SM3174
Page 55

CONTROL PANEL
ANTI-CREASE: Activating the anti-crease option is done by the G button. The wash-
ing machine will adjust the wash parameters to decrease the chance of creases
forming, making ironing easier.
The spin speed is automatically set at 500 rev/min.
START/PAUSE: When programs and wash options are being selected, the start
LED remains off. To confirm your selection and start the wash cycle, press the H
button. The LED turns on.
During the wash program in progress, the cycle can be stopped by pressing the
START/PAUSE button for a couple of seconds.
At this point, the wash program stops and you can make changes to the wash options (enabled depending on which stage of the wash cycle you are in).
If the water temperature is below 50°C, the door can be opened (about 2 minutes after enabling the pause
function) to load/empty any laundry. To re-enable the wash phase press the START/PAUSE button again.
N.B. if, during a pause, no operation is carried out, the wash phase will restart automatically after
5 minutes.
11
CONTROL LOCK (child safety): enable the control panel lock by holding down the B key (delayed
start) until three horizontal bars appear on the left of the display.
If, during the wash cycle or at the end of the cycle you wish to reactivate the function of the controls,
hold down the B key (delayed start) until the three bars are cleared from the display.
N.B. the control lock function can only be enabled manually by holding down the delayed start key
for a few seconds.
DISINFECTING THE DRUM: Frequent washes at low temperatures may encourage the formation
of mildew and unpleasant odours inside the washing machine. The DRUM DISINFECTION function
thoroughly cleans the machine with a special cycle at 90°C.
DRUM DISINFECTION automatically recommends, through the blinking of the display, that you
start the cleaning program after a certain number of washes, if high temperature cycles have not
been selected during the period.
Remove all laundry from the drum, put the knob I on the DRUM DISINFECTION program and press
the start H button to start the cycle.
The DRUM DISINFECTION program can be performed at any time or when conditions require it.
Empty the washing machine drum and close the door. Put the knob I on the DRUM DISINFECTION
program, keep the prewash button pressed until the abbreviation appears on the display. Press H to
start the DRUM DISINFECTION cycle.
EASY LOGIC: The Easy Logic automatically adjusts washing time, water and energy consumption
based on the actual amount of laundry loaded in the machine. The 1/2 load function is unnecessary
as the Easy Logic system automatically sets the wash parameters.
SM3174
EN
Page 56

12
500
500
800
800
800
800
800
800
White linens and heavily soiled cotton, including organic stains.
Standard cotton programs at 60°C and 40°C are suitable for washing
normally soiled cotton laundry and they are the most efficient
programs in terms of combined energy and water consumption for
this type of laundry. The aforementioned programs are in compliance
with European Regulations 1015/2010 and 1061/2010 concerning
the specifics for eco-design requirements. The actual water
temperature may differ from that declared by the cycle. The standard
60°C and 40°C cotton programs have been checked in accordance
with the EN60456 Standard.
The special program allows you to wash different fabrics together
(cotton, synthetics, mixed) with a perfect result.
The wool program is ideal for washing delicate items with labels
stating "machine washable". It ensures colour care and that garments
stay in good shape.
Quick wash cycle is suitable for refreshing, in just 20 minutes, lightly
soiled laundry. Quick to save you precious time, performing a wash
cycle at 35°C.
Delicate garments require special care and are usually hand washed.
The specific hand wash option ensures garments are washed gently.
The hygiene program ensures that any germs or bacteria in the
laundry are efficiently removed. The program ensures maximum
hygiene for white, coloured and synthetic fibre fabrics.
The colour program allows you to wash different coloured garments
together; you can safely wash light and dark coloured laundry
without any risk colours running.
The special jeans program gently washes at 40°C, taking care of the
denim fibres and simultaneously preventing colours from running.
Faded denim garments will always come out looking like new.
The shirts program reduces ironing time. The temperature, water
level, intensity of washing and spin speed are adjusted electronically
to prevent creases and making ironing easier.
The sportswear program is designed for sports and casual wear. The
40°C wash cycle helps retain the shape of the fabric and the elasticity
of modern synthetic fibres.
Ideal for washing garments rapidly that do not need to be ironed. The
cold wash cycle is suitable for all delicate fabrics.
The rinse program is useful for re-rinsing hand washed laundry or for
refreshing items that have been stored for a long time.
The spin speed is adjustable to suit every type of fabric.
Programs Type of laundry Options
Maximum
spin speed
(rev/min)
Symbols
Maximum load
depending on the
model and the
program selected
(kg)
Temperature
(*)
8.0
4.0
2.0
8.0
8.0
8.0
4.0
2.0
4.0
2.0
8.0
8.0
4.0
8.0
2.0
90°C
20°C
40°C
35°C
30°C
40°C
30°C
40°C
40°C
40°C
60°C
40°C
PROGRAM TABLE
(*) Actual water temperature may differ from the value indicated in the program.
EN
SM3174
Page 57

TECHNICAL SPECIFICATIONS
Dimensions
13
MODEL
Width (cm)
Height (cm)
Depth (cm)
Maximum spin speed (revs/min)
Maximum load
Water pressure
Electrical connection
.................................................................................................................................................................................................
.................................................................................................................................................................................................
.................................................................................................................................................................................................
.................................................................................................................................................................................................
.................................................................................................................................................................................................
BWM01.0814W
59.5
82.0
54.5
1400
8.0
0.05 MPa - 1MPa
see the rating plate
NOTES
.................................................................................................................................................................................................
.................................................................................................................................................................................................
.................................................................................................................................................................................................
.................................................................................................................................................................................................
.................................................................................................................................................................................................
.................................................................................................................................................................................................
.................................................................................................................................................................................................
.................................................................................................................................................................................................
.................................................................................................................................................................................................
.................................................................................................................................................................................................
.................................................................................................................................................................................................
SM3174
EN
Page 58

14
.................................................................................................................................................................................................
.................................................................................................................................................................................................
.................................................................................................................................................................................................
.................................................................................................................................................................................................
.................................................................................................................................................................................................
.................................................................................................................................................................................................
.................................................................................................................................................................................................
.................................................................................................................................................................................................
.................................................................................................................................................................................................
.................................................................................................................................................................................................
NOTES
.................................................................................................................................................................................................
.................................................................................................................................................................................................
.................................................................................................................................................................................................
.................................................................................................................................................................................................
.................................................................................................................................................................................................
.................................................................................................................................................................................................
.................................................................................................................................................................................................
.................................................................................................................................................................................................
.................................................................................................................................................................................................
.................................................................................................................................................................................................
.................................................................................................................................................................................................
.................................................................................................................................................................................................
EN
SM3174
Page 59

MODELLO:
WDOI 1475 L
РУКОВОДСТВО ПО СТИРКЕ
Лоток для моющего средства
1 Предварительная стирка
Смягчитель
2 Стирка
:
Панель управления:
A ЖК-ДИСПЛЕЙ
B Кнопка отложенного пуска/блокировки
управления
C Кнопка отжима
D Кнопка предварительной стирки/
обеззараживания
E Кнопка турбо
F Кнопка полоскания
G Кнопка антисминания
H Кнопка пуска/пауза
I Ручка выбора программ
ПРАВИЛЬНАЯ СТИРКА
Перед запуском стиральной машины убедитесь, что установка выполнена правильно,
согласно приведенным в брошюре инструкциям.
Бытовое использование
1. До загрузки одежды в стиральную машины выньте из карманов твердые и острые предметы
(гвозди, винты, монеты, булавки, камни), которые могут повредить машину и одежду.
2. Для улучшения результата стирки закладывайте белье в расправленном виде, не сжимая и
избегая перегрузки машины. Загрузка машины полностью сильно впитывающими тканями,
например, махровыми халатами или полотенцами, может нарушить балансировку машины во
время отжима. Система автоматической балансировки загрузки размещает белье наиболее
однородным образом и задает оптимальную скорость отжима для снижения до минимума
возможных вибраций.
3. Закройте люк, убедившись, что между дверцей и прокладкой на осталось зажатой одежды.
4. Отмерьте необходимое количество моющего средства в специальный лоток 2. Вставьте
входящую в комплект перегородку в случае, если используются жидкие моющие средства.
Если вы желаете задействовать опцию предварительной стирки, добавьте моющее средство
в лоток 1. Для смягчителя используйте лоток, помеченный специальным символом . После
заправки моющим средством аккуратно закройте ящик.
5. Выберите программу стирки в соответствии с типом ткани с помощью ручки I, следуя
приведенным в таблице программ указаниям. На ЖК-дисплее отобразиться длительность
выбранной программы при максимальной загрузке. Оставшееся время может изменяться
в течение цикла стирки в зависимости от заложенного белья. Надпись “Конец” (End)
появляется на дисплее в конце цикла.
6. Нажатием на клавишу C можно задавать скорость отжима, отличную от предлагаемой
выбранной программой. Клавиша B позволяет отложить запуск цикла стирки на
максимальное время до 19 часов. Оба значения отражаются на ЖК-дисплее.
7. С помощью кнопок D, E, F и G можно выбрать дополнительные функции. Выбранные
функции отражаются на ЖК-дисплее. Длительность цикла меняется в зависимости от
задействованных функций.
8. Нажмите кнопку пуска H для запуска цикла стирки. На дисплее отобразится длительность
цикла при максимальной загрузке. Система easy logic будет обновлять показания оставшегося
до конца цикла времени на основе фактической загрузки.
9. Конец цикла стирки обозначается на дисплее надписью “Конец” (End). Поверните ручку I в
положение и откройте люк для того, чтобы извлечь всё заложенное в машину белье.
10. Вы можете отменить программу в любое время, повернув ручку I в положение .
11. Чтобы выключить машину в случае возникновения чрезвычайной ситуации, установите
указатель ручки выбора программ в позицию « », выбор будет подтвержден
тактильной обратной связью и выключением всех светодиодов и ЖК-дисплеев.
SM3174
RU
15
Page 60

16
ЖК-ДИСПЛЕЙ: Большой ЖК-дисплей обеспечивает быстрое и удобное пользование стиральной машиной. На дисплее отображаются задействованные
функции стирки, отложенный пуск, выбранная скорость отжима и время,
оставшееся до конца цикла. Надпись “Конец” (End) предупреждает о разблокировке люка.
ОТЛОЖЕННЫЙ ПУСК: Эта функция позволяет отложить запуск цикла стирки
на максимальное время до 19 часов. Нажмите несколько раз кнопку B до тех
пор, пока на дисплее не будет отражаться желаемое время задержки пуска.
Значок h будет мигать на дисплее до запуска цикла стирки.
ПОЛОСКАНИЕ: Нажатием на кнопку F включается функция дополнительного
полоскания для выполнения добавочного полоскания. Эта опция рекомендуется при повышенной чувствительности кожи к энзимам, содержащимся к
моющих средствах.
ПРЕДВАРИТЕЛЬНАЯ СТИРКА Для выполнения предварительной стирки
нажмите на кнопку D и добавьте моющее средство в специальный лоток 1.
Стиральная машина выполняет предварительную стирку при максимальной
температуре 40°C. Предварительная стирка рекомендуется в случае одежды,
загрязненной пылью, песком или при наличии особенно стойких пятен. Более
подробную информацию смотрите в таблице программ.
ПАНЕЛЬ УПРАВЛЕНИЯ
ТУРБО: Нажмите кнопку E турбо для сокращения времени стирки. Рабочие
параметры настраиваются автоматически, чтобы обеспечить эффективность стирки и экономию времени. Более подробную информацию смотрите
в таблице программ.
РЕГУЛИРУЕМЫЙ ОТЖИМ: Нажатием на кнопку C скорость вращения может
регулироваться в зависимости от выбранной программы стирки и типа ткани.
На ЖК-дисплее будет показано выбранное значение скорости. Чтобы исключить выполнение отжима в конце цикла, выберите значение “00”.
Примечание: Максимальная скорость отжима меняется в зависимости от
модели. В каждой программе установлена рекомендуемая скорость отжима.
Данная стиральная машины оснащена специальной системой электронного контроля правильной балансировки загруженного белья. Перед каждым отжимом система обеспечивает
наиболее равномерное распределение белья в барабане. По соображениям безопасности, в
случае неравномерного распределения белья конечная скорость отжима будет уменьшена, а
в случаях сильной разбалансировки отжим не будет выполняться.
RU
Контроль разбалансировки загруженного в барабан белья:
SM3174
Page 61

ПАНЕЛЬ УПРАВЛЕНИЯ
АНТИСМИНАНИ: Активация функции антисминания выполняется с помощью
кнопки G. Машина при этом настраивает параметры таким образом, чтобы
уменьшить формирование складок, тем самым облегчая глажение.
Скорость отжима автоматически устанавливается на 500 оборотов/мин.
ПУСК/ПАУЗА: Во время выбора программы и опций стирки светодиод пуска
не горит. Для подтверждения выбора и запуска цикла стирки нажмите кнопку
H. Загорится светодиод.
Во время выполнения программы стирки можно остановить цикл, нажав на
несколько секунд кнопку ПУСК/ПАУЗА.
При этом программа стирки останавливается и вы можете внести изменения в опции стирки
(задействованные в зависимости от этапа продвижения стирки).
Если температура воды ниже 50°C, можно открыть люк (примерно через 2 минуты после включения функции “пауза”) для загрузки/выгрузки белья. Чтобы возобновить стирку, нажмите
кнопку ПУСК/ПАУЗА.
Примечание: если во время паузы не выполняется никаких действий, по прошествии 5 минут
стирка автоматически возобновляется.
17
БЛОКИРОВКА (защита от детей): чтобы активировать блокировку панели управления, удерживайте клавишу B (отложенный старт), пока на левой стороне дисплея не появятся три
горизонтальные полосы. Если во время цикла стирки или до окончания цикла вы захотите восстановить работу панели управления, нажмите и удерживайте кнопку B (отложенный пуск),
пока три горизонтальные полосы на дисплее не исчезнут.
Примечание: функция блокировки панели управления может быть включена только в ручном
режиме путём нажатия и удерживания в течение нескольких секунд кнопки отложенного пуска.
ОБЕЗЗАРАЖИВАНИЕ БАКА: Частая стирка при низких температурах может способствовать
образованию плесени и неприятных запахов внутри стиральной машины. Функция ОБЕЗЗА-
РАЖИВАНИЯ БАКА тщательно очищает машину с помощью специального цикла при 90°C.
После определенного количества стирок функция ОБЕЗЗАРАЖИВАНИЕ БАКА автоматиче-
ским миганием на дисплее предлагает запустить программу очистки, если за рассматриваемый
период не выполнялись циклы при высокой температуре.
Удалите все белье из барабана, установите ручку I на программу ОБЕЗЗАРАЖИВАНИЕ БАКА,
нажмите кнопку пуска (start) H для запуска цикла.
Программу ОБЕЗЗАРАЖИВАНИЯ БАКА можно выполнить в любой момент по желанию или в
случае необходимости. Освободите барабан стиральной машины и закройте люк. Установите
ручку I на программу ОБЕЗЗАРАЖИВАНИЕ БАКА, удерживайте нажатой кнопку предвари-
тельной стирки до тех пор, пока на дисплее не появится символ. Нажмите H пуск (start) для
запуска цикла ОБЕЗЗАРАЖИВАНИЯ БАКА.
Easy Logic: Система Easy Logic автоматически настраивает время стирки, расход воды и
энергии в зависимости фактического количества загруженного в машину белья. Функция
1/2 загрузки является излишней, так как система Easy Logic автоматически устанавливает
параметры стирки.
SM3174
RU
Page 62

18
500
500
800
800
800
800
800
800
Сильно загрязненное, с пятнами, включая пятна органического происхождения, белое льняное и хлопковое белье.
Стандартные программы для хлопка при 60°C и 40°C
подходят для стирки хлопкового белья нормальной степени
загрязненности и являются наиболее эффективными
программами с точки зрения комбинированного потребления
энергии и воды для стирки данного типа белья. Приведенные
программы соответствуют европейским нормативам
1015/2010 и 1061/2010 касательно требований к экосовместимому проектированию. Фактическая температура воды
может отличаться от заявленной температуры для цикла.
Стандартные программы для хлопка при 60°C и 40°C прошли
проверку в соответствии с нормативом EN60456.
Специальные смешанные программы позволяют стирать
вместе ткани различного происхождения (хлопок, синтетические, смешанные ткани) с отличным результатом.
Программа для шерсти идеально подходит для изделий,
требующих бережного ухода, на этикетке которых содержится
запись “машинная стирка”. Обеспечивает сохранение первоначального цвета и текстуры одежды в течение времени.
Быстрый цикл стирки подходит для освежения, всего за 20
минут, слегка загрязненного белья. Быстрый цикл позволяет
сэкономить ценное время, выполнив цикл стирки при 35°C.
Деликатные изделия требуют особого ухода и обычно
стираются вручную. Специальная ручная стирка гарантирует
максимальную осторожность в обращении с одеждой.
Гигиеническая программа обеспечивает удаление имеющихся
в белье микроорганизмов и бактерий. Программа гарантирует
максимальную чистоту белого, цветного белья и тканей из
синтетических волокон.
Программы для цветного белья позволяют стирать вместе
изделия разных цветов; можно безопасно стирать светлое и
темное белье без риска обесцвечивания.
Специальная программа для джинсовой ткани выполняет
бережную стирку при 40°C, заботится о волокнах “деним” и в то
же время бережно ухаживает за волокнами, сохраняя их цвет.
Одежда из ткани “деним делавэ” всегда остаётся как новая.
Программа для рубашек сокращает время г лажки. Температура, уровень воды, интенсивность стирки и скорость отжима
регулируются автоматически для снижения образования
складок и облегчения глажки блузок и рубашек.
Программа “спорт” задумана для спортивной и повседневной
одежды. Цикл стирки при 40°C не изменяет форму ткани и
эластичность современных синтетических волокон.
Идеально, чтобы быстро стирать одежду, которую не нужно
гладить. Цикл холодной стирки подходит для всех деликатных тканей.
Программа полоскания подходит для полоскания выстиранного вручную белья или освежения хранившейся в течение
долгого времени одежды.
Скорость отжима регулируется для разных видов ткани.
Программы Тип белья Опции
Максимал
ьная
скорость
отжима
(оборотов/
мин)
Символ
Максимальная
загрузка в
зависимости от
модели и
выбранной
программы (кг)
Те мпература
(*)
8.0
4.0
2.0
8.0
8.0
8.0
4.0
2.0
4.0
2.0
8.0
8.0
4.0
8.0
2.0
90°C
20°C
40°C
35°C
30°C
40°C
30°C
40°C
40°C
40°C
60°C
40°C
ТАБЛИЦА ПРОГРАММ
(*) Действительная температура воды может отличаться от указанной в программе.
RU
SM3174
Page 63

ТЕХНИЧЕСКИЕ ХАРАКТЕРИСТИКИ
Г
19
МОДЕЛЬ
Ширина (см)
абариты
Высота (см)
Глубина (см)
Максимальная скорость отжима (оборотов/мин)
Максимальная загрузка (кг)
Давление воды
Электрическое соединение
.................................................................................................................................................................................................
.................................................................................................................................................................................................
.................................................................................................................................................................................................
.................................................................................................................................................................................................
.................................................................................................................................................................................................
BWM01.0814W
59.5
82.0
54.5
1400
8.0
0,05 МПа - 1 МПа
см. характеристики на заводской табличке
ПРИМЕЧАНИЯ
.................................................................................................................................................................................................
.................................................................................................................................................................................................
.................................................................................................................................................................................................
.................................................................................................................................................................................................
.................................................................................................................................................................................................
.................................................................................................................................................................................................
.................................................................................................................................................................................................
.................................................................................................................................................................................................
.................................................................................................................................................................................................
.................................................................................................................................................................................................
.................................................................................................................................................................................................
SM3174
RU
Page 64

20
.................................................................................................................................................................................................
.................................................................................................................................................................................................
.................................................................................................................................................................................................
.................................................................................................................................................................................................
.................................................................................................................................................................................................
.................................................................................................................................................................................................
.................................................................................................................................................................................................
.................................................................................................................................................................................................
.................................................................................................................................................................................................
.................................................................................................................................................................................................
ПРИМЕЧАНИЯ
.................................................................................................................................................................................................
.................................................................................................................................................................................................
.................................................................................................................................................................................................
.................................................................................................................................................................................................
.................................................................................................................................................................................................
.................................................................................................................................................................................................
.................................................................................................................................................................................................
.................................................................................................................................................................................................
.................................................................................................................................................................................................
.................................................................................................................................................................................................
.................................................................................................................................................................................................
.................................................................................................................................................................................................
RU
SM3174
Page 65

MODELLO:
WDOI 1475 L
ПОСІБНИК З ПРАННЯ
Лоток для мийного засобу:
1 Попереднє прання
Пом’якшувач
2 Прання
Панель управління:
A LCD-ДИСПЛЕЙ
В Кнопка відкладеного пуску/блокування
панелі управління
C Кнопка віджимання
D Кнопка попереднього
прання/знезараження
E Кнопка турбо
F Кнопка полоскання
G Кнопка антизминання
H Кнопка пуску/пауза
I Ручка вибору програм
ПРАВИЛЬНЕ ПРАННЯ
Перш ніж запустити машину, переконайтеся, що встановлення було виконане правильно,
згідно з наведеними в брошурі інструкціями.
Побутове користування
1. Перед завантаженням одягу в пральну машину вийміть з кишень тверді та гострі предмети
(цвяхи, гвинти, монети, шпильки, камені), які можуть пошкодити машину та одяг.
2. Для поліпшення результату прання закладайте білизну в розправленому не стисненому
вигляді та уникайте перевантаження машини. Повне завантаження машини тканинами,
що сильно вбирають вологу, наприклад, махровими халатами або рушниками, може
порушити балансування машини під час віджимання. Система автоматичного балансування
завантаженої білизни розміщує білизну найбільш однорідним чином і задає оптимальну
швидкість віджимання для зниження до мінімуму можливої вібрації.
3. Закрийте люк, переконавшись, що між дверцятами та ущільненням не залишилося
затиснутого одягу.
4. Відміряйте необхідну кількість мийного засобу в спеціальний лоток 2. Вставте перегородку,
що надається в комплекті, якщо ви використовуєте рідкі мийні засоби. Якщо ви бажаєте
активувати опцію попереднього прання, додайте мийний засіб у лоток 1. Для пом’якшувача
використовуйте лоток, позначений спеціальним символом. Після заправки мийного засобу
акуратно закрийте ящик.
5. Виберіть програму прання відповідно до типу тканини за допомогою ручки I, дотримуючись
наведених у таблиці програм вказівок. На рідкокристалічному дисплеї відобразиться
тривалість обраної програми при максимальному завантаженні. Час, що залишився, може
змінюватися протягом циклу прання в залежності від закладеної білизни. Напис «Кінець»
(End) з’являється на дисплеї в кінці циклу.
6. Через натискання на кнопку C можна встановлювати швидкість віджимання, відмінну від тієї, що
її пропонує обрана програма. Кнопка B дозволяє відкласти пуск циклу прання на максимальний
час до 19 годин. Обидва значення відображаються на рідкокристалічному дисплеї.
7. За допомогою кнопок D, Е, F і G можна вибрати додаткові функції. Вибрані функції
відображаються на рідкокристалічному дисплеї. Загальна тривалість циклу змінюється в
залежності від активованих функцій.
8. Натисніть на кнопку пуску H для запуску циклу прання. На дисплеї відобразиться тривалість
циклу при максимальному завантаженні. Система easy logic буде оновлювати значення часу,
що залишився до кінця циклу, на основі фактичного завантаження.
9. Кінець циклу прання позначається на дисплеї написом «Кінець» (End). Поверніть ручку I в
положення і відкрийте люк, щоб витягти всю закладену в машину білизну.
10. Ви можете відмінити програму в будь-який час, повернувши ручку І в положення .
11. Щоб вимкнути машину в разі виникнення надзвичайної ситуації, встановіть покажчик
ручки вибору програм в позицію « », вибір буде підтверджений тактильним
зворотним зв’язком і вимкненням всіх світлодіодів і LCD-дисплею.
SM3174
UK
21
Page 66

22
LCD-ДИСПЛЕЙ: Великий рідкокристалічний дисплей забезпечує швидке
та зручне користування пральною машиною. На дисплеї відображаються
активовані функції прання, відкладений пуск, обрана швидкість віджимання
і час, що залишився до кінця циклу. Напис «Кінець» (End) попереджає про
розблокування люка.
ВІДКЛАДЕНИЙ ПУСК: Ця функція дозволяє відкласти запуск циклу прання
на максимальний час до 19 годин. Натисніть кілька разів кнопку B, доки на
дисплеї не відображатиметься бажаний час відкладення пуску. Значок h буде
блимати на дисплеї до запуску циклу прання.
ПОЛОСКАННЯ: Через натискання на кнопку F вмикається функція додаткового
полоскання для виконання додаткового полоскання. Ця опція рекомендується
при підвищеній чутливості шкіри до ензимів, що містяться в мийних засобах.
ПОПЕРЕДНЄ ПРАННЯ Для виконання попереднього прання натисніть кнопку
D і додайте мийний засіб у спеціальний лоток 1. Пральна машина виконує
попереднє прання при максимальній температурі 40°C. Попереднє прання
рекомендується у випадку одягу, забрудненого порохом, піском або при наявності надзвичайно стійких плям. Більш детальну інформацію дивіться в
таблиці програм.
ПАНЕЛЬ УПРАВЛІННЯ
ТУРБО: Натисніть на кнопку E турбо для скорочення часу прання. Робочі па-
раметри налаштовуються автоматично, щоб забезпечити ефективність прання
та заощадження часу. Більш детальну інформацію дивіться в таблиці програм.
РЕГУЛЬОВАНЕ ВІДЖИМАННЯ: Через натискання на кнопку C швидкість
обертання може регулюватися в залежності від обраної програми прання та
типу тканини. На рідкокристалічному дисплеї буде показано вибране значення швидкості. Щоб виключити виконання віджимання в кінці циклу, виберіть
значення “00”.
Примітка: Максимальна швидкість віджимання відрізняється в залежності від
моделі. У кожній програмі встановлена рекомендована швидкість віджимання.
Ця пральна машини обладнана спеціальною системою електронного контролю правильного
балансування завантаженої білизни. Перед кожним віджиманням система забезпечує найбільш
рівномірний розподіл білизни в барабані. З міркувань безпеки, в разі нерівномірного розподілу
білизни кінцева швидкість віджимання буде зменшена, а у випадках сильного розбалансування
віджимання не виконуватиметься.
UK
Контроль розбалансування завантаженої в барабан білизни:
SM3174
Page 67

ПАНЕЛЬ УПРАВЛІННЯ
АНТИЗМИНАННЯ: Активація функції антизминання виконується за допомогою
кнопки G, машина налаштовує параметри таким чином, щоб зменшити формування складок, тим самим полегшуючи прасування.
Швидкість віджиму автоматично встановлюється на 500 обертів/хв.
ПУСК/ПАУЗА: Під час вибору програми та опцій прання світлодіод запуску не
горить. Для підтвердження вибору і запуску циклу прання натисніть кнопку H.
Загориться світлодіод.
Під час виконання програми прання можна зупинити цикл, натиснувши на
кілька секунд кнопку ПУСК/ПАУЗА.
У цьому випадку програма прання зупиниться і ви можете внести зміни до опцій прання (активовані в залежності від етапу прання).
Якщо температура води нижче 50°C, можна відкрити люк (приблизно через 2 хвилини після
ввімкнення функції «пауза») для завантаження/розвантаження білизни. Щоб відновити прання,
натисніть кнопку ПУСК/ПАУЗА.
Примітка: якщо під час паузи не виконуються жодні дії, після 5 хвилин прання автоматично
поновлюється.
23
БЛОКУВАННЯ (захист від дітей): щоб активувати блокування панелі управління, утримуйте
кнопку B (відкладений пуск), доки ліворуч на дисплеї не з’являться три горизонтальні смуги.
Якщо під час циклу прання або до закінчення циклу ви схочете відновити роботу панелі управління, натисніть і утримуйте кнопку B (відкладений пуск), доки три горизонтальні смуги на
дисплеї не зникнуть.
Примітка: функція блокування панелі управління може бути ввімкнена тільки в ручному режимі
шляхом натискання й утримування протягом декількох секунд кнопки відкладеного пуску.
ЗНЕЗАРАЖЕННЯ БАКА: Часте прання при низьких температурах може сприяти утворенню цвілі
і неприємних запахів усередині пральної машини. Функція ЗНЕЗАРАЖЕННЯ БАКА ретельно
очищає машину за допомогою спеціального циклу при 90°C.
Після певної кількості прань функція ЗНЕЗАРАЖЕННЯ БАКА через автоматичне миготіння на
дисплеї пропонує запустити програму очищення, якщо за розглянутий період не виконувалися
цикли при високій температурі.
Видаліть з барабана всю білизну, встановіть ручку I на програму ЗНЕЗАРАЖЕННЯ БАКА,
натисніть кнопку включення (start) H для запуску циклу.
Програму ЗНЕЗАРАЖЕННЯ БАКА можна виконати в будь-який момент за бажанням або в разі
потреби. Звільніть барабан пральної машини та закрийте люк. Встановіть ручку I на програму
ЗНЕЗАРАЖЕННЯ БАКА, утримуйте кнопку попереднього прання, доки не з’явитися символ.
Натисніть H пуск (start) для запуску циклу ЗНЕЗАРАЖЕННЯ БАКА.
Easy Logic: Система Easy Logic автоматично налаштовує час прання, витрату води і енергії в
залежності від фактичної кількості завантаженої в машину білизни. Функція 1/2 завантаження
є зайвою, оскільки система Easy Logic автоматично встановлює параметри прання.
SM3174
UK
Page 68

24
500
500
800
800
800
800
800
800
Сильно забруднена, з плямами, втім з плямами органічного
походження, біла лляна та бавовняне білизна.
Стандартні програми для бавовни при 60°C і 40°C підходять
для прання бавовняної білизни нормального ступеня
забрудненості і є найбільш ефективними програмами з точки
зору комбінованого споживання енергії та води для прання
даного типу білизни. Наведені програми відповідають
європейським нормативам 1015/2010 і 1061/2010 щодо вимог
до екосумісного проектування. Фактична температура води
може відрізнятися від заявленої температури для циклу.
Стандартні програми для бавовни при 60°C і 40°C пройшли
перевірку відповідно до нормативу EN60456.
Спеціальні змішані програми дозволяють прати разом тканини
різного походження (бавовна, синтетичні, змішані тканини) з
відмінним результатом.
Програма для вовни ідеально підходить для виробів, що
вимагають дбайливого догляду, на етикетці яких міститься
запис «прати у пральній машині». Забезпечує збереження
первісного кольору і текстури одягу протягом часу.
Швидкий цикл прання підходить для освіження, лише за 20
хвилин, легко забруднених речей. Швидкий цикл дозволяє
заощадити цінний час та виконує цикл прання при 35°C.
Делікатні вироби вимагають особливого догляду і зазвичай
перуться вручну. Спеціальне ручне прання гарантує
максимальну обережність у поводженні з одягом.
Гігієнічна програма забезпечує видалення наявних у білизні
мікроорганізмів і бактерій. Програма гарантує максимальну
чистоту білої, кольорової білизни і тканин з синтетичних
волокон.
Програми для кольорової білизни дозволяють прати разом
вироби різних кольорів; можна безпечно прати світлу і темну
білизну без ризику знебарвлення.
Спеціальна програма для джинсової тканини виконує дбайливе
прання при 40°C, піклується про волокна «денім» і в той же час
дбайливо доглядає за волокнами, зберігаючи їхній колір. Одяг
з тканини «денім делаве» завжди залишається як новий.
Програма для сорочок скорочує час прасування. Температура,
рівень води, інтенсивність прання і швидкість віджимання
регулюються автоматично для змешення утворення складок і
полегшення прасування блузок і сорочок.
Програма «спорт» задумана для спортивного і повсякденного
одягу. Цикл прання при 40°C не змінює форми тканини і
еластичності сучасних синтетичних волокон.
Ідеально, щоб швидко випрати одяг, який не потрібно прасувати. Цикл холодного прання підходить для всіх делікатних
тканин.
Програма полоскання підходить для полоскання випраної
вручну білизни або освіження одягу, що зберігався протягом
довгого часу.
Швидкість віджимання регулюється для різних видів тканини.
Програми Тип білизни Опції
Максималь
на
швидкість
віджиманн
я (оборотів
/хв)
Символ
Максимальне
завантаження в
залежності від
моделі та
обраної
програми (кг)
Те мпература
(*)
8.0
4.0
2.0
8.0
8.0
8.0
4.0
2.0
4.0
2.0
8.0
8.0
4.0
8.0
2.0
90°C
20°C
40°C
35°C
30°C
40°C
30°C
40°C
40°C
40°C
60°C
40°C
ТАБЛИЦЯ ПРОГРАМ
(*) Реальна температура води може відрізнятися від температури, чка вказана у програмі.
UK
SM3174
Page 69

ТЕХНІЧНІ ХАРАКТЕРИСТИКИ
Г
25
МОДЕЛЬ
Ширина (см)
абарити
Висота (см)
Глибина (см)
Максимальна швидкість віджимання (оборотів/хв)
Максимальне завантаження (кг)
Ти ск води
Електричне з'єднання
ПРИМІТКИ
.................................................................................................................................................................................................
.................................................................................................................................................................................................
.................................................................................................................................................................................................
.................................................................................................................................................................................................
.................................................................................................................................................................................................
BWM01.0814W
59.5
82.0
54.5
1400
8.0
0,05 МПа - 1 МПа
див. характеристики на табличці
.................................................................................................................................................................................................
.................................................................................................................................................................................................
.................................................................................................................................................................................................
.................................................................................................................................................................................................
.................................................................................................................................................................................................
.................................................................................................................................................................................................
.................................................................................................................................................................................................
.................................................................................................................................................................................................
.................................................................................................................................................................................................
.................................................................................................................................................................................................
.................................................................................................................................................................................................
SM3174
UK
Page 70

26
.................................................................................................................................................................................................
.................................................................................................................................................................................................
.................................................................................................................................................................................................
.................................................................................................................................................................................................
.................................................................................................................................................................................................
.................................................................................................................................................................................................
.................................................................................................................................................................................................
.................................................................................................................................................................................................
.................................................................................................................................................................................................
.................................................................................................................................................................................................
ПРИМІТКИ
.................................................................................................................................................................................................
.................................................................................................................................................................................................
.................................................................................................................................................................................................
.................................................................................................................................................................................................
.................................................................................................................................................................................................
.................................................................................................................................................................................................
.................................................................................................................................................................................................
.................................................................................................................................................................................................
.................................................................................................................................................................................................
.................................................................................................................................................................................................
.................................................................................................................................................................................................
.................................................................................................................................................................................................
UK
SM3174
Page 71

Page 72

461000002 SM3174 20/12/2017
IT EN RU UK
 Loading...