

ZIGBEE G07 User Manual
G07 User Manual
G07 User Manual
Ver. 1.05
Copyright 2016 Nietzsche Enterprise Co., Ltd. All rights reserved
Nietzsche Enterprise reserves the right to make changes and improvements to its products without notice.
Contact Information: Email: zigbeenhr@shop-wifi.com, Website: www.shop-wifi.com/wireless-sensors
Contents
1) Package Content and Views of G07......................................................................................................................2
2) Installing Mounting for G07 .................................................................................................................................3
3) Powering On G07..................................................................................................................................................4
4) Connecting G07 to the Network...........................................................................................................................5
5) Configuring G07 in the Web Setting Homepage ..................................................................................................7
6) Sentrol Cloud Gateway Register ........................................................................................................................ 13
7) Replacing G07 in Existing IoT Network .............................................................................................................. 14
8) Joining Other Devices to G07’s IoT Network ..................................................................................................... 15
9) Removing Devices from G07’s IoT Network ...................................................................................................... 15
10) Reset ................................................................................................................................................................ 16
11) Product Specifications ..................................................................................................................................... 16
1
G07 User Manual
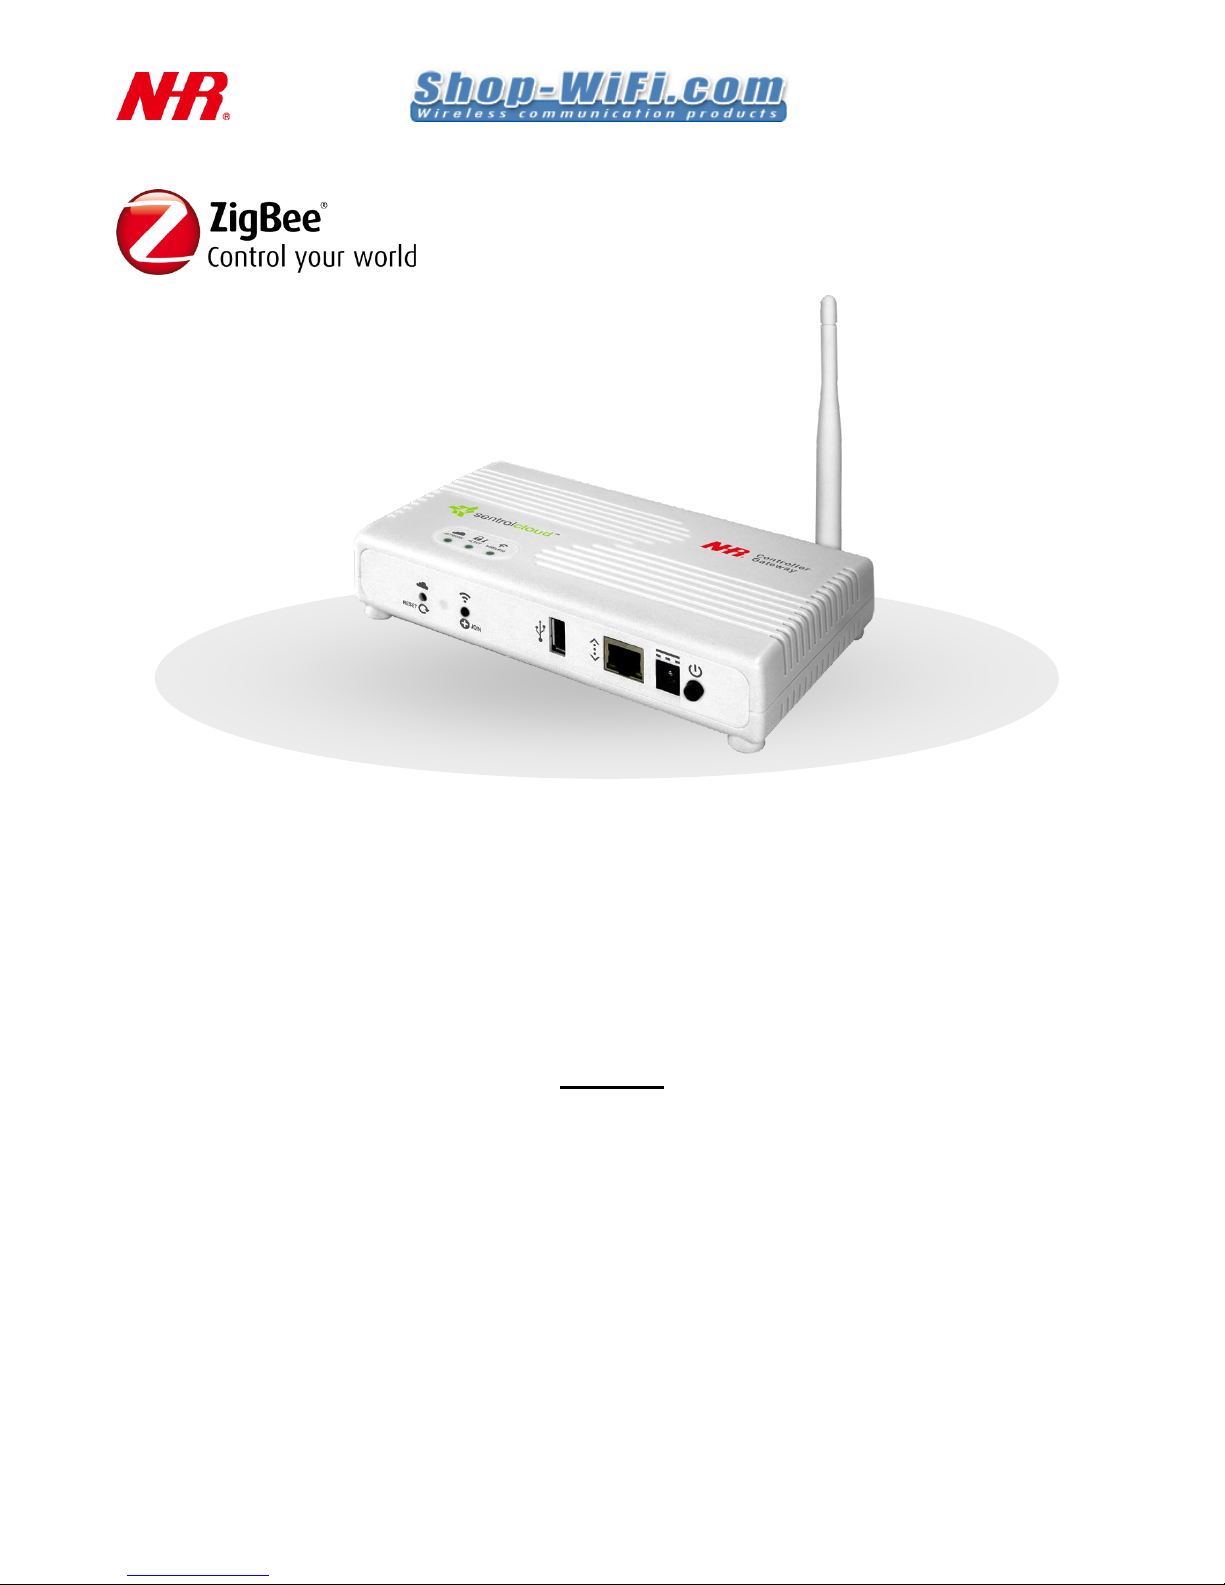
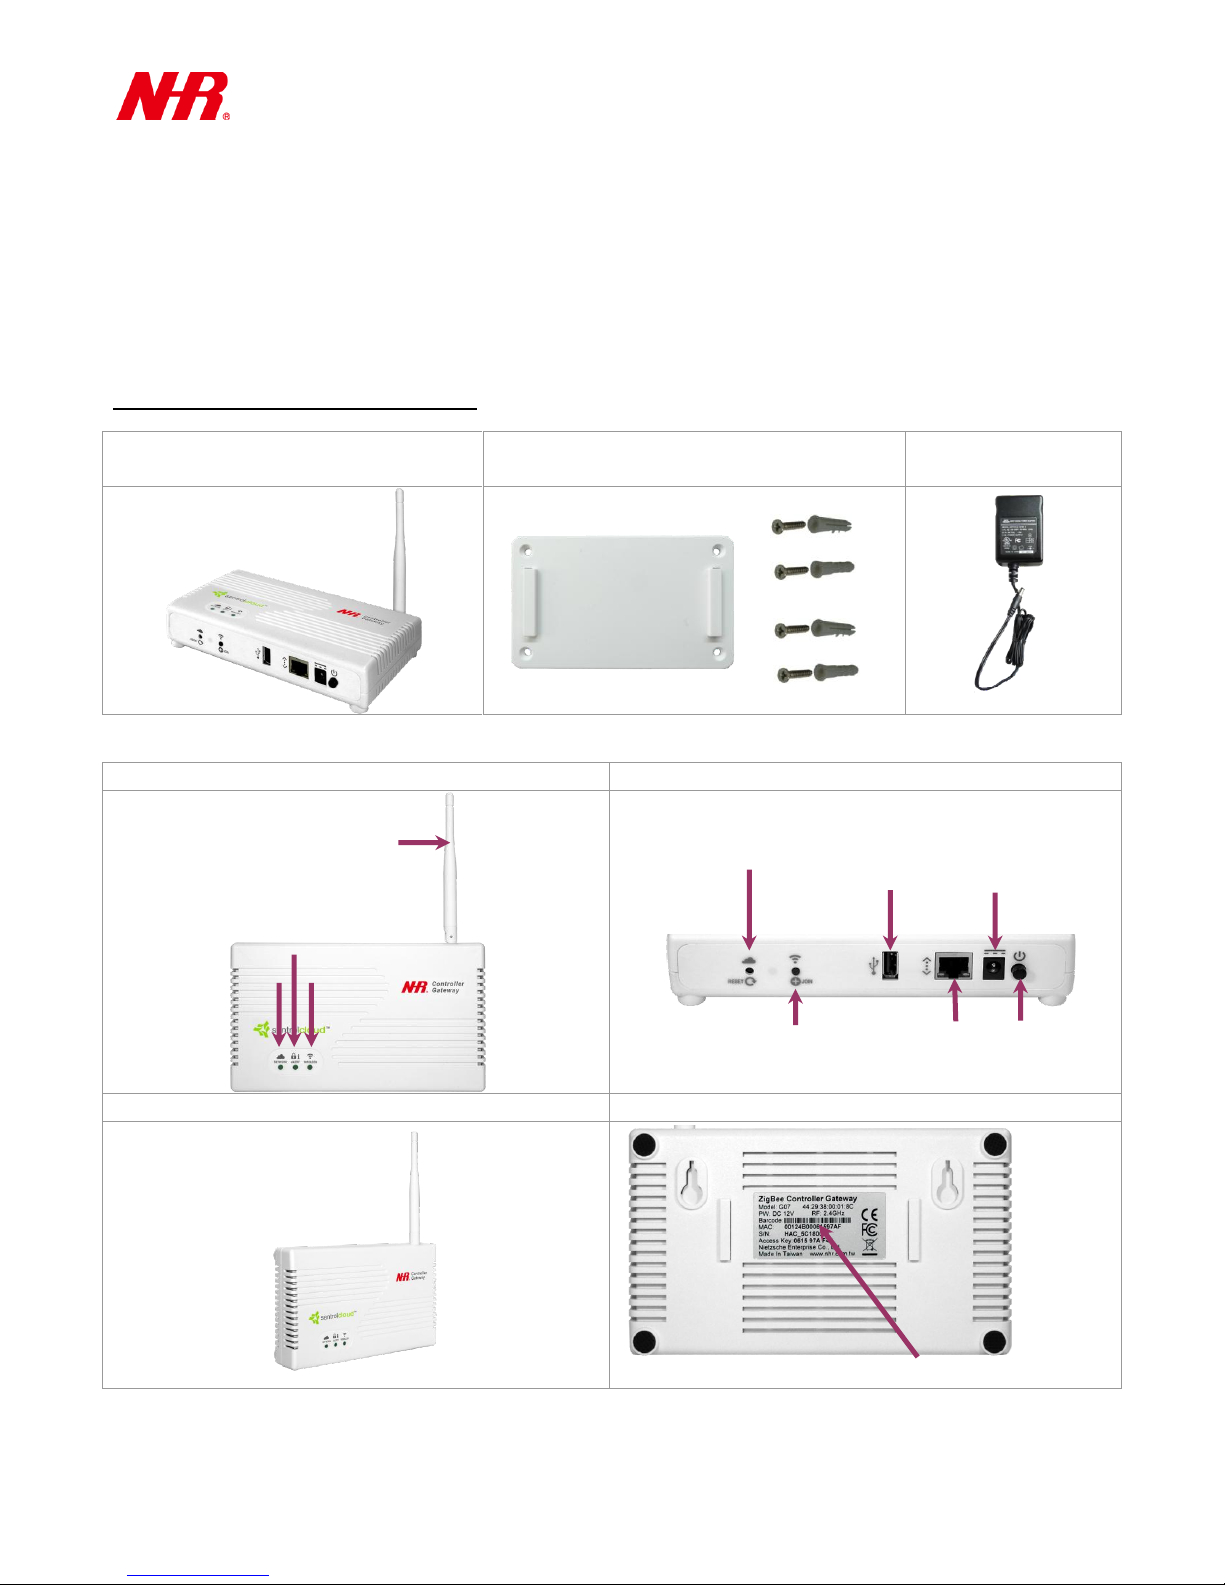
NHR G07 Controller Gateway
Mounting fixtures (mounting cradle, 4 wall
plugs, 4 screws)
DC 12V Adapter
Front
Bottom
Side
Back
Network LED
Wireless LED
Antenna
Power Switch
Power Socket
Ethernet Port
USB Port
Join Button
Reset Button
Alert LED
Unique MAC Address & Product Serial Number
Congratulations for choosing a world-class Total Solution with Controller Gateway using ZigBee,
Ethernet, and Wi-Fi wireless transmission technology. This manual is designed to help set up and get
the most from the sensor in a few short minutes.
Safety notice: Please read and follow the instructions before using this product
To prevent electrical shock or fire, do not disassemble or expose the unit to liquids of any kind.
Only use attachments and / or accessories specified by the manufacturer.
1 Package Content and Views of G07
If any of the above is missing please contact your supplier.
2
G07 User Manual
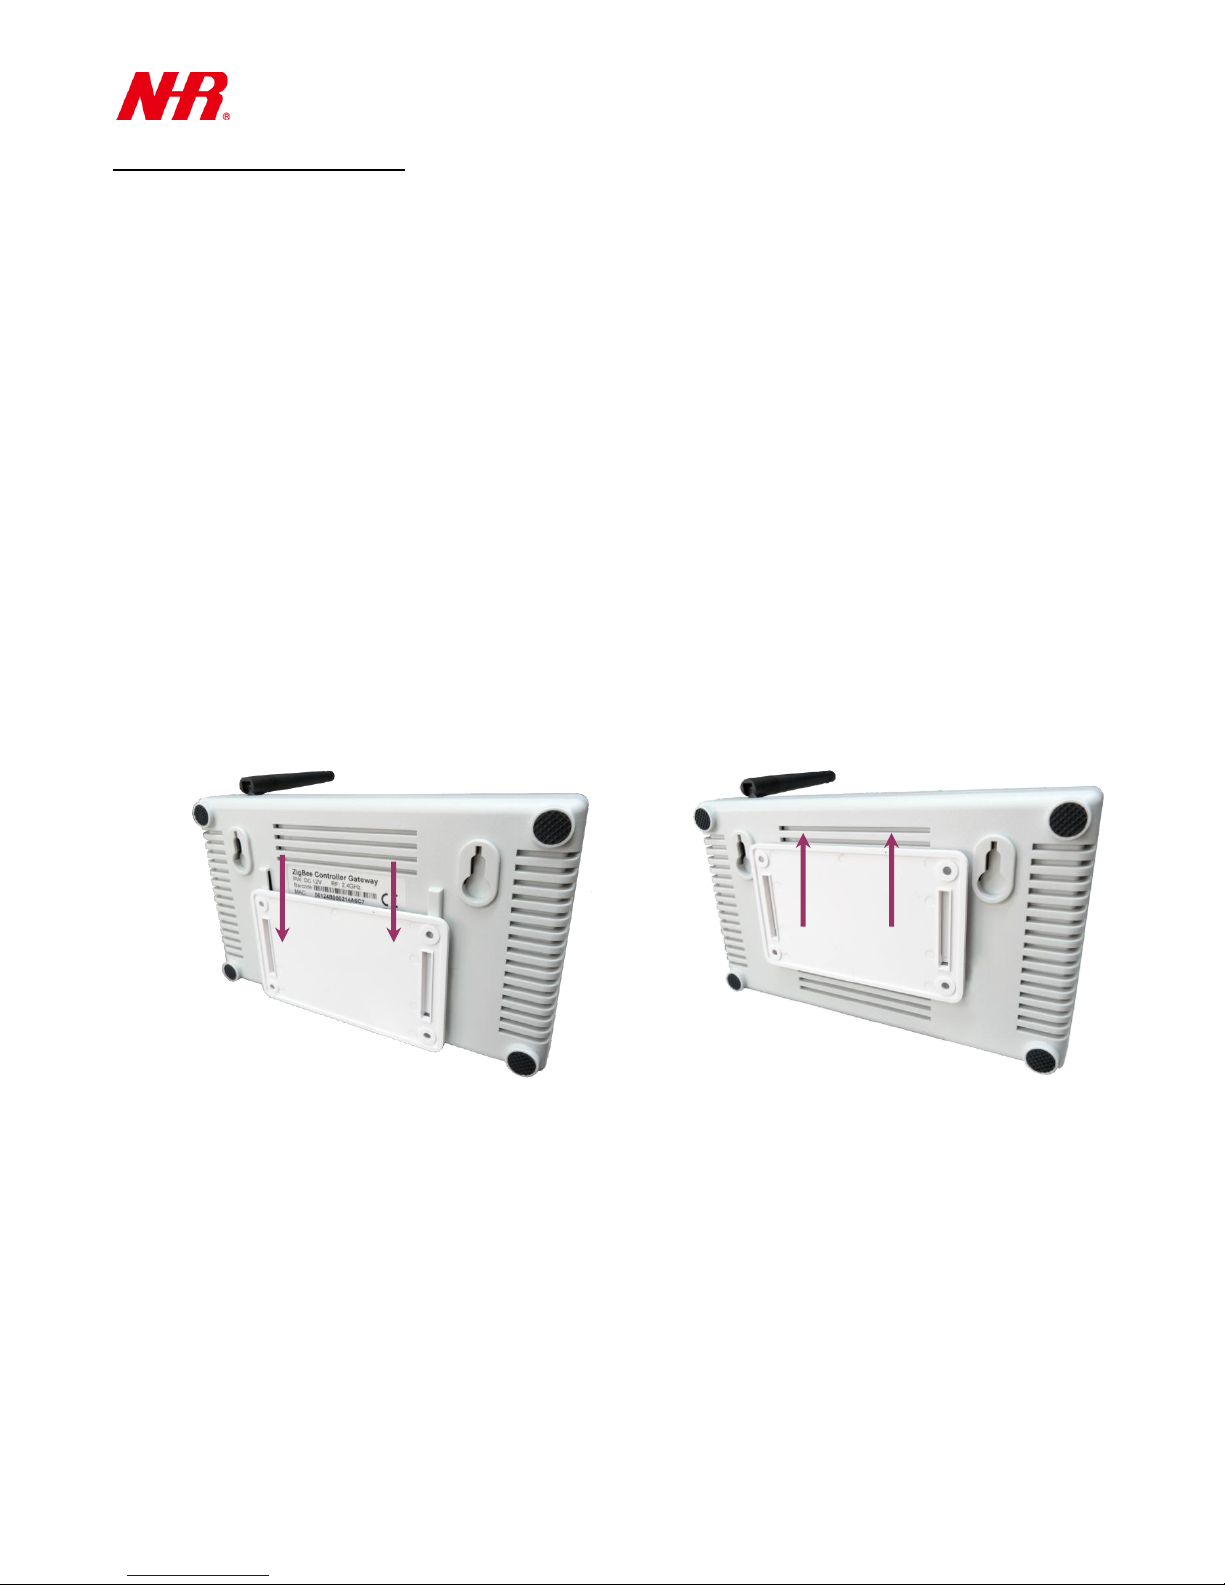
2 Installing Mounting for G07
Requirements:
Mounting fixtures
Drill with 5mm (0.2 inches) drill bit size (if using wall plugs) or 3.5mm (0.14 inches) drill bit size
(if not using wall plugs)
Size 1 Phillips screwdriver
a) Locate G07 with at least 15cm (approx.. 6 inches) spacing on each side (except on mounting side)
avoiding the following sources of interference: direct sunlight, air flow from vents, fans, doors,
windows, heaters, sources of steam, oil vapor, etc.
b) If necessary, pre-drill mounting holes using mounting cradle for alignment, then use appropriate
drill bit to drill the holes – 5mm (approx. 0.2 inches) if using wall plugs or 3.5mm (approx. 0.14
inches) if not using wall plugs.
c) If necessary, use a hammer to insert wall plugs into the 4 holes.
d) Use size 1 Phillips screwdriver to fasten the screws securing the mounting cradle. Note: pay
careful attention to the orientation of the mounting cradle.
e) Install and remove G07 using the following actions to ensure the mounting cradle has been
correctly and securely installed and G07 can be installed and removed.
Install - Remove -
Initial hardware installation for G07 has been successfully completed.
3
G07 User Manual
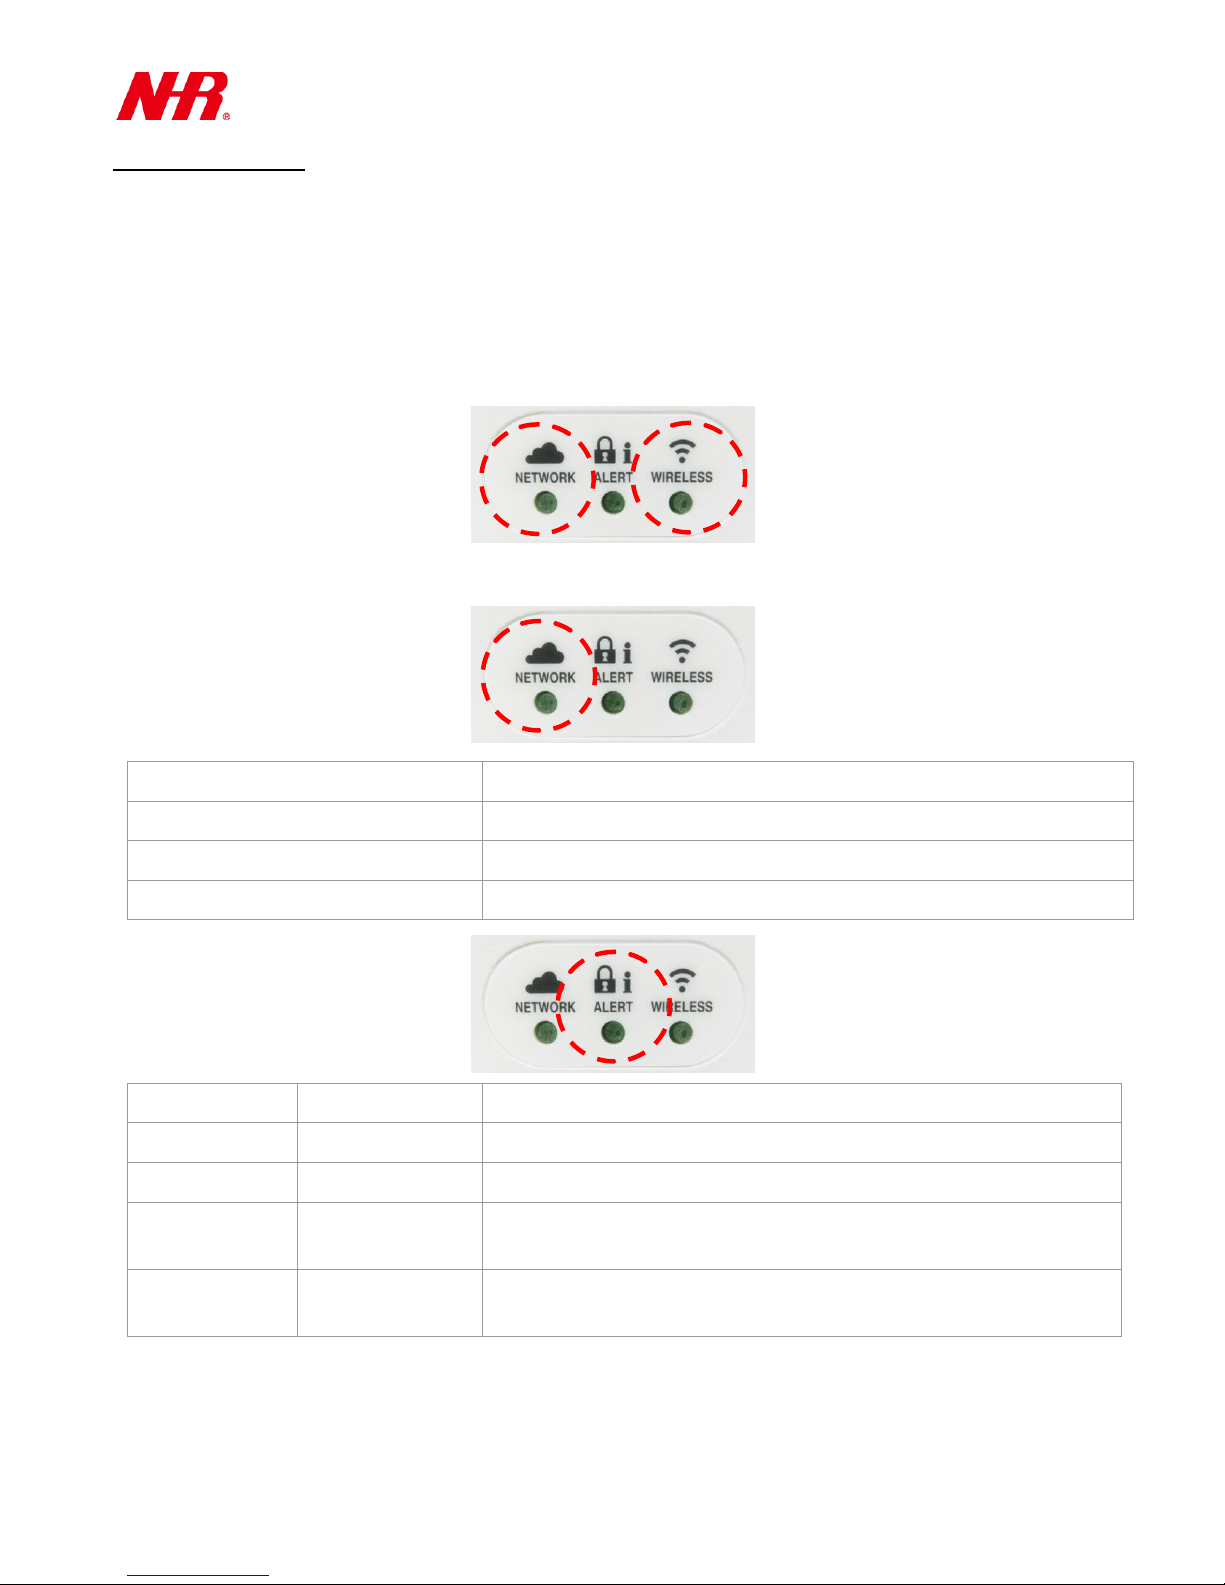
NETWORK LED
Status
Light on
Connected to the Cloud
Light off
Disconnected to the Cloud
Flashing
Reconnecting to the Cloud
ALERT LED
Alert Sound
Status
Light on
‘Beep’ x 30
Sentrol Cloud Away Mode (alarm is armed)
Flashing rapidly
Long ‘Beep’
Sentrol Cloud Panic Mode (alarm is activated)
Flashes 5 times,
then light off
N/A
Sentrol Cloud Home Mode (alarm is disarmed)
1 Flash every 5
seconds
‘Beep’ x 3
Sentrol Cloud Night/Sleep Mode (alarm is partially armed)
3 Powering On G07
Requirements:
DC 12V Adapter
a) Connect DC 12V adapter and plug into power socket.
b) G07 will take about 1-2 minute(s) to boot up. During the booting process, the NETWORK and
ALERT LEDs may both flash for about 2 seconds and light on for about 10 seconds.
c) After successful booting process, G07’s LEDs will indicate current status:
4
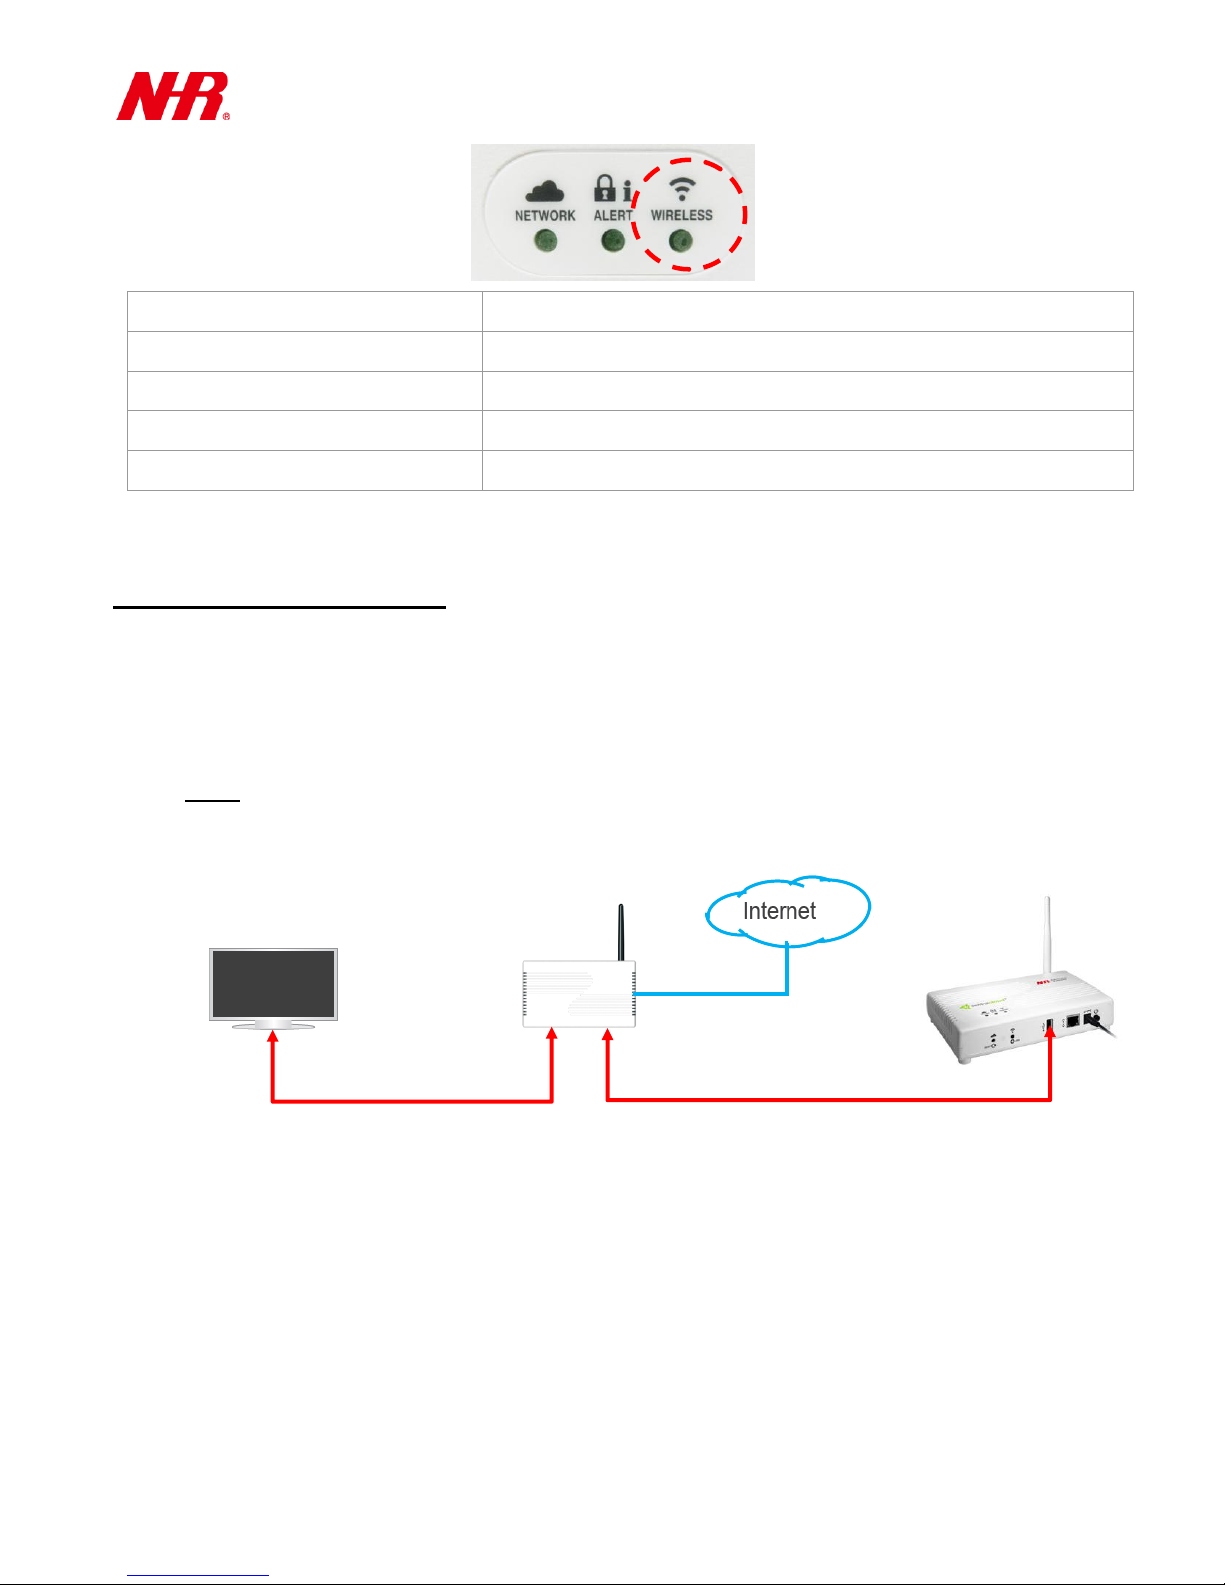
G07 User Manual
WIRELESS LED
Status
Light off
Stand by
1 flash every 2 or 3 seconds
Permit others to join
2 flashes
Device is joining or rejoining the Gateway and functioning normally
5 flashes
Device is removing from the Gateway
Windows Computer
(Wi-Fi) Repeater /
Ethernet Switch
G07 Gateway
Ethernet Cable
Ethernet Cable
(for wired connection or Wi-Fi setup)
G07 has been successfully powered on.
4 Connecting G07 to the Network
Requirements:
Ethernet Cable(s)
Computer (running Windows)
Repeater or Ethernet switch (supporting DHCP connection mode) with internet connection
and an available Ethernet LAN port reserved for G07
NOTE: If you want to use Wi-Fi connection, please use a Wi-Fi repeater with several available
Ethernet LAN ports, or you can include a Wi-Fi repeater or access point within the same local
network hosting both your computer and your G07.
a) If necessary, remove G07 from the mounting cradle.
b) Power on G07 (See “Powering On G07”).
c) Make sure your computer is connected to the repeater or Ethernet switch with internet
connection.
5
G07 User Manual
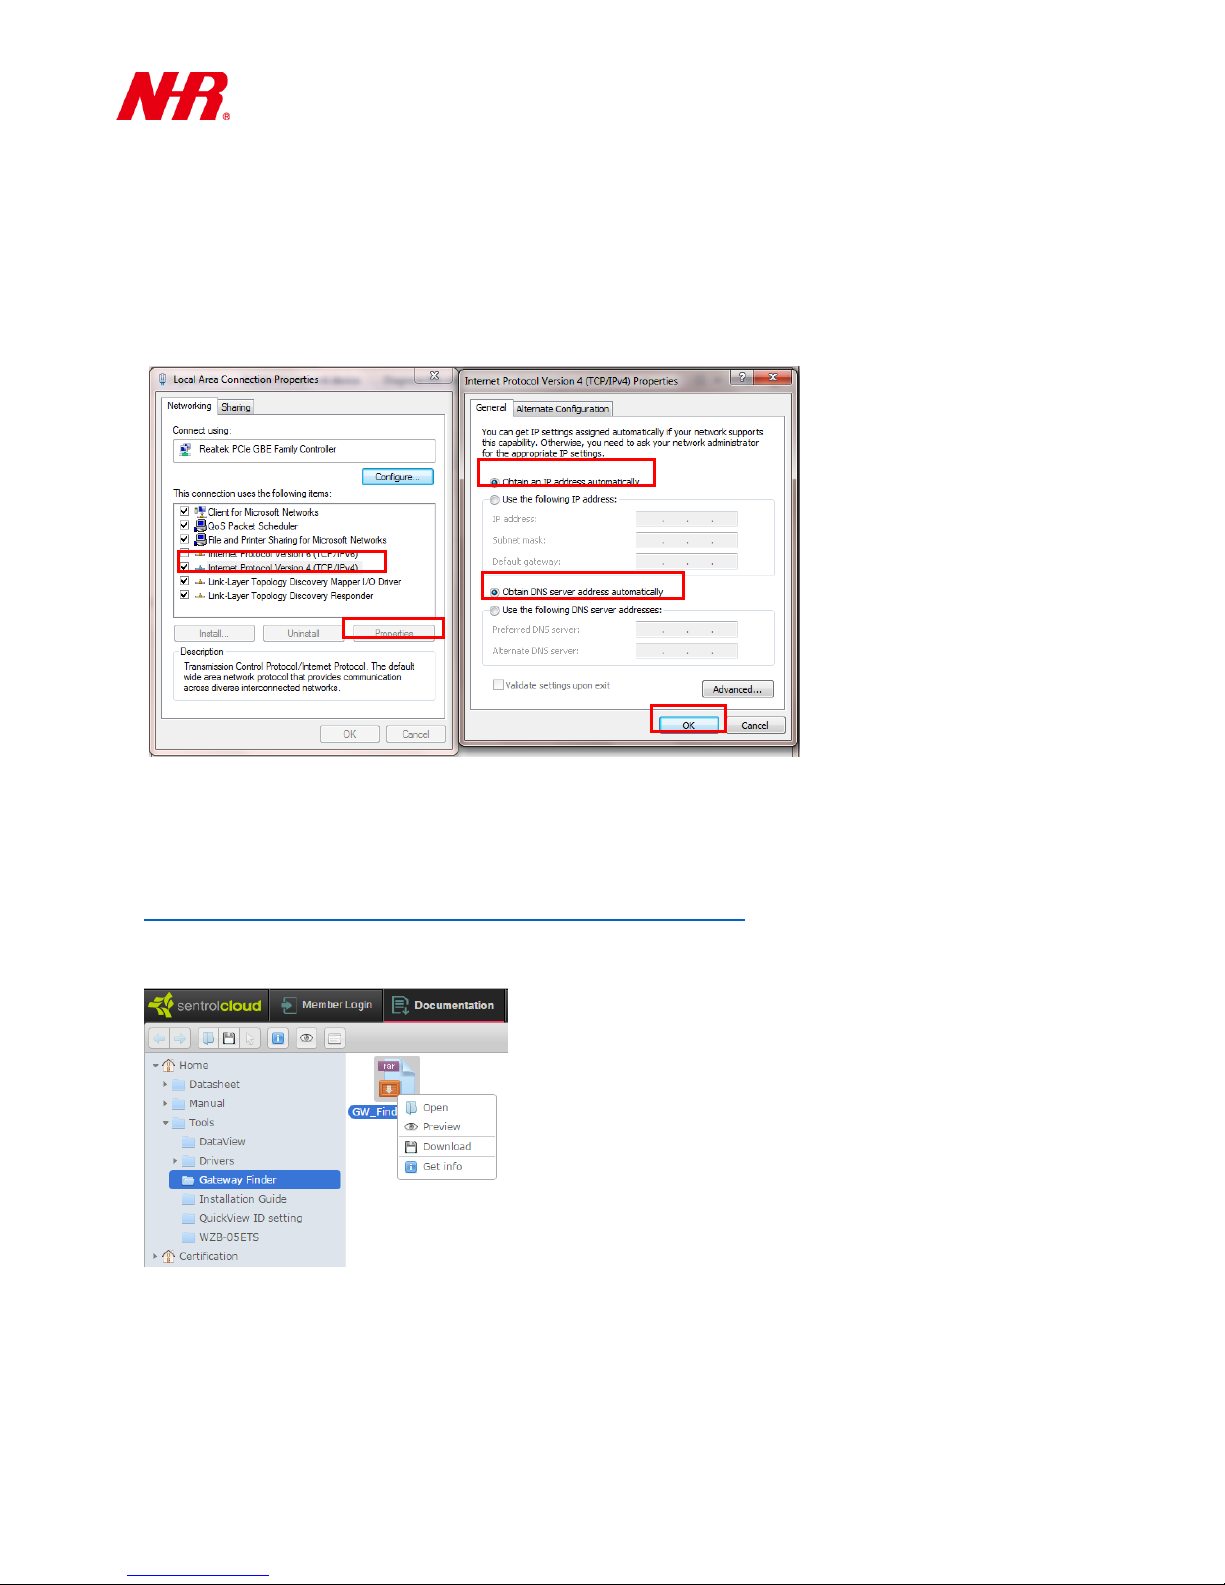
d) Initially your G07’s connection mode is set to DHCP (Dynamic Host Configuration Protocol) right
out of the factory. When your computer is connecting to your G07 for the first time, your
computer’s connection mode needs to be set to DHCP. (Using Windows 7 as an example) Go to
Start -> Control Panel -> Network and Sharing Center -> Change adapter settings -> Local Area
Connection -> Properties -> Internet Protocol Version 4 (TCP/IPv4) -> Properties. Make sure that
the options Obtain an IP address automatically and Obtain DNS server address automatically are
selected. Click OK.
e) Use an Ethernet cable to connect G07 to the same repeater or Ethernet switch that your computer
is connected to, or you can use an Ethernet cable to connect G07 to a repeater or Ethernet switch
that belong to the same local area network (with internet connection) of your computer.
f) Open a web browser on your computer and go to the website
http://www.sentrolcloud.com/nhr/view/front/download.php .
Please go to the folder Home -> Tools -> Gateway Finder . Right-click the GW_Finder RAR file icon
and select Download, then uncompress and install Gateway Finder to your computer.
g) Launch Gateway Finder. Click Search to search and display all of your G07 gateway(s) within the
same local network of your repeater or Ethernet switch, then double-click the MAC address of
your gateway (or you can manually open a web browser and manually enter the IP address of your
gateway).
6
 Loading...