

ZIGBEE DC-16SL-ZBS User Manual
DC-16SL-ZBS Door Contact
Introduction
DC-16SL-ZBS is a ZigBee Door Contact. It is capable of sending wireless signals to the coordinator in the
ZigBee network upon detection of door/window opening.
The Door Contact utilizes ZigBee technology for wireless signal transmission. ZigBee is a wireless
communication protocol that is reliable and has low power consumption and high transmission efficiency.
Based on IEEE802.15.4 standard, ZigBee allows a large amount of devices to be i ncluded in a network and
coordinated for data exchange and signal transmission
The Door Contact serves as an end device in the ZigBee network. It can be included in the ZigBee network to
transmit signal upon activation, but cannot permit any other ZigBee device to join the network through the Door
Contact.
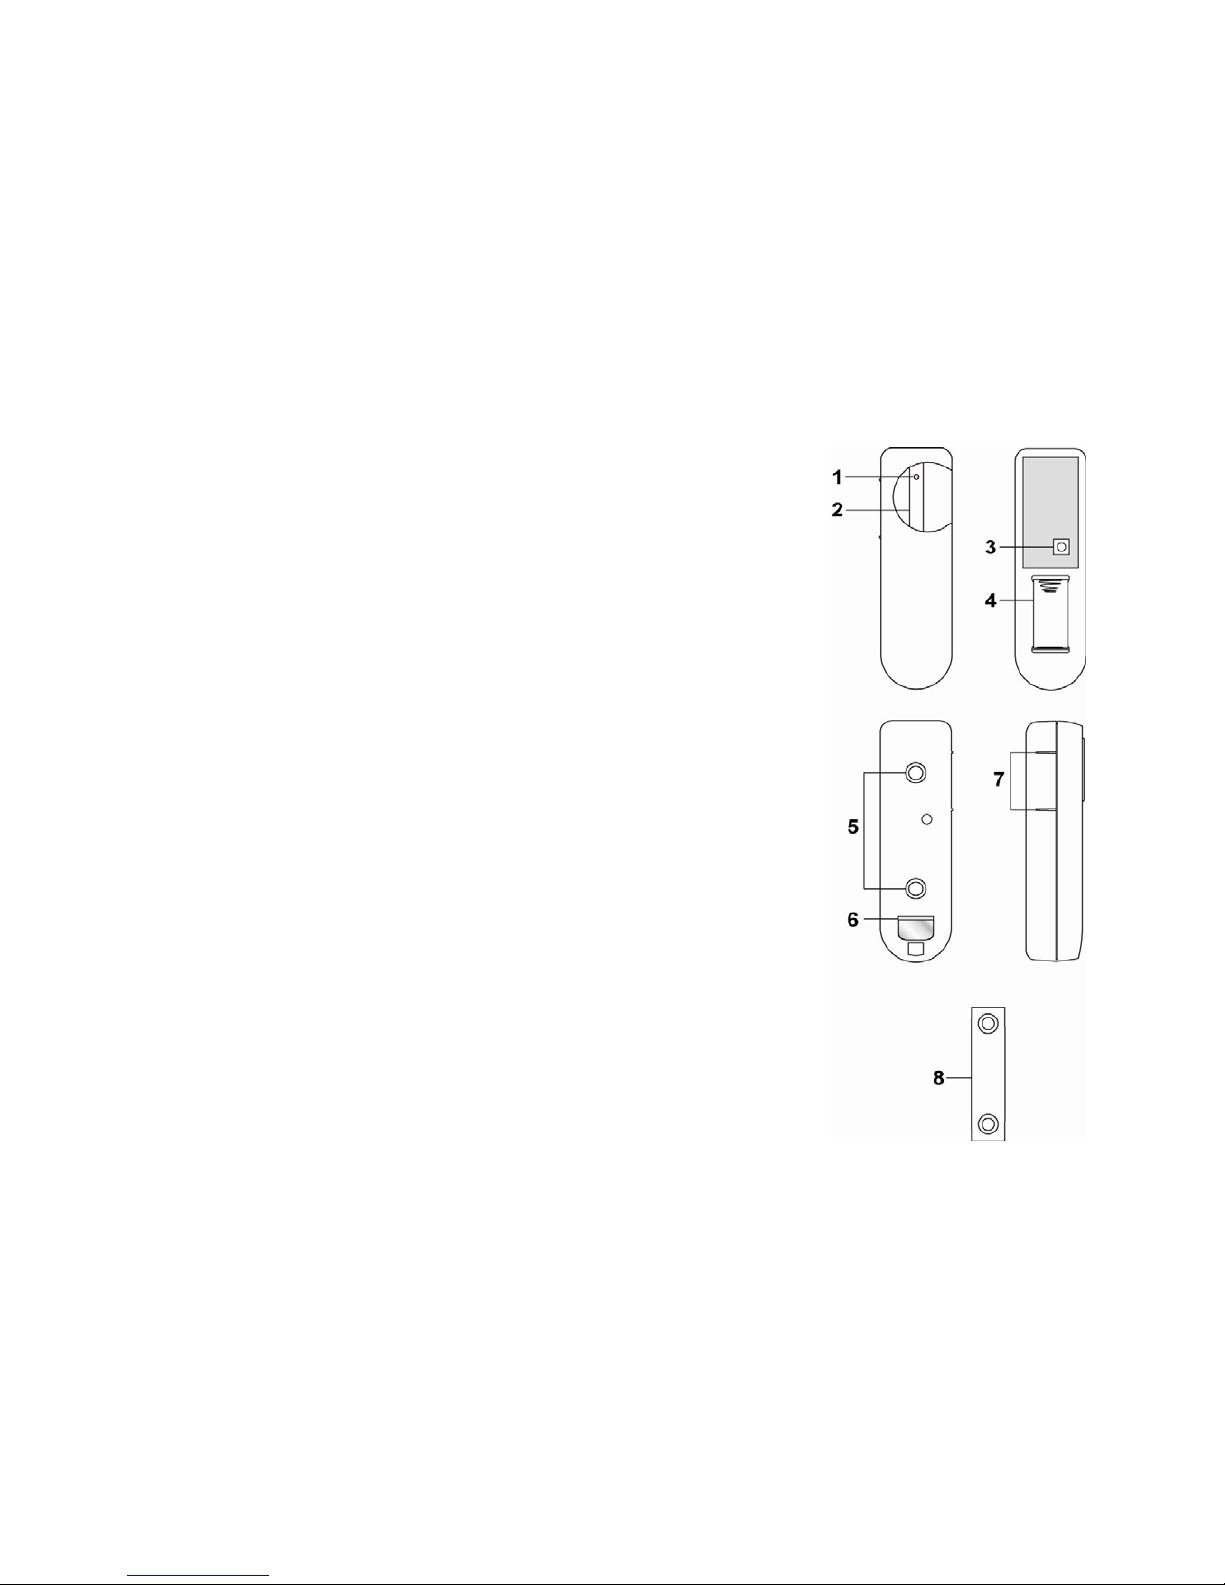
Parts Identification
1. LED indicator
The LED indicator lights up in the following conditions:
- Flashes twice quickly:
The Door Contact has successfully joined a ZigBee network.
- Flashes once every 20 minutes:
The Door Contact has lost connection to its current ZigBee network.
- Flashes under normal operation
The tamper switch is triggered
2. Function Button
- Press the button once to send a supervision signal.
- Press and hold the button for 10 seconds then release to reset the Door
Contact.
3. Tamper Switch
The Tamper switch will be activated when the Door Contact is removed from
mounted surface, or it cover opened.
4. Battery Compartment
The Door Contact is powered by one CR-2 3V Lithium battery.
5. Mounting Knockouts
6. Battery Insulator
7. Rib-Mark
8. Magnet
Features
Battery and Low Battery Detection
Battery and Low Battery Detection
The Door Contact uses one CR2 3V Lithium battery as its power source. The battery is installed in the
battery compartment with a battery insulator inserted. To activate the battery, simply pull out the battery
insulator.
The Door Contact feature Low Battery Detection function. When the battery voltage is low, the Door
Contact will transmit Low Battery signal to notify the user.
When changing battery, after removing the old battery, press the Tamper Switch twice to fully discharge
before inserting new battery
Tamper Protection
Tamper Protection
The Door Contact is protected by a tamper switch which is compressed against the mounting surface when
mounted. Whenever the Door Contact is removed from mounted location, or its cover opened, the tamper
switch will be activated and the Door Contact will send a tamper open signal to remind the user of the
condition.
Supervision
Supervision
The Door Contact will transmit a supervision signal to report its condition regularly according to user setting.
1

T
he factory default interval is 30 minutes. The user can also press the Function Button once to transm it a
supervision signal manually.
ZigBee Network Setup
ZigBee Device Guideline
ZigBee Device Guideline
ZigBee is a wireless communication protocol that is reliable and has low power consumption and high
transmission efficiency. Based on IEEE802.15.4 standard, ZigBee allows a large amount of devices to be
included in a network and coordinated for data exchange and signal transmission.
Due to the fundamental structure of ZigBee network, ZigBee device will actively seek and join net work after
powering on. Since performing a task in connecting network may consume some power, it is required to
follow the instructions to avoid draining battery of a ZigBee device
- Ensure your ZigBee network router or coordinator is powered on before inserting battery into the ZigBee
device.
- Ensure the ZigBee network router or coordinator is powered on and within range while a ZigBee device is
in use.
- Do not remove a ZigBee device from the ZigBee network router or coordinator without removing the
battery from a ZigBee device.
Joining the ZigBee Network
Joining the ZigBee Network
As a ZigBee device, the Door Contact needs to join a ZigBee network to transmit signal when it is triggered.
Please follow the steps bellow to join the Door Contact into the ZigBee network.
1. Pull out the battery insulator; this will connect the battery to power on the Door Contact.
2. After powering up, press and hold the Function button for 10 seconds, then release it to join the
network. Please make sure the permit-join feature on the router or coordinator of your ZigBee network
is enabled.
3. If the Door Contact successfully joins a ZigBee network, the LED Indicator will flash twice to confirm.
4. After joining the ZigBee network, the Door Contact will be registered in the network automatically.
Please check the ZigBee coordinator, system control panel or CIE (Control and Indicating Equipment)
to confirm if joining and registration is successful.
5. After joining the ZigBee network, if the Door C ontact loses connection to current ZigBee network, the
LED will flash every 20 minutes to indicate. Please check your ZigBee network condition and Door
Contact signal range to correct the situation.
Removing Device from ZigBee Network (Factory Reset)
Removing Device from ZigBee Network (Factory Reset)
To remove the Door Contact from current ZigBee network, the Door Contact must be put to Factory Reset
to complete device removal. Factory Reset function will clear the Door Contact of its stored setting and
information and prompt the Door Contact to search for new ZigBee network.
Before removing device, make sure the Door Contact is within current ZigBee network signal range
1. Press and hold the function button for 10 seconds, then release the button to reset Door Contact.
2. Upon reset, the Door Contact will clear current ZigBee network setting and transmit signal to ZigBe e
coordinator to remove itself from current ZigBee network. It will then actively search for available
ZigBee network again and join the network automatically.
Installation
Installation Guideline
Installation Guideline
The Door Contact should be installed on the door/window frame, and the magnet on the door/window
The distance between the Door Contact and the magnet should be no more than 15mm when the doo r
is closed.
Avoid mounting the Door Contact on metallic surface. If mounting on metallic surface, make sure the
Door Contact can be triggered when the door is opened and the signal can be received successfully by
Control Panel.
Mount the Door Contact as high as possible.
Using Door Contact with ZigBee Router
Using Door Contact with ZigBee Router
IMPORTANT NOTE
If the Door Contact installation location is away from your system control panel and requires ZigBee routers
to improve signal strength. DO NOT use a ZigBee Router without backup battery. A ZigBee router without
battery will be powered down during AC power failure and the Door Contact connected to the router will
lose connection with ZigBee network. You should plan your Door Contact installation location using only
ZigBee router with backup battery.
Mounting the Door Contact
Mounting the Door Contact
1. Find a suitable location close to your door/window to install the Door Contact.
2. The Door Contact has 2 rib-marks on one side (refer to figure), marking the internal magnet switch
2
 Loading...