

Page 1
ZI-9981
Operating Instruction
200A AC/DC Mini Clamp-on Meter
www.zicotech.com
Page 2

1
Features
3-2/3 digit (2400 count) LCD display
White LED backlight
Built-in non-contact AC voltage detector plus flashlight
Frequency measurement 40Hz to 1kHz
Autoranging with auto power off
0.7” (18mm) Jaw opening
Specifications
General Specifications
Display 3-2/3 (2400 count) Digit LCD
with white LED backlight
Polarity Minus sign ( - ) indicates negative
polarity
Current sensor Hall effect sensor type
Overload indication “OL” displayed on the LCD
DCA zero adjust One touch zero key
Display rate 2 readings/second, nominal
Battery Two 1.5V AAA batteries
Low Battery indication “BATT” displayed on the LCD
Auto OFF approx. 7 minutes
Operating conditions 32ºF to 86ºF (0ºC to 30ºC) 90%RH;
Storage conditions - 14ºF to 140ºF (-30ºC to 60ºC); <
90% Relative Humidity
Altitude Operate at less than 3000 meters
Weight 6.2 oz. (175g) including battery
Dimensions 164 x 65 x 32mm (6.5 x 2.6 x
1.3”) (HXWXD)
Jaw opening 18mm (0.7”)
Standards IEC61010 Category II 600V,
86ºF to 104ºF (30ºC to 40ºC)
75%RH; 104ºF to 122ºF (40ºC to
50ºC) 45%RH
Page 3
2
Range Specifications
Function
Range
Resolution
Accuracy (of
reading)
DC Current
200A
100mA
± (2.8% + 8
digits)
AC Current
(50/60Hz)
200A
100mA
±(3.0% + 8
digits)
Frequency
(Auto-Ranging)
40-51Hz
0.01Hz
±(1.2% + 5
digits)
Input
Sensitivity: 5A
AC RMS min.
51-510Hz
0.1Hz
0.51-1kHz
0.001kHz
Non-Contact
AC Voltage
100VAC to 600VAC 50/60Hz
Meter Description
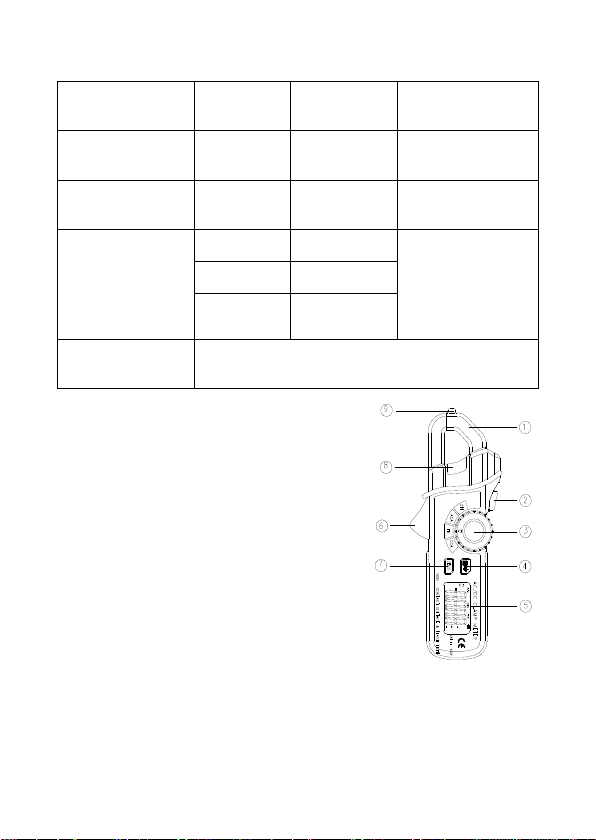
1, Current sense jaw
2. Flashlight button
3. Rotary function switch
4. Data HOLD and Backlight key
5. LCD display
6. Clamp trigger
7. One-touch DCA ZERO key
8. Non-contact AC voltage indicator light
9. Non-contact AC voltage detector probe tip
Page 4
3
Safety Information
!
Input Limits
Function
Maximum Input
AC Current
200A
DC Current
±200A
Frequency
1kHz
Caution! Refer to the explanation in this Manual
Double Insulation
This meter has been designed to be safe in use, but the
operator must use caution in its operation. The rules listed
below should be carefully followed for safe operation.
1. NEVER apply voltage or current to the meter that
exceeds the specified maximum:
2. USE EXTREME CAUTION when working with voltages
greater than 25VAC rms. These voltages are considerd
a shock hazard.
3. NEVER operate the meter unless the back cover and the
battery/fuse door are in place and fastened securely
Page 5
4
AC/DC CLAMP METER
AC/DC CLAMP METER
Operation
AC Current Measurements
1) Set the Function switch to the ACA range.
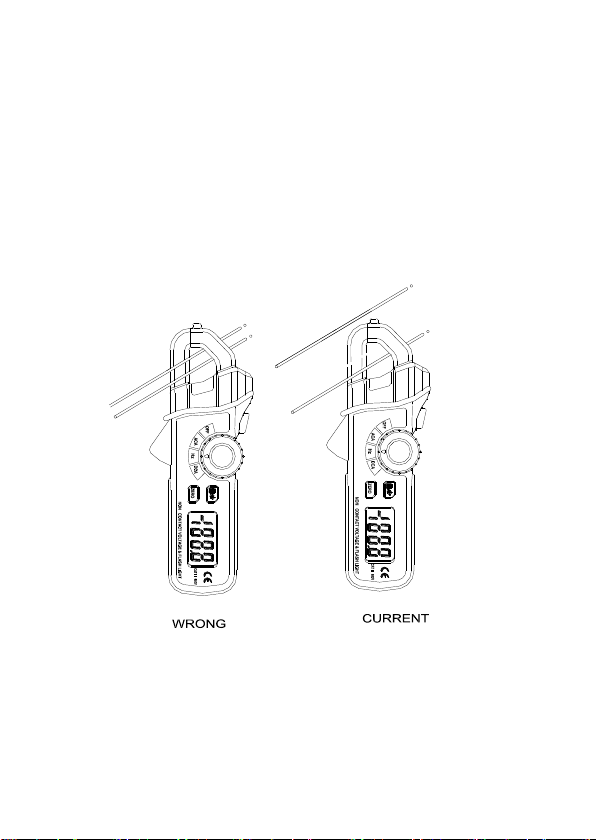
2) Press the jaw trigger and clamp around,
fully enclosing a single conductor.
Do not allow a gap between the two halves of the jaw.
Refer to the diagram at right for
the correct way to enclose a single conductor.
3) Read the ACA value on the LCD.
Page 6

5
DC Current Measurements
WARNING: Risk of Electrocution. Before use, always test the
Voltage Detector on a known live circuit to verify proper operation
1) Set the Function switch to the DCA range.
2) Press the ZERO key to null the meter display.
3) Press the Trigger to open the current sense Jaw.
4) Fully enclose the conductor to be measured.
Do not allow a gap between the two halves of the jaw.
5) Read the DCA value on the LCD.
Non-Contact AC Voltage Measurements
1) Touch the probe tip to the hot conductor or insert into the
hot side of the electrical outlet.
2) If AC voltage is present, the detector light will illuminate.
NOTE: The conductors in electrical cord sets are often
twisted. For best results, rub the probe tip along a
length of the cord to assure placing the tip in close
proximity to the live conductor.
NOTE: The detector is designed with high sensitivity.
Static electricity or other sources of energy may
randomly trip the sensor. This is normal operation
Page 7

6
Frequency Measurements
1) Set the Function switch to the Hz position.
2) Fully enclose the conductor to be measured. Do not
allow a gap between the two halves of the jaw.
3) Read the Frequency value on the LCD.
Flashlight
Press and hold the top button to turn the flashlight on.
Release the button to turn the flashlight off.
Data Hold
To freeze the current reading on the LCD, press the “Hold
Backlight” key. The word HOLD will appear on the LCD while
the meter is in the Data Hold mode. To release the Data Hold
function and return the meter to normal operation, press the
“Hold Backlight” key again. The word HOLD will switch off.
Backlight display
Press and hold the “Hold Backlight” key for more than 2
seconds to turn on the backlight. This will also activate the
Data Hold function. To release the Data Hold function and
return the meter to normal operation, press the Data Hold
key momentarily. To turn off the backlight, press and hold the
“Hold Backlight” key for more than 2 seconds
AUTO POWER OFF
Page 8

7
The auto off feature will turn the meter off after 7 minutes.
Battery Replacement
1) When the low battery symbol appears on the LCD
the batteries must be replaced.
2) Power down and remove the rear battery
compartment Phillips screw.
3) Lift off the battery compartment cover and replace
the two 1.5V AAA cells.
4) Replace compartment cover and secure the screw.
www.zicotech.com
 Loading...