

ZHUHAI ISMART DIGITAL C9004DN2 User Manual
Hybrid LED Lighting with Wi-Fi IP Camera
V1.1
FCCID:2AIXZC9004DN2

Contents
1. Overview……………………………………………………………………………………………………………………………………….……..1
2. Package contents…………………………………………………………………………………………………………………………….……1
3. Appearance………………………………………………………………………………………………………………………………….……….2
4. Installing the mobile App………………………………………………………………………………………………………………….…..3
5. Connecting the camera to your network………………………………………………………………………………………….……3
5A How to add camera in the App…………………………………………………………………………………………….…………..3
Method1: AP mode to Add Camera……………………..………………………………………..…………….…………………..3
Method2: Scan the camera’s QR code or input the DID directly…………………………………………………………5
Method3: Search camera in the LAN…………………………………………………………………………………………………6
5B Wireless Network Connection…………………………………………………………………………………………………...…….7
6. Insert a Micro-SD card for recording………………………………………………………………………………….………………….7
7. Install the Wi-Fi antenna…………………………………………………………………………………………………….…….………….8
8. Camera installation guide……………………………………………………………………………………………….………….…………8
8A Camera Location Tips ………………………………………………………………………………………………………..……………8
8B Camera Field of View…………………………………………………………………………………………………………….………..9
8C Lighting & Environment Tips………………………………………………………………………………………………….………..9
8D Tools Required (not included)……………………………………………………………………………………………………..…10
8E Installation Steps …………………………………………………………………………………………………………………………..10
8F LED and Camera Angle/Direction Adjustment…………………………………………………………………….……….….10
9. Main function introduction…………………………………………………………………………………………………………..…....11
9A LED working mode………………………………………………………………………………………………………………..……....11
9B Environmental illumination threshold setting for Day/Night mode switch ………………………….……..13
9C PIR trigger sensitivity setting…………………………………………………………………………………………….……………13
9D Notification push setting for PIR trigger…………………………………………………………………………………………14
9E Notification push setting for Motion Detection trigger……………………………………………………………..…...15
9F Recording to a Memory Card………………………………………………………………………………………..………….…....15
9G My messages………………………………………………………………………………………………………………………….……..16
10. Specifications……………………………………………………………………………………………………………………………….……16
11. Troubleshooting………………………………………………………..……………………………………………………………………...17
Hybrid LED lighting with WiFi IP Camera User manual
Overview
1
Thanks for your purchase of this hybrid LED lighting with HD Wi-Fi IP Camera! Get yourself familiar with
all of the ports and connections on the camera and have a look at the user manual for instructions on
how to install the camera and how to use mobile App software.
Features
•3 in 1: HD IP camera + flood lighting + PIR sensor
• Turn on/off lighting manually or automatically
•SD card recording
•Alarm notification push automatically
• Wireless connection
Important Safety Instructions
• Make sure product is fixed correctly and stable if fastened in place.
• Do not operate if wires and terminals are exposed.
• Apply for garden/square/wall/garage etc..
Default Password Information
• To ensure your privacy, this device supports password protection.
• The default, all-access username is admin, the default password is empty.
• To ensure your ongoing privacy, we strongly recommend setting a new password as soon as possible.
Quick Start Guide
Step1: Download mobile App
Step2: Connect the camera to router
Step3: Add camera in the App
Step4: Install the camera
Step5: Enjoy remote operation
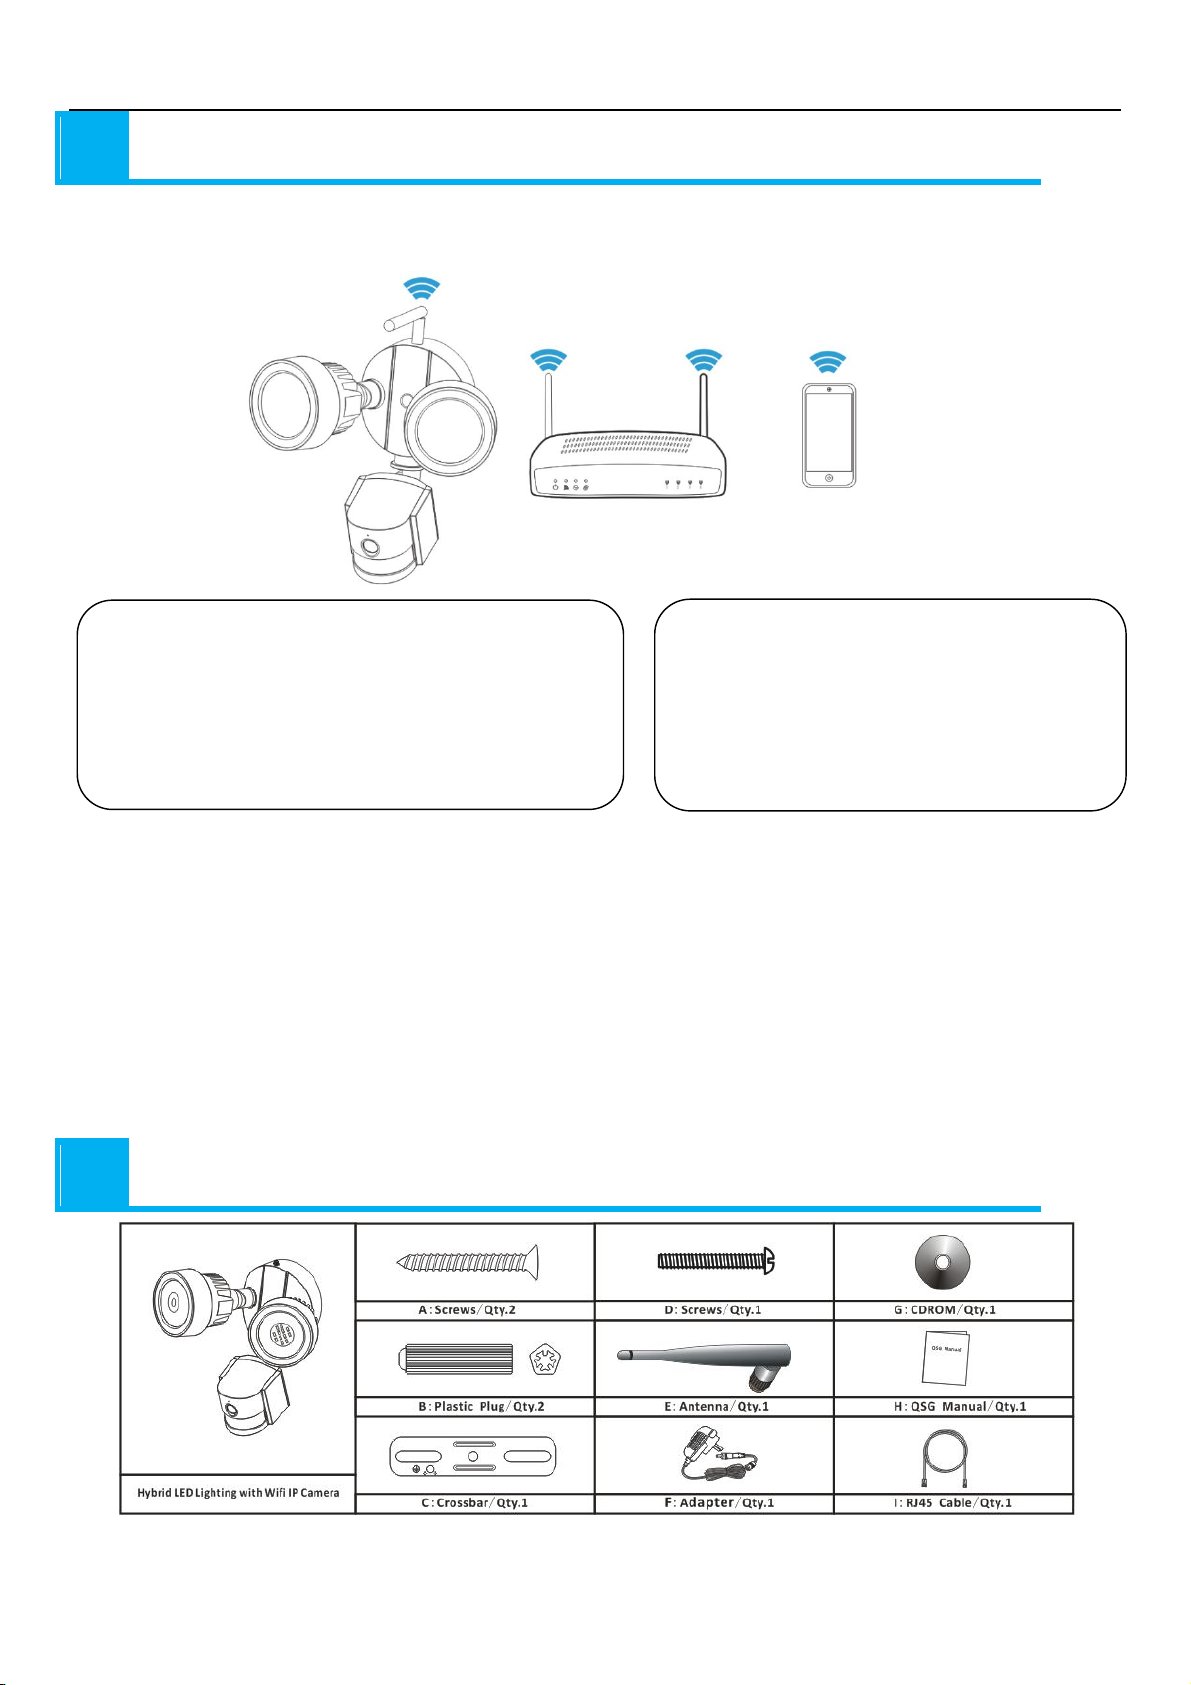
2 Package contents
1
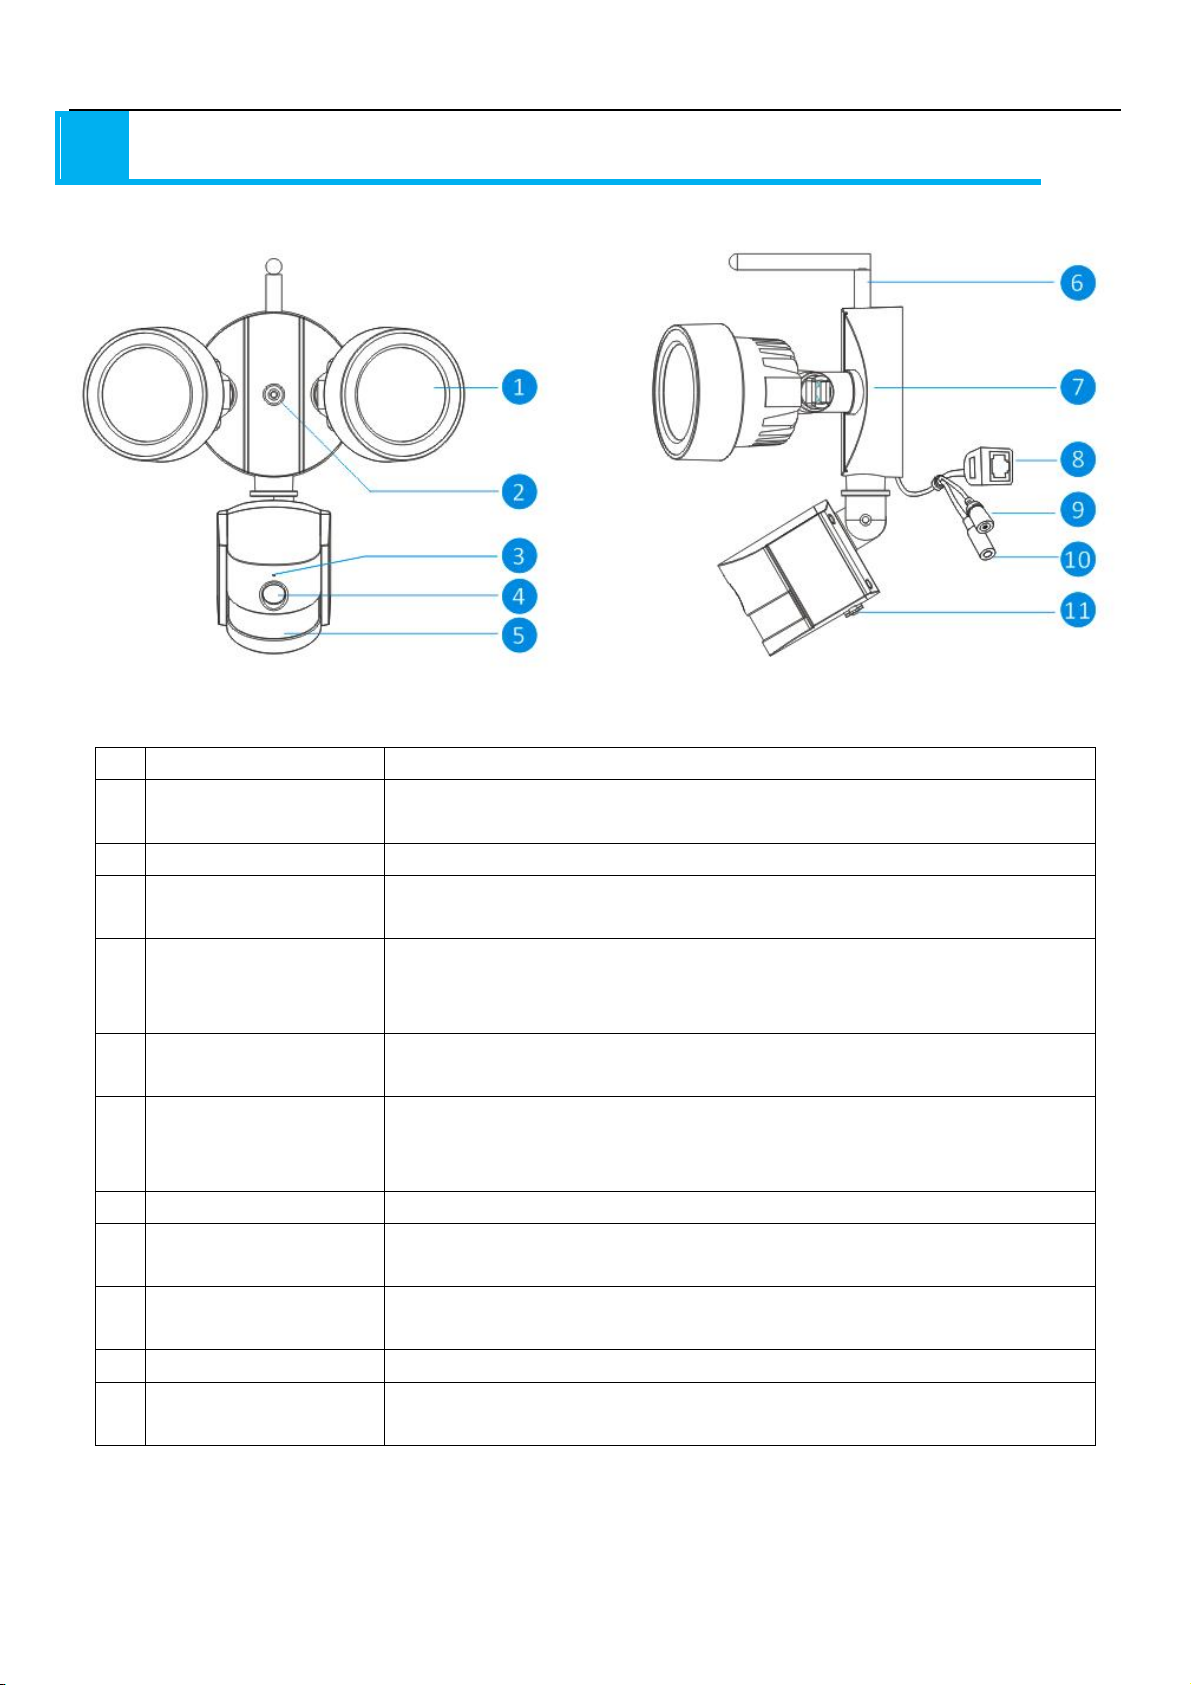
Appearance
3
Hybrid LED lighting with WiFi IP Camera User manual
Front view Side view
No. Name Description
1 White light source The camera will use these in low-light conditions to generate a black and
white image, even in total darkness.
2 Fixed hole The camera can be fixed on a wall with screw through this hole.
3 Microphone Allows the camera to pick up nearby sounds, and stream them with the
video.
4 Lens The business end of the camera. For a reliable and clear image, ensure that
the lens stays clean and unobstructed. To clean, use a dedicated lens
cleaning solution and cloth, available from all good photography stores.
5 PIR (Passive infrared
sensor)
6 Antenna Used to transmit the wireless signal to the router. For the best results, the
7 Mounting bracket The supplied mounting bracket can be screwed onto any flat surface.
8 RJ45 Ethernet connector
9 Reset button Long press and hold it over 15senconds when the power is disconnected and
10 Power socket Connect the power adapter here.(DC12V/2A)
11 TF card slot Insert a TF card for allowing you to capture a series of snapshots and video
2
This is an electronic sensor that measures infrared light radiating from
objects in its field of view.
antenna should be as unobstructed as possible - ideally having a clear line of
sight to the receiver.
For a wired connection, connect this to a spare port on your home router. so
you can use the ismsee App on your mobile device.
reconnected, all settings will revert to the factory defaults.
files.
Hybrid LED lighting with WiFi IP Camera User manual
4 Installing the mobile App
The hybrid LED lighting with HD Wi-Fi Security Camera works with iPhone, iPad and Android devices.
Install the mobile App and use your mobile for remote viewing/control your camera.
The mobile App is free to download for you, and is available from the respective Apple App Store and Google Play
Store.
4A To install App on Android
① Open Google Play Store.
② Search for “iSmsee8.0”.
③ Touch INSTALL.
④ Review the App’s permissions,
then touch ACCEPT to download.
After installing iSmsee App on your mobile device, just locate the iSmsee App and tap the icon to run. The App will
load and take you directly to the Device list screen.
4B To install App on iPhone/iPad
① Open the App Store.
② Search for “iSmsee”.
③ Tap INSTALL APP to download.
5 Connecting the camera to your network
5A How to add camera in the App
The camera works with your home Internet connection and wireless router. There are 2 ways you can follow to set
up the camera with your Wi-Fi network.
Method1: Add Camera
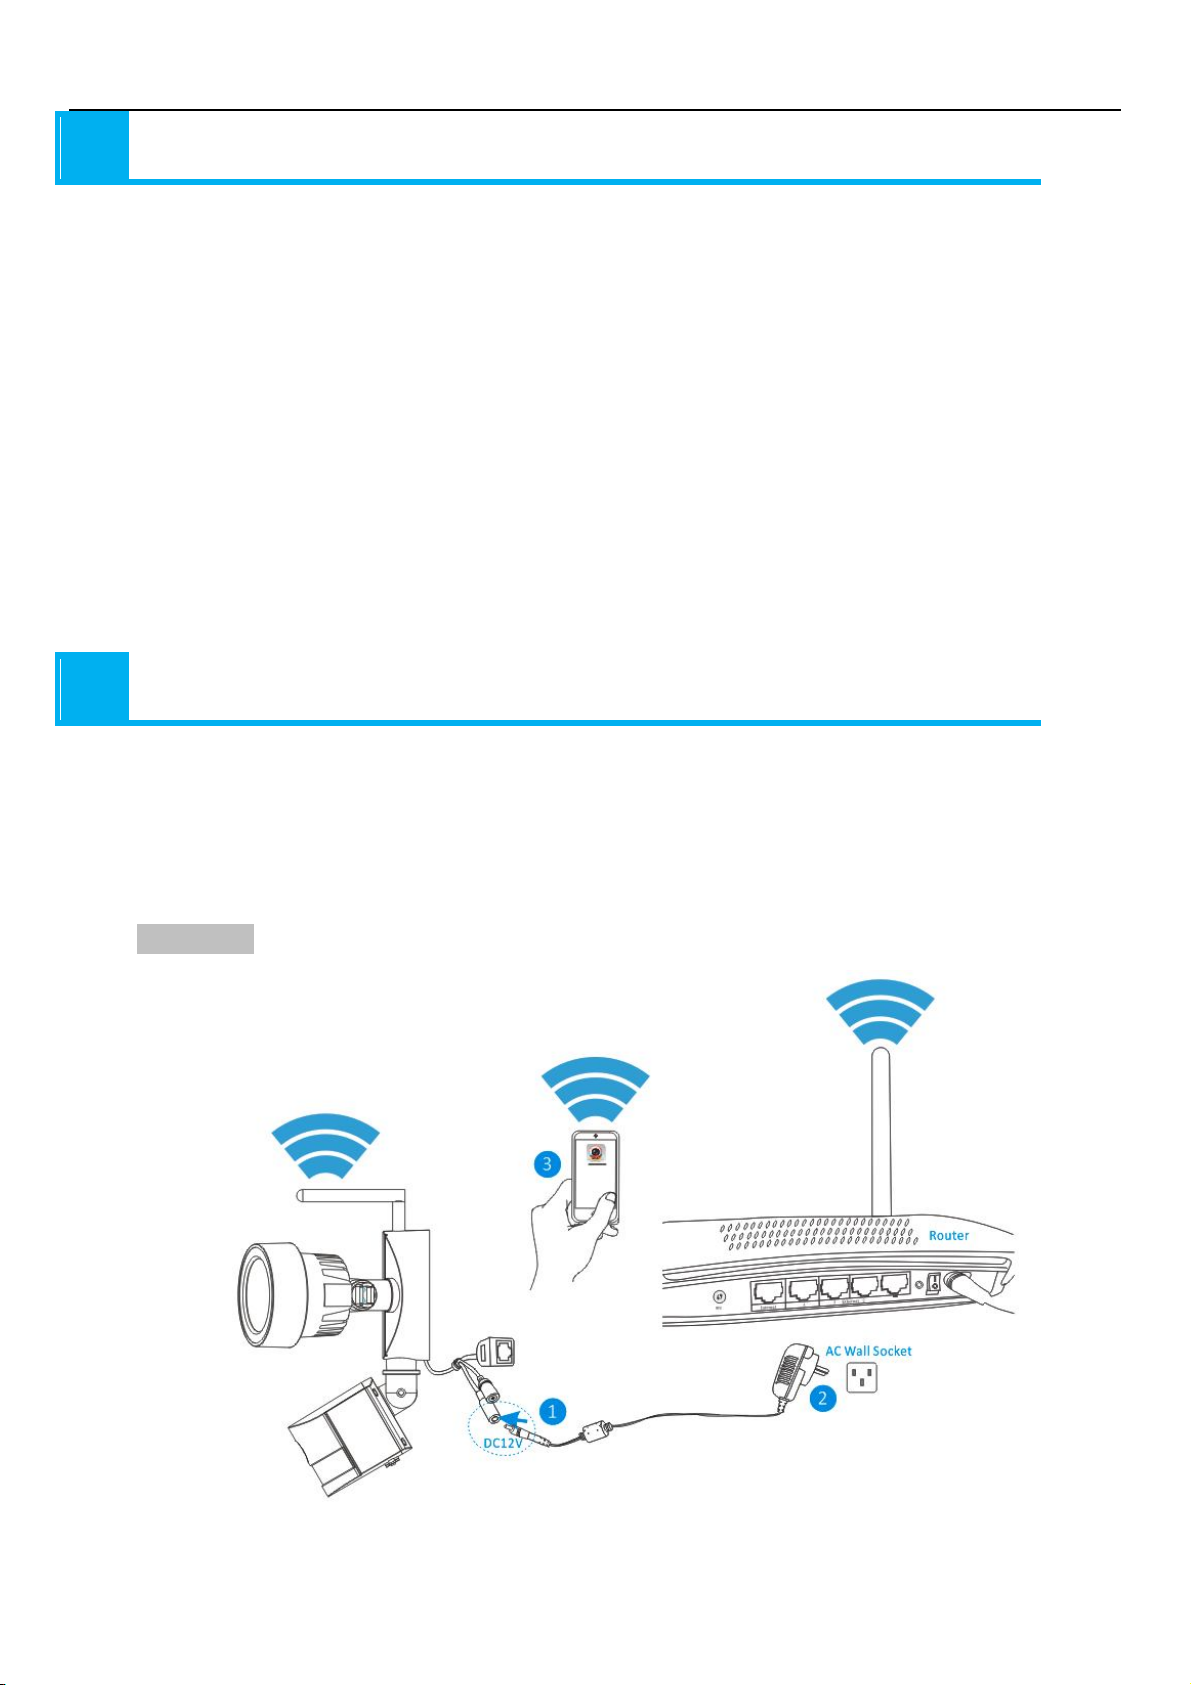
■Preparation
3
Hybrid LED lighting with WiFi IP Camera User manual
① Connect the output of the supplied 12V power adapter into the power socket on the camera.
② Plug the power adapter into the wall socket.
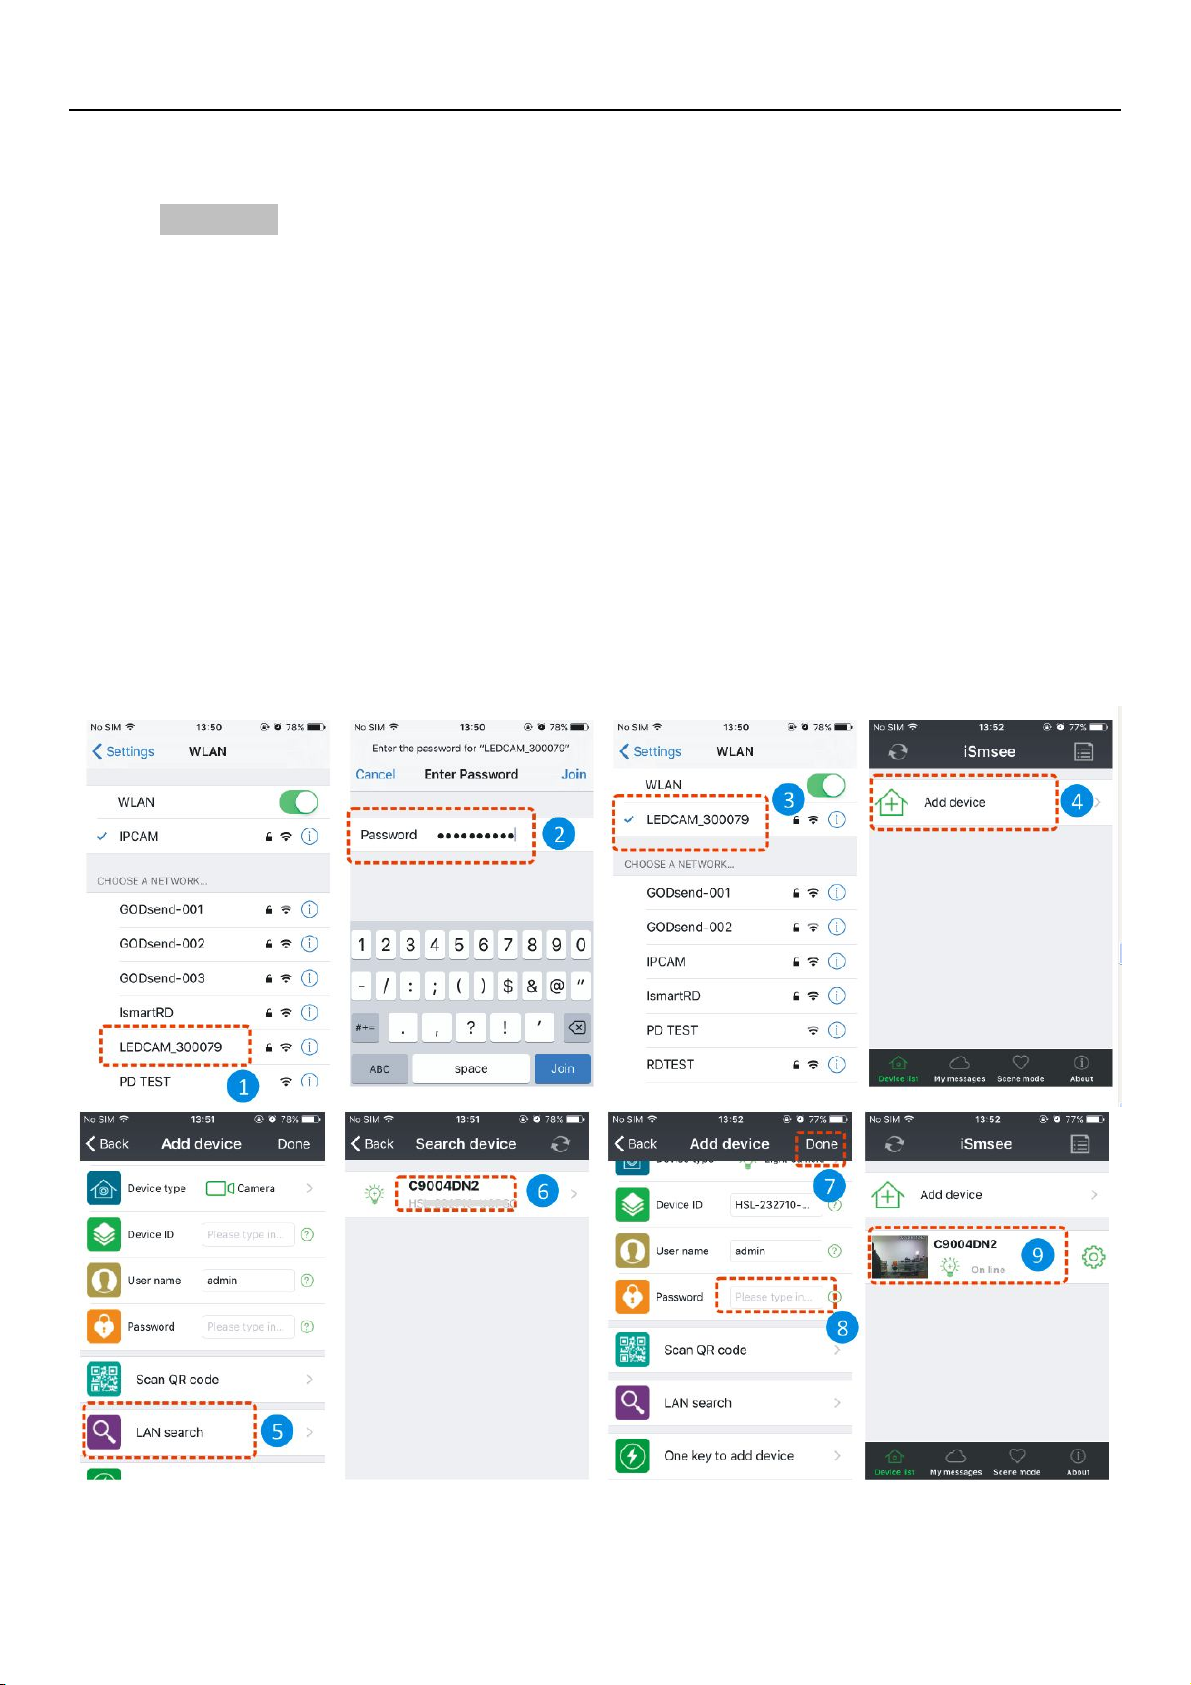
■Add camera
Wait for about 90 seconds when the camera started up then operate according to the below steps:
① Tap”Settings” on your phone and click “WLAN” option,then you will find one WI-FI network named
like as “LEDCAM_XXXXXX”,please click it.
②Enter the WI-FI password, default value is 0123456789, then click”Join”to save.
③ Now your phone has been connected to the LED camera WI-FI network.
④Run the APP, and Touch the “Add device” to enter the adding device screen.
⑤Tap “LAN search” to enter the “Search device” screen for searching the camera .
⑥If search out the DID, can directly Touch the camera then return to “Add device” screen.
⑦Enter the camera password.
Notice: The camera factory Settings password is empty, so when the first using of the camera, no
need to enter the password here and can tap the “Done” directly. (The same below)
⑧ Tap“ Done” to save.
⑨ Now the camera is added in the “Devices” list successfully.
Notice: If you need connect the camera to your home WI-FI router, please refer chapter5B.
4
 Loading...