

Page 1

Instruction Manual
Z1-Proud
3-axis handheld stabilizing
gimbal for GOPRO
Package Content
Note:
Install the GOPRO
before connecting power.
Camera Holder
Camera Charging port
Gopro LCD BacPac
To use the M2.5x19mm
Thumb Screw for GOPRO
with LCD BacPac.
To use the M2.5x9mm Thumb
Screw for GOPRO only.
18650
Lithium-ion
battery x2
Power Button
①
②
V1.00
Battery
indicator
DOWN
UP
Micro USB port – for
setting and firmware
upgrade
MODE
1
1
2
2
1
2
1
1
1
1
1
Camera Holder
Different Rotation Angle
Mode Status Indicator
3-axis handheld camera stabilizer
Camera Holder
M2.5x 9mm Thumb Screw
M2.5x19mm Thumb Screw
Gopro Charging Wire
18650
Lithium-ion Battery Charger
18650 Lithium-ion Battery
Micro USB Charger Cable
Warranty Card
Certificate
User's Manual
Gopro3
Gopro3
270°
45°
270°
Authorized Exclusive Distributor
Manufactured by Zhiyun Tech
Page 2
③
④
⑤
⑥
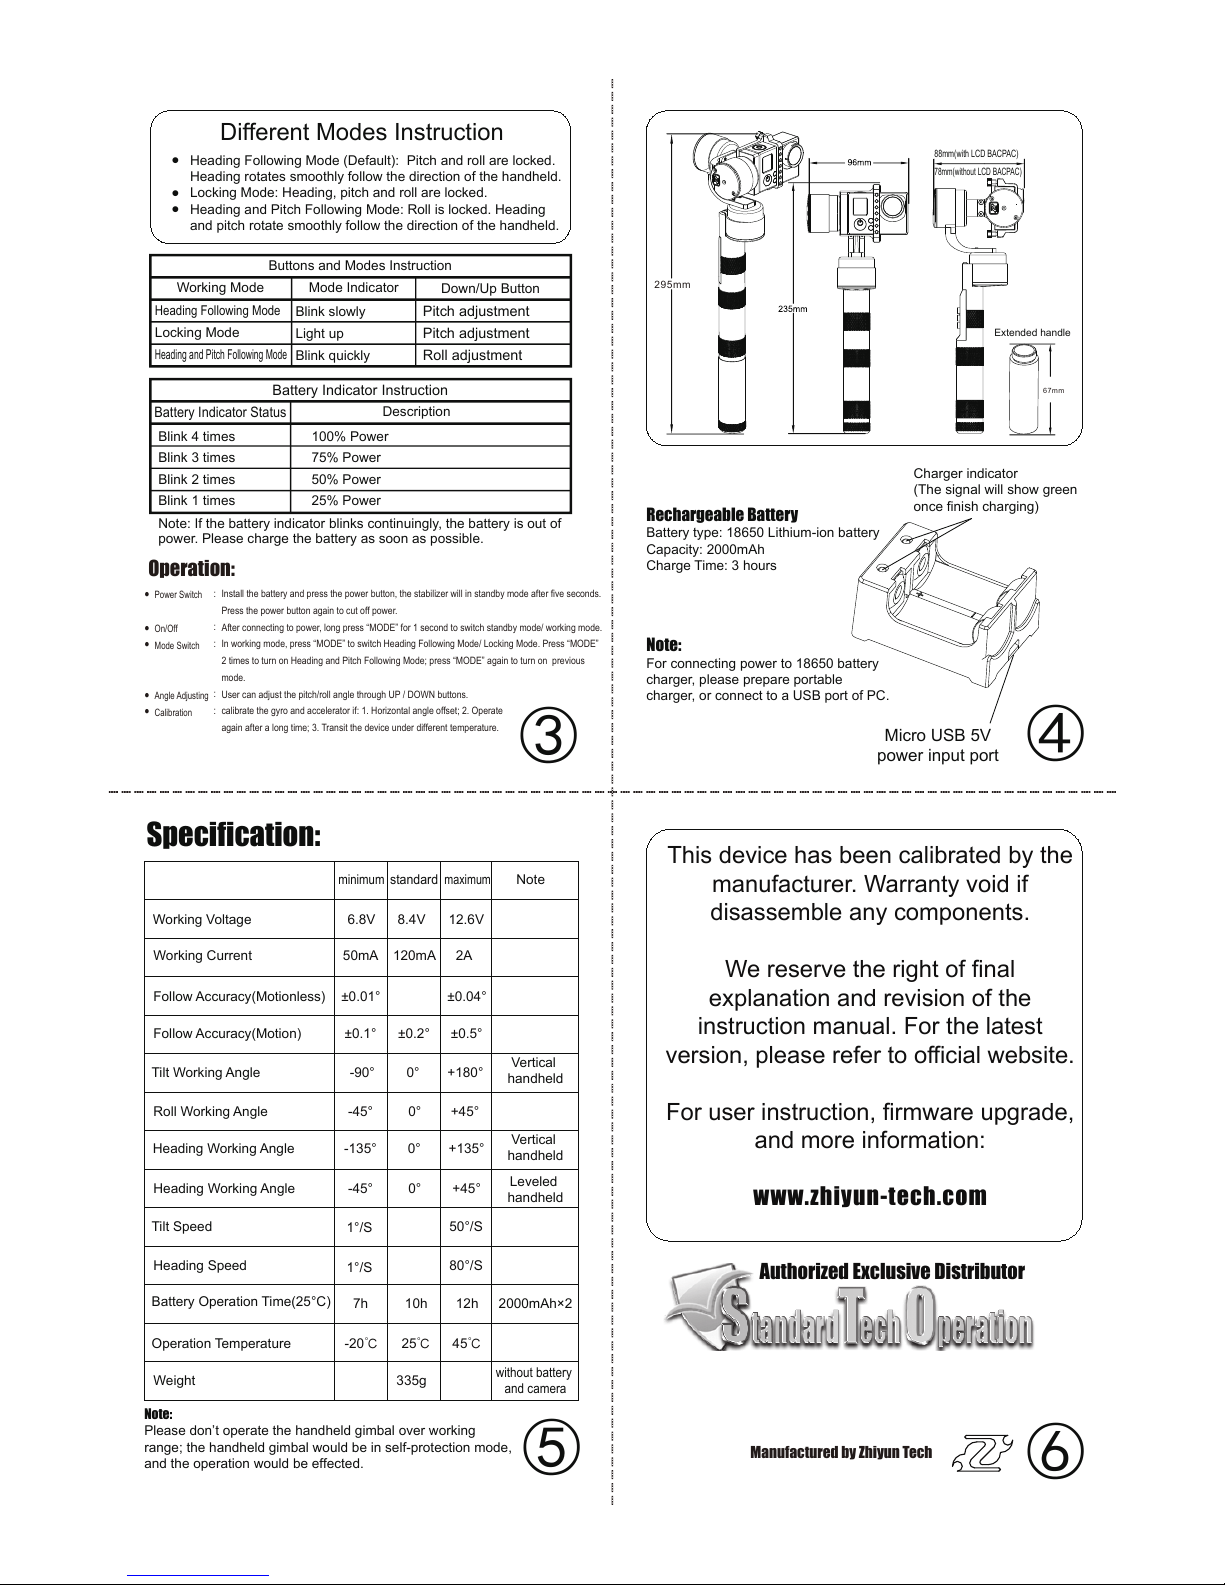
Charger indicator
(The signal will show green
once finish charging)
Micro USB 5V
power input port
Rechargeable Battery
Battery type: 18650 Lithium-ion battery
Capacity: 2000mAh
Charge Time: 3 hours
Note:
For connecting power to 18650 battery
charger, please prepare portable
charger, or connect to a USB port of PC.
Specification:
minimum
standard
maximum
Note
Working Voltage
Working Current
Follow Accuracy(Motionless)
Follow Accuracy(Motion)
Tilt Working Angle
Roll Working Angle
Tilt Speed
Battery Operation Time(25°C)
2000mAh×2
Weight
without battery
and camera
Operation Temperature
Heading Speed
78mm(without LCD BACPAC)
88mm(with LCD BACPAC)
Buttons and Modes Instruction
Working Mode Mode Indicator
Down/Up Button
Heading Following Mode
Heading and Pitch Following Mode
Locking Mode
Blink slowly
Blink quickly
Light up
Pitch adjustment
Roll adjustment
Pitch adjustment
Heading Following Mode (Default): Pitch and roll are locked.
Heading rotates smoothly follow the direction of the handheld.
Locking Mode: Heading, pitch and roll are locked.
Heading and Pitch Following Mode: Roll is locked. Heading
and pitch rotate smoothly follow the direction of the handheld.
Different Modes Instruction
●
●
●
Battery Indicator Instruction
Battery Indicator Status
Description
Vertical
handheld
Heading Working Angle
Vertical
handheld
Heading Working Angle
Leveled
handheld
Note:
Please don’t operate the handheld gimbal over working
range; the handheld gimbal would be in self-protection mode,
and the operation would be effected.
Note: If the battery indicator blinks continuingly, the battery is out of
power. Please charge the battery as soon as possible.
Blink 4 times
Blink 3 times
Blink 2 times
Blink 1 times
100% Power
75% Power
50% Power
25% Power
Manufactured by Zhiyun Tech
Authorized Exclusive Distributor
295mm
67mm
Extended handle
6.8V 8.4V 12.6V
50mA 120mA 2A
±0.01° ±0.04°
±0.1° ±0.2° ±0.5°
-90° 0° +180°
-45° 0° +45°
7h 10h 12h
335g
-20℃ 25℃ 45℃
-135° 0° +135°
-45° 0° +45°
1°/S
1°/S
50°/S
80°/S
Operation:
●
●
●
●
●
Install the battery and press the power button, the stabilizer will in standby mode after five seconds.
Press the power button again to cut off power.
After connecting to power, long press “MODE” for 1 second to switch standby mode/ working mode.
In working mode, press “MODE” to switch Heading Following Mode/ Locking Mode. Press “MODE”
2 times to turn on Heading and Pitch Following Mode; press “MODE” again to turn on previous
mode.
User can adjust the pitch/roll angle through UP / DOWN buttons.
calibrate the gyro and accelerator if: 1. Horizontal angle offset; 2. Operate
again after a long time; 3. Transit the device under different temperature.
Power Switch
On/Off
Mode Switch
Angle Adjusting
Calibration
:
:
:
:
:
This device has been calibrated by the
manufacturer. Warranty void if
disassemble any components.
We reserve the right of final
explanation and revision of the
instruction manual. For the latest
version, please refer to official website.
For user instruction, firmware upgrade,
and more information:
www.zhiyun-tech.com
Page 3

The calibration is applicable to Z1-Pro(GY-3DH), Z1-Rider, Z1-Proud, Z1-Smooth.
Before the first operation, please calibrate the gimbal.
Calibration is needed if the gimbal:
• is not leveled while activating
• is not activated after a long time
• is transported under different temperature.
1. Download and install the Silicon Labs CP210x VCP USB driver
2. Download and install the Gimbal tools software v1.0.6.
3. Connect the gimbal to PC through USB cable.
4. Check if the PC recognize the USB chip.
5. Press the power button. Do not turn on the gimbal.
6. Start the Calibration Software.
7. Calibration Software will recognize the port automatically. If not, start at step 4
8. Select the product type.
9. Click “Open Port” button. The gyro parameter will be indicated, and the “Calibration” button
will be highlighted. ( If not, please re-install the driver or try a different PC.)!
!
Serial port !
Click “Calibration” to calibrate gyro and accelerator. Place the gimbal according to the picture
below. It will take few seconds to process; if not, adjust the gimbal orientation.
Page 4

!
!
!
After the six orientations steps, the screen will show a V mark. The calibration is done.
Please disconnect the USB cable and power off the gimbal. Restart the gimbal, wait for 10 second,
and check if camera is leveled. If failed, please calibrate again.
! !
If the screen show a X mark, please calibrate again.
Page 5

Firmware upgrade
Click Open Serial Port button.
Select the corresponding product type in Product.
Select Firmware Upgrade.
Click Connect button.
After successful connection, the software will show the used firmware version of product.
Page 6

Click the BROWSE button to select the product corresponding firmware file (.ptz)
Click Update button to start firmware update.
!
!
When the update is complete, click Close Serial Port button to close the update software and pull
out USB cable. By now your product is already completed firmware upgrade.
!
Links: http://www.zhiyun-tech.com http://www.standard-tec.com/ http://www.infinity-hobby.com
 Loading...