


1
Video Doorbell

1
Microphone
Doorbell
Button
Indicator
Light
Power
Supply
Terminal
Power
Supply
Terminal
Speaker
Anti-theft
Screw
Hole
1 Doorbell Appearance
·Front and Rear Panels
Indicator , but ton and microph one Power supply terminal
·Side Panel
Speaker Anti-theft screw hole

1
2
Micro SD
Card slot
Reset
Button
·Inside
Micro SD card slot Reset button

3
2 In The Box
Doorbell body Replaceable faceplate
Angle adjustment bracket (hori z ontal) Flat bracket
Angle adjustment bracket (vertical) Mounting level
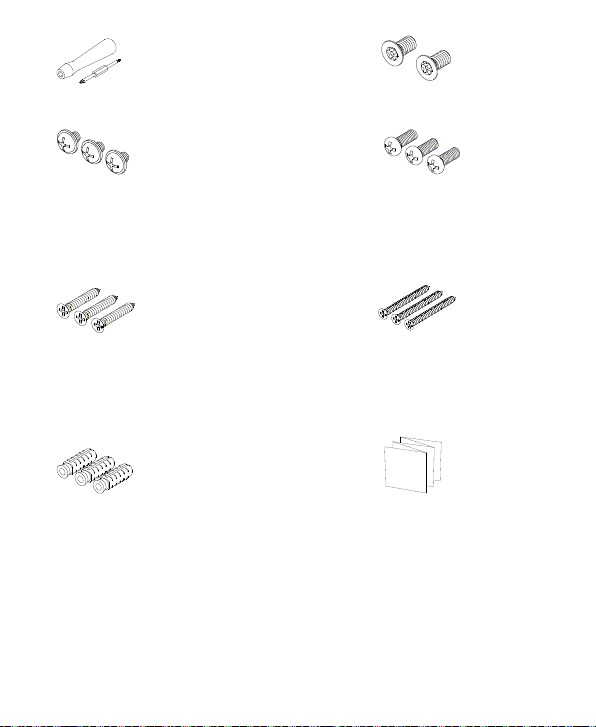
4
Dual purpose screwdriver Anti-theft screw*2
Set screw for power wire*3 Set screw for securing
the body to the
bracket*3
Self-tapping screw (0.75”)*3 Self-tapping screw
(1.26”)*3
Plastic expansion bolt*3 User manual

5
3 Doorbell Installation
Install Micro SD Card
1. Open the faceplate from 2. Open the Micro SD
the bottom. card slot cover.
3. Insert the Micro SD card.

6
Install the Doorbell
1. Install the mounting level, and mark points on the wall for
drilling according to the mounting level.
2. Drill holes on the wall, insert expansion bolts, and then
insert 0.75” self-tapp ing scr ews.

7
3. Connect the power wires coming out of the wall to the
terminals on the back of t he doorbell w ith set screws.(DC 12 V
or AC 16~24V )
4. Open the faceplate from the bottom.

8
5. Secure the doorbell body to the bracket using the
corresponding set screws.
6. Attach the faceplate to the body from the top.

9
7. Tighten the anti-theft screws at the bottom of the device
using the screwdriver.

10
Install the Bracket(Three ways)
A. Install the angl e adju stment bracket w ith 0.75” self-tapping
screws.
B. Install the angl e adju stment bracket w ith 0.75” self-tapping
screws.

11
C. Stack angle adjustment brackets
(1)Stack t he vertical angl e adjustment brac ket on top of the
horizontal angle adjustm ent br ack et, th en in sta ll the brackets
onto the wall.
( 2 ) Use the supplied 1.26” self-tapping screws when
stacking brackets.

12
4 Set Up
Download EZLive
Make sure your mobile ph one has been connected to W iFi. Scan the following QR code to download and install
EZLive.
https://a.app.qq.com/o/simple.jsp?pkgname=com.uniview.ap
p.smb.phone.en.lingyun
Add Devices
1. Open EZLive, sign up an overseas account and log in.

13
2. Click in the upper right 3. Choose video doorbell
corner, and select “Add Wi-Fi device.
Device”.

14
4. Follow the instructions to prepare the device ready for
configuration.

15
5. Complete configur ation i nfor mation and Sca n th e QR c ode
on the doorbell.

16
6. A QR code will be 7. Use the camera of the
Generated on the APP. doorbell to scan the QR
code. When the doorbe ll
indicator turns into
steady green and you
hear “Network
Connected”, click
Success. Continue.

17
8. Set DST after the device is added.

18
9. View the doorbell in the device list.

19
QR code scanned,
Doorbell Indicator Status During Setup
Indicator Status Description
Steady red
Steady green
Blinking green 1. Waiting for Wi-Fi
The device is starting up
Wi-Fi conne ction succeed
configuration.
2.
connecting Wi-Fi.
Doorbell Indicator Status After Setup
Indicator Status Description
Steady green 1. Normal
2. Call ended
Blinking blue Call initiated
Steady blue Call connected

20
Fi connection
doorbell is
resetting or
Doorbell Indicator Status During Exception
Indicator Status Description
Blinking red 1. Wi-
failed.
2. The
restarting.
Steady yellow
The doorbell gets offline
after connected to Wi-Fi.

21
5 Doorbell Operation
Two-way Audio

22
Live View

23
Playback

24
6 Notes
1. Make sure the connected Wi-Fi is 2.4GHz.
2. Make sure your router is close to the doorbell.
3. The installation height of the doorbell is about 1.6 meters.
4. Do not install the doorbell on the metal door to avoid si gnal
interference.

25
Regulatory Compliance
FCC Part 15
Please take attention that changes or modification not
expressly approved by the party responsible for compliance
could void the user’s authority to operate the equipment.
This device complies with Part 15 of the FCC Rules.
Operation is subject to the following two conditions:
(1) This device may not cause harmful interf erence, and
(2) This device must accept any interference received,
including interference that may cause undesired operation.
If the distance from the product to the human body is greater
than 20cm, the following warning is required.
This equipment complies with FCC radiation exposure limits
set forth for an uncontrolled environment. This equipment
should be installed and operated with minimum distance
20cm between the radiator & your body.
LVD/EMC Directive

26
2014/35/EU and EMC
by the Waste Electrical & Electronic
Equipment (WEEE) Directive and must be
This product complies w ith the E uropea n Low
Voltage Directive
Directive 2014/30/EU.
WEEE Directive–2012/19/EU
The product this manual refers to is covered
disposed of in a responsible manner.

27
Battery in the product complies
with the European Battery Directive
2013/56/EC. For proper recycling,
return the battery to your supplier
or to a designated collection point.

28
Zhejiang Uniview Technologies Co., Ltd.
Building No.10, Wanlun Science Park, Jiangling Road
88, Binjiang District, Hangzhou, Zhejiang, China
(310051)
Email: overseasbusiness@uniview.com;
globalsupport@uniview.com
http://www.uniview.com
©2019 Zhejiang Uniview Technologies Co., Ltd. All
rights reserved.
*Product specifications and availability are subject to
change without notice.

29
Version: V1.02
BOM: 3105C00P
 Loading...