

Page 1
LED + Smart Control
Quick Start Guide
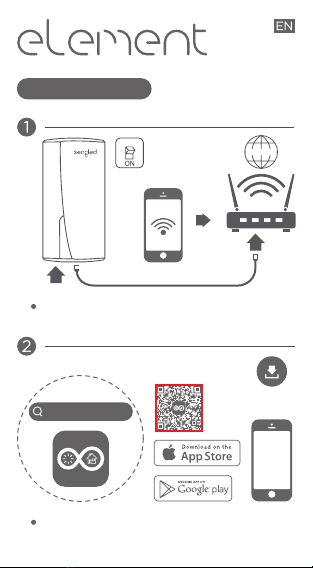
Login
Connect Element hub to any LAN port on the Wi-Fi
router via the ethernet cable provided in the package.
Then provide power to the hub.
sengled element
Connect your mobile app to the Wi-Fi provided by
the same Wi-Fi router in Step 1. Download and install
Element App on your iOS or Android mobile device.
Internet
LAN
Page 2
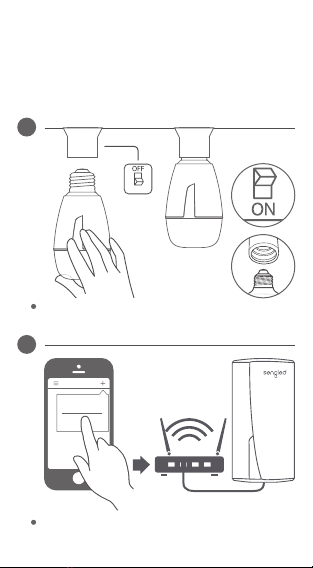
3
Turn off the wall switch, twist Element bulb into the
socket, then turn on the wall switch to power the
bulb.
4
Devices
Add a bulb
Add a Hub
Login
LAN
Open the Element App and follow the in-App instructions
to create an account, add bulbs and configure their
settings.
Page 3
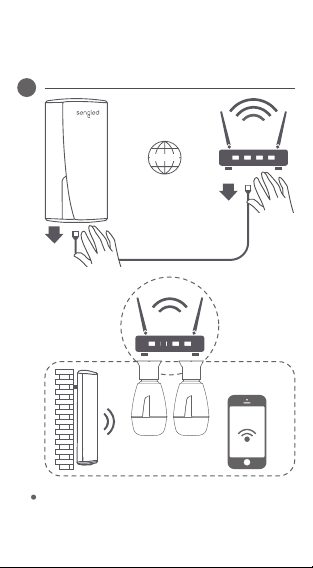
5
Internet
Once Element bulbs are successfully connected in
the App, the ethernet cable connecting the hub to
the router can be removed. The bulbs can now be
controlled by the App. Note: Keep the wall switch
on to provide constant power to the bulbs.
Page 4

Element User Menu
Parameter
Z01-hub
100-240V
30mA , 2W(rate)
User Operation Instructor
Ⅰ Software download way
Step1: Log in https://appdownload.cloud.sengled.com:8099/
Step2: you can see the android and IOS APP download address. Then click
the download button for setup .
ⅡEquipment installation method
Tighten the Element bulb clockwise on the bulbholder and light to electricity.
Power on the Element hub and connect the hub to your home network
cable.To ensure that the state of thehub is right,Please long press the reset
button on the hub over 7 seconds. Quickly power on and off the bulb10 times
to make sure it is reset factory settings.The bulbwill flashes 3times if it was
factory mode.
ⅢApp Operation Method
1. Open the App, named Element . The logo is as this , .
2. Log in sengledaccount . If you haven’t the cloud account, you can register
one or continue without login(as the PIC 3.2.1).
3. If you don’t log in with a account, you can only use element local features.
PIC 3.2.1
Page 5
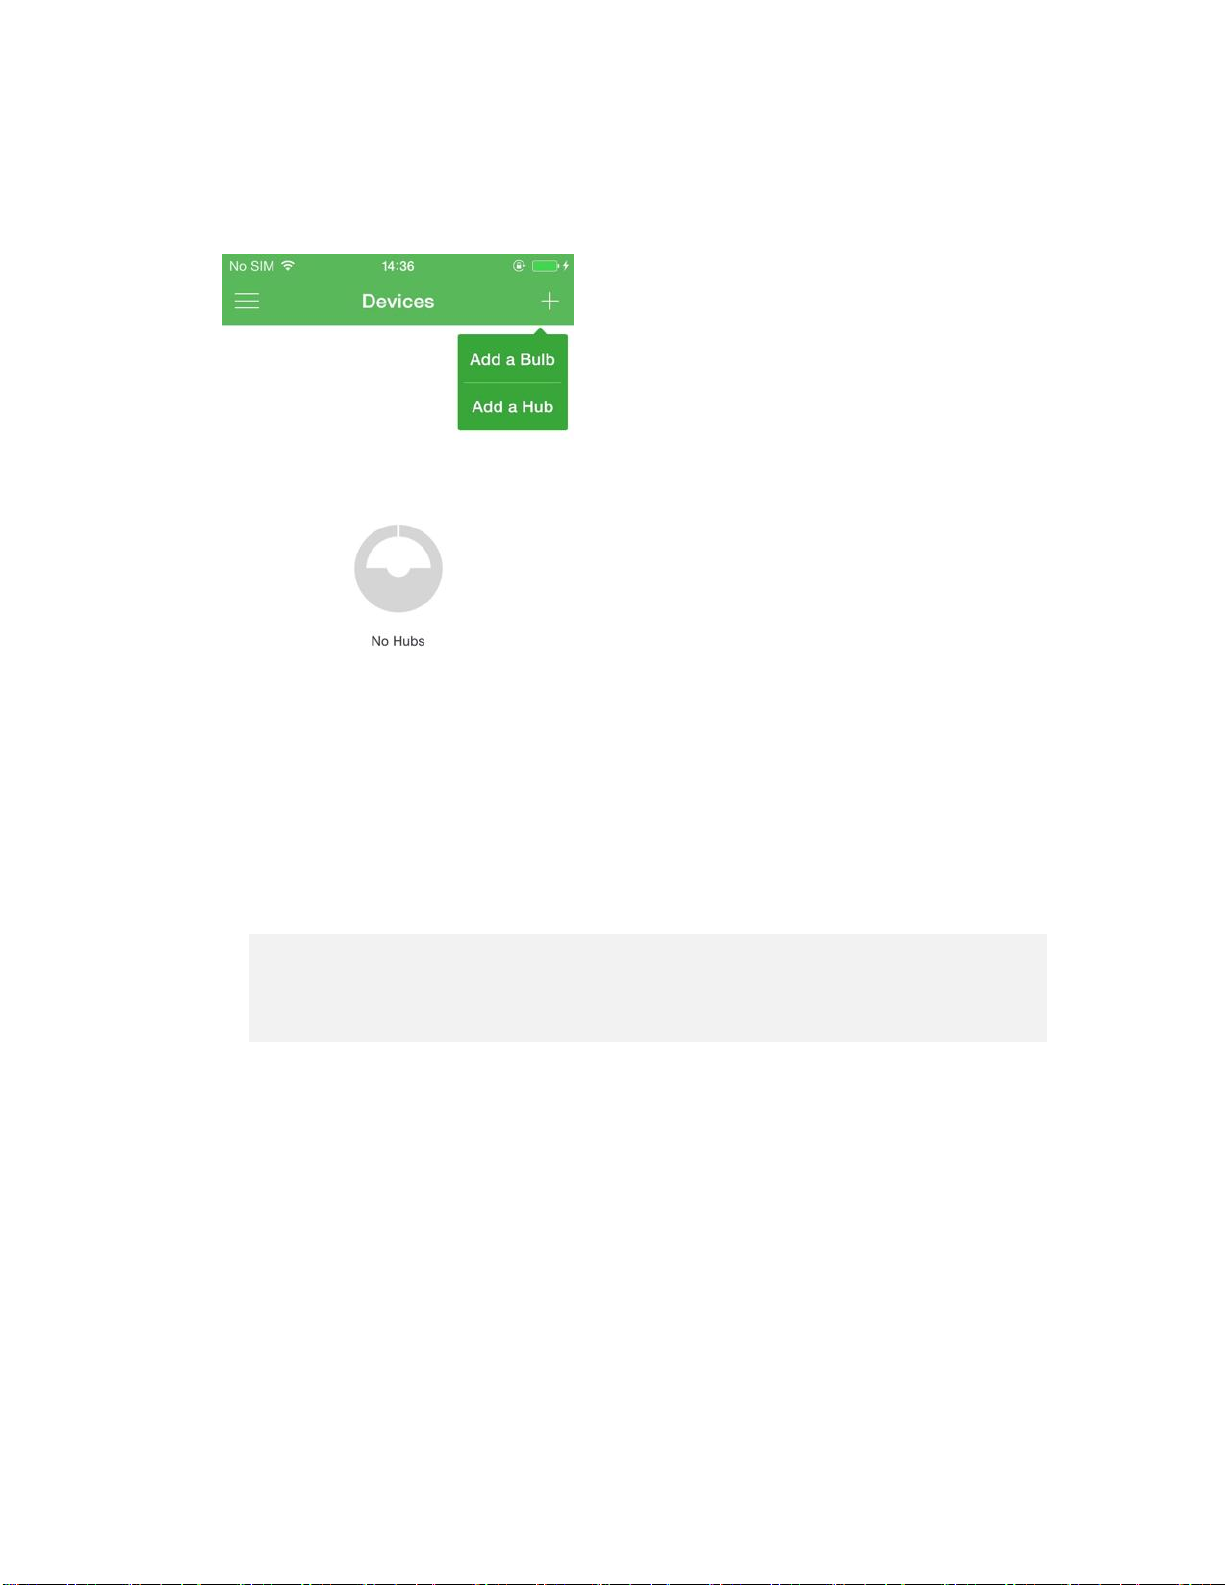
4. When log in successfully, we can see the main menu (as PIC3.5.1). Click
“Devices”to open the devices page and you can add new hub and the new
bulbs follow the Interface prompt.(3.3.1)
You should add hub first, and then add bulbs to the hub.
PIC3.3.1
5. Add a new hub
Devices interface ----- click the top-right “+”icon--click “Add a Hub”
and follow the guidance to connect the hub with your router .
The setting steps are as below:
(1) Insure the hub is power on and connect to your router with an
Ethernet cable;( PIC3.4.1)
(2) Click the next make sure your phone’s WIFI connect to the same
router---click the next(as PIC3.4.2). enter the password of your
router.(as PIC3.4.3)
(3) After about 20 seconds, we will do this work and we can add bulbs
now!
(as PIC3.4.4 and PIC3.4.5)
Page 6
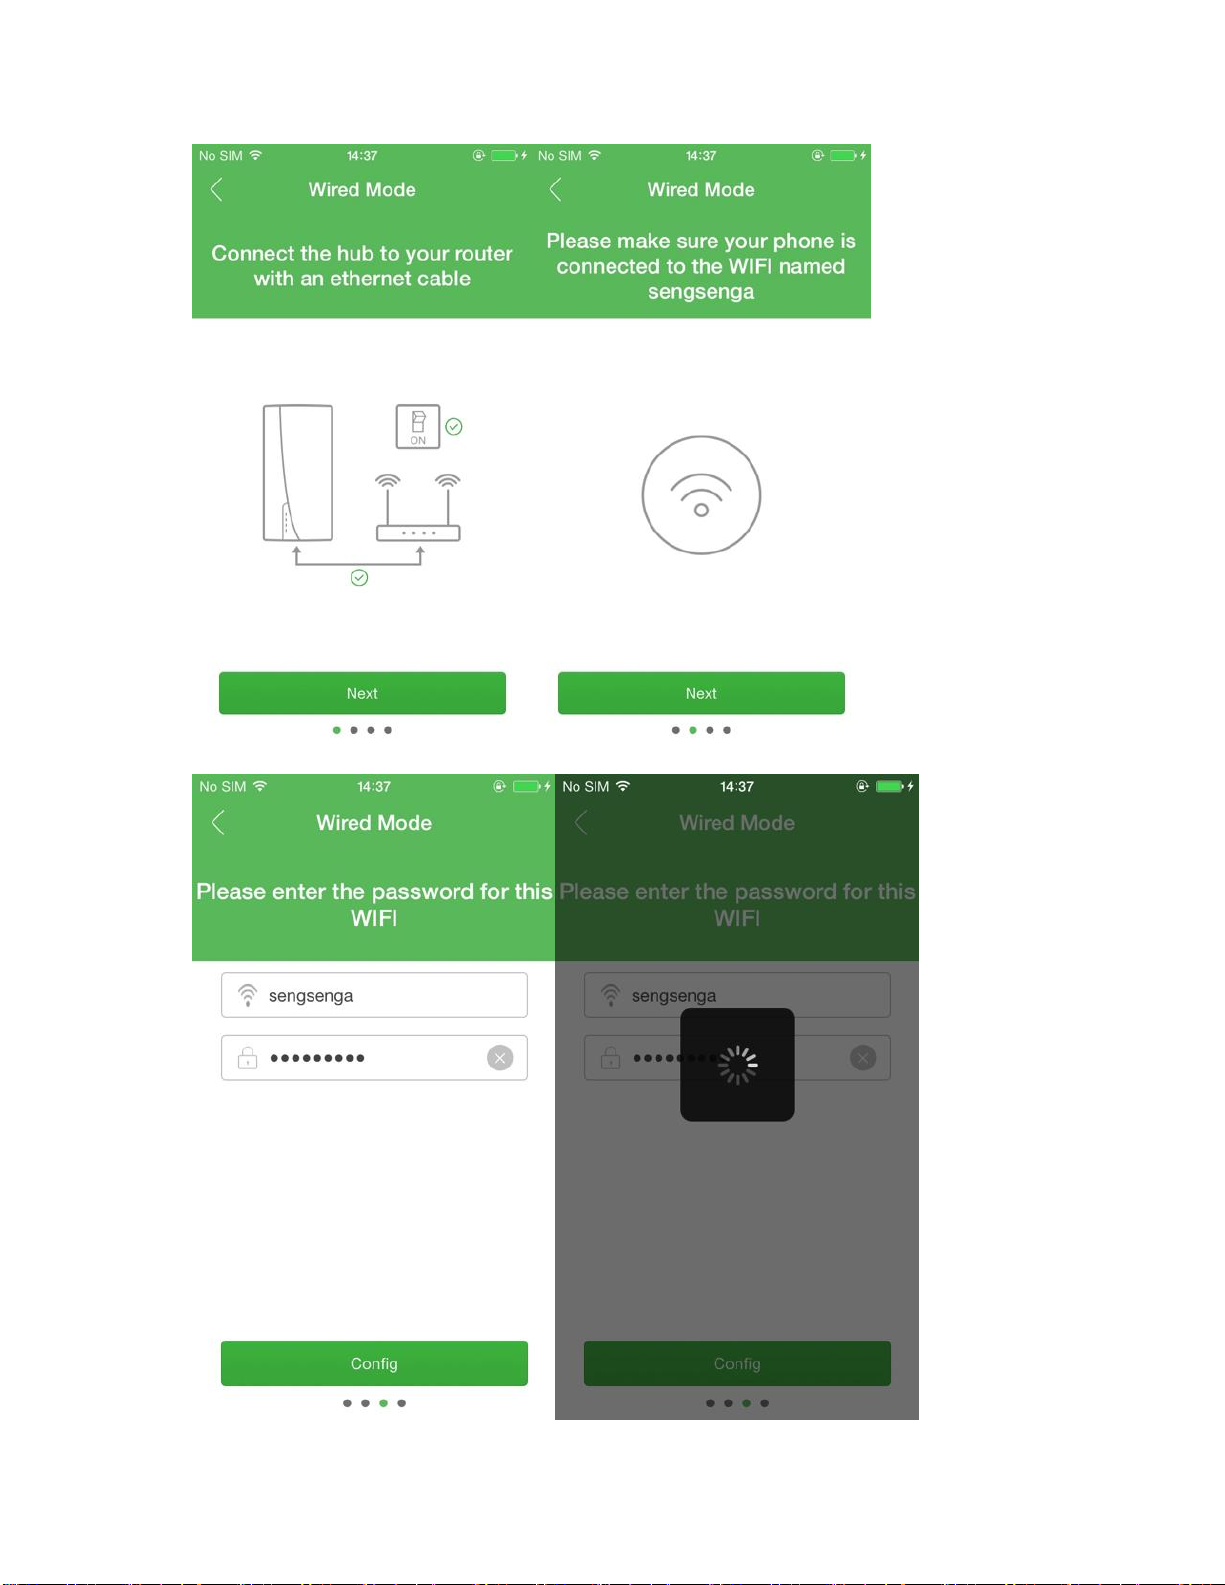
PIC3.4.1 PIC3.4.2
Page 7

PIC3.4.3 PIC3.4.4
PIC3.4.5 PIC3.4.6
6. Add a new bulbs
Devices interface ----- click the top-right “+”icon--click “Add a Bulb”
and follow the guidanceto connect the bulb to your hub.
The setting steps are as below:
(1)Select the hub you added before;( PIC3.4.6)
(2)Scan the QR code of every bulb which you want to add (as
PIC3.4.7).
The QR code is on your bulb like the PIC 3.4.8.
(3) If you done step2, you will find the QR code on you App just like
PIC3.4.9
(4) Click “Configure Bulb” to connect your new bulbs to the hub you
added before to make sure they work together.
Page 8
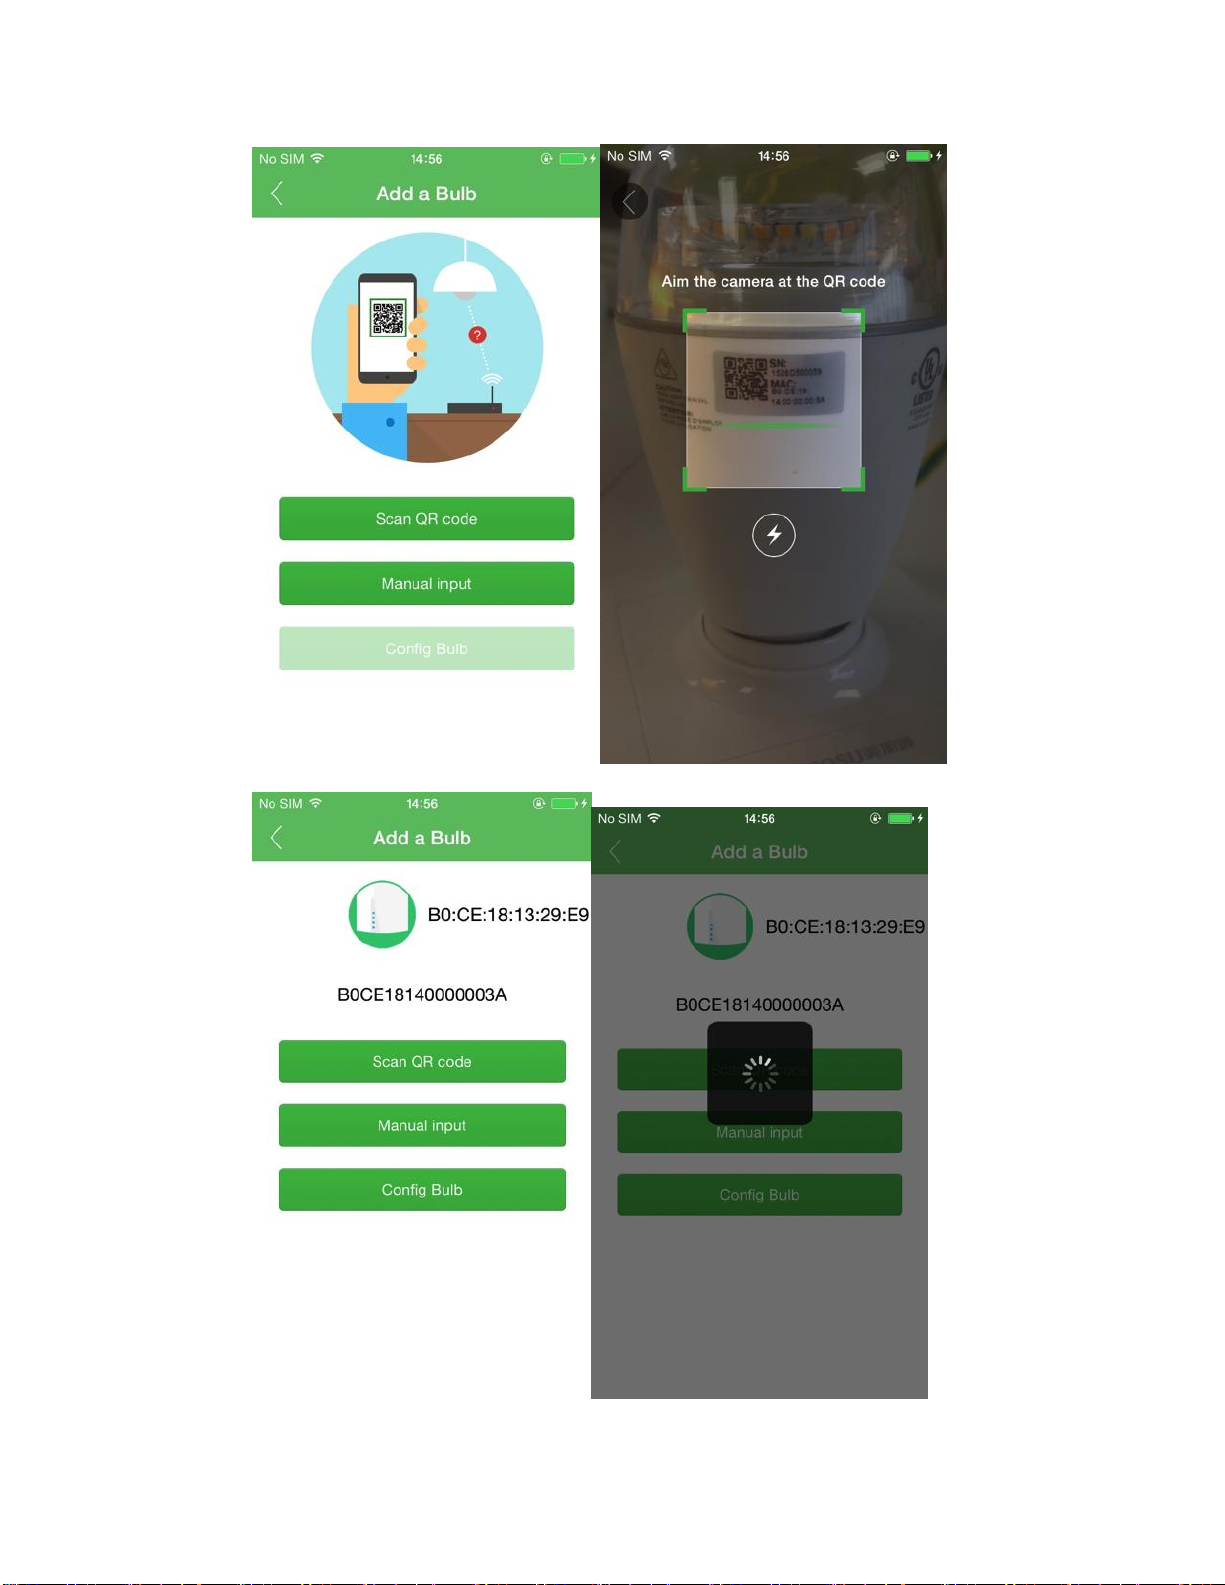
PIC3.4.7 PIC3.4.8
PIC3.4.9 PIC3.4.10
Page 9

7. Operation introduce
The functions of Element app as below PIC 3.5.1 showed:
●Main show yours bulbs . You can control them together with the All
page or single control with Individuals page. You can turn on or off your
bulbs or change the brightness and color temperature. (PIC3.5.2 and
3.5.3)
●Devices showed all your devices including all your hubs and its
bulbs. You remove manage them in here.
●Scenesyou can add your favorite scenes as the way you use all your
bulbs. Then you can quickly make them effect by only click one button.
●Scheduleyou can add an alarm here to make the scene effect at the
special time you wanted.
●Account you can manage your account information.
●About show the information about software version and the
firmware version of hubs and bulbs. You can update the firmware here.
PIC3.5.1
7.1 Main
“Main” is about light control and so on. It will show all of theelementlight as two
Page 10

way: All or Individuals (such as PIC 3.5.2 and PIC3.5.3).
PIC3.5.2 PIC3.5.3
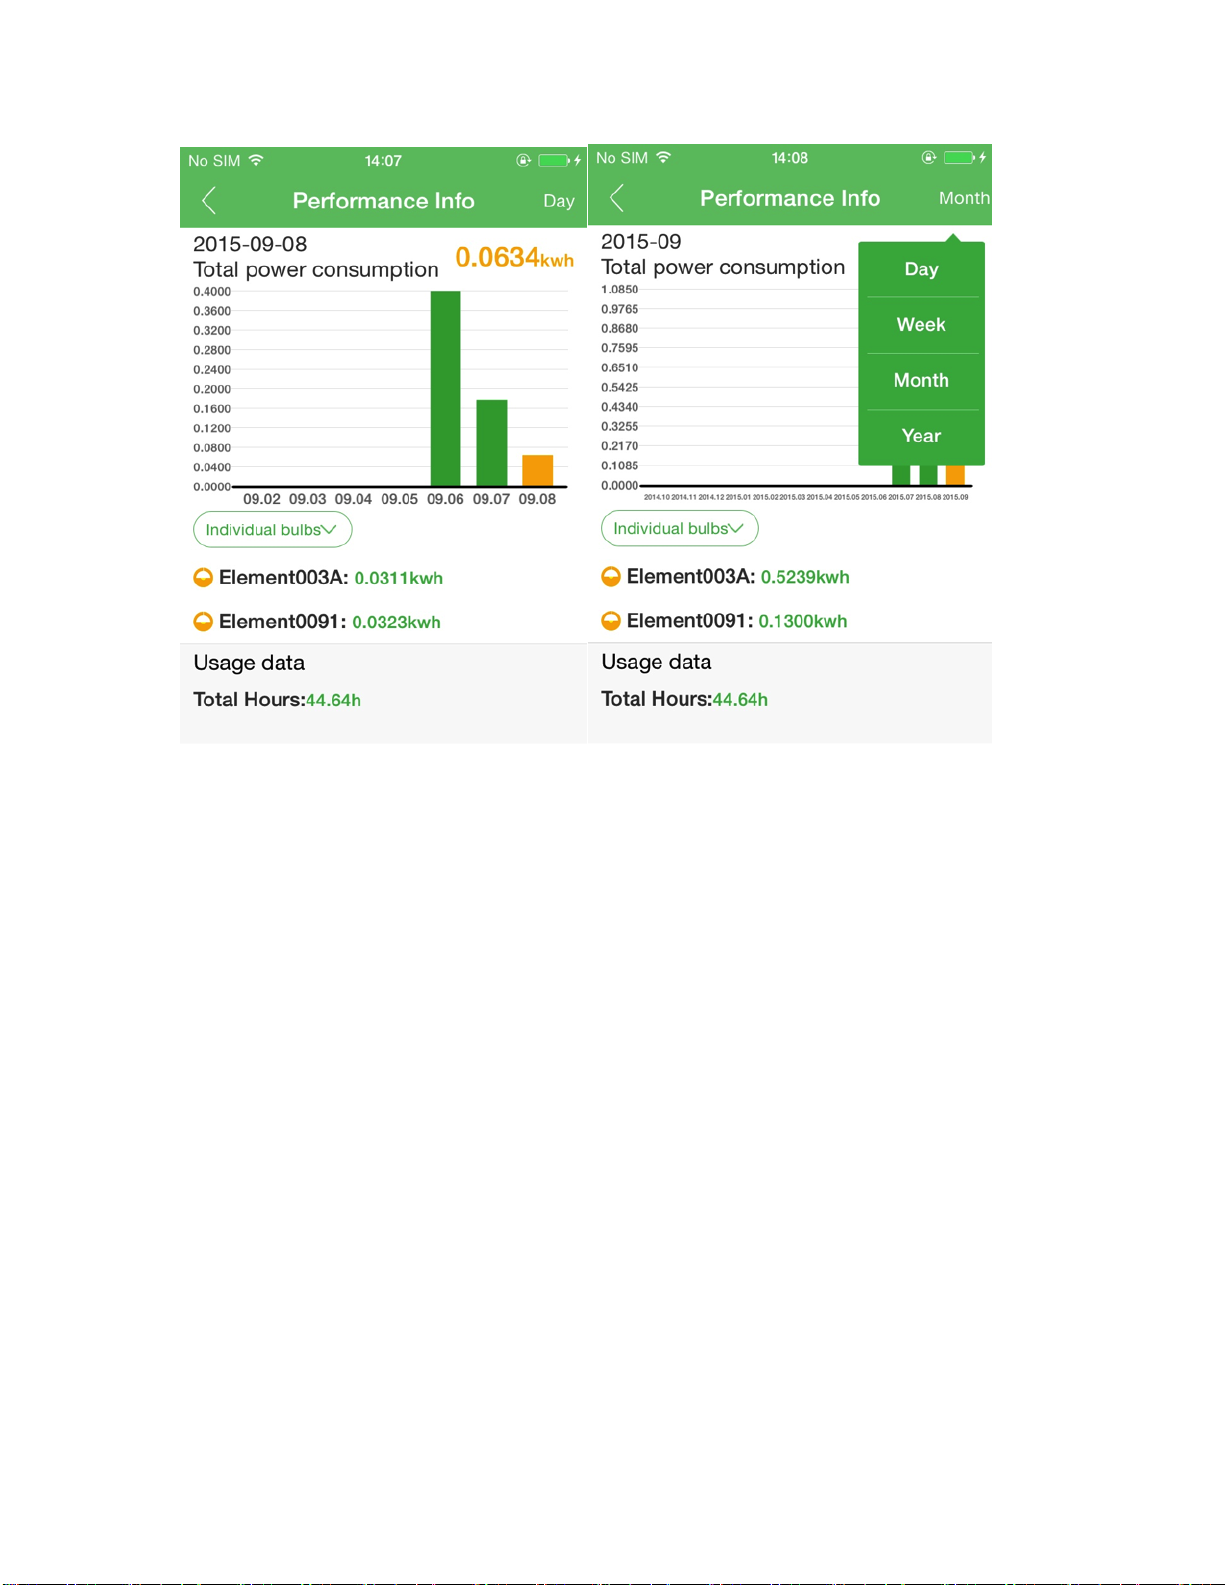
You can control all your bulbs together in the “All” page, including turn on and off
the bulbs or change their brightness or color temperature if you want.
The button on the top right corner, you can click it to show the performance
information of all bulbs daily or weekly or monthly.(PIC3.5.4 and PIC3.5.5)
Page 11
PIC3.5.4 PIC3.5.5
You can control your bulbs one by one in the “individuals” page. Click the right
arrow and you will see PIC3.5.6. You can control the bulb and rename the bulb
here and see its usage data by slide left.
Page 12

PIC3.5.6 PIC3.5.7
7.2 Devices
Devices allow you manage your devices both of hubs and bulbs.
Click the setting icon, and you can rename the SSID of hub. You can
also delete bulbs here.
Add new hub or bulbs will be enable when you click the top right add
button.
(PIC3.6.1 and PIC3.6.2).
Page 13

PIC3.6.1 PIC3.6.2
7.3 Scenes
You can add your favorite scenes as the way you use all your bulbs. Then
you can quickly make them effect by only click one button.
To add a scene, click the cross button on the top right and you will see
PIC3.6.4.
Need 3 steps to add a scene:
First, name it.
Second,select bulbs what you want
Third, set the brightness and color temperature you like.
Then click OK to save it, and now you can make it work only by click the
scene.
Page 14

PIC3.6.3 PIC3.6.4
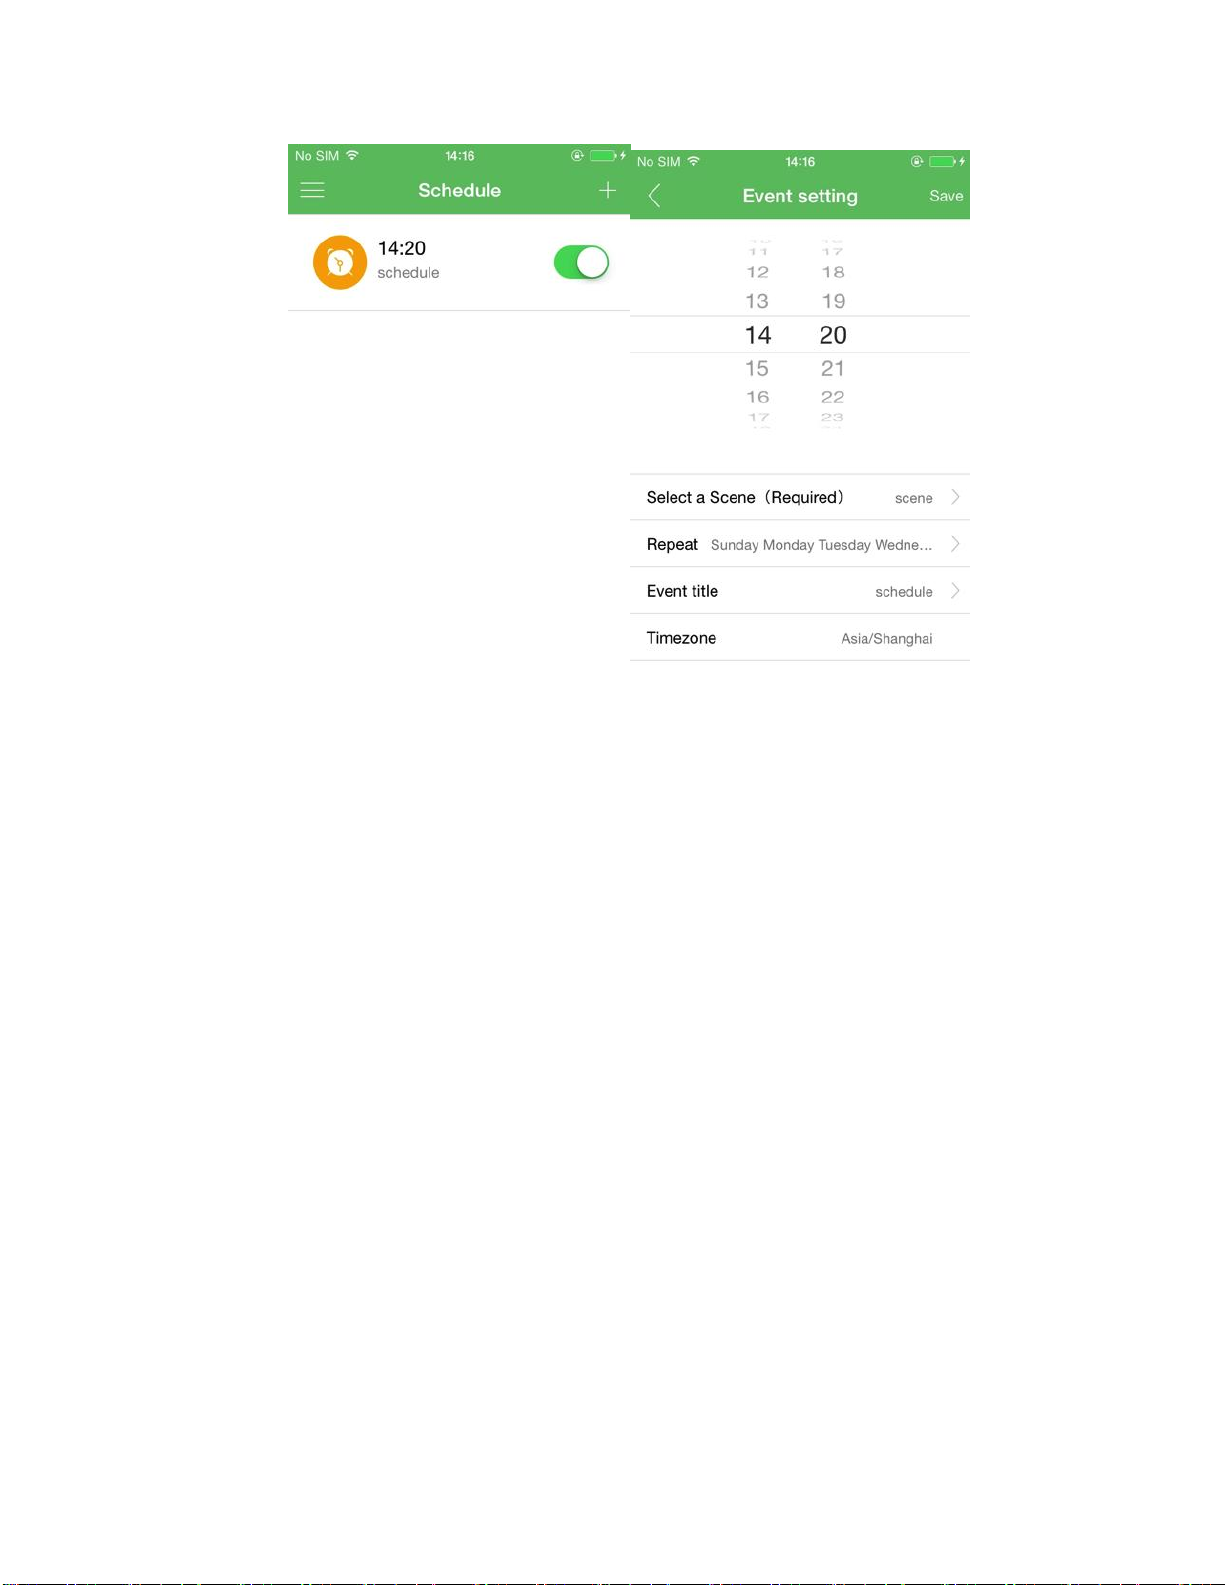
7.4 Schedule
You can add an alarm here to make the scene effect at the special time
you wanted.
As the picture 3.6.5,you can turn on or off the schedule to make it work
or not.
When you want to add a new schedule, you should click the cross
button and create a new one by 4 steps:
First, select a scene you like.
Second, select which day you what it work repeat.
Third, name it.
Forth, change your local timezone or not, it will be your phone system
timezone by default.
Page 15
PIC3.6.5 PIC3.6.6
7.5 Account
You can change your account password or logout in here.(PIC3.7.1)
Page 16

PIC3.7.1
7.6 About
About show the information aboutsoftware version and the firmware version of
hubs and bulbs. You can also update the firmware here.(PIC3.8.1)
Page 17

PIC3.8.1
Page 18

FCC STATEMENT FOR USERS
This device complies with part 15 of the FCC Rules. Operation is subject to the
following two conditions:
(1) This device may not cause harmful interference, and
(2) this device must accept any interference received, including interference that may
cause undesired operation.
SECTION 15.21
The user’s manual or instruction manual for an intentional or unintentional radiator
shall caution the user that changes or modifications not expressly approved by the
party responsible for compliance could void the user's authority to operate the
equipment. In cases where the manual is provided only in a form other than paper,
such as on a computer disk or over the Internet, the information required by this
section may be included in the manual in that alternative form, provided the user can
reasonably be expected to have the capability to access information in that form.
FEDERAL COMMUNICATION COMMISSION INTERFERENCE STATEMENT, SECTION
15.105(b)
This equipment has been tested and found to comply with the limits for a class B
digital device, pursuant to part 15 of the FCC Rules. These limits are designed to
provide reasonable protection against harmful interference in a residential
installation. This equipment generate, uses and can radiate radio frequency energy
and, if not installed and used in accordance with the instructions, may cause harmful
interference to radio communications. However, there is no guarantee that
interference will not occur in a particular installation. If this equipment does cause
harmful interference to radio or television reception, which can be determined by
turning the equipment off and on, the user is encouraged to try to correct the
interference by one or more of the following measures:
• Reorient or relocate the receiving antenna.
• Increase the separation between the equipment and receiver.
• Connect the equipment into an outlet on a circuit different from that to which the
receiver is connected.
• Consult the dealer or an experienced radio/TV technician for help.
RF RADIATION EXPOSURE WARNING
This equipment must be installed and operated in accordance with provided
instructions and the antenna(s) used for this transmitter must be installed to provide
a separation distance of at least 20 cm from all persons and must not be co-located
or operated in conjunction with any other antenna or transmitter. End-users and
installers must be provided with antenna installation instructions and transmitter
operating conditions to satisfy RF exposure compliance.
Page 19

IC Radiation Exposure Statement for Canada
This device complies with Industry Canada licence-exempt RSS standard(s). Operation
is subject to the following two conditions: (1) this device may not cause interference,
and (2) this device must accept any interference, including interference that may
cause undesired operation of the device.
Le présent appareil est conforme aux CNR d'Industrie Canada applicables aux
appareils radio exempts de licence. L'exploitation est autorisée aux deux conditions
suivantes : (1) l'appareil ne doit pas produire de brouillage, et (2) l'utilisateur de
l'appareil doit accepter tout brouillage radioélectrique subi, même si le brouillage est
susceptible d'en compromettre le fonctionnement.
Under Industry Canada regulations, this radio transmitter may only operate using an
antenna of a type and maximum (or lesser) gain approved for the transmitter by
Industry Canada. To reduce potential radio interference to other users, the antenna
type and its gain should be so chosen that the equivalent is otropically radiated
power (e.i.r.p.) is not more than that necessary for successful communication.
Conformément à la réglementation d'Industrie Canada, le présent émetteur radio
peut fonctionner avec une antenne d'un type et d'un gain maximal (ou inférieur)
approuvé pour l'émetteur par Industrie Canada. Dans le but de réduire les risques de
brouillage radioélectrique à l'intention des autres utilisateurs, il faut choisir le type
d'antenne et son gain de sorte que la puissance isotrope rayonnée équivalente
(p.i.r.e.) ne dépasse pas l'intensité nécessaire à l'établissement d'une communication
satisfaisante.
User manuals for transmitters equipped with detachable antennas shall also contain
the following notice in a conspicuous location:
This radio transmitter (identify the device by certification number, or model number
if
Category II) has been approved by Industry Canada to operate with the antenna types
listed below with the maximum permissible gain and required antenna impedance for
each antenna type indicated. Antenna types not included in this list, having a gain
greater than the maximum gain indicated for that type, are strictly prohibited for use
with this device.
Le présent émetteur radio (identifier le dispositif par son numéro de certification ou
son numéro de modèle s'il fait partie du matériel de catégorie I) a été approuvé par
Page 20

Industrie Canada pour fonctionner avec les types d'antenne énumérés ci-dessous et
ayant un gain admissible maximal et l'impédance requise pour chaque type d'antenne.
Les types d'antenne non inclus dans cette liste,ou dont le gain est supérieur au gain
maximal indiqué, sont strictement interdits pour l'exploitation de l'émetteur.
IMPORTANT NOTE:
Radiation Exposure Statement:
This equipment complies with “Industry Canada RSS-102 for radiation exposure limits
set forth for an uncontrolled environment”.
This equipment should be installed and operated with minimum distance 20cm
between the radiator and your body.
L'exposition aux radiations:
Cet équipement est conforme aux «Industrie Canada RSS-102 pour les limites
d'exposition aux rayonnements définies pour un environnement non contrôlé".
Cet équipement doit être installé et utilisé à distance minimum de 20cm entre le
radiateur et votre corps.
 Loading...