

Installation Guide
Installation Guide
Installation GuideInstallation Guide
Please read this installation guide carefully before installation
◆◆◆◆ Model
Model
ModelModel
◆◆◆◆ Features
Features
FeaturesFeatures
◆◆◆◆ Specifications
Specifications
SpecificationsSpecifications
Items
ZEROtherm
®
VGA Cooler GX800, GX810
Heat Pipe & 2-ball Bearing Blower Fan
Copper 6mm heat pipe for max. heat transfer
2-ball bearing blower fan adapted
Compatible with latest NVIDIA & ATi
Support up to NVIDIA®GeForce®7900 GTX
Support up to ATi Radeon X1900XTX
Killer performance
Copper base & 140pcs of extremely thins aluminum fins
Optimized air flow & fin pitch
Silence Innovations
Automatic fan speed control(900~2,500rpm)
Acoustical noise level: 16.95~29.85dBA(±10%)
Models
NVIDIA & ATi Graphics cardPlatform
Φ
6mm,Sintered wick type, 1eaHeat Pipe
CopperBase Material
116 x 100 x 32 mm (4.6 x 3.9 x 1.3 inch)Size
2.4W (12VDCx0.2A)Input power
2-Ball bearingBearing type
900~2,500rpm±10%Fan speed
16.95~29.85dBA @900~2,500rpmAcoustical noise
3pin-3wire to M/B or to PSUConnector
GX810GX800
CopperAluminumHeatsink Material
About 188.2gAbout 148.5gWeight
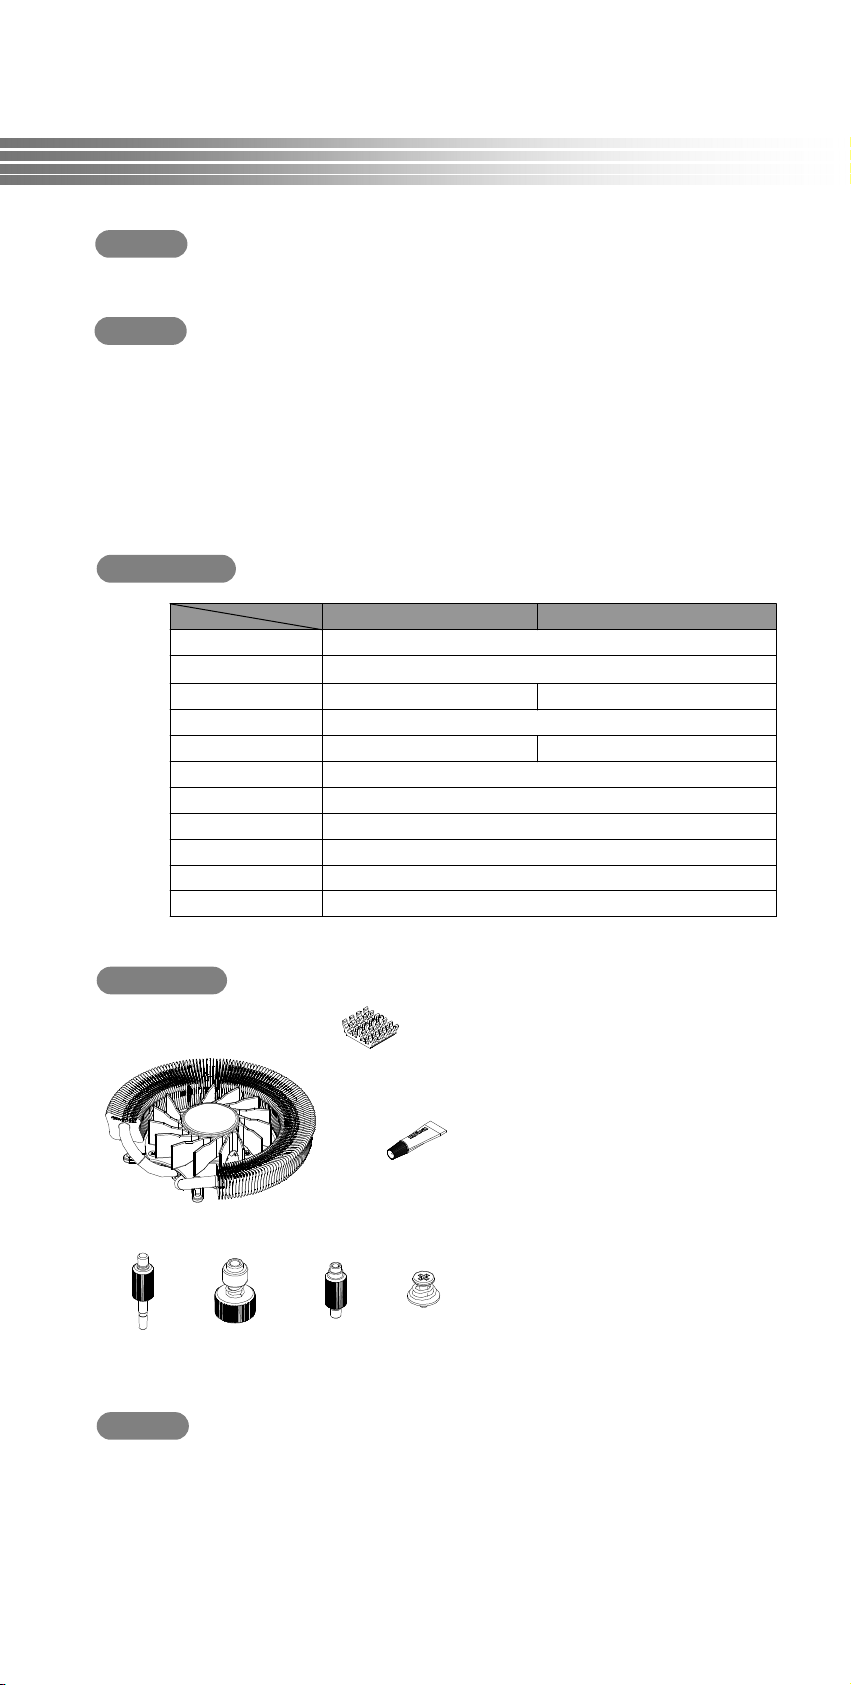
◆◆◆◆ Components
Components
ComponentsComponents
①①①①
④④④④ ⑤⑤⑤⑤
◆◆◆◆ Patents
Patents
PatentsPatents
②②②②
① VGA cooler, 1개
② Memory heat sink, 8개
③ Thermal grease, 1개
③③③③
⑥⑥⑥⑥
Registered Trade Mark: 40-0564565-0000호
Patent application pending around the world including US, EU, Japan, China
and Taiwan
⑦⑦⑦⑦
④ Standard Knurling-screw, 4개
⑤ Standard Knurling-nut, 4개
⑥ SLi/CrossFire Knurling-nut, 4개
⑦ SLi/CrossFire Spring-screw, 4개
Installation Guide
Installation Guide
Installation GuideInstallation Guide
Please read this installation guide carefully before installation
◆◆◆◆ Compatible VGA Cards & Screws Installation Guide Holes
Compatible VGA Cards & Screws Installation Guide Holes
Compatible VGA Cards & Screws Installation Guide HolesCompatible VGA Cards & Screws Installation Guide Holes
① NVIDIA GeForce 6600 Series (Except 6600 AGP)
NVIDIA GeForce 7600 Series
② NVIDIA GeForce 6800 Series
NVIDIA GeForce 7800 Series
②②②②
①①①① ①①①①
②②②②
③③③③
NVIDIA GeForce 7900 Series
ATI Radeon X1800 Series
ATI Radeon X1900 Series
③③③③
①①①① ①①①①
②②②②
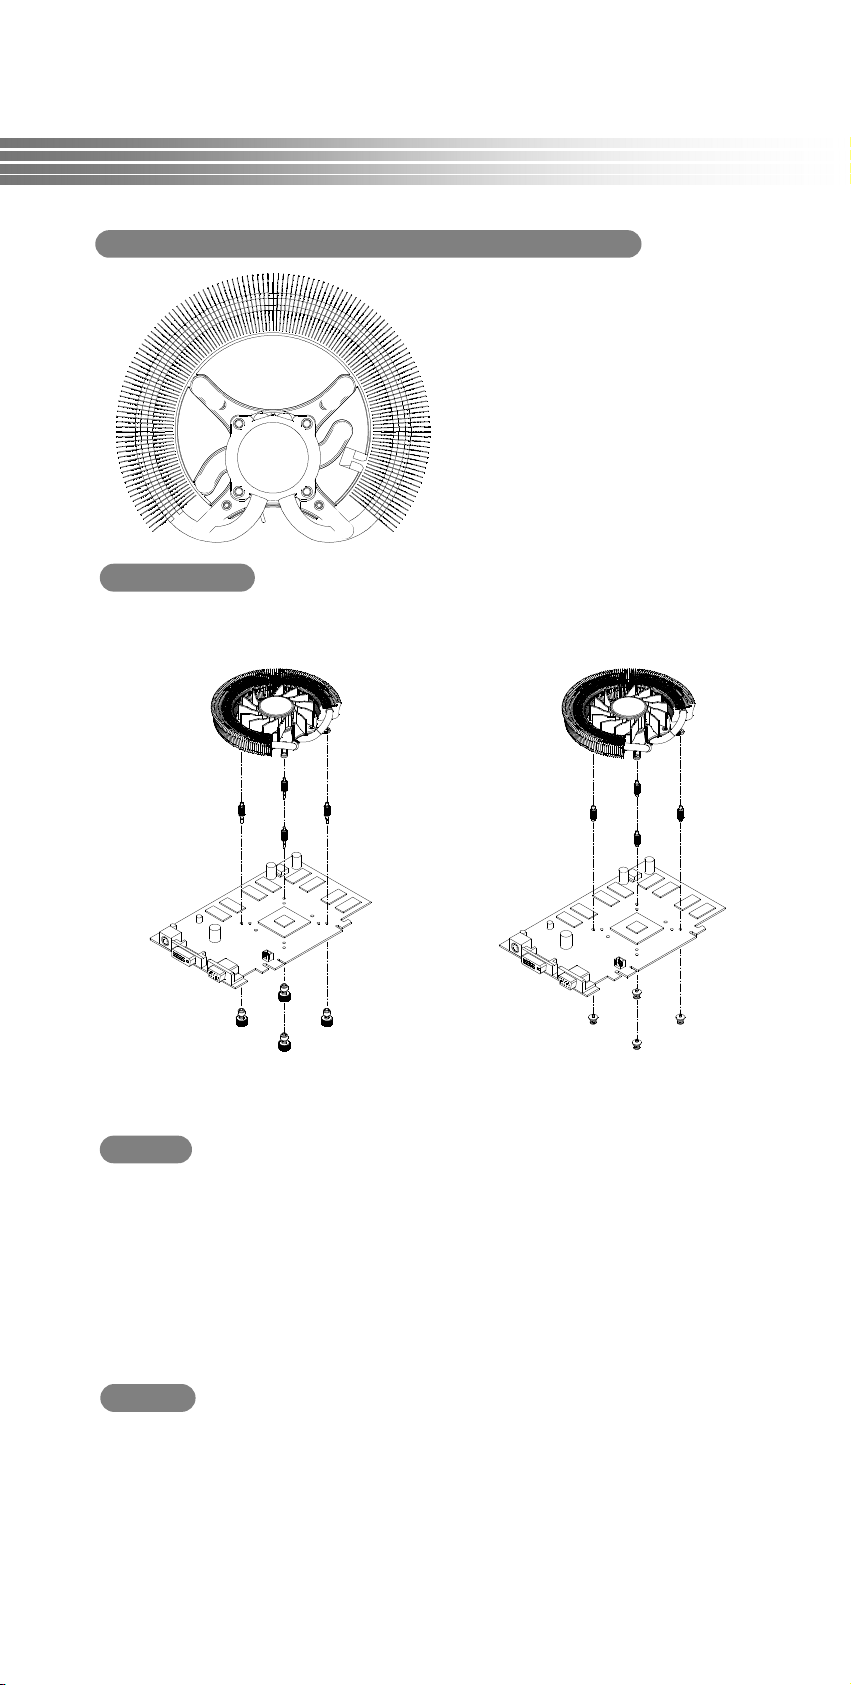
◆◆◆◆ Exploded View
Exploded View
Exploded ViewExploded View
When not using
When not using SLi/CrossFire
When not using When not using
④ Standard
Knurling-screw
⑤ Standard
Knurling-nut
②②②②
SLi/CrossFire
SLi/CrossFireSLi/CrossFire
③ ATI Radeon X1300 Series
ATI Radeon X1600 Series
When using SLi/CrossFire
⑥ SLi/CrossFire
Knurling-nut
⑦ SLi/CrossFire
Spring-screw
◆◆◆◆ Notice
Notice
NoticeNotice
◆◆◆◆ Warranty
Warranty
WarrantyWarranty
This VGA cooler is designed to be installed on ATi & NVIDIA reference cards
It is possible that there is an interference between this cooler and some VGA cards. If
your VGA card and its components interfere with the installation of this cooler, stop
installation.
This cooler is not compatible with NVIDIA PCX 5 series, GeForce 6600 AGP series, ATi
Radeon 9550/9600 series and Matrox VGA cards. Please check the compatibility at
www.zerotherm.net (or www.apack.net)
The installation of this cooler will make a PCI slot adjacent to the PCI (or AGP) slot
unusable.
If the air flow is clogged by cables, it will reduce the performance of this cooler.
Be sure to be careful not to hurt yourself because the fins of this cooler have sharp
corners.
Warranty: 2 years
APACK, Inc. is not responsible for an y damage to the product, and/or the computer
including CPU resulted from:
1) Incorrect installation 2) VGA overclocking
URL: http://www.zerotherm.net, http://www.apack.net
E-mail: support@apack.net

◆◆◆◆ Installation for standard user
Installation for standard user
Installation for standard userInstallation for standard user
1. Attach the memory heat sinks
1. Attach the memory heat sinks
1. Attach the memory heat sinks1. Attach the memory heat sinks
Remove the previous VGA cooler from your VGA
card.
Attach 8 pcs of memory heat sinks on the RAM
of your VGA card like <picture 1>.
※ The thermal tapes on the memory heat sink
ate not reusable because the adhesiveness will be
reduced after their first attachment.
<picture 2>
3. Install the
3. Install the ④④④④ standard knurling
3. Install the 3. Install the
Install the end of ④ standard knurling-screws on
the VGA cooler like <picture 3>.
※Please check the list of Compatible VGA Card &
Screws Installation Holes before installing the
screws.
standard knurling----screws
standard knurlingstandard knurling
screws
screwsscrews
Installation Guide
Installation Guide
Installation GuideInstallation Guide
Please read this installation guide carefully before installation
<picture 1>
2. Paste the thermal grease on your GPU (or VPU)
2. Paste the thermal grease on your GPU (or VPU)
2. Paste the thermal grease on your GPU (or VPU)2. Paste the thermal grease on your GPU (or VPU)
Paste the thermal grease on the core your GPU (or
VPU) of your VGA card like <picture 2>.
<picture 4>
5. Connect the fan
5. Connect the fan----connector
5. Connect the fan5. Connect the fan
Insert your VGA card into the PCI (or AGP) slot
and connect the 3-pin connector to your
motherboard or to your power supply unit like
<picture 5>.
※ Do not connect the 3-pin connector to your
VGA card.
connector
connectorconnector
<picture 3>
4. Fasten the
4. Fasten the ⑤⑤⑤⑤ standard knurling
4. Fasten the 4. Fasten the
Insert the VGA cooler into the holes on your VGA
card and fasten the standard ⑤ knurling-nuts like
<picture 4>
※Make sure that the base of the VGA cooler and
the GPU (or VPU) are completely in contact with
each other.
※Excessive force may result in malfunction or
damage to the core of your GPU (or VPU).
standard knurling----nuts
standard knurlingstandard knurling
nuts
nutsnuts
<picture 5>

◆◆◆◆ Installation for SLi/CrossFire users
1. Attach the memory heat sinks
1. Attach the memory heat sinks
1. Attach the memory heat sinks1. Attach the memory heat sinks
Remove the previous VGA cooler from your VGA
card.
Attach 8 pcs of memory heat sinks on the RAM
of your VGA card like <picture 6>.
※ The thermal tapes on the memory heat sink
ate not reusable because the adhesiveness will be
reduced after their first attachment.
<picture 7>
3. Install the
3. Install the ⑥⑥⑥⑥ SLi/CrossFire
3. Install the 3. Install the
Install the ⑥ Sli/CrossFire knurling-nuts on the
VGA cooler like <picture 8>.
※Please check the list of Compatible VGA Cards
& Screws Installation Holes before installing the
screws.
SLi/CrossFire knurling
SLi/CrossFireSLi/CrossFire
knurling----nuts
knurlingknurling
nuts
nutsnuts
Installation Guide
Installation Guide
Installation GuideInstallation Guide
Please read this installation guide carefully before installation
<picture 6>
2. Paste the thermal grease on your GPU (or VPU)
2. Paste the thermal grease on your GPU (or VPU)
2. Paste the thermal grease on your GPU (or VPU)2. Paste the thermal grease on your GPU (or VPU)
Paste the thermal grease on the core your GPU (or
VPU) of your VGA card like <picture 7>.
<picture 9>
5. Connect the fan
5. Connect the fan----connector
5. Connect the fan5. Connect the fan
Insert your VGA card into the PCI (or AGP) slot
and connect the 3-pin connector to your
motherboard or to your power supply unit like
<picture 10>.
※ Do not connect the 3-pin connector to your
VGA card
connector
connectorconnector
<Picture 8>
4. Fasten
4. Fasten ⑦⑦⑦⑦ SLi/CrossFire
4. Fasten 4. Fasten
Fit the VGA cooler and the installed ⑥
SLi/CrossFire knurling-nuts into the holes on
your VGA card. Fasten ⑦ SLi/CrossFire spring-
screws with a screw driver from the bottom of
your VGA card like <picture 9>.
※Make sure that the base of the VGA cooler and
the GPU (or VPU) are completely in contact with
each other.
※Excessive force may result in malfunction or
damage to the core of your GPU (or VPU).
SLi/CrossFire Spring
SLi/CrossFireSLi/CrossFire
Spring----screws
SpringSpring
screws
screwsscrews
<picture 10>
 Loading...