

Page 1
Honda CBR250R (11-13) DIY Windscreen Install
SPORTBIKE SADDLES & WINDSCREENS
443-IS
Installation Manual for Honda CBR250R
Thank you for purchasing Zero Gravity windscreen, which has
been designed and manufactured to give years of safe & fun riding. These instructions give you an in-depth look at the installation process.
To receive further assistance or parts please e-mail techinfo@zerogravity-racing.com.
Helpful hints: Use metric tools, clean hands, pu t the bike on a center stand. Do not pry on the screen excessively, as it will
break without much warning.
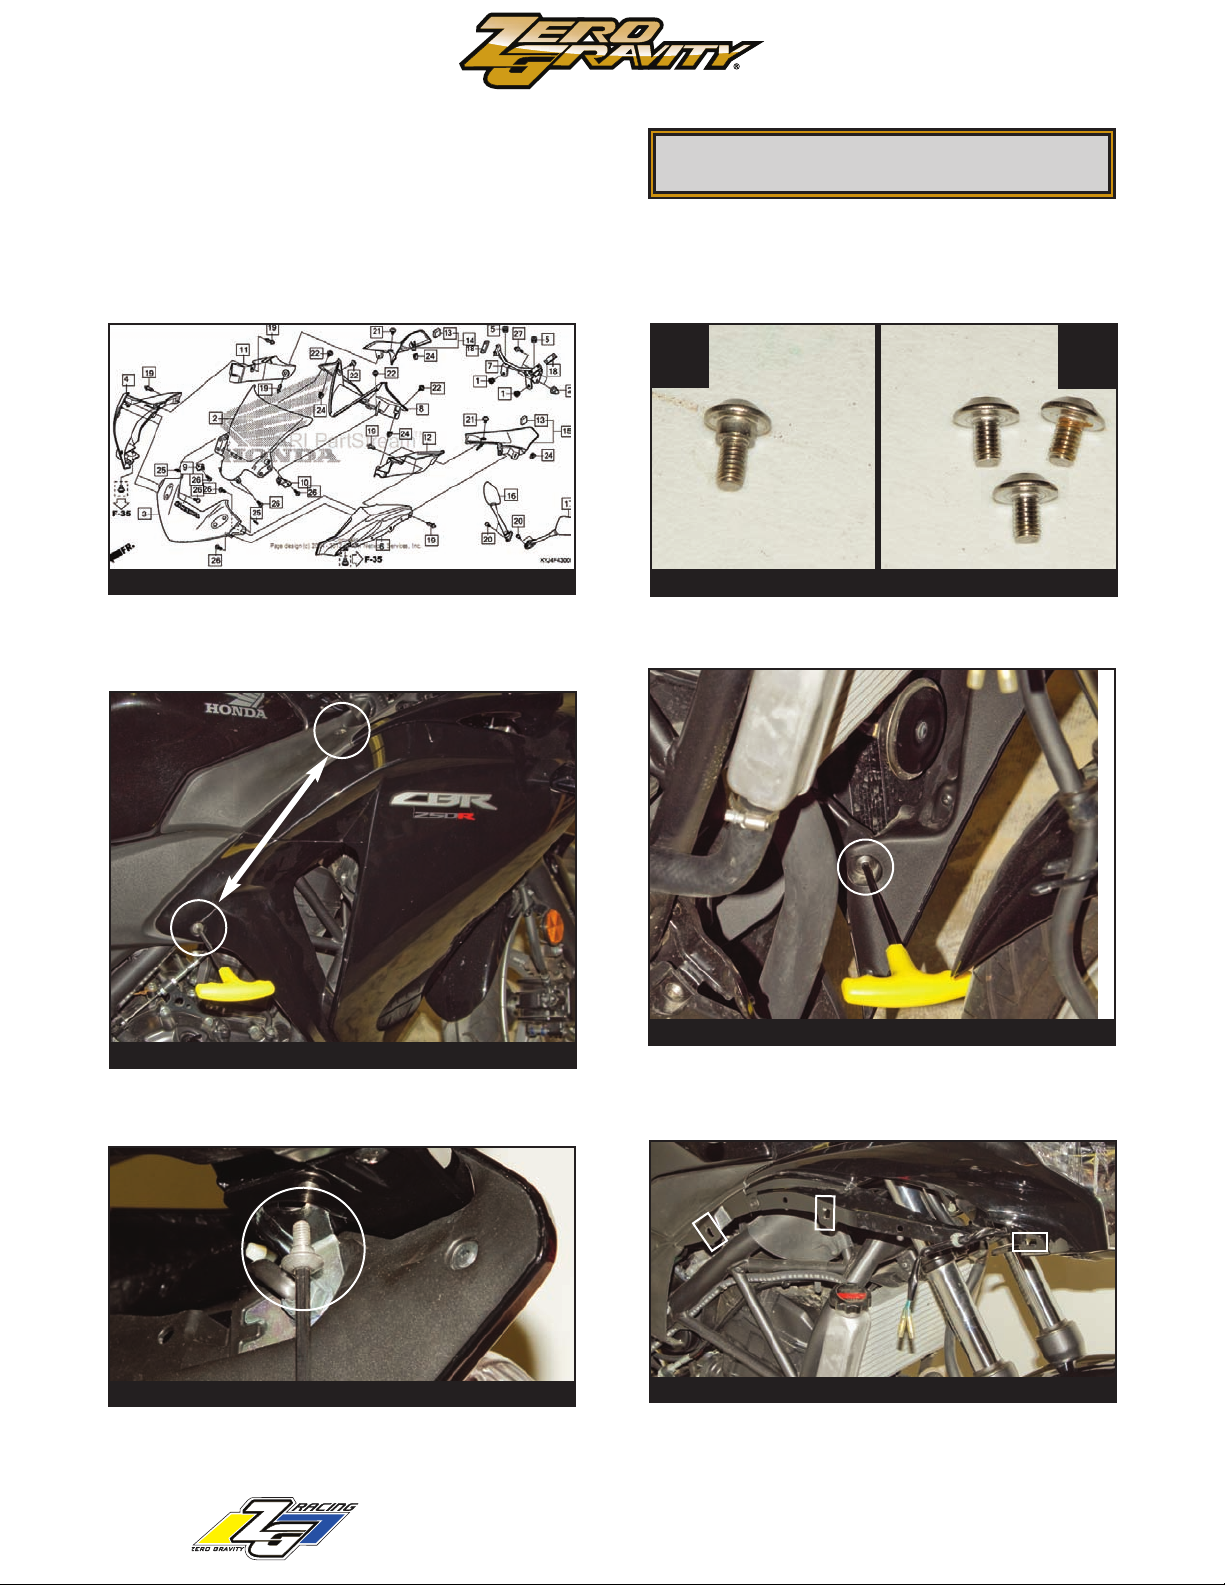
A
Removing Factory Screen Over View / Remove side mirrors
Overview of screen and exploded view of assembly. It
might be a good idea to go get a 2nd helper with the
install. Remove side mirrors, set aside.
Remove 2 sets of allen screws A & B. Note: One bolt
“A” is longer and has a step on the bottom shoulder.
PLEASE READ BEFORE
MOUNTING YOUR WINDSCREEN
B
Remove Side Fairing (For both sides)
Side Fairing Screw Locations Part 1 of 3
Here’s the side fairing screw location, there are two
more locations after this. Note: B screws are used.
Side Fairing Screw Locations Part 3 of 3
Here’s the inner front cowl of the bike, side fairing
screw location.
Note: A screw is used.
WWW.ZEROGRAVITY-RACING.COM
Side Fairing Screw Locations Part 2 of 3
Here’s the bottom of the bike, side fairing screw location. There is one more location after this.
Note: B screws are used.
Pulling the Side Fairing / Retention Clip Locations
Here’s the retention clips location after pulling the side
fairing off. Outline in white boxes. Caution: Electrical
wires are connected to the side fairing.
1
Page 2

Honda CBR250R (11-13) DIY Windscreen Install
SPORTBIKE SADDLES & WINDSCREENS
Pinch both
sides
Feed the wire
loom into hole.
443-IS
Attaching and Detaching Wires
Detach the fairing wires and set side fairing aside.
Note: Upon reattaching wires, match the wire colors.
Pop Rivets
How to remove and install pop rivets on the bike.
To remove these simply use a blunt point like a phillips
screw driver and press in the middle circle as shown
on the right. To install, prep the pop rivets as shown on
the left and simply press the middle circle to fasten.
Should be flush if done correctly.
Detaching Wire Loom Keeper
Dislodge the keeper by using a needle nose pliers
pinch the plastic and pull away. Feed the wire loom
back into the fairing hole.
Remove
both sides
Removing Pop Rivets
Remove two pop rivets on either side of the bike. Set
aside the 4 total pop rivets .
Retention clip Retention clip
Removing Gauge Cluster / Screw & Retention Clip locations
Unscrew the allen screws, and pull up on retention clips area when pulling cluster off.
Apply even pressure from the backside to dislodge retention clips shown above. Pull
away from fairing. Caution: Electrical wires are connected to the dash. Unplug
connector from dash assembly. Set aside the gauge cluster.
2
WWW.ZEROGRAVITY-RACING.COM
Note: Allen screws have
a step on the bottom shoulder, fine
thread.
Page 3

Honda CBR250R (11-13) DIY Windscreen Install
SPORTBIKE SADDLES & WINDSCREENS
443-IS
Point it 5
O’clock
Front Fairing Headlamp Removal Access To Inner Front Face Fairing OVERVIEW 1 of 2
You will be removing these Small screws from, the front upper fairing, shown in a Circle.
You will be removing these Big screws from, the front upper fairing, shown in a Box.
Very Important Note: Brackets shown are in the correct position. Use this image when reinstalling
dash. These brackets will hold the top gauge cluster in place.
Point it 7
O’clock
FFRROONNTT BBIIKKEE
Front Fairing Headlamp Removal Access To Inner Front Face Fairing OVERVIEW 2 of 2
You will be removing these Small screws from the side upper fairing, shown in a Circle.
You will be removing these Big screws from the side upper fairing, shown in a Box.
WWW.ZEROGRAVITY-RACING.COM
3
Page 4

Honda CBR250R (11-13) DIY Windscreen Install
SPORTBIKE SADDLES & WINDSCREENS
Pull up on
the fairing to
dislodge
from these
holes.
443-IS
Front Fairing Headlamp Removal Access To Inner Front Face Fairing PT1
Cover your front fender with a cloth. Locate the two mirror mounts on the upper fairing. Pull upper fairing up
and away to dislodge the two raised holes from the
metal bracket.
FFRROONNTT BBIIKKEE
Front Fairing Headlamp Removal Access To Inner Front Face Fairing PT3
Remove two Big screws from the front face fairing and
headlamp. Location shown in OVERVIEW 1 of 2.
Front Fairing Headlamp Removal Access To Inner Front Face Fairing PT2
Pull forward to remove the front face with headlamp. It
should look like shown above. This step is to make PT3
easier to have access.
FFRROONNTT BBIIKKEE
Front Fairing Headlamp Removal Access To Inner Front Face Fairing PT3
Remove two Big screws from the side of the front face
fairing & headlamp assembly on either side of the bike.
Front Fairing Headlamp Removal Access To Inner Front Face Fairing PT4
Remove two Big screws attached from the front face fairing
and headlamp.
4
WWW.ZEROGRAVITY-RACING.COM
QQUUIICCKK IINNSSTTAALLLL TTIIPP
You can save alot of time and steps from here if you
have a 2nd helper to hold the front face fairing and
headlamp while you concentrate on unscrewing the
screws shown in OVERVIEW 1 of 2. You will be removing
Small screws from this front upper fairing. Shown in a
circle. After removing the small screws and bracket,
slide the windscreen up to dislodge. Install Zero Gravity Screen, like your factory screen was installed in. If
this shortcut is taken skip to Page number 6.
Page 5

Honda CBR250R (11-13) DIY Windscreen Install
SPORTBIKE SADDLES & WINDSCREENS
443-IS
FFRROONNTT BBIIKKEE
Headlamp Dowel
Side and Front Fairing Removal
Once all of the fairing screws are removed place the
headlamp dowel into the rubber grommet on either side
of the bike as shown. Caution: The headlamp is
supported by those dowels only.
Access Opening
Headlamp
side Mount
Side and Front Fairing Removal
Pull the side and front fairing away from the headlamp
and be sure to route the headlamp side mount to the
side fairing through the access opening.
FFRROONNTT BBIIKKEE
Front Face Removal
Once removed it will look like this.
WWW.ZEROGRAVITY-RACING.COM
Side Front Fairing Removal
Remove four Small screws attached from the front face
fairing and side front fairing on either side of the bike.
Be careful not to drop the fairings or windscreen.
5
Page 6

443-IS
SPORTBIKE SADDLES & WINDSCREENS
Honda CBR250R (11-13) DIY Windscreen Install
Front Face Removal
Once removed look at OVERVIEW 1 of 2 image and remove the screws. Then carefully pop these out, outlined in white cir-
cle and replace it with a Zero Gravity Windscreen. Follow the instructions carefully in reverse, there are a few steps
below to guide with the install.
Sport Touring Windscreen Disclaimer
Special Note: Sport Touring Windscreen
Brake lever position, factory setting should
not become a problem. Altered brake lever
position may cause contact with the windscreen at a full left turn.
FFRROONNTT BBIIKKEE
Gauge Install & Clip Snap
LEFT IMAGE: Shows after the gauge is in place to
compress the gauge to the upper fairing to seat correctly.
RIGHT IMAGE: After the gauge is compressed, apply
pressure to the thumb and press to snap in the gauge
cluster.
6
Please see www.zerogravity-racing.com for
further information concerning this product.
WWW.ZEROGRAVITY-RACING.COM
 Loading...