

Zepter WT-100 Instruction Manual
WT-100
INSTRUCTION MANUAL
AR
UK
SR
RU
PL
HU
IT
FR
ES
DE
EN


1
EN
Instruction Manual
pag. 02
DE
Bedienungsanleitung
Seite 27
ES
Manual de Instrucciones
Página 52
FR
Manuel d’utilisation
page 77
IT
Manuale d’Uso
pagina 102
HU
Használati útmutató
127. oldal
PL
Instrukcja obsługi
strona 152
RU
Инструкция по эксплуатации
стр. 177
SR
Uputstvo za upotrebu
str. 202
UK
Інструкція з експлуатації
стр. 227
AR

EN
2
INTRODUCTION
AQUEENAPRO: WATER PURIFIER
Thank you for choosing ZEPTER AqueenaPro water purifying system and your trust in Zepter
International. Your AqueenaPro will reliably provide clean, healthy and great-tasting water for you
and your family. Place Zepter AqueenaPro in your home and enjoy an endless source of pure spring
water, every day. Zepter International is a global specialist in health and lifestyle.
This guideline will help you get the best out of your water fi ltration system. Please go through this user
instruction manual to familiarise with its operation and maintenance.
To make sure the warranty is effective, follow all instructions provided in this user manual. For further
information or support, please contact your Zepter sales representative*.
For any questions regarding AqueenaPro installation, maintenance or fi lter replacement, please
contact your service technician/Zepter Service Centre*.
*All contact details can be found in the Warranty card.

EN
3
INTRODUCTION 02
CONTENT 03
SAFETY INFORMATION 04
AQUEENAPRO TECHNOLOGY 10
AQUEENAPRO FEATURES 10
AQUEENAPRO OVERVIEW 11
ITEMS IN THE BOX 12
AQUEENAPRO INSTALLATION 12
– Installation Instructions
13
OPERATING INSTRUCTION 13
– Before fi rst use 13
– RO Membrane Installation 14
– Display functions 15
MAINTENANCE AND FILTER REPLACEMENT METHOD 16
– Flushing the RO Membrane 16
– Filter Replacement Method 16
– Filters replacement procedure 16
– Restoring leakage sensor 17
– After fi lter replacement 18
– The RO replacement procedure 19
– Filter Replacement Time 19
– RO membrane replacement time
20
TECHNICAL INFORMATION 21
OPERATING INFORMATION 21
TROUBLESHOOTING GUIDELINE 22
DISPOSAL INFORMATION 23
WARRANTY CARD 24
WARRANTY STATEMENT 25
AQUEENAPRO PERFORMANCE DATA SHEET 26
CONTENTS

EN
4
SAFETY INFORMATION
The manual uses specifi cations to draw your attention
to some details
Warning! Failure to observe a warning may result
in severe physical injury or property damage
Caution! For safety reasons, be careful! Failure to
observe a caution sign may result in minor physical
injury or property damage
Note! It contains additional information and useful
advice for the proper use of the water fi ltration unit.
Caution!
• This user manual is an integral part of the
appliance. Read all the instructions and safety
precautions contained in this manual carefully,
as they provide important information on
the use and maintenance of the device.
Keep the manual for future reference.
• After removing the packaging, make sure that
the water fi ltration unit is intact, carefully
inspect the device body and the accessory box.
• This appliance should only be used for its
intended purpose. The manufacturer shall
not be held liable for any damages caused
by improper, incorrect or unreasonable use.

EN
5
• This appliance is not intended for use by persons
(including children) with reduced physical,
sensory or mental capabilities, or lack of
experience and knowledge, unless they are
supervised or have been instructed on the
use of the appliance by a person responsible
for their safety.
• Children should be supervised to ensure that
they do not to play with the appliance.
• At the end of its lifetime, the appliance should
be disposed of separately from ordinary
waste, leaving it with operators who are
qualifi ed to collect this kind of material.
In this way it will be properly disposed of and
recycled, helping to safeguard the environment!
Note!
1. AqueenaPro is a water fi ltration system for
household use. Any use outside your home
and for purposes other than purifying water for
household use will automatically void your
warranty.
2. The AqueenaPro should not be used on feed
water that is microbiologically unsafe or has
unknown microbiological quality without
disinfecting the water before using the device.

EN
6
3. Cold water plumbing – AqueenaPro must
be connected to a cold water pipe. Using
hot water (>38°C) as a water source will cause
permanent damage to the RO membrane and
severely degrade the performance of the product.
Warning!
Important safety information:
Warning for the European market:
This appliance can be used by children aged over
8 years and persons with reduced physical, sensory
or mental capabilities or lack of experience and
knowledge if they are supervised or have been
instructed on the safe use of the appliance and
understand the hazards involved. Children shall
not play with the appliance. Cleaning and user
maintenance shall not be carried out by children
without supervision
Warning for Non-European markets:
This appliance is not intended for use by persons
(including children) with reduced physical, sensory
or mental capabilities, or lack of experience and
knowledge, unless they are supervised or have been
instructed on the use of the appliance by a person
responsible for their safety.
Children should be supervised to ensure that they
do not play with the appliance. The new hose-sets
supplied with the appliance are to be used and old
hose-sets should not be reused.
EN
7
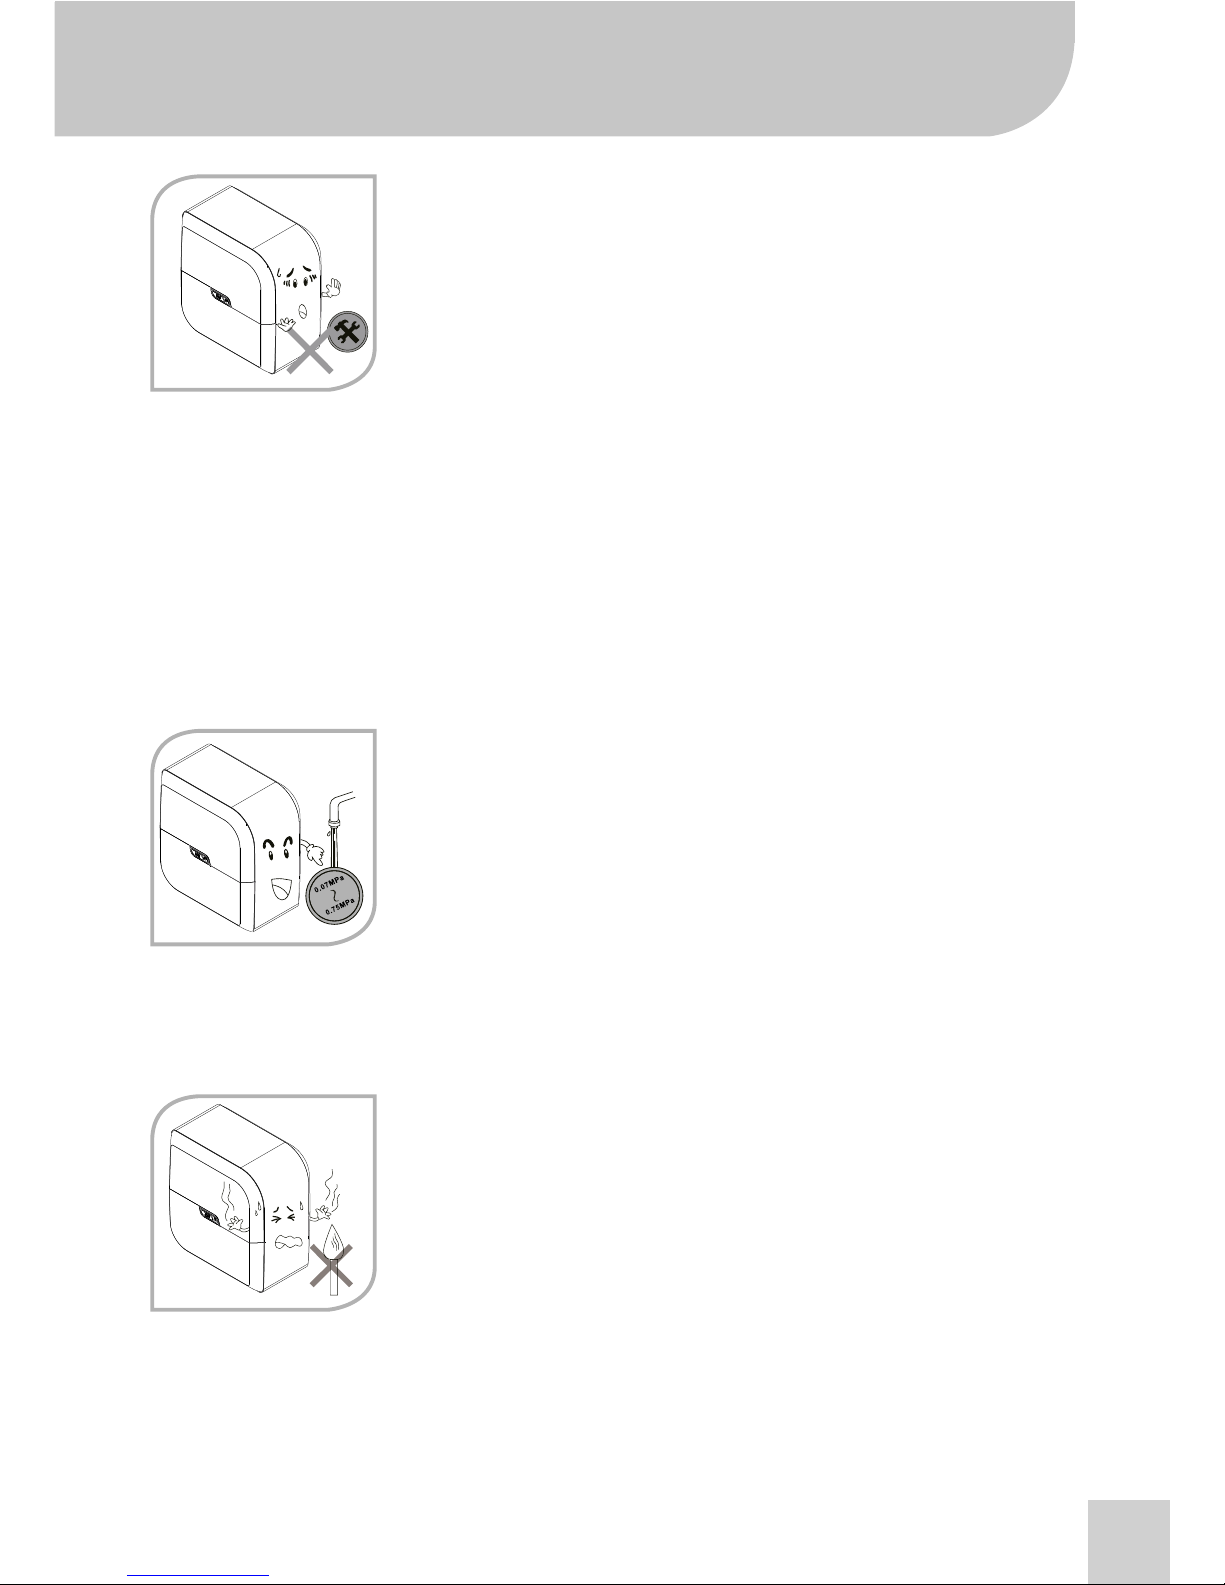
• Do not disassemble
or modify AqueenaPro
on your own!
Never attempt to repair or change
any internal part of AqueenaPro,
as it may compromise the effi ciency
and safe operation of your water
purifi er. Any unauthorised change
will automatically void the warranty.
If you fi nd that a repair is needed,
please contact your Zepter service
technician for support.
• Do not use AqueenaPro
under high water pressure!
Operating under high pressure
conditions may result in rupture of the
water purifi er pipes and a consequent
water leakage. Recommended inlet
pressure is 0.1MPa to 0.35MPa.
(14.5 - 50.8 psi).
• Do not use AqueenaPro
near gas, naked fl ames,
explosive or highly
fl ammable materials.
Do not leave the water purifi er near
fi replaces or other high temperature
heat sources (stove, oven), as it can
result in deformation or melting of
the housing.

EN
8
• AqueenaPro
is a free-standing unit.
Do not place or keep anything on
top of the unit.
• Before connecting the unit
to the mains, make sure the
information found on the data plate
matches that of your electricity
mains.
• Do not use the appliance if
the power cord or plug are
damaged.
If the supply cord is damaged,
it must be replaced by the
manufacturer, its service agent or
similarly qualifi ed persons in order
to avoid a hazard. The appliance
is only to be used with the power
supply unit provided with the water
dispenser.
• Do not touch the power
plug with wet hands!
It may lead to electric shock.
EN
9
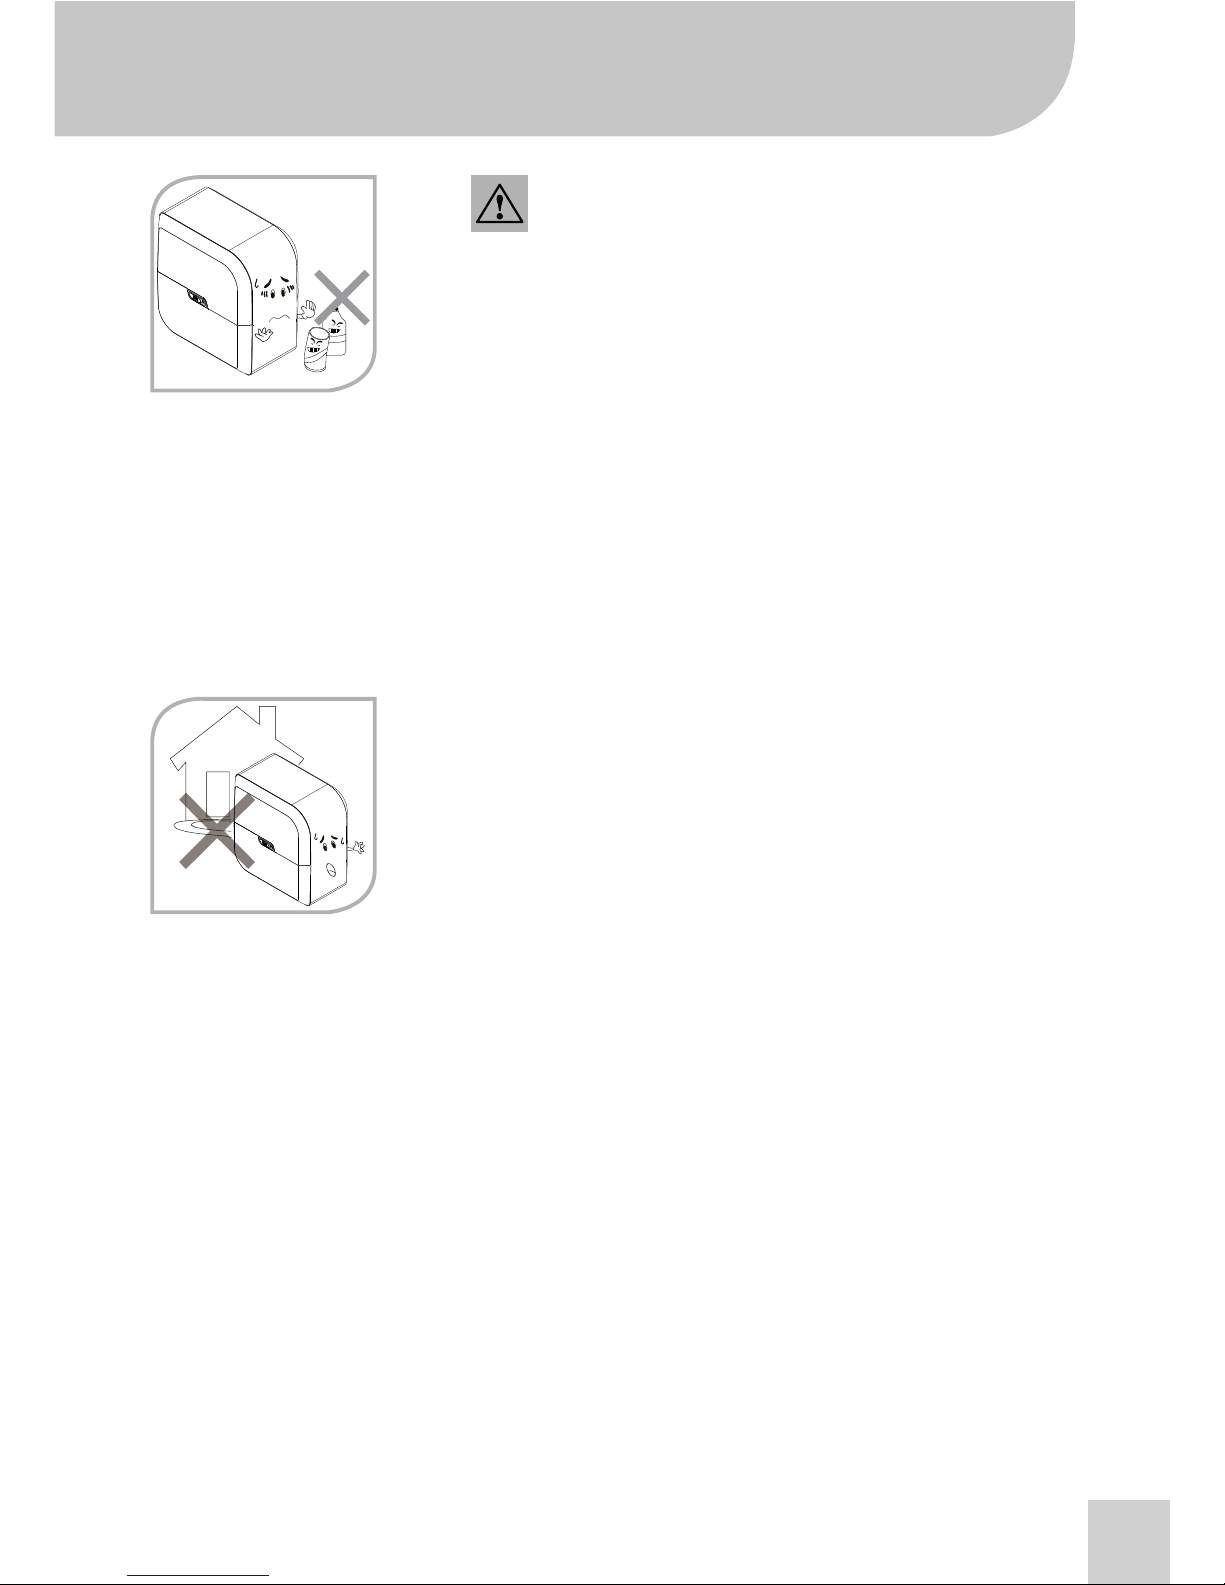
Caution!
• Do not use any chemicals
when cleaning the outside
casing of AqueenaPro.
Alcohol, petrol, organic and
inorganic acids and strong basic
chemicals like concentrated
dishwashing detergents will
irreparably damage the plastic
housing of your AqueenaPro.
• Do not use your
AqueenaPro outdoors!
Using AqueenaPro outdoors can
accelerate the corrosion of pipes
and parts, which can result in
leaks or damage to the device.
EN
10
AQUEENAPRO TECHNOLOGY
AQUEENAPRO FEATURES
AqueenaPro is a low-noise 5-stage fi ltration system which uses the most advanced international RO
(reverse osmosis) technology currently available.
The heart of the AqueenaPro water fi ltration system is a RO membrane with 0.0001-micron small
pores designed to remove even dissolved impurities (heavy metals), pesticide residues as well as
harmful micro organisms (bacteria and viruses). AqueenaPro signifi cantly reduces bacteria and
infectious viruses.
• Built-in water tank, theoretical volume 2.5 Gallon (9.5 l).
• Computer control box, which automatically adjusts AqueenaPro’s working status.
• Filter change alarm, which indicates when the fi lter needs to be replaced.
• RO membrane integrated with the membrane housing to prevent tampering.
• Leakage sensor, to detect device leakage; it secures the user`s property
and avoids damages caused by leaks.
• High pressure pump, which creates a stable environment for the RO membrane.
• Flushing solenoid valve, to fl ush the RO membrane automatically and control waste water fl ow.
• Inlet solenoid valve, which by defi nition opens or shuts inlet water pressure in a range
between 0.03 and 0.6MPa (4.35 – 87 psi).
• Checking fl ow valve, to prevent water backfl ow.
• Safe feature, pressure switch.
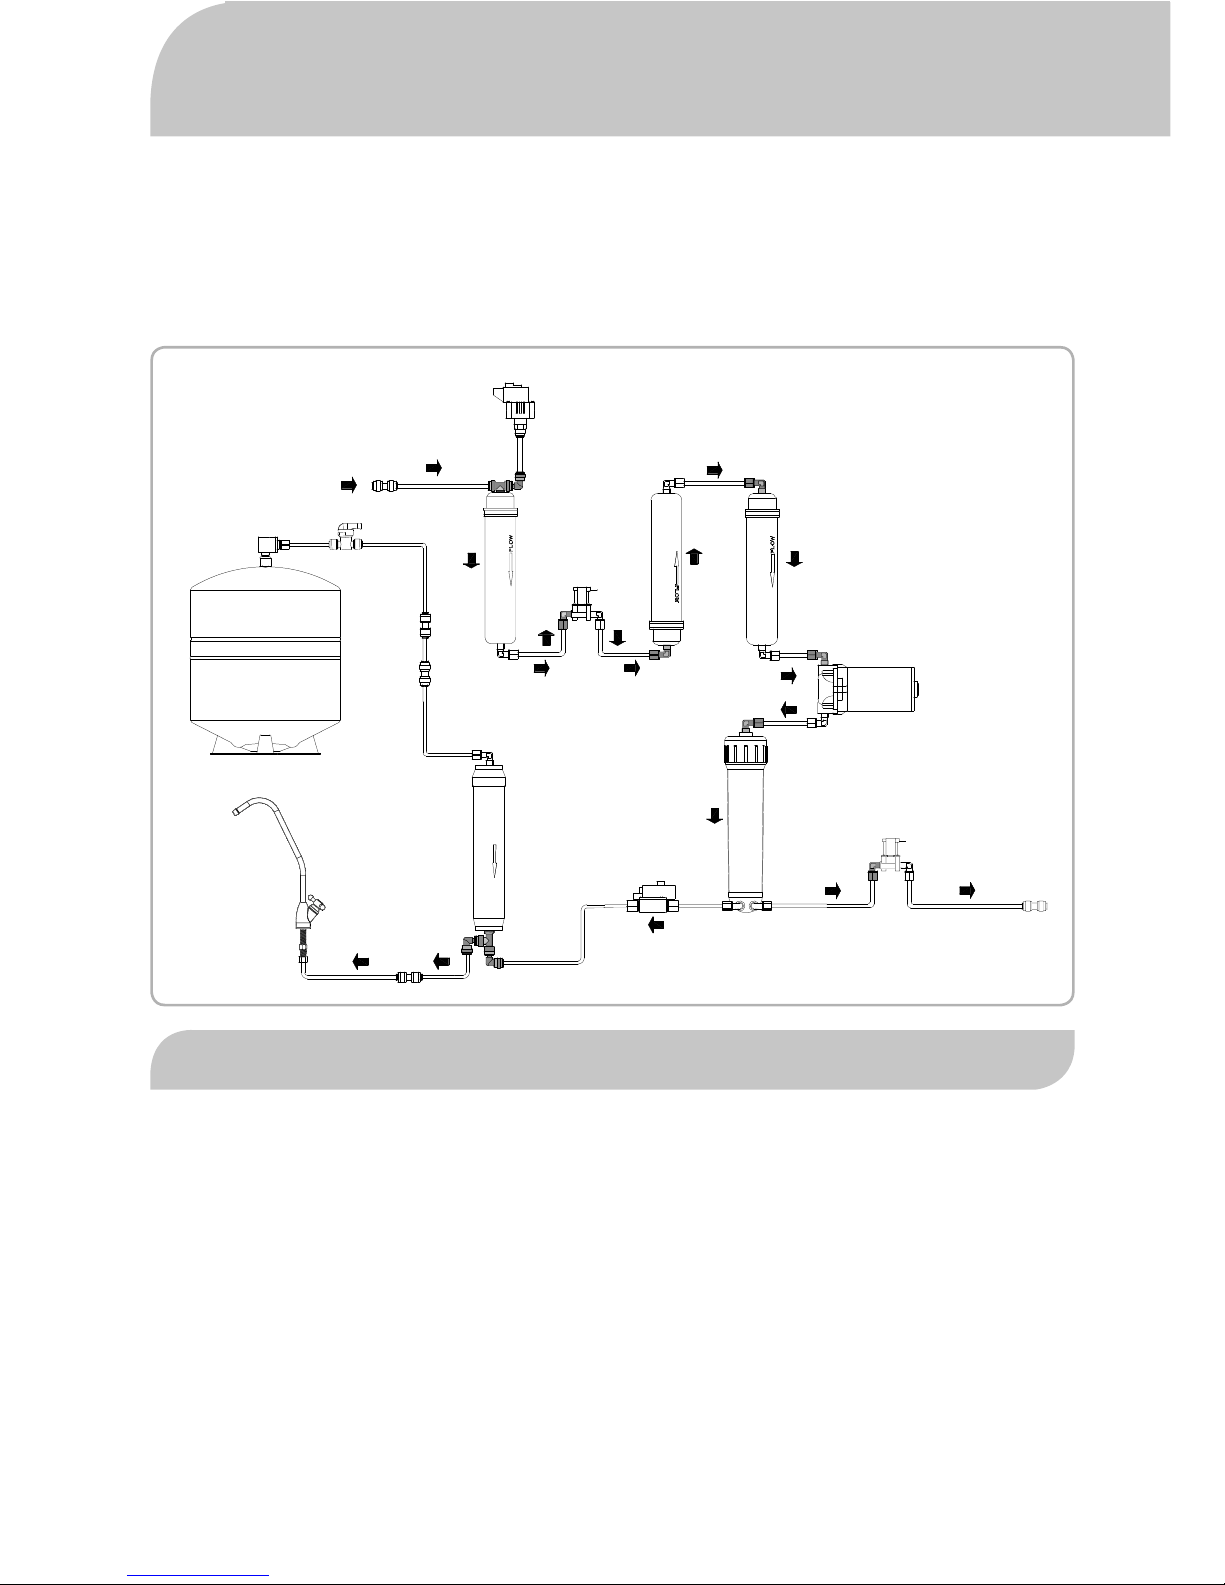
Low pressure switch
Inlet water
5μm PP fi lter
1μm PP fi lter
Pump
Reverse osmosis
Coconut fi lter
Tank valve
Tank
Pure water
Faucet
Flow
Waste water
Flushing solenoid valve
Inlet
solenoid valve
Pellet
carbon
fi lter
High pressure switch
17
16
15
14
13
12
11
10
9
8
7
6
5
4
3
2
1
EN
11
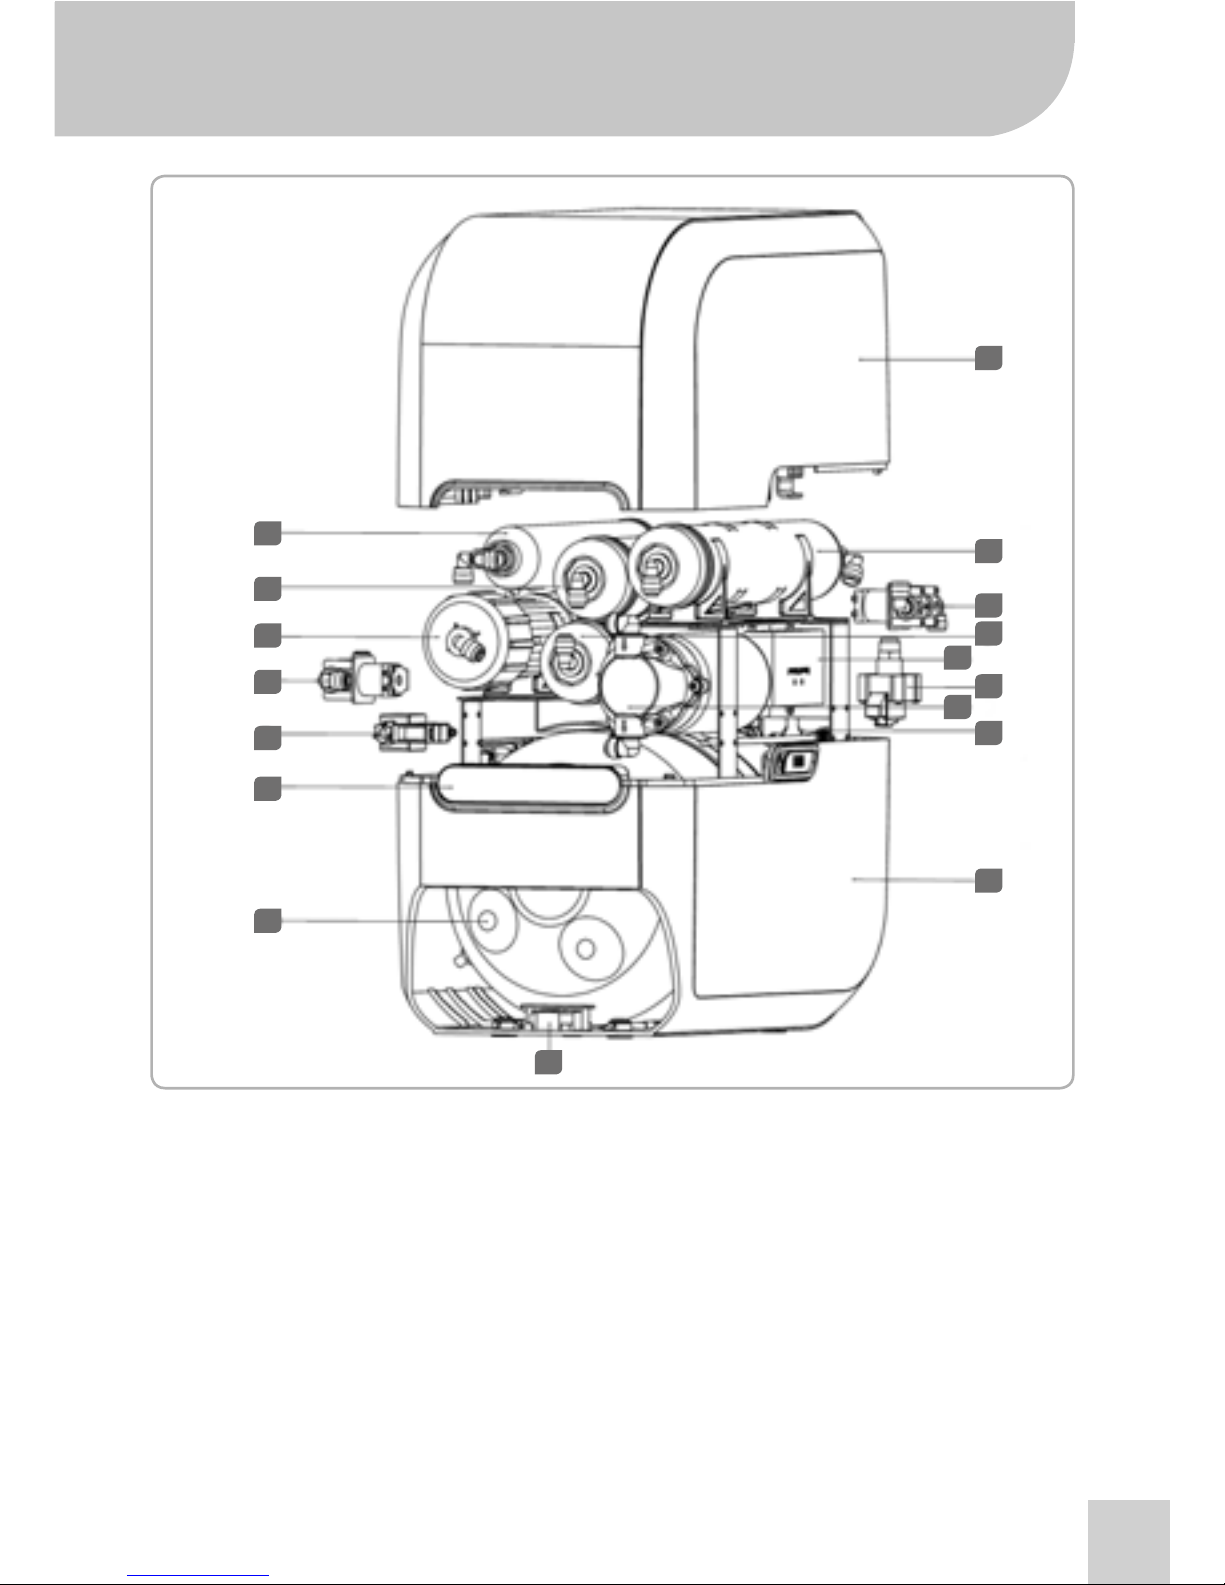
AQUEENAPRO OVERVIEW
1. Upper cover
2. 5 micron PP Filter
3. Inlet Solenoid Valve
4. Pellet Carbon Filter
5. Computer control box
6. Low Pressure Switch
7. Pump
8. Bracket for inlet/outlet water
9. Lower cover
10. Leakage sensor
11. 2.5G water tank
12. Display
13. High pressure switch
14. Flushing Solenoid Valve
15. Reverse Osmosis
16. 1 micron PP Filter
17. Coconut Filter
EN
12
ITEMS IN THE BOX
1. AqueenaPro water fi ltration system 1 piece
2. RO membrane in protective fi lm 1 piece
3. Power supply adaptor 1 piece
4. User manual 1 piece
5. Drinking water faucet 1 piece
6. Tube 5 m
7. Drainage clamp 1 piece
8. Wrench for membrane housing 1 piece
9. Accessory bag 1 piece
a) Inline feed water connector 1 piece
b) Clip for quick connectors 2 pieces
c) Faucet fi xture 1 piece
AQUEENAPRO INSTALLATION
Installation, servicing, maintenance and repairs should only be performed by
Zepter authorised staff.
All maintenance should be performed using original Zepter replacement cartridges and spare parts.
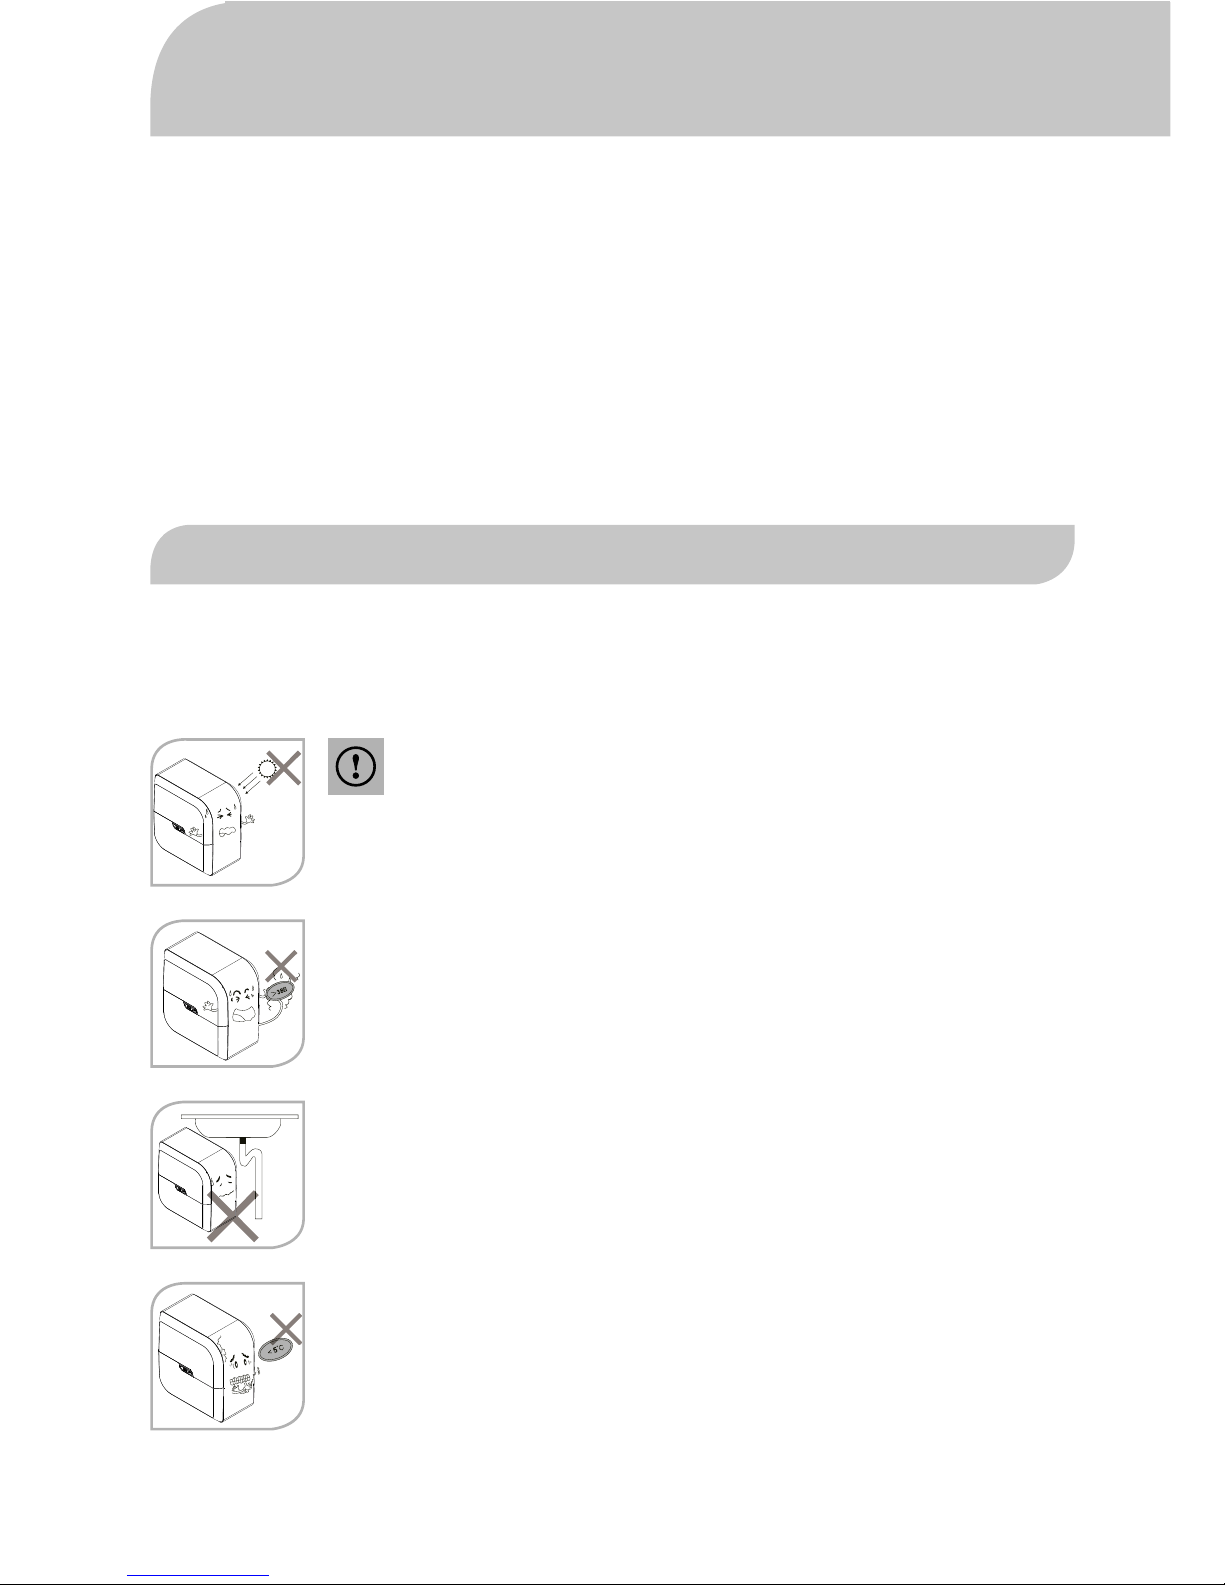
Warning!
• Avoid exposure to direct sunlight and installation in damp areas
It may create a breeding ground for microorganisms resulting in reduced purifi ed
water quality, as the internal components of the water purifi er can be polluted
• Inlet water cannot exceed 38°!
Using a hot water source (>38°C) will cause permanent damages to the RO
membrane and severely degrade the performance of the product.
Make sure that AqueenaPro is connected to a cold water supply only.
• The maximum distance between the water source and the
purifi er should not be more than 3 m.
• Avoid sharp bends in the pipe. Do not bend or block the
reject water tube.
• Do not confi ne your AqueenaPro in a tight cabinet.
• Do not use the AqueenaPro when the drain is clogged up.
• Do not use AqueenaPro at temperatures below 5°!
If the room temperature is below 5°, it can result in pipes cracking due to water
freezing inside the machine.

EN
13
Note!
Aqueena Pro water purifi er has been designed to be installed under the sink. The initial installation
requires carpentry and plumbing works.
Installation, servicing, maintenance and repairs should only be performed by
Zepter authorised staff .
Recommended side preparation
• Mains connection no more than 1.5 m from the point of installation of AqueenaPro
• Water supply no more than 3 m away
• Drain for rejected water no more than 3 m away
• Space as per the size of AqueenaPro
• It is preferable to install AqueenaPro near a sink so that inlet and reject water
lines are easily available.
Important notes!
1. If you are not using your AqueenaPro for more than two days (48 hrs),
switch off the device and drain the storage tank.
2. To keep the storage tank clean, it should be drained once every 2 days.
3. The buzzer will sound to indicate a fault in the purifi er. If you hear an audible alarm, take action as
reported in the “Display function” section and/or the “Troubleshooting guideline” or call a
service technician for support.
4. Do not try to service the AqueenaPro on your own. Call a service technician/Zepter Service centre
for help.
Installation Instruction
OPERATING INSTRUCTIONS
Before fi rst use
1. Install the RO membrane according to the section RO Membrane Installation
2. Make sure that all connections are secure.
3. Connect the water purifi er to the mains. Make sure the power connector plug
can plug into the local power socket.
4. Bypass the water tank, close the water tank valve.
5. Open water inlet valve and water faucet
6. Switch on your AqueenaPro. As a start up audio signal will be activated 1 buzz.
7. Let water run through the system for approx. 5-10 min (system stabilisation)
and check all connections.
Caution! If you fi nd any leaks, do not proceed further until the leaks are fi xed.
8. Turn off the water faucet and check if the fl ow of waste water stops
(approx. after 30 s).
9. If no deviation or leak is found, open the water tank valve and let the system fi ll with water.
10. Drain the fi rst two water tanks before use.
EN
14
Note! The fi rst two tanks can contain black residues.
These are carbon particles washing away from the carbon fi lter and
will not affect future system performance nor the quality of purifi ed water.
11. Measure TDS level and record it on your Product Warranty Card.
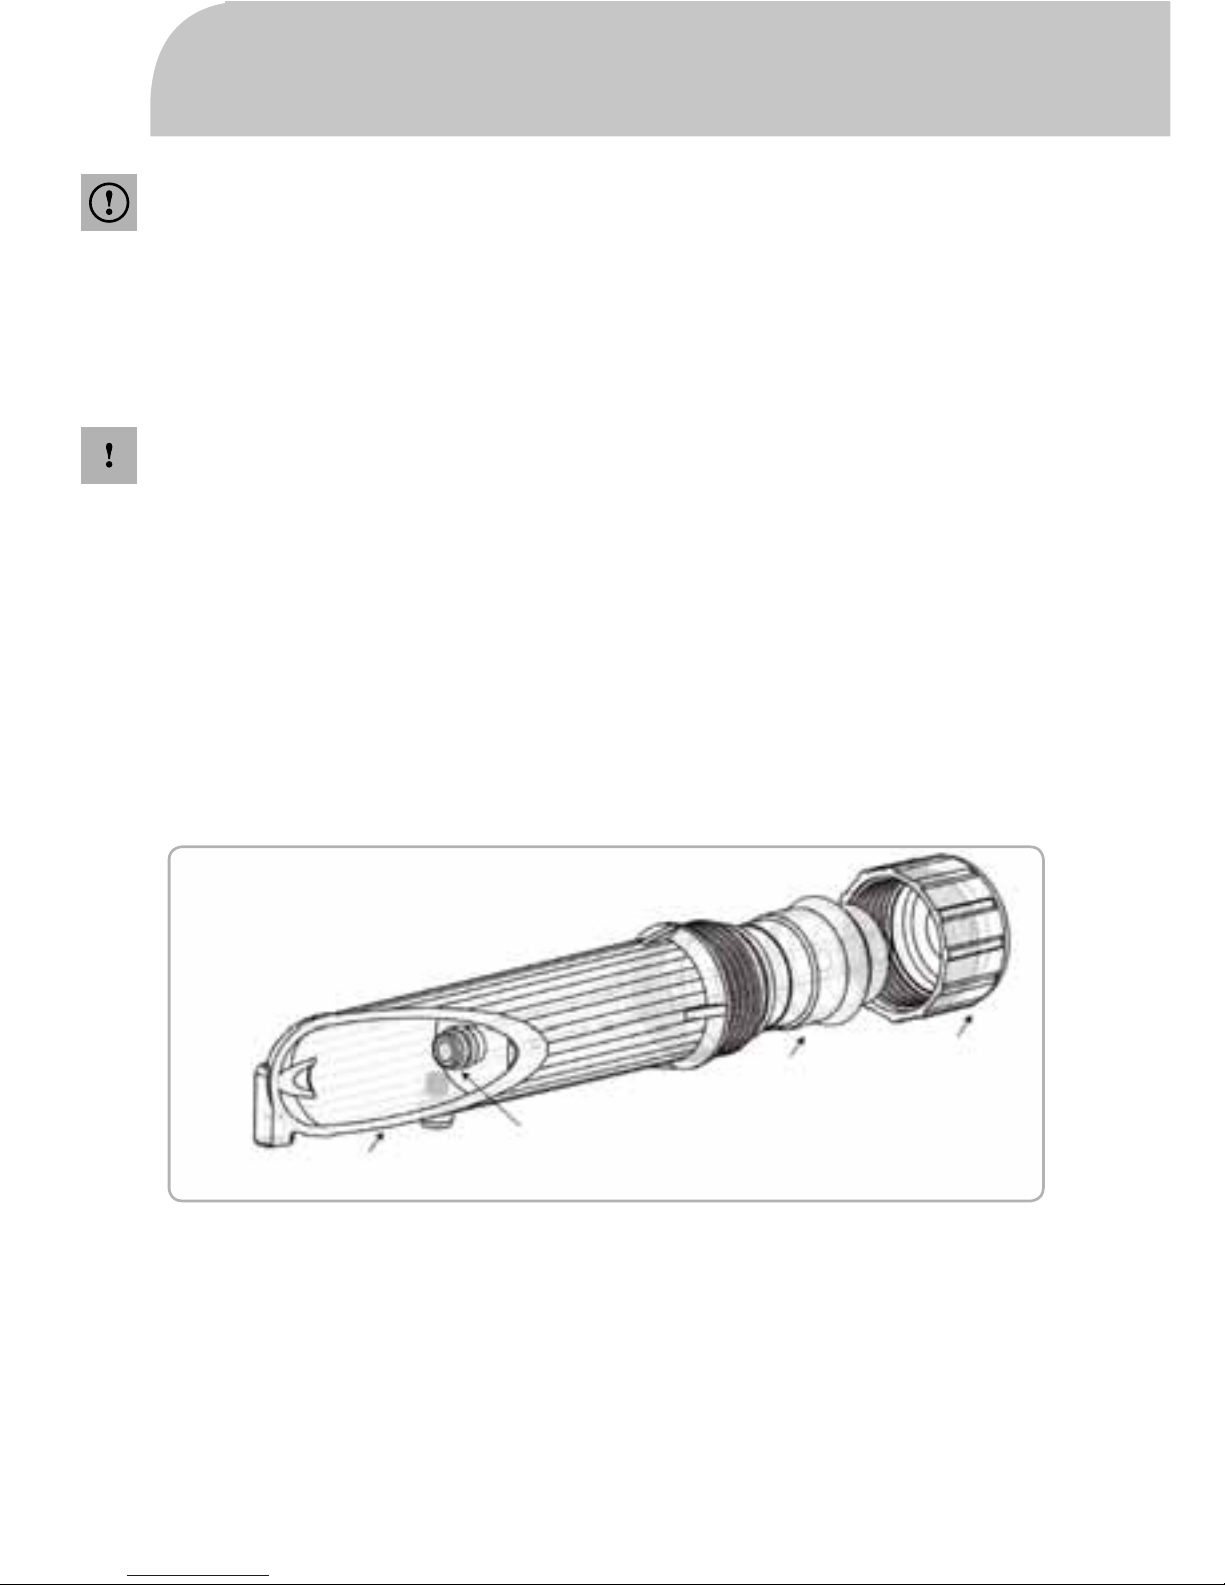
RO Membrane Installation
Note!
• The AqueenaPro water purifi er is delivered with the RO membrane uninstalled
and packed separately with protective fi lm.
• In order to prevent microbial contamination of membrane components during storage
and transportation, the RO membrane package contains a small amount of protective solution.
1. Remove the AqueenaPro top cover.
2. Unscrew the cap’s nut from the membrane housing and remove inlet water pipe.
3. Disassemble membrane cap with the enclosed wrench.
4. Remove RO membrane from its protective fi lm.
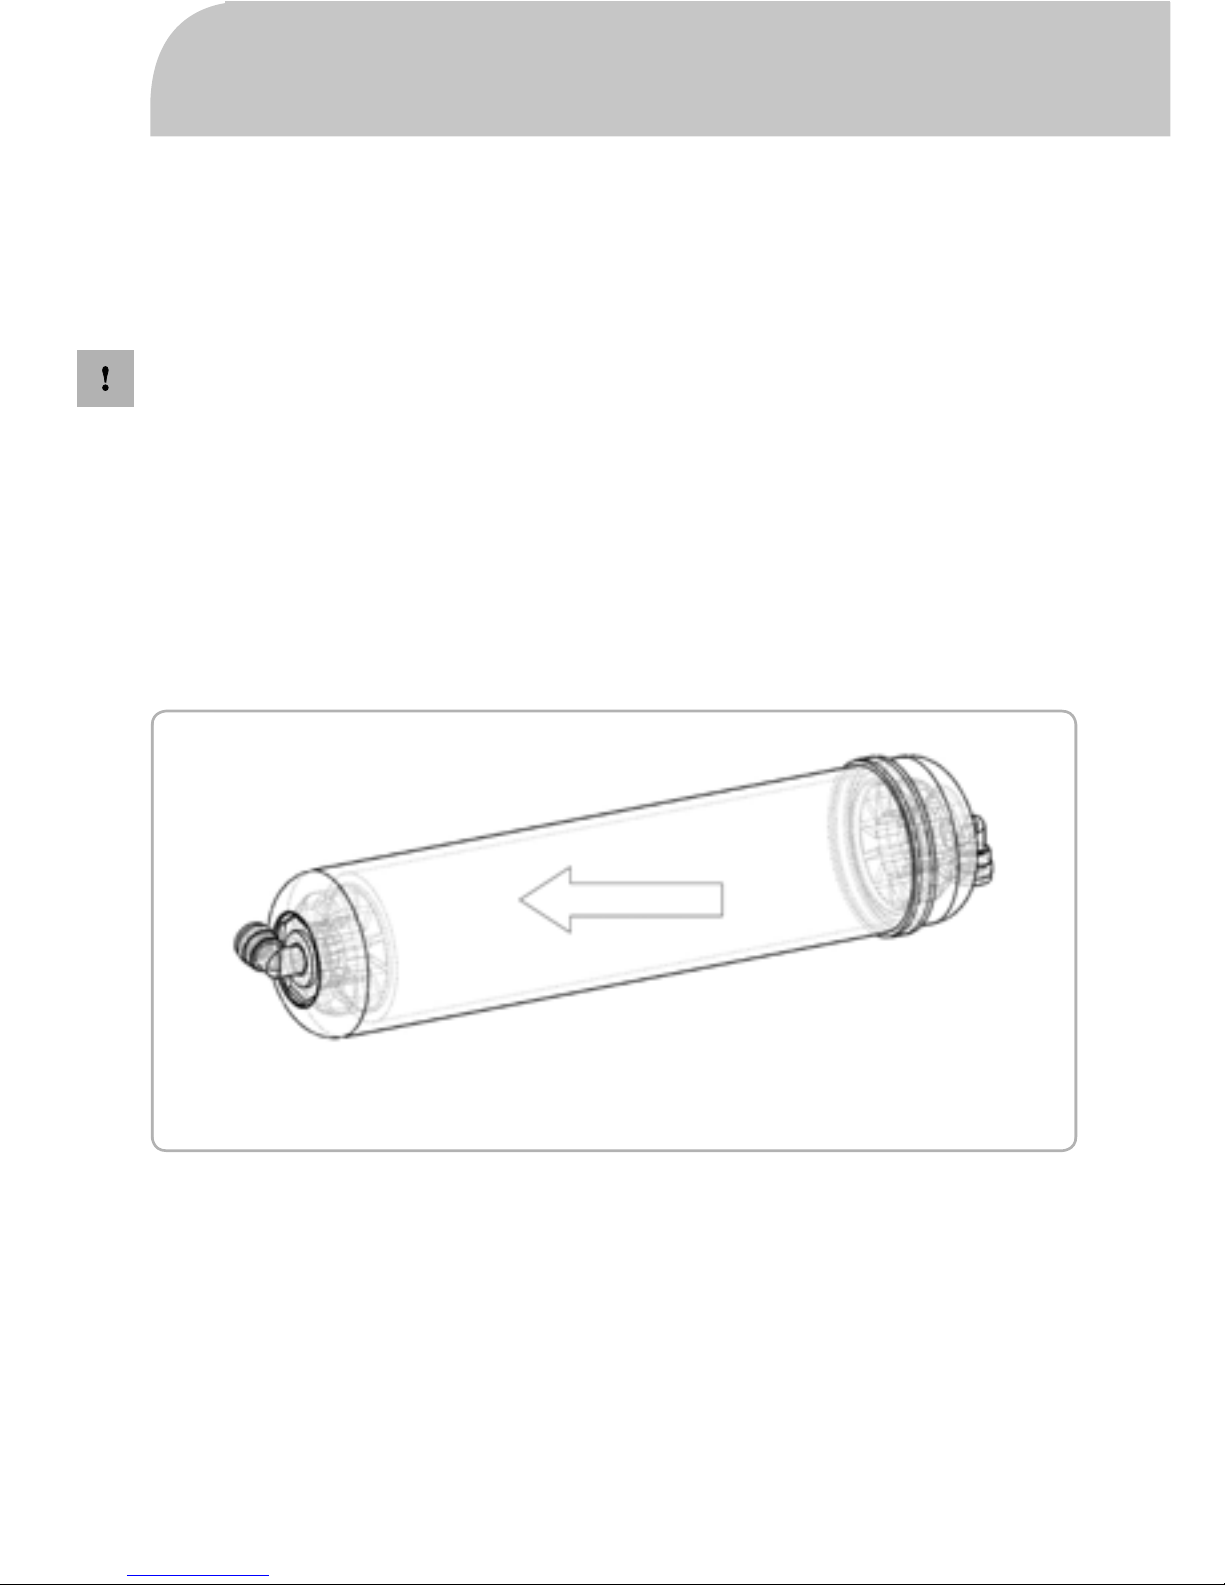
5. Insert RO membrane into membrane housing. The membrane end with O-ring must be placed
on the bottom of the housing. (see picture below)
6. Close the membrane casing with the cap. Use the wrench to tighten the cap properly.
7. Connect the inlet water pipe and secure it with the cap’s nut.
8. Place the RO membrane cartridge in the correct position.
9. Check all connections and make sure that there are no leaks.
10. Close the AqueenaPro top cover.
O-rings
cartridge
membrane
cap
EN
15
Warning!
Pay attention to the direction of the membrane; the membrane ending with an O-ring must be placed
in the bottom part of the housing.
• Do not force the RO membrane into the membrane casing; it may cause permanent damage
to the membrane shell or membrane components.
• If the RO membrane is installed correctly in the membrane housing, there is no need to force it.
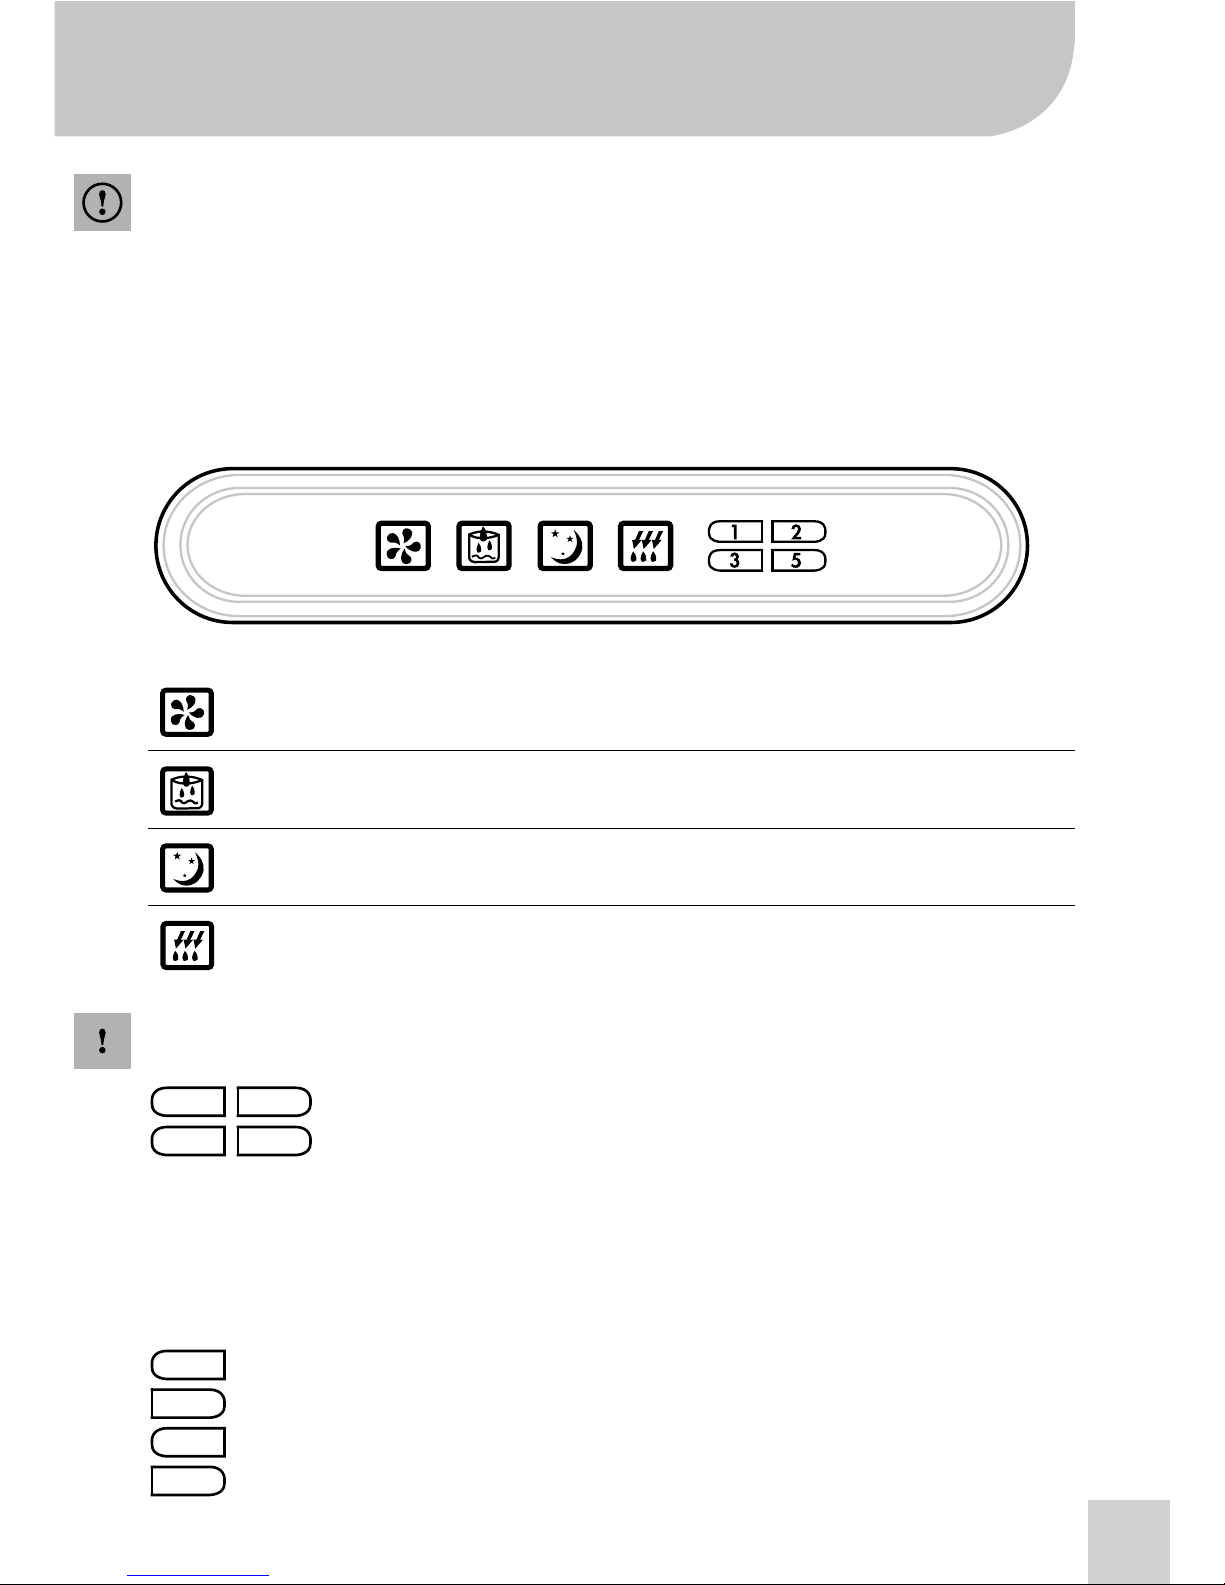
Note! If any leaks occur, all icons (“Working”, “ Water source”, “Standby” and “Flush” icons) will
fl ash at same time along with an audible alarm.
Filter Status Display: It shows the actual fi lter status.
Green light – the fi lter works at its optimum level.
Orange light - the fi lter will soon need replacing. Please contact Zepter Service for maintenance
support.
A red light along with an audible alarm (4 buzzes) means that the fi lter must be changed immediately.
Further use of the fi lter is not recommended.
5 – micron PP fi lter WT-100-72
Pellet carbon fi lter WT-100-73
1 – micron PP fi lter WT-100-74
Coconut fi lter WT-100-75
Display functions
5
3
2
1
12
53
If a display icon lights up:
Working:
Water purifi cation is in the progress, the device is in working mode.
Water
Source:
Flashing light - missing inlet water source or low inlet water pressure.
The “Water source” icon will light up with an audible alarm (7 buzzes).
Standby:
The water purifi er is in standby mode.
Flush:
The fl ushing function is activated.
EN
16
Flushing the RO Membrane
The RO membrane is automatically fl ushed for 18 seconds when the device is turned on.
When the water tank is full, the RO membrane is automatically fl ushed for 10 seconds.
Filter Replacement Method
Note! Filters and membranes are consumables. Their replacement time
depends on the quality of raw water and water consumption.
They are not covered by the warranty.
Filter Replacement procedure
1. Turn off the power supply.
2. Close the inlet water valve.
3. Remove the top cover.
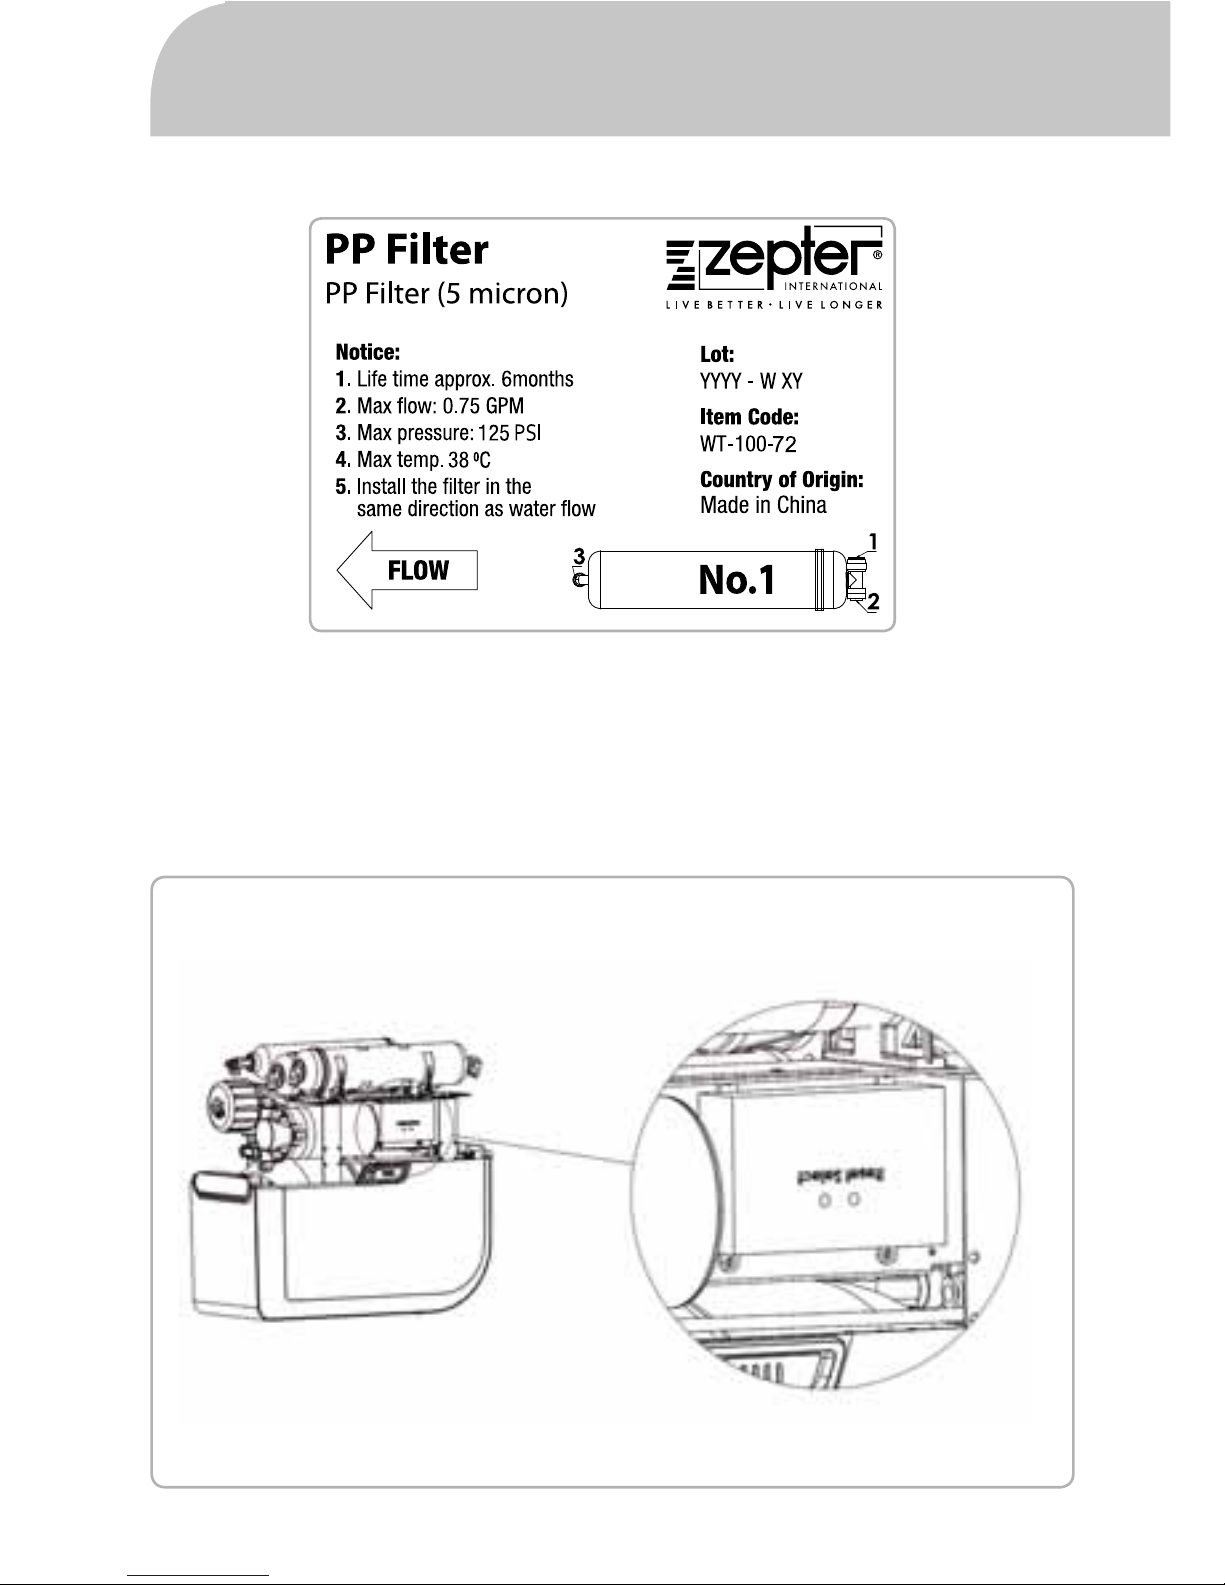
4. Unplug the “old” fi lter – disconnect fi lter from quick connectors (memorise fi lter orientation).
5. Replace the fi lter – Pay attention to correct water fl ow direction!
6. Check all connections and make sure there are no water leaks.
7. Close the top cover.
8. Open the inlet water valve and turn on the power supply.
MAINTENANCE AND FILTER REPLACEMENT METHOD
FLOW
EN
17
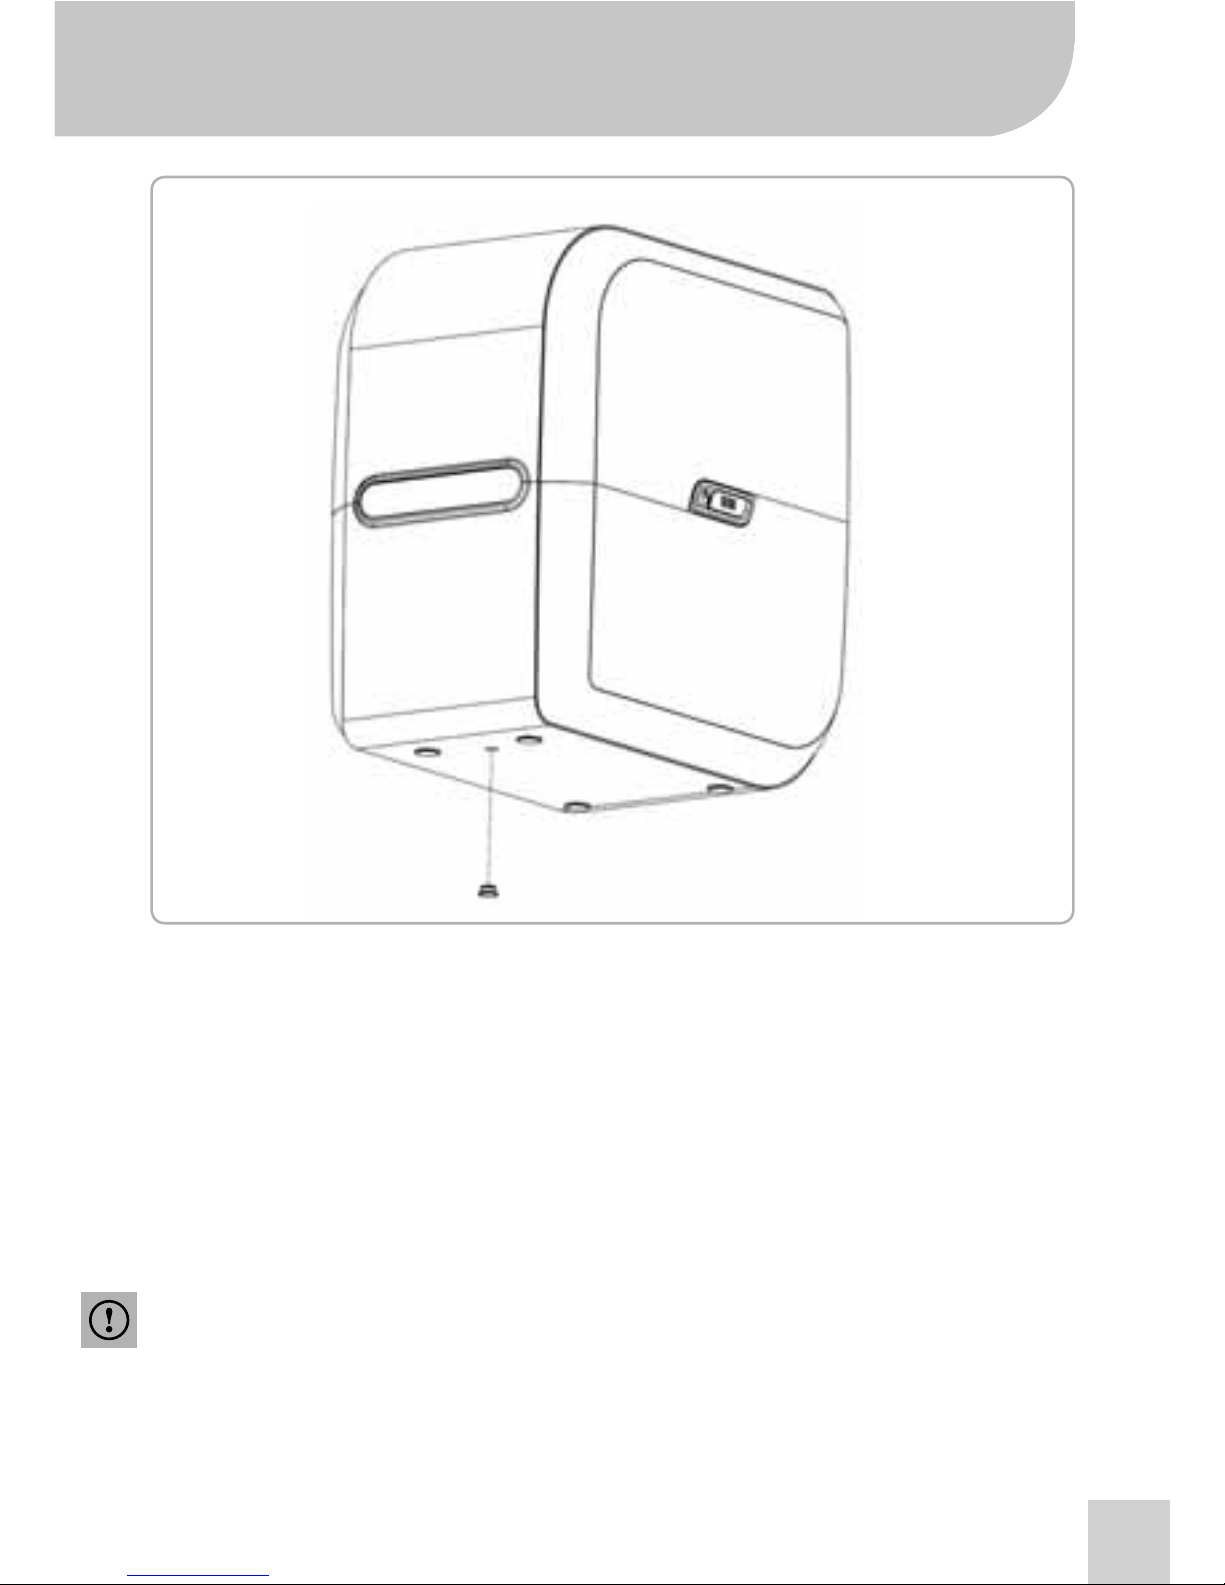
Restoring Leakage sensor:
1. Turn off the power supply
2. Close the inlet water valve
3. Remove the top cover
4. Repair the leakage
5. Drain the water out of the housing by removing the rubber cap at the bottom of the housing.
6. Dry the sensor
Warning!
When installing a new fi lter, pay special attention to water fl ow direction – the arrow on the fi lter label
shows the correct water fl ow direction.
The fi lter cannot be installed upside down.
EN
18
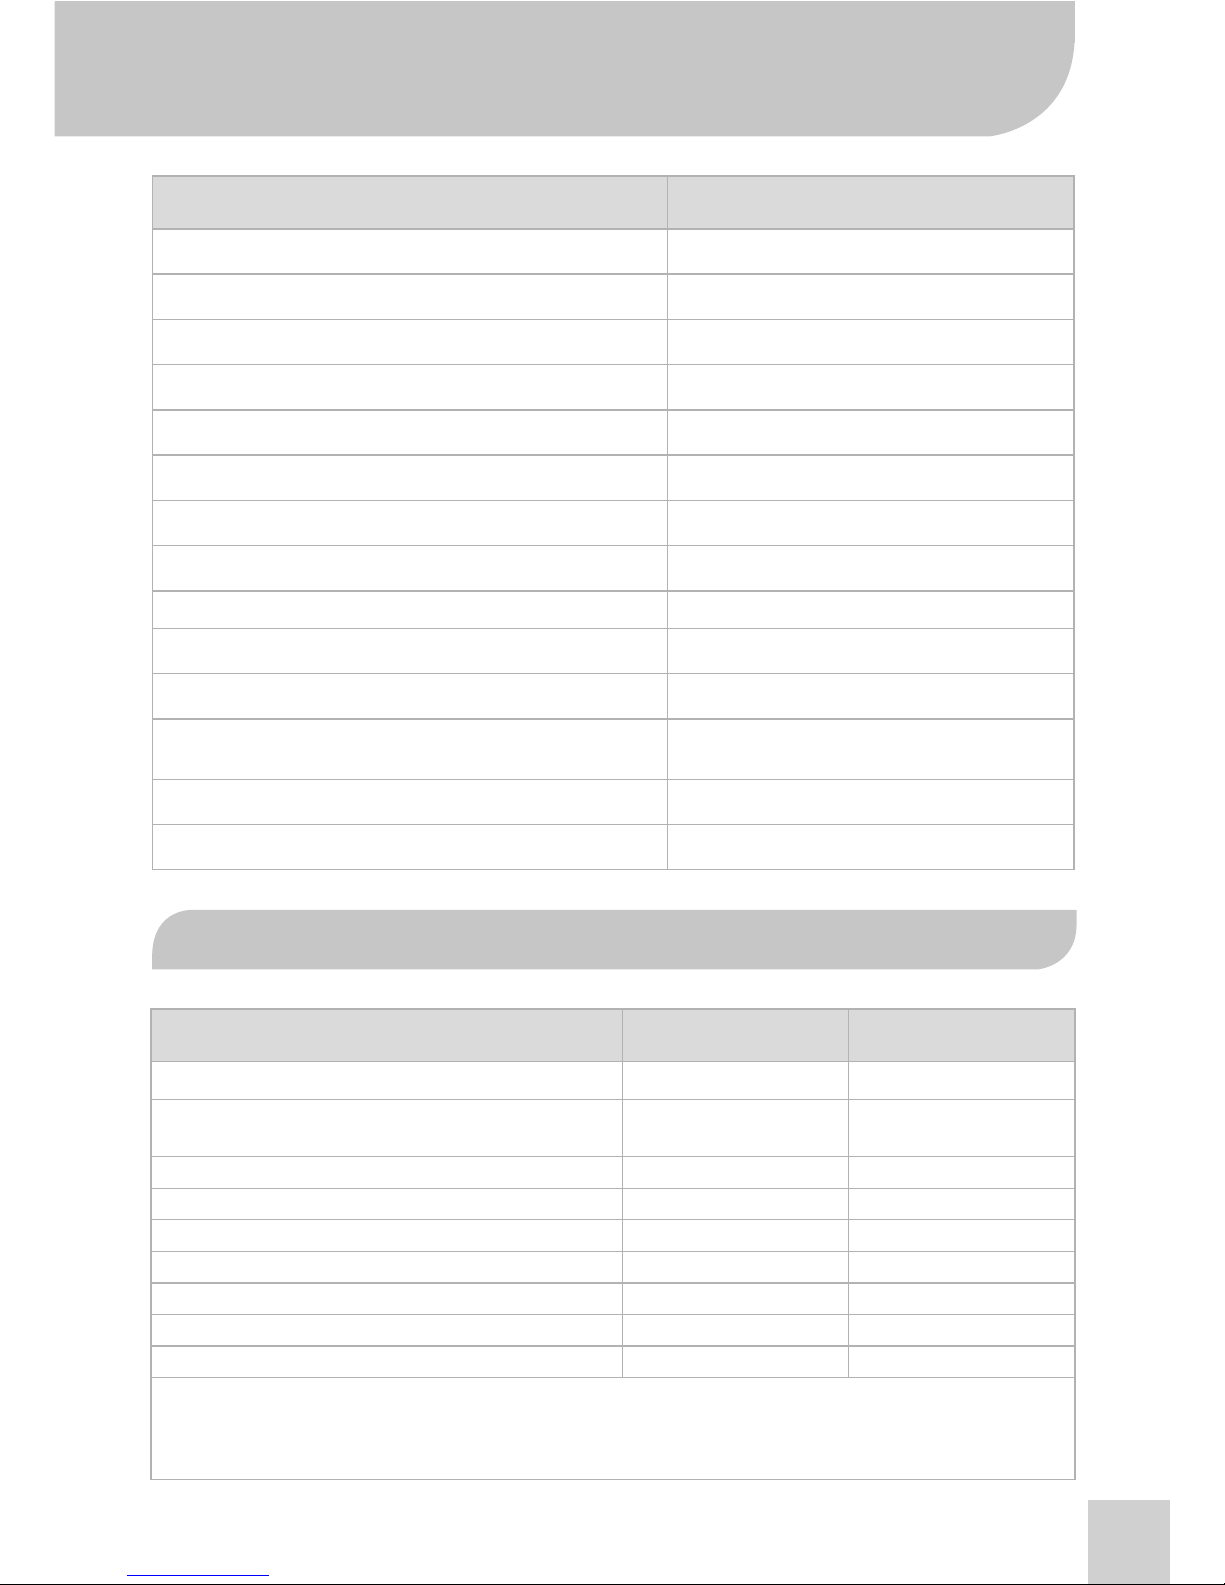
After fi lter replacement
“Select” button: After the fi lters are replaced, press the “Select” button to select the
corresponding fi lter icon. Icon will start to blink.
“Reset” button: Select the corresponding fi lter and press the “Reset” button, hold for more than 3
seconds until the function is effective. After resetting, the red light will turn green.

EN
19
O-ring
RO-Membrane
CapCartridge
The RO replacement procedure
1. Turn off the power supply.
2. Close the inlet water valve.
3. Remove the top cover.
4. Unplug the “old” fi lter – disconnect fi lter from quick connectors
5. Replace the fi lter – Pay attention to correct water fl ow direction!
6. Check all connections and make sure there are no water leaks.
7. Close the top cover.
8. Open the inlet water valve and turn on the power supply.
Filter Replacement Time
The AqueenaPro water purifying system is equipped with a special system to monitor fi lter life time.
The system automatically monitors fi lter conditions and the current status is shown on the Filter
Status Display.
Green light – the fi lter works at its optimum level.
Orange light - the fi lter will soon need replacing. Please contact Zepter Service for maintenance
support.
A red light along with an audible alarm (4 buzzes) means that the fi lter must be changed imme-
diately. Further use of the fi lter is not recommended.
Attention!
Max. recommended fi lter replacement cycle represents time equivalent of AqueenaPro
engaged in the process of fi ltration.
Theoretical model used in the calculation of max. recommended fi lter replacement cycle is
based on 10L per day of purifi ed water consumption. For demand exceeding the model assumptions,
replacement cycle may vary.
The fi lter replacement cycle is not the fi lter quality warranty period, but the expected cycle (lifetime)
when the fi lter shows its original performance. The lifetime of the fi lter is affected by the daily water
consumption and inlet water condition, therefore, the fi lter replacement cycle may be shorter for the
areas where the water contains high level of suspended solids (particles, sediments, etc.)

EN
20
Filter type
Max. recommended fi lter
replacement cycle (months)
WT-100-72 5-micron PP fi lter
6
WT-100-73 Pellet carbon fi lter
6
WT-100-74 1-micron PP fi lter
6
WT-100-75 Coconut fi lter
12
Membrane
Max. recommended fi lter
replacement cycle (months)
WT-100-15 RO membrane
12
RO Membrane Replacement Time
The manufacturer recommends changing the RO membrane WT-100-15 with the Coconut fi lter WT100-75; therefore refer to Coconut fi lter replacement period as shown on the Filter Status Display
(No. 5)
Tips!
If you are unsure about the right time for changing your fi lter,
• Is the TDS level signifi cantly higher than at the beginning of the purifi cation
process? (Please refer to your record in the Warranty Card).
• Does it take longer to completely fi ll the water tank compared to the beginning
of the purifi cation process?
• Is the amount of waste water greater than at the beginning of the purifi cation process?
If you have answered YES to at least one of these 3 questions, please change your fi lter(s).
EN
21
General Operating Information Value Unit
Rated Capacity* <378 [L/day]
Min-Max Feed Water Pressure
0.69MPa - 0.75MPa
10-110
[MPa]
[psi]
Min-Max Feed Water Temperature 5-38 [°C]
Product Recovery Rate** 42 [%]
Maximum Feed Water Hardness <1000 [mg/L]
Maximum Feed Water TDS <2000 [ppm]
Maximum Feed Water Dissolved Iron <2 [mg/L]
Suitable Feed Water pH 6-8 [-]
Turbidity <3 [NTU]
* at 5 bar feed water pressure and 25° C feed water temperature
** at 3.5 bar feed water pressure and 25° C feed water temperature; TDS <750ppm.
Measured with closed tank
TECHNICAL INFORMATION
PRODUCT NAME: ZEPTER AQUEENAPRO
Model
WT-100
Voltage
AC100-240V, 50-60HZ
Power Rating
25W
Size (mm)
408wx265dx420h
Suitable Inlet Water Pressure
0.07-0.75MPa
Operating Pressure
0.6MPa-0.8MPa
Inlet Water Temperature
5-38°C
Maximum Inlet Water TDS Value
< 2000 PPM
Maximum Daily Water Production Volume
100 Gallons, approximately 378.5 Litres
Self-fl ushing system
YES
Electric Shock Protection Type
Type II
Tank Capacity
9.5 l (usable capacity 6 l)
2.5 Gallons (usable capacity 1.6G)
Suitable Water Quality
Primly designed for municipal tap water.
Country of Origin
China
OPERATING INFORMATION
EN
22
TROUBLESHOOTING GUIDELINE
Failure Reason Possible cause
The machine will
not start
• Power source not connected
• Check power source or power
source plug
• Low inlet water pressure or no water • Check inlet water pressure
• Low-pressure switch failure,
cannot connect the power source
• After connecting the inlet water,
measure the resistance and
replace if needed
• High-pressure switch cannot
be restored
• After easing pressure, measure the
resistance and replace if needed
• Transformer is burned out
• Measure output voltage and
replace if needed
The high pressure pump
is working properly,
but no water is being
produced
• High-pressure pump has lost
pressure
• Measure water pump pressure
and replace if needed
• Inlet water solenoid valve is
faulty, no water can get in (no
pure water)
• Replace solenoid valve
• A pre-fi lter is clogged
• Check pure water and waste
water and replace the pre-fi lter
• Non return valve is blocked
(waste water, no pure water)
• Replace the non return valve
• RO Membrane is clogged
• Clean or replace the RO
membrane
The storage tank is full
but no pure water is
fl owing out
• Storage tank doesn’t have
enough pressure
• Infl ate the storage vessel and empty
tank; pressure should be
between 0.05 and 0.07MPa
• Post-activated carbon fi lter is
clogged
• Replace the post-activated carbon fi lter
The machine is turned off
but waste water has not
stopped
• Inlet solenoid valve failed, cannot
effectively cut off water supply
• Check waste water, replace the inlet
solenoid valve
• Non return valve has lost pressure
(low waste water fl ow rate)
• Check waste water, replace the non
return valve
After the machine is fi lled
with water, the machine
starts repeatedly
• Non return valve has lost pressure • Replace the non return valve
• High-pressure switch failure • Replace the high pressure switch
• Loss of pressure in the system
• After checking the non return valve,
check for any water leaks in the
pipelines
Pure water fl ows slowly
or is not fl owing
• Pre-fi lter is clogged • Replace the pre-fi lter
• RO membrane is clogged • Wash or replace the RO membrane
• Inlet solenoid valve failure • Replace the inlet solenoid valve
• Non return valve is clogged • Replace the non return valve
• Post-carbon fi lter is clogged • Replace the post-carbon fi lter
• High-pressure pump pressure is
not enough
• Measure high-pressure pump water
pressure, replace if needed

EN
23
DISPOSAL INFORMATION
In accordance with art. 13 of Legislative Decree no. 151 dated 25 July 2005, the
implementation of European Directives 2002/95/EC, 2002/96/EC and 2003/108/
EC on the reduced use of hazardous substances in electrical and electronic equipment
and their disposal, the barred bin symbol means that used electrical and electronic
products should not be mixed with general household waste. For proper treatment,
recovery and recycling, please take this product to designated collection points at the
end of its useful life.
Disposing of this product correctly will help save valuable resources and prevent any potential negative
effects on human health and the environment, which could otherwise arise from inappropriate waste
handling.

EN
24
WARRANTY CARD
Product:
AqueenaPro, WT-100
Serial No.:
...........................................................................................................................
Lot No.:
...........................................................................................................................
CUSTOMER DETAILS
INSTALLATION DETAILS
SERVICE CONTACT
Customer`s name:
Name:
Name and stamp of installation service provider:
Invoice number:
Customer signature:
Invoice date:
Service technician signature:
Customer`s
address:
Address:
Date of installation:
Phone number:
Phone number
TDS of raw water:
e-mail:
e-mail:
TDS of purifi ed water
.....................................................
.....................................................
.................................
.........................................
..................................................................................................................
.................................................................................................................................
....................................................................................................................................................
.............................................................................................................
.............................................................................................................
..............................................................................................
................................................................................................................
.................................................................................................................................
........................................................
....................................................................................................................................................
....................................................................................................................................................
....................................................................................................................................................
...........................................
..............................................
.......................................
............................................
Warranty period:
....................................................................................................
months

EN
25
WARRANTY STATEMENT
All our appliances have been thoroughly tested following strict procedures and are guaranteed
against manufacturing defects. The Warranty is valid from the date of purchase, as indicated on the
invoice issued by the dealer upon delivery of the appliance. The manufacturer undertakes to repair or
replace, free of charge, any parts that are found to be defective within the Warranty period. Defects
that are not clearly attributable to either faulty materials or manufacturing processes will be examined
at one of our Zepter Service Centres or our headquarters and charged according to the outcome.
The warranty is only valid if:
1. The machine has faulty materials or manufacturing defects.
2. There are no signs of tampering by the customer or original parts having been fi tted by
unauthorised personnel.
3. Original accessories have been used.
4. The machine has not been overloaded or caused to crash.
5. The device has been maintained in line with the manufacturer’ recommendations.
6. All fi lters and membrane have been changed regularly and the recommended fi lter replacement
period has not been exceeded.
The Warranty does not apply to:
1. Components subject to wear and tear.
2. Damage caused by transport, incorrect use, negligence or faulty installation, as per the
warnings set out in the product catalogue.
3. Consumables (including fi lters and membranes, which have to be replaced regularly).
This Warranty does not affect the consumer’s statutory rights applicable under the national legislation
in force, or consumers’ rights to claim against the retailer as set out in the sales/purchase agreement.
In the absence of applicable national laws, this Warranty will be the consumer’s sole and exclusive
remedy. In this case, the manufacturer will not be liable for any accidental or consequential damage
arising from the breach of any express or implied guarantees of this product. The manufacturer’s
liability will be limited to and will not exceed the product purchase price paid by the consumer.
This Warranty does not cover damage to the product resulting from abuse or misuse, inappropriate
packaging, accidents, or maintenance and repair operations carried out by unauthorised service
centres.
The manufacturer reserves the right to withdraw this Warranty if the label containing the product serial
number has been removed or rendered illegible after purchase.
EN
26
AQUEENAPRO PERFORMANCE DATA SHEET
AqueenaPro has been tested by an authorised Drinking Water Laboratory for the substances and
conditions shown in the following table.
Substance Unit Feed Water
Reduction Rate [%]
(effl uent drinking water)
Chemical composition
Field parameters
Pressure bar 3.5
Water Temp °C 25
Feed Water - Sample Volume L 100
Physiochemical parameters Unit Feed Water Reduction Rate [%]
Turbidity NTU >1 >85%
pH
1)
pH 7+10% neutral
Hardness and cations Unit Feed Water Reduction Rate [%]
Total hardness ppm mgCaCO
3
/L 270±20% >96%
Calcium (dissolved) mgCa/L 90±20% >98%
Magnesium (dissolved) mgMg/L 20±20% >86%
Anions Unit Feed Water Reduction Rate [%]
Chloride mgCI/L 40±20% >97%
Nitrate mgNO
3
/L 120±20% >91%
N- and P- compounds Unit Feed Water Reduction Rate [%]
Nitrite mgNO
2
/L 0.50±10% >93%
Ammonium mgNH
4
/L 0.1±20% >80%
Elements and heavy metals Unit Feed Water Reduction Rate [%]
Arsenic (V) (dissolved) mgAs/L 0.5±20% >99%
Lead (dissolved) mgPb/L 0.5±20% >95%
Cadmium (dissolved) mgCd/L 0.5±20% >98%
Iron (dissolved) mgFe/L 0.5±20% >96%
Manganese (dissolved) mgMn/L 0.5±20% >99%
Mercury (dissolved) mgHg/L 0.5±20% >98%
Microbiological Unit Feed Water Reduction Rate [%]
Total Germs (72h@22°C) [CFU/ml] 6000-8000 >99.999%
Total Germs (24h@37°C) [CFU/ml] 4000-6000 >99.999%
E.Coli [CFU/100ml] 600±20% Not detectable
Enterococcus [CFU/100ml] 600±20% Not detectable
1)
Final pH value depends on concentrate of dissolved gaseous fraction of carbon dioxide. High concentrations have tendency to
lower pH.
*Tested under laboratory conditions, actual performance may vary

DE
27
EINLEITUNG
AQUEENAPRO: WASSERAUFBEREITER
Vielen Dank, dass Sie sich für das ZEPTER AqueenaPro Wasseraufbereitungssystem entschieden
haben, und das damit gezeigte Vertrauen in Zepter International. Der Wasseraufbereiter AqueenaPro
wird Sie und Ihre Familie zuverlässig mit sauberem, gesundem und wohlschmeckendem Trinkwasser
versorgen. Stellen Sie Zepter AqueenaPro in Ihr Haus und erfreuen Sie sich jeden Tag an einer
unerschöpfl ichen Frischwasserquelle. Zepter International ist ein weltweiter Experte für Gesundheit
und Lebensqualität.
Diese Anleitung wird Ihnen dabei helfen, das Beste aus Ihrem Wasserfi ltersystem herauszuholen.
Bitte lesen Sie sich diese Bedienungsanleitung aufmerksam durch, um sich mit seiner Bedienung und
Wartung vertraut zu machen.
Damit die Garantie wirksam ist, müssen alle Anweisungen in dieser Bedienungsanleitung befolgt
werden. Für weitere Informationen und Hilfe wenden Sie sich bitte an Ihren Zepter Handelsvertreter*.
Wenn Sie Fragen zur Installation, Wartung oder zum Filterwechsel bei AqueenaPro haben, wenden
Sie sich bitte an Ihren Servicetechniker oder an das Zepter Servicezentrum*.
*Alle Kontaktdaten fi nden Sie im Garantieschein

DE
28
EINLEITUNG 27
INHALTSVERZEICHNIS 28
SICHERHEITSINFORMATIONEN 29
AQUEENAPRO TECHNOLOGIE 35
AQUEENAPRO EIGENSCHAFTEN 35
AQUEENAPRO ÜBERBLICK 36
INHALT DER VERPACKUNG 37
AQUEENAPRO INSTALLATION 37
– Installationsanweisungen
38
BETRIEBSANLEITUNG 38
– Vor Inbetriebnahme 38
– Einbau der RO-Membrane 39
– Anzeigefunktionen 40
WARTUNG UND FILTERWECHSEL 41
– Spülen der RO-Membrane 41
– Filterwechsel 41
– Vorgehen beim Filterwechsel 41
– Wiederherstellen des Leckage-Sensors 42
– Nach Filterwechsel 43
– Vorgehen beim RO-Membranwechsel 44
– Filterwechselzeit 44
– RO-Membranwechselzeit
45
TECHNISCHE ANGABEN 46
BETRIEBSINFORMATIONEN 46
ANLEITUNG ZUR FEHLERSUCHE 47
INFORMATIONEN ZUR ENTSORGUNG 48
GARANTIESCHEIN 49
GARANTIEERKLÄRUNG 50
AQUEENAPRO LEISTUNGSDATENBLATT 51
INHALTSVERZEICHNIS
 Loading...