

Page 1

Instruction Manual
Bluetooth Blood Pressure
Monitor for Arm
HPL-308
Page 2

2
Contents
Introduction..…………………………………………….… 3
Warning Signs/Safety Statements ……………………… 3
Health and Blood Pressure Values …………………….. 3
Warning …………………………………………………… 4
Suggestions before Measuring Blood Pressure ……… 4
Device Descriptions ……………………………………… 5
Description of Control Buttons …………………………. 6
Description of LCD Display Symbols ………………….. 6
Installing / Replacing Batteries ..……………..………… 7
Program Date and Time ...……………………..………… 8
How to Apply the Arm Cuff ………….…………………… 8
Correct Measurement Position ………….……………….. 10
How to Take A Measurement ……………………………. 10
How to Use the Memory Features ……………………… 12
How to Delete Single or All Memories ……………….…. 13
Searching Bluetooth address …………………………… 13
Installing BPPLINK software …………………………… 15
Using PC-Bluetooth Dongle function ………………… 17
Using Mobile-Bluetooth Dongle function ……………… 25
Maintenance ……………………………………………….. 33
Error Message and Troubleshooting ……………………. 34
Specifications ……………………………………………… 38
Page 3

3
Introduction
Thank you for purchasing the HPL-308 Automatic Blood
Pressure Monitor with Voice Prompt for Arm.
For your safety, please be sure to read this Instruction
Manual thoroughly before using the Blood Pressure
Monitor. For other specific information about your own
blood pressure, CONTACT YOUR PHYSICIAN.
Warning Signs & Safety Statements
ATTENTION!!
Read user’s manual before use.
Type BF applied part.
Health and Blood Pressure Values
Classification of Blood Pressure by the WHO:
The World Health Organization (WHO) and the
Inter-national Society of Hypertension (ISH) developed
the Blood Pressure Classification shown as below.
Page 4

4
Warning
If the event of the cuff pumping up and not stopping,
please open the cuff at once.
Do not measure repeatedly for a long period of time.
This device is not supposed to be used if your wrist has
any wound or injury.
If locks connectors are used in the construction of
tubing, there is a possibility that they might be
inadvertently connected to intra-vascular fluid systems,
which case may allow air to be pumped into a blood
vessel.
Take batteries out of the housing if the unit is not to be
used for a long time.
Do not use different type, date or brand-name batteries,
and this may lead to an incorrect reading.
Leaving the batteries in the blood pressure monitor for a
long period and not using the device may damage the
main unit.
Suggestions before Measuring Blood Pressure
1. It is recommend that persons has one of the diseases
as heart troubles, kidney trouble, hyper-tension,
diabetes, arteriosclerosis or frustration problem of blood
vessel, please consult your physician before and during
using the blood pressure monitor to determine if your
wrist blood pressure accurately reflects your actual
blood pressure.
2. Please sit or lie down for at least 5-10 minutes before
taking a measurement.
3. Avoid eating, smoking, exercising, bathing and drinking
(alcohol/caffeine/or tea) for at least 20-30 minutes
before taking a measurement, and avoid talking during
a measurement.
4. Be sure the wrist cuff is at the same level as your heart.
Page 5

5
5. Stress raises blood pressure. Keep calms and relax
yourself during a measurement.
6. Wait 2-3 minutes before taking another blood pressure
measurements.
7. Keep the records for your physician as reference.
Reminded that one measurement does not provide you
with real blood pressure value, only long-term records
will reveal the long-term trend of your blood pressure.
Try to measure your blood pressure at the same time
each day for consistency.
Device Descriptions
Page 6

6
Description of Control Buttons
POWER: To turn on or turn off the unit and Start inflating
to measure blood pressure and pulse.
SEND: Transmit data to PC(mobile phone) or turn
on/turn off Bluetooth in power off mode.
TIME: To set the Date/Time.
MEMO/▲: To review the measured record(s) manually /
To select the digit of Sate/Time.
SCAN/▼: Automatically review all previously
memorized record(s) / To select the digit of Date/Time /
To delete memorized record(s).
Description of LCD Display Symbols
Page 7

7
Installing/Replacing Batteries
1. Slide the battery compartment to remove it.
2. Place the batteries (4 “AA” Alkaline batteries) in the
compartment as indicated by the polarity symbols (+
and -) marked inside. All the display symbols appear for
1 secondand then return to standby mode.
3. Replace the battery compartment cover.
Note: When (Low Battery indicator) appears on the
display, the batteries are weak.
Warning:
a. Be sure to follow the instruction above when plugging
the adapter and installing or replacing the batteries.
b. We recommend you to use the ALKALINE batteries for
the best performance and the longest device life.
c. Use only brand new batteries of the required size and
DO NOT mix using old and new or different type of
batteries together.
d. Remove the batteries if not using the blood pressure
monitor for an extended period (i.e., 3 months). The
Page 8

8
batteries can leak chemicals then damage the electronic
parts.
e. Immediately replace run-down batteries with new ones.
f. Check the batteries periodically and replace them when
necessary.
Program Date and Time
1. Continuously press TIME button for 2 seconds until
“2009” shown on the screen and starts to flash.
2. Press MEMO/▲ button or SCAN/▼ button to set the
number representing the Year.
(You can press and hold MEMO/▲ or SCAN/▼ buttons
for about 2 seconds, the number of the Year will be
displayed in the faster speed.)
3. Press TIME button to confirm the Year setting. Then the
number representing the Date will flash.
4. In the same manner, set the Month, Date, Hour and
Minute.
Note: After replacing batteries, always check the Date/Time
is properly set or not first, then use the blood pressure
monitor. If the batteries are removed for more than 40
seconds, you must reset the Date/Time.
How to Apply the Arm Cuff
1. Insert the air plug of the arm cuff into the air jack of the
blood pressure monitor.
2. The cuff should be assembled correctly when it is
removed from the box. If it is not, pass the end of the
cuff furthest from the tubing through the metal D-ring to
form a loop. The smooth cloth should be on the inside of
the cuff loop.
3. If the cuff is assembled correctly, the sewn hook
Page 9

9
material will be on the outside of the cuff loop and the
metal D-ring will not touch your skin.
4. Put your left arm through the cuff loop. The bottom of
the cuff should be approximately 1/2” above the elbow.
The cuff tubing should be positioned along the middle of
the inside of your arm as shown.
5. Pull the cuff so that the top and bottom edges are
tightened evenly around your arm.
6. When the cuff is positioned correctly, press the sewn
hook material firmly against the pile side of the cuff.
7. The cuff should be wrapped so that it fits snugly and
stays in place. You should be able to fit one finger
Page 10

10
between the cuff and your arm.
Correct Measurement Position
It is extremely important for the measure values, which that
the cuff is at the same level of the heart. Higher or deeper
position will give deviations from the true value.
Measurement while sitting down
1. Sit in a chair with your feet flat on the floor and rest your
arm on a table so that the cuff is at the same level as
your heart.
2. Relax your arm and turn your palm upward.
3. Make sure there are no kinks in the air tubing.
4. After taking deep breaths for several times before
measurement, take a natural breath, and then relax your
body.
How to Take A Measurement
Please read and follow directions in the section
“Suggestions before Measuring Blood Pressure” and “How
to Apply the Arm Cuff” before taking a measurement.
1. Press POWER button to turn on the unit.
All the symbols displayed for a couple seconds then the
number 0 will flash.
2. Press POWER button again, the cuff automatically
Page 11

11
inflates to approximately 170mmHg. (50mmHg higher
than the average systolic blood pressure reading.)
3. When the cuff reaches your correct inflation level, it
begins to deflate automatically with decreasing numbers
shown on the display. The Heart Symbol flashes as
the onset of oscillation signals.
* If during deflation the blood pressure monitor senses
that higher pressure is required to measure the user’s
blood pressure, the device will stop deflation and pump
again to reach the workable pressure (up to the max.
280 mmHg). If the inflation continues and doesn’t stop,
please untie the cuff immediately or turn off the unit by
pressing the POWER for 1 second.
4. The monitor exhausts the residual air when the
measurement is completed. The Heart Symbol
stops flashing and your blood pressure and pulse will
appear on the display. In the mean time, the unit
announces the measured value of Systolic, Diastolic
and Pulse. After taking the measurement, the latest
measured readings will always be displayed before the
power is turned off.
Note:
Wait for at least 3 minutes if you want to take another
measurement. Waiting allows your blood vessels to
bounce back to normal status. More rest time may be
required between measurements depending on
individual physiological conditions.
Page 12

12
While starting the unit each time, it will give a voice
prompt. If you don’t need, please off the announcement.
How to Use the Memory Features
The blood pressure and pulse measured and displayed are
automatically stored in the memory. The blood pressure
monitor can store up to 80 measurements. If more than 80
measurements have been taken, the earliest measurement
will be erased and replaced by the most recent
measurement.
1. Review the Average Value and previously
measurements:
Press MEMO/▲ button, the unit first display the average
values of Systolic, Diastolic and Pulse. (Averaged from
all memorized readings.) Press MEMO/▲ button again
to review the measurement from the latest to the earlies.
The latest measurement (M 01) appears when you
press MEMO/▲ button. M 01 is the latest reading
measured. The Systolic, Diastolic, Pulse and Date/Time
of the measurement will be displayed. Press MEMO/▲
button to repeatedly review other memorized readings.
The readings will be displayed as M 02, M 03, M 04 …
etc. You can press SCAN/▼ button to switch to the
automatic display mode.
2. Scan all previous measurements:
Press SCAN/▼button, the unit will display all
measurements one by one in one in one second interval.
In the automatic display mode, You can press MEMO/▲
button to switch to the single display mode.
Page 13

13
How to delete Single or All Memories
1. Delete single measurement:
You can delete the single memory just after taking the
measurement. Press SCAN/▼ button then “dEL” will
appear and flash. Press SCAN/▼ button again to
confirm the delete function.
2. Delete all measurements:
Turned off the unit first then keep pressing SCAN/▼
until “
dEL ALL
” displayed. Press SCAN/▼ button again
and all memories will be deleted when “
00 ALL
” shown
on the screen.
Searching Bluetooth Address::::
1. Before the using, please install the Alkaline batteries in
the battery compartment. You will hear three short beep
tones and turn off the device.
2. Press Send button and it shows “BT ON” to turn on
bluetooth feature.
Page 14

14
(Figure1) (Figure 2)
3. Press MEMO/▲▲▲▲ button or SCAN/▼▼▼▼button to turn on or
turn off the bluetooth feature.
Note::::Please turn off bluetooth feature to save power
consumption.
4. When turn on the bluetooth feature, please press Send
button again and it shows the bluetooth address
(00-1C-97-2F-FF-2E) on the display. Please type the
bluetooth address from up to down and left to right and
each device has different address/code.
(Figure 3) (Figure 4)
5. Press Send button again. It shows “─ ─ ─ and 41”(41
means 41 records) and it can start pairing.
6. When it shows “Snd 0 or((((Snd xx))))“ and “bt” on the left
lower corner, it means pairing successfully.
(Figure 5) (Figure 6)
7. Press Send button again to transmit the data. If there is
no any record, press Send button again to turn off the
device. If no data transmission, press /Start button to
5
Page 15

15
turn to stand by mode.
Note: During the stand by mode, it will turn off
bluetooth feature if it did not complete the pairing to
save power. Please press /Start button for one
second to turn off the device and turn on the device again
to pair it.
(Figure 7) (Figure 8)
Installing BPPLINK Software:
Please ensure installing BlueSoleil application program
first, the icon of “ ” shows on the screen. Then
HPL-308 can link the computer via Bluetooth
Next install the BPPLINK-BT application program to
transfer the data from HPL-308 to PC. Follow these steps
to install the program:
Step 1.
Please insert the installation CD and run the installation
program (C:\Program File\BPPLINK-BT). Please select the
destination folder and click NEXT then click FINISH to
complete the installation.
Page 16

16
Step 2.
When you finish installing BPPLINK-BT program, the icon
of “BPPLINK” will show on the desktop.
Page 17

17
Using PC-Bluetooth Dongle Function:
Step 1.
When you turn on the computer, you can find the icon of
“BPPLINK-BT” and “BlueSoleilon” on the screen.
Step 2.
Please connect the Bluetooth USB Adapter to the USB port
on computer and turn on the HPL-308 unit.
Step 3.
Click the icon of “BPPLINK” on the screen to run the
program and click the BT Setting button to
enter Bluetooth Mode.
Page 18

18
Step 3.
Please key-in the Bluetooth ID number in the dialogue box
and press save and press BT button again, the computer
will connect the HPL-308 unit automatically
Step 4.
When PC screen shows below dialogue box, it means
connecting successfully. You can start to take
measurements (refer to how to take a measurement) and
transmit the measurement results via Bluetooth.
Page 19

19
Step 4.
Sample Pulse:Click the button to take a
measurement on real time and show the measuring
curves of blood pressure/pulse.
Sample Result:Click the button to transfer the
measured results of HPL-308 to PC for data statistic
management.
Page 20

20
View Pulse:Look up the measured values that you
have already stored on the computer.
View Result:Look up the measured curves that you
have already stored on the computer.
Page 21

21
Step 5.
Manage Measured Results:
(Line Graph)
(Bar Graph)
Page 22

22
(Circle Graph)
(Compare Analyze Graph)
Page 23

23
(Print the statistical graph)
2
3
4
3
6
7
1
5
2
Page 24

24
Note:
1. Please key-in the file name before storing measured curves.
2. It shows measuring curves of pulse on real time.
3. It shows measuring curves of blood pressure on real time.
4. Adjusting curves of pulse in upper and lower displacement.
5. Adjusting curve of blood pressure in left and right sides.
6. Adjusting curve of blood pressure in upper and lower.
7. Storing the measured curves.
Note:
1. Listing one of the result information.
2. Average values of blood pressure.
3. Choosing the display style of the statistical graph.
4. Open stored file.
5. Checking the previous record.
6. Checking the next record.
7. Printing the statistical graph.
8. Listing the measured results.
9. Storing the measured values.
1
2
4
3
5
7 6
8
9
Page 25

25
Using Mobile-Bluetooth Function:
System Requirement::::
(1) The mobile phone needs to support MIDP2.0 or JSR82
(Bluetooth Protocol).
(2) The recommend mobile phone model No.: Nokia 7610,
Sony Erisson 750.
Install and Uninstall Program::::
Please see the instructions of installing and uninstalling on
user manual of the mobile phone.
How to Set up the program::::
1. System Setting:
Please install the BPPLINK application program on mobile
phone. Please click the file: BPPLINK to enter the
Bluetooth address setting in 2-3 seconds. Please key-in the
correct Bluetooth address of BPM and then press “Back” to
return BT list “Figure 1”. Double-click back to main function
list (Figure 2).
【Figure 1】 【Figure 2】
2. Operate BPPLINK program:
Page 26

26
If Bluetooth address is empty when operate the BPPLINK
program, the program will enter Bluetooth address setting
automatically (Refer to Figure 1). If there is the existed
address, the BPPLINK will search Bluetooth service and
establish the connection. When the LCD of mobile phone
shows green icon, you can start taking measurements.
※ Note: You have to power off HPL-208 and then power on
before operating BPPLINK program. It cannot establish
blue tooth connection to power off HPL-208.
3. Bluetooth Link:
(1) HPL-208 BPM will link the mobile phone automatically
when BPPLINK program is operating.
(2) Select “Bluetooth Link” on main function list (Refer to
Figure 2), and then mobile phone will show “bluetooth
service searching” (Figure 3).
【Figure 3】 【Figure 4】
(3) Figure 4: Please key-in cable soft password “12345”.
Page 27

27
【Figure 5】 【Figure 6】
(4) Figure 5: Press YES to confirm establishing the
connection.
(5) Figure 6: Green icon indicates Bluetooth Link
successfully.
(6) Figure 7: White icon indicates the mobile phone can not
find the Bluetooth service and Bluetooth Link failed.
【Figure 7】 【Figure 8】
(7) Figure 8: Red icon indicates the mobile find the
Bluetooth service but not connect yet.
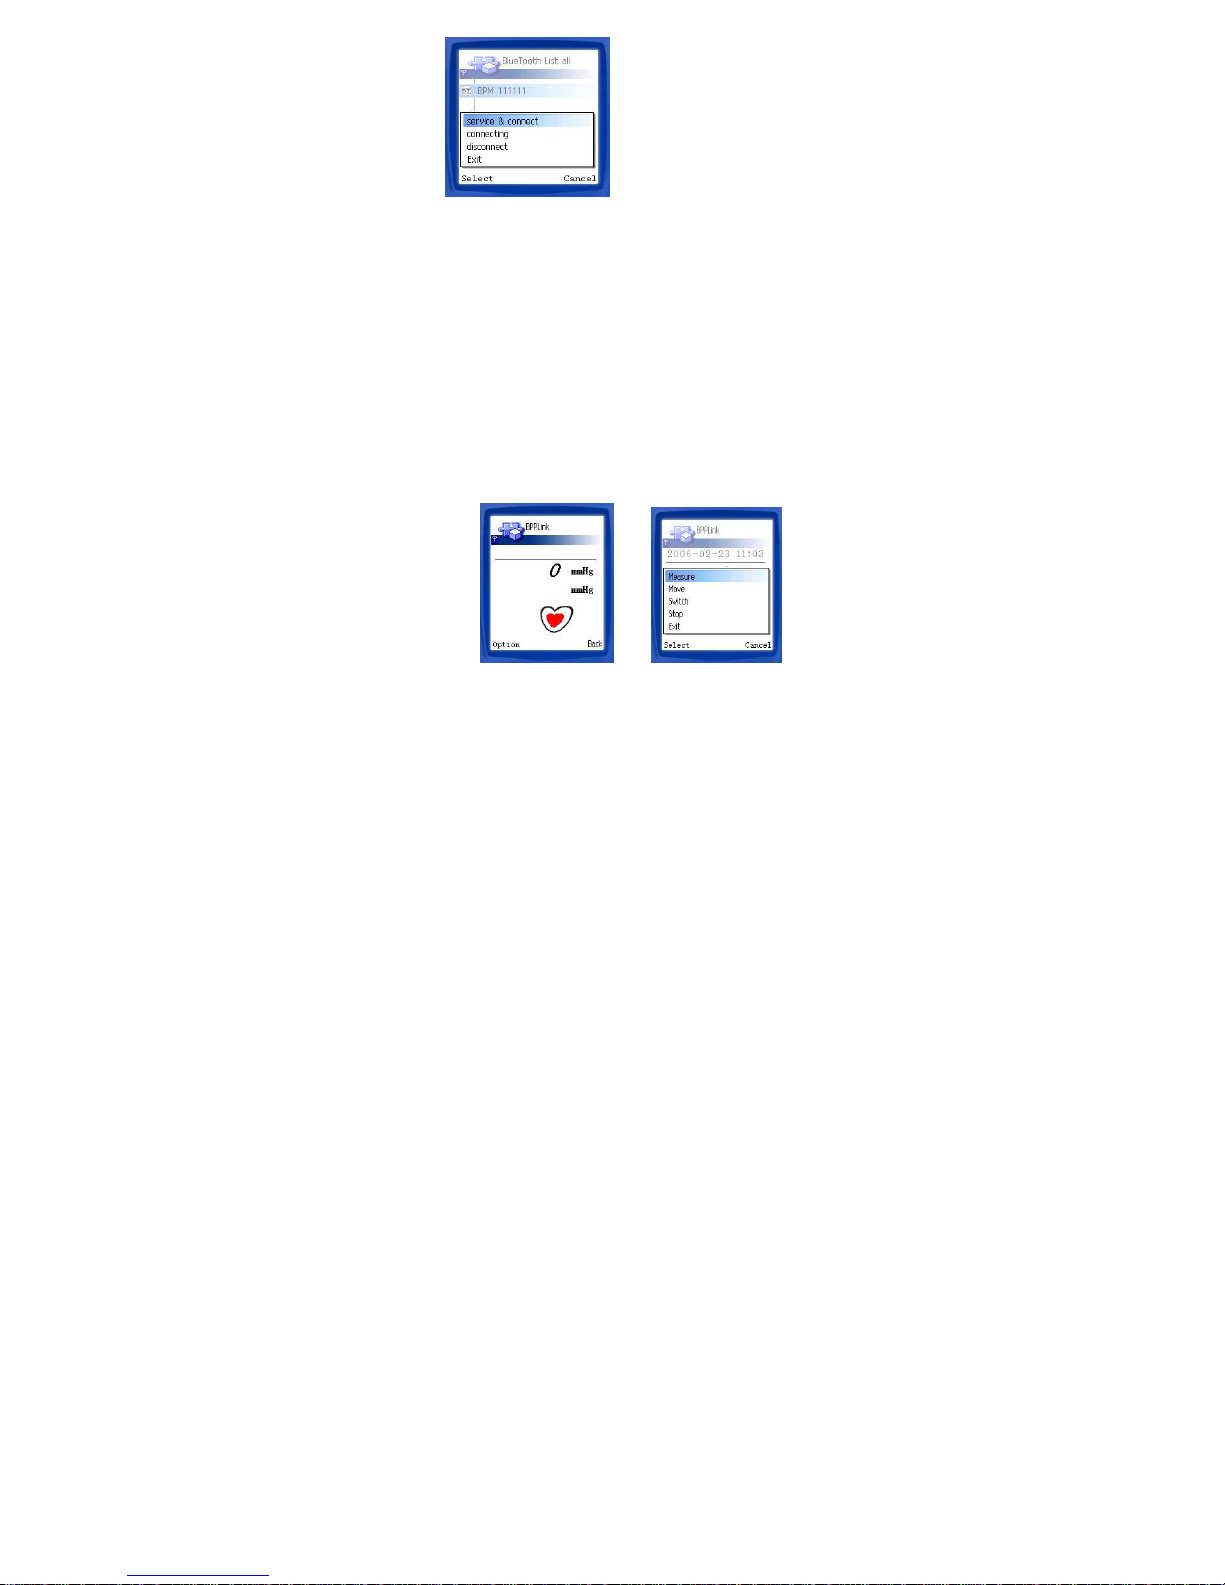
(8) Figure 9: When the LCD displays white icon, please
press “Option”(Figure 9). Please re-start to power on
the HPL-208 BPM and select “service & connect” to
re-connect.
Page 28
28
【Figure 9】
※Note:
(1) If the link is failed, please exit the BPPLINK program.
Power off the HPL-208 BPM and power on again. Then
re-operate the BPPLINK program.
(2) “Disconnect” means to disconnect the link of present
Bluetooth.
4. Measurement:
You can start to take measurements when Bluetooth Link
set up successfully. Please select “Measure” on main
function list (Figure 2), the mobile phone send the
command to HPL-208 BPM to measure blood pressure.
(Refer to Figure 10,11)
【Figure 10】 【Figure 11】
Page 29

29
(1) When start measuring, the LCD shows the mmHg
increasing and the heart symbol flashing (Refer to
Figure 10).
(2) The function OPTION can switch different graphs and
send the command to start or stop the measurement.
(Refer to Figure 11)
(3) Different colors indicate different results of the
measurements (green, yellow, purple and red colors
which represent normal, normal high, warning and
dangerous)
(4) Send a SMS to the programmed number automatically
when the measurement results are over the setting
value twice.
Meas. Warning Normal Warning Dangerous
SYS 0-99 100-139 140-159 160-255
DIA 0-59 60-89 90-99 100-255
5. Statistic:
(1) Please select “statistic” on main function list (Figure 12)
to list measurements and select “data load” to upload
the previous measurement results from HPL-208
Bluetooth BPM. Press Analyse and the LCD displays
different graphs as below.
【Figure 12】 【Figure 13】
Page 30

30
【Figure 14】 【Figure 15】
【Figure 16】 【Figure 17】
【Figure 18】
6. Historical Measurement:
Select “Historical Meas” on main function list. Different
colors indicate different results of the measurements (green,
yellow, purple and red colors which represent normal,
normal high, warning and dangerous).
Page 31

31
【Figure 19】 【Figure 20】
【Figure 21】 【Figure 22】
【Figure 23】 【Figure 24】
7. System setting:
Select “System setting” on main function list (Refer to
Figure 2) to set following functions.
Page 32

32
【Figure 25】
(1) Name: Set the user name. (Refer to Figure 26)
(2) Phone book: Set the SMS phone numbers. (Refer to
Figure 27)
(3) ALARM: Set the alarm clock to remind users to
measure blood pressure. (Up to 6 times daily) (Refer
to Figure 28)
(4) BlueTooth: Manage the bluetooth address setting.
(Refer to Figure 29)
【Figure 26】 【Figure 27】
【Figure 28】 【Figure 29】
Page 33

33
Maintenance
Storage
1. Always put the device in the storage box attached when
not in use or during transporting.
2. If you won’t use the device for an extended period like
over 3 months, remove the batteries.
3. Do not store the device under direct sunlight, high
temperature, humid, dusty, or corrosive environment.
4. Do not stretch, bend or tug the wrist cuff too hard.
5. Do not wet the unit.
Cleaning
1. Do not use an alcoholic-base, benzene, gasoline or
solvent agent to clean the device.
2. Wipe with a moistened cloth with clean water or a mild
cleaning agent and then dry the device with a soft and
dry cloth.
3. The dirt on the cuff can be wiped by the moistened cloth
and soap.
4. Do not flush the device and cuff.
5. Do not bend the cuff or sleeve and wrap the sleeve to
the inside-out surface.
6. Do not disassemble the device or dismantle the cuff or
try to repair by yourself. If any problem happens, bring
the device to the distributor for further examination.
7. Do not operate the device under the severe environment
of extreme temperature or humidity, or direct sunshine.
Page 34

34
Error Message & Troubleshooting
The unit is manufactured through the complete quality
assurance system.
If the measurement is not made correctly, the following
error will be displayed. Measure your blood pressure again
correctly.
ERROR MESSAGE
Error Indicators
Cause How to correct
Incorrect posture in
measurement or the
user moves or talks
during
measurement.
There are any
artificial interference
and noise during
measurement.
User is tense and
does not relax or has
severe heart beat
problem.
Cuff is not fastened
well; please fasten
again by following
the instructions.
Wait at least 3
minutes before
taking another
measurement.
Repeat steps listed
under “How to Take
a Measurement.”
User has special
characteristic,
please refer to a
physician.
Page 35

35
Error Indicators
Cause How to correct
No pulse or blood
pressure sensed.
Incorrect posture
during
measurement.
Cuff is not wrapped
properly.
Cuff is not fastened
correctly or not tight
enough; please
fasten the cuff by
following the
instructions.
Wait at least 3
minutes before
taking another
measurement.
Please see “How
to Take a
Measurement” on
page 15.
Insufficient or
failure inflation.
Cuff broken.
Cuff is not fastened
well; please
re-fasten the cuff by
following the
instructions.
Pump, or venting
valve or deflation
valve failure, please
contact the
distributor.
If a trouble occurs while you are using the blood pressure
monitor, check the attached Troubleshooting first. If you can
not measure your blood pressure correctly even after taking
the following countermeasures, the monitor may be broken.
Please send the unit to the distributor for repair. Do not
dismantle or try to repair the monitor by yourself.
Page 36

36
TROUBLESHOOTING
Condition Cause Correction
After
the batteries are
installed, no
indication or symbol
displayed on the
LCD. The wrong
indication when
power is turned on.
Batteries are not
installed properly.
Batteries run out
the electricity.
Check and correct
the battery
polarities.
Remove the old
batteries and wait
for one minute, then
install the new
batteries.
The inflation cannot
be done or the air
pressure cannot rise.
Cuff is not wrapped
properly.
Check the arm
position and fasten
the cuff correctly
and re-measure the
pressure again.
Battery low.
Battery voltage is
excessively low.
In order to keep
the previous
measurements &
date/time, ensure
the unit is turned off
before replacing
batteries.
Replaced with new
“AA” Alkaline
batteries.
Page 37

37
Condition Cause Correction
The blood pressure
cannot be taken, and
the LCD shows error
message or wrong
result.
-----
Re-fasten the cuff.
Relax yourself.
Keep the cuff and
heart at the same
level during the
measurement.
Keep silent and still
in measurement.
If the patient has
severe heart beat
problem, and the
blood pressure
reading may not be
correct.
Under normal
operating
circumstance, the
reading at home is
different from that of
the clinics.
-----
Usually people feel
tenser in the
hospital or clinic
(white robe effect)
than in their home.
Record the results
and consult with
your physician.
Each measurement
has various reading.
The variation might
be due to the
different
environments.
The blood pressure
is changing
according to the
physiological or
psychological status
of the human body.
Page 38

38
Specifications
Model No.
HPL-308
Display
LCD Digital Display
Measurement
Method
Oscillometric method
Measurement
Range
Pressure: 20~280mmHg
Pulse: 40~190 / minute
Accuracy/
Calibration
Pressure:± 3mmHg or 2% of reading
Pulse: ± 5% of reading
Memory capacity
80 sets memories
(80x1 user
Inflation
Automatic inflation by air pump
Deflation
Automatic liner pressure deflation valve
Pressure Release
Automatic exhaust valve
Sensor
Semiconductor pressure sensor
Power Supply
6V DC (4 “AA” alkaline batteries)
Measuring Interval
1 mmHg
Operating
Temperature /
Humidity
+10℃~+40℃ (50 0F~104 0F)
40%~85% R.H. maximum
Storage
Temperature /
Humidity
-20℃~+50℃ (-4 0F~122 0F)
15%~85% R.H. maximum
Battery Life
(Alkaline batteries)
Approx. 180 uses
Unit Weight
Approx. 400grams (not including bteries)
Cuff Circumference
Fits arm circumference 8.7” ~ 12.6”
Unit dimensions
Approx. 115 (l) x 125 (w) x 50 (h) mm
Accessories
Storage Case, Instruction Manual, 4 “AA”
alkaline batteries
Please understand that specifications may be changed
without prior notice.
Page 39

Changes or modifications to this unit not expressly approved by the party responsible for compliance could void
the user authority to operate the equipment.
This Transmitter must not be co-located or operating in conjunction with any other antenna or transmitter
NOTE: This equipment has been tested and found to comply with the limits for a Class B digital device,
pursuant to Part 15 of the FCC Rules. These limits are designed to provide reasonable protection against
harmful interference in a residential installation. This equipment generates, uses and can radiate radio
frequency energy and, if not installed and used in accordance with the instructions, may cause harmful
interference to radio communications.
However, there is no guarantee that interference will not occur in a particular installation. If this
equipment does cause harmful interference to radio or television reception, which can be determined by
turning the equipment off and on, the user is encouraged to try to correct the interference by one or
more of the following measures:
Reorient or relocate the receiving antenna.
Increase the separation between the equipment and receiver.
Connect the equipment into an outlet on a circuit different from that to which the receiver is
needed.
Consult the dealer or an experienced radio/TV technician for help.
Service Center:
Zephyr Znnapolis
Phone: +1 (443) 569 3603
Fax: +1 (443) 926 9402
E-Mail: sales@zephyr-technology.com
Address
1 Annapolis Street, Suite 200, Annapolis, MD 21401 U.S.A.
 Loading...