


T2 BODYCAM
INSTRUCTION MANUAL
EN 1.0

WELCOME!
Thanks for buying a ZEPCAM T2 camera. We hope you will enjoy our
product as much as we enjoyed creating it.
Before starting please check:
- If the product or the packaging is not visibly damaged.
- Make sure all the packaging content is complete (camera, clip,
docking station, usb cable, charger, Pin code sticker)
- Do not attempt to use the device with missing or damaged parts.
[Note] The information contained in the document are subject to change
without notice. For any question, please check www.zepcam.com/support/

3
SUMMARY
Product description
Zepcam Manager (Cloud / Server Software)
Zepcam Connect PC Software
Docking station
T2 problem solving
• Zepcam T2
• Functionalities
• Colour signals
• Single docking station
• Description
• How to log in
• User management and add users
• First setup
• Pairing Zepcam Connect
• Software options
• Product descriptions
• Pairing the docking station to the Zepcam Manager
• Offloading and charging with the T2 docking station.

4

5
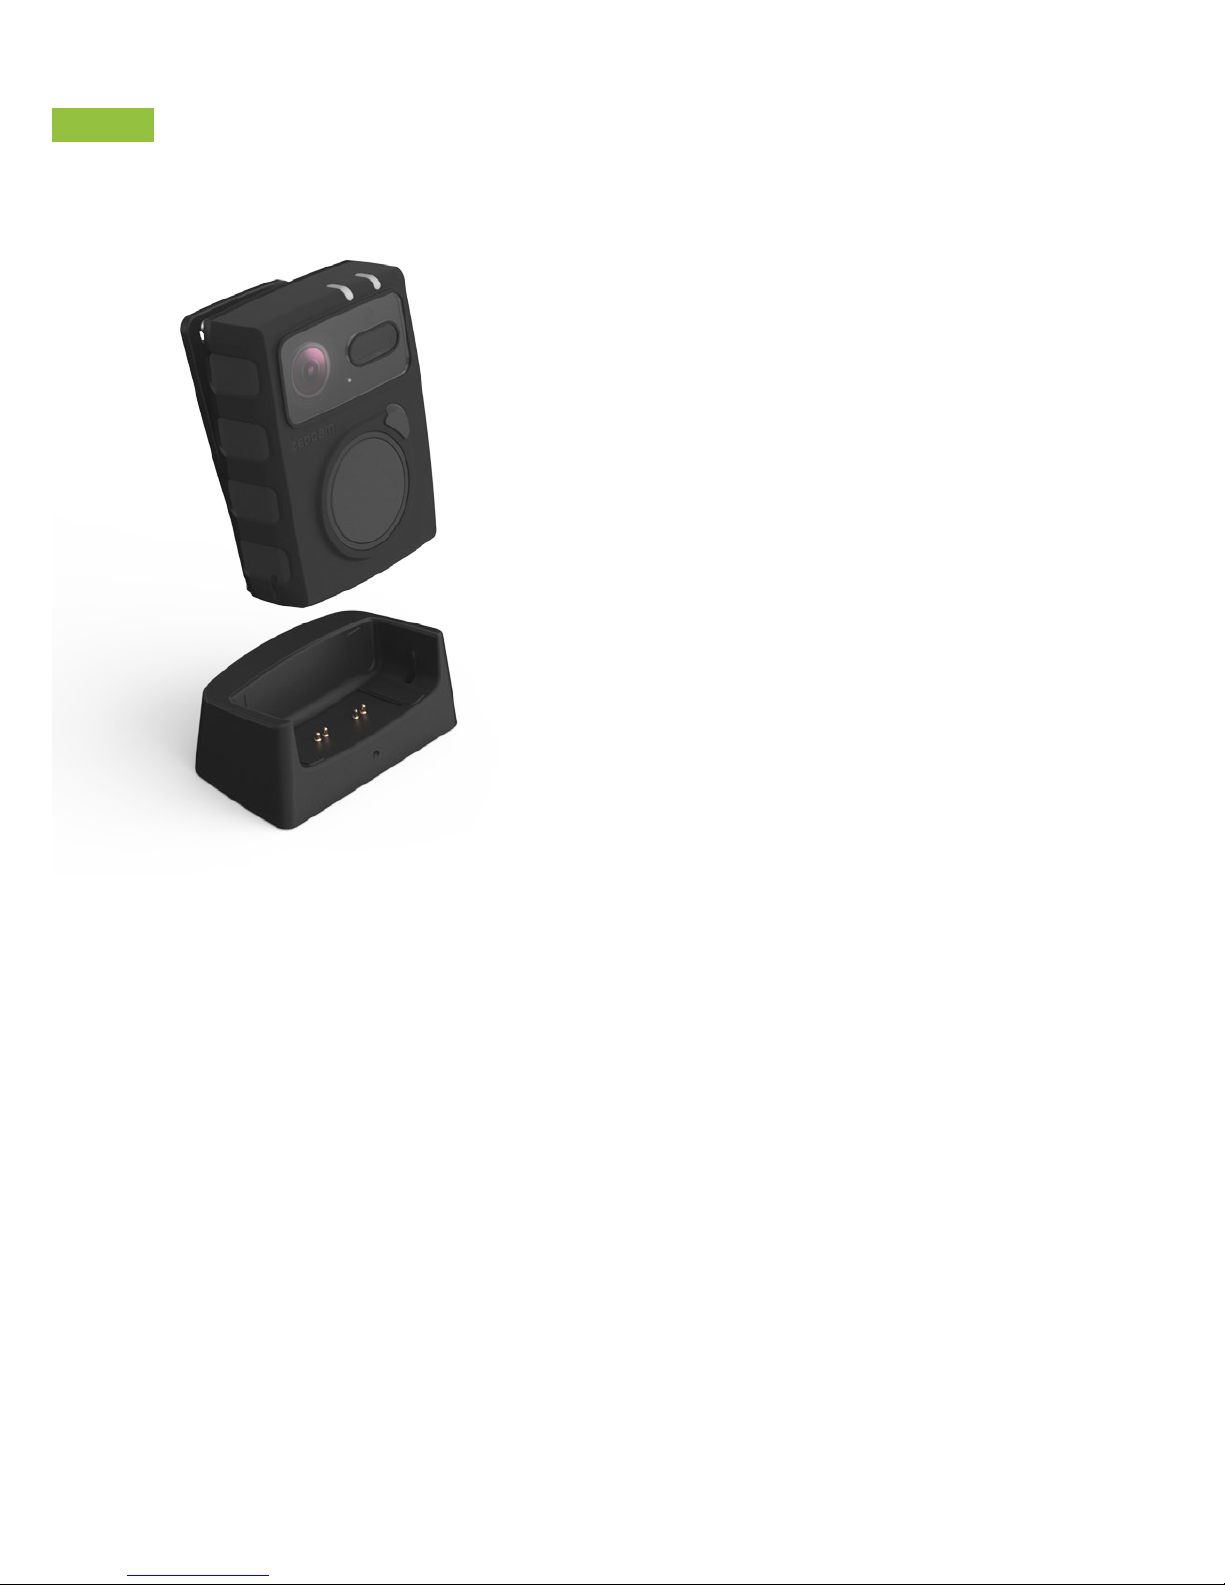
PRODUCT DESCRIPTION
ZEPCAM T2
1. Wide angle lens
2. Light sensor
3. Infrared light source
4. Main button for power on/off and
record
5. Photo button
6. Reset button
7. Included Clip mount (several mounts
available)
8. Charge indicator
9. Recording indicator
Universal mounting thread, suitable
for many fixtures on clothing, vehicles or stationary use is available.
The standard ¼-20 UNC thread will
interface with most mounting solutions.
11.
HOW TO USE YOUR PRODUCT
2
8 9
3
5
4
1
10
11
7
6
• The Zepcam T2 is a bodycam for professional use to record video, audio and GPS.
The T2 camera is very easy to use, ruggedized and has a large battery to record up
to 7 hours continously. The Zepcam T2 comes with an integrated back end solution
to store and manage recorded footage.
10.Contacts for charge and data transfer

6
FUNCTIONALITIES
POWER ON
• Push button 4, keep pressed for 2 seconds (single beep,
indicator 9 is green to indicate standby).
• (Note! After switching on, the camera needs 5 seconds before
accepting record commands!)
POWER OFF
• (When the indicator 9 is green) Push button 4, and keep
pressed for 3 seconds (single long beep, indication lights
turns off).
RECORD
• Push button 4. (2 beeps, indicator 9 blinks red)
STOP RECORDING
• Push button 4, keep pressed for 2 seconds. (2 beeps,
indicator 9 is green).
TAKE A PICTURE
• Push button 5 (1 beep, indicator 9 flashes one time red)
TAKE A PICTURE
WHILE RECORDING
• Push button 4 or 5. (1 beep).
PRERECORDING
ENABLED
• When pre-recording is activated, indicator 9 is flashing red.
(you can activate this option in Zepcam Connect).
RESET
• Press once for reset (no data and settings will be lost).
MEMORY CARD
FULL
• Long / short beep every 10 seconds
BATTERY ALMOST
EMPTY
• Battery almost empty: (< 15%): 2 beeps every 10 seconds
5
4
6
9

7
COLOUR SIGNALS
Green light : Device powered ON in
standby mode
Not recording
Green light : Blinking- with one beep -
storage full
Red light : One flash - a picture is taken
Red light : Recording video
Red and green light : Battery empty
single beep
Blue light : Charging. Turns off when fully
charged
8
SINGLE DOCKING STATION
The T2 is provided with a single docking
station. The single docking station is used to
charge and offload data using a PC or laptop
with Zepcam Connect software installed.
• Your Zepcam T2 must be connected by a
USB cable to a PC or a laptop with Zepcam
Connect installed.
• Zepcam Connect is supported on Windows 7,
8.1 or 10.
• Zepcam Connect will automatically take care
of downloading movies to your computer
and/ or offloading them to the Zepcam
Server or Cloud as well as charging the
camera (for charging only, it is advised to
use the USB charger that comes with the T2
bodycam. This makes charging faster than
using the USB port of a PC).
• Zepcam Connect will be provided via a
download link by your Zepcam contact
person.
[Note] when the data is successfully copied and or offloaded, the data is
automatically removed from the T2.

9
1. Run the Setup file to install Zepcam Connect (provided by your Zepcam contact
person).
2. When Zepcam Connect is newly installed and started for the first time it will ask for
the unlock/pairing code:
Choose between: unlock software or unlock software and pair to server
ZEPCAM CONNECT
SETUP OF ZEPCAM CONNECT
PC SOFTWARE FOR VIDEO TRANSFER
• Zepcam Connect is the software allowing you to download the Zepcam T2 videos
to your PC and transfer them to Zepcam Manager (cloud or server software).
• Zepcam Connect is supported by Windows 7, 8.1 and 10 only.
Unlock: Only download movies to your local PC
Unlock software and pair to server: copy movies to your local pc and/or offload movies to Zepcam
Cloud or server.
Zepcam Connect can be paired later with the Zepcam Cloud or a Zepcam Server
Unlock Zepcam Connect software
Follow these steps in case you want to use Zepcam Connect as standalone
software. Videos will be stored on your PC. Go to the next page for cloud details.
1. Use activation code provided by your Zepcam contact person
2. In Zepcam Connect: enter activation / pairing code at screen
3. In Zepcam Connect: message “Pairing successful”
4. Go now to the section “Link your Zepcam T2 to Zepcam Connect”
 Loading...