

Zenza Bronica SQ-B Instruction Manual

Thank you for purchasing the Bronica SQ-B camera kit.
Based on the technology and experience acquired through the evolution of the Bronica SQ
Series, the SQ-B is a manually operating 2 ¼ x 2 ¼ in. (6 x 6 cm) single-lens-reflex camera
built to satisfy all the needs of professional photographers who work with hand-held exposure meters, studio and/or portable electronic flash units and various types of accessories.
Among the many professional features of the Bronica SQ-B is the flash synchronization at all
shutter speeds, up to the fastest 1/500 sec., which is one of the greatest advantages of the
lens-shutter single-lens-reflex camera.
The following instructions are for the basic operations of the SQ-B. Although instructions
following are based on the standard camera accessories provided with this kit, the actual
choice of lenses, film backs and finders from the collection of Bronica system accessories is
left to the discretion of the photographer, who should choose what is suitable for the type
of assignment contemplated.
To obtain the best results from your Bronica SQ-B, please read this instruction manual carefully before using the camera.
By thoroughly familiarizing yourself with the camera before use, you should be able to handle the camera properly and maintain it in good working condition for a longer period of
time.
1
SQ-B

2
Specifications of the Bronica SQ-B
Operational Parts of the Bronica SQ-B
1. Loading the Battery
2. Battery Checking
3. Attachment and Removal of Film Backs
4. Construction of Film Back
5. Film Loading
6. Film Type Indicator
7. Film Advance and Shutter Cocking
8. Remark on Exposure
9. Exposure Counter
10. Film Unloading
11. Setting the Shutter Speed Dial
12. Shutter Release Button
13. Time (T) Exposure
14. Exchanging Lenses
15. Interchanging Finders
16. Waist-level Finder and Interchanging Magnifiers
17. Setting the Aperture
18. Focusing Adjustments
19. Distance Scale and Depth-of-Field Scale
20. Infrared Photography
21. Flash Photography
22. Multiple Exposures
23. Mirror Lock-Up
24. Interchanging Focusing Screens
25. Removal and Attachment of Film Winding Crank
26. Attachment of Neck Strap
27. Facts About the Battery
28. Pointers on Shooting
29. Care of the Bronica SQ-B
30. Depth-of-Field Table
3, 4
5
6
6
6, 7
8
8, 9,10
10
10
11
11
11
11, 12
12
13
13
14
14, 15
15
16
16, 17
17
17
18
18, 19
20
20
20, 21
21
21, 22
22, 23
24
Contents Page

3
Type 6cm x 6cm format, lens-shutter type single-lens-
reflex camera; with interchangeable lens, film back,
finder and focusing screen systems; without exposure meter coupling mechanism to accept meterrelated accessories.
Frame Size 55.6mm x 55.6mm
Film 120 roll film with standard film Back SQ/B 120; exclu-
sive accessory film backs are provided for use of 220
roll film, 135 cartridge-loaded film and Polaroid Land
Pack film.
Lens Interchangeable type. Standard lens Zenzanon-PS/B
80mm, f/2.8; 6 elements in 5 groups; multi-layer antireflection coated; 50.7° angle of view; f/22 minimum
aperture; intermediate aperture settings; helical
focusing from infinity to 80cm.
Filter Sizes 67mm diameter on Zenzanon-PS/B 80mm lens.
Lens Mount Exclusive four-claw Bronica SQ bayonet mount.
Focusing Helical focusing system built into each lens; angle of
focusing 171 degrees for standard lens.
Shutter Electronically controlled SEIKO #0 between-lens leaf
shutter; shutter speeds 8 sec. to 1/500 sec.;without
intermediate settings; mechanical control 1/500 second; with shutter release lock.
Lens Aperture Fully automatic instant reopening lens aperture;
equal-distant aperture scale graduation in half-stop
increments; depth of field preview.
Film Winding Film winding crank; one complete forward revolution
or ratcheted winding action.
Cable Release Socket ISO standard.
Specifications of the BRONICA SQ-B

4
Multiple Exposure Multiple exposure possible with lever on camera
main body.
Mirror Lock-Up Mirror lock-up possible with switch lever on the side
of the camera body; single or continuous mirror lockup shooting possible.
Film Back Daylight loading interchangeable type; exclusive film
backs for 120, 220 and 135 roll films and Polaroid
Land pack films. The SQ-B does not couple with
meter when finders with built-in exposure meters
are attached.
Finder Interchangeable finder system; 94% of actual field of
view (remains unchanged when finder is
exchanged.) Exposure meter incorporated finder unit
does not activate when attached.
Finder Screen Interchangeable type; standard microprism/split-
image screen; optional screens are split-image,
microprism, matte, grid-lines,microprism/split-image
(for 135 film) and matte (for 135 film.)
Flash Synchronization X-setting (up to 1/500 sec.) with ISO Standard con-
tact terminal.
Battery Checking Red-colored LED lights up in front center area, out-
side screen area, when battery check button is
depressed, LED also doubles as shutter closing signal.
Battery Single 6-volt silver-oxide battery (4SR44) or alkaline-
manganese battery (4LR44.)
Dimensions 92mm wide x 109mm high x 179mm long (with stan-
dard lens, Film Back SQ/B 120 and Waist-level Finder
S/B.)
Weight 1,460 grams (with standard lens, Film Back SQ/B 120
and Waist-level Finder S/B.)
*Specifications are subject to change.
Specifications of the BRONICA SQ-B (con’t)
5
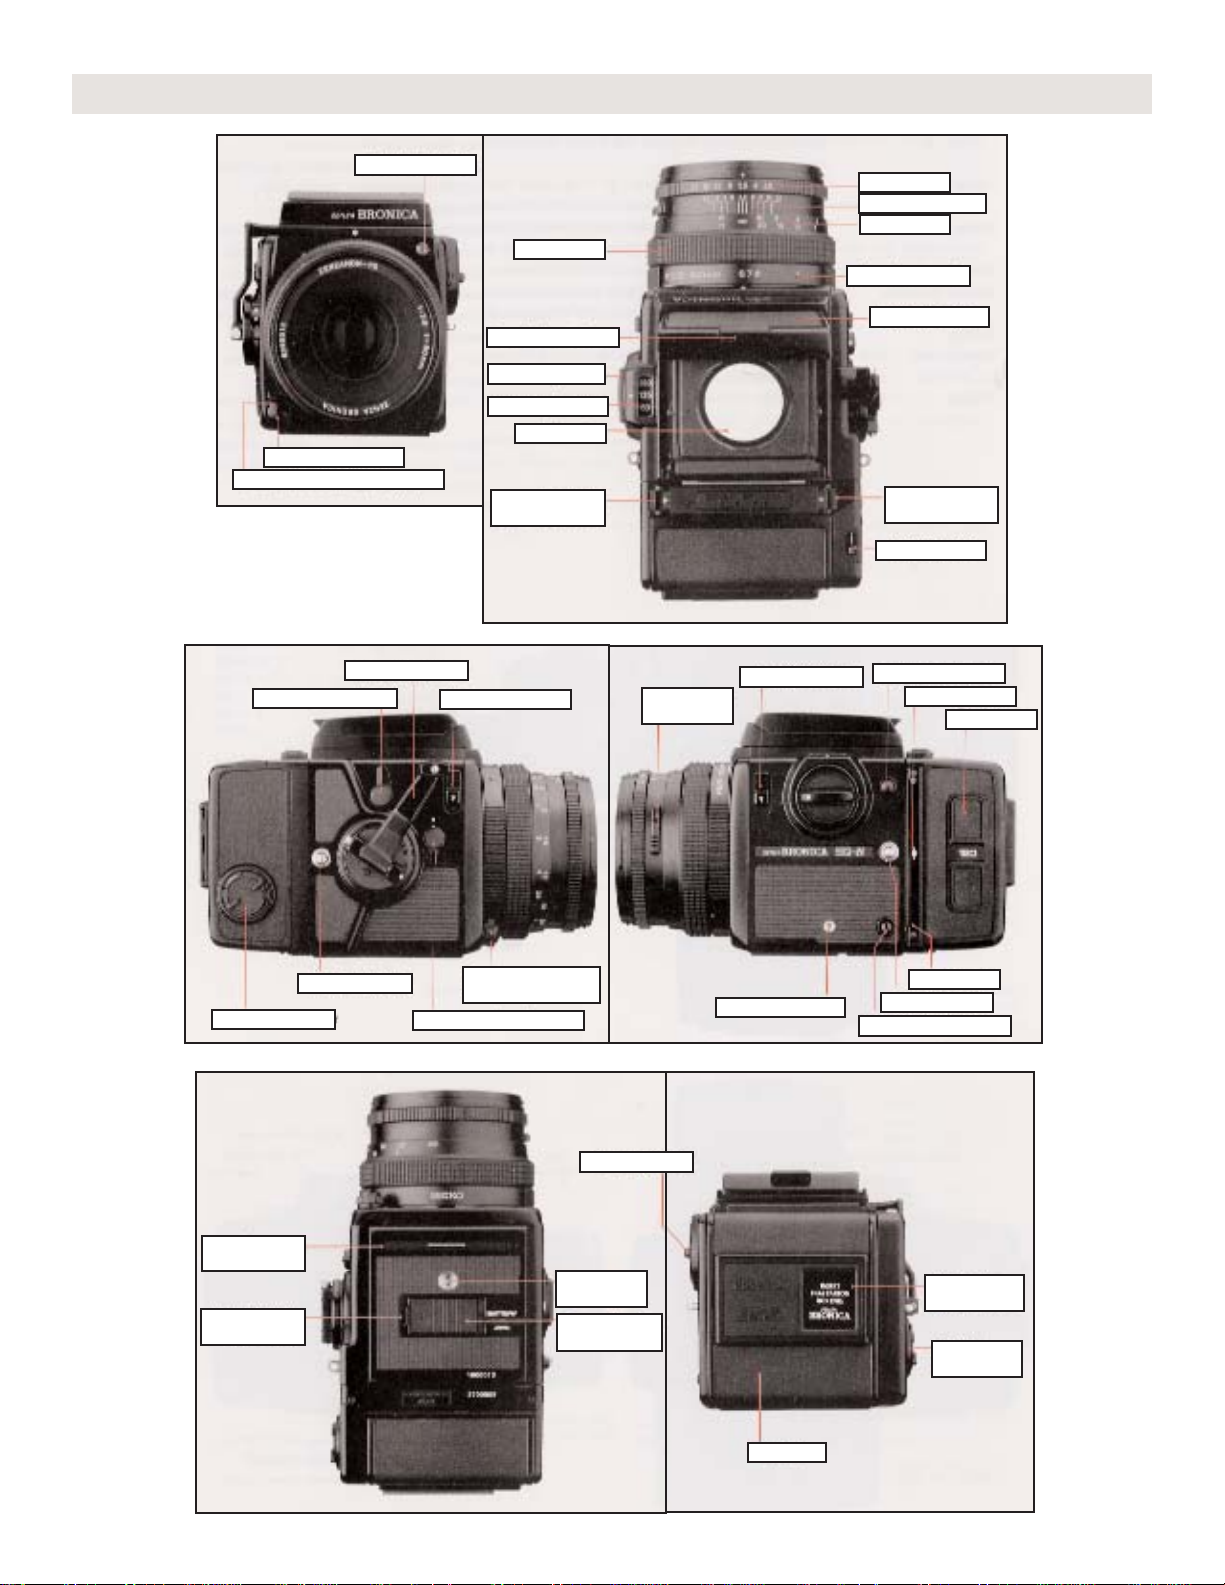
Operational Parts of the BRONICA SQ-B
Aperture ring
Depth of field scale
Distance scale
Lens alignment dot
Waist-level finder
Focusing ring
Focusing hood catch
Shutter speed dial
Shutter speed scale
Magnifier
Back cover release
button (right)
Exposure counter
Lens release button
Battery check button
Film plane mark
Film holder
Depth of field
preview lever
Cable release socket
Dark slide slit
Neck strap eyelet
Film back release button
Shutter speed dial
Film type
indicator frame
Manual
film winder
Trip od soc ket
(1/4” screw)
Battery chamber
cover
Accessory
mounting guide
Battery chamber
cover release
Manual film winder
Neck strap eyelet
Mirror Lock-up switch lever
Shutter release button
locking ring
Film winding crank
Finder release button
Multiple exposure lever
Shutter release button locking ring
Shutter release button
Flash synch socket
Back cover release
button (left)
Film back
6
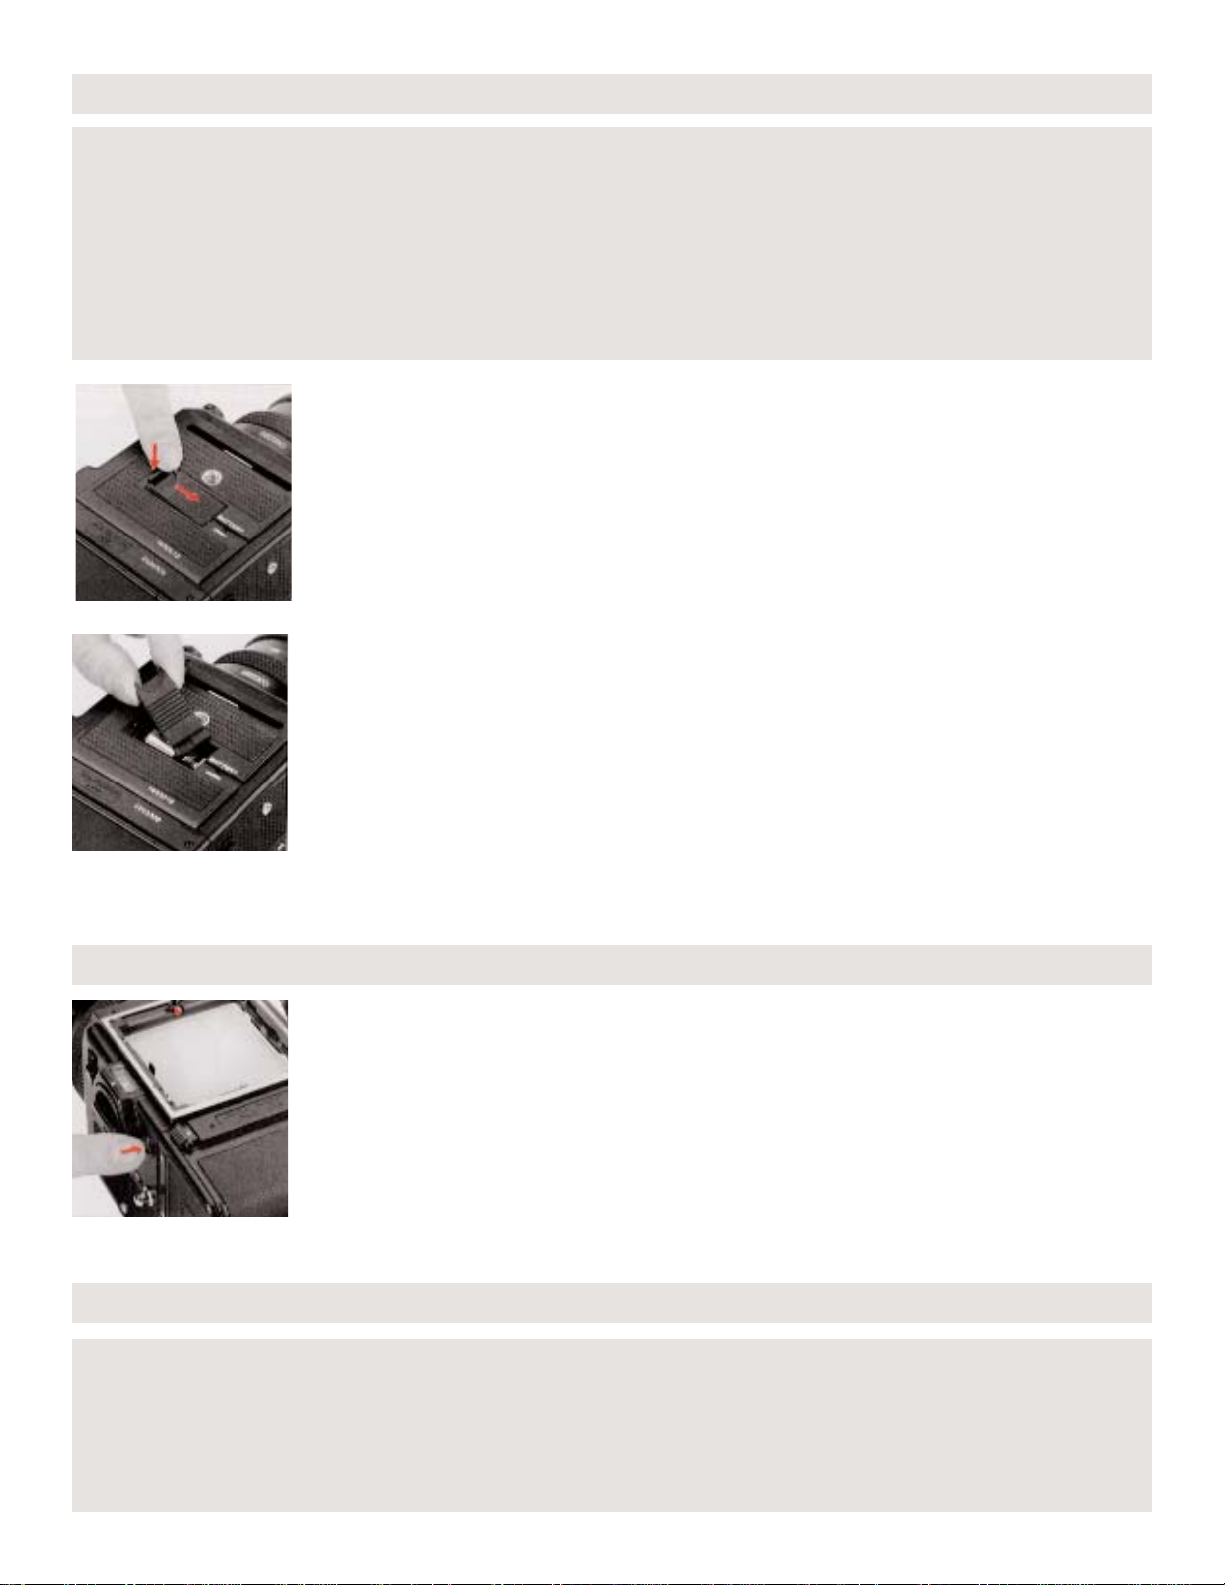
A. Depress the battery chamber button and, at the same time, move
the battery chamber cover in the arrow indicated direction. The
cover will come off easily.
B. Coincide the plus (+) and minus (-) marks on the battery with similar polarity indications in the battery chamber. Then, push in the battery. Insert the battery chamber cover into the "BATTERY" end first
and then move the cover in the other direction (opposite to the
arrow indication) until it locks.
* The shutter will be mechanically controlled (at 1/500 sec. ) when the
battery is loaded with polarity marks reversed.
If a red-colored battery check LED lights up outside the focusing
screen area, (central front of finder), when the battery check button is
pressed the battery is loaded properly and there is sufficient power
for operations.
* If the LED does not light up, (1) the battery is not loaded properly or,
(2) the battery is completely drained and should be exchanged.
The film back is a film chamber that can be attached or detached at any time, permitting
rapid change of film types even during shooting sessions.
The main camera body and film back are fully coupled, upon connection, therefore, always
turn the film winding crank completely one time, upon attaching the film back. If winding is
not possible, all preparations for taking pictures have been completed.
1. Loading the Battery
The electronically-controlled shutter will not work without loading the battery. The shutter
will be mechanically controlled when the battery is not loaded and will be released at 1/500
sec., regardless of the setting on the shutter speed dial. Use one 6-volt silver-oxide battery
or alkaline-manganese battery.
* The battery may be obtained at any photographic equipment or electronic appliance
shop.
2. Battery Checking
3. Attachment and Removal of Film Backs
7
But, if winding is possible, rotating the film winding crank until it stops will automatically
take care of the incomplete actions, whether the shutter is not fully cocked or film not fully
advanced. Thus, it is always possible to choose the film type most suited for the shot, even
midway in the roll.
Additional film backs including a Polaroid film back are available optionally in 6 x 6, 6 x 4.5
and 35mm formats.
* Refer to the instructions supplied with Film Back SQ 135 for proper use of that particular
film back.
* The accessory Film Back SQ/B 120 does not have the film speed and exposure compensation dials. This film back can be attached to other SQ cameras but the exposure meter, if
applied, will not operate.
* It is possible to attach a film back incorporating the film speed and exposure compensation dials to the main camera body of the SQ-B but finders with built-in exposure meters
will not activate.
A. To attach the film back to the main camera body, simply insert the
latches at the upper end of the film back into the attachment openings at the upper end of the main camera body. Then, press the lower
end of the film back against the main body until it locks securely.
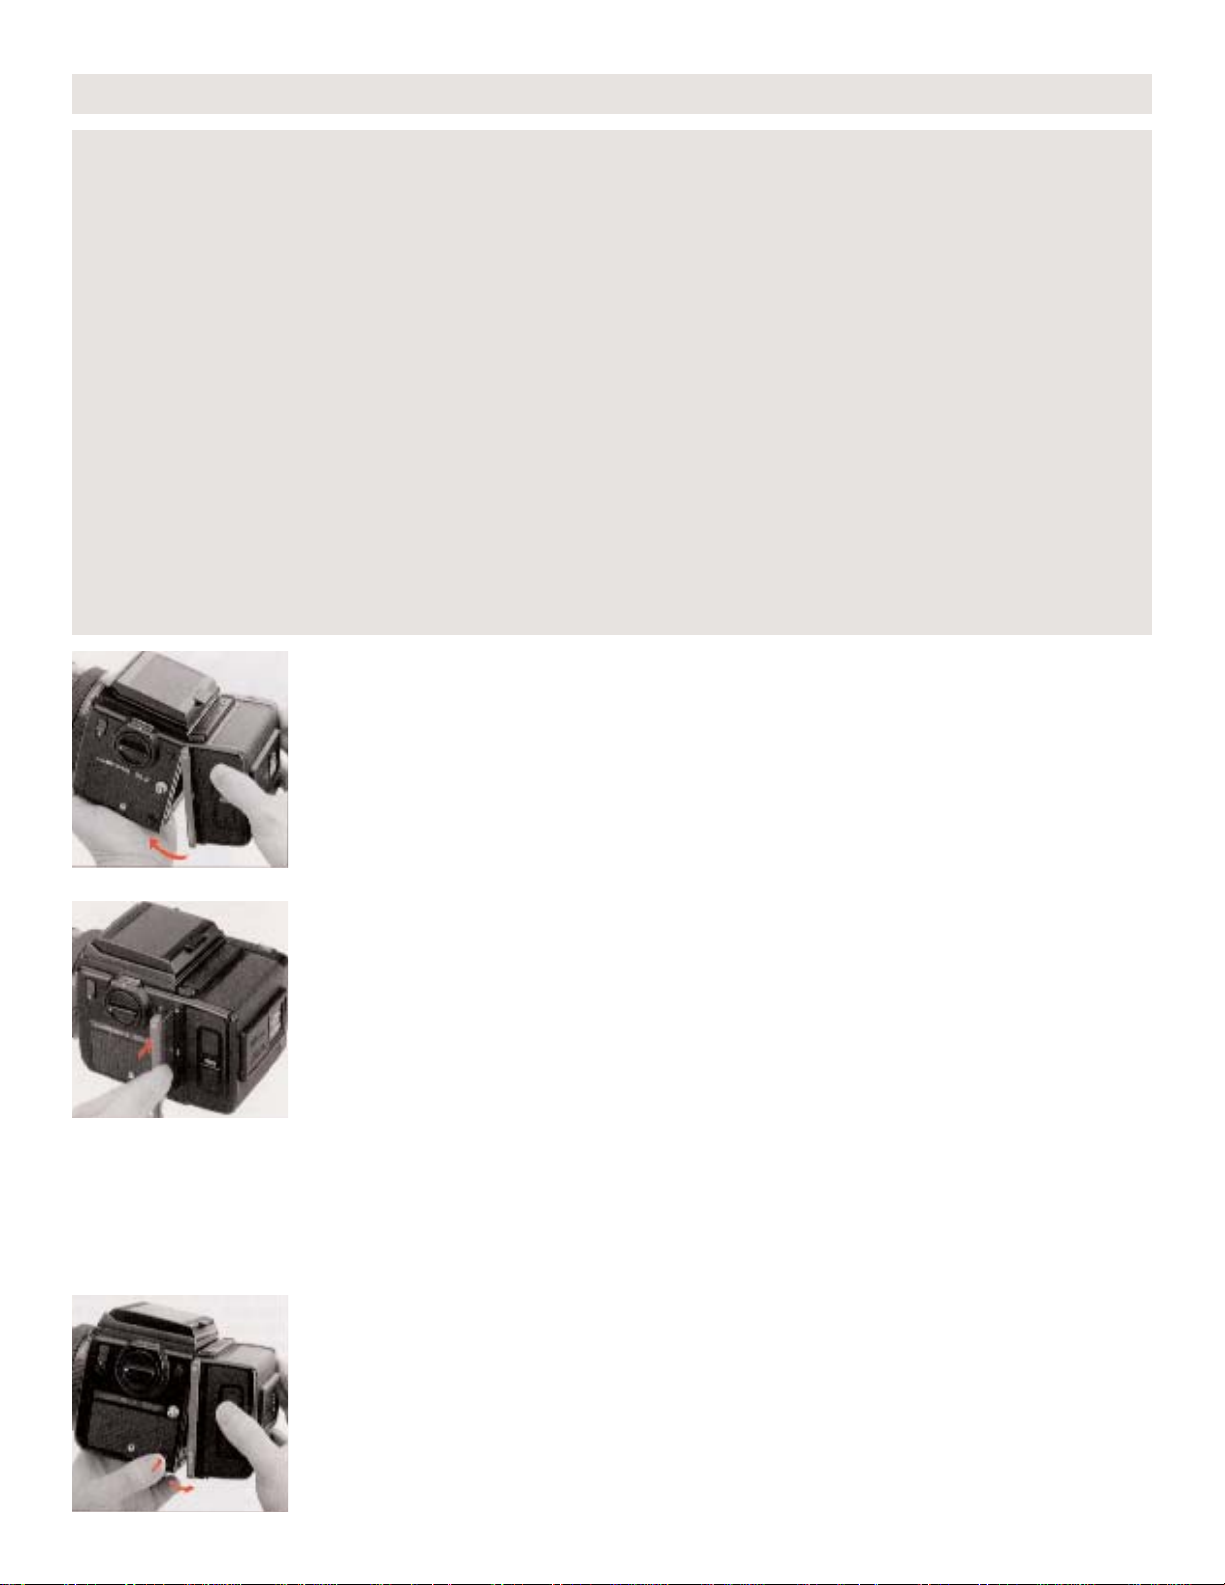
B. To remove the film back from the main camera body, insert the
dark slide into the dark slide slit, as illustrated, with the mark on the
dark slide at the top end. Push it all the way in.
C. Depress the film back release button and the lower end of the film
back can be removed, as illustrated. Simply shift the film back up
slightly and pull it away.
* The dark slide cannot be withdrawn from the film back when the
film back is detached from the main camera body.
* The dark slide must be withdrawn from its slit, upon attachment of
the film back to the main body, as otherwise the shutter cannot be
released. Furthermore, there is danger of the film back accidentally
becoming detached from the main body, should the dark slide be left
in its slit while the camera is being carried. Therefore, make it a rule
to withdraw the dark slide promptly upon attaching the film back to
the main body.
3. Attachment and Removal of Film Backs (con’t)
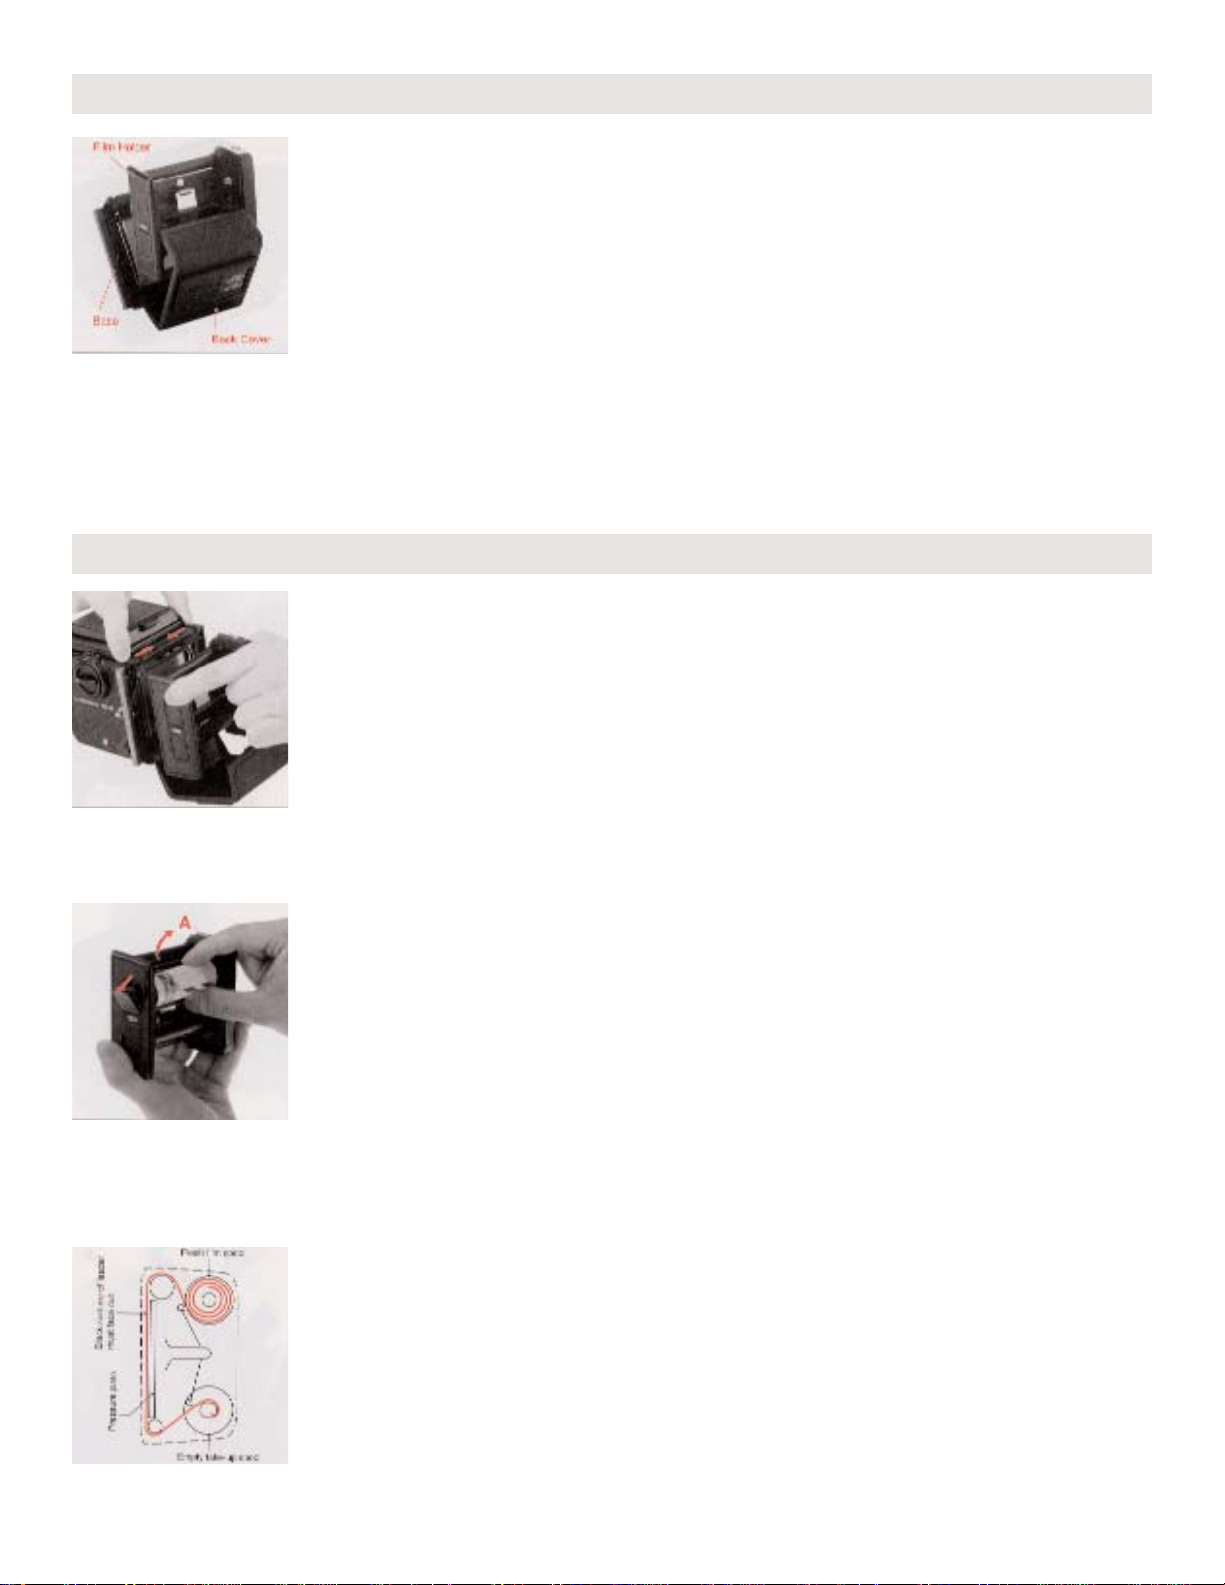
8
The film back consists of a film holder which will be loaded with a roll
of film and a film back frame which completely encloses the film
holder and shields it from light.
* The Film Back SQ/B 120 is for exclusive use of 120 roll film. For loading 220 roll film, use the optional Film Back SQ-I 220.
* To take other format pictures such as 6 x 4.5cm, 24 x 35mm, 24 x
54mm or Polaroid pictures, use exclusive film backs.
A. Open the back cover by squeezing the back cover release button
toward each other, then remove the film holder.
* Note, when you load the first roll after opening the camera package
and empty film spool is in the bottom spool holder you do not need
to transfer the empty film spool from the top to the bottom film
holder as instructed next.
B. Remove the empty film spool pre-inserted in the top spool holder
of the film holder by pushing up the spool in the arrow-indicated "A"
direction. Insert the empty spool to the bottom spool holder by
pressing out the left-hand bottom shaft and aligning the spool key
hole with the right-hand shaft. Insert a fresh film spool into the top
spool holder aligning the right-hand key hole of the film spool with
the top-right shaft, then close the left-hand shaft to securely hold the
film spool.
C. After loading the fresh film spool properly, draw out the leading
end of the film and turn it across the film pressure plate (as illustrated). Run it down and turn it over to take up spool. Insert the leading
end into the slit of the take-up spool and wind slightly until securely
engaged.
* The inside black surface of the leader must face out when running
across the pressure plate.
4. Construction of Film Back
5. Film Loading
 Loading...