

Page 1
User Manual
www.myxlive.com
Page 2
This manual includes : Usage, safety, repair and maintenance.
Before using XLIVE, read this manual carefully.
Thank you for your purchasing XLIVE
Zenocom does its best to satisfy its customers with its advanced technology.
XLIVE introduces the technology of Bluetooth for a next generation multimedia
system. You can talk to the others while listening to music and easily upload and
download files wirelessly.
Page 3

4
38 Seeing Image File JPEG/BMP File Viewer (JPEG VIEWER : XM-200 series)
39
New Bluetooth Technology Let's See Optimal Range(XM-300 series)
40
New Bluetooth Technology Bluetooth Operation Environment Setting(XM-300 series)
45
New Bluetooth Technology Bluetooth Headset(XM-300 series)
48
New Bluetooth Technology Bluetooth Handsfree(XM-300 series)
53
New Bluetooth Technology Bluetooth File Transmission(XM-300 series)
56
Menu Configuration My XLIVE Configured With My Own Choice
65
How To Install USB Mass Storage Driver Install USB Driver On My PC
66
Homepage Service & Support Our On-Line Services
67
The Way To Upgrade Gradual Upgrade Of Firmware And Font Setting
69
About POWER How To Insert Battery
70
To Connect USB Cable USB Cable Connection Between XLIVE And PC
71
Confirming Error Let's Solve Simple Problems By Ourselves
72
Product Standard
73 Warranty
C o n t e n t s
3
05 Notes For Safety Pay Attention To The Following For Safe Usage Of XLIVE
07
Characteristics Of XM-200/300 series Let's Learn Various Features Of XM-200/300 series
08
Components Let's Check The Components Of XLIVE
09
Operation Environment Let's See The Operation Environment Of XLIVE
10
Names Of Each Part Let's Learn The Names Of Each Part In Detail
13
Basic Operation Let's Learn Basic Operation
17
Basic Operation MUSIC
19
Search and Playback/Repetition Mode Functions Easily Finding file and Setting playback/
Repetition
22
Equalizer / SRS Function Dancing Equalizer / SRS World
24
Lyrics Service MediaSync Program / Lyrics Editor
27
When Listening To FM Radio When You Want To Enjoy FM Radio Broadcast
32
When Recording Voice Voice Recording By One Touch
34
Line In Function Recording Files Of Separate Device
36
VOICE RECOGNITION(XM-200 series only) Find & Operate a File or Folder By Voice
37
Configuring Introduction Window Edit or Revise The Introduction Image Directly
Page 4
Safe Usage
6
Be careful that it doesn t harm your hearing. If you keep the volume of earphone high, it
could permanently harm your ear. To prevent the hearing damage, maintain adequate
volume level. If you have a ringing in your ears, reduce the volume or stop using XLIVE.
If you have to drive a car or concentrate on something, stop using XLIVE when it distracts you.
When you wear XLIVE around your neck, be careful not to be caught by doors or the other
objects.
Notes For Management
Pay Attention To The Following For Safe Usage Of XLIVE
5
Before connecting XLIVE into an outlet, read this manual carefully.
Keep this manual to hand while introducing yourself to the XLIVE player.
Don't expose it to high or low temperature, high humidity or highly dusty environments.
Never disassemble, repair or remodel XLIVE.
Remove the battery if the player is not to be used for a long time.
Don't expose XLIVE to direct sunlight or put it in a confined space of extreme temperatures.
Don't put metals(hairpin) or something easy to burn inside XLIVE.
Before cleaning XLIVE, turn off the power and remove the battery.
Don't use solvents or chemicals to clean XLIVE as this could result in the surface becoming
distorted or the paint coming off. Use dampened and soft cloth to clean XLIVE. Be careful
that water doesn’t get into XLIVE unit.
Don't apply impact on the XLIVE player. Don't put it on a machine that vibrates heavily.
Be careful not to use it near to any magnetic devices.
Page 5
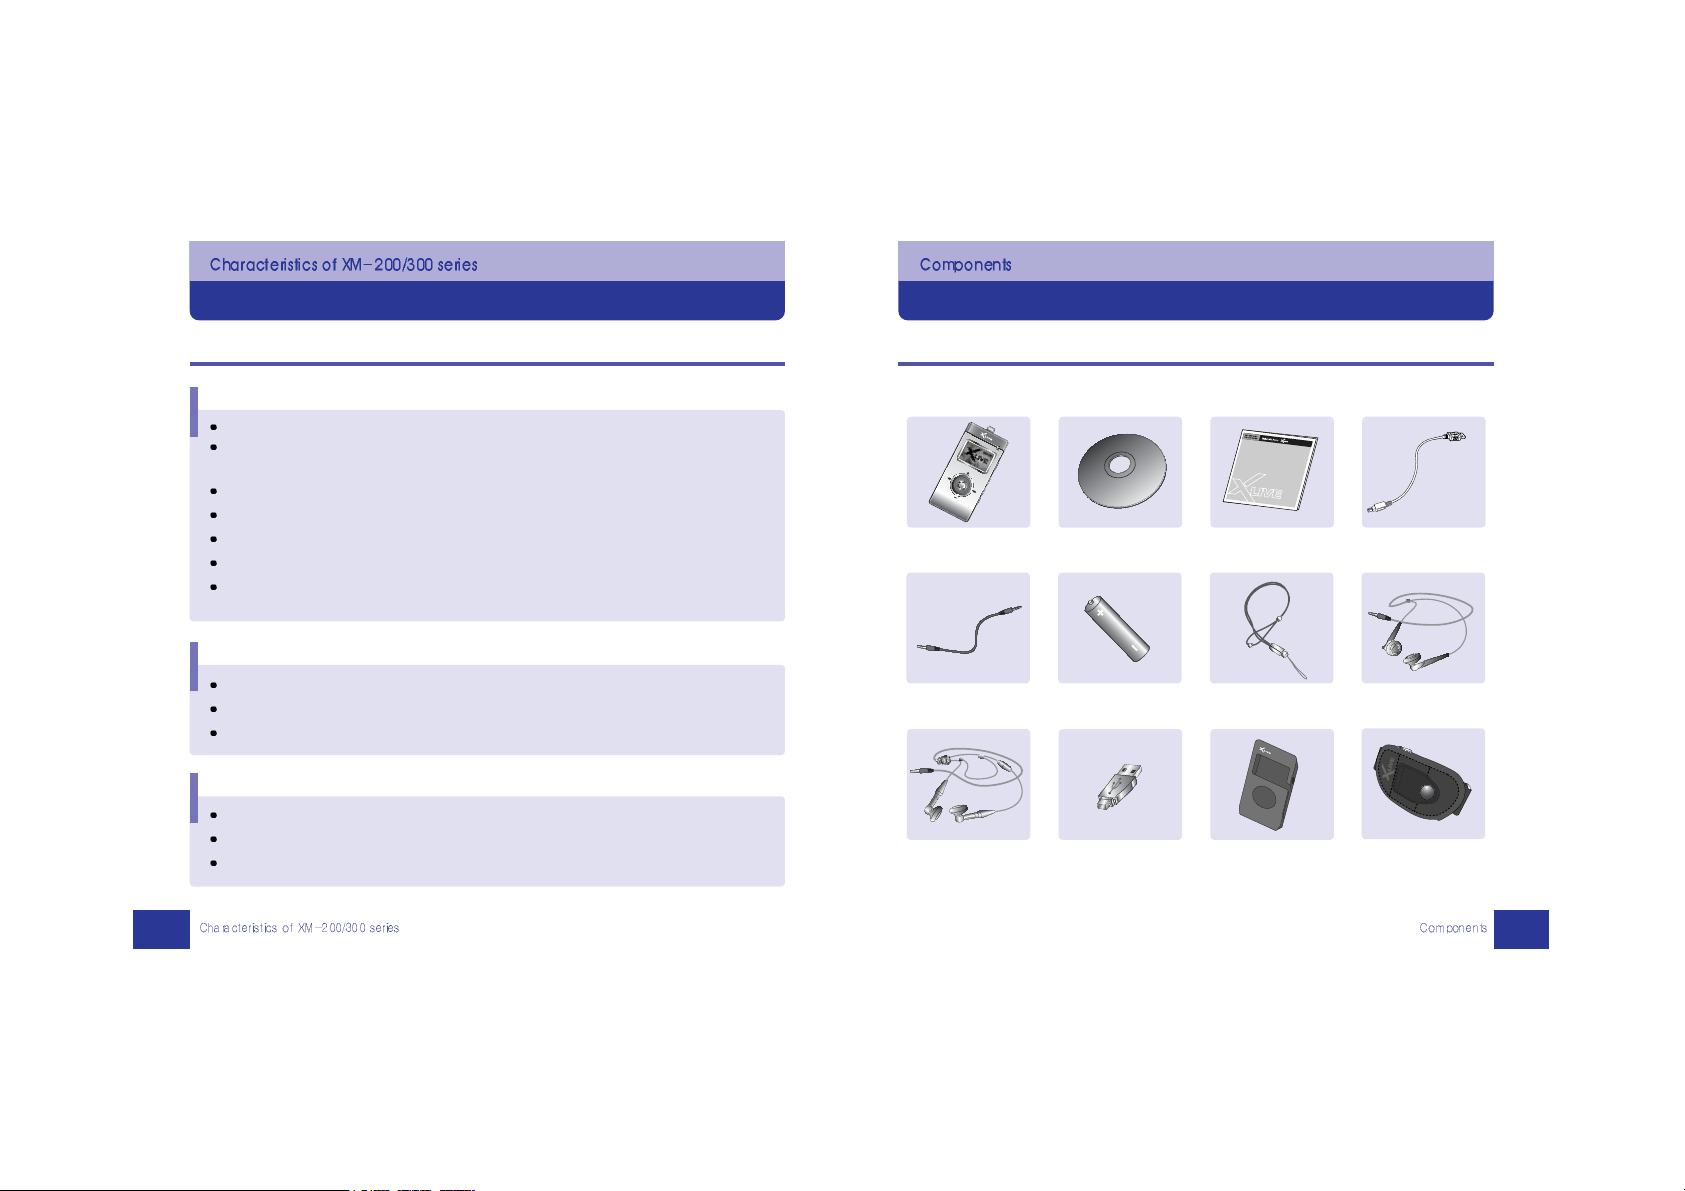
XLIVE includes the following components
Let's Check The Components Of XLIVE
8
The following components for helping a user understanding may be differed from the real things :
Functions Of XM-200/300 series
Let's Learn Various Features Of XM-200/300 series
7
MP3 Player Install CD User Manual USB Cable
Audio Cable AAA Battery Neck Strap Earphone
(XM-200) (XM-200)
Integrated Earphone Mini USB Jack Carrying Case Arm Band
(XM-300) (Option) (Option) (Option)
Common Features
It provides the superior GUI with Color LCD.
Lyrics service including a music file provided by the automatic lyrics support program
“MediaSync” is available.
It is available to revise and edit the wanted introduction screen directly.
Viewer function of BMP file can be seen through file browsing.
All songs contained in CD can be recorded as each file using CD SYNC.
SRS, VAD(Voice Activity Detector), MP3 Direct Encoding, MP3/WMA File Formats
FM Radio, Sound Recording, Various Equalizer, Multi Languages, Firmware Upgrade,
USB Memory Storage
XM-200 Series
It supports OGG Vorbis that is the newest compression file format.
Voice Recognition enables to find a file and operate the functions of button.
Viewer function supports to see JPEG file through file browsing.
XM-300 Series
Make a call after XLIVE stops music automatically if there is a phone call.
Send and receive files wirelessly between two units of XLIVE.
Record the important conversation during a call.
Page 6
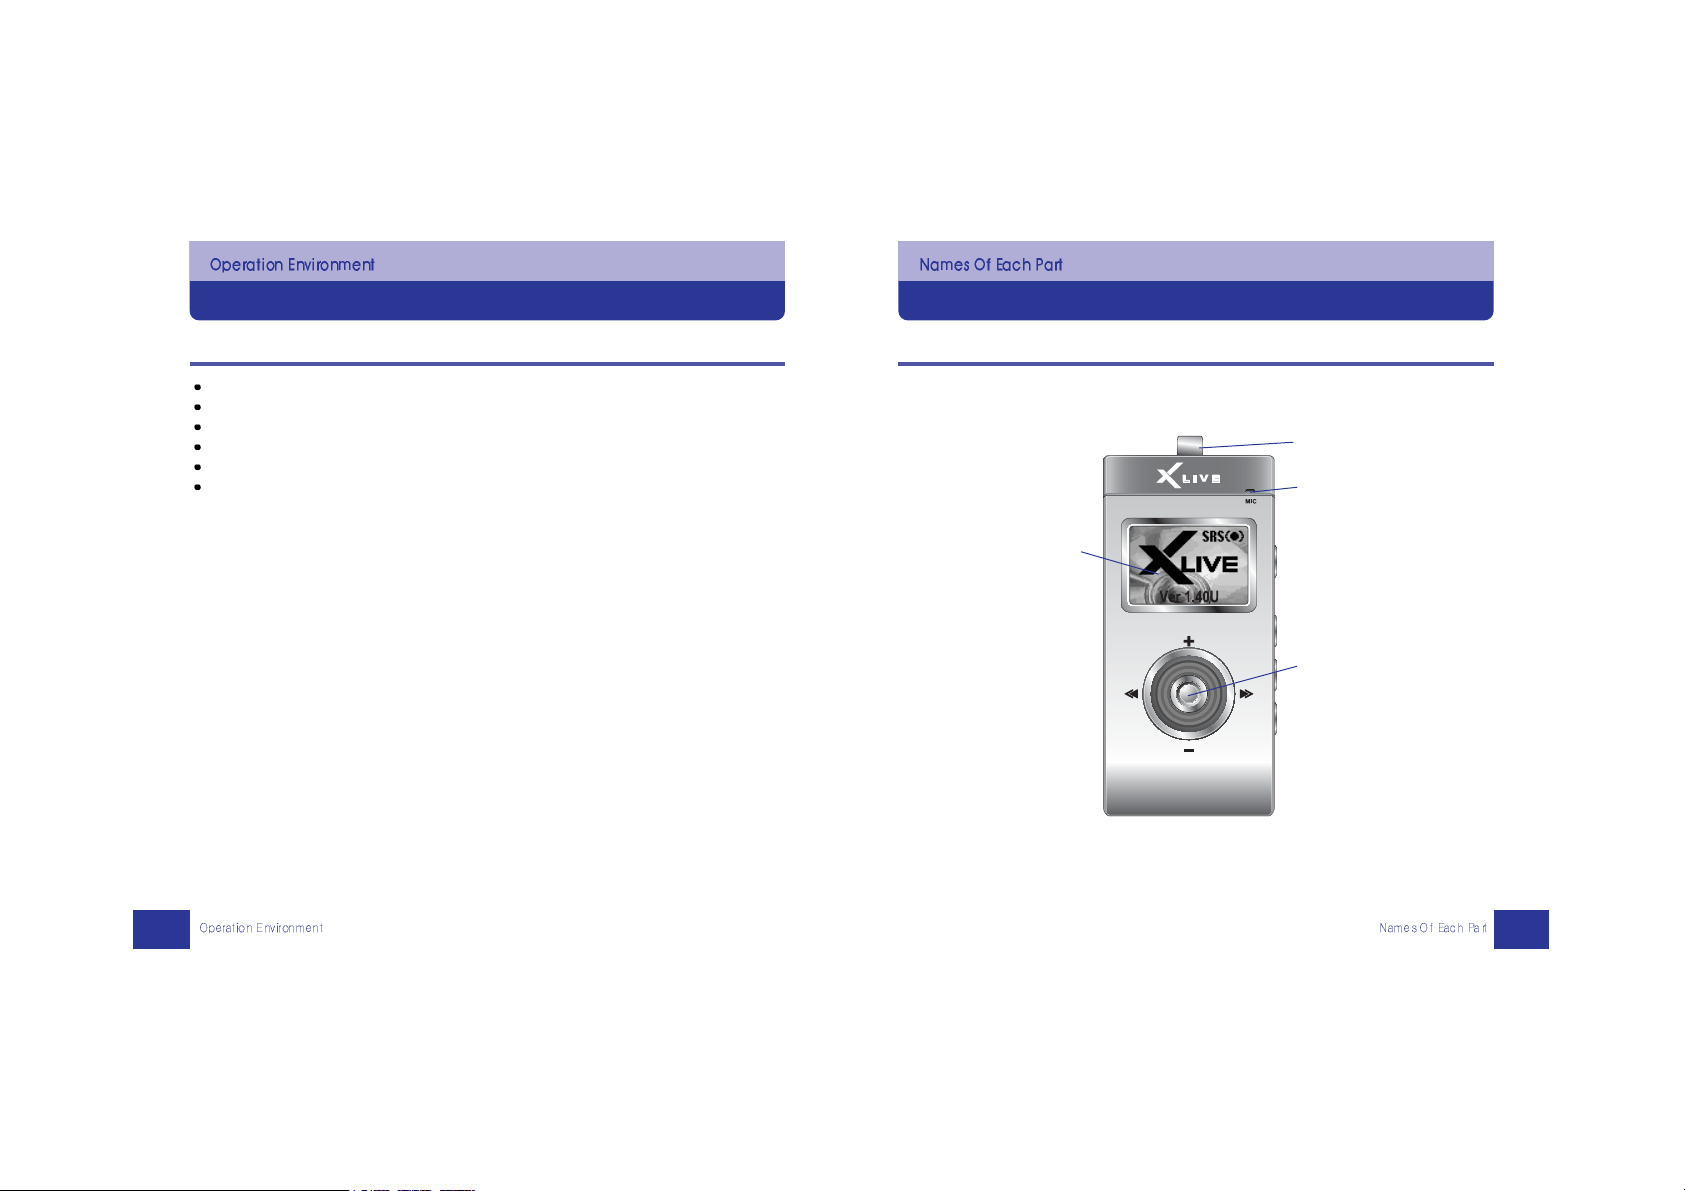
Let's look at the front of XLIVE
Let's Learn The Names Of Each Part In Detail
10
Basic specification of a computer for using XLIVE
Let's See The Operation Environment Of XLIVE
9
CPU : Above Intel Pentium II 233MHz
Memory : Above 64MB (128MB recommended)
Hard Disk : Above 20MB
Operating system : Microsoft Windows 98SE/ ME/ 2000/ XP, Mac OS 9.x
USB Interface : Ver 1.1
CD-ROM Drive
Link for NECKLACE
MIC
LCD WINDOW
NAVI/MENU
Page 7
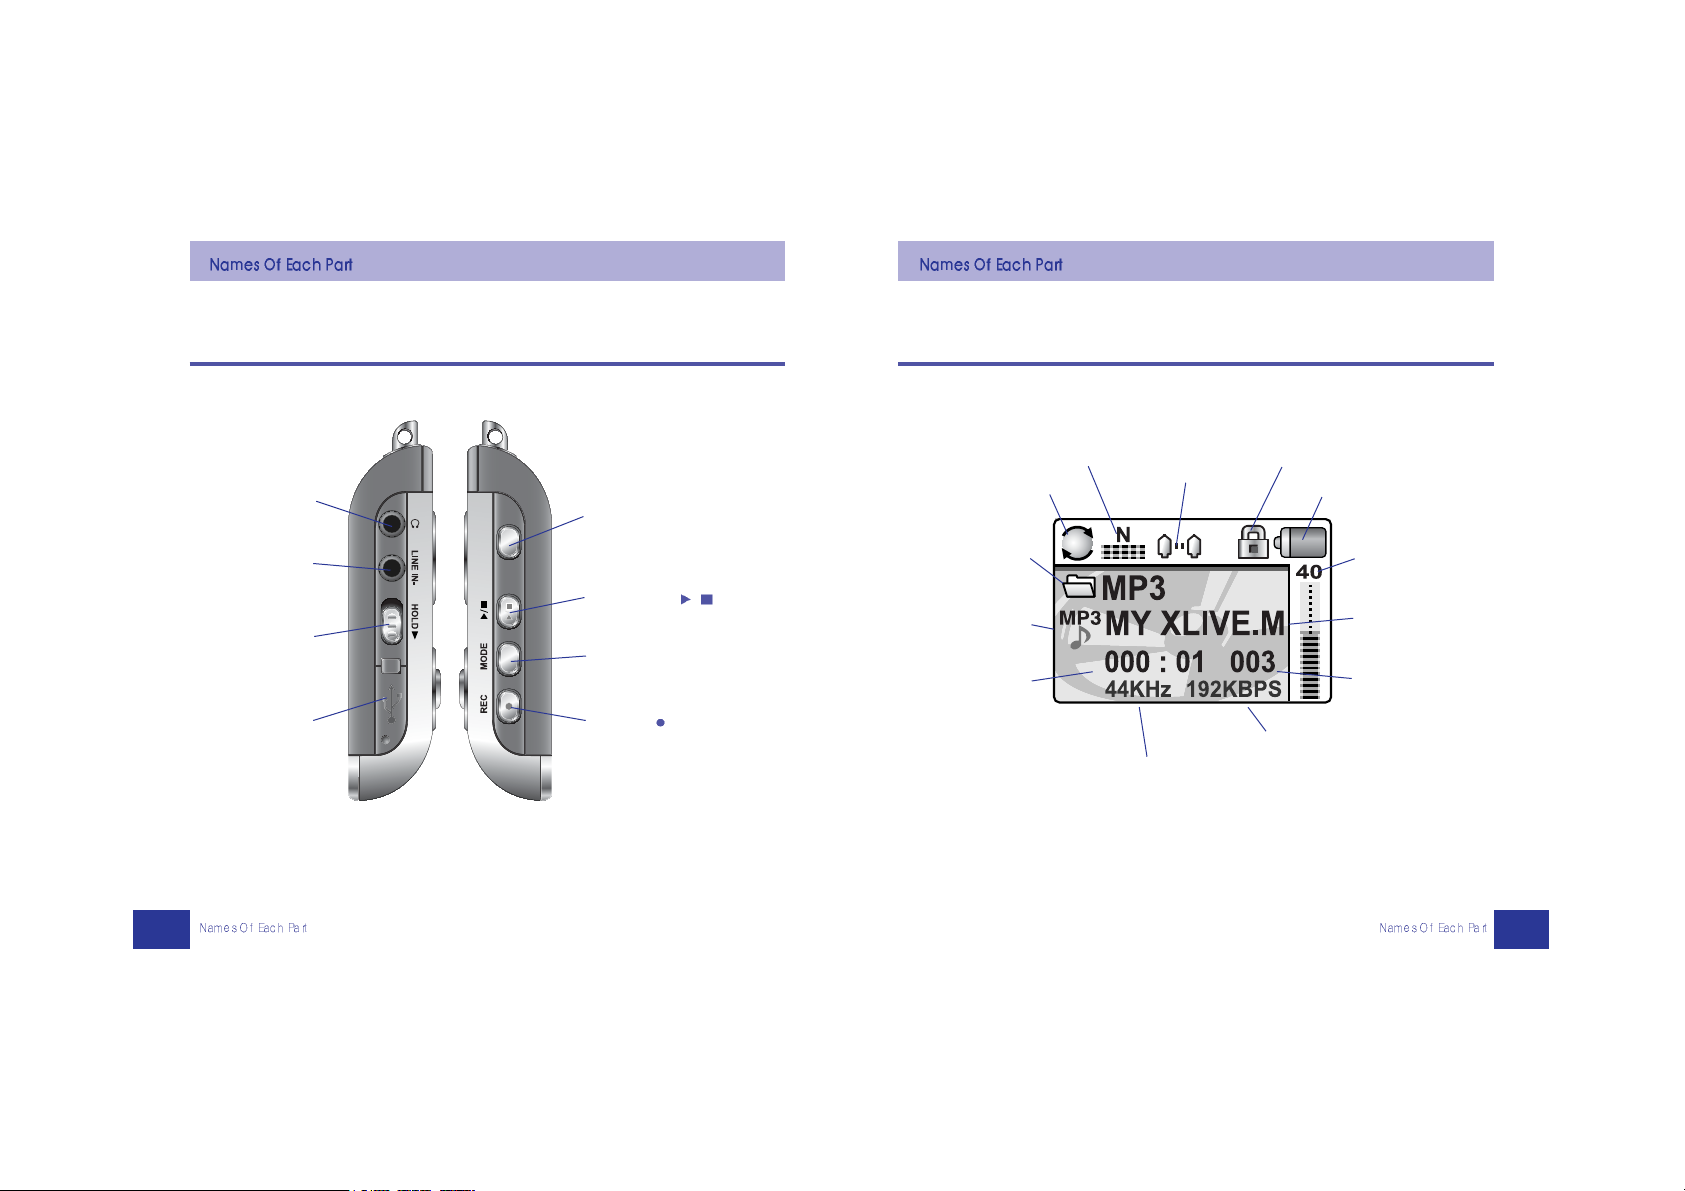
Let's look at the sides of XLIVE
11
LCD Display
12
The following is a display explaining the information of LCD.
VOICE RECOGNITION Button
(XM-200)
BLUETOOTH Button(XM-300)
EARPHONE
LINE-IN
HOLD
USB
PLAY/STOP (
/
)
MODE/EQ (M)
A-B/REC ( )
PLAYING MODE
EQ/SRS
HOLD
BATTERY
FILE NAME
NUMBER OF MUSIC
BIT RATE
SAMPLING RATE
FOLDER NAME
FILE TYPE
PLAYING TIME
Volume Level
REPEAT
SECTION
Page 8
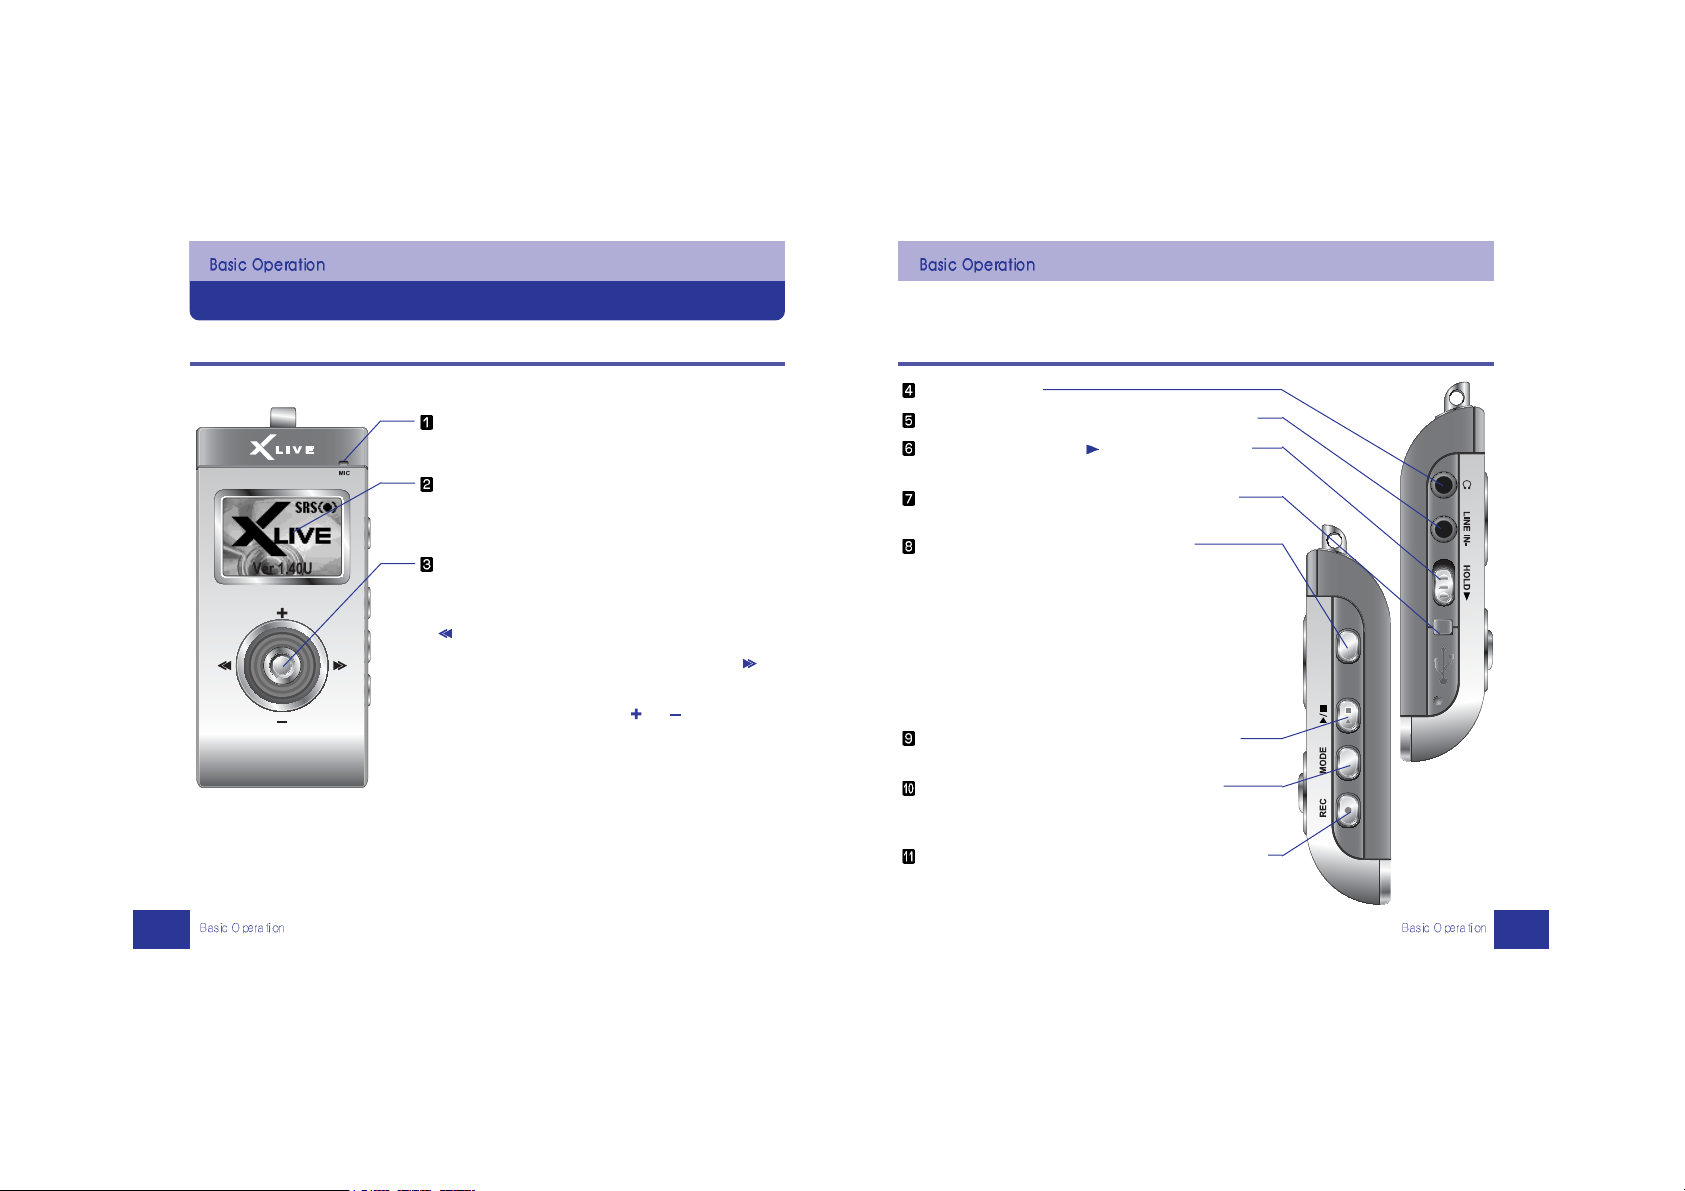
Operation Explained with a Drawing
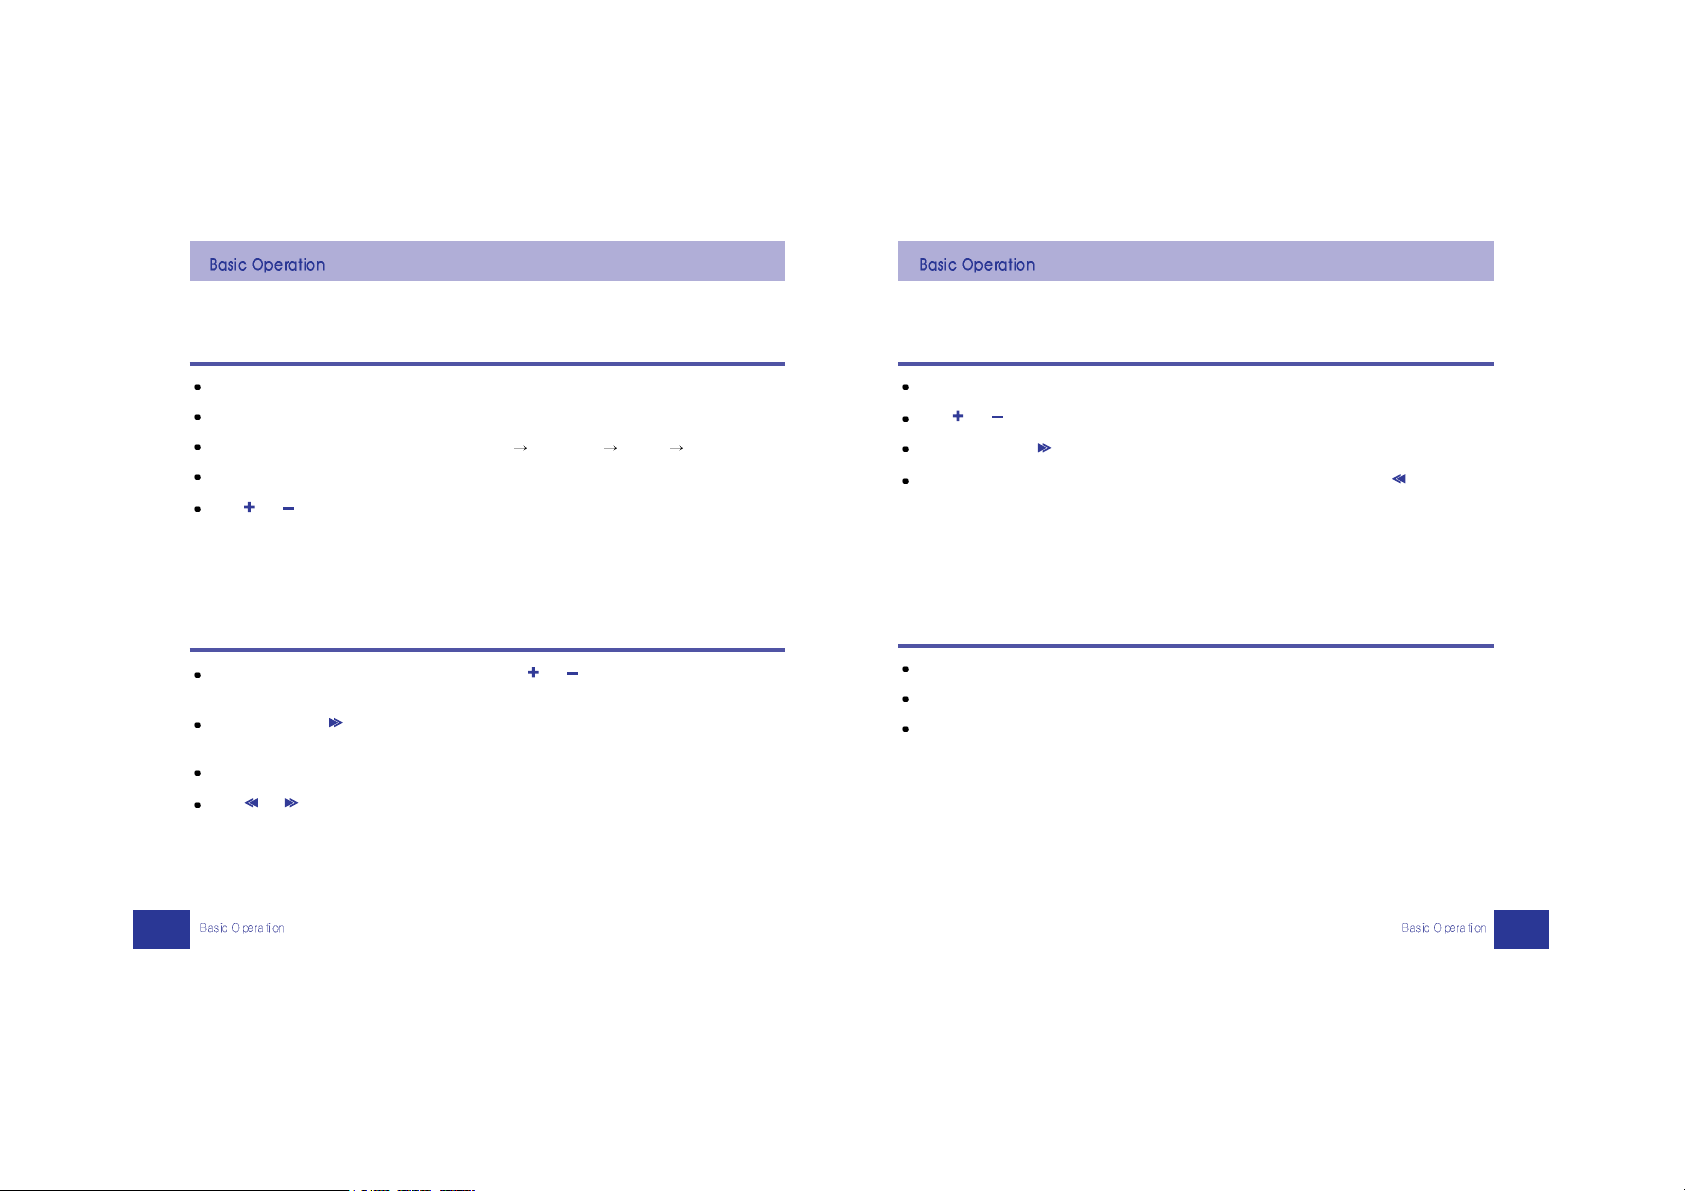
14
Connect Earphone
Connect the other A/V devices through LINE-IN cable.
Push the HOLD button to direction to close all the
buttons.
Connect USB terminal of PC through supplied USB
cable.
XM-200 Series : Voice Recognition Button
Input Command, File Name, Folder Name, etc by Voice
after pushing the center of Voice Recognition button.
Push and hold the center of Voice Recognition button to
display Menu.
XM-300 Series : Bluetooth Button
Make a call by pushing Bluetooth button when there is a
phone call. Push and hold Bluetooth button to get into
Bluetooth menu.
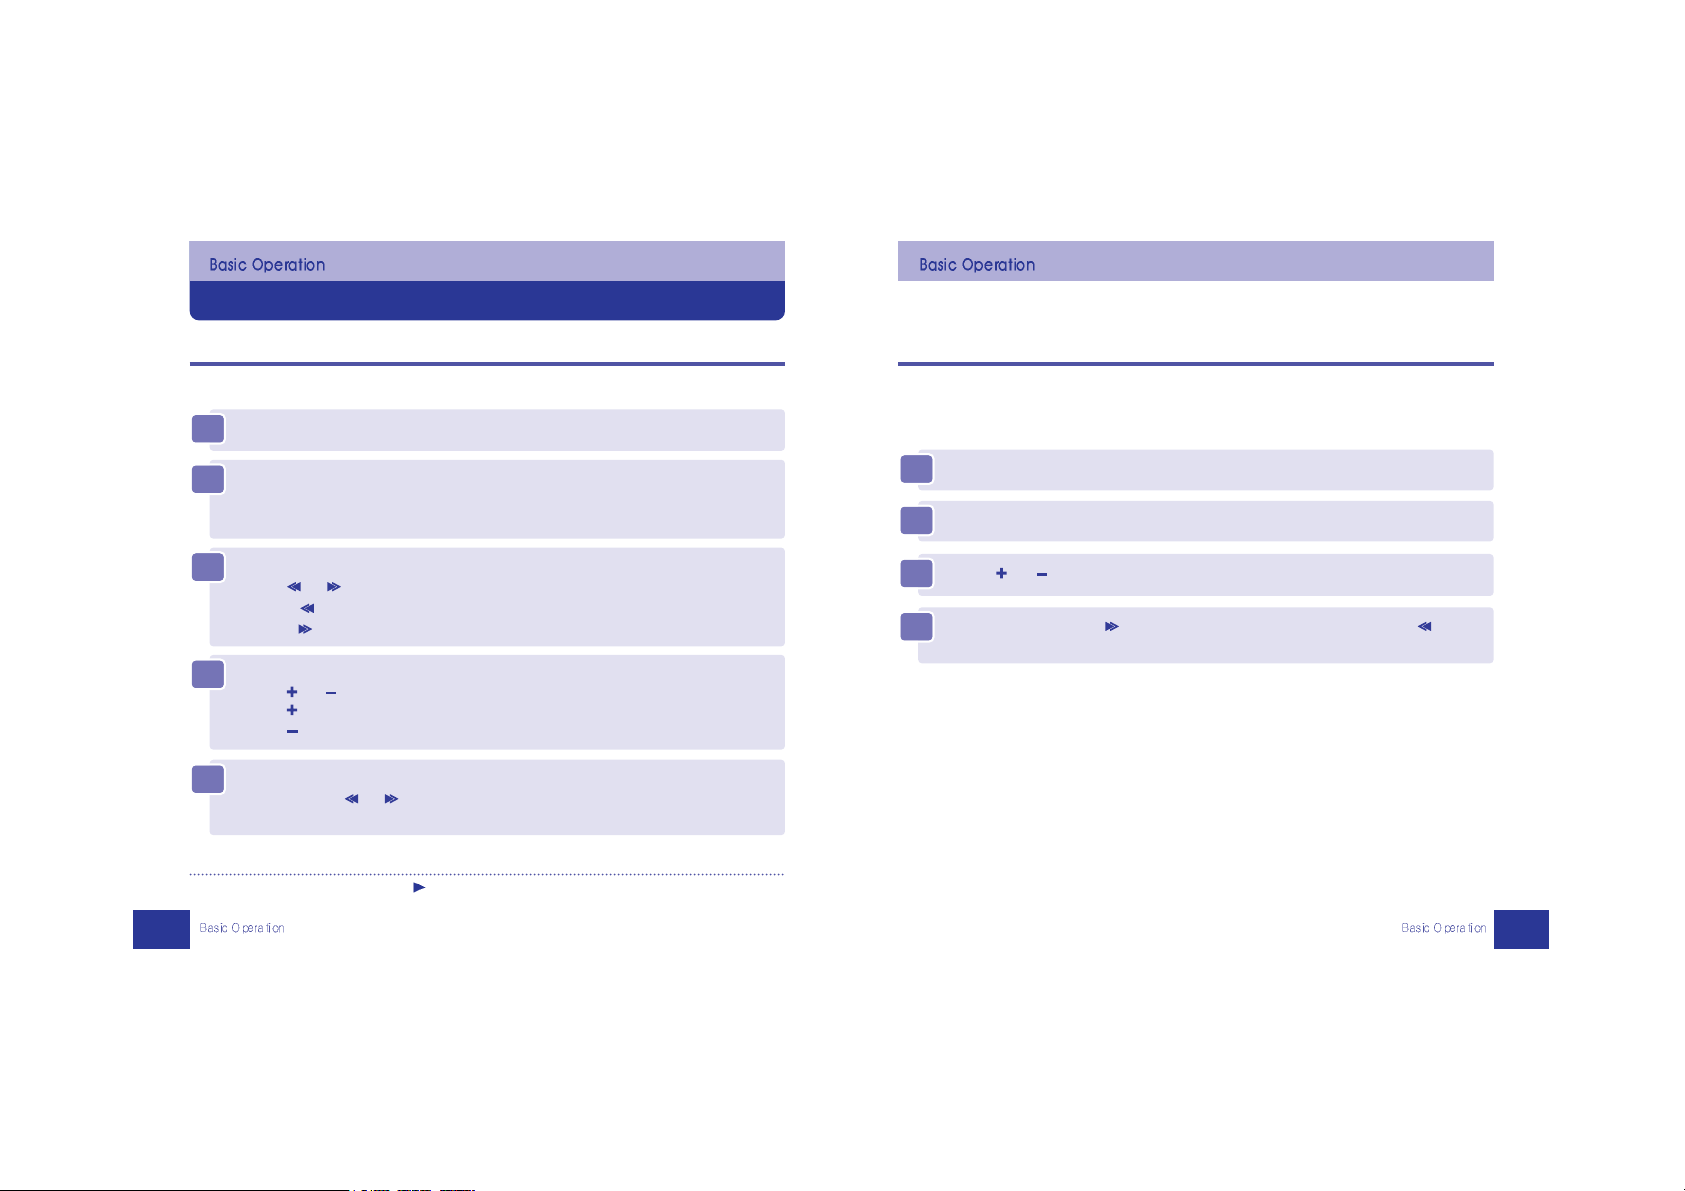
Play and stop music files, Switch to stereo or mono
when listening to FM radio, Turn on or off the power.
Change Mode, erase stored FM Radio channels,
proceed Auto FM Radio channel scan, and set equalizer
/ SRS during listening to music file.
Repeat specific parts, record, move to previous position,
and set a repeat mode during listening to music file.
Operation Explained with a Drawing
Let's Learn Basic Operation
13
Integrated MIC.
Indicating the operation status and playing file
information on LCD.
Push the center of NAVI/MENU button to enter the
Navigation state. Push and hold to enter Menu.
Hear previous playing file or FM program by pushing
of
NAVI/MENU button.
Hear next playing file or FM program by pushing of
NAVI/MENU button.
Control the volume by pushing or of
NAVI/MENU button.
Page 9
Menu
16
Push and hold the center of NAVI/MENU button to see Menu.
Push or of NAVI/MENU button to select a menu.
Push the center or of NAVI/MENU button to select Menu.
To get out of Menu, push and hold the center of NAVI/MENU button or push of
NAVI/MENU button or push A-B/ REC button.
Basic Operation
15
Push PLAY/STOP button to turn on the power. If you push and hold, the power turns off.
Push and hold Voice Recognition button to access its Menu.
Push MODE/EQ button to change Mode (MUSIC FM RADIO VOICE LINE IN).
Push PLAY/STOP button to change FM Mode (Stereo/Mono).
Push or of NAVI/MENU button to control the volume.
Navigation (file browsing)
Push the center of NAVI/MENU button an d co nt ro l or of NAVI/MENU button to find a
file.
Push the center or of NAVI/MENU button to play a selected music file or to display a
selected image file.
Push and hold MODE/EQ button to delete a selected file.
Push or of NAVI/MENU button to move to upper or lower folder.
Other features
Push and hold A-B/REC button while listening to a music file to select Repeat mode.
Push A-B/REC button while listening to FM radio for recording.
Push A-B/REC button to move to previous state.
Page 10
Deleting Files
18
You may be bored of listening to same music repeatedly.
If you want to hear new music files but their is no space left on the player, delete the music file
on XLIVE.
Listening To Music
MUSIC
17
Listen to music with perfect clarity using XLIVE
1
1
Connect the earphone to XLIVE.
2
2
Turn on the power.
Push PLAY/STOP button to turn on the power.
If you push it once again, it plays.
3
3
Select music file
Pu sh or o f NAVI/MENU bu t t o n t o s e l e c t m u s i c .
Contro l to select previous music.
Contr ol to select next music.
4
4
Control volume
Pu s h or o f NAVI/MENU but t o n t o c o n t r o l t h e v o l u m e .
Push to increase the volume.
Push to decrease the volume.
5
5
Forward or Rewind
Push and hold or of NAVI/MENU button to forward or rewind a piece of
music.
* Caution : If push HOLD but t o n t o direction, the buttons don’t work.
1
1
Stop playing.
2
2
Push the center of NAVI/MENU button.
3
3
Control or of NAVI/MENU button to select a file to delete.
4
4
Delete a file by pushing of NAVI/MENU button or cancel by pushing of
NAVI/MENU button after pushing & holding MODE/EQ button.
Page 11
Various Repeated Playback Mode Functions
20
Playback Mode is selected when push & hold A-B/REC button and changes whenever you
push it within a certain time (typically, 3 seconds).
Use of Search Function
Easily Finding file and Setting playback/Repetition
19
The function using Navigation enables you to find a wanted music, recorded, and image file as
soon as possible.
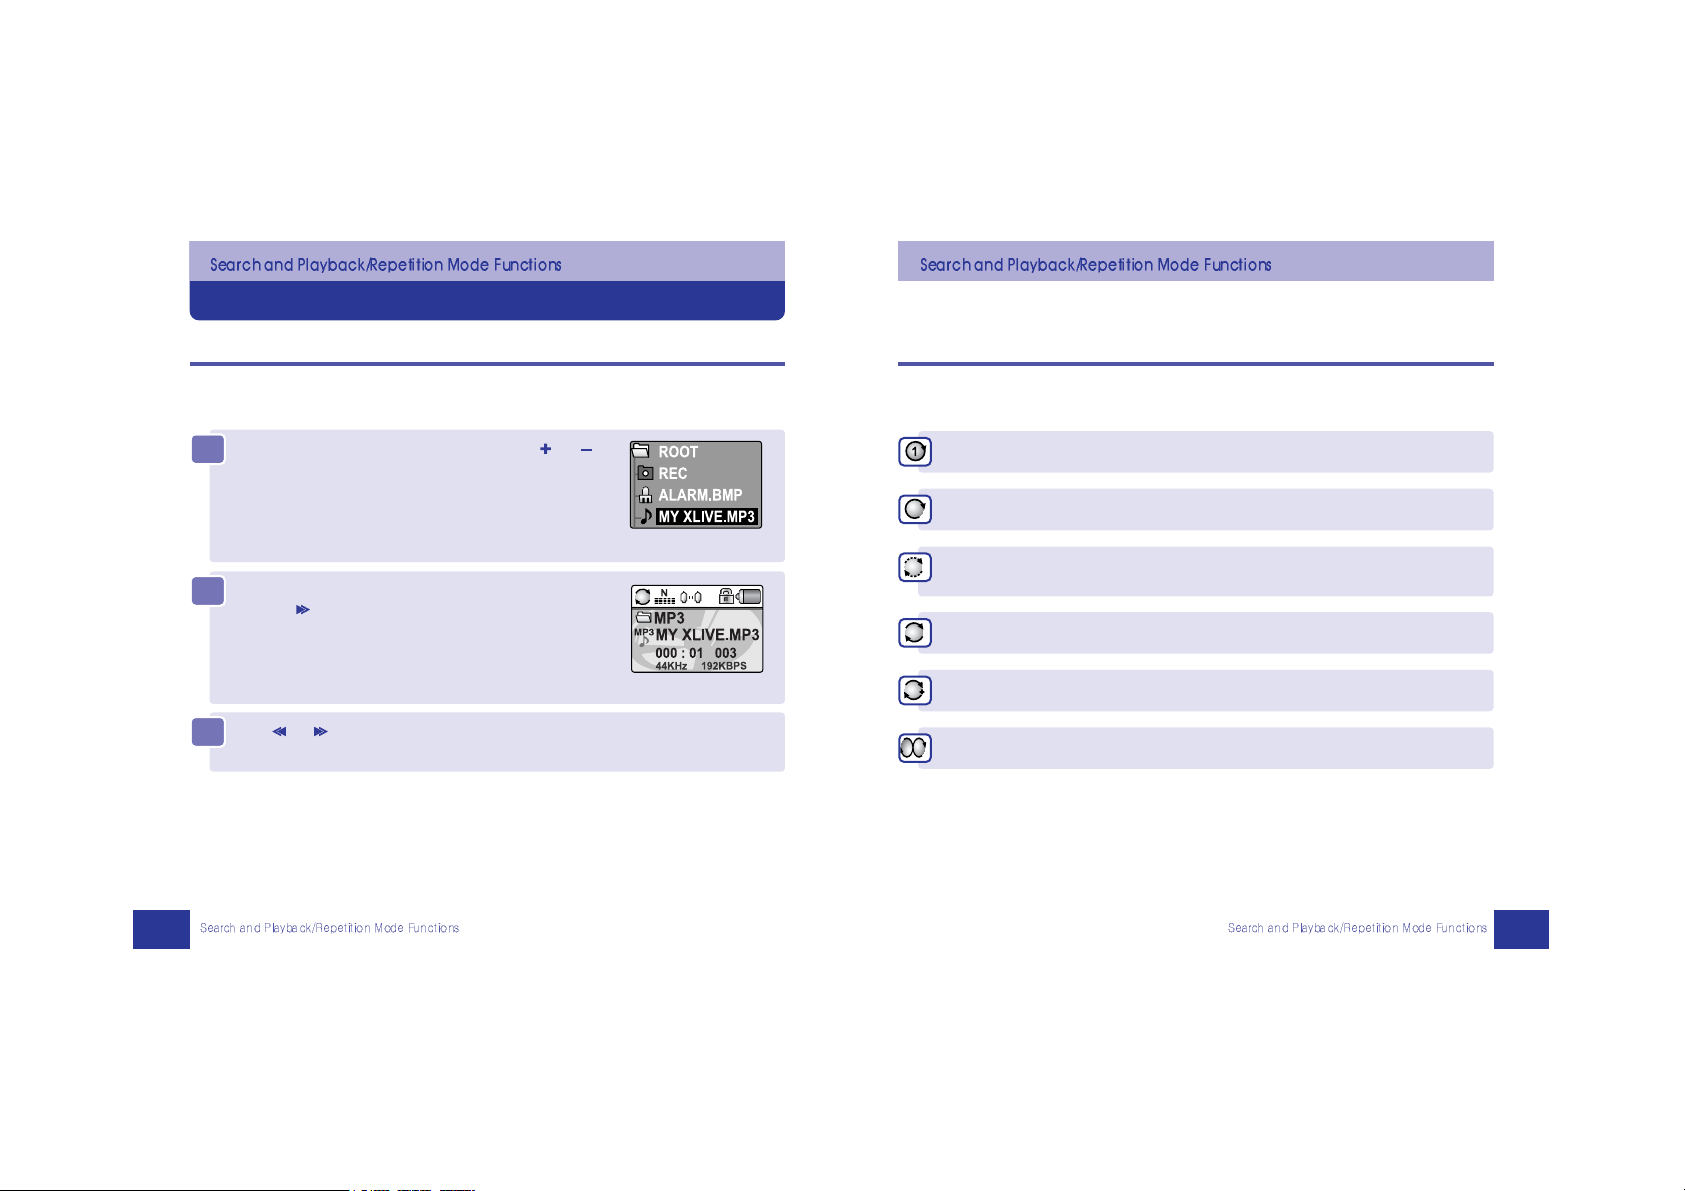
3
3
Push or of NAVI/MENU button to move to upper or lower folder.
2
2
Listen to a music file or see a image file by pushing the
center or of NAVI/MENU button after finding out.
1
1
Find a wanted music or image file by pushing or
of NAVI/MENU button after pushing the center of
NAVI/MENU button in MUSIC mode.
Listen to only one piece repeatedly.
Listen to music of the current folder according to the sequential playback method
Listen to music of the current folder repeatedly for just 5 seconds according to
the introduction playback method
Listen to all music files at the current folder indefinitely and repeatedly .
Listen to all music files indefinitely and repeatedly.
Listen to all music files randomly and repeatedly.
Page 12
Changing EQ by Kind of Music
Dancing Equalizer / SRS World
22
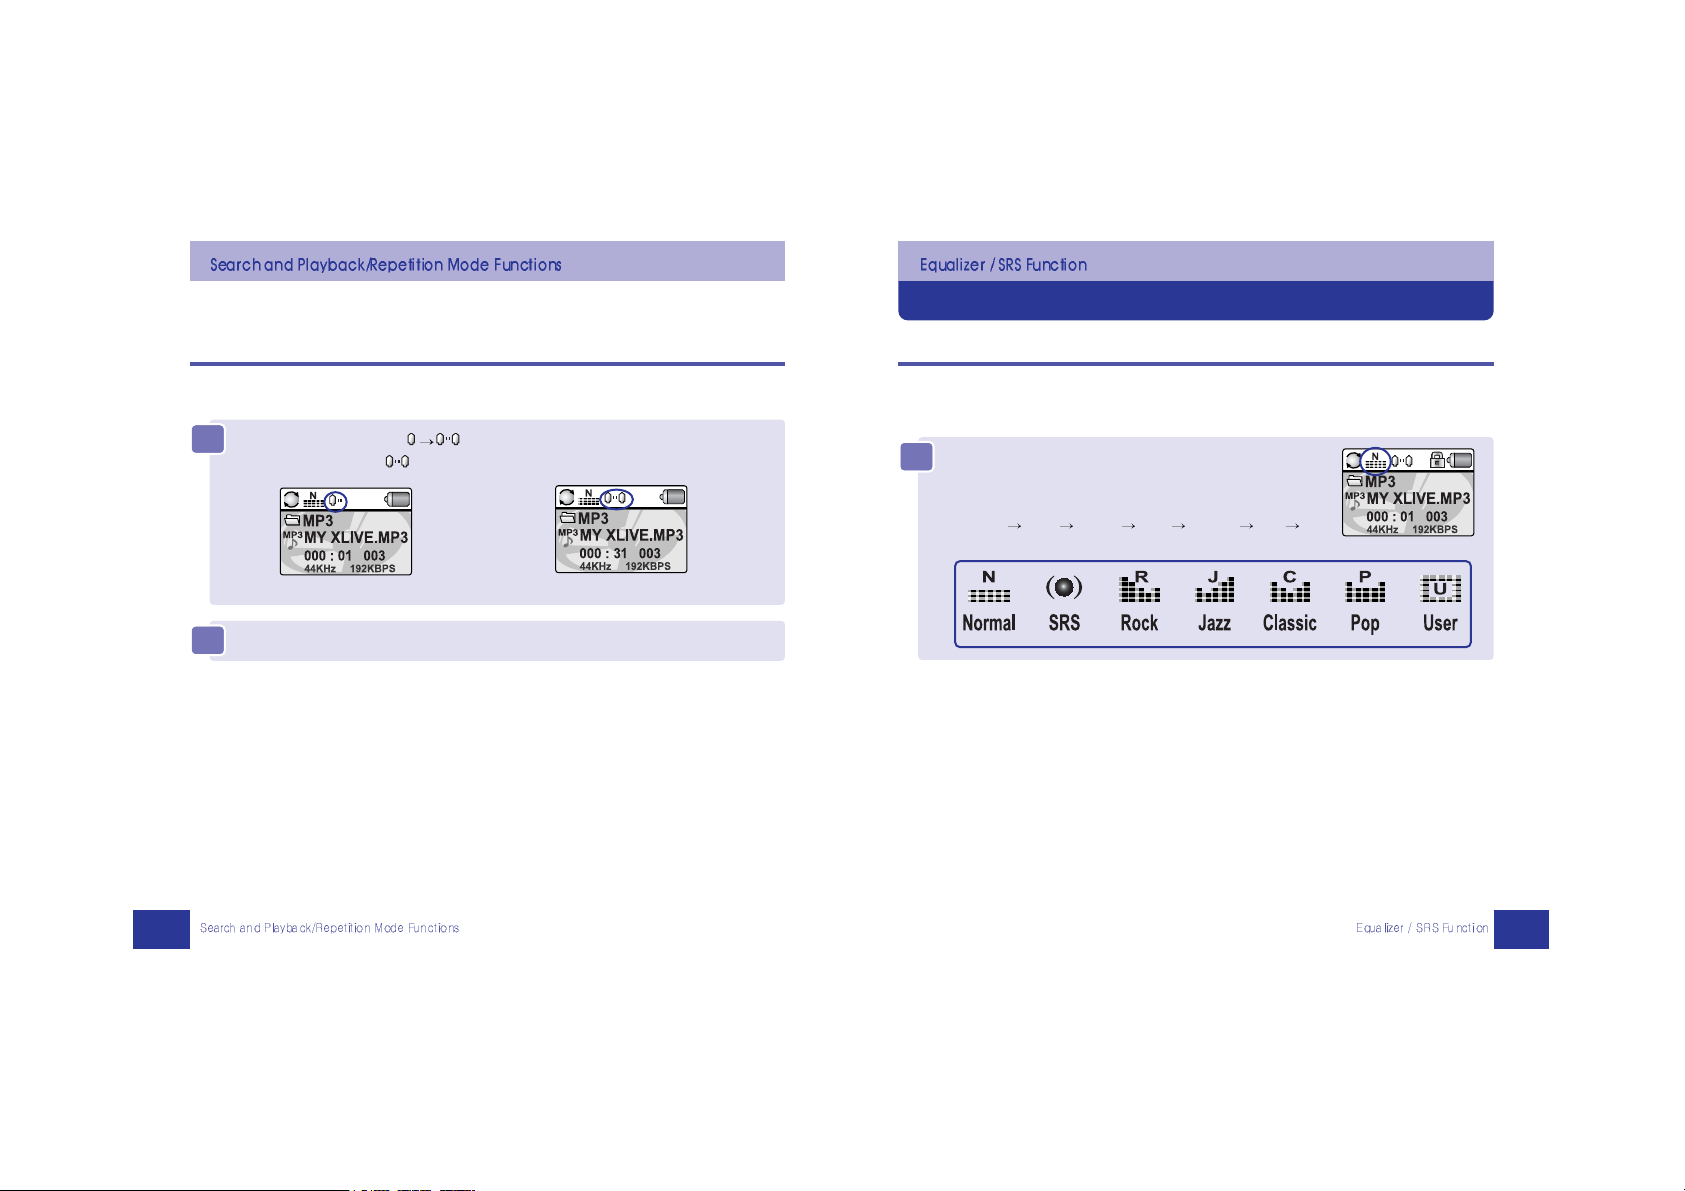
XLIVE supports different tones such as Normal, SRS, Rock, Jazz, Classic, Pop, and User.
Repeated Section Playback Function
21
It can be used when you want to repeatedly listen to a selected section of music.
When you push & hold MODE/EQ button while playback,
the present EQ is displayed and changed whenever you
push it within a certain time(typically, 3 seconds).
Normal
SRS ROCK Jazz Classic Pop
User EQ
1
1
Set the playback section ( ) by pushing twice A-B/REC button.
The section between is reproduced repeatedly
2
2
Push A-B/REC button again in order to cancel repeated section playback.
Page 13

MediaSync Player
MediaSync Program
24
It is the newest technology to displays automatically the lyrics at LCD by inserting lyrics to
music files like MP3/WMA/OGG.
Auto Equalizer
23
If Auto EQ is set in menu, it will be automatically set in accordance with the setting of music file
Tag.
SRS
SRS can be selected in EQ mode like Normal/Rock, and its types(SRS, TRUBASS, WOW) can
be set at menu.
Note
Note
SRS is the registered trademark of SRS Labs. Inc.
WOW technology is subject to license of SRS Labs. Inc.
SRS is the most representative 3D sound technology.
MERIT : WOW-Surround, TRUBASS-BASS
1
1
Install and execute the program at your PC
after the downloading
MediaSync Program”
at our provided CD or our homepage
(www.myxlive.com).
2
2
Save after searching the lyrics information using MediaSync Player.
[Note] Click
F1 key at the working of program to see the detailed usage of
MediaSync Player
3
3
It displays the lyrics at screen during playing music file after copying the lyrics
inserted music file to XLIVE.
When you push & hold MODE/EQ button while playback,
the present EQ is displayed and changes whenever you
push it within a certain time(typically, 3 seconds).
Normal
SRS ROCK Jazz Classic Pop
User EQ
Select “WOW” and “TRUBASS” at “SRS” menu.
(MUSIC
SRS)
Note
Note
Select LYRIC SET using NAVI/MENU button (MUSIC LYRIC)
Select “ON” to display lyrics, and the default is “OFF”.
Page 14

Lyrics Editor
Lyrics File Edition
26
It is the standard method to display the lyrics at LCD after reading the separated lyrics file from
music file automatically while playing the music file.
MediaSync Editor
25
Install and execute the program at your PC after the downloading
MediaSync Editor” at our
provided CD or our website (www.myxlive.com) to edit the lyrics in music file or insert the lyrics
directly.
1
1
Install and execute the program at your PC after downloading Lyrics Editor at
our assigned website(www.hiker.org.il/lyrics.htm).
Refer to our website(www.myxlive.com) about its detailed usage.
2
2
Make the lyrics file using Lyrics Editor Program
[Note] Lyrics file name must be same as music file, and its extension name has to be
”LRC”. For example, lyrics file name of ”YESTERDAY.MP3” is ”YESTERDAY.LRC”.
3
3
It displays the lyrics at screen automatically while playing music file after
copying the music file and lyrics file together to XLIVE.
[Note] Click ‘help’ icon at the working of program to see the detailed usage of MediaSync
Editor.
Note
Note
Select LYRIC SET using NAVI/MENU button (MUSIC LYRIC)
Select “ON” to display lyrics, and the default is “OFF”.
Page 15

Manual Frequency Searching
When You Intend To Listen Wanted Broadcast
28
Switching and Listening To Radio Mode
When You Want To Enjoy FM Radio Broadcast
27
2
2
Control the volume by pushing or of NAVI/MENU button.
1
1
Push MODE/EQ button.
FM RADIO screen is displayed on LCD.
3
3
If you want to select either Stereo or Mono, please push PLAY/STOP button.
1
1
Push the center of NAVI/MENU button during listening to
FM Radio to go to Manual Mode.
2
2
Push or of NAVI/MENU button to change frequency.
Auto Frequency Searching
Auto Scan automatically tracks the next channel by pushing and holding or
of NAVI/MENU button.
Push PLAY/STOP button if you want to stop Auto Scan.
Mono Stereo
Page 16

30
As a function to establish automatically Preset, it registers as Preset by scanning all frequency.
When You Intend To Save Wanted Broadcast
When You Intend To Save and Listen Wanted Broadcast
29
1
1
Push the center of NAVI/MENU button during listening to
FM Radio to go to Manual Mode.
Select a channel to be saved using frequency searching
function.
2
2
Push and hold A-B/REC button to save channel.
Channel number is assigned automatically from No. 1 to
No. 20.
Listening To Saved Broadcast
1
1
Push the center of NAVI/MENU button to go to Preset
Mode.
2
2
Push or of NAVI/MENU button to listen to previous or next channel.
Function of Auto Scan Save
1
1
Push the center of NAVI/MENU button to go to Manual Mode.
2
2
Push and hold MODE/EQ button to scan all frequencies and save channels
automatically.
It is possible to save up to 20 channels.
Just push PLAY/STOP button if you want to stop Auto Scan.
Deleting Saved Frequency (Preset Delete)
1
1
Push the center of NAVI/MENU button to go to Preset
Mode.
2
2
Push or of NAVI/MENU button to select channel to be deleted.
3
3
Push and hold MODE/EQ button to delete channel.
The next channel shows up when deleting CH 03.
Please continue to push & hold MODE/EQ button if you
want to continue deleting.
Page 17

Voice Recording
Voice Recording By One Touch
32
The function enables you to either record lectures of your professors during class or study
foreign language for yourself.
To Record Broadcasting
When You Intend To Record Broadcast while listening
31
3
3
Push A-B/REC button to start recording.
Note
Note
Select ”ON” for voice recording at VAD mode using NAVI/MENU button
(RECORD
VAD ON). It records the recognized voice only in high quality
by using VAD(Voice Activity Detector) that saves the memory space and
power consumption.. The default setting is “OFF”.
To Record Wanted Broadcast While Listening
Just push A-B/REC button!
To Stop the Recoding
Again push A-B/REC button!
The recorded files are saved in REC Folder in the form of FMRCxxx.MP3, and recording
occurs as numbers increase depending on recorded files.
To Stop Temporarily Recording
Push PLAY/STOP button to stop temporarily!
Re-pushing of PLAY/STOP button restarts the recording again.
To play Recorded Broadcast
Push the center of NAVI/MENU button or of NAVI/MENU
button after selecting a wanted recorded file in REC Folder
by implementing file browser in MUSIC mode.
1
1
Push MODE/EQ button to display VOICE RECORD mode.
2
2
Push or of NAVI/MENU button to change sampling
and bit rate of recording file.
Page 18

To Record Music Contained in Separate Device
Recording Files of Separate Device
3433
To Stop Voice Recording
Push A-B/REC button.
The recorded file is saved in REC Folder in the form of VORCxxx.MP3 file.
To Stop Temporarily Voice Recording
Push PLAY/STOP button to stop temporarily.
Re-push PLAY/STOP button if you want to resume the recording
To Listen To Recorded Voice
Push PLAY/STOP button immediately after stopping recording or push the center of
NAVI/MENU button or of NAVI/MENU button after selecting a wanted file in REC
Folder by implementing file browser at MUSIC mode.
3
3
Push or of NAVI/MENU button to change sampling and bit rate of recording
file.
2
2
Push the center of MODE/EQ button to display LINE IN
mode.
1
1
Please connect the separate device to 'Line In' using our provided Audio cable.
4
4
Push A-B/REC button to start recording.
Page 19

What is Voice Recognition?
Find & Operate a File or Folder By Voice
36
XLIVE provides the up-to-date Voice Recognition function that is possible for operating its
button by speaking a command and searching or playing by talking a music folder or file.
And XLIVE’s Voice recognition is the very convenient way that it is available for making a use
not to save your voice in advance.
35
Note
Note
It records as CD SYNC function if it set the different value(second) excepting
”OFF” at CD SYNC mode of the operation environment (RECORD
CD
SYNC). The recording file is to be saved as new file in case of not
recognizing a sound within the setting value(e.g. 2 seconds) at CD SYNC
mode, not saved as one file.
This function is to record each song as each file in case of recording all
songs of CD played at audio device through LINE IN.
The default setting is ”OFF” and 2 seconds is adequate.
To Stop Recording
Push A-B/REC button.
The recorded files are saved in REC Folder in the form of AUDIxxx.mp3.
To Play Recorded File / To Stop Temporarily Recording
Environment Setting
Push and hold Voice Recognition button to display Menu.
DISABLE : Not used.
COMMAND : Carry out XLIVE button function by speaking
Command, and the command are as follows. Please refer to the
specific and upgrade command at our website (www.myxlive.com)
Usage
Say the wanted command or file name or folder name after pushing Voice
Recognition button.
It is available for finding up to maximum 500 songs, and replays the most similar song
automatically after searching.
- MUSIC mode : PLAY(means music start), STOP(means
music stop), FORWARD (means next song), BACKWARD
(means previous song),VOLUME UP,VOLUME DOWN,
FILE NAME : Search and play music by file name
DIRECTORY : Search and play music by folder name
Page 20

Usage of Image File Viewer
JPEG/BMP File Viewer
38
To See a various picture file prepared by user at XLIVE. (JPEG VIEWER : XM-200 series)
XLIVE Introduction Window Drawn Up by User
Edit or Revise The Introduction Image Directly
37
You can revise and edit the wanted introduction screen personally.
1
1
Configure BMP file to the screen of 96 x 64 size using the
picture edition program at your PC and save its file name
as
XMSTART.BMP .
2
2
Copy XMSTART.BMP to ROOT Directory of XLIVE after connecting XLIVE and
PC using USB cable.
3
3
After the disconnection of USB cable, select “STARTBMP”using NAVI/MENU
button.
(SYSTEM
SYS SETUP STARTBMP)
1
1
Configure and save BMP file to the screen of 96*64 size using the picture edition
program at your PC.
JPEG file can be used regrardless of the image size.
The extension of BMP/JPEG file have to be “BMP/JPG”.
2
2
Copy JPEG/BMP file to XLIVE after connecting XLIVE and PC using USB cable.
3
3
Push the center of NAVI/MENU button to move to
Navigation(file browsing) function after disconnecting
USB cable.
4
4
Push or of NAVI/MENU button to select JPEG/BMP
file. Display the selected file by pushing the center of
NAVI/MENU button or of NAVI/MENU button.
5
5
Push one of any button to move to Navigation mode.
4
4
After the introduction window is progressed without problem,
it is reset and starts again.
Page 21

Bluetooth Information
Bluetooth Operation Environment Setting(XM-300 series)
40
It explains Bluetooth information of XLIVE.
1
1
Push and hold Bluetooth button or the center of NAVI/MENU button to get in
menu state.
Push or of NAVI/MENU button when moving main-menus and sub-menus
and push the center of NAVI/MENU button to select BT INFO.
(BLUETOOTH
BT SETUP BT INFO)
2
2
Push and hold the center of NAVI/MENU button or push of NAVI/MENU button
or push A-B/REC button to get out of menu.
What is Bluetooth?
Let's see Optimal range(XM-300 series)
39
Bluetooth enables mobile phone, PDA, computer and the other digital electric appliances to
communicate to one another wirelessly when they are near to each other.
Page 22

42
Bluetooth PINCODE Setting (Default : Four digits 0000 )
41
A Bluetooth PinCode is the password necessary for XLIVE to pair with Bluetooth phone. During
the pairing, when the password is asked, you have only to enter XLIVE’s PinCode.
Please check it before using the Bluetooth function.
If the Bluetooth phone’s pincode is six digits, the number of XLIVE (Default : Four digits
‘0000’) must be adjusted to six digits.
PinCode must be identical for file transmission between XLIVEs.
Select PinCode setting to see or change the current password of XLIVE after the selection
of BT SETUP at the Bluetooth Menu.
Push A-B/REC button to cancel if an error occurs during Pincode setting.
1
1
Select PINCODE using NAVI/MENU button.
(BLUETOOTH
BT SETUP PINCODE)
Then the current pincode information displays
as the screen.
2
2
Push or of NAVI/MENU button to remove or add Pincode. Change a
number of the selected Pincode by pushing or of NAVI/MENU button.
3
3
Push and hold the center of NAVI/MENU button when the
wanted Pincode is completely set.
Then the revised Pincode and
YES/NO displays.
SECURITY
Phone Type
1
1
Select PHONE TYPE using NAVI/MENU button
(BLUETOOTH
BT SETUP PHONE TYPE)
2
2
Select your Phone Type by pushing or of MENU/
NAVI button and push the center of NAVI/MENU button.
SECURITY LEVEL must be identical for sending or receiving the file between two units of XLIVE
using FTP (File Transmission Program).
4
4
Push or of NAVI/MENU button to select YES .
And save the revised Pincode by pushing the center of NAVI/MENU button.
Page 23

44
Bluetooth Connection (XLIVE-Bluetooth Device)
43
To use Bluetooth HEADSET and HANDSFREE function, PAIRING menu is to connect between
Bluetooth device and XLIVE, and READY menu is to connect the most recently paired
Bluetooth device with XLIVE.
Connection of Bluetooth phone and XLIVE
Re-connection of Bluetooth phone and XLIVE
1
1
Select PAIRING using NAVI/MENU button
(BLUETOOTH
CALL PAIRING)
2
2
Execute pairing process on Bluetooth phone.
(Please see the manual of mobile phone for the pairing)
The initial PINCODE of XLIVE is ‘0000’. If pairing is
completed, it doesn’t require this process again.
But you have to follow the process again to connect to a
3
3
If pairing process is successful, it
displays .
In case of power OFF/ON of XLIVE or Bluetooth phone under the paired status between XLIVE
and Bluetooth phone.
1
1
Select READY using NAVI/MENU button
(BLUETOOTH
CALL READY)
2
2
Perform the connection mode at Bluetooth phone.
(Refer to the manual of Bluetooth phone)
4
4
If you complete connection process, it
displays Bluetooth logo instead of
.
different Bluetooth phone.
Push NAVI/MENU button to cancel the pairing.
Page 24

46
How To Use Bluetooth Headset
Bluetooth Headset(XM-300 series)
45
In case Bluetooth phone supports Headset Profile, if Bluetooth phone paired and connected
with XLIVE rings, you can directly receive while listening to music using XLIVE.( Ref. Page 43)
Receiving and Disconnecting Calls While Listening To Music
1
1
When there is a phone call, the music automatically stops.
When you get a phone call, this graphic is displayed.
2
2
Push Bluetooth button to receive a call.
3
3
When connected, this graphic is displayed.
Talk to the other party.
4
4
To disconnect the call, push Bluetooth button.
When you complete the call, the previous mode operates again.
Note
Note
RING.mp3 in the REC folder makes the ring sound.
You can overwrite this file by naming the new file “RING.MP3“ and it will
automatically delete the previous ring sound.
Usage of Sony Ericsson P900 model
1
1
When there is a phone call, the music automatically stops and
displays the right.
Then push Bluetooth button to talk.
2
2
Talk to the other party.
3
3
To disconnect the call, push Bluetooth button.
When you complete the call, the previous mode operates again after 3 seconds.
Call Transfer
Call Transfer feature is to change CALL DEVICE under the connection between XLIVE and
Bluetooth phone. It can talk over XLIVE by pushing Bluetooth button of XLIVE while
communicating with the other party by Bluetooth phone.
Page 25

Bluetooth Handsfree(XM-300 series)
4847
Making a Call While Listening To Music
When you want to make a call through a mobile phone, XLIVE has to be under connection with
mobile phone.
Recording during a call
This section explains how to record a telephone conversation.
1
1
Push Bluetooth button to make a call to the last calling
number of Bluetooth phone.
The music stops automatically. Then Bluetooth phone makes a
call to the last calling number. But in case it doesn’t call and
displays the sending call list only, push Bluetooth button of
XLIVE once more.
2
2
When connected, it displays this
graphic. Tal k t o t h e o t h e r p a r t y .
3
3
To disconnect the call, push
Bluetooth button.
When you complete the call, the
previous mode operates again.
1
1
After call is connected, if you want to record, push A-B/
REC button and then you can record the conversation.
The recorded voice files are stored in the form of
BTRCxxx.mp3 according to their respective serial numbers.
2
2
Push A-B/REC button to stop
recording.
3
3
If you want to listen to the recorded
call, you have to play BTRCxxx.mp3
in the REC folder by implementing file
browsing.
How To Use Bluetooth Handsfree
In case Bluetooth phone supports Handsfree Profile, if Bluetooth phone paired and connected
with XLIVE rings, you can directly receive while listening to music using XLIVE.( Ref. Page 43)
Receiving and Disconnecting Calls While Listening To Music
1
1
When there is a phone call, the music automatically stops.
When you get a phone call, this graphic is displayed.
3
3
You can select “YES” or “NO” on LCD. If you want to call, you have to select
“YES” by pushing the center of NAVI/MENU button. But if you don’t want to call,
you have to select “NO” by pushing the center of NAVI/MENU button.
5
5
Next is same as Bluetooth Headset.
2
2
Caller ID is displayed. (Bluetooth phone connected with XLIVE must support Caller ID
display service.)
4
4
When connected after the selection of “YES”, this graphic
is displayed.
Page 26

50
In Case Of Using LAST CALL Menu
2
2
Push the center of NAVI/MENU button after selecting LAST CALL by pushing +
or - of NAVI/MENU button.
1
1
When pushing Bluetooth button, LAST CALL, DIALING and PHONE BOOK appear
as the screen. The m u s i c s t o p s a u t o m a t i c a l l y .
3
3
The XLIVE displays the waiting state as the screen, and
Bluetooth phone makes a call to the last calling number. But
in case it doesn’t call and displays the sending call list
only, push the Calling button of Bluetooth phone
4
4
When the call is connected, the right screen comes up. Make a
call.
5
5
If you want to end the call, you have to push Bluetooth button.
After completing the call, the previously performed mode works again.
It is same as Bluetooth Headset
49
Call Transfer / Recording during a call
Making A Call While Listening To Music
When pushing Bluetooth button after connecting XLIVE to Bluetooth phone, LAST CALL,
DIALING and PHONE BOOK appear as the screen.
The function must be supported by the Bluetooth phone.
The numbers and characters shown at the screen while making a call is to input the required
extension numbers or characters from the receiving phone.
Push the center of NAVI/MENU button after selecting the
required extension numbers or characters by pushing
or of NAVI/MENU button to input them.
Page 27

5251
In Case Of Using DIALING Menu
1
1
Push the center of NAVI/MENU button to run DIALING.
The numbers possible for you to dial are displayed.
2
2
After selecting the numbers by pushing or of NAVI/MENU button, push the
center of NAVI/MENU button. And push of NAVI/MENU button to remove the
input number.
3
3
Push Bluetooth button after selecting the wanted numbers to make a call.
4
4
When the call is connected, the graphic appears.
Talk to the other party.
5
5
If you want to end the call, push Bluetooth button.
After completing the call, the previously performed mode works again.
In case of using PHONE BOOK Menu
1
1
Push the center of NAVI/MENU button to carry out Phone
Book.
Then name and telephone number are displayed at the
screen.
2
2
Push the center of NAVI/MENU button after selecting the wanted name or
telephone number by pushing or of NAVI/MENU button.
4
4
If you want to end the call, you have to push Bluetooth button.
After completing the call, the previously performed mode works again.
3
3
When the call is connected, the screen comes up.
Make a call to the other party.
Note
Note
Preparation of Phone Book
Save after naming file name “BT_ADDR.TXT” certainly after drawing up Phone
Book(ex. Zenocom_822314214107) using TEXT Editor Program at your PC.
Click “Enter Key” of your PC surely after entering each name and telephone
number that have be prepared by using English/Number/Hyphen only.
(Ex. ZENOCOM-82314214107
.
Copy “BT_ADDR.TXT” to ROOT Directory of XLIVE after connecting XLIVE and
PC using USB cable.
Page 28

File Transmission By Using Bluetooth
Bluetooth File Transmission(XM-300 series)
53
Bluetooth File Transmission is to wirelessly send or receive files between two units of XLIVE by
using Bluetooth Serial Profile.
Select BT INFO at BT SETUP of Bluetooth Menu and check Device Address, PinCode setting
and Security Level before file transmission.
Transmitted file is saved at Download folder. In addition, push & hold the center of NAVI/MENU
button or push A-B/REC button to previous state or cancellation.
54
1
1
Select FTP using NAVI/MENU button.
(BLUETOOTH
FTP)
2
2
The screen comes up when you push the center of NAVI/MENU button after
“READY” selected for receipt-wanted device and “SEARCH” selected for
sending-wanted device.
5
5
File browsing is automatically implemented when it is
connected to the other device.
<Sending Device> <ReceivingDevice>
3
3
The sending-wanted device is displayed as follow when finding out its neighboring
Bluetooth Device(XLIVE).
<In Case Of Finding Out Device> <In Case Of Not Finding Out Device>
4
4
In case of finding out Device, select Device Address of
receipt-wanted device by pushing or of
NAVI/MENU button and push the center of NAVI/MENU
button.
6
6
After selecting files to be sent by pushing or of NAVI/MENU button, push
the center of NAVI/MENU button.
Page 29

Configuration Menu By User
My XLIVE Configured With My Own Choice
56
We provide the menu for user so that they can configure the operation environment for
themselves. However, the menu may be modified in accordance with Firmware Version.
55
7
7
Files to be sent and transmission progress are shown as follows.
<Sending Device> <ReceivingDevice>
8
8
If finish successfully, “Transfer Complete” displays at sending-wanted device and
“Receive Complete” displays at receipt-wanted device.
9
9
Push the center of NAVI/MENU button to continue File Transmission.
But if wanting to end and go to the previous mode, push A-B/REC button.
BLUETOOTH
(XM-300
series)
CALL
FTP
BT SETUP
DISABLE
COMMAND
FILE NAME
DIRECTORY
SRS
REPEAT
EQ
USER EQ
AUTO EQ
RESUME
TEMPO
S.FADE-IN
LYRIC SET
TAG USE
VOICE
(XM-200
series)
MUSIC
FM RADIO
AUTO SCAN
FM SELECT
REC QUAL
REC VOL
CD SYNC
VAD
MUSIC
FM RADIO
VOICE
LINE IN
RECORD
MODE
SYS INFO
LANGUAGE
DISPLAY
POWER OFF
MIC
BATTERY
SYS SETUP
SYSTEM
Page 30

57
VOICE RECOGNITION
Voice Recognition/MUSIC
58
Easy Menu Operation
Push & hold the center of NAVI/MENU button to go to Menu. There are six main
menus and their sub menus.
Main-menus and their sub-menus can be moved by pushing or of
NAVI/MENU button.
Entering Into Sub Menus from Main Menus
Push the center or of NAVI/MENU button to enter into sub menus.
(The change of color shows which menu is selected.)
Getting Out Of Current Menu
Push & hold the center of NAVI/MENU button or push of NAVI/MENU button or
push A-B/REC button to get out of current menu.
If selecting DISABLE, it does not work.
If selecting COMMAND, FILE NAME, DIRECTORY,
Voice Recognition starts to work.
SRS(Sound Retrieval System)
SRS is the newest technology to enable you to feel
the strong bass and 3D stereo sound.
Enjoy music by selecting the most suitable value of
WOW and TRUBASS(0~63).
REPEAT
The various repeated playback function can be set.
(Ref. p.20)
MUSIC
Page 31

MUSIC
60
MUSIC
59
USER EQ
It controls 5 frequencies to select equalizing that
user wants.
EQ
The function provides a different EQ by kind of
music.
AUTO EQ
During operation, XLIVE automatically selects
equalizer after detecting Tag information of music
file.
SOUND FADE IN
It slowly increases the volume to prevent rapid
increase of volume at selecting ’ON’.
TEMPO
It controls the playback tempo of music file.
The default value is 100 and the value can be
changed from 50 to 200 by 10.
RESUME
It selects a state for Power On.
When By File is selected, it resumes the first part of
the lastly played file. If By Second is selected, it
resumes the last parts of the last file. When Disable
is selected, it resumes the first music stored in it.
LYRICS SET
It displays lyrics at LCD.
Lyrics is shown at the selection of ’ON’ and not at
the selection of ’OFF’ in case of lyrics supporting
music file.
TAG USE
The function indicates the information such as title,
singer, etc., of music file. It displays file name if
music file don’t have any TAG information despite
the selecting ’ON’.
Page 32

RECORD/MODE
62
FM Radio/RECORD
61
VAD (Voice Activity Detector)
It records the recognized voice only using VAD that saves the
memory space and power consumption.
The default is “OFF”.
CD SYNC
It records each song as each file in case of recording all songs of
CD played at audio device through LINE IN.
The default setting is “OFF”.
REC VOL
It setup record volume level that users want.
FM Radio
MODE
Push or of NAVI/MENU button to select MUSIC,
FM RADIO, VOICE, LINE IN.
REC QUAL
It sets up sampling and bit rate during recording
BLUETOOTH, FM RADIO, VOICE, and LINE IN.
RECORD
MODE
AUTO SCAN
It performs the function of Auto Scan Save at FM
RADIO mode.
FM SELECT
Set FM frequency range and searching gap.
Except for JAPAN, you have to select 'DEFAULT'.
Page 33

SYSTEM
64
SYSTEM
63
SYS IFO
It displays System Information such as the current software version.
DISPLAY
Brightness : Control the brightness of backlight
Contrast : Control the light and darkness of LCD
Backlight : Control the operation time of backlight.
LANGUAGE
To display the song title of music file, select the language
in the menu to comply with the language used in
operating system of your PC.
SYSTEM
POWER OFF
SLEEP : After assigned time, the Power is Off.
STOP : After assigned time during stop state, the
Power is Off.
SYS SETUP
It performs the functions such as FONT SETTING,
INITIALIZE (Defau lt Se tt ing), UPGRADE, FORMAT
AND STARTBMP.
BATTERY
Selects the type of battery that will be inserted.
The default is “ALKALINE”.
MIC (Default : XM-200 Series-Player/XM-300 Series-Ear phone)
It determines MIC for Bluetooth communication, Voice
Input for Voice Recognition, and Recording.
Page 34

http://www.myxlive.com
Our On-Line Services
66
You can obtain information on our company profile and products.
We are ready to give answers to your questions or inquiries.
You are able to make a various functions such as firmware(system software) upgrades and
improve persistently performances of products through website.
When you join our membership program, you can also be provided on-line after-sales service
and receive newsletters on upgrade.
Install USB Mass Storage Driver in Windows 98
Install USB Driver on My PC
65
If you want to connect XLIVE to PC through USB cable, Windows ME, Windows 2000, and
Windows XP install the driver automatically because they have their own USB Mass Storage
Drivers. However, as for Windows 98 users, you must install manually the Driver as follows.
1
1
Put provided CD into PC’s CD Drive.
Select Win98 driver directory of CD.
2
2
Execute install. bat in Win98 driver directory.
3
3
Re-boot PC.
The movable hard disk is generated in your PC window when you connect XLIVE to PC
using provided USB cable after re-booting.
Page 35

Font Setting
68
Check if the battery has enough energy before Font setting. If there isn’t enough energy in
batteries while Font Setting, it could damage XLIVE if the power is off.
Firmware
Gradual Upgrade Of Firmware and Font Setting
67
Make backup for important data before upgrading. Check if the battery has enough energy.
If there isn’t enough energy in batteries while upgrading firmware, the power could be off while
downloading the firmware and it could damage XLIVE.
1
1
Download Firmware file at our website(www.myxlive.com) after the connecting
PC and XLIVE using USB cable.
2
2
Transfer the downloaded firmware to ROOT directory of XLIVE.
(If you don’t transfer the firmware file to ROOT folder, the firmware upgrade will not work)
3
3
After the disconnection of USB cable, select
UPGRADE using NAVI/MENU button
(SYSTEM
SYS SETUP UPGRADE)
4
4
After the firmware is upgraded without problem, it is reset and starts again.
You have to configure the Font Setting after upgrading firmware if the characters are
broken.
1
1
Download Font file at our website(www.myxlive.com) after connecting PC and
XLIVE using USB cable.
3
3
After the disconnection of USB cable, select
FONT using NAVI/MENU button.
(SYSTEM
SYS SETUP FONT)
4
4
When Font Setting is complete, the power turns off automatically after displaying a
completion message.
2
2
Transfer the downloaded Font file to ROOT directory of XLIVE.
(If you don’t transfer Font file to ROOT folder, Font Setting will be not work.)
Page 36

How to connect USB Cable
USB Cable Connection Between XLIVE and PC
70
How to insert battery
69
1
1
Open the battery cover.
2
2
Insert the battery.
Be sure to match the + and
ends of the
battery with the diagram inside the battery
compartment.
3
3
Close the battery cover
Note
Note
To avoid corrosion, remove the battery if the player is not to be used for a
long time.
Remove dead battery immediately to avoid damage from corrosion.
When corrosion occurs, clean the battery compartment immediately and
exchange a battery.
Note
Note
Please definitely use our provided USB Cable only for your safe usage.
Page 37

Let's Solve Simple Problems By Ourselves
71
If you think that the product has an error, check the following first.
Product standard
72
I can’t turn the power on
It doesn’t produce
sound.
It produces noise
LCD displays strange
characters
There is a noise when
listening to radio. It is
hard to catch a radio
station
I can’t download files
Power turns off
automatically
Check if the battery is full.
Is Hold key direction?
Check if the volume is in the location of ‘0’.
Check if the earphone is connected correctly.
Check if there is any dirty substance.
If music files get damaged, it could produce noise or
the sound could be paused. Check if the other files have
similar symptom.
Check if the language is correctly chosen.
Turn off powers of any electronic appliances near to XLIVE.
If noise is reduced, it is better to locate XLIVE far away from
the electronic appliances.
If you don’t install earphone, it could be hard to listen to
radio programs. .
Check if the batteries have enough energy.
Check if the USB cable is correctly connected between PC
and XLIVE.
Check if Power OFF(SYSTEM POWER OFF SLEEP/
STOP) mode is “OFF”.
Bluetooth
(XM-300
Series)
Audio
FM Tuner
File support
Bluetooth Spec. 1.1(2.4Ghz)
Class II (0~4dBm)
Headset, Serial, Hands Free
20 Hz ~ 20 KHz
L 30 mW + R 30 mW (maximum volume)
90 dB(MP3)
78 MHz ~ 108 MHz
60 dB
Earphone code antenna
MPEG 1/2/2.5 Layer 3, WMA, OGG, JPG, BMP
8 Kbps ~ 320 Kbps (OGG : 64 Kbps ~ 400 Kbps)
ID3 VI, ID3 V2 2.0, ID3 V2 3.0, ID 3 V2 4.0
MPEG 1/2/2.5 Layer 3
Color LCD (1.1
, 96 X 64)
39 languages
about 36 hours(16 Kbps, 256MB)
about 14 hours
(256MB, MP3, Volume 20, Normal EQ, Bluetooth OFF)
USB 1.1
68 mm X 33 mm X 18 mm
32 g (Excluding battery)
1.5V AAA X 1EA
-5
~ 40
Classification
Item
Specification
Specification
Output Power
Profile
Frequency characteristics
Output Power
Ratio between signal and noise(S/N)
FM frequency range
Ratio between signal and noise(S/N)
Antenna
File type
Bit Rate
Tag Info
MP3 encoding
L C D
Language
Voice recording
Maximum playing time
U S B
Size
Weight
Battery
Range of operation temperature
Page 38

M E M O
Warranty
We guarantee the following.
1. The device passed strict quality test before being produced.
2. When XLIVE gets out of order under normal usage, it could be repaired at the
shop you purchased XLIVE or at our service center within warranty period.
3. When warranty period is over, have to pay for repairing XLIVE. If it is determined that the user
has to pay for repairing even in warranty period, the user has to pay for repairing service.
4. You have to suggest the warranty for repairing.
5. Keep this warranty securely. We don
t issue an warranty twice.
6. This warranty is valid only in worldwide.
Telephone
Name
Warranty period
Name of device
Manufacturing number
Customer
Sales shop
Sales day
Person in charge of warranty
Name
Address
Name
Address
Telephone
Address
Period for keeping parts for repair
For 5 years after shopping sales of XLIVE
Model name
Telephone
Year, Month, Date
#312, ChangKang Bldg., 22, Dohwa-dong,
Mapo-Ku, Seoul Korea (121-812)
one(1) year
82 - 80 - 230 - 4500
After-Sales
Service Center
Page 39

Acknowledging Special Precautions and
the FCC Industry Canada Notice
Cautions
Modifications not expressly approved by the party responsible for compliance could
void the user’s authority to operate the equipment.
FCC compliance Information
This device complies with part 15 of FCC Rules.
Operation is subject to the following two conditions:
1. This device may not cause harmful interference, and
2. This device must accept any interference received.
Including interference that may cause undesired operation.
Information to User
This equipment has been tested and found to comply with the limits for a Class B
digital device, Pursuant to part 15 of the FCC Rules. These limits are designed to
provide reasonable protection against harmful interference in a residential
installation.
This equipment generates, uses and can radiate radio Frequency energy and, if not
installed and used in accordance with the instructions, may cause harmful
interference to radio communications.
However, there is no guarantee that interference will not occur in a particular
installation. If this equipment does cause harmful interference to radio or television
reception, which can be determined by turning the equipment off and on, the user
is encouraged to try to correct the interference by one or more of the following
measures:
Reorient or relocate the receiving antenna.
Increase the separation between the equipment and receiver
Connect the equipment into an outlet on a circuit different from that to which the
receiver is connected.
Consult the dealer or an experienced radio/TV technician for help.
 Loading...