

Page 1
#7201, 7th Dongil Technotown, 823, Kwan yang 2-Dong,
Dongan-Ku, Anyang-Shi, Kyoungi-Do, Korea
Tel : 82-31-421-4107 Fax : 82-31-421-4109
User Manual
XBM-100 series Bluetooth MP3 Player
www.myxlive.com
Thank you for your purchasing XLIVE
Page 2

Thank you for your purchasing XLIVE
XLIVE introduces the technology of Bluetooth for a next generation
multimedia system. You can talk to the others while listening to music
and easily upload and download files wirelessly.
This manual explains the usage of XLIVE, safety, repair and maintenance. Before using XLIVE, read this manual carefully.
Zenocom does its best to satisfy its customers with its advanced
technology of MP3 Player.
Page 3
XLIVE Manual Contents
5
XLIVE Manual Contents
4
06
Notes for Safety
Pay attention to the followings for safe usage of XLIVE
08
Characteristics of XBM-100 series
Let’s learn various features of XBM-100 series
09
Optimal range
Let’s see Optimal range
10
Components
Let’s check the components of XLIVE
11
Operation environment
Let’s see the operation environment of XLIVE
12
Names of each part
Let’s learn the names of each part in detail
14
Basic operation
Let’s learn basic operation
20
New Bluetooth Technology
Bluetooth Headset
28
New Bluetooth Technology
Bluetooth HandsFree
33
New Bluetooth Technology
Bluetooth File Transmission
36
When Listening To FM Radio
When You Want To Enjoy FM Radio Broadcast
41
When Recording Voice
Voice Recording By One Touch
43
Line In Function
Recording Files of Separate Device
43
Search and Playback Mode Functions
Easily Finding file and Setting playback
47
Equalizer / SRS Function
Dancing Equalizer / SRS World
48
Menu Configuration
My XLIVE Configured With My Own Choice
54
How To Install USB Mass Storage Driver
Install USB Driver On My PC
55
Homepage Service & Support
Our On-Line Services
56
The way to upgrade
Gradual upgrade of Firmware and Font Setting
58
About a power
Charging With USB Cable
59
Confirming error
Let’s solve simple problems by ourselves
60
Product standard
61
Warranty
Contents
Page 4

Notes for Safety
7
Notes for Safety
6
Pay attention to the followings for safe usage of XLIVE
Notes for management
Before connecting XLIVE into an outlet, read the manual carefully.
Put user’s manual near to you so that you can read it easily when you use
XLIVE.
Don’t expose it to high or low temperature, high humidity and much dust.
Never disassemble, repair or remodel XLIVE.
Don’t expose it to direct sunlight and put XLIVE in a car of which the windows
are closed.
Don’t put metals(hairpin) or something easy to burn inside XLIVE.
Before cleaning XLIVE, turn off the power of XLIVE and unplug it. Don’t use
solvents or chemicals to clean XLIVE. If not so, the surface could be distorted
or the paint could come off. Use dampened and soft cloth to clean XLIVE. Be
careful that water doesn’t get into XLIVE.
Don’t drop or give impact on XLIVE. Don’t put it on a machine that vibrates
heavily. Be careful not to use it near to magnetic devices.
Be careful that it doesn’t harm your hearing.If you keep the volume of
earphone high, it could permanently harm your ear. To prevent the hearing
damage, maintain adequate volume level. If you have a ringing in your ears,
reduce the volume or stop using XLIVE.
If you drive a car or if you concentrate on something, stop using XLIVE when it
distracts you.
When you wear XLIVE around your neck, be careful not to be caught by doors
or the other objects.
Safe usage
Notes for Safety Notes for Safety
Page 5
Optimal range
9
Characteristics of XBM-100 series
8
Let s learn various features of XBM-100 series
Functions of XBM-100 series
When Bluetooth cellular phone makes sound, XLIVE stops music with the
feature of Bluetooth Headset / Handsfree. Then you can respond to the call.
When phone rings, Bluetooth button emits light and makes it easy to seek
Bluetooth button.
When PC with our provided software has Bluetooth, it can easily send or
receive files to and from XLIVE.
If your wireline phone has Bluetooth adapter, you can receive a call in an area
near to the phone.
You can hear high quality of music with 3D effect that is provided by SRS Lab.
It enables MP3 Direct Encoding and makes it easy to record files.
It supports the formats of MP3 and WMA as Multi Codec player.
You can easily enjoy to FM stations and set your favorite stations by using
auto frequency preset and memory functions.
It can easily record specific parts of radio program or telephone communications.
It supports the feature of equalizer for some types of music. You can use the
feature of automatic equalizing.
It provides wide Graphic LCD display, multi languages of song name and
Firmware Upgrade
You can connect XLIVE with the feature of USB Mass Storage to PC through
USB cable to transfer files to and from PC easily.
You can charge the built-in rechargeable Li-Polymer battery of XLIVE through
PC and other digital devices using our provided USB cable and AC adapter.
Characteristics of XBM-100 series
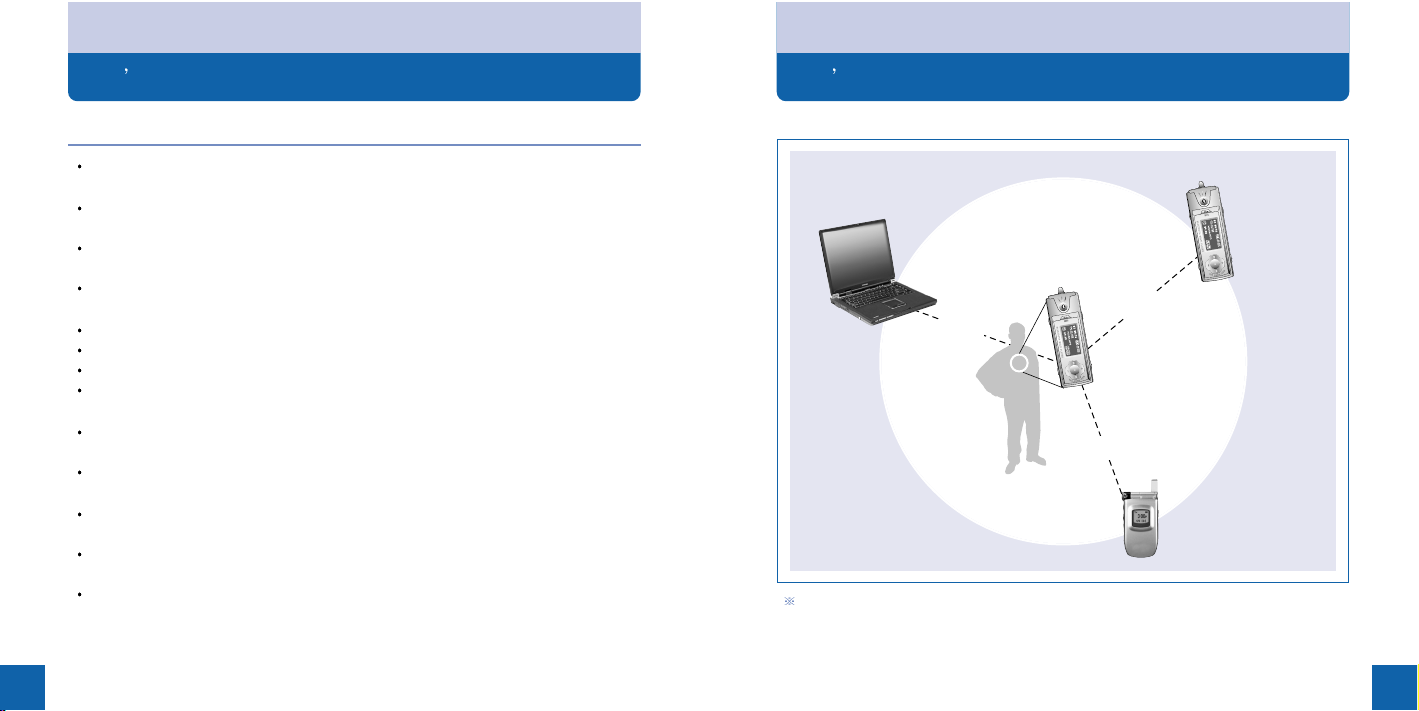
Let s see Optimal range
Optimal range
5m
5m
5m
Bluetooth
Cellular Phone
What is Bluetooth? Bluetooth enables cellular phone, PDA, computer and the other
digital electric appliances to communicate to one another wirelessly when they are near
to one another.
XLIVE
XLIVE
Bluetooth
Computer
Page 6
Operation environment
11
CPU : Above Intel Pentium 233MHz
Memory : Above 64MB (128MB recommended)
Hard Disk : Above 20MB
Operating system : Microsoft Windows 98/SE/ME/2000/XP
USB Interface : Ver 1.1
CD-ROM Driver
Basic specification of a computer for using XLIVE
Components
10
Let s check the components of XLIVE
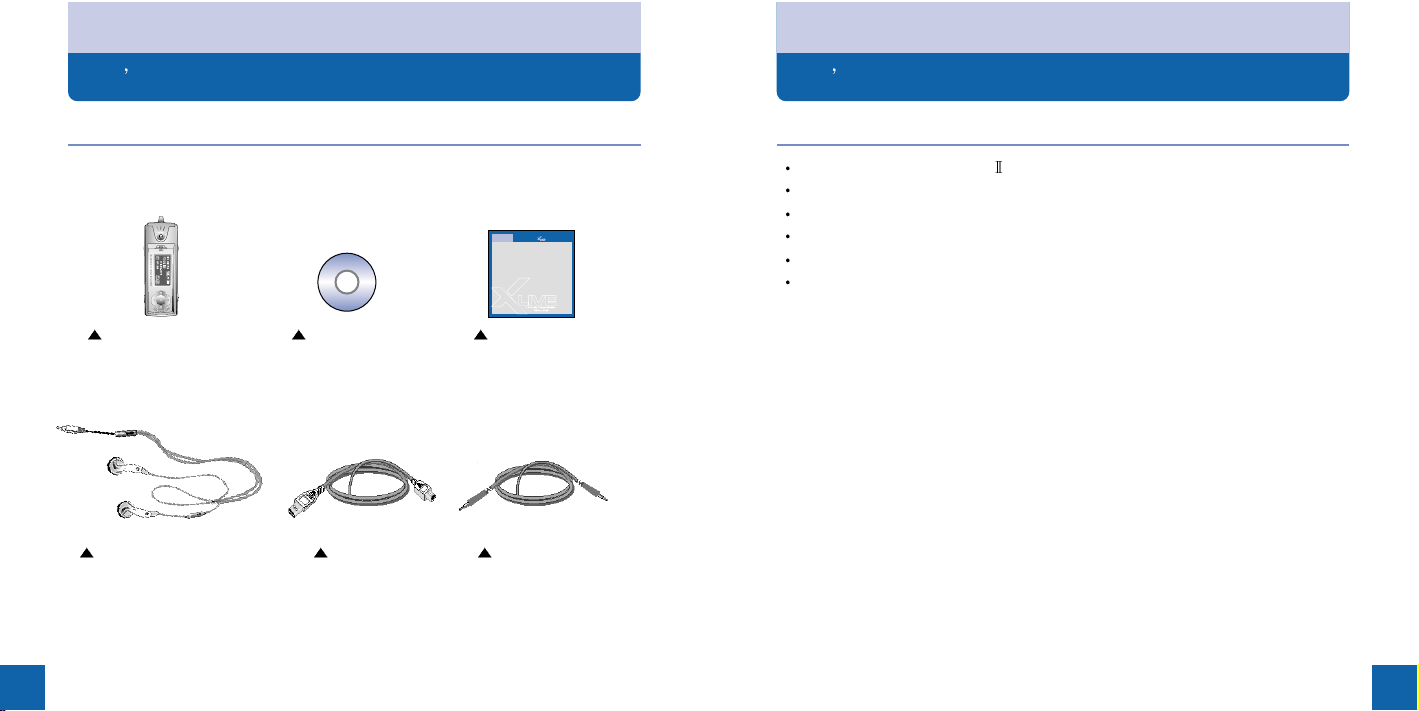
XLIVE includes the following components
The following components are shown just to help buyers to understand XLIVE.
The following components could be different from real ones.
Components
Let s see the operation environment of XLIVE
Operation environment
USB Cable Audio CableIntegrated Earphone
(W/MIC)
Installation CD Bluetooth MP3 Player User Manual
XBM-100 Series
Bluetooth MP3 Player
User Manual
Thank you for your purchasing XLIVE
Page 7
Names of each part
13
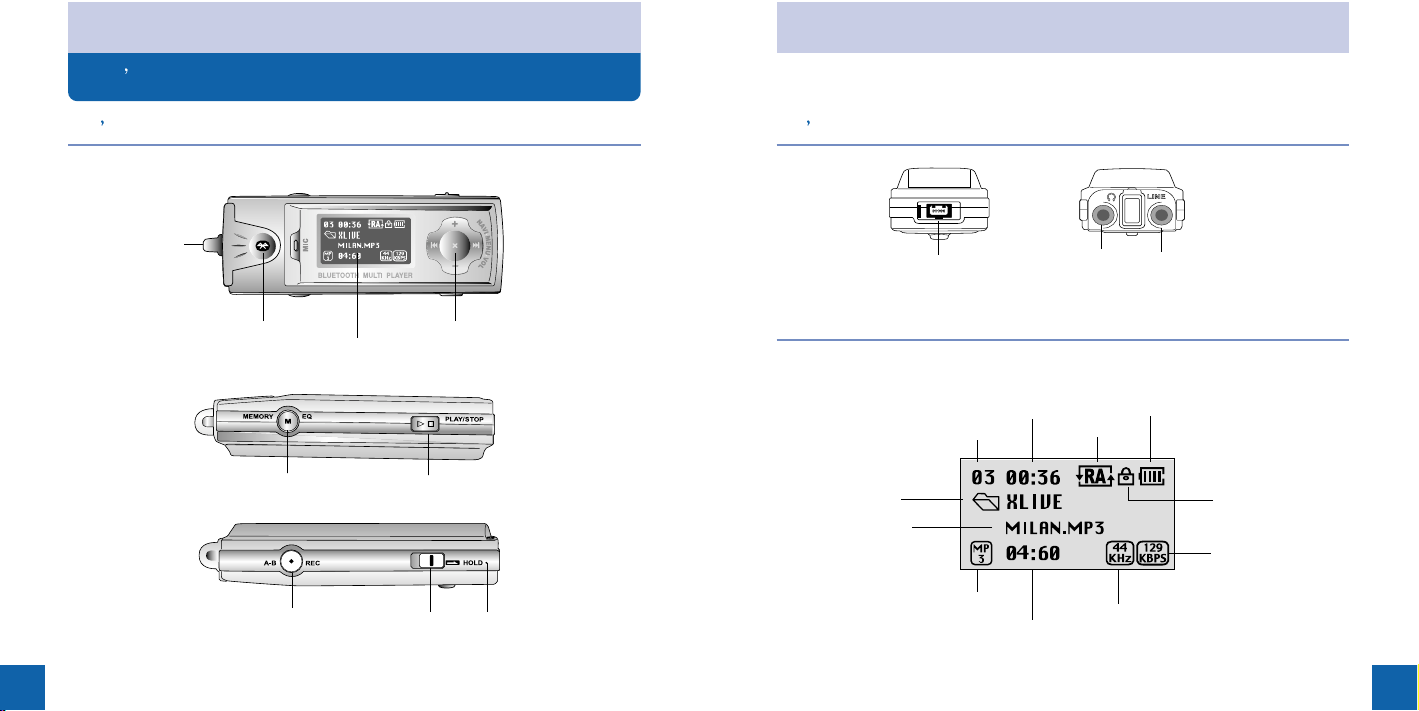
Let s look at the upper and lower sides
Names of each part
LCD display
Names of each part
12
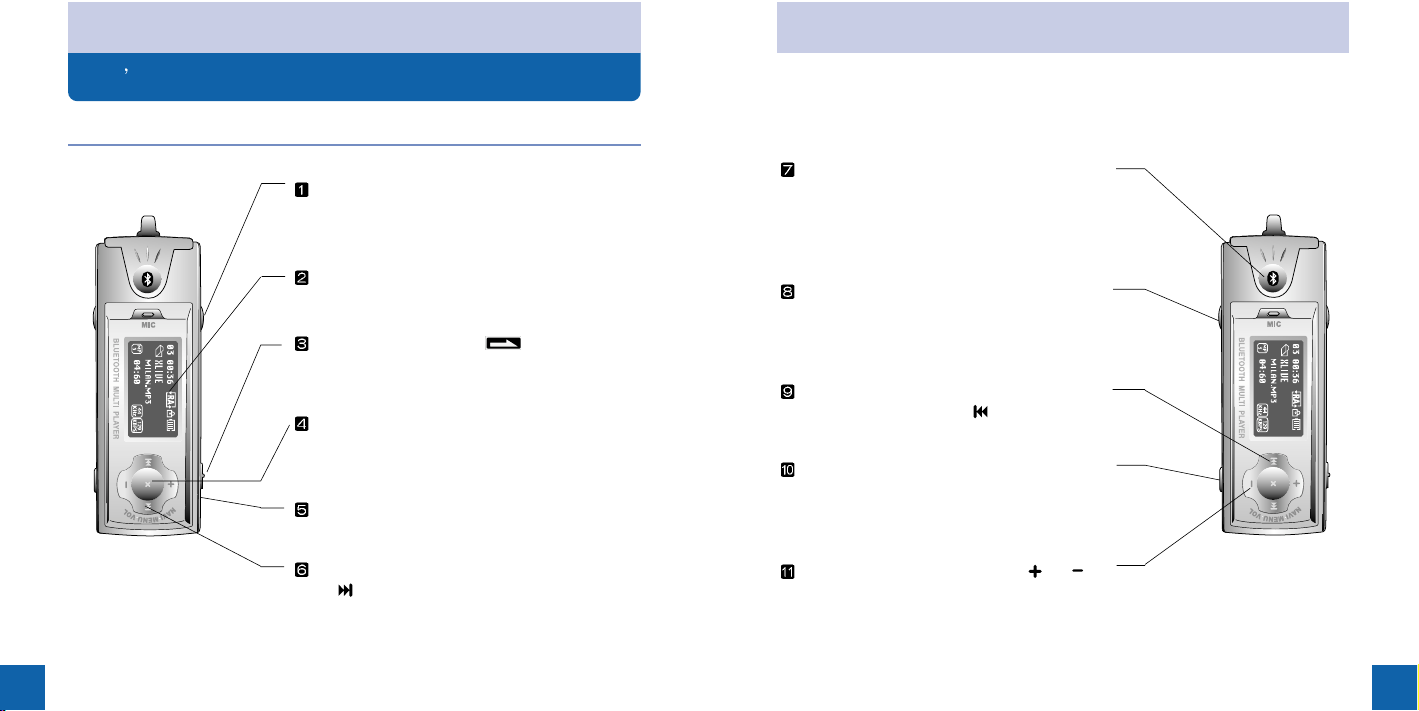
Let s learn the names of each part in detail
Let s look at the front and sides of XLIVE
Names of each part
Hold ResetA-B/REC
Play/Stop
Mode/Memory/EQ/SRS
No of Music
Folder Name
Music Name
Sampling Rate
Total Time
Playing Time
Battery
Hold
Bit Rate
Playing Mode
File Type
The following is a display explaining the information of LCD.
LCD display
Navigation/Menu
Line In
Earphone
USB connection terminal
Link for necklace
Bluetooth button
Page 8
Basic operation
15
Basic operation
Basic operation
14
Let s learn basic operation
Basic operation
Repeating specific parts, recording, moving to
previous position, replay modes while using it
as a MP3
When someone calls you, you can push
Bluetooth button to respond to a call. You
can transfer files to the other XLIVE using
Bluetooth file transmission.
C
ontrol the volume by pushing or of
Navi/Menu button.
H
ear previous MP3 file or previous FM
program by pushing
of
Navi/Menu
button.
Playing and stopping MP3 files, Switching
to stereo or mono when listening to FM
radio, Turning on or off the power
Indicating the operation status on LCD
Push the Hold button to direction
to close the button.
P
ush the center of Navi/Menu shortly to become
Navigation state. Push the center of Navi/Menu
long to become Menu state.
Hear next MP3 file or FM program by pushing
of
Navi/Menu button.
Operation explained with a drawing
Push Reset with a pincette when the system
operates incorrectly.
Mode selection, Working as a station erase
and Auto scan save when listening to FM
radio, working as an equalizer/SRS when
listening to an MP3 file.
Page 9

Basic operation
17
Push the center of Navi/Menu button long to see Menu.
Control or of Navi/Menu button to select a menu.
(General Setup )
Push the center of Navi/Menu button shortly to select Menu.
To get out of Menu, push the center of Navi/Menu button long or push A-B/
REC button shortly.
Menu
Basic operation
Push Memory/EQ button shortly to select MP3, FM, VOICE or LINE IN.
Push A-B/REC button long while listening to an MP3 file to select Play mode.
Push A-B/REC button shortly while listening to FM radio, VOICE, LINE IN or
talking with Bluetooth for recording.
Push A-B/REC button shortly to move to previous state.
Other features
Basic operation
16
Basic operation
Push Play/Stop button shortly to turn on the power. If you push it long, the
power turns off.
Push Bluetooth button long so that Bluetooth Menu appears.
Push Memory/EQ button shortly when changing mode and push or of
Navi/Menu button to select a mode.(MP3 FM Radio Voice Line In)
Push Play/Stop button shortly when changing FM Mode(Stereo/Mono)
Control the volume by pushing or of Navi/Menu button.
Basic operation
Navigation (file browsing)
Push the center of Navi/Menu button shortly and control or of Navi/
Menu button to find a file.
Push the center of Navi/Menu button shortly to play music.
Push Memory/EQ button long to delete selected music
Push Navi/Menu button of Navi/Menu button to move to upper folder.
Page 10
Basic operation
19
Revive your favorite music into an music file and listen to it with perfect
sound.
Listening to music
Basic operation
Basic operation
18
Deleting files
You may be bored of listening to same music repeatedly. If you want to
hear new music files but the storage is not enough for the music files,
delete some files.
Basic operation
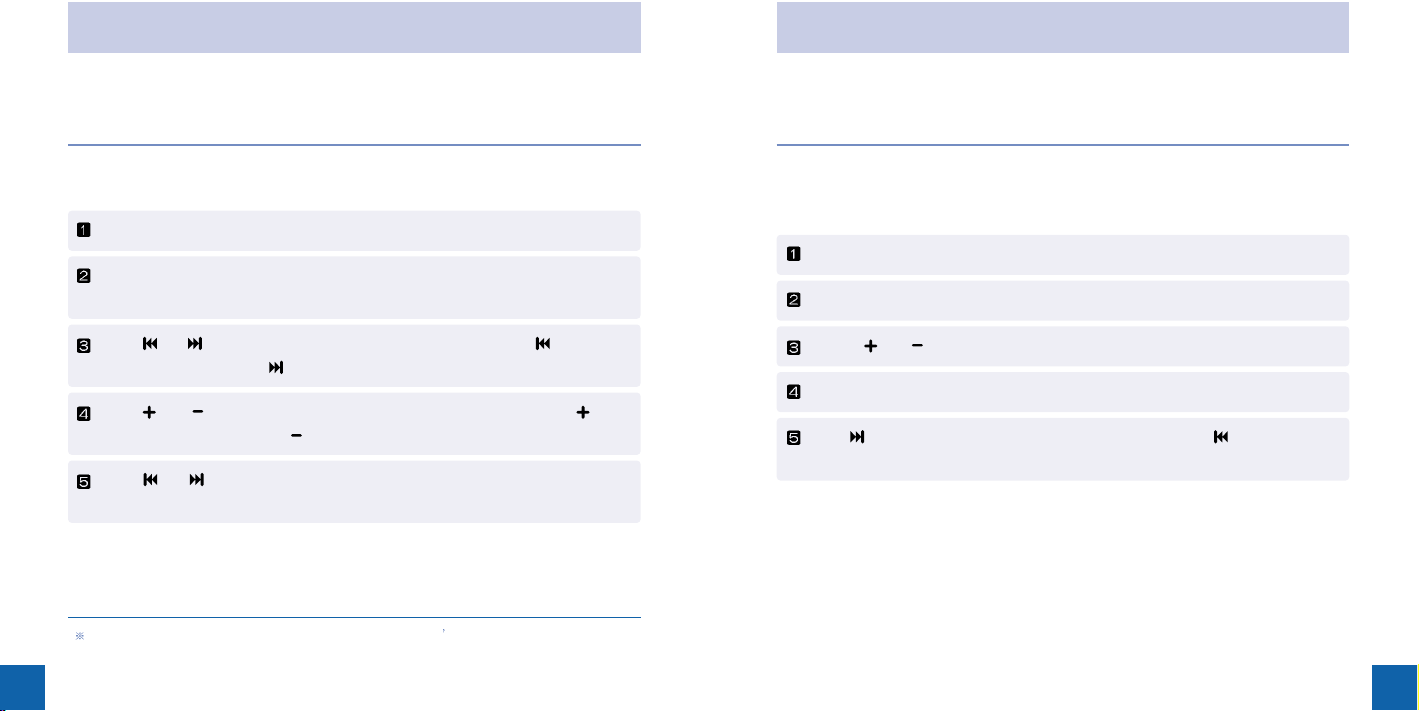
Caution : When Hold switch is On state, the buttons don t work.
Stop playing.
Connect XLIVE to the earphone.
Push Play/Stop button shortly to turn on the power. If you push it shortly
once again, it plays.
Push or of Navi/Menu button to select music. Control to select
previous music. Control to select next music.
Push or of Navi/Menu button to control the volume. Push to
increase the volume. Push to decrease the volume.
Push or of Navi/Menu button long to forward or rewind a piece of
music.
Push the center of Navi/Menu button shortly.
Control or ofNavi/Menu button to select a file to delete.
Delete a file by pushing Memory/EQ button long.
Push of Navi/Menu button shortly to delete and push of Navi/Menu
button shortly to cancel.
Page 11

New Bluetooth Technology
Save PinCode by pushing long the center of Navi/
Menu button when the wanted PinCode is
completely set.
Bluetooth Menu screen comes up when pushing a
long Bluetooth button.
Select MGR Menu by pushing or of Navi/
Menu button and push shortly the center of
Navi/Menu button.
Select PinCode by pushing or of Navi/
Menu button and push shortly the center of
Navi/Menu button, then the present PinCode is
displayed as PinCode XXXX.
Push shortly the center of Navi/Menu button after
selecting number by pushing or of Navi/
Menu button.
Bluetooth PinCode Setting (Default : Four digits ‘0000’)
Bluetooth PinCode is the password necessary for XLIVE to pair with
Bluetooth phone. During the pairing, when the password is asked, you
have only to enter XLIVE’s PinCode. Please check it before using
Bluetooth function.
If th number of PinCode required in Bluetooth phone is six digits, the
number of XLIVE(Default : Four digits ‘0000’) must be adjusted to six
digits.
PinCode must be identical for file transmission between XLIVEs.
Select PinCode setting to see or change the current password of
XLIVE after the selection of MGR at Bluetooth Menu.
Bluetooth Headset
New Bluetooth Technology
New Bluetooth Technology
21
New Bluetooth Technology
Page 12

New Bluetooth Technology
23
New Bluetooth Technology
New Bluetooth Technology
22
Let s learn the features of Bluetooth Headset
Headset pairing-connection
Bluetooth Headset is an upgraded version of MP3 player. When Bluetooth
cellular phone rings, you can directly respond to the call with XLIVE while
listening to music. Also you can also call a cellular phone using Bluetooth
Headset.
New Bluetooth Technology
Push Bluetooth button long so that Bluetooth Menu
appears.
Select Headset by pushing o r of Navi/Menu
button, and push the center of Navi/Menu button
shortly to display Pairing Clean and Ready.
Push
or of Navi/Menu button to select Pairing Clean. Push the
center of it shortly to execute Pairing Clean.
Pairing Clean process deletes previous information
and waits to connect to new Bluetooth Device.
Cellular phone executes pairing process of Bluetooth Headset.(Please
see the manual of cellular phone for the pairing of Headset.)
The initial pin code of XLIVE is 0000 . If pairing was complete, it doesn’t
require this process again. But you have to follow the process again to
connect to a different cellular phone. Push Navi/Menu button long to
cancel the pairing of Headset.
Case
¥¥∞::
If you want to set up a new connection while a headset
is paired, select Ready of Bluetooth Headset.
Case
¥¥––::
Push Bluetooth button Shortly to go Ready of Bluetooth
Headset in operation.
To connect XLIVE again to the same paired Bluetooth phone
after power-off of XLIVE or Bluetooth phone.
Note
Select CALL by pushing or of Navi/Menu
button. Push the center of Navi/Menu button
shortly to display Handsfree and Headset.
Page 13

New Bluetooth Technology
25
New Bluetooth Technology
New Bluetooth Technology
24
New Bluetooth Technology
The LED of Bluetooth button emits light and it rings.
If you complete pairing process, it displays .
If you complete connection process, it displays
Bluetooth logo instead of
.
Push Bluetooth button shortly to receive a call.
Talk to the other party.
To disconnect the call, push Bluetooth button shortly.
When connected, it displays the right.
When you complete the call, the previous mode operates again.
When there is a phone call, the music automatically stops. When you get a phone call, it displays
the right.
To receive a phone call, XLIVE should be paired and connected in cellular
phone. The following is the way to receive a phone call when you listen to
music.
Receving and disconnecting telephone call while listening to music
RING.mp3 in REC folder makes the ring sound. You can register
a ring sound as Ring.mp3. It will automatically delete the previous
ring sound.
Note
Page 14

New Bluetooth Technology
27
New Bluetooth Technology
New Bluetooth Technology
26
New Bluetooth Technology
Push Bluetooth button shortly.
It shows the last calling number in the connected
Bluetooth phone. (It could differ according to
cellular phones.)
Talk to the other party.
To disconnect the call, push Bluetooth button shortly.
When you complete the call, the previous mode operates again.
When connected, it displays the right.
When you want to make a call through a cellular phone, you first should
pair and connect XLIVE in the cellular phone.(Please refer to Headset
Pairing-Connection process.)
Making a call while listening to music (redialing)
If you want to listen to the recorded call, you have only to play BTYxxxx.mp3
in the REC folder by implementing browser.
Push Play/Stop button shortly to stop temporarilly.
Re-pushing of Play/Stop button shortly has the recording start again.
The recorded voice files are stored in the form of BTYxxxx.mp3 and
according to their respective serial numbers.
After Bluetooth call being connected, if you want to
record, just push A-B/REC button shortly and then
can record the call.
When intending to stop the recording, you have only to push A-B/REC
button shortly.
It is the function to record important voices from the other party during a call.
Recording during a call
Push Bluetooth button shortly once again to call the last number. Then
music stops automatically.
Page 15

New Bluetooth Technology
New Bluetooth Technology
New Bluetooth Technology
Bluetooth HandsFree
How To Use Bluetooth HandsFree
New Bluetooth Technology
Next is same as Headset.
Next is same as Headset.
Caller ID is shown.
When connected after the selection of YES, it
displays the right.
You can select YES or NO on LCD. If you want to call, you have to
select YES by pushing shortly the center of Navi/Menu button. But if
you want not to call, you have to select NO by pushing shortly the
center of Navi/Menu button.
Handsfree pairing-connection
Bluetooth Handsfree is an upgraded version of MP3 player. When
Bluetooth cellular phone rings, you can directly receive and make a call
while listening to music using XLIVE. In addition, push A-B/REC button
long to talk over Bluetooth cellular phone instead of XLIVE during a call.
Receiving and Disconnecting Calls While Listening To Music
Push Bluetooth button long so that Bluetooth Menu
appears.
Select Handsfree by pushing or of Navi/ Menu
button, and push the center of Navi/Menu button
shortly to display Pairing Clean and Ready.
Select CALL by pushing or of Navi/Menu
button. Push the center of Navi/Menu button
shortly to display Handsfree and Headset.
When there is a phone call, the music automatically stops. When you get a phone call, it displays
the right.
The LED of Bluetooth button emits light and it rings.
Page 16

New Bluetooth Technology
New Bluetooth Technology
New Bluetooth Technology
Making A Call While Listening To Music
When pushing shortly Bluetooth button on the pairing
and connection with Bluetooth phone, such screens
as MEMORY, LAST CALL, DIALING come up. The
function must be supported by the Bluetooth
phone.
New Bluetooth Technology
In Case Of Using MEMORY Menu
When pushing shortly Bluetooth button after selecting Bluetooth phone s
MEMORY number, you can make a call.
If you want to end the call, you have to push shortly Bluetooth button.
After completing the call, the previously performed mode works again.
If you want to end the call, you have to push shortly Bluetooth button.
After completing the call, the previously performed mode works again.
When the call is connected, the right screen comes
up. Make a call.
In Case Of Using LAST CALL Menu
Push shortly the center of Navi/Menu button by
selecting LAST CALL. Make a call by the number
last dialed by Bluetooth Phone.
The right screen comes up when call is made.
Push shortly the center of Navi/Menu button after the selection by pushing
or of Navi/Menu button.
Push shortly the center of Navi/Menu button by
selecting MEMORY. And numbers are displayed
enabling to select Bluetooth phone s MEMORY
number.
Page 17

New Bluetooth Technology
New Bluetooth Technology
In Case Of Using DIALING Menu
When pushing shortly Bluetooth button after selecting the numbers of the
wanted call all, you can make a call.
If you want to end the call, you have to push shortly Bluetooth button.
After completing the call, the previously performed mode works again.
Push shortly the center of Navi/
Menu button by selecting DIALING.
The numbers possible for you to dial
are displayed.
When the call is connected, the right screen comes
up. Make a call.
After selecting the numbers by pushing or of Navi/Menu button,
push shortly the center of Navi/Menu button.
File Transmission By Using Bluetooth
Bluetooth Menu comes up when pushing long
Bluetooth button.
Push shortly the center of Navi/Menu button after
selecting FTP by pushing or of Navi/Menu
button.
Bluetooth File Transmission
New Bluetooth Technology
Bluetooth File Transmission is to wirelessly send or receive files between
two units of XLIVE by using Bluetooth Serial Profile. Please select My
Information at MGR of Bluetooth Menu and check Device Address and
PinCode setting before file transmission. In addition, push long the center
of Navi/Menu button or push shortly A-B/REC button to previous state or
cancellation.
New Bluetooth Technology
Page 18

New Bluetooth Technology
New Bluetooth Technology
New Bluetooth Technology
File browser is automatically implemented when it
is connected the other device.
In case of finding out Device, select Device
Address of receipt-wanted device by pushing
or of Navi/Menu button and push shortly the
center of Navi/Menu button.
The sending-wanted device is displayed as follow when finding out its
neighboring Bluetooth Device(XLIVE).
<In Case of Not Finding Out Device>
Files to be sent and transmission progress are shown as follow.
After selecting files to be sent by pushing or of Navi/Menu button,
push shortly the center of Navi/Menu button.
If finish successfully, ‘Transfer Complete’ displays at Searching Device
and ‘Receive Complete’ displays at Receiving Device.
Push shortly the center of Navi/Menu button to continue FIle Transmission.
<In Case Of Finding Out Device>
New Bluetooth Technology
The screen comes up when you push shortly the center of Navi/Menu
button after Ready selected for receipt-wanted device and Device Search
selected for sending-wanted device.
<Receiving Device><Sending Device>
<Receiving Device><Sending Device>
Page 19

When Listening To FM Radio
37
When Listening To FM Radio
When Listening To FM Radio
36
When You Want To Enjoy FM Radio Broadcast
Switching and Listening To Radio Mode
When Listening To FM Radio
When You Intend To Listen Wanted Broadcast
Push shortly Memory/ EQ button. Function
selection is displayed on LCD.
Select to FM Radio by pushing or of Navi/Menu button.
Push shortly the center of Navi/ Menu button.
Manual Mode takes place when pushing Navi/
Menu button shortly.
Push or of Navi/Menu button to change frequency.
Manual Frequency Searching
Auto Scan automatically tracks the next channel by pushing or of
Navi/Menu button long. Just push shortly Play/Stop button if you want to
stop Auto Scan.
Auto Frequency Searching
If you want to select either Stereo or Mono, please push
Play/Stop button shortly.
Note
Page 20

When Listening To FM Radio
39
When Listening To FM Radio
When Listening To FM Radio
38
When Listening To FM Radio
Channel is automatically allocated and deployed in frequency s order.
Save is possible from Channel No. 1 to No. 20.
You can listen to previous or next channel broadcast by pushing or
of Navi/Menu button.
Manual Mode takes place when pushing the center
of Navi/ Menu button shortly. Select a broadcast to
be saved using frequency searching function.
Wanted broadcast channel is saved when pushing
A-B/REC button long.
When You Intend To Save / Record Wanted Broadcast
Please generate Manual Mode by pushing the center of Navi/Menu button
shortly. A long pushing of Memory/ EQ button makes it possible to save
channels by scanning all frequencies. It is possible to save up to 20
channels. Just push shortly Play/Stop button if you want to stop Auto Scan.
Please select a channel to be deleted by pushing or of Navi/Menu
button.
The channel is deleted when pushing Memory/EQ
button long. The next channel shows up when
deleting CH 05. Please continue to push Memory
/EQ button long again if you want to continue
deletion.
Deleting Saved Frequency (Preset Delete)
Please establish Preset Mode by pushing the
center of Navi/ Menu button shortly.
Listening To Saved Broadcast
As a function to establish automatically Preset, it registers as Preset by
scanning all frequency.
Function of Auto Scan Save
Please establish Preset Mode by pushing the center of Navi/ Menu button
shortly.
Page 21

When Recording Voice
41
When Listening To FM Radio
40
To Stop the Recoding
Again push A-B/REC button shortly!
The recorded files are saved in REC Folder in the form of FMRCxxx.MP3,
recording occurs as numbers increase depending on recorded files.
When Listening To FM Radio
To Stop Temporarilly Recording
Push Play/Stop button shortly to stop temporarilly!
Re-pushing of Play/Stop button shortly has the recording start again.
To Reproduce Recorded Broadcast
Push the center of Navi/ Menu button shortly or of Navi
/Menu button after selecting a wanted recorded file in
REC Folder by implementing file browser in the MP3
mode.
Voice Recording By One Touch
Voice Recording
The function enables you to either record lectures of your professors during
class or study English for yourself.
When Recording Voice
Push Memory/EQ button shortly.
Select VOICE by pushing
or
of Navi/ Menu
button.
Recording standby mode will occur if you push the
center of Navi/Menu button.
Push A-B/REC button shortly to start recording.
To Record Wanted Broadcast While Listening
Just push A-B/REC button shortly!
Page 22

Line In Function
43
When Recording Voice
42
When Recording Voice
To Stop Temporarily Voice Recording
Push Play/Stop button shortly to stop temporarily. Re-push Play/Stop buttonn
shortly if you want to resume the recording
To Stop Voice Recording
Push A-B/REC button shortly. The recorded file is saved in REC Folder in the
form of VORCxxx.MP3 file.
To Listen To Recorded Voice
Push Play/Stop button shortly immediately after stopping recording or select a
wanted file in REC Folder by implementing file browser.
To Stop Recording
Please push A-B/REC button shortly. The recorded files are saved in REC
Folder in the form of AUDIxxx.mp3.
Recording Files of Separate Device
To Record Music Contained in Separate Device
Line In Function
To Play Recorded File / To Stop Temporarilly Recording
Same as Voice recording.
Please connect the separate device to Line In using our provided Audio
cable.
Function selection is displayed on LCD by pushing
the center of Memory/ EQ button shortly. Please
select Line In by pushing or of Navi/Menu
button.
Next is same as Voice recording.
Page 23

Search and Playback Mode Functions
45
Search and Playback Mode Functions
44
Playback Mode is selected when pushing A-B/REC
button long and changes whenever you push
shortly it within a certain time (typically, 3 seconds).
Various Repeated Playback Mode Functions
Search and Playback Mode Functions
You can listen to music according to the sequential playback method.
You can listen to only one piece repeatedly.
You can listen to whatever both indefinitely and repeatedly.
You can listen to whatever both randomly and repeatedly.
You may also listen to all the music for just 5 seconds according to
the introduction playback method.
Easily Finding file and Setting playback
Use of Search Function
The function using Navigation enables to find wanted music file or recorded
file as soon as possible.
Search and Playback Mode Functions
Find out a wanted music by pushing or of
Navi/Menu button after pushing the center of
Navi/Menu button shortly in MP3 Mode.
Move on to a file or subordinate folder
when pushing the selected Folder.
Move on to a superior folder when pushing of Navi/Menu button.
Listen to it by pushing the center of Navi/Menu button shortly or pushing
of Navi/Menu button.
Page 24

47
Search and Playback Mode Functions
46
Equalizer / SRS Function
Dancing Equalizer / SRS World
Changing EQ by Kind of Music
The function has different tones such as Normal,
SRS, Jazz, Classic, Pop, and Rock.
When you push Memory/EQ button long while
playback, the present EQ is displayed and
changes whenever you push shortly it within a
certain time(typically, 3 seconds).
Equalizer / SRS Function
Auto Equalizer
If Auto EQ set in Menu, it will be automatically set in accordance with the
setting of MP3 file
s Tag.
SRS
Normal, SRS, Rock, Jazz,
Classic, Pop, Vocal, User
SRS is the registered trademark of SRS Labs. Inc.
WOW technology is subject to license of SRS Labs. Inc.
EQ is set as Normal when you select SRS.
Note
SRS can be selected in EQ mode like Normal/Rock, and its types(SRS,
TRUBASS, WOW) can be set at main Menu.
Search and Playback Mode Functions
Repeated Section Playback Function
It can be used when you want to repeatedly listen to a selected section of
music.
Set the playback section (A B) by pushing twice A-B/REC button shortly
The section between A and B is reproduced repeatedly.
Push A-B/REC button again in order to cancel repeated section playback.
Pushing Shortly Pushing Shortly
Page 25

Menu Configuration
49
Easy Operation
Menu Configuration
Menu Configuration
48
My XLIVE Configured With My Own Choice
We provide the menu for users so that they can configure the operation
environment for themselves. However, the menu may be modified in
accordance with Firmware Version.
Menu Configuration
TIMER
DISPLAY
USER EQ
AUTO EQ
SRS USE
RECORD
REC VOL
SYSTEM
Sleep Power Off
Stop Power Off
LCD Contrast
Back Light
On
Off
SRS
TRUBASS
WOW
Setup Menu
You can move to sub menus by pushing
or
of
Navi/Menu button.
Push the center of Navi/Menu button shortly to
enter into sub menus.(The change of color shows
which menu is selected.)
Entering into sub menus from main menus
LANGUAGE
Chinese
English
Japanese
Korean
SOUND
FADE IN
On
Off
RESUME
By File
By Seconds
Disable
MIC
MP3
Ear Phone
FM SELECT
Japan
Others
General Menu
Push the center of Navi/Menu button long and it
changes to Menu. There are two main menus and
their sub menus. Main menus(General, Setup) can
be moved by pushing or of Navi/Menu button.
Getting out of current Menu
Push the center of Navi/Menu button long or push A-B/REC button shortly.
Page 26

Menu Configuration
51
Menu Configuration
Menu Configuration
50
Menu Configuration
General menus
To display the name of MP3 file songs, select the
language in the menu to comply with the language
used in operating system of a PC
LANGUAGE
It slowly increases the volume to prevent rapid
increase of volume at ‘ON’ mode.
SOUND FADE IN
Set FM frequency range and searching gap. Except
for JAPAN, you have to select
Others .
FM SELECT
It selects a state for Power On. When By File is
selected, it resumes the first part of the lastly
played file. If By Second is selected, it resumes the
last parts of the last file. When Disable is selected,
it resumes the first music stored in it.
RESUME
It determines MIC for talking through Bluetooth and
recording voices. XLIVE uses 4 poles of earphone
terminals. You can use earphone that has embedded MIC.
MIC (Default : Ear Phone)
Page 27

Menu Configuration
53
Menu Configuration
Menu Configuration
52
Menu Configuration
- LCD Contrast : It controls the brightness of LCD.
- Back Light : It controls Back Light time for key
operation.
DISPLAY
It sets up sampling rate when recording
Bluetooth, FM Radio, Voice, and Line In.
RECORD
It can do Font Setting, Factory Setting (Default
Setting), Upgrade, Format and Information.
SYSTEM
It controls 5 frequencies to select equalizing that
the user wants.
USER EQ
During On operation, it selects Equalizer stored in
Tag of MP3 file.
AUTO EQ
You can enjoy music more valuable 3D surround
sound such as SRS, TRUBASS, WOW.
SRS USE
It can indicate record volume level that users want.
REC VOL
Setup menu
- Sleep Power Off : After a fixed time, the Power is
Off.
- Stop Power Off : After a fixed time during stop
state, the Power is Off.
TIMER
Page 28

How To Install USB Mass Storage Driver
Install USB Driver on My PC
Install USB Mass Storage Driver in Windows 98
If you want to connect XLIVE to PC through USB cable, Windows ME,
Windows 2000, and Windows XP install automatically the Driver because
they have their own USB Mass Storage Drivers. However, as for Windows
98 users, they must install manually the Driver as follows.
How To Install USB Mass Storage Driver
Put provided CD into PC s CD Driver. Select Win98 driver directory of
CD Driver.
Execute install.bat in Win98 driver directory.
If you want to cut the connection with PC after saving files in XLIVE, you
can save them safely only when going through the following steps. Select
the control panel s system.
Select the hard disk controller after choosing device administrator in the
system. Then select and delete XLIVE Win98 USB Mass Storage
Device.
Homepage Service & Support
Our On-Line Services
http://www.myxlive.com
You can obtain information on our profile and products. We are ready to
give answers to your questions or inquiries.
You are able to make a various functions such as firmware(system
software) upgrades and improve persistently performances of products.
When you join our membership program, you can also be provided online A/S and receive newsletters on upgrade.
Homepage Service & Support
Re-boot PC. The movable hard disk is generated in your PC window
when you connect XLIVE to PC using provided USB cable after rebooting.
Page 29

The way to upgrade
57
The way to upgrade
56
Select and push
Upgrade at the system of Setup menu.
( If there isn t enough energy in batteries while
upgrading firmware, the power could be off while
downloading the firmware and it could damage
XLIVE.)
Download firmware to upgrade at our homepage. (www.myxlive.com) Transfer
the downloaded firmware to ROOT directory of XLIVE.(If you don t transfer
the firmware to ROOT, the firmware upgrade couldn t be progressed.)
You have to configure the Font after upgrading firmware. If you don t
configure the Font, the characters could be broken.
When Font Setting i s complete, the power turns off.
Gradual upgrade of Firmware and Font Setting
The way to upgrade
After the firmware is upgraded, it is reset and starts again.
Select and push
Font Setting at the system of Setup menu.
( If there isn t enough energy in batteries while
Font Setting, the power could be off while
downloading the Font data and it could damage
XLIVE.)
Download font data to upgrade at our homepage. (www.myxlive.com) Transfer the
downloaded Font to ROOT directory of XLIVE.(If you don t transfer Font to ROOT,
the font setting couldn t be progressed.)
The way to upgrade
Firmware
Make backup for important data before upgrading. Check if the battery has
enough energy.
Font Setting
Make backup for important data before upgrading. Check if the battery has
enough energy.
Page 30

About a power
Charging Using USB Cable
Automatic charging is made irrespective of XLIVE s operation when USB
cable is connected to PC and XLIVE.
- XLIVE stops to operate during its charging
- Charging is made even though player s power is off.
- The status of battery changes during its charging
About a power
Let s solve simple problems by ourselves
If you think that the product has an error, check the following first.
Confirming error
Check if the battery is fully charged.
Is the Hold key of Bluetooth MP3 direction?
Check if the language is correctly chosen.
Turn off powers of any appliances near to
XLIVE. If noise is reduced, it is better to locate
XLIVE far away from the appliances.
If you don t install earphone, it could be hard to
listen to radio programs.
Check if the batteries have enough energy.
Check if the USB cable is firmly connected
between PC and XLIVE.
Check if the volume is in the location of 0 .
Check if the earphone is connected firmly.
Check if there is any dirty substance.
If data in MP3 or WMA get damaged, it could
produce noise or the sound could be paused.
Check if the other files have similar symptom.
I can t turn the
power on
It doesn t
produce sound.
It produces noise
There is a noise
when listening to radio.
It is hard to catch
a radio station
LCD displays
strange characters
I can
t download files
Confirming error
59
Page 31

6160
Product standard
Model name
Period for keeping parts for repair
You have to fill out the above blanks of customer name, sales shop name and sales date when you sell XLIVE.
For 5 years after stopping sales of XLIVE
one(1) year
Year, Month, Date
zenocom
82-31-421-4107
Name of device
Manufacturing number
Name
Address
Name
Address
Customer
Sales shop
Sales date
Manufacturer
(Person in charge
of warranty)
Company name
Address
Telephone
Telephone
Name
Warranty period
Telephone
Classification Item Specification
Warranty
Bluetooth Spec 1.1(2.4 GHz)
Class II (0~4dBm)
Headset, Serial, Hands Free
76MHz~108MHz
L 10mW + R 10mW maximum volume
50dB
Earphone code antenna
85mm x 30mm x 18mm
42g(including battery)
Rechargeable Li-Polymer
20Hz ~ 20KHz
L 10mW + R 10mW maximum volume
90dB(MP3)
MPEG 1/2/2.5 layer3, WMA
8Kbps ~320Kbps
ID3 V1,ID3 V2 2.0, ID3 V2 3.0, ID3
MPEG 1/2/2.5 layer3
Full Graphic 4Line with Backlight
39 languages
About 36 hours (16kbps, 256 MB)
About 14 hours
(256,MP3, volume 20, EQ normal,Bluetooth Off)
USB 1.1
-5
~40
Specification
Output Power
Profile
FM frequency range
Cell phone output power
Ratio between signal and noise (S/N)
Antenna
Frequency characteristics
Cell phone output power
Ratio between signal and noise (S/N)
File type
Bit Rate
Tag Info
Size
Weight
Battery
MP3 encoding
LCD
Language
Voice recording
Maximum playing time
USB
Range of operation temperature
Bluetooth
FM Tuner
Audio
File support
We guarantee the following.
1. The device passed strict quality test before being produced.
2. When XLIVE gets out of order under normal usage, it could be repaired at the
shop you purchased XLIVE or at our service center within warranty period.
3. When warranty period is over, you have to pay for repairing XLIVE. If it is determined
that the user has to pay for repairing even in warranty period, the user has to pay for
repairing services.
4. You have to suggest the warranty for repairing.
5. Keep this warranty securely. We don
t issue an warranty twice.
6. This warranty is valid only in worldwide.
#7201, 7th Dongil Technotown, 823, Kwan yang 2-Dong,
Dongan-Ku, Anyang-Shi, Kyoungi-Do, Korea
Page 32

MenuMenu
Memo Memo
Page 33

Acknowledging Special Precautions and
the FCC Industry Canada Notice
Cautions
Modifications not expressly approved by the party responsible for compliance could
void the user’s authority to operate the equipment.
FCC compliance Information
This device complies with part 15 of FCC Rules.
Operation is subject to the following two conditions :
1. This device may not cause harmful interference, and
2. This device must accept any interference received.
Including interference that may cause undesired operation.
Information to User
This equipment has been tested and found to comply with the limits for a Class B
digital device, Pursuant to part 15 of the FCC Rules. These limits are designed to
provide reasonable protection against harmful interference in a residential
installation.
This equipment generates, uses and can radiate radio Frequency energy and, if not
installed and used in accordance with the instructions, may cause harmful
interference to radio communications.
However, there is no guarantee that interference will not occur in a particular
installation. If this equipment does cause harmful int erference to radio or television
reception, which can be determined by turning the equipment off and on, the user
is encouraged to try to correct the interference by one or more of the following
measures:
▪ Reorient or relocate the receiving antenna.
▪ Increase the separation between the equipment and receiver
▪ Connect the equipment into an outlet on a circuit different from that to which the
receiver is connected.
Consult the dealer or an experienced radio/TV technician for help.
 Loading...