


®
THEQUALITYGOESIN BEFORETHENAME GOESON
Return the
Pro du c t
Registration
Card :and your
TV could be

SAFETYWARNINGS
WARNING
i
,i
WARNING: _.
TOREDUCETHERISKOFELECTRICSHOCKDONOTREMOVECOVER(ORBACK).NOUSER
SERVICEABLEPARTSINSIDE.REFERTOQUALIFIEDSERVICEPERSONNEL.
Thelightning flash with arrowheadsymbol,within anequilateraltriangle,is intendedto alert
the userto the presenceof uninsulated"dangerousvoltage,'within the product's enclosure
that may beof sufficient magnitudeto constitutea risk of electricshock to persons.
Theexclamationpoint within anequilateraltriangleis intendedto alert the userto thepresenceof impor-
tant operatingandmaintenance(servicing)instructions in theliteratureaccompanyingtheappliance.
WARNING:
TOPREVENTFIREORSHOCKHAZARDS,DONOTEXPOSETHIS•PRODUCTTORAINORMOISTURE.
POWER CORD POLARIZATION
CAUTION:
Topreventelectricshock,matchwidebladeof plugtowideslot,fullyinsert.
ATTENTION:
Po_r6viterleschocs_lectriques,introduirelalamela pluslargedelafichedansia bornecorrespondante
dela prise et pousserjusqu'au fond.
Note to Cable TV System Installer
This reminderis providedto callthecableTVsystem installer'sattentionto Article820-40 of theNational
ElectricalCode(U.S.A.).The codeprovidesguidelinesfor propergroundingand,in particular,specifies
that thecableground shallbe connectedtothe groundingsystemof thebuilding,as closeto thepoint of
the cableentry as practical.
RFGULATORY INFORMATION
This equipmenthas beentestedandfound to complywiththelimits for a ClassBdigital device,pursuant
to Part15 of the FCCRules.Theselimits are designedtOprovidereasonableprotectionagainstharmful in-
terl:erencewhenthe equipmentis operatedina residentialinstallation.Thisequipmentgenerates,usesand
cartradiateradio frequencyenergyand, if not installedandusedin accordancewith theinstruction manual,
may causeharmful interferenceto radiocommunications.However,thereis noguaranteethatinterference
will not occur ina particular installation.Ifthis equipmentdoescauseharmfulinterferenceto radioor tele.-
vision reception,which can bedeterminedbyturningthe equipmentoff andon,the userisencouragedto
try to correctthe interferenceby oneor moreofthe following measures:
• Reorientor relocatethe receivingantenna.
• Increasethe se_)arationbetweenthe equipmentand receiver.
• Connectthe-equipmentintoan outleton acircuitdifferentfrom that to which thereceiveris connected.
• Consultthe dealeror anexperiencedradio/TVtechnicianfor help.
CAUTION: - ,.
DonotattempttomodifythisproductinanywaywithoutwrittenauthorizationfromZenithElecb'onics-.
Corporation.Unauthorizedmodificationcouldvoidtheuser'sauthorityto operatethisproduct. ....
GA-TV'WEL ii ('
IMPORTANT SAFETY INSTRUCTIONS
Your product has been manufactured and tested with your safety in mind. However, improper use can result in potential
electrical shock or fire hazards. To avoid defeating the safeguards that have been built into your new product, please
read and observe the following safety points when installing and using your new product, and save them for future refer-
ence.
Observing the simple !_recautions discussed in this section of the operating guide can help you get many year:; of enjoy-
ment and safe operatio n that are built into your new product.
1. Read Instructions
All the safety and operating instructions
should be read before the product is operated.
2. Folh)w Instructions
All operating and use instructions should be
followed.
3. Retain Instructions
The safety and operating instructions should
be retained for future reference.
4. Heed Warnings
All warnings on the product and in the operat-
ing instructions should be adhered to.
5. Cleaning
Unp;lug this product from the wall outlet be-
fore cleaning. Do not use liquid cleaners or
aerosol cleaners. Use a damp cloth for clean-
ing.
6. Water and Moisture
Do not use this product near water -- for ex-
ample, near a bath tub, wash bowl, kitchen
sink, or laundry tub, in a wet basement, or
near a swimming pool.
7. Accessories
Do not place this product on an unstable cart,
stand, tripod, bracket, or table. The product
may fall, causing serious injury to a child or
adult, and serious damage to the product. Use
only with a cart, sland, tripod, bracket, or ta-
ble recommended by the manufacturer, or sold
with the product. Any mounting of the product
should follow the manufacturer's instructions,
and should use a mounting accessory recom-
mended by the manufacturer.
8. Transporting Product
A product and Cart combina-
l__ tion should be moved with
care. Quick stops, excessive
force, and uneven surfaces may
cause the product and cart com-
PORTAaLE CART W&RNING bination to overturn.
9. Attachments
Do not use attachments not recommended by
the product manufacturer as they may cause
hazards.
10. Ventilation
Slots and openings in the cabinet are provided
for ventilation and to ensure reliable operation
of the product and to protect it from overheat-
ing, and these openings must not .be blocked
or covered. The openings should never be
blocked by placing the product on a bed, sofa,
rug: or other similar surface. This product
should'riot be placed in a built-in installation
such as a bookcase or rack unless proper venti-
lation is provided or the manufacturer's in-
structions have been adhered to.
11. Power Sources
This product should be operated only from the
type of power source indicated on the marking
label. If you are not sure of the type of power
supply to your home, consult your product
dealer or local power company. For products
intended to operate from battery power, or '
other sources, refer to the operating instruc-
tions.
12. Line-Cord Polarization
This product is equipped with a polarized alter-
nating-current line plug (a plug having one
blade wider than the other). This plug will fit
into the power outlet only one way. This is a
safety feature. If you are unable to insert the
plug fully into the outlet, try reversing the
plug. If the plug should still fail to fit, contact
your electrician to replace your obsolete out-
let. Do not defeat the safety purpose of the po-
larized plug.
13. Power-Cord Protection
Power-supply cords should be routed so that
they are not likely to be walked on or 15inche d
by items placed upon or against them, paying
particular attention to cords at plugs, conven-
ience receptacles, and the point where they
exit from the product.
I4. Outdoor Antenna Grounding
If an outside antenna or-cable system is con-
nected to the product, be sure the antenna or
cable system is grounded so as to provide
some protection against voltage surges and
built-up static charges. Article 810 of the Na-
tional Electrical Code (U.S.A.), ANSI/NFPA
70 provides information with regard to proper
grounding of the mast and supporting struc-
ture, grounding of the lead-in wire to an an-
tenna discharge unit, size of grounding
conductors, location of antenna-discharge
unit, connection to grounding electrodes, and
requirements for the grounding electrode• See
figure on next page.
15. Lightning
For added protection for this product (re- •
ceiver) during a lightning storm, or when it is
left unattended and.unused for long periods of
time, unplug it from the wall outlet and discon-
nect the antenna or cable system. This will pre-
vent damage to the 'product due to lightning
and power-line surges...
°°°
GA-S,M:E 111
IMPORTANT SAFETY INSTRUCTIONS
16. Power Lines
An outside antenna system should not be lo-
cated in the vicinity of overhead power lines
or other electric light or power circuits, or
where it can fall into such power lines or cir-
cuits. When installing an outside antenna sys-
tem, extreme care should be taken to keep
from touching such power lines or circuits as
contact with them might be fatal.
17. Overloading
Do not overload wall outlets and extension
cords as this can result in a risk of fire or elec-
tric shock.
18. Object and Liquid Entry
Never push objects of any kind into this prod-
uct through openings as they may touch dan-
gerous voltage points or short-out parts that
could result in a fire or electric shock. Never
spill liquid of any kind on the product.
19. Servicing
Do not attempt to service this product yourself
as opening or removing covers may expose
you to dangerous voltage or other hazards• Re-
fer all servicing to qualified service personnel.
20. Damage Requiring Service
Unplug this product from the wall outlet and
refer servicing to qualified service personnel
under the following conditions:
a. If the power-supply cord or plug is dam-
aged.
b. If liquid has been spilled, or objects have
falleh into the product.
c. If the product has been exposed to rain or
• water.
d. If the product does not operate normally by
following the operating instructions. Ad.-
just only those controlsthat are covered by
the operating instructions as an improper
adjustment of other controls may result in
damage and will often require extensive
work by a qualified technician to restore
the product to its normal operation.
e. If the product has been dropped or the cabi--
net has been damaged.
f. If the product exhibits a distinct change ir_
performance.
21. Replacement Parts
When replacement parts are required, be sure
the service technician has used replacement
parts specified by the manufacturer or have
the same characteristics as the original part.
Unauthorized substitutions may result in fire,
electric shock, or other hazards.
22. Safety Check
Upon completion of any service or repairs to
this product, ask the service technician to per-
form safety checks to determine that the prod-
uct is in proper operating condition.
23. Wall or Ceiling Mounting
The product should be mounted to a wall or
ceiling only as recommended by' the manufac-
turer.
24. Heat
The product should be situated away from heat
sources such as radiators, heat registers,
stoves, or other products (including amplifi-
ers) that produce heat.
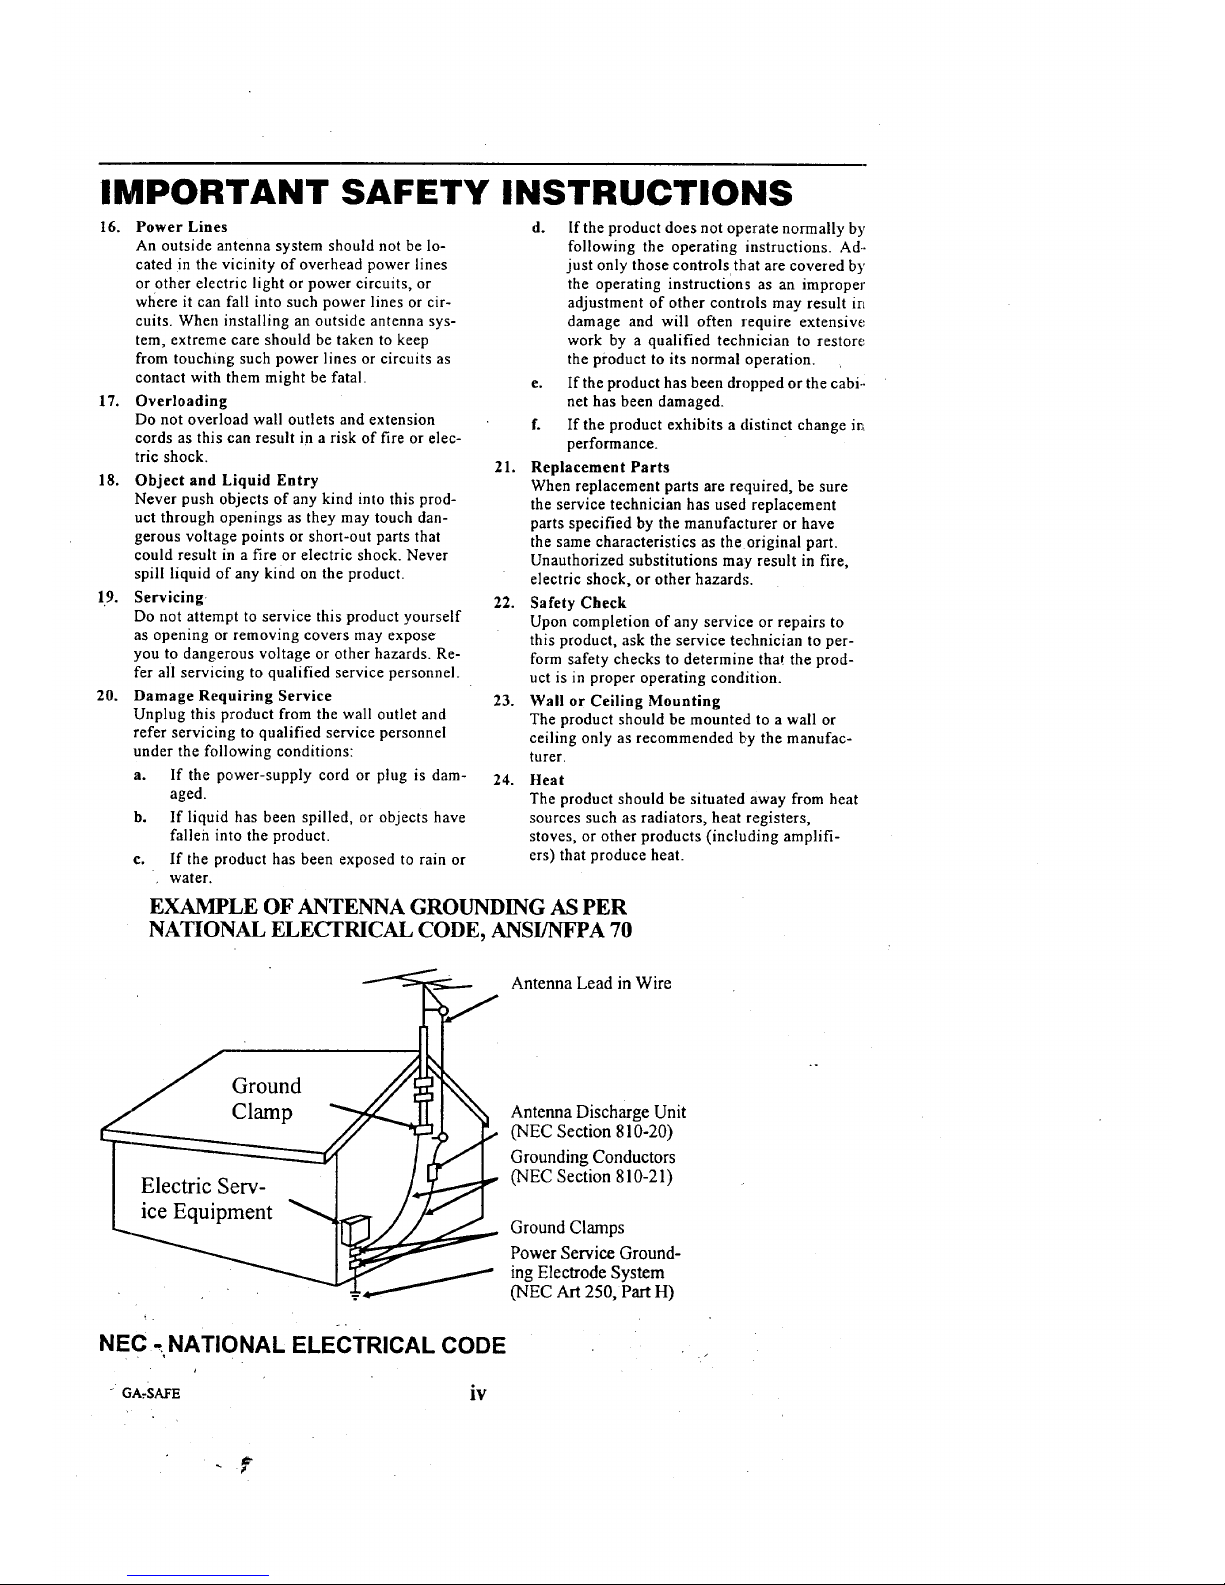
EXAMPLE OF ANTENNA GROUNDING AS PER
NATIONAL ELECTRICAL CODE, ANSI/NFPA 70
Oroun
L Electric Serv-_t__
NEC _ NATIONAL ELECTRICAL CODE
GA-SAr_- iv
Antenna Lead in Wire
Antenna Discharge Unit
(NEC Section 810-20)
Grounding Conductors
(NEC Section 810-21)
Ground Clamps
Power Service Ground-
ing Electrode System
(NEC Art 250, Part H)
CONTENTS
Safety Warnings ......................... ii
Important Safety Instructions ............ iii
Welcome .............................. vi
Installation Considerations ............... vi
Typical Connections For Your TV
Diagram 1. Basic Connection to TV without
VCR ................................ 1--1
Diagram 2. Basic Connection to TV with
VCR ................................ 1--2
Diagram 3. Audio/Video Connection to TV with
VCR ................................ 1--3
Quick Setup Guide
1 Connect the Power................... 2--1
2. Install Batteries into the Remote ........ 2--1
3. (Required) Use Auto Program .......... 2_2
4. Set the:Clock ....................... 2--3
Basic Menu Operation
Using Remote Control for menus ......... 3--1
Using Control Panel for menus ........... 3--2
Setup Menu Options
Use Auto Program (Channel Search) ...... 4--1
Descriptilons of Menu Options ............ 4---1
Using Add/Del/Surf .................... 4----2
Using Channel Labels .................. 4--3
Timer Setup: Sleep Timer ............... 4----4
Timer Setup: On/Off Timer .............. 4---4
Using Parental Control ................. 4---5
Using Auto Demo ..................... 4--6
Video Menu Options
Using the Video Menu ..... : ............ 5--1
MBR3447 Remote ControfFunctions
Simple Product Operation ............... 6--1
Programming Your Remote .............. 6---2
Auto Find Option
(Alternate Programming Method) ......... 6--3
Operating Codes By Brand Name ......... 6--4
TV Operations ................ :....... 6--3
Preset Codes For Zenith Products ......... 6--6
Special Features
Aux+l, Aux+2, Aux+3, Cable Box Volume
Override, Amplifier Volume Override . .... 6--7
Maintenance and Troubleshooting
Caring For Your TV ................... 7--1
Extended Absence ..................... 7--1
TV Picture Interference. ................ 7--1
Before Calling For Service .............. 7--2
Accessories For Your TV
Replacement Product Registration Card
AVISO PARA NUESTROS CLIENTES DE
HABLA HISPANA
Questionnaire
Your Zenith Warranty
Features Provided with Your TV
This Ol_,_ratingGuide describes a family of TV models. Not all models have all of the features described
in this guide. Different control panels may be used from model to model. Most models include the fol-
lowing features:
Auto Program Channel Search
Multi-iBrand Programmable Remote
24 Hour Clock
Sleep Timer
On/Off Timer with Multiple Settings
Closed Captions
MTS Stereo Audio
English; French, Spanish On-Screen Menus Option
Channel Add/Delete for Favorite Channel Scanning ..
Flashback to Previous Channel
On-Screen Picture Adjustments
Channel Labels for Easy Channel Identification
Parental Control
Audio/Video Input Jacks
(Design and specifications are subject to change without prior notification.)
3201-O
a-
TYPICAL CONNECTIONS FOR YOUR TV
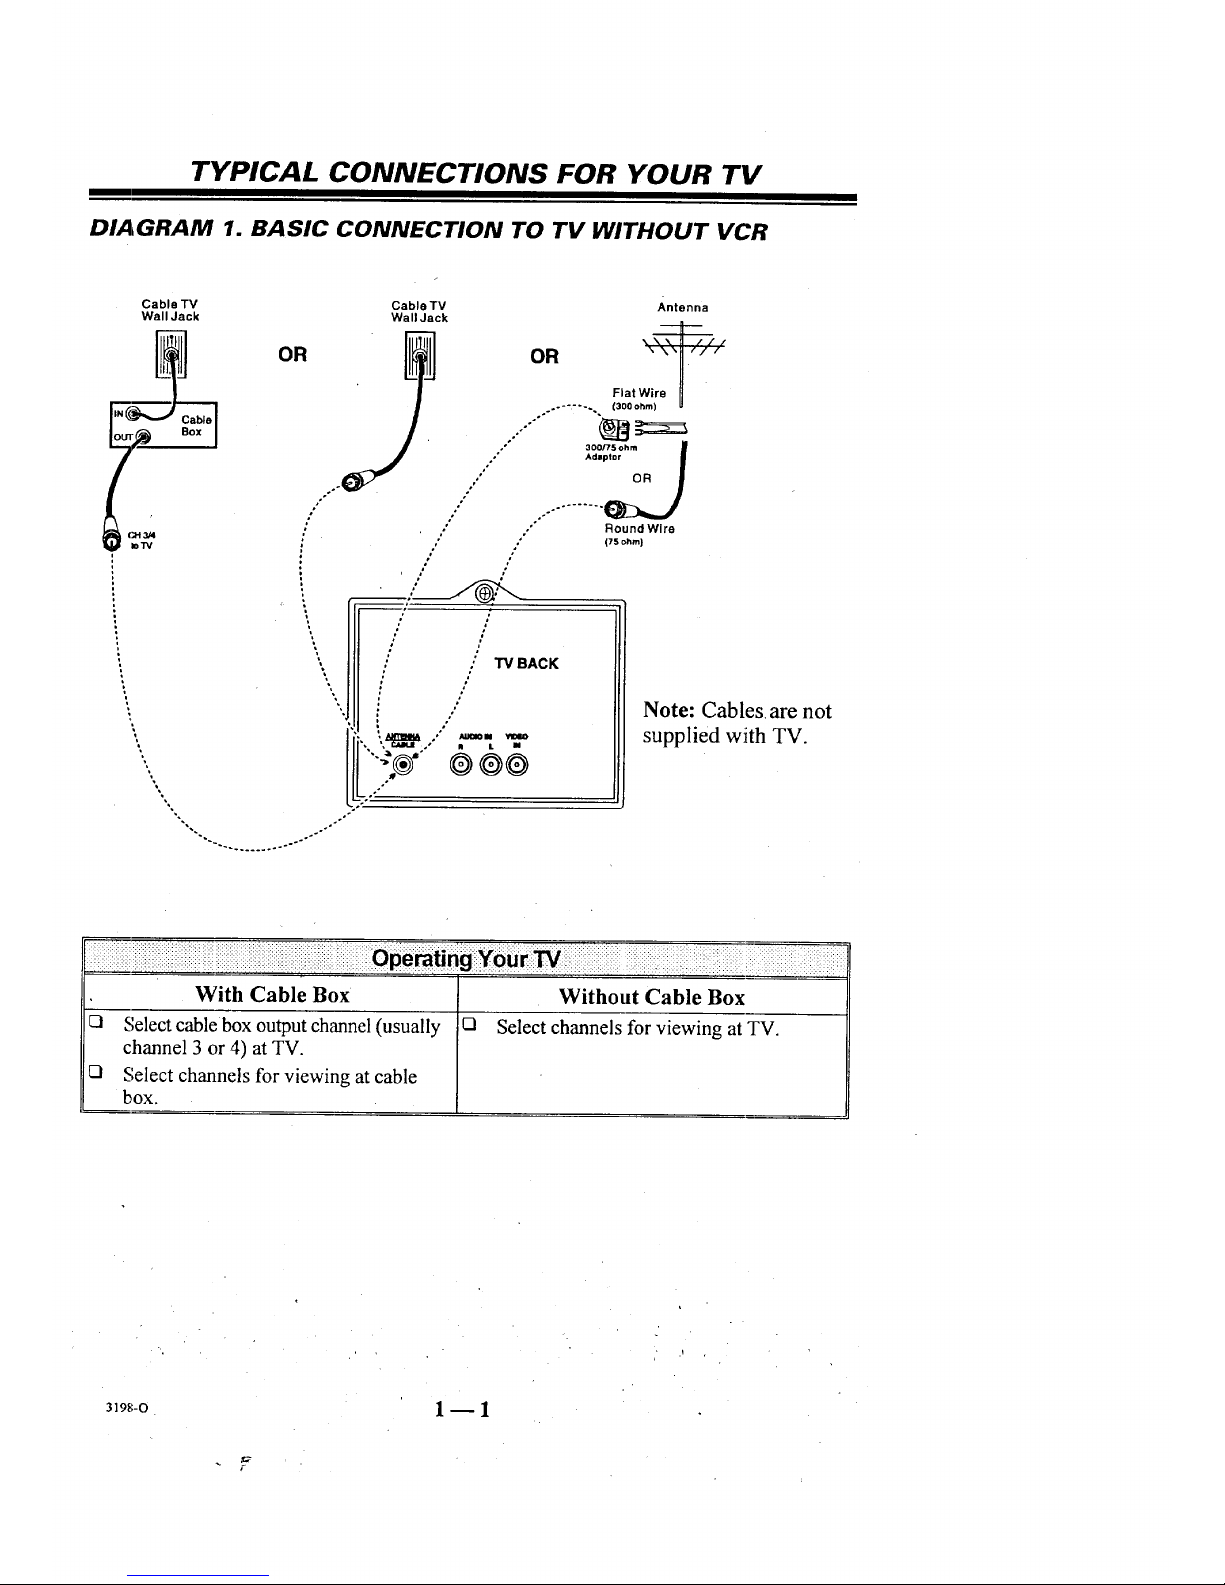
DIAGRAM 1. BASIC CONNECTION TO TV WITHOUT VCR
Cable TV
Wall Jack
OR
"%
%.
Note: Cables, are not
supplied with TV.
_!i_iiii_ii_iiiiii!!i!ii_iii_i_iiiii_iiiiiiiiii!ii!ii_iiii!iiiiiiiiii_iiiiiiiiiiiiiiiiiii!iiiii_ii_i_iiii_ii!ii_i_i_e_ti_gi_i_ii?.iiiii!!ii!!iiiii.iZiii/_i.....' ...............'.2
With Cable Box
Q Select cable box output channel (usually
channel 3 or 4) at TV.
O Select channels for viewing at cable
box.
Without Cable Box
o Select channels for viewing at TV.
319g-O
1 I
TYPICAL CONNECTIONS FOR YOUR TV
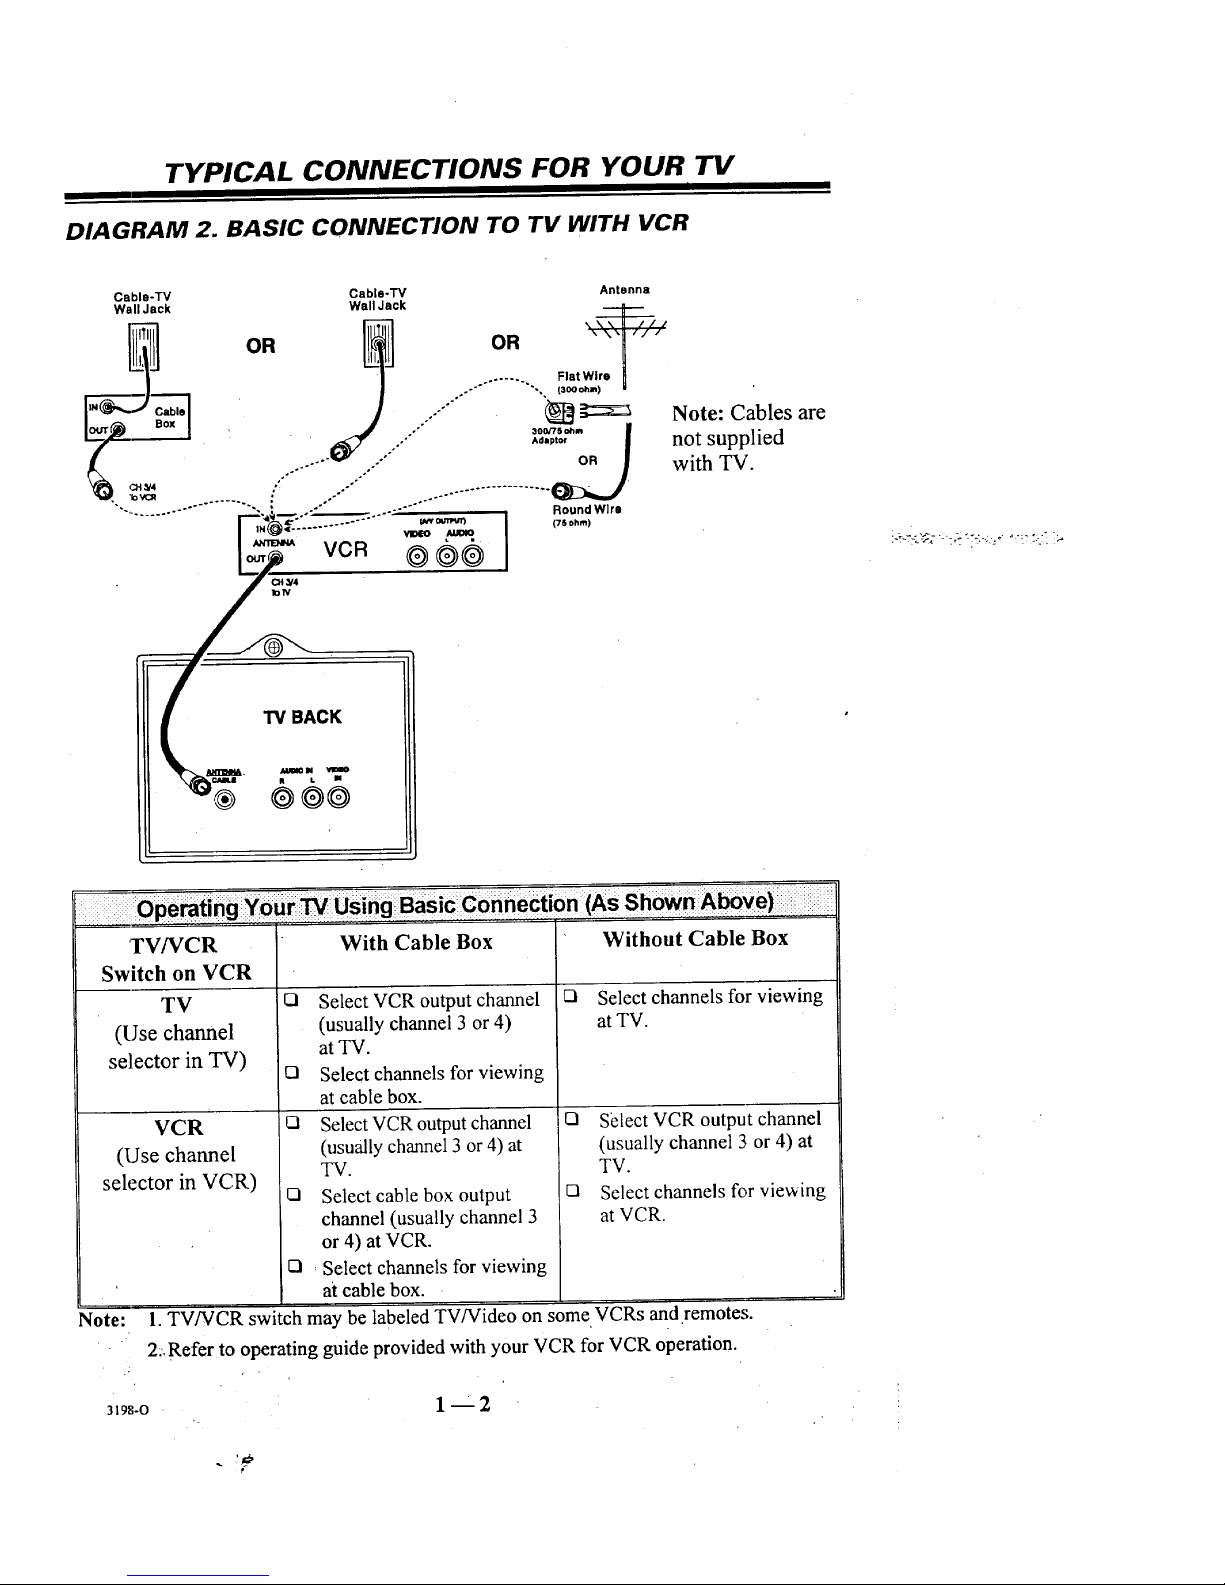
DIAGRAM 2. BASIC CONNECTION TO TV WITH VCR
Cabla-TV
We,IIJack
ITI
. .o° ........ .
"-,.. ....... -,
OR
Cable-TV Antenna
Wall Jack ',. \ \ [_ ,'/////
Jl o. ""H
Flat Wire
(aooohm) •
..-'"'°' ............ ""_ g:zz_ Note: Cables are
•-" not supplied
..... i.-- . with TV.
• o-°
Note:
TV/VCR
Switch on VCR
TV
(Use channel
se]lector in TV)
VCR
(Use channel
selector in VCR)
With Cable Box
121 Select VCR output channel
(usually channel 3 or 4)
at TV.
121 Select channels for viewing
at cable box.
O Select VCR output channel
(usually channel 3 or 4) at
"IV.
O Select cable box output
channel (usually channel 3
or 4) at VCR.
I:1 , Select channels for viewing
at cable box.
C3
Without Cable Box
Select channels for viewing
at TV.
I:1 SElect VCR output channel
(usually channel 3 or 4) at
TV.
_1 Select channels for viewing
at VCR.
1. TV/VCR switch may be labeled TViVideo on some VCRs and remotes.
2:, Refer to operating guide provided with your VCR for VCR operation.
3198-O " 1 " 2
TYPICAL CONNECTIONS FOR YOUR TV
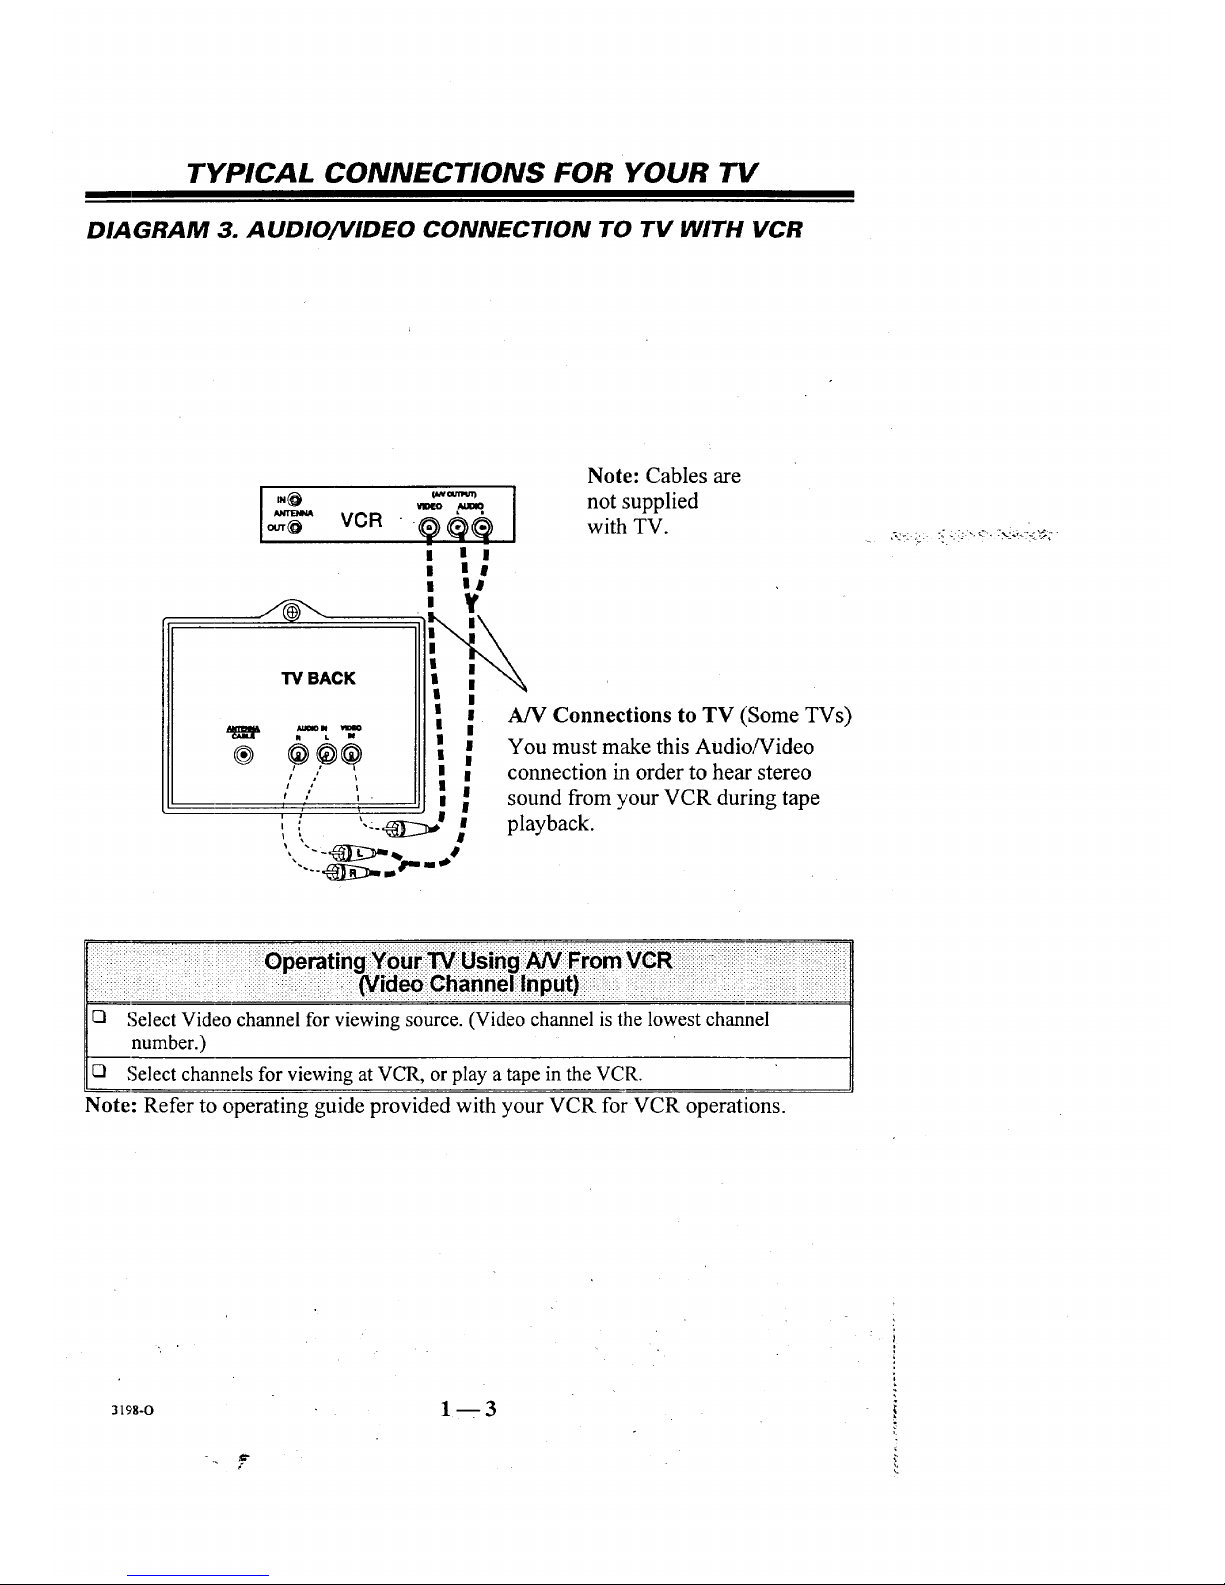
DIAGRAM 3. AUDIO/VIDEO CONNECTION TO TV WITH VCR
Note: Cables are
] ,_,,, _._*_,,_. ] not supplied
_ VCR @ _ with TV.
TVBACK
AN Connections to TV (Some TVs)
You must make this Audio/Video
connection in order to hear stereo
sound from your VCR during tape
playback.
iii!!!_i!ili!iiiii!ii!iiiiii__ii!_ii_i!!iiii_iiiii!_iiiiiliii_i_e!_"_ii_i_iii_i_i_i_ii_F__iii!iiiiiiiiiiiiii!iii!iiiiiiiiiiiii_i_i_i_!_iiiiiiiii_iiiii_!_iiiiiiiiiiii!ii_i_i_i_
UI Select Video channel for viewing source. (Video channel is the lowest channel
number.)
Select channels for viewing at VCR, or play a tape in the VCR.
Note: Refer to operating guide provided with your VCR for VCR operations.
3198-0
- ,¢P
1B3
QUICK SETUP GUIDE
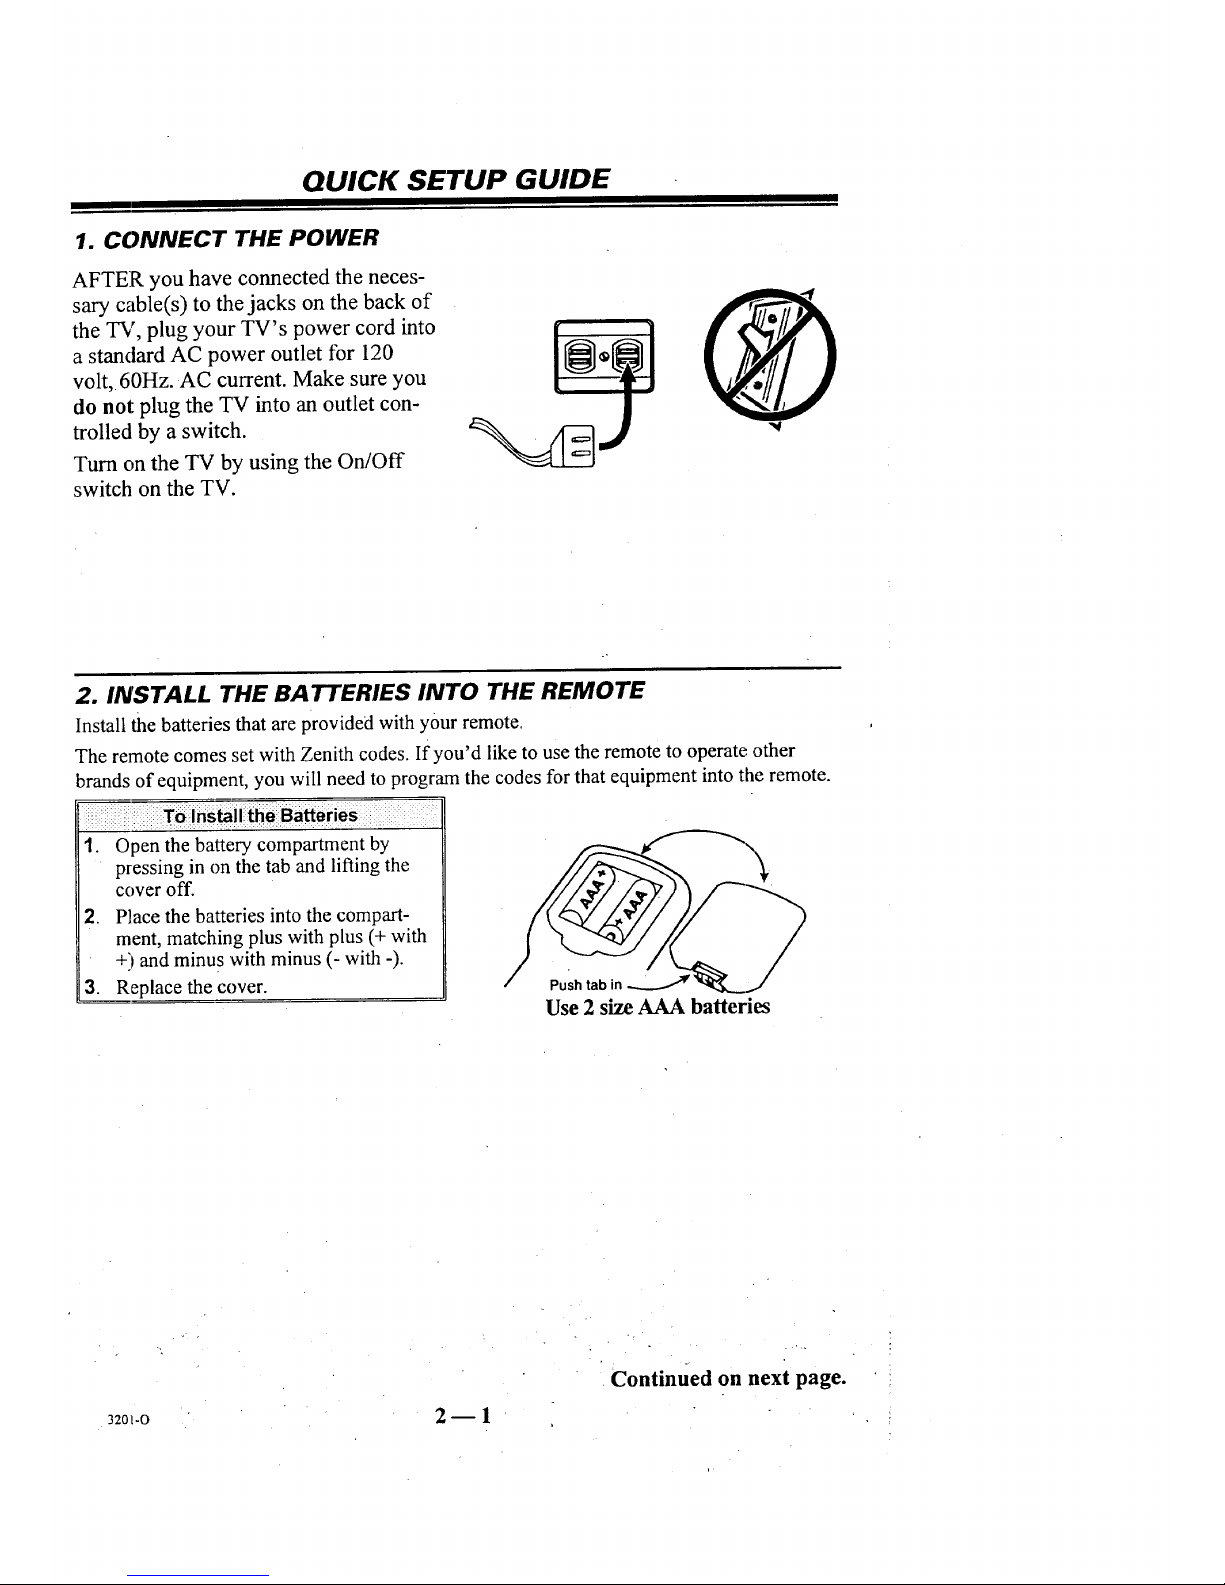
1. CONNECT THE POWER
AFTER you have connected the neces-
sary cable(s) to the jacks on the back of
the TV, plug your TV's power cord into
a standard AC power outlet for 120
volt, 60Hz. AC current. Make sure you
do not plug the TV into an outlet con-
trolled by a switch.
Turn on the "IV by using the On/Off
switch on the TV.
2. INSTALL THE BAtTTERIES INTO THE REMOTE
Install the batteries that are provided with your remote.
The remote comes set with Zenith codes. If you'd like to use the remote to operate other
brands of equipment, you will need to program the codes for that equipment into the remote.
i i Tb Instill theiBatteries
1. Open the battery compartment by
pressing in on the tab and lifting the
cover off.
2. Place the batteries into the compart-
ment, matching plus with plus (+ with
+) and minus with minus (- with -).
3. Replace the cover.
Use 2 size AAA batteries
Continued on next page.
32ol-o 2-- 1
QUICK SETUP GUIDE
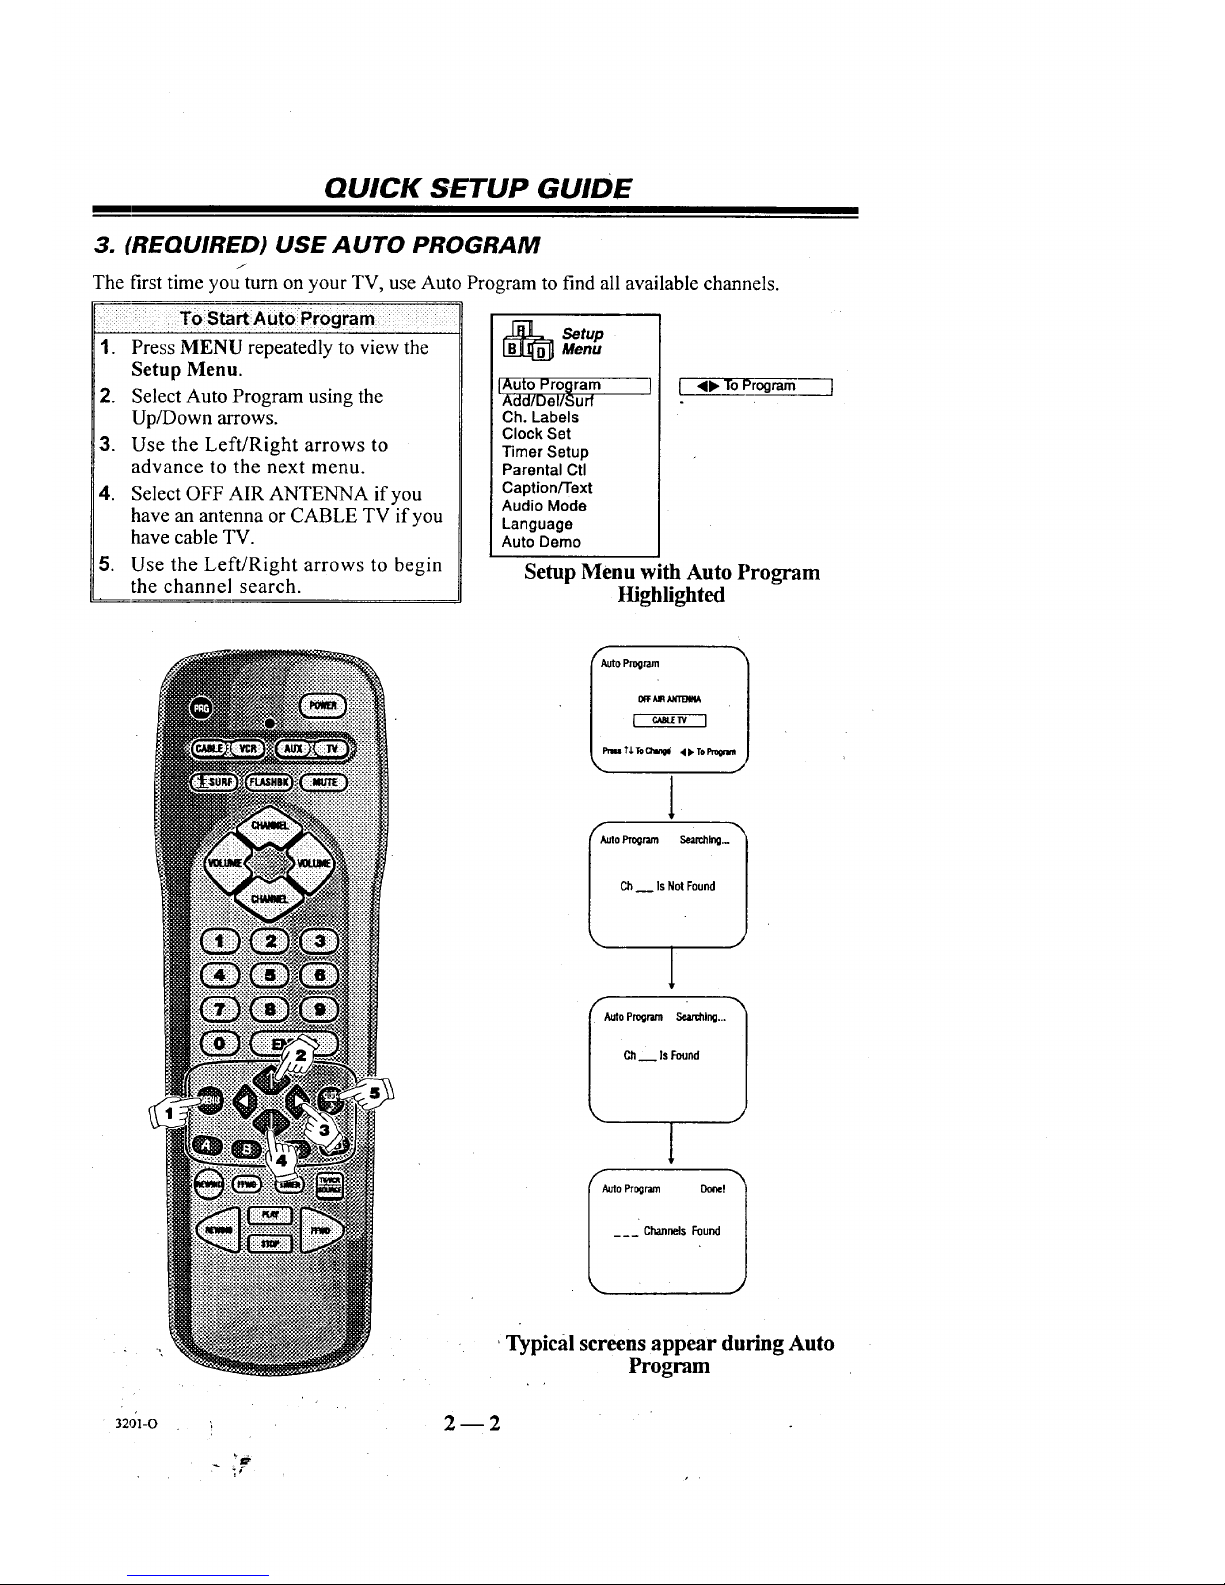
3. (REQUIRED) USE AUTO PROGRAM
J
The first time you turn on your TV, use Auto Program to find all available channels.
1. Press MENU repeatedly to view the
Setup Menu.
2. Select Auto Program using the
Up/Down arrows.
3. Use the Left/Right arrows to
advance to the next menu.
4. Select OFF .AIR ANTENNA if you
have an antenna or CABLE TV if you
have cable TV.
5. Use the Left/Right arrows to begin
the channel search.
[_ SetupMenu
I_to Program f
Add/Del/Surf
Ch. Labels
Clock Set
Timer Setup
Parental Ctl
Caption/Text
Audio Mode
Language
Auto Demo
[ <b" To Program
Setup Menu with Auto Program
Highlighted
J
l
FA.,op,og,_ _-1
Ch__ Is NotFound
" l
Ch_ IsFound
1
l AutoProgram Do_e!
__ ChannelsFound
3201-0
'Typical screens appear during Auto
Program
2m2

QUICK SETUP GUIDE
4. SI'T THE CLOCK
To Set the Clock
1. Press MENU repeatedly to view the
Setup Menu.
2. Select Clock Set using the Up/Down
alTOWS.
3. Use the numbers on your remote to
enter the time and press TIMER to
select AM or PM. (You can also use
the Left/Right arrows to set the clock
to the current time.)
4. Press ENTER to remove the menu
from view.
_ etup
Menu
Auto Program
Add/Del/Surf
Ch. Labels
Clock Set
Timer Setup
Parental Ctl
Caption/Text
Audio Mode
Language
Auto Demo
[ 10:30 AM_
Setup Menu with Clock Set Highlighted
3201-0
g-
2_3 "