


© Copyright 2005, LG Electronics USA, Inc.
Installation and Operating Guide | Warranty
Model Numbers
| |
LCD TV
Z15LCD1
Z20LCD1*
*
2
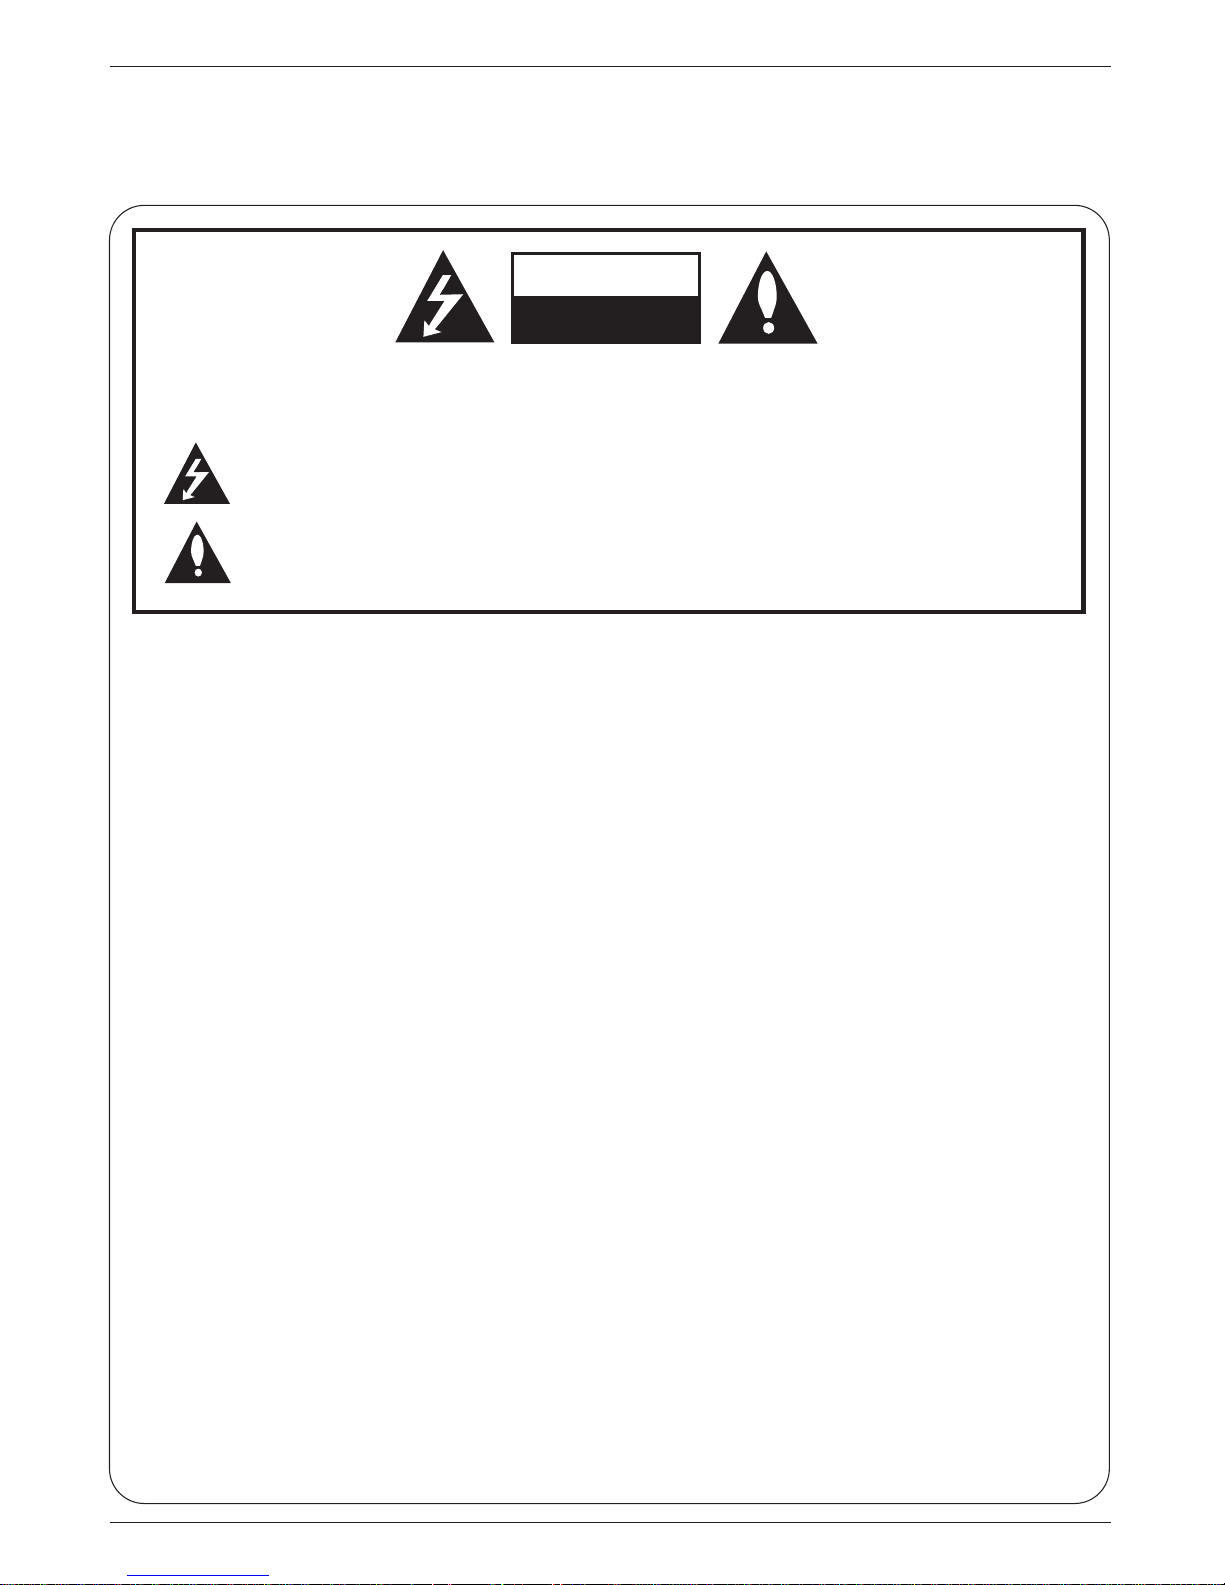
Warning
WARNING:
TO REDUCE THE RISK OF ELECTRIC SHOCK DO NOT REMOVE COVER (OR BACK). NO
USER SERVICEABLE PARTS INSIDE. REFER TO QUALIFIED SERVICE PERSONNEL.
The lightning flash with arrowhead symbol, within an equilateral triangle, is intended to alert the
user to the presence of uninsulated “dangerous voltage” within the product’s enclosure that may
be of sufficient magnitude to constitute a risk of electric shock to persons.
The exclamation point within an equilateral triangle is intended to alert the user to the presence of
important operating and maintenance (servicing) instructions in the literature accompanying the
appliance.
NOTE TO CABLE/TV INSTALLER:
This reminder is provided to call the CATV system installer’s attention to Article 820-40 of the
National Electric Code (U.S.A.). The code provides guidelines for proper grounding and, in particular, specifies that the cable ground shall be connected to the grounding system of the building, as close to the point of the cable entry as practical.
REGULATORY INFORMATION
This equipment has been tested and found to comply with the limits for a Class B digital device,
pursuant to Part 15 of the FCC Rules. These limits are designed to provide reasonable protection against harmful interference in a residential installation. This equipment generates,
uses and can radiate radio frequency energy and, if not installed and used in accordance with
the instructions, may cause harmful interference to radio communications. However, there is
no guarantee that interference will not occur in a particular installation. If this equipment does
cause harmful interference to radio or television reception, which can be determined by turning the equipment off and on, the user is encouraged to try to correct the interference by one
or more of the following measures:
- Reorient or relocate the receiving antenna.
- Increase the separation between the equipment and receiver.
- Connect the equipment into an outlet on a circuit different from that to which the receiver is connected.
- Consult the dealer or an experienced radio/TV technician for help.
Any changes or modifications not expressly approved by the party responsible for compliance
could void the user’s authority to operate the equipment.
CAUTION:
Do not attempt to modify this product in any way without written authorization from LG Electronics
Corporation. Unauthorized modification could void the user’s authority to operate this product.
COMPLIANCE:
The responsible party for this device compliance is:
Zenith Electronics Corporation
1-201-816-2000
Marked and distributed in the United States by LG Electronics U.S.A., Inc.
1000 Sylvan Avenue, Englewood Cliffs, NJ 07632
http://www.zenith.com
CAUTION
RISK OF ELECTRIC SHOCK
DO NOT OPEN
W
W
arning
arning
Safety Instructions
Safety Instructions
3
Safety Instructions
WARNING :
To Reduce The Risk Of Fire Or Electric Shock, Do Not Expose This Apparatus To Rain Or Moisture.
Apparatus shall not be exposed to dripping or splashing and no objects filled with liquids, such as vases,
shall be placed on the apparatus.
IMPORTANT SAFETY INSTRUCTIONS
1. Read these instructions.
2. Keep these instructions.
3. Heed all warnings.
4. Follow all instructions.
5. Do not use this apparatus near water.
6. Clean only with a dry cloth.
7. Do not block any of the ventilation openings. Install in accordance with the manufacturer’s instructions.
8. Do not install near any heat sources such
as radiators, heat registers, stoves, or other
apparatus (including amplifiers) that produce heat.
9. Do not defeat the safety purpose of the
polarized or grounding type plug. A polarized plug has two blades with one wider
than the other. A grounding type plug has
two blades and a third grounding prong. The
wide blade or the third prong is provided for
your safety. When the provided plug does
not fit into your outlet, consult an electrician
for replacement of the obsolete outlet.
10. Protect the power cord from being walked
on or pinched particularly at plugs, convenience receptacles, and the point where
they exit from the apparatus.
11. Only use the attachments / accessories
specified by the manufacturer.
Owner's M
anual
4
Safety Instructions
Safety Instructions continued
Safety Instructions continued
12. Use only with a cart, stand, tripod, bracket, or
table specified by the manufacturer, or sold
with the apparatus. When a cart is used, use
caution when moving the cart / apparatus
combination to avoid injury from tip-over.
13. Unplug this apparatus during lightning storms
or when unused for long periods of time.
14. Refer all servicing to qualified service personnel. Servicing is required when the
apparatus has been damaged in any way,
such as power supply cord or plug is damaged, liquid has been spilled or objects
have fallen into the apparatus, the apparatus has been exposed to rain or moisture,
does not operate normally, or has been
dropped.
On Disposal
a. The fluorescent lamp used in this product contains a small amount of mercury.
b. Do not dispose of this product with general household waste.
Disposal of this product must be carried out in accordance to the regulations of your local authority.
Note
- If the TV feels cold to the touch, there may be a small “flicker” when when it is turned on. This
is normal, there is nothing wrong with TV.
- Some minute dot defects may be visible on the screen, appearing as tiny red, green, or blue
spots. However, they have no adverse effect on the monitor's performance.
- Avoid touching the LCD screen or holding your finger(s) against it for long periods of time.
Doing so may produce some temporary distortion effects on the screen.
CAUTION concerning the Power Cord
Most appliances recommend they be placed upon a dedicated circuit; that is, a single outlet circuit
which powers only that appliance and has no additional outlets or branch circuits. Check the specification page of this owner's manual to be certain.
Do not overload wall outlets. Overloaded wall outlets, loose or damaged wall outlets, extension
cords, frayed power cords, or damaged or cracked wire insulation are dangerous. Any of these conditions could result in electric shock or fire. Periodically examine the cord of your appliance, and if
its appearance indicates damage or deterioration, unplug it, discontinue use of the appliance, and
have the cord replaced with an exact replacement part by an authorized servicer.
Protect the power cord from physical or mechanical abuse, such as being twisted, kinked, pinched,
closed in a door, or walked upon. Pay particular attention to plugs, wall outlets, and the point where
the cord exits the appliance.

5
Contents
Contens
Warnings....................................................................................................................2
Safety Instruction ·······································································································3-4
Introducyion
controls ······················································································································6
Connection Options····································································································7
Remoe Control Key Functions ···················································································8
Installation
Accessories················································································································9
Installtion Instruction ··································································································10
External Equipment Connections···············································································11-15
Aetenna Connection···································································································11
VCR Setup ·················································································································12
Cable TV Setup··········································································································12
External A/V Source Setup·························································································13
DVD Setup ·················································································································13
DTV Setup ·················································································································14
Using headphones ·····································································································14
PC Setup····················································································································15
Operation
To Use The Menus ·····································································································16
Main Menu ·················································································································16
Sound Menu Options ·································································································17
Picture Menu Options·································································································18
Special Menu Options ································································································19
Child Lock ··················································································································20
Channel Menu Options ······························································································21
Special Menu Options ································································································22
Maintenance ·············································································································23
Product Specifications····························································································23
Troubleshooting Checklist······················································································24
After reading this manual,Keep it handy for future reference.
6
Introduction
Introduction
Introduction
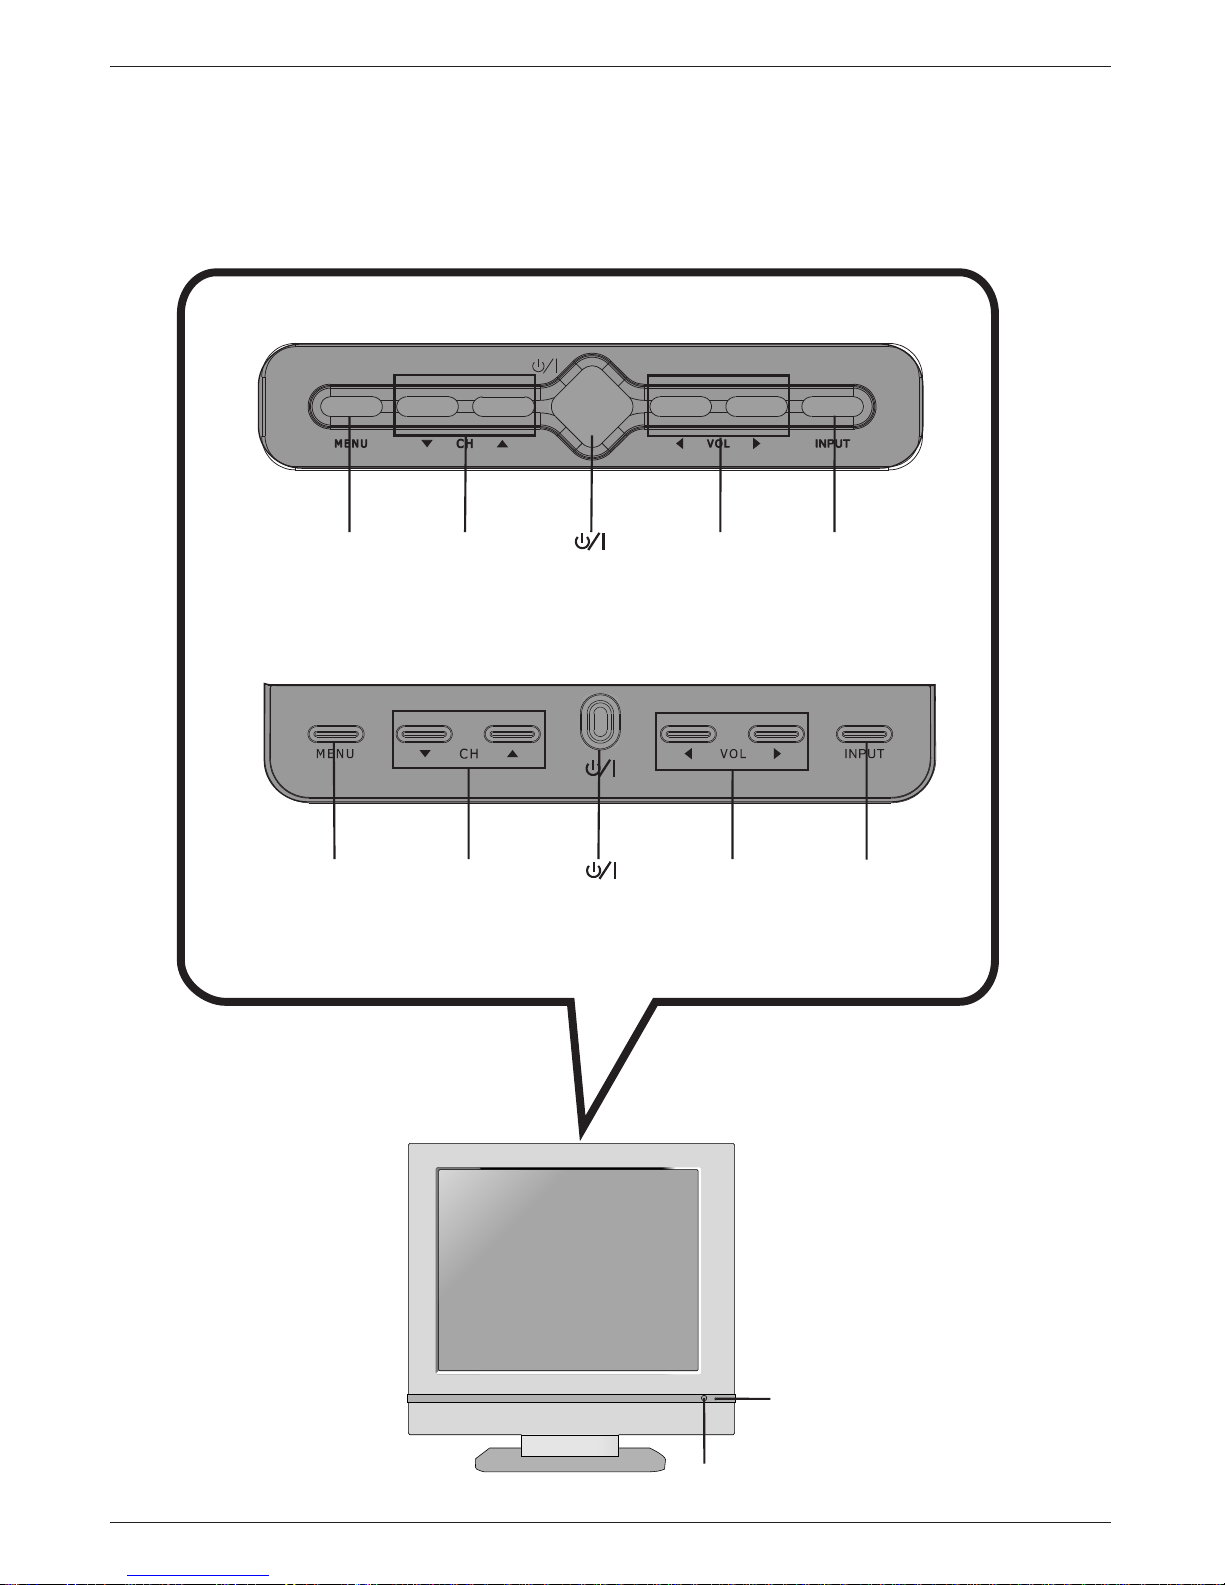
Controls
Controls
Z15LCD1
Z20LCD1
Menu CH
VOL
INPUT
Menu
CH VOL
INPUT
Remote Control Sensor
Power/Standby Indicator
Glows red in Standby mode,
Glows green when the TV is turned on
.
7
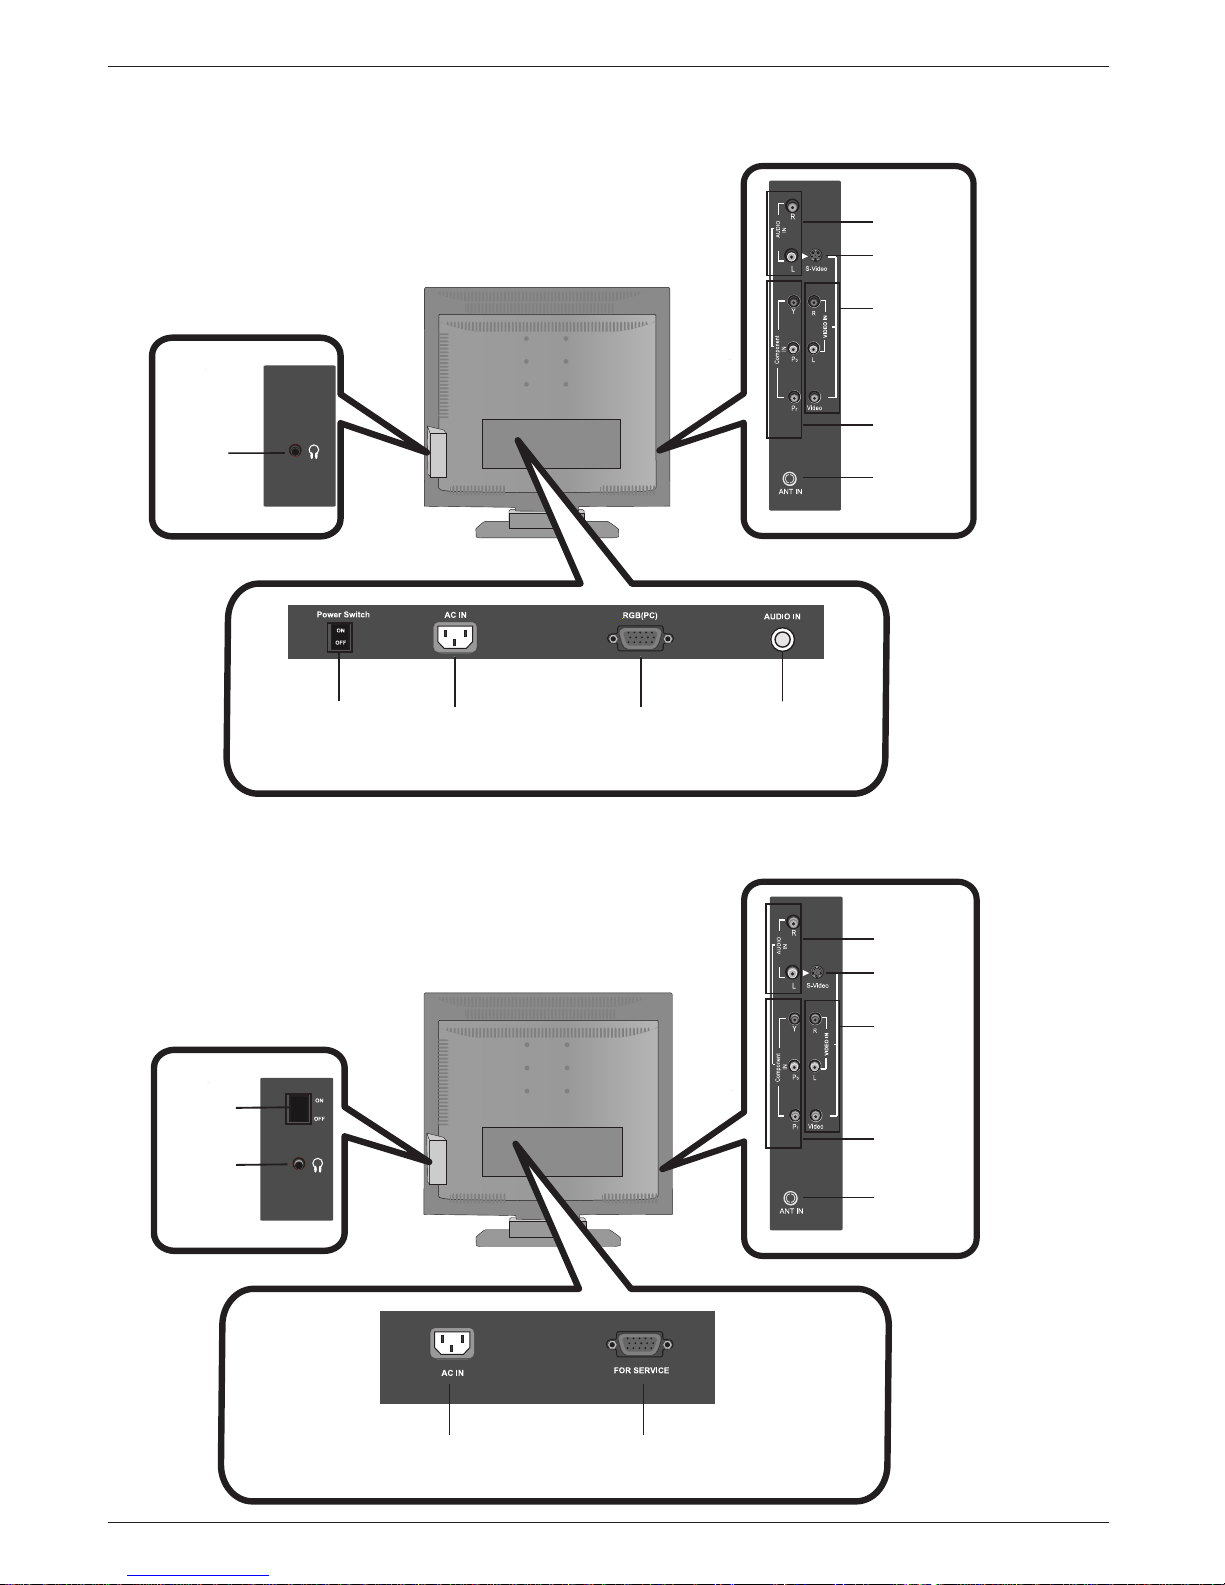
Introduction
Connection Options
Connection Options
Z15LCD1
Power Switch AC IN RGB(PC) AUDIO IN
HEADPHONE
JACK
AUDIO IN
S-Video
VIDEO IN
Component IN
ANT IN
Z20LCD1
AC IN FOR SERVICE
ON/OFF
HEADPHONE
JACK
AUDIO IN
S-Video
VIDEO IN
Component IN
ANT IN
8
Introduction
- When using the remote control, aim it at the remote control sensor on the TV.
• Open the battery compartment cover on the back side and insert
the batteries with correct polarity.
• Use two 1.5V batteries of AAA type. Don’t mix used batteries with
new batteries.
Installing Batteries
Installing Batteries
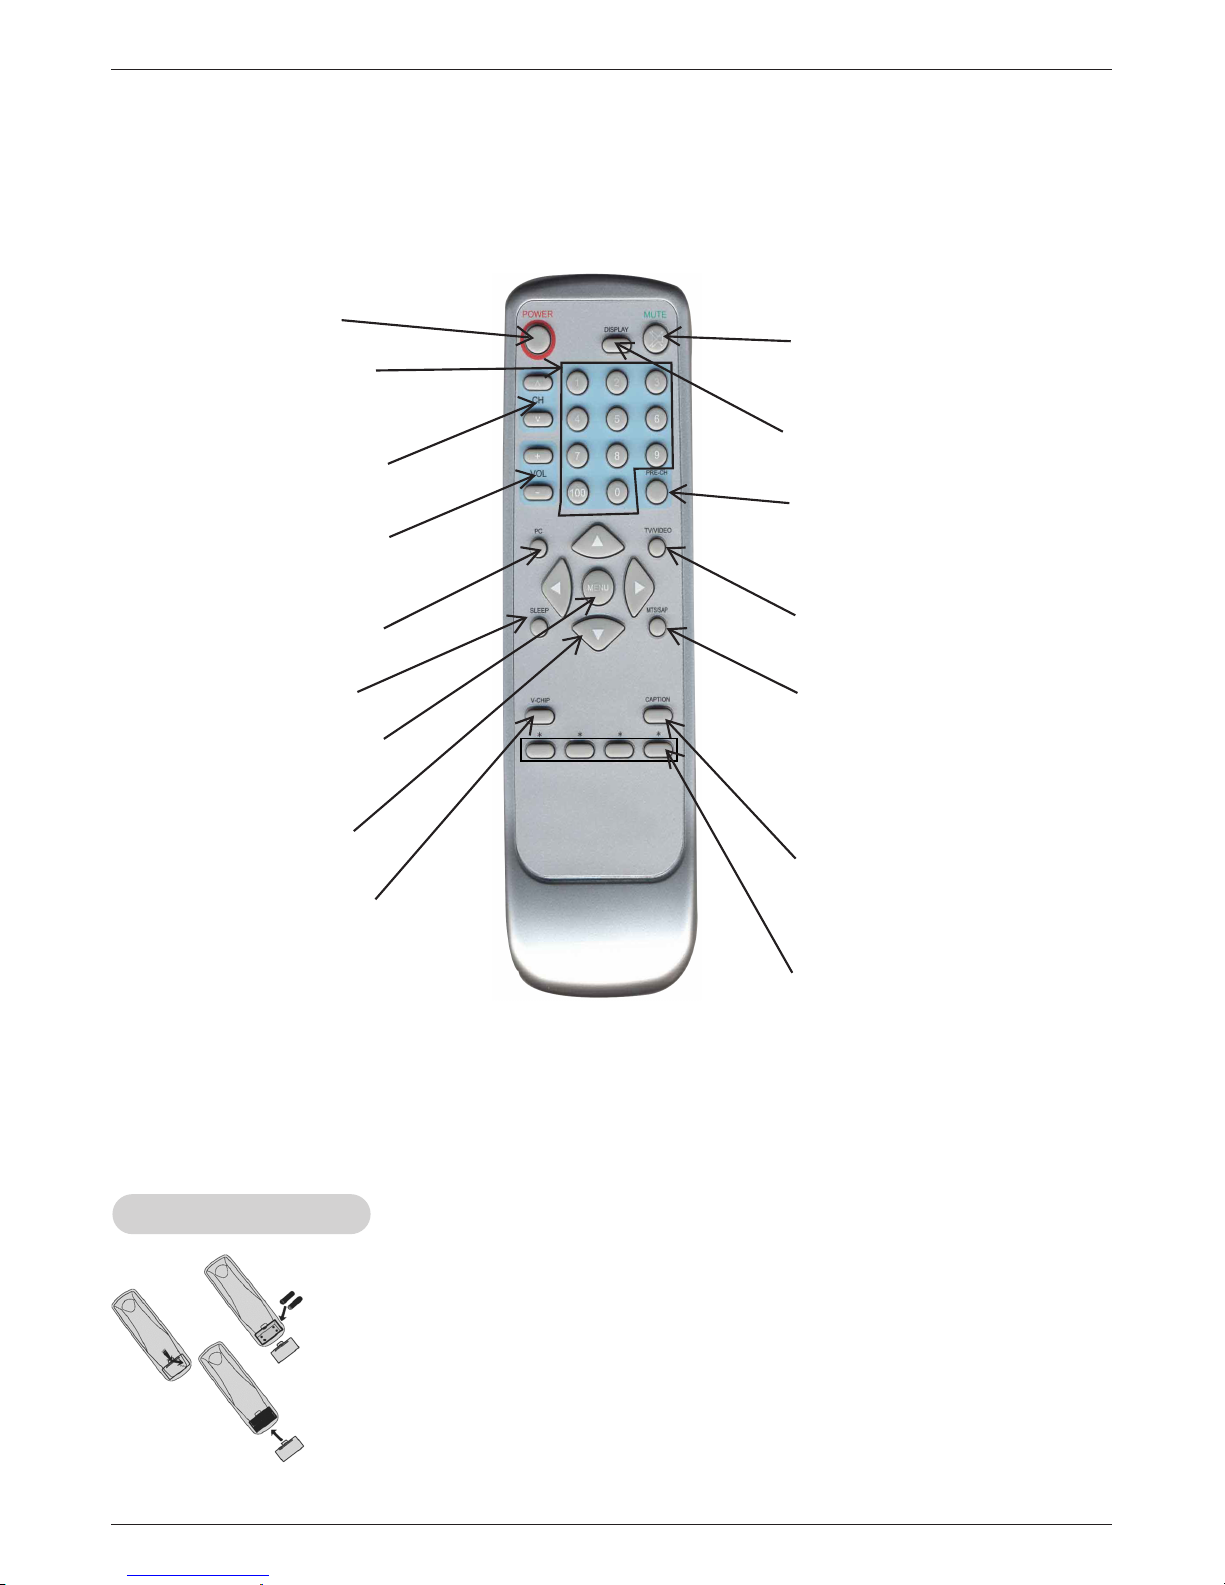
Remote Control Key Functions
Remote Control Key Functions
POWER: Power On/Off.
0~9 : Number buttons
CH: Press¿ or À to adjust
channel.
VOL: Press + or - to adjust
the volume.
PC: To change PC mode
(Only for Z15LCD1) .
SLEEP: To set sleep timer.
MENU: Press repeatedly to
display or exit OSD menu.
:Move menu
cursor or set menu
MUTE: Swithes the
sound on or off.
DISPLAY: Press this
button to display
Channel.
MTS /SAP: Press this
key to activate
Multichannel Television
Sound,
St
ereo or Mono
PRE-CH: To return the
last channel you were
watching.
TV/VIDEO:Press repeatedly
VIDEO IN
to select input source
▼
▲
V-CHIP:Press this button to
setup parental control
, , ,
sound.
CAPTION;: Press this
button to bring up
Closed Caption setup
menu.
▲
▲
*:No funcion
100:Number button:choose
two ,three digital channel
entry.

9
Installation
Audio cable (PC)
(Z15LCD1 only)
Owner’s Manual
AAA Batteries
Remote Control
Power Cord
D-sub cable (PC)
(Z15LCD1 only)
3-Fixing screw for stand
Installation
Installation
Accessories
Accessories
(Z20LCD1 only)
© Copyright
2005,
LG Electronics
USA,
Inc.
Installation
and
Operating
Guide
| W
arranty
Model
Numbers
|
|
LCD
TV
Z15LCD1
Z20LCD1

Note: Here shown may be somewhat different from your set.
10
Installation
Installation Instruction
Installation Instruction
A
ssembly the stand base
Installation Instruction
Installation Instruction
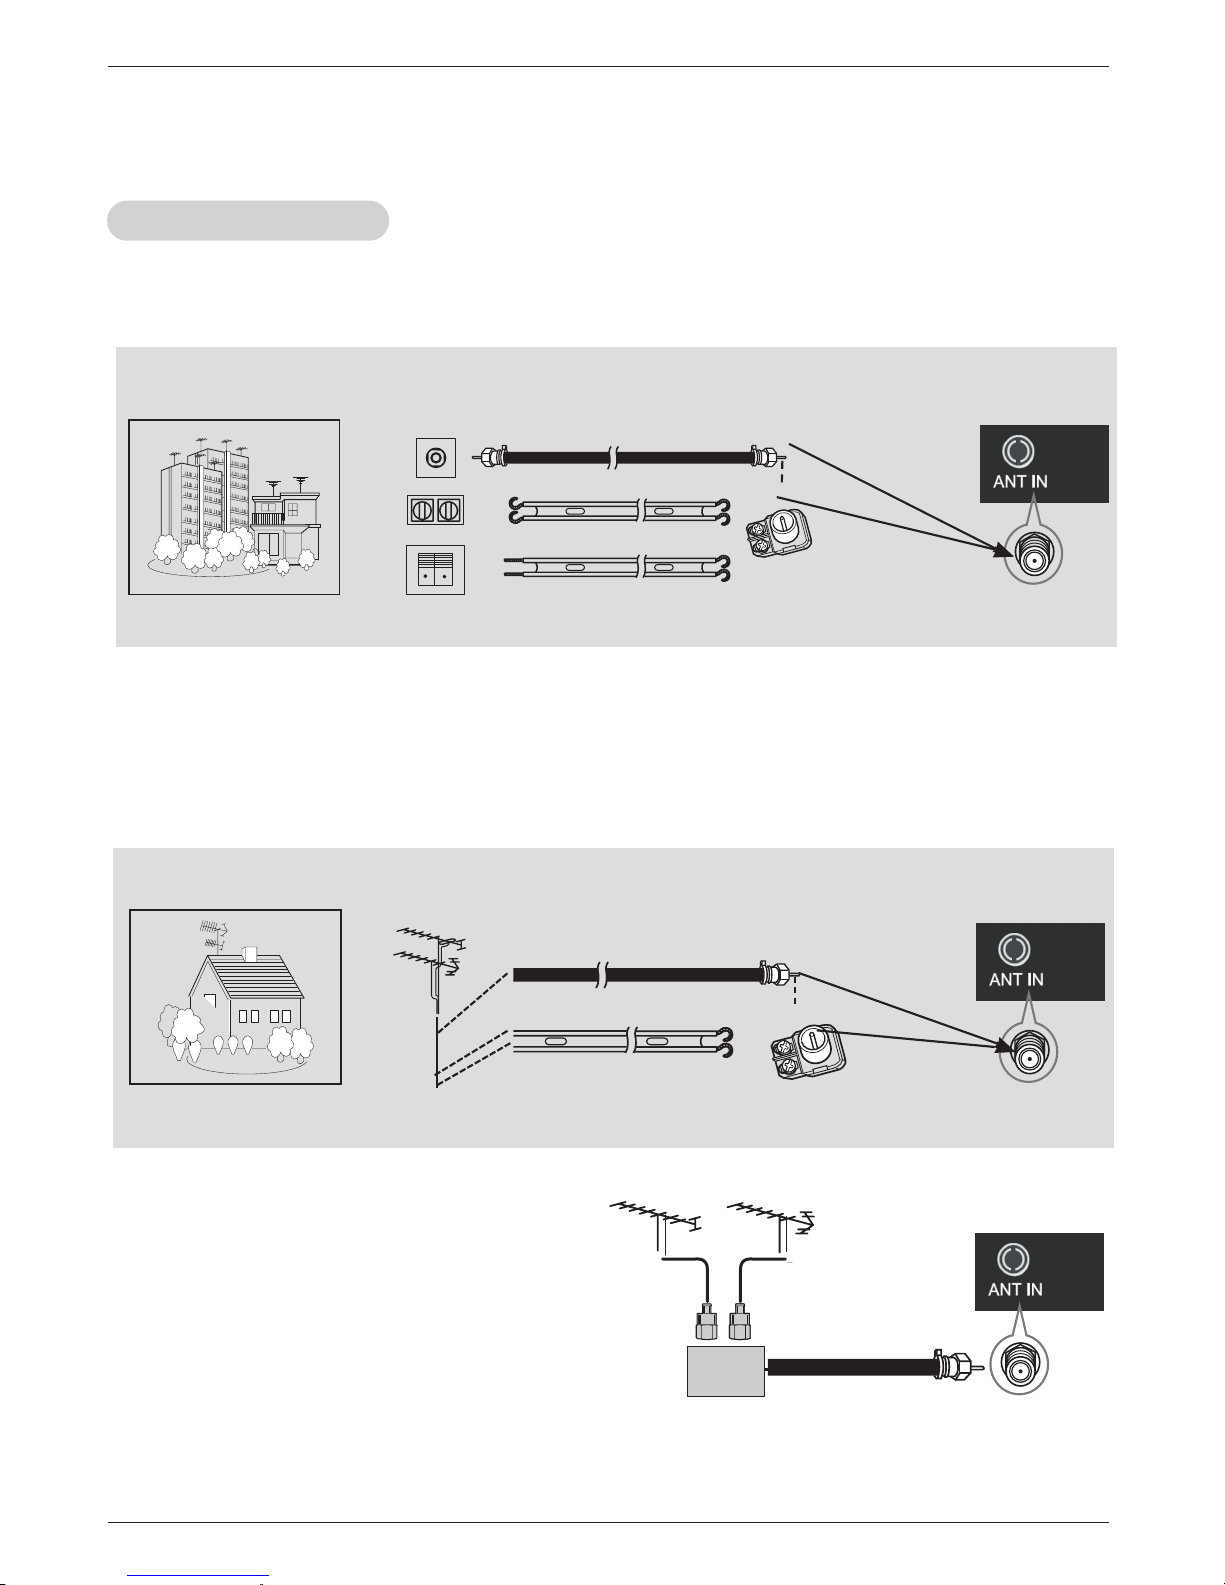
1. Connect the aerial cable to the socket marked ANT IN on the side. For the best reception an
outdoor aerial should be used.
2. To connect an additional equipment, see the External Equipment Connections section.
3. Connect the power cord.
Note: Here shown may be somewhat different from your set.
Connection of
Connection of TVTV
1. Place the set with its front facing dowmward on a soft cloth.
2. Assemble the stand into the set in the correct direction.
Make sure you push it until you hear it "click".
3. Once assembled take the set up carefully and face the front side.
4. Lock 3pcs fixing screws at the last step(for Z20LCD1 only).
11
Installation
External Equipment Connections
External Equipment Connections
- For optimum picture quality, adjust antenna direction.
- Typical wall antenna jack used in apartment buildings, connect the antenna cable as shown below.
(Use the correct type of antenna cable for the type of wall antenna jack.)
Wall Connection Jack
Apartment Buildings
Antenna Jack
Copper Wire
Turn clockwise to tighten.
Antenna
Converter
300Ω Flat Wire
75Ω Round Cable
- This type of antenna is commonly used in single family dwellings.
UHF
Antenna
VHF Antenna
- If you have a 75Ω round cable, insert the bronze wire and then tighten the connection nut. If you have
a 300Ω flat wire, connect the twisted wire to the antenna converter and then connect the converter to
the antenna jack on the TV.
- If using 75Ω round cable, do not bend the bronze wire. It may cause poor picture quality.
- In poor signal areas, to get better picture quality, install a signal amplifier to the antenna as
shown to the right.
- If signal needs to be split for two TVs, use an
antenna signal splitter for connection.
Signal
Amplifier
UHF
VHF
Single Family Home
Connecting to an Inside Antenna Setup
Connecting to an Outdoor Antenna Setup
Copper Wire
Turn clockwise to tighten.
Antenna
Converter
300Ω Flat Wire
75Ω Round Cable
Antenna Connection
Antenna Connection
Antenna Jack
Antenna Jack

Installation
Cable
Cable
TV Setup
TV Setup
VCR Setup
VCR Setup
- In Video mode, TV automatically reverts to
TV
mode if the INPUT
buttons are pressed.
Connection 1
Set VCR switch to 3 or 4 and then tune TV to
the same channel number.
Connection 2
1. Connect the audio/video output jacks on VCR
to the corresponding input jacks on the TV.
When connecting the TV to a VCR, match the
jack colors (Video = yellow , Audio Left =
white, and Audio Right = red).
2. Insert a video tape into the VCR and press
PLAY on the VCR. (Refer to the VCR owner
manual.)
3. Use the TV/VIDEO button on the remote control
to select . (If connected to S-VIDEO on
rear panel, select the S-Video external input
source.)
Connection 1
1. Select 3 or 4 with channel switch on cable box.
2. Tune the TV channel to the same selected output channel of
cable box.
3. Select channels at the cable box or with the cable box remote control.
Connection 2
1. Connect the audio/video output jacks on Cable Box to the corresponding input jacks on the TV . When connecting the TV to Cable
Box, match the jack colors
(V ideo = yellow , Audio Left = white, and Audio Right = red).
2. Use the TV/VIDEO button on the remote control to select .
3. Select channels with the cable box remote control.
- After subscribing to a local cable TV service and installing a converter , you can watch cable TV programming.
- For further cable TV information, contact a local cable service provider.
External Equipment Connections Continued
External Equipment Connections Continued
OUT
IN
CH3 CH4
S-VIDEO
ANT IN
ANT OUT
(R) (L)
AUDIOVIDEO
1
Typical
Antennas
VCR
Direct
Connection
2
OUT
IN
CH3 CH4
S-VIDEO
ANT IN
ANT OUT
(R) (L)
AUDIOVIDEO
Typical
Antennas
VCR
Direct
Connection
2
TV
VCR
RF Cable
(R) AUDIO (L) VIDEO
1
Cable Box
2
Video
Video .
12
1
1

R
AUDIO VIDEO
L
Installation
External
External
A/V Source Setup
A/V Source Setup
Connections
Connect the audio/video output jacks on the
external A/V equipment to the corresponding
input jacks on the TV . When connecting the
TV to external A/V equipment, match the jack
colors (Video = yellow, Audio Left = white,
and Audio Right = red).
Viewing Setup
1. Turn on the external A/V equipment.
2. Use the TV/VIDEO
button on the remote con-
trol to select V ideo .
3. Operate the corresponding external equipment. Refer to external equipment operating guide.
Camcorder
Video Game
set
External
Equipment
AUDIOYPB PR (L)
(R)
DVD
DVD Setup
DVD Setup
Viewing Setup
1. Turn on the DVD player , insert a DVD.
2. Use the button on the remote control to select
Component.
3. Refer to the DVD player's manual for operating instructions. (If connected to S-VIDEO on rear panel, select the
Video external input source.)
Component ports
of the TV
Y P B
P R
Video output ports
of DVD player
Y
Y
Y
Y
Pb
B-Y
Cb
P B
Pr
R-Y
Cr
P R
Component Input ports
To get better picture quality , connect a DVD player to
the component input ports as shown below.
Connections
1. Connect the DVD video outputs to the COMPONENT (Y, P B , P R ) jacks and connect the DVD audio
outputs to the AUDIO jacks.
2. If your DVD only has an S-V ideo output jack, connect this to the S-VIDEO input on the TV and connect the DVD audio outputs to the AUDIO INPUT jacks on the TV .
NOTE: If your DVD player does not have component video output, use S-V ideo.
Model Signal Component
Z15LCD1
Z20LCD1
480i/480p/720p/1080i
480i/480p
Ye s
Ye s
13
TV/VIDEO

Ins ta llation
DT V S etup
DT V S etup
- To watch digitally broadcast progra ms, purchase and connect a digital s et-top box.
C onnections
C onnect the digital set-top box video outputs to the C OM-
P ONE NT (Y, P B, P R ) jacks and connect the digital set-top
box audio outputs to the AUDIO jacks . (or, C onnect the
set-top box with the D-s ub output socket to P C INP UT
socket on the set and audio cable of the s et-top box to the
P C S OUND. (Z15L CD1 )
Viewing S etup
1. Turn on the digital s et-top box. (R efer to the owner's
manual for the digital s et-top box.)
2. Us e the TV/VIDEO button on the remote control to s elect
C omponent or PC (Z15L CD1
DT V R ec eiver
(S et-top B ox )
DT V R ec eiver
(S et-top B ox )
(Z15L CD1)
AUD IO
RG B -PV O UT PU T
14
AUDIOYPB PR (L)
(R)
Using Headphones
-Plug headphones in to H/P jack as shown.
-Adjust sound level to a headphone using the volume
buttons.While you are listening to sound
through a headphone(s),TV speakers will not be heard.
B R
box audio outputs to the AUDIO jacks . (or, C onnect the
set-top box with the D-s ub output socket to P C INP UT
socket on the set and audio cable of the s et-top box to the
P C S OUND. (Z15L CD1only
Viewing S etup
1. Turn on the digital s et-top box. (R efer to the owner's
manual for the digital s et-top box.)
2. Us e the TV/VIDEO button on the remote control to s elect
C omponent or PC (Z15L CD1 ).
only
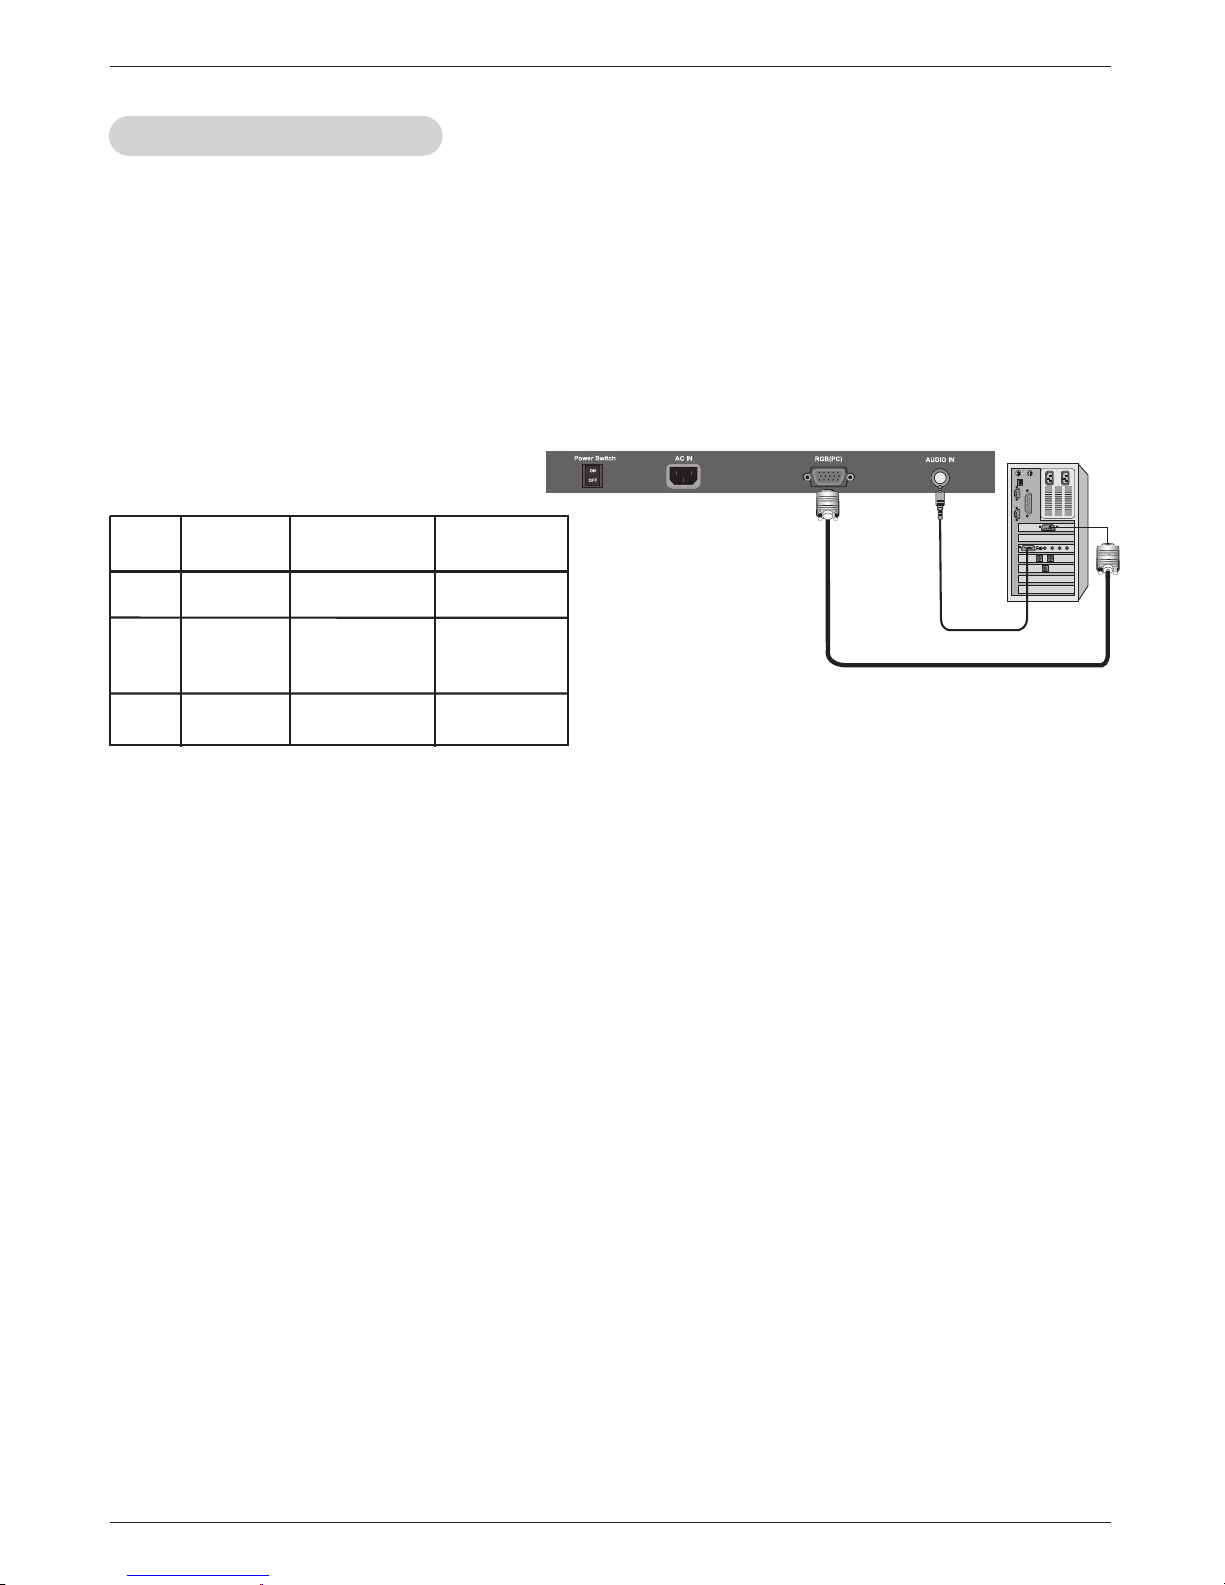
Ins ta llation
- After setup, be sure to select PC source on TV.
P C S etup (15LC1R
P C S etup (Z15LC D1
only)
only)
C onnections
1. Set the monitor output resolution on the P C b efore connecting to the T V.
2. Connect the TV to the P C with the P C cable.
3. Connect the P C audio output to the T V's P C S OUND input.
Viewing Setup
1. Turn on the P C.
2. Us e the P C button on the remote control to s elect PC
.
NOT E S
Monitor Dis play S pecific ations
MO DE R e s olu tion
Hor izo ntal
F requ enc y(k Hz )
Ve rtic al
F requ enc y(H z)
VG A
S VG A
XG A
640x480
800x600
1024x768
31.4
37.8
48.3
60
60
60
15
a. For optimum picture quality, use standard 1024x768@ 60Hz computer output at a 60Hz refres h rate . Us ing other
formats (V GA, S V GA, etc.) or refres h rates may res
ult in reduced picture quality. (To change the computer video
out
put format, please refer to the ope rat ing ma nual for the computer you are using).
b. If the mess age "Input Out of range"
appears on the s creen, adjust the P C output to a format listed in the
'Monitor Dis play S pecifications' chart above.
c. The s ynchroniza tion input form for Horizontal and Vertical frequencies is s eparate.
DP M (Dis play P ower Management) mode
If the P C goes to power sa ving mode, the monitor automatically switches to DP M mode.
If you don't use the P C cable provided, DP M mode may not work.
16
Operation
TO USE THE MENUS
1. Press the MENU button to display each menu
2. Use ▼,▲ to select a menu item.
3. Use
◀,▶ to enter a submenu or enable/disable the function.
4. Press the MENU button to exit the menu.
MAIN MENU
Press the MENU button to enter the main OSD (On Screen Display). Adjust the items including Sound
options, Picture options, Child Lock options, Special options and Channel options.
When the input source is PC (Only for Z15LCD1) or Component mode, only the Sound options, Picture options
and Special options can be selected; shown in the figure below:
When the input source is Video or S-Video mode, Sound options, Picture options, Child Lock options and
Special options can be selected; shown in the figure below:
When the input source is TV mode, Sound options, Picture options, Child Lock options, Special options and
Channel options can be selected; shown in the figure below:
17
Operation
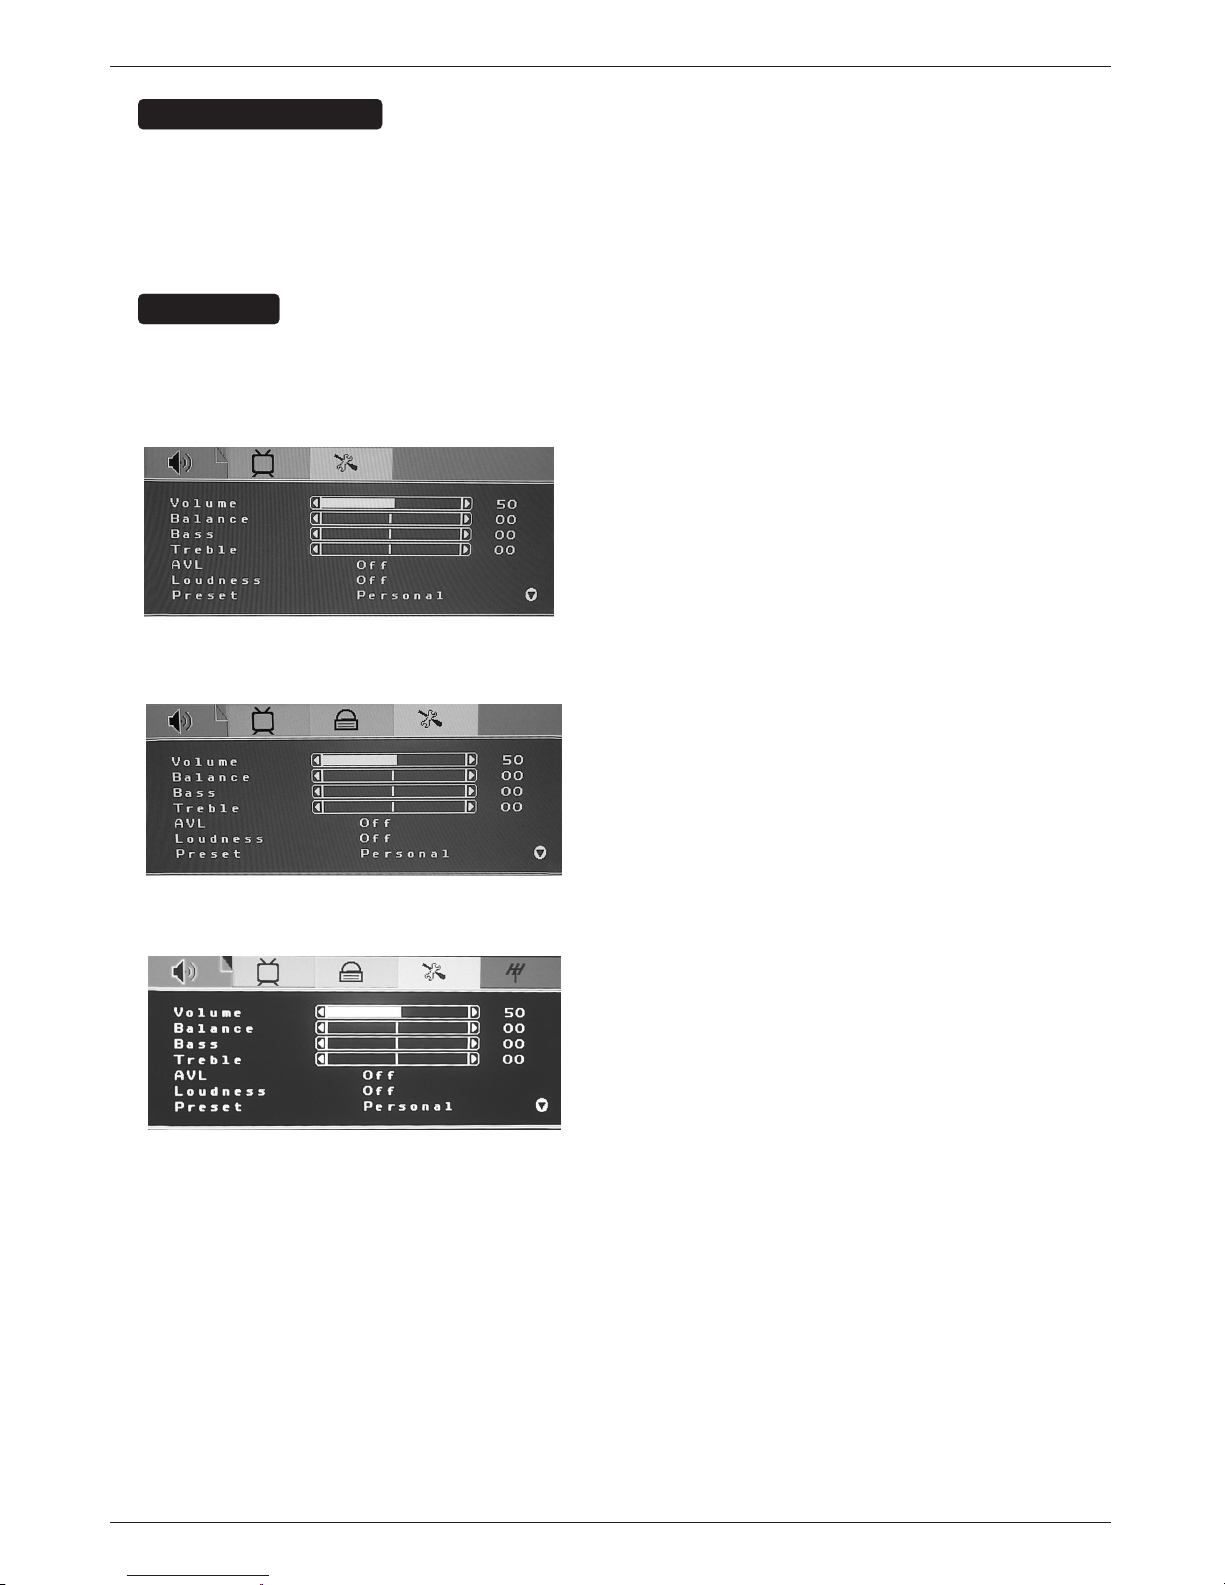
Sound Menu Options
1. The range of adjusting volume, bass : -05~+05, treble : -05~+05.
2. The range of adjusting Balance is L40~R40; when adjusting from 0 to L40, the sound from the left track
fades until silence; when adjusting from 0 to R40, the sound from the right track fades until silence.
AVL: you can set it “ON” or “OFF”.
The function is to adjust the input sound automatically. You may enable this function when you notice that
the sound in the two tracks are very different, in order to prevent the bad sound effect resulting from large
sound variation.
5.
Select "ON" or "OF F" for Loudness: a default setting is preset, you may adjust when necessary.
The follow ing menu will appear when selecting continuously:
6.
Preset: Designed for different types of sound output, wherein, the dialogue, music and theater modes are
preset; you can set Bass, Treble and Equalizer in sound output mode according to your preference.
7.
Equalizer: You can select and adjust 100, 300, 1K, 3K and 8K respectively (the figures represent the
sound frequency range).
Reset to default: Reset the sound setting to the factory default value.
4.
3.
18
Operation
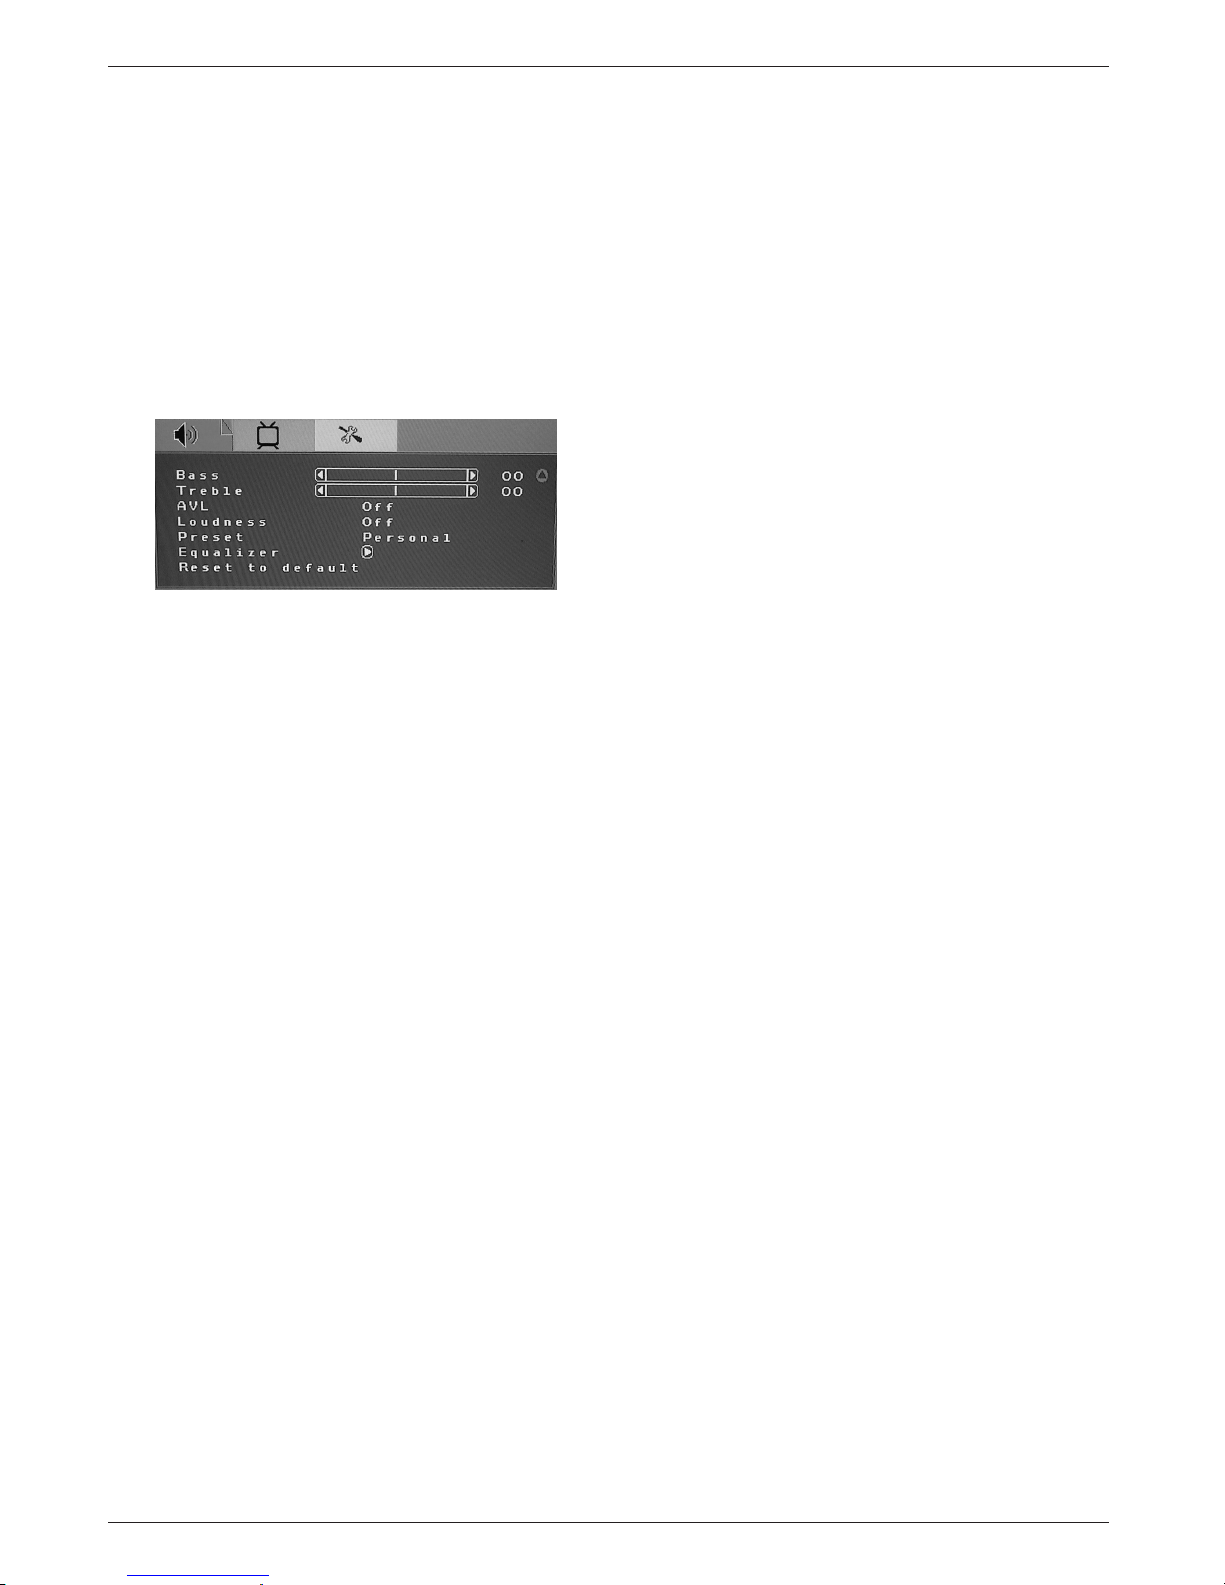
Picture Menu Options
When the input source is in PC mode(Only for Z15LCD1) ,you can select Brightness, Contrast, Position,
Video noise, Sharpness, Info, Color Temp., Red, Green, Blue and Reset to default; shown in
the figure below:
1. Brightness and Contrast: The range can be adjusted from 0~100.
2. Position: There are two options, Horizontal and Vertical, which can be adjusted from -50 to +50.
3. Video noise: There are two options, Phase and Clock, which can be adjusted from -50 to +50.
4. Sharpness: Select from 6 options of Sharp, Sharpest, Auto, Softest, Soft and Normal. You may adjust
the
above options according to your preference.
5.
6.
Info: Prompt the current size for PC input definition (only the definition that can be shown by this device).
7.
Color Temp.: There are four options of colour temperature provided for users - Warm, Normal, Cold
and user. You can select the three colour temperatures of Warm, Normal and Cold, or manually adjust
red, green or blue in the user setting (you can only adjust red, green and blue in the user setting).
Reset to default: It is used to reset the picture settings to the factory default mode.
When the input source is in TV/Video/S-Video mode, you can select Brightness, Contrast, Color, Sharpness,
Tint, Dyn. skin tone,Temperature and Reset to default respectively; shown in the figure below:

19
Operation
When the input source is in Component mode, you can select Brightness, Contrast, Video noise ,Color,
Sharpness, Tint, Temperature and Reset to default respectively; shown in the figure below:
1. Brightness and Contrast: The range can be adjusted from 0~100; use Brightness and Contrast options to
adjust the brightness of picture.
2. Video noise: There are two options, Phase and Clock, which can be adjusted from -50 to +50.
3. Color: The range can be adjusted from 0~100; use this option to adjust the colour saturation of picture.
4. Sharpness: Select from six options of Normal,Softest, Soft, Auto, Sharp and Sharpest. You can adjust
the sharpness of picture using any option above.
5. Tint: The range can be adjusted from R50~G50; use this option to adjust the colour of picture.
6. Temperature.: There are three options of colour temperature provided for users-warm, normal and cold.
7. Reset to default: It is used to reset the picture setting to the factory default mode.
Special Menu Options
When the input source is in TV, Video or S-Video mode, you can select Source OSD, Language, Child lock,
Sleep timer , CC Mode and Reset to default; shown in the figure below:
1. Current Source OSD setting: When OSD is set to ON, the left upper corner of the display will show the
input source or the TV channel number; when OSD is set to OFF, the input source or the TV channel
number will disappear.
2. OSD language setting: There are six language options provided - English, French, German, Spanish,
Portuguese and Traditional Chinese.
3. Child Lock Setup;

20
Operation
(1). Only when the Child Lock is ON, and the Channelock will be enabled; when the Child Lock Setup is OFF,
and the Channelock is disabled.
(2). Lock code: V-Chip password can be set up when the code is locked. Enter the 4-digit password which
you choose! The factory default password is 0000.
4. Sleep Timer: Set the sleeping timer and the alert function which indicates the time left.
5. Closed Caption (CC) setting: Select CC1~CC4, TXT1~TXT4 or OFF.
6. Reset to default: It is used to reset the OSD settings.
When the input source is in PC(only for 15) or Component mode, you can select Source OSD, Language,
S
leep timers and Reset to default; shown in the figure below:
Source OSD, Language, Sleep timer and Reset to default options are operated similarly as the above
instructions!
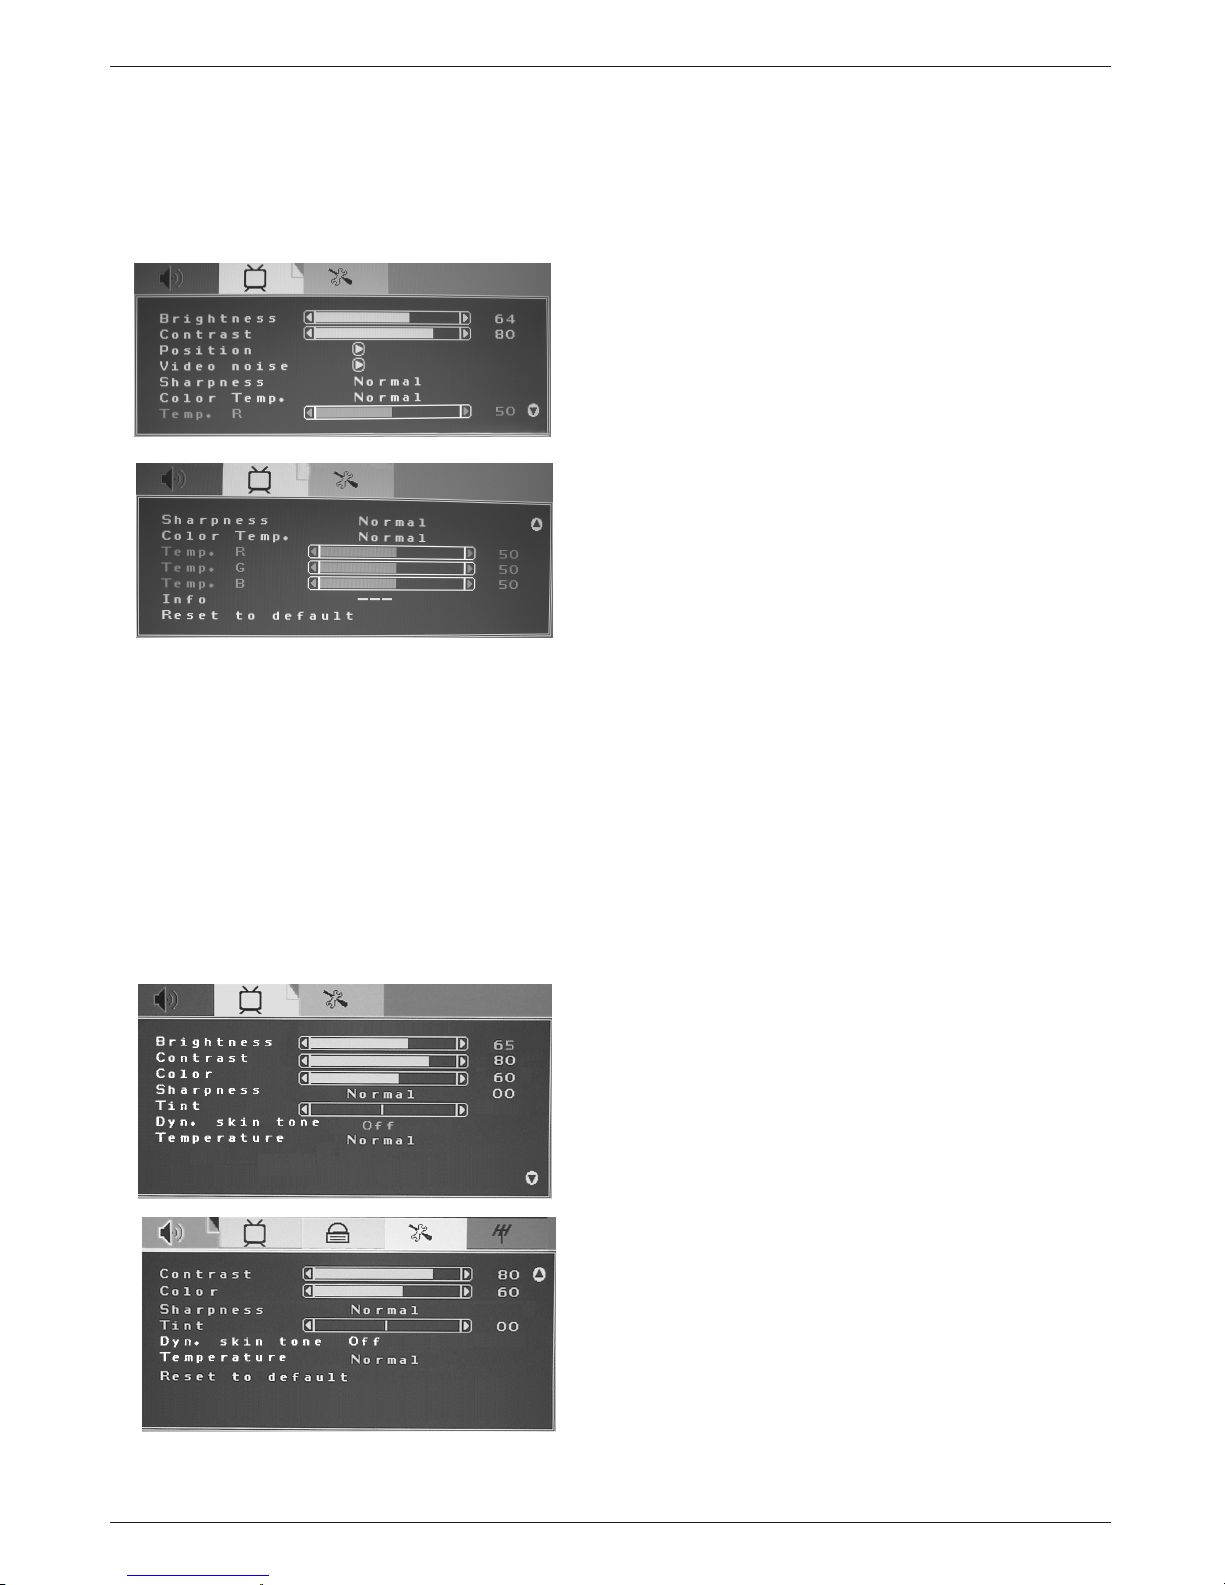
Child Lock
When you enter the Child Lock setting, a message on the display will prompt you to enter password,shown in
the figure below.
You can enter the Child Lock setting to set up the V-Chip level when you enter the correct password:
1. Age: it may be set to Child, Youth, Youth Adult, Adult only, Custom or Off; when you select Custom, it can be
set according to you preference.
7. Note:If your ever forget your password,key in'3','4','4','8'on the remote control.
21
Operation
2. MPAA Rating: Select the movie ratings from low to high (alert) - G, PG, PG-13, R, NC-17, X and Off.
3. TV PG Rating: Shown in the figure below:
The empty box refers to unlocked; the solid box refers to locked.
4. Reset to default: Reset to the factory default value.
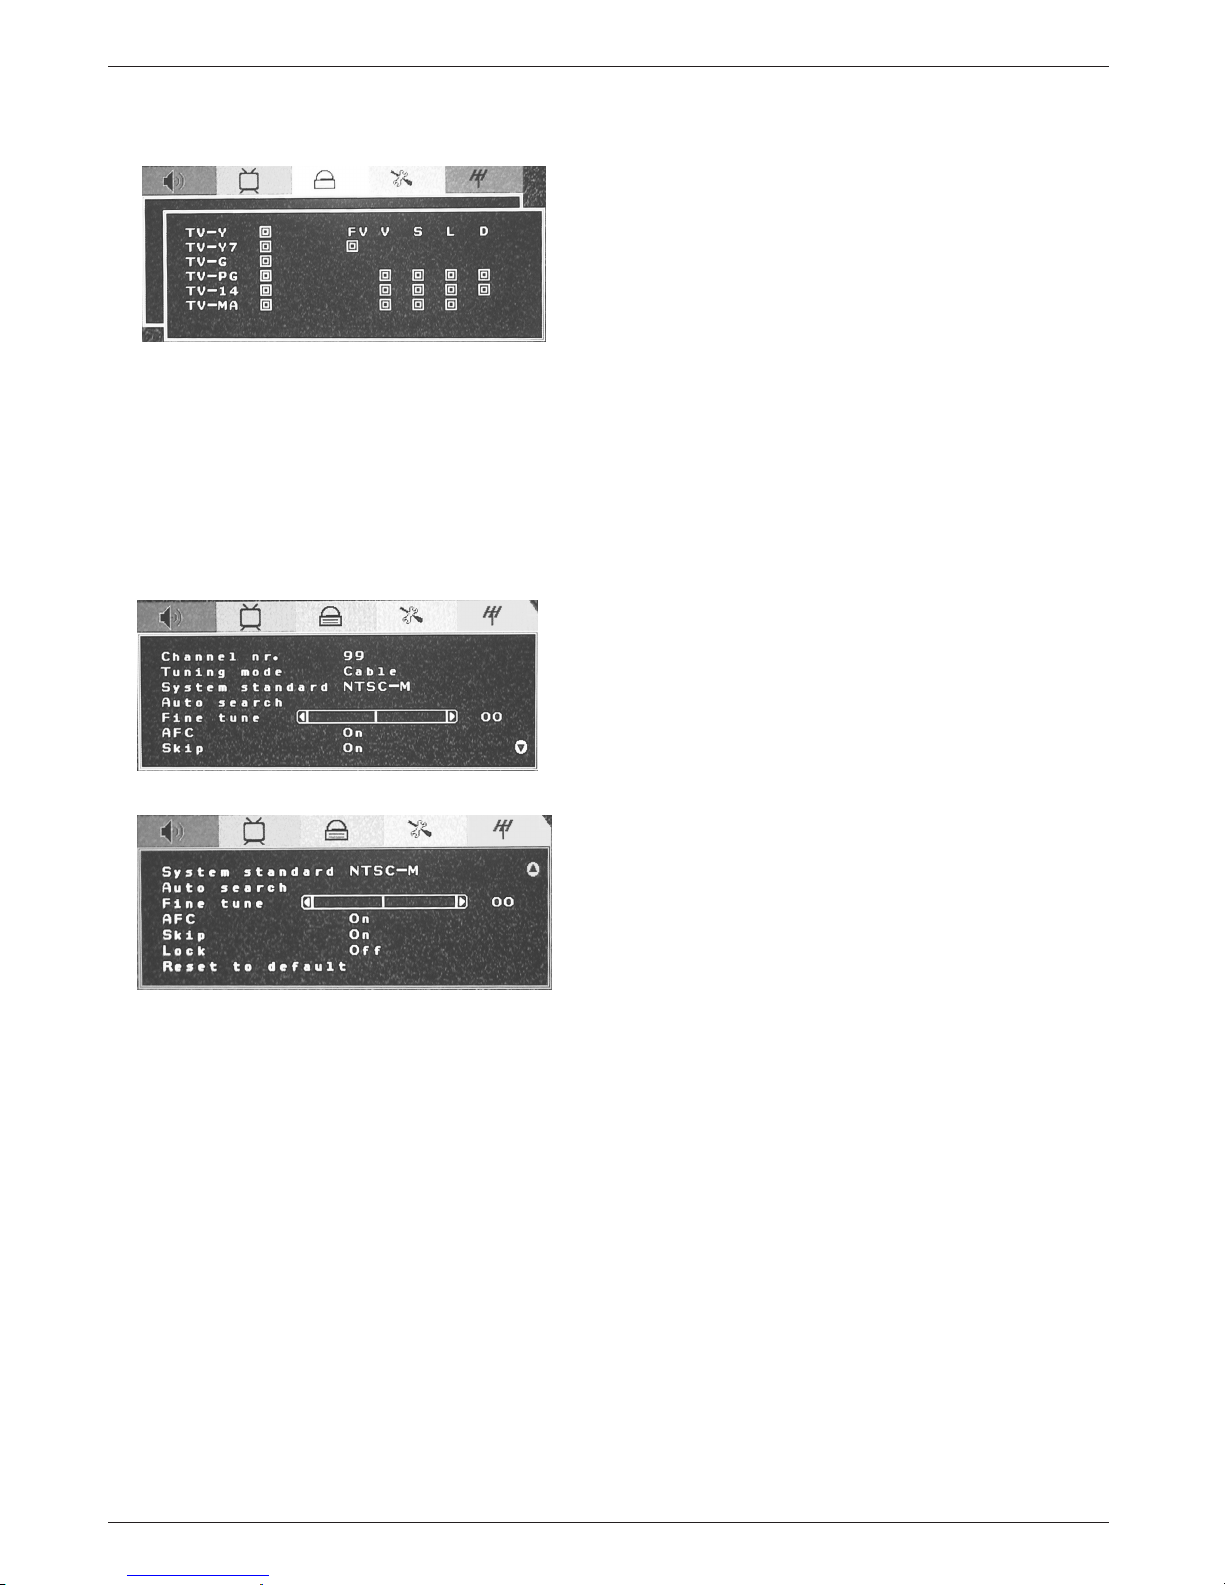
Channel Menu Options
The following menu appears only in the TV mode.
1. Channel nr: Shows the current channel number.
2. Tuning mode: Select the mode of TV signal - Cable\HRC Cable\IRC Cable\ Broadcast.
3. System standard: NTSC-M.
4. Auto search: Select "Auto Search" to search all signaled channel; when the searching is complete, it
stays at the first channel with signal and all channels that have been located are stored. If you would like
to stop "Auto Search" during the process, simply by pressing the function button.
5. Fine tune: NTSC-M is seldomly used.
6. AFC can be set to ON or OFF. When it is set to ON, the TV will search the TV signal automatically; when
there is any offset in the signal, it will automatically adjust the channel to the correct positon.
7. Skip can be set to ON or OFF. When it is set to ON, a channel can be skipped by pressing the switching
button on the remote control or on the front panel.
9. Reset to default: Reset to the factory default value.
8. Lock can be set to on or off,when it is set to on,the current channel is locked.
Channel tuning method: Select "Channel nr", press 100 number button , it will
show"--","---","-"("-" stands for
one digital channel,"--"two digital channel,"---" three digital
channel),then input the channel number you want.

22
Operation
Special Menu Options
Special Menu Options
Closed Captions
Closed Captions
2. An old, bad, or illegally recorded tape is being played.
3. Strong, random signals from a car or airplane interfere with the TV signal.
4. The signal from the antenna is weak.
5. The program wasn’t captioned when it was produced, transmitted, or taped.
Closed captioning is a process which converts the audio portion of a television program into written words
which then appear as subtitles on the television screen. Closed captions allow viewers to read the dialogue and narration of television programs.
Captions are the subtitles of the dialogue and narration of television programs.
For prerecorded programs, program dialogue can be arranged into captions
in advance. Its possible to caption a live program by using a process called
real-time captioning, which creates captions instantly. Real-time captioning is
normally done by professional reporters using a machine shorthand system
and computer for translation into English.
Captioning is an effective system for the hearing-impaired, and it can also aid
in teaching language skills.
• The picture at left shows a typical caption.
• IGNITION:
Picture may flutter, drift, suffer from black spots, or horizontal streaking.
Usually caused by interference from automobile ignition systems, neon lamps,
electrical drills, and other electrical appliances.
• GHOSTS:
Ghosts are caused when the TV signal splits and follows two paths. One is the
direct path and the other is reflected off tall buildings, hills or other objects.
Changing the direction or position of the antenna may improve reception.
• SNOW:
If your receiver is located at the weak, fringe area of a TV signal, your picture
may be marred by small dots. It may be necessary to install a special antenna
to improve the picture.
Caption Tips
FOLLOW ME
Using Closed Captions
• Not all TV broadcasts include closed caption signals.
• Sometimes TV stations broadcast four different caption signals on the same channel. By selecting From
CC 1 to CC 4
, you can choose which signal you view. CC 1 is usually the signal with the captions, while
Another mode might show demonstration or programming information.
• Your TV might not receive caption signals normally in the following situations.
1. Poor reception conditions are encountered:

23
Maintenance & Product Specifications
Maintenance & Product Specifications
Power Requirement
Television System
Television Channel
Television Screen
External Antenna Impedance
Audio Output
Z15LCD1
*
: AC100-120V~ 50/60Hz 1.0A
Z20LCD1
*
: AC100-120V~ 50/60Hz 1.2A
NTSC
VHF : 2 ~ 13, UHF : 14 ~ 69, Cable : 01 ~ 125
LCD Panel
75 Ω
Z15LCD1
*
: 2W+2W
Z20LCD1*: 2W+2W
Product Specifications
Product Specifications
1. Here’s a great way to keep the dust off your screen for a while. Wet a soft cloth in a mixture of
lukewarm water and a little fabric softener or dish washing detergent. Wring the cloth until it’s
almost dry, and then use it to wipe the screen.
2. Make sure the excess water is off the screen, and then let it air-dry before you turn on your TV.
To remove dirt or dust, wipe the cabinet with a soft, dry, lint-free cloth.
Please be sure not to use a wet cloth.
If you leave your TV dormant for a long time (such as a vacation), it’s a good idea to
unplug the power cord to protect against possible damage from lightning or power surges.
- Early malfunctions can be prevented. Careful and regular cleaning can extend the amount of time you
will have your new TV. Be sure to turn the power off and unplug the power cord before you begin any
cleaning.
Cleaning the Screen
Cleaning the Screen
Cleaning the Cabinet
Cleaning the Cabinet
Extended
Extended
Absence
Absence
Maintenance
Maintenance

24
Troubleshooting Checklist
TTroubleshooting Checklist
roubleshooting Checklist
The video function does not work.
No picture &
No sound
No or poor
color
or poor picture
• Adjust Color in menu option.
• Keep a sufficient distance between the product and the VCR.
• Try another channel. The problem may be with the broadcast.
• Are the video cables installed properly?
• Activate any function to restore the brightness of the picture.
Picture appears
slowly after
switching on
• This is normal, the image is muted during the product startup
process. Please contact your service center, if the picture has not
appeared after five minutes.
Horizontal/ vertical
bars or picture
shaking
• Check for local interference such as an electrical appliance
or power tool.
Poor reception on
some channels
• Station or cable product experiencing problems, tune to another station.
• Station signal is weak, reorient antenna to receive weaker station.
• Check for sources of possible interference.
Lines or streaks
in pictures
• Check antenna (Change the direction of the antenna).
• Check whether the product is turned on.
• Try another channel. The problem may be with the broadcast.
• Is the power cord inserted into wall power outlet?
• Check your antenna direction and/or location.
• Test the wall power outlet, plug another product’s power cord into the
outlet where the product’s power cord was plugged in.
The remote control
doesn’t work
The operation does not work normally.
• Check to see if there is any object between the product and the
remote control causing obstruction.
• Are batteries installed with correct polarity (+ to +, - to -)?
• Correct remote operating mode set: TV, VCR etc.?
• Install new batteries.
Power is suddenly
turned off
• Is the sleep timer set?
• Check the power control settings. Power interrupted
• No broadcast on station tuned with Auto off activated.

25
Troubleshooting Checklist
The audio function does not work.
Picture OK &
No sound
• Press the VOL (or Volume) button.
• Sound muted? Press MUTE button.
• Try another channel. The problem may be with the broadcast.
• Are the audio cables installed properly?
Unusual sound
from inside the
product
• A change in ambient humidity or temperature may result in an
unusual noise when the product is turned on or off and does not
indicate a fault with the product.
No output from
one of the
speakers
• Adjust Balance in menu option.
Screen color is
unstable or
single color
• Check the signal cable.
• Reinstall the PC video card.
The signal is out
of range.
There is a problem in PC mode.
(Only PC mode applied)
• Adjust resolution, horizontal frequency, or vertical frequency.
• Check the input source.
Vertical bar or
stripe on
background &
Horizontal Noise
& Incorrect
position
•
Work the auto adjust or adjust clock ,
phase in video noise,or horizontal
vertical in postion.(option)
As an ENERGY STAR
Partner LGE U. S. A.,Inc.
has determined that this
product meets the ENERGY STAR guidelines for
energy efficiency.

26
Note
Note
Note

7 2
Note
Note
Note

ZENITH ELECTRONICS CORPORATION
LCD-TV LIMITED WARRANTY – USA
Zenith will repair or replace your product, at Zenith’s option, if it proves to be defective in material or workmanship under normal use, during the warranty period (“Warranty Period”) listed below, effective from the
date (“Date of Purchase”) of original purchase of the product. This limited warranty is good only to the original purchaser of the product and effective only when used in the United States, excluding U.S. Territories.
THIS WARRANTY IS IN LIEU OF ANY OTHER WARRANTIES, EXPRESS OR IMPLIED, INCLUDING
WITHOUT LIMITATION, ANY WARRANTY OF MERCHANTABILITY OR FITNESS FOR A PARTICULAR
PURPOSE. TO THE EXTENT ANY IMPLIED WARRANTY IS REQUIRED BY LAW, IT IS LIMITED IN
DURATION TO THE EXPRESS WARRANTY PERIOD ABOVE. ZENITH WILL NOT BE LIABLE FOR ANY
INCIDENTAL, CONSEQUENTIAL, INDIRECT, SPECIAL, OR PUNITIVE DAMAGES OF ANY NATURE,
EVEN IF ADVISED OF THE POSSIBILITY OF SUCH DAMAGES, INCLUDING WITHOUT LIMITATION,
LOST REVENUES OR PROFITS, LOST OR CORRUPTED PROGRAMMING OR DATA, OR ANY OTHER
DAMAGE WHETHER BASED IN CONTRACT, TORT, OR OTHERWISE.
Some states do not allow the exclusion or limitation of incidental or consequential damages or limitations on
how long an implied warranty lasts, so the above exclusion or limitation may not apply to you. This warranty
gives you specific legal rights and you may also have other rights that vary from state to state.
• Damages or operating problems that result from shipping, installation, adjustment of user controls, calibration, maintenance or failure to maintain, or separate system components; and
• Damages or operating problems that result from normal wear and tear, misuse, abuse, operation outside
environmental specifications or contrary to the requirements or precautions in the Operating Guide, accident, lightning strikes or other natural causes, unauthorized modification or alteration, incorrect electrical
current or voltage, signal reception or input, operating and software protocols adopted after date of manufacture or for outside the US, institutional or commercial use, or other causes not arising out of defect in
material or workmanship.
The cost of repair or replacement under these excluded circumstances shall be borne by the consumer.
THIS LIMITED WARRANTY DOES NOT APPLY TO:
LG Customer Interactive Center
201 James Record Road
Huntsville, Alabama 35824
http://www.zenithservice.com
CUSTOMER INTERACTIVE CENTER NUMBERS:
For Where to buy, Product
Assistance, or Customer
Assistance
Call 1-877-9Zenith (1-877-993-6484) (24 hours a day, 365 days
per year) and select appropriate options from the menu.
Or visit our website at http://www.zenithservice.com
WARRANTY PERIOD:
LABOR: 1 Year from the Date of
Purchase.
PARTS: 1 Year from the Date of Purchase.
*
Repaired or replaced products are warranted for the remaining portion of the
original warranty period.
HOW SERVICE IS HANDLED:
Factory Service. Call 1-877-9Zenith (1-877-993-6484)
(24 hours a day, 365 days per year) for instructions on getting the
defective unit repaired or replaced.
Please retain dated sales receipt and your box to return the
unit to Zenith for replacement.
Shipping charges both ways will be paid by Zenith during the
Warranty Period.
Visit our website at http://www.zenithservice.com
Printed in China
Q41T1501689 1A
 Loading...