

Page 1

SERVICE MANUAL
Product Type: DVD+VCR
Chassis: D35 (DECK), DP-7C(MD)
Manual Series: XBV323
Manual Part #: 3829RVN006P
Model Line: F
Product Year: 2003
Summary 1
Cabinet & Main Chassis 2
Electrical 3
Mechanism of VCR Part 4
Mechanism of DVD Part 5
Parts List 6
Published September 2003
by Technical Publications
Zenith Electronics Corporation
201 James Record Road
Huntsville, Alabama 35824-1513
Copyright © 2003 by Zenith Electronics Corporation
Model Series:
CONTENTS
XBV323
....................................................
.............................
....................................................
.............................
.............................
....................................................
Page 2

Page 3

1-1
SECTION 1
SUMMARY
CONTENTS
PRODUCT SAFETY SERVICING GUIDELINES FOR VIDEO PRODUCTS ............. 1-2
SERVICING PRECAUTIONS .................................................................................................. 1-3
SPECIFICATIONS ...................................................................................................................... 1-4
Page 4
1-2
IMPORTANT SAFETY NOTICE
This manual was prepared for use only by properly trained audio-video service
technicians.
When servicing this product, under no circumstances should the original
design be modified or altered without permission from Zenith Electronics
Corporation. All components should be replaced only with types identical to
those in the original circuit and their physical location, wiring and lead dress
must conform to original layout upon completion of repairs.
Special components are also used to prevent x-radiation, shock and fire hazard. These components are indicated by the letter “x” included in their component designators and are required to maintain safe performance. No deviations
are allowed without prior approval by Zenith Electronics Corporation.
Circuit diagrams may occasionally differ from the actual circuit used. This way,
implementation of the latest safety and performance improvement changes
into the set is not delayed until the new service literature is printed.
CAUTION: Do not attempt to modify this product in any way. Never perform
customized installations without manufacturer’s approval. Unauthorized modifications will not only void the warranty, but may lead to property damage or
user injury.
Service work should be performed only after you are thoroughly familiar with
these safety checks and servicing guidelines.
GRAPHIC SYMBOLS
The exclamation point within an equilateral triangle is intended to
alert the service personnel to important safety information in the
service literature.
The lightning flash with arrowhead symbol within an equilateral triangle is intended to alert the service personnel to the presence of
noninsulated “dangerous voltage” that may be of sufficient magnitude to constitute a risk of electric shock.
The pictorial representation of a fuse and its rating within an equilateral triangle is intended to convey to the service personnel the
following fuse replacement caution notice:
CAUTION: FOR CONTINUED PROTECTION AGAINST RISK
OF FIRE, REPLACE ALL FUSES WITH THE SAME TYPE AND
RATING AS MARKED NEAR EACH FUSE.
SERVICE INFORMATION
While servicing, use an isolation transformer for protection from AC line shock.
After the original service problem has been corrected, make a check of the following:
FIRE AND SHOCK HAZARD
1. Be sure that all components are positioned to avoid a possibility of adjacent
component shorts. This is especially important on items trans-ported to and
from the repair shop.
2. Verify that all protective devices such as insulators, barriers, covers, shields,
strain reliefs, power supply cords, and other hardware have been reinstalled
per the original design. Be sure that the safety purpose of the polarized line
plug has not been defeated.
3. Soldering must be inspected to discover possible cold solder joints, solder
splashes, or sharp solder points. Be certain to remove all loose foreign particles.
4. Check for physical evidence of damage or deterioration to parts and components, for frayed leads or damaged insulation (including the AC cord), and
replace if necessary.
5. No lead or component should touch a high current device or a resistor rated
at 1 watt or more. Lead tension around protruding metal surfaces must be
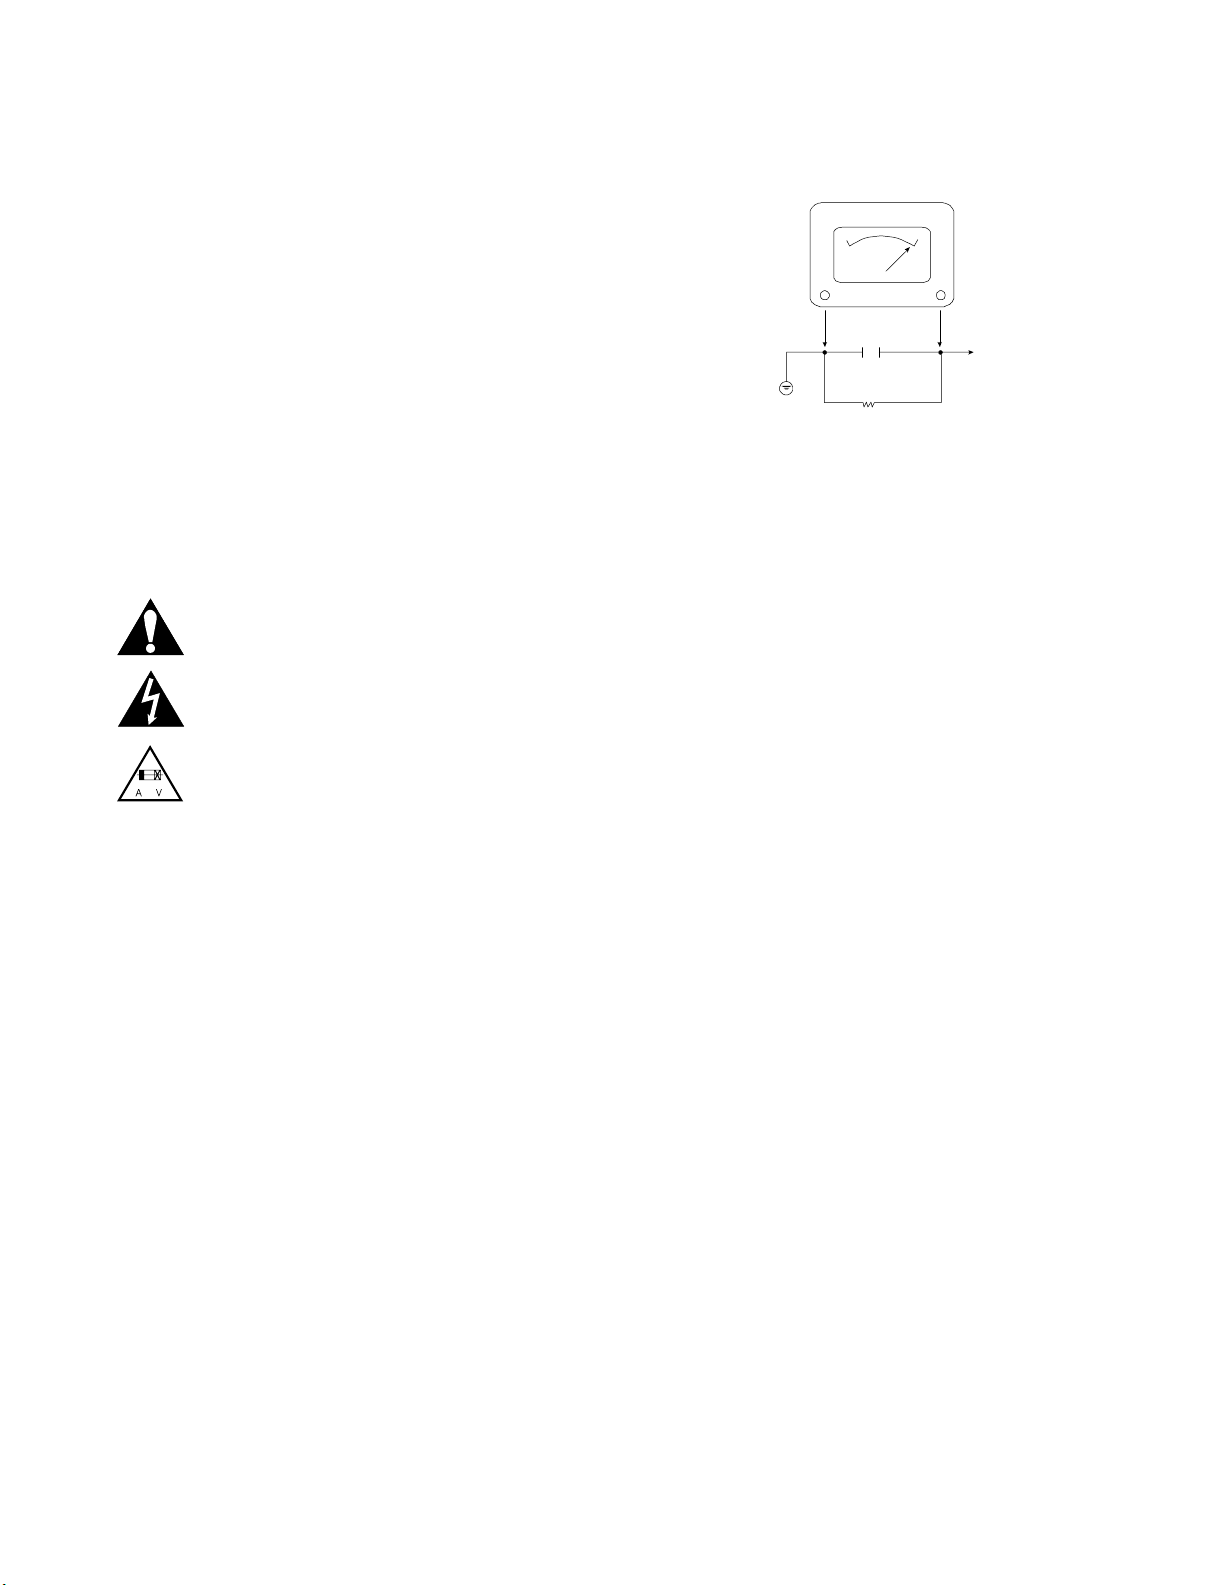
avoided.
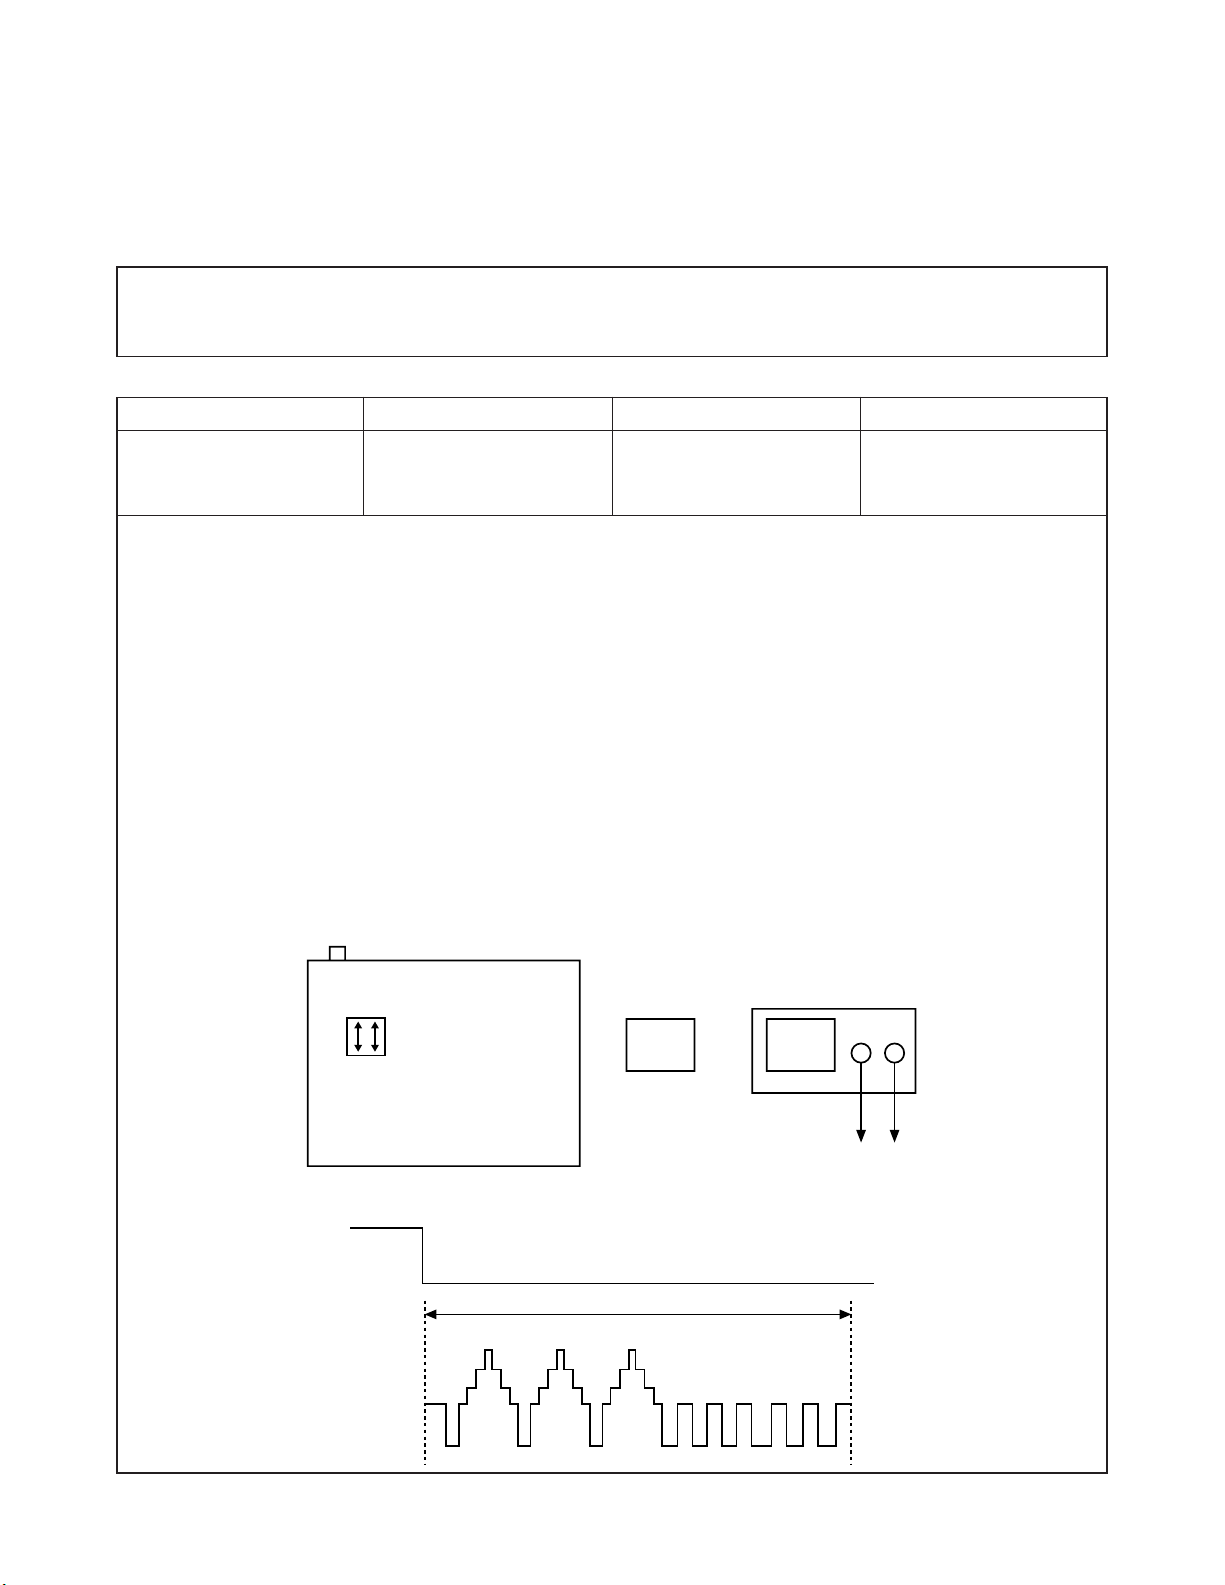
6. After reassembly of the set, always perform an AC leakage test on all
exposed metallic parts of the cabinet (the channel selector knobs, antenna
terminals, handle and screws) to be sure that set is safe to operate without
danger of electrical shock. DO NOT USE A LINE ISOLATION TRANSFORMER DURING THIS TEST. Use an AC voltmeter having 5000 ohms per
volt or more sensitivity in the following manner: Connect a 1500 ohm, 10
watt resistor, paralleled by a .15 mfd 150V AC type capacitor between a
known good earth ground water pipe, conduit, etc.) and the exposed metallic parts, one at a time. Measure the AC voltage across the combination of
1500 ohm resistor and .15 mfd capacitor. Reverse the AC plug by using a
non-polarized adaptor and repeat AC voltage measurements for each
exposed metallic part. Voltage measured must not exceed 0.75 volts RMS.
This corresponds to 0.5 milliamp AC. Any value exceeding this limit constitutes a potential shock hazard and must be corrected immediately.
TIPS ON PROPER INSTALLATION
1. Never install any receiver in a closed-in recess, cubbyhole, or closely fitting
shelf space over, or close to, a heat duct, or in the path of heated air flow.
2. Avoid conditions of high humidity such as: outdoor patio installations where
dew is a factor, near steam radiators where steam leakage is a factor, etc.
3. Avoid placement where draperies may obstruct venting. The customer
should also avoid the use of decorative scarves or other coverings that
might obstruct ventilation.
4. Wall- and shelf-mounted installations using a commercial mounting kit must
follow the factory-approved mounting instructions. A product mounted to a
shelf or platform must retain its original feet (or the equivalent thickness in
spacers) to provide adequate air flow across the bottom. Bolts or screws
used for fasteners must not touch any parts or wiring. Perform leakage tests
on customized installations.
5. Caution customers against mounting a product on a sloping shelf or in a tilted position, unless the receiver is properly secured.
6. A product on a roll-about cart should be stable in its mounting to the cart.
Caution the customer on the hazards of trying to roll a cart with small casters across thresholds or deep pile carpets.
7. Caution customers against using extension cords. Explain that a forest of
extensions, sprouting from a single outlet, can lead to disastrous consequences to home and family.
A.C. Voltmeter
1500 OHM
10 WATT
Place this probe
on each exposed
metal part.
Good Earth Ground
such as the Water
Pipe, Conduit, etc.
0.15uF
PRODUCT SAFETY SERVICING GUIDELINES FOR VIDEO PRODUCTS
Page 5

1-3
SERVICING PRECAUTIONS
CAUTION: Before servicing the DVD+VCR covered by this
service data and its supplements and addends, read and follow the
SAFETY PRECAUTIONS. NOTE: if unforeseen circumstances create conflict between the following servicing
precautions and any of the safety precautions in this publications, always follow the safety precautions.
Remember Safety First:
General Servicing Precautions
1. Always unplug the DVD+VCR AC power cord from the AC
power source before:
(1) Removing or reinstalling any component, circuit board,
module, or any other assembly.
(2) Disconnecting or reconnecting any internal electrical
plug or other electrical connection.
(3) Connecting a test substitute in parallel with an elec-
trolytic capacitor.
Caution: A wrong part substitution or incorrect
polarity installation of electrolytic capacitors may result
in an explosion hazard.
2. Do not spray chemicals on or near this DVD+VCR or any
of its assemblies.
3. Unless specified otherwise in this service data, clean
electrical contacts by applying an appropriate contact
cleaning solution to the contacts with a pipe cleaner,
cotton-tipped swab, or comparable soft applicator.
Unless specified otherwise in this service data, lubrication
of contacts is not required.
4. Do not defeat any plug/socket B+ voltage interlocks with
whitch instruments covered by this service manual might
be equipped.
5. Do not apply AC power to this DVD+VCR and / or any of
its electrical assemblies unless all solid-state device heat
sinks are correctly installed.
6. Always connect the test instrument ground lead to an
appropriate ground before connecting the test instrument
positive lead. Always remove the test instrument ground
lead last.
Insulation Checking Procedure
Disconnect the attachment plug from the AC outlet and turn
the power on. Connect an insulation resistance meter (500V)
to the blades of the attachment plug. The insulation resistance between each blade of the attachment plug and accessible conductive parts (Note 1) should be more than 1Mohm.
Note 1: Accessible Conductive Parts include Metal panels,
Input terminals, Earphone jacks,etc.
Electrostatically Sensitive (ES) Devices
Some semiconductor (solid state) devices can be damaged
easily by static electricity. Such components commonly are
called Electrostatically Sensitive (ES) Devices. Examples of
typical ES devices are integrated circuits and some field
effect transistors and semiconductor chip components.
The following techniques should be used to help reduce the
incidence of component damage caused by static electricity.
1. Immediately before handling any semiconductor component or semiconductor-equipped assembly, drain off any
electrostatic charge on your body by touching a known
earth ground. Alternatively, obtain and wear a commercially available discharging wrist strap device, which
should be removed for potential shock reasons prior to
applying power to the unit under test.
2. After removing an electrical assembly equipped with ES
devices, place the assembly on a conductive surface such
as aluminum foil, to prevent electrostatic charge buildup or
exposure of the assembly.
3. Use only a grounded-tip soldering iron to solder or unsolder
ES devices.
4. Use only an anti-static solder removal device. Some
solder removal devices not classified as “anti-static” can
generate electrical charges sufficient to damage ES
devices.
5. Do not use freon-propelled chemicals. These can
generate an electrical charge sufficient to damage ES
devices.
6. Do not remove a replacement ES device from its protective package until immediately before you are ready to
install it. (Most replacement ES devices are packaged with
leads electrically shorted together by conductive foam,
aluminum foil,or comparable conductive material).
7. Immediately before removing the protective material from
the leads of a replacement ES device, touch the protective
material to the chassis or circuit assembly into which the
device will be installed.
Caution: Be sure no power is applied to the chassis or
circuit, and observe all other safety precautions.
8. Minimize bodily motions when handling unpackaged
replacement ES devices. (Normally harmless motion such
as the brushing together of your clothes fabric or the lifting
of your foot from a carpeted floor can generate static electricity sufficient to damage an ES device.)
Page 6

1-4
SPECIFICATIONS
General
Power requirements AC 120V ,60 Hz
Power consumption 23W
Dimensions (approx.) 430 X 97.5 X 293 mm (16.9 x 3.9 x 11.5 inches)(w x h x d)
Mass (approx.) 4.8 kg (10.58 lbs)
Operating temperature 5 °C to 40 °C (41 °F to 104 °F)
Operating humidity 5 % to 90 %
Signal system NTSC
Inputs
ANTENNA IN Antenna or CATV input,75 ohms
VHS VIDEO IN 1 Vp-p 75 ohms,sync negative,RCA jack x 1
VHS AUDIO IN -6.0 dBm more than 47 ohms,RCA jack (L,R)x 1
Outputs
VIDEO OUT 1 Vp-p 75 ohms,sync negative
S-VIDEO OUT (Y)1.0 V (p-p),75 ohms,negative sync,Mini DIN 4-pin x 1
(C)0.3 V (p-p)75 ohms
COMPONENT VIDEO OUT (Y)1.0 V (p-p),75 ohms,negative sync,RCA jack x 1
(Pb)/(Pr)0.7 V (p-p),75 ohms,RCA jack x 2
Audio output (digital audio) 0.5 V (p-p),75 ohms,RCA jack x 1
Audio output (analog audio) 2.0 Vrms (1 KHz,0 dB),330 ohms,RCA jack (L,R)x 1
RF OUT Channel 3 or 4
VCR Specifications
Head system Four head helical scan azimuth system
TTimer 12-hour display type with AM,PM
Tape speed SP:33.35 mm/sec,LP:16.67 mm/sec,SLP:11.12 mm/sec
Tape width 12.7 mm
Maximum recording time SP:2 HOURS (T-120),SLP:6 HOURS (T-120)/8 HOURS (T-160)
Rewind time About 3 minutes (T-120)
Antenna 75 ohms (VHF/UHF)
VHF output signal Channel 3 or 4 (Switchable)
Channel coverage VHF:2-13,UHF:14-69,CATV:1-125 (4A,A-W,W+1 -W+84,A-5 -A-1)
Frequency range 20Hz to 20kHz
Signal-to-noise ratio More than 43dB
Dynamic range More than 88 dB
Channel separation More than 60 dB
DVD Specifications
Laser system Semiconductor laser,wavelength 650 nm
Frequency response DVD (PCM 96 kHz):8 Hz to 44 kHz,
DVD (PCM 48 kHz):8 Hz to 22 kHz
CD:8 Hz to 20 kHz
Signal-to-noise ratio More than 100dB (ANALOG OUT jacks only)
Harmonic distortion Less than 0.008%
Dynamic range More than 95 dB (DVD/CD)
Accessories:
Video cable x 1,Audio cable x 1,RF 75-ohm Coaxial Cable x 1,Remote control x 1,Batteries x 2
• Design and specifications are subject to change without prior notice.
FRONT VIEW (XBV323)
Page 7

2-1
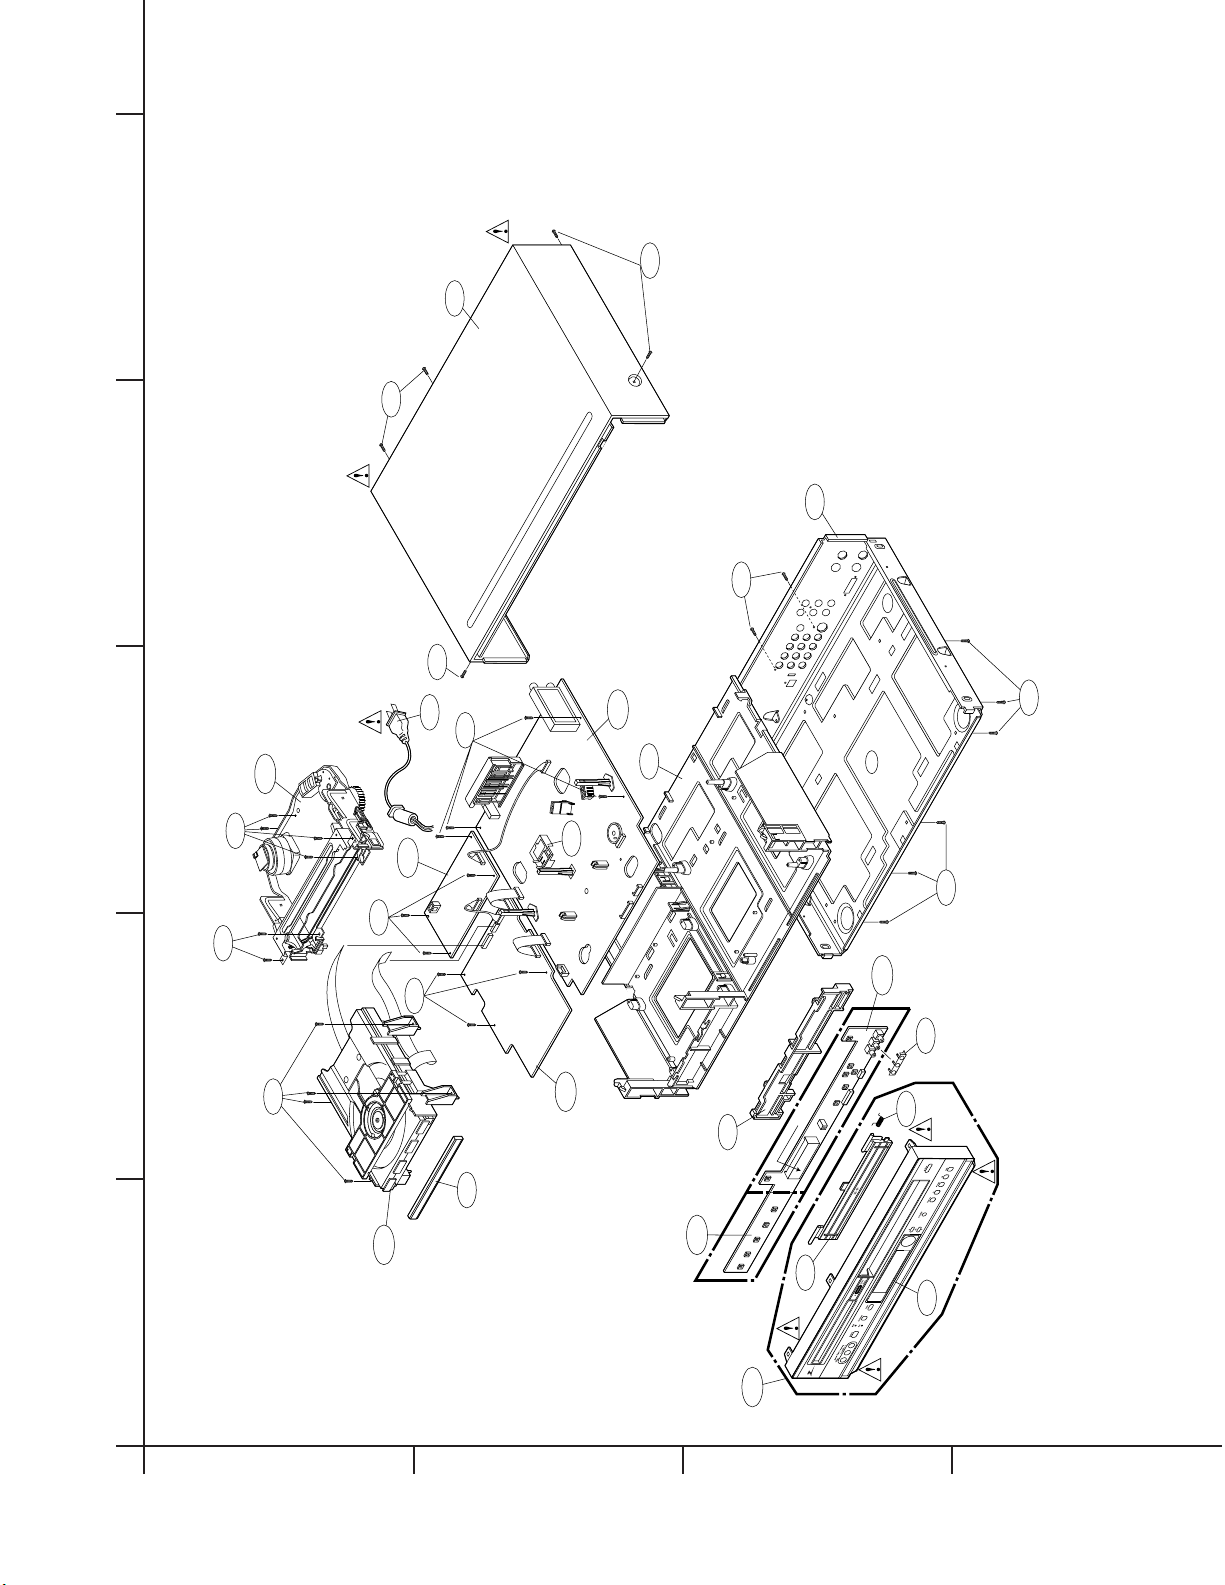
SECTION 2
CABINET & MAIN CHASSIS
CONTENTS
1. EXPLODED VIEWS ................................................................................................................2-2
1. Cabinet and Main Frame Section ...........................................................................................2-2
2. Packing Accessory Section....................................................................................................2-3
Page 8
2-2
EXPLODED VIEWS
1. Cabinet and Main Frame Section
A43
A42
A49
280
465
250
467
467
467
284
283
LD601
300
330
276
260
A46
A46A
A48
A00
A26
285
457
457
457
457
467
467
452
274
452
330
323
A
5
4
3
2
1
BCD
Page 9
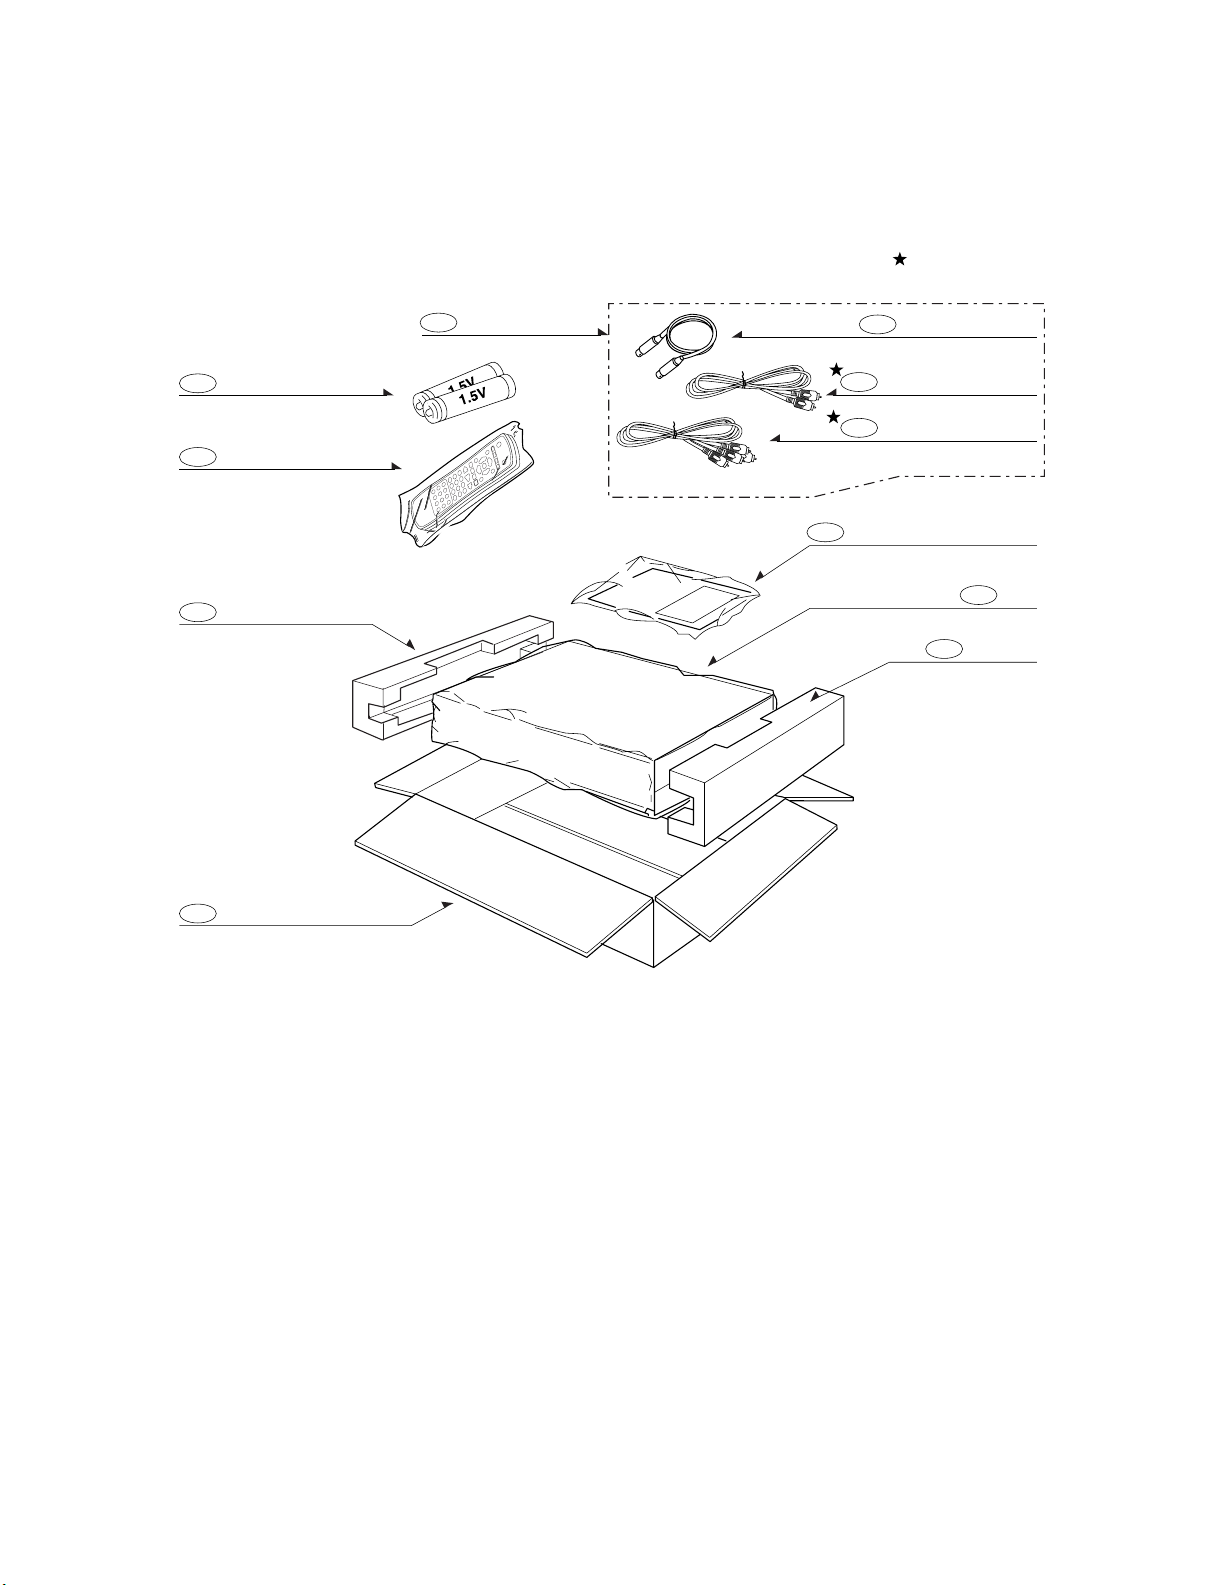
2-3
2. Packing Accessory Section
BATTERY
808
BAG
804
PACKING
803
806
INSTRUCTION ASSEMBLY
CABLE(COAXIAL)
810
CABLE ASS'Y RF
801
REMOCON
900
BOX CARTON
802
PACKING
803
811
812
PLUG ASS'Y 1WAY
PLUG ASS'Y 2WAY
OPTIONAL PARTS
Page 10

3-1
SECTION 3
ELECTRICAL
CONTENTS
OVERALL WIRING DIAGRAM..............................3-2
VCR PART
ELECTRICAL ADJUSTMENT
PROCEDURES
............................................................3-3
VCR ELECTRICAL TROUBLESHOOTING
GUIDE
.............................................................................3-4
1. POWER(SMPS) CIRCUIT .......................................3-4
2. SYSTEM/KEY CIRCUIT ..........................................3-7
3. SERVO CIRCUIT.....................................................3-8
4. OSD CIRCUIT .......................................................3-10
5. Y/C CIRCUIT .........................................................3-11
6. Hi-Fi CIRCUIT .......................................................3-13
7. Tuner/IF CIRCUIT .................................................3-18
BLOCK DIAGRAMS................................................3-20
1. Power (SMPS) BLOCK DIAGRAM ......................3-20
2. TU/IF BLOCK DIAGRAM......................................3-22
3. Y/C BLOCK DIAGRAM.........................................3-24
4. NORMAL AUDIO BLOCK DIAGRAM ..................3-26
5. Hi-Fi BLOCK DIAGRAM.......................................3-28
6. SYSTEM BLOCK DIAGRAM................................3-30
CIRCUIT DIAGRAMS..............................................3-32
1. Power (SMPS) CIRCUIT DIAGRAM ....................3-32
2. TU/IF CIRCUIT DIAGRAM....................................3-34
3. A/V CIRCUIT DIAGRAM .......................................3-36
4. Hi-Fi CIRCUIT DIAGRAM.....................................3-38
5. JACK CIRCUIT DIAGRAM ...................................3-40
6. SYSTEM CIRCUIT DIAGRAM ..............................3-42
7. TIMER CIRCUIT DIAGRAM..................................3-44
• WAVEFORMS .........................................................3-46
• CIRCUIT VOLTAGE CHART ..................................3-48
PRINTED CIRCUIT DIAGRAMS.........................3-50
1. VCR P.C.BOARD ..................................................3-50
2. KEY 1(LEFT) P.C.BOARD ....................................3-52
3. KEY 2(RIGHT) P.C.BOARD ..................................3-52
4. POWER P.C.BOARD ............................................3-54
DVD SECTION
ELECTRICAL TROUBLESHOOTING
GUIDE & WAVEFORMS
........................................3-56
1. SYSTEM OPERATION FLOW..............................3-56
2. TEST & DEBUG FLOW ........................................3-57
DETAILS AND WAVEFORMS ON
SYSTEM TEST AND DEBUGGING
...................3-63
1. SYSTEM 27MHZ CLOCK,
RESET, FLASH R/W SIGNAL ..............................3-63
2. SDRAM CLOCK....................................................3-63
3. TRAY OPEN/CLOSE SIGNAL ..............................3-64
4. SLED CONTROL RELATED SIGNAL
(NO DISC CONDITION) ........................................3-67
5. LENS CONTROL RELATED SIGNAL
(NO DISC CONDITION) ........................................3-67
6. LASER POWER CONTROL RELATED
SIGNAL(NO DISC CONDITION)...........................3-68
7. DISC TYPE JUDGEMENT WAVEFORMS............3-68
8. FOCUS ON WAVEFORMS ...................................3-70
9. SPINDLE CONTROL WAVEFORMS
(NO DISC CONDITION) ........................................3-71
10. TRACKING CONTROL RELATED
SIGNAL(SYSTEM CHECKING)..........................3-72
11. RF WAVEFORM ..................................................3-73
12. MT1379 AUDIO OPTICAL AND COAXIAL
OUTPUT (ASPDIF) .............................................3-73
13. MT1379 VIDEO OUTPUT WAVEFORMS...........3-74
14. AUDIO OUTPUT FROM AUDIO DAC ................3-75
BLOCK DIAGRAMS................................................3-77
1. OVERALL BLOCK DIAGRAM..............................3-77
2. SERVO BLOCK DIAGRAM ..................................3-78
3. MPEG & MEMORY BLOCK DIAGRAM ...............3-79
4. VIDEO & AUDIO BLOCK DIAGRAM ...................3-80
CIRCUIT DIAGRAMS..........................................3-81
1. SYSTEM CIRCUIT DIAGRAM ..............................3-81
2. RF & DSP SERVO CIRCUIT DIAGRAM ..............3-83
3. AUDIO CIRCUIT DIAGRAM .................................3-85
4. AV/JACK CIRCUIT DIAGRAM..............................3-87
• CIRCUIT VOLTAGE CHART ..................................3-89
PRINTED CIRCUIT DIAGRAMS.........................3-93
1. MTR P.C.BOARD ..................................................3-93
Page 11
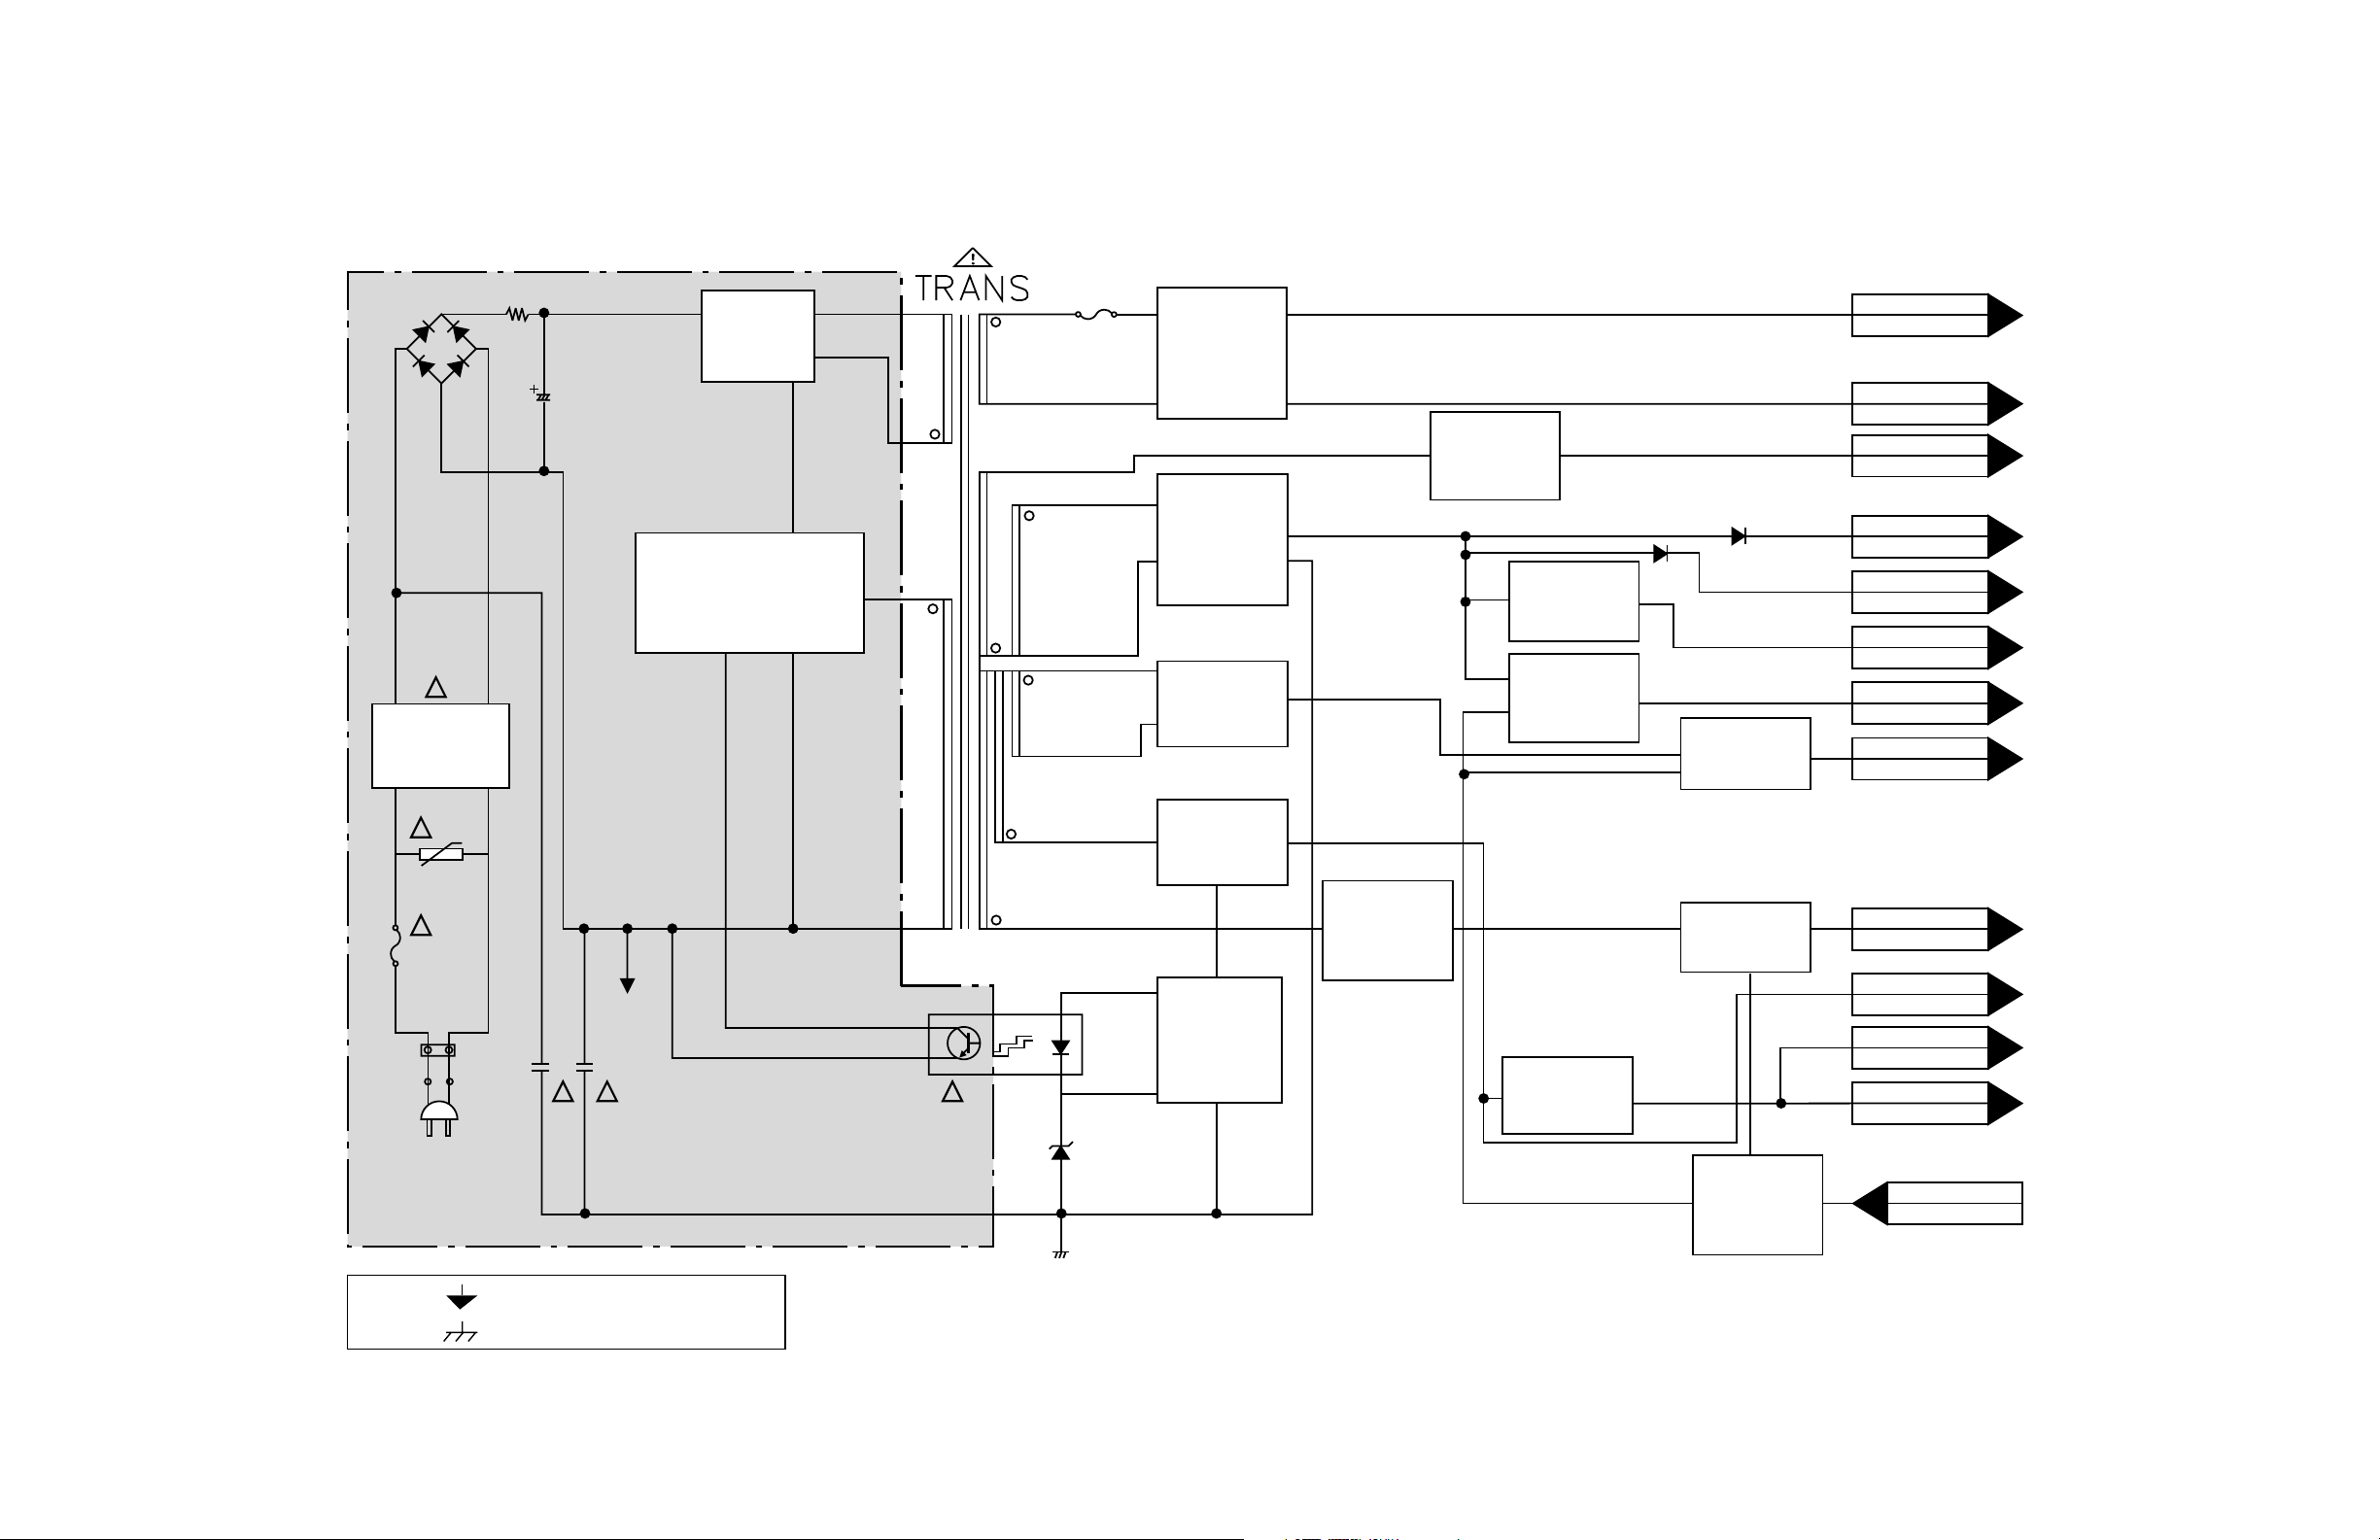
OVERALL WIRING DIAGRAM
3-2
PMC01
CFG
12VA(CAP)
5.2VA
CAP REV'H'
I-limit
MOTOR GND
GND
12VA(DRUM)
CAP CTL
LD IN
DFG/FG
DRUM CTL
1
2
3
4
5
6
7
8
9
10
11
12
1
2
3
4
5
6
7
8
9
10
11
12
PMP01
5.3VA
5.0V
GND
CAP Vcc
REG 12V
33V
12VA(DRUM)
PWR CTL 'H'
GND
NC
GND
GND
1
2
3
4
5
6
7
8
9
10
11
12
1
2
3
4
5
6
7
8
9
10
11
12
5.3VA
8V
GND(M)
REG 12V
3.3V5V3.3V
GND
GND
PDP01PPD01
123456789
123456789
PMD02
Vcc(HF)
RF
DVD_LD
DVD_PD
VOL(DVD)
GND
VC_INPUT
Vcc(HF)
F
E
A
D
C
B
F(+)
T(-)
T(+)
F(-)
Vcc
GND
CD_LD
CD_PD
VOL(CD)
123456789
10111213141516171819202122
23
123456789
10111213141516171819202122
23
PM601
GND
DISPLAY CLK
DISPLAY ENA
DISPLAY DATA
REMOCON
KEY RETURN 1
KEY RETURN 2
5.3VA
FD(-)
FD(+)
-27VA
GND
123456789
101112
123456789
101112
PM603
VIDEO IN
GND
AUDIO 'L'
GND
AUDIO 'R'
54321
54321
PMD03
SPM +
SPM -
FM +
FM -
LM -
LM +
SW(OPEN)
SW(CLOSE)
GND
SW(LEAD IN)
GND
123456789
10
11
123456789
10
11
P3D02
CTL(+)
CTL(-)
A/E(+)
A/E(-)
A.REC
A.PB
1
2
3
4
5
6
1
2
3
4
5
6
GND
FULL ERASE
P3D03
1
2
1
2
S/COMPO SW
COAXIAL
OPTICAL
GND
GND
K.RTN 2
DVD RESET
DVD ENA
DVD CLK
DVD DATA IN
DVD DATA OUT
GND
PVD02PMD01
1
2
3
4
5
6
7
8
9
10
11
12
1
2
3
4
5
6
7
8
9
10
11
12
Y
GND
Pb/C
GND
Pr
GND
C_V_OUT(DVD)
GND
D_A_L_OUT
GND
D_A_R_OUT
GND
A_MUTE_L
A_MUTE_R
GND
PDV03PMD02
1
2
3
4
5
6
7
8
9
10
11
12
13
14
15
1
2
3
4
5
6
7
8
9
10
11
12
13
14
15
GND
GND
DVD LED
VCR LED
5.3VA
K-RTN 1
K-RTN 2
GND
PM602PM603
1
2
3
4
5
6
7
8
1
2
3
4
5
6
7
8
DECK MD
MPEG
BOARD
SMPS
BOARD
TIMER
BOARD
KEY BOARD
VCR
Page 12
3-3
ELECTRICAL ADJUSTMENT PROCEDURES
1. Servo Adjustment
1) PG Adjustment
• Adjustment And Specification
• Test Equipment
a) OSCILLOSCOPE
b) NTSC MODEL : NTSC SP TEST TAPE
MODE
PLAY
• Adjustment Procedure
a) Insert the SP Test Tape and play.
b) Connect the CH1 of the oscilloscope to the H/SW(W861, W862) and CH2 to the Video Out for the VCR.
c) Trigger the mixed Combo Video Signal of CH2 to the CH1 H/SW(W861, W862), and then check the dis-
tance (time difference), which is from the selected A(B) Head point of the H/SW(W861, W862) signal to
the starting point of the vertical synchronized signal, to 6.5H ± 0.5H (412µs, 1H=63µs).
Note - Adjust the distance of X, pressing the Tracking(+) or Tracking(-) when the “ATR” is blinking after
the SP Test Tape is inserted.
• PG Adjustment Method
a-1) Playback the SP standard tape
b-2) Press the “OK(ENTER)” key on the Remote controller and the “REC” key on the Front Panel at the
same time, then the unit will go in to Tracking initial mode.
c-3) Repeat the above step(No.b-2), then the unit finishes the PG adjusting automatically.
d-4) Stop the playback, then the unit goes out of PG adjusting mode after saving the PG data.
• CONNECTION
• WAVEFORM
V.Out
H/SW(W861, W862)
R/C TRK JIG KEY 6.5 ± 0.5H
MEASUREMENT POINT ADJUSTMENT POINT SPECIFICATION
V.Out
H/SW(W861, W862)
OSCILLOSCOPE
CH1 CH2
V.outH/SW
R/C KEY
(W861, W862)
H/SW
Composite
VIDEO
6.5H(412µs)
VCR PART
Page 13
3-4
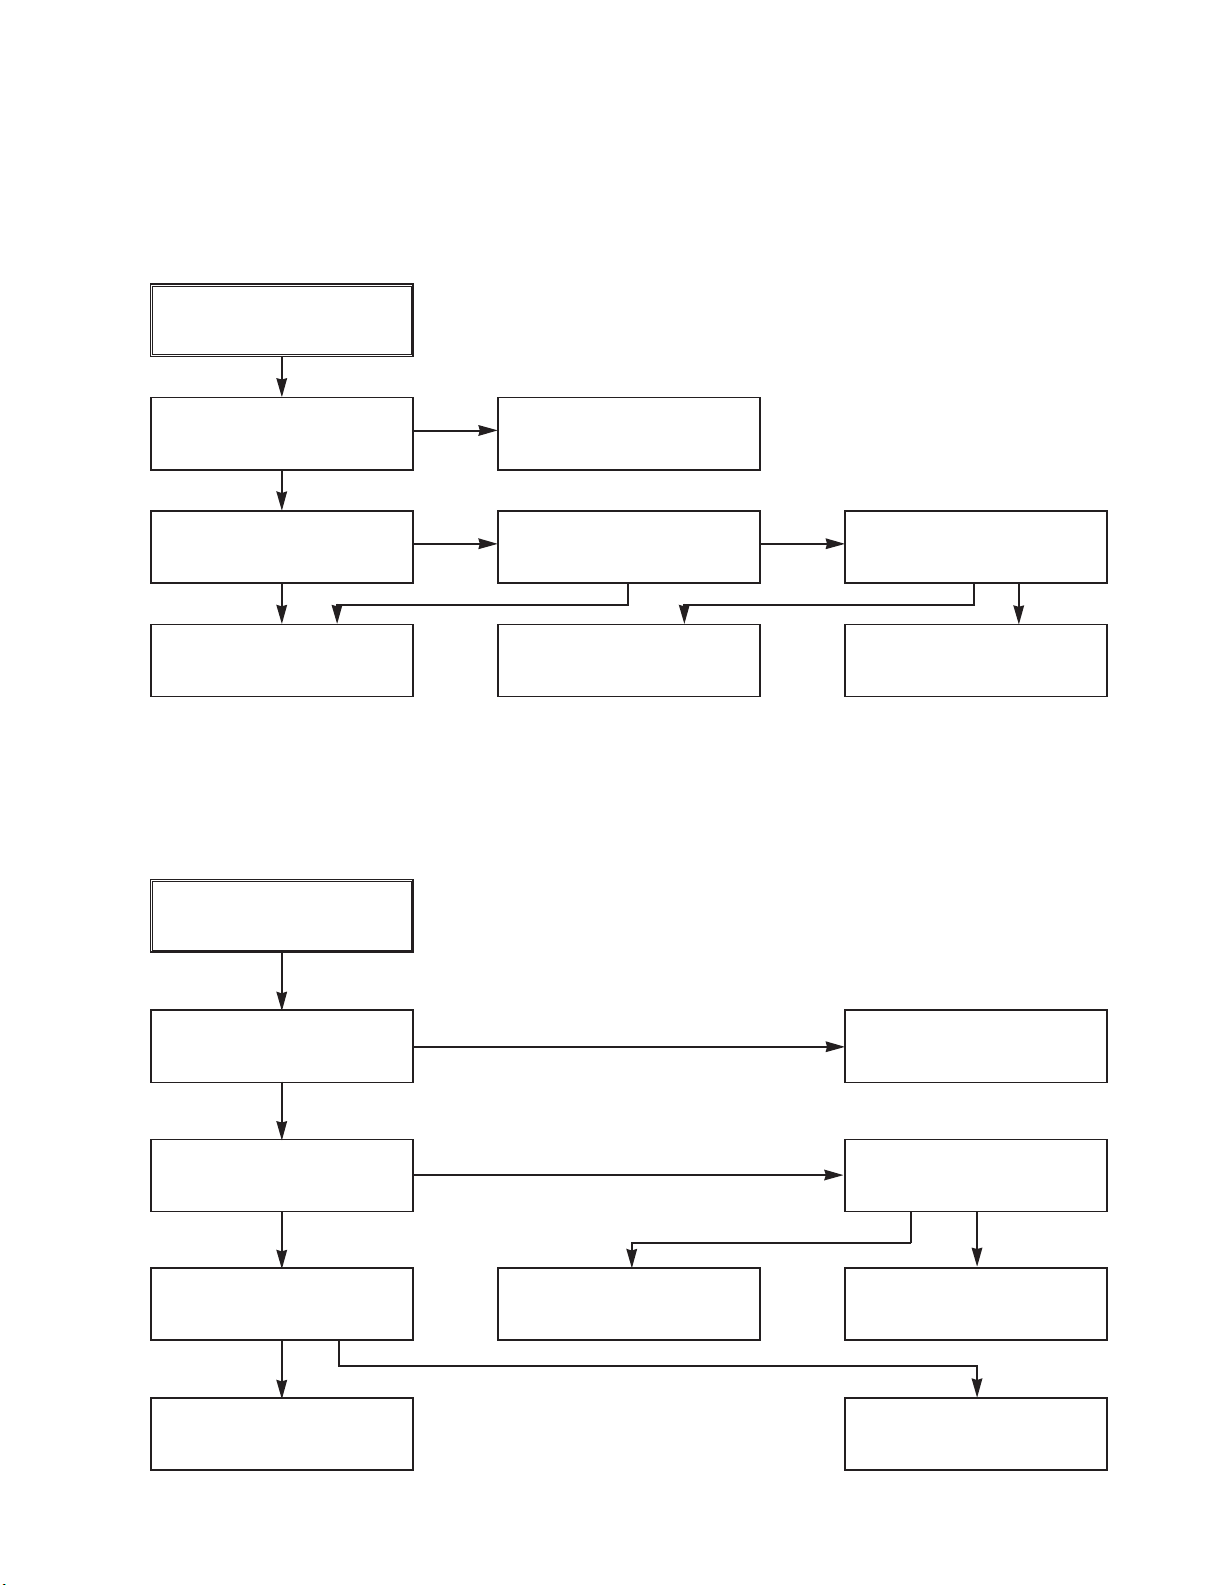
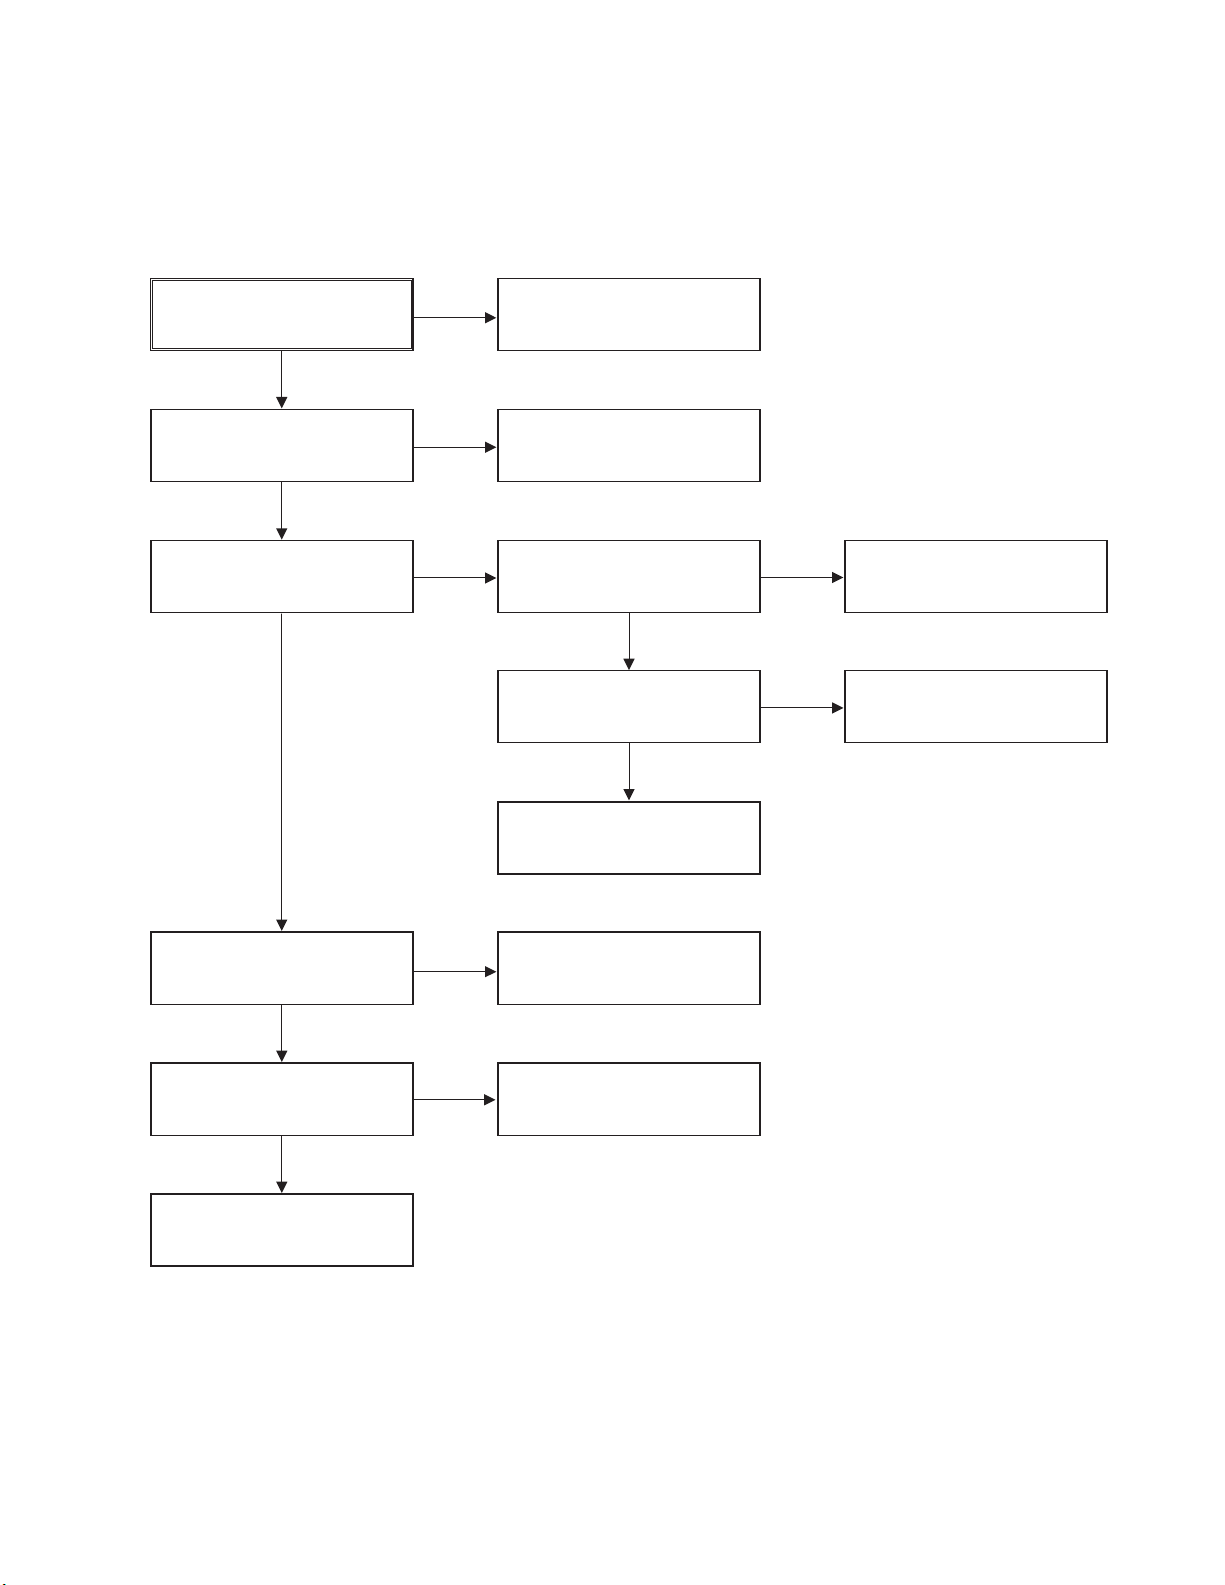
VCR ELECTRICAL TROUBLESHOOTING GUIDE
1. Power(SMPS) CIRCUIT
NO 5.3VA.
Replace F101.
(Use the same type)
Is F101 normal?
Is R101 normal?
Is BD101 normal?
NO
NO
NO
NO
NO
NO
Replace BD101.
Replace R101.
Is D102 normal?
Check or Replace
D102.
Replace D112.
Replace IC103.
YES
YES
YES
YES
YES
YES
Is Vcc(8.5~21V) supplied to IC101 Pin7?
NO
Is D112 normal?
Is there about 2.5V
at IC103 Vref?
Check the Main PCB
5.3VA/5.0V Line short?
(1) No 5.3VA (SYS/Hi-Fi/TUNER)
NO 12VA.
Check or Replace
D110.
Is the Vcc(13V) supplied
to (+) terminal in D115?
Check or Replace
the Motor Vcc.
Is the Vcc(12V) supplied
to (-) terminal in D115?
NO
NO
Replace D115.
YES
YES
(2) No 12VA (TO CAP, DRUM MOTOR)
NO 5.2VA.
5.3VA Line Check.
Is 5.3VA put into
Q160 Emitter?
Is about 5V put into
Q160 Base?
Is the Q162 Base
“H”?
NO
NO
Check the Power
Control.
NO
Check or Replace Q162,
R157, R158, R159, D121.
YES
Check or Replace
Q162/Q160.
YES
(3) No 5.2V (SYS/Hi-Fi/TUNER)
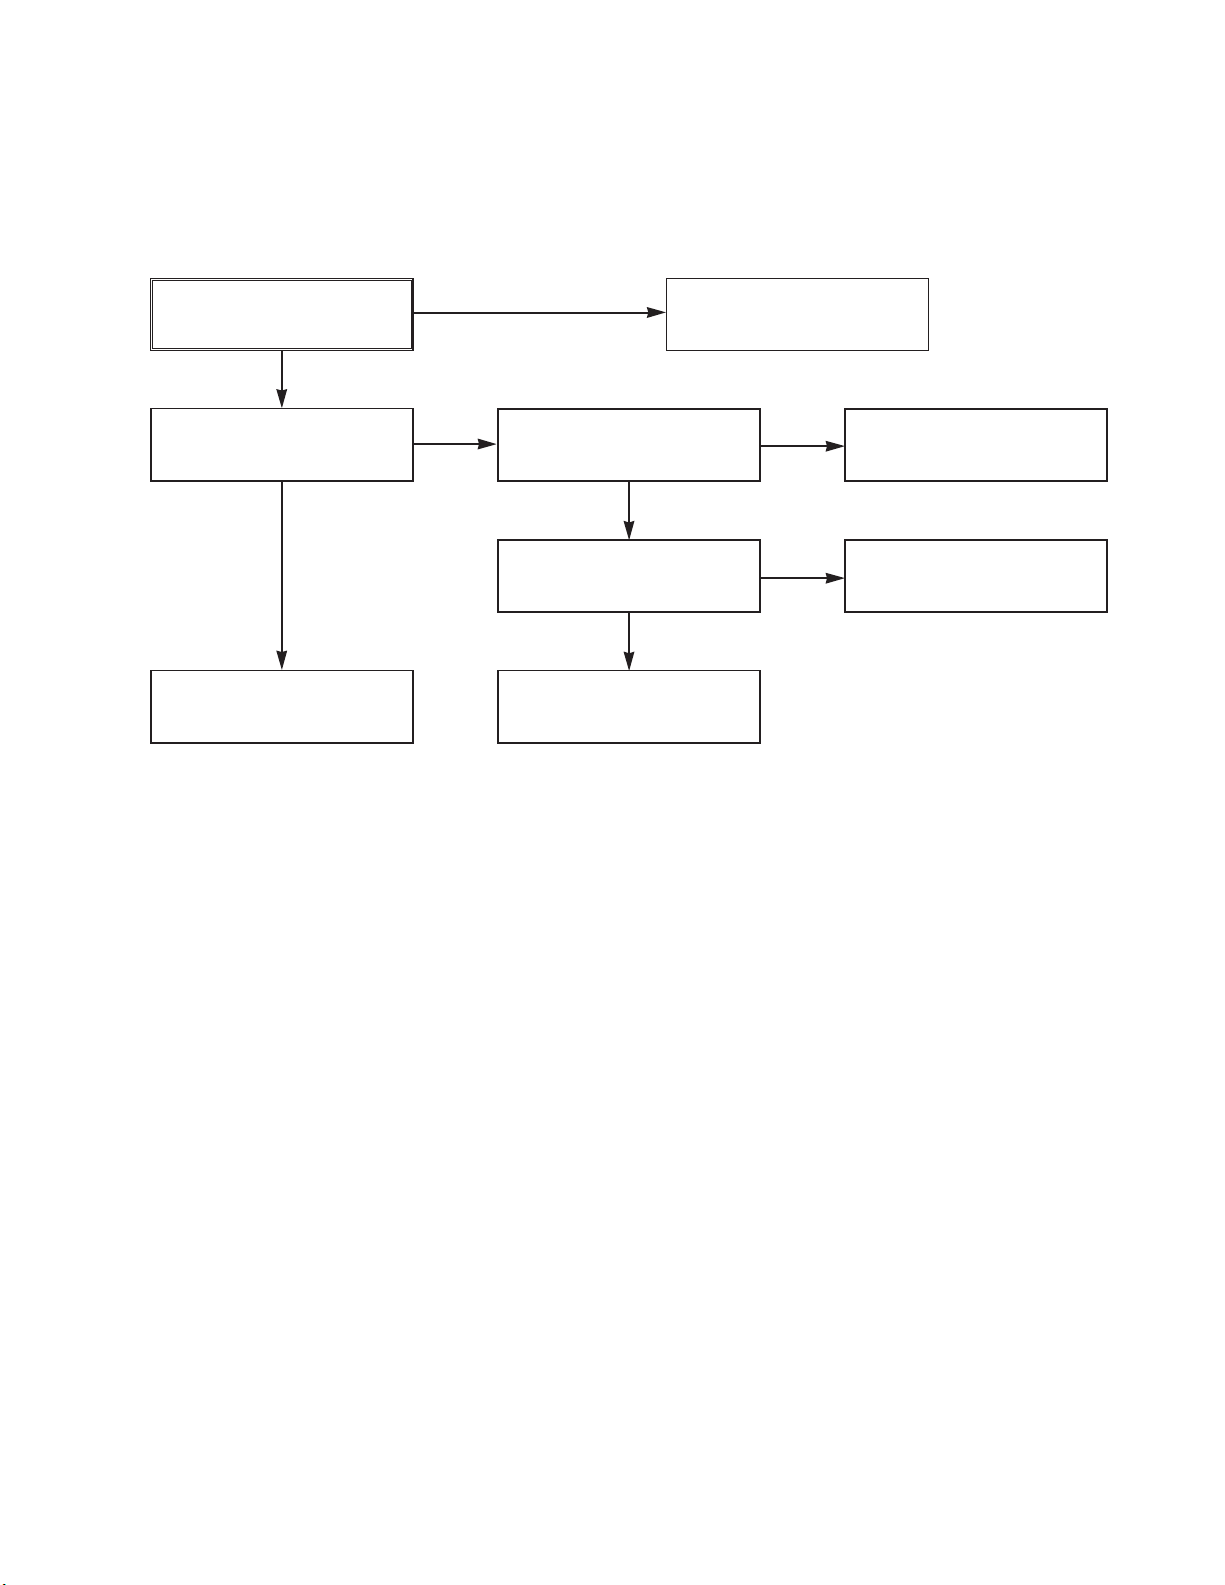
Page 14
NO -27VA.
Check or Replace
D108.
(7) No -27VA
VCR ELECTRICAL TROUBLESHOOTING GUIDE
3-5
NO 5V.
5.3VA Line Check.
Is 5.3VA put into
Q160 Emitter?
Is about 5V put into
Q160 Base?
Is Q162 Base “H”?
NO
NO
NO
Check the Power
Control.
Check or Replace Q162,
R157, R158, R159, D121.
YES
YES
YES
Check or Replace
Q162/Q160
(4) No 5V (TO DVD)
No 33V.
Check the Power
Control.
Is Q162 Base “H”?
Check or Replace
Q161, R154, R155.
NO
YES
(5) No 33V (TUNER)
No REG 12V.
Check or Replace
D110.
Is 13V put into
Q156 Collector?
Is 13V put into
R153 Base?
NO
Check 33V Line.
NO
YES
Check or Replace Q156,
ZD103, R153, C151.
YES
(6) No REG 12V
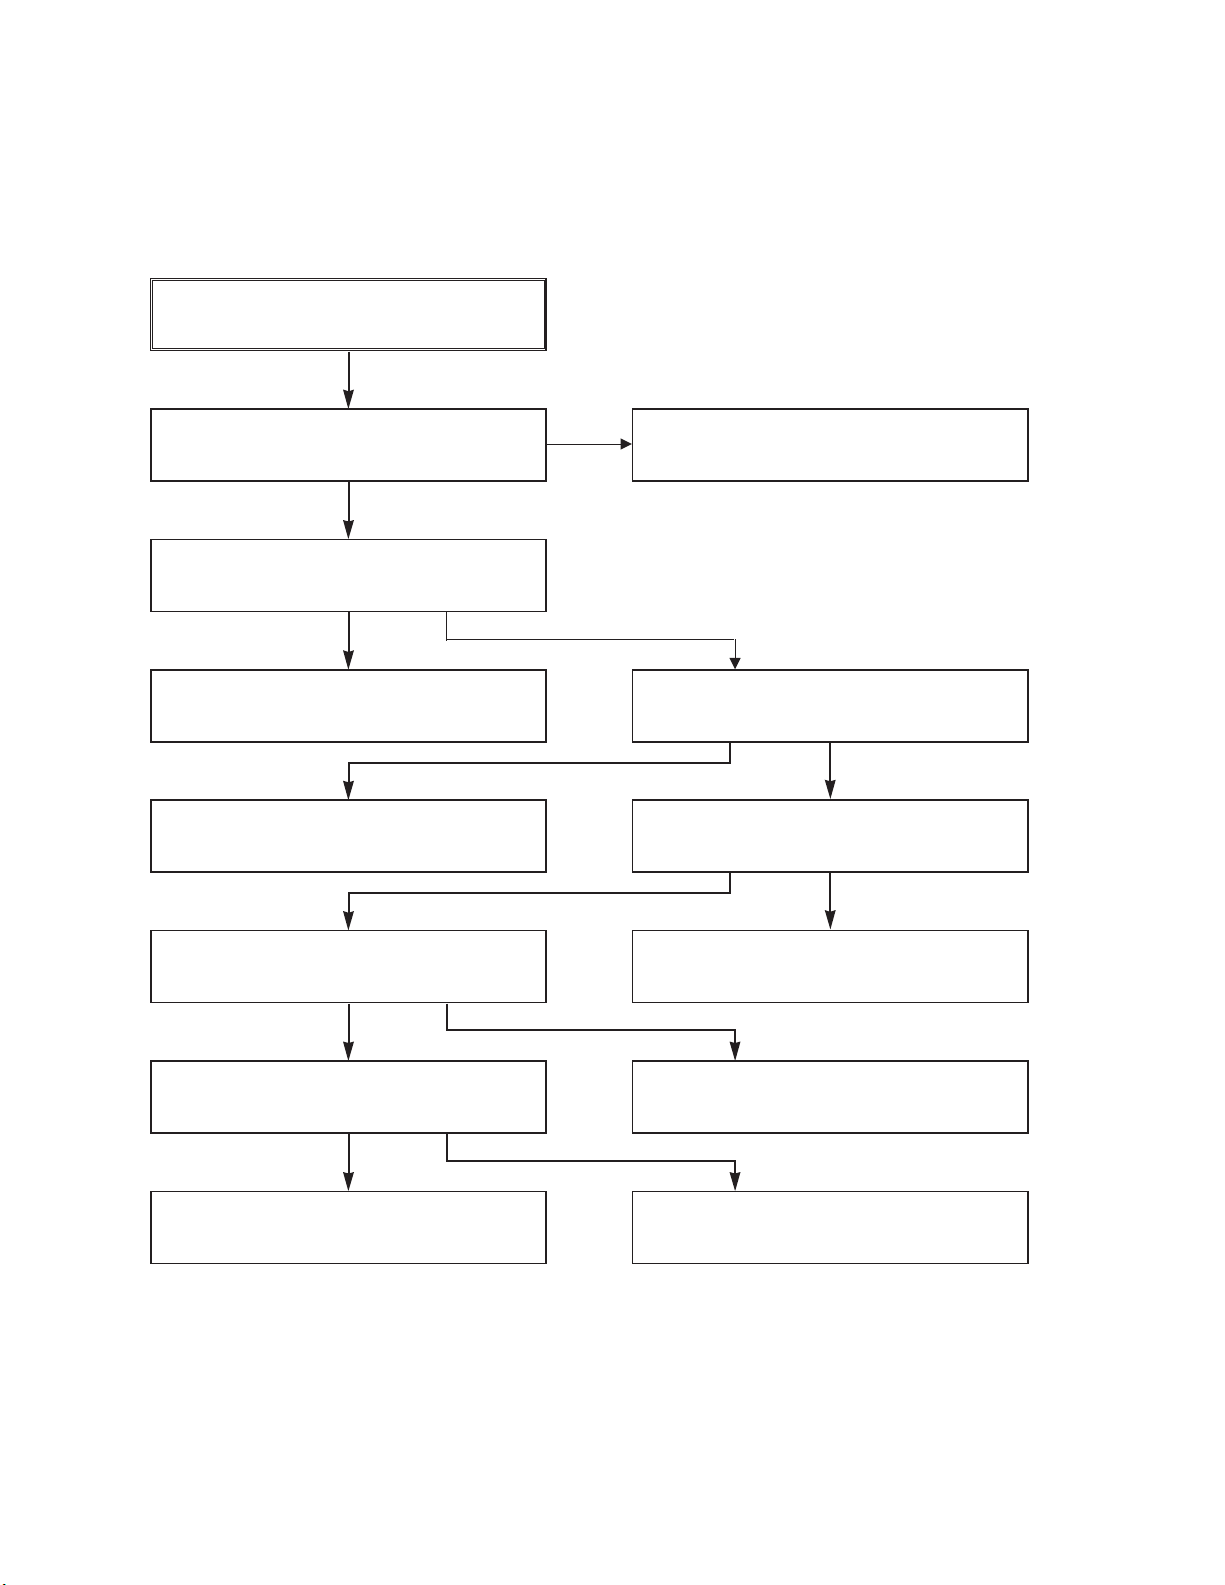
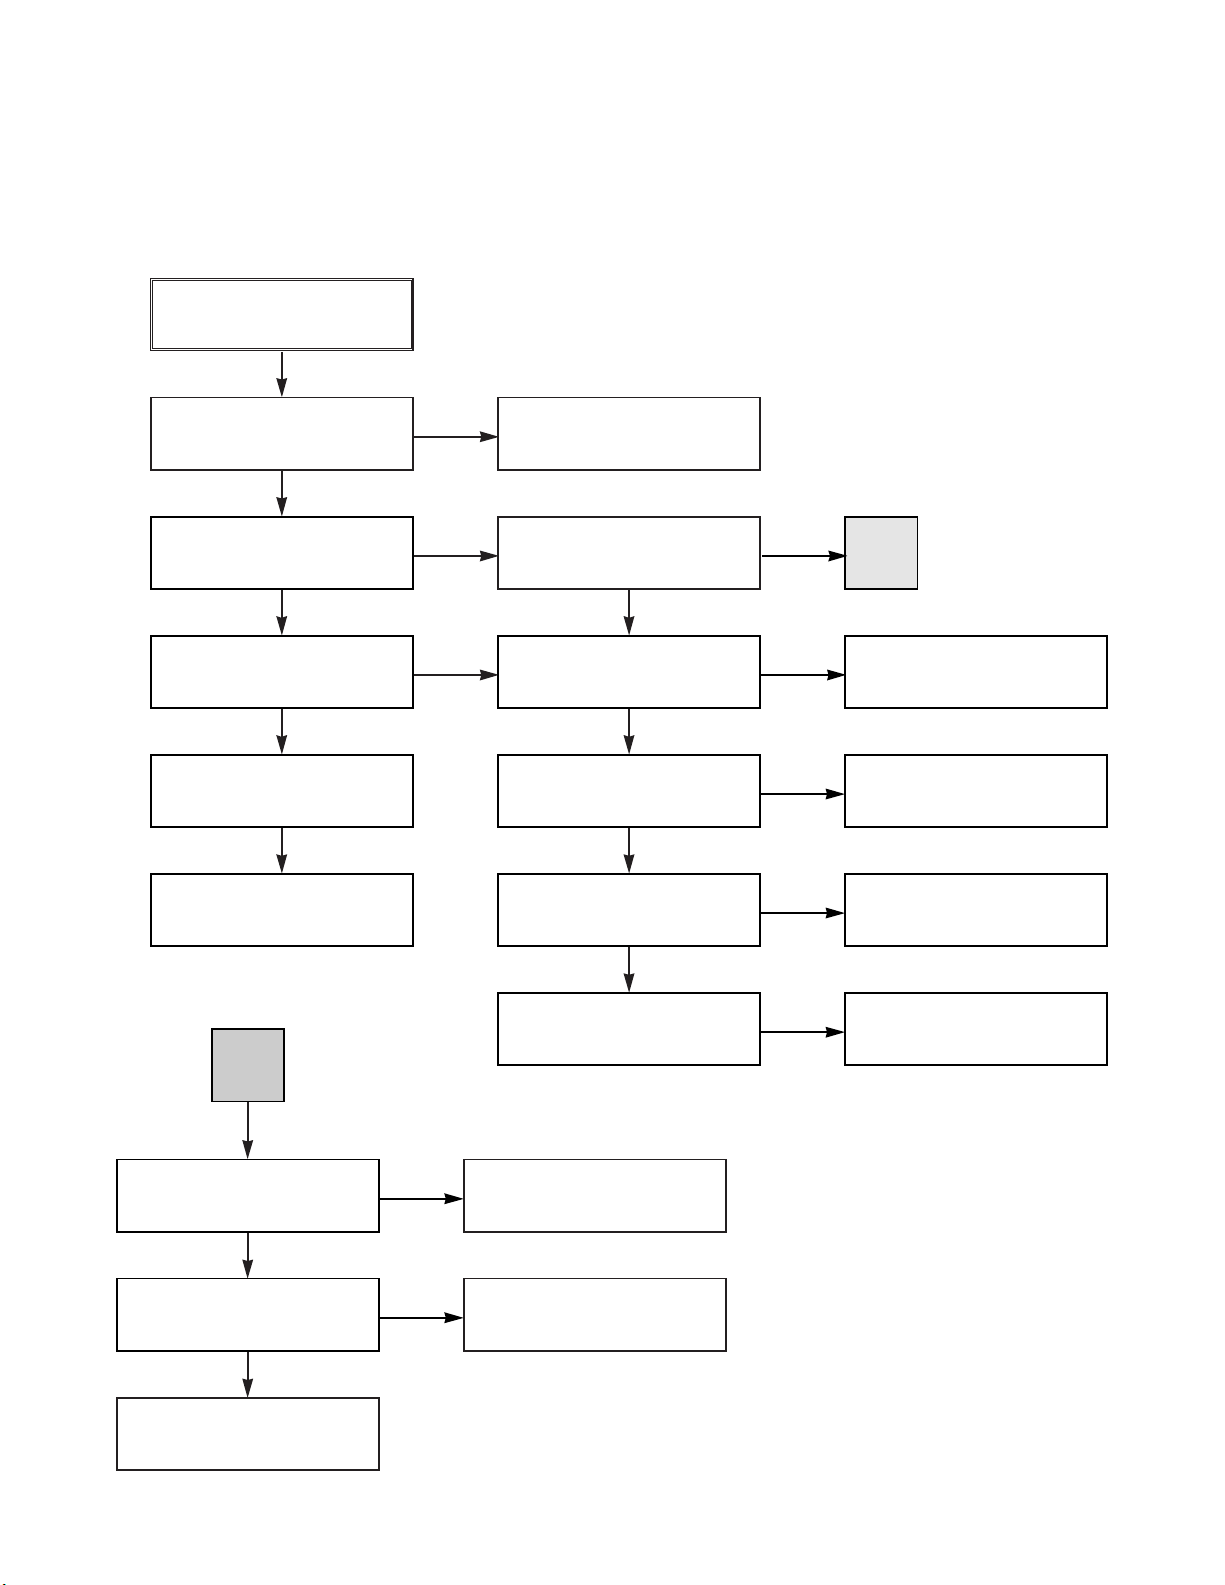
Page 15
3-6
VCR ELECTRICAL TROUBLESHOOTING GUIDE
NO 8V.
Check or Replace
D110.
Is Vcc(13V) supplied to
(+) terminal in D114?
Is Q162 Base “H”?
Is Vcc(12V) supplied
to IC151 Pin1?
NO
NO
Check or Replace
D114.
NO
Check the Power
Control.
YES
YES
Check or Replace
IC151, R170, C154.
YES
(8) No 8V(TO DVD)
NO 3.3V.
Is Vcc(4V) supplied
to IC152 Pin1?
Is the Q162 Base
“H”?
YES
Check or Replace
IC152, R156, C153.
YES
(9) No 3.3V(TO DVD)
Check or Replace
D111.
NO
NO
Check the Power
Control.
Page 16
3-7
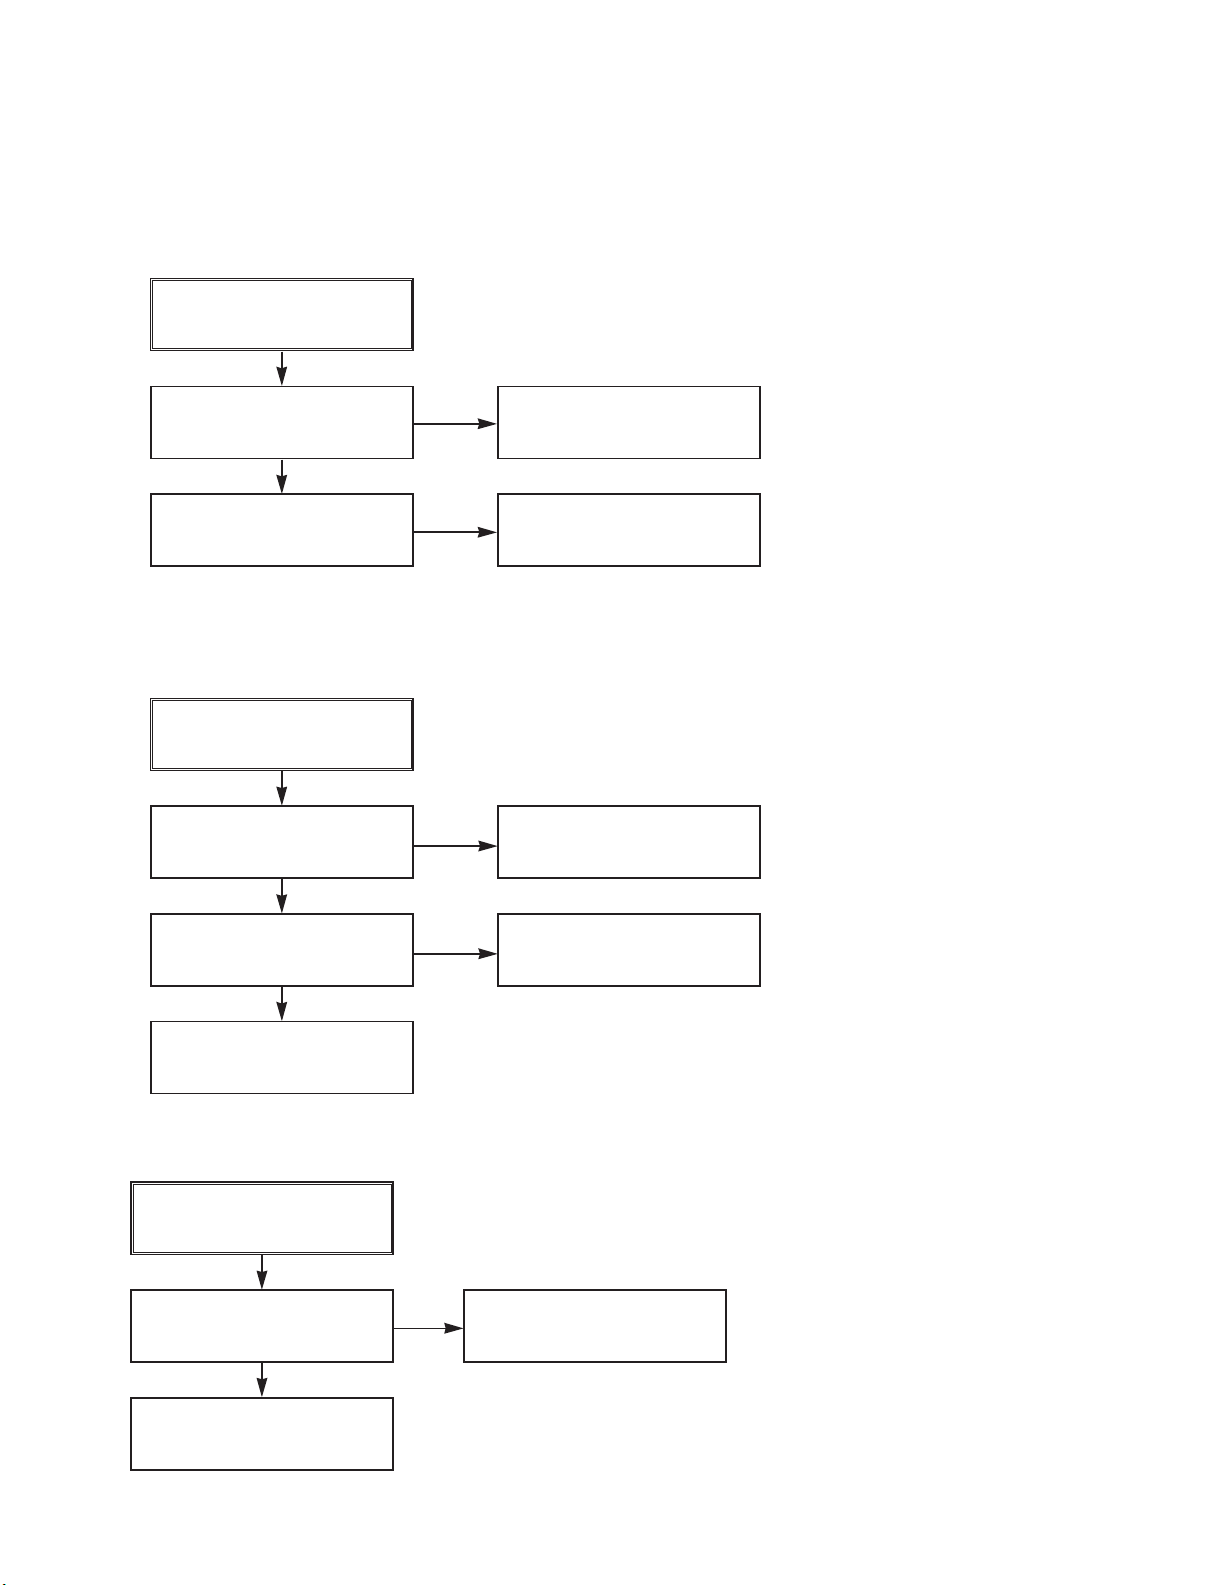
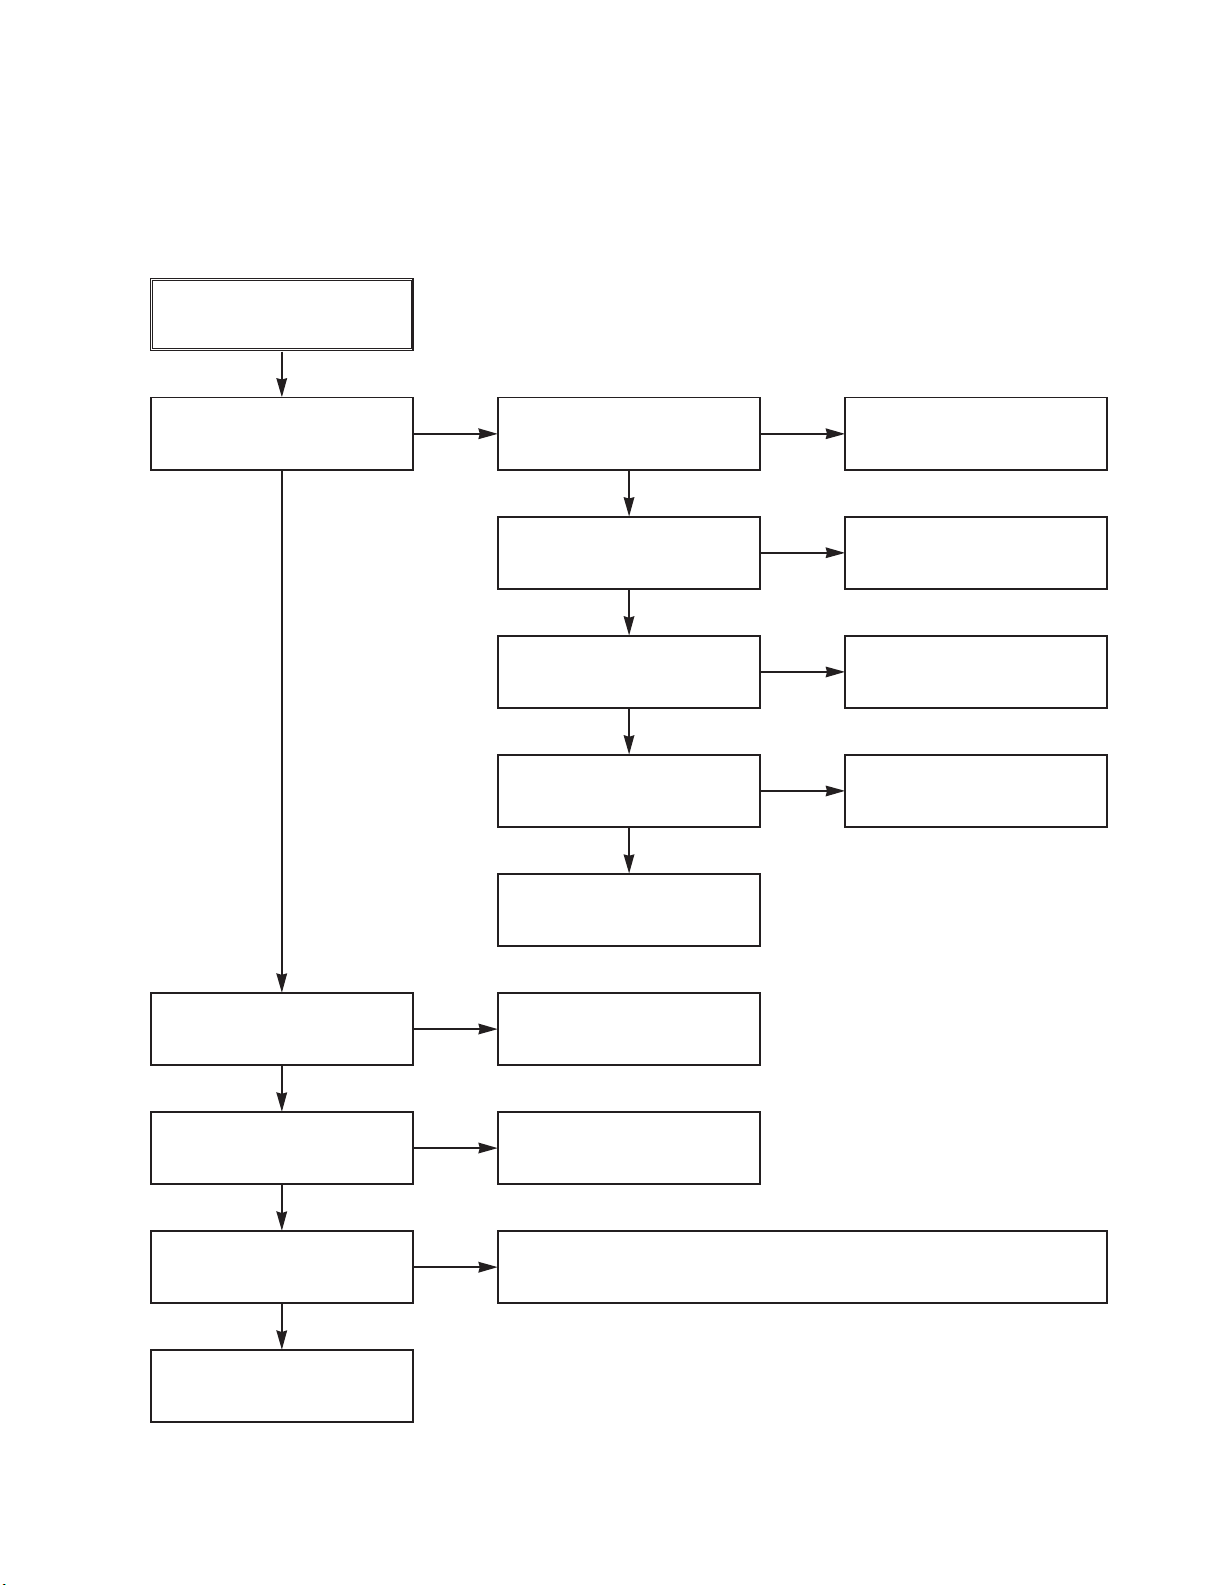
2. SYSTEM/KEY CIRCUIT
(1) AUTO STOP
(2) The unstable loading of a Cassette tape
Auto Stop
Does the SW30 waveform
appear at IC501 Pin18?
Do the T-UP Reel Pulses
appear at IC501 Pin80?
Is 12V applied to PMC01
Pin8?
Check the Drum Motor
signal.
Does 5V appear at the
RS501?
Check the Q160 Power
Circuit.
Refer to “SMPS DRUM
12 Volt Trouble Shooting”.
Is 5V applied to R531 ?
Refer to SMPS 5.3VA
troubleshooting.
Check IC501
Pins22, 23, 24, 25.
Do T/UP Reel Pulses
appear at the point
between R556 and R536?
Replace the T/UP Reel
Sensor (RS501).
Check the CST SW and
the peripheral circuitry.
Replace the IC501.
The unstable loading of a
Cassette tape
Does the “H” signal appear
at IC501 Pin60 during
inserting the CST ?
Does the “L” signal appear
at IC501 Pin19 during
inserting the CST?
Check the Deck
Mechanism.
Note :
Auto stop can occur because Grease or Oil has dried up
YES
YES
NO
YES
YES
YES
NO
NO
NO
NO
NO
NO NO
YES
YES YES
VCR ELECTRICAL TROUBLESHOOTING GUIDE
Page 17
3-8
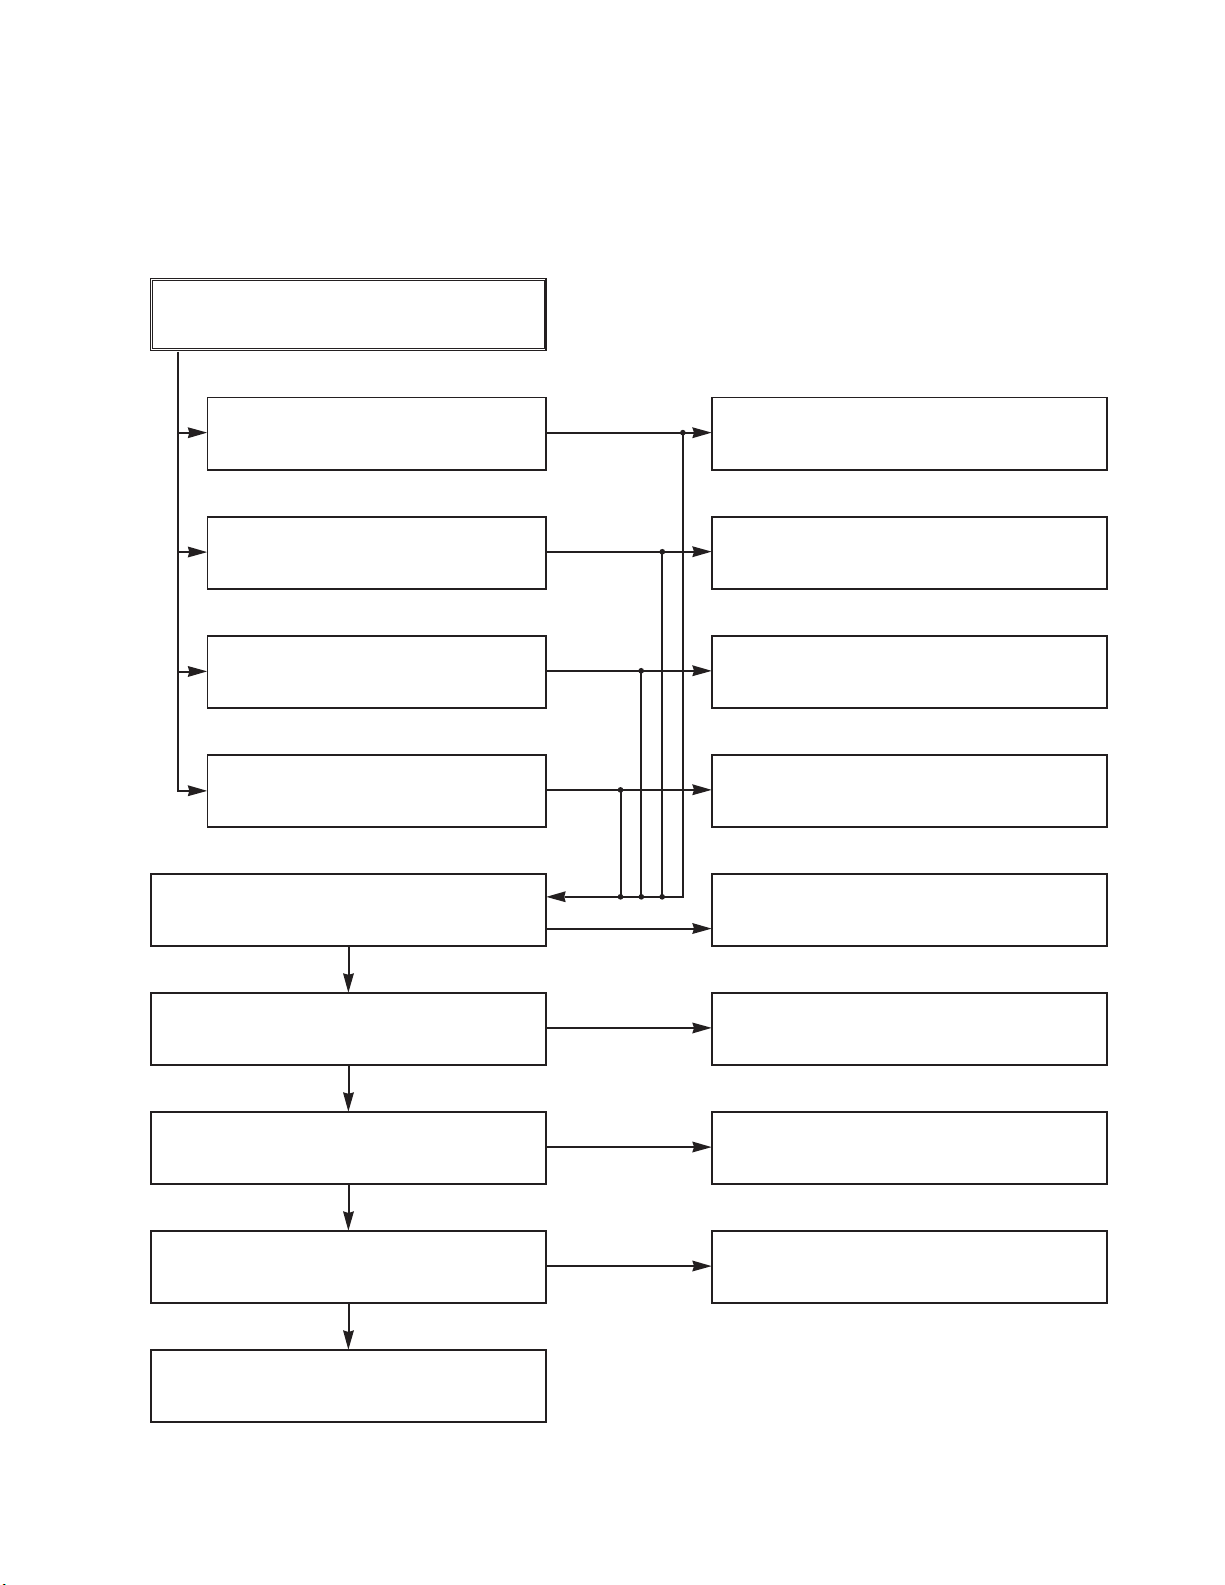
3. SERVO CIRCUIT
(1) Unstable Video in PB MODE
Does the Noise level of the
screen change
periodically?
Do the CTL pulses appear
at IC501 Pin97?
Is the height adjustment of
the CTL Head accurate?
Readjust the height of the
CTL Head.
Replace IC501.
Refer to “When the Y signal
doesn’t appear on the
screen in PB Mode”.
Confirm the CFG
waveform at IC501 Pin87?
On tracking do the CTL
pulses move?
Does the Video Envelope
waveform appear at IC501
Pin9?
Replace IC501.
YES
YES
YES
NO
YES
NO
NO
NO
(2) When the Drum Motor
(2) doesn’t run.
Do the DFG Pulses appear
at PMC01 Pin11?
Replace the Cap M.
Are the foil patterns and
the Components between
IC501 Pin 90 and PMC01
Pin11 shorted?
Replace IC501.
Refer to “(2)
No 12VA of Power section”
Do the Drum PWM Pulses
appear at IC501 Pin76?
Are the foil patterns and
the Components between
IC501 Pin76 and PMC01
Pin12 shorted?
Do the DFG Pulses appear
at IC501 Pin90?
Do the Drum PWM Pulses
appear at IC501 Pin76?
Are the connecting patterns and the Components
between IC501 Pin76 and PMC01 Pin12 shorted?
When the Drum Motor
doesn’t run,
Does 12V appear at
PMC01 Pin8?
Does 2.8V appear at
PMC01 Pin12?
Check the connector
(PMC01) and the Drum
Motor Ass’y.
NO
YES
YES
YES
NO
NO
NO
NO
NO
YES
YES
YES
VCR ELECTRICAL TROUBLESHOOTING GUIDE
Page 18
3-9
Does the CFG signal appear at
PMC01 Pin1?
Does the PWM signal appear at IC501
Pin77?
Does 2.8V appear at PMC01?
Check the PMC01 and the Capstan
Motor Ass’y.
Does the Capstan PWM signal appear at
IC501 Pin77?
Are the foil patterns and Components
between IC501 Pin77 and PMC01
Pin9 shorted?
Does the CFG signal come into IC501
Pin87?
Are the foil patterns and Components
between IC501 Pin77 and PMC01
Pin9 shorted?
2. SERVO CIRCUIT
(3) When the Capstan Motor doesn’t run,
NO
NO
NO
YES
YES
YES
When the Capstan Motor doesn’t run,
Does 12VA appear at PMC01?
YES
Replace IC501.
YES
NO
NO
YES
Refer to “SMPS(CAPSTAN/12Volt)
Trouble Shooting”.
Are the foil patterns and component
between IC501 Pin87 and PMC01
Pin1 shorted?
Check the Capstan Motor Ass’y.
NO
VCR ELECTRICAL TROUBLESHOOTING GUIDE
Page 19
3-10
4. OSD CIRCUIT
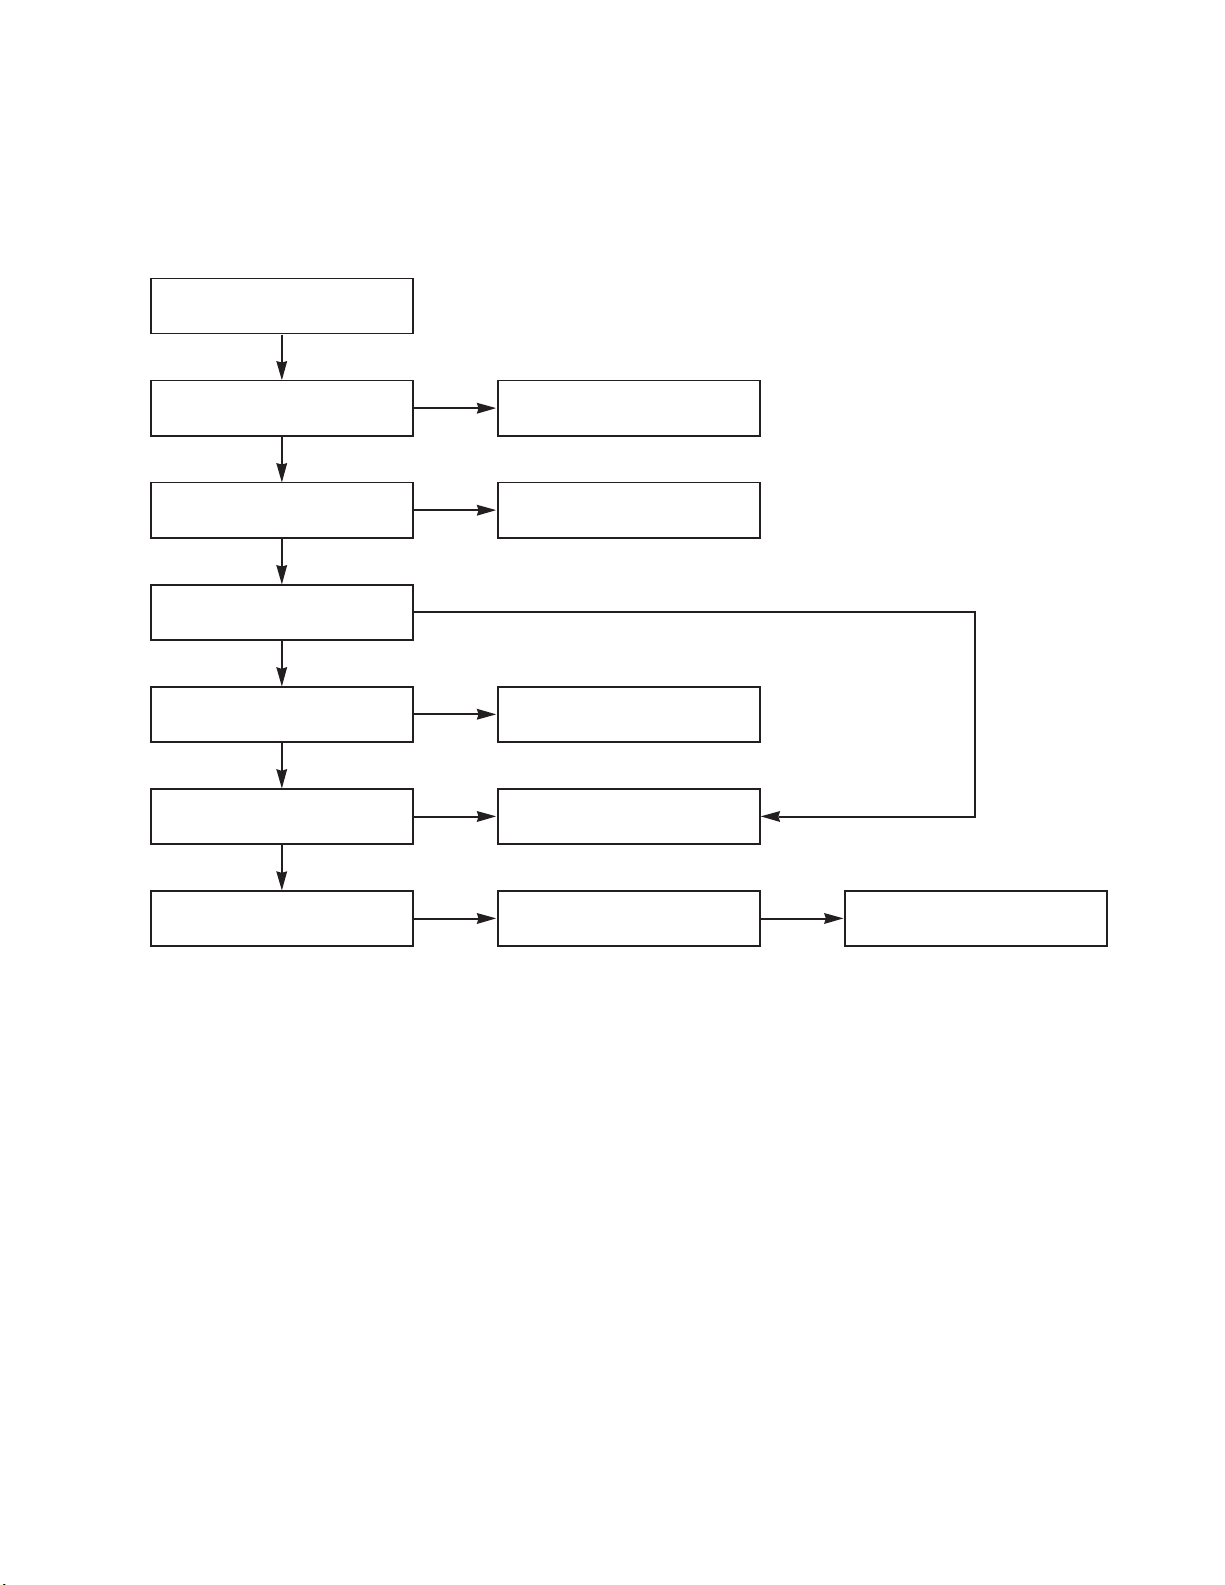
(1) No OSD display.
(2) I
2
C BUS CHECK
Keys do not work
Is 5V applied to IC501
Pin79?
Does LED or FLD change
when a function button is
pressed?
No OSD or F.OSD display.
Is 5.3V applied to IC501
Pin53?
Does oscillation occur at
IC501 Pins44, 45?
Replace IC501.
No I2C bus communication
Does Power appear at the
Pull up impedence
(R569, R507)?
Replace IC501.
Refer to “SMPS 5.3VA
Trouble Shooting”.
Replace the defective
switches.
Refer to “SMPS 5.3VA
Trouble Shooting”.
Check or Replace the pheripheral Circurity.(L511,
R518, C596, C595)
Refer to “SMPS 5.3VA
Trouble Shooting”.
YES
YES
YES
YES
NO
NO
NO
NO
NO
2. SERVO CIRCUIT
(4) Keys do not work
VCR ELECTRICAL TROUBLESHOOTING GUIDE
Page 20

3-11
5. Y/C CIRCUIT
(1) No Video in EE Mode,
No Video in EE Mode
Does the Video signal
appear at IC302
Pins1, 5?
Is there 5V at IC302 Pin6?
Check the REG 5V Line.
(Power Circuit)
Replace IC302.
Does the Video signal
appear at IC301
Pins28, 30, 32?
Is REG 5.0V applied to
IC301Pins23, 44, 45, 52, 68,
77?
Does the Video signal
appear at IC301 Pin26?
Does the Video signal
appear at IC501 Pin52?
Does the Video signal
appear at IC602 Pin7?
Check the REG 5V Line.
(Power Circuit)
Is I2C BUS signal applied to
IC301 Pins53, 54, 55?
Replace IC301.
Check the path of the signal between IC301 Pin 26
and IC501 Pins50, 52.
Is there 5V on the plus
terminal of C614?
Check the REG 5V Line.
(Power Circuit)
Replace IC602.
Check the System Circuit.
(Refer to ‘SYSTEM I2C BUS
CHECK Trouble Shooting’)
YES
YES
YES
YES
YES
YES
NO
NO
NO
NO
NO
NO
Check the REG 5V Line.
(Power Circuit)
NO
NO
YES
YES
Check DVD Video Input
(IC802, Pin29), Tuner
Video Input (TU701 Pin24),
Line Video Input (JK801),
respectively.
NO
NO
VCR ELECTRICAL TROUBLESHOOTING GUIDE
Page 21
3-12
3. Y/C CIRCUIT
(2) When the Y(Luminance) signal doesn’t appear on the screen in PB Mode,
Is 5V applied to IC301
Pins23, 44, 45, 52, 68, 77?
Is the Y/C Bus siganl
applied to IC301 Pins53,
54, 55?
Does the normal RF signal
appear at IC301 Pin 14?
Check the line of the REG
5V Line. (Power Circuit)
Check the System Circuit.
(IC501 Pin18)
Check the V.H.S/W level.
Refer to ‘SYSTEM Y/C
BUS CHECK Trouble
Shooting’.
Is the V.H.S/W signal
applied to IC301 Pin57?
Does the Rectangular
waveform(5V) appear at
IC301 Pin57(V.H.S/W)
Clean the Drum.
Check C324.
Check R328, C322, C323.
Does the Y(Luminance)
signal appear at IC301
Pin20?
Is the Y(Luminance) Video
waveform showed up at
IC301 Pin22?
Replace IC301.
NO
YES
YES
YES
YES
YES
YES
YES
NO
NO
NO
NO
NO
NO
VCR ELECTRICAL TROUBLESHOOTING GUIDE
Page 22
3-13
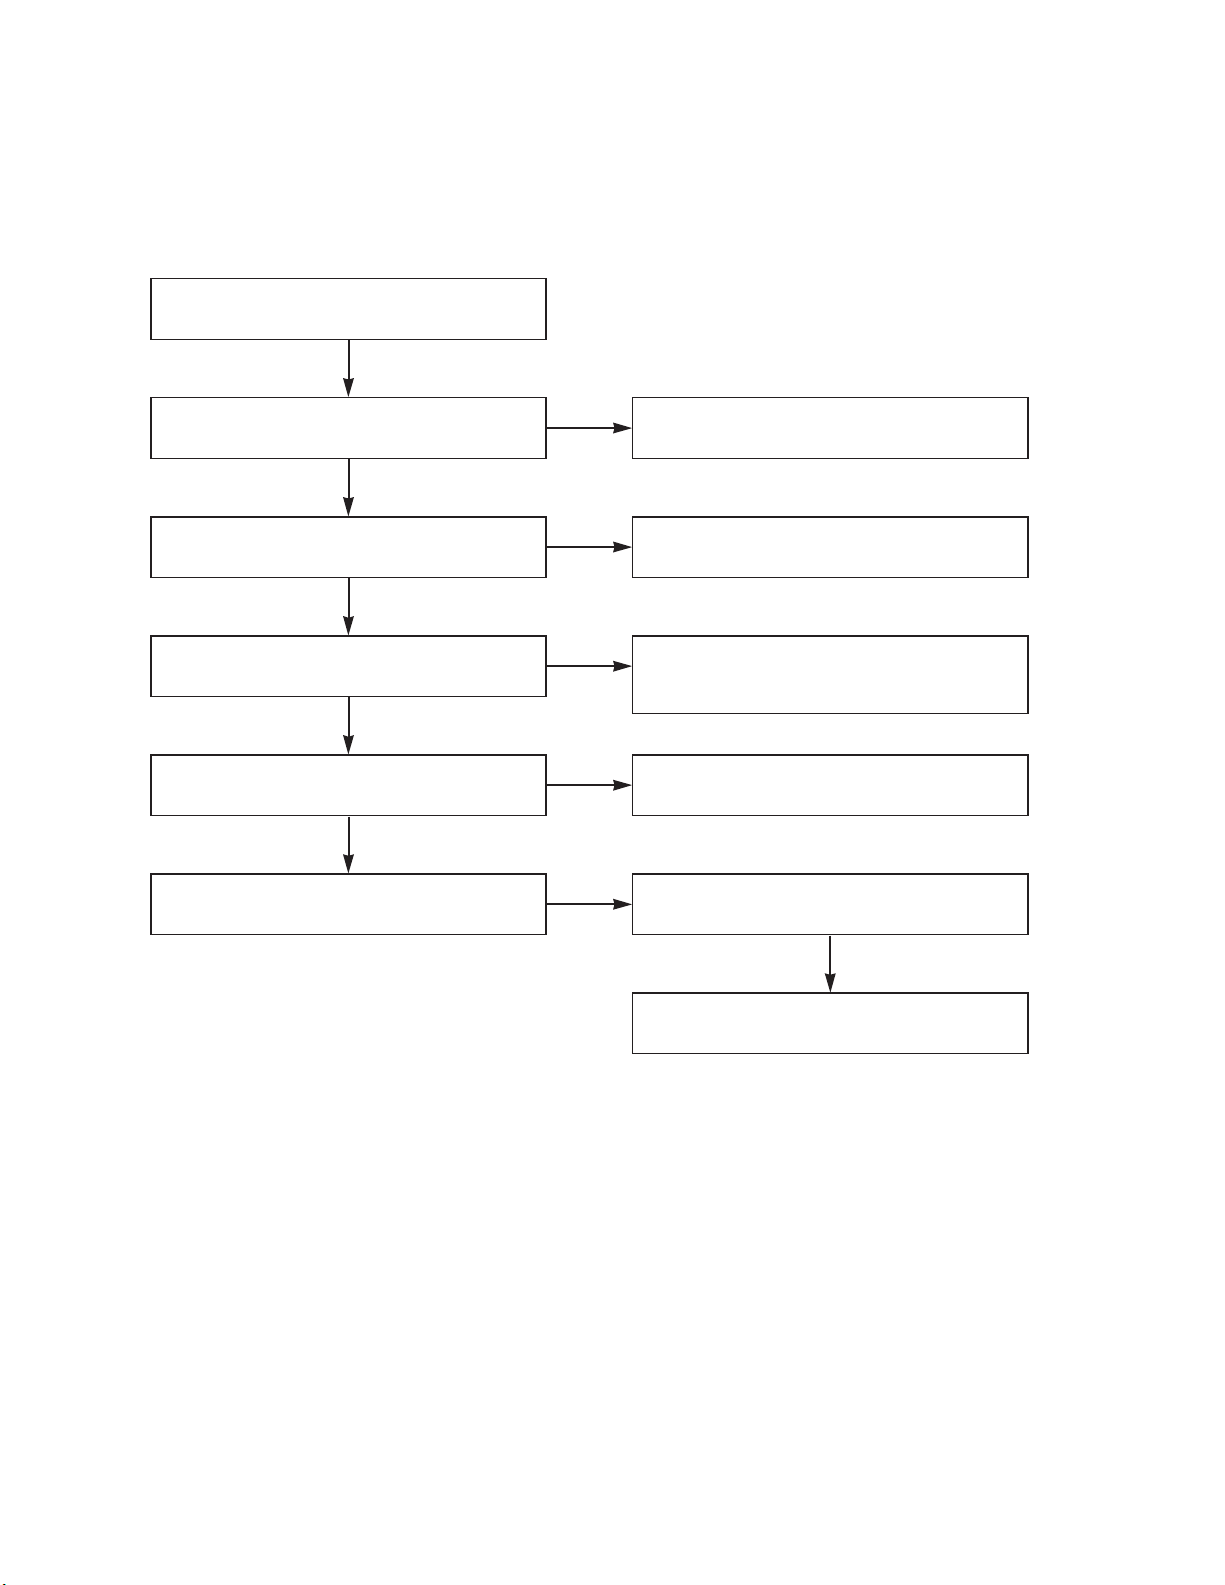
3. Y/C CIRCUIT
(3) When the C(Color) signal doesn’t appear on the screen in PB Mode,
Is 5V applied to IC301
Pins23, 44, 45, 52, 68, 77?
Does the Color signal
appear at IC301
Pins41, 50?
Check the line of the REG
5V Line. (Power Circuit)
Replace X301.
Check C342, C341,
R333.
Is X301 (3.58MHz)
normal?
Replace IC301.
Does the Color signal
appear at IC301 Pin48?
Replace IC301.
NO
YES
YES
YES
NO
NO
NO
VCR ELECTRICAL TROUBLESHOOTING GUIDE
Page 23
3-14
3. Y/C CIRCUIT
(4) When the Video signal doesn’t appear on the screen in REC Mode,
YES
YES
NO
NO
YES
YES
YES
YES
YES
Check system part
(V.H/SW)
Replace the IC301.
Check the drum
*OPTION
Pins72, 73, 74(SP)
Pins65, 66, 67(EP)
REC mode
Check the EE mode
NO
Is EE mode normal?
Is color
normal?
A
A
YES YES
Is brightness normal?
Does signal appear at
IC301 Pins41, 50?
NO
Check X301 oscillation
frequency.
YES
Is the brightness signal supplied to IC301 Pins18?
Is 5V supplied to IC301
Pins23, 44, 45, 68, 77?
Check the power of Pins23,
44, 45, 52, 68, 77.
Check the 5V power
NO
NO
NO
NO
NO
Is Y/C Bus applied to
IC301 Pins53, 54, 55?
Check the REG 5V power
Check system part
Do X301 and X-TAL
oscillate?
Check X301, 302
Is V.H SW supplied to
IC301 Pin57?
Does the FM signal appear
at IC301*?
VCR ELECTRICAL TROUBLESHOOTING GUIDE
Page 24
3-15
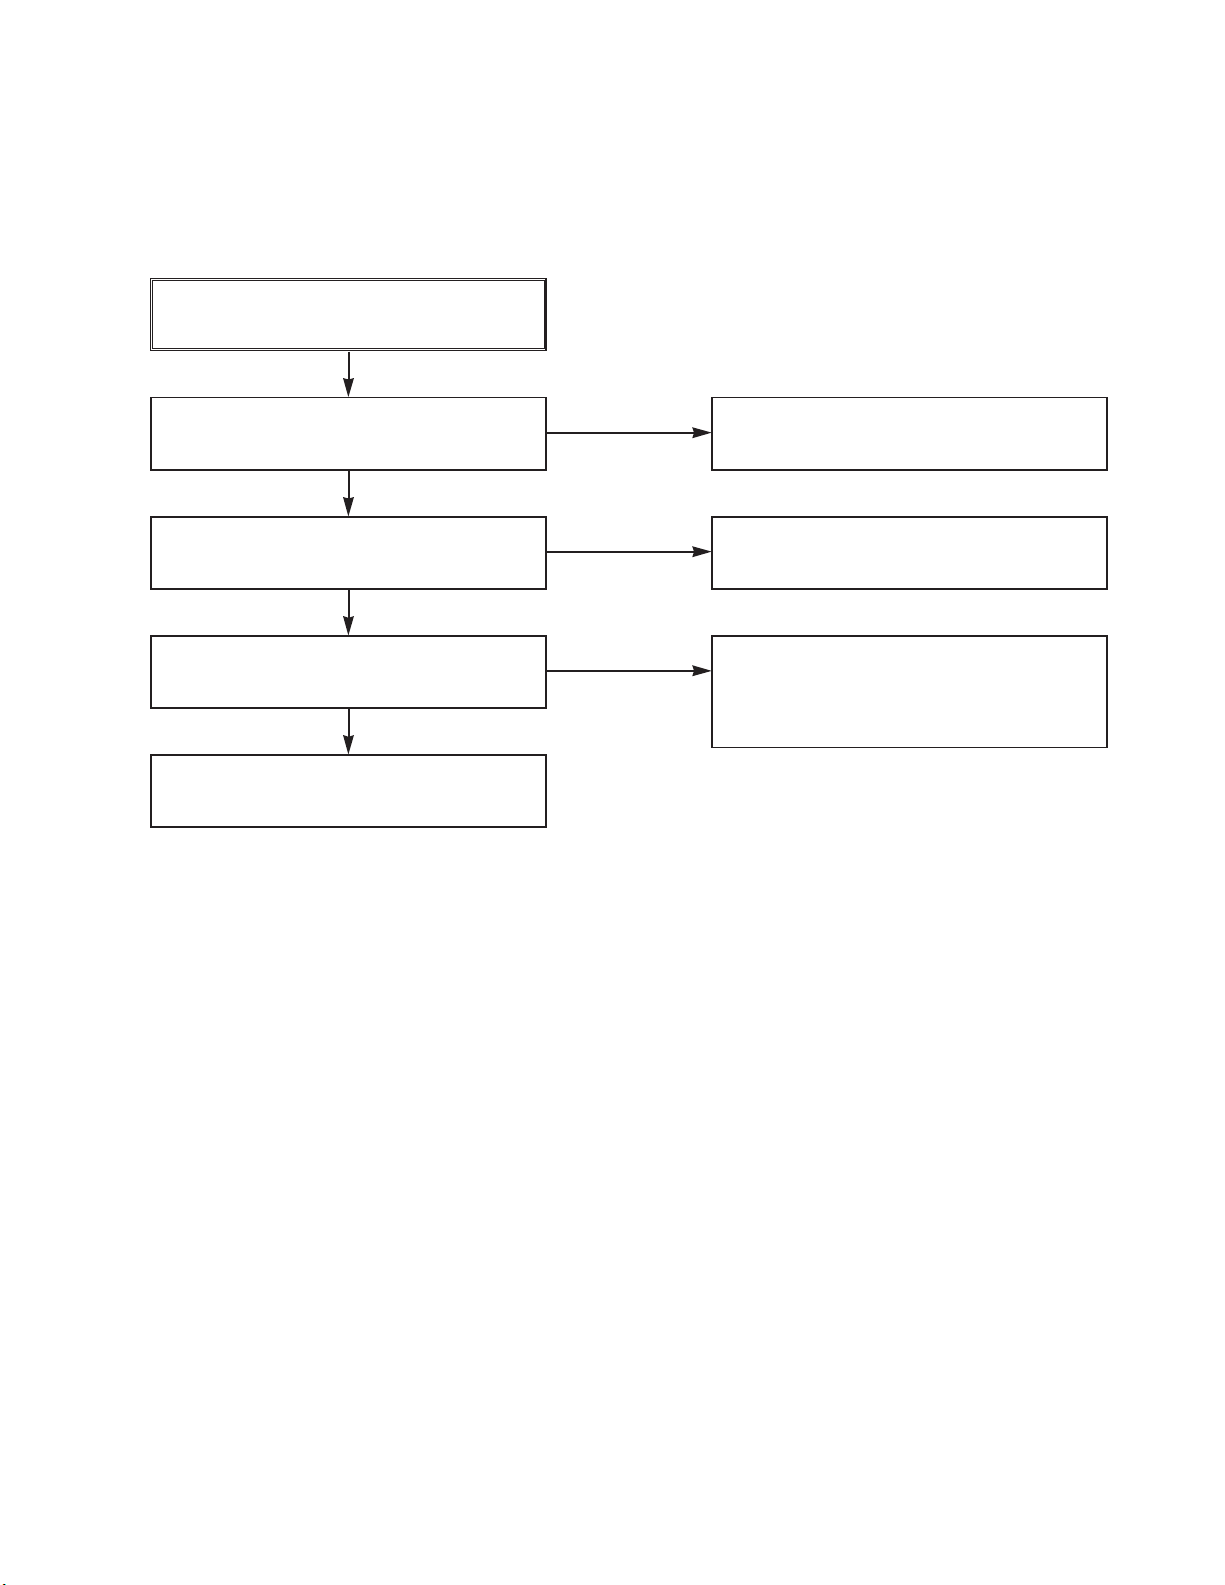
6. Hi-Fi CIRCUIT
(1) No Sound(EE Mode)
No Sound.
Check the SIF.IN of IC801 Pins57.
Check the DVD Audio of IC801
Pins12, 74.
Check the AV1 Audio of IC801
Pins11, 73.
Check the AV2 Audio of IC801
Pins9, 71.
Check the Vcc of IC801 Pins3, 5, 15,
32, 36, 46, 54.
YES
Check the IIC Clock and DATA at
IC801 Pins37, 38.
YES
Check Audio of IC801 Pins78, 80.
YES
Check Audio of C804, C854.
YES
Check JK601.
Check the TU701 SIF Pin13.
NO
Check the DVD MODULE.
(PMD02 Pins9, 11).
NO
Check the Rear Jack.
(JK601 Audio in).
NO
Check the front Jack.
(JK5L1 Audio in).
NO
Check the Power 5.2V, 5.3VA, REG 9V.
Q701, PMP01 Pins1, 2, 5, 6.
YES
NO
Check IC501 Pins71, 72.
NO
Replace IC801.
Replace C804, C854.
NO
NO
VCR ELECTRICAL TROUBLESHOOTING GUIDE
Page 25
3-16
3. Y/C CIRCUIT
(2) Hi-Fi Playback
YES
YES
YES
No Sound.
Check the Vcc of IC801
(Pins3, 5, 15, 32, 36, 46, 54).
Check the Hi-Fi Selection switch.
(IC801 Pin39) and the Tape quality.
Is the RF Envelope at
IC801 Pin23 over 3Vp-p?
YES
Check IC801 Pin37(Data),
Pin38(Clock)
YES
Do Audio Signals appear at
IC801 Pin80(L-CH), 78(R-CH)?
YES
Do Audio Signals appear at
JK601?
Check Power.
NO
Check IC501 Pin19
(A.H/SW)
NO
NO
Check the parts of µ-COM
(IC501 Pins71, 72)
NO
Check the Connection at
P3D01 Pins7, 9.
NO
Check the Jack(JK801)
NO
Check C801, C851, R801,
R851.
VCR ELECTRICAL TROUBLESHOOTING GUIDE
Page 26
3-17
(3) Hi-Fi REC
No recorded Hi-Fi Audio Signal
Check Vcc of IC801.
(Pins3, 5, 15, 32, 36, 46, 54)
Check IC801 Pin37(Data), Pin38(CLOCK).
YES
Do Audio signals appear at IC801 Pin6?
YES
Do Audio signals appear at IC301
Pin76(Normal Audio)?
YES
Do OSC signals appear at P3D02 pins4,5
(50Vp-p)
YES
YES
Check Power.
NO
Check ports of µ-CPM.
(IC501 Pins71, 72)
Check Audio input signal of IC801
Pin57(TU.A.), 7, 69(DVD.A.),
11, 73(AVI.A.), 9, 71(AV2.A.)
NO
Check C825, C306, R311, R312, R346.
Check REC OSC BLOCK
(FL301, Q301~Q305, Q308, Q309)
Is IC501 Pin74 “ High” in REC mode?
NO
NO
NO
VCR ELECTRICAL TROUBLESHOOTING GUIDE
Page 27
3-18
7. Tuner/IF CIRCUIT
(1) No Picture on the TV screen
No picture on the TV
screen
Does the Video signal
appear at TU701 Pin16.
YES YES
Is +33V applied to TU701
Pin14?
YES
Is +5V applied to TU701
Pin3?
NO
Does the video signal
appear at IC302 Pin7.
NO
Does the Video signal
appear at IC501 Pin 52.
YES
NO
Does the Video signal
appear at IC602 Pin 7.
YES
NO
Check the signal flow from IC602
Pin7 to JK601 Pin Video out.
YES
Check 33V line.
NO
Check 5V line.
NO
YES
Does the Clock signal
appear at TU701 Pin9?
Check the l2C Clock Signal
of µ-COM Pin71.
NO
YES
Does the data signal
appear at TU701 Pin10?
Replace Tuner.
Check the signal flow from
IC501 Pin27.(Pin27 is ‘L’
state in Tuner Mode)
Check the signal from IC301
Pin26 to IC501 Pin50.
Check the signal from IC501 Pin52 to IC602 Pin1 and IC602 Pin2.
(IC602 Pin2 is ‘L’ state in VHS mode)
Check the l2C Data Signal
of µ-COM Pin72.
NO
VCR ELECTRICAL TROUBLESHOOTING GUIDE
Page 28
3-19
(2) No Sound
No Sound.
Check the Vcc of TU701 Pins3, 14. Check 5.2V, 33V Line.
NO
Check the Tuner SiF signal at IC801
Pin57.
YES
Check the Audio of IC801 Pins78, 80.
YES
Check the Signal flow from IC801 Pins78,
80 to JK601 Audio out(L), (R)
YES
Check the Tuner SIF of TU701 Pin13.
NO
1. Check the Vcc(5.3VA, 9V) of IC801
Pins3, 5, 36, 54.
2. Check the I2C Clock and Data at IC801
Pins37, 38.
NO
VCR ELECTRICAL TROUBLESHOOTING GUIDE
Page 29
4
3
12
TO CAP MOT
12VA
TO SYS
-27VA
TO SYS
FD(+)
TO SYS
FD(-)
TO DRUM MOT
12VA
TO DVD/Hi-Fi
REG 12V
TO DVD
8V
TO DVD
3.3V
TO TUNER
33V
TO SYS/Hi-Fi/Tu
5.0V
TO DVD
5V
FROM µ-COM
PWR CTL 'H'
TO SYS/Hi-Fi/Tu
5.3VA
DRIVE & S/W BLOCK
OVER CURRENT LIMIT
BLOCK
(IC101,BD01,D102,R105,
C108,R107,C107,C109)
LINE FILTER
BLOCK
(C101, L102, C102)
BD101
C103
V101
1
2
218
17
16
15
14
13
12
11
5
8
3
10
4
3
IC102
D117
T/W
D115
IC103
PW101
BR
(BK)
HOT CIRCUIT
BL
(WH)
F101
F102
C111
HOT GND
R101
SNUBBER
BLOCK
(D101, R104,
C105, C106)
RECTIFIER &
SMOOTHING
(D110, C123, L122,
C126, C163)
RECTIFIER &
SMOOTHING
(D108, C130, R118)
RECTIFIER &
SMOOTHING
(D111, C127,
L123, C128)
RECTIFIER &
SMOOTHING
(D112, L124,
C129, C131)
FEED-BACK
BLOCK
(R112, R113, C133,
R114, R115, R116,
R117)
8VA REG
BLOCK
(D114, IC151, C154)
12VA REG
BLOCK
(Q156,ZD103,C151,
C152,R153)
3.3V REG
BLOCK
(IC152, C153)
RECTIFIER &
SMOOTHING
(D113, R119, C132)
33V S/W
BLOCK
(Q114, R154, R155)
PWR CTL
BLOCK
(Q162,R163,R164,
R171,C161)
5V BLOCK
(R157, Q160, R158,
R159, D121, C155)
!
!
C110
! !
!
!
NOTES : Symbol denotes AC ground.
Symbol denotes DC chassis ground.
RECTIFIER &
SMOOTHING
(D107, C121,
ZD101, R167, R168)
3-20 3-21
BLOCK DIAGRAMS
1. POWER(SMPS) BLOCK DIAGRAM
Page 30
5.3VA
5.0V
GND
CAP VCC
REG 12V
33V
DRUM VCC
PWR CTL 'H'
GND
HSR 'H'
GND
GND
FD(-)
FD(+)
-27VA
PMP01-PPM01
123456789
1011121314
15
A.IN
CH S/W
REG 5V
CONTROL
V.IN
RF AGC
NC
ENABLE
CLOCK
DATA
AFT
A.OUT
SIF
TU 30V
NC
V.OUT
999 GND
83 PWR CTL 'H'
81 HSR 'H'
110 FD(-)
109 FD(+)
108 -27VA
100AFT
732TU.V.OUT
103 DRUM VCC
102 REG 12V
104 CAP VCC
107 REG 5V
786 REG 9V
875 MOD A.IN
61 MOD CTL
106 5.0V
26 VCR 'H'
671 MOD V.IN
71 IIC CLK
72 IIC DATA
781 SIF OUT
1
2
3
4
5
6
7
8
9
10
11
12
13
14
15
16
REG. BLOCK
5V
REG. BLOCK
9V
3-22 3-23
2. TU/IF BLOCK DIAGRAM
Page 31

3-24 3-25
3. Y/C BLOCK DIAGRAM
EP PB 'A'
EP PB 'B'
SP PB 'B'
SP PB 'A'
64
59 58 57 55 54 53
65
67
72
74
ACC
DET
ENV
DET
C-ROT
RF-SW
IN
Y/C ENA
Y/C DATA
Y/C CLOCK
V.OUT
AUDIO
MUTE
HA SW
P
P
P
C-LPF
MAIN
CONV
3.58M
BPF2
ACC
AMP
ACC
DET
CLAMP
Y
LPF
CLAMP
CLAMP
IN
OUT
VCA
CCD
3.58M
BPF1
Y/C
MIX
6dB
DOUBLE
LIMFMDEM
SUB
LPF
MAIN
DE-EM
PB
FM-EQ
FM
AGC
CNC
YNR
COMB
4.21M
BPF
SUB
CONV
39
37
36
34
26
22
21
P
B
(PB Mode)
EP REC
SP REC
57
V. H/SW55Y/C ENA
54
Y/C DATA
53 51 50 49 48 47
39
38
37
36
34
32
30
28
22
21
20
73
70
69
66
Y/C CLOCK
X-TAL
3.58MHZ
C-LPF
MAIN
CONV
4.21M
BPF
SUB
CONV
DETAIL
ENH
MAIN
EMPHA
REC
FM-EQ
4.7K
FM
MOD
Y
LPF
YNR
COMB
3.58M
BPF1
LINE2
26
V.OUT
DVD
TU/LINE1
VIDEO
AGC
CLAMP
CLAMP
CLAMP
IN
CCD
OUT
VCA
SW
BLOCK
IC302
NL
EMPHA
B-UP
AMP
ACC
AMP
ACC
DET
BGA
REC
APC
REC
APC
320FH
VCO
SLDVX01
SERIAL
DECODER
R
R
B
(REC Mode)
Page 32

3-26 3-27
4. NORMAL AUDIO BLOCK DIAGRAM
IC301
LA71206M
SIF
A_IN
RF_MOD
IC801
LA72670M
TUNER
TU701
10
76
DET
NORMAL
AUDIO
OUT
LINE AUDIO(R) IN
LINE AUDIO(L) IN
REAR Jack
A. OUT (L)
ALC
4
6
13
1
57
9
2
71
80
78
A. OUT (R)
(System)
IC801
LA72670M
IC301
LA71206M
AMP
EQ
AMP
78
410
A. OUT (R)
MOD. OUT
DATA
CLOCK
R/P HEAD
N.A.IN
53
ENA
55 54
5
4
6
From u-COM
80
A. OUT (L)
2
OUTPUT
SELECTOR
EQ
3
2
IC301
LA71206M
SIF
IC801
LA72670M
TUNER
TU701
10
76
DET
NORMAL
AUDIO
OUT
LINE AUDIO(R) IN
LINE AUDIO(L) IN
REAR Jack
A. OUT (L)
REC
AMP
4
6
13 57
RF MOD.
A_IN
1 2
9
71
80
78
A. OUT (R)
ALC
9
(EE Mode) (PB Mode) (REC Mode)
Page 33

A
B
Hi-Fi/
REC
IC801
LA72670M
A.OUT
To JACK
MODULATOR
A.OUT
(To Tu)
24
Hi-Fi PB 'B'
Hi-Fi PB 'A'
Hi-Fi REC
57
12
74
11
73
9
71
6 4
26 27
80
A.OUT 'L'
A.OUT 'R'
78
3
AUDIO INPUT
BLOCK
NORMAL AUDIO
OUT(To AVCP)
NORMAL AUDIO
IN(From AVCP)
SIF
DVD A.IN 'L'
DVD A.IN 'R'
AV1 A.IN 'L'
AV1 A.IN 'R'
AV2 A.IN 'L'
AV2 A.IN 'R'
3-28 3-29
5. Hi-Fi BLOCK DIAGRAM
Page 34

GND
MODE S1
MODE S2
MODE S3
MODE S4
MODE S/W
TO/FROM AVCP
T-UP REEL
T-UP END
SUP REEL
CST.SW/REC TAP
5V
CS501
5.3VA
5.3VA
ES501
R550
LD501
DECK IR LED
R553
R555
RS501
RS502
R556
R558 C582
R538
R535
R537
R536
C534
R544
C552
R5C6
C500 C517
R541
R529
R583
L512
MS501
X502
14MHz
32.768KHz
OSC
OSC
X501
1
2
RESET
GND
Vcc
3
5.3VA
5V
IC504
+
+ +
C592
+
C503
L501
R557
SUP END
ES502
C535
R564
R531
OSC
R/C
RC601
L511
R598
C595
C596
+
C561
TO/FROM DECK
Q503
Q501
CV IN
25
24
23
22
21
79
58
80
88
49
40
37
98
34
IC501
M37760
MODE S1
I-Limit
MODE S2
MODE S3
MODE S4
T-UP Sensor
T-UP Reel
SUP Reel
CST IN
Vss (AMP)
Vss (OSD)
Vss (SYSCON)
Vcc
(SYSCON)
Vcc
(SERVO)
CAP. PWM
CTL +
CTL -
CFG
CAP. REV 'H'
LD CTL
V. ENV
V.H.SW30
DPG
D.V.Sync
38
39
X out
Xc in
Xc out
X in
35
36
44
OSC in 2
95
94
87
12
59
9
18
76
90
13
H.A.SW
SQPB
16
59
77
11
DRUM PWM
53
Vcc (OSD)
20
SUP Sensor
45
OSC out 2
14
99
Vcc (A/D)
TO/FROM AUDIO(Hi-Fi)
TO/ FROM TU/IF
72
100
26
VCR 'H'
PLL DATA
PLL CLK
CV OUT
AFT
71
52
POWER FAIL
78
A. MUTE 'H'
A. ENV
A. H.SW
REC 'H'
74
68
71
72
CLK
DATA
74
50
COMP IN
17
REC 'H'
15
C.ROT
84
A.MUTE'H'
S clk
S in
S out
8
19
67
66
65
Hi-Fi ONLY
2
GND
Vcc
3
IC505
1
IC5F1
DISPLAY
3-30 3-31
6. SYSTEM BLOCK DIAGRAM
Page 35

NOTES) Symbol denotes AC ground.
NOTES) Symbol denotes DC chassis ground.
NOTE) Warning
NOTE) Parts that are shaded are critical
NOTE) With respect to risk of fire or
NOTE) electricial shock.
3-32 3-33
CIRCUIT DIAGRAMS
1. POWER(SMPS) CIRCUIT DIAGRAM
Switching Error.
IC101 is defective.
Switching Error.
IC103, 102 are defective.
2.5V, 3.3V no power.
D111 is defective.
No Power.
F101 is defective.
5.3VA no power.
D112 is defective.
33V no power.
D113 is defective.
No power.
BD101, R101 are defective.
12VA no power.
D110 is defective.
IMPORTANT SAFETY NOTICE
WHEN SERVICING THIS CHASSIS, UNDER NO CIRCUMSTANCES SHOULD THE ORIGINAL DESIGN BE
MODIFIED OR ALTERED WITHOUT PERMISSION
FROM THE ZENITH ELECTRONICS CORPORATION.
ALL COMPONENTS SHOULD BE REPLACED ONLY
WITH TYPES IDENTICAL TO THOSE IN THE ORIGI-
NAL CIRCUIT. SPECIAL COMPONENTS ARE SHADED
ON THE SCHEMATIC FOR EASY IDENTIFICATION.
THIS CIRCUIT DIAGRAM MAY OCCASIONALLY DIFFER FROM THE ACTUAL CIRCUIT USED. THIS WAY,
IMPLEMENTATION OF THE LATEST SAFETY AND
PERFORMANCE IMPROVEMENT CHANGES INTO
THE SET IS NOT DELAYED UNTILTHE NEW SERVICE
LITERATURE IS PRINTED.
NOTE :
1. Shaded( ) parts are critical for safety. Replace only
with specified part number.
2. Voltages are DC-measured with a digital voltmeter
during Play mode.
Page 36

PB
REC
3-34 3-35
2. TU/IF CIRCUIT DIAGRAM
Page 37

3
1
1
7
8
9
1
4
5
2
6
PB Y+C
REC Y+C
WAVEFORM
3-36 3-37
3. A/V CIRCUIT DIAGRAM
IC301 Pin 59 is defective.
Auto Tracking has failed.
IC301 Pin 57 is defective.
PB COLOR Signal does not appear.
IC301 Pins 53, 54, 55 are defective.
IC301 doesn’t operate.
IC301 is defective.
PB COLOR Signal does not appear.
IC306, Q307 are defective.
EE, PB Screen doesn’t appear.
FL301, Q304, Q305 are defective.
Normal Audio Signal is not recorded.
Page 38

PB
REC
100
100
T/W
KTC3875
'02. 12. 04 R13734C
3-38 3-39
4. Hi-Fi CIRCUIT DIAGRAM
No Hi Fi Audio
23 Pin is defective.
No Audio
IC801 Pins37, 38 aredefective.
Page 39

ONLY COMPONENT OPTION
ONLY SVHS OPTION
3-40 3-41
5. JACK CIRCUIT DIAGRAM
Page 40

1
3
48 5 6
7
2
WAVEFORM
0
R545
0
14 504
1K
C542
680P
MTZ5.6B
MTZ5.6B
5 6 7 8
4 3 2 1
R502
100
72 71 99
R501
100
IC501
M37762
IC503
'02. 12. 04 R13732C
FROM TO JACK
EEPROM
29
28
VCR LCD
DVD LED
NC
3-42 3-43
6. SYSTEM CIRCUIT DIAGRAM
Q501, Q503 are defective.
µ-COM is unstable.
IC505 is defective.
VCR will not operate.
X501 is defective.
CLOCK SETTING will not operate.
X502 is defective.
µ-COM will not operate.
IC504 is defective.
• Reset is defective.
• Set dead.
ES501, ES502, LD501 are
defective.
Auto Rew will not work.
RS501,RS502 are
defective.
Auto stop occures.
R575, R576, R577,
R578 are defective.
Deck will not operate.
Page 41

3-44 3-45
7. TIMER CIRCUIT DIAGRAM
Page 42

3-46 3-47
• WAVEFORMS
* IC301 Waveform
IC301 Pins 20, 21, 22
100mV/10msec DIV
VV/EE
20 Main DE Emphasis Filter
21 Main DE Emphasis out
22 Clamp in
IC301 Pin 32
200mV/10msec DIV
EE
(VIDEO IN)
IC301 Pin 41
100mV/0.2msec DIV
REC/PB
(2fsc)
IC301 Pin 25
1.0V/20msec DIV
VV/EE
(C-SYNC OUT)
IC301 Pin 49
100mV/0.2msec DIV
PB/REC
(3.58MHz X-TAL IN)
IC301 Pin 14
100mV/5msec DIV
PB
(PB RF out)
IC301 Pin 73
500mV/2msec DIV
SP REC
(REC RF)
IC301 Pin 26
500mV/10msec DIV
VV/EE
(VIDEO OUT)
IC301 Pin 66
500mV/2msec DIV
EP REC
(REC RF)
* IC501 Waveform
Tek Stop : 10.0KS/s
280 Acqs
M5.00ms Ch1Ch1 3.04 V1.00 V
T
T
1
Tek Stop : 250KS/s
299 Acqs
M 200µs Ch1Ch1 3.04 V1.00 V
T
T
1
Tek Stop : 10.0KS/s
18 Acqs
M 5.00ms
Ch1
Ch1
3.04 V
Trigger Position: 12%
1.00 V
T
1
T
Tek Stop : 10.0KS/s
27 Acqs
M5.00ms Ch1Ch1 3.04 V1.00 V
T
T
1
Tek Stop : 10.0KS/s
35 Acqs
M5.00ms Ch1
Ch1
3.04 V1.00 V
T
T
1
Tek Stop : 50.0KS/s
120 Acqs
M1.00ms Ch1Ch1 3.04 V1.00 V
T
T
1
T
Tek Stop : 5.00KS/s
2 Acqs
M 10.00ms
Ch1
Ch1
340V
Trigger Level: 340mv
500mV
T
1
IC501 Pin 18
REC/PB
IC501 Pin 13
QUE/REV
IC501 Pin 13
QUE/REV
IC501 Pin 95
REC
IC501 Pin 87
REC/PB
IC501 Pin 90
REC/PB
(DPG/DFG)
(DPG)
(DFG)
IC501 Pin 97
PB
(CTL OUT)
IC501 Pin 94
REC
Page 43

3-48 3-49
• CIRCUIT VOLTAGE CHART
EE PLAY
MODE
PIN NO.
2.3
2.29
2.29
2.29
2.31
2.3
0
2.31
2.31
2.25
4.93
1
0.97
1.92
1.55
0
2.37
2.39
0
2.46
1.73
3.07
4.96
0
0.36
1.83
1.47
2.25
2.32
2.25
4.08
2.25
3.62
2.97
3.13
2.37
2.35
0
1.82
0
0.83
2.34
0
4.92
4.95
2.27
3.31
3.32
3.94
2.54
2.12
4.95
4.75
4.7
2.31
2.28
2.28
2.28
2.29
2.31
2.31
2.32
2.31
2.27
4.93
1
0.97
1.89
1.53
0
2.55
1.45
0
2.49
1.79
2.29
4.95
0
0.35
1.87
1.6
2.56
2.31
2.26
4.08
2.26
2.8
2.93
3.14
2.37
2.29
0
1.87
0
0.83
2.37
0
4.92
4.95
3.17
3.31
3.32
3.94
2.55
2.09
4.95
4.62
4.52
EE PLAY
MODE
PIN NO.
0.68
0
0
0
0
4.91
2.92
0
3.96
1.76
1.84
1.84
1.84
4.93
0.18
0.15
0
1.82
1.82
1.82
0
2.3
4.96
2.3
0
2.3
2.96
0
3.01
5.12
2.95
4.97
2.2
0
0.97
5.17
5.17
0
0.5
0
0.4
0.19
0.29
0.68
0
0
0
4.78
0
0
0.68
2.56
2.57
0.93
0
2.56
1.61
2.9
0.94
1.94
0
3.98
1.72
1.85
1.86
1.86
4.93
0
0
0
0.71
0.71
0.71
0
2.3
4.96
2.3
0
2.3
2.96
0
3
5.12
2.95
4.97
2.2
0
0
5.17
5.16
0
0.54
0
0.42
4.06
3.91
0.99
3.42
0
0
4.78
2.57
0
0.43
2.57
2.57
IC302
IC501
EE PLAY
MODE
PIN NO.
0
0.11
5.17
]5.17
5.17
0
5.13
5.13
5.13
0
0
0
0
0
5.15
1.52
1.43
5.15
2.19
2.28
0
0.51
0.26
0.26
2.35
2.41
0
1.29
0
0
1.88
0.53
1.88
4.96
2.03
2.6
1.96
0
0
0
2.57
0
0
0
0
0.97
2.38
5.07
4.7
5.02
4.75
5.17
5.17
0
0
0
0.11
5.17
5.17
5.17
0
5.13
5.17
5.13
0
0
0
0
0
5.15
1.51
1.44
5.15
2.18
2.27
0
0.55
0.55
0
2.34
2.41
0
0
0
0
1.99
0.57
1.98
4.95
2.03
1.92
2.05
0
0
0
2.58
4.28
0
0
0
0.86
0
5.07
4.45
4.97
4.61
5.17
5.17
0
0
EE PLAY
MODE
PIN NO.
0
0
0
0
0
0
0
4.94
5.03
0
2.69
0.58
0.17
0
0.54
0.1
2.53
2.54
0.21
2.5
2.5
2.52
2.52
5.08
5.17
2.64
5.19
0
5.14
5.19
0
4.7
1.93
2.01
5.05
1.7
0
5.05
2.51
0
2.27
0
0
5.06
2.53
0
0
2.56
9.21
2.48
0
1.79
2.72
4.76
0
0
0
4.94
4.98
0
2.67
0.68
2.36
0
0
1.36
2.54
2.53
0
2.49
2.49
2.52
2.52
5.08
5.17
1.95
5.19
0
5.14
5.19
0
4.7
1.93
2.01
5.05
1.7
0
5.05
2
0
2.35
0
0
5.06
2.04
0
0
2.54
9.18
2.48
IC504
IC505
IC601
IC602
IC801
EE PLAY
MODE
PIN NO.
5
6
7
8
9
10
11
12
13
14
15
16
17
18
19
20
21
22
23
24
25
26
27
28
29
30
31
32
33
34
35
36
37
38
39
40
41
42
43
44
45
46
47
48
49
50
51
52
53
54
55
56
57
58
59
5.19
1.91
0
0.29
0
0
0
2.5
1.91
2.49
5.06
2.51
0
0
2.51
2.52
2.52
2.51
0.19
2.25
0
2.24
2.25
0
2.48
0
2.51
5.02
2.64
2.64
0
5.06
5.17
5.17
0
0.19
2.52
2.51
2.52
2.52
0
5.06
2.49
1.9
0
0
2.05
1.22
3.86
9.2
6.26
1.96
2.2
4.56
2.52
5.19
2.07
0
1.31
0
0
0
2.5
2.44
2.49
5.05
2.51
0
0.86
2.44
2.45
2.43
2.42
3.66
2.3
0
2.3
2.3
0
0.11
1.34
3.79
5.01
2.65
2.64
0
5.05
5.05
5.17
2.57
0
2.45
2.43
2.45
2.45
0.25
5.05
2.49
2.42
0
0
2.06
0
0.25
9.19
0.28
0.29
2.15
0
2.35
EE PLAY
MODE
PIN NO.
3.86
3.15
4.02
3.83
2.45
3.87
4.09
3.88
3.94
0
0
0
3.86
0
2.5
3.87
3.17
0
4.42
0
4.4
5.06
5.06
0
0.1
0.1
0.13
0
0.76
0.76
0
0
0
0.23
0.24
0
0
0
0.32
0.32
0.31
0.31
0
0
0
0.31
0
2.5
0.4
0.22
0
4.3
0
4.3
5.07
5.07
0
0.73
0.73
0
0.26
0.77
0.76
0
0
0
SW601
IC301
1
2
3
4
5
6
7
8
9
10
11
12
13
14
15
16
17
18
19
20
21
22
23
24
25
26
27
28
29
30
31
32
33
34
35
36
37
38
39
40
41
42
43
44
45
46
47
48
49
50
51
52
53
54
55
56
57
58
59
60
61
62
63
64
65
66
67
68
69
70
71
72
73
74
75
76
77
78
79
80
1
2
3
4
5
6
7
8
1
2
3
4
5
6
7
8
9
10
11
12
13
14
15
16
17
18
19
20
21
22
23
24
25
26
27
28
29
30
31
32
33
34
35
36
37
38
39
40
41
42
43
44
45
46
47
48
49
50
51
52
53
54
55
56
57
58
59
60
61
62
63
64
65
66
67
68
69
70
71
72
73
74
75
76
77
78
79
80
81
82
83
84
85
86
87
88
89
90
91
92
93
94
95
96
97
98
99
100
1
2
3
1
2
3
1
2
3
4
5
6
1
2
3
4
5
6
7
8
1
2
3
4
60
61
62
63
64
65
66
67
68
69
70
71
72
73
74
75
76
77
78
79
80
1
2
3
4
5
6
7
8
9
10
11
12
EE PB EE PB
Base Emitter Collector
PB EE
Location
No.
Q301
Q302
Q303
Q304
Q305
Q306
Q307
Q308
Q309
Q501
Q503
Q504
Q505
Q506
Q507
Q805
Q701
Q702
Q601
Q602
4.26
0.758
0.734
0
4.92
1.828
1.843
5.19
0
0.68
5.17
2.82
1.58
5.07
2.8
2.56
9.02
4.98
0.75
0.75
4.96
0
0
0
4.93
2.5
2.62
4.91
0
0
4.48
2.27
2.24
0
3.23
2.08
9.81
5.7
0
0
4.907
0
0
0
0
0
0
4.93
4.91
0
5.15
4.95
4.96
0
0
5.06
12.58
5.19
0
0
4.91
0
0
0
0
0
0
4.92
4.97
0
5.15
4.95
4.96
3.29
0
5.05
12.99
5.19
0
0
4.26
1.74
0.72
0
4.92
1.86
2.05
5.19
0
0.68
5.17
2.94
1.58
0
2.6
2.56
9.24
4.97
0.75
0.75
4.97
0
0
0
4.94
2.45
2.51
4.87
0
0
4.48
2.18
1.03
0
0
2.08
9.82
5.7
0
0
Page 44

LOCATION GUIDE
3-50 3-51
PRINTED CIRCUIT DIAGRAMS
1. VCR P.C.BOARD
Page 45

3-52 3-53
2. KEY 1(LEFT) P.C.BOARD
LOCATION GUIDE
3. KEY 2(RIGHT) P.C.BOARD
LOCATION GUIDE
Page 46

3-54 3-55
4. POWER P.C.BOARD
LOCATION GUIDE
NOTES) Warning
NOTES) Parts that are shaded are critical
NOTES) With respect to risk of fire or
NOTES) electricial shock.
Page 47

3-56
ELECTRICAL TROUBLESHOOTING GUIDE
1. System operation flow
Power On
No
Yes
Yes
Yes
No
No
No
Show LOGO
Tray Closed?
Tray Close to Closed position
SLED Moves to Inner Position
Recieve
OPEN/ CLOSE
Key?
Receive
CLOSE Key?
1. Stop Playback & Open Tray
2. Display tray open message & LOGO
1. Execute Pressed Key & IR Key
2. Systemoperati on Routi ne Loop
1. Judge whether have disc and disc type
2. Jump to related disc reading procedure
SLED at Inner
Side?
1. 8032 initializes SERVO, DSP & RISC registers
2. Write RISC code to SDRAM
3. Reset RISC
DVD SECTION
Page 48

3-57
2. Test & debug flow
TEST
Check the POWER PART
No
Yes
No
Yes
No
No
No
Yes
Yes
Yes
Check the POWER PART
Check the regulators or diode(D601).
Check the cable connection.
(PDV02)
1. Check 27MHz system clock.
2. Check systemreset circuit.
3. Check FLASH R/Wenable signal PRD,
RWR.
4. Check RS232 SIGNALS.
5. Check FLASH Memory related circui t.
Check the
AC Vol tage
Power PCBA (110V
or 220V)
Switch on the Power PCBA
Is
the DC Voltage
outputs OK?
(5V, 3.3V, 8V, 12V)
Is 3.3V and 2.5V DC
outputs normal on main
PCBA?
Update
FLASH(IC5A1)
successfully?
Replace FLASH( IC5A1)
A
Communication between
VCR & DVD is normally?
Connect to PC RS232 Cable and
update the FLASH memory code.
Page 49

3-58
A
B
RESET or Power On.
Show LOGO?
Flash
Memory operates
properly?
Check connection lines between FLASH
& MT1379 and the FLASH access time
whether is sui table or not.
SDRAM
works properl y?
MT1379
VIDEO outputs
properly?
Have
TV signal output?
Check AV cable
connection to TV set .
Check the load OPEN &
CLOSE switch
Check the Tray control IO pins
on MT1376 & MT1379.
Check the Tray control amplifying
circuit on Motor driver.(IC202)
Does
Tray move inside
when it is not at
closed position?
Normal
TROUT & TRIN
signals?
Normal
TRCLOSE &
TROPEN signal?
Normal
LOAD+ & LOAD-
signal ?
Check the cable connection between
main PCBA and loader. (MECHA)
Check connection lines between
SDRAM(IC502,IC503) & MT1379 and the
SDRAM is damaged.
Check the related circuit of MT1379.
(IC501 PIN 161,166, 168 check)
Check the filtering and amp circuit of
TV si gnal .(IC604)
NO NO
NO
NO
NO
NO
NO
NO
NO
YES
YES
YES
YES
YES
YES
YES
YES
YES
Page 50

3-59
B
No
Yes
OKYes
Yes
No
Yes
Yes
Yes
No
Yes
No
NoNo
No
Does
the SLED move
to inner side when it is at
outer position?
Motor Driver STBY
Pin is High?
Motor Driver STBY
Pin is High?
SL+ and SL- output
properly?
Optical
Lens has movements
for searching
Focus?
Proper F+
& F- outputs?
Check cable connect of the
pick-up head.
Proper FOSO outputs
to motor driver?
Check FOSO connection on
MT1379 and motor driver.
Check the amp circuit on
motor driver.
C
Check the cable connection
with MECHA.
Do not put in disc and tray
close.
Check the connection line of
STBY signal .
Check the related circuit of
FMSO.
Check the amp circuit on
motor driver.
Page 51

3-60
C
No
No
No
No
No
No
Yes
Yes
Yes
Yes
Yes
Yes
Yes
Yes
No
No
Laser turns on when
reading disc?
LD01 or LD02 output
properly?
Check the laser power circuit
on MT1336 and connecting to
power transistor. (Q204, Q205)
Check the related circuit on
laser power transi stor
Check the related circuit
on MT1336 RFL signal .
Collector
voltage of power
transistor is OK?
( Q204, Q205)
Check cable connection between
transistor output and pick-up head.
Proper RFL signal
on MT1336?
Proper
DMSO signal on
MT1379
Check DMSO related
circuit on MT1379.
Check the spindle control
amp circuit of motor driver.
SP+ & SP- output
properly?
Check the cable connection
between spindle and main PCBA.
Check the RFL connection
between MT1336 and MT1379.
Disc ID is correct?
Does spindle rotate?
D
Page 52

3-61
D
Yes
Yes
No No
Yes
Yes
Yes
Yes
Yes
Yes
Yes
No
NoNo
No
No
No
Focus ON OK?
Track On OK?
Disc is play?
E
Proper
signals on A, B, C,
D of MT1336
Check connections between
MT1336 and pick-up head.
Proper FEO signal
on MT1336?
Proper FEO signal
on MT1336?
Check the related circuit
on MT1336 FEO sugnal .
Check the related
circuit on MT1336
Properly TRSO signal
on MT1379?
T+ & T- output
properly?
Check the TRSO connection
on MT1379 and motor dirver.
Check the tracking control
amp circuit on motor driver.
Check cable connection on
pick-up head.
Check RF signal waveform.
Check FEO connection
between MT1336 and MT1379
Page 53

3-62
E
NO
YES YES
YES
NO
NO
Normal
Audio output
when disc playback?
TEST END
Audio
DAC received
correct data stream?
Normal
Audio DAC
out? (IC401)
Check Audio filter, amplify, mute
circuit. (IC402 Application circuit)?
Check connection between MT1379
& Audio DAC. (Check VRST#, ACLK,
ABCK, ASDAT3)
Check the related circuit of
Audio DAC. (Check Audio
out Pin 14, 15,18,19)
Page 54

DETAILS AND WAVEFORMS ON SYSTEM TEST AND DEBUGGING
1. SYSTEM 27MHz CLOCK,RESET,FLASH R/W SIGNAL
1) MT1379 main clock is at 27MHz(X501)
3.8V, 27MHz
FIG 1-1
2) MT1379 & MT1336 reset is high active.
PWR_CTL(CN505 PIN 7)
5.2VA
Power Cord in
M_RESET(CN505 PIN 9)
URST(IC501 PIN 188)
FIG 1-2
3-63
Page 55

3-64
3) RS232 waveform during procedure(Downloading)
TXD(J6 PIN3)
RXD(J6 PIN 2)
FIG 1-3
4) Flash R/W enable signal during download(Downloading)
FRD(IC5A1 PIN 28)
FWR(IC5A1 PIN 11)
FIG 1-4
Page 56

3-65
2. SDRAM CLOCK
1) MT1379 main clock is at 27MHz(X501)
(IC502,IC503 PIN 35)
DCLK = 93MHz, Vp-p=2.2, Vmax=2.7V
FIG 2-1
3. TRAY OPEN/CLOSE SIGNAL
1) Tray open/close waveform
OPEN((CN203 PIN 3)
CLOSE(CN203 PIN 2)
TROPEN(IC202 PIN 1)
TRCLOSE(IC202 PIN 2)
FIG 3-1
Page 57

3-66
2) Tray close waveform
OPEN((CN203 PIN 3)
CLOSE(CN203 PIN 2)
TROPEN(IC202 PIN 1)
TRCLOSE(IC202 PIN 2)
FIG 3-2
3) Tray open waveform
OPEN((CN203 PIN 3)
CLOSE(CN203 PIN 2)
TROPEN(IC202 PIN 1)
TRCLOSE(IC202 PIN 2)
FIG 3-3
Page 58

3-67
4. SLED CONTROL RELATED SIGNAL (NO DISC CONDITION)
FMSO(2.0V/1.4V/1.0V)
(IC501 PIN 19)
STBY(5V) – (IC201 PIN 50)
SL+(4.7V/3.6V/1.9V)
(IC202 PIN 12)
SL-(5.3V/3.7V/2.5V)
(IC202 PIN 13)
FIG 4-1
5. LENS CONTROL RELATED SIGNAL(NO DISC CONDITION)
FOSO(1.5V/1.4V/1.3V)
(IC501 PIN 12)
F+(4.0V/3.6V/3.2V)
(IC202 PIN 9)
F-(4.0V/3.6V/3.2V)
(IC202 PIN 8)
FIG 5-1
Page 59

3-68
6. LASER POWER CONTROL RELATED SIGNAL(NO DISC CONDITION)
MDI1(0V/180mV)
(IC201 PIN 124)
LD01(5.0V//3.5V)
IC201 PIN 125)
LD02(5.0V/3.6V)
(IC201 PIN 126)
FIG 6-1
7. DISC TYPE JUDGEMENT WAVEFORMS
F+(IC202 PIN 9)
FE(IC201 PIN 18)
RFL(IC201 PIN 19)
FIG 7-1 (DVD)
Page 60

3-69
F+(IC202 PIN 9)
FE(IC201 PIN 18)
RFL(IC201 PIN 19)
FIG 7-2 (DVD)
F+(IC202 PIN 9)
FE(IC201 PIN 18)
RFL(IC201 PIN 19)
FIG 7-3 (CD)
Page 61

3-70
F+(IC202 PIN 9)
FE(IC201 PIN 18)
RFL(IC201 PIN 19)
FIG 7-4 (CD)
8. FOCUS ON WAVEFORMS
FE(IC201 PIN 18)
FOSO(IC501 PIN12)
F+(IC202 PIN 9)
F-(IC202 PIN 8)
FIG 8-1 (DVD)
Page 62

3-71
FE(IC201 PIN 18)
FOSO(IC501 PIN12)
F+(IC202 PIN 9)
F-(IC202 PIN 8)
FIG 8-2 (CD)
9. SPINDLE CONTROL WAVEFORMS (NO DISC CONDITION)
DMSO(1.4V/1.8V)
(IC501 PIN 18)
SP-(3.6V/2.4V)
(IC202 PIN 10)
SP+(3.6V/4.8V)
(IC202 PIN 11)
FIG 9-1
Page 63

3-72
10. TRACKING CONTROL RELATED SIGNAL(System checking)
TE(IC201 PIN 21)
TRSO(IC501 PIN 13)
T-(IC202 PIN 7)
T+(IC202 PIN 6)
FIG 10-1(DVD)
TE(IC201 PIN 21)
TRSO(IC501 PIN 13)
T-(IC202 PIN 7)
T+(IC202 PIN 6)
FIG 10-2(CD)
Page 64

3-73
11. RF WAVEFORM
RFOP(2.3V/1.1V)
(IC201 PIN 6)
RFON(0.8V/2.0V)
(IC201 PIN 7)
FIG 11-1
12. MT1379 AUDIO OPTICAL AND COAXIAL OUTPUT (ASPDIF)
(IC501 PIN 153)
FIG 12-1
Page 65

3-74
13. MT1379 VIDEO OUTPUT WAVEFORMS
1) Full colorbar signal(CVBS)
(IC604 PIN 23)
FIG 13-1
2) Y
(IC604 PIN 21)
FIG 13-2
Page 66

3-75
3) C
(IC604 PIN 26)
FIG 13-3
14. AUDIO OUTPUT FROM AUDIO DAC
1) Audio L/R
FIG 14-1
(JK601 PIN 4,5)
Page 67

3-76
2) Audio related Signal
ASDAT3(IC501 PIN 157)
ABCK(IC501 PIN 148)
ALRCK(IC501 PIN 149)
ASDATA3
FIG 14-2
Page 68

3-77
BLOCK DIAGRAMS
1. Overall Block Diagram
M
M
DISC
SPINDLE
MOTOR
LOADING
MOTOR
DECK MECHANISM
DVD:RF0,A,B,C,D
CD:RF0,A,B,C,D,E,F
PICK
UP
KEY Input
B/Pb
IC5A1
29LV800TA-70
1M
8BIT
FLASH ROM
URST
A[00:19]
PCE#
PRD#
PWR#
DQ[00:15]
RFON,RFOP,FEO,RFL,CSO
TEO,BDO,RFRP,HTRC,V2P8
L/R
CVBS
R/Pr G/ Y
Y[1:6]
Y
C
L/R
VF+
AC 90V~240V
50HZ/60Hz
VF-
-27VA
5V
3V3M
12V
STBY,TRCLOSE
27MHz
X-TAL
PWRCTL
DV33
IC505
KS24C021CS
EEPROM
IC401
CS4391(2DAC)
IC401
NJM4580
OP-AMP
RC901
REMOCON
RECEIVER
IC903
RESET IC
LOAD+,LOAD-
F+,F-,T+,T-
SP+,SP-
IC201
MT1336E
RF
SLED
(FEEDING)
MOTOR
SL+,SL-
IC202
LA6560
MOTOR
DRIVER
M
V33
DV33
AV33/DV33/V25
VCC/DV33/3V3M
ACLK
ABCLK
ALRCK
IC604
MM1623XFBE
VIDEO BUFFER
MIC_DETC
ASPDIF
COAX OPTICAL
ASPECT
VCC
RVCC
AVCC
AV33
V25
LD01,LD02, IOA, V2.0
VCC/+8V
RVCC
LIMIT
TROUT,TRIN
TROPEN,TRSO,FOSO,DMSO,FMSO
°‹
SCLK,SDEN,SDATA
PWMOUT2
AD[0:7]
VCC
VCR
VFD_SCK
VFD_TXD
M_REQ
POWER
BOARD
V1P4
MDI1
APC
VFD_RXD
S_REQ
5V2A
+P8V
MUTE
J6
RS232
TXD
RXD
SCL
IC502
M12L16161A
512K
2Banks
16BIT
SDRAM
SD33
IC503
M12L16161A
512K
2Banks
16BIT
SDRAM
SD33
IC506
M12L64164A
1M
4Banks
16BIT
SDRAM
MA[00:10]
BA0
DCLK
DCKE
CS#
RAS#
CAS#
WE#
DQM[0:1]
DQ[16:31]
DQM[2:3]
MA11,BA1
SDA
VRST#
ASDAT[0:3]
VSCK
VSDA
ASTB
IC501
MT1379E
DSP/MPEG
+12V
+12VVCC
DV33
IC510
BUFFER IC
74HCT244
VCC
ADIN
SD33
Page 69

3-78
IC202
LA6560
Motor Driver
DVD: A,B,C,D, RFO
CD: A,B,C,D, E, F,RFO
SP+, SP-
M/D
PICK
UP
X501
IC501
MT1379
DVDPLAYER
COMBO
CHIP
IC201
MT1336E
RF Signal
Processor
FOSO,TRSO,FMSO
DMSO,,TROPEN
FEO,TEO,RFL,RFRP
BDO,CSO,HTRC,V2P8
ADIN
F+, F-, T+, T-
SL+, SL-
LOAD+, LOAD-
27MHz
X-TAL
RFOP,RFON
LD0 1, LDO 2, IOA
MDI 1
ALPC
V20
SDEN, SDATA,
SCLK,PWMOUT2
LIMIT,TRIN,TROUT
TRCLOSE
STBY,V1P4
IC302
GM72V161621
1M x 16bit
SDRAM
IC303
GM72V161621
1M x 16bit
SDRAM
MA[0:10]
DQM0 ,DQM1
WE#,CAS#,RAS#
CS#,BA0,
DCLK
DCKE
DQ[0:15]
DQ[16:31]
MA[0:10]
DQM0 ,DQM1
WE#,CAS#,RAS#
CS#,BA0,
DCLK
DCKE
FLASH
ROM
PRD#, PWR#
PCE#
AD[0:7]
A[0:19]
EEP
ROM
SCL, SDA
RS232C(MTK)
RXD, TXD
2. SERVO Block Diagram
Page 70

3-79
3. MPEG & MEMORY Block Diagram
IC503
SDRAM
16M
IC505
EEPROM
IIC501 (MPEG + DSP )
MT1379
IC5A1
FLASH MEMORY
(8 M )
IC510
(74HCT244)
Voltage level shift
VIDEO
Interface
AUDIO
Interface
RF IC
Interface
FRONT MICOM
Interface
(FRONT BOARD)
IC502
SDRAM
16M
RFOP,RFON,HTRC,RFRP,RFL
DCLK,WE,CAS,RAS
CS,DCKE,MA[0:10]
DQM0,DQM1
DQ[0:15]
DQM2,DQM3
DQ[16:31]
X501
27MHz
SCL,SDA
Y2(Y),Y3(Color)
Y4(Y),Y5(Cb),Y6(Cr)
ASPECT(16:9)
FEO,CSO,TEO,ADIN,BDO
SDATA,SDEN,SCLK,URST
FMSO,DMSO
V1P4,V2P8
TROPEN,TRSO,FOSO
ACLK,ALRCK,ABCK
MUTE,VSCK,VSDA
ASDTA[0:3]
ASTB,SCL,SDA
ASPDIF
PWR,PCE,PRD
A[0:19]
AD[0:7]
VFD_SCK
VFD_TXD
M_REQ
SCKO,TXDO,M-REQ
URST,S_REQ
VFD_RXD
Page 71

3-80
4. VIDEO & AUDIO Block Diagram
IC5C1
VIDEO 6dB
Amp
IC401
AUDIO DAC
(2CH)
IC402
(OP Amp)
LPF&Buffer
CVBS
COMPONENT (R.G.B) / (Y.Pb.Pr )
SUPER VIDEO (Y/C)
(R.G.B) / (Y.Pb.Pr )
(Y/C)
DAC RESET
ACLK
SCL
SDA
INTERFACE
MPEG
MPEG
AUDIO ‘R’
AUDIO ‘R’
ADATA3
Page 72

Page 73

System not working or
screen is abnormal
No Power on
No Video
signal.
Video signal Y
Video signal Color
Digitron will not display
System not working
Program download fail
3-81 3-82
CIRCUIT DIAGRAMS
1. SYSTEM CIRCUIT DIAGRAM
Page 74

No CD/DVD LD
3-83 3-84
2. RF & DSP SERVO CIRCUIT DIAGRAM
Page 75

3-85 3-86
3. AUDIO CIRCUIT DIAGRAM
Page 76

3-87 3-88
4. AV/JACK CIRCUIT DIAGRAM
Page 77

3-89 3-90
• CIRCUIT VOLTAGE CHART
PIN STOP PLAY STOP PLAY STOP PLAY STOP PLAY STOP PLAY STOP PLAY
1 1.03 2.99 0 0 1.22 1.22 3.27 3.28 0000
2 5.11 5.08 0 0 0 0 1.18 1.26 0 0 2.59 2.55
3 0 0 8.04 8.01 0.96 0.9 1.1 1.52 0000
4 0 0 0.12 0.06 2 2.06 0 0 0 0 2.59 2.56
5 5.11 5.07 0 0.06 0 1.51 0.66 1.07 3.28 3.29 0 0
6 0 1.95 3.64 3.69 1.48 1.47 0.85 1.12 3.28 3.29 3.24 3.23
7 0 0 3.62 3.61 0 1.56 3.27 3.28 0000
8 0 0 3.64 3.53 3.2 1.52 0.51 0.97 3.28 3.29 0.14 0.08
9 5.11 0 3.6 3.76 0.12 0.06 3.06 0 0 0
10 5.11 5.08 3.62 2.43 0.12 0.06 0 0 0 0
11 5.11 5.08 3.63 4.85 3.25 3.25 0.06 0.98 0.15 0.09
12 0 0 3.62 3.72 1.41 1.49 3.18 0.87 0 0
13 5.11 0 3.64 3.57 1.41 1.41 3.27 3.28 0.15 0.08
14 5.11 5.08 8.04 8.01 0 0 2.94 2.56 5.19 5.19
15 2.84 2.81 1.45 1.48 1.42 1.42 0.47 0.42 0.14 0.09
16 1.45 1.43 0.27 1.39 3.3 0 2.93 3.01 5.25 5.24
17 2.08 2.07 0.29 1.32 2.53 2.53 3.21 3.22 0.15 0.08
18 1.37 1.42 1.45 1.43 1.42 2.27 2.87 2.95 5.23 5.23
19 0.69 2.3 1.45 1.43 1.42 1.39 0.15 1.32 0 0
20 2.4 0 1.45 0.82 0 0 0 0.05 5.25 5.25
21 2.35 0 1.45 1.43 2.61 2.58 3.09 1.32
22 5.11 5.08 1.45 1.43 0.75 1.46 3.09 1.32
23 0 0 1.47 1.37 2.83 1 3.09 1.32
24 2.59 3.2 1.45 1.43 1.9 0.89 3.09 1.33
25 0.19 1.88 1.45 1.43 1.72 0.39 3.27 3.29
26 1.58 0 0.95 0.91 0.68 0.31 0 0
27 2.56 3.13 0 0 2.84 3.16 0.15 1.36
28 2 2.01 1.45 1.43 0 0 1.84 2.36
29 2 2.06 5.15 5.11 2.85 0.66 1 2.32
30 2.96 1.52 1.45 1.43 1.83 0.49 0.54 1.75
31 0 0 1.45 1.43 0.91 1.39 0.06 0.06
32 0.06 2.07 1.45 1.43 1.43 1.2 0.05 0.06
33 0.07 2.07 1.46 1.45 1.51 1.57 0 0
34 0 0 5.08 5.06 1.51 1.43 0.73 1.26
35 0 0 5.15 5.11 3.3 3.29 1.48 1.55
36 0 0 0 0 0.81 1.26 2.91 2.53
37 5.13 0 1.45 1.02 0.07 0
38 0 0 1.82 1.6 3.27 3.28
39 0 0 1.2 1.5 1.06 1.05
40 0 0 2 2.06 0.47 0.98
41 0 0 2.17 1.95 0 0
42 5.12 5.09 2.53 2.52 0 0.6
43 5.12 5.09 1.96 1.9 1.12 1.24
44 5.12 5.09 1.79 1.9 3.27 3.28
45 5.12 5.09 0.8 1.72 1.21 0.99
46 5.12 5.09 0.8 1.96 1.31 1.34
47 0 0 0.8 1.84 0 0
48 5.12 5.09 3.3 2.63 1.43 1.44
49 5.12 0 0 0.13 0.88 1.01
50 5.08 5.06 0 0.07 0 0
51 5.09 5.07 0 0
52 5.1 0 0 0
5300 00
54 5.13 0 0 0
55 0.09 0.2 3.25 3.27
56 1.61 0 1.21 1.18
5700 00
58 0 0 3.29 3.29
5900 00
6000 00
61 3.28 0 2.59 2.57
62 0 0 2.58 2.58
6300 00
64 0 0 2.59 2.56
65 0 0 3.29 3.29
66 0.26 0 3.3 3.29
67 5.12 5.08 3.29 3.29
68 0 0 2.57 2.56
69 5.12 0 5.19 5.18
70 3.21 2.03 2.59 2.57
71 3.46 2.2 0.12 0.08
72 2.81 0 2.53 2.52
73 0 0 2.59 2.57
74 0.21 0.09 3.29 3.29
75 0.22 0 2.61 2.61
76 0 0.1 3.27 3.24
77 0.21 0.09 0 0
78 0.23 0.09 0.94 1.04
79 0.21 0.08 0.78 1.06
80 0.23 0.08 0.89 1.15
STOP PLAY STOP PLAY STOP PLAY STOP PLAY
STOP PLAY STOP PLAY STOP PLAY STOP PLAY
0.08 0.16 3.28 3.29 5.52 5.49 5.09 5.08
1.82 0.45 3.28 3.28 5.52 5.48 2.43 2.42
2.84 0 0 1.65 5.51 5.47 5.09 5.08
2.83 3.12 1.63 1.64 0 0 1.45 0
0.69 0.26 1.64 1.65 5.51 5.48 0 0
1.72 0.25 1.59 1.61 5.51 5.48 1.45 1.69
1.92 0.9 0 0 5.52 5.47 0 0
1.7 1.45 3.28 0 12.03 12.03 2.47 2.46
0 0 3.28 3.29 0 0
0 0 0 0 1.14 1.76
3.27 3.29 5.01 5.01 0 0
3.56 3.55 2.31 2.31 2.42 2.42
3.29 3.29 4.96 0 5.09 5.08
0 0 1.42 2.41 2.43 2.42
0.23 0.06 2.4 2.39 0 0
0 0 0 0 2.49 2.47
0 0 5.11 5.09 0 0
0 0.87 2.41 2.41 2.48 2.47
1.98 2.64 2.43 2.43 0 0
2.28 2.18 0 0 1.18 2.3
2.13 1.96 1.76 2.17
1.67 2.01 0 0
1.99 1.72 1.76 2.24
1.93 2.19 0 0
2.05 1.94 0 0
00 00
0 0 0.06 0.05
0 0 5.09 0
1.49 2.03
0.16 1.07
1.96 1.25
0.16 1.1
0.99 2.2
1.17 1.07
0.79 1.82
0.15 1.07
3.29 3.3
1.93 3.09
0.16 1.07
1.5 2.2
0.16 1.07
1.21 2.64
0.16 1.08
1.64 1.48
2.05 2.06
00
00
0.07 0.13
IC201
(MT1336E)
IC202
(MOTOR)
IC501
(MT1379)
IC502
(SDRAM)
IC505
(EEPROM)
IC510
(BUFFER)
IC5A1
(FLASH)
IC401
(CS4391)
IC402
(AMP)
IC5C1
(MM1623XFBE)
PIN STOP PLAY STOP PLAY STOP PLAY STOP PLAY STOP PLAY STOP PLAY
81 0.22 0 0.99 1.34
82 0 0 2.52 2.52
83 0 0 3.09 1.33
84 0.07 0 0.37 1.16
85 0.07 2.27 3.08 1.1
86 1.97 0 3.07 1.08
87 1.96 1.9 0.59 1.04
88 1.54 1.71 1.57 2.53
89 0.19 2.22 3.2 3.13
90 0.21 0 2.77 2.53
91 0.22 0.06 0.22 1.68
92 0.22 0 0 0
93 0.23 0.06 3.32 1
94 0.23 0.06 0.16 1.58
95 2.28 0 3.31 1.62
96 2.28 2.25 3.3 1.08
97 2.27 1.23 3.3 3.29
98 2.27 2.23 3.32 1.62
99 2.27 2.23 0.16 1.09
100 2.26 2.23 3.32 1.27
101 2.08 2.17 3.3 1.32
102 2.07 2.17 0 0
103 2.07 2.18 1.56 1.55
104 2.08 0 0.94 1.25
105 0.14 0.15 0.41 0
106 0.14 0.16 0.05 0.06
107 0 0 0 0.06
108 1.28 1.28 3.27 3.26
109 5.18 5.05 0 0
110 0.14 0.16 0.19 1.74
111 0.15 0.15 3.3 3.29
112 0.13 0.16 0.18 1.62
113 0.14 0.15 2.98 2.38
114 5.1 5.05 3.02 1.48
115 2.07 2.09 0 0
116 2.06 2.09 2.86 3.01
117 0 0 2.86 2.54
118 0 0 0 0
119 0 0 0 2.5
120 5.1 5.05 2.55 2.51
121 0.13 0.15 3.03 1.4
122 0.14 0.15 3.03 1.4
123 0 0.18 0.22 1.39
124 0 0.18 0.22 0.34
125 5.08 5.03 0 0
126 5.08 3.16 3.31 0.98
127 0.06 2.08 0.26 1.64
128 0 0 3.31 1.53
129 3.3 1.15
130 3.3 3.29
131 3.31 1.49
132 0.16 0.89
133 3.3 0
134 3.3 1.07
135 0 0
136 2.86 2.53
137 2.86 2.53
138 0.07 0.86
139 0.09 0.99
140 0.07 2.51
141 0.07 0.94
142 0.09 1.13
143 0.07 1.19
144 0.09 1.07
145 0.09 0
146 0 1.51
147 0.09 1.25
148 0.07 1.64
149 0.06 0
150 0 1.65
151 0.07 3.29
152 0 1.6
153 0 1.64
154 0 1.44
155 0 0
156 0 0
157 0 1.63
158 0 3.29
159 0 3.27
160 0 1.27
STOP PLAY STOP PLAY STOP PLAY STOP PLAY
IC201
(MT1336E)
IC202
(MOTOR)
IC501
(MT1379)
IC502
(SDRAM)
IC505
(EEPROM)
IC510
(BUFFER)
IC5A1
(FLASH)
IC401
(CS4391)
IC402
(AMP)
IC5C1
(MM1623XFBE)
Page 78

3-91 3-92
PIN STOP PLAY STOP PLAY STOP PLAY STOP PLAY STOP PLAY STOP PLAY
161 0 1.27
162 0 2.35
163 0 0
164 0 0.73
165 0 3.27
166 0 0.5
167 0 0
168 0 0.53
169 0 3.27
170 0 0.59
171 0 0
172 3.01 0.72
173 0 0.72
174 0 0
175 0 2.73
176 0 3.13
177 0 3.13
178 0 3.25
179 0 0
180 0 0
181 2.04 2.64
182 0 2.52
183 0 0
184 0 0.09
185 0 3.26
186 - 187 0 0.08
188 0 0
189 0 0
190 0 0
191 0.23 0
192 0 3.29
193 0 0
194 0 0
195 0 0
196 0 0
197 0 1.63
198 0 0
199 0 0
200 0 2.15
201 0 1.44
202 0 1.44
203 0 1.43
204 0 1.43
205 0 1.42
206 0 2.1
207 0 2.07
208 0 1.41
209 0 1.52
210 0 1.43
211 0 2.81
212 0 3.28
213 0 0.12
214 0 0.12
215 1.02 1.43
216 0 1.43
STOP PLAY STOP PLAY STOP PLAY STOP PLAY
IC201
(MT1336E)
IC202
(MOTOR)
IC501
(MT1379)
IC502
(SDRAM)
IC505
(EEPROM)
IC510
(BUFFER)
IC5A1
(FLASH)
IC401
(CS4391)
IC402
(AMP)
IC5C1
(MM1623XFBE)
Q201 Q202 Q203 Q204
STOP PLAY STOP PLAY STOP PLAY STOP PLAY
E 0 0 0 0 0 0 5.14 4.34
C 0 5.09 0 0 0 0.19 0 2.42
B 0.68 0 0 5.04 5.04 0 5.08 3.64
Q205 Q501 Q6401
STOP PLAY STOP PLAY STOP PLAY
E 5.14 5.10 0 5.17 0
C 0.5 0 0 0 0 0.13
B 5.08 5.05 0.83 0.83 5.11 0
Page 79

LOCATION GUIDE
3-93 3-94
PRINTED CIRCUIT DIAGRAMS
1. MTR P.C.BOARD
Page 80

Page 81

DECK MECHANISM PARTS
LOCATIONS
• Top View . . . . . . . . . . . . . . . . . . . . . . . . .4-1
• Bottom View . . . . . . . . . . . . . . . . . . . . . . .4-1
DECK MECHANISM DISASSEMBLY
1. Drum Assembly . . . . . . . . . . . . . . . . . . .4-2
2. Top Plate Assembly . . . . . . . . . . . . . . . .4-4
3. CST Holder Assembly . . . . . . . . . . . . . .4-4
4. Door Opener . . . . . . . . . . . . . . . . . . . . .4-4
5. L/D Motor Bracket Assembly . . . . . . . . .4-4
6. F/L Gear Rack . . . . . . . . . . . . . . . . . . . .4-4
7. F/L Arm Assembly . . . . . . . . . . . . . . . . .4-4
8. S/W Lever Assembly . . . . . . . . . . . . . . .4-4
9. Cleaner Arm Assembly . . . . . . . . . . . . . .4-5
10. F/E Head . . . . . . . . . . . . . . . . . . . . . . . .4-5
11. A/C Head Base Assembly . . . . . . . . . . .4-5
12. T Brake Assembly . . . . . . . . . . . . . . . . .4-6
13. RS Brake Assembly . . . . . . . . . . . . . . . .4-6
14. Tension Arm Assembly . . . . . . . . . . . . . .4-6
15. S Reel / T Reel . . . . . . . . . . . . . . . . . . .4-6
16. P4 Base Assembly . . . . . . . . . . . . . . . . .4-7
17. Lid Opener . . . . . . . . . . . . . . . . . . . . . . .4-7
18. Pinch Arm Assembly . . . . . . . . . . . . . . .4-7
19. T/up / Arm T/up Lever . . . . . . . . . . . . . .4-7
20. Capstan Belt /Capstan Motor . . . . . . . . .4-8
21. F/R Lever . . . . . . . . . . . . . . . . . . . . . . . .4-8
22. D35 Clutch Assembly . . . . . . . . . . . . . . .4-8
23. Capstan Brake Assembly . . . . . . . . . . . .4-8
24. Drive Gear / Cam Gear . . . . . . . . . . . . .4-9
25. Sector Gear . . . . . . . . . . . . . . . . . . . . . .4-9
26. Slider Plate . . . . . . . . . . . . . . . . . . . . . .4-9
27. Tension Lever . . . . . . . . . . . . . . . . . . . .4-9
28. Spring Lever . . . . . . . . . . . . . . . . . . . . .4-9
29. P2 Gear Assembly/
P3 Gear Assembly . . . . . . . . . . . . . . . .4-10
30. P2 Base Assembly/
P3 Base Assembly . . . . . . . . . . . . . . . .4-10
31. Loading Base . . . . . . . . . . . . . . . . . . . .4-11
32. Tension Base . . . . . . . . . . . . . . . . . . . .4-11
33. Idler Arm Jog Assembly . . . . . . . . . . . .4-11
DECK MECHANISM ADJUSTMENT
• Tools and Fixtures for Service . . . . . . .4-12
1. Mechanism Alignment Position Check .4-13
2. Preparation for Adjustment . . . . . . . . . .4-14
3. Checking Torque . . . . . . . . . . . . . . . . .4-14
4. Guide Roller Height Adjustment . . . . . .4-15
4-1. Preliminary Adjustment . . . . . . . . .4-15
4-2. Precise Adjustment . . . . . . . . . . . .4-15
5. Audio/Control (A/C) Head Adjustment . .4-16
5-1. Preliminary Adjustment . . . . . . . . .4-16
5-2. Confirmation of Tape Path between
Pinch Roller and Take-up Guide . .4-17
5-3. Precise Adjustment
(Azimuth Adjustment) . . . . . . . . . .4-17
6. X-Value Adjustment . . . . . . . . . . . . . . .4-17
7. Adjustment after Replacing Drum Assembly
(Video Heads) . . . . . . . . . . . . . . . . . . .4-18
8. Check the Tape Travel after Reassembling
Deck Mechanism . . . . . . . . . . . . . . . . .4-18
8-1. Check Audio and RF Locking Time
during Playback after CUE or REV
. . . . . . . . . . . . . . . . . . . . . . . . . . .4-18
8-2. Check Tape Curling or Jamming . .4-18
MAINTENANCE/INSPECTION
PROCEDURE
1. Check before starting Repairs . . . . . . .4-19
2. Required Maintenance . . . . . . . . . . . . .4-20
3. Scheduled Maintenance . . . . . . . . . . . .4-20
4. Supplies Required for Inspection and
Maintenance . . . . . . . . . . . . . . . . . . . .4-20
5. Maintenance Procedure . . . . . . . . . . . .4-20
5-1. Cleaning . . . . . . . . . . . . . . . . . . . .4-20
5-2. Greasing . . . . . . . . . . . . . . . . . . . .4-21
MECHANISM TROUBLESHOOTING
GUIDE
1. Deck Mechanism . . . . . . . . . . . . . . . . .4-23
2. Front Loading Mechanism . . . . . . . . . .4-26
EXPLODED VIEWS
1. Front Loading Mechanism Section . . . .4-28
2. Moving Mechanism Section (1) . . . . . . .4-29
3. Moving Mechanism Section (2) . . . . . . .4-30
CONTENTS
SECTION 4 MECHANISM OF VCR PART
Page 82

DECK MECHANISM PARTS LOCATIONS
4-1
• Top View
• Bottom View
20
24
23
20
24
22
21
29
30
29
30
25
32
27
26
28
NOTE: When reassembly perform the
procedure in the reverse order.
1 Drum Assembly 3 Screw A-1 T
2 Top Plate Assembly 2 Hook A-2 T
2 3 CST Holder Assembly Chassis Hole A-2 T
2 4 Door Opener Chassis Hole A-2 T
5 L/D Motor Bracket 3 Hook A-2 T
Assembly
2,3,4 6 F/L Gear Rack 1 Hook, Chassis Hole A-2 T
2,3,4,6 7 F/L Arm Assembly Chassis Hole A-2 T
8 S/W Lever Assembly 1 Hook A-2 T
9 Cleaner Arm Assembly Chassis Embossing A-3 T
10 F/E Head Chassis Embossing A-3 T
11 A/C Head Base Assembly 1 Screw A-3 T
2,3 12 T Brake Assembly 1 Hook A-4 T
2,3 13 RS Brake Assembly 1 Hook A-4 T
2,3 14 Tension Arm Assembly 2 Hook A-4 T
2,3,12,13, 15 S Reel / T Reel A-4 T
14
16 P4 Base Assembly Chassis Embossing A-5 T
17 Lid Opener Chassis Embossing A-5 T
17 18 Pinch Arm Assembly Shaft A-5 T
17 19 T/up / Arm T/up Lever 1 Hook A-5 T
17,18 20
Capstan Belt /Capstan Motor
3 Screw A-6 B
21 F/R Lever Locking Tab A-6 B
20, 21 22 D35 Clutch Assembly Washer A-6 B
23 Capstan Brake Assembly Locking Tab A-6 B
24 Drive Gear / Cam Gear Washer/Hook A-7 B
25 Sector Gear 1 Hook A-7 B
20,21,23, 26 Slider Plate Shaft Guide A-7 B
24,25
20,21,23, 27 Tension Lever 1 Hook A-7 B
24,25,26
2,3,14,20, 28 Spring Lever Locking Tab A7 B
21,25,23,
24,26
25 29
P2 Gear Assembly/P3 Gear Assembly
Boss A-8 B
2,3,14,25, 30
P2 Base Assembly/P3 Base Assembly
Chassis Slot A-8 B
29
2,3,14,25, 31 Loading Base 1 Screw A-9 T
29
2,3,14 32 Tension Base Chassis Embossing A-9 B
2,3,20,21, 33 Idler Arm Jog Assembly Locking Tab A-9 T
22
Starting
No.
Procedure
Part Fixing Type
Fig-
ure
1) When reassembling, confirm Mechanism and Mode
Switch Alignment Position (Refer to Page 4-14)
2) When disassembling, the Parts in the "Starting No."
colum should be removed first.
R: Top, B:Bottom
2
7
10
1
31
14
15
8
6
3
4
9
5
11
18
16
17
19
19
12
33
13
15
Page 83

4-2
DECK MECHANISM DISASSEMBLY
(S3)
(S2)
(S2)
(S3)
(A)
Stator
Carbon Brush
Drum Motor
Rotor
Drum Sub Assembly
FPC Drum
(S1)
(S1)
(S1)
FPC Holder
H1
H2
1. Drum Assembly (Fig. A-1-1)
1) Unplug the FPC Drum Connector.
2) Remove three Screws (S1) on the bottom side and separate the Drum assembly.
3) Unhook (H1), (H2) and separate the FPC Holder and
FPC Cap. (See Fig. B-1)
1-1. Drum Motor
1) Remove two Screws (S2) and disassemble the Stator of
the Drum Motor.
(2) Remove two Screws (S3) and separate the Rotor of the
Drum Motor from the Drum Sub assembly.
When reassembling, check to ascertain that the Carbon
Brush is in position.
Fig. A-1
NOTE
(Fig. B-1)
FPC Holder
FPC Drum
FPC Cap
Figure in the opposite direction
(Fig. A-1-1)
Page 84

DECK MECHANISM DISASSEMBLY
4-3
(B)
(E)
(C1)
(C)
Top Plate
F/L Arm Assembly
S/W Spring Lever
F/L Gear Rack Assembly
Chassis
Door Opener
L/D Motor Bracket Assembly
CST Holder Assembly
(B')
(C')
(D)
(E')
(H6)
(A)
(B)
S/W Lever Assembly
(H8)
Fig. A-2
(Fig. A-2-1)
(Fig. A-2-2)
(Fig. A-2-6)
(Fig. A-2-7)
(Fig. A-2-5)
(Fig. A-2-3)
(Fig. A-2-4)
Page 85

4-4
DECK MECHANISM DISASSEMBLY
2. Top Plate Assembly (Fig. A-2-1)
1) Pull the (B) portion of the Top Plate back in direction of
arrow and separate the right side of it.
2) Pull the (B’) portion of the Top Plate back in direction of
arrow and separate the left side of it.
(Tools: (-) Flat type screwdriver or any tool with a sharp
or flat point.)
(1) When reassembling, push the Top Plate on after aligning
the two position (C), (C’) as Fig.
3. CST Holder Assembly (Fig.A-2-2)
1) Move the CST Holder Assembly in direction of arrow and
separate the left side of it first through the (D) position of
the Chassis.
2) Disassemble the right side of the CST Holder Assembly
from each guided hole of the Chassis.
When reassembling, insert the (E) part of the CST Holder
assembly in the (E’) hole of the Chassis first and assemble
the left side of it.
4. Door Opener (Fig.A-2-3)
5. L/D Motor Bracket Assembly
(Fig. A-2-4)
1) Unplug the Connector (C1).
2) Unhook three Hooks (H3, H4, H5) on thr bottom side of
the Chassis, lift up the L/M Bracket Assembly and disasemble the L/D Motor Bracket Assembly.
6. F/L Gear Rack (Fig. A-2-5)
1) Move the F/L Gear Assembly Rack in the direction of
arrow (A) and unhook the Hook (H6) pulling back in front.
2) Separate the F/L Rear Rack in direction of arrow (B).
When reassembling, align the Gear part of the Gear F/L
Assembly Rack with the Drive Gear as below Fig.
7. F/L Arm Assembly (Fig. A-2-6)
1) Move the F/L Arm Assembly in direction of arrow and
separate the left side of it first.
2) Disassemble the F/L Arm Assembly from each guided
Holes in of the Chassis.
8. S/W Lever Assembly (Fig. A-2-7)
1) Hook the S/W Spring Lever on the Hook (H7) first as
shown below.
2) Unhook the Hook (H8) in the left side of the Chassis and
move the S/W Lever Assembly.
(B')
(C')
(C)
(B)
NOTE
NOTE
(H3)
(H4)
(H5)
Bracket assembly L/M
NOTE
F/L Gear Rack
Holder assembly CST
(D)
Chassis
Drive Gear
Chassis
(H8)
(H7)
S/W Spring Lever
Page 86

DECK MECHANISM DISASSEMBLY
4-5
9. Cleaner Arm Assembly (Fig. A-3-1)
1) Carefully pry tab "A" (see Fig.A-3-1) to clear the
embossed tab on the chassis. Turn the Cleaner Arm
Assembly clockwise and lift it from the chassis.
10. F/E Head (Fig. A-3-2)
1) Carefully pry tab "A" (see Fig.A-3-2) to clear the
embossed tab on the chassis. Turn the Cleaner Arm
Assembly counter-clockwise and lift it from the chassis.
11. A/C Head Base Assembly (Fig. A-3-3)
1) Remove the Screw (S4) and lift the A/C Head Base
Assembly up.
(A)
Cleaner
Arm Assembly
A/C Head Base Assembly
(S4)
F/E Head
(A)
Chassis
Fig. A-3
(Fig. A-3-1)
(Fig. A-3-3)
(Fig. A-3-2)
Page 87

4-6
DECK MECHANISM DISASSEMBLY
T Brake Assembly
TB Spring
(H9)
T Reel
RS Brake Assembly
RS Spring
Tension Arm Assembly
Tension Spring
S Reel
Tension Base
(H11)
(H12)
Chassis
(H10)
Fig. A-4
12. T Brake Assembly (Fig. A-4-1)
1) Unhook the TB Spring from the Hook (H9) of the Chassis.
2) LLift the T Brake Assembly up.
13. RS Brake Assembly (Fig. A-4-2)
1) Unhook the RS Spring from the Hook (H10) of the
Chassis.
2) Lift the T Brake Assembly up.
14. Tension Arm Assembly (Fig. A-4-3)
1) Unhook the Tension Spring from the Hook (H11) of the
Tension Arm Assembly.
2) Unhook the Hook (H12) of the Tension Base and lift the
Tension Arm Assembly up.
Difference for Springs
15. S Reel / T Reel (Fig. A-4-4)
1) Difference for S Reel / T Reel
TB Spring
RS Spring
Tension Spring
(Difference for Springs)
Color (Black)
S Reel T Reel
NOTE
(Fig. A-4-1)
(Fig. A-4-3)
(Fig. A-4-4)
(Fig. A-4-4)
(Fig. A-4-2)
Page 88

DECK MECHANISM DISASSEMBLY
4-7
Lid Opener
Pinch Arm
Assembly
P4 Base Assembly
T/up Arm
T/up Lever
(A)
(B)
(C)
(C)
(H13)
(B)
(H13)
Chassis
Fig. A-5
16. P4 Base Assembly (Fig. A-5-1)
1) Carefully pry the (A) portion of the P4 Base Assembly
from the Embossing of the Chassis.
2) Turn the P4 Base Assembly counterclockwise and lift it
up.
17. Lid Opener (Fig. A-5-2)
1) Carefully pry the (B) portion of the Lid Opener from the
Embossing of the Chassis.
2) Turn the Lid Opener to clockwise direction and lift it up.
18. Pinch Arm Assembly (Fig. A-5-3)
1) Lift the Pinch Arm Assembly up.
19. T/up (Fig. A-5-4)/
Arm T/up Lever (Fig. A-5-5)
1) Unhook the Hook (H13) of the bottom Chassis and lift the
T/up Lever up.
2) Lift the T/up Arm up.
When reassembling, confirm the (C) portion of the Pinch Arm
Assembly is inserted in the Chassis Hole correctly.
Place the Mechanism face down, or up side down.
NOTE
(Fig. A-5-2)
(Fig. A-5-1)
(Fig. A-5-3)
(Fig. A-5-5)
(Fig. A-5-4)
Page 89

4-8
DECK MECHANISM DISASSEMBLY
Chassis
(S5)
Capstan Belt
Capstan Motor
Washer(W1)
F/R Lever
D35 Clutch Assembly
Capstan Brake Assembly
(L1)
(L2)
(L1)
Fig. A-6
20. Capstan Belt (Fig. A-6-1)/
Capstan Motor (Fig. A-6-2)
1) Remove the Capstan Belt..
2) Remove the three Screws (S5) from the bottom of the
Chassis and lift the Capstan Motor up.
21. F/R Lever (Fig. A-6-3)
1) Unlock the Locking Tab (L1) as Fig. A-6-3 and lift the F/R
Lever up.
22. D35 Clutch assembly (Fig. A-6-4)
1) Remove the Washer (W1) and lift the D35 Clutch
Assembly up.
23. Capstan Brake Assembly
(Fig. A-6-5)
1) Pull the Locking Tab (L2) back in the direction of the
arrow and lift it up.
(Fig. A-6-1)
(Fig. A-6-2)
(Fig. A-6-3)
(Fig. A-6-5)
(Fig. A-6-4)
Page 90

DECK MECHANISM DISASSEMBLY
4-9
Drive Gear
Washer (W2)
Cam Gear
Slider Plate
Tension Lever
Spring Lever
Loading Base
Sector Gear
(L3)
(H15)
(H16)
(H14)
(A)
Chassis
Drive Gear Hole(C)
Cam Gear Hole(B)
Drive Gear Hole(A)
Fig. A-7
24. Drive Gear (Fig. A-7-1)/
Cam Gear (Fig. A-7-2)
1) Remove the Washer (W2) and lift the Drive Gear up.
2) Unhook the Hook (H14) of the Cam Gear and lift the Cam
Gear up.
When reassembling, align the Drive Gear Hole (A) and the
Cam Gear Hole (B) in a straight line after the Drive Gear
Hole (C) is aligned with the Chassis Hole.
25. Sector Gear (Fig. A-7-3)
1) Unhook the Hook (H15) of the Loading Base on bottom
Chassis and lift the Sector Gear up.
26. Slider Plate (Fig. A-7-4)
1) Lift the Slider Plate up.
27. Tension Lever (Fig. A-7-5)
1) Unhook the (A) portion of the Tension Lever from the
Hook (H16) of the Chassis.
2) Turn the Tension Lever counterclockwise and lift it up.
28. Spring Lever (Fig. A-7-6)
1) Unlock the Locking Tab (L3) from the bottom of the
Chassis and lift the Spring Lever up.
(Fig. A-7-4)
(Fig. A-7-5)
(Fig. A-7-6)
(Fig. A-7-1)
(Fig. A-7-2)
(Fig. A-7-3)
NOTE
Page 91

4-10
DECK MECHANISM DISASSEMBLY
P3 Gear Assembly
P2 Gear Assembly
P2 Base Assembly
P3 Base Assembly
(A)
(B)
Chassis
P2 Gear Assembly Hole
Sector Gear Hole(A)
Slider Plate Hole(B)
Spring Lever Boss
P3 Gear Assembly Hole
Fig. A-8
29. P2 Gear Assembly (Fig. A-8-1)/
P3 Gear Assembly (Fig. A-8-2)/
1) Lift the P2 Gear Assembly up.
2) Lift the P3 Gear Assembly up.
When reassembling, align the two Holes of the P2 and P3
Gear Assembly in a straight line after confirming the Sector
Gear Hole (A) and the Slider Plate Hole (B) are aligned as in
the above Fig.
30. P2 Base Assembly (Fig. A-8-3)/
P3 Base Assembly (Fig. A-8-4)
1) Move the P2 Base Assembly in the direction of the arrow
(A) along the slot of the Chassis and disassemble it from
the bottom side.
2) Move the P3 Base Assembly in the direction of the arrow
(B) along the slot of the Chassis and disassemble it from
the bottom side.
Place the Mechanism face up, or return to it's original
position.
NOTE
(Fig. A-8-1)
(Fig. A-8-2)
(Fig. A-8-3)
(Fig. A-8-4)
Page 92

DECK MECHANISM DISASSEMBLY
4-11
(A)
(B) (C)
(S7)
Idler Arm Jog Assembly
Loading Base
Tension Base
Chassis
(D)
Fig. A-9
31. Loading Base (Fig. A-9-1)
1) Remove the Screw (S7).
2) Lift the Loading Base up.
32. Tension Base (Fig. A-9-2)
1) Remove the (A) portion of the Tension Base from the
Embossing of the Chassis.
2) Turn the Tension Base counterclockwise and lift it up.
33. Idler Arm Jog Assembly (Fig. A-9-3)
1) Pinch (B) and (C), as shown in Fig. A-9-3.
2) Lift the Idler Arm Assembly up.
When disassembling, be careful not to catxh part (D) on the
Chassis (see inset).
NOTE
(Fig. A-9-1)
(Fig. A-9-2)
(Fig. A-9-3)
Page 93

DECK MECHANISM DISASSEMBLY
4-12
• Tools and Fixfures for Service
1. Cassette Torque meter
SRK-VHT-303 (Not SVC part)
Part No: D00-D006
4. Torque gauge adaptor
Part No:D09-R001
5. Post height adjusting driver
Part No:DTL-0005
6. + Type driver (ø 5)
2. Alignment tape
Part No NTSC: DTN-001
PAL:DTN-0002
3. Torque gauge
3. 600g.Cm ATG
3. Part No:D00-D002
SRK
V
ID
E
O
C
A
S
S
E
T
T
E
T
O
R
Q
U
E
M
E
T
E
R
V
H
T-30
3
S
R
K
-
V
H
T
-
S
S
R
K
-
V
H
T
T
300
250
200
1
50
5
0
0
300
250
2
00
15
0
50
0
1
00
Page 94

DECK MECHANISM ADJUSTMENT
4-13
Purpose:To determine if the Mechanism is in the correct position, when a Tape is ejected.
1. Mechanism Alignment position Check
1) Turn the Power S/W on and eject the Cassette by pressing the Eject Button.
2) Remove the Top Cover and Top Plate Assembly, visually check if the Cam Gear Hole is aligned with the
Chassis Hole as below Fig. C-2.
3) If not, rotate the Shaft of the Loading Motor Clockwise or
Counterclockwise until the Alignment is as shown below
in Fig. C-2.
4) Remove the Screw which attaches the Deck Mechanism
and Main Frame, confirm the Cam Gear is aligned with
the Drive Gear as shown below in Fig. C-1 (A).
5) Confirm if the Mode S/W on the Main P.C. Board is
aligned as shown below in Fig. C-1 (B).
6) Remount the Deck Mechanism on the Main P.C. Board
and check each operation.
Cam Gear
Drive Gear
(C)
Mode S/W
(B)
Test Equipment/ Fixture
• Blank tape
Test Conditions (Mechanism
Condition)
• Eject Mode (with Cassette ejected)
Check Point
• Mechanism and Mode Switch Position
Fig. C-1
Fig. C-2
CHECK DIAGRAM
BOTTOM VIEW
TOP VIEW
Gear Cam (o) and Gear Drive (o) groove alignment
L/D Motor Assembly
(A')
(B')
Cam Gear
Chassis Hole
(B)
(A)
Cam Gear Hole Cam Gear Hole
Page 95

4-14
DECK MECHANISM ADJUSTMENT
Purpose: To insure smooth Transport of the Tape during each Mode of Operation.
If the Tape Transport is abnormal, then check the Torque as indicated by the chart below.
2. Preparation for Adjustment (To set the
Deck Mechanism to the Loading state
without inserting a Cassette Tape).
1) Unplug the Power Cord from the AC Outlet.
2) Disassemble the Top Cover and Top Plate Assembly.
3) Plug the Power Cord into the AC Outlet.
4) Turn the Power S/W. Push the Stop Lever of the CST
Holder Assembly to the back for Loading without the
Tape.
Cover the Holes of the End Sensors at the both sides of
the (L) Side Bracket and Door Bracket Assembly to prevent sensing light.
Then The Deck Mechanism drives to the Stop Mode.
In this case, The Deck Mechanism can accept inputs of
each mode, however the Rewind and Review Operation
can not be performed for more than a few seconds
because the Take-up Reel Table is in the Stop Mode
and can not detect the Reel Pulses.
3. Checking Torque
The Values are measured by using a Torque Gauge and
Torque Gauge Adaptor with the Torque Gauge affixed.
The Torque reading to measure occurs when the Tape
abruptly changes direction from Fast Forward of Rewind
Mode, when quick bracking is applied to both Reels.
SRK
VIDEO
CASSETTE
TORQUE
METER
VHT-303
S
R
K
-
V
H
T
-
S
S
R
K
-
V
H
T
T
300
250
200
150
50
0
300
250
200
150
50
0
100
Test Equipment/ Fixture
• Torque Gauge (600g/cm ATG)
• Torque Gauge Adaptor
• Cassette Torque Meter
SRK-VHT-303
Checking Method
• Perform each Deck Mechanism Mode without
inserting a Cassette Tape (Refer to above No.2
Preparation for Adjustment).
• Read the Measurement of the Take-up or Supply
Reels on the Cassette Torque Meter (Fig. C-3-2).
• Attach the Torque Gauge Adaptor to the Torque
Gauge and then read the Value of it (Fig. C-3-1).
NOTE:
Fig. C-3-2 Fig. C-3-1
Torque Gauge
Torque Gauge
Adaptor
Reel Table
Item
Fast Forward Torque
Rewind Torque
Play Take-Up Torque
Review Torque
Mode
Fast Forward
Rewind
Play
Review
Test Equipment
Cassette Torque Gauge
Cassette Torque Gauge
Cassette Torque Meter
Cassette Torque Meter
Measurement Reel
Take-Up Reel
Supply Reel
Take-Up Reel
Supply Reel
Measurement Values
More than 400g/cm
More than 400g/cm
40~100g/cm
120~210g/cm
Test Conditions
(Mechanism Condition)
• Play (FF) or Review (REW) Mode
NOTE:
• Cassette Torque Meter (SRK-VHT-303)
• Torque Gauge (600g.cm ATG)
Page 96

DECK MECHANISM ADJUSTMENT
4-15
4.Guide Roller Height Adjustment
Adjustment Procedure
1) Confirm that the Tape runs along the Tape Guide Line of the
Lower Drum.
2) If the Tape runs at the Bottom of the Guide Line, turn the
Guide Roller Height Adjustment Screw Clockwise.
3) If it runs at the Top, turn Counterclockwise.
4) Adjust the Height of the Guide Roller to be guided to the
Guide Line of the Lower Drum from the Starting and Ending
Point of the Drum.
Purpose: To regulate the Height of the Tape so that the Bottom of the Tape runs along the
Tape Guide Line on the Lower Drum.
Test Equipment/ Fixture
• Post Height Adjusting Driver
Test Conditions (Mechanism Condition)
• Play or Review Mode
Adjustment Point
• Guide Roller Height Adjustment
screws on the Supply and Take-Up
Guide Rollers.
Fig. C-4-1
Upper Flange
Guide Roller
Retaining Screw
Guide Roller Height
Adjustment screw
ADJUSTMENT DIAGRAM
Test Equipment/Fixture
• Oscilloscope
• Alignment Tape
• Post Height Adjusting
Driver
Test Equipment Connection Points
• CH-1:PB RF Envelope
• CH-2:NTSC: SW 30Hz
PAL: SW 25Hz
• Head Switching Output
Point
• RF Envelope Output
Point
Test Conditions VCR (VCP) State
• Play an Alignment Tape
Adjustment Point
• Guide Roller Height
Adjustment Screws
Fig. C-4-2
Fig. C-4-3
P3 POST
ADJUSTMENT
P2 POST
ADJUSTMENT
Turn the Roller Guide Height
Adjustment Screw slightly
to flatten the waveform.
Tracking control at center
RF ENVELOPE OUTPUT TEST POINT
OSCILLOSCOPE
HEAD SWITCHING OUTPUT TEST
POINT
Turn (Move) the tracking
control to both directions
4-1. Preliminary Adjustment
4-2. Precise Adjustment
Adjustment Procedure
1) Play an Alignment Tape after connecting the Probe of the
Oscilloscope to the RF Envelope Output Test Point and
Head Switching Output Test Point.
2) Tracking Control (in PB Mode): Center Position (When
this Adjustment is performed after the Drum Assembly
has been replaced, set the Tracking Control so that the
RF Output is Maximum).
3) Height Adjustment Screw: Flatten the RF Waveform.
(Fig. C-4-2)
4) Turn (Move) the Tracking Control (in PB Mode)
Clockwise and Counterclockwise. (Fig. C-4-3)
5) Check that any Drop of RF Output is uniform at the
Start and End of the Waveform.
If the adjustment is excessive or insufficient the tape
will jam or fold.
NOTE
Waveform Diagrams
Connection Diagram
Page 97

4-16
DECK MECHANISM ADJUSTMENT
5. Audio/Control (A/C) Head Adjustment
10.9
Purpose: To insure that the Tape's Audio and Control Tracks pass accurately over the
head in exact alignment in both the Record and Playback Modes.
Test Equipment/ Fixture
• Blank Tape
• Screw Driver (+) Type 5mm
• Play the blank tape
Test Conditions (Mechanism Condition)
Adjustment Point
• Tilt Adjustment Screw (C)
• Height Adjustment Screw (B)
• Azimuth Adjustment Screw (A)
Fig. C-5-1
A/C Head Base
Fig. C-5-2
Height Adjustment
Screw (B)
Tilt Adjustment
Screw (C)
Azimuth Adjustment
Screw (A)
X-Value Adjustment
Hole
Fixed Screw
Fig. C-5-3
A/C Head
Tap e
Tape
0.2~0.25mm
P4
5-1. Preliminary Adjustment (Height and Tilt Adjustment)
Perform the Preliminary Adjustment, when there is no Audio Output Signal with the Alignment Tape.
1) Adjust the A/C Head Base Assembly as shown Fig. C-51 by using the Height Adjustment Screw (B).
2) Play a Blank Tape and observe if the Tape passes accurately over the A/C Head without the Tape Curling or
Folding.
3) If Folding or Curling occurs adjust the Tilt Adjustment
Screw (C) while the Tape is running to resemble Fig. C5-3.
4) Reconfirm the Tape Path after playback of approximately 4~5 seconds.
Ideal A/C head height occurs when the tape runs between
0.2~0.25mm above the bottom edge of the A/C head core.
NOTE
Adjustment Procedure/Diagrams
A/C Head Assembly
Page 98

DECK MECHANISM ADJUSTMENT
4-17
Purpose: To obtain compatibility with other VCR (VCP) Models.
5-2. Confirm that the Tape passes smoothly
between the Take-up Guide and Pinch Roller
(using a Mirror or the naked eye).
1) After completing Step 5-1. (Preliminary Adjustment),
check that the Tape passes around the Take-up Guide
and Pinch Roller without Folding or Curling at the Top or
Bottom.
(1) If Folding or Curling is observed at the Bottom of
the Take-up Guide then slowly turn the Tilt
Adjustment Screw (C) in the Clockwise direction.
(2) If Folding or Curling is observed at the Top of it then
slowly turn the Tilt Adjustment Screw (C) in the
Counterclockwise direction.
Check the RF Envelope after adjusting the A/C Head, if
the RF Waveform differs from Fig. C-5-4, performs
Precise Adjustment to flat the RF Waveform.
Test Equipment/ Fixture
• Oscilloscope
• Alignment Tape (SP)
• Screw Driver (+) Type 5mm
Connection Point
• Audio output jack
Test Conditions
(Mechanism Condition)
• Play an Alignment Tape
1KHz, 7KHz Sections
Adjustment Point
• Azimuth Adjustment Screw (A)
• Height Adjustment Screw (B)
1) Connect the Probe of the Oscilloscope to the Audio
Output Jack.
2) Alternately adjust the Azimuth Adjustment Screw (A)
and the Tilt Adjustment Screw (C) for Maximum Output
of the 1Khz and 7Khz segments, while maintaining the
flattest Envelope differential between the two
Frequencies.
Adjustment Procedure
5-3. Precise Adjustment (Azimuth adjustment)
6. X-Value Adjustment
Fig. C-5-4
1KHZ
• Oscilloscope
• Alignment tape (SP only)
• Screw Driver (+) Type 5mm
• CH-1: PB RF Envelope
• CH-2: NTSC: SW 30Hz
PAL: SW 25Hz
• Head Switching Output
Test Point
• RF Envelope Output Test
Point
Test Conditions
(Mechanism Condition)
• Play an Alignment Tape
Adjustment PointConnection PointTest Equipment/ Fixture
Adjustment Procedure
1) Release the Automatic Tracking to run long enough for
Tracking to complete it’s Cycle.
2) Loosen the Fixed Mounting Screw and move the A/C
Head Base Assembly in the direction as shown in the
Diagram to find the center of the peak that allows for the
maximum Waveform Envelope.
This method should allow the 31um Head to be centrally
located over the 58um Tape Track.
3) Tighten the A/C Head Base Assembly mounting Screw.
7KHZ
A:Maximum
B:Maximum
Left
Right
Groove at the
Base A/C
Height Adjustment Screw (B)
Tilt Adjustment Screw (C)
Azimuth Adjustment
Screw (A)
X-Value Adjustment Hole
Fixed Screw
RF ENVELOPE OUTPUT TEST POINT
OSCILLOSCOPE
HEAD SWITCHING OUTPUT TEST POINT
Connection Diagram
Adjustment Diagram
NOTE:
CH-1
CH-2
Page 99

4-18
DECK MECHANISM ADJUSTMENT
Purpose: To correct for shift in the Roller Guide and X value after replacing the Drum.
8-2. Check for tape curling or jamming
Test Equipment/ Fixture
• T-160 Tape
• T-120 Tape
Specification
• Be sure there is no tape jamming or curling at
the begining, middle or end of the tape.
VCR(VCP) State
•
Run the CUE, REV play mode at the
beginning and the end of the tape.
Test Conditions (Mechanism Condition)
1) Confirm that the tape runs smoothly around the roller
guides, drum and A/C head assemblies while abruptly
changing operating modes from Play to CUE or REV.
This is to be checked at the begining, middle and end
sections of the cassette.
2) Confirm that the tape passes over the A/C head assembly as indicated by proper audio reproduction and proper tape counter performance.
Checking Procedure
7. Adjustment after Replacing Drum Assembly (Video Heads)
Test Equipment/ Fixture
• Oscilloscope
• Alignment tapes
• Blank Tape
• Post Height Adjusting Driver
• Screw Driver (+) Type 5mm
Connection Point
• CH-1: PB RF Envelope
• CH-2: NTSC: SW 30Hz
PAL: SW 25Hz
• Head Switching Output
Test Point
• RF Envelope Output Test Point
Test Conditions
(Mechanism Condition)
• Play the blank tape
• Play an alignment tape
Adjustment Points
• Guide Roller Precise
Adjustment
• Switching Point
• Tracking Preset
• X-Value
Checking/Adjustment Procedure
Play a blank tape and check for tape curling or creasing around
the roller guide. If there is a problem, follow the procedure 4.
"Guide Roller Height" and 5. "Audio Control (A/C) Head
Adjustment".
RF ENVELOPE OUTPUT TEST POINT
OSCILLOSCOPE
HEAD SWITCHING OUTPUT TEST
POINT
Connection Diagram
Waveform
V1/V MAX EE0.7
V2/V MAX EE0.8
RF ENVELOPE OUTPUT
Fig. C-7
8. Check the Tape Travel after Reassembling Deck Assembly.
8-1. Check Audio and RF Locking Time during playback and after CUE or REV (FF/REW)
Test Equipment/ Fixture
• Oscilloscope
• Alignment tapes (with 6H
3kHz Color Bar Signal)
• Stop Watch
Specification
• RF Locking Time: Less than 5
sec.
• Audio Locking Time:Less than
10sec
Test Equipment
Connection Points
• CH-1: PB RF Envelope
• CH-2: Audio Output
• RF Envelope Output Point
• Audio Output Jack
Test Conditions
(Mechanism Condition)
• Play an alignment tape
(with 6H 3kHz Color Bar
Signal)
Checking Procedure
Play an alignment tape then change the operating mode to
CUE or REV and confirm if the unit meets the above listed
specifications.
1) CUE is fast forward mode (FF)
2) REV is the rewind mode (REW)
3) Referenced to the Play mode
NOTES:
V1
V
V2
CH1 CH2
Connection Points
Page 100

MAINTENANCE/INSPECTION PROCEDURE
4-19
(3) F/E Head
(5) Drum Assembly
(Video Head)
(4) P2 Base
Assembly
(2) Tension Post
(1) Supply Reel
(6) P3 Base Assembly
The following faults can be remedied by cleaning and oiling. Check the needed lubrication and the conditions of
cleanliness in the unit.
Check with the customer to find out how often the unit is
used, and then determine that the unit is ready for inspection and maintenance. Check the following parts.
1 Check before starting repairs
Phenomenon Inspection
Replace-
ment
Color beats Dirt on full-erase head
o
Poor S/N, no color
Dirt on video head
Vertical or
Horizontal jitter
Dirt on Audio/control head
Dirt on pinch roller
If locations marked with o do not operate normally after
cleaning, check for wear and replace.
See the EXPLODED VIEWS at the end of this manual as
well as the above illustrations See the Greasing (Page 4-22)
for the sections to be lubricated and greased.
NOTE
o
o
o
o
Dirt on video head
Dirt on tape transport system
Low volume,
Sound distorted
Tape does not run.
Tape is slack
o
In Review and
Unloading (off mode),
the Tape is rolled up
loosely.
Clutch Assembly D33K
Torque reduced
Cleaning Drum and
transport system
Fig. C-9-3
(7) A/C Head
(8) P4 Post
(10) Pinch Roller
(11) Take-up Guide Post
(9) Capstan Shaft
(12) Take-up Reel
* No. (1) ~ (13) Indicates the Tape Path to be traveled from Supply Reel to Take-up Reel.
Fig. C-9-1 Top View
Fig. C-9-2 Bottom View
F/E Head
Video Head
A/C Head
Pinch Roller
Belt Capston
Clutch
Assembly D33K
Fig. C-9-3 Tape Transport System
 Loading...