

Page 1

Operating Guide and
Warranty for your new Zenith
Entertainment Machine
Models
VRS418
VRS428
thanks for
choosing zenith
R
Page 2

WARNING:
TO REDUCE THE RISK OF ELECTRIC SHOCK DO NOT REMOVE COVER (OR BACK). NO USER SERVICEABLE PARTS INSIDE.
REFER SERVICING TO QUALIFIED SERVICE PERSONNEL.
The lightning flash with arrowhead symbol, within an equilateral triangle, is intended to alert the user to the presence of uninsulated “dangerous voltage” within the product’s enclosure that may be of sufficient magnitude to constitute a risk of electric shock to persons.
The exclamation point within an equilateral triangle is intended to alert the user to the presence of important operating and maintenance (servicing) instructions in the literature accompanying the appliance.
WARNING:
TO PREVENT FIRE OR SHOCK HAZARDS, DO NOT EXPOSE THIS PRODUCT TO RAIN OR MOISTURE.
POWER CORD POLARIZATION:
CAUTION: To Prevent Electric Shock, match wide blade of plug to wide slot, fully insert.
ATTENTION: Pour éviter les chocs électriques, introduire la lame la plus large de la fiche dans la borne
correspondante de la prise et pousser jusqu’au fond.
NOTE TO CABLE/TV INSTALLER:
This reminder is provided to call the cable TV system installer’s attention to Article 820-40 of the National Electric
Code (U.S.A.). The code provides guidelines for proper grounding and, in particular, specifies that the cable ground
shall be connected to the grounding system of the building, as close to the point of the cable entry as practical.
REGULATORY INFORMATION:
This equipment has been tested and found to comply with the limits for a Class B digital device, pursuant to Part 15
of the FCC Rules. These limits are designed to provide reasonable protection against harmful interference when the
equipment is operated in a residential installation. This equipment generates, uses and can radiate radio frequency
energy and, if not installed and used in accordance with the instruction manual, may cause harmful interference to
radio communications. However, there is no guarantee that interference will not occur in a particular installation. If
this equipment does cause harmful interference to radio or television reception, which can be determined by turning
the equipment off and on, the user is encouraged to try to correct the interference by one or more of the following
measures:
• Reorient or relocate the receiving antenna.
• Increase the separation between the equipment and receiver.
• Connect the equipment into an outlet on a circuit different from that to which the receiver is
connected.
• Consult the dealer or an experienced radio/TV technician for help.
CAUTION:
Do not attempt to modify this product in any way without written authorization from Zenith Electronics
Corporation. Unauthorized modification could void the user’s authority to operate this product.
This class B digital apparatus meets all requirements of the Canadian Interference-Causing Equipment
Regulations.
“Ce appareil numérique de la class b respecte toutes les exigences du Règulement sur le matériel brouillier
du Canada.”
RECORD YOUR MODEL NUMBER
(Now, while you can see it)
The model and serial number of your new VCR are located
on the back of the VCR cabinet. For your future convenience,
we suggest that you record these numbers here:
MODEL NO.____________________________________
SERIAL NO.____________________________________
WARNING
RISK OF ELECTRIC SHOCK
DO NOT OPEN
SAFETY TIPS:
Refer to the “Safety Tips” leaflet that
came with your product for Important
Safety Instructions.
Page 3

INSTALLATION PAGE 3
This page
shows the features of your
VCR and the
differences
between the
models
VCR Features Chart
FEATURES VRS418 VRS428
VCR Plus+® Recording System X X
SpeakEZ Function X X
4-Heads (Special Video Effects) X X
Full Load/Quick Start X X
Auto Head Cleaner X X
Audio System Monaural MTS Hi-Fi Stereo
Audio/Video (A/V) Jacks Monaural Stereo
Remote Control MBR424 X X
Auto/Manual Band Select X X
Auto/Manual Channel Search X X
Channel Capability (CATV & TV) 181 181
Record Speeds SP/EP X X
Playback Speeds SP/LP/EP X X
Auto Playback System X X
Auto/Manual Digital Tracking X X
Instant Recording X X
Timer-Controlled Recording X X
Auto Playback Tape Speed Adjust X X
Forward/Reverse Slow-Motion X X
Video (4-head VCR) Variable 1/10 to 1/32 Variable 1/10 to 1/32
Pause/Still Video X X
Real-Time Tape Counter X X
Speed Search X X
CM Skip X X
English/Spanish/French Menus X X
1-Year, 8-Event Timer X X
LED Clock Front Panel Display X X
Auto Clock Set System X X
Hook-up Cable (VCR to TV) X X
1. Model VRS428 is used for the description, operation, and details provided in this operating guide.
2. VCR design and specifications are subject to change without prior notice.
X = Feature is provided N/A = Feature is Not Available
Page 4
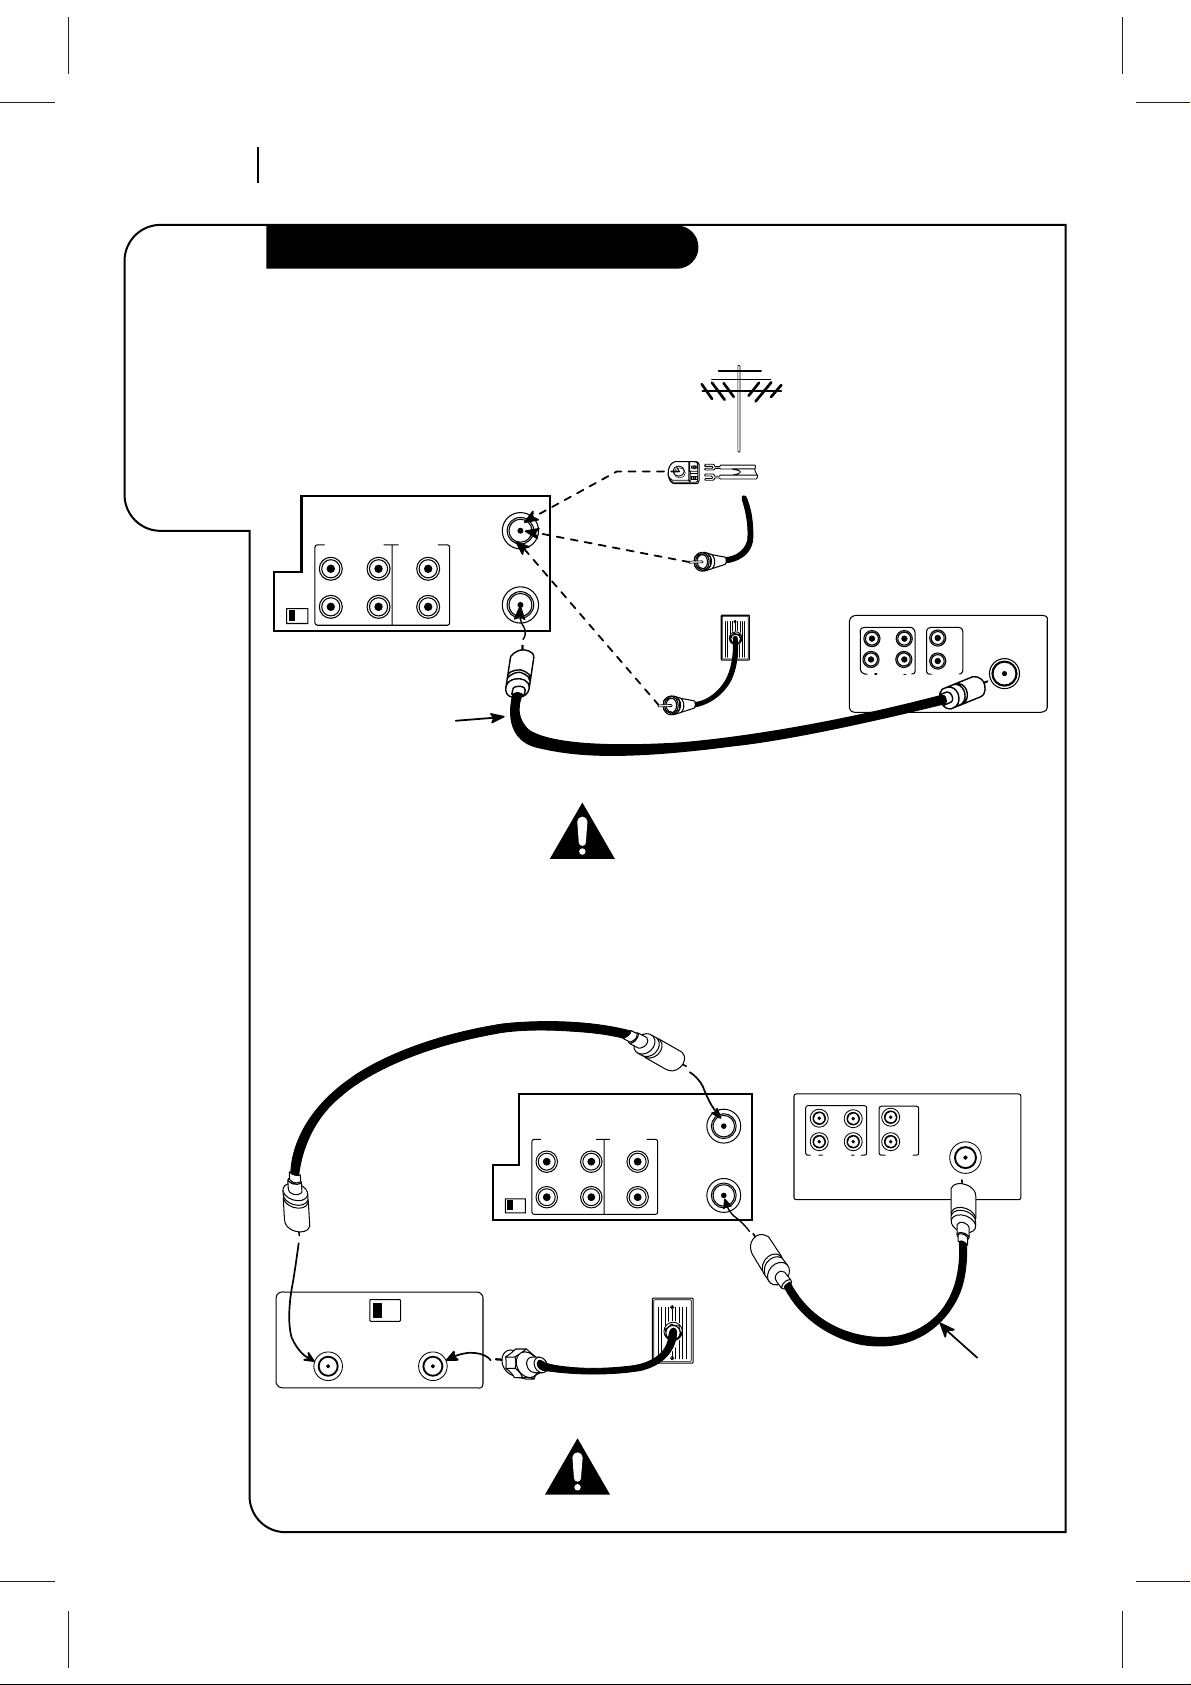
INSTALLATIONPAGE 4
Required
connections
for your VCR
Connections for your VCR
Connections With a Cable Box
Connections Without a Cable Box
Back Panel of Stereo VCR
Back Panel of Typical TV
Antenna
Flat Wire
(300 ohm)
300/75 ohm
Adaptor
(Not provided)
Cable TV
Wall Jack
This cable is provided
with your VCR.
OR
OR
IN
OUT OUT
IN
R
L
AUDIO
VIDEO
VHF/UHF/CATV
ANT
IN
ANT
IN
OUT
TO
TV
VHF/UHF/CATV
VIDEOR-AUDIO-L
OUT
IN
OUT
CH3 CH4
IN
Turn off power or unplug VCR
before making any connections.
Back Panel of
Typical Cable Box
CH3 CH4
CABLE
OUT IN
Back Panel of Stereo VCR Back Panel of Typical TV
IN IN
OUTOUT
R
L
AUDIO VIDEO
VHF/UHF/CATV
ANT
IN
Cable TV
Wall Jack
This cable is provided
with your VCR.
ANT
IN
OUT
TO
TV
VHF/UHF/CATV
VIDEOR-AUDIO-L
OUT
IN
OUT
CH3 CH4
IN
Turn off power or unplug VCR
before making any connections.
Page 5
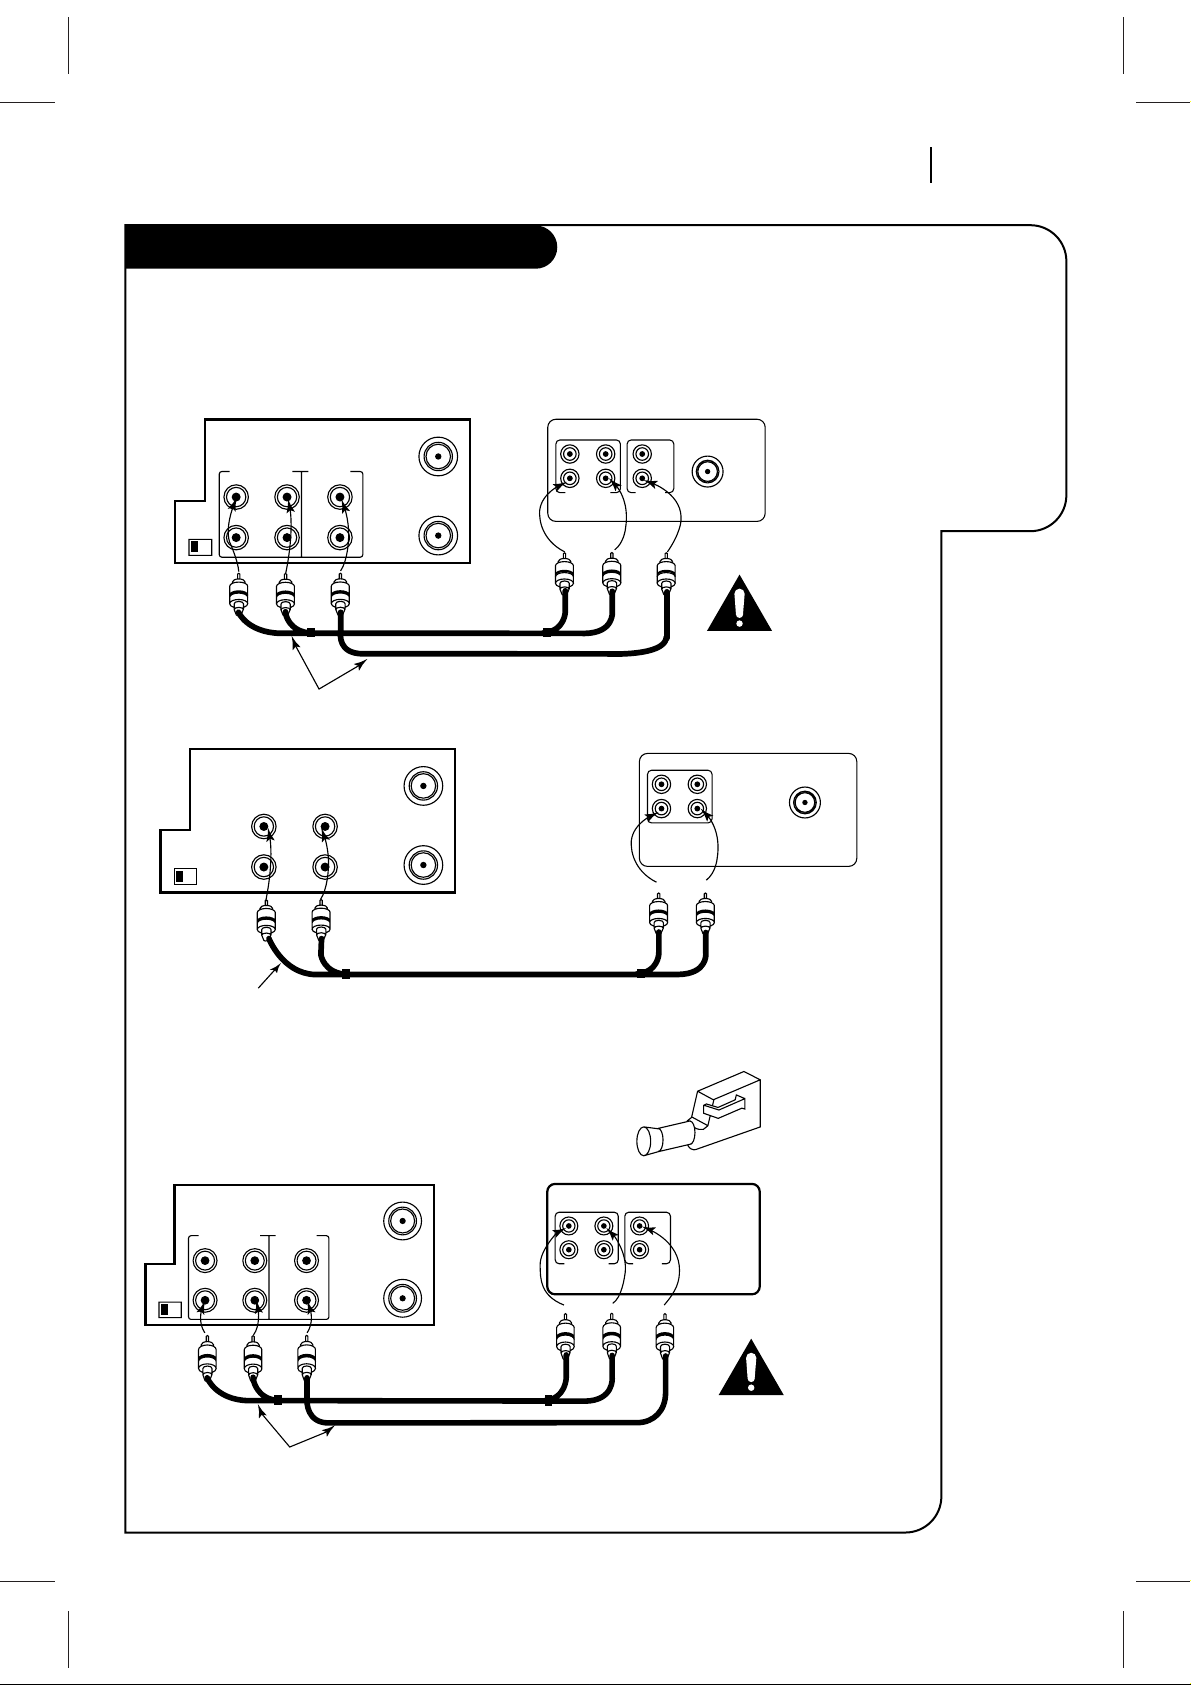
INSTALLATION PAGE 5
Optional
connections
for your VCR
Connections for your VCR
Audio/Video (A/V) Connections to TV
Use A/V connections for a better picture.
Accessory Audio/Video (A/V) Connections to VCR
CH3 CH4
OUT
IN
OUT
IN
R-AUDIO-L VIDEO
VHF/UHF/CATV
ANT
IN
Back Panel of Typical TV
ANT
IN
A/V cable is not provided with VCR.
ANT
IN
OUT
TO
TV
VHF/UHF/CATV
VIDEOAUDIO
OUT
IN
Back Panel of Monaural VCR
Back Panel of Stereo VCR
OUT
AUDIO VIDEO
IN
VHF/UHF/CATV
Back Panel of Typical Monaural TV
Note: If the back panel
on your TV is different,
refer to the TV's operating
guide.
A/V cable is not provided with VCR.
ANT
IN
OUT
TO
TV
VHF/UHF/CATV
VIDEOR-AUDIO-L
OUT
IN
OUT
CH3 CH4
IN
ANT
IN
OUT
TO
TV
VHF/UHF/CATV
VIDEOR-AUDIO-L
OUT
IN
OUT
CH3 CH4
IN
Back Panel of Stereo VCR
OUT
IN
OUT
IN
R-AUDIO-L VIDEO
Jack panel of Accessory
A/V cable is not provided with VCR.
Accessory
Component:
Another VCR,
Camcorder,
Video Camera,
Satellite Receiver,
Laser Disc Player
Turn off power
or unplug VCR
before making
any connections.
Turn off power
or unplug VCR
before making
any connections.
Page 6
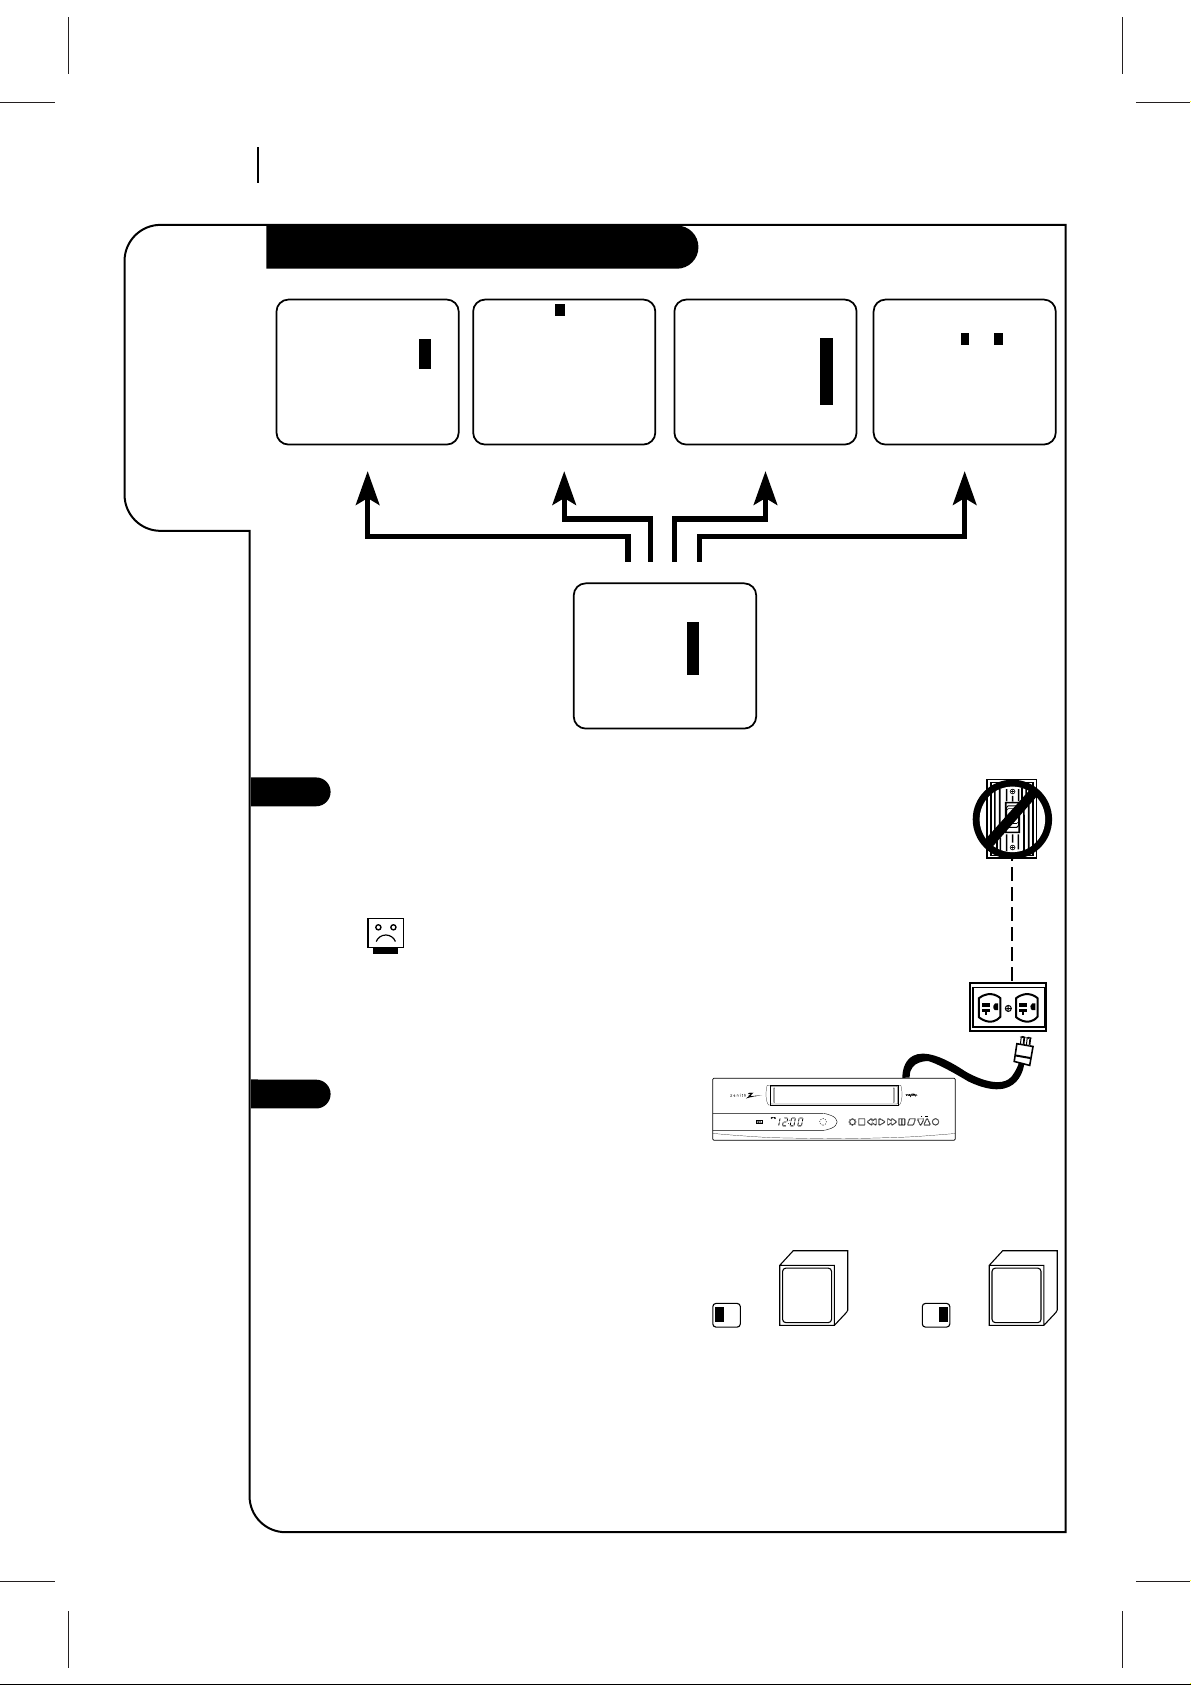
INSTALLATIONPAGE 6
Things you
must do
before you
can operate
your VCR
Before you operate your VCR
1
2
Press number keys
QUIT = exit
SpeakEZ
CLOCK : 1
TIMER : 2
SETUP : 3
AUDIO : 4
PROGRAM 1
MONTH :
DAY :
START :
STOP :
CHANNEL :
SPEED :
REPEAT :
(1-8) to select program
ENTER to adjust program
Press number keys
QUIT = exit
SETUP MENU
AUTO PROGRAM: 1
CH. ADD/DEL: 2
SOURCE: 3
ON-SCREEN DISPLAY: 4
LANGUAGE SELECT: 5
CLOCK
MAIN MENU
TIMER SETUP AUDIO
Press NUMBER (1, 2, 3, 4) button
Press number keys
then ENTER QUIT = exit
AUDIO MENU
SpeakEZ: ON 1 ON 2 OFF
PLAYBACK:
RECORD:
CLOCK MENU
AUTO CLOCK SET(ON): 1
MANUAL CLOCK SET : 2
Press number keys
QUIT = exit
Note:
Audio menu’s PLAYBACK and
RECORD options are available only
with stereo VCRs.
Connect the Power
(Required) Plug your VCR into an unswitched
120 Vac, 60 Hz household power outlet. Turn
on the VCR by pressing the POWER on the
remote or on the VCR’s front panel.
Do not plug the VCR into a switched
power outlet. Otherwise, when the
power is switched off, the VCR turns
off. You may then have to reset the
time and date, and reprogram operational features.
Set Position of the CH3/CH4 Switch
(Required) The CH3/CH4 switch on the VCR’s
back panel determines which channel the VCR
uses to send video signals to your TV. The TV
must be tuned to the same channel you set
with the CH3/CH4 switch to see tape playback and status displays from the VCR. To
determine which video channel provides the
best picture for your system, try the switch
in CH3 position and tune your TV to channel
3; then try the CH4 position and tune your
TV to channel 4.
For a test display, press TV/VCR on remote
repeatedly until the VCR indicator appears in
the VCR’s front panel display. Press MENU on
the remote to see the main menu.
TYPICAL ZENITH VCR
WALL
SWITCH
POWER
OUTLET
CH3 CH4
power stop/eject rew play f fwd pause sp/ep ch rec/itr
AM
VCR
PM
REC
TMR
Tune
TV to
Ch.3
OR
CH3 CH4
Tune
TV to
Ch.4
Page 7

INSTALLATION PAGE 7
Things you
must do
before you
can operate
your VCR
Before you operate your VCR
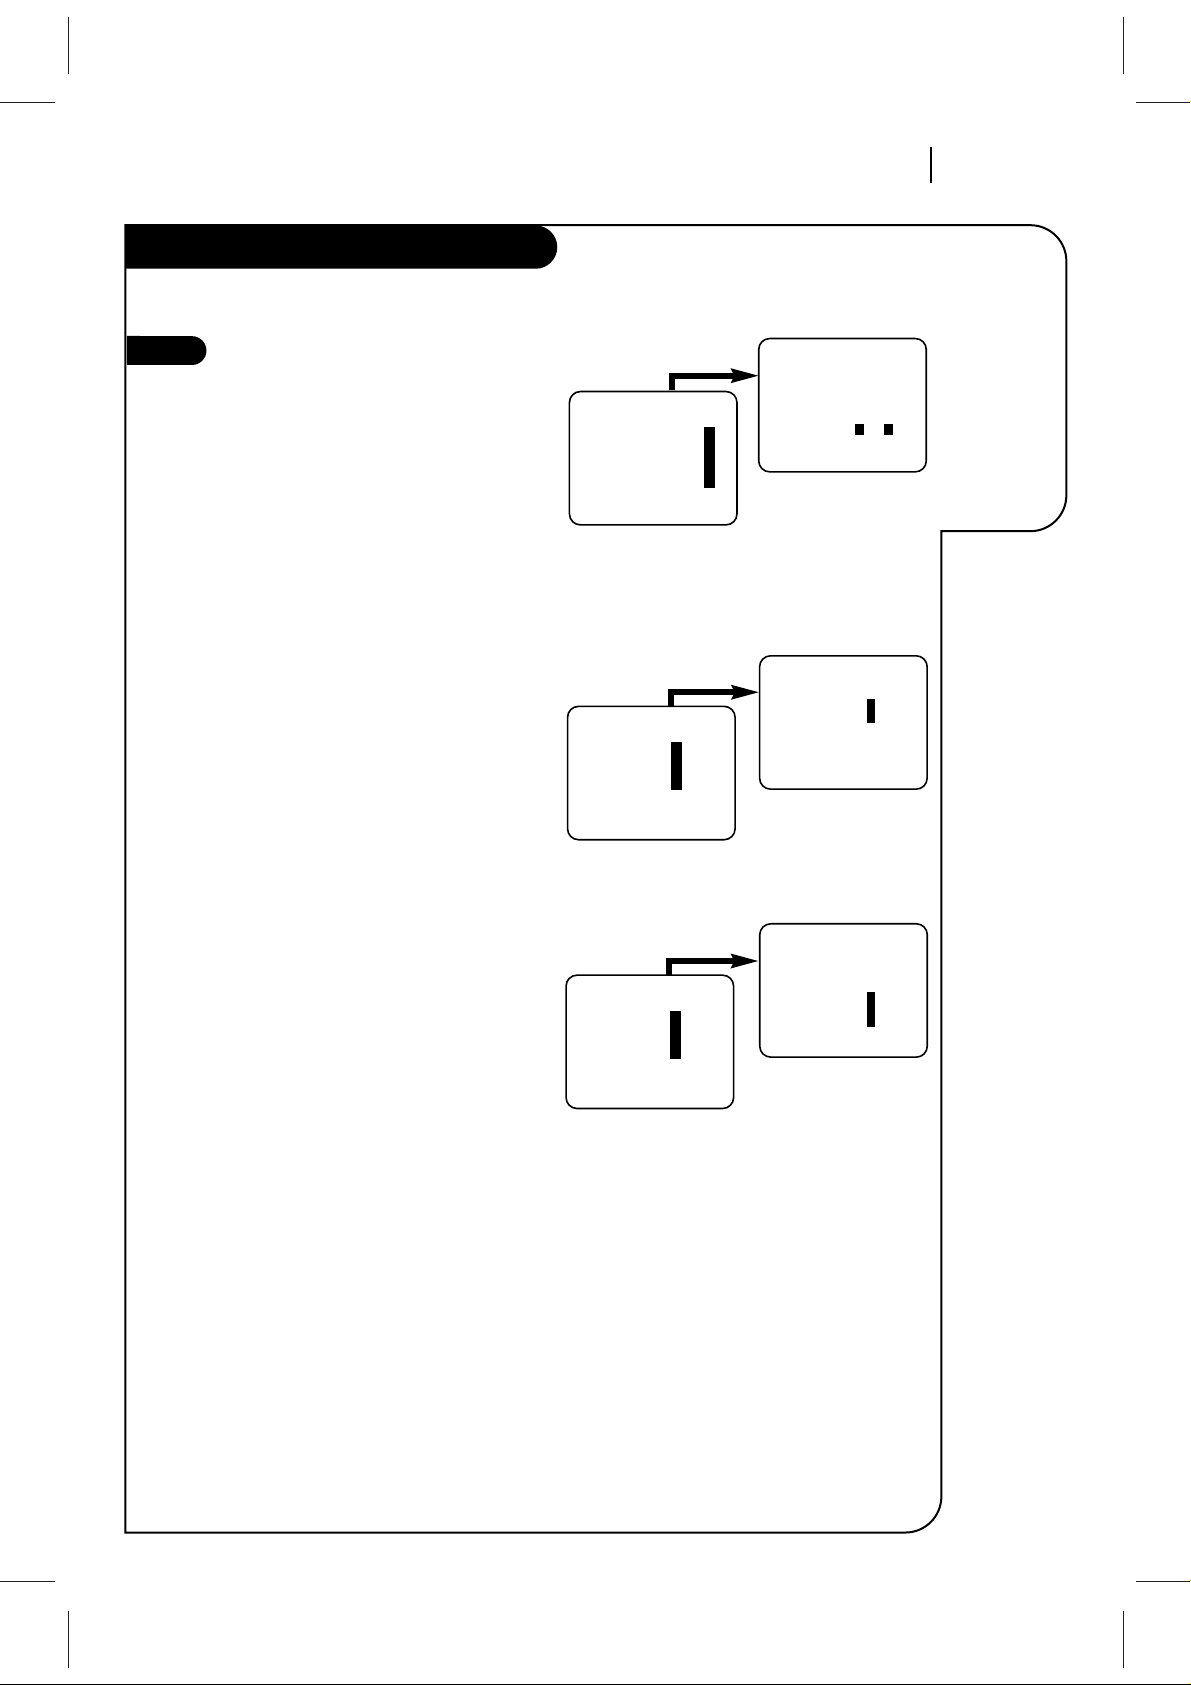
How to Access Menus
1. Press MENU to see Main Menu.
2. Press NUMBER (1, 2, 3, or 4) to see
desired sub menu to be used.
3. Press NUMBER to choose desired
option to be changed.
4. Press QUIT/CC to exit menu, or wait a
few minutes and the VCR returns to
normal operation.
Select SpeakEZ Function ON/OFF
A voice tells you how to use the features
in the menus if SpeakEZ is ON. (ON is
recommended.).
See the AUDIO Menu for details.
SpeakEZ only functions with
ENGLISH.
Select Language for VCR
Menus/Displays
(Optional) Select English, Spanish, or
French for VCR menus and status displays. See the LANGUAGE SELECT option
on the SETUP menu for details.
tv
dvd
cbl/
dbs
vcr
vcr+ sel
adj
rev fwd
power
play
stop
rew
f fwd
123
456
789
0
mute
program
cm skip
tv/vcr
tv/vcr
memorysp/ep
rec/itr
vol vol
ch
pause
menu
quit/cc
enter
123
456
789
0
menu
quit/cc
enter
ch
sel
Selects
VCR tuner
Chooses and
modifies options
Point remote toward VCR
SpeakEZ
CLOCK : 1
TIMER : 2
SETUP : 3
AUDIO : 4
Press number keys
QUIT = exit
Press number keys
then ENTER QUIT = exit
AUDIO MENU
SpeakEZ: ON 1 ON 2 OFF
PLAYBACK:
RECORD:
MAIN MENU
Press NUMBER
(1 or 2) to choose
ON or OFF
Press 4.
SETUP MENU
Press NUMBER (1, 2,
or 3) to select the
desired language
Press 5.
3
4
SETUP MENU
AUTO PROGRAM: 1
CH. ADD/DEL: 2
SOURCE: 3
ON-SCREEN DISPLAY: 4
LANGUAGE SELECT: 5
Press number keys
QUIT = exit
SETUP MENU
LANGUAGE SELECT : ENGLISH
1 ENGLISH 2 ESPAÑOL
3 FRANÇAIS
Press number keys
then ENTER QUIT = exit
Page 8
INSTALLATIONPAGE 8
Some things
you must do
and others
you may
want to do
before you
can operate
your VCR
Before you operate your VCR
Press number keys
QUIT = exit
SETUP MENU
AUTO PROGRAM: 1
CH. ADD/DEL: 2
SOURCE: 3
ON-SCREEN DISPLAY: 4
LANGUAGE SELECT: 5
Press number keys
then ENTER QUIT = exit
SETUP MENU
SOURCE: TUNER (TV)
1 TV 2 CATV
3 AUX
SETUP MENU
Press NUMBER
(1, 2, or 3) to select
the desired source
Press 3.
Set Date and Time for Clock
Set the clock in the VCR to the current
date and time. See CLOCK Menu for
details.
Your VCR also has an Auto-Clock Set
feature. See CLOCK Menu for details.
The Timer features will not
function unless the Clock has
been set.
Select Source for VCR
(Optional) Set the source of the VCR for
the type of program signal you have
connected to the ANT IN jack on the
back of the VCR. Choose TV if you have
an antenna connected to the VCR.
Choose CATV if you have a cable system
(with or without a cable box) connected
to the VCR. Choose AUX if you have an
accessory Audio/Video (A/V) connected
to the VCR.
See SOURCE option on SETUP menu for
details.
Use Auto Program to Find
Channels
(Required) Use AUTO PROGRAM to find
active channels in your broadcast area.
AUTO PROGRAM stores the active channels that you can access by using the
Channel Up/Down arrows. See AUTO
PROGRAM on the SETUP Menu for
details.
Use CH. ADD/DEL to Create
Favorite Channels
(Optional) Use CH. ADD/DEL to change
the list of active channels found when
using AUTO PROGRAM, so you can list
your favorites. See CH.ADD/DEL on the
SETUP Menu for details.
6
Press number keys
QUIT = exit
SETUP MENU
AUTO PROGRAM: 1
CH. ADD/DEL: 2
SOURCE: 3
ON-SCREEN DISPLAY: 4
LANGUAGE SELECT: 5
QUIT = exit
SETUP MENU
AUTO PROGRAM: SEARCHING
SETUP MENU
Press 1.
Press number keys
QUIT = exit
SETUP MENU
AUTO PROGRAM: 1
CH. ADD/DEL: 2
SOURCE: 3
ON-SCREEN DISPLAY: 4
LANGUAGE SELECT: 5
Press number keys
then ENTER QUIT = exit
SETUP MENU
CH. ADD/DEL: CH. 2 ADD
SETUP MENU
Press NUMBER
(0-9) then ENTER
Press 2.
7
8
5
CLOCK MENU
AUTO CLOCK SET(ON): 1
MANUAL CLOCK SET : 2
Press number keys
QUIT = exit
CLOCK MENU
MONTH : 1 JANUARY
DAY : 1 THU
YEAR : 1998
TIME : 12:00 PM
Press number keys
then ENTER QUIT = exit
CLOCK MENU
Press NUMBER
(0-9) then ENTER to
set date and time
Press 2.
Page 9
INSTALLATION PAGE 9
Things you
may want to
do before you
operate your
VCR.
Before you operate your VCR
9
Select Other Menu Options
Show or hide the VCR status on your
screen by using the ON-SCREEN DISPLAY
option on the SETUP menu. We recommend keeping this option ON. See the
SETUP menu for details.
If you have a stereo VCR, select the audio
format (HI-FI or NORMAL) to use when
you play a tape. We recommend setting
this option to HI-FI. See the PLAYBACK
MODE option on the AUDIO Menu for
details.
If you have a stereo VCR, select the audio
format (STEREO, MONO or SAP) to use
when recording. We recommend using
STEREO. See the RECORD MODE option on
the AUDIO Menu for details.
Press number keys
QUIT = exit
SETUP MENU
AUTO PROGRAM: 1
CH. ADD/DEL: 2
SOURCE: 3
ON-SCREEN DISPLAY: 4
LANGUAGE SELECT: 5
Press number keys
then ENTER QUIT = exit
SETUP MENU
ON-SCREEN DISPLAY: ON
1 ON 2 OFF
SETUP MENU
Press NUMBER (1 or 2)
to choose ON or OFF
Press 4.
SpeakEZ
CLOCK : 1
TIMER : 2
SETUP : 3
AUDIO : 4
Press number keys
QUIT = exit
Press number keys
then ENTER QUIT = exit
AUDIO MENU
SpeakEZ:
PLAYBACK: HI-FI 1 HI-FI
2 NORMAL
RECORD:
MAIN MENU
Press NUMBER (1 or 2)
to choose
HI-FI or NORMAL
Press 4.
SpeakEZ
CLOCK : 1
TIMER : 2
SETUP : 3
AUDIO : 4
Press number keys
QUIT = exit
Press number keys
then ENTER QUIT = exit
AUDIO MENU
SpeakEZ:
PLAYBACK:
RECORD: STEREO 1 STEREO
2 MONO
3 SAP
MAIN MENU
Press NUMBER
(1, 2 or 3) to choose
STEREO, MONO, or SAP
Press 4.
Page 10
INSTALLATIONPAGE 10
Before you
can record
programs
with VCR
Plus+®, you
must tell this
VCR the
PlusCode
TM
channels for
your area.
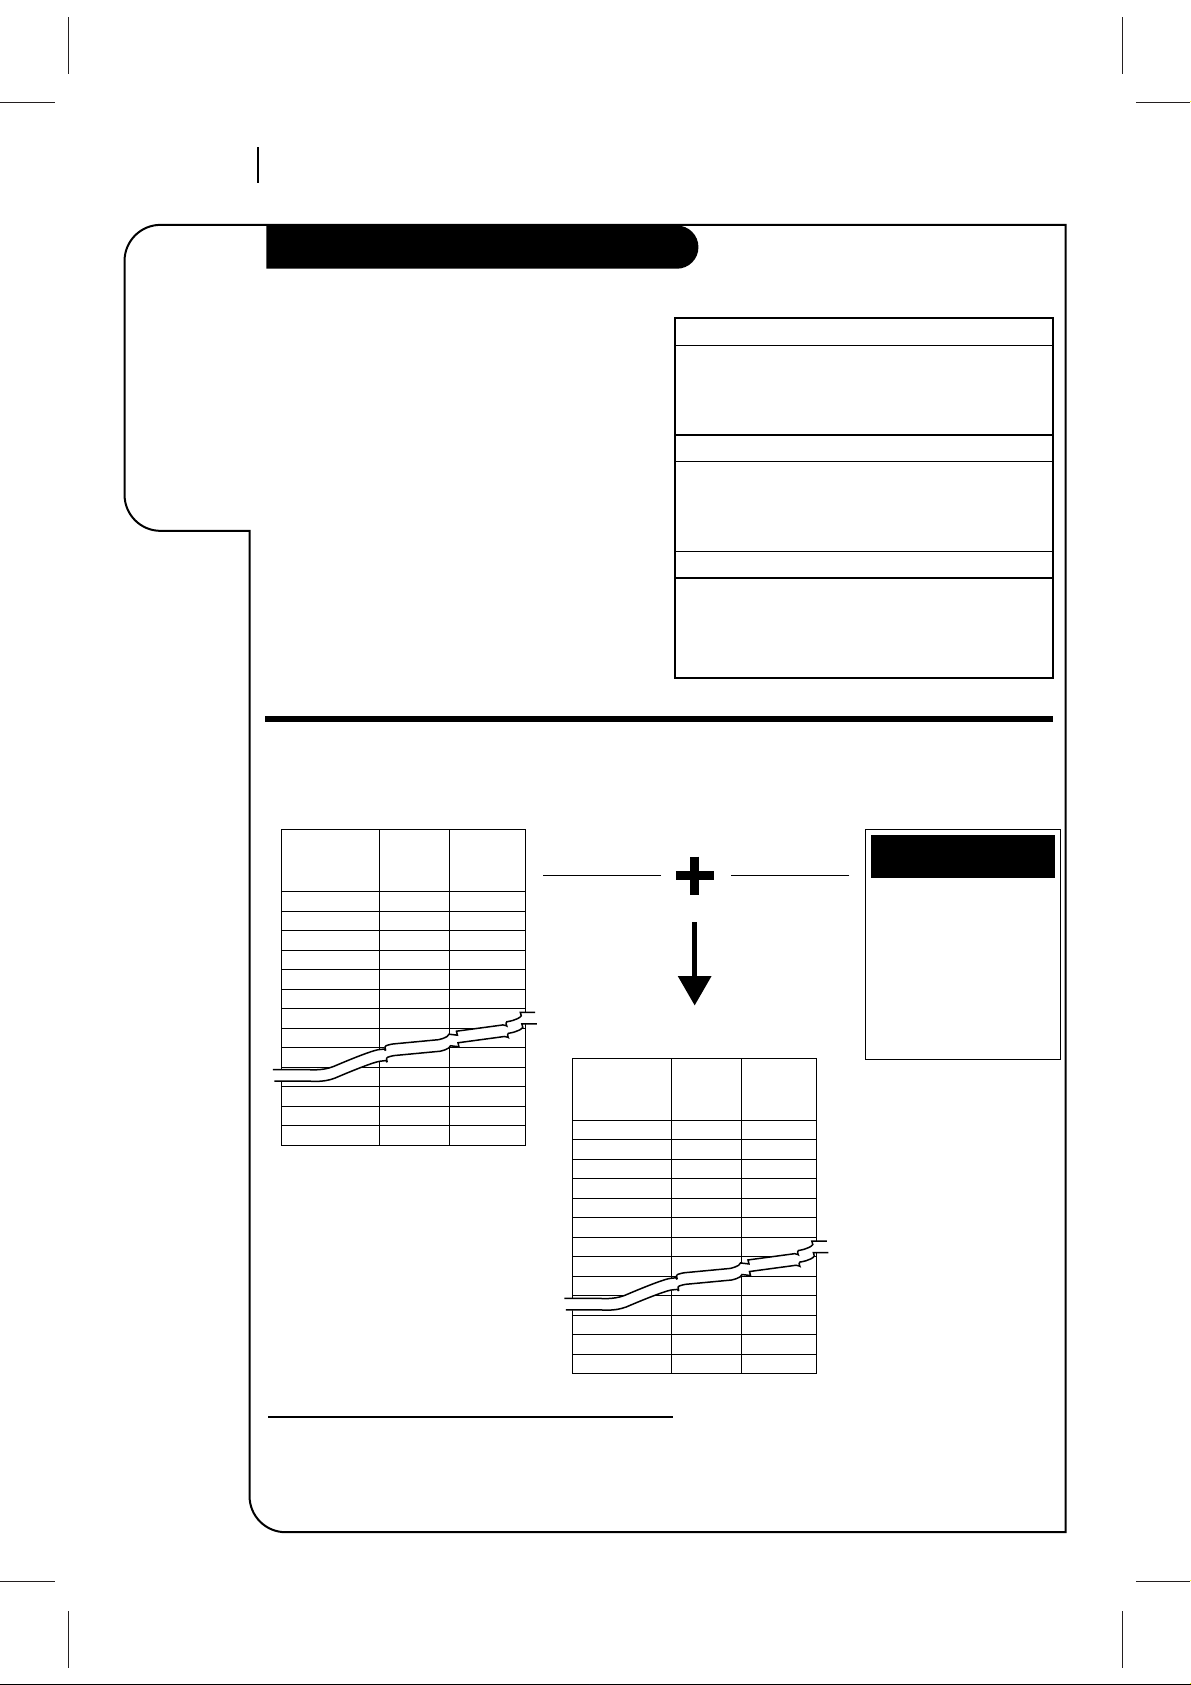
Setup for VCR Plus+® recording
Example of Completed Worksheet
VCR Plus+ and PlusCode are trademarks of Gemstar Development
Corporation. The VCR Plus+ system is manufactured under license
from Gemstar Development Corporation.
Introduction
These PlusCodeTMchannels must be mapped to the
active channels you found using AUTO PROGRAM
on the SETUP menu. An example of channel
mapping and a blank worksheet are provided for
your convenience. Check the TV schedule in your
local newspaper for the published PlusCode
TM
channels.
Note: The VCR PLUS+ system does not control the
cable box.
Channel Mapping Your VCR
PREPARATION (Already Done)
See “Before You Operate Your VCR” section.
1. Set Date and Time for Clock.
2. Select Tuning Band for VCR.
3. Use Auto Channel to find channels.
PRELIMINARY STEPS
1. Turn on VCR, TV, and cable box (if used).
2. Select TV (or CATV) for SOURCE on SETUP
menu.
3. Obtain listing of PlusCode channels.
CHANNEL MAPPING
1. Complete Channel Mapping Worksheet.
2. Press VCR+ on remote and follow all on-screen
instructions. Enter channels with Numbers.
Use ADJ (Left/Right) to erase (some models).
Channel found
via Auto Channel
(TV Ch/Cable Ch)
Network or
Station ID
Network or
Station ID
Worksheet with Channels Found
via Auto Channel
Published
PlusCode
Channel
(VCR+ Ch)
TM
2 CBS
5 NBC
7 ABC
9WB
11 PBS
20 PBS
23 WFBT
26 WCIU
32 WFLD
38 WSNS
50 WPWR
60 HSN
66 WGBO
Channel found
via AutoChannel
(TV Ch/Cable Ch)
PlusCodes
Ch.2:WBBM (CBS) 2
Ch.5:WMAQ (NBC) 5
Ch.7:WLS (ABC) 6
Ch.9:WGN (WB) 8
Ch.11:WTTW (PBS) 11 &19
Ch.20:WYCC (PBS) 20
Ch.26:WCIU (Ind.) 26
Ch.32:WFLD (Fox) 32
Ch.38:WCFC (Ind.) 3
Ch.44:WSNS (Tel.) 4
Ch.50:WPWR (UPN) 42
Ch.66:WGBO (Uni.) 46
Completed Worksheet for Channel Mapping
Published List of PlusCode
Channels
Published
PlusCode
Channel
(VCR+ Ch)
TM
22CBS
55NBC
76ABC
98WB
11 11 & 19PBS
20 20PBS
23 – –WFBT
26 26WCIU
32 32WFLD
38 4WSNS
50 42WPWR
60 – –HSN
66 46WGBO
CHANNELS,
VCR PLUS+
TM
Page 11
INSTALLATION PAGE 11
Before you
can record
programs with
VCR Plus+®,
you must tell
this VCR the
PlusCode
TM
channels for
your area.
Setup for VCR Plus+® recording
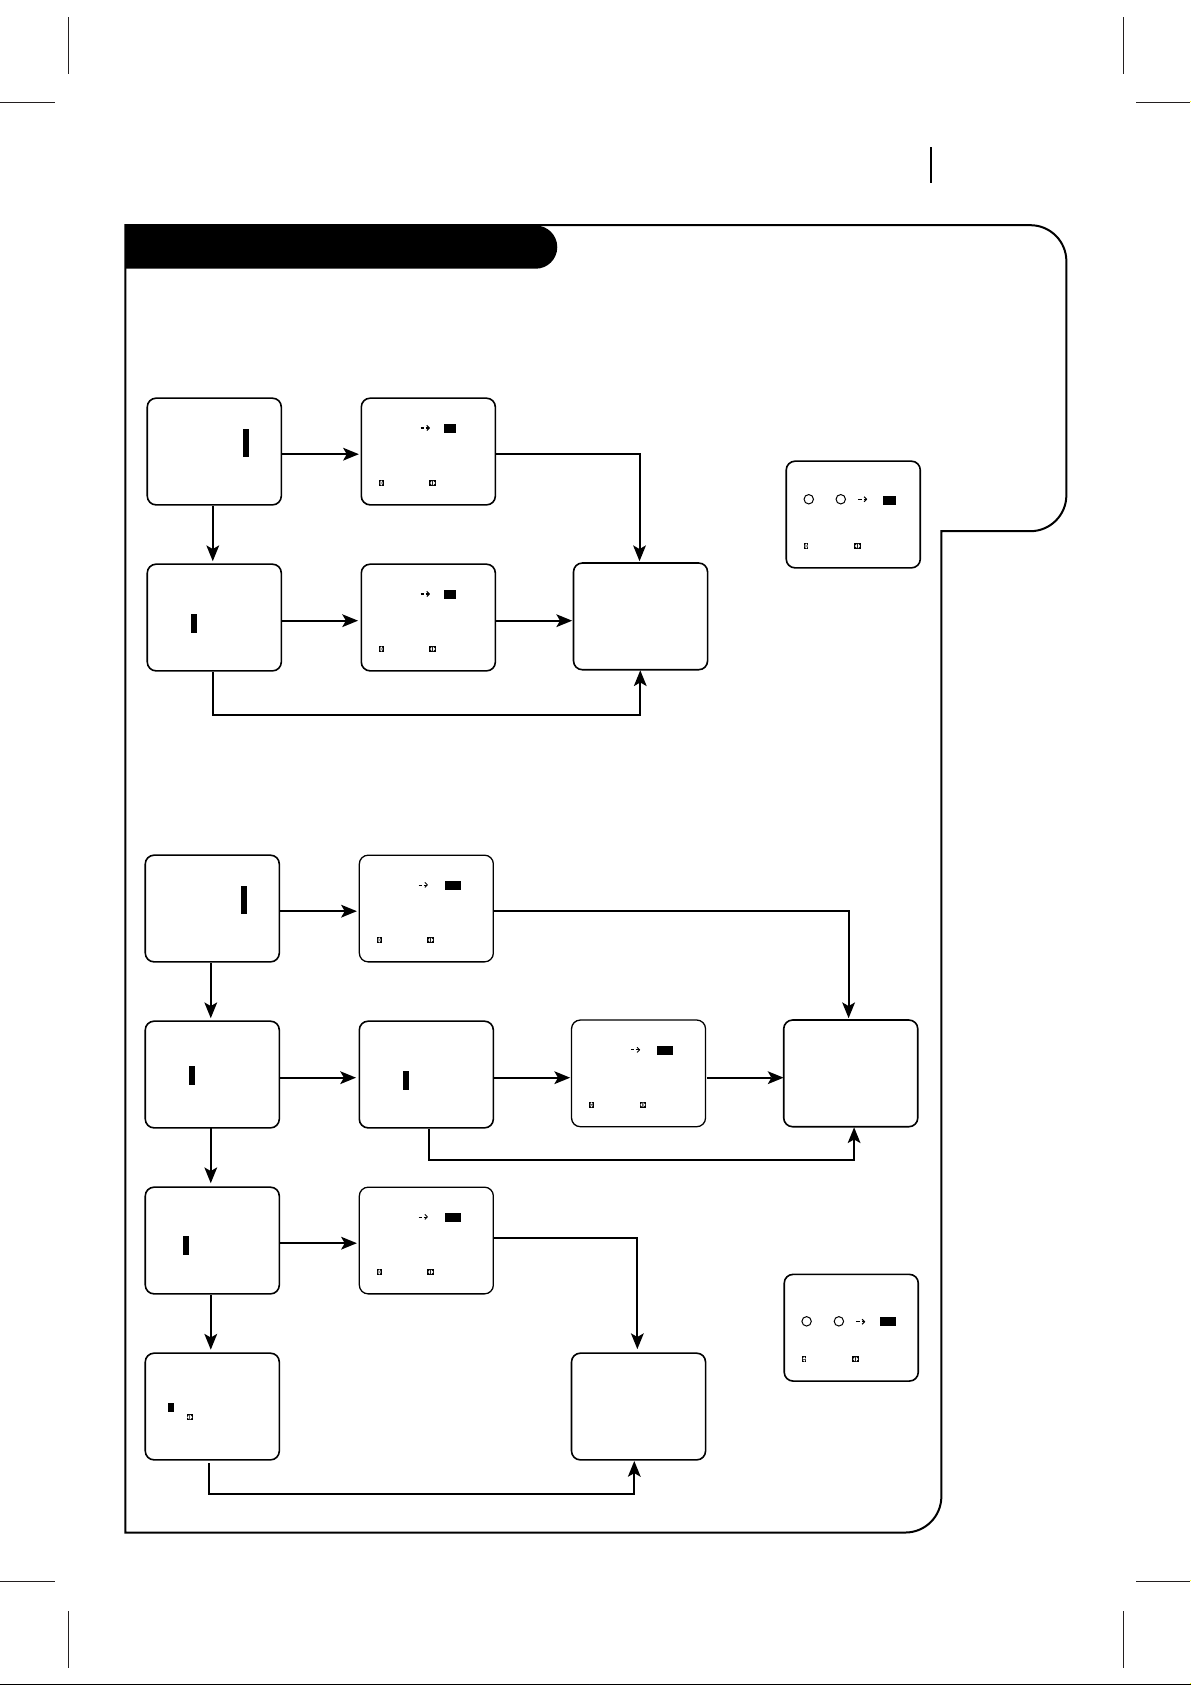
On-Screen Instructions for TV Tuning Band
On-Screen Instructions for CATV Tuning Band
VCR PLUS
VCR+ program: 1
Ch Map Setup: 2
Ch Map Review: 3
Press number keys
QUIT = exit
VCR PLUS
Setup complete
Are your channels on
TV the same as in TV
listing?
1 Yes
2 No
Press number keys
QUIT = exit
Channel Map
to select to adjust
QUIT=exit
TV Ch VCR+ Ch
2 - -
3- 4- 5- 6- 7- -
Channel Map
to select to adjust
QUIT=exit
TV Ch VCR+ Ch
2 - -
3- 4- 5- 6- 7- -
Double Map
to select to adjust
QUIT=exit
TV Ch VCR+Ch 2nd VCR+Ch
2 2 - 33 - -
4 4 - 5 5 - 6 6 - 7 7 - -
START
Press VCR+
on remote
Press 0000 to show
Double Map Screen
3-Review
2-Setup
1-Yes
2-No
QUIT
QUIT
Channel mapping a
second PlusCode
Channel for
TV channel 3.
TM
Are your channels on
TV the same as in TV
listing?
1 Yes
2 No
Press number keys
QUIT = exit
Do you have a Cable
Box or DBS receiver?
1 Yes
2 No
Press number keys
QUIT = exit
Is the Cable Box or
DBS receiver connected
to VCR ‘ANT IN’?
1 Yes
2 No
Press number keys
QUIT = exit
Enter your Cable Box
or DBS receiver
output channel:
-
(Use to erase)
Press number keys
then ENTER QUIT = exit
VCR PLUS
VCR+ program: 1
Ch Map Setup: 2
Ch Map Review: 3
Press number keys
QUIT = exit
VCR PLUS
Setup complete
VCR PLUS
Setup complete
START
Press VCR+
on remote
Press 0000 to show
Double Map Screen
3-Review
2-No
1-Yes
1-Yes
1-Yes
ENTER
2-Setup
2-No
QUIT
QUIT
2-No
QUIT
Channel mapping a
second PlusCode
Channel for Cable
channel 3.
TM
Double Map
to select to adjust
QUIT=exit
Cable VCR+Ch 2nd VCR+Ch
1 1 - - 2 2 - - 33 - - -
4 4 - - 5 5 - - 6 6 - - -
Channel Map
to select to adjust
QUIT=exit
Cable Ch VCR+ Ch
1 - - -
2 - - 3 - - 4 - - 5 - - 6 - - -
Channel Map
to select to adjust
QUIT=exit
Cable Ch VCR+ Ch
1 - - -
2 - - 3 - - 4 - - 5 - - 6 - - -
Channel Map
to select to adjust
QUIT=exit
Cable Ch VCR+ Ch
1 - - -
2 - - 3 - - 4 - - 5 - - 6 - - -
Page 12
INSTALLATIONPAGE 12
Before you
can record
programs
with VCR
Plus+®, you
must tell this
VCR the
PlusCode
TM
channels for
your area.
Setup for VCR Plus+® recording
Channel Mapping Worksheets
Channel found Network or Published
via Auto Channel Station ID PlusCode
TM
(TV Ch/Cable Ch) Channel (VCR+ Ch)
Channel found Network or Published
via Auto Channel Station ID PlusCode
TM
(TV Ch/Cable Ch) Channel (VCR+ Ch)
NOTE: Two PlusCodeTMchannel numbers may be listed f or certain networks or stations. Enter both
numbers on the worksheet. After you have “mapped” the first number, press 0000 to show the
Double Map menu. Then enter the second number next to the first one.
Page 13

CONTROLS AND DISPLAYS PAGE 13
Descriptions
of items you
need to know
to operate
your VCR.
Front Panel Diagram
Front Panel Controls
These controls perform basic VCR operations—some of them light up as you use them. The Remote
performs basic as well as advanced VCR operations.
power stop/eject rew play f fwd pause sp/ep ch rec/itr
VCR
REC
AM
PM
TMR
LED Clock Front Panel Indicators
POWER On/Off
Button
Cassette
Compartment
Channel Up/Down
Selector
Stop/Eject
Selector
PLAY, REW (Rewind),
F FWD (Fast Forward),
PAUSE Selector
LED Clock Front Panel
Display
Recording
Speed Selector
REC/ITR
(Instant Timer
Record) Selector
A Cassette is in the VCR
VCR is Recording
Clock Time
Time is PM
Time is AM
VCR is in timer recording
VCR functions are available and
channels are selected at VCR
Front Panel Display shows which VCR function you
are using. For example, when you press SP/EP, SP
or EP appears to indicate the tape speed. As you
change channels, the channel numbers appear. The
current time shows even while the VCR is off.
Other messages include:
AU Auxiliary channel is selected for viewing
equipment connected to the A u di o/Vi d eo jack
on the front or rear of the VCR.
EP Extended Play speed is selected.
SP Standard Play speed is selected.
-:-- Clock is not set.
Err Error: Turn VCR On and OFF to er ase “Err” mes-
sage. If it is not erased, take VCR to an
authorized repair center.
VCR
REC
AM
PM
TMR
Page 14

CONTROLS AND DISPLAYSPAGE 14
On-Screen
displays tell
you the
status of the
tape inserted
and VCR
functions.
VCR Status Display
The VCR Status Display appears on the TV when a
VCR function starts, like when you change a
channel or select a different VCR mode. For
example, pressing STOP while the VCR is in PLAY
mode shows STOP in the display. Press ENTER on
the remote at any time (except Special Effect
Playback mode; SLOW, STILL etc.) to see the Status
Display.
Note:
If the VCR Status Display does not appear on the
TV screen, check the ON-SCREEN DISPLAY option
on the SETUP menu. Select ON to see the display.
See “VCR Menu Operations” section for details.
VCR Status Display Options
When the Status Display appears, press ENTER
repeatedly to see abbreviated displays, as follows:
1. Press ENTER to see Status Display.
2. Press ENTER a second time to show only the
tape counter position.
3. Press ENTER a third time to show only the tape
time remaining.
4. Press ENTER repeatedly until all displays are
removed.
PLAY HI-FI VCR CH 11
SP ST/SAP
15 MON
7:17 AM M-1:35:45
M-1:35:45 REM 1:35
Current mode of operation
(STOP, PAUSE, RECORD, PLAY, etc.)
and audio format of tape, where
Play=HI-FI or NORMAL (No display)
Tape Speed
EP=Extended Play
LP=Long Play
SP=Standard Play
Current date, day, and time
Current CH (Channel) selected
by using tuner in VCR
Audio format of signal
received by VCR tuner:
STEREO, MONO or ST/SAP
Real-time tape counter
M = Counter Memory is active
– = Tape is rewound past index
mark.
1:35:45 = Length of tape (in time)
1 = 1 hour
35 = 35 minutes
45 = 45 seconds
Typical VCR Status Display
on TV
Tape Counter Position
Tape Time Remaining
VCR Status Displays
Page 15

OPERATION PAGE 15
A quick list
of all the buttons on your
remote control
and what
they do.
The Buttons on Your Remote
Installing Batteries
Be sure to install the batteries
provided with this remote. Match
positive (+) and negative (-) with
markings shown in battery compartment.
After installing batteries, the
remote resets to the following
brand codes:
TV = 100, CABLE = 300
NOTE: All VCR operations and menu
options can be accessed by using
the remote control.
ADJ (ADJUST Left/Right) — Changes status of
menu options. Adjusts tape playback tracking while
in VCR mode.
CH (Up/Down) — Changes favorite channel list.
Also selects AUX A/V input channel.
CM SKIP — Fast forwards picture search through
30 seconds of recording.
ENTER — Programs menu options and shows VCR
status display.
F FWD (Fast Forward)—Advances tape rapidly.
MEMORY — Returns real-time tape counter to
zero (M 0:00:00).
MENU — Shows main menu. Accesses Zenith TV
menus while in the TV mode.
MUTE — Press to turn off TV sound. Press again to
restore TV sound.
Numbers — Chooses channels and enters pro-
gramming information.
PAUSE — Pauses tape temporarily during playback
or record.
PLAY — Begins tape playback.
POWER — Turns VCR On and Off. Also turns VCR
Timer Off and On, if programmed.
PROGRAM — Programs rem ote with bran d cod es f or
your brand of TV and/or cable box (DBS)/ DVD.
QUIT/CC — Exits menu system. Selects closed
caption for some TVs while in TV mode.
REC/ITR — Begins tape recording.
REV ❚❚ FWD (Reverse/Forward) — Rotate Shuttle
Ring for variable-speed playback. Move Jog Wheel
for frame-by-frame playback.
REW (REWIND) — Rewinds tape to the beginning.
SEL (SELECT Up/Down) — Chooses on-screen
menu options.
SP/EP — Chooses tape recording speed.
STOP — Cancels playback or record modes.
TV/VCR — Switches source of TV picture between
TV channel and VCR channel selection. VCR functions are available in TV mode.
VCR/CBL(DBS)/TV/DVD — Selects operational
mode of remo t e.
VCR+ — Begin s VCR Plus+® setup an d accesses VCR
Plus+® recording.
VOL (VOLUME Up/Down) — Chang es volum e of TV.
Remote Control Operation
tv
dvd
cbl/
dbs
vcr
vcr+ sel
adj
rev fwd
power
play
stop
rew
f fwd
123
456
789
0
mute
program
cm skip
tv/vcrmemorysp/ep
rec/itr
vol vol
ch
pause
menu
quit/cc
enter
ch
sel
Select VCR Mode,
aim at VCR
Select TV Mode,
aim at TV
Select CBL(DBS) Mode,
aim at cable box or DBS
Select DVD Mode,
aim at Zenith DVD
POWER Button
MODE Selector
CBL
VCR/DBS/TV/DVD
power stop/eject rew play f fwd pause sp/ep ch rec/itr
VCR
REC
AM
PM
TMR
Selecting Mode of Operation
1. Slide VCR/CBL(DBS)/TV/DVD selector
to desired position for VCR, cable box
(DBS), TV, or DVD operation.
2. Press POWER to turn On/Off the
selected equipment.
3. Refer to instructions with TV, cable
box (DBS) and/or DVD for operation.
AAA
AAA
Page 16

OPERATIONPAGE 16
Your remote
control
operates the
common
features of
most, but not
all, models
and brands of
IR (infrared)
controlled TVs
and cable
converters
(DBS).
Programming Your Remote
Some functions of your products may not be controlled by
this remote. In such cases, use the original remote control
furnished with the product.
If you are using Zenith products, the remote comes
programmed for the most commonly used codes. For other
brands — or if your remote fails to control your Zenith
product — you will have to program the remote.
Follow these steps for each product:
1. Locate the three-digit code for your brand and type of
equipment in the code tables below.
2. Slide VCR/CBL(DBS)/TV/DVD to choose TV, cable box
(DBS) or DVD mode of operation.
3. Press and hold PROGRAM while entering the brand code
for your equipment.
4. Enter the three-digit brand code and then release
PROGRAM. If your equipment does not work, repeat steps
3 and 4, or try a different brand code.
5. Write down the code that operates your equipment.
TV , CATV , DBS
Note: DVD mode is operated only with Zenith DVD.
tv
dvd
cbl/
dbs
vcr
vcr+ sel
adj
rev fwd
power
play
stop
rew
f fwd
123
456
789
0
mute
program
cm skip
tv/vcrmemorysp/ep
rec/itr
vol vol
ch
pause
menu
quit/cc
enter
ch
sel
Program Button
VCR/DBS/TV/DVD
Mode Selector
CBL
TV Codes by Brand
TV Brand Name Codes
Admiral 151, 152, 110, 144
Citizen 156, 157, 158, 160, 161, 162
Curtis Mathes 115, 130, 113, 118, 144, 151
Daewoo 145, 146, 147, 148, 149, 150
Daytron 130, 115
Emerson 110, 111, 115, 131, 140, 143
Fisher 116, 125
Funai 153, 154
General Electric 102, 118, 127, 128, 144, 151
Goldstar 115, 122, 130, 131, 133, 146
Hitachi 119, 131, 132
JCPenney 102, 115, 124, 130, 133
JVC 109, 141
KTV 115, 130, 131, 138
LXI 104, 116, 123, 124, 125, 131
Magnavox 100, 101, 106, 107, 109, 114
115,
121, 122, 130, 131, 133
MGA/Mitsubishi 103, 115, 130
Montgomery Wards 115, 129, 131, 103, 113, 121
NEC 115, 130
Panasonic 104, 122, 127, 128, 133, 163
Philco 115, 121, 122, 131, 130, 150
Philips 121, 122
Pioneer 134
Proscan 118, 144, 151
Quasar 127, 128
Radio Shack 110, 111, 129
RCA 118, 144, 151
Realistic 110, 111, 129
Samsung 104, 115, 130, 131
Sanyo 116, 125
Cable Converter Codes by Brand
Cable Decoder
Codes
Brand Name
Arccher 336
Cableview 336
Citizen 336
Curtis Mathes 317
Eagle 306, 307, 310
GE 353
Gemini 302, 328, 333
General Instrument 327, 328
Gobrand 336
Hamlin 314, 330, 331
Jerrold 323, 324, 325, 326, 329
Kale Vision 334
Macom 311, 312, 342
Magnavox 307, 310, 337, 338
NSC 332, 334
OAK 301, 321, 322
TV Codes by Brand
TV Brand Name Codes
Scott 115, 130
Sears 104, 116, 123, 124, 125, 131
Sharp 112, 129, 131, 139
Sony 105
Sylvania 106, 107, 115, 121, 122, 130
133
Symphonic 153, 154
Toshiba 104, 123, 124
Wards 102, 113, 114, 115, 121, 130
131
XR1000 155
Zenith 100, 101
DVD Code
Zenith Pre-programmed Zenith
exclusively.
Cable Converter Codes by Brand
Cable Decoder
Codes
Brand Name
Panasonic 313, 320
Paragon 300
Philips 306, 307, 308, 309, 310
Pioneer 318, 319
Pluser 336
RCA 318
Regal 310
Regency 304
Samsung 334
Scientific Atlanta 317, 347, 335, 354
Simarx 318, 327
Sprucer 318, 320, 327
Standard 334
Components
Stargate 318, 327, 328
Teleview 336
Texscan 303
Tocom 315, 316
Uniden 348
Unika 336
Universal 351, 352
Vid Tech 339
Video Way 349
Viewstar 306, 307, 310
Zenith 300, 305, 311
DBS Codes by Brand
DBS Brand Name
Codes
RCA 356
Sony 355
Page 17

OPERATION PAGE 17
Playback
Jog-Shuttle
Operation
(For Special
Video Effects)
Playback Jog-Shuttle operation
Shuttle Ring Operation
1. Press PAUSE for playback STILL mode.
2. Rotate shuttle ring toward FORWARD to advance
the tape, or toward REVERSE to r everse the tape.
How far you rotate and hold the shuttle ring
determines the speed at which the tape moves.
3. Release the shuttle ring to r eturn to STILL mod e .
4. Press PLAY to return to normal playback speed.
NOTES:
■ The Shuttle Ring may be used while in both PLAY
and STILL modes. When the Ring is released,
PLAY will resume at normal playback speed.
■ Some of the speeds given in the pictorial above
are not indicated in the VCR Status Display
shown on the TV.
■ Some video “noise” may be present in REV
(Reverse) mode.
■ Tapes recorded at SP (Standard Play) speed have
better quality special effects than tapes recorded at EP (Extended play) speed.
Jog Wheel Operation
1. Press PAUSE for playback STILL mode.
2. Move jog wheel with finger toward FWD to
advance tape frame-by-frame, or toward REV to
reverse tape frame-by-frame. Movement of the
jog wheel one “click” moves the tape by one
frame. H ow “f ast” you move th e jog wh eel determines how fast the frame-by-frame movement
occurs.
3. Press PLAY to return to normal playback speed.
NOTES:
■ Jog wheel cannot be used for special video
effects while the VCR is in play mode.
■ Tapes recorded at SP (Standard Play) speed have
better quality special effects than tapes recorded at EP (Extended Play) speed.
Move Jog Wheel for
frame-by-frame tape
playback—forward
or reverse. M ove
Wheel a small
amount for one
frame.
Jog wheel
Shuttle Ring
Rotate Shuttle
Ring for variable
speed adjust from
Slow to Jet Speed
Search in the
direction chosen
PLAY for normal
Playback speed
PAUSE for Still
Playback
Jog Wheel for
frame-by-frame
Shuttle Ring for
variable speed
Keys Used for
Special Effects
power
rew
pause
quit/cc
enter
123
456
789
0
cbl/
tv
vcr
dbs
play
stop
menu
ch
vol vol
ch
vcr+ sel
adj
rev fwd
dvd
f fwd
rec/itr
mute
program
cm skip
tv/vcrmemorysp/ep
sel
REVERSE FORWARDSTILL (Pause)
—Slow
—Play
—PlayX3
REV Search
REV Jet Search
rev fwd
rev fwd
Slow
Play
PlayX2
FWD Search
FWD Jet Search
Page 18

OPERATIONPAGE 18
Introducing
you to the
Main Menu
selections
Main Menu
Press number keys
QUIT = exit
SpeakEZ
CLOCK : 1
TIMER : 2
SETUP : 3
AUDIO : 4
PROGRAM 1
MONTH :
DAY :
START :
STOP :
CHANNEL :
SPEED :
REPEAT :
(1-8) to select program
ENTER to adjust program
Press number keys
QUIT = exit
SETUP MENU
AUTO PROGRAM: 1
CH. ADD/DEL: 2
SOURCE: 3
ON-SCREEN DISPLAY: 4
LANGUAGE SELECT: 5
CLOCK
MAIN MENU
TIMER SETUP AUDIO
Press NUMBER (1, 2, 3, 4) button
Press number keys
then ENTER QUIT = exit
AUDIO MENU
SpeakEZ: ON 1 ON 2 OFF
PLAYBACK:
RECORD:
CLOCK MENU
AUTO CLOCK SET(ON): 1
MANUAL CLOCK SET : 2
Press number keys
QUIT = exit
How to Access Menus
Menu operation is easy—just follow the instructions
shown at the bottom of the menu.
1. Press MENU to see main menu.
2. Press NUMBER (1, 2, 3, or 4) to see desired sub
menu to be used.
3. Press NUMBER to choose desired option to be
changed.
4. Press QUIT/CC to exit menu, or wait a few
minutes and the VCR returns to normal operation.
tv
dvd
cbl/
dbs
vcr
vcr+ sel
adj
rev fwd
power
play
stop
rew
f fwd
123
456
789
0
mute
program
cm skip
tv/vcr
tv/vcr
memorysp/ep
rec/itr
vol vol
ch
pause
menu
quit/cc
enter
123
456
789
0
menu
quit/cc
enter
ch
sel
Selects
VCR tuner
Chooses and
modifies options
Point remote toward VCR
Note:
Perform menu operations with the VCR and TV on,
and tune the TV to channel 3 or 4. The VCR must
also be in the VCR mode of operation. Press TV/VCR
repeatedly until VCR indicator appears in the front
panel.
Page 19

OPERATION PAGE 19
The Clock
Menu sets the
clock in VCR
to the current
time.
Clock Menu
The Clock Menu sets the clock in the VCR to the current
time. There are two options. AUTO and MANUAL
Auto Clock Set
AUTO automatically sets the clock in the VCR to the current
time and date. AUTO works only in areas where Data Service
(DS) signals are provided along with normal TV signals.
1. Press MENU to see Main Menu.
2. Press 1 to see Clock Menu on the Main Menu.
3. Press 1 to set the current time automatically on the
Clock Menu.
Notes:
We recommend that you set the clock using the MANUAL
method the first time you use your VCR. See MANUAL
option for details.
The clock must be set before you can record by using the
TIMER Menu.
Manual Clock Set
The CLOCK Menu sets the clock in the VCR to the current
date and time.
Notes:
The clock must be set before you can record by using the
TIMER menu.
You may have to reset the clock if a power outage lasts for
more than 3 seconds.
How to Set Clock
1. Press MENU to see Main Menu.
2. Press 1 to see clock options.
3. Press 2 to adjust your options.
4. Press the NUMBER (0~9) then ENTER to specify current
date and time.
5. Press QUIT/CC to exit the menu system.
CLOCK MENU
MONTH : 1 JANUARY
DAY : 1 THU
YEAR : 1998
TIME : 12:00 PM
Press number keys
then ENTER QUIT = exit
CLOCK MENU
AUTO CLOCK SET(ON): 1
MANUAL CLOCK SET : 2
Press number keys
QUIT = exit
Typical CLOCK Menu with
date and time settings
Page 20

OPERATIONPAGE 20
The TIMER
Menu tells
the VCR when
to record a
program on a
day and at a
time you
specify
Timer Menu
PROGRAM 1
MONTH : 7 JULY
DAY : 20 MON
START : 11:16 AM
STOP : 11:46 AM
CHANNEL : 20 TV
SPEED : EP
REPEAT : ONCE
(1-8) to select program
to erase press (0)
PROGRAM 1
MONTH : 7 JULY
DAY : 20 MON
START : 11:16 AM
STOP : 11:46 AM
CHANNEL : 20 TV
SPEED : EP
REPEAT : ONCE
(1-8) to select program
to erase press (0)
You can specify eight different events to be recorded in a one-year period.
How to Use Timer
1. Choose TIMER menu as described in “How to
Access Menus.”
2. Press the Numbers on the Remote as needed for
the items in the menu, then press ENTER.
3. Press QUIT/CC to exit the menu system.
Note:
Set the VCR in TIMER mode by pressing POWER to
turn off the VCR. The TMR indicator appears in the
front panel of the VCR.
You cannot operate the VCR manually while
it is recording. Pressing POWER stops the
recording.
To Erase a Program
1. Choose TIMER menu as described in “How to
Access Menus.”
2. Press NUMBER(1-8) to select desired PROGRAM to
be erased.
3. Press 0 to erase the program.
4. Press QUIT/CC to exit the menu system.
SpeakEZ
CLOCK : 1
TIMER : 2
SETUP : 3
AUDIO : 4
Press number keys
QUIT = exit
PROGRAM 1
MONTH :
DAY :
START :
STOP :
CHANNEL :
SPEED :
REPEAT :
(1-8) to select program
ENTER to adjust program
PROGRAM 8
MONTH :
DAY :
START :
STOP :
CHANNEL :
SPEED :
REPEAT :
(1-8) to select program
ENTER to adjust program
Press 2
Month of Recording
Day of Recording
Start Time of Recording
Stop Time of Recording
Channel of Recording
Speed of Recording
Frequency of Recording
Program Number
When highlighted, press NUMBER (1-
8) to choose program Number.
REPEAT OPTIONS
ONCE — Records once.
WEEKLY — Records once each week.
DAILY — Records one time each day,
Monday - Friday.
CHANNEL OPTIONS
To select an AUX channel, select the
next highest or lowest channel programmed in the VCR with the CHANNEL Up/Down arrows.
SPEED OPTIONS (SP or EP)
The SP mode determines how much
tape is left and switches speed from
SP to EP, if necessary, to complete
recording the program. There will be
some picture and sound distortion at
the point of the speed change.
Press 0 to erase program
Follow
these
steps
Page 21

OPERATION PAGE 21
The SETUP
Menu customizes the
VCR’s operation for your
particular
needs.
Setup Menu
Press number keys
QUIT = exit
SETUP MENU
AUTO PROGRAM: 1
CH. ADD/DEL: 2
SOURCE: 3
ON-SCREEN DISPLAY: 4
LANGUAGE SELECT: 5
Choose SETUP Menu as
described in “How to
Access Menus.”
AUTO PROGRAM Finds all active channels and stores them in the VCR’s memory for access
by Channel Up/Down. Press 1 to begin search.
CH. ADD/DEL Edits the channels found by AUTO PROGRAM. Use number keys followed by
ENTER to select the channel to be edited (e.g., to ADD channel 3, press 3
then ENTER). Press ENTER to ADD or DEL (Delete) channels to create your
own list of favorite channels.
SOURCE Selects TV, CATV, or AUX as the source of the program to watch or record.
Choose TV if you have an antenna connected to the VCR. Choose CATV if
you have a cable system (with or without a cable box) connected to the
VCR. Choose AUX if you want to see the program from accessory equipment, such as a camcorder, connected to the Audio/Video (A/V) IN jacks
on the VCR.
ON-SCREEN DISPLAY Selects whether or not you see VCR Status Displays on the TV.
LANGUAGE SELECT Selects English, Spanish or French for VCR menus and displays on the TV.
Page 22

OPERATIONPAGE 22
AUDIO Menu’s
PLAYBACK
and RECORD
options are
available only
with stereo
VCRs.
Audio Menu
SpeakEZ Turns SpeakEZ ON or OFF.
A voice tells you how to use the features you select in the menus if
SpeakEZ is ON. (ON is recommended.)
PLAYBACK Selects HI-FI or NORMAL for tape playback.
HI-FI (High Fidelity) provides stereo sound, if present on the tape, to the
left and right VCR AUDIO output jacks on the back of the VCR.
NORMAL provides monaural sound, regardless of the audio format present
on the tape.
RECORD Select the STEREO, MONO, or SAP for recording a program.
STEREO records sound from the left and right audio tracks in stereophonic
format.
MONO (Monaural) records sound in monaural format even if the program is
in stereo.
SAP records the Second Audio Program (SAP) track, if present, in addition
to the stereo audio tracks. SAP usually contains audio in another language.
The AUDIO Menu indicates
the audio format used
when recording or playing
a tape. Choose AUDIO
Menu as described in
“How to Access Menus.”
Press ENTER (and repeat)
to choose items in the
menu (some models).
Press number keys
then ENTER QUIT = exit
AUDIO MENU
SpeakEZ: ON 1 ON 2 OFF
PLAYBACK:
RECORD:
Page 23

OPERATION PAGE 23
This page
shows a
typical video
system and
explains how
to select
channels.
Watching TV Through the VCR
Selecting Channels when the VCR is OFF
1. Turn TV on.
2. Select channel you’d like to watch at the TV. If
you have a cable box, select channel 3 or 4 at
the TV. Selects cable box channels at the cable
box.
Selecting Channels at the TV when VCR is
ON
1. Turn TV and VCR on.
2. Place VCR in TV mode by pressing TV/VCR on
the remote repeatedly until the VCR indicator
disappears from the VCR front panel.
3. Select channel you’d like to watch at the TV. If
you have a cable box, select channel 3 or 4 at
the TV. Select cable box channels at the cable
box.
Selecting Channels at the VCR when VCR is
ON
1. Turn TV and VCR on.
2. Place VCR in VCR mode by pressing TV/VCR on
remote repeatedly until the VCR indicator
appears in the VCR front panel.
3. Select channels 3 or 4 at the TV. If you have
connected your VCR to the TV’s A/V input
jacks, select the A/V source at the TV for a
better picture.
4. Select the channel you’d like to watch at the
VCR. If you have a cable box, select channel 3
or 4 at the VCR. Select cable box channels at
the cable box.
IN OUT
Audio/Video Output to TV
VCR Output to TV
(Channel 3 or 4 when
VCR is on and TV/VCR
is in VCR position)
CH3 CH4
Cable Box
Output
to VCR
From
Cable- TV
System
Direct Cable
All-Channel
Antenna
Cable TV
Wall Jack
Typical
Cable Box
OUT
VHF/UHF/CATV
IN
AUDIO
OUT
VIDEO
OUT
RL
34
CHANNEL
Zenith Stereo VCR
VHF-UHF
CABLE IN
VIDEOINAUDIO
IN
RL
Zenith TV
Or
Or
Page 24

OPERATIONPAGE 24
This page
describes how
to connect a
camcorder to
your VCR.
Camcorder Connected to VCR
Select AUX for Viewing an Audio/Video
source like a Camcorder
1. With TV and VCR on, place VCR in VCR mode by
pressing TV/VCR on the remote (and repeat) until
the VCR indicator appears in the VCR’s front panel.
2. Select channel 3 (or 4) on the TV. Note: If your TV
has A/V jacks, you may get a better picture if you
connect your VCR there. (Then, select the A/V
source on the TV.)
3. At the VCR, Channel Down lower than the lowest
channel (or Channel Up above the highest) to
select “AUX” Or, you may—
Choose the SETUP menu as described in “How to
Access Menus.”
Press 3 for the SETUP menu’s SOURCE item.
Press 3 for AUX, then ENTER. (Press QUIT/CC to
exit.)
Turn off power or unplug VCR
before making any connections.
Press number keys
then ENTER QUIT = exit
SETUP MENU
SOURCE: TUNER (TV)
1 TV 2 CATV
3 AUX
Press 3 to select AUX
SOURCE Shows the program source—TV, CATV, or AUX—selected for the VCR to receive.
TUNER The VCR is using its Tuner to receive programs from an antenna or cable.
TV Selects programs for the VCR from a rooftop-type antenna.
CATV Selects programs for the VCR from Cable TV.
AUX Selects programs for the VCR from the R-AUDIO-L—VIDEO IN jacks (where you may have
connected your camcorder).
Items in the Menu
Back Panel of Stereo VCR
ANT
VIDEOR-AUDIO-L
OUT
OUT
CH3 CH4
IN
IN
A/V cable is not provided with VCR.
IN
VHF/UHF/CATV
OUT
TO
TV
Page 25

OPERATION PAGE 25
This page
explains the
basics of
playing tapes
in your VCR.
Playing Tapes
Automatic Playback (No Safety Tab)
1. Tape playback begins automatically, if the safety tab is removed from the cassette case. For
example, most rental movies have no safety
tab. Simply insert the prerecorded VHS cassette
into the VCR. Power turns on and playback
begins.
2. Select the channel 3 or 4 at the TV. Or, select
the TV’s AUX (Auxiliary) source to see the
picture, if you are using the A/V jacks.
Manual Playback (Has Safety Tab)
1. Press POWER to turn VCR on.
2. Insert a prerecorded VHS cassette into the VCR.
3. Press PLAY to begin playback.
4. Select the channel 3 or 4 at the TV. Or, select
the TV’s AUX (Auxiliary) source to see the
picture, if you are using the A/V jacks.
Unloading the Cassette from the VCR
1. Press STOP if the tape is playing.
2. Press STOP/EJECT at the VCR until the cassette
is ejected.
Note:
This VCR records only in SP and EP speeds. Your
VCR sets the playback speed automatically to the
speed used to record the tape.
(Continued on next page)
VHS Cassette Playback/Record Times
Cassette SP LP EP
Length (Standard Play) (Long Play) (Extended Play)
T-30 30 Minutes 1 Hour 1 Hour,
30 Minutes
T-60 1 Hour 2 Hours 3 Hours
T-120 2 Hours 4 Hours 6 Hours
T-160 2 Hours, 5 Hours, 8 Hours
40 Minutes 20 Minutes
tv
dvd
cbl/
dbs
vcr
vcr+ sel
adj
rev fwd
power
play
stop
rew
f fwd
123
456
789
0
mute
program
cm skip
tv/vcrmemorysp/ep
rec/itr
vol vol
ch
pause
menu
quit/cc
enter
ch
sel
POWER
PLAY
STOP
TV/VCR
power stop/eject play
VCR’s Controls
Cassette
Safety Tab
Shown in
Place
Page 26

OPERATIONPAGE 26
This page
explains how
to use the
remote to
play tapes on
your VCR.
Playing Tapes
Auto/Manual Tracking Adjustment
Your VCR adjusts tracking automatically when
you play a tape. If the tape was recorded on
a different VCR, streaks (video noise) may
appear. While the tape is playing, press
ADJ. (
F/G
) to adjust the tracking manually.
Real-Time Tape Counter
Press ENTER twice to keep the tape counter
on the TV screen. Press ENTER repeatedly to
remove all displays. The counter resets to
0:00:00 when you insert a cassette or when a
tape is rewound to its beginning.
Pause/Forward/Reverse Slow-Motion
Video
(While in play mode) Press PAUSE for still
video. Press PAUSE again, and follow
on-screen instructions for Forward or Reverse
slow motion. Press F FWD or REW to control
slow speed during slow motion. Press PLAY to
resume normal tape playing.
Note: When the reverse slow mode continues
for more than 30 secondes, the VCR will automatically change to play mode.
Tape Rewind and Fast Forward
(While in Stop mode) Press and release REW
or F FWD (Fast Forward), as desired. Press
STOP when tape reaches desired location.
Reverse/Forward Search
(While in Play mode) Press and release REW or
F FWD, as desired. Press PLAY to resume
normal tape playing.
CM Skip (Commercial Skip)
(While in play mode) Pressing CM SKIP on the
remote skips commercials or other program
material. Pressing 1, 2, 3, or 4 times skips
30, 60, 90, or 120 seconds, respectively. CM
SKIP skips a full 120 seconds of commercials
in a few seconds, then resumes normal playback.
tv
dvd
cbl/
dbs
vcr
vcr+ sel
adj
rev fwd
power
play
stop
rew
f fwd
123
456
789
0
mute
program
cm skip
tv/vcrmemorysp/ep
rec/itr
vol vol
ch
pause
menu
quit/cc
enter
ch
sel
POWER
PLAY
REW (Rewind)
PAUSE
ENTER
F FWD
(Fast Forward)
STOP
CM SKIP
ADJUST
(
F/G
)
Page 27

OPERATION PAGE 27
Recording
what you are
watching
on TV.
Instant Recording
Options You Can Use While Recording
Instant recording lets you record until you reach
the end of tape or you press STOP to stop recording.
1. Turn TV and VCR on.
2. Place VCR in VCR mode by pressing TV/VCR on
the remote repeatedly until the VCR indicator
appears in the VCR front panel.
3. Select channel 3 or 4 at the TV. If you have
connected your VCR to the TV’s A/V input jacks,
select the A/V source at the TV for a better picture.
4. Select the channel to be watched and recorded
at the VCR. If you have a cable box, select the
cable box output channel (usually 3 or 4) at the
VCR. Select cable box channels at the cable box.
5. Insert a VHS cassette tape into the VCR.
6. Press SP/EP to select recording speed, if
desired. Recording speed is always SP, unless
you select EP.
7. Press REC/ITR until recording begins. REC indicator appears in the VCR front panel. Recording
continues until you reach the end of the tape,
or until you press STOP to stop recording.
Instant Recording Instant Timer Recording
(until end of tape) (Preset recording times)
PAUSE – ST OP or STOP/EJECT –
Momentarily Pauses Stops and exits recording
recording. Press PAUSE mode.
again to resume recording.
STOP or STOP/EJECT –
Stops and exits recording
mode.
power
sp/ep
power stop/ejectsp/ep rec/itr
tv/vcr
rec/itr
Remote's Controls
VCR's Controls
stop
Page 28

OPERATIONPAGE 28
Recording
using preset
time periods.
Instant Recording
Presses of
Display
Preset Time For
REC/ITR Recording
1 (Press) Current Time Until end of tape
2 0:30 30 minutes
3 1:00 1 hours
4 1:30 1 hour and
30 minutes
5 2:00 2 hours
...
...
...
9 4:00 4 hours
10 No display normal recording
Preset Time Periods for ITR Recording.
Note:
Preset recording time counts down until the recording time is over.
Instant (attended) Timer Recording (ITR) lets you
record where you record for a specific preset time
period, instead of recording until the end of tape is
reached. For example, you can record a 30-minute
show using the preset time period.
Turn TV and VCR on.
Place VCR in VCR mode by pressing
TV/VCR on the remote repeatedly until
the VCR indicator appears in the VCR
front panel.
Select channel 3 or 4 at the TV. If you
have connected your VCR to the TV’s
A/V input jacks, select the A/V source
at the TV for a better picture.
Select the channel to be watched and
recorded at the VCR. If you have a
cable box, select the cable box output
channel (usually 3 or 4) at the VCR.
Select cable box channels at the cable
box.
Insert a VHS cassette tape into the
VCR.
Press SP/EP to select recording speed,
if desired. Recording speed is always
SP, unless you select EP.
Press REC/ITR until recording begins.
The REC indicator appears in the VCR
front panel. Recording continues until
you reach the end of the tape, or until
you press STOP to stop recording.
Press REC/ITR repeatedly to select a
preset recording time period. Each subsequent press of REC/ITR increases the
recording time by 30 minutes until you
reach a maximum of 4 hours.
2
3
4
1
5
6
7
8
Note: The SP mode determines how much tape
is left and switches speed from SP to EP, if
necessary, to complete recording the program.
There will be some picture and sound distortion
at the point of the speed change.
power
sp/ep
power stop/ejectsp/ep rec/itr
tv/vcr
rec/itr
Remote's Controls
VCR's Controls
stop
Page 29

OPERATION PAGE 29
Recording one
show while
watching
another.
Instant Recording
Note:
If you have a cable box connected to your VCR,
you cannot record one show and watch another.
Choose the show you wish to record using the
VCR’s channel selector. Choose the show you wish
to watch using the TV’s channel selector.
Turn TV and VCR on.
Place VCR in VCR mode by pressing
TV/VCR on the remote repeatedly until
the VCR indicator appears in the VCR
front panel.
Select channel 3 or 4 at the TV. If you
have connected your VCR to the TV’s
A/V input jacks, select the A/V source
at the TV for a better picture.
Select the channel to be watched and
recorded at the VCR. If you have a
cable box, select the cable box output
channel (usually 3 or 4) at the VCR.
Select cable box channels at the cable
box.
Insert a VHS cassette tape into the
VCR.
Press SP/EP to select recording speed,
if desired. Recording speed is always
SP, unless you select EP.
Press REC/ITR until recording begins.
REC indicator appears in the VCR front
panel. Recording continues until you
reach the end of the tape, or until you
press STOP to stop recording.
Place VCR in TV mode by pressing
TV/VCR on remote to turn off VCR
indicator in the VCR front panel.
Select the show you wish to watch
using the TV’s channel selector.
Note:
To return to the show you’re recording, select
channel 3 or 4 at the TV. Place the VCR in the VCR
mode by pressing TV/VCR on the remote to show
the VCR indicator in the VCR’s front panel.
Options You Can Use While Recording
2
3
4
1
5
6
7
8
9
Instant Recording
(until end of tape)
PAUSE –
Momentarily pauses recording. Press PAUSE
again to resume recording.
STOP or STOP/EJECT – Stops and exits
recording mode.
power
sp/ep
power stop/ejectsp/ep rec/itr
tv/vcr
rec/itr
Remote's Controls
VCR's Controls
stop
Page 30

OPERATIONPAGE 30
This page
explains how
to use the
timer so that
you can
record while
you are away.
Recording While You’re Away
Timer-controlled recording lets you record shows
unattended. Pick a day and time up to one year in
advance. The show may be recorded once or on
multiple days. You can schedule up to eight
different events into the PROGRAM TIMER for
recording, as long as no events overlap in the
same time period.
Turn TV and VCR on.
Place VCR in VCR mode by pressing
TV/VCR on the remote repeatedly until
the VCR indicator appears in the VCR
front panel.
Select channel 3 or 4 at the TV.
Insert a VHS cassette tape into the
VCR.
Program events to be recorded with the
Timer by following the procedure in the
TIMER MENU section. If you have a
cable box, select channel 3 or 4 (at
the VCR) as the channel to be recorded. Keep your cable box on when using
the Timer to record.
Enable the Timer by pressing POWER to
turn off the VCR. The TMR indicator
appears in the VCR front panel to indicate the VCR is in the TIMER recording
mode.
MAIN MENU
TIMER MENU
for Program 1
TIMER MENU
for Program 8
VCR TIMER
VCR OPERATION
POWER STATUS
On Off
Off On (or set)
Disables timer-controlled
recording if an event is
Scheduled in the Timer. All
other VCR operations can
be used as desired.
Enables timer-controlled
recording if an event is
scheduled in the Timer. You
cannot be operate the VCR
manually while it is in
Timer Set mode. If you
have scheduled the Timer,
you’ll be recording at a
later time.
2
3
4
1
5
6
SpeakEZ
CLOCK : 1
TIMER : 2
SETUP : 3
AUDIO : 4
Press number keys
QUIT = exit
PROGRAM 1
MONTH :
DAY :
START :
STOP :
CHANNEL :
SPEED :
REPEAT :
(1-8) to select program
ENTER to adjust program
PROGRAM 8
MONTH :
DAY :
START :
STOP :
CHANNEL :
SPEED :
REPEAT :
(1-8) to select program
ENTER to adjust program
Press 2
VCR Operation with Timer Off or On
Page 31

OPERATION PAGE 31
Recording
With
PlusCode
TM
program
Numbers
VCR Plus+® recording
VCR Plus+®tapes for you automatically. Simply enter
the PlusCode
TM
number for your favorite show from
the TV listing, and your VCR does the rest. It turns
on at the proper time, selects the channel to be
recorded, and starts recording. You can record a
show once, or on a daily or weekly basis. You can
schedule up to eight different shows in the VCR
Plus+® recording system, as long as no show
overlaps another in the same time period.
Turn TV and VCR on.
Place VCR in VCR mode by pressing
TV/VCR on the remote repeatedly until
the VCR indicator appears in the VCR
front panel.
Select channel 3 or 4 at the TV.
Insert a VHS cassette tape into the VCR.
Program events to be recorded in the
VCR Plus+® system by following the
procedure shown when you press VCR+
on the remote.
Enable the VCR Plus+® timer by pressing
the POWER to turn off the VCR. The TMR
(TIMER) indicator appears in the VCR
front panel to indicate the VCR is in the
timer mode of recording.
Turn the VCR on after the recording is
made if you want to remove the message, TAPING DONE.
VCR PLUS MENU
VCR PlusCode
TM
Entry
TIMER MENU
VCR TIMER
VCR OPERATION
POWER STATUS
On Off
Off On (or set)
Disables timer-controlled
recording if an event is
Scheduled in the Timer. All
other VCR operations can
be used as desired.
Enables timer-controlled
recording if an event is
scheduled in the Timer. You
cannot be operate the VCR
manually while it is in
Timer Set mode. If you
have scheduled the Timer,
you’ll be recording at a
later time.
3
4
5
2
1
6
7
VCR PLUS
VCR+ program: 1
Ch Map Setup: 2
Ch Map Review: 3
Press number keys
QUIT = exit
Pluscode
- - - - - - - - -
Press number keys
then ENTER QUIT = exit
Enter Pluscode
from TV listing
(Use to erase)
PROGRAM 1
MONTH : 7 JULY
DAY : 26 MON
START : 11:16 AM
STOP : 11:46 AM
CHANNEL : 20 TV
SPEED : EP 1 EP 2 SP
REPEAT : ONCE
Press number keys
then ENTER QUIT = exit
Press 1
Enter PlusCode
VCR Operation with Timer Off or On
Sample TV Schedule Showing VCR Plus+® PlusCodeTMNumber
MIDNIGHT
12:00 9 In the Heat of the Night
Lana’s inherited home plays an
important part in a mob-related
real estate scam (Part 2 of 2)
(CC) (60 mins.) 52228
11 Tonight (R) 23624
26 Lauren Hutton and... Gabrielle
Reece. (30 mins.) 989402
32 I Love Lucy “Drafted” Lucy and
Ethel think their husbands have
been
drafted. (30 mins.) 529044
9
In the Heat of the Night
Lake Winahatchie (Part 2
of 2) 52228
Tonight
73624
L.Hutton
989402
Paid Prog
273353
Love Lucy
813995
Paid Prog
770841
Paid Prog
147599
Paid Prog
886976
Paid Prog
426518
Love Lucy
529044
Charlie Rose 16112
Fat Man In
France 79082
Paid Programming
44808
Paid Programming
51686
11
26
32
12:00 12:30 1:00 1:30
Page 32

TROUBLESHOOTINGPAGE 32
Some quick
and easy tips
to fixing
problems
yourself.
Troubleshooting
Before Calling for Service
Please refer to this chart before calling for service. First, turn on the TV and VCR. Select appropriate
input for the TV to receive the video signal from the VCR. You will probably use the Antenna In connection to the TV. Select channel 3 or 4 at the TV. Place the VCR in the VCR mode by pressing TV/VCR on
the remote repeatedly until VCR indicator appears in the VCR front panel. If you have a cable box, turn
it on and select channel 3 or 4 at the VCR.
Operating Problems
Observed Condition
No power to the VCR.
Remote does not function.
No picture appears on TV screen
from any VCR function.
VCR features do not function.
VCR does not respond to remote
functions or VCR keys.
Possible Cause
Power cord is not connected.
Batteries are weak.
You are too far away from the
VCR.
Remote may be at an awkward
angle.
Source for TV is not selected
properly.
TV/VCR mode for VCR is set to TV.
VCR is locked up
Probable Solution
Connect power cord.
Replace with new batteries.
Move closer to the VCR.
Avoid holding the remote at
sharp angle.
Set INPUT source on TV to
Audio/Video In, or tune TV to
Channel 3 or 4, as appropriate.
Press TV/VCR on remote repeatedly to choose VCR mode. VCR
indicator appears in VCR front
panel.
Disconnect VCR power cord for
three (3) seconds. Reset clock
and other features as necessary.
Playing Tapes (Playback) Problems
Observed Condition
Tape will not rewind or fast
forward.
Mechanical sound is audible
during playback.
Tape playback does not appear
on TV screen.
Video “noise” (horizontal
streaks) appear during normal
tape playing.
VCR Status Display flickers
when using STILL video during
tape playback.
Possible Cause
Tape is fully rewound or is at
its end.
Note: This is normal operating
sound from internal
mechanisms.
Source for TV is not selected
properly.
TV/VCR mode for VCR is set to
TV.
Tape is a rental or was recorded
on another VCR.
Tape heads are dirty.
Tape tracking needs to be
adjusted while in slow-motion
playback.
Probable Solution
No action necessary.
No action necessary.
Set Input source on TV to
Audio/Video In, or tune TV to
Channel 3 or 4, as appropriate.
Press TV/VCR repeatedly to
choose VCR mode. VCR indicator
appears in VCR front panel.
Use ADJ. (
F/G
) for ma nual
tracking adjustment while tape
is playing.
Clean video heads.
From STILL video mode, enable
slow-motion playback. Use
ADJ. (
F/G
) to adjust tracking
for best picture. Return to PLAY
mode, then press PAUSE for
STILL video.
Page 33

TROUBLESHOOTING PAGE 33
Some quick
and easy tips
to fixing
problems
yourself.
Troubleshooting
Recording Problems
Observed Condition
Camcorder image is not shown.
Camcorder image via A/V input
to VCR is not shown on TV
screen.
Timer recording is not possible.
TMR indicator appears after VCR
is turned off.
Possible Cause
Camcorder is off.
VCR SOURCE is not set to AUX.
Clock in VCR is not set to
correct time.
VCR is on which disables timer.
Timer has been programmed
incorrectly.
TMR indicator does not appear
after programming timer.
VCR is in Timer Recording mode.
Probable Solution
Turn camcorder on and operate
properly.
Use Channel Up/Down to select
AUX A/V input channel.
Set clock to correct time. See
CLOCK menu.
Turn VCR off to enable timer.
TMR indicator appears in the
VCR front panel.
Reprogram Timer. See TIMER
menu.
Reprogram Timer and turn VCR
off to enable timer.
This is normal indication that
the VCR is in TIMER mode. If
needed, disable TIMER by
turning VCR on.
Channel Tuning Problems
Observed Condition
Some channels are skipped over
when using Channel Up/Down.
Picture and sound are weak or
missing.
Possible Cause
Those channels were deleted
with the CH. ADD/DEL option.
Antenna or cables are loose.
Wrong SOURCE option is being
used.
Probable Solution
Use CH. ADD/DEL to restore
channels. See SETUP Menu for
details.
Tighten connections or replace
cable.
Try all SOURCE options. See
SETUP menu for details.
VCR Plus+® Recording Problems
Observed Condition
VCR records program on different
channel than channel specified.
Recorded wrong channel or no
channel with cable box.
Possible Cause
Channel Mapping was not
performed or is incorrect.
Cable box is not tuned to
channel you wanted to record.
Cable box is not turned on.
VCR is not tuned to cable box
output channel 3 or 4.
Probable Solution
Channel map the VCR for your
area. See “Setup for VCR Plus+®
Recording” section.
Tune cable box to channel you
want to record. Keep cable box
turned on.
Turn on cable box and keep it
on.
Tune VCR to cable box output
channel.
Page 34

TROUBLESHOOTINGPAGE 34
Some quick
and easy tips
to fixing
problems
yourself.
Troubleshooting
Magnetic Field from Other Equipment
Keep the VCR and videotapes away from strong magnetic fields, such as those produced by a vacuum
cleaner, refrigerator, or air conditioner.
Video Head Cleaning
Your VCR automatically cleans the heads as it is used. However, after long periods of use, your video
heads may become clogged with accumulated dirt, causing distortion. When this occurs, use a do-ityourself wet-type head cleaning cassette available from your Zenith dealer.
Caution:
Do not use a dry-type head cleaning system. It may seriously damage the VCR and cassettes used in the
VCR. Snow, streaking in picture, and horizontal pulling indicate the need for professional video head
cleaning. See your Zenith approved service center for cleaning.
Cabinet Cleaning
Clean the outside surfaces of the VCR with a soft lint-free cloth as required. Use care not to scratch the
VCR during cleaning.
Moisture Condensation
Moisture condensation can occur:
• When the video recorder is moved from a cold
place to a warm place.
• Under extremely humid conditions
In locations where moisture condensation may
occur:
• Keep the power cord plugged into an AC outlet
and POWER On. This will help prevent condensation.
• When condensation has occurred, wait a few
hours for the VCR to dry before using it.
Stereo Audio Record and/or Playback Problems
Observed Condition
Stereo is not present.
Possible Cause
TV is not Stereo-compatible.
Program is not in stereo format.
VCR A/V Out jacks are not con-
nected to TV A/V In jacks.
VCR Audio/Video Out is not
selected for viewing at the TV.
VCR AUDIO RECORD mode is set
to SAP or MONAURAL.
Probable Solution
No action is possible.
No action is possible.
Make A/V connections. Stereo is
available only via A/V output
from VCR.
Select AUX or A/V source as TV
input.
Set VCR AUDIO RECORD mode to
Stereo. See AUDIO Menu.
Page 35

INDEX PAGE 35
Find what you
want quickly.
INDEX
FEATURE. . . . . . . . . . . . . . . . . . . . . . . PAGE
Audio Menu. . . . . . . . . . . . . . . . . . . . . . . . . . . . . . . . . . . . . . 22
Auto Channel Search . . . . . . . . . . . . . . . . . . . . . . . . . . . . . . 8, 21
Connections . . . . . . . . . . . . . . . . . . . . . . . . . . . . . . . . . . 4-5, 23
Ch. Add/Del. . . . . . . . . . . . . . . . . . . . . . . . . . . . . . . . . . . . 8, 21
Clock Set . . . . . . . . . . . . . . . . . . . . . . . . . . . . . . . . . . . . . 8, 19
Features Chart . . . . . . . . . . . . . . . . . . . . . . . . . . . . . . . . . . . . . 3
Front Panel Diagram . . . . . . . . . . . . . . . . . . . . . . . . . . . . . . . . 13
Instant Recording . . . . . . . . . . . . . . . . . . . . . . . . . . . . . . . 27-29
Language Menu . . . . . . . . . . . . . . . . . . . . . . . . . . . . . . . . . . . 21
Main Menu . . . . . . . . . . . . . . . . . . . . . . . . . . . . . . . . . . . . . . 18
Maintenance . . . . . . . . . . . . . . . . . . . . . . . . . . . . . . . . . . . . . 34
Playback Jog-Shuttle Operation. . . . . . . . . . . . . . . . . . . . . . . . . 17
Playing Tapes . . . . . . . . . . . . . . . . . . . . . . . . . . . . . . . . . . 25-26
Remote Control . . . . . . . . . . . . . . . . . . . . . . . . . . . . . . . . . 15-16
Safety Information . . . . . . . . . . . . . . . . . . . . . . . . . . . . . . . . . . 2
Setup for VCR Plus+® Recording . . . . . . . . . . . . . . . . . . . . . . 10-12
Setup Menu. . . . . . . . . . . . . . . . . . . . . . . . . . . . . . . . . . . . . . 21
SpeakEZ Function. . . . . . . . . . . . . . . . . . . . . . . . . . . . . . . . . . . 7
Timer Menu . . . . . . . . . . . . . . . . . . . . . . . . . . . . . . . . . . . . . . 20
Timer-Controlled Recording. . . . . . . . . . . . . . . . . . . . . . . . . . . . 30
Troubleshooting . . . . . . . . . . . . . . . . . . . . . . . . . . . . . . . . . 32-34
VCR Plus+® Recording . . . . . . . . . . . . . . . . . . . . . . . . . . . . . . . 31
VCR Status Displays . . . . . . . . . . . . . . . . . . . . . . . . . . . . . . . . 14
Warranty. . . . . . . . . . . . . . . . . . . . . . . . . . . . . . . . . . . . . . . . 40
Watching TV . . . . . . . . . . . . . . . . . . . . . . . . . . . . . . . . . . . . . 23
Page 36

NOTESPAGE 36
Use this page
to makes
notes.
Notes
Page 37

NOTES PAGE 37
Use this page
to makes
notes.
Notes
Page 38

NOTESPAGE 38
Use this page
to makes
notes.
Notes
Page 39

VRS418
VRS428
VRS418
VRS428
VRS418
VRS428
Printed in Korea
Zenith Part No. 206-3439
GS#3835RM0024Q
Issue O
Printed in Korea
Zenith Part No. 206-3439
GS#3835RM0024Q
Issue O
Printed in Indeonesia
Zenith Part No. 206-3439
GS#3835RM0024R
Issue O
Printed in Indonesia
Zenith Part No. 206-3439
GS#3835RM0024R
Issue O
 Loading...