

Zenith VRB421 Owner’s Manual
machine number I VRB211 VRB411 VRB412 VRB421
Y STAR® Partm
has determined
NERGYSTAR®
operating guide / warranty
WARNING:
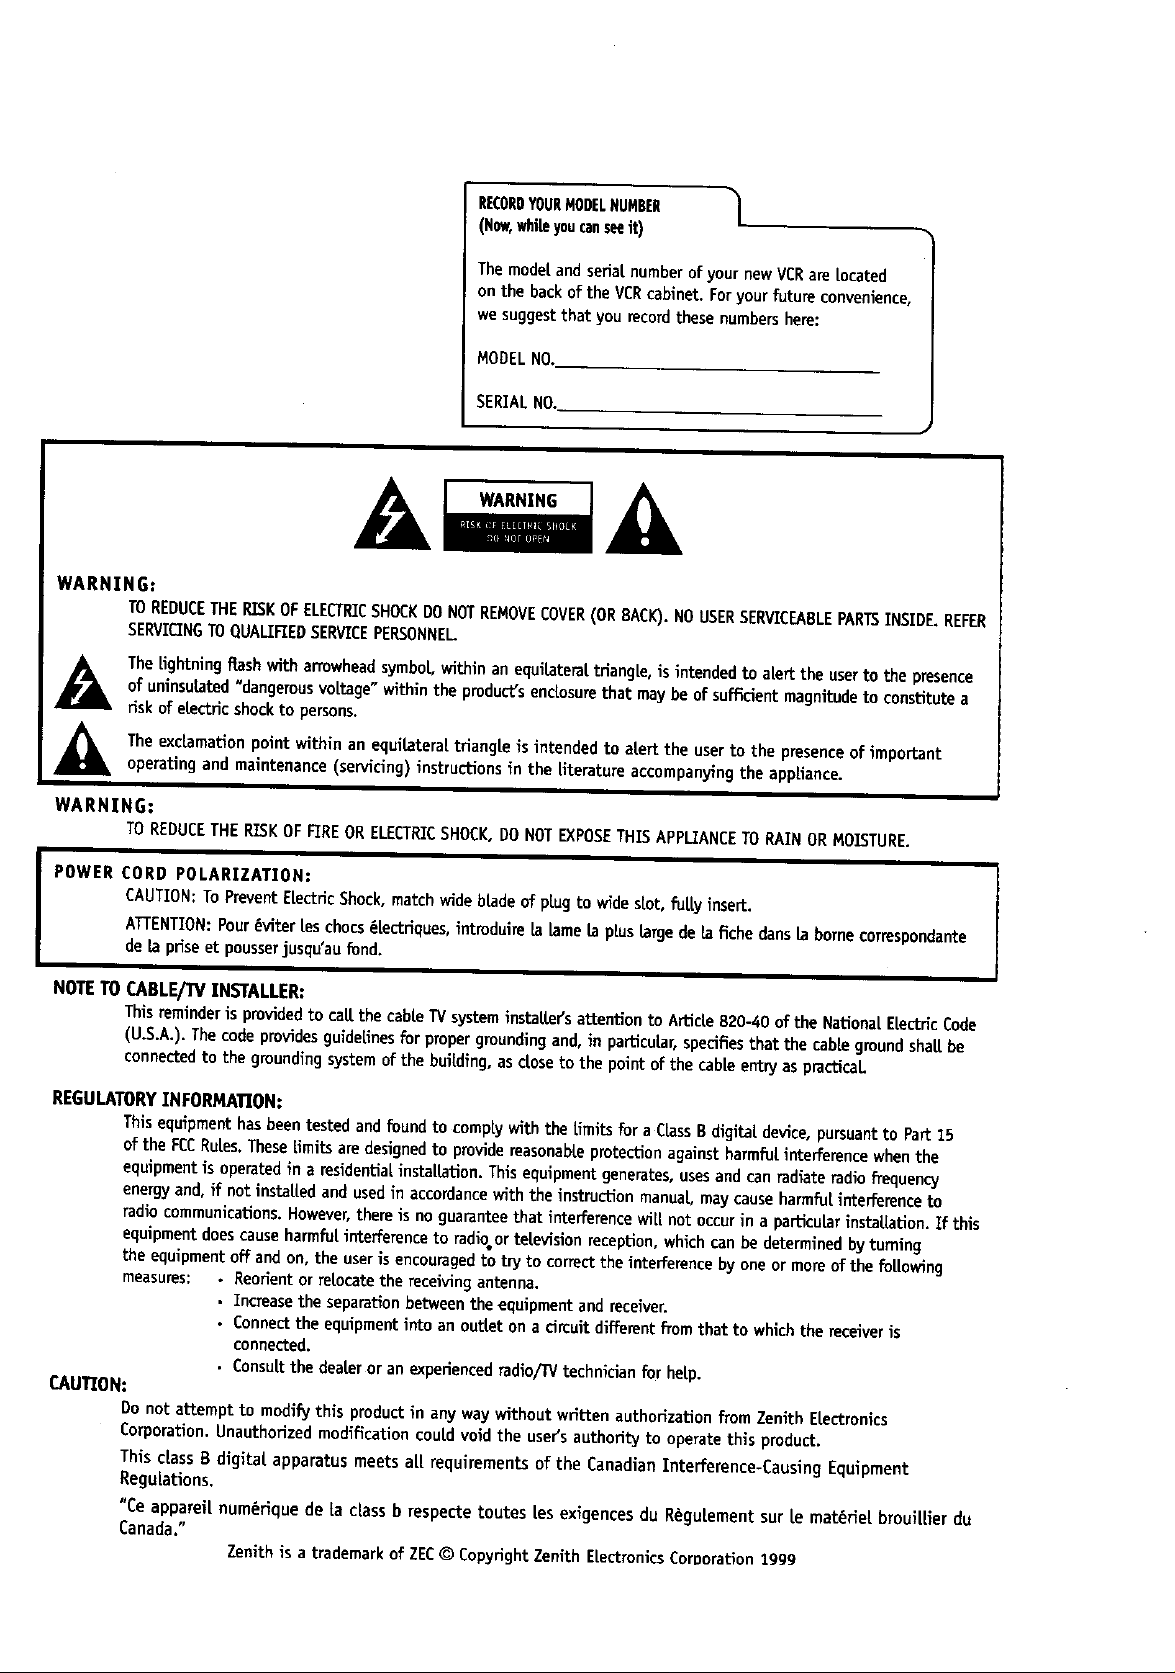
RECORDYOURMODELNUMBER |
(Now,whiteyoucanseeit)
/
The modelandserialnumberofyour new VCRareLocated
onthe backofthe VCRcabinet.Foryourfuture convenience,
wesuggestthat yourecordthese numbershere:
MODEL NO.
SERIALNO.
TOREDUCETHERISKOFELECTRICSHOCKDONOTREMOVECOVER(ORBACK).NOUSERSERVICEABLEPARTSINSIDE. REFER
SERVICINGTO QUALIFIEDSERVICEPERSONNEL
The Lightningflashwitharrowheadsymbol withinan equilateral,triangle,isintendedtoa[erttheusertothepresence
ofuninsulated"dangerousvoltage"withintheproduct'senclosurethatmay be ofsufficientmagnitudetoconstitutea
riskofelectricshockto persons.
The exclamationpoint within an equiLateraLtriangle is intended to alert the user to the presenceof important
operatingand maintenance(servicing) instructions in the Uteratureaccompanyingthe appliance.
WARNING:
TOREDUCETHERISKOF FIREOR ELECTRICSHOCK,DONOTEXPOSETHISAPPLIANCETORAINOR MOISTURE,
CAUTION:ToPreventELectricShock,matchwide blade of plug to wide slot, fu[[yinsert.
I POWER CORD POLARIZATION:
NOTE TO CABLE/_/INSTALLER:
REGULATORY INFORMATION:
_J,U110N:
ATTENTION:Pour_viterLeschocs_tectriques,intrudui_etaLametaplusLa_jede tafichedens_ bornecorrespondante
delapriseetpousserjusqu'aufond.
ThisreminderisprovidedtocartthecableIV systeminstatter'sattentiontoArticLe820-40oftheNationalEtecb'icCode
(U.S.A.).Thecodeprovidesguide[inesforpropergroundingand,inparticular,specifiesthatthecabLegroundshaLLbe
connectedto thegroundingsystemofthebuilding,asclosetothepointofthecableentryaspractical
This equipment has been tested and found to comply with the limits for a CLassB digital device, pursuant to Part 15
of the FCCRuLes. These Emits are designed to provide reasonable protection against harmfot interference when the
equipment is operated in a residential, installation. This equipment generates, usesand can radiate radio frequency
energy and, if not installed and used in accordance with the instruction manual may cause harmful interference te
radio communications. However, there is no guarantee that interference wii[ not occur in a particular instaLLation. If this
equipment does cause harmfo[ interference to radio or te[evision reception, which can be determined by turning
the equipment off and on, the user is encouraged to try to correct the interference by one or more of the following
measures: • Reorient or relocate the receiving antenna.
• Increase the separation between the equipment and receiver.
• Connect the equipment into an outlet on a circuit different from that to which the receiver is
connected.
• ConsuLtthe dealer or an experienced radio/TV technician for help.
Do not attempt to modify this product in any way without written authorization from Zenith ELectronics
Corporation.Unauthorizedmodificationcould voidthe user'sauthori_ to operatethisproduct.
Thisclass B digital,apparatus meets a[[requirements of the Canadian Interference-CausingEquipment
Regul`ations.
"Ce apparei[num_rique de [a classb respectetoutes [esexigences du R_gu[ement sur [e materielbroui[[ierdu
Canada."
Zenithisa trademark of ZEC © CopyrightZenith EiectronlcsCornoratlon1999

SAFETY TIPS {
Thesesimple precautionswiLLt_lp ensure that you get many yearsof safe enjoyment fromyour new product.
1,
Read Instructions
Readall ofthe safetyand operatinginstructions before
operatingthe product.
20
Retain |n$'croctlons
Keep all safety and operating instructions for future
reference.
3. Heed Warnings
Followwarningson the product and in the operating
guide.
4. FollowInstructions
Followaft operaUngand use instructions.
5°
CLeaning
Unplugthisproductfromthe waltoutletbefore
cleaning.Do notuse Liquidcleanersoraerosolcleaners.
Usea damp clothforcleaning.
6. Attachments
Do not useattachments not recommendedby product
manufactureras they maycausehazards.
7. Water and Moisture
Do not use this productnearwater--for example, near
a bathtub,washbowl,sink,orlaundrytub,ina wet
basement,or neara swimming pool
11. Power Sources
Operateproduct only fromtype of powersource
indicatedon markinglabeL.Ifyou atenotsureofthe
typeofpowersupplytoyourhome, consultyour
productdealer or Localpower company.Forproducts
intended to operatefrom battery poweror other
sources,referto manual.
12.Line-CordPolarization
Product is equippedwith a polarized aLternaUng-
currentfine plug (a plug having one blade widerthan
theother).Asa safetyfeature,this_ug willfitinto
poweroutletonlyoneway.Ifyou'reunableto insert
plugfullyintooutlet,tryreversingtheplug.Ifplug
stillfailsto fit,contactan electricianto replaceyour
obsoleteout[el.Do notdefeatsafetypurposeof
polarizedplug.
13. Power-Cord Protection
Routepower-supplycordsso
they are not likely to be
walkedon or pinchedby items
placeduponor againstthem,
paying particularattention to
cordsat plugs,convenience
receptacles, and the point
wherethey exit from product.
8, Accessories
Donot place producton an unstablecaR, stand,
tripod, bracket,or table. Productmayfal!., causing
seriousinjury to a child or adult, and seriousdamage
to the product.Use onlywith a cart, stand, tripod,
bracket,or table recommendedby the manufacturer or
soldwiththe product.Any mountingof productshould
fo[towmanufacturer'sinstructionsand shouldusea
mountiDgaccessoryrecommended by manufacturer.
9. Transporting Product
Moveproduct andcart combinations
with care. Quick steps, excessive
force, and uneven surfacesmaycause
product and cart combinaUonto
overturn.
10. Ventilation
Slotsand openingsin cabinet mustnot be blocked or
covered.Theyare providedfor ventilation,to ensure
reliableoperation, and to protectfrom overheating.
Neverblockopeningsby placingproducton a bed,
sofa,rug, or other similar surface. Do not place product
in bui[t-in installation suchas a bookcase or rack
unlessproperventilation is providedor manufacturer's
instructions have been adheredto.
14.
OutdoorAntenna Grounding
If an outside antenna or cable system is connectedto
this product,be sureantenna or cable systemis
groundedsoas to providesomeprotection against
voltage surgesand built-up static charges.A_cle 810
oftheNationalElectricalCode(USA),ANSI/NFPA70
providesinformationon groundingofmastand
supportingstructure,groundingoflead-inwiretoan
antennadischargeunitconnectionto grounding
electrodes,and requirementsforgroundingelectrode.
(See Fig.I below.)
Fig. 1
NEC Section 8_10-20
Conductors
round Clamps
Power Se_ice GTounding
NEC: National ELectricalCode
Antenna grounding perNECCode,ANSI/NFPA70
+ I SAFETY TZPS
Thesesimple precautionswill help ensurethat you get manyyears of safe enjoyment from your new product.
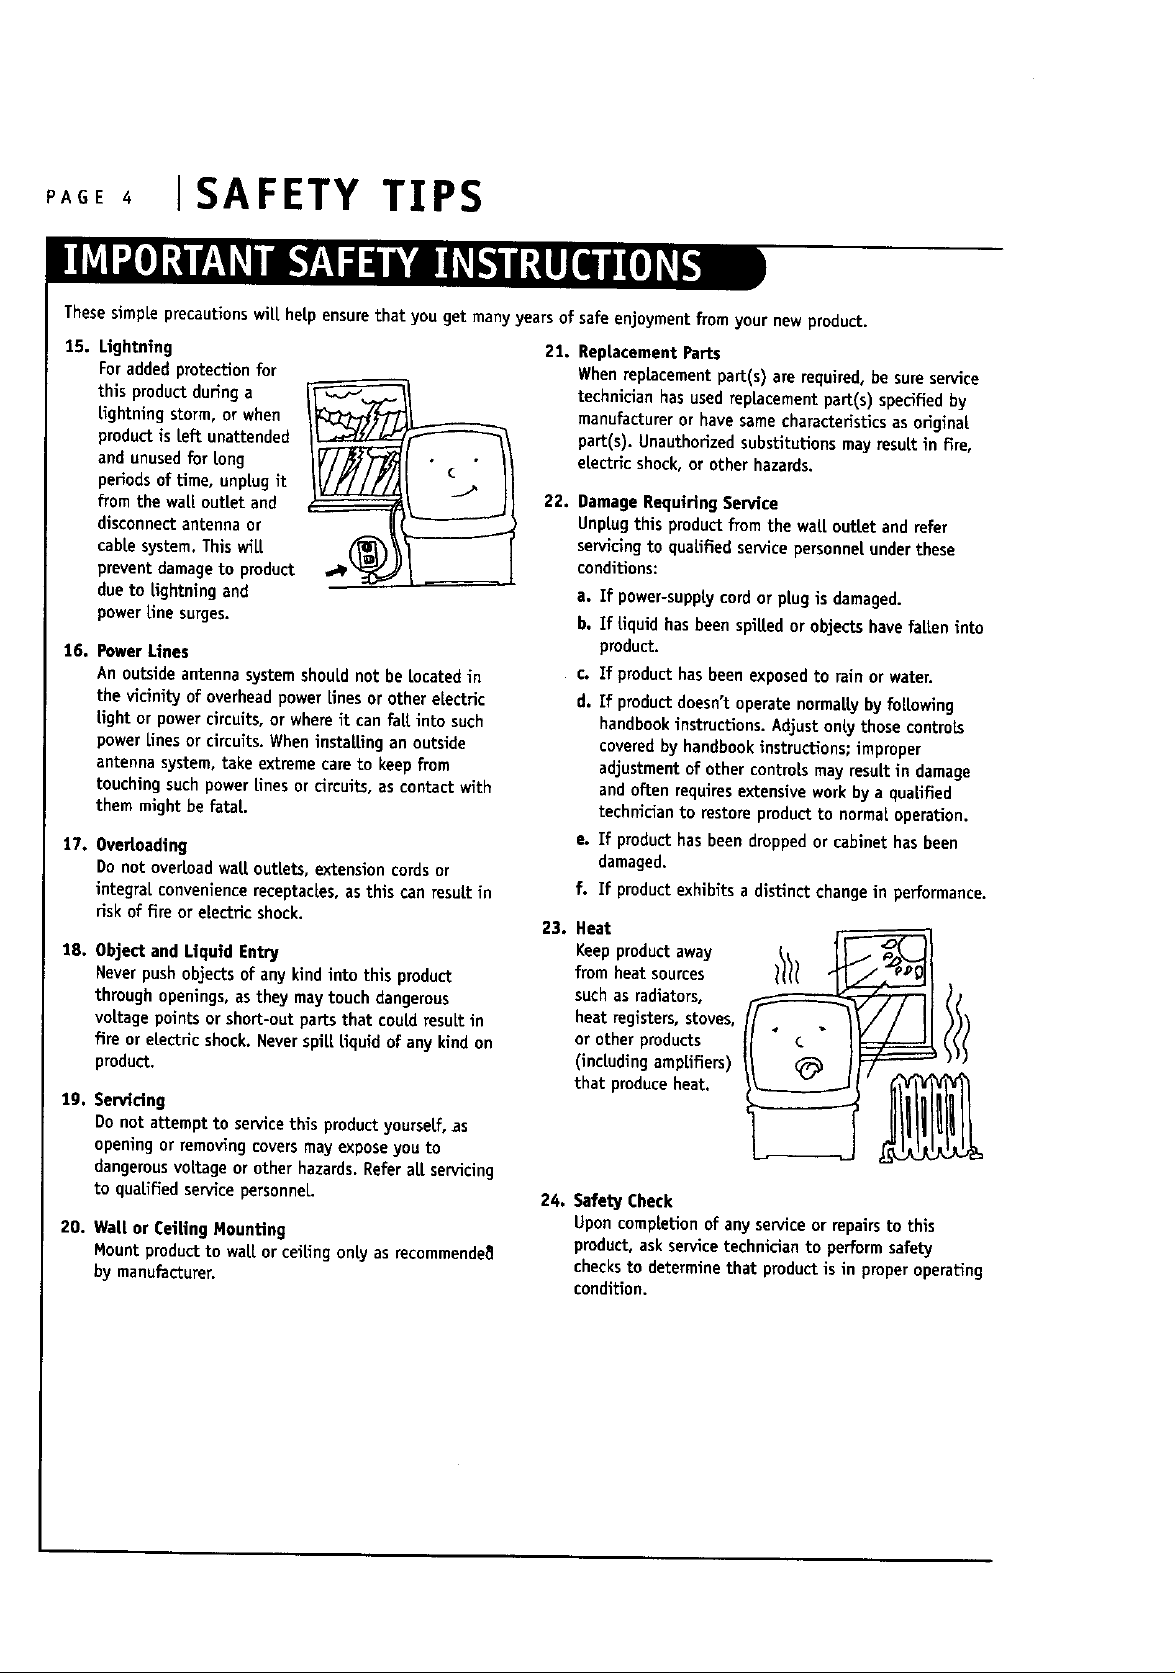
15. Lightning
Foraddedprotectionfor
this productduring a
[ightning storm, or when
productis Left unattended
and unused for tong
periods of time, unplug it
from the wall outlet and
disconnectantenna or
cablesystem.This wilt
prevent damageto product
due to Lightningand
powerLinesurges.
16. PowerLines
Anoutside antenna systemshouldnot be Locatedin
the vicinity of overheadpower lines or other electric
tight or powercircuits,or where it can fall into such
powerLinesorcircuits,When installingan outside
antennasystem,takeextremecareto keepfrom
touchingsuchpowerlinesorcircuits,as contactwith
them mightbe fatal.
17. Over!oading
Do not overloadwall outlets, extension cordsor
integral conveniencereceptacles, as this can resultin
risk of fire or electric shock.
18. Object and Uquid Entry
Neverpushobjects of any kind into this product
through openings,as they may touch dangerous
voltage pointsor short-out partsthat couldresult in
fire or electricshock.Neverspill Liquidof any kind on
product.
19. Servidng
Donot attempt to service this productyourself,as
opening or removingcoversmay expose you to
dangerousvoltage or other hazards.Referall servicing
to qualified servicepersonnel.
20. WaUor CeiUng Mounting
Mount productto watt or ceiling only as recommendea
by manufacturer.
21.
RepLacement Parts
When replacement part(s) ate required, be sure service
technician has used replacement part(s) specified by
manufacturer or have same characteristics as original
part(s), Unauthorized substitutions may result in fire,
electric shock, or other hazards.
22.
Damage Requiring Service
Unplug this product from the walt outlet andrefer
servicingto qualified servicepersonnelunderthese
conditions:
a. If power-supply cord or plug is damaged.
b. If Liquidhas been spilled or objects have fallen into
product.
CoIf producthas been exposedto rain or water.
d. If productdoesn'toperate normallyby following
handbook instructions.Adjustonly those controls
coveredby handbookinstructions; improper
adjustmentof othercontrolsmay resultin damage
and often requiresextensiveworkbya qualified
technician to restoreproductto normaloperation.
e.
If producthasbeen droppedor cabinet hasbeen
damaged.
f.
Ifproductexhibitsadistinctchangeinperformance.
23.
Heat
Keep product away
from heat sources
suchasradiators,
heat registers,stoves,
or otherproducts
(includingamplifiers)
that produceheat.
24. Safety Check
Uponcompletionof any service or repairsto this
product,askservicetechnicianto performsafety
checksto determinethat productis in properoperating
condition.
INSTALLATIONI PAGE S
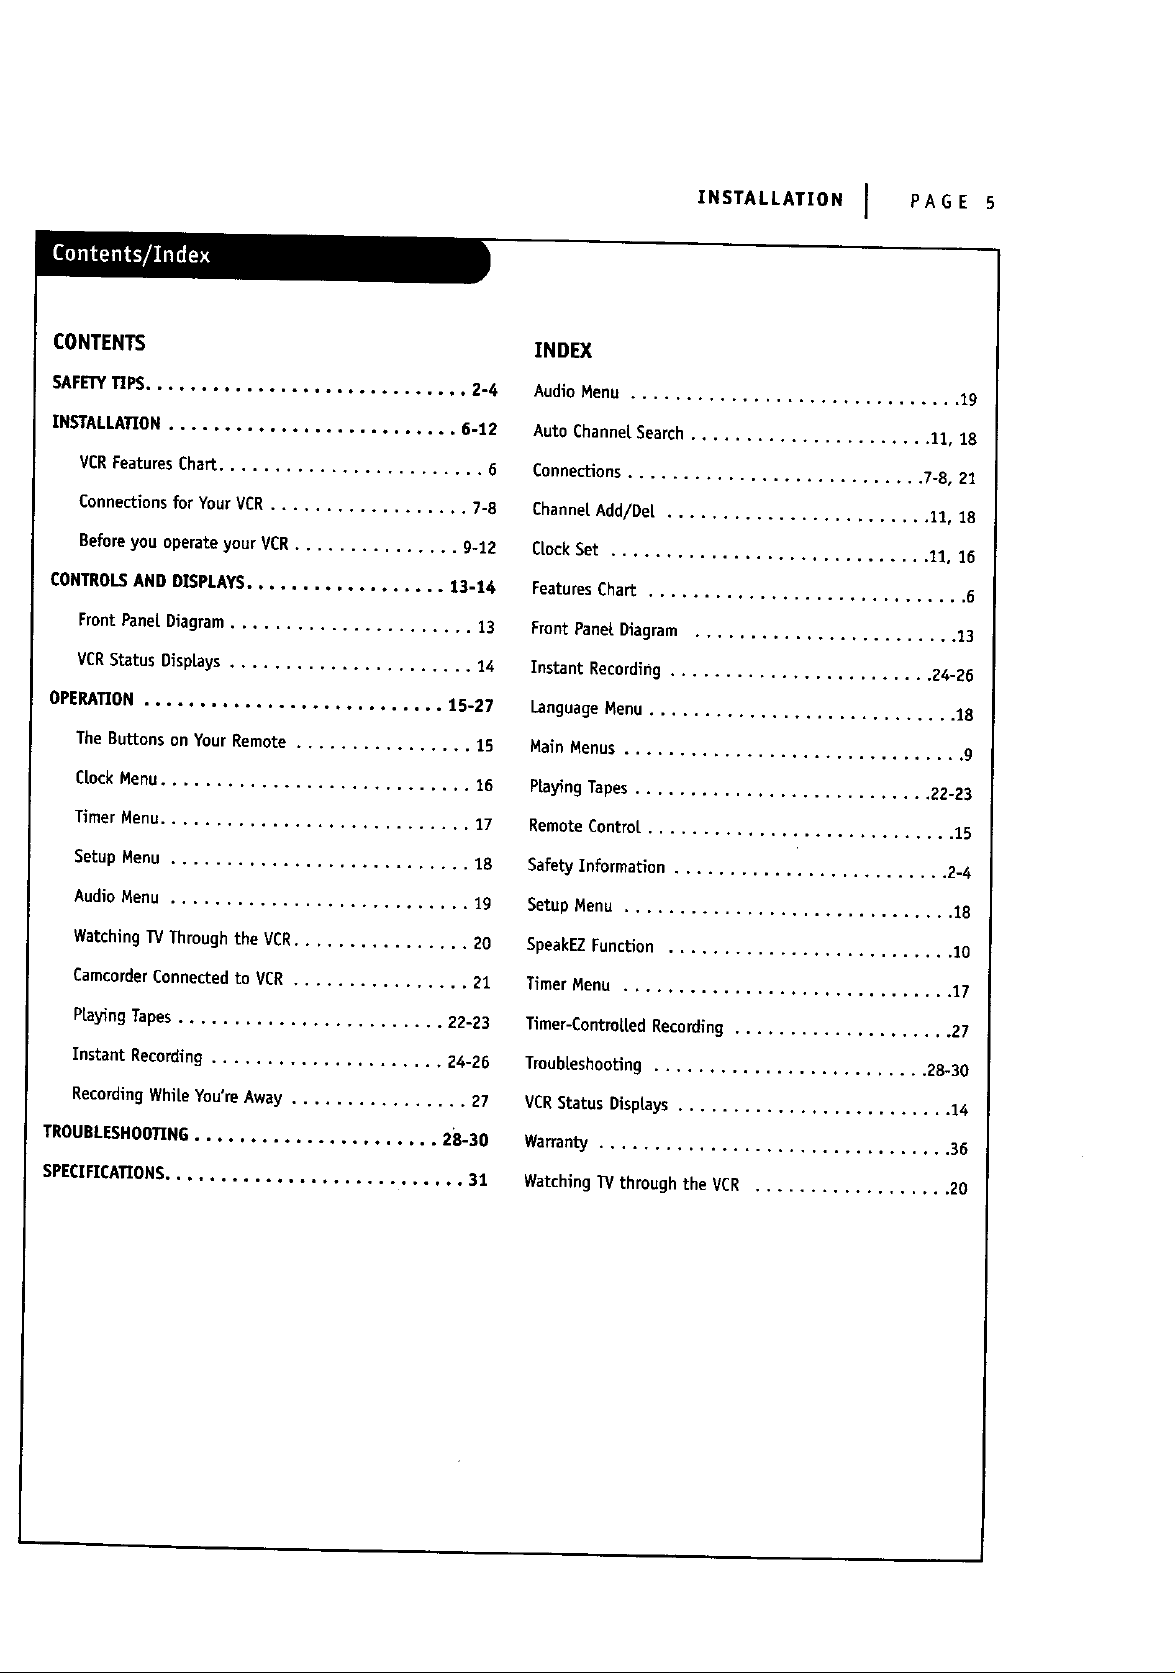
CONTENTS
SAFETYTIPS............................. 2-4
INSTALLATION.......................... 6-12
VCRFeaturesChart ........................ 6
Connections for YourVCR.................. 7-8
Beforeyou operateyour VCR............... g-12
CONTROLSAND DISPLAYS.................. 13-14
FrontPanelDiagram ...................... 13
VCRStatusOisptays...................... 14
OPERAT[ON................... .. .. .. .. 15-27
The Buttonson YourRemote ................ 15
CrockMenu............................ 16
TimerMenu............................ 17
Setup Menu ........................... 18
AudioMenu ........................... 19
INDEX
AudioMenu .............................. 19
Auto ChannetSearch...................... 11, 18
Connections........................... 7-8, 21
CharmerAdd/Det ........................ 11, 18
CrockSet ............................. 11, 16
FeaturesChart ............................. 6
FrontPanel Oiagram ........................ 13
Instant Recording ........................ 24-26
LanguageMenu ............................ 18
MainMenus ............................... g
P_ayingTapes........................... 22-23
RemoteContret............................ 15
SafetyInformation......................... 2-4
SetupMenu .............................. 1B
Watching_ Throughthe VCR................ 20
CamcorderConnected to VER ................ 21
PrayingTapes........................ 22-23
Instant Recording..................... 24-26
RecordingWhileYou'reAway ................ 27
TROUBLESHOOTING...................... 28-30
SPECIfiCATIONS........................... 31
SpeakEZFunction.......................... 10
TimerMenu .............................. 17
Timer-ControlledRecording.................... 27
Treubteshooting......................... 28-30
VCR StatusDisplays......................... 14
Warranty ................................ 36
WatchingTV through the VCR .................. 20
PAGE 6 IINSTALLATION
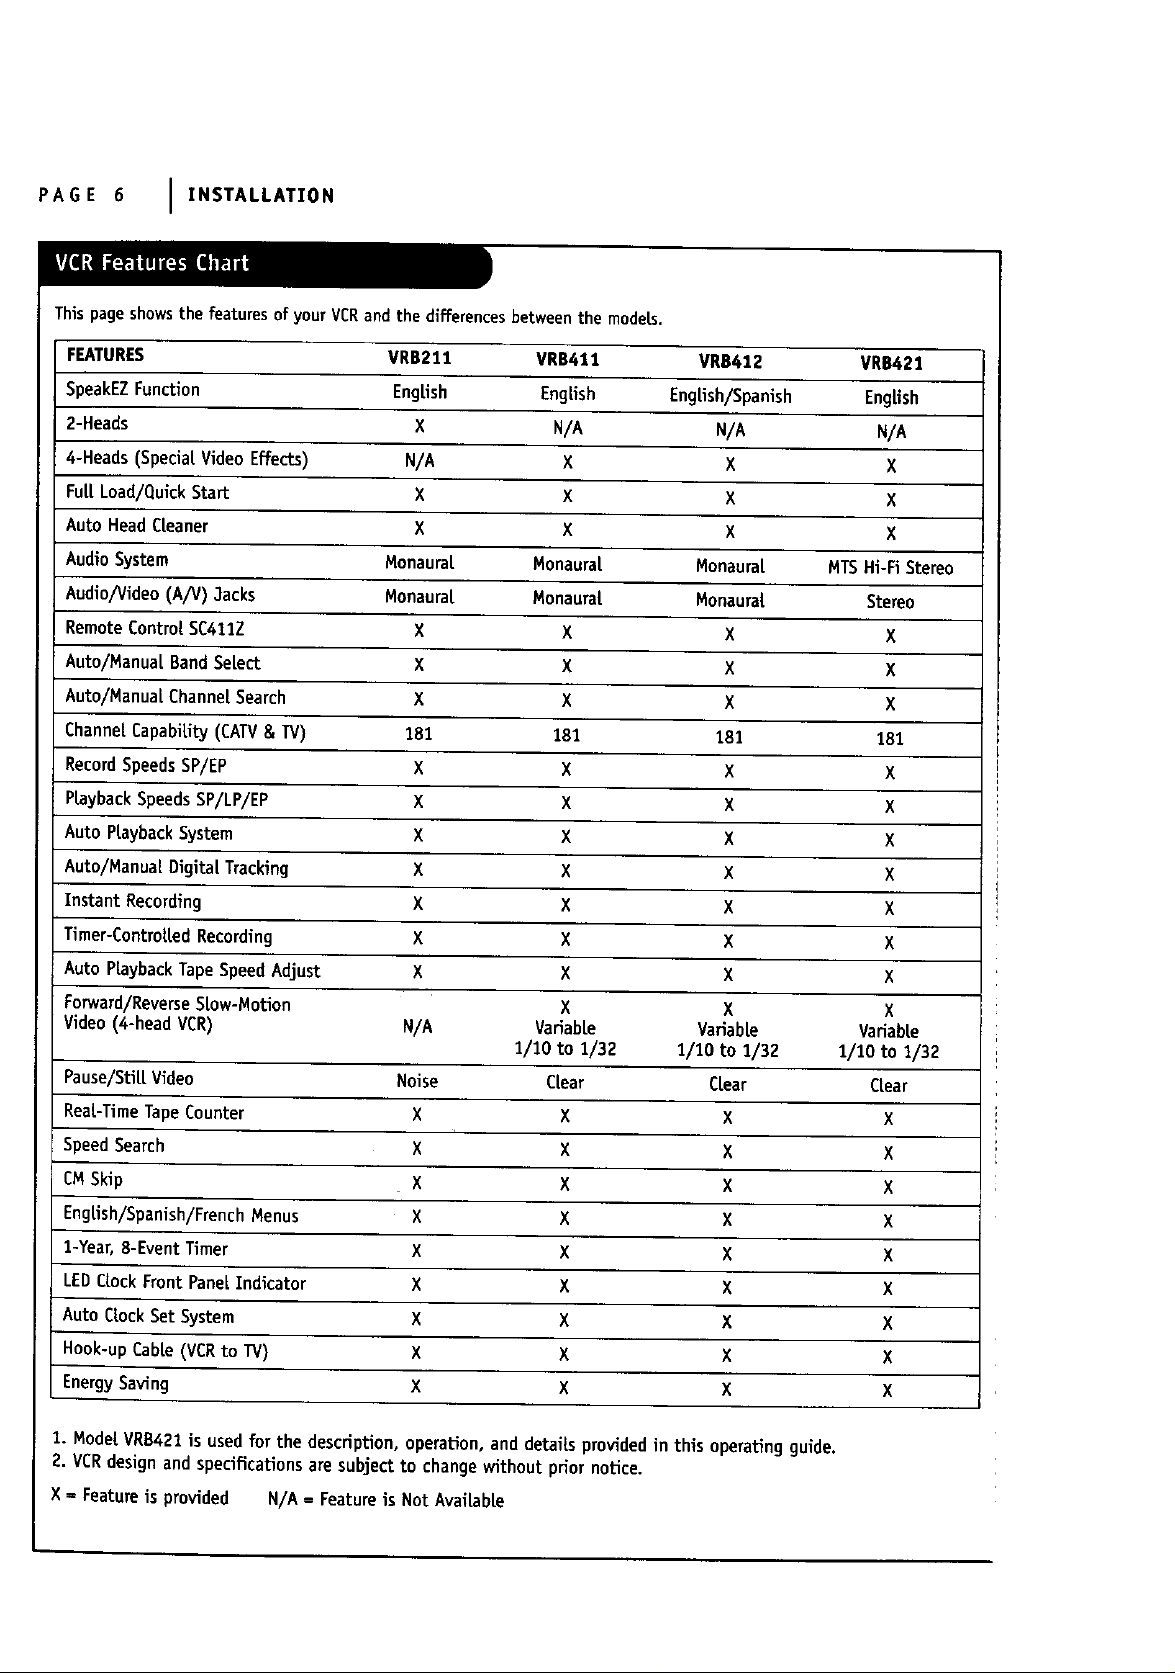
Thispageshowsthe features of your VCRandthe differencesbetweenthe models.
FEATURES VRB211 VRB411 VRB412 VRB421
SpeakEZFunction EngLish EngLish EngtLsh/Spanish EngLish
2-Heads X N/A N/A N/A
4-Heads(Special.VideoEffects) N/A X X X
FuLLLoad/QuickStaFf X X X X
Auto Head CLeaner X X X X
AudioSystem Monaural Monaural MonauraL MTS Hi-FiStereo
Audio/Video (A/V) 3acks Monaural _onaura[ Monaural Stereo
Remote Control SC411Z X X X X
Auto/ManuaLBand SeLect X X X X
Auto/ManuaLChannelSearch X X X X
Channe[CapabiLity(CATV& TV) 181 181 181 181
RecordSpeeds SP/EP X X X X
PLaybackSpeedsSP/LP/EP X X X X
Auto PLaybackSystem X X X X
AutolManua[Digita[Tracking X X X X
InstantRecording X X X X
Timer-ControLledRecording X X X X
Auto PLaybackTapeSpeed Adjust X X X X
Forward/ReverseSLow-Motion X X X
Video(4-headVCR) N/A VariabLe VariabLe VariabLe
1/10 to 1/32 1/10 to 1/32 1/10 to 1/32
Pause/StiLLVideo Noise C[ear CLear CLear
ReaL-TimeTape Counter X X X X
Speed Search X X X X
CM Skip _ X X X X
English/Spanish/FrenchMenus X X X X
1-Year,8-EventTimer X X X X
LED CLockFrontPanelIndicator X X X X
Auto CLockSetSystem X X X X
Hook-upCabLe(VCRto TV) X X X X
EnergySaving X X X X
1. Mode{ VRB421 is used for the description, operation, and details providedin this operating guide.
2. VCRdesign and specifications are subject to change without prior notice.
X = Feature is provided N/A = Feature is Not AvaiLabLe
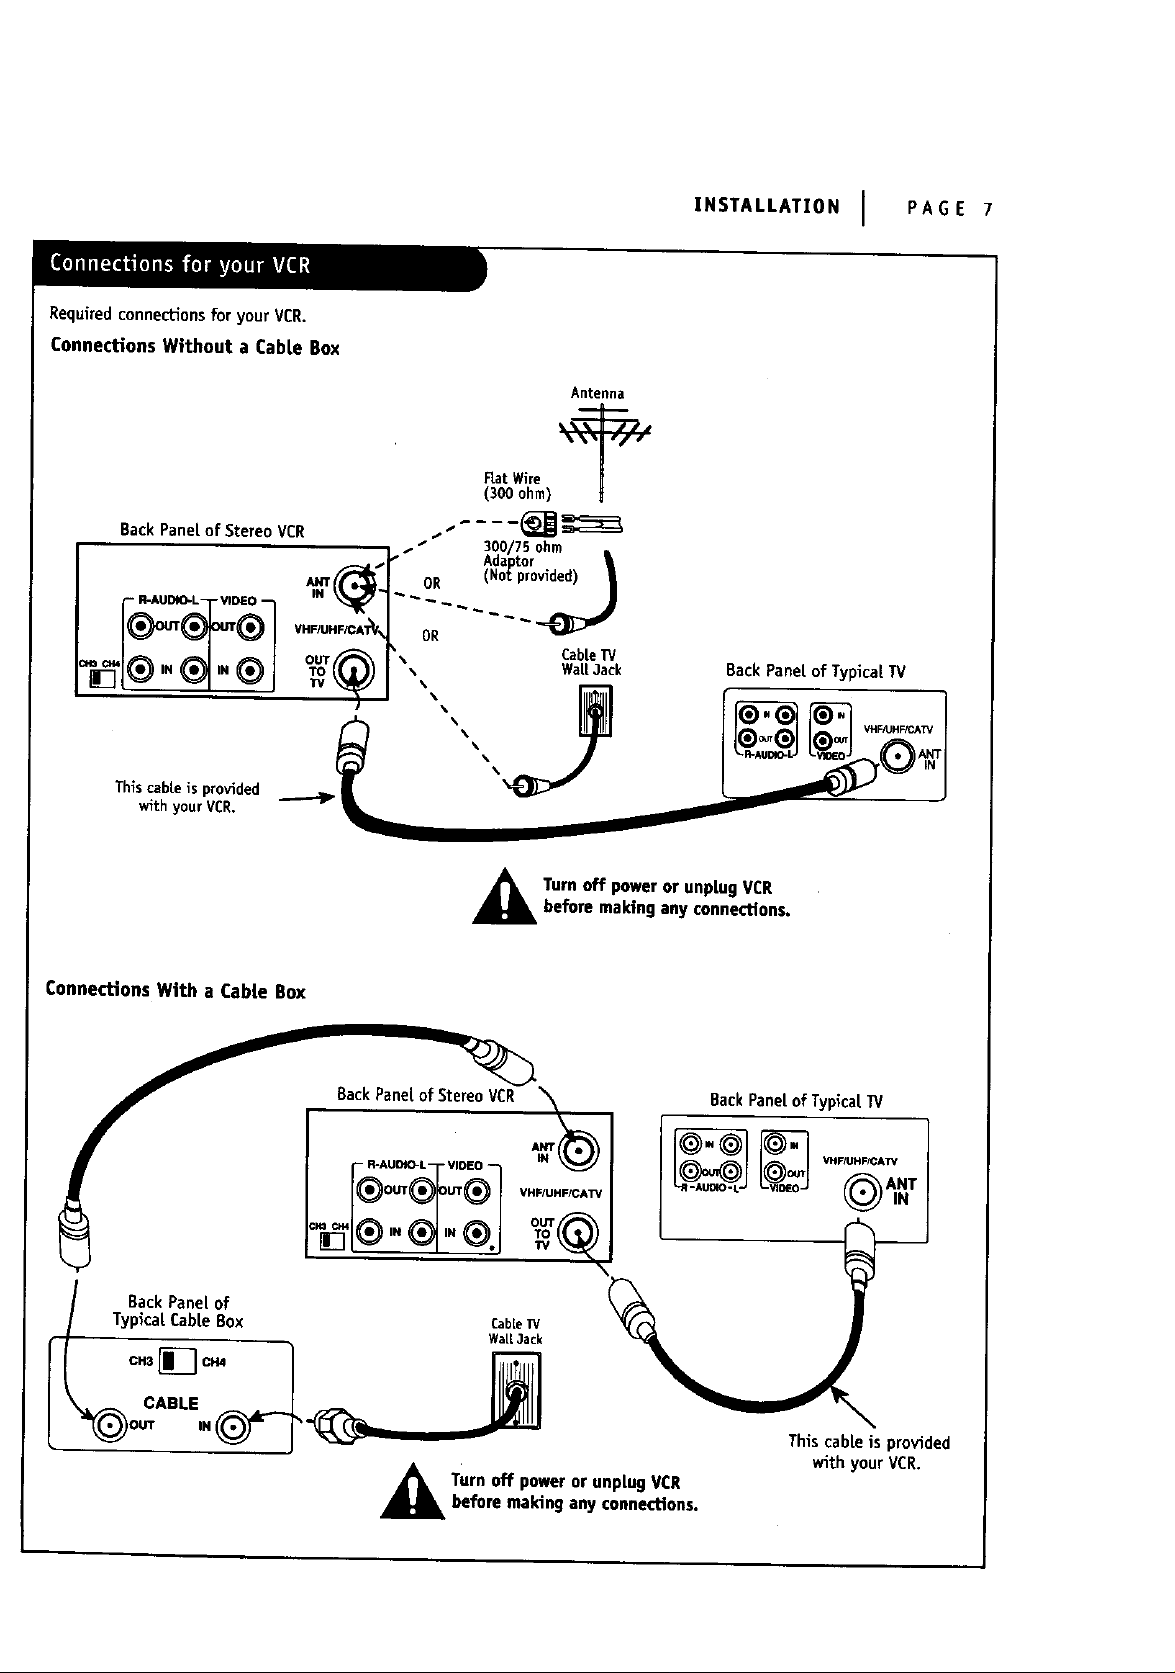
Requiredconnectionsfor yourVCR.
Connections Without a Cable Box
INSTALLATXON I PAGE 7
Antenna
FlatWire
(300ohm)
BackPanelof Stereo VCR
Thiscableis provided ._p/
withyourVCR.
Connections With a CaMe Box
s s 300/75ohm i,
Adaptor
. OR (Notpro_
OR __
OUT \ Wall3ack BackPanel of TypicalTV
T_)_ "" CabLeW
%
Tum off power or unplug VCRbefore malting any connections.
BackPane[of StereoVCR
BackPane[of TypicalIV
VHF_JHF/CATV
BackPane[of
TypicalCable Box CableTV
Walt 3ack
CABLE ______ .L_
Turn off power or unplug VCR
before making any connections.
Thiscableis provided
with your VCR.
PAGE 8 J INSTALLATION
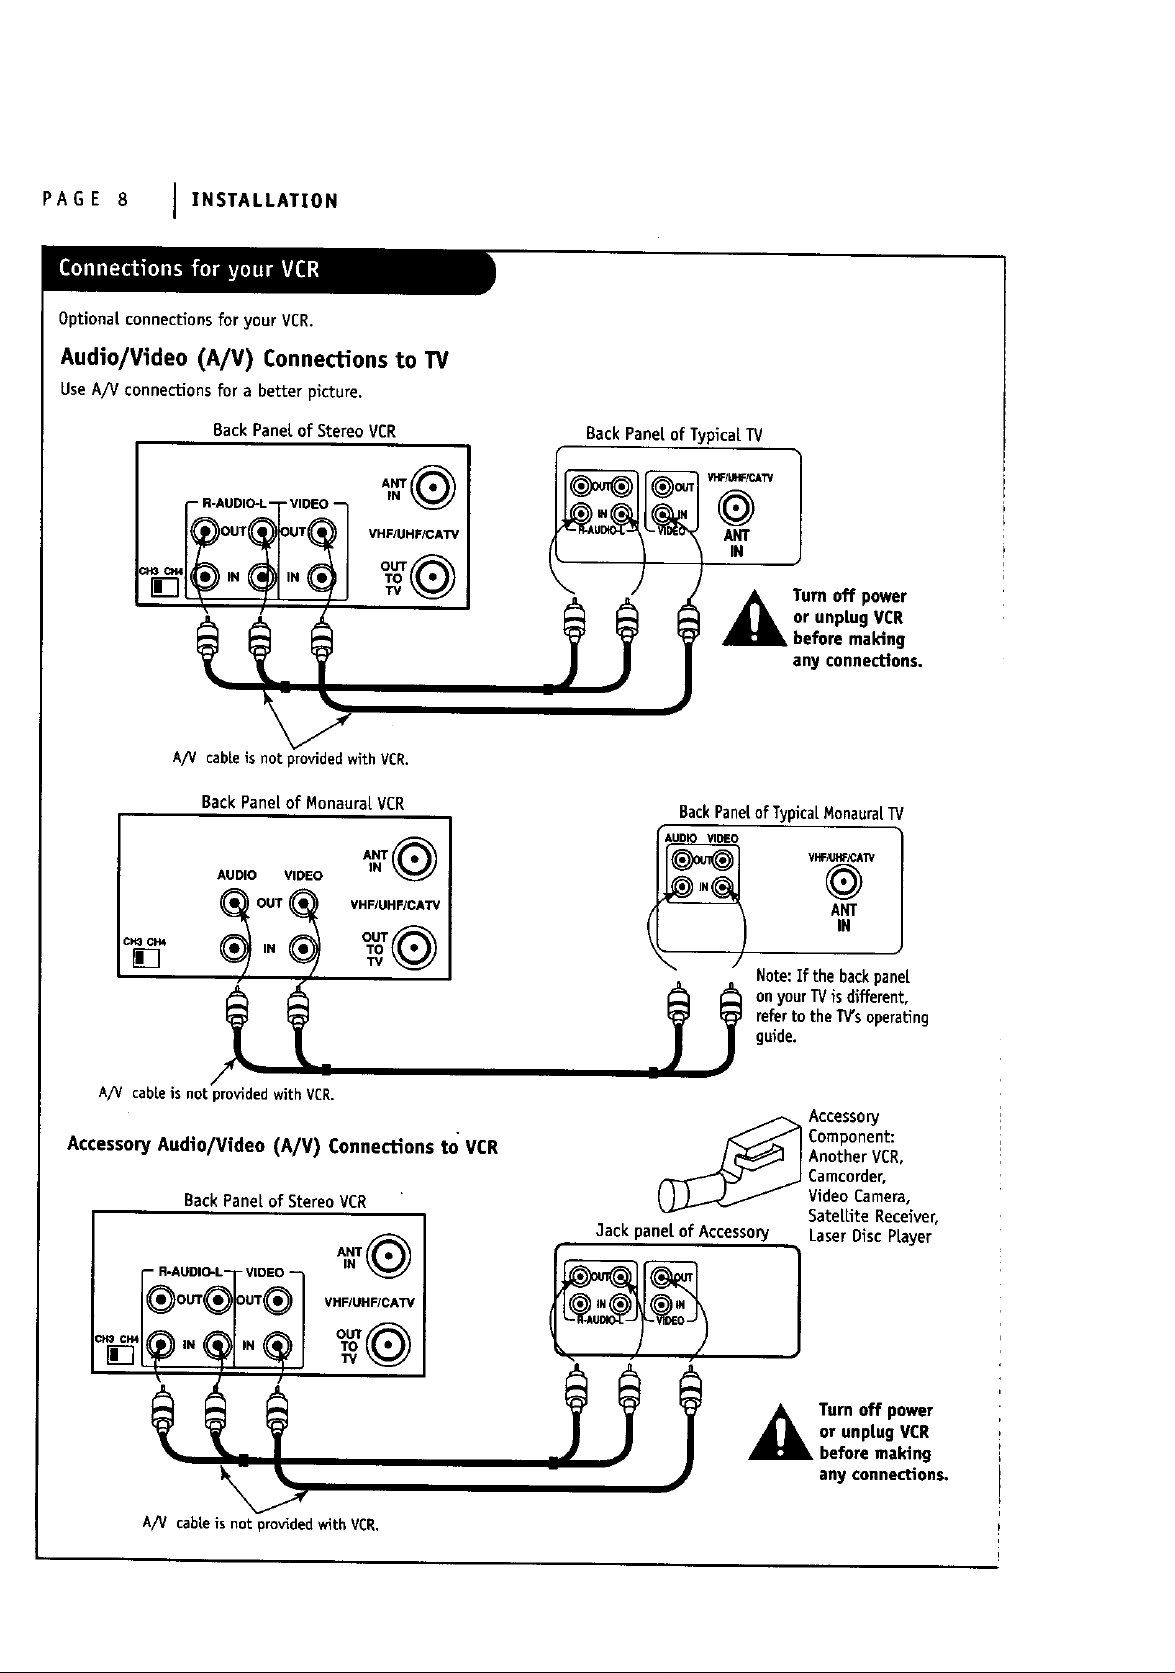
Optional connectionsfor your VCR.
Audio/Video (A/V) Connections to TV
UseA/V connectionsfor a better picture.
BackPanel ofStereoVCR
-. AUO,_L- ;N"T
A_/ cableisnot providedwithVCR.
BackPanelof MonauralVCR
AUDIO VIDEO ANNT(_
c_ c_
[]
VHF/UHF/CATV
VHF/UHF/CATV
Back Panel of TypicalTV
VHflUHF_AT_
@
ANT
IN
BackPanelofTypicalMonaura[_/
AUD VIDEO VHF_iF/CA TM
/ ANT
or unptug VCR
Tum off power
before ma_ng
any connections.
IN
Note:If the backpanel
onyourTVis different,
refertothe 1N'soperating
guide.
A/V cableis not providedwithVCR.
Accessory Audlo/Video (A/V) Connections to VCR
BackPanel of StereoVCR
_N_
VHF/UHF/CA'I%"
A/V cableis not provided with VCR.
_ Accessory
Component:
AnotherVCR,
Camcorder,
VideoCamera,
SateLLiteReceiver,
3ackpanetof Accessory LaserDiscPLayer
or unptug VCR
Turn off power
before making
any connections.
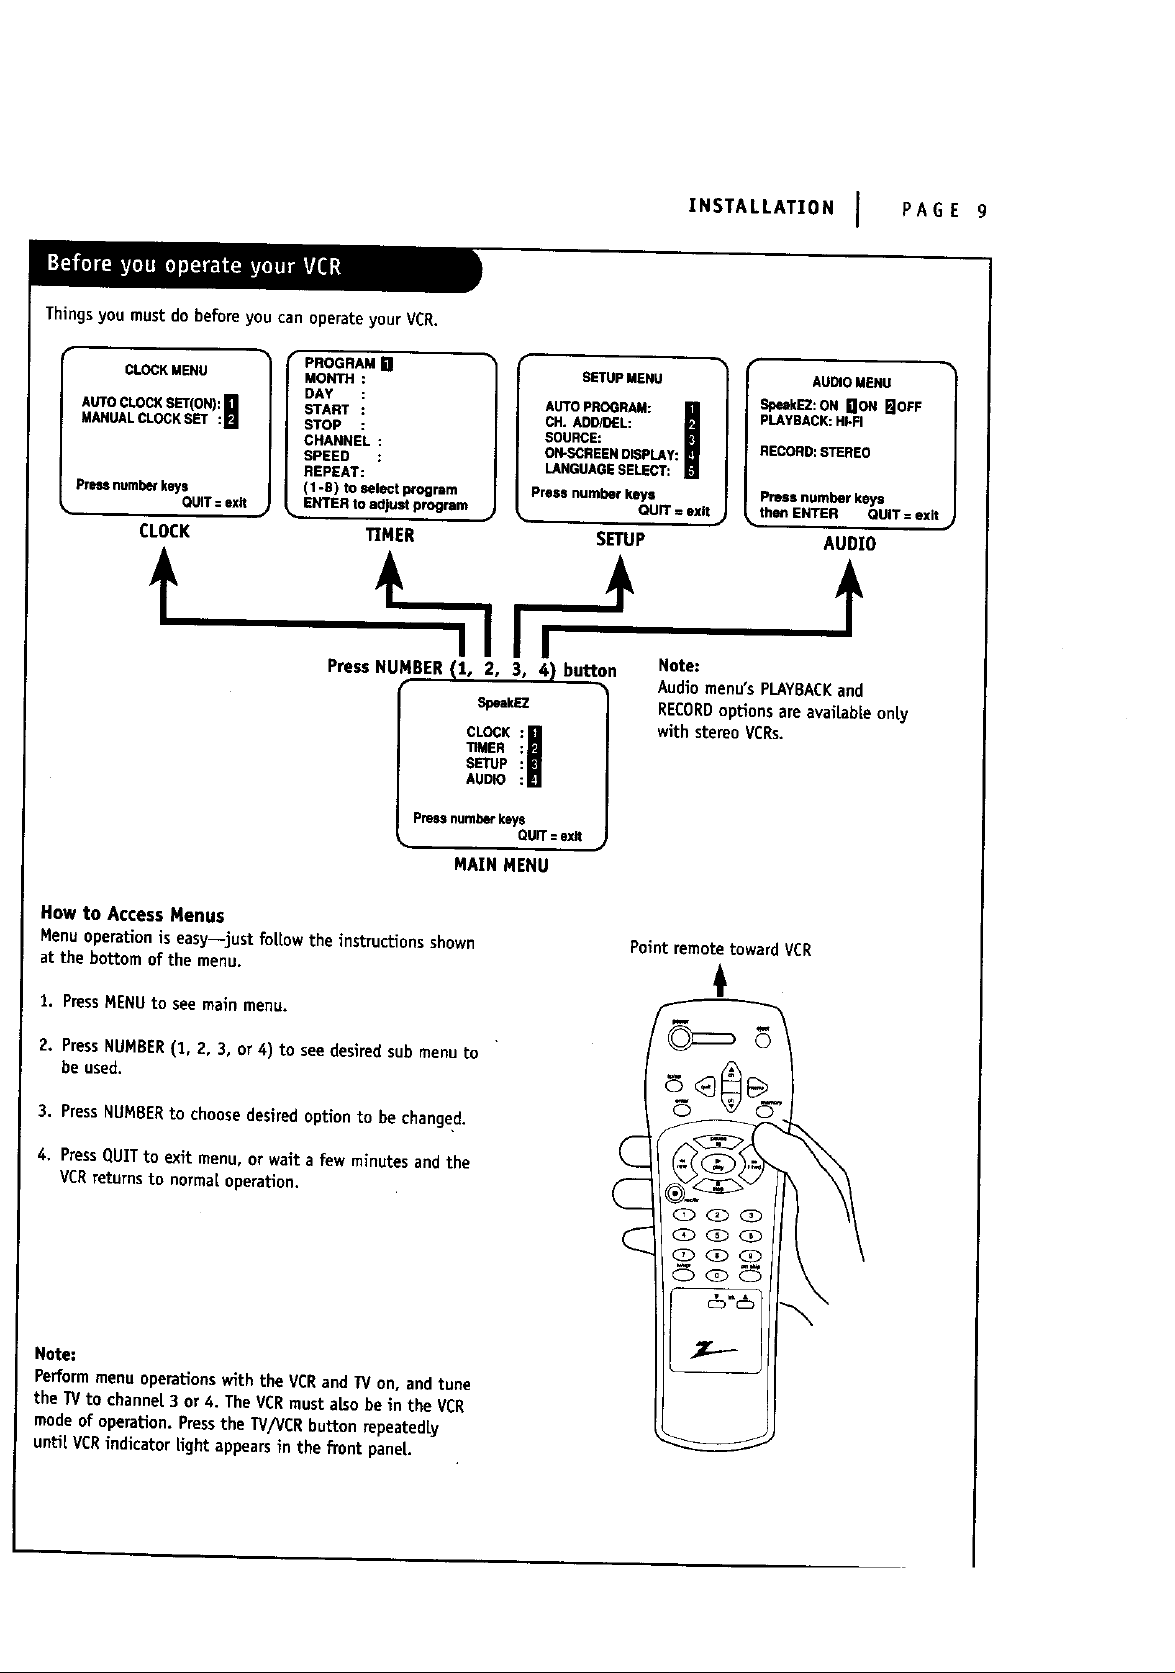
Thingsyou mustdo beforeyoucan operateyourVCR.
INSTALLATION I PAGE g
CLOCKMENU
AUTOCLOCKSET(ON):i'll
MANUALCLOCKSET :N
Pressnumberkeys
QUIT=exit
CLOCK
• PROGRAM E1
MONTH :
DAY
START
STOP
CHANNEL :
SPEED :
REPEAT:
(1-8) toselectp¢ogmm
_. ENTER to adjust program
TIMER
f
Press NUMBER (1, 2, 3, 4) button
Pressnumberkeels
MAIN MENU
Mow to Access Menus
Menu operation is easy--just fot[ow the instrudons shown
at the bottom of the menu.
SETUP MENU
OH. ADD/DEL:
SOURCE:
AUTO PROGRAM:
ON-SCREEN DISPLAY:
LANGUAGE SELECT:
Press number keys
SETUP
SpukEZ
"flMEN
SETUP
CL !I
AUDIO
QUIT=exit
AUDIOMENU
s_Ez: ORUO__OFF
pLAYBACK:HkFI
RECORD:STEREO
QUIT = exit
Press number keys
• then ENTER QUIT = exit.
AUDIO
f
Notes
Audiomenu's PLAYBACKand
RECORDoptionsare avaiLableonly
with stereoVCRs.
Point remote towardVCR
1. Press MENU to see main menu.
2. Press NUMBER (1, 2, 3, or 4) to see desired sub menu to
be used.
3. Press NUMBER to choose desired option to be changed.
4. Press QUIT to exit menu, or wait a few minutes and the
VCR returnsto normal operation.
Note:
Perform menu operations w_th the VCR and TV on, and tune
the TV to ehanne[ 3 or 4. The VCR must also be in the VCR
mode of operation. Press the W/VCR button repeatedly
unit VCR indicatorlightappearsin the frontpanel
PAGE 10 I INSTALLATION
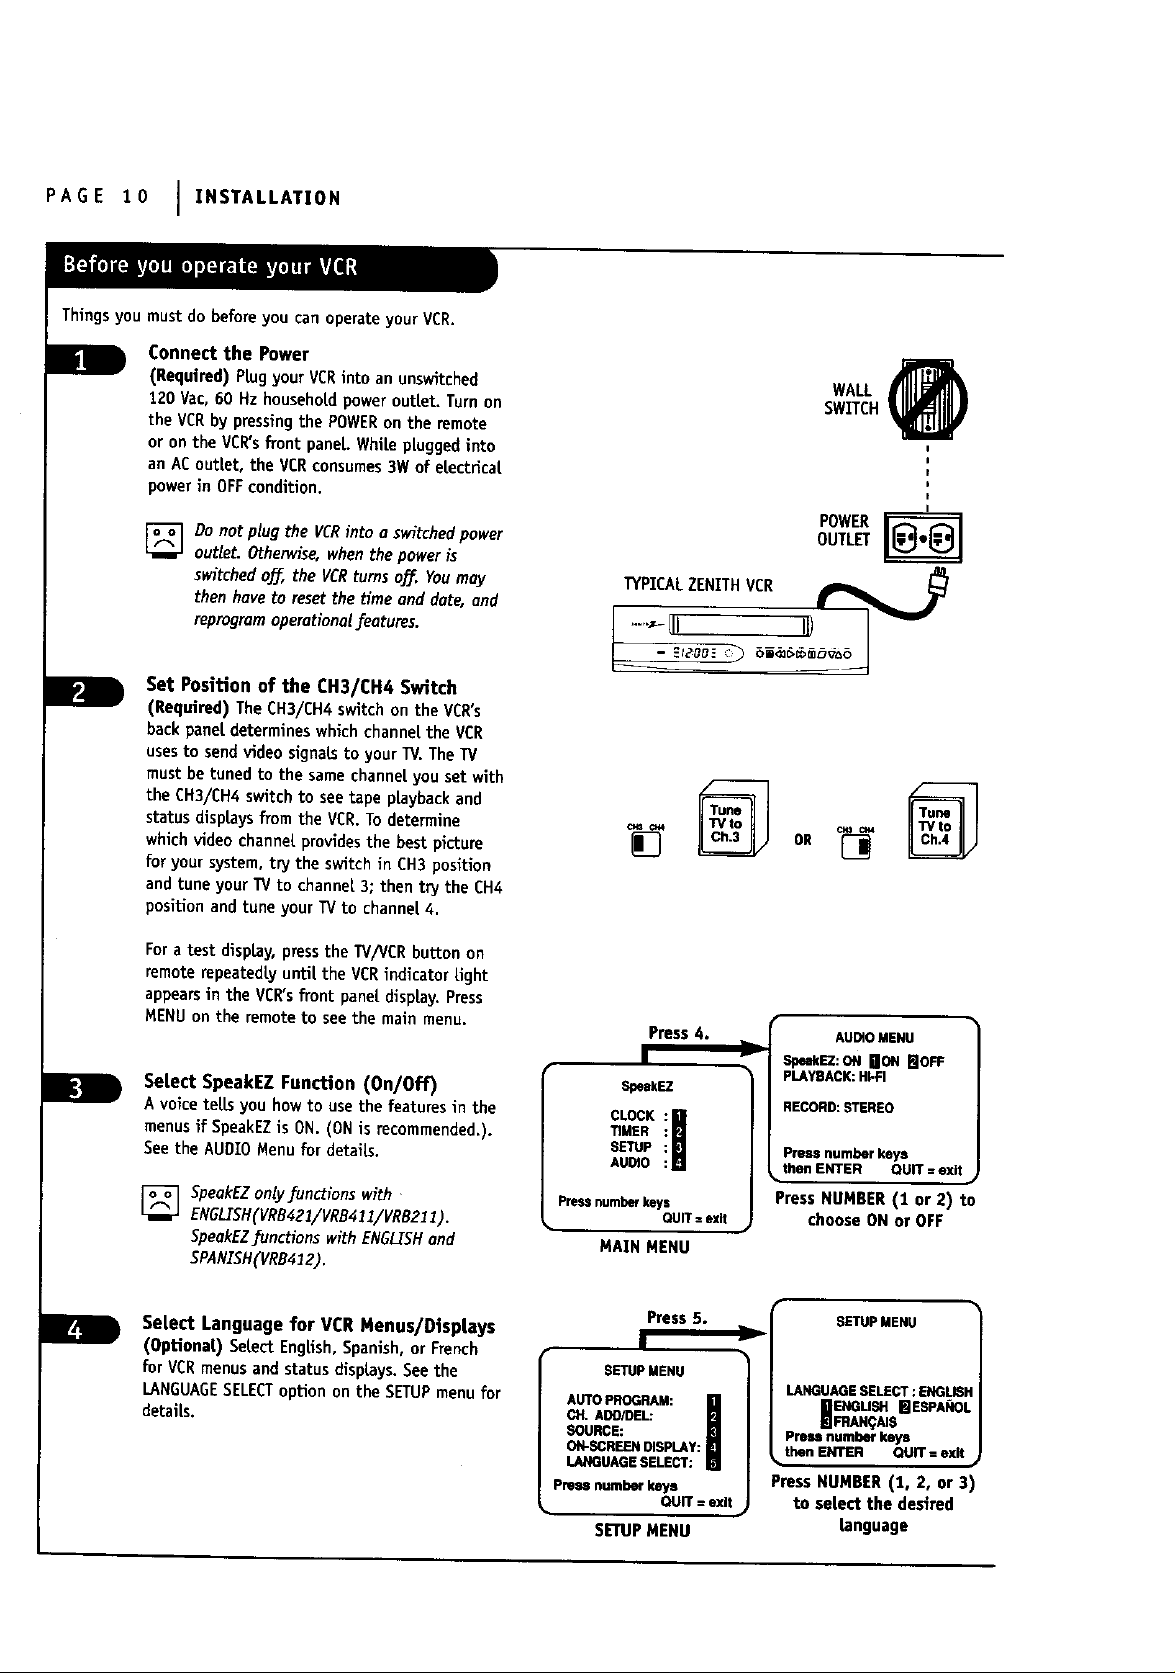
Things you must do before you can operate your VCR.
L
- F
Connect the Power
(Required) PLugyour VCRinto an unswitched
120 Vac,60 Hz householdpoweroutlet. Turnon
the VCRby pressingthe POWERon the remote
or on the VCR'sfront pane[.WhiLepluggedinto
an ACoutlet, the VCRconsumes3W of eLectricaL
powerin OFFcondition.
[]Do not plug the VCRinto a switched power
outlet. Othemdse,whenthe poweris
switchedo_, the VCRturnso_. Youmay
then haveto reset the time and dote, and
reprogram operationalfeatures.
Set Position of the CH3/CH4 Switch
(Required) The CH3/CH4 switchon the VCR's
hackpanel determineswhich channelthe VCR
usesto sendvideo signalsto your TY.The TY
mustbe tuned to the samechannelyou set with
the CH3/CH4switchto seetape playbackand
statusdisplaysfrom the VCR.Todetermine
whichvideo channelprovidesthe best picture
foryoursystem,trytheswitchinCH3 position
andtuneyourTY tochannel3;thentrytheCH4
positionand tuneyourTVto channel4.
SWITCH'
WALL
OUTLET
POWER_
TYPICALZENITHVCR _ _
I
I
I
I
I
For a test dispby, pressthe TY/VCRbutton on
remoterepeatedlyuntil the VCRindicatorlight
appearsin the VCR'sfront panel display.Press
MENUon the remote to seethe main menu.
Select SpeakEZ Function (0n/Off)
A voicetellsyou how to usethefeaturesinthe
menus ifSpeakEZisON. (ON isrecommended.).
SeetheAUDIO Menu fordetaffs.
[_ SpeakEZonlyfunctionswith
ENGLISH(VRB421/VRB41I/VRB21I).
SpeakEZJ:unctionswith ENGLISHand
SPANISH(VRB412).
Select Language for VCR Menus/Displays
(OptionaL) SeLectEngUsh,Spanish,or French
forVCRmenusand statusdisplays.Seethe
LANGUAGESELECTopUonon the SETUPmenufor
details,
Press4.
SpeakEZ
TIMER
SETUP
AUDIO
Press number keys
QUIT = exit
MAIN MENU
Press5,
I
SETUP MENU
CH. ADO/DEL:
SOURCE:
ON-SCREEN DISPLAY:
AUTO PROGRAM:
LANGUAGE SELECT:
Pressnumberkeys
SETUPMENU
QUIT = exit
AUDIOMENU
Y SpeakEZ:ON noel mOFF
PLAYBACK:HkFI
RECORD:STEREO
Pressnumber keys
• then ENTER QUIT=exit .
Press NUMBER (1 or 2) to
choose ON or OFF
SETUp MENU
LANGUAGE SELECT : ENGLISF
IENGUSH m ESPAI_IOL
FRAI_A_
Pressnumberkeys
• thenENTER QUIT= exN
Press NUMBER(1, 2, or 3)
to select the desired
language
INSTALLATION I PAGE 11
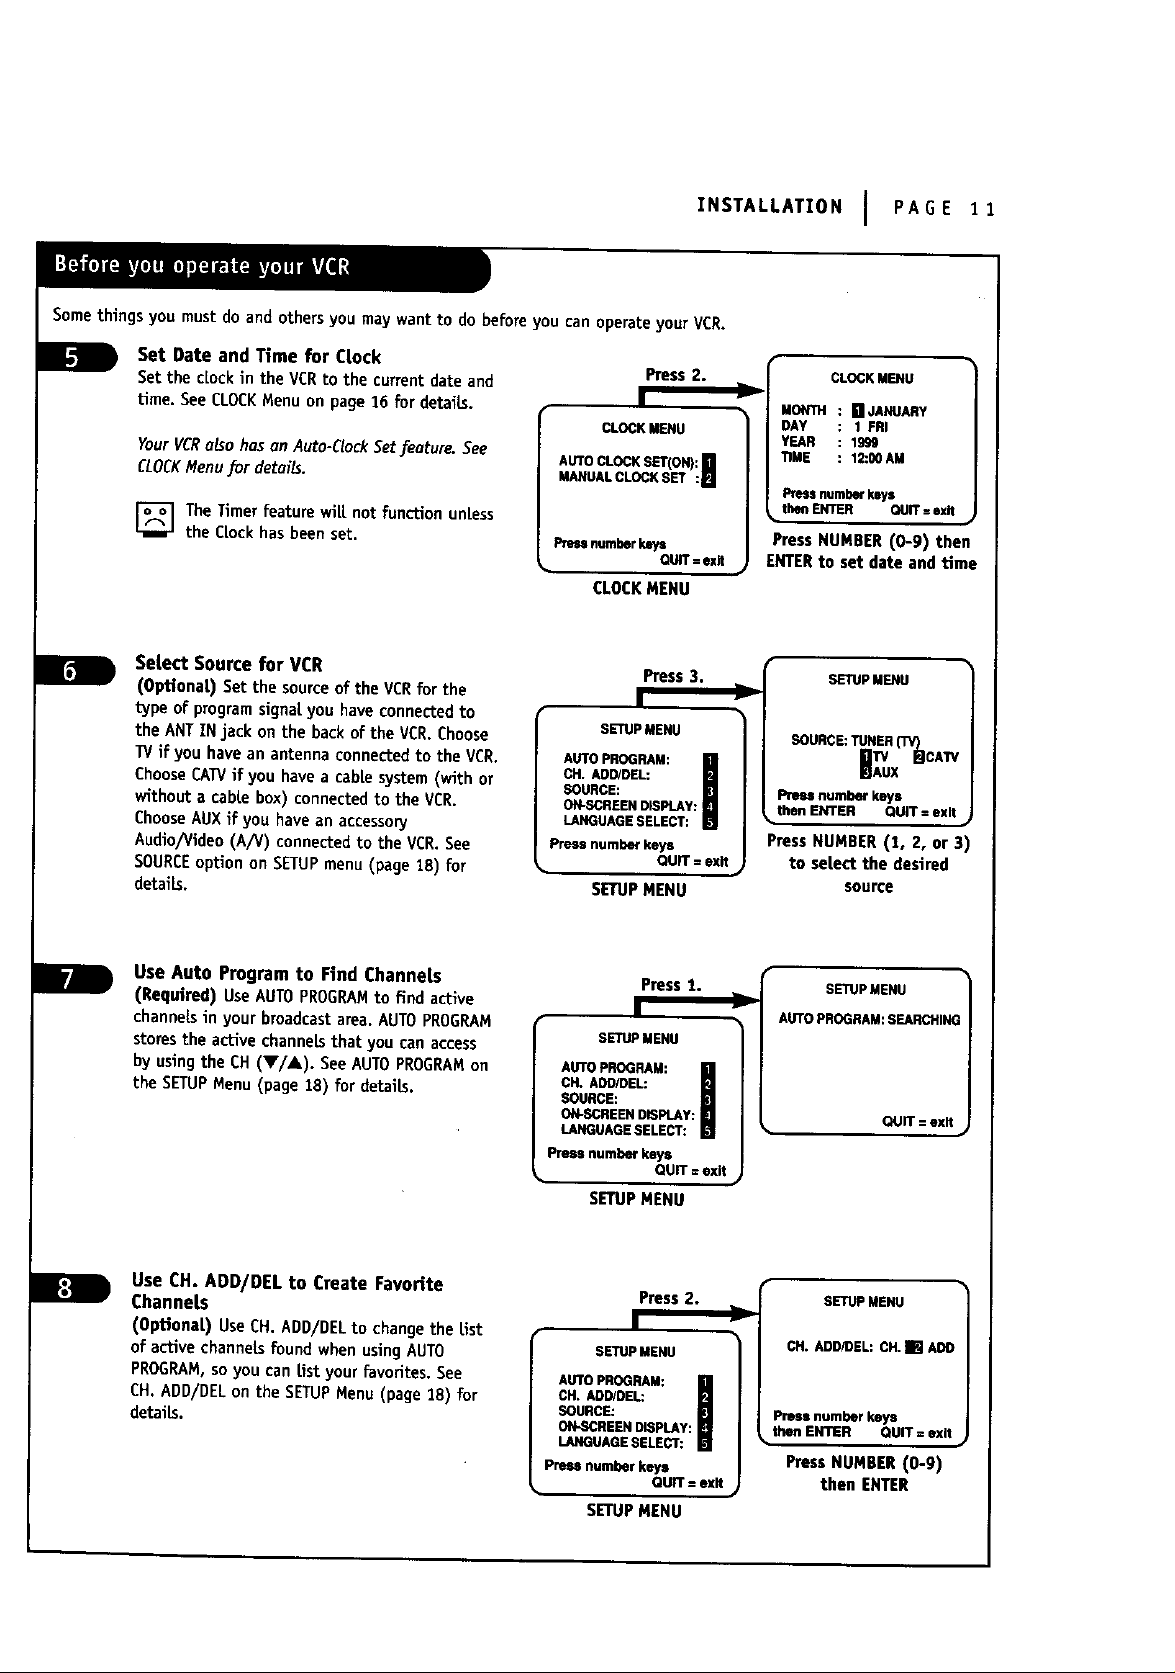
Somethings you must do and othersyou may want to do before you can operateyour VCR.
U
Set Date and Time for Clock
Set the c(ockin the VCRto the currentdate and
time. See CLOCKMenu on page 16 for details.
YourVCRalso has an Auto-ClockSet[eature. See
CLOCKMenufor details.
[_The Timerfeature wiff not function unless
the Clockhasbeen set.
Select Source for VCR
(OptionaL) Set the sourceof the VCRfor the
type of programsignaI.you haveconnected to
the ANTIN jack on the back of the VCR.Choose
TV if you have an antenna connected to the VCR,
ChooseCAWif you have a cablesystem(with or
without a cable box) connectedto the VCR,
ChooseAUXif you have an accessory
Audio/video (A/V) connected to the VCR.See
SOURCEopUon on SETUPmenu(page 18) for
details.
Press2.
I
CLOCKMENLI
AUTO CLOCK SET(ON): []
MANUAL CLOCK SET :
Pressnumber
CLOCKMENU
CH. ADD/DEL:
SOURCE:
ON-SCREEN DISPLAY:
AUTO PROGRAM:
LANGUAGE SELECT:
press number keys
SETUPMENU
OUIT=exit
Press3.
I
SETUP MENU
QUIT= exit
CLOCKMENU
MONTH [] JANUARY
DAY 1 FRI
YEAR 1999
11ME 12:00 AM
[]
Pressnumberkeys
then ENTER QUIT i exit
PressNUMBER(0-9) then
ENTERto set date andtime
SETUpMENU
SOURCE:TUNER
IA_? RCATV
Pressnumberkeys
then ENTER QUIT = exit ,_
Press NUMBER(1, 2, or 3)
to select the desired
source
Use Auto Program to Find Channels
(Required) UseAUTOPROGRAMto find active
channels in your broadcastarea. AUTOPROGRAM
storesthe ac_ve channelsthat you can access
by usingthe CH (V/A). SeeAUTOPROGRAMon
the SETUPMenu (page 18) for details.
Use CH. ADD/DEL to Create Favorite
Channels
(OptionaD UseCH. ADD/DELto change the List
of active channelsfound when usingAUTO
PROGRAM, soyou can Listyourfavorites.See
CH.ADD/DEL on theSETUPMenu (page18)for
details.
Press1.
!
SETUP MENU
CH. ADD/DEL:
SOURCE:
AUTO pROGRAM:
OIl-SCREEN DtSPLE¥:
LANGUAGE SELECT:
press number keys
SETUPMENU
Press2.
SETUP MENU
CH. AOD/DEL:
SOURCE:
ON-SCREEN thSPLAY:
AUTO PROGRAM:
LANGUAGE SELECT:
preem number keys
SETUPMENU
QUIT : exit
QUIT : ey_it
r
SETUP MENU
AUTO PROGRAM: SEARCHIEK
QUIT=exit
SETUp MENU
CH. ADD/DEL: CH.IN ADD
Pr-_ number keys
_,thenENTER QUiT=exit .
PressNUMBER(O-g)
then ENTER
 Loading...