

Page 1
THE QUALITY GOES IN BEFORE THE NAME GOES ON
' 0
_I Return the
Produc t
Registration
Card and your
_ TV could be
FREEI
recycledpaper
: 50percent
para nuestros
t de habla hispana:
informaci6n que
de este manual!
Page 2
I I II
SAFETY WARNINGS
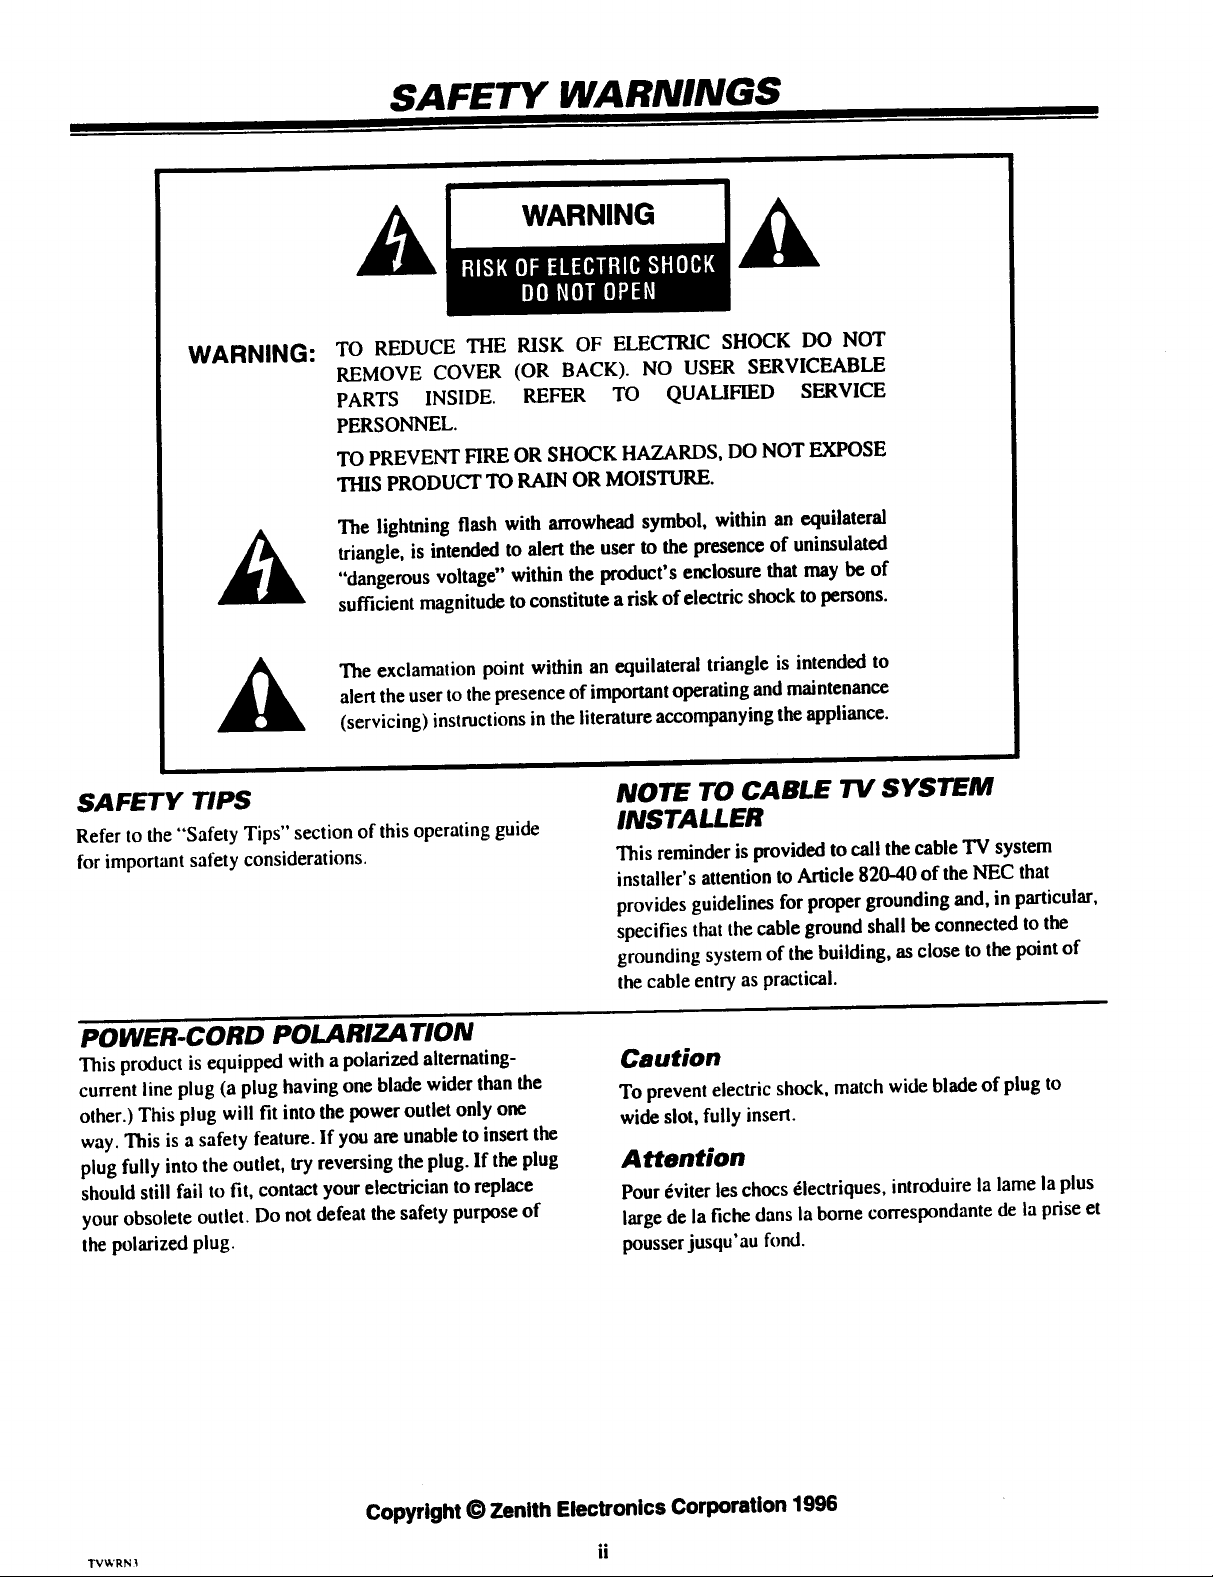
WARNING:
A
A
SAFETY TIPS
Refer to the "Safety Tips" section of this operating guide
for important safety considerations.
TO REDUCE THE RISK OF ELECTRIC SHOCK DO NOT
REMOVE COVER (OR BACK). NO USER SERVICEABLE
PARTS INSIDE. REFER TO QUALIFIED SERVICE
PERSONNEL.
TO PREVENT FIRE OR SHOCK HAZARDS, DO NOT EXPOSE
THIS PRODUCT TO RAIN OR MOISTURE.
The lightning flash with arrowhead symbol, within an equilateral
triangle, is intended to alert the user to the presence of uninsulated
"dangerous voltage" within the product's enclosure that may be of
sufficient magnitude to constitute a risk of electric shock to persons.
The exclamation point within an equilateral triangle is intended to
alert the user to the presence of important operating and maintenance
(servicing) instructions in the literatureaccompanying the appliance.
NOTE TO CABLE TV SYSTEM
INSTALLER
This reminder is provided to call the cable TV system
installer's attention to Article 820-40 of the NEC that
provides guidelines for proper grounding and, in particular,
specifies thatthe cable ground shall be connected to the
grounding system of the building, as close to the point of
the cable entry as practical.
POWER-CORD POLARIZATION
This product is equipped with a polarized alternating-
current line plug (a plug having one blade wider than the
other.) This plug will fit into the power outlet only one
way. This is a safety feature. If you are unable to insert the
plug fully into the outlet, try reversing the plug. If the plug
should still fail to fit, contact your electrician to replace
your obsolete outlet. Do not defeat the safety purpose of
the polarized plug.
Copyright O Zenith Electronics Corporation 1996
TVWRN3
Caution
To prevent electric shock, match wide blade of plug to
wide slot, fully insert.
Attention
Pour_viter ies chocs _iectriques, introduire la lame la plus
large de la fiche dans la borne correspondante de la prise et
pousser jusqu'au fond.
ii
Page 3
SAFETY TIPS
Important safeguards for you and your new product
Your product has been manufactured and tested with your safety in mind. However, improper use can result in potential electrical
shock or fire hazards. To avoid defeating the safeguards that have been built into your new product, please read and observe the
following safety points when installing and using your new product, and save them for future reference.
Observing the simple precautions discussed in this section of the operating guide can help you get many years of enjoyment and
safe operation that are built into your new product.
1. Read Instructions 9.
All the safety and operating instructions should be
read before the product is operated.
2. Follow Instructions 10.
All operating and use instructions should be fol-
lowed.
°
Retain Instructions
The safety and operating instructions should be re-
tained for future reference.
.
Heed Warnings
All warnings on the product and in the operating in-
structions should be adhered to.
5. Cleaning
Unplug this product from the wall outlet before
cleaning. Do not use liquid cleaners or aerosol
cleaners. Use a damp cloth for cleaning.
6. Water and Moisture
Do not use this product near water -- for example,
near a bath tub, wash bowl, kitchen sink, or laundry
tub, in a wet basement, or near a swimming pool.
7. Accessories
Do not place this product on an unstable cart,
stand, tripod, bracket, or table. The product may
fall, causing serious injury to a child or adult, and
serious damage to the product. Use only with a
cart, stand, tripod, bracket, or table recommended
by the manufacturer, or sold with the product. Any
mounting of the product should follow the manufac-
turer's instructions, and should use a mounting
accessory recommended by the manufacturer.
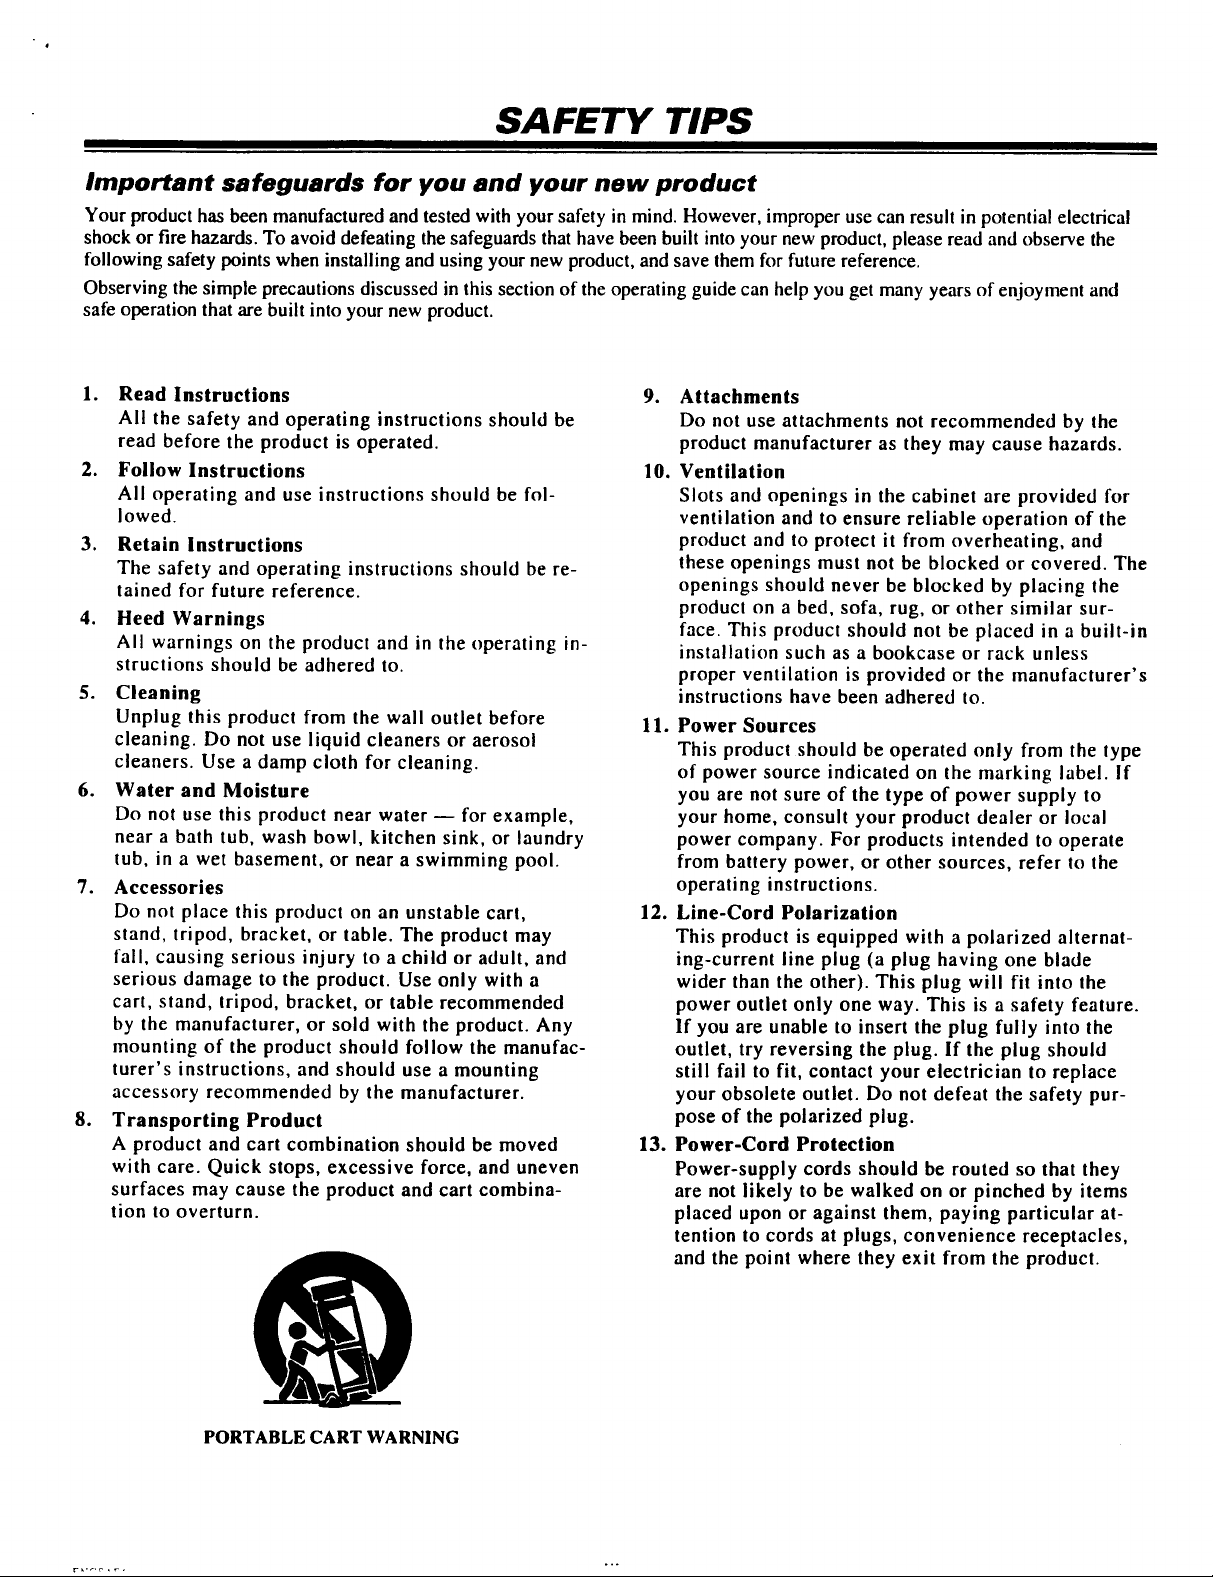
8. Transporting Product
A product and cart combination should be moved
with care. Quick stops, excessive force, and uneven
surfaces may cause the product and cart combina-
tion to overturn.
Attachments
Do not use attachments not recommended by the
product manufacturer as they may cause hazards.
Ventilation
Slots and openings in the cabinet are provided for
ventilation and to ensure reliable operation of the
product and to protect it from overheating, and
these openings must not be blocked or covered. The
openings should never be blocked by placing the
product on a bed, sofa, rug, or other similar sur-
face. This product should not be placed in a built-in
installation such as a bookcase or rack unless
proper ventilation is provided or the manufacturer's
instructions have been adhered to.
11. Power Sources
This product should be operated only from the type
of power source indicated on the marking label, if
you are not sure of the type of power supply to
your home, consult your product dealer or local
power company. For products intended to operate
from battery power, or other sources, refer to the
operating instructions.
12. Line-Cord Polarization
This product is equipped with a polarized alternat-
ing-current line plug (a plug having one blade
wider than the other). This plug will fit into the
power outlet only one way. This is a safety feature.
If you are unable to insert the plug fully into the
outlet, try reversing the plug. If the plug should
still fail to fit, contact your electrician to replace
your obsolete outlet. Do not defeat the safety pur-
pose of the polarized plug.
13. Power-Cord Protection
Power-supply cords should be routed so that they
are not likely to be walked on or pinched by items
placed upon or against them, paying particular at-
tention to cords at plugs, convenience receptacles,
and the point where they exit from the product.
PORTABLE CART WARNING
Page 4
SAFETY TIPS
14. Outdoor Antenna Grounding
If an outside antenna or cable system is connected
to the product, be sure the antenna or cable system
is grounded so as to provide some protection
against voltage surges and built-up static charges.
Article 810 of the National Electrical Code
(U.S.A.), ANSI/NFPA 70 provides information
with regard to proper grounding of the mast and
supporting structure, grounding of the lead-in wire
to an antenna discharge unit, size of grounding con-
ductors, location of antenna-discharge unit,
connection to grounding electrodes, and require-
ments for the grounding electrode.
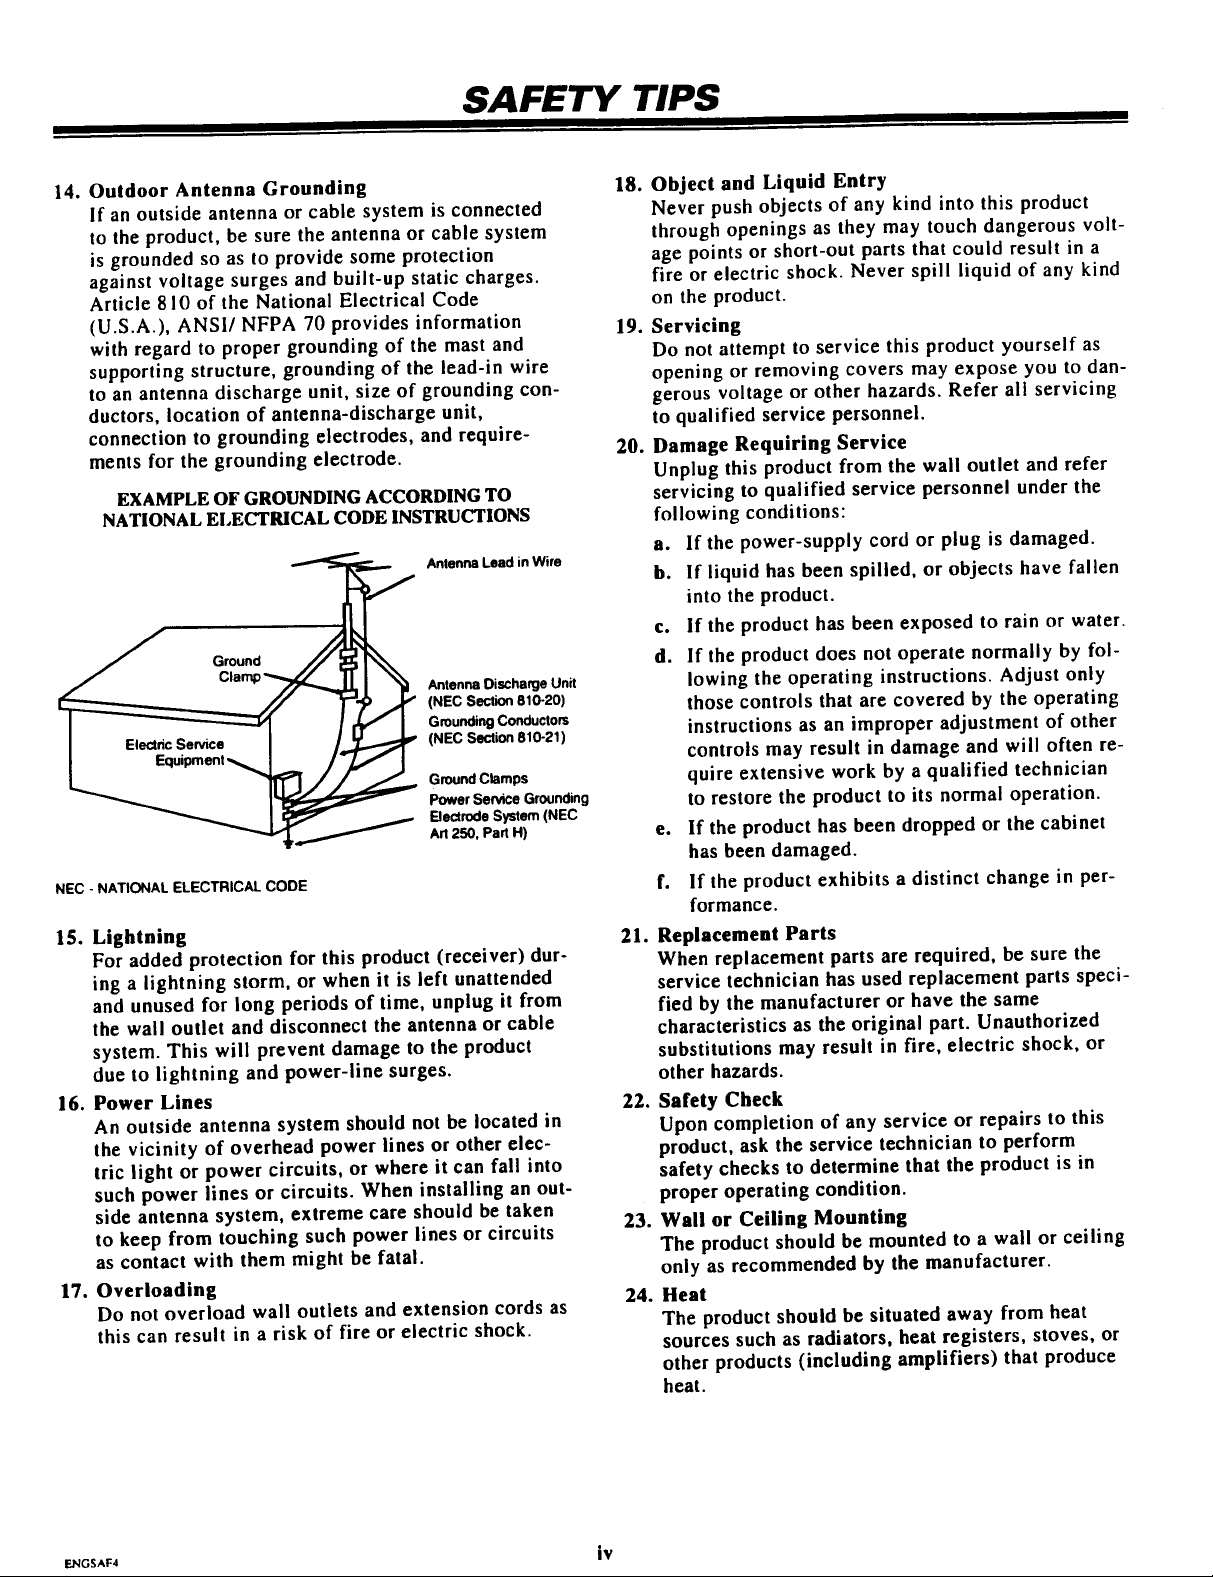
EXAMPLE OF GROUNDING ACCORDING TO
NATIONAL ELECTRICAL CODE INSTRUCTIONS
AntennaLeadin Wire
Ground
Antenna OischaKJe Unit
(NEC Section 810-20)
Grounding Conductors
(NEC Section 810-21)
Ground Clamps
Power Service Grounding
Electrode System (NEC
Art 250, Part H)
NEC - NATIONAL ELECTRICAL CODE
15. Lightning
For added protection for this product (receiver) dur-
ing a lightning storm, or when it is left unattended
and unused for long periods of time, unplug it from
the wall outlet and disconnect the antenna or cable
system. This will prevent damage to the product
due to lightning and power-line surges.
16. Power Lines
An outside antenna system should not be located in
the vicinity of overhead power lines or other elec-
tric light or power circuits, or where it can fall into
such power lines or circuits. When installing an out-
side antenna system, extreme care should be taken
to keep from touching such power lines or circuits
as contact with them might be fatal.
17. Overloading
Do not overload wall outlets and extension cords as
this can result in a risk of fire or electric shock.
18.
Object and Liquid Entry
Never push objects of any kind into this product
through openings as they may touch dangerous volt-
age points or short-out parts that could result in a
fire or electric shock. Never spill liquid of any kind
on the product.
19.
Servicing
Do not attempt to service this product yourself as
opening or removing covers may expose you to dan-
gerous voltage or other hazards. Refer all servicing
to qualified service personnel.
20.
Damage Requiring Service
Unplug this product from the wall outlet and refer
servicing to qualified service personnel under the
following conditions:
a. If the power-supply cord or plug is damaged.
b. If liquid has been spilled, or objects have fallen
into the product.
c. if the product has been exposed to rain or water.
d. If the product does not operate normally by fol-
lowing the operating instructions. Adjust only
those controls that are covered by the operating
instructions as an improper adjustment of other
controls may result in damage and will often re-
quire extensive work by a qualified technician
to restore the product to its normal operation.
e. If the product has been dropped or the cabinet
has been damaged.
f. If the product exhibits a distinct change in per-
formance.
21. Replacement Parts
When replacement parts are required, be sure the
service technician has used replacement parts speci-
fied by the manufacturer or have the same
characteristics as the original part. Unauthorized
substitutions may result in fire, electric shock, or
other hazards.
22. Safety Check
Upon completion of any service or repairs to this
product, ask the service technician to perform
safety checks to determine that the product is in
proper operating condition.
23. Wall or Ceiling Mounting
The product should be mounted to a wall or ceiling
only as recommended by the manufacturer.
24. Heat
The product should be situated away from heat
sources such as radiators, heat registers, stoves, or
other products (including amplifiers) that produce
heat.
F_GS*F4 iv
Page 5
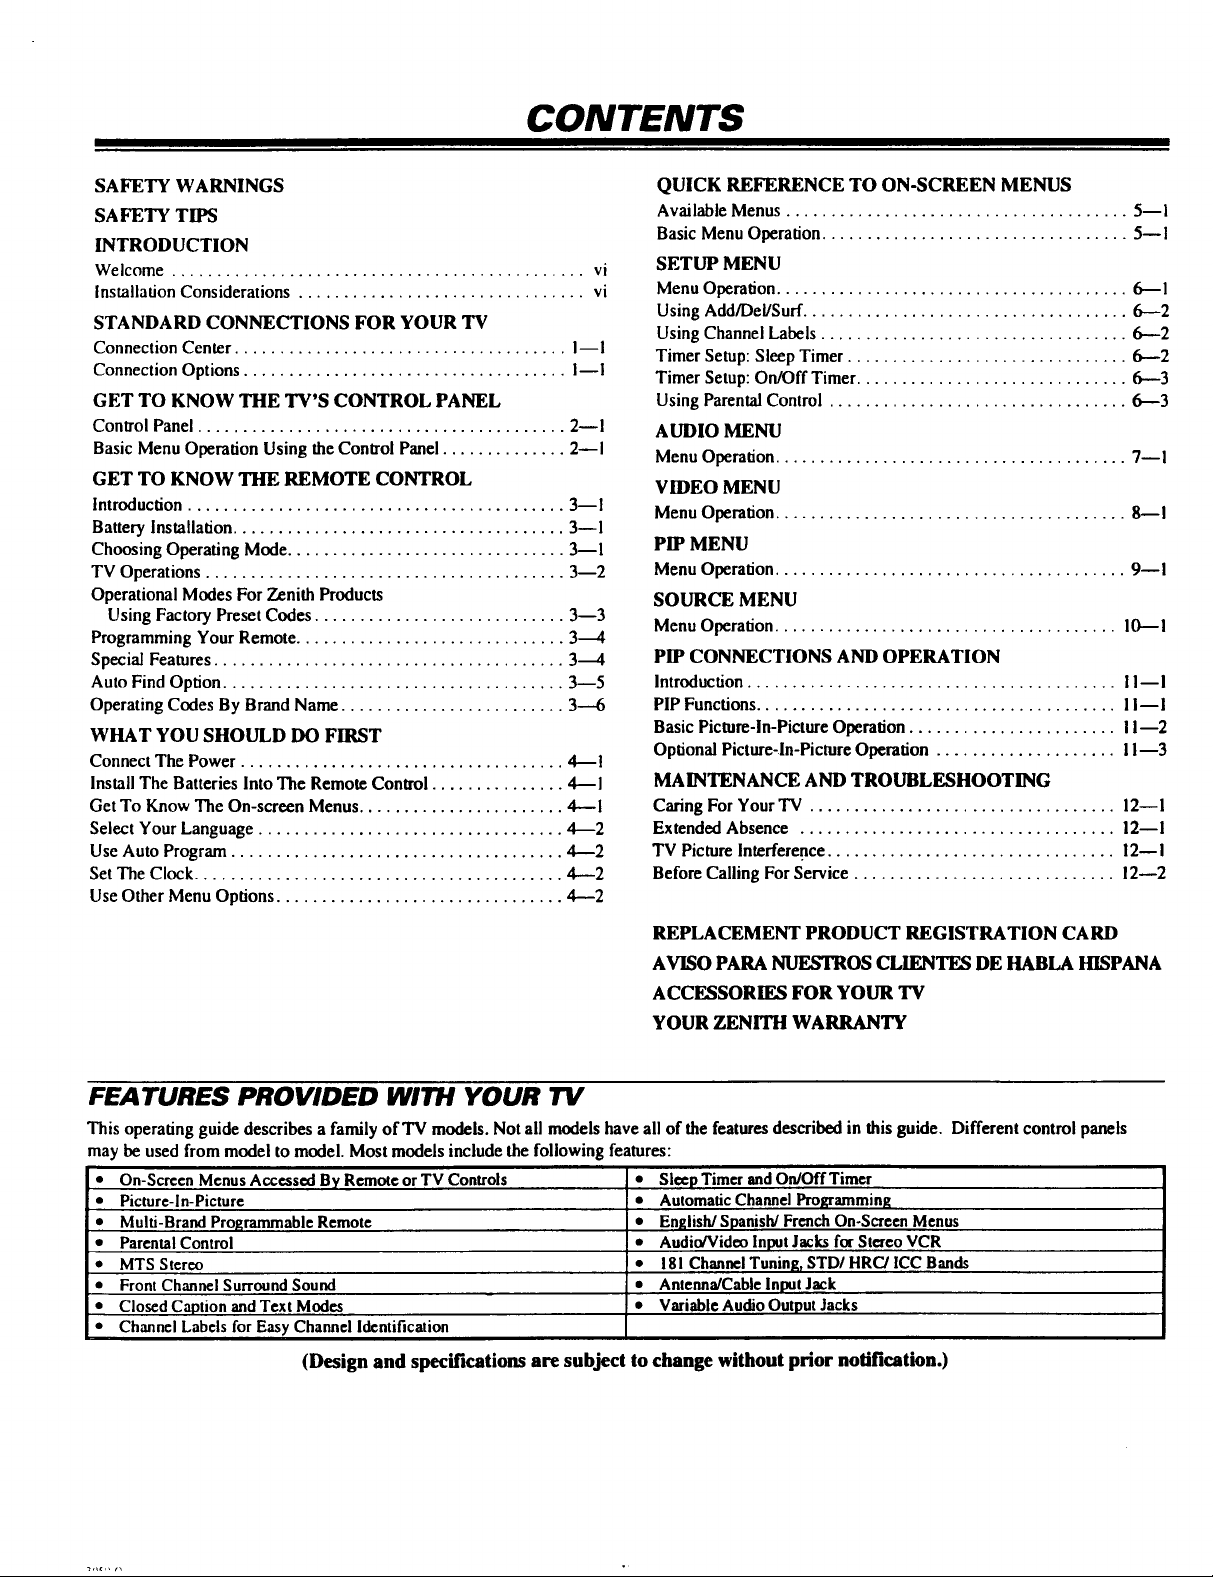
CONTENTS
SAFETY WARNINGS
SAFETY TIPS
INTRODUCTION
Welcome .............................................. vi
installafon Considerations ................................ vi
STANDARD CONNECTIONS FOR YOUR TV
Connection Center ..................................... I--I
Connection Options .................................... i--I
GET TO KNOW THE TV'S CONTROL PANEL
Control Panel......................................... 2--1
Basic Menu Operation Using theConD'olPanel.............. 2--1
GET TO KNOW THE REMOTE CONTROL
Introduction.......................................... 3--1
Battery Installation..................................... 3--1
Choosing Operating Mode ............................... 3--1
TV Operations ........................................ 3--2
OperationalModesFor Zenith Products
Using Factory PresetCodes ............................ 3--3
ProgrammingYourRemote.............................. 3--4
Special Features ....................................... 3------4
Auto FindOption ...................................... 3--5
Operating Codes By BrandName ......................... 3---6
WHAT YOU SHOULD DO FIRST
Connect The Power.................................... 4--1
InstallTheBatteriesIntoThe RemoteControl ............... 4--I
Get To Know The On-screenMenus....................... 4----I
Select YourLanguage.................................. 4--2
Use Auto Program..................................... 4--2
Set The Clock ......................................... 4-..--2
UseOther Menu Options................................ 4--2
QUICK REFERENCE TO ON-SCREEN MENUS
Available Menus ...................................... 5--1
Basic Menu Operation .................................. 5--1
SETUP MENU
Menu Opera_on ....................................... 6--I
Using Add/Dei/Surf .................................... 6----2
Using Channel Labels .................................. 6-.--2
Timer Setup: Sleep Timer ............................... 6---2
Timer Setup: On/Off Timer .............................. 6---3
Using Parental Control ................................. 6---3
AUDIO MENU
Menu Operation ....................................... 7--1
VIDEO MENU
Menu Operation ....................................... 8--1
PIP MENU
Menu Operation ....................................... 9--1
SOURCE MENU
Menu Operation ...................................... 10--I
PIP CONNECTIONS AND OPERATION
Introduction ......................................... i I--I
PIP Functions ........................................ II--I
Basic Picture-in-Picture Operation ....................... 1I--2
Optional Picture-In-Picture Operation .................... II--3
MAINTENANCE AND TROUBLESHOOTING
Caring For Your TV .................................. 12--1
Extended Absence ................................... 12--1
TV Picture Interference ................................ 12--1
Before Calling For Service ............................. 12--2
REPLACEMENT PRODUCT REGISTRATION CARD
AVISO PARA NUES'rROS CLIENTES DE HABLA HISPANA
ACCESSORIES FOR YOUR TV
YOUR ZENITH WARRANTY
FEATURES PROVIDED WITH YOUR TV
This operating guide describes a family of TV models. Not all models have all of the features described in this guide, Different control panels
may be used from model to model. Most models include the following features:
• On-Screen Menus Accessed By Remote orTV Controls
• Picture-In-Picture
• Multi-Brand Programmable Remote
• Parental Control
• MTS Stereo
• Front Channel Surround Sound
• Closed Caption and Text Modes
• Channel Labels for Easy Channel Identification
(Design and specifications are subject to change without prior notification.)
• Sleep Timer andOn/OffTimer
• Automatic Channel Programming
• English/Spanish/French On-Screen Menus
• Audio/Video Input Jacks for Stereo VCR
• ! 81 ChannelTuningISTDI HRC/ICC Bands
• Antenna/Cable InputJack
• Variable Audio OutputJacks
Page 6

INTRODUCTION
WEL C OME
Welcome into the family of Zenith Color Television owners.
This guide provides instructions on how tooperate your new
TV. in addition, we strongly advise you to read and observe
the precautions listed in the Safety Tips section of this operat-
ing guide. Read this publication carefully so that you will re-
ceive full enjoyment from your new Zenith TV for many years
to come.
Your new TV has been designed and built to give you the very
best in quality, features and performance. There are many re-
gional Zenith authorized service centers throughout the U.S.,
Canada and Mexico who can attend promptly and effectively
to ordinary service needs.
Ifyou should have an unusual performance orservice problem
thatcannot be satis/actorily resolved by your Zenith authorized
service center, call or write:
Zenith Electronics Corporation
Customer Service Department
1000 Milwaukee Avenue
Glenview, IL 60025-2493
Telephone: (847) 391-8752
Mon-Fri, 8:00 a.m. - 4:30 p.m. Central Time
Send the model number, serial number, and date of purchase
or original installation, with a full explanation of the problem
and the service history. We will welcome the opportunity to
look into your specific question or problem and to be of assis-
tance in resolving it promptly.
The model and serial numbers of your new TV are located on the
back of the TV cabinet. For your futureconvenience and protec-
tion, we suggest that you recordthese numbers here:
Model No.
Serial No.
INSTALLATION CONSlDERATIONS
Before you install your TV...
Ventilation -- Proper ventilation keeps your "IV
running cool. Air circulates through perforations
in the back and bottom of the cabinet. Do not
block these vents or you will shorten the life of
your TV.
A_ Power Source w Your "IV is designed to operate
on normal household current, 120 volt 60 Hertz AC.
Do not attemptto operate it on I)(2 current.
Power Cord -- Your power cord has a polarized
plug as required by Underwriters' Laboratories. it
has one regular blade and one wide blade and fits
only one way into a standard electrical outlet. If
the blades will not enter either way, your outlet is
very old and non-standard. A new outlet should be
installed by a qualified electrician.
Safe Operation m Your TV is manufactured and
tested with your safety in mind. However, unusual
stress caused by dropping or mishandling, expo-
sure to flood, fire, rain or moisture, or accidental
spilling of liquids into the TV, can result in poten-
tial electrical shock or fire hazards. It this hap-
pens, have your TV checked by a service
technician before using it again.
Please read and observe each safety point in the "Safety
Tips" section when installing and using your TV.
VIDEO GAMES AND OTHER FIXED
PATTERN DISPLAY CAUTION -- If you use your TV for
video games or other fixed displays, avoid setting the
BRIGHTNESS control for an excessively bright picture. A
fixed display is any image which does not change frequently,
such as a channel/network identification or other symbol that
remains in the same location for long periods of time. A
bright, fixed pattern, if left on for long periods of time, can re-
sult in a permanent imprint on the TV picture tube. You can re-
duce this possibility by alternating the use of the fixed pattern
display with normal TV picture viewing, by turning down the
CONTRAST control forsustained fixed pattern use, and by
turning off the fixed pattern display when not in use.
PLUGGING IN YOUR TV m Be sure to plug your TV into
an "unswitched" AC power source. The "switched" AC out-
lets found on some video equipment will not continue supply-
ing power to the TV once the equipment is turned off. if the
power to the TV is interrupted, you will have to reset the clock
in the TV to the current time.
TVWFI I}lR_ vi
Page 7
STANDARD CONNECTIONS FOR YOUR TV
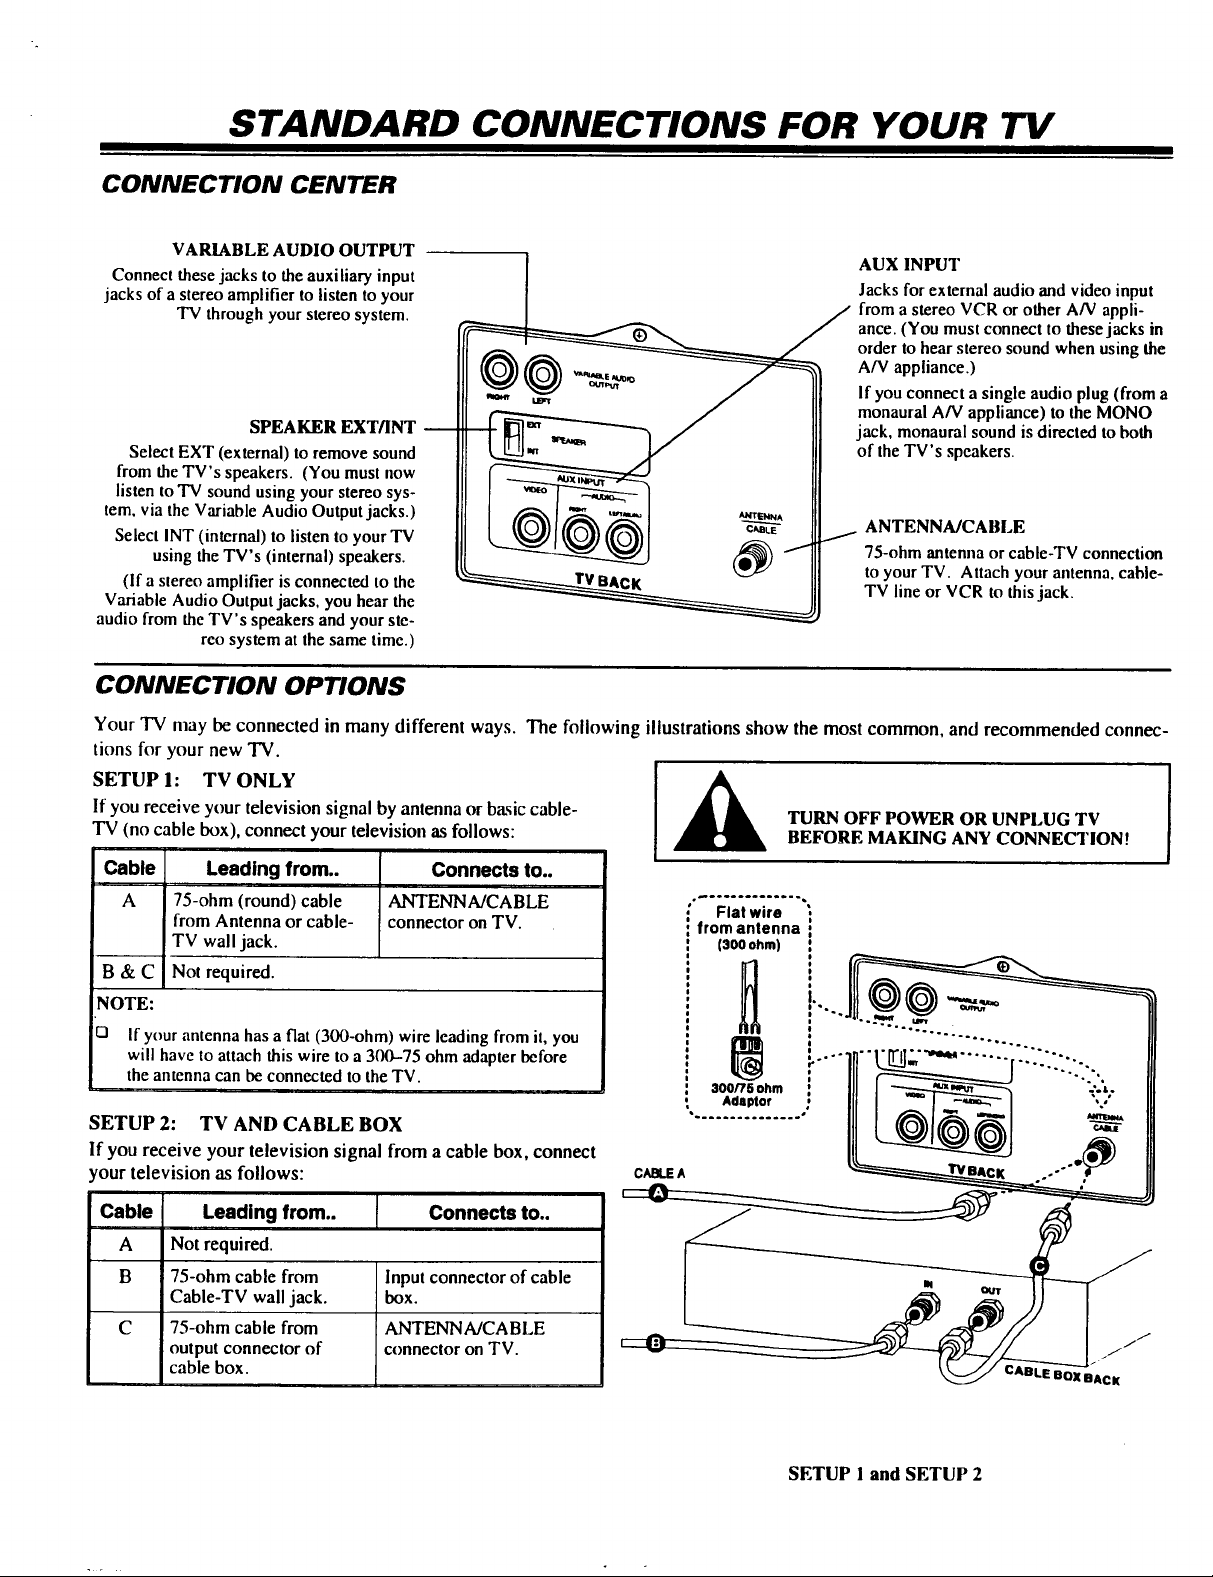
CONNECTION CENTER
VARIABLE AUDIO OUTPUT
Connect these jacks to the auxiliary input
jacks of a stereo amplifier to listen to your
TV through your stereo system.
_ /ance. (You must connect to these jacks in
AUX INPUT
Jacks for external audio and video input
/ from a stereo VCR or other A/V appli-
..-,. ____ / order to hear stereo sound when using the
C(_(_--_ _'_._,_© _ A/V appliance.)
_'_ "_'_-- / If you connect a single audio plug (from a
SPEAKER EXT/INT
-'1- _][=' _ _ / jack, monaural sound is directed to both
/ monaural A/V appliance) to the MONO
Select EXT (external) to remove sound
from the TV's speakers. (You must now
listen to TV sound using your stereo sys-
of the TV's speakers.
tem, via the Variable Audio Output jacks.)
Select INT (internal) to listen to your TV
using the TV's (internal) speakers.
(If a stereo amplifier is connected to the
Variable Audio Output jacks, you hear the
l (O) 1(_(_) _(_ I '_"_ / ANTENNA/CABLE
(_ / - 75-ohm antenna or cable-TV connection
TV line or VCR to this jack.
to your TV. Attach your antenna, cable-
audio from the TV's speakers and your ste-
reo system at the same time.)
CONNECTION OPTIONS
Your TV may be connected in many different ways. The following illustrations show the most common, and recommended connec-
tions for your new TV.
SETUP I: TV ONLY
If you receive your television signal by antenna or basic cable-
TV (no cable box), connect your television as follows:
Cable Leading from.. Connects to..
A 75-ohm (round) cable ANTENNA/CABLE
from Antenna or cable- connector on TV.
!TV wall jack.
B & C Not required.
NOTE:
!O If your antenna has a flat (300-ohm) wire leading from it, you
will have to attach this wire to a 300-75 ohm adapter before
the antenna can be connected to the TV.
SETUP2: TV AND CABLE BOX
If you receive your television signal from a cable box, connect
your television as follows:
CABLEA
Flat wire :
from antenna :
(300 ohm) :
300/75 ohm :
Adaptor l
TURN OFF POWER OR UNPLUG TV
BEFORE MAKING ANY CONNECTION!
t
i
!
°° ° °,
t
Cable Leading from.. [ Connects
l
A Not required.
B 75-ohm cable from Input connector of cable
Cable-TV wall jack. box.
C 75-ohm cable from ANTENNA/CABLE
output connector of connector on TV.
cable box.
to..
/"
OX BACK
SETUP 1 and SETUP 2
Page 8
STANDARD CONNECTIONS FOR YOUR TV
I Ill
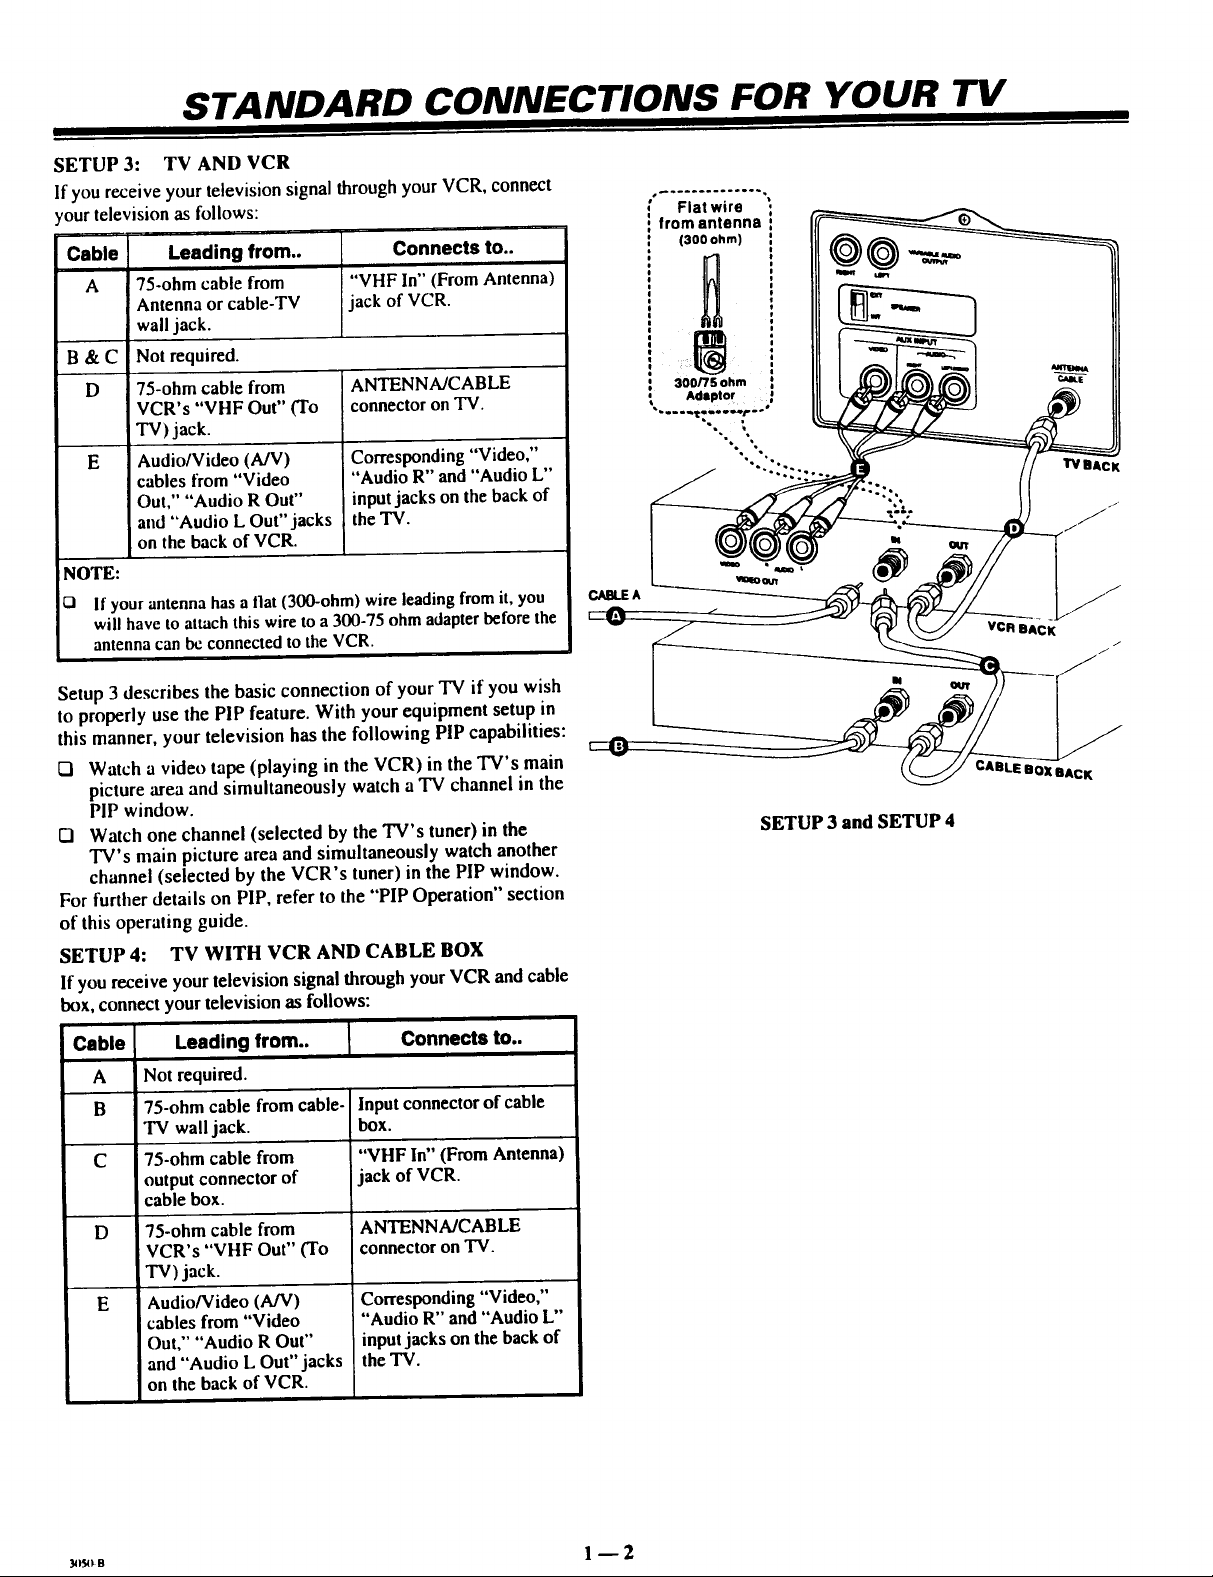
SETUP 3: TV ANDVCR
If you receive your television signal throughyour VCR, connect
_ourtelevision as follows:
Cable Leading from.. Connects to..
A 75-ohm cable from "VHF In" (From Antenna)
Antenna or cable-TV jack of VCR.
wall jack.
B & C Not required.
D ANTENNA/CABLE
75-ohm cable from
VCR's "VHF Out" (To
TV) jack.
E Corresponding "Video,"
Audio/Video (A/V)
cables from "Video
Out," "Audio R Out"
and "Audio L Out" jacks
on the back of VCR.
NOTE:
O
If your antenna has a flat (300-ohm) wire leading from it, you
will have to attach this wire to a 300-75 ohm adapter before the
antenna can be connected to the VCR.
connector on TV.
"Audio R" and "Audio L"
input jacks on the back of
the TV.
I l
Flat wire
from antenna
(300 ohm)
, 300/75 ohm :
Adaptor ,_
"-.":::::
o
,°
BACI
vcn BACK
Setup 3 describes the basic connection of your TV if you wish
to properly use the PIP feature. With your equipment setup in
this manner, your television has the following PIP capabilities:
Q Watch a vide() tape (playing in the VCR) in the TV's main
picture area and simultaneously watch a TV channel in the
PIP window.
Q Watch one channel (selected by the TV's tuner) in the
TV's main picture area and simultaneously watch another
channel (selected by the VCR's tuner) in the PIP window.
For further details on PIP, refer to the "PIP Operation" section
of this operating guide.
SETUP4: TV WITH VCR AND CABLE BOX
If you receive your television signal through your VCR and cable
box, connect your television as follows:
Cable Leading from.. Connects to..
A Not required.
B 75-ohm cable from cable- Input connector of cable
TV wall jack. box.
C 75-ohm cable from "VHF In" (From Antenna)
output connector of Ijack of VCR.
cable box.
D ANTENNA/CABLE
75-ohm cable from
VCR's "VHF Out" (To
TV) jack.
E
Audio/Video (A/V)
cables from "Video
Out," "Audio R Out"
and "Audio L Out" jacks
on the back of VCR.
connector on TV.
Corresponding "Video,"
"Audio R" and "Audio L"
inputjacks on the backof
the TV.
OXBACK
SETUP 3 and SETUP 4
Page 9
STANDARD CONNECTIONS FOR YOUR TV
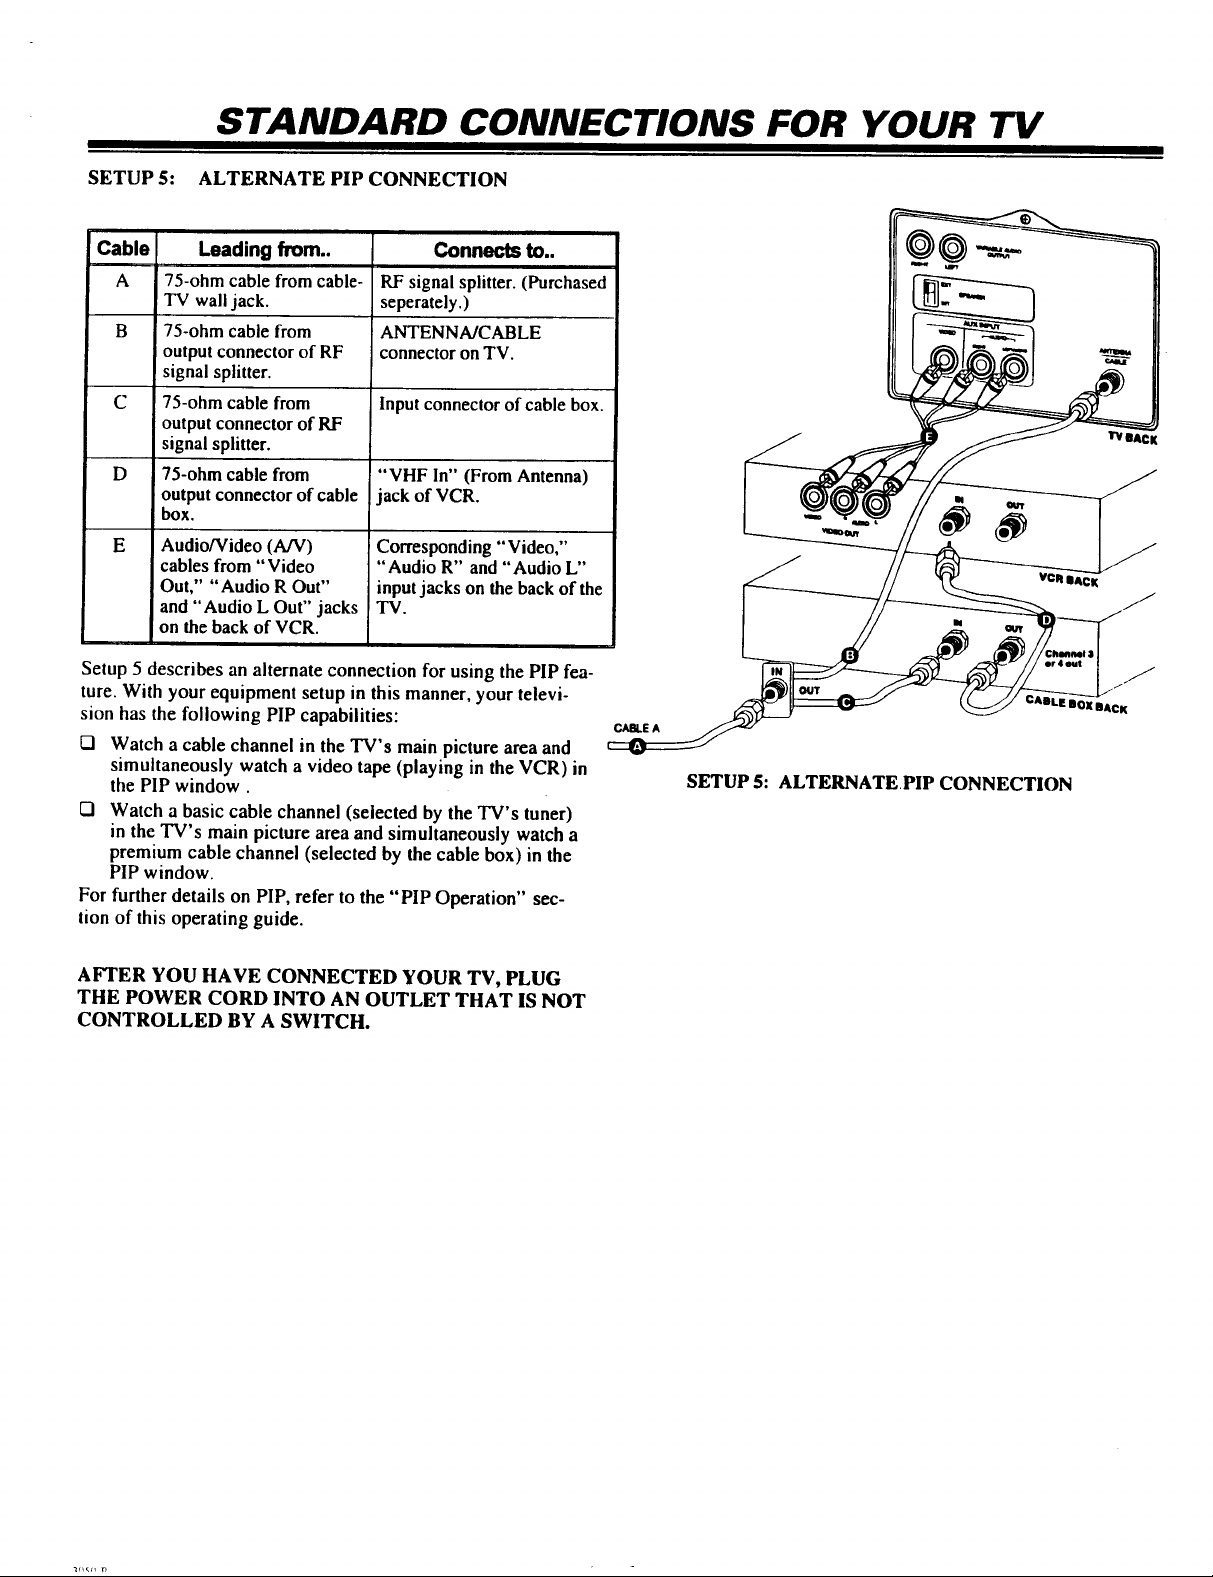
SETUP 5:
ALTERNATE PIP CONNECTION
Cable Leading from.. Connects to..
A 75-ohm cable from cable- RF signal splitter. (Purchased
TV wall jack. seperately.)
B 75-ohm cable from ANTENNA/CABLE
output connector of RF connector on TV.
signal splitter.
C 75-ohm cable from Input connector of cable box.
output connector of RF
signal splitter.
D 75-ohm cable from "VHF In" (From Antenna)
output connector of cable jack of VCR.
box.
E
Audio/Video (A/V)
cables from "Video
Out," "Audio R Out"
and "Audio L Out" jacks
Corresponding "Video,"
"Audio R" and "Audio L"
mput jacks on the back of the
TV.
on the back of VCR.
Setup 5 describes an alternate connection for using the PIP fea-
ture. With your equipment setup in this manner, your televi-
sion has the following PIP capabilities:
[] Watch a cable channel in the TV's main picture area and
simultaneously watch a video tape (playing in the VCR) in
the PIP window.
[] Watch a basic cable channel (selected by the TV's tuner)
in the TV's main picture area and simultaneously watch a
premium cable channel (selected by the cable box) in the
PIP window.
For further details on PIP, refer to the "PIP Operation" sec-
tion of this operating guide.
CABLE A
SETUP 5:
ALTERNATE.PIP CONNECTION
//
LE BOX BACK
T'V@Ac K
J
AFTER YOU HAVE CONNECTED YOUR TV, PLUG
THE POWER CORD INTO AN OUTLET THAT IS NOT
CONTROLLED BY A SWITCH.
Page 10

GET TO KNOW THE TV'S CONTROL PANEL
I II I II
CONTROL PANEL FUNCTIONS
The control panel shown here may be slightly different from the one on your TV, but the operation of the controls are the same.
The majority of the TV's features may be operated using the control panel on the "IV. However, to fully appreciate all of the fea-
tures built in to the TV, such as last channel FLASHBACK and volume MUTE, use the supplied remote control.
f
Press to see the Channel/ Press once to see a menu. Press Press to increase or decrease
ADJUST Left/Right
Pressduring on-screenmenu
operation to adjust the se-
ENTER MENU VOLUME Up/Down
Time display, repeatedlyto sequence through the sound level.
_ 4ADJUST), SELECT__MENU VVOLUMEIA, VCHANNELA OFF-ON/
lectedmenu option.
the other available menus.
SELECT
Press during on-screen
menu operations to se-
lect a menu option.
CHANNEL Up/Down
Press to select channels higher or lower
than the current channel. (To add or
delete channels stored in the scanning
sequence, see Add/Del/Surf option.)
BASIC MENU OPERATION USING THE CONTROL PANEL
OFF-ON
Pressto turnTV
power ON or OFF.
Remote Window
Point the remote control
towards this window to
operate the TV.
PressSELECT repeatedly to tog-
gle the highlight to the menuop-
tion you wantto select.
ENTER
• ADJUSTI_ SELECT MENU
PressENTERto remove
menus fromview orwait a
fewseconds and the menu
will disappearby itself.
Press MENU repeatedly to
choose between available
menus.
Press the Left or Right
ADJUST key to adjust the
selected menu option.
Selector
semp
Menu
Auto Program
Add/Del/Surf
Ch. Labels
Clock Set
]imer Setup
Parental Ctl
Caplion/Text
._Quage
to Demo
1 I
Status of
selected option.
o. 1
Example of "Selected" Menu option.
1
Page 11

GET TO KNOW THE REMOTE CONTROL: MBR 3457
INTRODUCTION
The remote control provided with your new TV is a "multi-
brand" remote control. It will operate the common features of
most, but not all, models and brands of IR (infrared) control-
led TVs, VCRs, cable conveners, video disc players, and
audio equipment. The remote may provide functions that are
not available on your equipment, e.g., menu operations. Some
functions of your particular equipment may not be controlled
by this remote. In such cases, use the original remote control
for your equipment.
Channel/Volume Changes
On-Screen Menu Functions
Picture-In-Picture Functions
Mode Select Keys
Number Keys
VCR Functions
BATTERY INSTALLATION
Batteries are provided, but they must be installed before using the remote control. When it no longer functions normally, or when it
loses memory, replace the batteries with two high-quality, alkaline, size AAA batteries.
Unless your equipment responds to the factory preset codes commonly used for Zenith products, i.e.., 101 for TV, 201 fi)r VCR,
353 tot CABLE, and 401 for AUX., you will need to program the remote control with the codes for your particular equipment.
To Install the batteries:
1. Open the battery compartment by pressing in on the tab and lift-
" ing the cover off.
i2. Place the batteries into the compartment matching plus with
plus (+ with +), minus with minus (- with -) with the markings
shown in the battery compartment.
3. Replace the compartment cover.
Push tab in ?_
NOTES:
U Do not to place heavy objects on top of the remote control
keys. Prolonged unintentional operation of the remote
shortens battery life.
Q Remove the batteries if the remote control will not be used
for a month or more. Battery leakage can permanently
damage the remote, for which Zenith is not responsible.
CHOOSING OPERA TING MODE
To control your TV, VCR, cable box, or auxiliary equipment with
this remote, you mustfirstchoose the mode of operatiou. Press the
desired mode key for'IV, VCR, CABLE or AUX. Note that
some keys on the remote will always operate a particular product
function regardless of which mode the remote is set to.
Page 12

GET TO KNOW THE REMOTE CONTROL: MBR 3457
TV OPERA TIONS
First, press the TV button on the remote control to select the TV mode of operation.
Point Remote at TV
PRG (Program)
Used for programming your remote to op-
erate other equipment. See "Programming
Your Remote" later in this chapter for
more details.
FLASHBK (Flashback)
Press to return to the previous TV
channel selected for viewing.
SURF
Activates the TV's channel
"Surf" feature.
CHANNEL (Up or Down)
Tunes to the next higher or lower channel
programmed into the TV memory.
When the channel "Surf" mode is acti-
vated, only channels set as "'Surf"chan-
nels will be tuned.
If "Surf" mode is not activated, channels
set as "Added" and "Surf" will he tuned.
(See Add/Del/Surf of Setup Menu for
more information.)
ENTER
Press to see the Channel/Time display or
enter channel numbers.
MENU
Displays on-screen menus for TV mode of
operation. Press repeatedly to view other
on-screen menus.
PIP, SWAP, and FREEZ KEYS
See "PIP Operation"
section for more details.
TIMER
Displays the SLEEP TIMER menu. Press
repeatedly to set desired TV shut-off time.
Also used to specify AM or PM when set-
ting the TV's clock or programming a
timer feature. See "Getting to Know Your
TV." section for more details.
POWER
Turns TV ON or OFF.
TV
Press to select TV mode of operation.
MUTE
Press to turn off sound while the picture re-
mains. Press again to restore the sound.
VOLUME Left
Decreases the TV's sound level. Press zmd
hold to repeat.
VOLUME Right
Increases the TV's sound level. Press and
hold to repeat.
NUMBER KEYS
Press for direct channel selection and
entering number values for some
menu options.
UP/DOWN, LEFT/RIGHT ARROWS
The Up and Down arrow keys are the
select keys. They are typically used to se-
lect an option in a menu. Press to move
the highlight bar within the menu.
The Left and Right arrow keys are the
adjust keys. They are typically used to ad-
just or activate the selected option. Press
to adjust a selected menu option.
QUIT/_
Removes on-screen display or pop-up
from view. if no display is on, this toggles
front speaker surround sound ON attd
OFF.
CC (Closed Captioning)
Press to display the closed caption menu.
TV/VC.R - SOURCE
Press to switch between watching TV via
the ANTENNA/CABLE input source or
the VIDEO IN input source.
TV Operations
NOTE:
Keys dedicated to VCR functions may be used to operate your VCR while the remote is in TV mode.
UI All features listed may not be available on your TV. See Contents page for a listing of features available ti_r your TV.
I:1 All features and specifications are subject to change without prior notice.
_o 3 -- 2
Page 13

GET TO KNOW THE REMOTE CONTROL: MBR 3457
OPERA TIONAL MODES FOR ZENITH PRODUCTS USING FACTORY PRESET CODES
Pushbutton
or Key Label
POWER
CABLE
VCR
AUX
TV
SURF
FLASHBK
MUTE
CHANNEL UP
CHANNEL DN
VOLUME (Right)
TV Power On/Off
Selects Cable Mode
Selects VCR Mode
Selects AUX Mode
Selects TV Mode
Surf ON/OFF
TV Flashback
TV Mute
TV Channel Up
TV Channel Dn
TV Volume Up
VOLUME (Left) TV
1 TV
2
3
4
5
6
7
8
9
0
ENTER
MENU
TV
TV
TV
TV
TV
TV
TV
TV
TV
TV
TV
UP ARROW TV
DOWN ARROW TV
LEFT ARROW TV
RIGHT ARROW TV
QUIT/.b TV
PIP TV
SWAP 'IV
FREEZ TV
CC TV
TIMER TV
TVNCR/SOURCE TV
RECORD
PAUSE
REWIND
PLAY
STOP
FFWD
VCR Record
VCR Pause
VCR Rewind
VCR Play
VCR Stop
VCR Fast Forward
"IV Mode
Zenith Code 101
VCR Mode
Zenith Code 201
VCR Power On/Off
Selects Cable Mode
Selects VCR Mode
Selects AUX Mode
Selects TV Mode
VCR AM/PM
VCR Flashback
TV Mute
VCR Channel Up
VCR Channel Dn
TV Volume Up
Volume Dn
Digit i
Digit 2
Digit 3
Digit 4
Digit 5
Digit 6
Digit 7
Digit 8
Digit 9
Digit 0
Enter
Menu
Select Up
Select Dn
TV Volume Dn
VCR Digit I
VCR Digit 2
VCR Digit 3
VCR Digit 4
VCR Digit 5
VCR Digit 6
VCR Digit 7
VCR Digit 8
VCR Digit 9
VCR Digit 0
VCR Enter
VCR Menu
VCR Select Up
VCR Select Dn
Adjust Left VCR Adjust Left
Adjust Right VCR Adjust Right
SEQ Sound VCR Quit
PIP VCR VCR+
PIP Swap VCR Channel Map
PIP Freeze VCR Search
Closed Captions VCR Memory
Timer VCR Timer
Source VCR TV/VCR Tuner
VCR Record
VCR Pause
VCR Rewind
VCR Play
VCR Stop
VCR Fast Forward
Cable Mode
Zenith Code 353
Cable Power On/Off
Selects Cable Mode
Selects VCR Mode
Selects AUX Mode
Selects TV Mode
CABLE FC/Fav Ch
CABLE Flashback
TV Mute (See Note I)
CABLE Channel Up
CABLE Channel Dn
TV Volume Up (See Note l)
Tv Volume Dn (See Note 1)
CABLE Digit I
CABLE Digit 2
CABLE Digit 3
CABLE Digit 4
CABLE Digit 5
CABLE Digit 6
CABLE Digit 7
CABLE Digit 8
CABLE Digit 9
CABLE Digit 0
CABLE Enter
CABLE Menu
CABLE Up Arrow
CABLE Down Arrow
CABLE Left Arrow
CABLE Right Arrow
CABLE Quit
CABLE Day Up
CABLE Day Down
CABLE Pg Up/*
CABLE Pg Down/#
CABLE Timer
CABLE info
CABLE Buy
CABLE Guide
VCR Rewind
VCR Play
VCR Stop
VCR Fast Forward
AUX Mode
Zenith Code 401
AUX TV/Disc
Selects Cable Mode
Selects VCR Mode
Selects AUX Mode
Selects TV Mode
AUX Audio
AUX Frame/rime
"IVMute
AUX Skip>>
AUX Skip<<
'IV Volume Up
"IV Volume Dn
AUX Digit 1
AUX Digit 2
AUX Digit 3
AUX Digit 4
AUX Digit 5
AUX Digit 6
AUX Digit 7
AUX Digit 8
AUX Digit 9
AUX Digit 0
AUX Display
AUX Program
AUX Part
AUX Random
AUX x3 FAST <
AUX x3 FAST >
AUX Clear
AUX Repeat-Side
AUX Repeat-A-B
AUX Repeat-Chap
AUX Memory
AUX Still
AUX TV/Disc
AUX Edit
AUX Pause
AUX Scan <<
AUX Play
AUX Stop/Eject
AUX Scan>>
Reference:124-212-36and
BP 221-952-02A
NOTES:
I. Can be overwritten with Cable Vol/Mute when 399 is entered.
Page 14

GET TO KNOW THE REMOTE CONTROL: MBR 3457
PROGRAMMING YOUR REMOTE
If yt,u are using Zenith products, the remote is programmed for the most commonly used codes. For other audio/video brands you
will have to program the remote.
Follow these steps for each product you are using: NOTES:
To program the remote:
1. Locate the three-digit code for your brand (such as Zenith) and
equipment (such as VCR) in the code table.
2. Press and hold PRG with a small blunt object until the indicator
lights (about three seconds).
3. Press TV, VCR, CABLE or AUX to select the product you
want your remote to control. (Use CABLE or AUX to
program your remote for a second TV or VCR or to
program your remote for a video disc player or audio
equipment.)
4. Enter the three-digit code then press ENTER. The indicator light
should flash then turn offto indicate that the code was accepted. If
the light stays on, repeatsteps 3 and 4 or try usinga different code.
5. Write the codes that operate your equipment on the label
inside the battery compartment for future reference.
SPECIAL FEATURES
UI To erase all code programming and return to the factory
preset codes, enter code 9-1-1 when programming the
remote.
If no key on your remote is pressed within 60 seconds, the
programming process will stop, and you will have to start
again.
I:::1You may cancel programming at any time by pressing PRG.
AUX+I, AUX+2, AUX+3 CAPABILITY
Your remote can control up to seven electronic components, if
you have programmed the remote for four components using the
TV, VCR, CABLE and AUX keys, you may also program it for
up to three additional components.
To program AUX+I, AUX+2, & AUX+3:
1. Locate the three-digit code for your equipment in the code table.
2. Press and hold PRG until the indicator lights.
3. Press AUX and "'1" simultaneously to select AUX+I.
4. Enter the three-digit code then press ENTER. The indicator light
should flash then turn off to indicate that the code was accepted. If
the light stays on, repeat steps 3 and 4 or try using a different code.
5. Repeat steps 2 -- 4 for AUX+2 and AUX+3 programming.
6. Write the codes that operate your equipment on the label
; inside the battery compartment for future reference.
Once programmed, hold down the AUX key and press 1, 2 or 3,
to access the additional AUX +1, 2 or 3 mode.
CABLE BOX VOLUME
You may use your remote to control cable box volume and mut-
ing if available on your equipment.
Programyour cable box code into the CABLE or the AUX mode.I'
i Repeat the pn_gramming steps, again using the CABLE or AUX I
I12 To program the cable box volume: I
key. hutenter code3-9-.-9inste',dofa brandc_xleand press I
ENTER. !
AMPLIFIER VOLUME OVERRIDE
You may use your remote to override your TV, VCR or video
disk player's volume functions with your amplifier's volume and
muting.
To program the amplifier volume override:
1. Program your amplifier code into the CABLE or one of the
AUX modes.
2. Select the mode on your remote O'V, VCR, etc.) where you
want the amplifier volume control function to appear. In other
words, if you want to operate the volume and mute of your
amplifier while the remote is in TV mode, press TV for this step.
3. Enter code 4-9-9, followed by ENTER.
The amplifier volume and mute features are now available in the
TV mode.
NOTES:
I.J To restore normal volume and muting control to your TV
cable box, reprogram the remote for these units into each
mode (TV, VCR, etc.) to be restored.
I::l CD and tape devices will automatically select amplifier vol-
ume and mute.
NOTE:
F..l To restore TV volume/mute control to the CABLE or AUX
mode, reprogram your cable code into that mode.
........ 3_4
Page 15

GET TO KNOW THE REMOTE CONTROL: MBR 3457
A UTO FIND OPTION
If you have tried all the codes listed in the code table for your brand and type of product, and none of those codes operate your
equipment, you can use Auto Find to search for the code you need.
Follow these steps for each product you are using:
To auto find a code:
1. Turn the product ON.
2. Press and hold PRG untl the indicator lights.
3. Press the mode key on the remote for the product you want to
control: "IV, VCR, CABLE, or AUX.
4. Enter code 0-0-0, then press ENTER. When the indicator light
flashes three times and remains lit, Auto Find is active.
5. Aim the remote toward the product and press and release
POWER, repeating this action until the product turns OFF.
6. Press ENTER immediately to save the code. If your remote fails
operate the functions you use most often, you can re-enter Auto
Find and search for a better code.
NOT_:
t-I The indicator light should flash OFF when you press
POWER and back ON when you release it. If the indicator
light stays on when you press POWER, Auto Find has trie_
all available codes. If you finish Auto Find and the producl
you want to control has not turned off, your remote cannot
control that product.
121 Pressing PRG at any time during the use of Auto Find will
cancel Auto Find, and you will have to start again.
Typical Remote
Control
Equipment to be
controlled
Page 16

GET TO KNOW THE REMOTE CONTROL: MBR 3457
OPERA TING CODES BY BRAND NAME
TVS
Admiral 116. 121, 130. 133
Adwnlum TV/VCR 154
Akai 11)4
Amirk 1(13.146
AOC 11)4
Bell & Howell 121
Broksmic 131. 136
Candle 139
Cemunon 119
Cilizcn 121. 139
Cnntec 141
Cortlnad. I 1)3
Cn)wn I I13
Curtis Malhes 16, 119, 121
Daewoo 149, 139
Daewoo TV/VCR 148
Daylrlm 19
Ekkua 121
EmersGm 11)3. IO4.123.12 4.
Emerita 1N/VCR
Fislzr
F,rm TWVCR
General
Ekcuic
Guldu_
Gold, tar TV/VCR
Hitachi
J.C Prnncy
JVC
KMC
KTV
Kumui
Lodgcrx:t
Lo8ik
LXI
Magnav.x
MaLmavox"rVNCR
Majestic
Marlnlz
Mesatrou
Mcmorcx
MGA/
Mitsubishi
M_m_nery
Ward
NEC IIM, 119
Plmaailnlc lit6+ 11/7. Itqi. 166
PimlumJc TV/VCR 174
Phi[co 1(13.1(14. 112.
Phdips 12, 113
Pitmeer 135
Portland 1113
Proscan 116. 157, 162. 167
Qua,tau" 1116, 11/7
131, 136. 145
158
1119+118
154
1116+lift, 114.
116, 117, 161
liD, 1()4. 119. 147 i
153
IlFl. 103. 129. 163
1114, 111:,114.
117. 119
125. 132. 164
103
1113.1114.138
121
121
i
121
133, 137
1113,112, 113,
117, 119, 127,
l28. 139. 165
:173
i
il21
1114.1211.115
146
121
1114.119. 1211.
1311,I11, 155
1113.1114, 105,
113, I14, 119.
121, 1311. 133
113, 139
RCA
Realistic
Sampo
Samsun 8
Sanyo
So("
Scars
Sony
S<mndr+ign
Sylvania
Symphnc'l'VNCR
Tatung
Tcknika
Tel-rent
Tmhiba
XR 111111
Yorx
Zellith
Zenith TV/VCR
Admiral
Adventura
Aiwa
Akai
Audio
Dymmmics
Ikll & Htiwcfi
Brolr_onic
Clli[I
:illrl
Craig
Curtis Mathes
)aewim
Daytrlll
)BX
_mers_m
Fisher
:urlai
General
Eiccmc
Gilhlslar
litachi
Instam Replay
|.C. Pcnney
IVC
Kenwt_.d
Logtk
LXl
Ill. 116, 126.157.
161.162.167.168
105. 12.3. 124
119
1113.119. 134. 141
1118.1119.118
119. 124
1113.I_, 109.1111,
111. 118. 134
liD. I115.122. 133.
137. 156, 169
liD. 1114, 1115.
113. 114, 119.
121. 1311. 133
115. 143. 151.17(|
139
112, 113. 117. 119.
127, 128, 139
154
1116
1113.112. 121.
124, 139
1113.121
I1(I. I11, 134. 17i
121
119
IOI. 149. 175
IS3. 134. 1"/2
VCRS
2(lB. 261
231
231
223. 238. 241
2112.218
2116.247
221,226, 2511, 235
214
2119
212
214, 239
244. 246. 248. 254
236. 2,16
2112, 218
21D. 21_). 221,
223. 226. 233.
235. 243.2511
211. 212.213.24"7
231
214. 216. 2211
2119
256. 262+ 263
213, 25"/
214,227
214. 215. 218.227
2112.224.225, 258
2O2
239
21!9, 231
Magnavox
Maramz
Maria
Memorex
Mitsubishi
Mimlgome[y
Ward
Multi Tech
NEC
Onnn
Panasonic
I
'Penlax
Philco
Phdil_
Pi_m¢¢r
Ptmland
Pm Scan
Quasac
RCA
RealL_tlL
Simsuug
S_,.mi
Sanyo
seon
Sear+
Sharp
Shnit(wn
S qmatt_: 21NIl
S_my
Sylvania
Symph,mic
Ttshil_
Tamng
Teac
Teknika
Toshiba
XRIIXli
VectorRe,r.arch
Yamaha
Zenith
2117.214. 231
2fl.7.218
211,+1
2116.212. 214+231
204. 222. 252. 264
2118.214.216.
219. 231. 249
239
2O2,218
250
214. 251. 239
215
21/7. 214
2117.214. 227
2111.215
246
216. 26D
214, 259
215. 216+ 2211.227.
2411.242.2,19. 260
2116.21E. 212.
214. 231
2211.2311.238
239
Ill& 212. 24"/
2114.2lB. 233. 243
2ll& 21%.21I,
212. 215
2111.261
239
2114, 214, 216,
219. 23 I. 249
217. 232. 237
_21/7,214. 227
231
21_
2112
2112,231
2119.234
2115.215
239
2114.218
12112.218
2111.224. 225.
229. 237
CABLE/SATELLITE
A|Ic_ro
AllegroA_B Swilch
Gemini
Gerund Ekcu'ic
Genial
illr,JralTleui
tlamlin
klTold
Kale Visxm
Mac'llru
Magnavoa
i358.362
361
3115.331. 338
36.7
3114.3o5. 3116.
131/7.3111!.31J9.
3111.318
302. 3(13, 345,
365, 366
3_14+_17. ]liB, 509.
3111,318.3r_). 363
335
314. 321
334
NSC
Oak
Pa_a._)ni_
Paragon
Philips
Pioneer
RCA DSS
Rel_ncy
Samsung
Scientific Adama
Sprtu:er
Standard Comp
Stargaz
"rex_can
Tt_om
Unika
United Satellite
Uniwrsal
Vid T¢ch
Video Way
Viewstar
Zenith
Zenith Satelkte
335. 339, 368,
369. 3"/11
311. 332. 342
313. 324)
333
347, 350. 352,
354, 335
3 IS. 343
373
329
33_
316. 323. 336. 364
313
335
3"P3
339. 356.3.71
317,318.346
3411,3&7.
344
I
35& 362
3411
349
354,355, 372
3111. 353.3.74
312, 328. 3311.
351, 3711
VIDEO DISK
PLAYERS
Pioneer 14112.403
Sanyo [ 4111Sony 41)4
Zemth I 4OI
AUDIO CD
PLAYERS
Alai
Crown
Denim
Fisher
Golt_tar
HarmaNKar&m
JVC
Kenw(x_d
Masnavox
dilsubishi
NAD
Nakamiciu
NEC
Cmkyo
Pamasonic
Philips
Pitier
Oua-,,ar
Radio Shack
RCA
San)t)
Scoll
t)9. 424
4111
411
412. 438
46(I
413
415
412.416,417,441
42L 422, 433. 434
423. 424
425. 426, 44.7
42.7. 428
429
4311
43 I. 432
42 I. 433. 434
43 I, 435
432
43 I. 436, 439. 4411.
441
437
438. 439
4411
Sharp 44 I. 442
Sony 443. 444.445
So(redesign 461,498. 50 I. 502
Sylvania 433
Teac 446
Technics 432, 439
Tt_hiba 447
Yamaha 448
Zenith 4611. 4_11 498. 5<11,
5<12
AUDIO TAPE
DECKS
Ikmm 455
Harman/Kardtm 456
JVC 45.7
Kenwl_ld 450
Onkytl 458
Phiiil_ DCC 454
)iIwlCCI 4_ 1. 471t
Sony 452
iTcclm_.'s 454. 497
Yamaha 453
AUDIO TUNERS
AND AMPLIFIERS
Demm 462,463
Fisher 4h4
G_hhlar 4_1)
Harman/ 465
Kardon
iVC 46+,
Kenweod 468.4OJ
Maramz 472. _03
(_nkyii 473
Philip_ 475.4"76
Pumeu 477. 478. 479
Radio S'hack 487. 488
Realistic 4_)
San)t) 481
Scott 482
Sharp 483
She_vtmd 487. 488
Sony 489. 4_1. 491. 492
Soaodesign 461,498. 5111.._12
Teac 494. 495
Technics 497
Yamaha 496
Zemth 461).461. 4914.5(11,
Ref: 124-212-34/35 and
5112
pP 221-952-02A
+,_s,+o 3 -- 6
Page 17

WHAT YOU SHOULD DO FIRST
(_ CONNECT THE POWER
AFTER you have connected tile necessary cable(s) to the _1
jacks on the back of the TV, plug your TV's power cord into
an AC outlet. Make sure you do not plug the TV into a
"switched" outlet (an outlet that is controlled by a switch).
Do not plug TV into switched outlet on a
VCR or cable-TV decoder
(_ INSTALL THE BATTERIES INTO THE REMOTE CONTROL
If you have not already installed the batteries in the remote control, now is a good time to do so. Batteries are provided, but they
must be installed before it can be used.
Unless your equipment responds to the factory preset codes, you will need to reprogram the remote control with tile codes of your
Jarticular equipment each time you replace batteries. Refer to "Get To Know Your Remote Control" for programming details.
To install the batteries:
1.
Open the battery compartment by pressing in on the tab and lift-
ing the cover off.
2 Place the batteries into the compartment matching plus with
plus (+ with +), minus with minus (- with -) with the markings
shown in the battery compartment.
3. Replace the compartment cover.
NOTES:
Q Do not place heavy objects on top of the remote control
keys. Prolonged unintentional operation of the remote
shortens battery life.
121 Remove the batteries if the remote control will not be used
for a month or more. TitE REMOTE CONTROL MANUFAC-
TURER IS NOT RESPONSIBLE FOR DAMAGE CAUSED BY
BA2"FERY LEAKAGE.
(_ GET TO KNOW THE ON-SCREEN MENUS
Your new TV is a sophisticated entertainment appliance. For
this reason, it is equipped with an automatic demonstration of
the on-screen menus that control the setup and operational fea-
tures of the TV. By turning on Auto Demo, the on-screen
menus will appear on the TV one-by-one.
1. Press MENU repeatedly to view the Setup Menu.
Select Auto Demo.
! To start the Auto Demo:
Use the Left/Right arrows to turn Auto Demo ON.
Press QUIT to remove the menu from view.
NOTE:
C3 The Auto Demo will continue to operate until it has
been turned OFF in the Setup Menu.
Push tab in
Multi-Brand Remote Control
(Uses 2 size AAA batteries)
Q o -4
Auto Program
Add/Del/Surf
Ch. Labels
Clock Set
"lqmerSetup
Parental C11
Caption/Text
Language
Auto Demo
Setup Menu with Auto Demo Highlighted
I E o.
Page 18

WHAT YOU SHOULD DO FIRST
(_ SELECT YOUR LANGUAGE
"i_e on-screen menus can appear in one of three languages;
English, Spanish or French. Select the language that you
would be most comti)rtable with. Note that the word LAN-
GUAGE always appears in English regardless of which lan-
guage is chosen.
1. Press MENU repeatedlyto view theSetup Menu.
Select l.anguage.
I_i TO select a LANGUAGE:
Use the Left/Right arrows choose a language.
4. Press QU!T to remove the menu from view.
(_ USE AUTO PROGRAM
The first time your TV is turned on, Auto Program will be se-
lected in the Setup Menu. Auto Program finds all available
channels and stores them in the memory of the TV.
To start AUTO PROGRAM:
1. Press MENU repeatedly to view the Setup Menu.
2. Select Auto Program.
3. Use the I.eft/Right arrows to advance to the next menu.
4. Select either OFF AIR ANTENNA or CABLE TV.
5. Use the l.e|t/Righl arrows to begin the channel search.
AutoProgram
Add/Del/Surf
Ch.Labels
Clock Set
TimerSetup
ParentalCtl
_Ca_o_t
ILanguage
AutoDemo
I (
Setup Menu with Language Highlighted
IAu|oProgram
Add/Del/Surf
Ch,Labels
ClockSet
TimerSetup
Parental Ctl
Caption/Text
Language
AutoDemo
Setup Menu with Auto Program Highlighted
English
I"411_ To Program ]
®
SET THE CLOCK
To set the clock:
1. Press MENI; repeatedly to view the Setup Menu.
2. Select Clock Set. ,'
3. Use the ,mmbcred buttons on your remote control to enter the
correct time and press the TIMER button I(_select AM or PM.
(You can ;lls() use the Left/Right arrows to advauce the 24 hour
ch_k to the correct time.)
4. Press QUIT m remove the menu from view.
(7(_ USE OTHER MENU OPTIONS
You ntay want It)use the following options:
U Create your own pcrson:tl list o1 lhwxite channels lor use with
the channel Up/D,_wn butlons. Refer to the Add/Dd/Suff op-
ti(m liar details.
LI Label channels with network or station names: Refer to the
Ch. l,abels option lot details.
Auto Program
Add/Del/Surf
Ch. Labels
IClock Set
Timer Setup
Parental Ctl
Caption/Text
Language
Auto Demo
I I re:so_<_
Setup Menu with Clock Set Highlighted
l.J Use the Parental Control feature to block the viewing of
tmdesirable channels: Refer to the Parental CII up|ion li)r
details.
U Adjust options in the Audio and Video Menus tier your per-
sonal preterences.
,...... 4--2
Page 19

QUICK REFERENCE TO ON-SCREEN MENUS
II I I
AVAILABLE MENUS
Your TV is menu operated. In other words, adjustments to the TV are made via a list of choices which appear on your TV screen.
To view these menus, press the MENU key on the remote control. Press MENU repeatedly to toggle through the available menus.
_ etupMenu
IAuIo Program I
AddiDel/Sur f"....
Ch. Labels
Clock Set
Timer Setup
Parental Ctl
Caption/Text
Language
Auto Demo
Pressk-_
MENU _
_ udioMenu
I Bass !
Treble
Balance
Audio MoOe
Surround J'
SoundRite
i
WdeoMenu
[_-ntrast ]
Brightness
Color
Tint
Sharpness
Picture Pref
Presst-a
MENU
MENU_
_]_Menu
t
SourceMenu
[Main Source ]
PIP Source
BASIC MENU OPERA TION
The remote control buttons which are most frequently used for menu operations are shown here. In addition to these buttons, the
number buttons may also be used where a number value is necessary, such as setting the time in the TV.
PressMENU repeatedlyto
choose between available
menus.
Press an Up or Down
arrow key repeatedly until
the desired option is high-
lighted.
Press a Left or Right arrow
key to adjust the selected
menu option.
Press QUIT to remove
menus from view or wait a
few seconds and the menu
will disappear by itself.
Typical Remote Control Shown
Page 20

_ etupMenu
Au_A_Program I
Add/Del/Surf
Ch. Labels
Clock Set
"timer Setup
Parental CII
Caption/Text
Language
Auto Demo
MENU OPERA TION
SETUP MENU
[4)' ToProgram ]
[Clock Set
-timer Setup
Parental CII
Caption/Text
Language
Auto Demo
I I 10:30 AM._
While the VIDEO Input Source is Chosen
Press MENU repeatedly until the
Setup Menu is shown.
Press the Up or Down arrows until
the desired option is selected.
Menu Option
Auto Program
Add/Del/Surf
Finds all active channels and stores themin the TV's memory foruse by the CHANNEL up/down keys.
Edits the channel numbersfound by the Auto Program featureto create your own list of favorite channels
(/_us_
(SELECT)
Function Of Menu Option
Press the Left orRight arrows to ad-
just the selected option.
PressQUIT or wait a few seconds
fortheTV to returntonormal
operation.
when using the CHANNEL up/down keys. See the informationfollowing this chart for details.
Channel Labels
Assigns a network/station label, name or call lettersto specified channels. For example, if you choose the
labelABC forchannel 13, then ABC will appear in the Channel/Time display whenever channel 13 is
selected. See the informationfollowing this chart fordetails.
Clock Set
Used for setting the TV's internalclock to the correct time. See "What You Should i_ First" section of the
operating guide.
Timer Setup
Parental Ctl
Sets the TV's Sleep Timer and On/Off Timer features. See theinformationfollowing this chartfordetails.
Use this feature to block viewing of any undesirable channels, including the VIDEO input source. See the
information following this chart for details.
Caption/Text
Displays closed captioning or informationaltext when available on the selected channel. Options are: Off,
Caption 1, Caption 2, Caption 3, Caption 4, Text 1,Text 2, Text 3, and Text 4. (At present, few TV
programsor video tapes offer text captioning for any option otherthan CAPTION 1. Therefore,CAPTION
1is the only recommendedchoice, unlessyou know thata specific programis providingcaptioning using one of
theotherselections. )
Language Selects the language used for on-screen menus. Languages available include: English, Spanish or French.
Auto Demo Activates automatic demonstration of on-screen menus. See "What You Should Do First" section of the
operating guide.
continued on next page
Page 21

USING ADD/DEL/SURF
SETUP MENU
To Add Channels:
Added ChanneLs: Channels set to
"Added" are tuned when using the
CHANNEL Up and Down arrow
keys. All channels which were found
by the Auto Program function are
initially set as "Added" channels.
1.
Use the Up or Down arrow keys to
choose Add/Del/Surf.
2.
Select a channel using the number
keys on the remote.
3,
Use the Left/Right arrows to show
Added.
4,
Press QUIT to remove the menu
from view.
To Delete Channels:
Deleted Channels: These channels
are blocked from tuning when using
the CHANNEL Up and Down keys.
However, they may be tuned directly
by using the number keys on the
remote control.
1. Use the Up or Down arrow keys to
choose AddiDel/Surf.
2. Select a channel using the number
keys on the remote.
3. Use the Left/Right arrows to show
Deleted.
4. PressQUITto remove the menu
fromview.
USING CHANNEL LABELS
To assign CHANNEL LABELS:
.
Select Channel Labels.
2.
Select a channel by using the number keys on the remote.
3.
Use the Left/Right arrows to sequence through the choices until
the desired label appears. (Selecting the dashes specifies no
channel label.)
To Setup Surf Channels:
Surf Channels: "SURF' channels act as a list of favorite
channels, intended for your most frequently watched
channels. When the "SURF' mode is activated, these are
the only channels that wm be tuned while using the
CHANNEL Up and Down keys.
1. Use the Up or Down arrow keys to choose Add/Del/Surf.
2. Select a channel using the number keys.
3. Use the Left/Right arrows to show Surf.
4. Repeat steps 2 and 3 make your most frequently watched
channels "Surf" channels.
5. Press QUIT to remove the menu from view.
To activate "SURF' mode, press the SURF key on the
remote control.
[surf's upl appearson the screen.
To deactivate "SURF," press SURF again.
[ No Surfing (_)1 appears on the screen.
Auto Program
AdcVDel/Surf
Ch. Labels ]
Clock Set
"l]mer Setup
Parental CII
Caption/Text
Language
Auto Demo
[ Ch 2 1
TIMER SETUP: Sleep Timer
The Sleep Timer programs the TV to automatically turn itself off after a period from 15 minutes up to 4 hours.
From Setup Menu
1.' Make sure the TV's clock is set.
2. Select Timer Setup and press a Left/Right
arrow to view the Timer Menu.
3. Select Sleep Timer.
4. Press a Left/Right arrow repeatedly to set
the period of time the TV will remain on.
One minute before the TV turns off, the GOOD NIGH'I; display appears on the screen. At
this time you have a choice of the following two actions:
1. Do nothing. The TV will turn itself off in one minute.
2. Delay the turn-off by pressing TIMER.
NOTES:
1_1Before the Timer Menu can be viewed, you must set the time on the TV.
See "WHAT YOU SHOULD DO FIRST" in the operating guide.
F..I To cancel the SLEEP TIMER, turn off the TV or press the Timer button
repeatedly until OFF is showing.
Direct From Timer Button
.
Press TIMER on the remote control.
2.
Press TIMER repeatedly to set the
period of time the TV will remain on.
_D2
i m
ISloep "nrrmr , I
On Time
OIf'limo
On/OffTimer
Sleep Timer set to turn TV
off in 30 minutes.
"Good Night" display appears
60 seconds before shut-off.
:3O
I
Page 22

SETUP MENU
TIMER SETUP:On/Off Timer
TheON/OFF TIMERis a featurewhichprograms the TV toturnitself on at aspecific timethenturnitselfoff atanothertime.
Set On/Off Timer
1. Make sure theTV's clock is set.
2. Select Timer Setup and press a Left/Rightarrow toview the Timer Menu.
3+ Select On Time and use the numbered buttons on your remotetoenter a timeforthe
TV to turnitself ON PressTIMERon the remotetoselect AM or PM.
4. Select Off Thne and usethe numbered buttons onyour remoteto enter a timeforthe
TVto turnitselfOFF. PressTIMERon the remoteto select AM or PM.
i_.++.+++ ++.+..+..+.i i +..1!;oo_+
+re.m+::...:. :.+ +.....1:® P++i
_'T+rmr I I On I
5. Select On/OffTimer and use a Left/Rightarrow toshow ON.
6. PressQUITon your remotecontrol to removethe menu fromview.
NOTES:
Q An "Off Time"must beset before the On/OffTimer can be turned ON.
Before the Timer Menu can be viewed, you must set the time on theTV. See "WHAT YOU SHOULD DO FIRST" fordetails.
USING PARENTAL CONTROL
To "block" channels or the Video Input Source:
1. Select Parental CII and press a Left/Right arrow to view the Parental
Control menu.
2. Select Block Ch. (channel).
3. Use the number keys on the remote to enter a channel number and press a Left/
Right arrow to show "Blocked.".
4. Repeat steps 3 and 4 for each channel you want blocked.
5. If you wish to block the Video source input, select Block Video and press a Left/
Right arrow to show "Source Blocked.".
6. After all desired channels and/or the Video source are "Blocked," select Set
Hours and use the Left/Right arrows to choose the period of time you want
Parental Control to be active: From I hour to 99 hours.
7. Select Set Password
8. Press a Left/Right arrow and enter any 4-number "Password" when prompted to
do so. (You will be prompted to verify the code by entering ita second time.)
9. Select Lock On/Off and use the Left/Right arrows to show "'On."
10. Press QUIT to remove the menu from view.
IBIockCh.
T/mer
Menu
Sleep "limer
On/Off Timer set to turn TV ON at
11:00 am and OFF at 1:00 pm.
Pamnlal
Contro/
l [Ch 9 alockedl
Block Video
SetHours
Set Password
LockOn/Off
(:E:":+L_:__L_x_-_LI
Parental Control Menu
NOTES:
l_ REMEMBER THE ACCESS CODE! TO RE-ENTER PARENTAL CONTROL WHILE IT IS ACTIVATED, YOU
MUST ENTER THIS NUMBER. Otherwise, simply allow the specified period of time to elapse.
O Do not unplug the TV in an attempt to deactivate the Parental Control. This only resets Parental Control.
{J Parental Control cannot be turned ON (Lock On/Off) until the Hours and Password have been set.
3m_+o 6 -- 3
Page 23

I I
AUDIO MENU
_ udio
[Bass
Treble
Balance
Audio Mode
Surround .I,
SoundRite
Menu
I f,
MENU OPERATION
fj_ "" "-,.
Press MENU repeatedly until the
Audio Menu is shown.
(ADJUST)
Press the Up or Down arrows undl
the desired option is selected.
Menu Option Function Of Menu Option
Bass Adjusts the BASS (low-frequency) level.
Treble
Balance
Audio Mode
Adjusts the TREBLE (high-frequency) level.
Adjusts the balance of sound between the two speakers.
Allows you to select Stereo, Mono or 2nd Audio/SAP speaker operation. See information below this chart for
more details.
Stereo:
Directs the sound to the Left and Right speakers as supplied by the programsource (broadcast
TV, VCR, etc.)
Mono:
Directs the same sound to both Left and Right speakers, even if the programbeing received is in
stereo.
2nd Audio/
SAP:
Directs the sound for the Second Audio Program (second language) to both the Left andRight
speakers. SAP sound is always monaural. (SAP is not available while Video ischosen as the
viewing source: The audio signal being received from the auxiliary video source is assumed to be
eitherstereo or mono. )
Surround ,,_ Used to activate the "front" channel surroundsound decoder of the TV. You can then listen to front channel
surround sound audio from the TV's speakers. (Surroundsound audio will only be heard if the program being
watched is in stereo and is encoded with surround sound.)
SoundRite Turn this feature ON to maintain the television's volume ata constant level. In other words, commercials and
audio from the auxiliary input source will no longer appear to sound louder than the volume level you have set.
Press the Left or Right arrows to ad-
just the selected option.
Press QUIT or wait a few seconds for
the TV to return to nornl;.ll operation.
NOTES:
17 Adjustments to the Audio Menu are optional. You do not have to adjust these features in order to use your TV.
I7 With "Stereo" as the selected Audio Mode, the TV switches automatically between Stere() and Mono sound depending on the
actual signal being received.
U3 With "SAP" as the selected Audio Mode, you hear the SAP (usually a second language) on those stations which broadcast two
audio signals. When the SAP broadcast ends, the TV switches automatically between Stereo and Mono modes. The TV
switches back to 2nd Audio/SAP when the SAP broadcast resumes.
7w!
Page 24

MENU OPERA "lION
VIDEO MENU
Video
II Menu
!Contrast I
Brightness
Color
Tint
Sharpness
Picture Pref
r4
t,I
PressMENU repeatedlyuntil the
Video Menu is shown.
Pressthe Left or Rightarrows to ad-
just the selected option.
(/_IUST)
Pressthe Up or Down arrows until
the desiredoptionis selected.
PressQUIT or wait a few seconds for
theTV to return to normal operation.
(SELECT)
Menu Option
Contrast
Brightness
Color
Tint
Sharpness
Picture Pref.
(Preference)
Adjusts the overall contrast and color level of the picture.
Adjusts the brightness level of black areas in the picture.
Adjusts the intensity of the colors in the picture.
Adjusts the color of the flesh tonesto more Red or more Green.
Adjusts the definition of the object edges for bestpicture quality.
Selects the video adjustmentstobe used:
(CUSTOM = your personal adjustment preferences;PRESET = factory set adjustments.)
Function of Menu Option
NOTES:
D
All adjustments on the Video Menu areoptional. It is not necessary to use these features in order to operate the "IV.
Q
Any adjustments made to the Video Menu settings while Picture Pref. is in "Preset" mode will automatically store the current
settings as the "Custom" setting.
3osf_o 8 D 1
Page 25

PIP MENU
_ PlP
[Color
Tint
Size
Menu
] [4 i
MENU OPERA TION
Press MENU repeatedly until the
Press the Up or Down arrows until
the desired option is selected.
NOTE:
Menu Option
Color
Tint
Size
PIP Menu is shown.
ISB.ECrl
Purpose of Menu Option
Adjusts the intensity of the colors in the PIP inset.
Adjusts the color of the flesh tones in the PIP window to more Green or more Red.
Selects either a small or largePIP window.
NOTE:
LI
All adjustments on the PIP Menu are optional. You do not have to use these features in order to use your TV.
Press the Left or Right arrows to ad-
just the selected option.
PressQUIT (or wait afewseconds)
to remove the menu from view.
9--1
Page 26

SOURCE MENU
- ource
Menu
IMain Source
PIP Source
I [Antenna/Cable
MENU OPERA TION
PressMENLI repeatedly until the
Source Menu is shown.
(ADJUST)
Press the Up or Down arrows until
the desired option is selected.
(SELECT)
Menu Option Purpose of Menu Option
Main Source Selects the television's input signal source for basic television viewing. In other words, will your primary
television viewing be from the antenna or cable box that is connected to the Antenna/Cable jack on the back
of the TV. Or, will you mostly watch TV via a VCR (or other audio/video device) connected to the A/V
jacks on the back of the TV. Select either Antenna/Cable or Video.
PIP Source Selects the television's input signal source that is providing the video for the PIP window. Select either
Antenna/Cable or Video.
Press the Left or Righ! arrows to ad-
just the selected option.
Press QUIT or wait a few seconds
for the TV to return to normal
operation.
NOTE:
U The sources may also be changed directly by pressing the SOURCE key on the remote control. When no PIP window is on, the
SOURCE key selects the source for the main picture. If the PIP window is on, SOURCE selects the source for the PIP window.
PIP Window
U_ the arrow keys to
place the window any-
where on the TV screen.
Main Picture Area
In order to show two _ channels on the "IV at the same lime. one signal source
(;mlenna, cable box. etc..) must be connected to the Antenna/Cable jack and a differ-
ent signal source (VCR. Laser Disk. etc..) must be connected to the A/V jacks.
Page 27

PIP CONNECTIONS AND OPERA TION
INTRODUCTION
Your TV must be connected to two separate sources in order to view a
different picture in the PIP inset from that which is showing in the
main picture area of the TV. One source (such as an antenna) must be
connected to the ANTENNA/CABLE jack. The other source (such as a
VCR) must be connected to the AUX INPUT AUDIO and VIDEO jacks.
If you have not already selected the input sources for your main "IV picture
and the PIP window, refer to the instructions below.
I I I
SourceMenu
{Main Source I
PIP Source
IAntenna/Cable
Main picture source
1. Show Source Menu on the
TV.
2. Select Main Source.
3. Press a LefffRight arrow re-
peatedlyto show Antenna/
PiP picture source"
1. Show Source Menu on the
"IV.
2. Select PIP Source.
3. Press a Left/Right arrow
repeatedly to show Video.
Source of main
picture shows
here.
Source of PIP picture
shows here.
Cable.
* A PIP window appears during Source Menu operations to show
the effect of choosing a PIP source.
Main Picture Area
PIP Window
PIP FUNCTIONS
The remote control buttons which are most frequently used for PiP operations are shown here. In addition to these, other buttons on
the remote such as the CHANNEL Up/Down buttons may affect the PIP window, depending on your source selection.
i
PIP Functions
D
Arrow Keys: Use the Left/Right and Up/Down arrow keys to
move the PIP window to the desired location of the TV screen.
SWAP: Press the SWAP key to swap the main picture with
the PIP window. Press SWAP again to return to the original
display.
O
PIP On/Off: Press the PIP key to display the PIP window.
Press it again to remove the PIP window.
O
FREEZE: Press FREE.Z to freeze motion of the picture
shown in the PIP window. Press FREEZ again to return to a
live PIP window.
O SOURCE: When the PiP window is on, SOURCE selects the
source for the PIP window.
O PIP Size: Select Size in the PIP Menu to choose between
seeing a small or large PIP window.
i
Arrow Keys
SWAP
PIP
(on/off)
FREF.Z
SOURCE
i
Page 28

PIP CONNECTIONS AND OPERATION
BASIC PICTURE-IN-PICTURE OPERATION
This illustration shows the basic connection of your TV
to a stereo VCR. With your equipment setup in this man-
ner, your television has the following PIP capabilities:
ISI Simultaneously view a video tape playing in the
VCR and a channel selected by the TV's tuner.
t--i Simultaneously view two different channels; one
selected by the TV's tuner and another using the
VCR's tuner.
[:1 Swap the main picture and the PIP inset.
PIP VIEWING OPTIONS
Viewing Two Different
Channels
1. Set VCR's TVNCR* switch
toTV.
2. Select Main Source in the Source
Menu.
3. Press a Left/Right arrow to select
Antenna/Cable.
4. Select PIP Source in the Source
Menu.
5. Press a Left/Right arrow to select
Video.
6. Press QUIT to remove the menu
from view.
7. Press PIP key to activate PIP.
8. Select a TV channel using the
TV's channel selector.
9. Select a PIP channel using the
VCR' s channel selector.
* May be labeled TV/Video.
Viewing a Video Tape
and a TV Channel
1. Set VCR'sTV/VCR* switch
to TV.
2. Select Main Source in the Source
Menu.
3. Press a Left/Right arrow to select
Antenna/Cable.
4. Select PIP Source in the Source
Menu.
5 Press a Left/Right arrow to select
Video.
6. Press QUIT to remove the menu
from view.
7. Press PIP key to activate PIP.
8. Select a "IV channel using the
TV's channel selector.
9. Play a video tape in the VCR and
view it in the PIP window.
VIDEO Source
Connect to the AUDIO/VIDEO
Inputjacks.
CABLE A
Option 1: Antenna or Direct Cable Connection to VCR.
(Cables are not supplied with television.)
Antenna/Cable
Source
Connect to theANTENNM
CABLE jack.
TVBAcK
VCRBAcK
s,s_. 11 -- 2
Page 29

PIP CONNECTIONS AND OPERA TION
OPTIONAL PICTURE-IN-PICTURE OPERA TION
With your equipment setup in this manner, your
television has the following PIP capabilities:
121Simultaneously view a video tape playing in the
VCR and a basic cable channel selected by the TV's
tuner.
D Simultaneously view two different channels; one
basic cable channel selected by the TV's tuner and a
scrambled (premium) cable channel selected by the
decoder's tuner.
Fi Swap the main picture and the PIP inset.
NOTE:
O The cable channels you can view depends on the service
you have purchased from your cable company.
PIP VIEWING OPTIONS
Viewing Two Different
Channels
1 Select Main Source in theSource
Menu.
2. Press a Left/Rightarrow to select
Antenna/Cable.
3. SelectPIP Source in the Source
Menu.
4. Pressa Left/Rightarrow to select
Video.
5. PressQUITto removethe menu
from view.
6. Press PiPkey to activate PIP.
7. Select a TV channel using the
TV's channel selector.
8. Select a PIP channel using the
cable box.
Viewing a Video Tape
and a TV Channel
1 Select Main Source in the Source
Menu.
2. Press a Left/Right arrow to select
Antenna/Cable.
3. Select PIP Source in the Source
Menu.
4. Press a Left/Right arrow to select
Video.
5. Press QUIT to remove the menu
from view.
6. Press PIP key to activate PIP.
7. Select a TV channel using the
TV's channel selector.
8. Play a video tape in the VCR
and view it in the PIP window.
Connect to the AUDIO/VIDEO
Signal Splitter
(Purchased separately)
CABLE A
Option 2: Cable-TV Connection Direct to TV & Cable Box to VCR.
VIDEO Source
Input jacks.
(Cables are not supplied with television.)
Antenna/Cable
Source
Connect to the
ANTENNA/
CABLE jack.
TVBACK
VCRBAcK
11--3
Page 30

MAINTENANCE AND TROUBLESHOOTING
CARING FOR YOUR TV
Your TV will look better, have a longer life and perform better
if you care for it properly.
First check to see that the TV is off. For added
safety, unplug the "IV from the power outlet.
NOTE: If you unplug your TV, you will have to
reset the clock to the current time.
Cabinet Care
Non-Wood Cabinet or Cabinet Components Moisten a soft
cloth with a mild soap solution or Ivory dishwashing deter-
gent. Wipe the surface with a damp cloth. Then rinse the cloth
inclean water and wipe the surface again. Allow the TV to air-
dry before turning it on.
Wood Cabinets or Cabinet Components Use any good fur-
niture cleaner and polish. Regular care will help preserve the
finish.
Picture Glass Cleaning
The picture tube face attracts dust particles and should be
cleaned regularly. To clean the face, spray a small amount of
glass cleaner on a cleaning cloth and wipe the picture tube
glass face until clean. Repeat if necessary.
To delay new dust accumulation, wet a soft cloth in lukewarm
water in which a little fabric softener or Ivory dishwashing de-
tergent has been mixed. Wring the cloth almost dry. Wipe the
glass face. Make sure no drops of moisture are squeezed onto
the glass. Do not wipe the glass dry. Allow the glass to air-dry
before you turn the TV on again.
EXTENDED ABSENCE
Before an extended absence (such as a vacation) you may
want to unplug the power cord from the electrical wall outlet.
This will protect the TV from possible damage from lightning
or power line surges. If you have an outdoor antenna, you may
also want to disconnect the antenna lead-in wires on the back
of the TV.
TV PICTURE INTERFERENCE
Your TV picture may be affected by interference caused by
one or a number of factors. These include:
Speckled or Streaked Picture Can be caused by nearby auto-
mobile ignition, electrical appliances, etc. This is most notice-
able in weak signal areas.
Snow in Picture Caused by insufficient signal. Usually
caused by the TV being located too far from the TV station or
by an improper antenna installation.
NOTE: If you unplug your TV, you will have to reset the
clock to the current time.
Ghosts or Reflections Caused by signals being reflected
from surrounding buildings, water tanks, or other high struc-
tures.
Radio Signal Police, amateur or CB radio transmitters may
cause interference.
These interference problems can often be corrected through
the use of a better antenna, signal amplifiers, or various filter
devices. See your TV dealer for additional information, and
available TV accessories.
"rvcA_tm 12 m I
Page 31

MAINTENANCE AND TROUBLESHOOTING
I I IIII
BEFORE CALLING FOR SERVICE
Check these items and see if you can correct the trouble by changing the adjustment of a control or the setting of a switch.
By making these simple checks before calling for service, you may save time and money.
1
PROBLEM [ TRY THIS
Picture OK. Poor sound. Re-orientantenna. Try another channel -- possible station trouble. Adjust
Sound OK. Poor picture. Re-orientantenna. Try another channel -- possible station trouble.
No picture or sound. Is TV on? Is there power in wall outlet? Is TV plugged in7 Is antenna
Pictureblurredor distorted. Ghost in picture. Check antenna or cable hook up for broken wires. Try another channel
No color, or poor color. Is ita color program? Check antenna orcable hook up for brokenwires.
No sound. Volume setting may be too low. Check MUTE buttonoperation on
Cannot select certain channels. Channels may be skipped in Add/Del/Surf option of Setup Menu.
No closed captions Are captions available? Is Caption I, 2, 3 OR 4 selected using the
Black box covers half of screen. Is text intormation available? Is Text i, 2, 3 or 4 selected in the
No picture or sound when Video source is selected. Is audio/video source hooked up properly? Are all wires connected to
No stereo sound or weak stereo sound Check Audio mode. Was stereo sound present before selecting
when using a stereo VCR. VIDEO source?
PIP window is black or lacks contrast when Adjust PIP Color and Tint settings in PIP Menu. Are all wires
selecting Video for PIP inset, connected to VIDEO IN jacks on connection center?
PIP window is "snowy" when using Antenna/Cable IsTV/VCR switch on the VCR in the TV position?
for PIP and Video for main picture.
Complete picture loss when using Video for PIP window Is TV/VCR switch on the VCR in the TV position'?
source and Antenna/Cable for main picture.
TV appears to remain on the same channel when using Check Add/Del/Surf option in Setup Menu: Is only one channel
the Channel Up and Down keys. labeled as "AddedT' If operating TV in Surf mode, is only one channel
Remote control does not work. Are batteries okay? Is TV turned ON? Is TV plugged in?
m
Audio Menu options. Check forlocal interference.Is antenna/cable
connection loose?
Adjust Video Menu options. Troublewith cable-TV system? Is
antenna/cable connection loose?
hooked up? Is cable hooked up? Is the channel blocked by the Parental
Control? Trouble with cable-TV system? Check auxiliary audio/video
equipment. Check channel selection.
-- possible station trouble. Check for local interference.
Adjust Video Menu options.
remote control. Check Audio Mode in Audio Menu: Audio Mode may
be set to SAP, but no SAP signal is detected on thechannel.
CaptionfText option on the Setup Menu?
Caption/Text option of the Setup Menu.
VIDEO IN jacks on connection center?
labeled as "Surf?."
NOTES:
U If your TV fails to respond to the PICTURE PREF. selec-
lion, or to any other menu selection, you must reset the
TV. Simply disconnect the AC power cord from the power
outlet. Wait a few minutes, then plug the TV back into the
power outlet. You will have to reset the clock to the cur-
rent time.
/2.1 Unplugging the "IV does not deactivate the Parental
Control.
_1,5,_o 12 m 2
Always request that your technician use only genuine Zenith
exact replacement parts for continued Quality and Safety per-
formance. Keep your Zenith ALL Zenith.
Page 32

YOUR ZENITH TV WARRANTY
DIRECT-VIEW COLOR TV
Welcome into the Zenith family! We believe that you will be pleased with your new Zenith Color TV. Please read this page
carefully. It is a "LIMITED WARRANTY" as defined under Federal Law. This warranty gives you specific legal rights, and you
may also have other rights that vary from state to state within the U.S.A.
Zenith's Responsibility
Service Labor -- During a period of 90 days from effective
warranty date, Zenith will pay for service labor by a Zenith
authorized service center when needed as a result of
manufacturing defects.
Parts -- New or remanufactured replacements for
factory-defective parts will be supplied by a Zenith authorized
service center for one year from effective warranty date (color
picture tube -- two years). Such replacement parts are warranted
for the remaining portion of the original warranty period.
Home Service -- Warranty service for 21" diagonal (U.S.A.) or
larger screen size models is provided in the home in most cases.
(Some repairs may require the unit to be taken by the servicer to
the repair facility and returned, at no additional charge.)
Not Covered -- This warranty covers manufacturing defects
and does not cover installation, adjustment of customer controls
in the home, installation or repair of home antenna systems, cable
converters or cable company-supplied equipment; it also does
not cover damage due to misuse, abuse, negligence, acts of God
or other causes beyond the control of Zenith. Any alteration of
the product after manufacture voids this warranty in its entirety.
Owner's Responsibility
Effective Warranty Date -- Warranty begins on the date of
original consumer installation. For your convenience, keep the
dealers dated bill of sale or delivery ticket as evidence of the
purchase date.
Operating Guide -- Read your Operating Guide carefully so
that you will understand the operation of your set and how to
adjust the customer controls.
Carry-In Service -- Models under 21" diagonal (U.S.A.)
screen size must be taken to a Zenith authorized service center
for warranty service and must be picked up by the owner.
Antenna -- Reception problems caused by inadequate home
antennas or faulty antenna connections are the owner's
responsibility.
Important: Product Registration -- Please fill out and mail
your Product Registration Card. It is imperative that Zenith know
how to reach you promptly if we should discover a safety
problem that could affect you.
Warranty Service -- For warranty service information, contact
any Zenith authorized service center. Partsand service laborthat
are Zenith's responsibility (see above) will be provided without
charge. Other service is at the owner's expense. If you have any
problem in obtaining satisfactory warranty service, call orwrite:
Before you ask for Warranty service, check the
operating guide section entitled, "Maintenance
And Troubleshooting." It may be possible to
avoid a service call.
ADDITIONAL ZENITH PROTECTION PLAN AVAILABLE
Zenith offers you the opportunity to obtain additional long-term protection against failure of
the picture tube in your new television. Our Picture Tube Protection Plan enables you to avoid
any unexpected picture tube repair expenses and keep your television in top condition. It
guarantees you a genuine Zenith replacement picture tube and service from a Zenith
authorized service center.
Be sure to send in the Product Registration Card. We will send you an application tot the
Protection Plan near the expiration of the two year manufacturer's warranty on the picture
tube. You may also register by calling (847) 391-8757.
Zenith Electronics Corporation
Customer Service Department
1000 Milwaukee Avenue
Glenview, IL 60025-2493
Telephone: (847) 391-8752
Mon-Fri, 8:00 a.m. - 4:30 p.m. Central Time
TVWRDIR4
Page 33

ZENITH ELECTRONICS CORPORATION
1000 MILWAUKEE AVENUE
GLENVIEW, ILLINOIS 60025-2493
TVWRDIR3
Part No. 206-3050
Printed in U.S.A.
EP-EDC
 Loading...