

Page 1

operating guide / warranty
®
machine number MP360
enjoy the music
Page 2
2
DECLARATION OF CONFORMITY
This device complies with Part 15 of the FCC Rules.
Operation is subject to the following two conditions : (1) this
device may not cause harmful interference, and (2) this
device must accept any interference received, including
interference that may cause undesired operation.
Trade Name / Model : Zenith / MP360
Responsible Party : Zenith
Address : 201 James Record Road, Building #3
Huntsville, AL 35824
Contact : Zenith National Response Center
Tel. No. (256) 772-1515
Fax No. (256) 774-4070
email: customer.service@zenith.com
Equipment Classification : FCC Class B Peripheral Device (JBP)
Type of Product(EUT) : MP3 PLAYER
Manufacture : LG Electronics Inc.
Address : 19-1, Cheongho-Ri, Jinwuy-Myon
Pyungtaek-S hi, Kyunggi-Do, 451-713 Korea
Attention : Mr. T. K. Lee- General Manager
Digitalmedia Standards Team
We hereby declare that the equipment bearing the trade and
model number specified above was tested conforming to the
applicable FCC Rules under the most accurate measurement
standards possible, and that all the necessary steps have
been taken and are in force to assure that production units of
the same equipment will continue to comply with the
Commission's requirements.
Tested To Comply With
FCC Standards
FOR HOME OR OFFICE USE
Page 3
3
IMPORT ANT SAFETY INSTRUCTIONS
To reduce the risk of fire or electric shock, do not expose this
appliance to rain or moisture.
The graphical symbols marked on the bottom or back of the
set mean the following explanation.
CAUTION
TO REDUCE THE RISK OF ELECTRIC SHOCK, DO NOT
REMOVE COVER(OR BACK) NO USER SERVICEABLE
PARTS INSIDE.
REFER SERVICING TO QUALIFIED SERVICE PERSONNEL.
RISK OF ELECTRIC SHOCK
DO NOT OPEN
CAUTION
To avoid electrical shock; do not open the cabinet. Refer servicing
to qualified personnel.Shock hazard-do not open.
CAUTION
Use of controls or adjustments or performance of procedures other
than those specified herein may result in hazardous radiation
exposure.
The lightning flash with arrowhead within an equilateral
triangle is intended to alert the user to the presence of
uninsulated “dangerous voltage” within the product’s
enclosure that may be of sufficient magnitude to
constitute a risk of electric shock to persons.
The exclamation point within an equilateral triangle is
intended to alert the user to the presence of important
operating and maintenance (servicing) instructions in
the literature accompanying the appliance.
Page 4
4
Industry Canada requirement
This class B digital apparatus meets all requirements of the Canadian
Interference-Causing Equipment Regulations.
Cet appareil numérique de la classe B respecte toutes les exigences du
Réglement sur le matériel brouilleur du Canada.
FCC COMPLIANCE STATEMENT
Note : This equipment has been tested and found to comply with the limits
for a Class B digital device, pursuant to Part 15 of FCC Rules.These
limits are designed to provide reasonable protection against harmful
interference in a residential installation. This equipment generates,
uses, and can radiate radio frequency energy and, if not installed
and used inaccordance with the instructions, may cause harmful
interference to radio communications. However, there is no
guarantee that interference will not occur in a particular installation. If
this equipment does cause harmful interference to radio or television
reception, which can be determined by turning the equipment off and
on, the user is encouraged to try to correct the interference by one or
more of the follow measures:
- Reorient or relocate the receiving antenna.
- Increase the separation between the equipment and receiver.
- Connect the equipment into an outlet on a circuit different from
that to which the receiver is connected.
-Consult the dealer or an Authorized Service Center for help.
• FCC WARNING
Changes or modifications not expressly approved by the party
responsible for compliance could void the user’s authority to operate the
equipment.
• This MP3 PLAYER is for use only with UL listed personal computers that
have installation instructions detailling user installation of card cage
accessory.
This product is manufactured to comply with the radio interference
requirements of EEC DIRECTIVE 89/336/EEC and 73/23/EEC.
IMPORT ANT SAFETY INSTRUCTIONS
Page 5

5
1.Read Instructions - All the safety and operating instructions
should be read before the product is operated.
2.Retain instructions - The safety and operating instructions
should be retained for future reference.
3.Heed Warnings - All warnings of the product and in the
operating.
4.Follow instruction - All operating and use instructions should
be followed.
5.Cleaning - Unplug this product from the wall power outlet before
cleaning. Do not use liquid cleaners or aerosol cleaners. Use a
damp cloth the cleaning.
6.Attachments - Do not use attachments not recommended by
the product manufacturer as they may cause hazards.
7.Water and Moisture - Do not use this product near water - for
example, near a bath tub, wash bowl, kitchen sink, or laundry
tub; in a wet basement; or near a swimming pool; and the like.
8.Accessories - Do not place this product on an unstable cart,
stand, tripod, bracket, or table. The product may fall, causing
serious injury to a child or adult, and serious damage to the
product. Use only with a stand, tripod, bracket, or table
recommended by the manufacturer or sold with the product.
Any mounting of the product should follow the manufacturer’s
instructions and should use a mounting accessory
recommended by the manufacturer.
9.Overloading - Do not overload wall power outlets, extension
cords, or integral convenience receptacles, as this can result in
a risk of fire or electric shock.
10.Servicing - Do not attempt to service this product yourself as
opening or removing covers may expose you to dangerous
voltage or other hazards. Refer all servicing to qualified service
personnel.
IMPORT ANT SAFETY INSTRUCTIONS
Page 6

6
11. Damage Requiring Service - Unplug this product from the
wall power outlet and refer serving to qualified service person-
nel under the following conditions :
a) When the power-supply cord or plug is damaged.
b) If liquid has been spilled, or objects have fallen into the
product.
c) If the product has been exposed to rain or water.
d) If the product does not operate normally by following the
operating instructions. Adjust only those controls that are
covered by the operating instructions as an improper
adjustment of other controls may result in damage and will
often require extensive work by a qualified technician to
restore the product to its normal operation.
e) If the product has been dropped or damaged in any way.
f) When the product exhibits a distinct change in performance,
this indicates a need for service.
12. Replacement Parts - When replacement parts are required,
be sure the service technician has used replacement parts
specified by the manufacturer or have the same characteristics
as the same characteristics as the original parts.
Unauthorized substitutions may result in fire, electric shock, or
other hazards.
13. Safety Check - Upon completion of any service or repairs to
this product, ask the service technician to perform safety
checks to determine that the product is in proper operating
condition.
14. Wall or Ceiling Mounting - The product should be mounted
to a wall or ceiling only as recommended by the manufacturer.
15. Heat - The product should be situated away from heat source
such as radiators, heat registers, stoves, or other products
(including amplifiers) that produce heat.
IMPORT ANT SAFETY INSTRUCTIONS
Page 7

7
IMPORTANT SAFETY INSTRUCTIONS 3
Precaution 8
Battery Installation 9
What is an ‘MP3 PLAYER’ ? 10
ACCESSORIES SUPPLIED 13
SYSTEM REQUIREMENTS 14
INSTALLING SOFTWARE 15
CONNECTING DATA IN/OUT CABLE 16
USING MP3-Explorer 17
DOWNLOADING FILES 20
UPLOADING FILES 23
MP3 ERROR MESSAGES 26
BEFORE OPERATING 27
PLAYING MP3 FILES 31
OTHER FUNCTIONS 39
Specifications 40
CONTENTS
Page 8

8
Charge the rechargeable battery before using it for the first time.
The rechargeable battery maybe charged about 500 times.
If you do not use the charger for a long period of time, unplug it
from the AC outlet.
If you plan not to use the MP360 for a long time, remove the
battery to avoid any damage caused by battery leakage and
corrosion.
Avoid listening to the MP360 while driving, cycling or operating
any motorized vehicle.
Do not use the MP360 in places which are extremely hot, cold
dusty or humid.
Unlock the HOLD switch before operating.
Battery Life
Battery life maybe different according to the using condition,
manufacture corporation and production years and months.
Charge the rechargeable battery or replace the battery with a new one
under the following conditions.
The indicator lights.
The operation buttons do not work.
Battery MP3 Playback
‘AA’ Alkaline battery (1EA) 8.5
Rechargeable battery(1300mA) 6.5
(The unit of time:hours)
To prevent the electrostatic discharge during use:
Avoid operating this device under dry conditions.
If this device stops during normal operation, replace the battery.
Precaution
Page 9
9
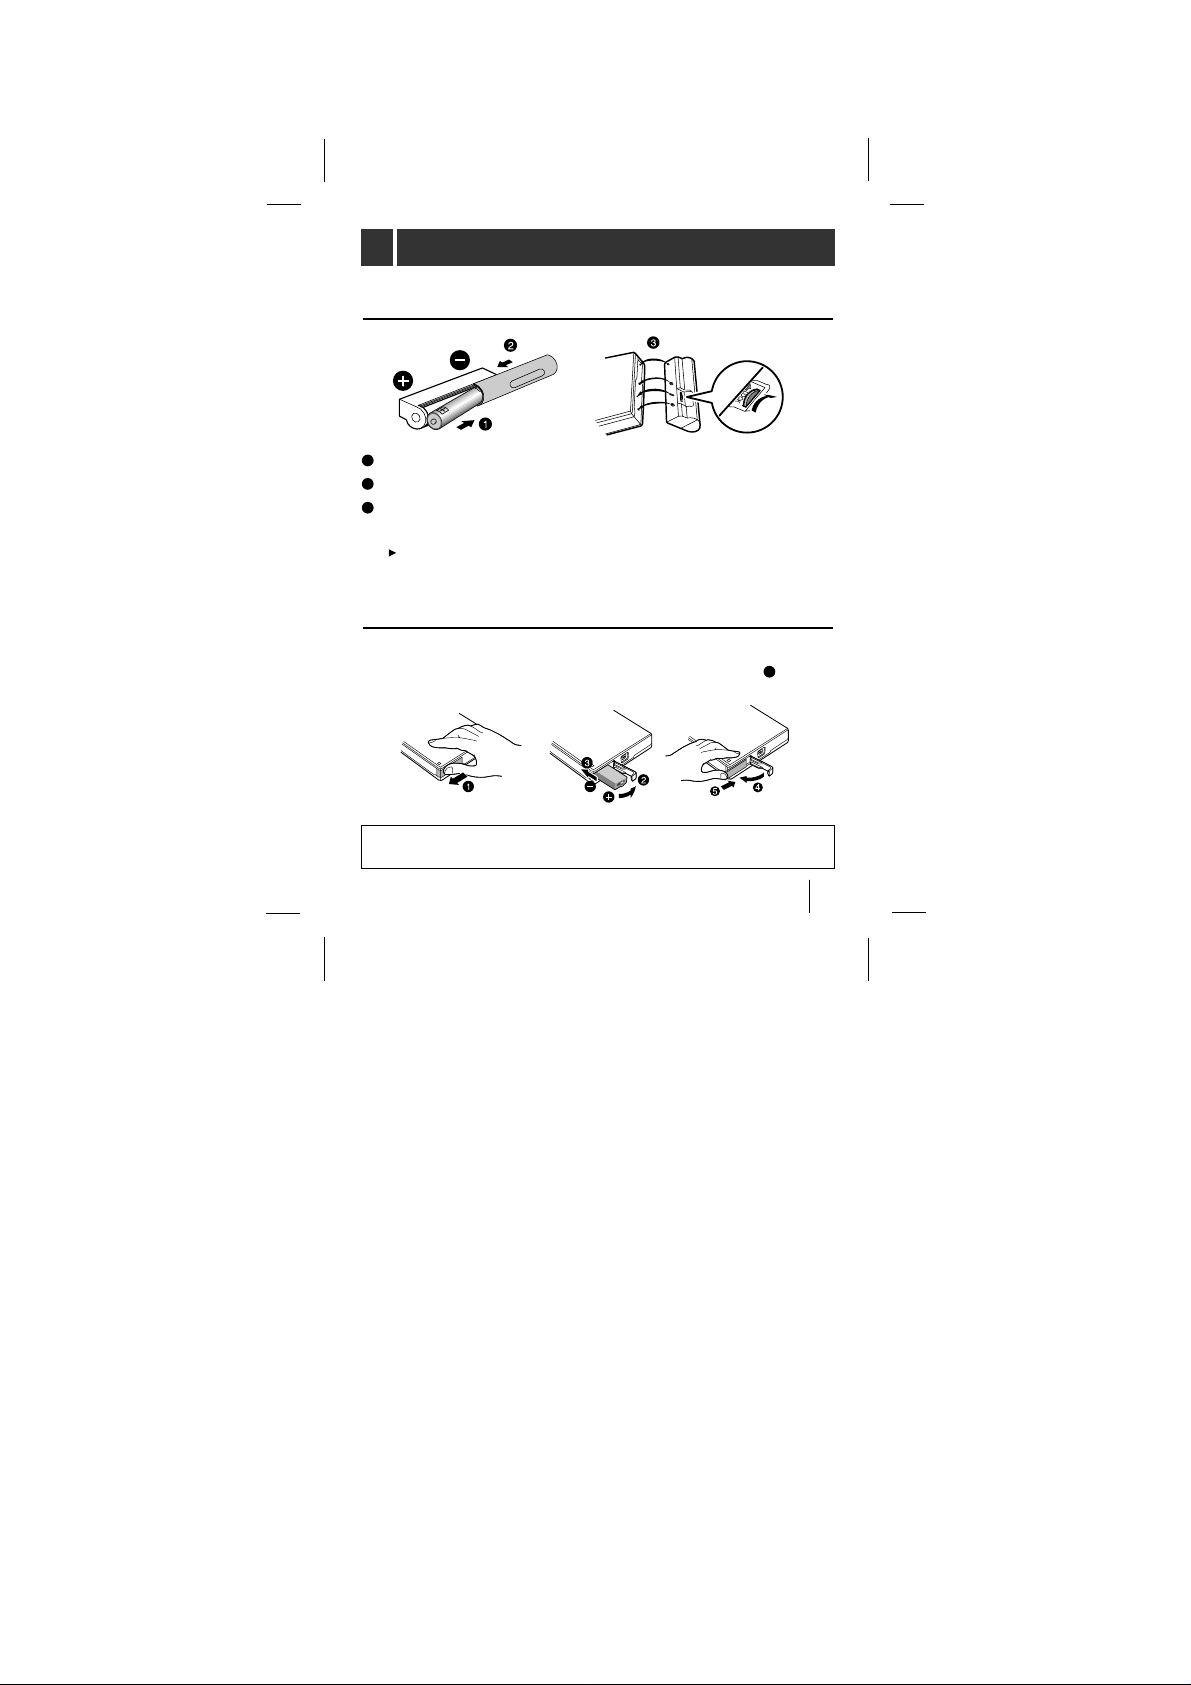
To install the ‘AA’ battery
Open the cover of the battery case and insert the battery.
Close the cover.
To join the battery case with the main unit, insert everything
correctly in the inlet and thumbscrew to lock.
To detach the battery case, turn the screw in the opposite
direction.
To install the rechargeable battery
Open the battery cover, insert the battery and push lock the
battery cover to the direction of the arrow in the NO.
position.
CAUTION
Danger of explosion if battery is incorrectly replaced
.
Battery Installation
1
2
3
5
Page 10

10
The MP360 MP3 Player is a palm-sized audio device that
uses no moving parts for playback, and delivers high-quality
sound for your enjoyment. The MP360 uses the MPEG 3
compression method for quality internet audio.
Your MP3 Player is a portable digital audio player that plays
MP3 files without requiring the use of tapes or CDs. MP3
Players use one or two flash memory cards, which are
expandable up to 64MB. MP3 is a well known, high-quality
digital audio format. MP3 files can be compressed up to 12
times the original wave file size. Using a computer, thousands
of MP3 files are available on the internet. You can down files
to your computer without leaving your home, or having to wait
in long lines at record stores. Just download the files legally
from anywhere in the world through your internet connection.
You will have to pay a fee for downloading MP3 files to the
MP3 provider. The files can then be transferred to your player
and listened to on your home stereo, in your car, on the
beach, or any where you wish to go! Also, you can make your
own CD quality MP3 files from CD or WAV , by using the MP3
encoder software.
MP3 Players take advantage of MP3’s small data size and CD
quality sound.
What is an ‘MP3 PLAYER’?
Page 11

11
You’ll need to have MP3 files stored on your computer, a
data In/Out cable and your MP3 Player.
Using the MP3 Explorer software, select the MP3 files you
wish to transfer from your PC to the MP3 Player. You can
transfer songs from your PC to your MP3 Player via your
USB port with a data In/Out Cable. Also, you can transfer
data from your MP3 Player to your PC!
A benefit of using MP3 Player for storage of data, windows
documents, etc. is that when transferring large data from
PC to PC, you can carry an equivalent of more than 40
floppy disks! A floppy disk can store only 1.44MB of data,
but you can store up to 64 Mega Bytes of data using your
MP3 Player.
How do I use the ‘MP3 Player’?
Characteristics-advantages of MP3 Player
MP3
file
MP3
file
MP3
Player
Internet
What is an ‘MP3 PLAYER’?
Page 12

12
New generation Digital Audio Player that does not require
tapes or CDs.
Pure sound guaranteed while handling, exercising,or
jogging.
Multimedia communication audio player through PC,
network and Internet.
Data storage device when transferring large data from PC
to PC.
Enjoy CD quality sound while listening to MP3 files
anywhere.
You can get thousands of songs at a fraction of CD prices
from various MP3 Internet providers via the innovative Try &
Buy program without leaving home! You can buy only one
song at a time, no more buying an entire CD for the one or
two songs you want.
You can select your own favorite songs, and change the
order of songs whenever you like.
The MP360, MP3 Player has no moving parts and will not
skip since it does not require physical movement such as
rotating Tapes or CDs.
What is an ‘MP3 PLAYER’?
1
2
3
4
5
6
7
8
Page 13

13
The multimedia card may be damaged by static electricity.
Therefore we recommend that you store it in your static
electircity prevention bag provided.
Keep the multimedia card away from any magnetic material;
data on the multimedia card may be damaged .
Data In/Out cable
(USB cable)
Carrying case ‘AA’ Battery
(Optional)
Earphones with
remote control
Installation CD Multimedia
card (MMC)
Rechargeable
Battery
Charger
Battery case
ACCESSORIES SUPPLIED
Page 14

14
Your MP3 Player needs the minimal system requirements for
your computer.
Operation Circumstance
What is USB?
(1) USB stands for Universal Serial Bus.
(2) It is a new inferface based on the new concept between
PC and peripherals.
(3) 12 Mbps is the maximum bandwidth and a maximum 127
USB devices can be connected to a single PC.
NOTES
OS : Microsoft Windows 98/2000
CPU : At least Pentium - 133MHz
Memory : At least 16MB
(32MB above is recommended.)
HDD Space : At least 7MB
Video Card : 640 x 480 Mode,
At least High Color(16bit)
USB Port
CD-ROM Driver
SYSTEM REQUIREMENTS
Page 15

15
MP3-Explorer is the communication software that allows your
computer to share information with your MP3 Player. In order for
your MP3 Player to work properly, the MP3-Explorer software must
be installed correctly under Windows.
The MP3-Explorer software is available for Microsoft Windows
98/2000, but it’s not available to NTTM.
Insert the software CD into drive D:\ (CD ROM drive).
Search the ‘Setup.exe’ file in CD ROM and double-click the file.
Continue installation as directed in the dialog boxes.
Installing Automatically
Insert the software CD into drive D:\ ( where D: \ is name of your CD
ROM drive). The installation will run automatically.
Continue installation as directed in the dialog boxes.
Installing Manually
If automatic installation does not work, try manual installation as
follows:
R
INSTALLING SOFTWARE
1
2
Page 16

16
After installing MP3-Explorer
Express software , the MP3Explorer icon is created on
the Windows desktop.
To complete setup, you should connect the supplied Data
In/Out cable to a PC from your MP3 Player.
Connect one end with the USB port on the back of your PC
and then plug the other end into the Data In/Out terminal of
your MP3 Player.
MP3 Player
DATA
In/Out terminal
USB Port
USB Port
Connecting your MP3-Player to a PC
Compare the two ends of the cable
USB: Universal Serial Bus
NOTES
USB PORT
Data In/Out
cable
INSTALLING SOFTWARE
CONNECTING DATA IN/OUT CABLE
Page 17

17
MP3-Explorer is the software that interacts with the MP3 Player
and a PC.
MP3 files or any data files can be downloaded to the MP3 Player
or vice versa.
Double-click the
‘
MP3-Explorer Express’icon on the Windows
desktop to open the MP3-Explorer.
The following figure describes the MP3-Explorer software.
The various features are explained below.
USING MP3-Explorer
1
2
4
3
6
5
8
7
10
9
14
15
12
11
13
19
17
18
16
Page 18

18
‘
Release/Connect’ button
Connect or release to communicate between your MP3
Player and a PC.
‘
New Folder’ button
It creates a new folder on the ‘PC files’ display panel.
‘
Upper Folder’ button
Move to upper folder.
‘
Cut’ button
Removes the selected items and copies them onto the clip
board.
‘
Copy’ button
Copies the selected items to the clipboard.
‘
Paste’ button
Inserts the items you have copied or cut into the selected
location.
‘
Delete’ button
Deletes the selected item.
‘
Refresh’ button
Refreshes the contents of the current page.
‘
Card Files display’ button
Display panel for the data or MP3 files of the selected
Multimedia card.
‘
Option’ button
Enables you to change the start folder settings.
‘
Version’ button
Shows the version of MP3 Explorer.
USING MP3-Explorer
1
2
3
4
5
6
7
8
9
10
11
Page 19

19
‘
Desktop’ button
Shows the desktop.
‘
Card 1 or 2 select’ button
Selects Card 1 or 2. The selected card number is indicated
in a yellow color.
‘
Download’ button (PC to MP3 Player)
This button will allow you to copy the selected MP3 files or
data on the PC in the local folder onto your MP3 Player.
The time spent on the copying process takes about 30
seconds or more to copy a 4MB file to your MP3 Player.
The download time will vary depending on your PC.
‘
Upload’ button (MP3 Player to PC)
The Upload button but uploads information to the PC. This
will allow you to copy the selected MP3 files or data from
the MP3 Player (Multimedia card) into the directory as a
destination folder. The time spent on the copying process
from the MP3 Player to a PC is much slower than the
download process.
‘
Total space’ display
Displays the total space of the selected card.
‘
Free space’ and ‘Selected card’ display
Displays the free space of selected card.
‘
PC files display’ panel
Display panel for the data or MP3 files of the selected
multimedia card.
‘
PC directory display’ panel
Select the directory or folder where MP3 files or other files
that you want to copy onto the MP3 player (multimedia
card) are located.
USING MP3-Explorer
12
13
14
15
16
17
18
19
Page 20

20
Preparation
1 Insert the battery into the MP3 Player.
2 Put MP3 Player into the stop mode. (While the MP3
Player is operating you cannot download or upload)
3 Open Card door and load the Card 1 and/or 2.
4 Connect the MP3 Player and your PC with the Data In/Out
cable.
To download the MP3 files or data files from PC to MP3
Player, do the following:
To eject Card, open the Card door and push the Card 1 or 2
eject switch.
CARD IN
OPEN
Card 2
Card 1
Card Door
Card 2 eject switch
Card 1 eject switch
USING MP3-Explorer
Page 21

21
6 Double-click the ‘MP3 Explorer
Express
’ icon to run the software.
(If the remote controller is inserted into
the MP3 Player,
‘PC
’ appears on the
remote control display)
7 Click Card 1 or Card 2 button to download.
To download files
5 Buy and store the MP3 files on your PC from the Internet
site, CD ROM etc.
DOWNLOADING FILES
Page 22

22
9 Click Download button of the Menu bar. It will be
downloaded to the selected Card,(Card1 or Card 2).
8 Display the MP3 files or data files on the ‘PC Files’
display panel and select a file.
DOWNLOADING FILES
Page 23

23
To upload files
To upload the MP3 files or data files from MP3 Player to PC,
do the following.
1 Select a directory or folder on the ‘PC Directory’ display
panel.
(The files of the selected directory or folder will be
displayed on the
‘PC Files’ display panel)
DOWNLOADING FILES
Page 24

24
2
Click Card 1 or Card 2 button and select a MP3 file or data
file on the
‘
Card Files’ display panel to upload.
3 Click the
‘Upload’ button and the selected file(s) will be
uploaded into the selected directory or folder of your PC.
UPLOADING FILES
Page 25

25
NOTES
If there is no battery is in the MP3 Player or battery charge
condition is insufficient, you can still upload or download to
your PC.
You can operate your MP3 Player if the Data In/Out cable is
connected between your MP3 player and a PC and the PC
is powered-on, .
MP3.com (http://www.mp3.com)
MP3-2000.com (http://www.mp3-2000.com)
MP3now.com (http://www.mp3now.com)
Information about MP3 files service site
UPLOADING FILES
Page 26

26
The followings are major error messages which may be
displayed while using MP3 Explorer.
After solving
the problem,
press the
[retry] button,
or exit MP3
Explorer and
run it again.
After inserting,
press [OK] or
[Card 1/2]
button to detect
the card again.
Exit MP3
Explorer and
run it again.
1) Is the cable
connected
correctly?
2) Is the player
stopped?
1) Check that
the card is
inserted
correctly.
2) Is the cable
connected
correctly?
Is the size of
the file to be
downloaded
larger than the
remaining space
in card?
Card is not formatted. Format card.
Reinsert
the cable
correctly.
Stop the
player.
Insert the
card
correctly.
Reinsert
the cable
correctly.
Replace the
card, or
remove files
on the card,
and retry.
Player isn’t
ready
.
There is
no card.
Not
enough
space in
card.
Card isn’t
formatted.
Error
Check Points Solutions Remarks
Messages
MP3 ERROR MESSAGES
Page 27

27
HOLD
The hold function locks the MP360 and remote control
separately to prevent them from operating if you
accidentally press a button. Unlock it before operating.
If you set the HOLD on the MP360 to lock position or
press a button in lock position, the
‘’
will blink 5
times.
You can still control the volume of remote control in
lock position.
UNLOCK
UNLOCK
LOCK
LOCK
BEFORE OPERATING
Page 28

28
Display Contrast
Display Light
In stop mode, press the VOLUME+
button on the MP360.
each time the button is pressed the
display on remote control will
darken gradually. While if you press
the VOLUME- button, the display
will lighten gradually.
The initial luminosity of the display
is set to stage 5 and it can range
from 5 to 15 stages.
At night or in a dark place press the
LIGHT button on the remote control,
the light will remain on for 10
seconds allowing you to view the
current operating status on the display.
Under the conditions that the Data
In/Out cable is connected between
your MP3 player and a PC, the
display light of the remote control is
not illuminated.
VOLUME +/-
LIGHT
BEFORE OPERATING
Page 29

29
Using Earphones
To prevent getting the earphone cord tangled, raise
the slide.
You can attach the remote controller with the clip on
the rear of the remote controller.
slide
(when
using)
(when unused)
<remote controller>
<unit volume adjust>
MIN
MAX
Left(L)
short length
separatable
earphone
MIN
(-Button)
MAX
(+Button)
In maximum or minimum status of
the MP360 volume level, you can
hear the ‘beep’ sound four times.
Right(R)
long length
BEFORE OPERATING
1
2
Page 30

30
1
Select Card1 or Card2.
2
Click right-handed button of the PC mouse and
you can view the following dialog box.
Control the Play Sequence
3
Click Play List button of
the dialog box shown
above and you can view
the Play List control box
as the right-handed
figure. Select a mp3
music file and control
the play sequence by
using the Up & Down
button of the righthanded dialog box and
click Save button.
BEFORE OPERATING
Page 31

31
1
Open the Card door and load the multimedia card 1
or (and) 2.
2 Press PLAY/PAUSE button to play Card 1 [ flashes
on the display and you can hear the beep sound twice]
If you want to play the Card 2, press and hold the MP3
PLAY button for about 2 seconds
[ flashes on the display and you can hear the beep
sound twice]
To play a MP3 file
<remote controller>
<unit>
1
2
Each time the playing track is changed you can view the track name
and artist name on the display. The data that is stored on the
multimedia card.
1
2
PLAY/PAUSE
STOP
Card 2
indicator
track number
track playing time
Card 1
indicator
CARD IN
OPEN
Card 2
Card 1
Card Door
BEFORE OPERATING
Page 32

32
TIPS
Extensions of files playable in MP3 Player.
Files whose extensions are MP3 (*.MP3)
Files whose extensions are GU3 (*.GU3) among encrypted
MP3 files (If you download the encrypted files into PC
through DIGICAP service on the Internet or PC networks,
their extensions will be changed to *.CA. If you download
these *.CA files into MMC of the MP3 player through MP3
Explorer, their extensions will be changed to *.GU3.)
‘Card 1/2’ indicator blinks in the display only when playing
MP3.
If there is no card inserted when playing, no number will
appear in the display.
If there is no card inserted, or you try to play a card with no
MP3 file, the alarm beeps 4 times.
3 MP3 files of Card 1 or Card 2 will be played repeatedly
until you press the STOP button.
4 To pause the playing track, press the PLAY/PAUSE
( )button and ‘PAUSE’ appears on the display.
To resume play, press the button again.
5 To stop play, press STOP button.
6 If you resume play the MP3 file from the stop status, it
starts play from the place play was stopped.
PLAYING MP3 FILES
Page 33

33
NOTES
MP3 Explorer is the application which is used to download
into a portable MP3 player and play any music file with
extensions of MP3 (*.mp3) or CA (*.ca) stored in PC. If you
download any music file whose extension is CA, it detects
the ID of multimedia card (MMC), changes its extension to
GU3, and saves it. This protects against unauthorized
reproduction, which is required by the organizations related
to copyright of music. You can play downloaded music files
with the extension of GU3 in the MP3 player with the sound
quality of CD . Music files with the extension of GU3 stored
on this multimedia card can be played in any MP3 players
made by Zenith Electronics Corporation. But, in the case
that you upload any music file with the extension of GU3
onto PC, you will not be able to play these music files.
If you upload onto PC any GU3 (*.GU3) file which has been
downloaded into an MP3 player, and then, download it into
another card, it will not be played or playback will be broken
up, due to the reproduction prevention lock.
PLAYING MP3 FILES
1
2
Page 34

34
<remote controller>
<unit>
You can locate the beginning of any track on a Card 1
or Card 2.
Press the or button during MP3 file playing.
To return to the beginning of the current or
previous track
Press the button briefly once ( ) to return to the
beginning of the current track.
Press the button briefly and repeat to skip track(s)
backward one by one.
Skipping to the beginning of a track
PLAY/PAUSE
PLAY/PAUSE
To skip tracks
Press the button briefly and repeat to skip track(s)
forward one by one.
PLAYING MP3 FILES
Page 35

35
Intro Scan
Intro scan is the function that introduces the first 10 seconds
only for each track of the MP3 files.
Press and hold the or button for about 2 seconds during
MP3 file playing.
‘INTRO and track number’ flashes on the display.
To play a current introducing track continuously, press the
MP3 PLAY/PAUSE ( ) button.
Repeat Play
To play one track repeatedly
Press the RPT button briefly once while the MP3 file
is playing. ‘RPT1’ appears for a moment on the
display.
To cancel it, press the RPT button briefly once again.
PLAY/PAUSE
RPT
<remote controller>
RPT appears
1
2
PLAYING MP3 FILES
Page 36

36
To repeat playing all tracks of the currently playing
card
Press the RPT button briefly twice during MP3 file
playing, to display ‘RPT ALL’ for a moment on the
display.
1
2
RPT blinks
Press the RANDOM button briefly once( ) during
MP3 file playing. All the tracks on all cards (Card1 and
Card2) in the compartment from the selected card can
be played randomly.
Random Play
1
2
RANDOM
(RND)
RANDOM indicator
PLAYING MP3 FILES
Page 37

37
To cancel random play
Press the RANDOM button briefly once so that RND
indicator on the display goes out.
To skip tracks in the random play mode
Press the or button is pressed, the next track
is selected at random.
MP3 Book Mark function
If you set the Book Mark during MP3 file playing, you
can search for that ‘set point’ of the track automatically.
Press and hold the B.MARK button for about 2 seconds,
to display ‘’, while the MP3 file is playing.
While playing another track or another point of the set
track is playing, press B.MARK button briefly once ( ).
The player automatically searches and plays the ‘set
point’. This works in the currently playing card only.
1
2
B.MARK
Book Mark indicator
PLAYING MP3 FILES
1
2
Page 38

38
To cancel it, press the B.MARK button for about 2
seconds, so that the ‘’ disappears.
NOTE
If the playing card is changed, the Book Mark setting
is cancelled.
PLAYING MP3 FILES
3
Page 39

39
To select your desired sound, press SOUND during
playback.
Press SOUND once to select the ‘X-LIVE’
Press SOUND once again to select the ‘POP’.
Press SOUND one more time to select the normal
sound. (‘POP’ will disappear in the display)
Equalizer
SOUND
OTHER FUNCTIONS
1
2
3
Page 40

40
MP3 Section
Frequency response .............................20Hz~20kHz
Memory(Multimedia card)..................16MB or 32MB
(extendable)
General
Power requirements......................‘AA’ battery(1.5V)
Rechargeable battery(1.2V)
Output power ....................................2.5mW+2.5mW
Equalizer................................NORMAL/X-LIVE/POP
Remote control jack .................................. 3.5mm
Dimensions(W X H X D).......2.79X2.99X0.59 inches
Weight(without battery)..............about 0.132 pounds
Designs and specifications are subject to
change without prior notice.
Specifications
Page 41

MP3 PLAYER
Welcome into the Zenith family! We believe that you will be pleased with
your new Zenith Entertainment Machine. Please read this warranty
carefully, it is a LMITED WARRANTY” as defined under Federal Law. This
warranty gives you specific legal rights, and you may also have other rights
that vary from state to state within the U.S.A.
ZENITH’S RESPONSIBILITY
Service Labor During a period of 90 days from effective warranty date,
Zenith will provide service labor by a Zenith authorized
service center when needed as determined by Zenith, as a
result of manufacturing defects.
Parts New or remanufactured replacements for factory-defective
parts will be supplied by a Zenith authorized service center
for one year from effective warranty date. Such replacement
parts are warranted for the remaining portion of the original
warranty period.
Not Covered This warranty covers manufacturing defects and does not
cover installation, adjustment of customer controls in the
home, installation or repair of home antenna systems, cable
converters or cable company-supplied equipment; it also
does not cover damage due to misuse, abuse, negligence,
acts of God or other causes beyond the control of Zenith.
Any alteration of the product after manufacture voids this
warranty in its entirety.
OWNER’S RESPONSIBILITY
Effective Warranty Date
Warranty begins on the date of original consumer
purchase. For your convenience, keep the dealer’s
dated bill of sale or a delivery ticket as evidence of
the purchase date.
Operating Guide Read your Operating Guide carefully so that you will
understand the operation of your MP3 PLAYER and
how to adjust the customer controls.
Carry-In Service The MP3 PLAYER product must be taken to a U.S. or
Canadian Zenith authorized service center for warranty
service and must be picked up by the owner.
Your Zenith Limited WarrantyYour Zenith Limited Warranty
Page 42

Your Zenith Limited WarrantyYour Zenith Limited Warranty
TV Set Performance It is the owner's responsibility to maintain the TV
receiver with which the MP3 PLAYER product is used,
and the associated antenna system, in proper operating condition.
Important Product Registration Please fill out and mail your
Product Registration Card. It is imperative that Zenith
know how to reach you promptly if we should discover
a safety problem that could affect you.
Warranty Service For warranty service information, contact any Zenith
authorized service center. Parts and service labor that
are Zenith’s responsibility (see above) will be provided
without charge. Other service is at the owner’s
expense. If you have any problem in obtaining satisfactory warranty service, call or write the Zenith
Response Center. You must provide the model number, serial number and date of purchase or date of
original installation. Before you ask for warranty service, read ‘‘troubleshooting” in your operating guide.
You might avoid a service call.
THIS WARRANTY IS IN LIEU OF ANY OTHER WARRANTY, EXPRESS
OR IMPLIED, INCLUDING WITHOUT LIMITATION, ANY WARRANTY OF
MERCHANTABILITY OR FITNESS FOR A PARTICULAR PURPOSE, AND
ZENITH SHALL NOT BE LIABLE FOR ANY CONSEQUENTIAL, INDIRECT, OR INCIDENTAL DAMAGES OF ANY KIND, INCLUDING LOST
REVENUES OR PROFITS IN CONNECTION WITH THE PRODUCT.
Customer Service
Zenith National Response Center
201 James Record Road, Building #3
Huntsville, AL 35824
Phone: (256) 772-1515
Fax: (256) 774-4070
email: customer.service@zenith.com
ZENITH ELECTRONICS CORPORATION Zenith Part No. 206-3712
2000 MILLBROOK DRIVE GS# 3828R-B008D
LINCOLNSHIRE, IL 60069 Printed in KOREA
Issue 0
 Loading...